

Page 1

Dell™ Latitude™ C600/C500 User's Guide
About Your Computer
What You Need to Know
Features and Options
Setup and Operation
Using Your Computer
Connecting Devices
Microsoft® Windows® XP Features
Using Intel® SpeedStep™ to Set
Performance Levels
Passwords and Security
Traveling With Your Computer
Removing and Replacing Parts
Powering Your Computer
AC Adapter and Battery
Power Management and Conservation
Reinstalling Software
Solving Problems
Finding Solutions
Dell Diagnostics
Understanding Error Messages
Getting Help
Technical Specifications
Additional Information
Regulatory Notices
Limited Warranty and Return Policy
Using the System Setup Program
Model PP01L
Notes, Notices, and Cautions
Notes, notices, and cautions are used as follows:
NOTE: A NOTE indicates important information that helps you make better use of your computer.
NOTICE: A NOTICE indicates either potential damage to hardware or loss of data and
tells you how to avoid the problem.
CAUTION: A CAUTION indicates a potential for property damage, personal injury,
or death.
Information in this document is subject to change without notice.
© 2000–2001 Dell Computer Corporation. All rights reserved.
Reproduction in any manner whatsoever without the written permission of Dell Computer Corporation is strictly forbidden.
Trademarks used in this text: Dell, the DELL logo, Latitude, Inspiron, OptiPlex, Dell Precision, ExpressCharge, HyperCool,
DellWare, and AccessDirect are trademarks of Dell Computer Corporation; Microsoft, Windows, Windows NT , and MS-DOS are
registered trademarks of Microsoft Corporation; 3Com is a registered trademark of 3Com Corporation; Intel and Pentium are
registered trademarks, and SpeedStep and Celeron are trademarks of Intel Corporation. As an ENERGY STAR partner, Dell has
determined that this product meets the ENERGY STAR guidelines for energy efficiency.
Page 2

Other trademarks and trade names may be used in this document to refer to either the entities claiming the marks and names or
their products. Dell disclaims any proprietary interest in trademarks and trade names other than its own.
September 2001 368FN A02
Page 3

Back to Contents Page
What You Need to Know: Dell™ Latitude™ C600/C500
User's Guide
Finding Information When Using Your Computer
Safety and EMC Symbols Ergonomic Computing Habits
Safety Instructions When Removing or Installing Memory Modules
EMC Instructions Protecting Against Electrostatic Discharge
Finding Information
Besides this User's Guide, the following documentation is included with your computer.
NOTE: Documentation updates are sometimes included with your computer to describe changes to
your computer or software. Always read these updates before consulting any other documentation
because the updates contain the latest information.
An operating system Setup Guide, which describes how to set up the operating system installed on
your Dell computer.
Operating system documentation is included if you ordered your operating system from Dell. This
documentation describes how to configure and use your operating system software.
Online documentation for your computer's devices (such as a modem) and for options you purchase
separately from your computer.
In Microsoft® Windows® XP, click the Start button, and then click Help and Support. From
the Help and Support window, click the link to access the user and system guides.
In Windows 2000, double-click the Dell User's Guide icon on the desktop, click System
Information, and then click System Documentation.
Readme files may be installed on your hard-disk drive to provide last-minute updates about technical
changes to your computer or advanced technical reference material intended for experienced users or
technicians.
For detailed information on the computer's parts and assemblies and how to remove and replace them, see
the computer Service Manual at the Dell support Web site at http://support.dell.com.
Safety and EMC Symbols
The following information defines the meaning of additional symbols used only in the Safety and
Electromagnetic Compatibility (EMC) Instructions.
Page 4
Risk of explosion Aircraft
Risk of fire Use of this feature may be prohibited on aircraft
Risk of electric shock
Safety Instructions
General
Do not attempt to service the computer yourself unless you are a trained service
technician. Always follow installation instructions closely.
If you use an extension power cable with your AC adapter, ensure that the total ampere
rating of the products plugged in to the extension power cable does not exceed the
ampere rating of the extension cable.
Do not push objects into air vents or openings of your computer. Doing so can cause fire
or electric shock by shorting out interior components.
Place the AC adapter in a ventilated area, such as a desk top or on the floor, when you
use it to run the computer or to charge the battery. Do not cover the AC adapter with
papers or other items that will reduce cooling; also, do not use the AC adapter inside a
carrying case.
Do not allow your portable computer to operate with the base resting directly on
exposed skin for extended periods of time. The surface temperature of the base will rise
during normal operation (particularly when AC power is present). Allowing sustained
contact with the skin can cause discomfort or, eventually, a burn.
Do not use your computer in a wet environment, for example, near a bath tub, sink, or
swimming pool or in a wet basement.
If your computer includes an integrated or optional (PC Card) modem, disconnect the
modem cable if an electrical storm is approaching to avoid the remote risk of electric
shock from lightning via the telephone line.
To help avoid the potential hazard of electric shock, do not connect or disconnect any
cables or perform maintenance or reconfiguration of this product during an electrical
storm. Do not use your computer during an electrical storm unless all cables have been
disconnected and the computer is operating on battery power.
If your computer includes a modem, the cable used with the modem should be
manufactured with a minimum wire size of 26 American wire gauge (AWG) and an FCC-
Page 5

compliant RJ-11 modular plug.
PC Cards may become very warm during normal operation. Use care when removing
PC Cards after their continuous operation.
Before you clean your computer, remove power. Clean your computer with a soft cloth
dampened with water. Do not use liquid or aerosol cleaners, which may contain
flammable substances.
Power (Safety Instructions, continued)
Use only the Dell-provided AC adapter approved for use with this computer. Use of
another AC adapter may cause a fire or explosion.
Before you connect the computer to an electrical outlet, check the AC adapter voltage
rating to ensure that the required voltage and frequency match the available power
source.
To remove power from the computer, turn it off, remove the battery pack, and
disconnect the AC adapter from the electrical outlet.
To help prevent electric shock, plug the AC adapter and peripheral power cables into
properly grounded power sources. These power cables may be equipped with threeprong plugs to provide an earth grounding connection. Do not use adapter plugs or
remove the grounding prong from the power cable plug. If you use a power extension
cable, use the appropriate type, two-prong or three-prong, to mate with the AC adapter
power cable.
Be sure that nothing rests on your AC adapter's power cable and that the cable is not
located where it can be tripped over or stepped on.
If you are using a multiple-outlet power strip, use caution when plugging the AC
adapter's power cable into the power strip. Some power strips may allow you to insert
the plug incorrectly. Incorrect insertion of the power plug could result in permanent
damage to your computer, as well as risk of electric shock and/or fire. Ensure that the
ground prong of the power plug is inserted into the mating ground contact of the power
strip.
Battery (Safety Instructions, continued)
Use only Dell battery modules that are approved for use with this computer. Use of other
Page 6
types may increase the risk of fire or explosion.
Do not carry a battery pack in your pocket, purse, or other container where metal objects
(such as car keys or paper clips) could short-circuit the battery terminals. The resulting
excessive current flow can cause extremely high temperatures and may result in
damage to the battery pack or cause fire or burns.
The battery poses a burn hazard if you handle it improperly. Do not disassemble it.
Handle a damaged or leaking battery pack with extreme care. If the battery is damaged,
electrolyte may leak from the cells and may cause personal injury.
Keep the battery away from children.
Do not store or leave your computer or battery pack near a heat source such as a
radiator, fireplace, stove, electric heater, or other heat-generating appliance. When
heated to excessive temperatures, battery cells could explode or vent, posing a risk of
fire.
Do not dispose of your computer's battery in a fire or with normal household waste.
Battery cells may explode. Discard a used battery according to the manufacturer's
instructions or contact your local waste disposal agency for disposal instructions.
Dispose of a spent or damaged battery promptly.
Air Travel (Safety Instructions, continued)
Certain Federal Aviation Administration regulations and/or airline-specific restrictions may
apply to the operation of your Dell™ computer while you are onboard an aircraft. For example,
such regulations/restrictions may prohibit the use of any personal electronic device (PED) that
has the capacity for intentional transmission of radio frequency or other electromagnetic signals
while on an aircraft.
In order to best comply with all such restrictions, if your Dell portable computer is
equipped with Dell TrueMobile™ or some other wireless communication device,
please disable this device before you board the aircraft and follow all instructions
provided by airline personnel with regard to such device.
Additionally, the use of any PED, such as a portable computer, may be prohibited in
aircraft during certain critical phases of flight, for example, takeoff and landing.
Some airlines may further define the critical flight phase as any time the aircraft is
below 3050 m (10,000 ft). Please follow the airline's specific instructions as to when
the use of a PED is allowed.
Page 7

EMC Instructions
Use shielded signal cables to ensure that you maintain the appropriate EMC classification for the
intended environment. For parallel printers, a cable is available from Dell. If you prefer, you can order a
cable from Dell at its world-wide website at http://www.dell.com
Static electricity can harm electronic components inside your computer. To prevent static damage,
discharge static electricity from your body before you touch any of your computer's electronic
components, such as a memory module. You can do so by touching an unpainted metal surface on the
computer's input/output panel.
When Using Your Computer
Observe the following guidelines to prevent damage to your computer.
When setting up the computer for work, place it on a level surface.
When traveling, do not check the computer as baggage. You can put your computer through an X-ray
security machine, but never put your computer through a metal detector. If you have the computer
checked by hand, be sure to have a charged battery available in case you are asked to turn on the
computer.
.
When traveling with the hard-disk drive removed from the computer, wrap the drive in a nonconducting
material, such as cloth or paper. If you have the drive checked by hand, be ready to install the drive in
the computer. You can put the hard-disk drive through an X-ray security machine, but never put the
drive through a metal detector.
When traveling, do not place the computer in overhead storage compartments where it could slide
around. Do not drop your computer or subject it to other mechanical shocks.
Protect your computer, battery, and hard-disk drive from environmental hazards such as dirt, dust,
food, liquids, temperature extremes, and overexposure to sunlight.
When you move your computer between environments with very different temperature and/or humidity
ranges, condensation may form on or within the computer. To avoid damaging the computer, allow
sufficient time for the moisture to evaporate before using the computer.
NOTICE: When taking the computer from low-temperature conditions into a
warmer environment or from high-temperature conditions into a cooler
environment, allow the computer to acclimate to room temperature before
turning on power.
When you disconnect a cable, pull on its connector or on its strain-relief loop, not on the cable itself. As
you pull out the connector, keep it evenly aligned to avoid bending any connector pins. Also, before you
connect a cable make sure both connectors are correctly oriented and aligned.
Handle components with care. Hold a component such as a memory module by its edges, not its pins.
When removing a memory module from the system board or disconnecting a peripheral device from the
computer, wait 5 seconds after turning off the computer before removing the memory module or
Page 8

disconnecting the device to help avoid possible damage to the system board.
Clean the display with a soft, clean cloth and commercial window cleaner that does not contain wax or
abrasives. Apply the cleaner to the cloth; then stroke the cloth across the display in one direction,
moving from the top of the display to the bottom. If the display contains grease or some other
contaminant, use isopropyl alcohol instead of commercial window cleaner.
If your computer gets wet or is damaged, follow the procedures described in "Finding Solutions." If,
after following these procedures, you confirm that your computer is not operating properly, contact
Dell.
Ergonomic Computing Habits
CAUTION: Improper or prolonged keyboard use may result in injury.
CAUTION: Viewing the display or external monitor screen for extended periods of
time may result in eye strain.
For comfort and efficiency, observe the following ergonomic guidelines when setting up and using your
computer:
Position your computer directly in front of you as you work.
Adjust the tilt of the computer's display, its contrast and/or brightness settings, and the lighting around
you (such as overhead lights, desk lamps, and the curtains or blinds on nearby windows) to minimize
reflections and glare on the display.
When using an external monitor with your computer, set the monitor at a comfortable viewing distance
(usually 510 to 610 millimeters [20 to 24 inches] from your eyes). Make sure the monitor screen is at
eye level or slightly lower when you are sitting in front of the monitor.
Use a chair that provides good lower-back support.
Keep your forearms horizontal with your wrists in a neutral, comfortable position while using the
keyboard, touch pad, track stick, or external mouse.
Always use the palmrest with the keyboard, touch pad, or track stick. Leave space to rest your hands
when using an external mouse.
Let your upper arms hang naturally at your sides.
Sit erect with your feet resting on the floor and your thighs level.
When sitting, make sure the weight of your legs is on your feet and not on the front of your chair seat.
Adjust your chair's height or use a footrest, if necessary, to maintain proper posture.
Vary your work activities. Try to organize your work so that you do not have to type for extended
periods of time. When you stop typing, try to do things that use both hands.
Page 9
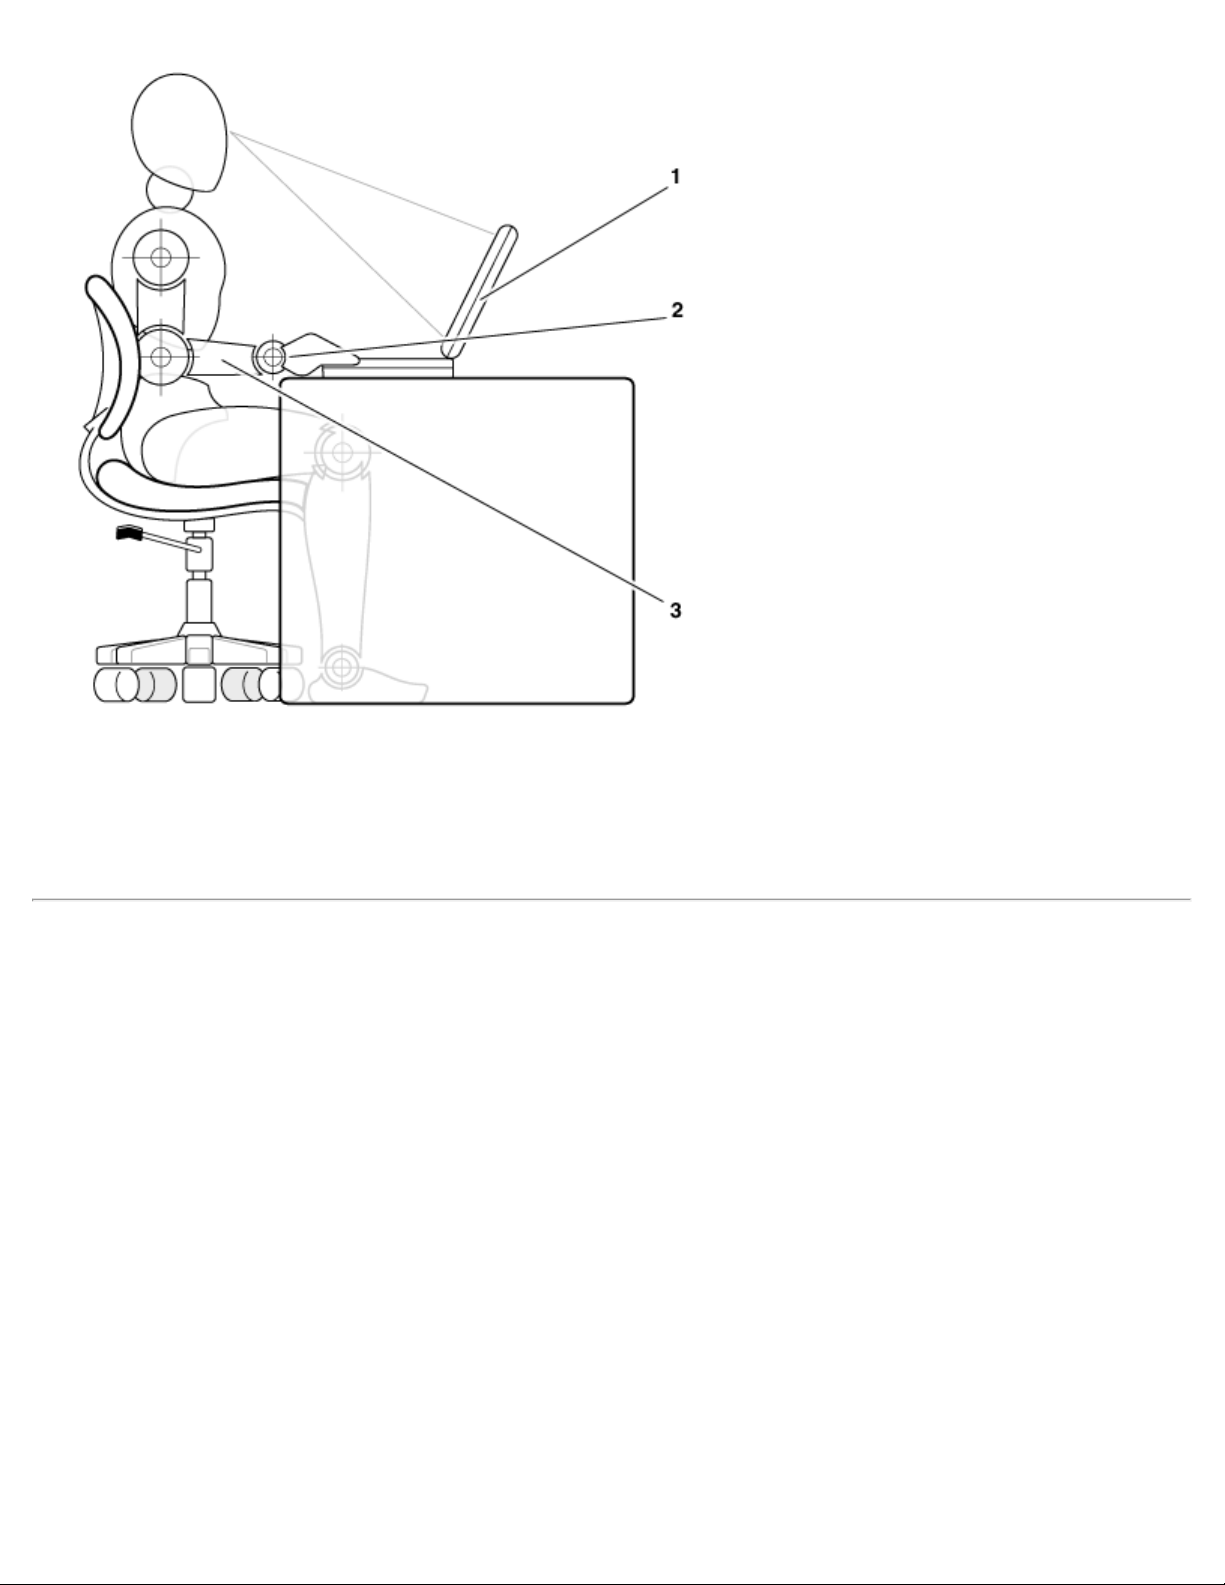
1
Computer positioned directly in front of user
2
Wrists relaxed and flat
3
Arms at desk level
When Removing or Installing Memory Modules
Before removing or installing memory modules, perform the following steps in the sequence indicated.
NOTICE: The only time you should ever access the inside of your computer is when you
are installing memory modules.
NOTICE: Wait 5 seconds after turning off the computer before disconnecting a
peripheral device or removing a memory module to help prevent possible damage to the
system board.
1. Turn off your computer and any attached peripherals.
2. Disconnect your computer and peripherals from AC power to reduce the potential for personal injury or
shock. Also, disconnect any telephone or telecommunication lines from the computer.
3. Remove the main battery from the battery compartment and, if necessary, the secondary battery from
the options bay.
4. Ground yourself by touching the unpainted metal surface of the I/O panel on the back of the computer.
Page 10

While you work, periodically touch the I/O panel to dissipate any static electricity that might harm
internal components.
Protecting Against Electrostatic Discharge
Static electricity can harm electronic components inside your computer. To prevent static damage, discharge
static electricity from your body before you touch any of your computer's electronic components, such as a
memory module. You can do so by touching an unpainted metal surface on the computer's I/O panel.
As you continue to work inside the computer, periodically touch an I/O connector to remove any static charge
your body may have accumulated.
You can also take the following steps to prevent damage from electrostatic discharge (ESD):
When unpacking a static-sensitive component from its shipping carton, do not remove the component
from the antistatic packing material until you are ready to install the component. Just before
unwrapping the antistatic packaging, be sure to discharge static electricity from your body.
When transporting a sensitive component, first place it in an antistatic container or packaging.
Handle all sensitive components in a static-safe area. If possible, use antistatic floor pads and
workbench pads.
The following notice may appear throughout this document to remind you of these precautions:
NOTICE: See "Protecting Against Electrostatic Discharge" in the safety instructions at
the front of this guide.
Back to Contents Page
Page 11
Back to Contents Page
Features and Options: Dell™ Latitude™ C600/C500 User's
Guide
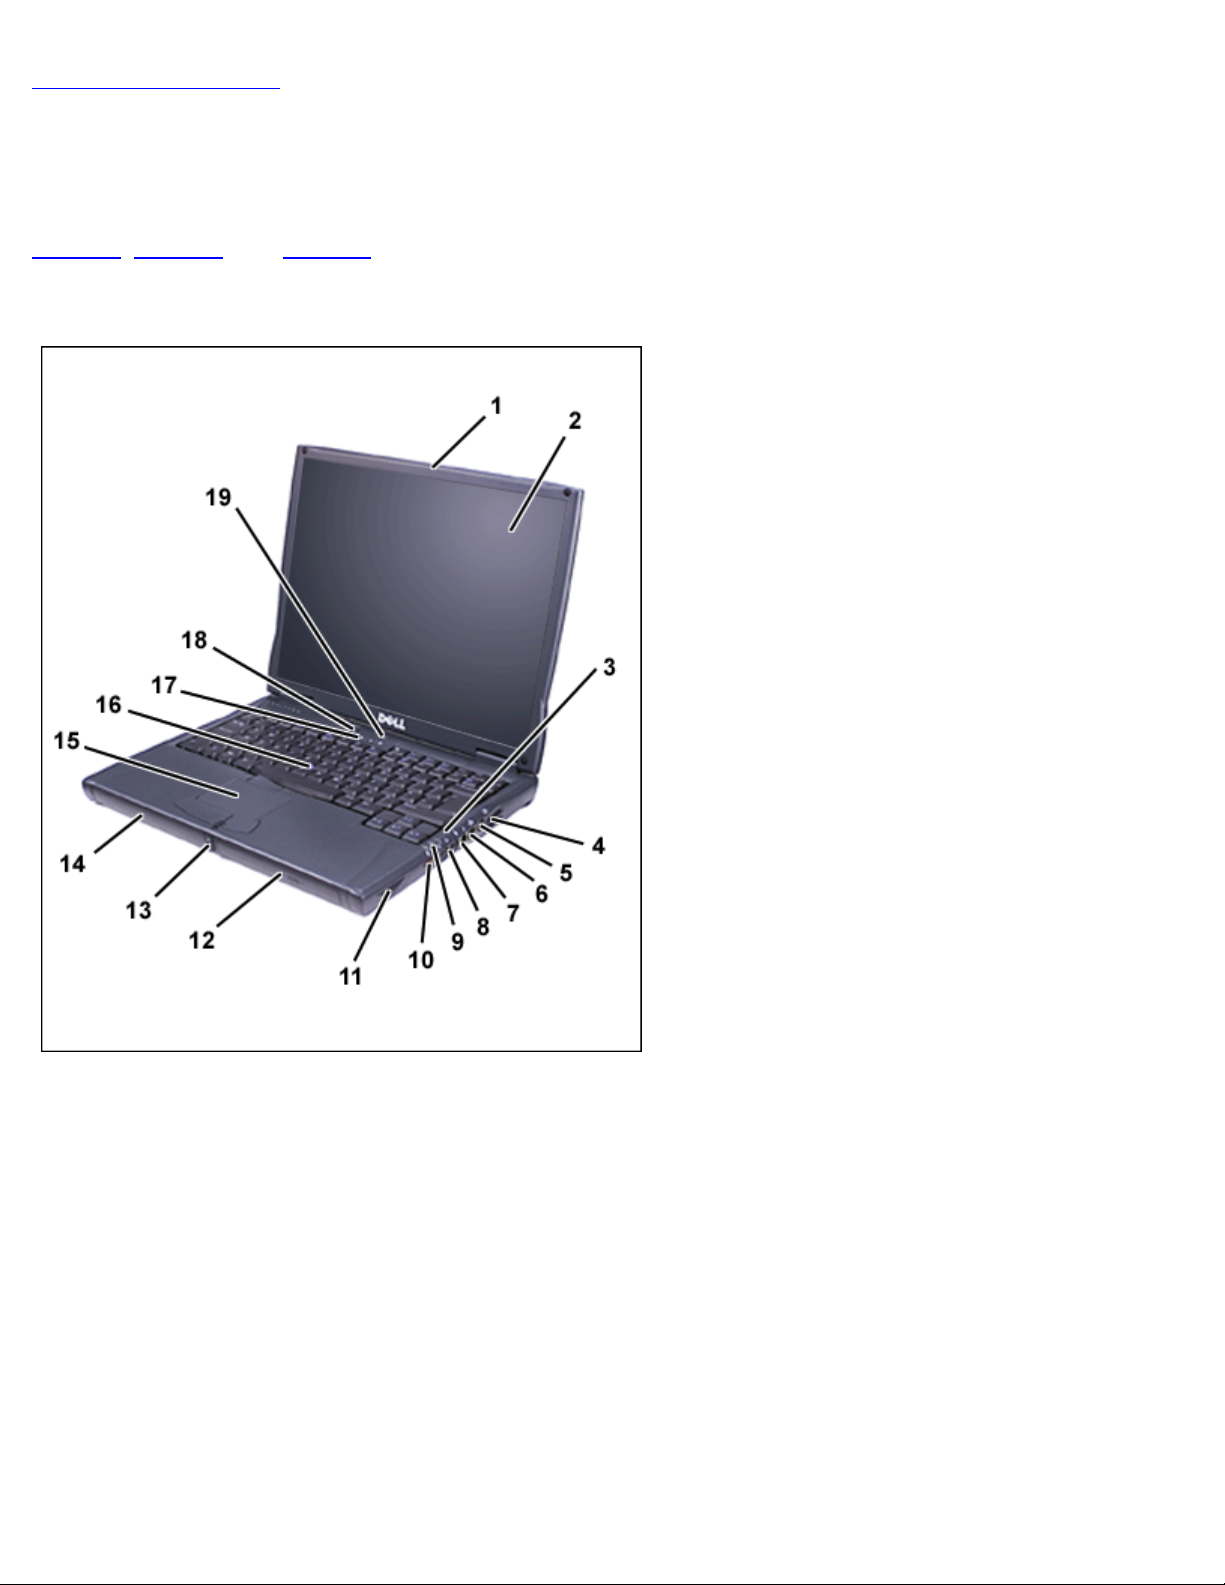
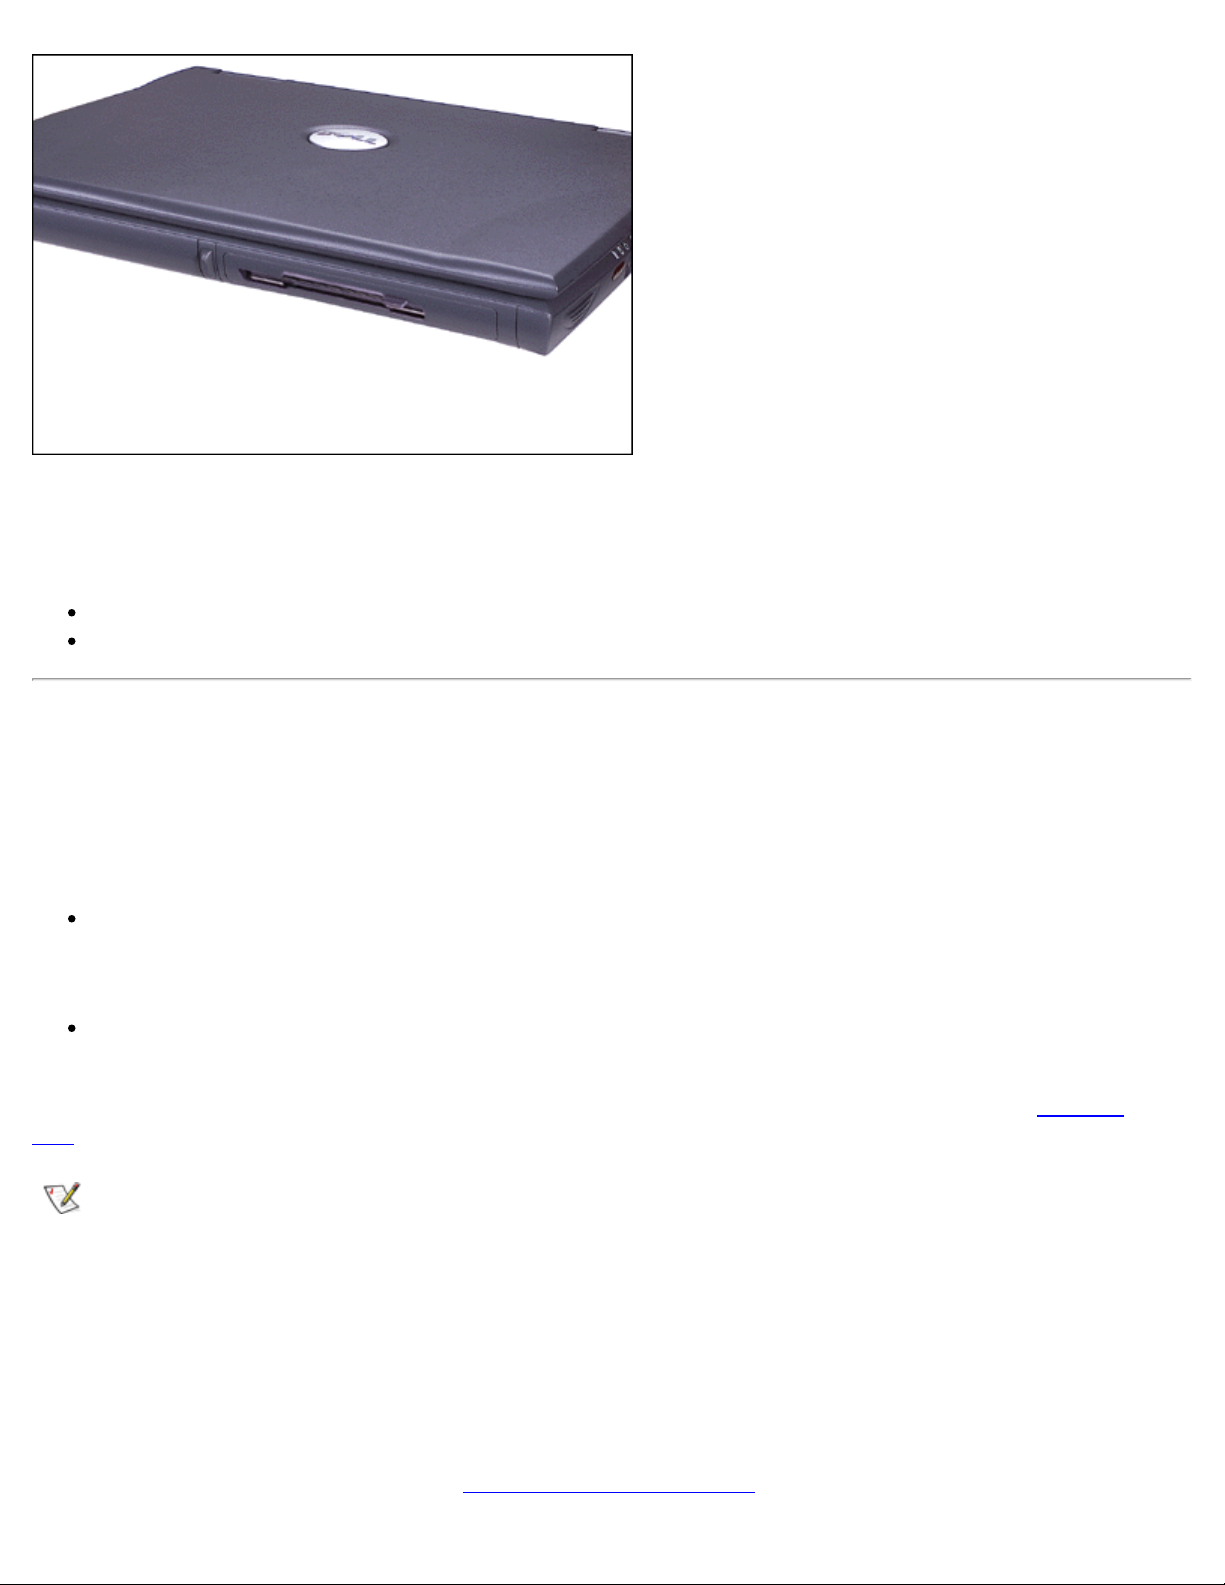
Figure 1, Figure 2, and Figure 3 show the front, back, and bottom views of the computer.
Figure 1. Front View of the Computer
1
Display latch
2
Display
3
Microphone
4
Air outlet
5
S-Video connector
6
Optional network connector
7
Optional modem connector
8
Audio jack (1)
9
System status lights
10
Infrared port
11
Speaker
12
Modular bay
13
Display latch button
14
Battery bay
15
Touch pad
16
Track stick
17
Keyboard status lights
18
Power button
19
Dell AccessDirect™ key
NOTICE: To avoid overheating the computer, do not place any objects close to the air
outlet or air vent, or allow any objects to cover up the outlet or air vent (see Figures 1
and 2).
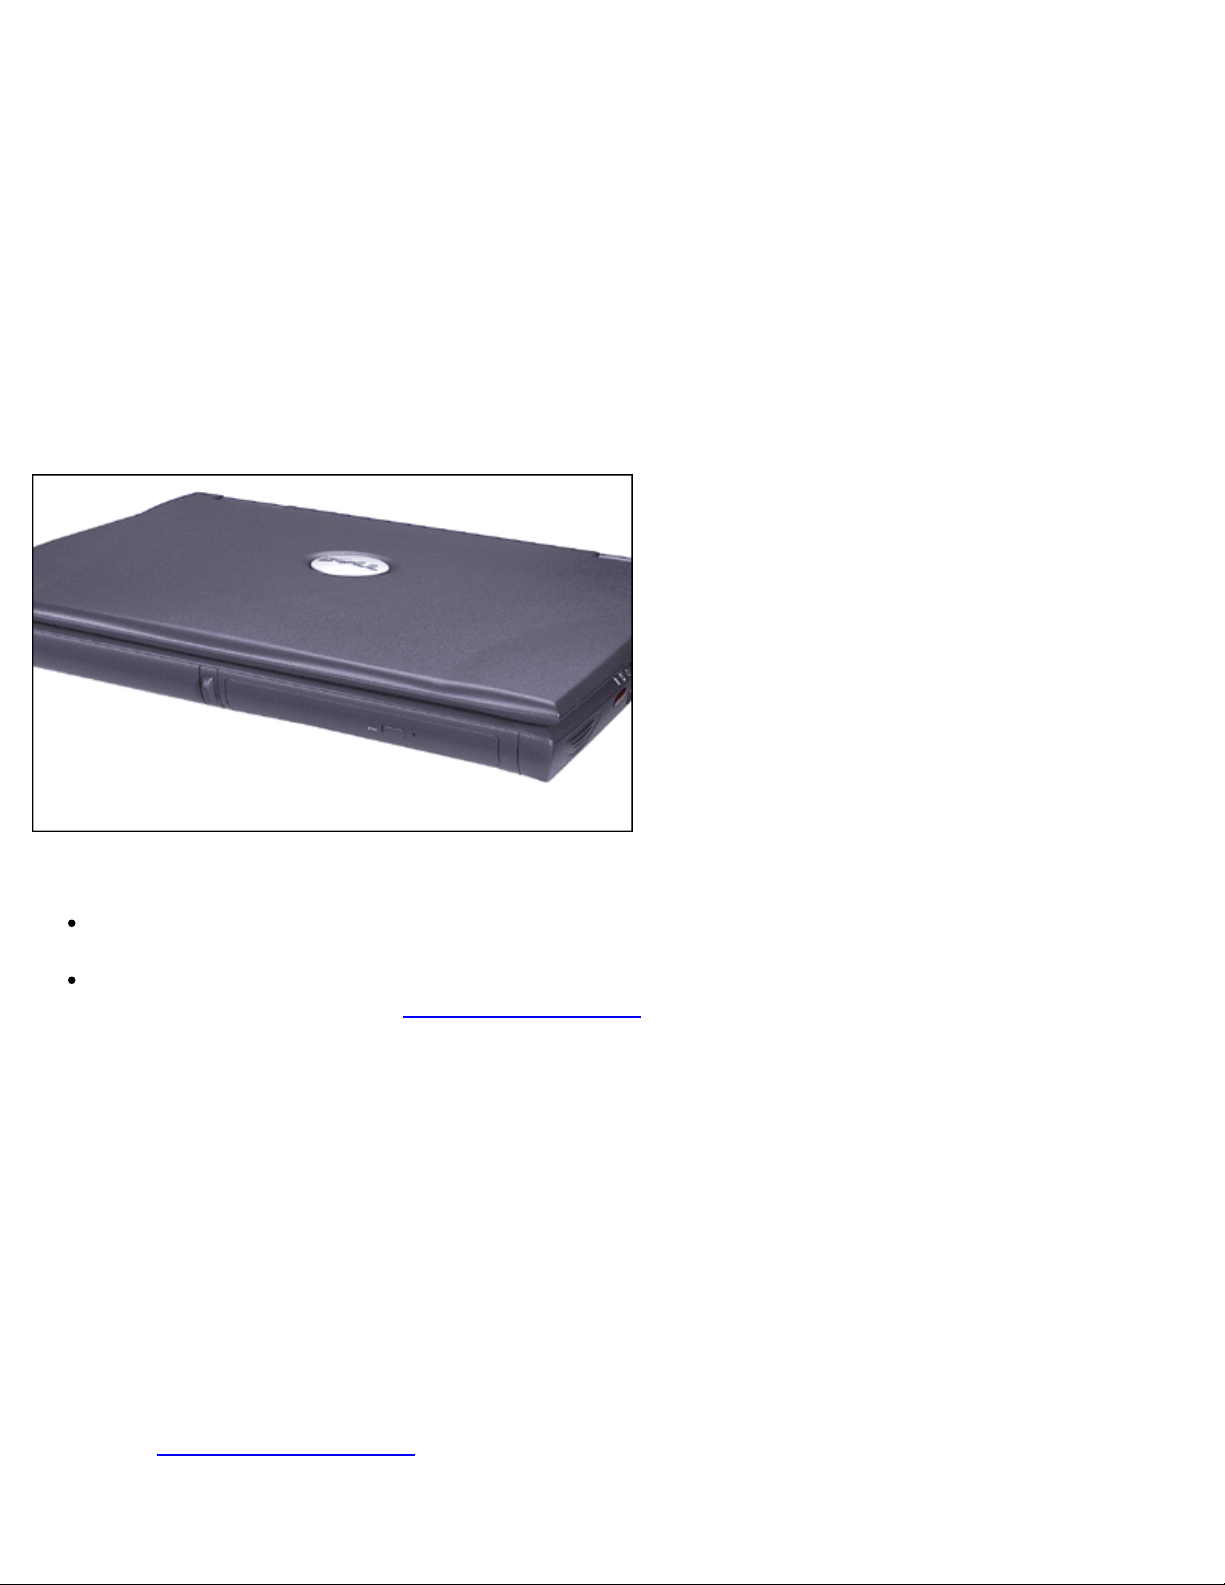
Figure 2. Back View of the Computer
1
Speaker
2
Security cable slot
3
Hard-disk drive
Page 12
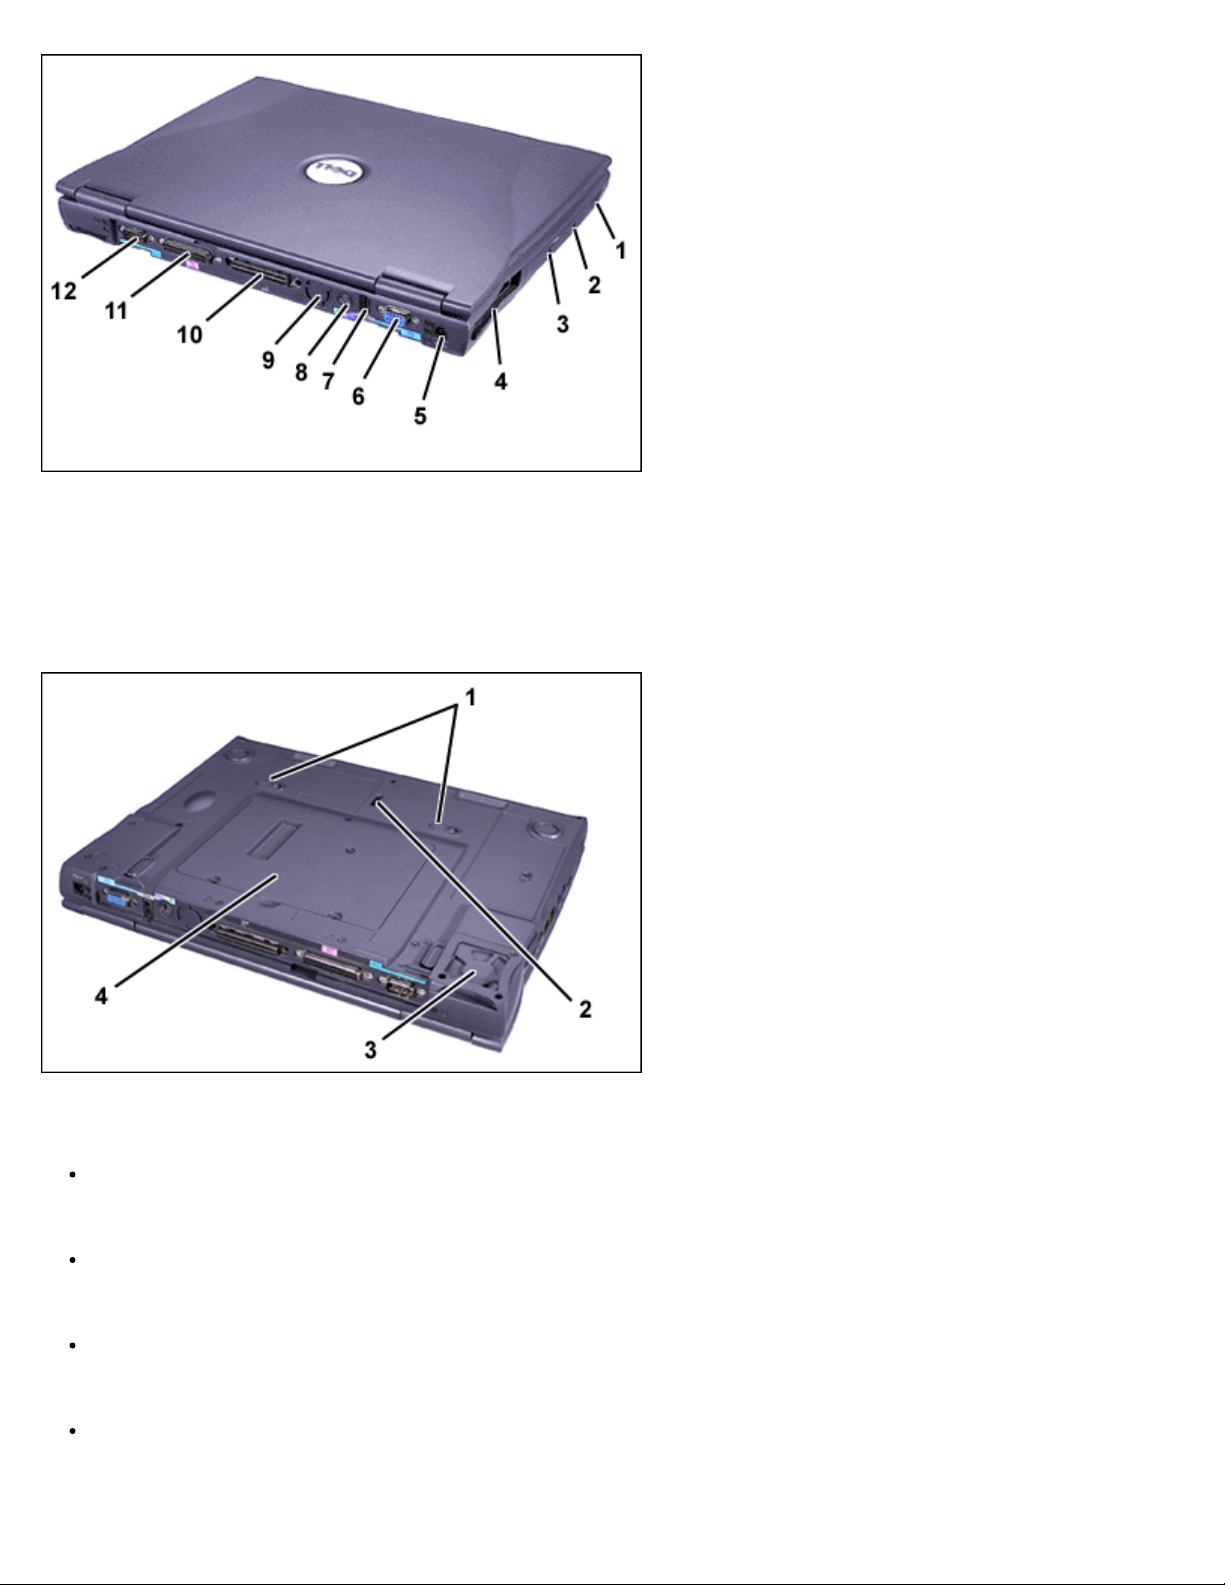
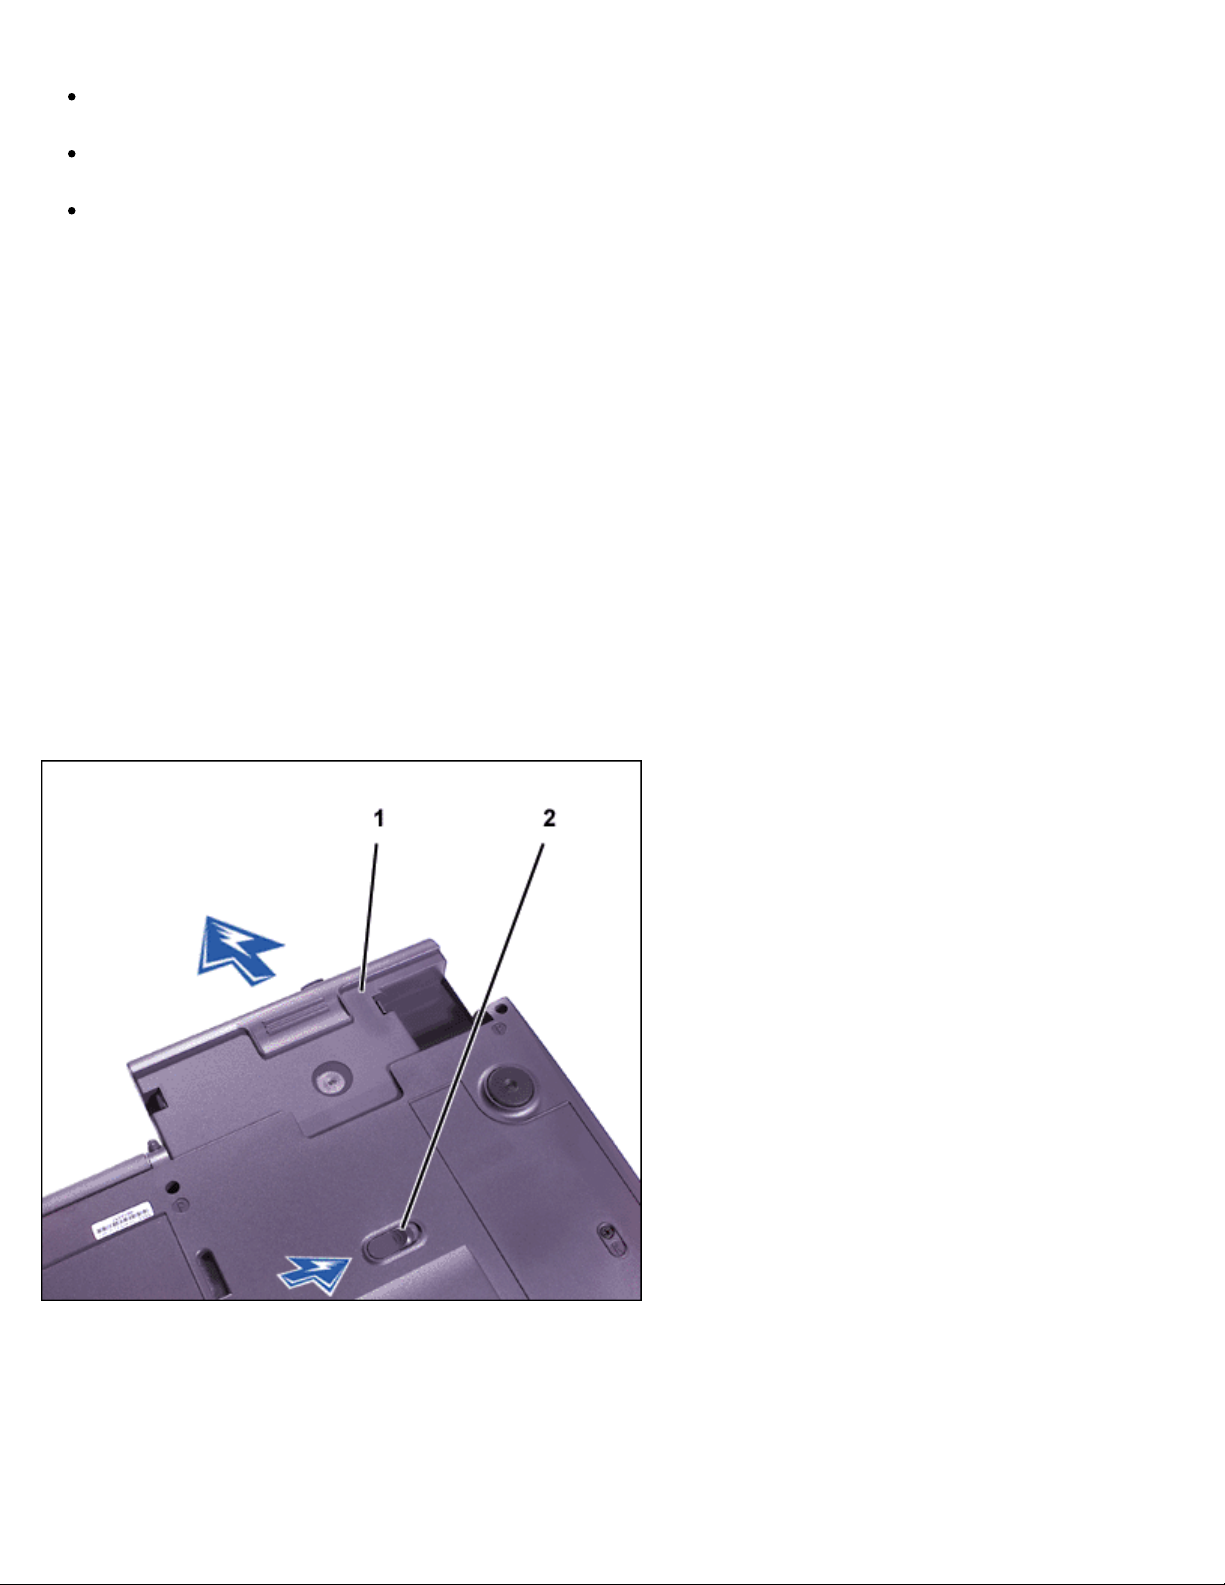
Figure 3. Bottom View
4
PC Card slots (2)
5
AC adapter connector
6
Video connector
7
USB connector
8
PS/2 connector
9
Air vent
10
Docking connector
11
Parallel connector
12
Serial connector
1
Module release latches (2)
2
Docking security latch
3
Fan
Your Dell computer has the following features:
A 14.1-inch extended graphics array (XGA), thin film transistor (TFT) 1024 x 768 active-matrix color
display (for C600 and C500 computers).
A 14.1-inch super extended graphics array plus (SXGA+), TFT 1400 x 1050 active-matrix color display
(for C600 computers only).
A 12.1-inch super video graphics array (SVGA), TFT 800 x 600 active-matrix color display (for C500
computers only).
4
Memory module and mini-PCI
cover
A Dell AccessDirect key located above your keyboard that allows you to quickly access a frequently
used program, such as Microsoft® Internet Explorer.
Page 13

A CD-ROM drive that can be used in the modular bay. When you unpack your computer, look for the
CD-ROM drive in the accessories box of the shipping carton.
128-bit hardware-accelerated video support, with 8 megabytes (MB) of video memory.
Support for a zoomed video (ZV) PC Card in the lower PC Card connector.
ESS Maestro 3i audio controller with software wavetable support and 3D surround sound.
Two audio jacks for connecting external speakers, headphones, or a microphone.
Integrated microphone and two stereo speakers.
Accelerated graphics port (AGP) architecture that increases the computer's video performance.
Energy efficiency. An ENERGY STAR® partner, Dell has determined that this product meets the
ENERGY STAR guidelines for energy efficiency.
A modular bay that supports modules such as a DVD-ROM drive, CD-ROM drive, CD-RW drive,
diskette drive, second battery, second hard-disk drive, Zip drive, or SuperDisk drive. To make the
computer as light as possible when you travel, use the travel module in the modular bay.
NOTE: Your computer was shipped with a diskette drive in the modular bay. For
information on removing the diskette drive and installing a different device in the bay, see
"Modular Bay
Optional V.90 Mini PCI Modem data/fax modem, PC99-compliant, and ACPI power management
support (including remote wake-up for Windows® 2000).
For additional information on the Mini PCI Card modem, see "Connecting Devices
PCI Modem User's Guide.
Optional 10/100 LAN + V.90 Modem Mini PCI Card data/fax modem, PC99-compliant, and ACPI
power management support (including remote wake-up for Windows 2000).
For additional information on the Mini PCI Card modem, see "Connecting Devices
+ V.90 Modem Mini PCI Card User's Guide.
A minimum of 64-MB synchronous dynamic random-access memory (SDRAM) module is standard.
You can increase memory up to 512 MB by installing combinations of 64-, 128-, or 256-MB 100megahertz (MHz) SDRAM modules in the two memory module sockets on the system board.
Two power conservation modes—suspend mode and suspend-to-disk mode—that help you conserve
battery power. If the batteries run out of power, suspend-to-disk mode prevents data loss by copying
all system data to the hard-disk drive and turning off the computer.
Connectors for two 3.3-volt (V) or 5-V PC Cards. The lower PC Card connector supports ZV PC Cards.
."
" and the V.90 Mini
" and the 10/100 LAN
NOTE: The PC Card controller supports the CardBus standard for 32-bit data transfer on
the PC Card.
Hardware and software support for the Dell Latitude C/Port Family Advanced Port Replicator (APR)
Page 14

and the Dell Latitude C/Dock Family Expansion Station.
A Dell DualPoint integrated pointing device which includes both a touch pad and a track stick. These
pointing devices are positioned for both left- and right-handed users. The track stick is positioned in the
keyboard to allow you to move the cursor while keeping your fingers in a typing position. Two sets of
left and right buttons, located above and below the touch pad, mimic mouse buttons. You can also
perform many pointing functions by tapping the touch pad or the track stick. Click-and-drag buttonless
functions are also supported.
An 8-cell, 59 watt-hour (WH) lithium ion battery (standard) in the battery bay, with support for a second
battery in the modular bay. For lithium ion batteries, the Dell ExpressCharge™ technology charges a
single battery in approximately 1 hour when the computer is off or in suspend mode.
Optional 4-cell, 26.5-WH lightweight lithium ion battery.
CAUTION: Do not puncture, disassemble, or incinerate the computer's battery.
The battery may present a fire or chemical burn hazard if mistreated. Do not
expose the battery to temperatures above 60° Celsius (C) (140° Fahrenheit [F]).
Keep the battery away from children. Handle damaged or leaking batteries with
extreme care; electrolyte may leak from the cells and cause personal injury.
CAUTION: If your battery is damaged, or if it no longer holds a charge, dispose of
it promptly and properly. Do not dispose of it along with household waste. Call
your local waste disposal agency or environmental agency for advice on
disposing of the battery.
CAUTION: Using the wrong battery type may present a risk of fire or explosion.
Replace the battery only with the same or equivalent type purchased from Dell.
You can use your computer's battery in any Latitude C-Family computer except for
the Latitude CS or CSx computers. Do not attempt to use the battery in CS or CSx
computers, and do not use a battery from those computers in your computer.
High-performance parallel and serial ports and a multipurpose Personal System/2 (PS/2) connector for
attaching external devices, a monitor connector for attaching an external monitor to your computer, and
a Universal Serial Bus (USB) connector that supports stand-alone and hub devices.
An infrared port that permits file transfer without the use of cable connections. The port is compatible
with the Infrared Data Association (IrDA) Standard 1.1 (Fast IR) and Standard 1.0 (Slow IR) for use
with external devices.
Dell HyperCool™, an automatic thermal management system that uses a variable-speed fan,
microprocessor speed changes, and Intel® Remote Heat Exchanger technology to keep the computer
running at the optimum temperature.
The following software is included with your Dell computer:
The Intel® SpeedStep™ technology is installed on your hard-disk drive.
The Windows operating system that you ordered with your computer.
The system setup program lets you view and change the system configuration. For more information,
Page 15

see "Using the System Setup Program."
Dell Diagnostics for evaluating the computer's components and devices.
NOTE: If Dell did not install an operating system on your hard-disk drive, the drivers, system utilities,
and diagnostics are available separately from Dell. To order them, see "Getting Help
appropriate telephone number in your location.
Available Options
For information on the available options for your computer, visit the Dell Web site at
http://www.dell.com.
Back to Contents Page
" for the
Page 16

Back to Contents Page
Using Your Computer: Dell™ Latitude™ C600/C500 User's
Guide
Turning the Computer On and Off Keyboard and Keypad Controls
Modular Bay Dell AccessDirect™ Key
Diskette Drive Speaker Controls
Removable Mass-Storage Drives Controlling the Cursor
Display PC Cards
Turning the Computer On and Off
To turn on the computer, press the power button. (See Figure 1 in "Features and Options.")
To turn off the computer, follow the standard shutdown procedure described in your operating system
documentation.
CAUTION: Do not allow your Latitude portable computer to operate for an
extended period of time with the base resting directly on your body. With
extended operation, heat can potentially build up in the base. Allowing sustained
contact with the skin could cause discomfort or, eventually, a burn.
Modular Bay
Your computer comes with a diskette drive installed in the modular bay. To use another device in the
modular bay, first remove
NOTICE: When drives are not inside the computer, they are fragile and must be handled
carefully to avoid damage. Do not press down on the drives or place heavy objects on
top of them. Place the drives in a travel case to keep them free of dust and liquids.
Store the drives in a safe place.
NOTICE: If the computer is docked, turn off the computer and undock it before
installing or removing a drive.
the diskette drive.
You can install the following modules in the modular bay:
Second battery
CD-ROM drive
DVD-ROM drive
CD-RW drive
Page 17
SuperDisk drive
Zip drive
Second hard-disk drive
To make the computer as light as possible, use the travel module in the modular bay in place of any of the
available drives.
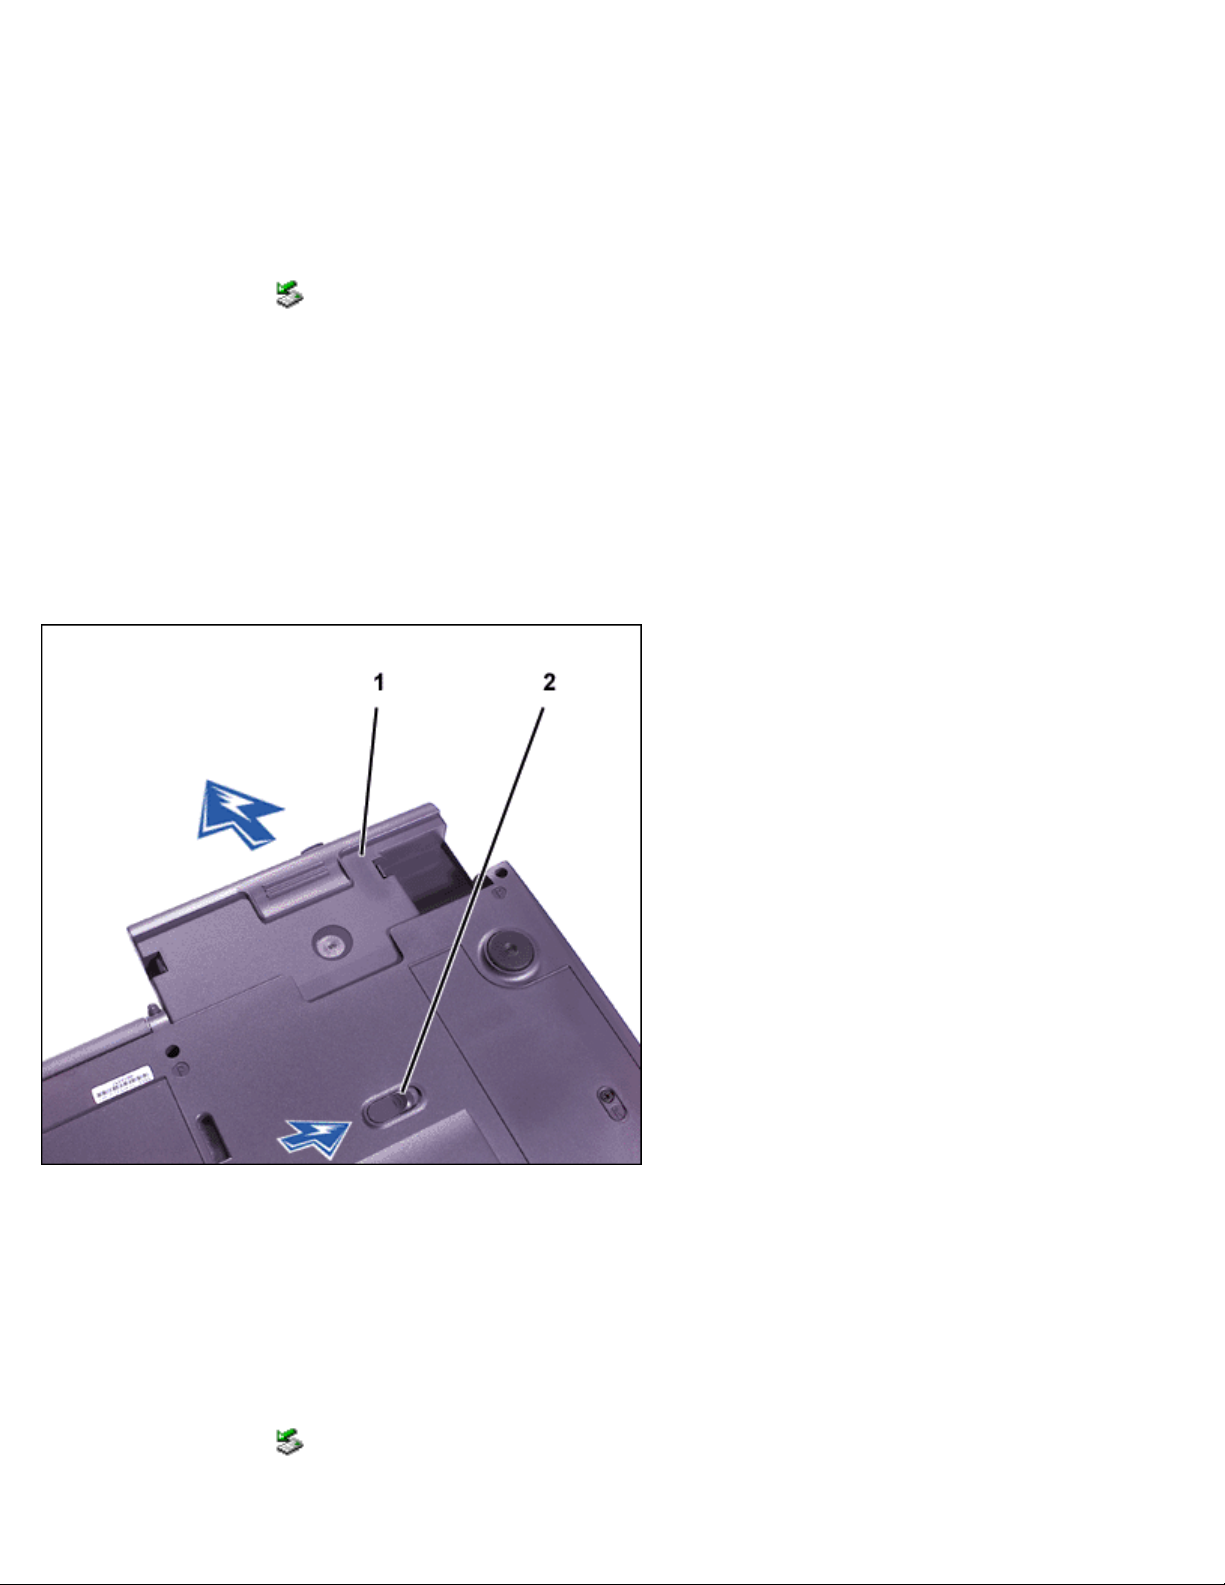
Swapping Devices While the Computer Is Off
1. Save and close any open files, exit any open programs, and shut down the computer.
2. If the computer is connected (docked) to an Advanced Port Replicator (APR) or docking station,
undock it.
3. Close the display and turn the computer over.
4. Slide and hold the latch release, and pull the device out of the bay.
NOTICE: To prevent damage to devices, place them in a travel case when they are not
inserted in the computer. Store devices in a dry, safe place, and avoid pressing down
on them or placing heavy objects on top of them.
1
Device
2
Modular bay latch
NOTICE: Insert devices before you dock and turn on the computer.
5. Insert the new device into the bay, and push it until you hear a click.
6. Turn the computer over and open the display.
7. Turn on the computer.
Page 18
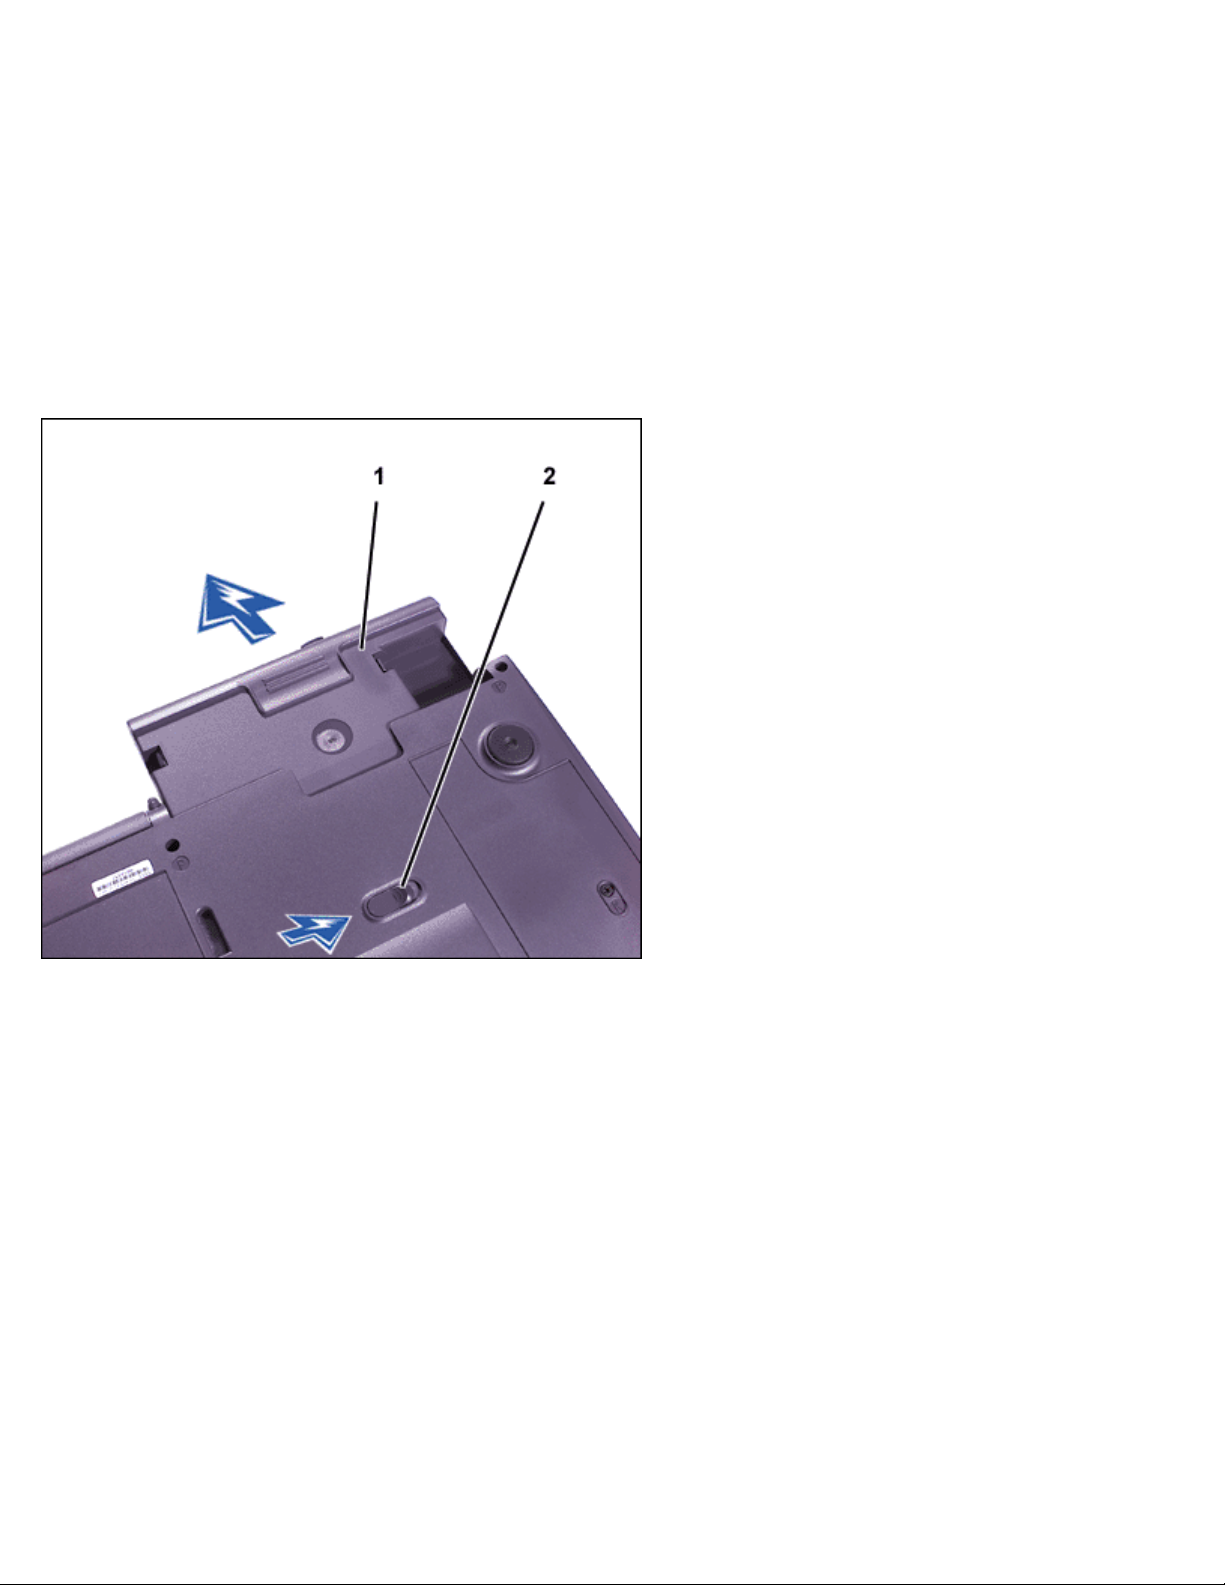
Swapping Devices While the Microsoft® Windows® Operating System Is Running
NOTICE: To prevent damage to the docking connector, do not remove or replace
devices while the computer is connected to an APR or docking station.
In Windows XP
1. Double-click the icon on the Windows taskbar.
2. Click the device you want to eject.
3. Keep the display open, and tilt the computer back so that you can access the bottom of the computer.
4. Slide and hold the latch release, and pull the device out of the bay.
NOTICE: To prevent damage to devices, place them in a travel case when they are not
inserted in the computer. Store devices in a dry, safe place, and avoid pressing down
on them or placing heavy objects on top of them.
1
Device
2
Modular bay latch
5. Insert the new device into the bay, and push the device in until you hear a click.
6. If necessary, enter your password to unlock your computer.
In Windows 2000
1. Double-click the icon on the Windows taskbar.
Page 19
2. Click the device you want to eject and then click Stop.
3. Click OK, and wait until the device you want to eject is cleared from the list of devices in the Unplug
or Eject Hardware window.
4. Keep the display open, and tilt the computer back so that you can access the bottom of the computer.
5. Slide and hold the latch release, and pull the device out of the bay.
NOTICE: To prevent damage to devices, place them in a travel case when they are not
inserted in the computer. Store devices in a dry, safe place, and avoid pressing down
on them or placing heavy objects on top of them.
1
Device
2
Modular bay latch
6. Insert the new device into the bay, and push the device in until you hear a click.
7. Turn the computer over and open the display.
8. Press the power button to resume from standby mode.
9. If necessary, enter your password to unlock your computer.
10. When Windows resumes and recognizes the new device, click Close.
In Windows 98 and Windows NT
1. In Windows 98, right-click the Softex BayManager icon on the Windows taskbar.
In Windows NT, right-click the Docking Services icon on the Windows taskbar.
2. Click Remove/Swap.
Page 20

3. Keep the display open, and tilt the computer back so that you can access the bottom of the computer.
4. Slide and hold the latch release, and pull the device out of the bay.
5. Insert the new device into the bay, and push it until you hear a click.
6. Click OK. Then click OK again to close the Softex BayManager window or the Softex Docking
Services window.
Diskette Drive
Your computer was shipped with a 3.5-inch diskette drive (see Figure 2) in the modular bay.
To use the diskette drive:
1. Insert a 3.5-inch diskette into the drive (label side up and metal end first).
2. Push the diskette into the drive until the eject button extends outside the drive casing.
When data is being accessed from the diskette drive in the modular bay, the drive access light blinks.
NOTICE: Do not travel with a diskette in the diskette drive. Doing so could break the
eject button and damage the drive.
NOTE: You can use the diskette drive externally by connecting it to the parallel connector on the back
of the computer.
To remove a diskette from the drive:
1. Press the eject button to release the diskette.
2. Pull the diskette out of the drive.
To remove the drive or to use another device in the modular bay, see "Modular Bay
NOTICE: When drives are not inside the computer, they are fragile and must be handled
carefully to avoid damage. Do not press down on the drives or place heavy objects on
top of them. Place the drives in a travel case to keep them free of dust and liquids.
Store the drives in a safe place.
NOTE: If the computer is docked, turn off the computer and undock it before installing or removing a
drive.
."
Figure 2. Diskette Drive Installed in Computer
Page 21
Caring for Diskettes
When handling and using diskettes, follow these precautions:
Never use damaged diskettes in the computer
Do not store diskettes near magnetic sources
Removable Mass-Storage Drives
You can install removable-mass storage drive modules such as a CD-ROM drive or SuperDisk drive in the
modular bay.
NOTICE: Follow these precautions when using your drive:
Protect the drives when they are not in the modular bay. Do not squeeze the drive
or place objects on top of it; doing so could damage the drive motor. Keep the
drive as clean as possible.
Do not use the drive while the computer is in motion. Doing so could interrupt the
flow of data between the disc and the hard-disk drive or diskette drive.
For instructions on installing a removable mass-storage drive module in the modular bay, see "Modular
Bay."
NOTE: If the computer is docked, turn off the computer and undock it before installing or removing a
drive.
CD-ROM, CD-RW, and DVD-ROM Drives
NOTICE: Always use compressed air to clean the lens in the drive. Never touch the
lens.
To play a disc:
1. Make sure the appropriate drive is installed in the modular bay
.
Page 22
2. Press the eject button on the front of the drive or press <Fn><F10>.
3. When the tray slides out, place the disc into the tray label side up.
Make sure that the CD is seated correctly on the spindle by pressing down on the disc until it
clicks in place.
NOTICE: If the disc is not seated correctly, the drive or media can be damaged.
4. Gently push in the tray.
When the drive is in use, the drive access light blinks on the computer’s front panel.
Figure 3. DVD-ROM, CD-ROM, or CD-RW Drive Installed in Computer
To eject the drive tray, perform one of the following tasks:
press the eject button on the front of the drive
press <Fn><F10> (on an external keyboard, press <Scroll Lock> instead of <Fn> if the External Hot
Key option is enabled in the system setup program
You can only use CD-ROM, DVD-ROM, and CD-RW drives externally with a C/Port Family Advanced Port
Replicator (APR) or a C/Dock Family Expansion Station.
If you are using the Microsoft Windows 98 operating system, disable the autoplay (auto insert notification)
feature while you use the drive. (The autoplay feature can interfere with the computer’s power management
functions.) If Dell installed the operating system, the autoplay feature has been disabled. If you reinstall the
operating system or if you installed it yourself, be sure to disable the autoplay feature if you want to use the
drive.
For instructions on changing the Auto Insert Notification option, see the operating system user’s guide.
DVD-ROM and CD-ROM drives are read-only devices that let you play most sound and video CDs. DVD-
ROM drives can also play DVDs. CD-rewritable (CD-RW) drives can write to and play CD-recordables (CDR) or CD-RWs and can play CDs. Dell has installed the appropriate device drivers on your hard-disk
drive. See "Technical Specifications
" for information on supported CD and DVD formats.
)
Caring for Discs
Page 23
When handling and using the discs, follow these precautions:
Never use a damaged or warped disc.
Always hold the disc by its edges. Do not touch the surface of the disc.
Use a clean, dry cloth to remove dust, smudges, or fingerprints from the surface of the disc. When
cleaning, wipe from the center of the disc to the edge.
Never use solvents, such as benzene, record cleaners, or antistatic sprays, to clean the disc.
Do not write on the surface of the disc.
Store discs in their containers, placing them in a cool, dry place. Extreme temperatures may damage
discs.
Do not bend or drop a disc.
Do not place objects on top of a disc.
Display
When you run the computer on battery power, set your computer's brightness control to the lowest setting
that affords comfortable viewing. You can conserve battery power by using the minimum brightness setting
(see Table 1)
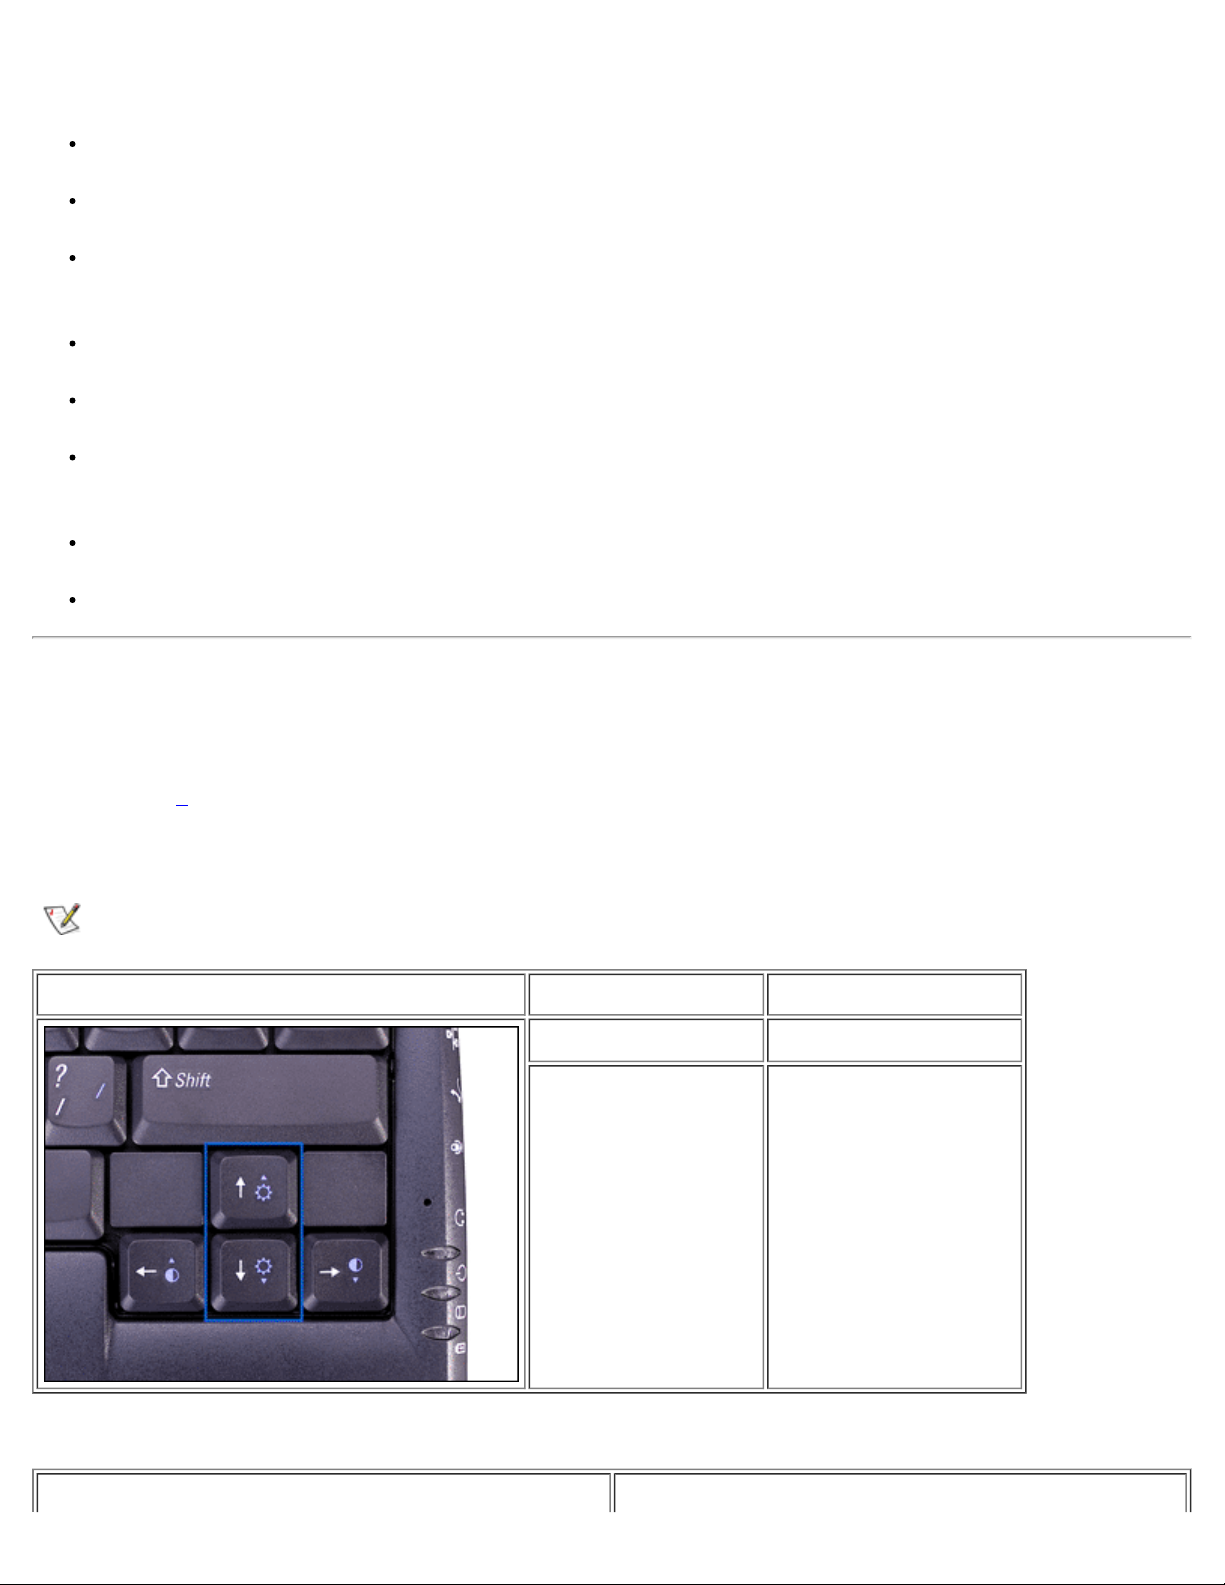
Table 1. Adjusting Brightness
NOTE: On an external keyboard, use <Scroll Lock> with the appropriate keys if the External Hot Key
option is enabled in the ddd.
Keys Function Key Combinations
1
.
Increase brightness <Fn> + up arrow
Decrease brightness <Fn> + down arrow
Table 2. Controlling Display Modes
Function Key Combinations
Page 24

Switch the computer’s display between expanded
mode and regular video mode.
<Fn><F7>
Switch the video image to the next display in the
<Fn><F8>
following sequence: the computer's display, an
external monitor, or both displays simultaneously.
Turn off the display. This key combination applies
<Fn><d>
only to Windows 98, and Windows NT and may not
be supported under certain conditions.
1
You cannot adjust contrast on your display.
2
Certain key combinations may not function with the Advanced Configuration and Power Interface (ACPI)
2
or may require configuration with the Power Management Properties window in the Control Panel. See
"Power Management and Conservation
."
Expanded Video Mode
When working in text mode, you can select the font used to display text. Press <Fn><F7> to toggle between
a regular serif font and a serif font with extra leading. Expanded video mode is useful if you are working in
800 x 600 resolution on a 14.1-inch XGA display.
Customizing Display Resolution
In Windows XP
1. Click the Start button, and then click Control Panel.
2. Under Pick a category, click Appearance and Themes.
3. Under Pick a task..., click the area you want to change, or under or pick a Control Panel icon,
click Display.
4. Try different settings for Color Quality and Screen resolution.
In Windows 2000, Windows 98, and Windows NT
1. Click the Start button, point to Settings, and then click Control Panel.
2. Double-click the Display icon, and then click the Settings tab.
3. Try different settings for Colors and Screen area.
For more information, see your operating system documentation.
If you choose a resolution or color palette that is higher than the display supports, the settings adjust
automatically to the closest possible setting.
Video Drivers and Video Resolution
Page 25

The Dell-installed video drivers work with the operating system to let you customize the video resolution and
number of screen colors on your display. For detailed information on video resolution, see "Technical
Specifications."
NOTE: The Dell-installed video drivers are designed to offer the best performance on your computer.
Dell recommends that you use only these drivers with your factory-installed operating system.
If the video resolution setting is higher than what the display supports, the computer display enters pan
mode. The computer enters pan mode at the following resolutions (depending on display type):
XGA: 1280 x 1024
SXGA+: 1400 x 1050
UGA: 1600 x 1200
In pan mode the screen resolution is too high to be completely displayed on the computer display. For
example, the taskbar that usually appears at the bottom of the desktop may no longer be visible. To view the
rest of the screen, use the touch pad or track stick to pan up and down and left and right.
NOTICE: Before adjusting the refresh rate on an external monitor, refer to the monitor's
user's guide. You can damage the monitor by using an unsupported refresh rate.
To display more colors, select a lower resolution. If you select a resolution and color combination that the
system does not support, the system automatically selects the next supported combination.
NOTE: Color depth is based on 256 colors for 8-bit, 65,536 colors for 16-bit, and 4,294,967,296 colors
for 32-bit displays.
Dual-Display Mode
With the Microsoft Windows 98 operating system, you can use an external monitor as an extension of your
display. For more information, see "Using an External Monitor in Dual-Display Mode
."
Keyboard and Keypad Controls
Key combinations allow you to:
Control display settings
Eject removable mass-storage drives
Control the Dell AccessDirect™ key
Adjust speaker volume
Use the embedded numeric keypad
Enter power management modes
Page 26
Enter the system setup program
NOTE: On an external keyboard, use <Scroll Lock> with the appropriate keys if the External Hot Key
option is enabled in the system setup program
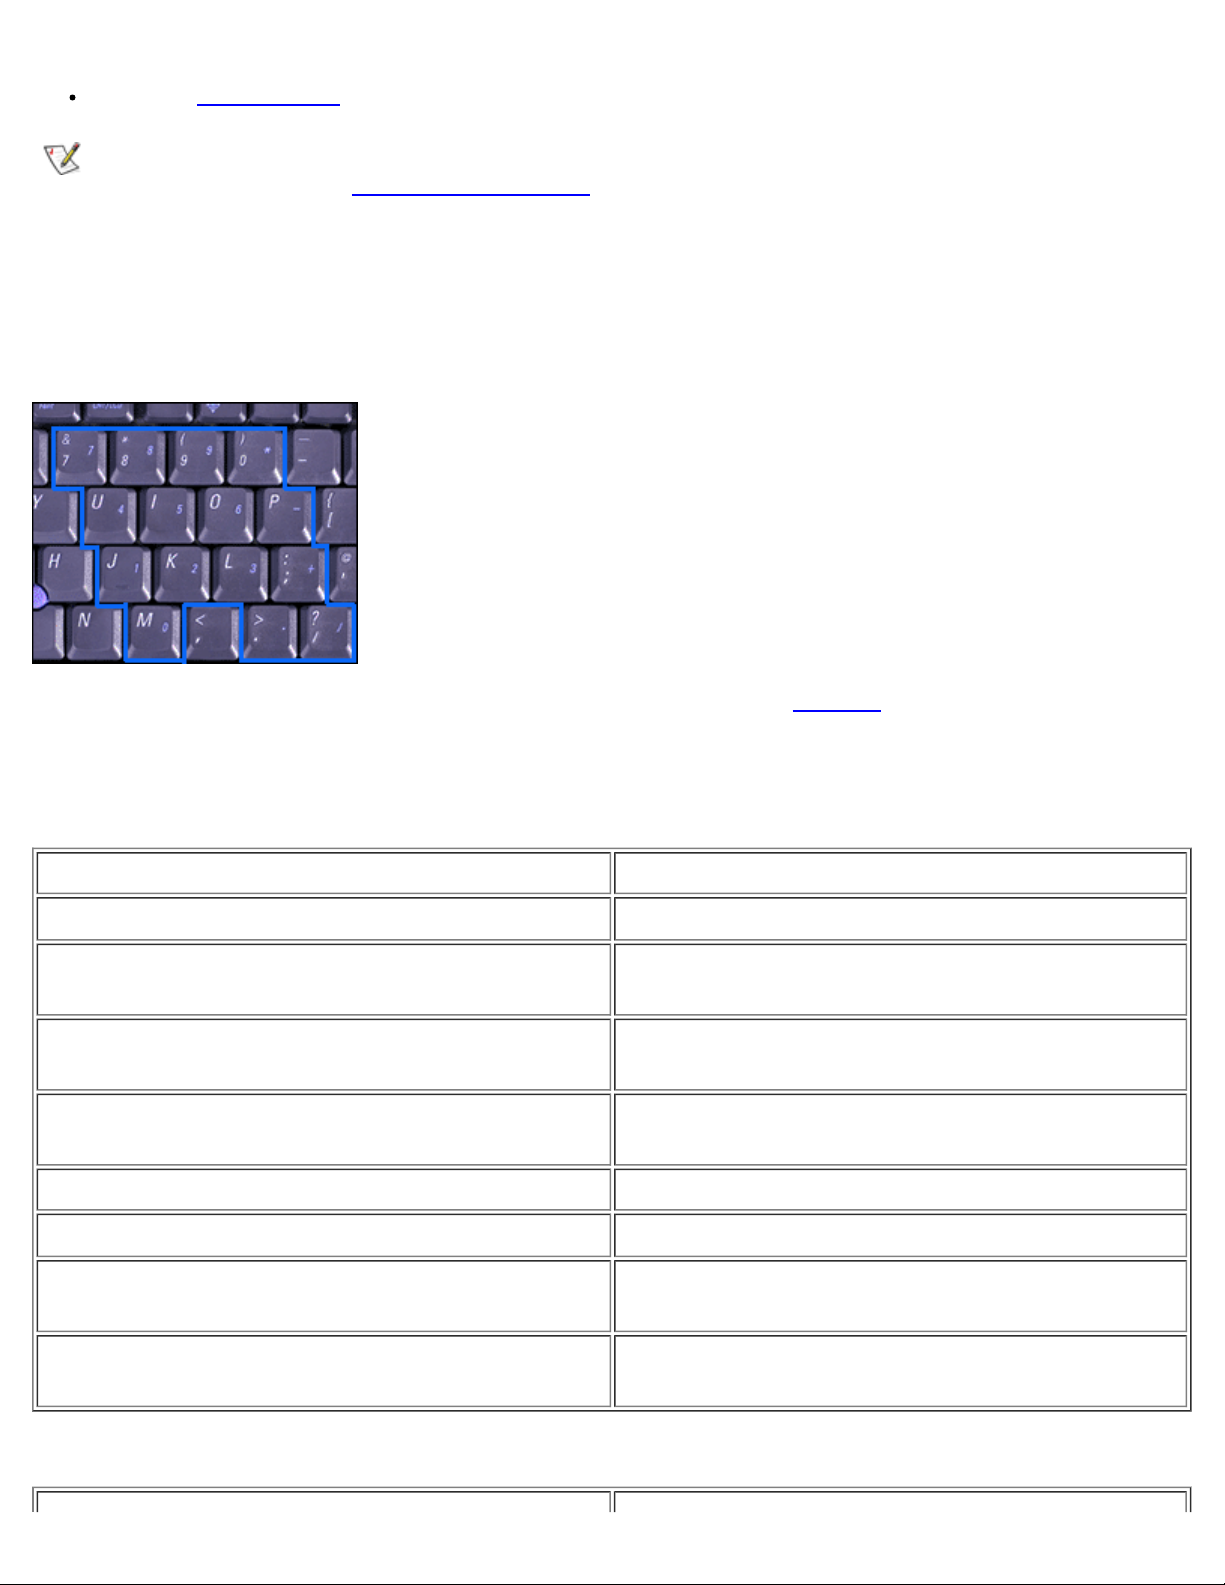
Embedded Numeric Keypad
To activate the keypad, press <Num Lk>. The Num Lock light turns on.
Figure 4. Embedded Numeric Keypad
.
As you work, you may want to use the embedded numeric keypad (see Figure 4) to enter numbers in
spreadsheet or financial programs. The keypad shares some of the keys on your computer's keyboard. The
number and symbol characters are marked to the right on these keys.
Table 3. Embedded Numeric Keypad Key Combinations
Function When Keypad Is On
Turn off the keypad <Num Lk>
Temporarily enable the lowercase
characters/functions of the keyboard
Temporarily enables the uppercase
characters/functions of the keyboard
Temporarily enable a cursor-control key in the
keypad
Function When Keypad Is Off
Turn on the keypad <Num Lk>
<Fn><key>
<Fn><Shift><key>
<Shift><cursor key>
Temporarily enable a cursor-control key in the
keypad
Temporarily enable a number or symbol key in the
keypad
Table 4. Power Conservation Key Combinations
<Fn><cursor key>
<Fn><Shift><number key>
Page 27

Function Key Combinations
Turn off the display* <Fn><d>
Turn off the hard-disk drive* <Fn><h>
Activate suspend, sleep, or standby mode* <Fn><Esc>
Activate suspend-to-disk mode* <Fn><a> or
<Fn><q> on French keyboards
* This key combination does not function with ACPI if the settings have not been configured with the Power
Management Properties window in the Control Panel. See " Power Management and Conservation
Table 5. System Setup Program Key Combinations
Function Key Combinations
Open the system setup program <Fn><F1>*
."
Open the Battery Status screen of the system
setup program
* This key combination does not function with ACPI.
<Fn><F3>*
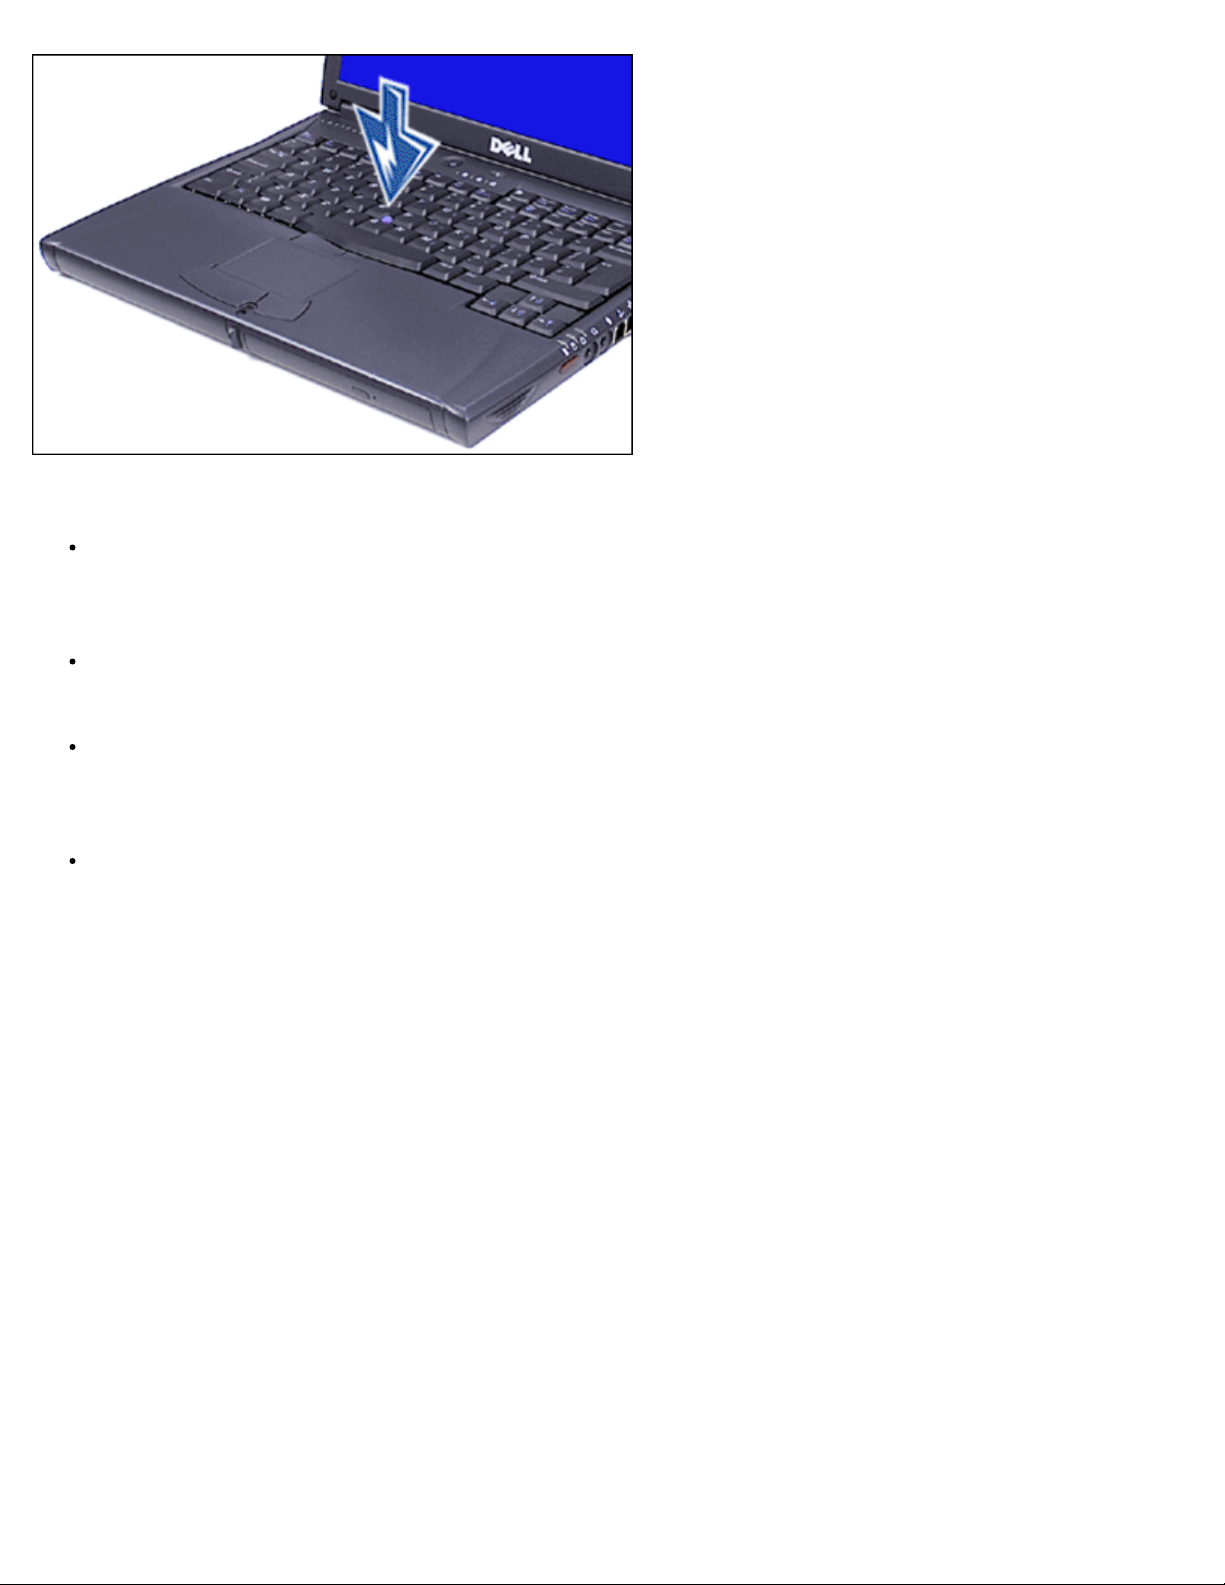
Dell AccessDirect Key
The Dell AccessDirect key located above your keyboard allows you to quickly access a frequently used
program, such as Microsoft Internet Explorer (see Figure 1
NOTE: Using an external keyboard with your computer disables the AccessDirect key.
For information on using an AccessDirect key and viewing or changing key assignments, see the
AccessDirect Help:
1. Open the Dell AccessDirect program in one of the following ways:
Double-click the AccessDirect icon in the system tray on the Windows taskbar (normally in the
bottom-right corner of the screen).
in "Features and Options").
For Windows XP, click the Start button and click Control Panel. In the Control Panel
window, click Printers and Other Hardware. Click the Keyboard icon, and then click the
AccessDirect tab.
For Windows 98 and Windows 2000, click the Start button, point to Settings, and then click
Control Panel. In the Control Panel window, double-click the Keyboard icon, and then
click the AccessDirect tab.
2. Click Help.
Page 28

Speaker Controls
Table 6. Speaker Key Combinations
NOTE: On an external keyboard, use <Scroll Lock> with the appropriate keys if the External Hot Key
option is enabled in the system setup program
Function Key Combinations
Turn the volume up <Fn><Page Up>
Turn the volume down <Fn><Page Dn>
Turn the speakers on or off <Fn><End>
.
Controlling the Cursor
Your Dell portable computer is equipped with the Dell DualPoint integrated pointing device, which includes
two cursor pointing devices (see Figure 5
pad and the track stick. You can choose to use the touch pad only, the track stick only, or both at the same
time.
DualPoint device software allows you to set the default for the type of cursor pointing device you want to
use, as well as sensitivity, motion, and drag and drop features of both the touch pad and track stick.
and Figure 6) that perform traditional mouse functions: the touch
NOTES: When enabled, the DualPoint device (whether touch pad only, track stick only, or both)
uses interrupt request (IRQ) 12. No other device can use IRQ12 while the DualPoint integrated
pointing device is enabled.
If the Pointing Device option in the system setup program
(the default), you can use both the DualPoint device and an external mouse
Using the Touch Pad
You can use the touch pad to move the cursor, just like a standard mouse (see Figure 5
two buttons, located directly below the touch pad, correspond to the left and right buttons on a mouse.
Figure 5. Touch Pad
is set to Touch Pad-PS/2 Mouse
if one is attached.
). The touch pad’s
Page 29

To best use the touch pad, follow these techniques:
To move the cursor, lightly slide your finger over the smooth sensor area.
To select an object, gently tap once on the surface of the touch pad or use your thumb to press the left
touch pad button.
To select and move (or drag) an object, position the cursor on the object and tap down-up-down on the
touch pad. On the second down motion, leave your finger on the touch pad and move the selected
object by sliding your finger across the surface.
To double-click an object, position the cursor on the object and then tap the touch pad or the left touch
pad button twice.
Using the Track Stick
You can use the track stick to move the cursor, just like a standard mouse (see Figure 6). The two buttons
located between the touch pad and the space bar on the keyboard correspond to the left and right buttons on
a mouse. The track stick functions much like the touch pad in that it allows you to use buttons for mouse
functions or the pointing device itself.
Figure 6. Track Stick
Page 30
To best use the track stick, use the following techniques:
To move the cursor, apply pressure to the track stick with your right or left index finger. Press up or
down to move the cursor to the top or bottom of the display screen. Press left or right to move the
cursor to the left or right of the display screen.
To select an object, tap once on the track stick or use your thumb to press the left track stick button.
The track stick buttons perform standard mouse functions.
To select and move (or drag) an object, position the cursor on the object. Then press and hold the left
track stick button. Leave your thumb on the button and move the selected object by pressing the track
stick in the desired direction.
To double-click an object, position the cursor on the object and then tap the left track stick button twice
or tap the track stick itself twice. The track stick functions much like the touch pad in that it allows you
to use buttons for mouse functions or the pointing device itself.
Customizing the DualPoint Integrated Pointing Device
In Windows XP
1. Click the Start button, and then click Control Panel.
2. Under Pick a category, click Printers and Other Hardware.
3. Click the Mouse icon, and then click the Touch tab in the Mouse Properties window.
4. In the drop-down menu, click to select either the touch pad or the pointing stick (track stick) and click
Apply.
5. Click OK to save the settings and close the window.
The DualPoint device software allows you to set the default for the type of cursor pointing device you want to
use, as well as sensitivity, motion, and drag and drop features of both the touch pad the track stick.
Click in the Disable this Device box to disable the selected touch pad or track stick settings. If you
Page 31

docked your computer with a mouse, the touch pad and track stick settings are automatically disabled.
In Windows 2000, Windows 98, and Windows NT
1. Click the Start button, point to Settings, and then click Control Panel.
2. Double-click the Mouse icon and click the Touch tab in the Mouse Properties window.
3. In the drop-down menu, click to select either the touch pad or the pointing stick (track stick) and click
Apply.
4. Click OK to save the settings and close the window.
To open the Mouse Properties window, you can also right-click the Touch Pad icon on the taskbar, and
click Touch Pad Properties.
To disable the selected touch pad or track stick settings, click in the Disable this Device box. If you
docked your computer with a mouse, the touch pad and track stick settings are automatically disabled.
The DualPoint device software allows you to set the default for the type of cursor pointing device you want to
use, as well as sensitivity, motion, and drag and drop features of both the touch pad and track stick.
Click in the Disable this Device box to disable the selected touch pad or track stick settings. If your
computer is docked with a mouse, the touch pad and track stick settings are automatically disabled.
Changing the Track Stick Cap
1. Pull the cap off the track stick (see Figure 7).
Figure 7. Removing the Track Stick Cap
2. Align a new cap over the square track stick post and gently press the cap down onto the post.
3. Test the track stick to ensure that the cap is seated properly.
Your computer came with four additional track stick caps in assorted colors. You may need to change the
track stick cap if it wears down from prolonged use.
Page 32

PC Cards
The computer has a slot into which you can install up to two PC Cards if the PC Cards comply with Release
2.01 of the Personal Computer Memory Card International Association (PCMCIA) standard and Release 4.2
of the Japanese Electronic Industry Development Association (JEIDA) standard. See "Technical
Specifications" for information on supported PC Cards.
NOTES: A PC Card is not a boot device. The "type" of a card refers to its thickness, not its
functionality.
Your computer recognizes most I/O cards and automatically loads the device driver associated with
that card.
NOTICE: Extended cards are longer versions of standard PC Cards. They fit into and
operate correctly with your computer. Follow these precautions when using extended
PC Cards:
Make sure that nothing strikes the exposed end of an installed extended card.
Otherwise, damage to the system board can occur.
Always remove an extended PC Card before you pack the computer in its carrying
case.
Try installing an extended card in the upper PC Card connector to allow room for a
second PC Card.
Installing PC Cards
1. Stop the card process with the PC Card configuration utility on the task bar.
You do not need to turn off your computer or exit suspend or standby mode before you install a
PC Card.
2. If necessary, remove the blank from the PC Card connector you intend to use (see "Removing PC
Cards or Blanks").
3. Hold the card with its orientation symbol pointing into the slot and the top side of the card facing up.
4. Insert the card into the slot, press in firmly until the card is completely seated in the internal PC Card
connector (see Figure 8
PC Cards are generally marked with a symbol, such as a triangle or an arrow, to indicate which
end should be inserted into the slot. The cards are keyed to prevent incorrect insertion. If card
orientation is not clear, see the documentation that came with the card.
), and rotate the PC Card eject button to its original position.
Figure 8. Installing a PC Card
Page 33

5. If you encounter resistance when inserting it, do not force the card. Check the card's orientation and try
again.
NOTE: Use a ZV PC Card in the lower connector only.
PC Card Blanks
Save the blank to use whenever you do not have a PC Card installed. The blank protects the PC Card
connector from dust and other particles.
Removing PC Cards and Blanks
NOTICE: If you are using Windows 98 or Windows 2000, use the PC Card configuration
utility on the taskbar to select and stop a card before you remove it. If you do not stop
the card using the configuration utility, you could lose data from open application
programs.
1. Stop the PC Card by using the PC Card configuration utility on the taskbar.
2. Rotate the PC Card eject button outward (see step 1 in Figure 9) for the card or blank you want to
eject.
Figure 9. Removing a PC Card
Page 34

3. Press the PC Card eject button (see step 2 in Figure 9).
The PC Card or blank protrudes from the slot slightly. It does not come out all the way.
4. Gently remove the card or blank (see step 3 in Figure 9), and rotate the PC Card eject button to its
original position.
Configuring PC Cards
The PC Card configuration utility performs the following functions:
Notifies you whenever a PC Card is inserted and tells you how the card is configured
Automatically loads the proper device driver if it is available on the hard-disk drive
If drivers are not available on the hard-disk drive, prompts you to install them using the device driver
CD that came with the card
The operating system automatically detects a PC Card and opens the Add New Hardware menu from
the Control Panel. For information, see the PC Card operating system documentation.
Back to Contents Page
Page 35

Back to Contents Page
Connecting Devices: Dell™ Latitude™ C600/C500 User's
Guide
About the I/O Connectors AC Adapter
External Monitor Infrared Port
Parallel Devices Modem
Docking Devices Network
USB Devices S-Video (Television)
Mouse, External Keyboard, and External
Numeric Keypad
Serial Devices
Audio Devices
About the I/O Connectors
You can connect external devices to the input/output (I/O) connectors. The computer's basic input/output
system (BIOS) detects the presence of external devices when you boot (start) or reboot your computer.
Figure 1
connectors on the side of the computer.
shows the I/O connectors on the back of your computer; Figure 2 shows the modem, TV, and audio
NOTES: Some external devices require you to load software called device drivers into system
memory before the devices will work. These device drivers help your computer recognize the external
device and direct its operation. Instructions for installing this software are usually included in the
upgrade kits.
For instructions on using the I/O connectors on the C/Port Family Advanced Port Replicator (APR) or
C/Dock Family Expansion Station, see the documentation that came with that device.
NOTICE: When disconnecting external devices from the back of the computer, wait 5
seconds after turning off the computer before you disconnect a device to avoid
possible damage to the system board.
Figure 1. I/O Connectors on Back of Computer
1
Serial
2
Parallel
3
Docking
4
PS/2 connector (for mouse, keyboard, or
Page 36

Figure 2. I/O Connectors on Right Side of Computer
1
2
3
4
keypad)
5
USB
6
Video
7
AC power
S-Video connector
Optional network
connector
Optional modem
connector
Audio jacks (2)
External Monitor
You can use the 15-hole video connector to attach an external monitor to the computer. With the Microsoft®
Windows® 98 operating system, you can use an external monitor as an extension of your display in dual-
display mode.
Connecting an External Monitor
NOTICE: Do not place the monitor directly on top of your portable computer, even if it is
closed. Doing so can crack the computer case and the display.
1. Make sure that the external monitor is turned off. Set the monitor on a monitor stand, desk top, or other
Page 37

level surface near your computer.
2. Connect the external monitor's video cable to the computer.
Plug the video cable connector into the matching video connector on the back of the computer,
as shown in Figure 3. If the video cable is not permanently attached to the monitor, connect it to
the monitor.
Figure 3. Connecting an External Monitor
Be sure to tighten all the screws on the video cable connector(s) to eliminate radio frequency
interference (RFI).
3. Connect your external monitor to a grounded electrical outlet.
Plug the three-prong connector on one end of the monitor's power cable into a grounded power
strip or some other grounded power source. If the cable is not permanently attached to the
monitor, connect it to the monitor.
You can also connect an external monitor to the C/Port Family APR or the C/Dock Family
Expansion Station.
NOTE: If you are using the Microsoft Windows 98 operating system, you can use an
external monitor as an extension of your display. For more information, see your operating
system documentation or "Using an External Monitor in Dual-Display Mode.
Using an External Monitor
When an external monitor is connected to the computer, the video image automatically appears on the
external monitor's screen when you boot your computer.
"
To toggle the video image between the display, an external monitor, or both simultaneously, press
<Fn><F8> on the keyboard. Press <Scroll Lock><F8> on an external keyboard if the External Hot Key
option is enabled in the system setup program
If the external monitor is turned off when you boot your computer, the computer still sends the video image to
the external monitor, but you will not see an image on either the computer's display or the external monitor.
.
Page 38

To see an image, turn on the external monitor or switch the video image to the computer’s display by
pressing <Fn><F8> on the keyboard or <Scroll Lock><F8> on an external keyboard if the External Hot
Key option is enabled in the system setup program.
NOTE: If you are using your external monitor at a resolution greater than the display supports, the
simultaneous display feature is disabled. To use the display, switch to a resolution that the computer
supports, or disconnect the external monitor and restart your computer.
Using an External Monitor in Dual-Display Mode
With the Windows 98 operating system, you can use an external monitor as an extension of your display.
1. Connect the external monitor, TV, or projector.
2. Click the Start button, point to Settings, and then click Control Panel.
3. Double-click the Display icon.
4. In the Display Properties window, click the Settings tab.
5. Change the Colors option to 256 Color or High Color (16 bit).
6. Change the Screen Area to the appropriate size for your display.
7. Click the Advanced... button.
8. When the RAGE MOBILITY video driver properties window appears, select the Displays tab.
9. Click the Monitor button.
The dual-display option is activated.
10. Click Yes when prompted to restart your system.
11. When the system has restarted, open the Display icon in the Control Panel.
12. Click the Settings tab.
Two displays now appear in this window.
13. Click the display that is grayed out. When asked if you want to enable this display, click Yes, and
then click Apply.
Parallel Devices
You can attach a parallel device (usually a printer) to the 25-hole parallel connector. You can also connect
the diskette drive to the parallel connector.
Connecting a Diskette Drive to the Parallel Connector
Page 39

You can use the the diskette drive as a second external device if you already have a device in the modular
bay. The diskette drive letter is A, unless a diskette drive is already installed in the modular bay, in which
case the drive connected to the parallel connector is drive B. For more information on using the diskette
drive, see "Diskette Drive
Use the parallel diskette drive cable that came with the computer to connect the drive to the parallel
connector on the I/O panel, as shown in Figure 4.
NOTE: If you are running the Microsoft Windows 98 or Windows 2000 operating system on your
computer and the Diskette Reconfig option is set to Any Time in the system setup program
not have to reboot the computer when you connect the diskette drive to the parallel connector. If you
are running the Microsoft Windows NT® operating system on your computer, you do need to reboot
the computer after you connect the diskette drive.
Figure 4. Using the Diskette Drive As an External Device
."
, you do
NOTICE: When the diskette drive is not being used externally, remove the parallel
diskette-drive cable from the parallel connector.
NOTICE: Use the parallel diskette-drive cable only with the diskette drive. Do not try to
connect any other device to the computer with this cable.
The drive access light does not blink when data is being accessed from the diskette drive connected to the
parallel connector.
NOTICE: Protect the diskette drive when it is not in the modular bay. Do not squeeze
the drive or place objects on top of it; doing so could damage the drive motor.
Docking Devices
You can attach your computer to Dell's C/Port Family APR and C/Dock Family Expansion Station docking
devices through the docking connector. For information on docking your computer, see the documentation
that came with your docking device.
Page 40

USB Devices
keyboard to the computer, the embedded numeric keypad is automatically disabled.
You can attach a USB hub device to the USB connector. The USB hub device can support multiple USB
devices (typically low-speed peripherals such as mice, keyboards, printers, and computer speakers). The
C/Port APR Family and the C/Dock Expansion Station Family docking solutions have two USB connectors.
NOTE: If you are using a USB external keyboard, do not enter the system setup program by using a
keyboard command on an external keyboard. Instead, press <Fn><F1> on the computer's keyboard.
Mouse, External Keyboard, and External Numeric Keypad
You can attach a PS/2-compatible device such as a mouse, 101- or 102-key keyboard, or numeric keypad to
the mini-DIN PS/2 connector (see Figure 5).
You can also connect these devices to the C/Port Family APR or the C/Dock Family Expansion Station.
Figure 5. External Mouse, Keyboard, or Keypad Connector
Mouse
If the Pointing Device option in the system setup program is set to Touch Pad-PS/2 Mouse (the
default), you can use both the DualPoint device and an external PS/2-compatible mouse if one is attached. If
you disconnect the mouse, to use the advanced features of the DualPoint integrated pointing device, you
must shut down the computer or enter suspend or standby mode and then resume. If you do not do this, the
DualPoint integrated pointing device resumes operation in standard PS/2 mode, which means that many of
the configuration features are disabled.
If you are using a PS/2-compatible mouse that is not made by Microsoft and the mouse does not work
properly, reboot the computer. If the mouse still does not work, install the drivers from the diskette or CD that
came with the mouse and reboot the computer.
External Keyboard
You can use the computer's keyboard and an external keyboard at the same time. When you attach a
Page 41

On an external keyboard, the <Scroll Lock> key acts the same way as the <Fn> key on the computer’s
keyboard (if the External Hot Key option is enabled in the system setup program
External Numeric Keypad
When you attach an external numeric keypad to the computer, the numeric keypad on the computer
keyboard is automatically disabled. The lights on the integrated keyboard track the operation of an external
numeric keypad.
).
Serial Devices
To attach a serial device to the computer, use the 9-pin serial connector.
The serial port passes data in serial format (one bit at a time over one line). This port supports a variety of
devices that require serial data transmission, including a serial mouse, serial printer, plotter, or external
modem.
AC Adapter
You can attach the AC adapter to the computer by using the AC adapter connector. The AC adapter
converts AC power to the DC power required by the computer.
You can connect the AC adapter with your computer turned either on or off.
The AC adapter works with electrical outlets worldwide. However, power connectors vary among countries.
Before using AC power in a foreign country, you may need to obtain a new power cable designed for use in
that country.
Infrared Port
The computer’s infrared (IR) port lets you transfer files from your computer to another IR-compatible device
without using cable connections. When you receive your computer, the IR port is disabled. You can enable
the IR port by selecting the appropriate setting for the Infrared Data Port option in the system setup
program.
After you enable the IR port, to transfer files:
1. Point the computer’s IR port directly at the compatible device’s IR port. IR devices transmit data in a
30-degree cone of IR light.
2. Start the data communications software on both devices, and then begin to transfer files. Read the
documentation that came with your compatible device to make sure that you operate it correctly.
NOTES: Make sure that no books, papers, or other objects come between the two IR devices and
that the two devices are within the 30-degree cone.
If the IR device does not work, the computer and device may be misaligned. Move the device and
Page 42

computer to bring them into the 30-degree cone.
The Microsoft Windows NT 4.0 operating system does not support the use of IR devices.
The IR port is compatible with Infrared Data Association (IrDA) 1.1 (Fast IR) and 1.0 (Slow IR) standards. An
IR data stream is transmitted through a lens in the computer up to a distance of 1 meter (m) (3.3 feet [ft]).
This light is received by a compatible computer, printer, mouse, or remote control.
The default address of the IR port is COM3. To avoid resource conflicts with other devices, remap the
address of the IR port.
When the computer is docked with the C/Port APR Family or C/Dock Expansion Station Family docking
solution, the IR port on the computer is automatically disabled.
For more information about using an IR device, see the documentation that came with your operating
system.
Modem
You can connect a telephone line to the optional modem through the modem connector on the right side of
the computer (see Figure 6).
NOTICE: Do not confuse the modem and network connectors on your computer. Do not
plug a telephone line into the network connector.
Figure 6. Modem and Network Connectors
1
Optional modem connector
2
Optional network connector
For information on using the modem, see the online modem documentation supplied with your computer. To
access this documentation, double-click the Dell Documents icon on the Windows desktop, click
System Information, and then click Communications.
Network
You can connect to the integrated network interface controller (NIC) through the optional network connector
on the right side of the computer (see Figure 6).
Page 43

NOTICE: Do not confuse the modem and network connectors on your computer. Do not
plug a telephone line into the network connector.
For information on using the integrated NIC, see the online NIC documentation supplied with your computer.
To access this documentation, double-click the Dell Documents icon on the Windows desktop, click
System Information, and then click Communications.
S-Video (TV)
You can connect a TV with an S-Video connector to your computer. Figure 7 shows the location of the SVideo connector.
Figure 7. Connecting a TV
To connect your computer to a TV, follow these guidelines:
If your TV uses an S-Video cable for video input:
1. Connect the S-Video cable to your computer's S-Video TV-out connector (see Figure 7).
2. Connect the other end to your TV's S-Video connector.
Connecting the S-Video cable that came with your TV to the TV's S-Video connector
and to the computer's S-Video TV-out connector allows your computer to play video
on the TV.
If your TV uses a composite video cable for video input:
1. Connect the composite TV-out adapter cable that came with your computer to your
computer's S-Video TV-out connector (see Figure 7).
2. Connect the other end of the composite TV-out adapter cable to your TV's composite video
cable.
3. Connect the composite video cable to your TV's composite video connector.
You need both the composite TV-out adapter cable that came with your computer and the
composite video cable that came with your TV. Connecting these cables together, then
Page 44

connecting them to your TV composite video-in connector and your computer's S-Video TV-out
connector, allows your computer to play video on the TV.
Audio Devices
You can connect audio devices such as speakers, microphones, and headphones to your computer. Figure
8 shows the locations of the audio jacks and the S-Video connector.
Connect the audio cable from a microphone to the microphone jack, also called the MIC IN jack.
Connect speakers or headphones to the headphones/speakers jack, also called the LINE OUT jack.
Connect the S-Video cable from a record/playback device to the S-Video connector. See "S-Video
(TV)." VCRs and video cameras are record/playback devices.
Figure 8. Connecting Audio and S-Video Devices
1
Headphones/speakers (LINE OUT)
jack
2
Microphone (MIC IN) jack
Back to Contents Page
3
S-Video connector
Page 45

Back to Contents Page
Microsoft® Windows® XP Features: Dell™ Latitude™
C500/C600 User's Guide
Overview
New User Interface
Files and Settings Transfer Wizard
Application and Device Compatibility
System Restore
User Accounts and Fast User Switching
Home and Small Office Networking
Internet Connection Firewall
Overview
Based on an enhanced version of the Windows 2000 operating system, Windows XP is available in
consumer and business editions: Windows XP Home Edition and Windows XP Professional. The features
discussed are available in both editions, but the Professional version, designed for business environments,
includes additional productivity, security, networking, and management features important in business
environments.
For home users, Windows XP brings the significantly increased stability and security inherent in the Windows
2000/Windows NT® operating systems. It also provides better support for portable computers. Key new
Windows XP features include:
An improved desktop and user interface
Files and Settings Transfer Wizard
Application program compatibility enhancements
System Restore
Fast User Switching*
Expanded home and small office networking functions*
A personal firewall for always-on Internet connections*
*Home and small office features
Page 46

Help and Support Center
The Help and Support Center, introduced with Microsoft Windows Millennium Edition (Me), replaces
Windows Help from earlier operating systems. The Help and Support Center provides an integrated resource
center for information and assistance in using, configuring, and troubleshooting your computer and installed
hardware devices and software. For Windows XP, the Help and Support Center features expanded search
capabilities, including full-text search and the capability to search across multiple remote sites in addition to
files resident on the hard-disk drive. You can use a single print command to print an entire chapter of help
content.
To open Help and Support Center, click the Start button, and then click Help and Support. From the
home page, you can conduct a search or select categories of information, leading to task and information
topics covering the use of your computer. Click User and System Guides for information on using your
Dell™ computer, including installed hardware devices and software.
New User Interface
Windows XP features a redesigned user interface with a new visual style, a less cluttered desktop, and builtin desktop cleanup features. Window layout has also been changed for Windows XP and, as in the Control
Panel, emphasizes task presentation. The Start menu has been redesigned. The left half of the new Start
menu includes the most frequently used icons. As you use your computer, the icons in this area are changed
and rearranged depending on your computer usage patterns. If you wish to keep one of the icons
permanently in its location, right-click the icon and click Pin to Start menu.
To access all the programs installed on the computer, click All Programs at the bottom of the Start
menu. The right half of the new Start menu contains useful icons for accessing your files, configuring the
computer, and finding information and assistance. The Dell Solution Center icon opens a portal to
services and application programs installed on your Dell computer.
Switching to Classic View
If you wish, you may change the appearance of the Start menu, desktop and windows, or Control Panel
layout to that of earlier Windows operating systems. These classic view options are independent of each
other.
You can easily switch back and forth between the new Control Panel category view and the classic icon view
by clicking Switch to Classic View or Switch to Category View in the upper left area of the
Control Panel window. This can be handy if you would like to take advantage of the new, task-oriented
features of the Windows XP Control Panel, but you are accustomed to performing a particular task with the
icon-oriented classic Control Panel.
To change the appearance of the Start menu to the classic view:
1. Right-click the empty area on the task bar.
2. Click Properties.
3. Click the Start Menu tab.
4. Select Classic Start Menu and click OK.
Page 47

If you prefer the classic window and button appearance, perform the following steps:
1. Right-click anywhere on the main desktop screen and click Properties.
2. Click the Appearance tab.
3. From the Windows and buttons dropdown box, select Windows Classic style.
4. To customize color, font, and other classic desktop options, click Advanced.
5. When you have completed your appearance selections, click OK.
Clean Desktop Wizard
Another feature of Windows XP is the Desktop Cleanup Wizard. The wizard runs 7 days after you first start
your computer and every 60 days after that. The Desktop Cleanup Wizard first opens a dialog box informing
you that there are unused icons on the desktop and asking whether you want to run the wizard. If you elect to
run the wizard, it places unused desktop icons in a folder.
The default for the Desktop Cleanup Wizard is on. To turn the wizard off:
1. Right-click anywhere on the main desktop screen and click Properties.
2. Select the Desktop tab and click Customize Desktop.
3. In the Desktop cleanup options make sure that the Run Desktop Cleanup Wizard every 60
days box is not checked.
You can run the Desktop Cleanup Wizard anytime by following these steps:
1. Right-click anywhere on the main desktop screen and select Properties.
2. Click the Desktop tab and click Customize Desktop.
3. Click Clean Desktop Now.
4. When the Desktop Cleanup Wizard appears, click Next>.
5. In the Shortcuts list, deselect any shortcuts you want to leave on the desktop, and then click Next>.
6. Click Finish to remove the shortcuts and close the wizard.
Taskbar Grouping
The Windows taskbar is a row of buttons that typically displays across the bottom of the screen. The taskbar
includes the Start button and a button for each open application. (The taskbar also includes the Quick
Page 48

Launch icons and the notification area.) Windows XP groups multiple instances of the same application on
the taskbar. For example, if six instances of Internet Explorer are open, each displaying a button on the
taskbar, Windows XP groups the buttons next to one another on the taskbar. If space becomes an issue on
the taskbar, Windows XP consolidates all the Internet Explorer buttons into a single button. When clicked,
that button expands to a menu of the six Internet Explorer active sessions.
Notification Area Cleanup
Over time, software icons tend to proliferate in the notification area, the area in the bottom right corner of the
Windows desktop. Windows XP detects when icons in the notification area are not being accessed and hides
them. A caret, or chevron, button indicates that there are hidden icons that can be viewed by selecting the
button. You can also configure the notification area manually by right-clicking the taskbar, selecting
Properties, and then clicking Customize... in the Taskbar and Start Menu Properties window.
For example, you may choose to hide the antivirus program icon because it is rarely accessed, but display
the audio volume icon because it is used frequently. The notification area cleanup feature is automatically
enabled when the operating system is installed, but you may disable it by unchecking Hide inactive
icons in the Taskbar and Start Menu Properties window.
Files and Settings Transfer Wizard
The Files and Settings Transfer Wizard is used to migrate personal files and settings from one computer to
another (for instance, when upgrading to a new computer). Personal files include the documents, images,
spreadsheets, presentations, and e-mail messages on your computer. User settings include display
properties, window sizes, toolbar settings, dial-up connections, Internet bookmarks, and so forth on your
computer. The Files and Settings Transfer Wizard is run on a source (old) computer to collect the data and is
run again on the destination (new) computer to import the data. If the old computer is using an earlier
operating system, the wizard can be launched either from the Windows XP CD or from a diskette created on
the new Windows XP computer. You transfer the data to the new computer over a network or direct serial
connection, or store it on a removable medium such as a diskette, Zip disk, or writable CD.
To use the Files and Settings Transfer Wizard:
1. On the new Windows XP computer, click the Start button, point to All Programs—> Accessories
—> System Tools, and click Files and Settings Transfer Wizard.
2. On the Files and Settings Transfer Wizard welcome screen, click Next>.
3. On the Which computer is this? screen, select New Computer, and then click Next>.
The Do you have a Windows XP CD? screen appears.
The Files and Settings Transfer Wizard guides you through the steps necessary to transfer user settings,
personal files, or both to the new computer. If a CD drive is not available, the wizard allows you to create a
wizard diskette to run on your old computer.
NOTE: The time required to collect and transfer data depends on the amount of data collected. Times
can vary from just a few minutes to several hours.
Page 49

Application and Device Compatibility
Although Windows XP is designed to be compatible with a wide range of application programs and hardware
devices, some older programs and devices may not be usable. Check the Microsoft Web site at
www.microsoft.com for application programs and hardware devices known to be compatible. When
buying new software and devices, look for those that are labeled as ready for Windows XP. If you encounter
problems using an application program designed for an earlier Windows operating system, Windows XP
provides a compatibility mode feature (see "Program Compatibility Wizard
installing application programs or hardware devices designed to operate on earlier Windows operating
systems, contact the manufacturer of the product for information or updates for Windows XP.
Windows XP also includes a new technology that addresses the problems sometimes encountered on
previous operating systems with Windows application programs that, when installed, replace current versions
of certain Windows files with older versions. This situation can cause problems with the newer application
programs, which rely on the replaced files. To eliminate this problem and improve operating system stability,
Windows XP manages multiple versions of files and invokes the correct version required by a program.
NOTE: If you experience problems with your operating system or other applications after performing
an installation, you can use System Restore
Program Compatibility Wizard
to return your computer to a previous stable condition.
"). If you are unsuccessful at
A program compatibility feature is provided in Windows XP that solves some issues that may be encountered
when attempting to run older application programs. Using the Program Compatibility Wizard, you can
configure a program to run in an environment closer to Windows 95, Windows 98/Me, Windows NT 4.0 with
Service Pack 5, or Windows 2000.
To use the Program Compatibility Wizard:
1. Click the Start button, point to All Programs—> Accessories, and click Program
Compatibility Wizard.
2. When the Program Compatibility Wizard appears, click Next>.
3. Select how you want to locate the program to run with compatibility settings: from a list, available on a
CD, or manually located. Then click Next>.
4. Select the type of operating system for which the program was designed or on which it ran successfully,
and then click Next>.
5. If necessary, as for some games, select display settings for the program.
6. Click Next>.
7. To test the compatibility settings for the program, click Next>.
After you have determined whether the program is running correctly, return to the Program
Compatibility Wizard window.
8. Select Yes if the program ran correctly, No, try different compatibility settings, or No, I am
Page 50

finished trying compatibility settings and click Next>.
9. Select either Yes to send information about the settings you used and whether they fixed the problem,
or select No, and then click Next>.
10. Click Finish to close the wizard.
System Restore
The System Restore feature of Windows XP provides the capability to restore the operating system, in the
event of a problem, to a previous state without losing personal data files (such as Word documents,
drawings, or e-mail).
System Restore actively monitors system file changes and some application file changes to record or store
previous versions before the changes occurred. System Restore maintains a rolling record of restore points;
to limit the amount of space used, older restore points are purged to make room for newer ones.
In the event of a serious operating system problem, System Restore can be used from Safe Mode or Normal
Mode to go back to a previous system state, restoring optimal system functionality.
NOTE: System Restore does not revert user data or document files, so restoring does not cause loss
of work, mail, or browsing history and favorites.
NOTE: Dell recommends that you make regular backups of your data files. System Restore does not
monitor changes to or recover your data files. In the event the original data on the hard-disk drive is
accidentally erased or overwritten or becomes inaccessible because of a hard-drive malfunction,
backup files are required to recover lost or damaged data.
Using System Restore
System Restore monitors a core set of system and application program files, recording and sometimes
copying states of these files before changes are made. System Restore automatically creates restore points;
no user intervention is required. In addition, you can create restore points manually, if desired.
Restore points are created to allow you to choose previous system states. Each restore point gathers the
necessary information needed to restore to a precisely chosen system state. There are three types of restore
points:
System (automatically created) restore points (scheduled by your computer)
Installation (event-triggered) restore points (when a program is installed)
Manual restore points (created by you as needed)
Scheduled Automatic Restore Points
By default, System Restore creates a restore point every day that the computer is running. If your computer
is off for more than a day, a new restore point is created the next time you turn the computer on.
Page 51

Event-Triggered Restore Points
To return your computer to a previous, stable condition, perform the following steps:
Event-triggered restore points are created before key changes are made to the system. System Restore
automatically creates a restore point before the following events:
Application installations — System Restore creates a restore point before you install an application
program designed for Windows XP. You may wish to create a manual restore point before attempting to
install an older program.
AutoUpdate installation — When you choose to install the update, System Restore creates a restore
point before the actual installation of the update begins.
Restore operation — The restore operation itself also creates a restore point for undo purposes.
Microsoft Backup Utility recovery — Before Microsoft Backup Utility (only available in Windows XP
Professional) performs a backup recovery, System Restore creates a restore point.
Unsigned driver installation — The INF installer of Windows detects unsigned device-driver
installations. Drivers that are signed (electronically certified by the device manufacturer) do not
generate a restore point.
Manual Restore Points
If you are logged on to the computer as computer administrator or as a user with administrator rights, you
may create and name an on-demand restore point. (For information on types of user accounts, see "How to
Add Users.") This is useful to create a checkpoint to return to before making a particularly risky change,
before leaving a shared system to other users, or at a particular state you believe is optimal.
To create a restore point, perform the following steps:
1. Click the Start button, point to All Programs—> Accessories—> System Tools, and then
click System Restore.
2. Select Create a restore point and click Next>.
3. Type a description of the restore point and click Create.
The date and time are automatically added to the description of the new restore point.
Restore Process
As the computer is used over time, restore points are collected in the archive without any management or
intervention. If you encounter operating system problems, you can use the System Restore feature to select
any of the restore points presented through the System Restore Wizard.
If problems occur after installing a device driver, you should first attempt to use Driver Rollback. If that is
unsuccessful, then use System Restore.
Page 52

1. Click the Start button, point to All Programs—> Accessories—> System Tools, and then
click System Restore.
2. Select Restore my computer to an earlier time and click Next>.
The Select a Restore Point screen appears. The calendar on the left indicates in bold the dates on
which restore points were created.
3. Click a date, click a restore point for that date, and click Next>.
4. Click Next> to confirm the restore point selection and complete the restore process.
After System Restore finishes collecting data, the computer automatically restarts and the Restoration
Complete screen appears.
5. Click OK.
If you are not satisfied with the results of the restoration, you can repeat the preceding steps, using a
different restore point, or you can undo the restoration.
To undo a restoration, perform the following steps:
1. Click the Start button, point to All Programs—> Accessories—> System Tools, and then
click System Restore.
2. Select Undo my last restoration and click Next>.
3. Click Next> to confirm the restoration undo.
After System Restore finishes collecting data, the computer automatically restarts and the Undo
Complete screen appears.
4. Click OK.
Driver Rollback
Windows XP device Driver Rollback can replace a device driver with the previously installed version. When
you install a new device driver that causes system instability, use Driver Rollback to reinstall the previous
drivers. In the event that Driver Rollback cannot reinstall your previous driver, you can use System Restore
to return your operating system to its state before the new device driver installation.
To use Driver Rollback, perform the following steps:
1. Click the Start button, and then right-click My Computer.
2. Click Properties.
Page 53

3. Click the Hardware tab, and then click Device Manager.
4. In the Device Manager window, right-click the device for which the new driver was installed, and
then click Properties.
5. Click the Drivers tab, and then click Roll Back Driver.
User Accounts and Fast User Switching
NOTE: Fast User Switching is the default user screen for both Home and Professional editions, but is
disabled in Windows XP Professional when the computer is a member of a computer domain.
Microsoft Windows XP includes a new feature that provides multiuser access to a single computer. Fast User
Switching, which is available in both the Home and Professional editions, allows users to access the
computer with their specific settings, including the desktop and various applications, without requiring the
previous user to log off. New users log on and switch from the original user's session to their own. New
users can run their desktop and applications without interfering with the original user. When the original user
returns, that user can switch back to the desktop and applications with the original settings. All of this is
accomplished without the delay of each individual user logging off the computer.
During setup, the computer administrator creates all the accounts that will be used on the computer. (For
information on types of accounts and adding new accounts, see "How to Add Users
starts, the main user screen appears with all of the user names. From this screen you select an account and
log in to that session.
How to Use Fast User Switching
To access Fast User Switching, perform the following steps:
1. Click the Start button and click Log Off.
2. When the Log Off Windows screen appears, click either Switch User or Log Off.
When you select Switch User, the main user screen appears. You can then select your account name
and log in. Your personal desktop appears.
What Happens When a Fast User Switch Occurs?
When a fast user switch occurs, the original user is not logged off the computer as previously happened on
other Microsoft operating systems. On Windows XP, the user's logon remains active, but is replaced by the
new user. Users can switch between login IDs as often as they want.
.") When the computer
However, user applications active during a user switch remain active and running in the background while
the new user is working; this can result in a slower computer until the process finishes. For example, if one
user is downloading a large file from the Internet and another user logs on to the computer, the file download
continues in the background until it is complete.
While most applications continue to run in the background during a fast user switch, multimedia applications
Page 54

do not. Because multimedia applications use resources that cannot easily be shared between different users
on a single computer, those applications terminate during the user switch, allowing the new user to take full
advantage of the multimedia capabilities.
Special Considerations With Fast User Switching
Considerations when using Fast User Switching include:
Some older Windows games may not operate with a fast user switch.
Multimedia games may shut down on a fast user switch.
DVD software shuts down and requires a restart when the user comes back.
Computers with low memory configurations can experience problems. The computer uses memory to
keep the first user's programs running in the background while the second user is logged on. On
computers with limited memory, this can cause the entire computer to run slowly. Fast User Switching
is off by default on computers with less than 128 megabytes (MB) of random-access memory (RAM).
Fast User Switching is unavailable if the computer has Windows XP Professional installed and is a member
of a computer domain.
How to Turn Off Fast User Switching
You must have a computer administrator account on the computer to turn off Fast User Switching. (For
information on types of accounts, see "How to Add Users
To disable Fast User Switching, perform the following steps:
1. Click the Start button, and click Control Panel.
2. In the Control Panel window, click User Accounts.
3. Under Pick a task, click Change the way users log on or off and do one of the following:
Select the Use Fast User Switching to log off check box to enable Fast User Switching.
Deselect the Use Fast User Switching to log off check box to disable Fast User
Switching.
4. Click Apply Options.
.")
How to Add Users
Only a computer administrator or a user with administrator rights can create multiple user accounts. The
individual who performs the initial operating system setup creates a computer administrator account and can
add any number of users during the initial setup. All user accounts created during setup have administrator
rights.
Page 55

After initial operating system setup, the computer administrator or a user with administrator rights can create
additional user accounts.
To add users, perform the following steps:
NOTE: Different account options are available when a Windows XP Professional computer is
connected to a domain.
1. Click the Start button, and click Control Panel.
2. In the Control Panel window, click User Accounts.
3. In the User Accounts window under Pick a Task, click Create a new account.
4. In the box under Name the new account, type the name of the new user. Click Next>.
5. Under Pick an account type, click the bullet next to the type of account you are going to create —
Computer administrator or Limited.
Computer administrators can change all computer settings.
Limited account users can change only a few settings such as their own passwords.
6. Click Create Account.
After the accounts are created, each shows up on the main user screen.
Home and Small Office Networking
The Network Setup Wizard includes a checklist and steps to guide you through the process of sharing
resources, such as files, printers, or an Internet connection, between computers in a home or small office. In
Windows XP, Microsoft has improved the online documentation and usability of operating-system tools for
setting up a home or small office network. New features in the operating system include support for the
Point-to-Point Protocol over Ethernet (PPPoE) and a built-in firewall.
Network Setup Wizard
The Home Network Wizard first appeared in Windows Me. To make setting up a home or small office
network easier, Microsoft developed an enhanced Network Setup Wizard for Windows XP. This version
provides more complete online documentation and support for setting up a home or small office network. The
new wizard automatically enables the personal firewall discussed later in this section (see "Internet
Connection Firewall").
To use the wizard, perform the following steps:
1. Click the Start button, point to All Programs—> Accessories—> Communications, and click
Network Setup Wizard.
2. When the Network Setup Wizard appears, click Next>.
Page 56

3. Click checklist for creating a network.
The checklist leads you through the steps necessary to set up a home or small office network and provides
extensive references for each step. When you have completed the necessary connections and preparations,
return to the Network Setup Wizard.
4. Select the Internet connection method and click Next>.
5. Select the desired Internet connection if required, and click Next>.
6. Type a description of the computer and a computer name, and then click Next>.
7. Review the network settings and click Next> to finish the setup.
8. When the setup process is complete, click Finish to close the wizard.
Internet Connection Firewall
Today's always-on cable modem and DSL Internet access connections offer unprecedented bandwidth to
the home, but also leave the connected computer or home network vulnerable to hacker attacks. The nature
of these attacks varies, but the goal is to gain access to individual computers attached to the Internet. With
this access, a hacker can browse the hard-disk drive and add or delete files, discover passwords and credit
card numbers, and set the system up to launch attacks on other systems or websites. As a result, firewall
protection from these attacks is increasingly required on computers. Recognizing this need, Microsoft
provides an integrated firewall in Windows XP to provide immediate protection from outside access attempts.
When enabled, the Internet Connection Firewall provides basic protection suitable for most home and small
office users. The Internet Connection Firewall is disabled when the computer is connected to a domain.
NOTE: Enabling the Internet Connection Firewall does not reduce the need for virus-checking
software.
The firewall is automatically enabled when you run the Network Setup Wizard. When the firewall is enabled
for a network connection, its icon appears with a red background in the Network Connections portion of
the Control Panel. The Internet Connection Firewall can be applied to each Internet connection on the
computer. The firewall also provides basic logging capabilities. Not all events that appear in the log are
hacker attacks. Many different types of harmless events can appear in the log, such as routine checks by an
Internet Service Provider to verify the presence of your computer (pings).
The firewall is configured using the Properties dialog box associated with each Internet connection in the
Control Panel. The firewall can be enabled or disabled. Additional configuration options are available for
more advanced users. These advanced options include the ability to open or close specific Transmission
Control Protocol (TCP) or User Datagram Protocol (UDP) ports or to enable port redirection. Port redirection
allows access requests to a specific port on the firewall (such as port 80, the Web server port) to be
automatically redirected to another computer on the local network. This capability allows a Web server on a
home network to be protected by an edge firewall.
Page 57

Back to Contents Page
Page 58

Back to Contents Page
Using Intel® SpeedStep™ to Set Performance Levels:
Dell™ Latitude™ C600/C500 User's Guide
Using Intel SpeedStep
Using the Adjust Properties Option
Setting the Advanced Options
Using Intel SpeedStep
NOTES: Intel SpeedStep technology is only available for C600 computers.
The Intel SpeedStep technology allows you to set the performance level of the microprocessor whether the
computer is running on battery or AC power. You can only use the Intel SpeedStep technology applet when
the Microsoft® Windows® 98, or Windows 2000 operating system is running. You can verify or change the
processor's performance mode when running in MS-DOS® mode by entering the system setup program
The first page lists the processor speed ranges.
.
To access the Intel SpeedStep properties window, perform the following steps:
1. Right-click the flag icon in the system tray on the Windows taskbar to access performance level
options. The following three options appear:
Maximum Performance option — switches your computer to the highest possible
performance level even if the computer is running on battery
Battery Optimized Performance option — lets your computer run on performance
level optimized for battery power even if the computer is connected to an electrical outlet
Adjust Properties — lets you change more performance options
2. To change the performance level, click the desired option.
To access the Intel SpeedStep options when the flag icon is not visible on the taskbar and if your computer is
running under ACPI, perform the following steps:
1. Click the Start button and point to settings.
2. Click Control Panel.
3. Click Power Management.
4. Select the Intel SpeedStep tab and select the options desired.
5. After you make any changes, click OK to accept the settings and close the Intel SpeedStep window.
Page 59

Using the Adjust Properties Option
1. To access the Intel SpeedStep option window, either right-click the flag icon and click the Adjust
Properties option or double-click the flag icon.
The Intel SpeedStep technology options window opens.
2. You can adjust the following performance options:
Automatically change performance when the power source changes (the
default) — changes the performance level of your computer automatically when it is running
on battery or connected to an electrical outlet.
Ask me before automatically changing performance — when selected, the
computer prompts you for confirmation before the computer changes performance level.
Running on batteries and Plugged in pull-down menus — change performance level
options.
3. Click Apply to accept the settings.
4. Click OK to close the Intel SpeedStep technology options window.
Setting the Advanced Options
The Advanced options lets you disable various options. To set Advanced options, perform the following
steps:
1. Click the flag icon in the Windows system tray on the taskbar.
2. Click the Adjust Properties option.
The Intel SpeedStep window opens.
3. Click the Advanced button.
The Advanced window opens.
4. Click any of the following options:
Disable Intel SpeedStep technology control
If you disable Intel SpeedStep through the Advanced options, you can only change
processor speed through the system setup program.
Remove flag icon.
Disable audio notification when performance changes.
5. Click Apply to accept the settings.
6. Click OK to close the Intel SpeedStep technology window.
Page 60

Back to Contents Page
Page 61

Back to Contents Page
Passwords and Security: Dell™ Latitude™ C600/C500
User's Guide
About Passwords Using a Hard-Disk Drive Password
Using a Primary Password Assigning an Asset Tag
Using an Administrator Password Using the Security Cable Slot
About Passwords
A primary password prevents unauthorized access to the computer at start-up. An administrator password
can be used in place of the primary password. A hard-disk drive password helps prevent the unauthorized
access of data on the hard-disk drive, even when the device is placed into another computer.
NOTES: All three passwords are disabled when you receive your computer. You need to assign those
passwords if you require password security for your computer. Some companies may assign any or
all of these passwords before distributing the computer.
NOTICE: The password features provide a high level of security for the data in your
computer or hard-disk drive. However, they are not foolproof. If your data requires
more security, you should obtain and use additional forms of protection, such as data
encryption programs or PC Cards with encryption features.
If you forget any of your passwords, call Dell
for proof of your identity to make sure that an unauthorized person is not trying to use the computer.
. For your protection, Dell’s technical support staff will ask you
Using a Primary Password
The primary password allows you to protect the computer from unauthorized access.
After assigning a primary password, you must enter it each time you turn on your computer. The following
message appears each time you turn on the computer:
Please type in the primary or administrator password and press <Enter>.
To continue, type your password and press <Enter>.
NOTE: If no password is entered within 2 minutes, the computer returns to its previous state.
If you have assigned an administrator password, you can use it instead of the primary password. The
computer does not specifically prompt you for the administrator password.
NOTICE: If you disable the administrator password, the primary password is also
disabled.
Page 62

Using an Administrator Password
The administrator password is designed to give system administrators or service technicians in large
companies access to computers for repair or reconfiguration. The administrators or technicians can
assign identical administrator passwords to groups of computers as they are unpacked and configured,
leaving the primary password free to be assigned by the user.
When you set an administrator password, the Configure Setup option becomes available in the system
setup program. The Configure Setup option allows you to restrict access to the system setup program in
the same way a system password restricts access to the system.
The administrator password can be used in place of the primary password. Whenever you are prompted to
enter the primary password, you can enter the administrator password instead.
NOTE: The administrator password provides access to the system, but it does not provide access to
the hard-disk drive when it is protected by a password.
If you forget the primary password and do not have an administrator password assigned, or if you have both
a primary and an administrator password assigned but forget them both, call Dell
NOTICE: If you disable the administrator password, the primary password is also
disabled.
.
Using a Hard-Disk Drive Password
The hard-disk drive password helps protect the data on your hard-disk drive from unauthorized access. You
can also assign a password for the modular hard-disk drive (if one is being used) that can be the same as or
different from the password for the primary hard-disk drive.
NOTE: Only hard-disk drives purchased from Dell for use with the Latitude C-Family portable
computers support the hard-disk drive password option.
After assigning a hard-disk drive password, you must enter it each time you turn on the computer and each
time you resume normal operation from suspend mode or standby mode.
If the hard-disk drive password is enabled, the following message appears each time you turn on the
computer:
Please type in the hard- disk drive password and press <Enter>.
To continue, enter the hard-disk drive password. Press <Esc> to return the computer to its previous state—
suspend or standby mode.
NOTE: If no password is entered within 2 minutes, the computer returns to its previous state.
If you enter the wrong password, the following message appears:
Invalid password
[Press Enter to retry]
Page 63

If the correct password is not entered in three attempts, the computer tries to boot from another bootable
device if the Boot First device option in the system setup program is set to allow it. If the Boot First
device option is not set to allow booting from another device, the computer returns to the state it was in
when you turned it on—suspend or standby mode.
NOTES: If the hard-disk drive password, the modular hard-disk drive password, and the primary
password are the same, you are prompted only for the primary password. If the hard-disk drive
password is different from the primary password, you are prompted for both. Two different passwords
provide greater security.
The administrator password provides access to the system, but it does not provide access to the
hard-disk drive when it is protected by a password.
Assigning an Asset Tag
The Asset Tag utility allows you to enter an asset tag number that you or your company assigns to the
computer. The default system setup screens do not show the asset tag number unless you enter one by
using this utility.
You can also use the Asset Tag utility to enter an owner tag that appears in the system log-on screen and
with the primary password prompt.
Viewing Existing Asset Tag and Service Numbers
To view existing asset tag and service tag numbers, perform the following steps:
1. Boot the computer from a bootable diskette or CD-ROM.
2. Type cd c:\Dell\Util and press <Enter>.
3. Type asset and press <Enter>.
Assigning an Asset Tag Number
An asset tag number can have up to ten characters; any combination of characters excluding spaces is valid.
To assign or change an asset tag number, perform the following steps:
1. Boot the computer from a bootable diskette or CD-ROM.
2. Type cd c:\Dell\Util and press <Enter>.
3. Type asset and a space followed by the new number, and press <Enter>.
For example, type the following command line and press <Enter>:
asset 1234$ABCD&
4. When the system prompts you to verify the asset tag number, type y and press <Enter>.
The system displays the new or modified asset tag number and the service tag number.
Page 64

Deleting an Asset Tag Number
/d
To delete the asset tag number without assigning a new one, perform the following steps:
1. Boot the computer from a bootable diskette or CD-ROM.
2. Type cd c:\Dell\Util and press <Enter>.
3. Type asset /d and press <Enter>.
Assigning an Owner Tag
An owner tag can have up to 48 characters; any combination of letters, numbers, and spaces is valid. To
assign an owner tag, perform the following steps:
1. Boot the computer from a bootable diskette or CD-ROM.
2. Type cd c:\Dell\Util and press <Enter>.
3. Type asset /o and a space followed by the new owner tag, and press <Enter>.
For example, type the following command line and press <Enter>:
asset /o ABC Company
4. When the system prompts you to verify the owner tag, type y and press <Enter>.
The system displays the new owner tag.
Deleting an Owner Tag
To delete the owner tag without assigning a new one, perform the following steps:
1. Boot the computer from a bootable diskette or CD-ROM.
2. Type cd c:\Dell\Util and press <Enter>.
3. Type asset /o /d and press <Enter>.
NOTE: For security, you cannot set, change, or delete the owner tag if the primary or administrator
passwords are set.
Table 1 lists the command-line options you can use with the Asset Tag utility. To use one of these options,
open an MS-DOS® prompt, type asset and a space followed by the option, and then press <Enter>.
Table 1. Asset Tag Utility Command-Line Options
Asset Tag
Option Description
Deletes the asset tag number
Page 65

/o tag
Specifies a new owner tag
/o /d
/?
Deletes the owner tag
Displays the Asset Tag utility help screen
Using the Security Cable Slot
To prevent unauthorized removal of the computer, you can use a security cable to attach the computer to an
immovable object. Your computer has one security cable slot, located on the left side of the computer—
between the speaker and the hard-disk drive (see Figure 1
The security cable slot allows you to attach a commercially available antitheft device to the computer.
Antitheft devices for portable computers usually include a segment of metal-stranded cable with an attached
locking device and associated key.
Basic Instructions for Using the Security Cable Slot
To prevent unauthorized removal of your computer, loop the cable around an immovable object, insert the
locking device into the security cable slots, and lock the device. See Figure 1 for an example of how to
secure your computer. Complete instructions for installing this kind of antitheft device are usually included
with the device.
).
Figure 1. Securing the Computer
NOTE: Antitheft devices are of differing designs. Before purchasing such a device, make sure that it
will work with the security cable slot in your computer.
Security and Docking Device
If your computer is installed in a Dell Latitude docking device, use the security cable slot on the docking
device to secure the computer. See your docking device User's Guide for the location of the security slot.
You can use the security cable slot to secure your computer when it is not docked to a Dell Latitude docking
device. However, to lock your computer and prevent unauthorized removal of the hard-disk drive, insert the
Page 66

locking device into the security cable slot located between the hard-disk drive and the speaker, and lock the
device with its associated key.
Back to Contents Page
Page 67

Back to Contents Page
Include the service tag number in your description of the computer. Ask that a case number be
Traveling With Your Computer: Dell™ Latitude™
C600/C500 User's Guide
Identifying Your Computer
Preparing Your Computer for Travel
Travel Tips
Identifying Your Computer
As an antitheft measure, assign a primary password and a hard-disk drive password to prohibit unauthorized
access to the computer.
Dell recommends that you follow these precautions before you travel with your computer:
Write down your service tag number, and put it in a safe place separate from the computer or carrying
case. If the computer is lost or stolen, use the service tag number when reporting to law enforcement
officials and to Dell.
Use a text editor (such as Microsoft® Windows® Notepad) to create a file called if_found in your root
directory. Place information such as your name, address, and telephone number in this file. (For
instructions on using the appropriate text editor, see the documentation that came with your operating
system.)
Attach your business card or other name tag to the computer.
Contact your credit-card company and ask if it offers coded identification tags that allow your property
to be returned to you without the risk of revealing your name, address, or telephone number.
Use a permanent marking or stenciling device to write your driver’s license number or some other
unique identifying mark on the computer. If a lost or stolen computer is recovered, such marking
identifies the computer as your property.
Service Tag Number
The service tag number is an alphanumeric code on a bar code label located on the bottom of the computer.
The number is unique to your computer and allows Dell technical assistance personnel to identify the
computer and its configuration quickly if you call for assistance.
If Your Computer Is Lost or Stolen
If your computer is lost or stolen, Dell suggests that you perform the following steps:
1. Call a law enforcement agency to report the lost or stolen computer.
Page 68

assigned, and write it down. Also write down the name, address, and telephone number of the
law enforcement agency. If possible, obtain the name of the investigating officer.
If you know where the computer was lost or stolen, call a law enforcement agency in that area. If
you do not know, call a law enforcement agency where you live.
2. If the computer belongs to a company, notify the security office of the firm.
3. Call Dell technical assistance to report the missing computer.
Provide the computer’s service tag number, the case number, and the name, address, and
telephone number of the law enforcement agency to which you reported the missing computer. If
possible, give the name of the investigating officer.
The Dell support technician will log your report under the computer’s service tag number and flag
the computer as missing or stolen. If someone calls Dell for technical assistance and gives your
service tag number, the computer is identified automatically as missing or stolen. The technician
will attempt to get the phone number and address of the caller. Dell will then contact the law
enforcement agency to which you made the report of the missing or stolen computer.
Preparing Your Computer for Travel
To prepare your computer for travel, perform the following steps:
1. Remove any external devices attached to the computer, and store them in a safe place. If a diskette is
in the diskette drive, remove it. Remove any cables attached to installed PC Cards (you do not have to
remove the PC Cards themselves).
2. To make the computer as light as possible, remove the storage device (if installed) from the modular
bay and install the travel module.
3. To maximize battery life, check the charge on your battery. Then fully charge the battery and any
spares you plan to carry with you.
4. Turn off the computer.
NOTICE: When you disconnect the AC adapter from the computer, grasp the adapter
cable's connector, not the cable itself, and pull gently but firmly to avoid damaging the
cable.
Disconnect the AC adapter.
NOTICE: When the display is closed, items left on the keyboard could damage the
display.
6. Make sure that there is nothing on the keyboard and palmrest that can damage the display when you
close it. Then close the display.
7. Pack all your computing accessories.
With the optional Dell carrying case, you can pack the computer and its accessories together.
Page 69

NOTE: Follow the travel tips and take special precautions if you are planning to travel by air.
Traveling by Air
You may want to take the following precautions when you are traveling by air with your computer:
Notify airport security in advance that you are bringing a portable computer.
Be sure to have a charged battery or the AC adapter and power cable available in case you are asked
to turn on the computer.
Do not check the computer as baggage.
NOTICE: Have airport security personnel check the computer by hand. If the computer
passes through a metal detector, data loss may occur. If you must pass the computer
through a metal detector, first remove the hard-disk drive.
Do not put the computer through a metal detector.
The computer can go through an airport X-ray security machine.
Before you use the computer on an airplane, check the in-flight magazine or ask the flight crew to verify
that such use is permitted. Some airlines forbid the use of electronic devices during the flight. All
airlines forbid the use of electronic devices during takeoff and landing.
Dell has several carrying cases that protect the computer and accessories during travel.
If you pack the computer in a suitcase, do not pack so tightly that the computer display breaks or so
loosely that the computer slides around.
Avoid packing the computer with items such as shaving cream, colognes, perfumes, or food.
Protect the computer, the battery, and the hard-disk drive from hazards such as extreme temperatures;
overexposure to sunlight; and exposure to dirt, dust, or liquids.
Pack the computer so that it does not slide around in the trunk of your car or in an overhead storage
compartment.
If you are carrying a second hard-disk drive separately, protect the drive from exposure to static
electricity by placing the drive in an antistatic bag or wrapping it in a nonconductive fabric.
Travel Tips
Consider changing the settings of your power management options to maximize battery life if you will
be using battery power for extended periods.
If you are traveling internationally, carry proof of ownership to speed your passage through customs. If
the computer is provided by your employer, carry documentation of your right to use the computer.
Investigate the customs regulations of the countries you plan to visit, and consider acquiring an
Page 70

international carnet from your government if you travel through many different countries.
Power interruptions can occur frequently in some countries. Always have a charged battery available if
traveling abroad.
Credit card holders should check with their credit card companies for information about the kinds of
emergency travel assistance they offer to users of portable computers. Many companies provide
services that help you solve problems, such as quickly locating 3.5-inch diskettes or providing a directdial telephone line for your modem connection.
NOTICE: Do not use removable media devices while the computer is in motion.
Vibrations could interrupt the flow of data to and from the device and the hard-disk
drive.
Carnet
A carnet is an international customs document (also known as a merchandise passport) that facilitates
temporary imports into foreign countries and is valid for up to 1 year.
Back to Contents Page
Page 71

Back to Contents Page
Removing and Replacing Parts: Dell™ Latitude™
C600/C500 User's Guide
Preparing to Work Inside the Computer
Replacing a Primary Hard-Disk Drive
Removing or Installing Memory Modules
Preparing to Work Inside the Computer
NOTES: If necessary, print these instructions for reference before proceeding.
Before you start to work on the computer, perform the following steps.
NOTICE: Failure to perform the following steps could result in damage to the computer.
1. Save any work in progress and close all open application programs.
2. Turn off the computer and any attached devices.
NOTE: Make sure that the computer is turned off and not in save-to-disk suspend (S2D) mode.
If you cannot shut down the computer using the computer’s operating system, press the power
button for 4 seconds.
3. If the computer is docked, undock the computer.
4. Disconnect the computer and any attached devices from their electrical outlets to reduce the potential
for personal injury or shock. Also disconnect any telephone or telecommunications lines from the
computer.
5. Remove the power cable.
6. Disconnect all other external cables from the computer.
7. Remove any installed PC Cards
NOTICE: Make sure that the work surface is clean to prevent scratching the computer
cover.
.
NOTICE: To avoid damaging the system board, remove the power cable, the battery,
and the second battery (if installed) before you service the computer.
8. Remove the main battery
9. Ground yourself by touching the unpainted metal surface of the input/output (I/O) panel on the back of
from the battery bay.
Page 72

the computer.
While you work, periodically touch the I/O panel to dissipate any static electricity that might harm
components.
Replacing a Primary Hard-Disk Drive
NOTICE: To prevent data loss, turn off your computer before you remove the hard-disk
drive. Do not remove the hard-disk drive if the computer is in suspend mode or if the
drive access light is on. Removing the drive under these conditions will lead to loss of
data.
To replace a primary hard-disk drive, perform the following steps:
1. Complete the tasks as described in "Preparing to Work Inside the Computer
2. Remove the hard-disk drive from the drive bay.
Close the display and turn the computer over. Using a small Phillips-head screwdriver, remove the
screw (see Figure 1) that holds the drive carrier in the drive bay. Save the screw for use later in this
procedure.
Figure 1. Removing a Hard-Disk Drive
."
3. As shown in Figure 1, push up and pull out the drive carrier out of the drive bay.
When the hard-disk drive is not in the computer, protect the drive from exposure to static
electricity. See "Protecting Against Electrostatic Discharge" for more information.
4. Remove the new hard-disk drive from its packaging.
Save the original packaging to use when you store or ship the hard-disk drive.
5. Install the new hard-disk drive into the computer (it comes in a drive carrier).
NOTICE: If the drive carrier does not slide in easily, pull it out and try again. To avoid
damage, do not force the drive carrier into the bay.
Page 73

6. Gently push the drive carrier into the drive bay until the carrier door is flush with the computer case.
7. Push down on the driver carrier until it snaps into place.
8. Replace the screw you removed in step 2. Be careful not to overtighten the screw.
If you have installed a new hard-disk drive, follow the directions that came with the drive to partition and
logically format the drive and to create a suspend-to-disk (S2D) partition.
NOTICE: Hard-disk drives are extremely fragile and must be handled carefully to avoid
damage. Follow these guidelines:
The primary hard-disk drive is installed in a metal carrier to protect the drive and
make installation easier. When you remove and install hard-disk drives, handle the
drive carrier, not the drive itself.
Never press down on the top of the drive.
Do not drop the drive. Even a slight jar or bump can damage the drive heads and
spinning plates, thus rendering the drive inoperable.
CAUTION: The primary hard-disk drive may be hot to the touch under extreme
environmental conditions. If the drive is hot, allow it to cool before you replace it.
Preparing a New Primary Drive
Every primary hard-disk drive must be physically formatted, partitioned, and logically formatted before it can
be used to store data. Every primary hard-disk drive from Dell is physically formatted before it is sent to you.
Use the program(s) provided by your operating system to partition and logically format the hard-disk drive.
Removing or Installing Memory Modules
NOTICE: Your computer only supports 100-megahertz (MHz) synchronous dynamic
random-access memory (SDRAM) modules. It does not support extended-data out (EDO)
memory modules.
NOTICE: Do not install memory modules while the computer is in suspend, standby, or
suspend-to-disk mode.
NOTICE: Ground yourself by touching an unpainted metal surface of a connector on the
back of the computer. While you work, periodically touch the connector to dissipate any
static electricity that might harm internal components.
To remove or install memory modules, perform the following steps:
1. Complete the tasks as described in "Preparing to Work Inside the Computer
2. Close the display, and turn the computer upside down.
3. Remove the memory module cover:
a. Using a small Phillips-head screwdriver, remove the two screws located on the memory
."
Page 74

module cover. The screws are part of the memory module cover and stay with the cover
when you remove it.
b. Locate the small semicircular indention at one end of the memory module cover. Place your
fingertip under the cover by the indentation and firmly lift the cover up.
c. When the cover pops up, lift it up to remove it and expose the memory modules underneath
it.
4. If you are replacing a memory module, remove the old one.
Carefully spread apart the inner metal tabs of the memory module socket just far enough for the
memory module to disengage from the socket (it should pop up slightly). Then lift the memory module
away from the socket (see Figure 2).
Figure 2. Removing a Memory Module
1
JDIM 1 socket
2
JDIM 2 socket
5. Ground yourself and unpack the new memory module from the upgrade kit.
6. If you need to install memory modules in two sockets, install a memory module in the socket labeled
"JDIM 1" before you install a module in the socket labeled "JDIM 2." If you only have one memory
module, install it in the "JDIM 1" socket. (See Figure 2
Memory modules are keyed, or designed to fit into their sockets in only one direction. The slots on
the system board are notched so that the memory module can be firmly seated only one way.
7. Align the memory module’s edge connector with the slot in the center of the memory module socket.
8. With the module at a 45-degree angle, press the memory module’s edge connector firmly into the
memory module socket.
9. Pivot the memory module down until it clicks into place.
.)
Page 75

If you do not hear a click as each end of the memory module snaps into the metal tabs, remove
the memory module and reinstall it.
NOTICE: After installation, if the memory module cover does not fit or is difficult to
close, you may have installed the memory module improperly or into the wrong slots.
Remove the memory modules and reinstall them. Do not force the memory module
cover to close because you may damage your computer.
10. Replace the memory module cover as follows:
a. Set the memory module cover loosely over the opening, aligning the three tabs on the
memory module cover to the corresponding slots on the opening. These tabs are on the
opposite side of the cover from the screw holes.
b. Rotate the cover down and reinstall the screws.
11. Reconnect your computer and devices to their electrical outlets and turn them on.
As the computer boots, it detects the presence of additional memory and automatically updates
the system configuration information. Verify that the correct memory total is displayed. If
necessary, repeat steps 1 through 9 until the memory total is correct
Back to Contents Page
Page 76

Back to Contents Page
AC Adapter and Battery: Dell™ Latitude™ C600/C500
User's Guide
About the AC Adapter First Low-Battery Warning
Connecting the AC Adapter Second Low-Battery Warning
About the Batteries Charging the Battery
Removing a Battery Detecting Battery Problems
Installing a Battery Battery Disposal
Checking the Battery Charge
About the AC Adapter
The AC adapter kit includes two cables: the AC adapter cable and an AC power cable.
You can connect the AC adapter with your computer either turned on or off.
The AC adapter works with electrical outlets worldwide. However, power connectors vary among countries.
Before you use AC power in a foreign country, you may need to obtain a new power cable designed for use
in that country.
If the computer is docked to a Dell C/Port Family Advanced Port Replicators (APR) or C/Dock Family
Expansion Stations, you can run the computer on AC power by connecting the AC adapter to the C/Port APR
or C/Dock Expansion Station.
NOTE: If you are running your computer on AC power with a battery installed, the AC adapter charges
the battery (if needed) and then maintains the battery's charge.
NOTICE: To avoid overheating the AC adapter when powering the computer or charging
the battery, use the AC adapter in a ventilated area, such as on a desktop or on the
floor. Do not use the AC adapter in a poorly ventilated environment, such as inside a
carrying case.
Connecting the AC Adapter
1
AC adapter cable
2
AC adapter power
cable
3
AC adapter
Page 77

About the Batteries
The integrated charge gauge lets you check a battery’s charge before you insert it into the computer.
A lithium ion battery in the battery bay is standard with the computer, and provides power when an electrical
outlet is not available. To double battery life, install a second battery in the modular bay.
CAUTION: Do not puncture, disassemble, or incinerate the computer's battery.
The battery may present a fire or chemical burn hazard if mistreated. Do not
expose the battery to temperatures above 60° Celsius (C) (140° Fahrenheit [F]).
Keep the battery away from children. Handle damaged or leaking batteries with
extreme care. If the battery is damaged, electrolyte may leak from the cells and
cause personal injury.
Lithium ion batteries are longer lived than conventional batteries and do not require replacement as often.
There is no battery memory effect with a lithium ion battery—you can charge the battery whenever you like
without fear of reducing its charge capacity, and you do not need to drain a lithium ion battery completely
before recharging it.
Lithium ion batteries should not be disposed of with common household waste products. For battery disposal
information, contact local authorities for the location of a chemical waste collection program nearest you.
Keep the following information in mind when you are running your computer from the battery:
With a single fully charged, 8-cell lithium-ion battery, you can expect about 3 hours of battery life; with
two fully charged lithium-ion batteries, 6 hours of battery life. Actual performance varies, depending on
which power management features are enabled and which application programs are being used.
When two batteries are installed, the computer draws power from the battery with the higher capacity
until both batteries are at the same charge level. Then it draws power from both. The AC adapter first
charges the battery in the battery bay.
Page 78

The battery’s self-test capability alerts you to battery conditions such as low charge.
The battery has a life span of around 400 discharge/charge cycles, provided it is charged at normal
room temperature.
Battery Usage
The battery is partially charged when you receive it. Dell recommends that you charge your battery to full
capacity before using it to power the computer. For information on conserving battery power, see "Power
Management Modes."
When you activate suspend mode (known as standby
operating systems), the computer can run on a fully-charged battery for approximately one week.
If you are going to store the computer, disconnect all peripheral devices and turn off the computer. Remove
the battery when you store your computer for an extended period of time. A battery will drain when not in use
during prolonged storage. After a long storage period, recharge the battery fully before you attempt to run
your computer from the battery.
in the Microsoft® Windows® 98 and Windows 2000
Removing a Battery
CAUTION: Using the wrong battery type may present a risk of fire or explosion.
Replace the battery only with the same or equivalent type purchased from Dell.
You can use your computer's battery in any Latitude C-Family computer except for
the Latitude CS or CSx computers. Do not attempt to use the battery in CS or CSx
computers, and do not use a battery from those computers in your computer.
NOTICE: To avoid data loss, do not replace a battery while the computer is turned on
unless the computer is connected to an electrical outlet or a second battery is
installed.
NOTICE: Only use lithium ion batteries in your computer. The computer does not
support nickel-metal hydride (NiMH) batteries. If you install a NiMH battery, the battery
status lights blink alternately green and amber.
NOTICE: If you choose to replace the battery with the computer in standby mode, you
have up to 4 minutes to complete the battery replacement. After 4 minutes, the
computer shuts down and you will lose any unsaved data.
1. Ensure that the computer is turned off, suspended in a power management mode, or connected to an
electrical outlet.
2. If the computer is docked, undock it.
3. Close the display and turn the computer over.
4. Slide and hold the battery bay (or module bay) latch release on the bottom of the computer, and then
remove the battery from the bay.
Figure 1. Removing a Battery
Page 79

1
Battery
2
Battery bay latch
Installing a Battery
Slide the battery into the bay until the latch release clicks.
Checking the Battery Charge
To check the charge level, press the battery test button that is next to the lights (see Figure 2). The number
of lights that appear shows an estimate of the remaining battery charge (see Table 1
Figure 2. Battery Charge Gauge and Test Button
).
Table 1. Percentage of Charge
Page 80

No. of Lights Lit % Charge Remaining
5 81–100
4 61–80
3 41–60
2 21–40
1 1–20
The battery charge gauge consists of five lights. Each light represents 20 percent of full charge. If only one
light appears, recharge the battery before using it.
NOTE: If the battery has a 0 (zero) percent charge, you cannot use the battery test button to check the
battery's capacity. The battery gauge indicator will not light if the battery is completely drained.
A light that blinks rapidly when you check the battery’s charge level indicates a temporary failure or a
potentially recoverable failure like overheating. Allow the battery to cool for several minutes before checking
the charge level again.
If the battery is experiencing a permanent failure, the lights do not appear when you press the test button. If
you install a failed battery into the computer, the amber battery light on the computer flashes rapidly (see
Figure 3
http://www.dell.com. Dispose of the old battery properly.
). To purchase a new battery, call Dell or access the Dell World Wide Web site at
First Low-Battery Warning
The first low-battery warning—a blinking amber battery light—occurs when you have about 15 minutes of
battery life left under current conditions and the computer is not connected to an electrical outlet. Figure 3
shows the battery status light.
Figure 3. Status Lights
1
Power light
2
Drive access light
3
Battery light
NOTICE: When you see a low-battery warning, save your work immediately. Then
Page 81

replace the battery or connect your computer to an electrical outlet.
After the first low-battery warning, if no input/output (I/O) activity occurs within 75 seconds, the computer
activates suspend-to-disk mode. Once suspend-to-disk mode is activated, no further power is consumed. If
the computer has no suspend-to-disk partition, the computer enters suspend mode. The computer can
preserve data for several hours in suspend mode.
NOTICE: Never turn off the computer while the drive access light is on. Doing so could
cause data loss. Instead, close all of your application programs before you turn off the
computer.
Second Low-Battery Warning
The second low-battery warning—a steady amber battery light—occurs when you have about 5 minutes of
battery life left under current conditions and the computer is not connected to an electrical outlet.
After the second low-battery warning, if no further I/O activity occurs within 15 seconds, the computer
activates suspend-to-disk mode. If there is no suspend-to-disk partition, the computer enters suspend mode.
The computer can preserve data for several hours in suspend mode.
If the computer is already in suspend mode when a final low-battery warning occurs, the computer activates
suspend-to-disk mode immediately. If suspend-to-disk mode has been disabled, the computer reenters
suspend mode.
NOTICE: To avoid losing data (and possibly corrupting data areas on your hard-disk
drive), save your work immediately after a second low-battery warning. Then connect
your computer to an electrical outlet, or place the computer in suspend mode. If the
battery runs completely out of power, the computer shuts off without properly closing
any open files.
Charging the Battery
Each time you connect the computer to an electrical outlet or install a battery in a computer that is connected
to an electrical outlet, the computer checks the battery's charge. The AC adapter charges the battery (if
needed) and then maintains the battery's charge.
NOTE: For maximum battery performance, charge the battery only at normal room temperature.
If two batteries are installed in the computer, the AC adapter first charges the battery in the battery bay, then
the battery in the modular bay.
When installed in a computer connected to an electrical outlet, the battery immediately starts charging. The
green power light remains steady while the AC adapter charges the battery. The power light starts blinking
when the Dell ExpressCharge™ cycle is complete. While the power light is blinking, the AC adapter provides
a trickle charge to bring the battery to full capacity. The power light continues to blink until you remove the
battery or disconnect the computer from its electrical outlet.
NOTICE: If the battery is hot from being used in your computer or being in a hot
environment, follow these precautions:
Page 82

A hot battery will not charge when you connect the AC adapter to the computer.
This safety feature is important because charging a hot battery shortens the
battery’s life span and may damage the battery and the computer.
The battery is too hot to start charging if the battery light flashes alternately green
and amber. If this occurs while the computer is connected to an electrical outlet,
disconnect the computer from the outlet and allow the computer and the battery
to return to room temperature. Then reconnect the computer to its electrical outlet
and continue charging the battery.
If the computer is not allowed to return to room temperature, the battery stops
charging before it reaches full capacity.
Charge Times
For lithium ion batteries, if the computer is turned off and connected to an electrical outlet through the AC
adapter, the computer uses ExpressCharge technology to charge the battery. ExpressCharge takes about an
hour to completely charge a fully discharged battery. If the computer determines that the battery is near full
capacity, the battery trickle charges instead of using ExpressCharge.
If the computer is on, it takes about the same time to charge, depending on which devices you are using and
which programs you are running.
NOTE: You can leave the battery in the computer as long as you like. The battery's integrated circuitry
prevents the battery from overcharging.
Detecting Battery Problems
A battery problem may prevent the battery from being charged to its full potential and can lead to
unpredictable operation. To obtain a new battery, call Dell
http://www.dell.com.
Dell suggests you follow these precautions when using the battery:
To avoid installing a defective battery in your computer, check the battery's charge by pressing the
battery test button (see Figure 2
drained.
If, after you insert the battery in the computer, the computer's battery status light (see Figure 3) flashes
alternately green and amber, the battery is too hot to charge. Turn off the computer, and let the battery
and computer cool to room temperature.
If, after you insert the battery in the computer, the computer's battery status light (see Figure 3) flashes
amber for 4 seconds when you connect or disconnect the AC adapter or when you press the power
button, you need to replace the battery.
If, after you insert the battery in the computer, the computer's battery status light (see Figure 3) flashes
rapidly amber, the battery is defective and needs to be replaced.
). The battery gauge light will not light if the battery is completely
or access the Dell World Wide Web site at
Battery Disposal
Page 83

When your battery no longer holds a charge, call your local waste disposal agency or environmental agency
for advice on disposing of it. To purchase a new battery, call Dell
http://www.dell.com.
CAUTION: If your battery is damaged, or if it no longer holds a charge, dispose of
it promptly and properly. Do not dispose of it along with household waste. Call
your local waste disposal agency or environmental agency for advice on
disposing of the battery.
Back to Contents Page
or access the Dell World Wide Web site at
Page 84

Back to Contents Page
Power Management and Conservation: Dell™ Latitude™
C600/C500 User's Guide
Management Tips Power Options Properties
Power Management Modes ENERGY STAR® Emblem
Management Tips
NOTE: See "About the Batteries" for more information on conserving battery power.
Connect the computer to an electrical outlet when possible, because the battery life expectancy is largely
determined by the number of times it is charged.
Place the computer in standby mode or hibernate mode when you leave the computer unattended for long periods
of time.
If you are going to connect your computer to a port replicator or a docking station, click None (or Do nothing)
when you program the display-close option in theAdvanced
Properties window.
To exit a power management mode, press the power button.
tab in the Microsoft® Windows® Power Options
Power Management Modes
Standby Mode (Suspend Mode)
Standby mode (also called suspend mode) conserves power by turning off the display and the hard-disk drive after a
predetermined period of inactivity (a time-out). When you exit standby mode, the computer returns to the same state it
was in before entering standby mode.
NOTICE: If your computer loses AC and battery power while in standby mode, you may lose data.
To enter standby mode in Windows XP, Windows 2000, or Windows 98:
If you are using Windows XP, click the Start button, click Turn Off Computer, and then click Stand By.
If you are using Windows 2000 or Windows 98, click the Start button, click Shutdown, click Standby, and then
click OK.
or
Depending on how you set the power management options in the Advanced tab, use one of the following
methods:
Press the power button.
Close the display.
Press the power management keyboard shortcut (sometimes referred to as the "sleep button"), .
If an external monitor is connected to the computer when you close the display, the computer does not enter standby
mode. You can still use the external monitor.
To exit standby mode, press the power button or open the display depending on how you set the options in the
Page 85

Advanced tab.
To enter standby mode in Windows NT:
To enter standby mode, press <FN><Esc>. For power management information, see Power Options Properties.
Hibernate Mode (Suspend-to-Disk Mode)
Hibernate mode (also called suspend-to-disk or S2D mode) conserves power by copying system data to a reserved area
on the hard-disk drive and then completely turning off the computer. When you exit hibernate mode, the computer returns
to the same state it was in before entering hibernate mode.
NOTICE: You cannot remove devices or undock your computer while in hibernate mode.
Your computer enters hibernate mode if the battery charge level becomes critically low.
Depending on how you set the power management options in the Advanced tab, use one of the following methods to
enter hibernate mode:
Press the power button.
Close the display.
Press the power management keyboard shortcut (sometimes referred to as the "sleep button"), .
If an external monitor is connected to the computer when you close the display, the computer does not enter hibernate
mode. You can still use the external monitor.
NOTE: You cannot exit standby mode or hibernate mode by pressing a key or touching the touch pad.
NOTE: Some PC Cards may not operate correctly after the computer exits hibernate mode. Remove and reinsert
the card, or simply restart (reboot) your computer.
To exit hibernate mode, press the power button. The computer may take a short time to exit hibernate mode.
For more information on hibernate mode, see the documentation that came with your operating system.
Power Options Properties (Power Management Properties)
For Microsoft Windows XP
1. Click the Start button, and then click Control Panel.
2. Under Pick a category, click Performance and Management.
3. Under or pick a Control Panel icon, click Power Options.
For Microsoft Windows 2000 or Windows 98
To access the Windows Power Options Properties (or Power Management Properties) window:
1. Click the Start button, point to Settings, and then click Control Panel.
2. Double-click the Power Options Properties (or Power Management Properties) icon.
For Microsoft Windows NT
Page 86

Dell provides Softex software compatible with the Power Management Controller, which allows you to suspend and
resume your computer without affecting your ability to use the docking station or its media bay.
For information on using any Softex application program, see the online Help:
1. Double-click the Softex program's icon in the system tray of the Windows taskbar (normally on the bottom-right side
of the screen).
2. Click Help.
Power
Schemes Tab
The Power schemes pull-down menu displays the selected preset power scheme. Depending on your operating
system, typical power schemes are:
NOTE: Dell recommends that you use the Portable/Laptop power scheme to maximize battery power.
Portable/Laptop
Home/Office
Always On
Presentation
Minimal Power Management
Max Battery
Each preset power scheme has different time-out settings for putting the computer into standby mode, turning off the
display, and turning off the hard-disk drive. For more information on power management options, see Windows Help or
Windows Help and Support Center.
Windows XP controls the performance level of the processor depending on the power scheme you select. You do not
need to make any further adjustments to set the performance level. For more information on setting processor
performance, see "Using Intel Speedstep
."
Alarms Tab
NOTE: To enable audible alarms, click each Alarm Action button and select Sound alarm.
The Low battery alarm and Critical battery alarm settings alert you with a message when the battery charge
falls below a certain percentage. When you receive your computer, the Low battery alarm and Critical battery
alarm check boxes are selected. Dell recommends that you continue to use these settings. See "Battery Warnings
" for
more information on low battery warnings.
Power Meter Tab
The Power Meter tab displays the current power source and amount of battery charge remaining.
Advanced Tab
The Advanced tab allows you to:
Set power icon and standby mode password options.
NOTES: If you are going to connect your computer to a port replicator or a docking station, click None when you
program the display-close option. This setting ensures that your computer does not enter standby mode or
hibernate mode when you close (lower) the display.
If the computer is running Windows 98, set power management options in the system setup program.
Page 87

Program the following functions:
Activate standby mode.
Activate hibernate mode.
Shut down Windows and turn off the computer.
Choose no action (None).
To program these functions, click an option from the corresponding pull-down menu, and then click OK.
Hibernate Tab
The Hibernate tab lets you enable hibernate mode by clicking the Enable hibernate support check box.
ENERGY STAR® Emblem
The EPA’s ENERGY STAR® Computers program is a joint effort between the EPA and computer manufacturers to
reduce air pollution by promoting energy-efficient computer products. The EPA estimates that use of ENERGY STAR®
computer products can save computer users up to two billion dollars annually in electricity costs.
Back to Contents Page
Page 88

Back to Contents Page
Using the System Setup Program: Dell™ Latitude™
C600/C500 User's Guide
Overview Changing Printer Modes
Entering and Exiting the System Setup Program Changing COM Ports
The System Setup Screens Enabling the IR Port
Changing the Boot Sequence
NOTE: This section provides general information on using the system setup program. For detailed
information on options and settings, see "Using the System Setup Program" in the computer User's
Guide at the Dell support Web site at http://support.dell.com.
Overview
Each time you turn on your computer, it compares the installed hardware with the system configuration
information stored in nonvolatile random-access memory (NVRAM). If the system detects a discrepancy, it
generates an error message for each incorrect configuration setting.
To adjust the configuration settings for APM operating systems, such as Microsoft® Windows® 98 or
Windows NT®, you can use the system setup program.
ACPI operating systems, such as Windows 2000 and Windows XP, automatically configure most of the
setup options available in the system setup program. In such cases, the operating system overrides
system setup options entered through the system setup program. One exception is the External Hot
Key option, which you can disable or enable only through the system setup program. For more
information on configuring features for these operating systems, see your Microsoft Windows Help.
NOTE: For ACPI operating systems, the system setup program is accessible only during
the system boot routine.
You can use the system setup program as follows:
To set or change user-selectable features — for example, your password or power management
features
To verify information about your computer's current configuration, such as the amount of system
memory
For some setup options, you must reboot the computer before any changes take effect. Changes for other
options take effect immediately.
NOTE: If you change an option that is activated by rebooting, the system setup program displays the
setting you selected rather than the setting currently in effect. You must reboot for the new setting to
take effect.
Page 89

After you set up your computer, run the system setup program to familiarize yourself with your system
configuration information and optional settings. Dell recommends that you write down the information for
future reference.
Entering and Exiting the System Setup Program
External Keyboard
Action Operating System Key Combinations
Key Combinations
Enter the system setup
program
Enter the Battery
Status screen of the
system setup program
Exit the system setup
program
Windows 98, Windows
NT
Windows 2000, WindowsXP<F2> when the F2
Windows 98, Windows
NT
All <Esc>
<Fn><F1> any time
<F2> during the system
boot routine
message appears during
the system boot routine
<Fn><F3> any time <Scroll Lock><F3> if the
If you change the setting
of an option that requires
rebooting to take effect,
exit the operating system
before rebooting. (The
Help text in the upperright corner of system
setup screens 1, 2, and
4 tells you if the
computer must be
rebooted.)
<Scroll Lock><F1> if the
External Hot Key
option is enabled
<F2> when the F2
message appears during
the system boot routine
External Hot Key
option is enabled
<Esc>
NOTE: If the system setup program is running when the computer enters suspend mode, the
computer exits the system setup program and then activates suspend mode.
The System Setup Screens
The system setup screens display the current setup and configuration information and optional settings for
your computer. Information on the screens is organized in five boxed areas:
Title
The box at the top of all screens lists the page number, system name, and version number of the basic
input/output system (BIOS).
Options
Page 90

The box on the left half of screens 1, 2, 4, and 5 lists options that define the installed hardware in your
computer and the power conservation and security features for your computer.
Fields next to the options contain settings or values. You can change those values that appear bright
on the screen. Options or values that you cannot change (because they are determined or calculated
by the computer) appear less bright.
Help
The box on the upper-right half of screens 1, 2, 4, and 5 displays help information for the option with a
currently highlighted field.
Computer data
The box in the lower-right corner of screens 1, 2, 4, and 5 displays information about your computer.
Key functions
The line of boxes across the bottom of all screens lists keys and their functions within the system setup
program.
Changing the Boot Sequence
To change the computer's boot sequence, change the device settings in the Boot First device, Boot
Second device, or Boot Third device options.
Boot Sequence
Option Description Default
Boot First device Tells the computer where to look first for the software it needs
to start the operating system
Boot Second device Tells the computer where to look if it cannot find the software it
needs to start the operating system on the drive identified in
Boot First device
Boot Third device Tells the computer where to look if it cannot find the software it
needs to start the operating system on the drive identified in
Boot First Device or Boot Second device
For a change in the boot sequence options to take effect, you must reboot your computer.
The term boot refers to the computer's start-up procedure. When you turn on the computer, it "bootstraps"
itself into an operational state by loading into memory a small program, which in turn loads the necessary
operating system. The boot sequence tells the computer where to look to find the software needed to start
the operating system.
Diskette Drive
Internal HDD
None
Changing Printer Modes
Set the Parallel Mode option according to the type of printer or device connected to the parallel port. The
Page 91

default for Parallel Mode is ECP.
To determine the correct mode to use, see the documentation that came with the device.
NOTE: The ECP setting also works for most software written for the AT and PS/2 modes. Devices that
use ECP mode may come with special drivers that need to be installed in order to use these modes.
Setting Parallel Mode to Disabled disables the parallel port and its assigned LPT address, freeing its
interrupt for another device to use.
For a change in the Parallel Mode option to take effect, you must reboot your computer.
Changing COM Ports
Serial Port allows you to map the address of the serial port to COM1 (the default), COM2, COM3,
COM4, or to disable the serial port and its assigned COM address, freeing that interrupt for another device
to use.
Enabling the IR Port
To enable the infrared (IR) port on the computer or docking device:
1. Set the Infrared Data Port option to COM1, COM2, COM3 (recommended), or COM4. The
default for Infrared Data Port is Disabled.
2. Set the Infrared Mode option to either Fast IR or Slow IR.
For a change in the Infrared Data Port option to take effect, you must reboot your computer.
Back to Contents Page
Page 92

Back to Contents Page
5. Under
, select the appropriate categories from the
Reinstalling Software: Dell™ Latitude™ C600/C500 User's
Guide
Installing Drivers and Utilities
Installing the Asset Tag Utility
Installing the Internal Modem and Network Adapter Drivers (Optional)
NOTES: Dell recommends that you print these procedures before you begin.
You may need administrator privileges to perform some of the procedures in this section. Dell
recommends that you check with your network administrator before performing the procedures.
Installing Drivers and Utilities
The Dell ResourceCD for your computer contains most of the drivers that you will need for your computer,
including drivers for operating systems that may not be on your computer. Verify that the driver you are
loading is for your operating system.
To reinstall drivers for optional devices such as wireless communications, DVD drives, and Zip drives, see
the software CD and documentation that came with those devices.
You can also access and download new drivers, system tools, and documentation from Dell's technical
support page at support.dell.com. For more information on using the operating system installed on your
computer by Dell, see the operating system user's guide that came with your computer.
NOTICE: Before you reinstall drivers, make sure that your computer is undocked.
To install a driver or utility from your ResourceCD:
1. Save your work in all open programs.
2. Insert your ResourceCD into the CD or DVD drive.
In most cases, the CD should start running automatically. If it does not, start Microsoft® Windows®
Explorer, click your CD drive directory to display the CD contents, and then click the autorcd
application file. If a welcome screen appears, click Next. The first time that you run the CD, it might
prompt you to install some setup files. Click OK and follow the instructions on the screen to continue.
3. From the Language pull-down menu in the toolbar, select your preferred language for the driver or
utility (if available).
A welcome screen appears.
4. Click Next.
Search Criteria
System Model, Operating
Page 93

System, Device Type, and Topic pull-down menus.
A link or links appear(s) for the specific drivers or utilities used by your computer.
6. Click the link of a specific driver or utility to display information about the driver or utility you want to
install.
7. At the driver information screen, do one of the following:
Click the Install button (if present) to start the automatic installation. At the welcome
screen, follow the screen prompts to complete the installation.
If no Install button is present, automatic installation is not an option. For installation
instructions, either go to the appropriate procedure below or click Extract, follow the
extracting instructions, and read the readme file.
NOTE: If instructed to navigate to the driver files, click the CD directory on the driver information
screen to display the files associated with that driver.
Reinstalling the Asset Tag Utility
1. Insert the ResourceCD.
In most cases, the CD should start running automatically. If it does not, start Windows Explorer, click
your CD drive directory to display the CD contents, and then double-click the autorcd application file.
If a welcome screen appears, click Next. The first time that you run the CD, it might prompt you to
install some setup files. Click OK and follow the instructions on the screen to continue.
2. Under Search Criteria, select the appropriate categories from the System Model, Operating
System, and Device Type pull-down menus, and select Utilities from the Topic pull-down
menu.
A link or links appear(s) for the specific utilities used by your computer.
3. Click Asset Tag.
4. Click Extract.
5. Unzip the Asset Tag utility on the ResourceCD to the c:\dell\util directory on your hard-disk drive.
To use the utility, see "Assigning an Asset Tag
."
Manually Reinstalling the Internal Modem and Network Adapter Drivers
(Optional)
If you ordered the internal modem, you need to reinstall the modem driver.
If you ordered the combination modem/network adapter, you need to reinstall both the modem and network
adapter drivers.
Page 94

To install a modem or network adapter driver, use the appropriate procedure in this section, depending on
your operating system.
Installing the Modem or Network Adapter Driver for Windows XP
1. Save your work in all open programs and insert your ResourceCD.
2. Click the Start button, and click Control Panel.
3. Under Pick a category, click Performance and Maintenance.
4. Under or pick a Control Panel icon, click System.
5. On the System Properties screen, click the Hardware tab.
6. Click Device Manager.
If you are installing a modem driver, click Modem and then click the appropriate modem.
If you are installing a network adapter, click Network adapters, and then click 3Com3C920
Integrated Fast Ethernet Controller.
7. Click Action, and then click Update Driver.
8. Select Install from a list or specific location (Advanced), and then click Next.
9. Verify that Search removable media is selected, and then click Next.
10. When the name of the appropriate driver appears, click Next.
11. Click Finish to restart your computer.
Installing the Modem or Network Adapter Driver for Windows 2000 and Windows 98
1. Save and close any open files, exit any open programs, and insert your ResourceCD.
2. Click the Start button, point to Settings, and then click Control Panel.
3. From the Control Panel, double-click the System icon.
4. In the System Properties window, click the Hardware tab.
5. Click Device Manager.
If you are installing a modem driver, click Modem and then click the appropriate modem.
If you are installing a network adapter, click Network adapters, and then click 3Com
3C920 Integrated Fast Ethernet Controller.
6. Click Action, and then click Properties.
Page 95

7. Click the Driver tab, click Update driver, and then click Next.
8. Verify that Search for a suitable driver for my device (Recommended) is selected, and
then click Next.
9. Verify that CD-ROM drives is selected, and then click Next.
10. When the name of the appropriate driver appears, click Next.
11. Click Finish and restart your computer.
Installing the Modem Driver for Windows NT
1. Save your work in all open programs.
2. Insert your ResourceCD into the CD or DVD drive.
In most cases, the CD should start running automatically. If it does not, start Windows Explorer, click
your CD drive directory to display the CD contents, and then click the autorcd application file. If a
welcome screen appears, click Next. The first time that you run the CD, it might prompt you to install
some setup files. Click OK and follow the instructions on the screen to continue.
3. From the Language pull-down menu in the toolbar, select your preferred language for the driver or
utility (if available).
4. On the welcome screen, click Next.
5. Under Search Criteria, select the appropriate categories from the System Model, Operating
System, Device Type, and Topic pull-down menus.
A link or links appear(s) for the specific drivers or utilities used by your computer.
6. Click the link of a specific driver or utility to display information about the driver or utility you want to
install.
7. At the driver information screen, click Extract.
NOTE: If instructed to navigate to the driver files, click the CD directory on the driver information
screen to display the files associated with that driver.
8. Click the Start button and then click Run.
9. In the Run window in the Open box, type
C:\Dell\Drivers\R25586\Drivers\Modem\NT\MdmSetup\Setup.
10. Click OK.
11. In the introductory dialog box, click Next.
12. Follow the directions on your display to complete the driver installation.
Page 96

Installing the Combination Modem and Network Adapter Drivers for Windows NT
To install the combination modem and network adapter drivers, you need to install the modem driver, the
network adapter driver, and the Mini PCI AMP software as described in the following sections:
Installing the Modem Driver
1. Save your work in all open programs.
2. Insert your ResourceCD into the CD or DVD drive.
In most cases, the CD should start running automatically. If it does not, start Windows Explorer, click
your CD drive directory to display the CD contents, and then click the autorcd application file. If a
welcome screen appears, click next. The first time that you run the CD, it might prompt you to install
some setup files. Click OK and follow the instructions on the screen to continue.
3. From the Language pull-down menu in the toolbar, select your preferred language for the driver or
utility (if available).
4. On the welcome screen, click Next.
5. Under Search Criteria, select the appropriate categories from the System Model and
Operating System pull-down menus.
6. Under Device Type, select Communications.
7. Under Topic, select Drivers.
8. Click the combination modem/network adapter name to display information about the driver.
9. At the driver information screen, click Extract.
10. Follow the information on the screen to unzip the drivers onto your hard-disk drive.
11. Click the Start button and then click Run.
12. In the Open box, type C:\Dell\Drivers\68GFM\Drivers\Modem\NT\MdmSetup\Setup.
13. Click OK.
14. In the introductory dialog box, click Next.
15. Follow the directions on your display to complete the driver installation.
Installing the Network Adapter Driver
1. Click the Start button, point to Settings, and then click Control Panel.
2. In the Control Panel window, double-click the Network icon.
Page 97

3. In the Network window, click the Adapter tab and then click Add.
4. In the Select Network Adapter window, click Have Disk.
5. In the Insert Disk window, type C:\Dell\Drivers\68GFM\Drivers\NIC\Win_NT, and click
OK.
6. Click the Ethernet adapter, and then click OK.
7. In the network configuration window, type the network specific configuration and click OK.
8. When the Network window appears, click Close.
9. After all the configuration information is complete and you are prompted to restart the computer, click
Yes.
Install the Mini PCI AMP Software
1. Insert the Dell Latitude C500/C600 Resource CD into your CD or DVD drive.
2. Click the Start button and then click Run.
3. In the Open box, type C:\Dell\Drivers\69GFM\Drivers\NIC\SoftexNT\Setup.exe.
4. Click OK.
5. In the introductory dialog box, click Next.
6. Follow the prompts to finish installing the drivers.
7. When the installation is complete, restart your computer.
Back to Contents Page
Page 98

Back to Contents Page
Finding Solutions: Dell™ Latitude™ C600/C500 User's
Guide
Overview Intel SpeedStep Problems
Recover From a Program That Is Not Responding PC Card Problems
Restart a Computer That Is Not Responding Modem, Fax, and Internet Connection Problems
Wet Computer No Image Appears on Display
Dropped or Damaged Computer No Image Appears on External Monitor
No Power at All No Image Appears on TV
No Power, Using AC Adapter Sound and Speaker Problems
No Power, Using Battery DualPoint Device, Touch Pad, or Mouse
Only Partial Power <Num Lock>, <Caps Lock>, and <Scroll Lock>
Lights Don't Light Up
Diskette Drive Problems External Keyboard Doesn't Work
Removable Storage Drive Problems Devices Attached to Serial or Parallel Ports Don't
Work
Hard-Disk Drive Problems Parallel Port Printer Doesn't Work
Hardware Conflicts Software Solutions
Incorrect Computer Memory Amount
Overview
Before you call Dell for technical assistance, complete the following tasks to help you resolve some
computer problems:
1. Read the safety instructions in your System Information guide and "What You Need to Know."
2. Run the Dell Diagnostics to help you detect a problem quickly.
If you are running Microsoft® Windows® XP, you can also use tools available in the Windows Help and
Support Center.
3. Perform the appropriate procedure for the component or equipment that is malfunctioning. Click a topic
from the menu at the top of this page for instructions.
NOTE: When you see the question "Is the problem resolved?" in a problem-solving procedure,
perform the operation that caused the problem to see if the problem still occurs.
Page 99

CAUTION: To help prevent possible damage to the system board, wait 5 seconds
after turning off the computer before you disconnect a device or remove a
memory module.
NOTICE: Only access the inside of your computer when you are installing memory
modules.
Problem Procedure
Recover From a
Program That Is
Not Responding
Restart a
Computer That Is
Not Responding
Wet Computer
Spills, splashes,
and excessive
humidity can cause
moisture damage to
the computer.
1. Press <Ctrl><Alt><Del>.
2. If necessary, click Task Manager.
3. Select the program that is no longer responding.
4. Click End Task.
1. Press and hold the power button until the computer turns off.
2. To turn on the computer, press the power button.
ScanDisk, a program that checks for and repairs errors on the hard-disk drive,
may run during the boot process. The Windows operating system loads and
runs after the scan completes.
CAUTION: Perform step 1 only after you are certain that it is safe
to do so. If the computer is connected to an electrical outlet, Dell
recommends turning off AC power at the circuit breaker before
attempting to remove the power cables from the electrical outlet.
Use the utmost caution when removing wet cables from live power.
1. Turn off the computer and disconnect it from the AC adapter. Then disconnect
the AC adapter from the electrical outlet. Turn off any attached peripherals and
disconnect them from their power sources and then from the computer.
2. Ground yourself by touching one of the metal connectors on the back of the
computer.
3. If the modular bay is wet, remove the device
wet, remove any PC Cards
4. Remove any installed batteries
. Put the device and cards in a safe place to dry.
.
from the bay. If the PC Card slot is
Wipe off each battery and store it in a safe place to dry.
5. Remove the hard-disk drive
6. Remove the memory module(s)
.
.
7. Open the display, and place the computer across two books or similar props to
let air circulate all around it. Let the computer dry for at least 24 hours.
Place the computer in a dry area at room temperature. Do not use artificial
means to speed up the drying process.
CAUTION: Before continuing with this procedure, verify that the
computer is thoroughly dry.
Page 100

8. Ground yourself by touching one of the unpainted metal connectors on the I/O
panel.
9. Replace the memory module(s).
10. Replace the memory module cover.
11. Reinstall the hard-disk drive.
12. Reinstall the modular bay and PC Cards that you removed.
13. Replace any batteries that you removed.
14. Reconnect the computer and peripherals to an electrical outlet and turn them
on.
15. Does the computer work properly?
Yes. The problem is resolved.
Dropped or
Damaged
Computer
No. If the computer is able to boot, run the Dell Diagnostics
to identify
computer damage. If the computer is unable to boot, see "No Power at
All." If you cannot identify the damaged component(s), call Dell for
technical assistance. (See "Getting Help
".)
1. Save and close any open files, exit any open application programs, and shut
down the computer.
2. Disconnect the AC adapter from the electrical outlet and disconnect the AC
adapter from the computer. Turn off any attached devices and disconnect them
from the electrical outlet and then from the computer.
3. Ground yourself by touching one of the metal connectors on the back of the
computer.
4. Remove any installed batteries
5. Remove the hard-disk drive
6. Remove the memory module cover
or other devices from the modular bay.
.
and the memory module(s).
7. Reinstall the memory modules, making sure to seat them properly.
8. Replace the memory module cover.
9. Reinstall the hard-disk drive.
10. Verify that any installed PC Cards are properly seated in the PC Card
connectors.
11. Reinstall the battery or other device(s) removed from the modular bay. Verify
that the device(s) is seated properly.
12. Reconnect the computer and peripherals to the electrical outlet and turn them
on.
13. Run the Dell Diagnostics
14. If the computer does not operate properly, fill out the Diagnostics Checklist
Then call Dell
for technical assistance.
to verify that the computer is operating properly.
.
No Power at All
If you don't have
any power, none
of the lights on the
keyboard or drives
light up and you won't
hear sounds from any
drives. See also "Only
Partial Power."
Fill out the Diagnostics Checklist as you perform the following steps:
1. Connect the AC adapter
to the computer and to an electrical outlet.
2. Remove all devices, including internal devices such as the diskette drive
disk drive, and battery.
3. Turn on
the computer.
4. Does the computer turn on properly?
Yes. The problem is resolved.
, hard-
 Loading...