

Page 1

C2665dnf Color Laser Multifunction Printer | Dell Document Hub
15
16
17
18
19
Quick Reference Guide
Front and Rear View
14
13
12
11
10
1
2
3
4
9
8
7
Duplex Automatic Document Feeder (DADF)
1
Transfer Belt Unit
2
Drum Cartridge
3
Waste Toner Box
4
Power Switch
5
Right Side Cover
6
Tray1
7
Optional 550-Sheet Feeder (Tray2)
8
Multipurpose Feeder (MPF)
9
Toner Cartridge
10
Front Cover
11
Front USB Port
12
6
Service Tag Express Service Code
xxxxxxx 000 000 000 00
Service Tag
24
23
5
22
21
Operator Panel
13
Top Cover
14
Ethernet Port
15
USB Port
16
Wireless Adapter Socket
17
Phone Connector
18
Wall Jack Connector
19
Left Side Cover
20
2nd Belt Transfer Roller (2nd BTR)
21
Fusing Unit
22
Power Connector
23
Rear Cover
24
20
October 2013
1
Page 2
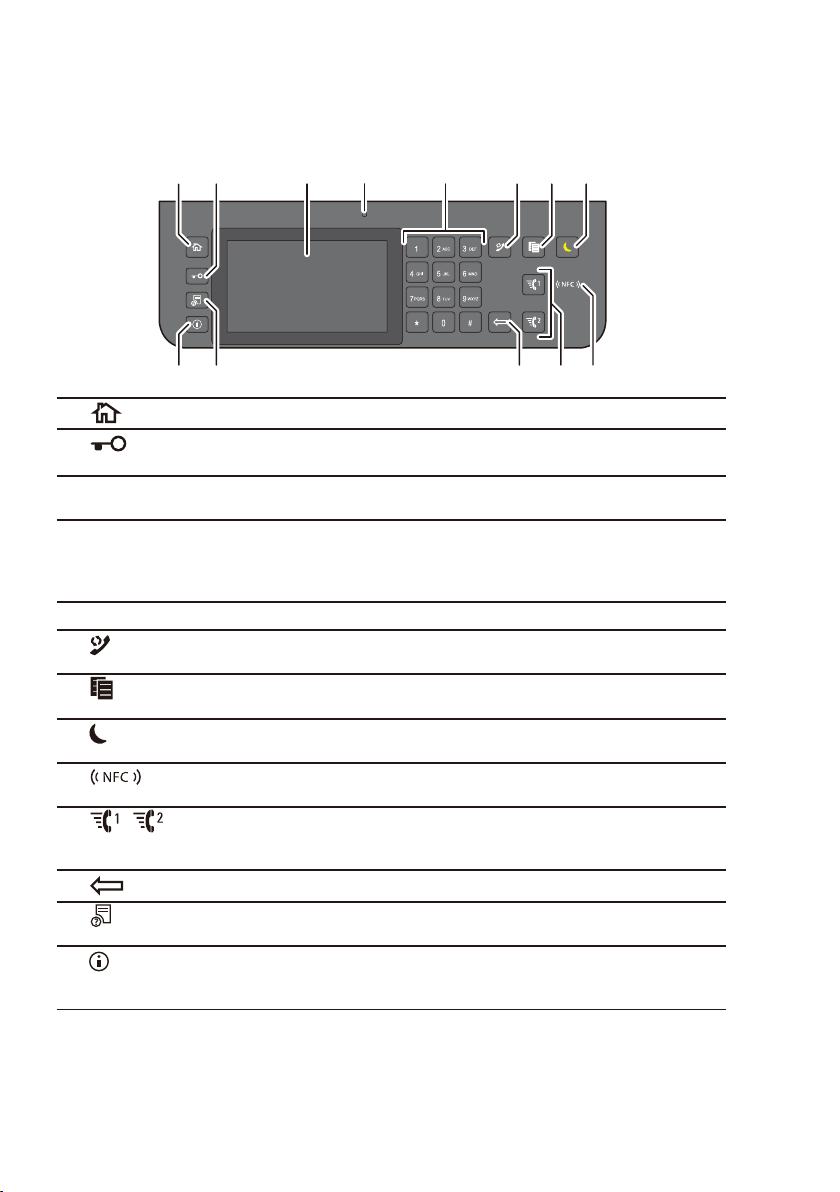
About the Operator Panel
1 3 4 5 762
8
The operator panel has a touch panel, a status LED, control buttons, and a number pad, which
allows you to control the printer.
11 91213
10
1
2
3
4
5
6
7
8
9
10
11
12
13
NOTE: Moving to a different menu or returning to a previous screen cancels the current entry or setting. Make sure to
select OK to save the current entry or setting.
(Home) button
(Login/Logout)
button
Touch Panel Specifies the settings by directly tapping the screen.
Status LED (Ready/Error) Shows a green light when the printer is ready and a blinking green light
Number Pad Enters numbers and characters.
(Redial/Pause) button
(Copy) button
(Power Saver) button
(NFC) reader
/ (Quick Dial 1/
Quick Dial 2) button
(Delete) button
(Job Status) button
(Information) button
Moves to the Home screen.
Logs out if pressed while the user is logged in.
Displays various settings, instructions, and error messages.
when data is being received.
Shows an amber light when an error occurs and a blinking amber light
when an unrecoverable print error occurs.
Re-dials a telephone number.
Inserts a pause into a telephone number.
Starts copying the document. Effective only from the Home screen while
you are logged in to the printer.
Enters or exits the Power Saver mode. When the printer is not used for a
while, it enters the Power Saver mode to reduce power consumption.
Starts communication between the card and the printer when an NFC
card is waved over the reader.
Starts faxing the document to the number registered as “001” and “002”
respectively of the FAX Speed Dial. Effective only when the Home
screen is displayed.
Deletes numbers and characters.
Moves to the Job Status screen. From this screen, you can check or
cancel active jobs.
Moves to the Information screen. You can access various information
and settings menu, check consumable levels and network status, and
print various types of reports and lists.
2
Page 3
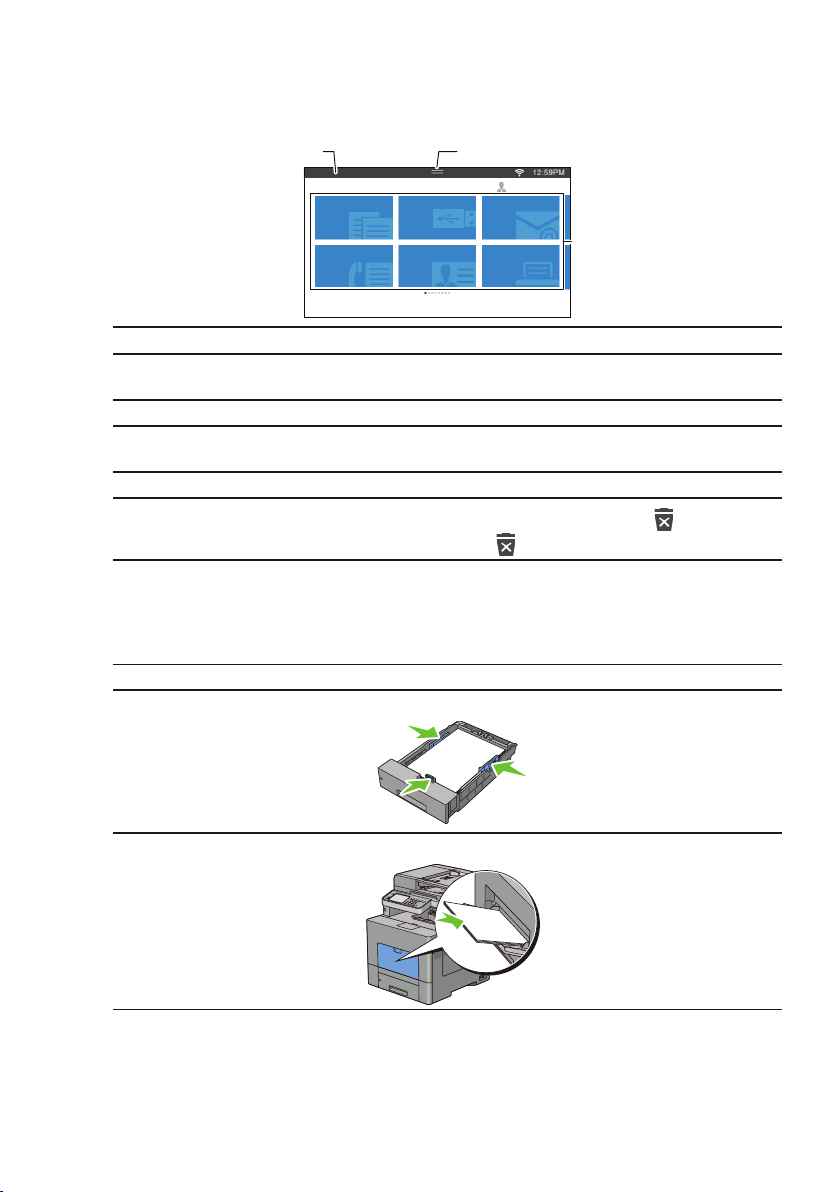
About the Home Screen
The Home screen is the default screen of the printer. See the table below for basic operations.
Notification Bar
Handle
To select a tile
To scroll the screen
Home
Copy
Fax
Scan to USB
ID Copy
Tap the tile.
Swipe the screen by dragging your finger on the screen.
Guest
Scan to Email
Print
Tiles
To scroll faster, flick the screen.
To display the status of the printer
To move the tiles
Drag down the handle of the Notication Bar.
Tap and hold the tile you want to move, and drag the tile to the
desired place.
To add the tiles
To delete a tile
Tap the Add App tile.
Tap and hold the tile you want to delete until
appears, and
then drag the tile to . Tap OK to delete the tile.
Loading Letterhead
The pre-printed paper such as letterhead and pre-punched paper must be inserted bottom edge first
with the print side facing down as shown below.
Print media source Print side Page orientation
Tray1 and optional 550-sheet feeder Face down
LETTERHEAD
Letterhead enters the printer last
MPF Face down
LETTERHEAD
NOTE: Set Letterhead 2-Sided or Letterhead Duplex Mode to Enable and Paper Type to Letterhead, Preprinted, or
Prepunched from the operator panel or the printer driver even when you print on a single side of letterhead, preprinted, or pre-punched paper.
Letterhead enters the printer last
3
Page 4

Loading an Envelope in the MPF
1
Load envelopes in the MPF as shown in the illustrations below.
CAUTION: Never use envelopes with windows, coated linings, or self-stick adhesives. These lead to paper jams and
can cause damage to the printer.
NOTE: If you do not load envelopes in the MPF right after they have been removed from the packaging, they may bulge.
To avoid jams, press firmly across the whole envelopes to flatten them before loading the envelopes in the MPF.
NOTE: The maximum height (quantity) of envelopes that can be loaded in the MPF is approximately 15 mm (0.59 inches)
(15 envelopes).
Envelope #10, Monarch, or DL size C5 size
or
Identifying the Location of Paper Jams
CAUTION: Do not attempt to clear any jams using tools or instruments. This may permanently damage the printer.
The following illustration shows where paper jams may occur along the print media path.
2
345
DADF
1
Fusing Unit
2
Tray1
3
4
5
Finding Information
For more information, access the Dell Printer Setup in the “
• Installation Video
Setup instructions for printer hardware and
optional accessories.
4
• User’s Guide
Additional information about printer
components, consumable replacement,
available software, and troubleshooting.
MPF
Optional 550-Sheet Feeder
Software and Documentation
disc”.
Page 5

Overview of the Dell Document Hub
1 2 3
The Dell Document Hub is a convenient one-stop gateway to a variety of cloud services to help you
manage your documents. With the Dell Document Hub, you can convert hard copy documents into
editable digital content and store them directly in your preferred cloud storage service. You can
search for files across multiple clouds simultaneously and then share and print content easily.
Register and Use
1. Go to www.dell.com/dochub to sign up for a free account.
2. Activate your account by following the instructions in the e-mail sent to you.
3. Connect your preferred cloud services from the Dell Document Hub portal.
4. Tap the Dell Document Hub tile from the printer.
5. Sign in to the Dell Document Hub with your e-mail address and password,
and automatically log in to connected cloud services.
6. Tap the Dell Document Hub feature tiles to begin use.
Dell Document Hub Features
Search for Files Search for your files across multiple cloud services that are connected from
1
Scan Scan your document in PDF* or JPG format and store it in the selected cloud
2
E-mail Me Conveniently e-mail the scanned document to your Dell Document Hub registered
3
Business Card
4
Reader
Smart OCR
5
Scan
Browse for Files Navigate and locate your files from the supported cloud services.
6
* denotes default file format.
6 5 4
www.dell.com/dochub.
service.
e-mail address without any setup.
Supported file formats include PDF*, searchable PDF, Microsoft Word, Excel,
PowerPoint, secured PDF, and JPG.
E-mail the electronic business card (vCard) to your Dell Document Hub registered
e-mail address.
Add or save the vCard to your contacts list.
Scan your documents and convert them into editable and searchable files.
Supported file formats include searchable PDF*, Microsoft Word, Excel,
PowerPoint, and secured PDF.
5
Page 6

What Are These Icons?
1
2
3
4
1
2
3
4
5
6
7
8
Indicates that the cloud service is correctly associated with the Dell Document Hub.
Indicates that the cloud service is not associated, or not linked correctly.
Go to www.dell.com/dochub to link it again.
Indicates that the cloud service link with the Dell Document Hub has expired.
Go to www.dell.com/dochub to link it again.
Tap to search for files in the current folder and subfolders (if any) from the selected cloud
service.
Tap to sort the results in ascending, descending, or by cloud services order.
Tap to change print, scan or e-mail settings.
Tap to preview the selected files, up to the first three pages of each file.
Tap to save print, scan, e-mail settings or folder as Favorite.
5 6 7
6
Page 7

How to Use "Search for
Files"
1. Tap the Search for Files tile in the
Dell Document Hub screen.
2. Enter the keywords, and tap Search.
How to Use "Browse for
Files"
1. Tap the Browse for Files tile in the
Dell Document Hub screen.
2. Tap the cloud service you want to browse in.
3. Tap and select up to10 files to print from
the search results.
Tap to preview the file before printing.
4. Tap Print to start printing.
To scroll the list, flick the screen up or
down.
3. Tap the location you want to browse in, and
tap the files you want to print.
4. Tap Print to start printing.
7
Page 8

How to Use "Smart OCR
Scan"
1. Tap the Smart OCR Scan tile in the Dell
Document Hub screen.
2. Tap the destination cloud service you want
to save the converted file to.
How to Use "E-mail Me"
1. Tap the E-mail Me tile in the Dell
Document Hub screen.
2. Tap the File Format box to specify the
file format to save the scanned file, and tap
the Subject text box to change the e-mail
subject.
3. Tap the location you want to save the
converted file to.
Tap to search for your folder.
4. Tap Next if you want to save the file in the
selected location.
Tap Back to return to the previous screen.
5. Tap the File Name text box to enter the
file name, and tap the File Format box
to specify the file format to save the
converted file.
Tap the Tag text box to enter the file tags.
Use “,” when entering multiple tags.
NOTE: Tags are not available for some cloud
services.
Tap Scan to start scanning using the OCR.
6.
3. Tap Send to start scanning and sending the
scanned file as an attached file of an e-mail.
dell.com/support
 Loading...