

Page 1
No.3951 (Punch card during power failure)
No.3952 (Do not punch card during power failure)
--------------------------------------------------------------------------------------------------------
Microcomputer Time Recorder
Instruction Manual
--------------------------------------------------------------------------------------------------------
Page 2

Page 3

Introduction
In order to guarantee safety and correct use of the product, please read this
manual carefully, and keep it properly for future reference.
The product should be only installed in a suitable environment to ensure the
time recorder works properly. Please do not install it in the place under rain
exposure or direct sun exposure.
The product’s specification, appearance and manual may be updated and
changed due to improvement.
This manual has been carefully written. But if you find any error, or do not fully
understand the illustration of the manual, please contact your vendor.
Don’t copy or reprint any or all part of this manual without the permission of
Deli Co., Ltd. Otherwise, we will pursue the legal responsibility.
Page 4

Page 5

Catalogue
Introduction
I. Operation safety precautions………………………………………………………………………........1
II. Name of each part…………………………………………………………………………………..…...2
2-1 Appearance name…………………………………………………………………………………...2
2-2 Button descriptions…………………………………………………………………….....……....…3
III. Operation process descriptions…………………………………………………………..........………..4
3-1 Power supply……………………………………………………………………………………... .4
3-2 Open and shut the upper cover………………………………………………………...........……. ..4
IV. Function setting (able to debug after open the upper cover)………………............................……….. .4
4-1 Year setting…………………………………………………………………...………………..……4
4-2 Date setting………………………………………………………………………………...…..……5
4-3 Time setting………………………………………………………………………...………….……5
4-4 Time of changing date setting……………………………………………..........…………….…….6
4-5 Card specification setting…………………………………………….......…………….………..….6
4-6 Salary classification setting (abroad)…………………………………….…...............…..……..….6
4-7 Time system setting………………………………………….………..………....………………….7
4-8 Printing position adjustment………………………………………………...........………….……...7
4-9 Daylight saving time setting……………..……………………………….........…………….……...8
4-10 Centesimal system setting (abroad) …………………………………................………….……....8
4-11 Setting of the front and back of timecard..…………………..................………………….……....9
V. Setting of color change time……………………………………......…………………….…………......9
VI. Setting of ring time……………………………………………………..……………….…………......10
VII. Setting of automatic shifting time…………………………………............………….…………........ .11
VIII. Punching methods…………………………………………………....……………….……….…...... .11
IX. Fault handling………………………………………………………………….……....……………....12
9-1 Fault handling……………………………………………….……..……….……….……………..12
9-2 Fault display codes…………………………………………………….……….….......……….….12
X. Notes…………………………………………………………………………….……….…………....13
XI. Maintenance..………………………………………………………………….……….……………....14
11-1 Replace ribbon……………………………………………………......….……….……………....14
11-2 Replace button battery………………………………………….……............….……………......14
XII. Specification..………………………………………………………………….….….……….…….....15
XIII. Comment..…………………………………………………………...…….….……..……….…….... .15
XIV.Case of setting.………………………………………………………….……….….…..………. . . . . 15
Ruler with hanging holes
Page 6

Page 7

I. Operation safety precautions
Before using this product, please carefully read and follow the following notes.
Notice!
PROHIBTED to use the power supply which is not in accordance with the voltage
indicated on the product.
Otherwise it may cause a fire or electric shock
PROHIBTED to be used by children.
The purpose is to prevent injury.
PROHIBTED to plug the power plug with wet hand.
Otherwise, it may cause electric shock.
PROHIBTED to damage or break the power line.
It may damage the power line to put heavy objects on the power line, or pull or bend it,
which are likely to cause fire or electric shock.
PROHIBTED to refit the time recorder.
Otherwise it may cause fire or electric shock.
If any abnormal phenomenon occurs, such as smoke, odor or heat, please unplug
the power plug form the power outlet, and contact the vendor.
Continuing to use the time record in the above circumstance may cause fire or electric
shock.
If foreign bodies (such as metal scraps, water or other liquid) fall into the time
recorder, please unplug the power plug from the power outlet immediately, and
contact the vendor.
Continuing to use the time record in the above circumstance may cause fire or electric
shock.
Before connecting the timekeeping device, please unplug the power plug from the
power outlet.
Otherwise it may cause fire or electric shock.
In order to avoid fire, please only use manufacturer’s specified fuse, rated voltage
and rated current.
Power supply Fuse
AC220V 250V, 1000mA (time delay)
Using any material to replace the fuse will cause fire.
Make sure the capacity of the fuse is suitable before using.
Page 8
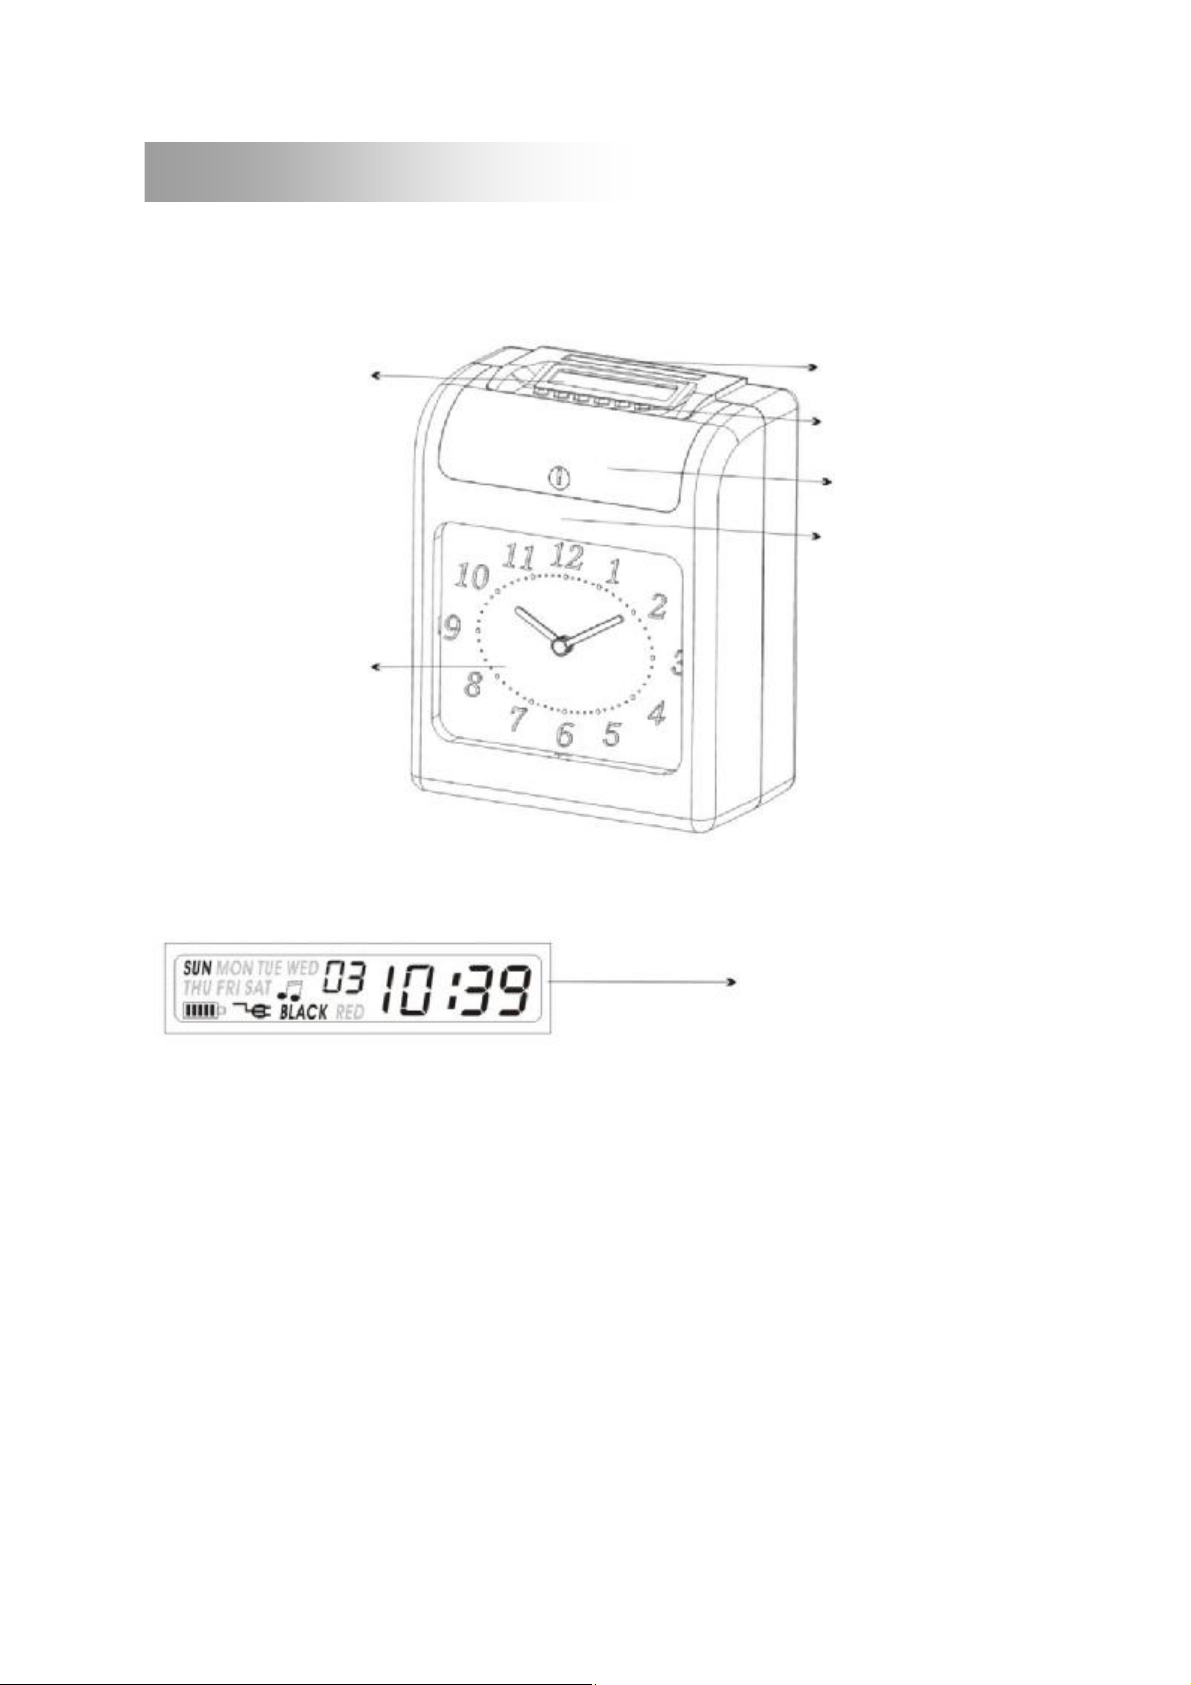
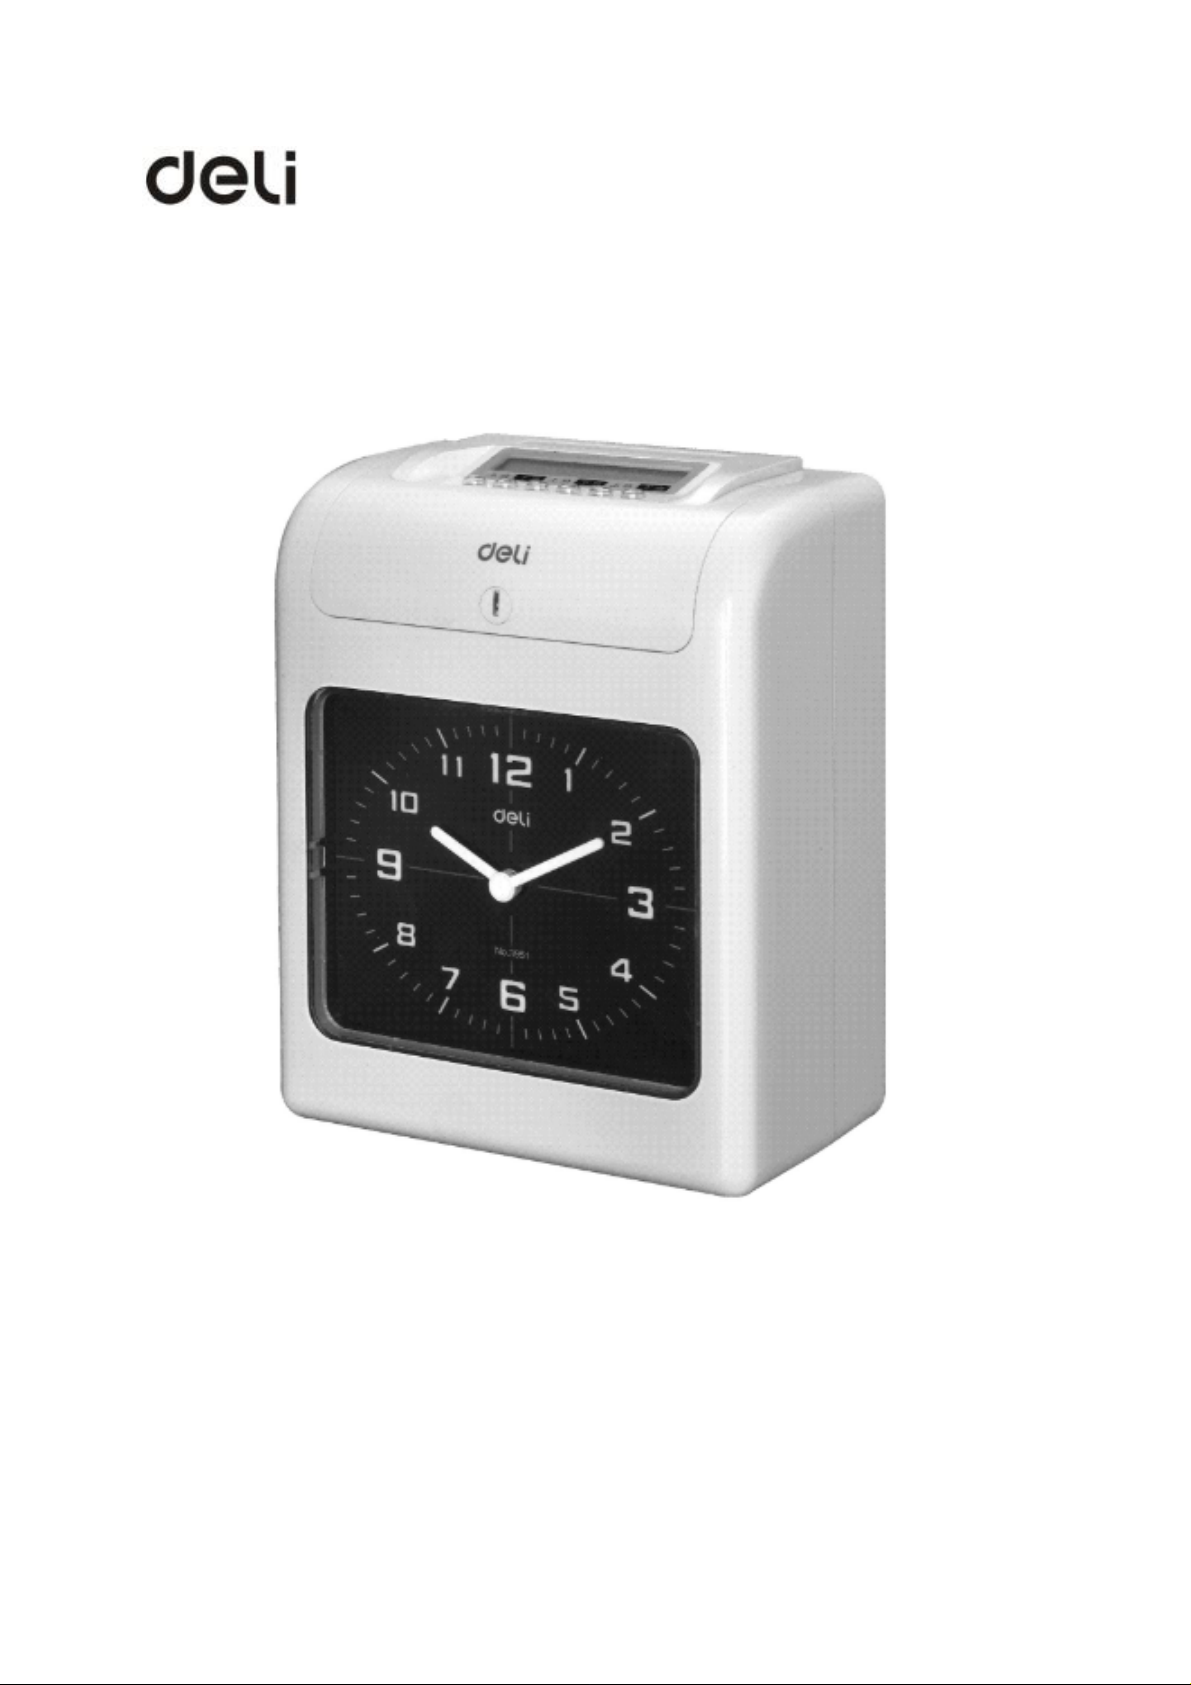
II. Name of each part
1. Appearance name
LCD Screen
Clock face display
Card entrance
Buttons
Upper cover
Keyhole
Appearance (Figure)
Clock face LCD screen
Page 9
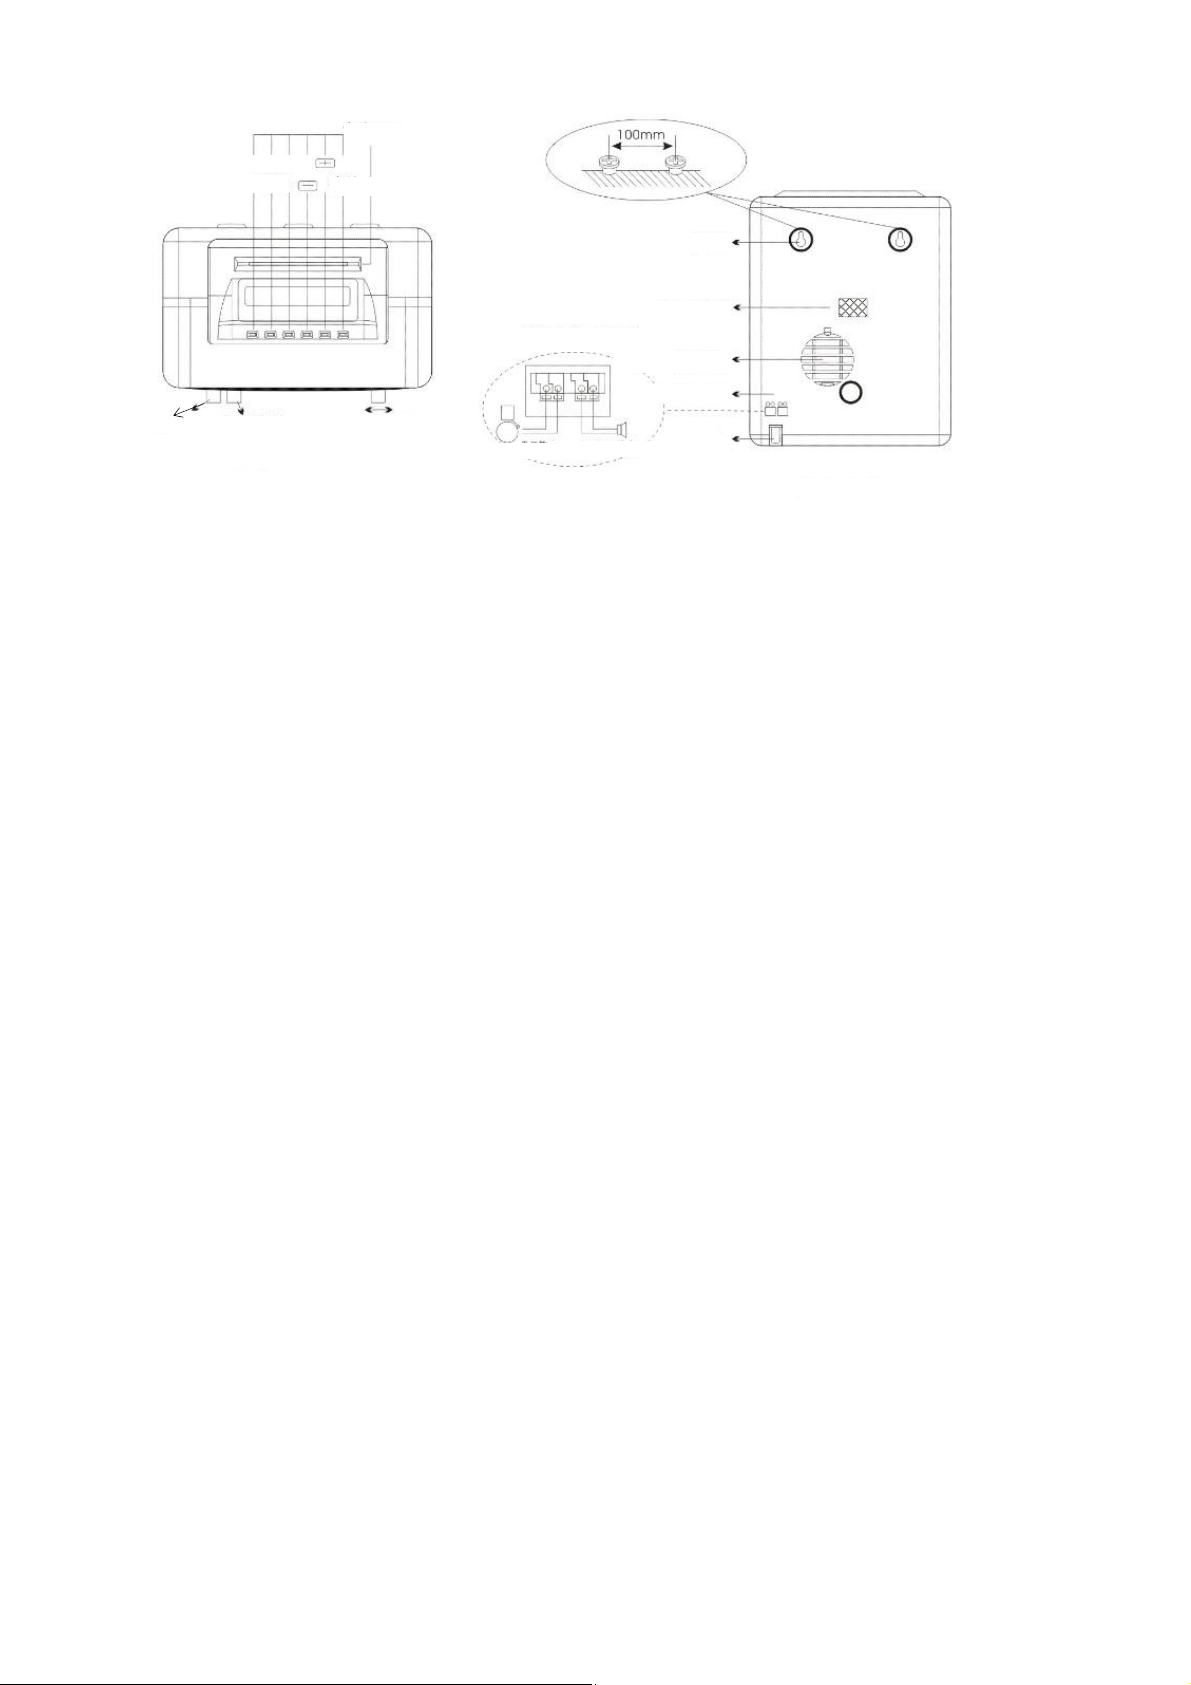
Reset key
Change color Shift
Ring
Volume control key
Card entrance
Confirm
Enter setting status
Terminal seat (diagram)
Get right
Power output
Audio signal output
Hook
Serial number paster
Loudspeaker hole
Terminal seat
Power line
Button seat (diagram)
Sea details in page 14
Back cover
Page 10

2. Button descriptions
This time recorder has two modes, which are normal print mode and setting mode. In the
normal print mode, the shifting switch is set on the right, and in the setting mode, the shifting
switch is set on the left.
Normal mode: (six keys from left to right)
Key
number
Function
of the key
Setting mode: (six keys from left to right)
Reset Volume ▲ ▲ ▲ ▲ ▲ ▲ ←Set
Add a value
Reduce a value
Volume key: Spin the key by a cross screwdriver to adjust the volume of music
output
Reset key: When pressing this key, the time recorder resets and self-checks, and all settings
restore factory-fresh default.
Name of the key Function of the key
1. Color change key In setting mode, press this key to enter the time setting of color
2. Music key In setting mode, press this key to enter the time setting of
3. Column key In setting mode, press this key to enter the time setting of
4. - reduce In setting mode, press this key to reduce a value of the
5. + add In setting mode, press this key to add a value of the twinkling
6. Confirm key In setting mode, press this key to confirm saving for the
1 2 3 4 5 6
The
printing
position is
in the 1st
column
Change color Ring Shift - + Confirm
Key change column
Music key
Color change key
change.
music ring.
column change.
twinkling number or functional group.
number or functional group.
current setting and enter the next function setting.
The
printing
position is
in the 2nd
column
The
printing
position is
in the 3rd
column
The
printing
position is
in the 4th
column
Confirm key Set switch
The
printing
position is
in the 5th
column
The
printing
position is
in the 6th
column
Page 11

Page 12

LCD screen on the
3. The time recorder is composed of the following parts. Check whether all subassembly are
complete before operation.
A machine A manual A set of keys Three punch papers Warranty card
III. Operation process descriptions
3-1 Power supply
1. Please use a power supply with stable voltage.
2. Please check whether the power plug and voltage are suitable.
3. There is a lithium-ion battery installed, which drives the internal clock during power failure
(valid time of accumulated power failure is a year).
3-2 Open and shut the upper cover
• When it is necessary to conduct four to seven
settings and ribbon cartridge replacement, please
open the upper cover.
1. Insert the key into the hole, rotate as shown in
the diagram on the right, and remove the upper
cover.
2. When shutting the upper cover, please operate
anticlockwise.
IV. Function setting (able to debug after open the upper cover)
4-1 Year setting
1. Move the setting switch (below the setting) to the left to enter the
setting state, press key and select the group, when it displays
01 flickering.
2. Press the confirm key to enter the setting of this group.
3. Press key until the setting column displays the year to
be set.
4. Press the confirm key to complete and enter the next group
of setting.
5. Continue to set or move the setting switch to the right, and
shut the upper cover to resume operation.
clock face (diagram)
Page 13

LCD screen on the
4-2 Date setting
1. Move the setting switch to the left to enter the setting
state, and press key to select the group, when it
displays 02 flickering.
2. Press the confirm key to enter the setting of this
group.
3. Press key until the setting column displays the
month to be set.
4. Press the confirm key, and the column will change to
display the date flickering.
5. Press key until the setting column displays the
date to be set.
6. Press the confirm key to complete and enter the next
group of setting.
7. Continue to set or move the setting switch to the right,
and shut the upper cover to resume operation.
4-3 Time setting
1. Move the setting switch to the left to enter the
setting state, and press key to select the group,
when it displays 03 flickering.
2. Press the confirm key to enter the setting of this
group.
3. Press key until the setting column displays
the hour to be set.
4. Press the confirm key, and the column will change
to display the minute flickering.
5. Press key until the setting column displays
the minute to be set.
6. Press the confirm key to complete and enter the
next group of setting.
7. Continue to set or move the setting switch to the
right, and shut the upper cover to resume operation.
clock face (diagram)
Page 14

LCD screen on the
4-4 Time of changing date setting
1. Move the setting switch to the left to enter the
setting state, and press key to select the
group, when it displays 04 flickering.
2. Press the confirm key to enter the setting of this
group.
3. Press key until the setting column displays
the hour to be set.
4. Press the confirm key, and the column will
change to display the minute flickering.
5. Press key until the setting column displays
the minute to be set.
6. Press the confirm key to complete and enter the
next group of setting.
7. Continue to set or move the setting switch to the
right, and shut the upper cover to resume operation.
4-5 Card specification setting
1. Move the setting switch to the left to enter the
setting state, press key to select the group,
when it displays 05 flickering. (Default value is
00)
2. Press the confirm key to enter the setting of this
group.
3. Press key to select 00 or 01 at the setting
column.
00: normal print 01: rise a grid then print
4. Press the confirm key to complete and enter the
next group of setting.
5. Continue to set or move the setting switch to the
right, and shut the upper cover to resume operation.
4-6 Salary classification setting (abroad)
1. Move the setting switch to the left to enter the
setting state, and press key to select the group,
when it displays 06 flickering. (Default value is 00)
2. Press the confirm key to enter the setting of this
group.
clock face (diagram)
Page 15

LCD screen on the
3. Press key to select 00 or 01 at the setting column. (00: print
with monthly salary, 01: print with weekly salary) For example: If
choosing 01, monthly salary print, then it enters into the
settlement date setting. In the settlement date setting,
press key, and one day can be chosen from Sunday
to Saturday as the settlement date. For example, if
Wednesday is chosen, Thursday will be the first day to
print fro the weekly salary print.
4. Press the confirm key to complete and enter the next
group of setting.
5. Continue to set or move the setting switch to the right,
and shut the upper cover to resume operation.
4-7 Time system setting
1. Move the setting switch to the left to enter the setting
state, and press key to select the group, when it
displays 07 flickering. (Default value is 24)
2. Press the confirm key to enter the setting of this group.
3. Press key to select 24 or 12 at the setting column.
4. Press the confirm key to complete and enter the next
group of setting.
5. Continue to set or move the setting switch to the right,
and shut the upper cover to resume operation.
clock face (diagram)
4-8 Printing position adjustment
1. Move the setting switch to the left to enter the
setting state, press key to select the group,
when it displays 08 flickering. (Default value is
08:08)
2. Press the confirm key to enter the setting of this
group.
3. Setting range is (00-15). Press key to add or
reduce progressively; the larger the value, the upper
the printing position at the column is, otherwise, the
lower the printing position is.
Page 16

LCD screen on the
4. Press the confirm key; at this time, the setting range (00-30) will display in the setting column.
Press key to add or reduce progressively; the larger the value, the more right the printing
position at the column is, otherwise, the left the printing position is.
5. Press the confirm key to complete and enter the next group of setting.
6. Continue to set or move the setting switch to the right, and shut the upper cover to resume
operation.
4-9 Daylight saving time setting (abroad)
1. Move the setting switch to the left to enter the setting state, and
press key to select the group, when it
displays 09 flickering.
2. Press the confirm key to enter the setting of
this group.
3. Press key until the setting column
displays the month to be set.
4. Press the confirm key, and the column will
change to display the date flickering.
5. Press key until the setting column
displays the date to be set.
6. Press the confirm key, and the column will
change to display the time flickering.
7. Press key until the setting column
displays the time to be set.
8. Press the confirm key, and it enters the
month setting. Continue to set follow the
methods below.
9. Press the confirm key to complete and enter
the next group of setting.
10. Continue to set or move the setting switch
to the right, and shut the upper cover to resume
operation.
clock face (diagram)
4-10 Centesimal system setting (abroad)
1. Move the setting switch to the left to enter the setting state, press key to select the
group, when it displays 10 flickering. (Default value is 00)
2. Press the confirm key to enter the setting of this group.
Page 17

LCD screen on the
3. Press key until selecting 00, 01 or 02 at the setting column.
00:60 min system print; 01: 100 min system print; 02: 12
hour system and bottom line system print.
4. Press the confirm key to complete and enter the next
group of setting.
5. Continue to set or move the setting switch to the right,
and shut the upper cover to resume operation.
4-11 Setting of the front and back of timecard
1. 1. Move the setting switch to the left to enter the
setting state, and press key to select the
group, when it displays 11 flickering. (Default
value is 00)
2. Press the confirm key to enter the setting of this
group.
3. Press key until selecting 00 or 01.
01: have identification; 00: have no identification
4. Press the confirm key to complete and enter the
next group of setting.
5. Continue to set or move the setting switch to the
right, and shut the upper cover to resume
operation.
clock face (diagram)
V. Setting of color change time
1. Press the color change key in the setting state to start
setting color change time.
2. Press key to select the number of the group, and
if there’s no information, start from the first group.
3. Press the confirm key to enter the setting of this group.
4. Press key to select hours of time change to be set,
and press the confirm key.
5. Press key to select minutes of time change to be
set, and press the confirm key.
6. Press key to select BLACK or RED, and press
the confirm key.
Page 18

LCD screen on the clock
VI. Setting of ring time
7. Now it enters the week setting. Press key to
face (diagram)
select from Sunday to Saturday, and the day to be set
will flicker. If it needs to cancel the color change
function of the day to be set, press the color change key,
and the cursor on that day will disappear. If it needs to
resume that function, press the color change key again.
8. Press the confirm key to complete and enter the next
group of setting.
9. Continue to set or move the setting switch to the right, and shut the upper cover to resume
operation.
1. Press the ring key in the setting state to start setting
color change time.
2. Press key to select the number of the group,
and if there’s no information, start from the first
group.
3. Press the confirm key to enter the setting of this
group.
4. Press key to select hours to be set, and press
the confirm key.
5. Press key to select minutes to be set, and
press the confirm key.
6. Press key to select 01, 02 or 03, and press
the confirm key.
01: internal music output 02: external part output
03: simultaneous output of internal and external
parts
7. Press the confirm key to enter the output setting.
Press key to set minutes. Press the confirm
key to enter the second adjustment (adjustable range
is 0-59 seconds), and press the confirm key.
8. Now it enters the week setting. Press key to
select from Sunday to Saturday, and the day to be set
will flicker. If it needs to cancel the color change
function of the day to be set, press the color change
key, and the cursor on that day will disappear. If it
needs to resume that function, press the color change
key again.
Page 19

LCD screen on the
9. Press the confirm key to complete and enter the next group of setting.
10. Continue to set or move the setting switch to the right, and shut the upper cover to resume
operation.
VII. Setting of automatic shifting time
1. Press the shifting key in the setting state to start
setting shifting time.
2. Press key to select the number of the group,
if there’s no information, start from the first group.
3. Press the confirm key to enter the setting of this
group.
4. Press key to select hours to be set, and press
the confirm key.
5. Press key to select minutes to be set, and
press the confirm key.
6. Press key to select shifting time column to be
set, and press the confirm key. (Range 01-06)
7. Now it enters the week setting. Press key to
select from Sunday to Saturday, and the day to be set
will flicker. If it needs to cancel the color change
function of the day to be set, press the color change
key, and the cursor on that day will disappear. If it
needs to resume that function, press the color change
key again.
8. Press the confirm key to complete and enter the
next group of setting.
9. Continue to set or move the setting switch to the
right, and shut the upper cover to resume operation.
clock face (diagram)
VIII. Punching methods
1. The lights of keys being on indicates that it is
available to print. Gently insert the timecard, which
will be automatically sucked in to be printed.
2. The function of distinguishing front and back side
can be set for this machine. If the timecard is
anti-inserted, the sound of “beee…” will be heard,
and meanwhile the timecard will be dropped out
without being printed.
Page 20

3. As the timecard will be automatically sucked in, please don’t insert hard into the entrance.
And don’t pull hard when printing.
4. Don’t insert anything else except the timecard.
IX. Fault handling
9-1 Fault handling
Fault Reasons Handling methods
Power failure
Bad connection of the
Not suck card
Time stops
Printing is light in color
Wrong printing position
Have “beee…” sound and
do not print
Wrong date Wrong date setting Set date properly again
Skew printing Wrong using methods
power supply
Inserting or pulling card
hard
Power failure
Bad connection of the
power supply
Wrong ribbon position
Or ribbons are out
Wrong settlement date
setting
Wrong using methods
The timecard is
anti-inserted
The timecard is inserted in
a wrong way
9-2 Fault display codes:
①Dislocation of left or right limit: E01
②Clock face mistake: E02
③Lifting mistake: E03
Wait for power restoration
Check the power socket
Check timecard’s inserting
and taking out methods
Wait for power restoration
Check the power socket
Properly install the ribbon
or replace the ribbon
Properly set the setting
date
Check timecard’s inserting
and taking out methods
Properly insert again
Insert the card lightly
Check timecard’s inserting
and taking out methods
Page 21

Horizontal and upward
Can’t stand heat
Can’t stand water and rain
Power output (AC220V 60W)
Audio signal output (8Ω 0.25M)
X. Notes
Proper setting and good using environment can maintain a long
lifespan of the time recorder.
This time recorder can be put on the horizontal table or be hung on
the wall.
Wrong setting places
Don’t put this time recorder at places
with direct sunlight or heat source in case
of deformation and aging to affect
equipment’s life span.
Can’t stand dust
Don’t put this time recorder at places
with lots of dust or unstable places.
External bell and signal output
If the music needs to be output
to the external loudspeaker or
bell, please connect wires with
terminal holes at the back of the
machine according to the
diagram on the right.
In the ring setting, the ring mode
should be: 02 or 03.
Don’t put this time recorder at places
with water or rain. This equipment does
not have waterproof.
Can’t stand vibration
Don’t put this time recorder at places
with strong vibration or places easy to
get shocked.
Page 22

Handle
Guard strip
XI. Maintenance
Before maintenance, the operator must free himself from static electricity.
If the operator starts repairing without freeing himself from static electricity, the static
electricity may cause damage to this equipment.
Replace ribbon
1. Insert key and open the upper cover to enter setting state
2. Hold the tenon of the ribbon and pull it towards yourself, and take out the ribbon box.
Tenon
3. Place the new ribbon box into the middle position between the print head and the guard
strip, press the ribbon box down to make the rotating rod rotate clockwise until the
ribbon tightens. Move the setting switch to the right, and shut the upper cover to resume
operation. Turn the set switch back to the right side, close the lid, and restore operations.
Print head
Ribbon rotating button of print head
Replace button battery
1. Insert key and open the upper cover.
Unscrew the two screws on both sides fixing
front and back covers with a cross-head
screwdriver, and the button battery on the
motherboard inside the machine can be seen.
2. Insert the new button battery into the
battery holder. Pay attention to battery’s
polarity.
Button battery’s inserting hole
Page 23

XII. Specification
Power supply AC220V±10%
Amperage 0.19A
Machine size 195×120×245mm (L×W×H)
Machine weight 2.5kg
Operation temperature
Operation humidity
Card size 85mm×188mm (W*L)
XIII. Comment
0℃~40℃
10%~80% RH
Ps: Color change key: able to set two colors, red and black, and color change time, totally 24
groups.
Ring key: able to set music time or power output time, totally 24 groups.
Shifting key: able to set automatic change time of the printing column, totally 24 groups.
key: adjust values in the setting column.
Confirm key: use this key to save the setting information.
Clear method: press the confirm key and key simultaneously for 3 seconds until
hearing the “bee…” sound.
XIV. Case of setting
Mr. B in A Company bought a six-column double-color time recorder in Jun 8th, 2005. The
commuter time of A company is:
On duty in
the morning
8:00 12:00 14:00 18:00 19:00 21:00
Off duty at
noon
On duty in
the
afternoon
Off duty in
the
afternoon
On duty in
overtime
Off duty in
overtime
Page 24

I. A company requires setting the following functions:
Time
setting
Automati
Year Month Day Hour Minute
2008 8 8 8 18
The 1
st
column
The 2
column
nd
The 3
column
rd
The 4
th
column
The 5
column
c column
change
Automati
c color
change
0:00-11:59 12:00-12:29 12:30-17:59 18:00-18:29
Black Red Black Red Black Red Black
00:00-8:00 8:01-11:59
12:00-14
:00
14:01-17:
59
18:00-19:00 19:01-20:59
18:30-20:
59
8:00 12:00 14:00 18:00 19:00 21:00
Music
ring
30 seconds 30 seconds 30 seconds 30 seconds 30 seconds 30 seconds
II. Detailed procedure of setting
Notes: LCD---(Liquid Crystal Display)
LCD flickering---Numbers or symbols displayed on the LCD appear and disappear
alternately.
LED light flickering---LED light is on and off alternately.
Setting
proced
Operating method
ure
1. Start the machine and enter the setting mode
1.1 Open the package of the time
recorder, take it out and pull up the
protection card in the card entrance
of the time recorder.
1.2 Add electricity (220V), insert the
accessory key into the key hole,
rotate clockwise lightly and open
the upper cover.
1.3 Move the setting switch (shifting
switch being set) to the left side,
and the time recorder enters the
setting mode, in which many
functions can be set. (The right side
is the normal mode, in which only
normal print can be made)
2. Set date and time
2.1 After entering the setting mode
(D221), LCD displays as follows:
Time recorder’s phenomenon and
explanation
The protection card must be taken out
and mustn’t be sucked into the time
recorder to cause fault.
I. After adding electricity, the time
recorder will home and self-check.
II. Pointers on the clock face will
rotate to the right.
1. Pointers on the clock face move to
12:00.
2. The printing head moves to the
fourth column.
3. 3 LED lights to the far right will
flicker.
1. Flickering “01” means functional
group.
2. Pressing key can change the
functional group to be set.
3. Press “confirm”—confirm button
to enter the setting of this functional
group.
th
The 6
column
21:00-23:59
After
21:00
th
Page 25

2.2 Press the confirm key to enter the
setting of this group. What LCD
displays is:
1. Flickering “2008” indicates the
current year.
2. Press key to change the
year value.
2.3 Press key to adjust LCD value,
which is: 2008, indicating that the
current year is 2008. Press the
confirm key to save and display date
setting.
2.4 What LCD displays is:
Press the confirm key to enter date
setting.
2.5 What LCD displays is after entering
date setting:
2.6 Adjust the value into 06 (meaning
June) through key. Press the
confirm key to enter date setting.
What LCD displays is:
Press the confirm key to save,
otherwise the setting values won’t be
saved.
1. Detailed setting can be seen at
Manual 4-2 for reference.
2. If need to enter date setting, please
press the confirm key.
1. Flickering number indicates
month.
2. Press key to change the
month value.
1. Flickering number 01 indicates
date.
2. Press key to change date
value.
2.7 Adjust the value into 18 (18th day)
through key. Press the confirm
Must press the confirm key to save
the setting date.
key to enter time setting.
2.8 Press the confirm key to enter time
setting. What LCD displays is:
1. Detailed setting can be seen at
Manual 4-3 for reference.
2. If need to enter time setting,
(03 indicates functional group, 08
indicates hour, 00 indicates minute)
please press the confirm key.’
3. Set it as 8:18 through the way
same with date setting.
4. Must press confirm key to save.
2.9 2.1-2.8 below completes the setting of year, date and time.
Setting of color change time
3.1 (Continuing the setting mode below)
press the color change key to enter
the setting of color change time.
What LCD displays is:
Press the confirm key to enter the
setting of this group.
1. Color change key is the first key
from left. At this time, there are 4
LED, 1, 4, 5, 6 (color change, ,
confirm) flickering.
2. Flickering 01 indicates the color
change time of the first group.
3. Press the confirm key to enter the
setting of this group.
Page 26

3.2
After starting setting, use key
to set the hour as 08.
3.3
The flickering value is minute. Use
key to adjust to 01, that is,
the first time of color change is “08:
01”.
3.4
The flickering value indicates the
changed color. The adjusted
flickering value is 02.
3.5
Press the confirm key to enter the
setting of week. What LCD indicates
is Sunday to Saturday, which is the
default. Set is as the default and
press the confirm key.
3.6 Set 12:00 as black according to
procedures of 3.1—3.5
3.7 Set 14:01 as red according to
procedures of 3.1—3.5
3.8 Set 18:00 as black according to
procedures of 3.1—3.5
3.9 Set 19:01 as red according to
procedures of 3.1—3.5
3.10 Set 21:00 as black according to
procedures of 3.1—3.5
Setting of ring time
4.0 In the setting mode, press the ring
key, and LCD displays: Press the
confirm key and enter the setting of
this group. There are 4 LED (2, 4, 5,
6) flickering.
1. 00:00 indicates hour: minute
2. Press confirm key to enter the
setting of minute.
3. Available to adjust the flickering
value.
1. Set as the time of the color that will
change.
2. Press the confirm key to enter the
changed color needed, which is the
printed color at this time.
1. 01 indicates black, 02 indicates red.
2. It indicates that after 8.01, red color
is printed.
3 Press the confirm key to enter the
setting of week.
1. Press the confirm key to save.
2. It indicates that after 8.01, red color
is printed。
3. Next is the setting of the second
group.
1. Refer to the Manual—V. setting of
color change time.
1. Set the ring. It needs to set the ring
time, the ring method and the ring
time span.
2. See details at the Manual—VI.
Setting of ring time for reference.
4.1 Press the confirm key to enter the
setting: Adjust the flickering value
to 08 (indicating 8 o’clock).
1. The flickering figure on the left is
hour, the right figure indicates
minute, which is the ring time.
2. Press the confirm key to enter ring
mode.
4.2 What LCD displays is:
The flickering figure is the minute to
1. The flickering figure on the right is
minute.
Page 27

be set, and press the confirm key.
2. Press the confirm key to enter ring
mode.
4.3 What LCD displays is:
The flickering figure is the minute to
be set, and press the confirm key.
Set it as 01 method.
1. Ring mode: 01 internal music
output, 02 external ring output, 03
simultaneous outputs of internal
music and external ring. Default is 01,
which is generally set.
2. Adjust flickering value.
4.4 What this LCD displays is the time span
of ring. Press the confirm key for twice
and enter the setting of week.
4.5 The default is Sunday to Saturday. Press
the confirm key to save, and enter the
setting of next group.
4.6 Set 12:00 as internal music output of
mode 1 according to procedures of
4.0-4.5. Ring for 22 seconds
4.7 Set 14:00 as internal music output of
mode 1 according to procedures of
4.0-4.5. Ring for 22 seconds
4.8 Set 18:00 as internal music output of
mode 1 according to procedures of
4.0-4.5. Ring for 22 seconds
4.9 Set 19:00 as internal music output of
mode 1 according to procedures of
4.0-4.5. Ring for 22 seconds
4.10 Set 21:00 as internal music output of
mode 1 according to procedures of
4.0-4.5. Ring for 22 seconds
Setting of automatic shifting time
5.0 At the setting mode, press the shifting key
(column setting key) to enter the setting of
automatic shifting time. LCD:
There are four LED (3,4,5,6) flickering.
5.1 Press the confirm key to enter the setting
of the first group. Adjust the flickering
value to 00.
1. Able to adjust the flickering
value to change the time span
of ring.
2. Set it as 22 seconds.
Press the confirm key to save.
1. See details at VII of the
Manual for reference, that is,
when to be set, which column
for the printing position to
move to.
2. Need to set: shifting time,
column.
The flickering figure on the left
is the hour, and on the right is
the minute.
5.2 Press the confirm key to enter the column
to be moved to at this time.
After setting time span, enter
the selecting of the next
printing column.
5.3 Set it as the 1st column, and press the It indicates that at 00:00, the
Page 28

confirm key to enter the selecting of
week.
5.4 Default is Sunday to Saturday. Press the
confirm key to save and enter the setting
of next group.
5.5 Complete the setting of the printing
position moving to the 2nd column as
12:00 according to procedures of 5.0-5.4
5.6 Complete the setting of the printing
position moving to the 3rd column as
12:30 according to procedures of 5.0-5.4
5.7 Complete the setting of the printing
position moving to the 4th column as
18:00 according to procedures of 5.0-5.4
5.8 Complete the setting of the printing
position moving to the 5th column as
18:30 according to procedures of 5.0-5.4
5.9 Complete the setting of the printing
position moving to the 6th column as
21:00 according to procedures of 5.0-5.4
Exit the setting mode (setting), and enter the normal printing mode.
1. Move the shifting switch from the left
to the right, that is, and enter the normal
printing mode from setting mode.
2. Install the upper cover and lock it.
3. A company has finished the whole
setting according to the following
procedures and can make normal printing.
printing position moves to the
1st column.
Must press the confirm key to
save and enter the setting of
next group.
1. Pointers on the clock face
will rotate, pointing to the right
time.
2. The printing position will
move to the set position.
There’s only one LED lights,
indicating the printing column.
Page 29

Use standard punching paper of the microcomputer time recorder
Page 30

DELI GROUP CO., LTD.
Add: No. 128, Bus Stop West Road, Huangtan
Town, Ninghai County, Zhejiang
Tel: 0574-65278888
Fax: 0574-65273660
http://www.deli-stationery.com
Perform standard: Q/NDL 68
 Loading...