

Page 1
EN USER GUIDE
Oven
Page 2

Dear Customer,
When you discover
DDee DDiieettrriicchh
products you experience the same fee-
lings that only objects of value can arouse.
You are immediately attracted as soon as you see them. The quality of
the design is illustrated by its timelessness, degree of refinement and
elegance, and high standard of finish, resulting in perfect harmony between different appliances.
Then comes the irresistible urge to touch.
DDee DDiieettrriicchh
design makes the
most of sturdy and noble materials; priority is given to authenticity.
By combining the most advanced technologies with the best materials,
DDee DDiieettrriicchh
makes products of the highest quality for the benefit of all
those who love cooking.
We hope you are extremely satisfied with this new appliance and will be
happy to receive your suggestions and to answer your questions. Please
send them to our customer service department or use our Internet site.
We invite you to register your product at
wwwwww..ddee--ddiieettrriicchh..ccoomm
to take
advantage of all the benefits the brand has to offer.
Thanking you for buying
DDee DDiieettrriicchh
Find further details on the brand at
wwwwww..ddee--ddiieettrriicchh..ccoomm
Visit La Galerie De Dietrich, 6 rue de la Pépinière in Paris
Open Tuesday to Saturday 10 a.m. to 7 p.m.
Customer Service : 0892 02 88 04
Page 3

3
EN
CONTENTS
1 / INFORMATION FOR THE USER
••
Steam cooking ____________________________________________ 04
••
Safety warnings
____________________________________________
05
••
Care of the environment ___________________________________ 06
2 / INSTALLING YOUR APPLIANCE
••
Choice of location
__________________________________________
07
••
Building in
________________________________________________
07
••
Electrical connection
_______________________________________
08
3 / DESCRIPTION OF YOUR APPLIANCE
••
Operating principle _________________________________________ 09
••
Introduction to your oven
____________________________________
09
••
Accessories
_______________________________________________
10
••
Introduction to the programmer ______________________________ 11
4 / USING YOUR APPLIANCE
••
How to set the time _________________________________________ 12
••
Programmed cooking times for different functions ___________________ 12
••
Instant steam cooking ______________________________________ 13
••
Cancelling cooking in progress_______________________________ 14
••
At the end of a cooking programme___________________________ 14
••
Water management_________________________________________ 14
••
Delayed cooking ___________________________________________ 15
••
Using the timer function_____________________________________ 16
••
Control panel locking (child safety device)______________________ 16
5 / FUNCTION DESCRIPTION AND COOKING CHART _________________ 18
••
Oven cooking modes table __________________________________ 19-20
6 / CARING FOR AND CLEANING YOUR APPLIANCE
••
Cleaning the outer surfaces
__________________________________
21
••
Cleaning the cavity
_________________________________________
21
••
Cleaning the water intake tube _______________________________ 21
••
Cleaning the steam generator ________________________________ 21
••
Cleaning the gutter _________________________________________ 21
7 / TROUBLESHOOTING __________________________________________ 22
••
Changing the bulb
_________________________________________
23
8 / AFTER-SALES SERVICE
••
Service calls
______________________________________________
24
Page 4

4
EN
1 / INFORMATION FOR THE USER
STEAM COOKING
General comments
Steam cooking presents nothing but advantages if you follow the instructions for use. Healthy
and natural, steam cooking preserves the full flavour of foods. A delicate sauce or aromatic herb
seasoning adds that something extra that makes the difference.
This kind of cooking produces no cooking smells. There is no need to season the cooking water with herbs or spices; however, you can flavour a fish by placing it on a bed of seaweed or make a savoury poultry dish by adding a bunch of rosemary or tarragon.
You can cook meat, fish and vegetables simultaneously.
Steam cooking gently reheats pasta, rice and mashed potatoes with no risk of food sticking or
drying out.
It facilitates cooking creams, tarts and rice pudding...covered with aluminium foil, food is not
wetted by condensation water.
There is no need to add salt before cooking, nor even cooking water.
To make meat look more appetising, quickly brown it on all sides in a frying pan using hot butter.
Compared to boiling, steaming offers only advantages:
It is quick: cooking starts immediately whereas for food in a water-filled dish, the cooking time
only really starts once the water returns to a full boil.
It is healthy: vitamins (those that are water soluble) and minerals are well preserved because
they hardly dissolve in the condensation water that touches the food.
Moreover, no fats are used for this type of cooking.
Steam maintains the taste of food. It does not add odours, nor the taste of the grill or the pan.
Furthermore, it takes nothing away because the food is not diluted in the water.
Words of advice: there is no point in using this cooking method to prepare fish that is not fresh
or vegetables left in the refrigerator for a week: the results will be catastrophic!
Steam does not spread tastes or odours therefore do not hesitate to save both time and money
by cooking items side by side, but not touching. For example, you can cook fish next to a dessert.
Steam is also suitable for blanching, defrosting and reheating or even keeping warm, especially sauces.
First use a very small amount of fat to heat meats like poultry, veal and pork so that they take on
an appetising browned appearance. Then finish cooking them using the steam method.
Cut into pieces, food cooks faster and more evenly than if left whole.
••
Page 5

5
EN
1 / INFORMATION FOR THE USER
Important
Keep this user guide with your appliance. If the appliance is ever sold or transferred to
another person, ensure that the new owner receives this user guide. Please become familiar
with these recommendations before installing and using your oven. They were written for
your safety and the safety of others.
SAFETY GUIDELINES
— This oven was designed for use by private
persons in their homes. It is intended solely
for cooking foodstuffs. This oven does not
contain any asbestos-based components.
— This appliance is not intended for use by
people (including children) with impaired physical, sensorial or mental abilities, or people
lacking in knowledge or experience, unless
they receive prior supervision or instructions
on using the appliances through a person responsible for their safety.
— When you receive the appliance, unpack it
or have it unpacked immediately. Check its
overall condition. Make note of any concerns
or reservations on the delivery slip and make
sure that you keep a copy of this form.
— Your appliance is intended for standard
household use. Do not use it for commercial
or industrial purposes or for any other purpose than that for which it was designed.
— Do not modify or attempt to modify any of
the characteristics of this appliance. That
would be dangerous to your safety.
— Keep young children away from the appliance while it is in operation. That way, you will
avoid the danger of them being burned by
knocking over cooking pans.
— Never pull your appliance by the door handle.
— During cooking, ensure that the door of
your oven is properly closed so that the seal
can do its job.
— Please ensure that children do not play with
the appliance.
— When in use, the appliance becomes hot.
Do not touch the heating elements inside the
oven. You run the risk of serious burns.
— When placing dishes inside or removing
them from the oven, use heat-protective kitchen gloves.
— At the end of cooking, do not touch dishes
with your bare hands.
— Do not place heavy weights on the oven
door when open, and make sure that children
cannot climb or sit on it.
— The oven must be turned off when cleaning
the inside.
— Intensive and prolonged use of the appliance may give rise to the need for additional
ventilation, by opening a window, or by
increasing the power of the mechanical fan.
— In addition to the accessories supplied with
your oven, only use dishes capable of withstanding high temperatures (follow the manufacturer’s instructions).
— After using your oven, make sure that all the
controls are in the off position.
— Never use steam or high-pressure devices to
clean the oven (electrical safety requirement).
••
Page 6

6
EN
1 / INFORMATION FOR THE USER
CARE FOR THE ENVIRONMENT
••
— This appliance’s packing materials are recyclable. Please recycle the packaging and help
protect the environment by placing it in the recycling bins provided by your local council.
— Your appliance also contains various recyclable materials. It therefore carries this logo to
indicate that used appliances should not be disposed of together with other waste. The manu-
facturer will arrange for the appliance to be recycled properly, in accordance with
European directive 2002/96/EC on Waste Electrical and Electronic Equipment.
Consult your local authority or your retailer to find the drop-off points for used
appliances nearest to your home.
— Thank you for helping to protect the environment.
Warning
Installation should only be performed by installers and qualified technicians.
This appliance complies with the following European directives:
- Low Voltage Directive 73/23/EEC modified by directive 93/68/EEC for the application of
CE marking.
- Electromagnetic Compatibility Directive 89/336/EEC modified by directive 93/68/EEC for
the application of CE marking.
- EC regulation no. 1935/2004 on materials and articles intended to come into contact with food.
Page 7

7
EN
2 / INSTALLING YOUR APPLIANCE
BUILDING IN
To do this:
1) Drill a 2 mm diameter hole in the cabinet
panel to avoid splitting the wood.
2) Attach the oven with the two screws.
Tip
To be certain that you have installed
your appliance correctly, do not
hesitate to contact a household appliance
specialist.
••
CHOICE OF LOCATION
The diagrams above show the dimensions of
a cabinet suitable for accommodating your
oven.
The oven may be installed either under a
worktop or in a full-height unit (open or
closed) that has the appropriate dimensions
for built-in installation.material for installation
must withstand the heat
Center the oven in the cabinet to ensure a
minimum distance of 10 mm with adjacent
cabinets.
• For greater stability, secure the oven in the
cabinet with two screws through the holes
provided for this purpose on the side panels.
••
Warning
We cannot be held responsible for any accident or incident resulting from non-existent,
defective or incorrect earthing.
If the electrical installation in your residence requires any changes in order to connect your
appliance, call a professional electrician.
If the oven malfunctions in any way, unplug the appliance or remove the fuse corresponding
to the circuit, to which the oven is connected.
50
50
10
20
550
450
550 mini
378
560
mini
445
400
592
456
450
560
550
26
Page 8
8
EN
2 / INSTALLING YOUR APPLIANCE
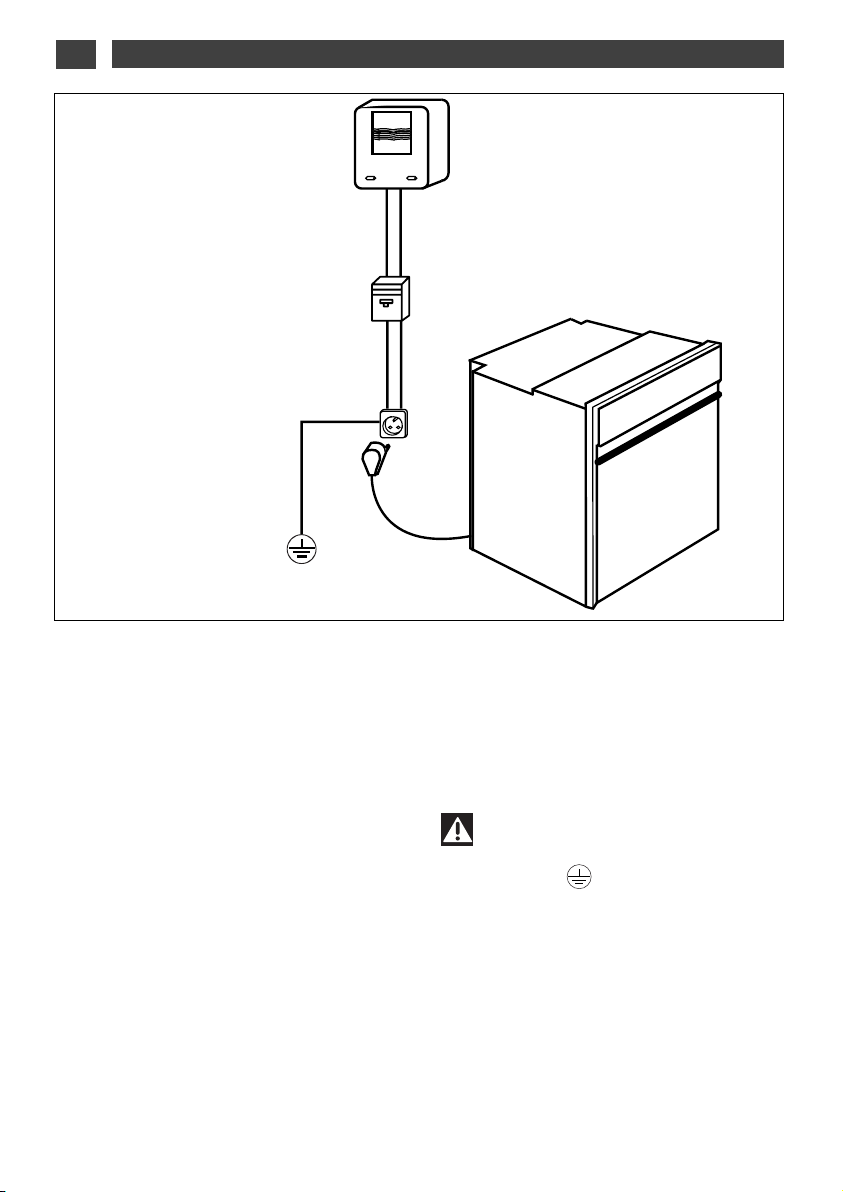
••
ELECTRICAL CONNECTION
Single phase 20A Meter
220-240V~ 50Hz
Electrical socket
2 pin +
eeaarrtthh
to IEC 60083 standard
220-240 V~ single-phase line
Power
supply cable
length 1.60 m approx.
10A fuse or residual current
circuit breaker
The appliance must be correctly installed to
ensure electrical safety. During fitting and
maintenance operations, the appliance must
be unplugged from the electrical system;
fuses must be switched off or removed.
The electrical connections are made before
the appliance is installed in its housing.
Ensure that:
- the electrical installation has sufficient
voltage,
- the electrical wires are in good condition,
- the diameter of the wires complies with the
installation requirements.
Your oven must be connected via a
(standardised) power cable with 3 conductors of
1.5mm2 (1 live + 1 neutral + earth) which must be
connected to a 220-240V~single-phase system.
by means of a 1 live + 1 neutral + earth IEC
60083 standard power socket or via an allpole cut-off device in compliance with the
installation rules.
It should be possible to disconnect from the
mains or using a sheet making current, or by
incorporating a switch in accordance with
fixed piping installation requirements.
Warning
The safety wire (green-yellow) is connected
to the appliance’s terminal and must be
connected to the installation’s earth.
In the case of connection to an electric wall
socket, it must remain accessible after
installation.
The circuit should be protected with a
10 Amp fuse.
If the power cable is damaged, it must be
replaced by the manufacturer, its AfterSales Service Department or a similarly
qualified person to avoid danger.
Page 9

9
EN
3 / DESCRIPTION OF YOUR APPLIANCE
INTRODUCTION TO YOUR OVEN
••
A
B
Display
Water intake tube
Steam generator
C
D
E
Control panel
Tank
Gutter
B
A
D
C
E
F
OPERATING PRINCIPLE
••
The water contained in the tank arrives in the
cavity via a pipe. This water is transformed into steam when it comes into contact with the
hot surface of the floor of the cavity:
this is the steam generator.
There is no need to add water to the cooking
dish. To ensure REAL STEAM COOKING,
your oven is supplied with specially designed
cookware that will produce perfect cooking.
Warning
You MUST fill the water tank to the
max. level before cooking. Replace the tank
in its housing by firmly pushing it ALL THE
WAY until you feel it LOCK INTO POSITION.
Warning
When in use, the appliance becomes
hot. Hot steam will escape when you open
the door of the appliance. Keep children at
a distance.
Page 10

10
EN
3 / DESCRIPTION OF YOUR APPLIANCE
ACCESSORIES
••
• Removable tank (fig.4)
Tank providing an independent water supply
to the oven.
Its capacity is approximately one litre
(maximum level).
fig.3
fig.4
• Shelf (fig.3)
Stainless steel removable shelf: it must be
placed in the oven.
Tip
The cookware may be cleaned in the
dishwasher.
Tip
Cookware may be cleaned in the
dishwasher.
Warning
Using demineralised water is
prohibited (not food quality).
• Food dish (fig.1)
Perforated stainless steel cooking dish to
prevent contact between food and condensation water.
fig.1
• Condensate dish (fig.2)
Stainless steel dish for the recovery of
condensation water.
fig.2
Tip
When cooking, place the dish in fig.1
on top of the dish in fig.2 in the opposite
direction, so that they do not nest inside
each other (see diagram opposite).
For storage, place the fig.1 dish on top of
the fig.2 dish the same way round, so that
they nest inside each other.
Page 11

11
EN
3 / DESCRIPTION OF YOUR APPLIANCE
••
INTRODUCTION TO THE PROGRAMMER
A
A
B
Cooking modes display
Cooking time indicator
Cooking time/timer display
Timer indicator
End of cooking time indicator
C
D
E
Clock display
Temperature rise indicator
Oven temperature display.
Water management indicator
Keypad locked indicator (child safety device).
F
G
H
I
I
C
H
F
B
J
JED G
A
B
Temperature adjustment button
Time setting button for cooking time, end of cooking time and timer
Stop button
C
C
A
B
Page 12

12
EN
4/ USING YOUR APPLIANCE
•
How to set the time
--
When you connect to a power source,
the displays flashes 12:00.
- Set the time using the control knob.
Example: 12H30.
- Press the control knob to confirm.
The display stops flashing.
-
To alter the time
- Hold the button down for a few
seconds until the display flashes and then
release it.
A beep indicates that the time may now be
set.
- Adjust the time, using the knob.
Press the knob to confirm.
Note
If the setting is not confirmed, it will
register automatically after a few seconds.
••
USING THE PROGRAMMER
5
4
1
2
3
1
2
3
5
4
-
+
-
+
Page 13

13
EN
4/ USING YOUR APPLIANCE
Tip
To avoid spoiling the dish, do not open the
appliance door during cooking.
IMMEDIATE STEAM COOKING AT 100°C
Warning
Never turn on the oven without first putting
water in the tank.
YOUR OVEN HAS 8 STEAM COOKING
FUNCTIONS (see table on page 18).
••
5
4
6
7
1
2
3
•Immediate cooking
— The programmer should be displaying only
the time. It should not be flashing.
- Use the control knob to select the type
of cooking.
- Example: .
Recommended temperature 100? .
Time 25 minutes
-- SS
EETTTTIINNGG TTHHEE CCOOOOKKIINNGG TTIIMMEE
::
- Press the
BUTTON .
- 0:25 flashes
- Adjust, using the knob.
Example: 30 minutes.
-- AAddjjuusstt tthhee ccooookkiinngg tteemmppeerraattuurree
- Press the . button . The temperature flashes.
Set the temperature, using the knob.
Example: 95°C
- Make sure that the door is firmly closed.
- Press the control knob to confirm.
Your oven starts and counts down second
by second.
- To stop cooking, press and hold the
button for a few seconds .
4
5
6
7
1
2
3
Page 14

14
EN
4 / USING YOUR APPLIANCE
Warning
You MUST empty the tank.
0m00s is displayed. The display animation
ceases. A succession of intermittent beeps
sounds for three minutes.
To stop the beeps, press the button or
open the door.
You can stop cooking at any time by
pressing the button (press and hold for
approximately one second).
If steam generation has not yet begun
(approximately one minute), the oven stops
immediately and the time display disappears.
If steam generation has already begun, the
time changes to 3 minutes; a countdown
begins and the steam escapes before the
door is opened.
CANCELLING COOKING IN PROGRESS
••
WHEN COOKING IS COMPLETE
••
In the event of a water circuit-related
problem during cooking, the symbol flashes
and a beep is emitted (fig.1).
This error is relates specifically to:
- an empty tank.
- a poorly seated tank.
After these two items have been checked,
cooking automatically restarts as soon as the
door is closed.
WATER MANAGEMENT
••
1
1
1
1
Page 15

15
EN
4 / USING YOUR APPLIANCE
Tip:
You can view or change the end of cooking time by pressing the button . To cancel the
programme, if required, press the STOP button.
DELAYED COOKING
••
--
Cooking with delayed start and selec-
ted end of cooking time
Delayed cooking is possible in all cases
eexxcceepptt ffoorr ddeeffrroossttiinngg ffuunnccttiioonnss
:
PPrroocceeeedd aass ffoorr pprrooggrraammmmeedd ccooookkiinngg..
- Press the button twice until the
end of cooking time indicator starts to
flash.
“
- The end of cooking time indicator
flashes to indicate that it may now be set.
- Turn the selector knob to set the end of
cooking time.
- Example: end of cooking at 1:30 p.m.
- Press the control knob to confirm.
The end of cooking time registers automatically after a few seconds.
The cooking end time display stops flashing.
- The display returns to the time of day.
-An animation in the display indicates that
the oven is in delayed cooking mode.
The oven cavity lights up when cooking starts
and the light switches off at the end of cooking.
1
2
3
4
5
1
3
4
5
2
6
6
Page 16

16
EN
4 / USING YOUR APPLIANCE
Note
It is possible to change or cancel the timer programme at any time by turning it to 0:00 and
pressing STOP.
-- YYoouurr oovveenn’’ss pprrooggrraammmmeerr ccaann bbee uusseedd aass aann
iinnddeeppeennddeenntt ttiimmeerr tthhaatt aalllloowwss yyoouu ttoo ccoouunntt
ddoowwnn aa ttiimmee wwiit
thhoouutt uussiinngg tthhee oovveenn..
In this case, the timer display takes priority
over the clock display.
- Press the button.
- The timer symbol and 0m00s flash.
- Set the time using the control knob.
- Press the button again to confirm.
USING THE TIMER FUNCTION
••
The display stops flashing after a few seconds
and the timer starts to run, counting down the
time in seconds.
Once the time has elapsed, the timer emits a
series of beeps to let you know.
The beeps can be stopped by pressing any
button.
1
2
1
2
Page 17

17
EN
4 / USING YOUR APPLIANCE
LOCKING THE CONTROLS (CHILD SAFETY)
OVEN OFF
You can prevent access to the oven controls
by taking the following steps:
When the oven is off, press
SSTTOOPP
and
hold the buttons together for a few seconds.
A “padlock” appears in the display
- access to the oven controls is locked.
To unlock, press
SSTTOOPP
and hold the
buttons together for a few seconds.
The oven controls are once again accessible.
••
Note
You cannot lock the oven during cooking or if you have programmed a cooking cycle.
1
2
1
2
THE “STANDBY” FUNCTION
••
--
You oven is equipped with a standby function
- The display shows the time.
- After 4 minutes without any action by the user, the oven display switches into standby mode.
NNoonnee ooff tthhee bbuuttttoonnss aarree aaccttiivvee..
To reactivate the display, use the function selector.
- The oven display is operational and cooking is again possible
.
Page 18

18
EN
2 / USING YOUR APPLIANCE
--
Set the time to 00:10 (see setting the time on p.6)
- Press the button u ntil -CO-
is displayed.
- Adjust the contrast, using the knob.
- Press the control knob to confirm.
ADJUSTING THE CONTRAST
••
1
2
3
1
2
3
-
+
Page 19

19
EN
2 / USING YOUR APPLIANCE
--
Set the time to 00:00 (see setting the time
on p.6)
- Press the
SSTTOOPP
buttons simul-
taneously and hold down for 10 seconds until
DEMO is displayed.
- To return to normal mode, press
SS TT OOPP
the buttons again until DEMO
disappears.
DEMO MODE
••
1
1
Page 20

20
5 / DESCRIPTION OF THE FUNCTIONS
EN
VVeeggeettaabblleess aanndd mmeeaattss
DDeelliiccaattee wwhhoollee ffiisshh ((ttrroouutt))
CCooookkiinngg ddeelliiccaattee ffiisshh
((ssaarrddiinnee ffiilllleettss,, rreedd mmuulllleett)
)
CCooccoottttee eeggggss;; ssttuuffffeedd ttoommaattooeess tthhaatt hhoolldd tthheeiirr
sshhaappee..
RRaammeekkiinnss,, ccuussttaarrdd ccrreeaammss,, eettcc..
TTeerrrriinneess,, cchhiic
ckkeenn lliivveerrss..
RReehheeaattiinngg ccooookkeedd ddiisshheess
MMeelltteedd cchhooccoollaattee,, bbuutttteerr..
SSlliigghhttllyy wwaarrmm ffrruuiitt ffoorr iimmmmeeddiiaattee sseerrv
viinngg
DDeeffrroossttiinngg ffiisshh ffiilllleettss bbeeffoorree bbrreeaaddiinngg..
BBeerrrriieess tthhaatt mmuusstt rreemmaaiinn ccooooll
((ffoorr ppiieess aanndd ssaauucceess))
DDe
effrroossttiinngg mmeeaattss bbeeffoorree ggrriilllliinngg ((ee..gg..:: ssaauussaaggeess
))
SStteeaamm ccooookkiinngg mmooddee mmoosstt
oofftteenn uusseedd
FFoorr ccooookkiinngg
ddeelliiccaattee ffooooddss
TThhee mmeeaatt rreemmaaiinnss iirriiddeesscceenntt,,
tthhee ccoolllla
aggeenn iiss nnoott aappppaarreenntt..
FFoorr ccooookkiinngg
ddeelliiccaattee ffooooddss,, ffrruuiitt,, ccoommppootteess
LLooww hheeaatt
SSllooww ddeeffrroossttiinngg wwiitthhoouutt
cc
ooookkiinngg
TTeemmppeerraattuurree
FFUUNNCCTTIIOONNSS
CCOOOOKKIINNGG
CCOOOOKKIINNGG EEXXAAMMPPLLEESS
110000
8855
7755
9900
9955
8800
5555
6600
°°CC
CCooookkiinngg
TTeemmppeerraattuurree °°CC
PPrrooggrraammmmeedd ttiimmee
MMiinn.. ttiimmee sseettttiinngg
MMaaxx.. ttiimmee sseettttiinngg
25 min
15 min
15 min
20 min
30 min
15 min
30 min
30 min
5 min
5 min
5 min
5 min
5 min
5 min
5 min
5 min
1 hour
1 hour
1 hour
1 hour
1 hour
1 hour
1 hour
1 hour
100
85
75
90
95
80
55
60
PROGRAMMED COOKING TIMES FOR THE DIFFERENT
FUNCTIONS
••
Page 21

21
5 / OVEN COOKING CHART
EN
Potatoes
Fresh
peas
Green
beans
Artichokes
(small)
TTIIMMEE
Asparagus
Broccoli
Carrots
Celeriac
Pumpkin
Mushrooms
Courgettes
Chinese artichokes
Spinach
Chicory
Fennel
Turn ips
4400 ttoo 4455 mmiinn..
3355 ttoo 4400 mmiinn..
1188 mmiinn..
2200 ttoo 2222 mmiinn..
2255 ttoo 3300 mmiinn..
1155 ttoo 2200 mmiinn..
1155 mmiinn..
1100 ttoo 1155 mmiinn..
2200 mmiinn..
2200 mmiinn..
3355 mmiinn
3300 mmiinn..
2222 mmiinn..
3300 ttoo 3355 mmiinn..
1155 ttoo 2200 mmiinn..
2200 ttoo 2255 mmiinn..
2255 mmiinn..
4400 ttoo 4455 mmiinn..
placed upside down in the dish
for tips only, decrease cooking time
in small bunches
in thin, round slices
in thin slices
in cubes
in rounds
Core removed, cut in half
lengthways
cut in half
in cubes
Leeks
2255 mmiinn..
cut in half
cut into rounds
whole
• These times
depend on the type, size and freshness of the vegetables. Follow
the indications
that appear in the
“Dish”
column.
• The cooking time remains the
same regardless
of the quantity to
be cooked.
Example:
1 or 4 artichokes
require the same
cooking time.
• To check the
degree of cooking, insert the
tip of a knife into
the thickest part
of the vegetable;
if it is cooked
there should be
no resistance.
(fresh) stir while cooking
(frozen)
//
Cabbage
3300 ttoo 3355 mmiinn..
2222 mmiinn..
3300 ttoo 3355 mmiinn..
Brussels sprouts
Cauliflower florettes
Green, chopped
in thin strips
VVEEGGEETTAABBLLEESS
PPRREEPPAARRAATTIIOONNSS
NNOOTTEESS
Scallops
Mussels/
Whelks
Crabs
Lobsters
Langoustines
1100 ttoo 1122 mmiinn..
2200 ttoo 2255 mmiinn..
2255 mmiinn..
3300 ttoo 3355 mmiinn..
1122 ttoo 1155 mmiinn..
with seasoning
with seasoning
/
depending on weight
/
• Place the scallops on the rack
on the glass dish,
add aromatic
herbs.
• Place the shell
fish on a bed of
seaweed.
SSHHEELLLLFFIISSHH
CCRRUUSSTTAACCEEAANNSS
Apples/
peaches/pears
Compote
Baked custards
1100 ttoo 1155 mmiinn..
2255 mmiinn..
1100 mmiinn..
whole, peeled
fruit in strips
in ramekins
• Times depend
on ripeness.
FFRRUUIITT
PPUUDDDDIINNGGSS
FFOOOODD
Whatever the quantity
110000
110000
110000
110000
110000
110000
110000
110000
110000
110000
110000
110000
110000
110000
110000
110000
110000
110000
°°CC
9900
9955
9955
9955
9900
9900
9955
9900
Page 22

22
EN
5 / OVEN COOKING CHART
Pike
Cod/hake
Sea bream
Haddock
Herring
Pollack/
coley
Monkfish
Mackerel
Whiting/Cod
Skate
• *Steaks: round
slices of fish of 2
to 3 cm in
thickness
(180/200g) per
person.
• Insist on very
fresh produce.
• Place whole
fish in the dish as
they are or on
bay leaves, fennel
or other aromatic
herbs.
• As soon as
cooking is
complete, remove
the skin, which
will come away
easily.
Red mullet
Red mullet/Sole
Rock salmon
Salmon
Tuna
Trout
Whole (1 kg)
2255 ttoo 3300 mmiinn..
1133 ttoo 1155 mmiinn..
2200 ttoo 2255 mmiinn..
1155 mmiinn..
2200 mmiinn..
1155 ttoo 2200 mmiinn..
1155 mmiinn..
2200 mmiinn..
1155 mmiinn..
2255 ttoo 3300 mmiinn..
1155 mmiinn..
1100 mmiinn..
2200 mmiinn..
1155 ttoo 2200 mmiinn..
2200 ttoo 2255 mmiinn..
2200 ttoo 2255 mmiinn..
whole (1 kg)
steaks (180 g)*
whole (1 kg)
fillets
whole (200 g)
steaks (180 g)
whole (250 g)
depending on thickness
fillets
whole (200 g)
fillets
Thick steaks
(6 to 10 cm in length)
steaks (180/200 g)
steaks (180/200 g)
whole (200 g)
13 to 15 mins.
Beef
Pork
(tenderloin)
Poultry
(breast)
(stuffed)
Sausages
1155 ttoo 3300 mmiinn..
2255 mmiinn..
2200 ttoo 2255 mmiinn..
2255 mmiinn..
2200 mmiinn..
Roast 800 g.:
55 to 60 min.
Chicken thighs: 35 to 40 min.
Roast turkey: 50 -60 min.
Morteau 400 g
• Then brown
under the grill in
another dish.
MMEEAATT
Black/white pudding
1100 ttoo 1155 mmiinn..
• Fluff with a fork
when cooking is
complete.
RRIICCEE,, PPAASSTTAA
SSEEMMOOLLIINNAA
Rice pudding
3300 mmiinn..
100 g rinsed rice - 20 cl milk
- 2 dessertspoons sugar
Semolina
2200 mmiinn..
200 gr (1/4 litre water)
Place directly in a dish then cover with water or milk. The steam is not sufficient to
saturate these inflating foods. Place a sheet of aluminium foil on the dish to prevent
water droplets from falling in.
77 mmiinn..
55 ttoo 66 mmiinn..
88 mmiinn..
Boiled: placed directly on the rack.
Sof
t-boiled: placed directly on the rack.
Sunn
y side up: broken into an individual dish
placed on the rack and covered with cooking film.
Start with very
fresh eggs kept
at room
temperature
1100 ttoo 1122 mmiinn..
Hard-boiled
TTIIMMEESS
PPRREEPPAARRAATTIIOONNSS
NNOOTTEESS
FFOOOODD
Whatever the quantity
°°CC
FFIISSHH
8855
7755
8855
8855
8800
8855
7755
8800
8800
7755
8855
8855
8855
8855
110000
110000
110000
110000
110000
9955
9900
9900
EEGGGGSS
110000
110000
110000
110000
Cocotte: see detailed recipes.
110000
9900
110000
Page 23

23
EN6 / CARING FOR AND CLEANING YOUR APPLIANCE
CLEANING THE OUTER SURFACES
••
To clean both the electronic programmer window and the oven door, use a window washing
product applied to a soft cloth.
Do not use abrasive cleaning products or hard metal scrapers for cleaning the oven’s glass
door, which could scuff the surface and cause the glass to shatter.
To maintain your appliance in good condition, we recommend that you use Clearit cleaning
products.
Clearit offers professional products and solutions suited to the daily care of your kitchen and
household appliances.
You will find them at your usual retailer, along with a complete range of accessories and
consumables.
PPrrooffeessssiioonnaall eexxppeerrttiissee
wwoorrkkiinngg ffoorr yyoouu aatt hhoommee
CLEANING THE CAVITY
(AFTER EACH USE)
••
CLEANING THE WATER INTAKE TUBE
(ONCE A MONTH)
••
CLEANING THE STEAM GENERATOR
(ONCE A MONTH)
••
Wipe the cavity with a dry cloth after the steam generator has cooled or let the cavity air-dry by
leaving the door open.
Remove the water intake tube by unscrewing it.
Remove any hard-water deposits that may be inside (using a thin, pointed object such as a thin
skewer or a knitting needle).
Pour 1/2 cup of white alcohol vinegar on the generator.
Let sit for a few minutes, then clean and rinse with water.
Do not use sponges, abrasive powders or coffee maker descalers.
Remove the gutter by pulling it upward. Wipe
it off and return it to its position using the
three notches provided.
CLEANING THE GUTTER
••
Warning
The oven should not be cleaned with a
steam cleaner.
Page 24

24
EN
7 / TROUBLESHOOTING
Tip
In all circumstances, if you cannot deal with a problem yourself, contact the after-sales
service department without delay.
WWHHAATT SSHHOOUULLDD YYOOUU DDOO??PPOOSSSSIIBBLLEE
CCAAUUSSEESS
YYOOUU NNOOTTIICCEE TTHHAATT……
WWaatteerr oorr sstteeaamm lleeaakk
aarroouunndd tthhee ddoooorr dduurriinngg
ccooookkiinngg..
-- TThhee ddoooorr iiss nnoott pprrooppeerrllyy
cclloosseedd..
-- TThhee ddoooorr sseeaall iiss ddeeffeeccttiivvee..
-- CCaallll tthhee AAfftteerr SSaalleess SSeerrvviiccee
DDeeppaarrttmmeenntt..
-- OOvveenn ppoowweerr ssuuppppllyy ffaauulltt..
-- EElleeccttrroonniicc bbooaarrdd nnoott
wwoorrkkiinngg..
TThhee ddiissppllaayy ddooeess nnoott
lliigghhtt uupp
-- CChheecckk tthhee ppoowweerr ((uussee OOKK))..
-- CCaallll tthhee AAfftteerr SSaalleess SSeerrvviiccee
DDeeppaarrttmmeenntt..
IIff yyoouu hhaavvee aa ddoouubbtt aabboouutt tthhee ccoorrrreecctt ffuunnccttiioonniinngg ooff yyoouurr oovveenn,,
this does not
necessarily mean that there is a fault.
AAllwwaayyss cchheecckk tthhee ffoolllloowwiinngg::
-- TThhee bbuullbb hhaass bblloowwnn..
-- TThhee oovveenn iiss nnoott ccoonnnneecctteedd
oorr tthhee ffuussee hhaass bblloowwnn..
TThhee oovveenn lliigghhtt iiss nnoott
wwoorrkkiinngg..
-- RReeppllaaccee tthhee bbuullbb..
-- CCoonnnneecctt tthhee oovveenn oorr rreeppllaaccee
tthhee ffuussee..
Warning
- Repairs to your appliance should only be made by a professional. Non-standard re-
pairs may be a source of danger for the user.
Page 25

25
EN7 / TROUBLESHOOTING
CHANGING THE BULB
••
Tip
To unscrew the glass cover and the bulb, use a rubber glove, which will make removal
easier.
Warning
- Disconnect your oven before accessing the bulb, to avoid the risk of electric shock
and, if necessary, allow the appliance to cool down.
fig.1
The bulb is located at the back right of the
oven cavity.
- Disconnect the oven before touching the
bulb to avoid the risk of electric shock.
- Turn the lamp glass a quarter turn to the left.
- Unscrew the bulb in the same direction.
Bulb specification:
- 15 W - 220-240 V
- 300°C - E 14 cap
- Replace the bulb then reposition the lamp
glass, making sure the seals are correctly
positioned.
- Reconnect the oven.
Bulb
Lamp glass
Page 26

26
EN
8 / AFTER-SALES SERVICE
Any repair made to your appliance must be
carried out by a qualified professional
authorised to work on the brand. When you
call, state your appliance’s complete reference
information (model, type, serial number). This
information appears on the manufacturer’s
nameplate (Fig.1).
ORIGINAL PARTS
During any servicing, ask that only
cceerrttiiffiieedd
ggeennuuiinnee rreeppllaacceemmeenntt ppaarrttss aarree uusseedd..
**
Service supplied by Brandt Customer Services, simplified shareholder company with capital of 25,000,000
Euros, 5/7 avenue des Béthunes, 95310 Saint Ouen l’Aumône - RCS Pontoise 440 303 303
BRANDT APPLIANCES SAS
7 rue Henri Becquerel
92500 RUEIL MALMAISON
230V ~ 50 Hz
MADE IN FRANCE
fig.1
SERVICE CALLS
••
FFaaggoorrBBrraannddtt SSAASS,,
lessee-manager – a French public limited company with share capital of 20 000 000 euros Nanterre Trade and Enterprise Register 440 303 196.
CZ5700819-00 - 03/11
 Loading...