

Page 1

FOUR
FR GUIDE D’UTILISATION
EN USER GUIDE
OVEN
Page 2
•
1
C
Z
3
3
0
0
5
6
6
G
L
7
4
0
0
0
8
8
C
Z
3
3
0
0
5
6
7
1
2
3
Page 3
•
1
•
2
A
B
4
A
D
B
C
6
6
5
0
0
3
3
Z
C
Page 4
•
3
•
2
D
C
E
C
Z
3
A
0
0
3
3
Z
C
6
6
5
5
6
5
0
0
3
Page 5
•
3
B
D
C
E
F
Page 6
A
C
B
•
4
A
A
A
A
Page 7

DEAR
CUSTOMER,
EN
Discovering a De Dietrich product means experiencing the range of unique
emotions.
The attraction is immediate, from the moment you set eyes on the product.
The sheer quality of the design
shines through, thanks to the timeless style and outstanding finishes which
make each component an elegant and refined masterpiece in its own right,
each one
in perfect harmony with the others. Next, comes the irresistible urge to
touch it.
De Dietrich design makes extensive use of robust and prestigious
materials, where the accent is place firmly upon authenticity. By combining
state-of-the-art technology
with top quality materials, De Dietrich produces
beautifully crafted products to help you get the most from the culinary arts,
a passion
shared by all lovers of cooking and fine food. We hope that you enjoy
using this new appliance.
Thank you for choosing a De Dietrich product.
Page 8

2
CONTENTS
EN
Description of the oven......................................................................3
The control panel..................................................................................3
Accessories ..........................................................................................6
Settings................................................................................................7
Setting the clock ..................................................................................7
Changing the clock ..............................................................................7
Minute Minder ......................................................................................7
Locking the controls..............................................................................7
Settings menu ......................................................................................7
Cooking ..............................................................................................8
Immediate cooking................................................................................8
Changing the temperature....................................................................8
Programming the cooking time ............................................................8
Delayed start time ................................................................................8
Low temperature ..................................................................................9
Care....................................................................................................10
External surface..................................................................................10
Removing the shelf runners................................................................10
Installing and removing the sliding rails..............................................10
Cleaning the inner glass ....................................................................10
Removing and putting back the door..................................................10
Pyrolytic self-cleaning ........................................................................10
Replacing the light bulb ......................................................................12
Anomalies and solutions ................................................................12
Page 9

3
•
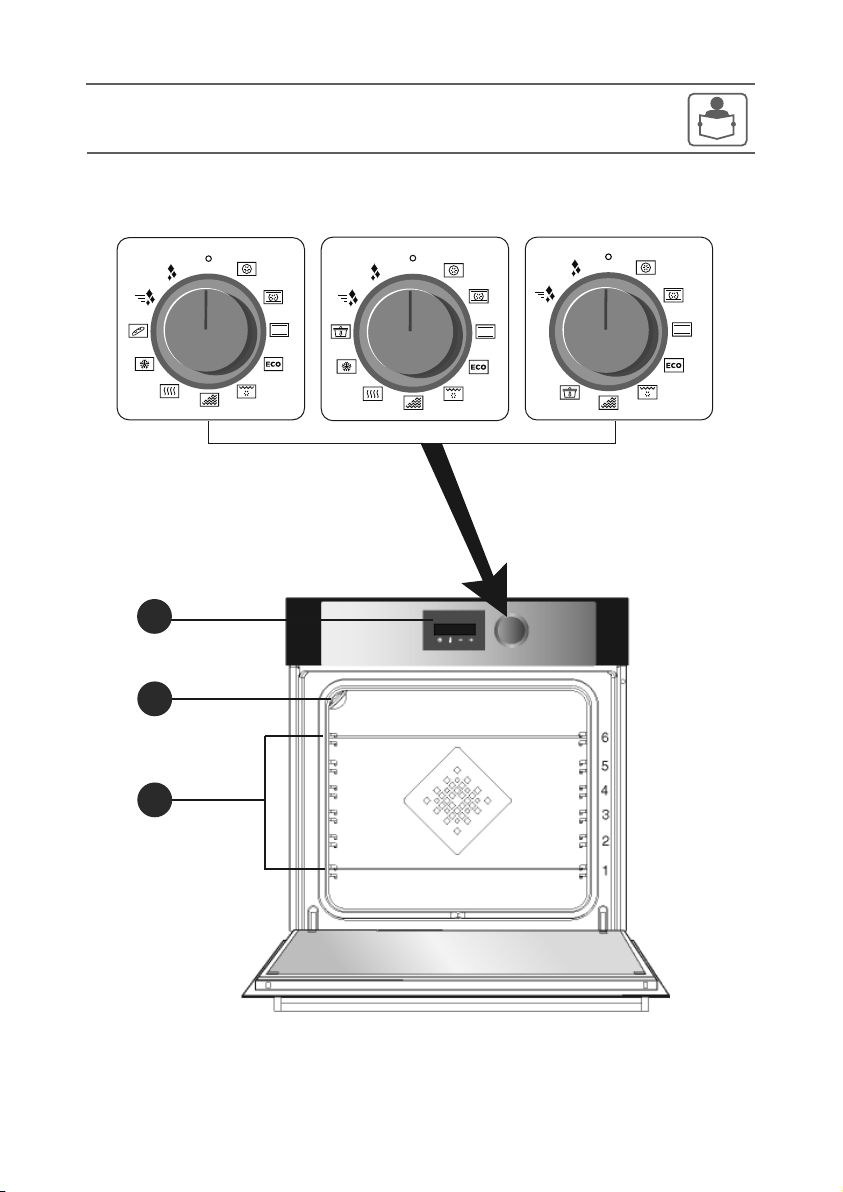
1DESCRIPTION OF THE OVEN
Fan
oven*
Recommended for keeping white meat,
fish and vegetables moist. For cooking
multiple items on up to three levels.
Zero position
The oven is switched off.
180°C
35°C - 250°C
Combined
oven
Recommended for quiches, pies, tarts
with juicy fruits, preferably in an
earthenware dish.
205°C
35°C - 230°C
Setting the clock and cooking time
Adjusting the temperature
Reducing the values
Increasing the values
BUTTONS
•
1
2
3
4
1
2
3
4
THE FUNCTION SELECTION KNOB
(depending on model)
Pre-heat your oven empty before cooking.
•
THE CONTROL PANEL
THE DISPLAY
1
•
Cooking time
End of cooking
Keypad lock
Minute Minder
Temperature indicator
Pre-heating indicator
Door lock
Position
Use
T°C recommended
mini - maxi
Page 10

4
•
1DESCRIPTION OF THE OVEN
Pulsed grill
Roasts and poultry are juicy and crisp all over.
Slide the drip tray on to the bottom shelf
support.
Recommended for all spit-roasted poultry or
meat, for sealing and thoroughly cooking a leg
or a rib of beef. To retain the moist texture of
fish steaks.
Variable grill
Recommended for grilling cutlets,
sausages, toasting bread and prawns
placed on the grill. Cooking is done by the
upper element. The grill covers the entire
shelf surface.
200°C
100°C - 250°C
4
1 - 4
Keep
warm
Recommended for letting dough rise for
bread, brioche, kügelhopf.
Put the mould on the bottom, not
exceeding 40°C (plate-warming,
defrosting).
60°C
35°C - 100°C
Defrosting
Ideal for delicate dishes (fruit tarts,
custard pies, etc.). Meat, rolls, etc. are
defrosted at 50°C (meat should be placed
under the grill with a dish underneath to
catch the drips).
35°C
30°C - 50°C
ECO*
This setting saves energy while
maintaining the quality of the cooking. In
this setting, pre-heating is not required.
200°C
35°C - 275°C
Conventional
Recommended for quiches, pies, tarts
with juicy fruits, preferably in an
earthenware dish.
200°C
35°C - 275°C
Position
Use
T°C recommended
mini - maxi
Page 11

5
•
1DESCRIPTION OF THE OVEN
Low
temperature
This mode is explained in the
«Cooking» chapter. It is recommended
for slow cooking and works only with a
non-preheated oven.
Bread
Recommended cooking sequence for
bread making. Pre-heat, then place the
ball of dough on a baking sheet - 2nd
shelf. Do not forget to place a dish of
water in the bottom to obtain a crisp,
golden crust.
205°C
35°C - 220°C
Position
Use
T°C recommended
mini - maxi
*Cooking mode as per standard EN 60350-1: 2016 to demonstrate compliance with requirements of the
energy label of European regulation UE/65/2014.
Advice on how to save energy:
Avoid opening the door during cooking to avoid heat escaping from the
oven.
SHELF RUNNERS AND LINERS
THE LIGHT
This oven has 6 shelf runners to position accessories (grill, dish, etc.) at
different heights depending on the
cooking mode chosen.
3
For characteristics and to find out how
to remove the light bulb, refer to the
«Care» chapter.
Never place tin foil directly in contact with the oven floor as the build
up of heat may damage the enamel.
2
Page 12

6
•
1DESCRIPTION OF THE OVEN
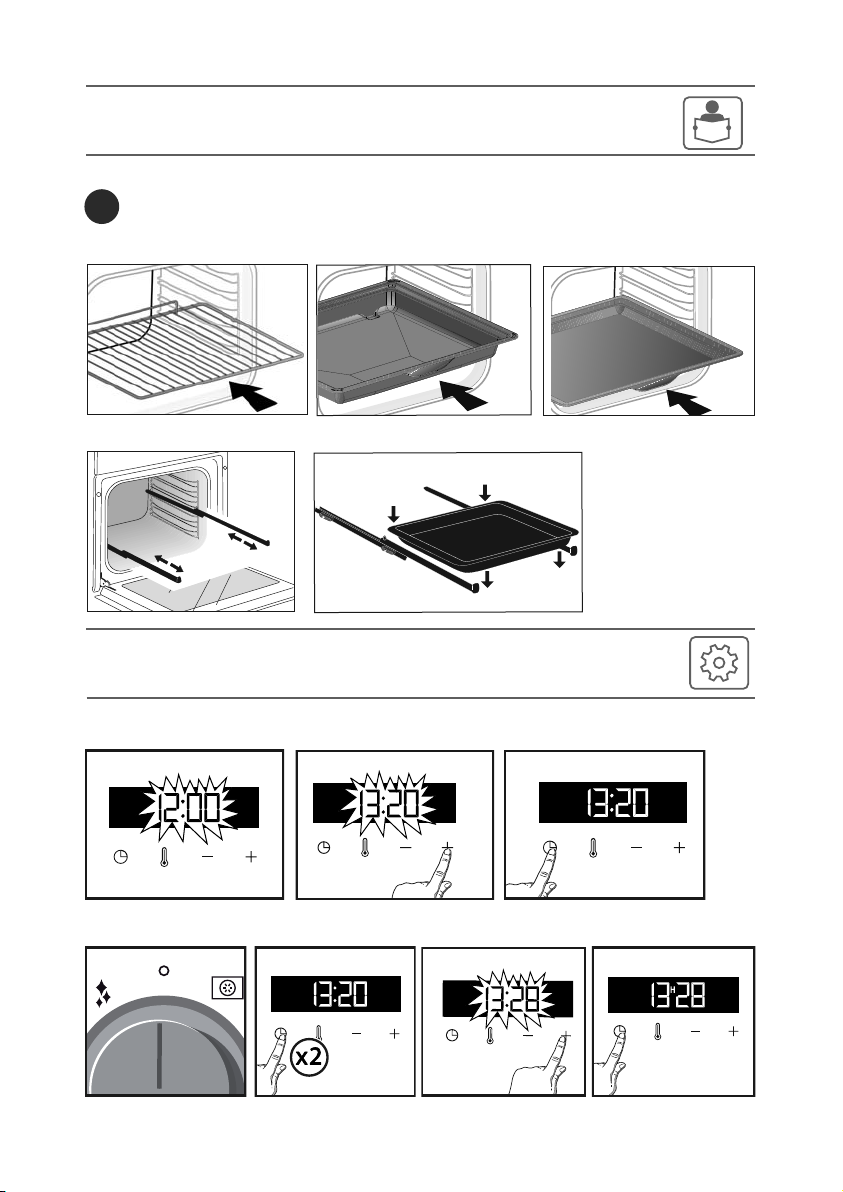
Anti-tip safety rack
(fig. A).
The rack can be used to support all dishes
and moulds containing food for cooking or
browning. It can be used for grilling (placed
directly on top).
Insert the anti-tip handle towards the back
of the oven.
Multi-purpose tray, drip tray, 45 mm
(fig. B).
When inserted in the shelf runners under
the grill with the handle towards the oven
door, it collects juice and fat from grilling,
and can be used half-filled with water as a
double-boiler.
Pastry dish, 20 mm (fig. C).
Insert in the shelf runners with the handle
towards the oven door. Ideal for baking
cookies, shortbread and cupcakes. The
tilted surface makes it easier for you to put
your preparations in a dish. Can also be
inserted into the shelf runners under the grill
to collect juice and fat from grilling.
Sliding rail system (fig.D)
The new sliding rail system makes food
more practical and easier to handle as the
trays can be effortlessly pulled for simpler
handling. The trays can be completely
removed, providing full access. Their
stability ensures that food can be handled
safely, reducing the risk of burns. This
means that you can take food out of the
oven far more easily.
Remove the accessories and
supports from the oven before
beginning pyrolysis cleaning.
Advice
To avoid fumes when cooking
fatty meats, we recommend you add
a small amount of water or oil to the
bottom of the drip pan.
The accessories may warp with
the effect of heat, but this will
not alter their function. They will
return to their original shape once
cooled.
ACCESSORIES
(depending on model)
4
Page 13

SETTING THE CLOCK (fig. A)
When switching on, the display flashes at
12:00.
Set the clock with + or -.
Confirm with .
If there is a power cut, the clock flashes.
CHANGING THE CLOCK (fig. B)
The function selector switch must be in
the zero position.
Press ; the minute minder symbol
appears . Press again and set the
clock using + or - .
Confirm with .
MINUTE MINDER (fig. C)
This function can only be used when the
oven is off.
Press .
The minute minder flashes . Set the
minute minder with + or -.
Press to confirm. The timer will then
start.
Once the time has lapsed, there is a
sound signal.
To stop it, press any key.
The time appears again in the display.
NB: You can modify or cancel the minute
minder at any time by pressing . To
cancel, set to 00:00.
If you do not confirm, it will be saved
automatically after a few seconds.
LOCKING THE CONTROLS (fig. D) Child safety
Press + and - at the same time until the
symbol appears on the screen. To
unlock, press + and - until the symbol
disappears off the screen.
SETTINGS MENU (fig. E)
You can adjust different settings on your
oven. To do so:
Hold down until you get to the “MENU”
display to access the settings mode.
Press again to scroll through the
different settings.
Activate or de-activate the different
parameters with + and -; see table below:
To exit the “MENU”, press again.
Light:
Position ON, the light stays
on throughout cooking
(except in ECO mode).
Position AUTO, the oven
light turns off after 90
seconds when cooking.
Sounds - beeps:
Position ON, sounds active.
Position OFF, no sounds.
Pre-heating:
Position ON, active.
Position OFF, no preheating.
DEMO Mode:
Position ON, mode active.
Position OFF, normal mode.
7
•
2SETTINGS
Default
settings
Page 14

8
•
3COOKING
Before using your oven for the
first time, heat it at maximum
temperature while empty for
approximately 30 minutes. Make sure
that the room is sufficiently ventilated.
IMMEDIATE COOKING (fig. A)
The programmer must only display the
time. It should not be flashing.
Turn the function selector to any position.
The temperature starts to increase at
once. Your oven suggests a temperature,
which can be modified.
The oven heats up and the temperature
indicator flashes. A series of beeps
sounds when the oven has reached the
programmed temperature.
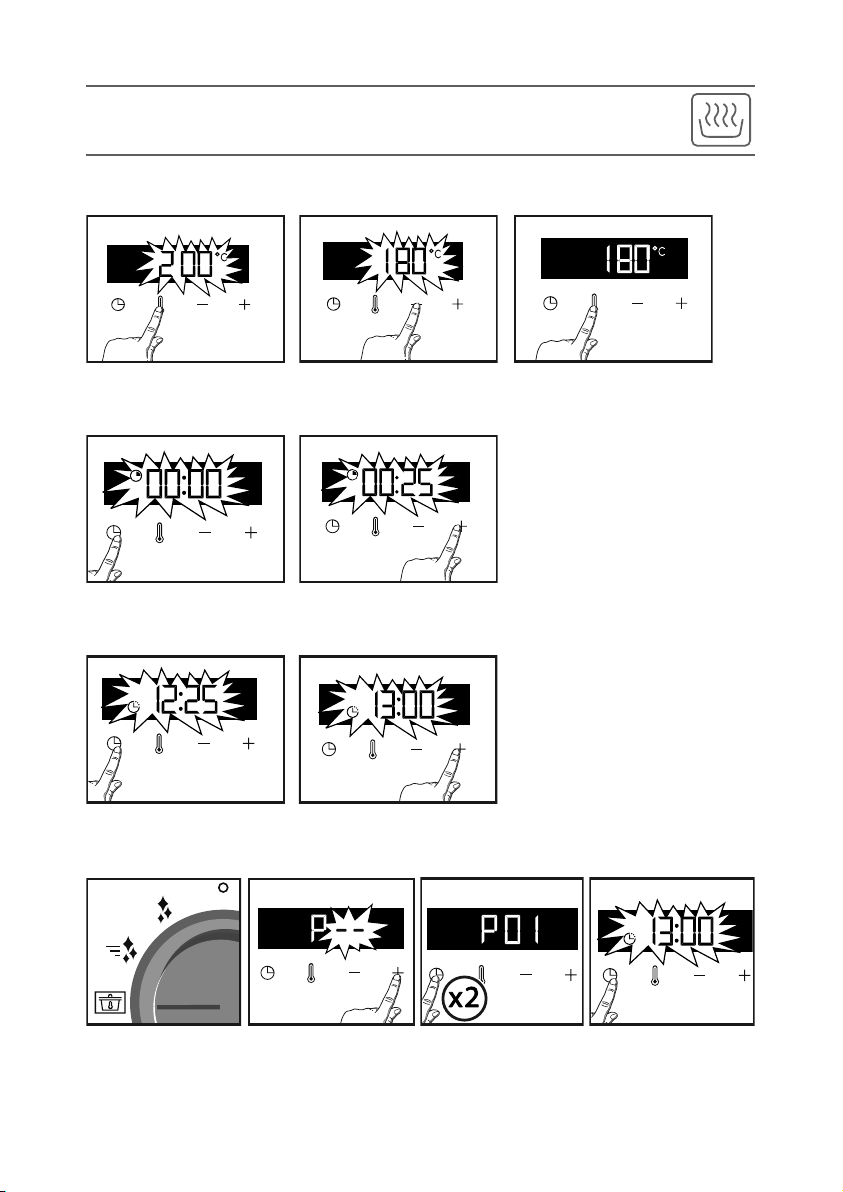
CHANGING THE TEMPERATURE(fig.
B)
When you are in the cooking mode of
your choice, press .
Adjust the temperature with + or -.
Confirm by pressing .
PROGRAMMING THE COOKING TIME
(fig. C)
Use the immediate cooking programme,
then press ; the cooking time flashes
and it is now possible to set it. Press +
and - to adjust the cooking time. Confirm
by pressing .
Your oven has the “SMART ASSIST”
function which, when programming a
cooking time, will suggest a cooking time
which can be modified depending on the
selected cooking mode.
See the table below.
The cooking time is saved automatically
after a few seconds. The time starts to
count down as soon as the cooking
temperature is reached.
DELAYED START (fig. D)
Proceed as for programmed cooking.
After setting the cooking time, press .
The display flashes. Set the cooking end
time with + and - .
The cooking end time is automatically
saved after a few seconds. The cooking
end time display stops flashing.
COOKING MODE
RECOMMENDA-
TION
OF COOKING TIME
FAN OVEN
30 min
COMBINED OVEN
30 min
CONVENTIONAL OVEN
30 min
ECO
30 min
PULSED GRILL
15 min
VARIABLE GRILL
7 min
KEEP WARM
60 min
DEFROSTING
60 min
BREAD
40 min
Page 15

9
“LOW TEMPERATURE” MODE
(depending on model).
The «Low temperature» mode must
begin with a non-pre-heated oven.
This cooking mode makes meat fibres
tender thanks to slow cooking at low
temperature.
Cooking quality is optimal.
Advice
Before putting in the oven, the
meat must be kept at room
temperature for at least one hour.
IMMEDIATE COOKING (fig. E)
Use the control knob to select the «Low
temperature» cooking mode.
The oven suggests a choice of 10
programmes (see table below).
Use + or - to scroll through the
programmes.
Once the programme has been selected,
for example P01 (roast veal), put your
meat directly on the grill pan on the shelf
level recommended in the table and put
the drip tray on the bottom shelf to catch
the drips.
N.B.: Do not use for programmes P08P09-P10. Put them directly on the drip
tray on the shelf level recommended in
the table.
Then confirm by pressing twice.
Cooking begins.
When cooking is complete, the oven
switches off automatically and rings for 2
minutes. Press to stop the beeping.
Cooking at low temperature
requires food to be extremely
fresh. For poultry, it is important to
rinse the outside and inside with
cold water and to dray with
absorbent paper before cooking.
DELAYED START (fig. F)
You can choose a delayed «low
temperature» start.
After selecting your programme, press
. The display flashes. Set the cooking end
time with + and - .
The cooking end time is automatically
saved after a few seconds. The cooking
end time display stops flashing.
If your oven is too hot to start low
temperature cooking, the word
«Hot» is displayed on the screen.
Leave the oven to cool.
•
3COOKING
Food
Cooking
time
Shelf
level
P01
Roast veal 4 hours
2
P02
Rare beef 3 hours
2
P03
Well-cooked beef 4 hours
2
P04
Roast pork 5 hours
2
P05
Rosé lamb 3 hours
2
P06
Well-cooked lamb
4 hours
2
P07
Chicken 6 hours
2
P08
Small fish 1 hour 20
3*
P09
Large fish
2 hours10
3*
P10
Yoghurt 3 hours
1*
Page 16

10
EXTERNAL SURFACE
Use a window washing product applied
to a soft cloth. Do not use abrasive
creams or scouring sponges.
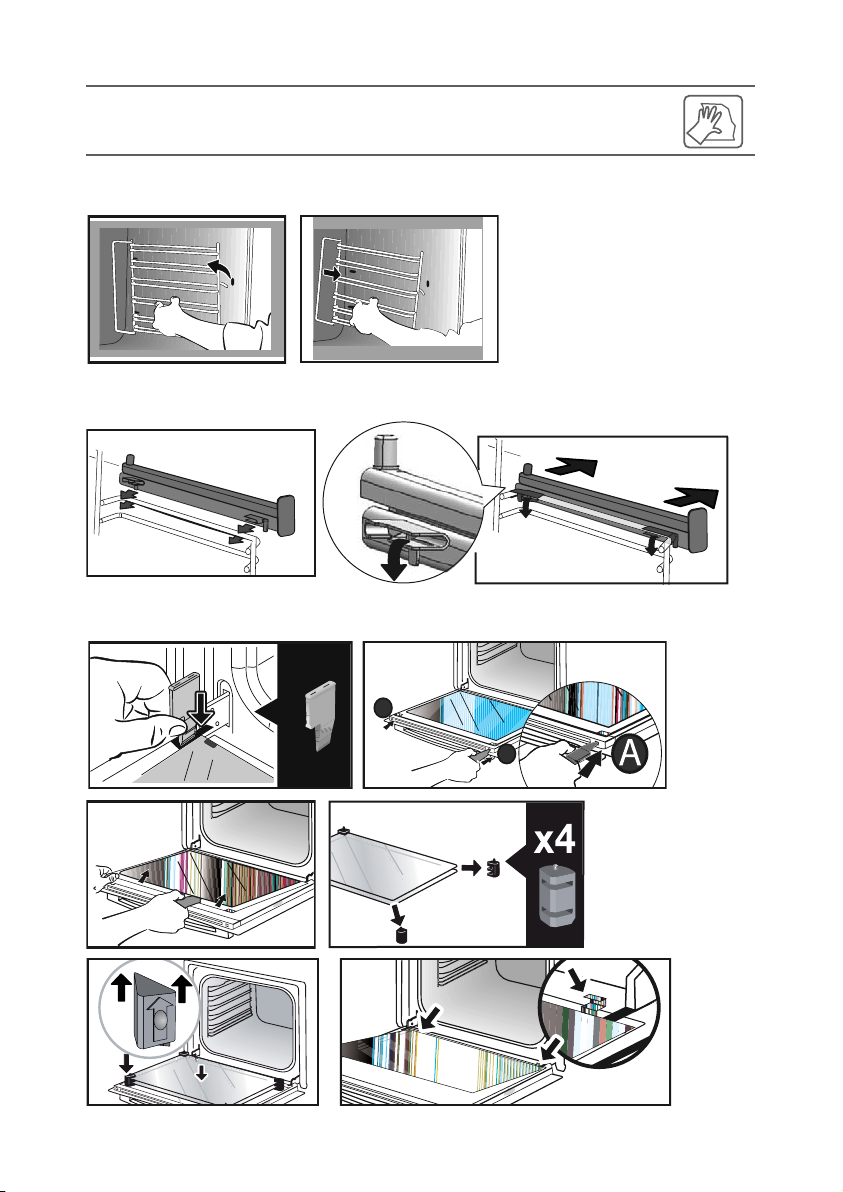
REMOVING THE SHELF RUNNERS
(fig. A) (depending on model)
Side liners with shelf runners:
Lift the front part of the shelf runner
upwards. Press the entire shelf runner
and release the front hook from its
housing. Then, gently pull the whole of
the shelf runner towards you to release
the rear hooks from their housing. Pull
out the two shelf supports.
INSTALLING AND REMOVING THE
SLIDING RAILS (fig.B)
(depending on model)
After removing the 2 shelf runners,
choose the height (2 to 5) at which you
want to fit your rails. Snap the right rail
against the right shelf runner by applying
enough pressure to the front and back of
the rail so that the 2 tabs on the side of
the rail slot into the shelf runner. Do the
same for the left-hand rail.
NOTE: the telescopic sliding part of the
rail must unfold towards the front of the
oven, with the buffer opposite you.
Insert your 2 shelf runners and then put
your tray on the 2 rails. The system is
now ready to use.
To remove the rails, remove the shelf
runners again.
Slightly prise apart the bottom of the tabs
fixed on each rail to release the shelf
runner. Pull the rail towards you.
CLEANING THE INNER GLASS
To clean the inner glass, remove the
door. Before doing this, remove any
excess grease with a soft cloth and
washing up liquid.
Warning
Do not use scouring products,
abrasive sponges or metal scrapers to
clean the glass oven door as this
could scratch the surface and cause
the glass to shatter.
REMOVING AND PUTTING BACK THE
DOOR (fig. C)
Open the door fully and block it with one
of the plastic wedges provided in your
appliance’s plastic pouch.
Remove the first clipped glass panel:
Using the other wedge (or a screwdriver),
press the slots to unclip the glass.
Remove the glass panel.
The door consists of two additional glass
panels, with a black rubber spacer at
each corner. If necessary, remove them
to clean them.
Do not soak the glass panels in water.
Rinse with clean water and dry off with a
lint-free cloth.
After cleaning, reposition the four rubber
stops with the arrow upwards and
reposition all of the glass panels.
Insert the last glass panel into the metal
stops, then clip it in with the side with
«PYROLYTIC» facing you and legible.
Remove the plastic wedge.
Your appliance is now ready for use
again.
A
A
•
4CARE
Page 17

11
•
4CARE
PYROLYTIC SELF-CLEANING
This oven is equipped with a pyrolytic
self-cleaning function:
Pyrolysis is a cycle during which the oven
cavity is heated to a very high
temperature in order to eliminate soiling
from splattering and spills.
Before starting pyrolysis cleaning,
remove any large overspills, if any.
Remove the excess grease on the door
using a damp sponge.
As a safety measure, cleaning only
occurs after the door locks automatically;
it is impossible to unlock the door.
Remove the accessories and
supports from the oven before
beginning pyrolysis cleaning.
PERFORM A SELF-CLEANING
CYCLE
Proposed cycles:
PyroExpress in 59 minutes.
This specific function uses the heat
built up during a previous cooking cycle
to quickly and automatically clean the
inside of the oven: it cleans a mildly
dirty oven interior in less than an hour.
The electronic oven temperature
monitor determines whether the
residual heat remaining in the oven
interior is sufficient to provide a good
cleaning result. If this is not the case, a
90-minute ECO pyrolysis cycle will
automatically begin.
Pyrolysis 2h00
for more in-depth cleaning of the inside
of the oven.
IMMEDIATE CLEANING (fig. D)
The programmer must only display the
time. It should not be flashing.
Turn the function selector to one of the
self-cleaning functions.
The pyrolysis cycle begins. The time
starts to count down at once.
During pyrolysis, the symbol is
displayed in the programmer to
indicate that the door is locked.
At the end of the pyrolysis cycle, 0:00
flashes.
When the oven is cool, use a
damp cloth to remove the white
ashes. The oven is clean again and
ready for further cooking
operations.
DELAYED CLEANING (fig. E)
Follow the instructions in the previous
paragraph and then set the end time for
the pyrolysis cycle by pressing . The
display flashes. Set the end time with +
and - . After these steps, the start of
pyrolysis is delayed so that it finishes
at the programmed time. When the
pyrolysis cycle has finished, put the
function selector back to 0.
Page 18

12
•
5ANOMALIES AND SOLUTIONS
•
4CARE
REPLACING THE LIGHT BULB
(fig. F)
Warning
Make sure the appliance is
disconnected from the power before
replacing the bulb in order to avoid the
risk of electric shock. Carry out the
operation when the appliance has
cooled.
Bulb specification:
25 W, 220-240 V~, 300°C, G9.
You can replace the bulb yourself.
Unscrew the view port and remove the
bulb (use a rubber glove, which will make
it easier to remove). Insert the new bulb
and replace the view port.
- «AS» is displayed (Auto Stop system).
This function stops heating the oven if you
forget to switch it off. Turn your oven to
STOP.
- Default code starting with «F». Your
oven has detected a problem.
Stop the oven for 30 minutes. If the fault is
still there, cut off the power supply for at
least one minute.
If the fault persists, contact the Customer
Service Department.
- The oven is not heating. Check that the
oven is correctly connected and that your
installation’s fuse is not out of service.
Check that the oven is not set to «DEMO»
mode (see settings menu).
- The oven light is not working. Replace
the bulb or the fuse.
Check that the oven is correctly connected.
- The cooling fan continues to operate
after the oven stops. This is normal. It can
work for up to one hour after cooking to cool
down the oven. If it continues beyond this,
contact the Customer Service Department.
- The pyrolysis cleaning cycle does not
begin. Check that the door is locked. Call
the Customer Services Department if the
problem persists.
- The «door locking» symbol flashes in
the display. Door locking fault. Contact the
Customer Services Department.
Page 19

BRANDT FRANCE, Etablissement de CERGY 5/7 avenue des Béthunes, 95310 SAINT OUEN L’AUMÔNE.
SAS au capital social de 100.000.000 euros RCS NANTERRE 801 250 531.
CZ5703043_00
 Loading...