

®
®
®
®
®
®
Quick Start Guide
Two-Way Setup
An illustrated guide to setting up your DriveRack® PA+
using two ampliers (high and low).
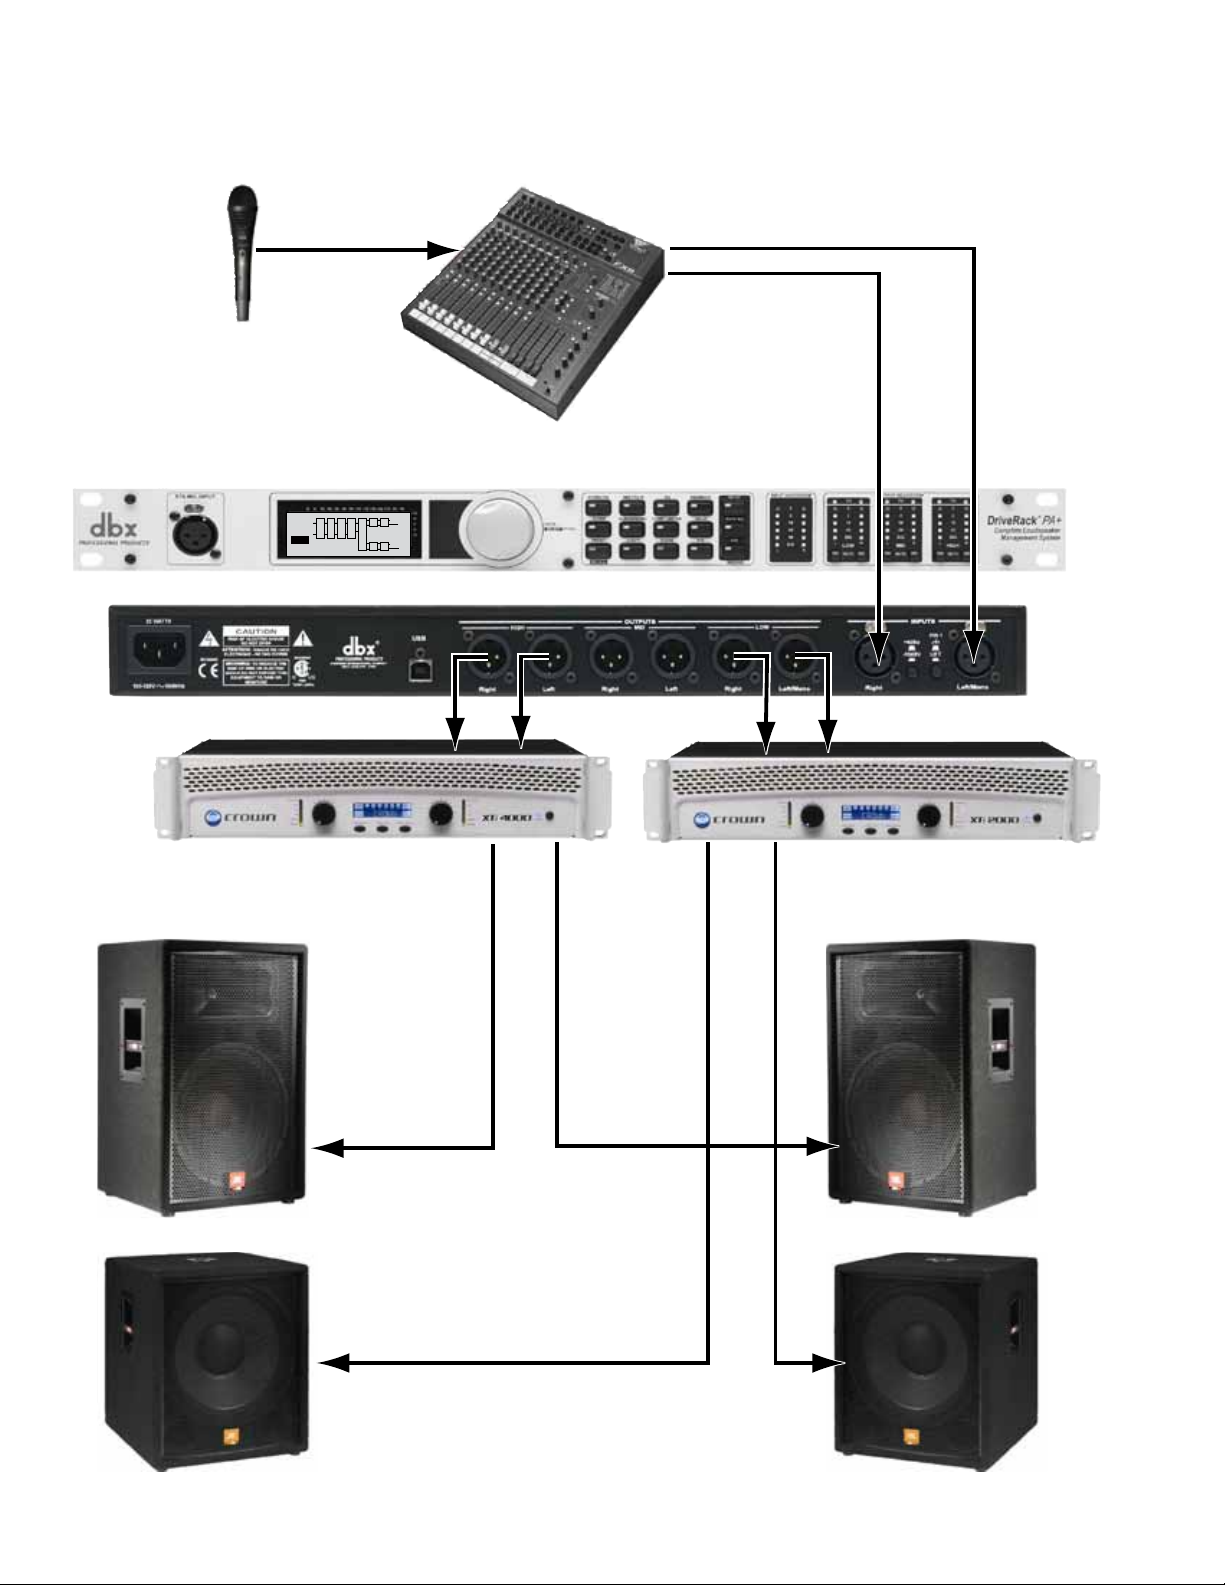
Low Speaker
Typical Stereo 2-Way Sound System Setup
Mic
Console
LH
P L
S
L
F
G
B
1
R
USER
Stereo 2Way
RH
C
U
X
B
LL
P L
RL
Low AmpHigh Amp
High Speaker
1.
L
F
G
B
1
R
USER
Stereo 2Way
RH
C
U
X
B
LL
P L
RL
LH
P L
S
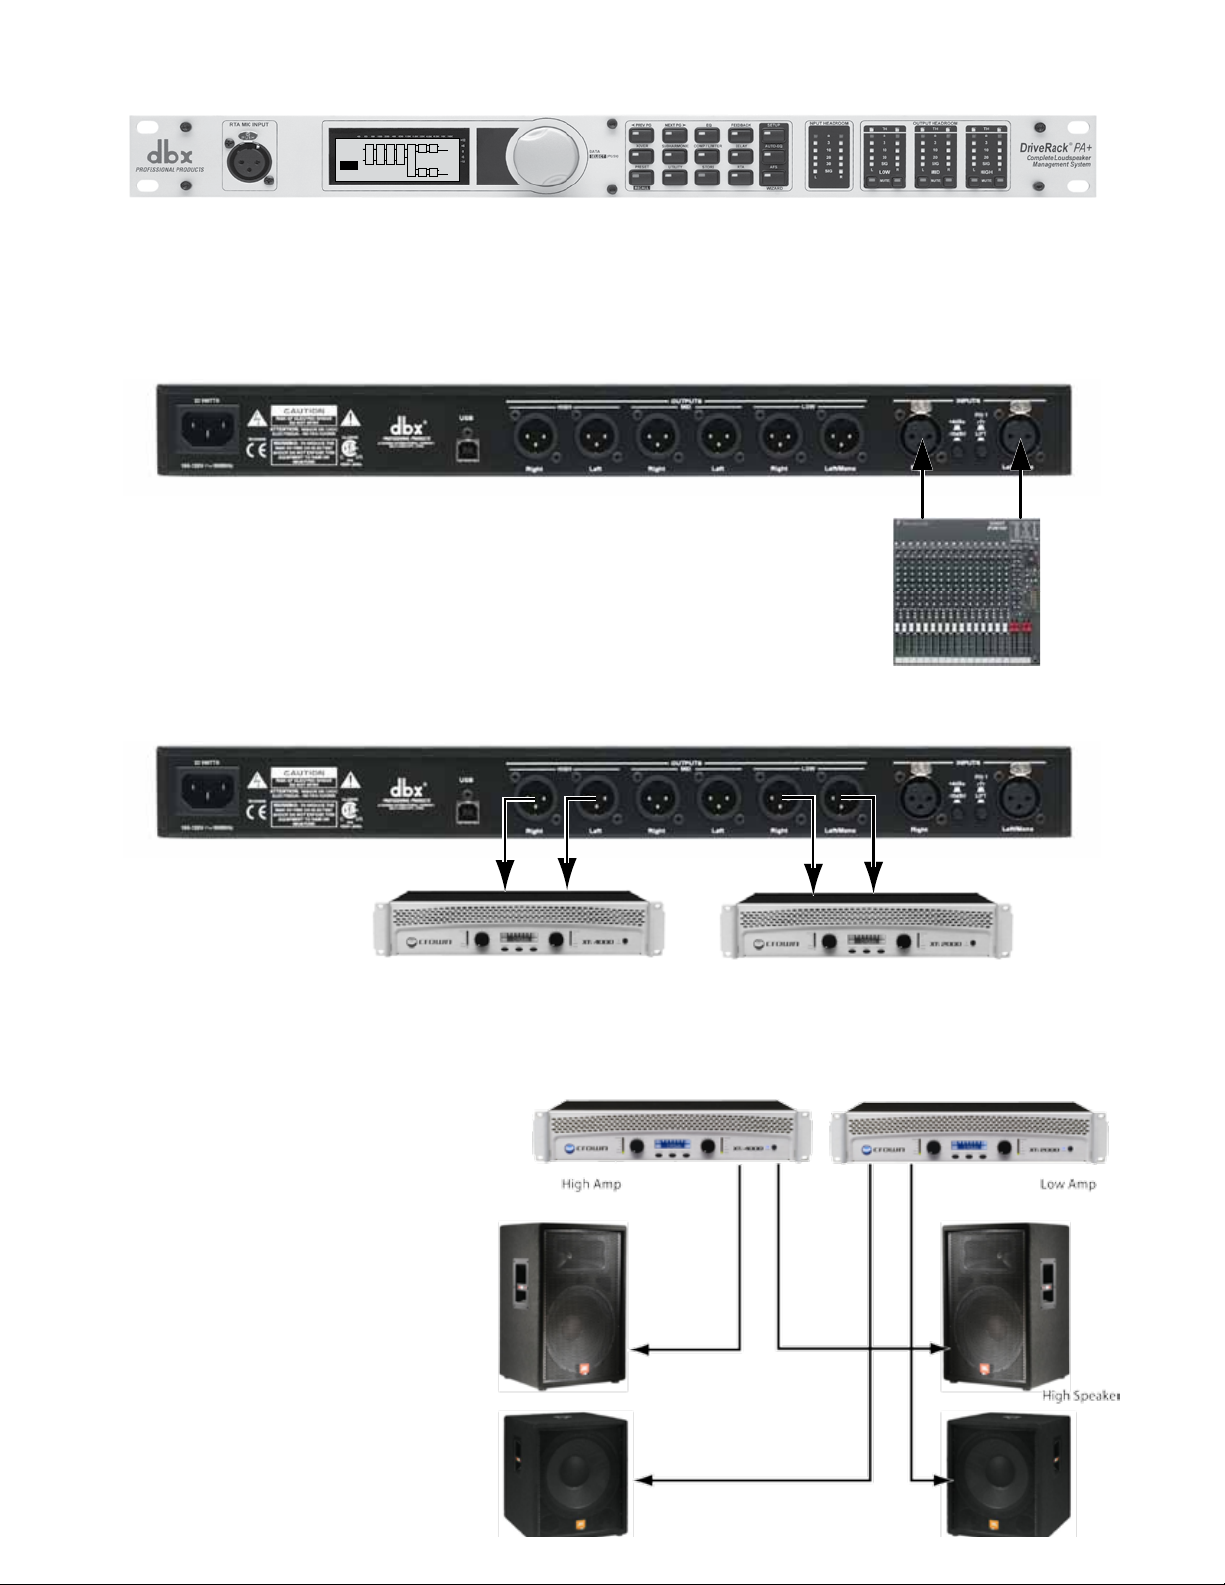
Remove the DriveRack PA+ from its box.
Rack mount the DriveRack PA+ and connect power cable.
2.
Connect the console Left and Right outputs to the DriveRack PA+
inputs.
3.
High Amp
Connect the DriveRack’s Left and Right High outputs to the inputs of the High Amp and the Left
and Right Low outputs to the inputs of the Low Amp.
4.
Connect the High Amplifier left and
right outputs to the High left and
High right speaker inputs as shown.
Connect the Low Amplifier left and
right outputs to the Low left and Low
right speaker inputs as shown.
Low Amp
5.
L
P L
R
C
F
B
S
U
B
1
USER
G
P L
LH
RH
LL
RL
X
L
P L
R
C
F
B
S
U
B
1
USER
G
P L
LH
RH
LL
RL
X
DriveRack PA+
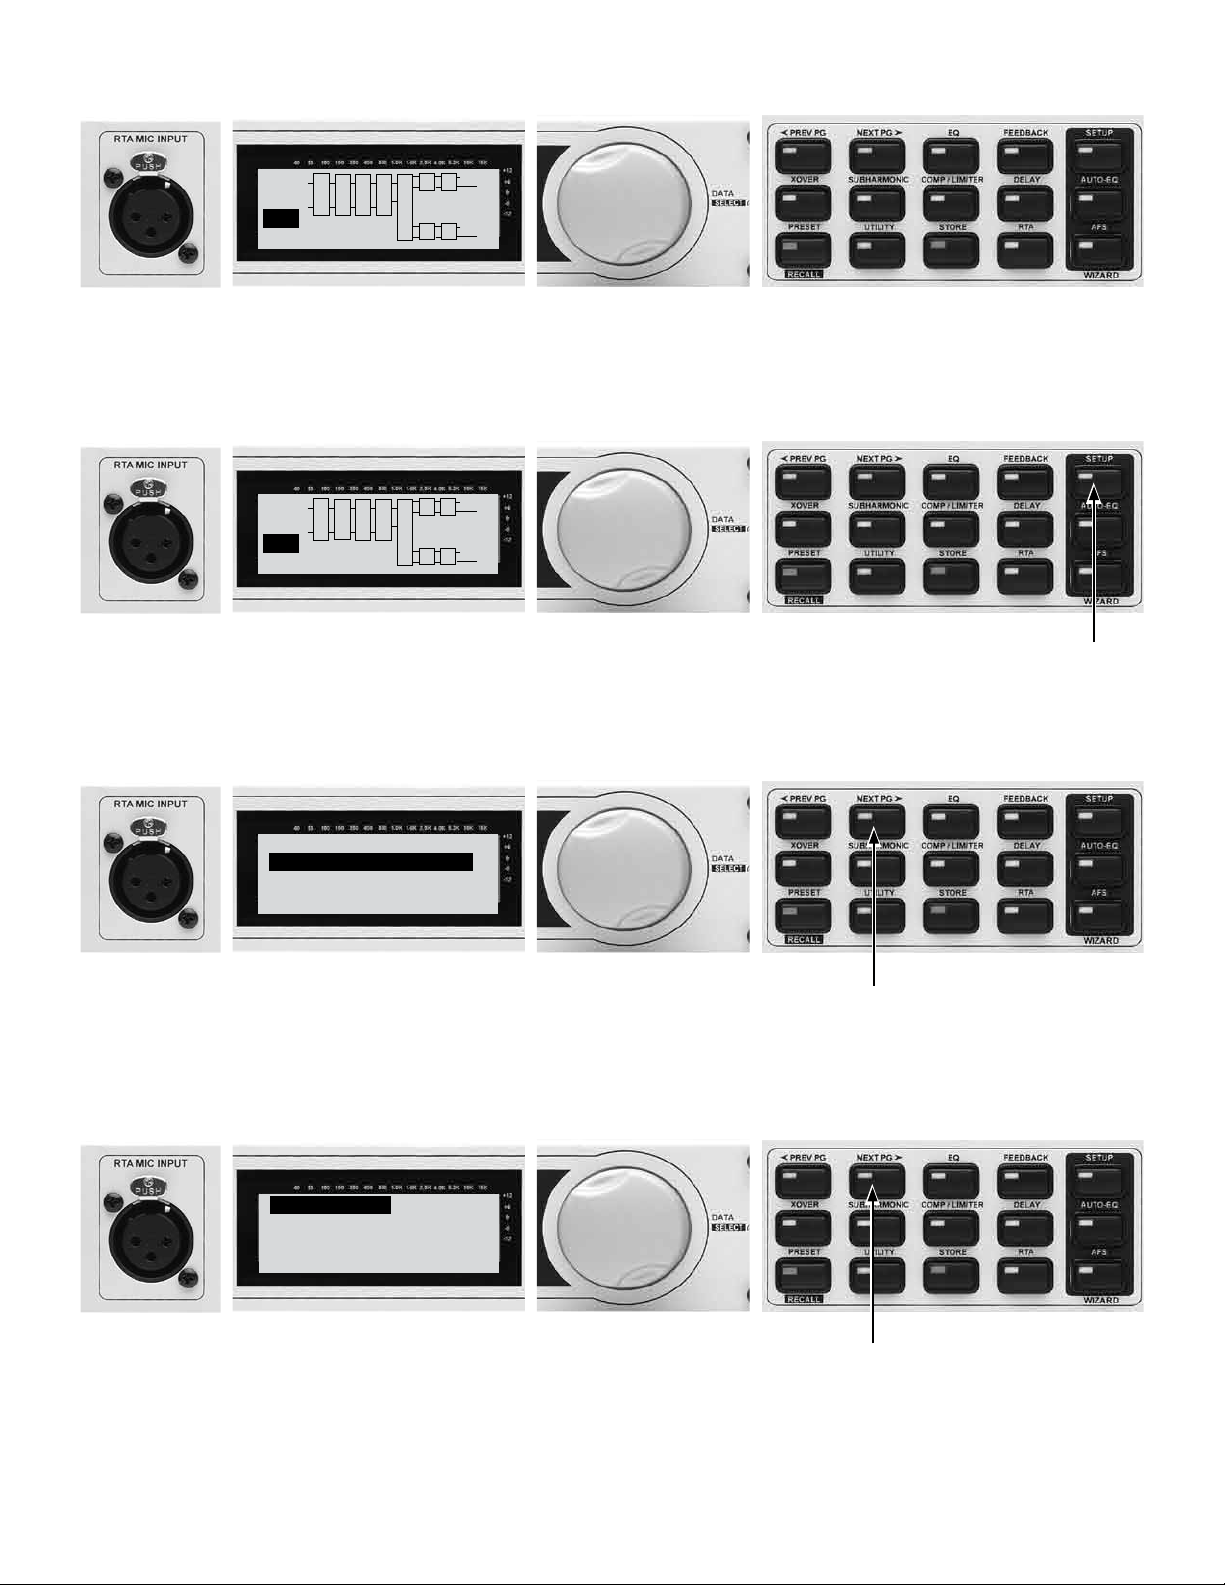
SYSTEM SETUP WIZARD
<NEXT PG> to advance
<RTA> skips SETUP
Input Setup
Select Input as MONO
or STEREO
˘STEREO.
5A - Turn on the console. Turn the console master faders down.
5B - Turn on the DriveRack PA+.
5C - Turn the amplifiers on with left and right channels all the way down.
6.
6A - Now let’s create a system design to match your speakers. This system
is designed around the JBL JRX-100 series speakers with Crown XTi
amplifiers for illustraction purposes.
7.
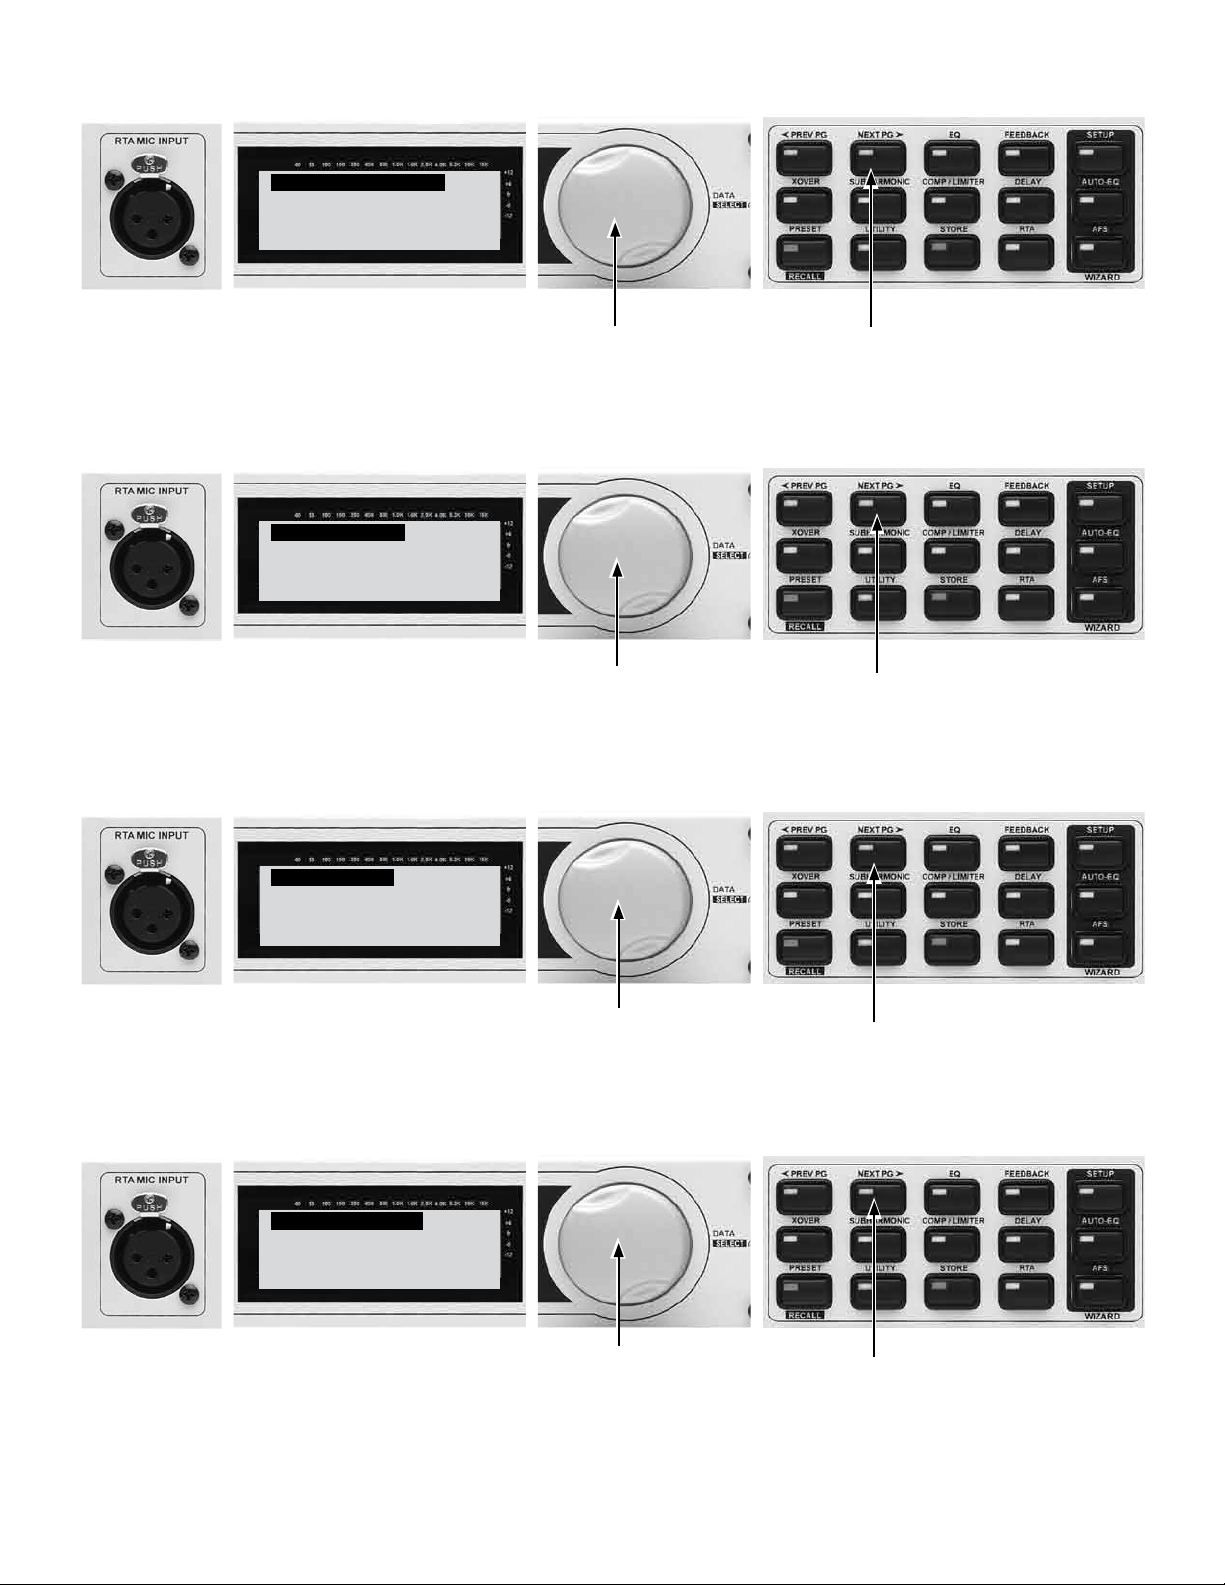
7A - The System Setup Wizard page appears. Press the NEXT PG button to
advance through system setup. Press the RTA button to skip setup and
move directly to the Auto Level Wizard. This is only used for subsequent
setup with sound systems with speaker, amp, and levels previously set.
8.
6B - Press and hold the
Setup Wizard button.
7B - Press the NEXT PG button.
8A - Turn the Data Wheel to select between MONO and STEREO
(Stereo typical).
8B - Press the NEXT PG button.
9.
Graphic EQ Setup
Select GEQ as DUAL
MONO or STEREO.
˘STEREO LINKED
Main Speaker
Select Main PA
JBL JRX100
˘JRX115 Passive
Sub Speaker
Select Sub PA
JBL JRX100
˘JRX118S Stereo
High Amplifier
Select an amplifier
Crown Xti
˘Crown Xti 2000
9A - Turn the Data Wheel to select between DUAL MONO
and STEREO Linked Graphic EQ. (Stereo Linked typical)
10.
10A - Turn the Data Wheel to select your speaker
manufacturer and model. For this example we have
selected the JBL JRX115 in passive mode.
11.
9B - Press the NEXT PG button.
10B - Press the NEXT PG button.
11A - Turn the Data Wheel to select your Sub speaker
manufacturer and model. For this example we have
selected the JBL JRX118S in Stereo.
12.
12A - Turn the Data Wheel to select your High speaker
amplifier manufacturer and model. For this example we have
selected the Crown XTi2000.
11B - Press the NEXT PG button.
12B - Press the NEXT PG button.

13.
High Amp Level
Adjust knob
same as your amp
˘56%
Low Amplifier
Select an amplifier
Crown Xti
˘Crown Xti 4000
Low Amp Level
Adjust knob
same as your amp
˘53%
Low Amp Bridging
Select
Same as your amp
˘Normal
13A - Set your amp input gain so it matches the dial shown
in the LCD display. You may also turn the Data Wheel to
change the display to match your amp dial setting if desired.
NOTE: If you are using self-powered speakers, make sure that
the speaker Mic/Line switch is set to Line.
14.
14A - Turn the Data Wheel to select your Low speaker
amplifier manufacturer and model. For this example we have
selected the Crown XTi 4000.
15.
13B - Press the NEXT PG button.
14B - Press the NEXT PG button.
15A - Set your amp input gain so it matches the dial shown
in the LCD display. You may also turn the Data Wheel to
change the display to match your amp dial setting if desired.
NOTE: If you are using self-powered speakers, make sure that
the speaker Mic/Line switch is set to Line.
16.
16A - Turn the Data Wheel to select Normal or Bridged to
match your amp setting (Normal typical).
15B - Press the NEXT PG button.
16B - Press the NEXT PG button.

17.
Load New Preset
Press Select to Load
˘New Preset
AUTO-LEVEL
Connect RTA Mic to:
RTA MIC INPUT
<NEXT PG> to advance
HIGH OUTPUTS
Verify amp
levels as shown
56% Level
LOW OUTPUTS
Verify amp
levels as shown
53% Level
At this point you are ready to load your new
preset. Press in on the Data Wheel to load
this new preset.
will appear in the display, and you
will move on to the Auto-Level
Wizard.
18.
Press the Data Wheel. “Loading”
18A - Connect the
RTA-M mic here.
NOTE: This Auto-Level feature requires that signal be present from both High outputs of the DriveRack! If
you are not using both of these outputs, don’t have the RTA mic, or do not want to use this feature, you can
skip this step by pressing the PRESET button. If you would still like to Auto EQ the system, press and hold
the Auto EQ button for 5 seconds then proceed to step 25.
18B - Press the NEXT PG button.
19.
20.
20A - Make sure your Low Amp level matches the
level shown in the display.
19A - Make sure your High Amp level matches the
level shown in the display.
19B - Press the NEXT PG button.
20B - Press the NEXT PG button.

21. Turn the Data Wheel until pink noise is playing through your speakers at performance level (the same
AUTO-LEVEL Pink Noise
Mic Level
TURN UP LEVEL
Pink Level ˘-InfdB
AUTO-LEVEL Complete
<NEXT PG> to advance
JRX115 2X4 Loaded
and Levels Balanced
<NEXT PG> AUTO-EQ
<PRESET> Exit Wizard
volume you intend to use during your performance). The words “SET TO PERFORMANCE LEVEL” will appear in
the display when you have passed the minimum threshold. Set level higher as needed.
21A - Turn the Data Wheel to adjust pink noise
level.
21B - Press the NEXT PG button when
your performance level is reached.
When performance level is reached, press the NEXT PG button. The DriveRack PA+ will now adjust the balance
between left/right levels for your main speakers and your subs. Note that you may be prompted to readjust
your speaker knob settings if needed.
22.
22A - When the Auto-Level Wizard is complete,
the display will read “Auto-Level Complete.
<NEXT PG> to advance.”
22B - Press the NEXT PG button.
23.
23A - The display reads “JRX115 2X4 Loaded
and levels balanced.”
23B - Press the NEXT PG button to
begin the AUTO-EQ Wizard.

24.
DriveRack PA+
SYSTEM SETUP WIZARD
<NEXT PG> to advance
<RTA> skips SETUP
AUTO-EQ
Connect RTA Mic to:
RTA MIC INPUT
<NEXT PG> to advance
AUTO-EQ Target Curve
˘Flat
25.
Press the NEXT PG button.
26.
25A - Connect the RTA-M mic here (if it
isn’t already connected).
26A - Turn the Data Wheel to change the
RESPONSE curve you want the DriveRack
PA+ to use for AUTO EQ (Flat typical).
26C - Press the Data Wheel to set the
PRECISION. Turn the Data Wheel to choose
High, Medium or Low precision (Medium
typical).
25B - Press the NEXT PG button.
26B - Press the NEXT PG button.
26D - Press the NEXT PG button.
27. The RTA-M mic should already be plugged into the RTA input of the DriveRack PA+. Place this mic on a
mic stand and aim it between the left and right speakers approximately 25’ away.

28.
AUTO-EQ Pink Noise
Mic Level
TURN UP LEVEL
Pink Level ˘-InfdB
AUTO-EQ Complete
<NEXT PG> to advance
29.
28A - Turn the Data Wheel until pink noise is playing
through your speakers at performance level (-5 dB to +5
dB). The words “Set to performance level” will appear
28B - Once your performance
level is reached, press the NEXT
PG button.
in the display when you have passed the minimum
threshold. Set level higher if needed.
NOTE: Don’t clip amps.
29 - Auto EQ will go through some audible changes as it tunes the
speakers to the room. This may take several minutes.
30.
30A - Auto EQ will complete or finish sending
pink noise once it has come as close as possible
to matching the response you selected earlier.
30B - Press the NEXT PG button to
begin the AFS Wizard.

31.
DriveRack PA+
AFS WIZARD
<NEXT PAGE> to advance
AFS
Please turn down the
mixer gain. Press
<NEXT PG> when done.
AFS
Select number of
fixed filters. ˘ 6
F F F F F F L L L L L L
AFS
Select fixed type.
˘Music High
Ultra Narrow Notch
31A - The first screen of the AFS Wizard appears on the
31B - Press the NEXT PG button.
display.
32.
32A - Turn down the mixer Master or Main level faders. 32B - Press the NEXT PG button.
33.
33A - Using the Data Wheel, choose the number of fixed filters to
use with Advanced Feedback Suppression (AFS). These filters, once
populated or FIXED, will stay at the set frequency and level. LIVE
“L” filters will change as needed during a performance to eliminate
further feedback.
34.
34A - Using the Data Wheel, choose the EQ notch filter width
appropriate for your needs. Speech is a wide filter, Music Low is a
narrow filter, Music Medium is a Very Narrow filter, and Music High
is an Ultra Narrow filter (Music High Typcial).
33B - Press the NEXT PG button.
34B - Press the NEXT PG button.

35.
AFS Slowly increase
the mixer gain to
the desired level.
F F F F F F L L L L L L
AFS
Fixed filters set.
Mode set to LIVE.
F F F F F F L L L L L L
L
P L
R
C
F
B
S
U
B
USER
G
P L
LH
RH
LL
RL
X
With the mixer channel faders down, set the master mixer level
to zero (0). Turn up channel level until feedback begins. The AFS
will start to populate the Advanced Feedback Suppression fixed
filters.
NOTE:
Do not talk into any of the microphones or play music. This
is only a search for feedback at this point.
36.
36A - Advanced Feedback Suppression has completed when “Fixed
filters set. Mode set to LIVE” appears in the display.
NOTE: Out of control feedback is not advised. Please keep this
under control manually with the console main fader.
37.
36B - Press the NEXT PG button.
Press the STORE button.

38.
NAME: JRX115 2X4
DATA - SELECTS CHAR
PREV/NEXTPG - LEFT/RIGHT
PRESS STORE TO ADVANCE
STORE: JRX115 2X4
Replacing:
U 1 Stereo 3Way
PRESS STORE TO ADVANCE
L
P L
R
C
F
B
S
U
B
USER
G
P L
LH
RH
LL
RL
X
38A - Turn the Data Wheel to change
numbers and letters.
38B - Press the NEXT PG or PREV PG buttons
to move between characters. Repeat 32A to
change the next letter.
39.
39A - Turn the Data Wheel to change the user preset
number to one of your choosing. (U1 listed above).
NOTE: This will replace the preset that currently resides in
this user location.
38C - Press STORE to advance.
39B - Press STORE to advance.
40.
Your new preset has now been stored. Congratulations and enjoy.
For further support please visit www.dbxpro.com.


Printed in China
18-0684V-B
 Loading...