DAVIS Windex 15 User Manual

ASSEMBLY & MOUNTING INSTRUCTIONS #3150
READ INSTRUCTIONS
CAREFULLY BEFORE
ASSEMBLY
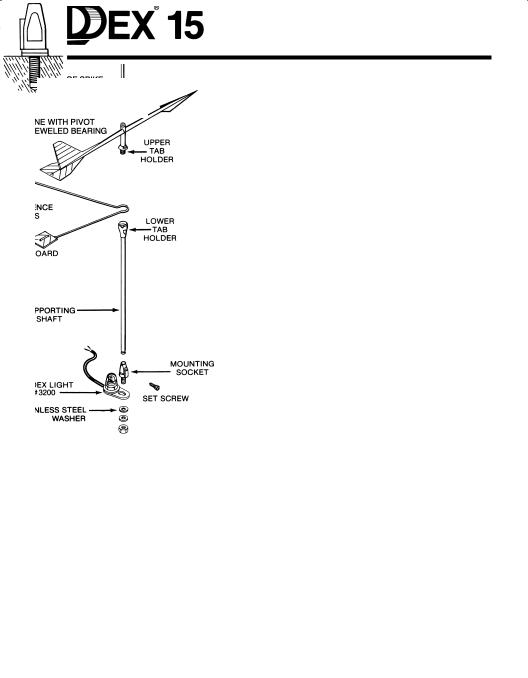
1.UNPACK CAREFULLY. Remove vane and supporting shaft from box. Then, by carefully lifting tab arms near tabs, raise cardboard insert and slide tabs out. Do not discard box.
2.REMOVE SUPPORT SHAFT. Remove the shaft from the mounting socket by loosening set screw for easier assembly and mounting.
3.ASSEMBLY. To ensure parts do not vibrate loose and to keep moisture out of the lower tab holder, it is best to use silicone adhesive during this assembly. Epoxy may also be used, although parts cannot be disassembled once compound has cured. Apply adhesive directly to threads and area inside of lower tab holder. Adhesive that contacts the shaft or clip at the bottom of the upper tab holder will not affect the vane's performance. Avoid applying an excessive amount of adhesive, as this may not allow the upper tab holder to seat properly. Screw upper tab holder approximately 1-1/2 turns into lower tab holder, leaving enough space to insert ends of port and starboard tab arms into circular groove of lower tab holder.
Be careful to align tab arms so that each projects out through its cutout in the lower tab holder. Tabs should be approx. horizontal (red reflecting side downwards). Screw in upper tab holder a little at a time using wrench while insuring that tab arms remain in proper position. Tighten securely.
4.SET TAB ANGLE. Using template printed on bottom of box, check reference tabs for the proper angle for your boat and, if required, adjust by bending tab arms very slightly. See recommendations on box.
5.INSTALL MOUNTING SOCKET. If your masthead is not already prepared for mounting of a Windex wind direction indicator, one of the following procedures should be used:
a.Where mounting socket can be secured with a nut (i.e. to masthead fitting), drill hole 5/16” (8 mm) and lock mounting socket by securely tightening nut provided. Be sure to use the stainless steel washers as indicated.
b.On wooden masts, drill vertical hole 1/4” (6.5 mm) approx. 1” (24.4 mm) deep into wood and thread socket into hole using strong glue (epoxy works best) on threads to achieve permanent mounting.
c.On metal or fiberglass masts, drill hole 1/4” (6.5 mm) and tap
5/16” (8 mm) x 18. Fit securely using washers as shown above, and use glue (epoxy or thread lock) on threads for permanent mounting.
Note: If the Windex Light (#3200) is being used, no washers are necessary under the mounting socket.
6. FINAL ADJUSTMENTS AND ASSEMBLY.
With socket mounted securely, insert supporting shaft into mounting socket and rotate until reference tabs point symmetrically aft. It is extremely important that starboard and port reference tab arms form the same angle to boat’s centerline. The mast spreaders are often a good reference when centering tabs.
 Loading...