


CYBEX GmbH
Riedinger Str. 18 | 95448 Bayreuth | Germany
info@cybex-online.com www.cybex-online.com www.facebook.com/cybex.online
C223_900-1_01E
Solution X2
USER GUIDE
DE/ UK / IT / FR / NL / PL / HU / CZ / SK
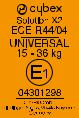
ECE R44/04, Gr. 2–3 | 15-36 kg (ca. 3–12Y)

DE – KURZANLEITUNG / UK – SHORT MANUAL / IT – SOMMARIO / FR – LE SOMMAIRE / NL – BEKNOPTE HANDLEIDING / PL – INSTRUKCJA SKRÓCONA / HU – RÖVID ISMERTETÉS / CZ – KRÁTKÉ INSTRUKCE / SK – KRÁTKE INŠTRUKCIE
1 |
2 |
3 |
4 |
5 |
6 |
9 |
10 |
7 |
8 |
|
kg |
|
> 22 kg |
11 |
12 |
1
DE
UK
IT
FR
NL
PL HU
CZ
SK
WARNUNG! DIESE KURZANLEITUNG DIENT NUR DER ÜBERSICHT. FÜR MAXIMALEN SCHUTZ UND KOMFORT IHRES KINDES, IST ES UNBEDINGT NOTWENDIG, DIE GESAMTE GEBRAUCHSANLEITUNG AUFMERKSAM ZU LESEN.
HINWEIS! WENN IHR KIND EIN GEWICHT VON 22 KG ÜBERSCHREITET, MUSS DIE LADE AUS DEM SITZ ENTFERNT WERDEN UM EINE EINWANDFREIE FUNKTION DES SITZES ZU GEWÄHRLEISTEN.
WARNING! THIS SHORT MANUAL SERVES AS AN OVERVIEW ONLY. FOR MAXIMUM PROTECTION AND BEST COMFORT OF YOUR CHILD, IT IS ESSENTIAL TO READ AND FOLLOW THE ENTIRE INSTRUCTION MANUAL CAREFULLY.
NOTE! IF YOUR CHILD EXCEEDS A WEIGHT OF 22 KILOS YOU MUST TAKE THE DRAWER OUT OF THE SEAT IN ORDER TO GUARANTEE A FLAWLESS FUNCTIONING OF THE SEAT.
ATTENZIONE! QUESTE ISTRUZIONI SONO SOLO UN SOMMARIO. PER GARANTIRE LA MASSIMA SICUREZZA E COMFORT AL VOSTRO BAMBINO È MOLTO IMPORTANTE LEGGERE ATTENTAMENTE ED INTERAMENTE IL MANUALE D’ISTRUZIONI E SEGUIRNE SCRUPOLOSAMENTE LE INDICAZIONI.
AVVERTENZA! SE IL PESO DEL BAMBINO SUPERA I 22 KG È NECESSARIO ESTRARRE IL CASSETTO PER GARANTIRE IL BUON FUNZIONAMENTO DEL SEGGIOLINO.
ATTENTION! LE SOMMAIRE EST UNE SYNTHÈSE. AFIN QUE VOTRE ENFANT BÉNÉFICIE D‘UN MAXIMUM DE PROTECTION ET DE CONFORT, IL EST ESSENTIEL DE LIRE ATTENTIVEMENT, L‘INTÉGRALITÉ DU MANUEL D‘INSTRUCTION.
A NOTER! SI LE POIDS DE VOTRE ENFANT EXCÈDE 22 KILOS ÔTER LE TIROIR DU SIÈGE DE FAÇON À GARANTIR LE BON FONCTIONNEMENT DE
CELUI-CI.
WAARSCHUWING! DEZE BEKNOPTE HANDLEIDING DIENT UITSLUITEND ALS OVERZICHT. VOOR MAXIMALE BESCHERMING EN OPTIMAAL COMFORT VOOR UW KIND IS HET VAN ESSENTIEEL BELANG DAT U DE GEHELE INSTRUCTIEHANDLEIDING AANDACHTIG DOORLEEST EN NAUWGEZET OPVOLGT.
LET OP! ALS HET LICHAAMSGEWICHT VAN UW KIND GROTER IS DAN 22 KILO, DIENT U DE LADE UIT HET ZITJE TE VERWIJDEREN, OM EEN
OPTIMALE WERKING VAN HET ZITJE TE WAARBORGEN.
OSTRZEŻENIE! INSTRUKCJA TA JEST TYLKO OBRAZKOWYM STRESZCZENIEM. ABY ZAGWARANTOWAĆ SWOJEMU DZIECKU MAKSYMALNE BEZPIECZEŃSTWO I WYGODĘ, NALEŻY UWAŻNIE PRZECZYTAĆ CAŁĄ INSTRUKCJĘ.
UWAGA! JEŻELI TWOJE DZIECKO WAŻY WIĘCEJ NIŻ 22 KG, NALEŻY WYJĄĆ Z FOTELIKA SZUFLADKĘ, ABY FOTELIK PRAWIDŁOWO SPEŁNIAŁ
SWOJĄ FUNKCJĘ.
FIGYELEM! EZ A RÖVID KÉZIKÖNYV CSAK ÁTTEKINTÉSÜL SZOLGÁL. A GYERMEKE MAXIMÁLIS VÉDELME ÉS LEGJOBB KÉNYELME ÉRDEKÉBEN ELENGEDHETETLEN A TELJES HASZNÁLATI UTASÍTÁS ELOLVASÁSA ÉS GONDOS BETARTÁSA.
MEGJEGYZÉS: HAA GYERMEK SÚLYA MEGHALADJAA 22 KG-OT, AZ ÜLÉS HIBÁTLAN MŰKÖDÉSE ÉRDEKÉBEN KI KELL VENNI AZ ÜLÉSBŐLA
FIÓKOT.
VAROVÁNÍ! TYTO KRÁTKÉ INSTRUKCE SLOUŽÍ POUZE JAKO PŘEHLED. PRO MAXIMÁLNÍ OCHRANU A POHODLÍ DÍTĚTE JE NEZBYTNÉ SI DŮKLADNĚ PŘEČÍST CELÝ NÁVOD K POUŽITÍ A ŘÍDIT SE JÍM.
UPOZORNĚNÍ! JESTLIŽE DÍTĚ PŘEKRAČUJE HMOTNOST 22 KILO, JE TŘEBA VYJMOUT ZÁSUVKU ZE SEDAČKY, ABY SE ZARUČILO BEZVADNÉ FUNGOVÁNÍ SEDAČKY.
VAROVANIE! TIETO KRÁTKE INŠTRUKCIE SLÚŽI LEN AKO PREHĽAD. PRE MAXIMÁLNE OCHRANU A POHODLIE DIEŤAŤA JE POTREBNÉ SI DÔKLADNE PREČÍTAŤ CELÝ NÁVOD NA POUŽITIE A RIADIŤ SA NÍM.
UPOZORNENIE! AK VÁHA VÁŠHO DIEŤAŤA PRESAHUJE 22 KILOGRAMŮ, MUSÍTE Z DÔVODU ZARUČENIE BEZCHYBNEJ FUNKČNOSTI
AUTOSEDAČKY, VYBRAŤ JEJ ZÁSUVKU.
2

3

SEHR GEEHRTE KUNDIN, SEHR GEEHRTER KUNDE,
Vielen Dank, dass Sie sich bei der Wahl eines Kindersitzes für den CYBEX Solution X2 entschieden haben. Bei der Entwicklung des CYBEX Kindersitzes Solution X2 haben Sicherheit, Komfort und Bedienfreundlichkeit im Vordergrund gestanden. Das Produkt wird unter besonderer Qualitätsüberwachung hergestellt und erfüllt strengste Sicherheitsanforderungen.
DEAR CUSTOMER,
Thank you for purchasing the CYBEX Solution X2. We assure you that in the process of developing the CYBEX Solution X2 we focused on safety, comfort and user friendliness. The product is manufactured under special quality surveillance and complies with the strictest safety requirements.
GENTILE CLIENTE,
Ci congratuliamo con Lei per avere acquistato il seggiolino CYBEX Solution X2. Le assicuriamo che nel progettare CYBEX Solution X2 i nostri principali obiettivi sono stati la sicurezza, il comfort e la maneggevolezza. Il prodotto è stato elaborato sotto uno stretto controllo qualitativo e risponde ai più severi standard di sicurezza.
4
Gebrauchsanleitung
CYBEX Solution X2
Sitzerhöher mit Rückenstütze
EMPFOHLEN FÜR:
Alter: von ca. 3 bis ca. 12 Jahren
Gewicht: 15 bis 36 kg
Körpergröße: bis 150 cm
Für Fahrzeugsitze mit Dreipunkt Automatik Gurt
ZULASSUNG:
ECE R-44/04, Gruppe 2/3, 3–12 Jahre (15–36 kg)
Gruppe 3: ab 22 kg ohne Schublade
INSTRUCTION MANUAL
CYBEX Solution X2 booster with backrest
RECOMMENDED FOR:
Age: from approximately 3 to 12 years Weight: 15 to 36 kg
Body height: up to 150 cm
For vehicle seats with three-point automatic retractor belt
HOMOLOGATION:
ECE R-44/04, group 2/3, 15 to 36 kg Group 3: from 22 kg without drawer
MANUALE D‘ISTRUZIONI
CYBEX Solution X2 seduta con schienale
RACCOMANDATO PER:
Età: dai 3 ai 12 anni circa Peso: dai 15 ai 36 kg
Altezza: fino a 150 cm
Per sedili dotati di sistema di cinture di sicurezza a tre punti.
OMOLOGAZIONE:
ECE R-44/04, group 2/3, 15 to 36 kg Gruppo 3: dai 22 kg senza cassetto
11/2013
DE INHALT
Warnung! Um den optimalen Schutz für Ihr Kind zu gewährleisten, muss der CYBEX Solution X2 unbedingt so verwendet werden, wie es in dieser Anleitung beschrieben wird.
Hinweis! Bewahren Sie die Anleitung immer griffbereit auf (z.B. unter dem elastischen Bezug an der Rückseite der Rückenlehne).
Hinweis! Durch länderspezifische Anforderungen können Produktmerkmale abweichen.
Kurzanleitung.................................................................................................. |
1 |
Warnung / Hinweis.......................................................................................... |
2 |
Zulassung – Eignung...................................................................................... |
5 |
Erstmontage.................................................................................................... |
7 |
Anpassen an die Körpergröße........................................................................ |
7 |
Einstellung der Kopfstütze.............................................................................. |
7 |
Der richtige Platz im Fahrzeug........................................................................ |
9 |
Den Sitz ins Fahrzeug stellen........................................................................ |
11 |
Anschnallen des Kindes................................................................................ |
13 |
Ist Ihr Kind richtig gesichert?......................................................................... |
15 |
Neigungsverstellbare Kopfstütze.................................................................. |
15 |
Pflege............................................................................................................ |
17 |
Entfernen des Bezugs................................................................................... |
17 |
Entfernen des Sitzbezugs von der Sitzlehne................................................ |
17 |
Reinigung...................................................................................................... |
19 |
Verhalten nach einem Unfall......................................................................... |
19 |
Produktlebensdauer...................................................................................... |
19 |
Entsorgung.................................................................................................... |
21 |
Garantie................................................................................................... |
21-23 |
5
UK CONTENT
Warning! For your child‘s maximum protection, it is essential to use and install the CYBEX Solution X2 according to the instructions in this manual.
Note! Please keep the instruction manual close by for future reference (e.g. under the elastic cover on the rear side of the backrest)
Note! According to local codes the product characteristic can be different.
Short manual................................................................................................... |
1 |
Warning / Note................................................................................................ |
2 |
Homologation.................................................................................................. |
5 |
First installation............................................................................................... |
8 |
Adjustment regarding the child‘s height.......................................................... |
8 |
Adjustment of the headrest............................................................................. |
8 |
The best position in the car........................................................................... |
10 |
Securing the child.......................................................................................... |
12 |
Fastening the seat belt of your child............................................................. |
14 |
Is your child properly secured?..................................................................... |
16 |
Reclining headrest........................................................................................ |
16 |
Product care.................................................................................................. |
18 |
Removing the seat cover.............................................................................. |
18 |
Removing the seat cover of the backrest...................................................... |
18 |
Cleaning........................................................................................................ |
20 |
What to do after an accident......................................................................... |
20 |
Durability of the product ............................................................................... |
20 |
Disposal........................................................................................................ |
22 |
Warranty................................................................................................... |
22-24 |
IT ARGOMENTI
Attenzione! Per garantire un’adeguata sicurezza del Vostro bambino è molto importante che l’uso e l’installazione di CYBEX Solution X2 siano effettuati seguendo scrupolosamente questo manuale d’istruzioni.
Nota Bene! Consigliamo di conservare il manuale istruzioni sotto la copertura elastica sul retro dello schienale in modo da averlo sempre a portata di mano per una veloce consultazione.
Nota Bene! In base alle normative locali alcune caratteristiche del prodotto potrebbero differire.
Sommario........................................................................................................ |
1 |
Attenzione / Avvertenza.................................................................................. |
2 |
Omologazione - qualificazione........................................................................ |
5 |
Prima installazione.......................................................................................... |
8 |
Regolazione in base alla corporatura del bambino......................................... |
8 |
Regolazione dell‘appoggiatesta...................................................................... |
8 |
Posizionamento corretto del seggiolino all‘interno dell‘autoveicolo.............. |
10 |
Fissaggio del bambino.................................................................................. |
12 |
Allacciare la cintura di sicurezza del bambino.............................................. |
14 |
Il bambino è fissato correttamente?.............................................................. |
16 |
Reclinazione dell‘appoggiatesta.................................................................... |
16 |
Manutenzione del prodotto............................................................................ |
18 |
Rimozione del rivestimento........................................................................... |
18 |
Rimozione del rivestimento schienale........................................................... |
18 |
Pulizia............................................................................................................ |
20 |
Cosa fare a seguito di un incidente............................................................... |
20 |
Durevolezza del prodotto.............................................................................. |
20 |
Smaltimento.................................................................................................. |
22 |
Garanzia................................................................................................... |
22-24 |
6

b
a
c
d
e
h
a
d
z |
e
f
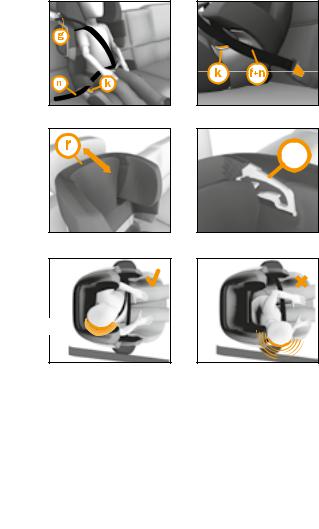
ERSTMONTAGE
Der Kindersitz besteht aus einem Sitzkissen (d) und einer Rückenlehne (a) mit höhenverstellbarer Schulterund Kopfstütze. Nur die Kombination der beiden Teile bietet Ihrem Kind den bestmöglichen Schutz und Komfort.
Warnung! Die Bestandteile des CYBEX Solution X2 dürfen weder einzeln, noch in Verbindung mit Sitzkissen, Rückenlehnen oder Kopfstützen anderer Hersteller oder einer anderen Baureihe verwendet werden. Die Zulassung würde in einem solchen Fall sofort erlöschen.
Die Rückenlehne (a) wird mit der Führungsnase (b), auf der Achse (c) des Sitzkissens (d) eingehakt.
Hinweis! Bitte verwahren Sie die Gebrauchsanleitung immer in der Lade, so ist sie zur Hand falls Sie etwas nachlesen wollen.
Stecken Sie anschließend die Lade bis zum Anschlag in die dafür vorgesehene
Öffnung am Sitz.
Warnung! Achten Sie immer darauf, dass die Einzelteile des Kindersitzes niemals gestaucht oder eingeklemmt werden (z.B. durch die Fahrzeugtür oder durch Verstellen der Rückbank).
Das „Linear Side Protection“ System (LSP) wird für beide Seiten in die Montagebohrungen (z) gesteckt, dann nach unten geschoben, bis es einrastet.
ANPASSEN AN DIE KÖRPERGRÖSSE
Nur eine in optimaler Höhe eingestellte Schulterund Kopfstütze (e) bietet größtmöglichen Schutz und Komfort für Ihr Kind und gewährleistet außerdem den optimalen Verlauf des Diagonalgurtes (f).
Die Höhenverstellung (e) kann in insgesamt 11 Positionen erfolgen. Die Schulterstütze ist mit der Kopfstütze fest verbunden und muss nicht separat eingestellt werden. Die Anpassung hat so zu erfolgen, dass zwischen
der unteren Kante der Kopfstütze und der Schulter des Kindes noch zwei Fingerbreit Platz ist.
EINSTELLUNG DER KOPFSTÜTZE
•Setzen Sie Ihr Kind in den Kindersitz.
•Ziehen Sie den Verstellgriff (h) nach oben, um die Schulterund Kopfstütze zu entriegeln.
•Nun können Sie die Schulterund Kopfstütze (e) in die gewüschte Position bringen.
•Sobald Sie den Verstellgriff (h) loslassen, rastet die Schulterund Kopfstütze (e) automatisch ein.
7
FIRST INSTALLATION
The child seat consists of a booster seat (d) and a backrest (a) with height adjustable shoulder and headrest. Only the combination of both parts provides best protection and comfort to your child.
Warning! The parts of the CYBEX Solution X2 must not be used alone or in combination with boosters, backrests or headrests from other manufacturers or of a different product series. In such cases, the certification expires immediately.
Connect the backrest (a) to the booster (d) by hooking the guide lug (b) on the axis (c) of the booster (d).
Note! Please keep the instruction manual close by for future reference (e.g. by storing it under the elastic cover at the rear side of the backrest).Then insert the drawer all the way in the provided opening in the seat.
Warning! Please make sure that the plastic parts of the child seat never get jammed (e.g. in the car door or by adjusting the back seat).
Insert the Linear Side-impact Protection (L.S.P. System) pads on both sides into the mounting holes (z), then push down until they click into place.
PRIMA INSTALLAZIONE
Il seggiolino di sicurezza per auto è composto da una seduta (d) e di uno schienale (a) con appoggiatesta e protezioni per le spalle ad altezza regolabile integrati. Solo l’insieme di entrambe le componenti fornirà al Vostro bambino la corretta protezione e comfort.
Attenzione! Le parti del seggiolino CYBEX Solution X2 non devono assolutamente essere usate separatamente o in combinazione con prodotti di altro modello o produttore. In tal caso la licenza sarà automaticamente annullata.
Lo schienale (a) è agganciato nell’asse (c) della seduta (d) con il binario di ancoraggio (b).
Nota! Raccomandiamo di conservare il manuale in un posto sicuro. Dovrebbe essere sempre a portata di mano per riferimenti futuri. Consigliamo di riporlo sotto la copertura elastica, sul retro dello schienale.
Attenzione! Fare sempre molta attenzione a non danneggiare il sedile durante l’uso quotidiano, inserendo le cinture o nel chiudere le porte del veicolo.
Inserire i cuscinetti del Sistema LSP (Protezione Lineare nell‘Impatto Laterale) negli appositi alloggiamenti (z) da ambo i lati e spingere verso il basso fino a sentire il click di collegamento avvenuto.
adjustment regarding the child‘s height
A headrest can only provide the best protection and comfort for your child if optimally adjusted. Only then it can guarantee the optimal position of the
diagonal belt (f). You can adjust the height of the Solution X2 headrest (e) in 11 positions. The shoulder rest is attached to the headrest and does not have to be adjusted separately. You can check the optimal adjustment of the headrest by trying to fit exactly two fingers between the headrest and the shoulders of the child.
Adjustment of the headrest
•Place your child in the child seat.
•Pull the adjustment handle (h) in order to unlock the shoulder and headrest.
•Bring the shoulder and headrest (e) in the desired position.
•As soon as you let go of the adjustment handle (h), the shoulder and headrest (e) locks automatically.
REGOLAZIONE IN BASE ALLA CORPORATURA DEL BAMBINO
Soltanto una protezione per le spalle ed un appoggiatesta (e) regolati correttamente in base all’altezza possono fornire l’adeguata protezione e comfort al Vostro bambino e contemporaneamente garantire la posizione ottimale della cintura diagonale (f). L’altezza (e) può essere regolata in 11 posizioni. Le protezioni per le spalle sono fissate all’appoggiatesta e non richiedono una regolazione distinta. L’altezza dev’essere regolata in modo da poter inserire 2 dita tra la base dell’appoggiatesta e la spalla el
bambino.
REGOLAZIONE DELL‘APPOGGIATESTA
•Sistemare il bambino nel seggiolino
•Sollevare verso l’alto la maniglia di regolazione (h) per sbloccare il meccanismo.
•Portare protezioni per le spalle e appoggiatesta (e) nella posizione desiderata.
•Lasciando andare la maniglia di regolazione (h) le protezioni per le spalle e l’appoggiatesta (e) si fissano automaticamente in posizione.
8
f
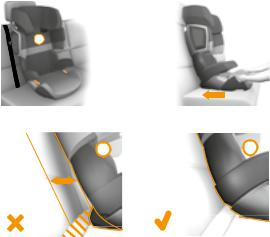
DER RICHTIGE PLATZ IM FAHRZEUG
Der CYBEX Solution X2 ist auf allen Plätzen mit Dreipunkt - Automatikgurt verwendbar. Wir empfehlen generell den Sitz hinten im Fahrzeug zu installieren. Auf dem Beifahrersitz ist Ihr Kind bei einem Unfall in den meisten Fällen höheren Gefahren ausgesetzt.
Warnung! Der Sitz ist nicht für die Verwendung mit einem 2-Punkt- oder Beckengurt geeignet. Wird der Sitz mit einem 2-Punkt-Gurt gesichert, kann es bei einem Unfall zu schweren oder gar tödlichen Verletzungen des Kindes
kommen.
In Ausnahmefällen kann der Sitz jedoch auch vorne am Beifahrersitz verwendet werden. Beachten Sie dabei die folgenden Punkte:
•Bei Fahrzeugen mit Airbag sollten Sie den Beifahrersitz so weit wie möglich nach hinten schieben. Beachten Sie jedoch, dass der obere Anlenkpunkt des Fahrzeuggurtes hinter der Gurtführung des Kindersitzes bleibt.
•Die Empfehlungen des Fahrzeugherstellers sind unbedingt zu befolgen.
Warnung! Der Diagonalgurt (f) muss schräg nach hinten verlaufen und darf nie nach vorn zum oberen Gurtpunkt in Ihrem Fahrzeug führen. Sollte dies nicht einzustellen sein, z.B. durch Vorschieben des Autositzes oder Verwendung auf einem anderen Sitzplatz, so ist der Kindersitz für dieses Fahrzeug nicht geeignet.
Gepäckstücke oder andere Gegenstände im Fahrzeug, welche bei einem Unfall Verletzungen verursachen können, müssen immer gut befestigt werden. Sie können zu tödlichen Geschossen im Fahrzeug werden.
Warnung! Auf Fahrzeugplätzen, die quer zur Fahrtrichtung angeordnet sind, ist die Verwendung des Sitzes nicht zulässig. Auf
rückwärtsgerichteten Fahrzeugsitzen, wie z.B. in einem Van oder Minibus, ist die Verwendung zulässig, sofern der Fahrzeugsitz für die Beförderung eines Erwachsenen zugelassen ist. Zu Beachten ist, dass die Kopfstütze bei rückwärtsgerichtetem Einbau nicht entfernt werden darf! Der Kindersitz muss auch dann, wenn er nicht benutzt wird, immer mit dem Fahrzeuggurt befestigt sein. Bereits bei einer Notbremsung oder einem geringen Aufprall kann ein unbefestigter Sitz andere Mitfahrer und Sie selbst verletzen.
Hinweis! Bitte lassen Sie Ihr Kind nie unbeaufsichtigt im Fahrzeug zurück.
9
THE BEST POSITION IN THE CAR
The CYBEX Solution X2 can be installed on all vehicle seats equipped with a three-point automatic retractor belt. We generally recommend,
however, using the child seat in the back of the vehicle. In the front, your child is usually exposed to higher risks in case of an accident.
Warning! You must not use the Solution X2 with a two-point belt or a lap belt. When securing your child with a two-point belt, the child may sustain lethal injuries in an accident.
In exceptions, the child seat may be used on the passenger seat. Please note the following for such cases:
•In cars equipped with airbags you should push the passenger seat as far back as possible. Please make sure that the upper point of the vehicle seat belt stays behind the belt guide of the child seat.
•You must follow the recommendations of the vehicle manufacturer.
Warning! The seat belt (f) must run diagonally from the back and must never lead to the front to the upper belt point of the front seat of in your vehicle. Should you be unable to adjust this for example by pushing the seat to the front or by using the seat on a different seat in the car, then the child seat is not suitable for this vehicle.
Luggage or other objects in the vehicle which may cause injuries in an accident must always be secured properly. Loose parts may turn into deadly projectiles during an impact.
Warning! For vehicles with passenger seats that are positioned sideways, the use of this child seat is not allowed. For seats that are positioned against the direction of travel, e.g. in a van or a minibus, the use of the child seat is allowed, assuming the seat is approved to carry an adult. Please ensure that the headrest is not taken off when mounting the child seat on a passenger seat which is positioned against the direction of travel! The child seat must have the seat belt fastened even when not in use. This is necessary to avoid the driver or passenger getting injured by a loose child seat when making an emergency stop or in case of a crash.
Note! Please never leave your child unattended in the car.
POSIZIONAMENTO CORRETTO DEL SEGGIOLINO ALL‘INTERNO DELL‘AUTOVEICOLO
Il seggiolino CYBEX Solution X2 può essere utilizzato su qualsiasi sedile di autoveicolo dotato di sistema di cinture di sicurezza a tre punti di ancoraggio. Raccomandiamo normalmente di utilizzare il seggiolino nella parte posteriore dell’autoveicolo. Sul sedile anteriore il bambino è esposto a maggiori rischi in caso di incidente.
Attenzione! Il seggiolino non può essere utilizzato con cinture di sicurezza a due punti di ancoraggio o soltanto con quella per le gambe, perché in tal caso il bambino sarebbe esposto a lesioni letali in caso di incidente.
In casi eccezionali il seggiolino potrà essere fissato sul sedile del passeggero.
In tal caso, preghiamo di notare quanto segue:
•Nei veicoli dotati di airbag è necessario arretrare il sedile del passeggero al massimo. Assicuratevi che il punto di attacco superiore delle cinture si trovi sempre dietro alla guida superiore del seggiolino.
•E’ indispensabile seguire le raccomandazioni del costruttore del veicolo.
Attenzione! La cintura di sicurezza (f) deve scorrere diagonalmente da dietro ed il punto più alto deve trovarsi sempre dietro al seggiolino. Se, per esempio, nell’arretrare al massimo il sedile anteriore o sistemandolo in altra posizione nell’auto, il punto più alto della cintura non si trovasse dietro al s eggiolino, quest’ultimo non potrà essere utilizzato in tale veicolo.
Bagagli o altri oggetti presenti nell’abitacolo dovranno sempre essere ben fissati e disposti in modo da non costituire pericolo in caso di incidente.
Attenzione! Seggiolino NON utulizzabile su sedili orientati lateralmente. Per sedili orientati contro il senso di marcia, per es. van o minibis, l‘uso è possibile soltanto se tali sedili sono omologati per il trasporto di un adulto. Nei sedili orientati contro il senso di marcia NON togliere l‘appoggiatesta quando viene montato il seggiolino. Allacciare sempre il seggiolino con la cintura di sicurezza anche quando non in uso. In caso di frenata improvvisa o di incidente, il seggiolino non fissato può costituire un grave pericolo per il conducente o altri passeggeri.
Nota! Non lasciare MAI il bambino incustodito nell’autovettura.
10
|
|
|
DEN SITZ INS FAHRZEUG STELLEN |
|
|
|
|
|
|
|
Stellen Sie den Kindersitz auf den entsprechenden Fahrzeugsitz im Auto. |
a |
|
|
• Achten Sie unbedingt darauf, dass die Rückenlehne (a) des Kindersitzes flächig |
|
|
an der Rückenlehne des Autositzes anliegt, so dass sich der Kindersitz auf keinen |
|
|
|
|
|
|
|
|
Fall in einer Liegeposition befinden kann. |
|
|
|
• Sollte die Kopfstütze des Fahrzeugsitzes störend sein, ziehen Sie diese ganz |
|
|
|
heraus, drehen Sie sie um oder nehmen Sie sie ganz ab. Die Rückenlehne (a) |
|
|
|
passt sich optimal stufenlos fast jeder Neigung des Fahrzeugsitzes an. |
|
|
|
Um den größtmöglichen Schutz für das Kind zu gewährleisten, muss sich der Sitz |
|
|
|
|
|
|
|
einer normalen aufrechten Position befinden! |
|
|
|
Warnung! Die Rückenlehne des Solution X2 muss an der Lehne des |
1 |
|
2 |
Fahrzeuges flächig aufliegen. Der Sitz muss am Sitzerhöher kräftig nach |
|
hinten in die Sitzmulde gedrückt werden. |
||
|
|
|
Sollte dies bei Fahrzeugen mit einer besonderen Ausformung des |
|
|
|
Fahrzeugsitzes aufgrund der Schublade nicht möglich sein (1), muss |
|
|
|
diese entfernt werden (2). Ab einem Körpergewicht von 22kg (ECE-Gruppe |
|
|
|
3) ist der Solution X2 grundsätzlich ohne Lade zu verwenden. |
|
|
|
Wenn der Solution X2 ohne Lade verwendet wird, ist die Anleitung an der |
|
|
|
Rückseite der Rückenlehne unter dem elastischen Bezug aufzubewahren. |
|
|
|
Hinweis! An einigen Autositzen aus empfindlichem Material (z.B. Velours, |
|
|
|
|
|
|
|
Leder, etc.) können durch die Benutzung von Kindersitzen mögliche |
|
|
|
Gebrauchsspuren und/oder Abfärbungen auftreten. Um das zu vermeiden, |
|
|
|
können Sie z.B. eine Decke oder ein Handtuch unterlegen. Ferner weisen wir in |
|
|
|
diesem Zusammenhang auf unsere Reinigungshinweise hin, die vor der ersten |
|
|
|
Verwendung des Sitzes unbedingt beachtet werden sollten. |
11
SECURING THE CHILD
Place the child seat on the respective seat in the car.
•Please make sure that the backrest (a) of the child safety seat rests flat against the backrest of the car seat so that the child seat is under no circumstances in a sleeping position.
•Should the headrest of the vehicle seat interfere, please pull it out completely and turn it around or take it off entirely. The backrest (a) optimally adjusts to almost any inclination of the vehicle seat.
For the best possible protection of your child, the seat must be in a normal upright position!
Warning! The backrest of the Solution X2 should rest flat against the upright part of the car seat. Pushing the booster rearwards the seat should be tightly pressed against the seat.
If this is not possible due to the drawer, e.g. in cars with a special seat configuration (1) the drawer should be removed (2). For children with a body weight above 22kg (ECEgroup 3) the Solution X2 should always be used without drawer.
When using the Solution X2 without the drawer, please store the instruction manual on the rear side of the backrest under the elastic cover.
Note! It is possible that some car seats that are made of soft material (e.g. velours, leather, etc.) may show signs of usage and/or discolouration. In order to avoid this, you could, for example, place a cover or towel underneath it.
In this context, we would also like to refer to you to our cleaning instructions, which must absolutely be followed before the first use of the seat.
FISSAGGIO DEL BAMBINO
Collocare il seggiolino di sicurezza sul sedile dell’auto.
•Prestare la massima attenzione affinché lo schienale del seggiolino (a) sia correttamente appoggiato al sedile dell’auto e non inclinato.
•Se l’appoggiatesta del sedile interferisce con il posizionamento del seggiolino di sicurezza sarà bene rialzarlo completamente o rimuoverlo. Lo schienale
(a) del seggiolino si adatta perfettamente a qualsiasi inclinazione del sedile dell’autoveicolo.
Per la massima sicurezza del bambino il sedile deve trovarsi nella normale posizione eretta!
Attenzione! Lo schienale del seggiolino Solution X2 dovrà essere perfettamente apppoggiato allo schienale dell‘auto. La base dovrà essere spinta all‘indietro contro il sedile.
Se ciò non fosse possibile a causa del cassetto portaoggetti, per esempio nel caso di automobili con sedili particolari (1) il cassetto portaoggetti dovrà essere rimosso (2). Per il trasporto di bambini di peso supriore ai 22 kg (ECE - Gruppo 3) il seggiolino Solution X2 dovrà sempre essere utilizzato senza il cassetto portaoggetti.
Quando usate il Solution X2 senza cassetto vi invitiamo a riporre il manuale istruzioni nella parte posteriore dello schienale, sotto il rivestimento elastico, per averlo sempre a portata di mano.
Nota! Nel caso di sedili in materiali particolarmente delicati (per esempio velluto, pelle, ecc.) per evitare danneggiamenti consigliamo di di stendere un telo protettivo sotto il seggiolino. Con l‘occasione ricordiamo di fare riferimento anche alle istruzioni per il lavaggio, che devono essere seguite scrupolosamente prima dell‘utilizzo.
12
l
l m
|
|
|
f |
n |
k |
|
|
|
d |
n |
k |
|
|
g e

 f f
f f 
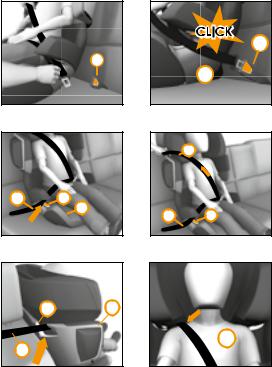
ANSCHNALLEN DES KINDES
Setzen Sie Ihr Kind in den Kindersitz. Ziehen Sie den Dreipunktgurt weit heraus und führen Sie diesen vor Ihrem Kind entlang zum Gurtschloss (l).
Warnung! Gurt auf keinen Fall verdrehen.
Stecken Sie die Gurtzunge (m) ins Gurtschloss (l). Dieses muss hörbar einrasten.
Den Beckengurt (n) in die unteren Gurtführungen (k) des Kindersitzes einlegen. Ziehen Sie nun den Beckengurt (n) straff, indem Sie kräftig am Diagonalgurt
(f) ziehen. Je enger der Gurt anliegt, desto besser kann er vor Verletzungen schützen. Auf der Seite des Gurtschlosses müssen Schultergurt und Beckengurt zusammen in die untere Gurtführung eingelegt sein.
Warnung! Das Fahrzeuggurtschloss (l) darf keinesfalls in die untere Gurtführung (k) hineinreichen. Ist die Gurtpeitsche zu lang, ist der Sitz nicht für dieses Fahrzeug geeignet.
Der Beckengurt (n) sollte auf beiden Seiten des Sitzkissens (d) in den unteren Gurtführungen (k) liegen.
Hinweis! Bringen Sie Ihrem Kind von Anfang an bei, immer auf eine straffe Gurtführung zu achten und bei Bedarf, den Gurt selbst festzuziehen.
Warnung! Der Beckengurt muss auf beiden Seiten so tief wie möglich über der Leistenbeuge Ihres Kindes verlaufen, um im Falle eines Unfalls optimal wirken zu können.
Nun führen Sie den Diagonalgurt (f) durch die obere rote Gurtführung (g) in der
Schulterstütze (e), bis er sich innerhalb der Gurtführung befindet.
Achten Sie bitte darauf, dass der Diagonalgurt (f) zwischen Schulteraußenkante und Hals Ihres Kindes verläuft. Falls erforderlich, passen Sie durch Verstellen der Kopfstützenhöhe den Gurtverlauf an. Die Höhe der Kopfstütze kann auch noch im Auto eingestellt werden.
13
FASTENING THE SEATBELT OF YOUR CHILD
Put your child in the child seat. Pull out the three-point belt and lead it in front of your child to the belt buckle (l).
Warning! Never twist the belt!
Put the belt guide (m) into the belt buckle (l). If you hear a clicking sound it is securely locked.
Put the lap belt (n) in the bottom belt guides (k) of the child seat. Now pull the lap belt (n) tight by pulling the diagonal belt (f) until there is no slack. The tighter the belt the better it can protect from injuries. The diagonal belt and lap belt should both be inserted in the bottom belt guide at the side of the belt buckle.
Warning! The belt buckle of the car seat (l) must under no circumstances reach into the bottom belt guide (k). If the belt strap is too long, the child seat is not suitable for this vehicle.
The lap belt (n) should be placed in the bottom belt guides (k) on both sides of the seat (d).
Note! Teach your child from the beginning to always pay attention to a tight belt and that it should pull the belt tight by itself if necessary.
Warning! The lap belt must, on both sides, run as low across the groin of your child as possible in order to take optimal effect in case of an accident.
Now lead the diagonal belt (f) through the upper red belt guide (g) in the shoulder rest (e) until it is inside the belt guide.
Please make sure that the diagonal belt (f) runs between the outer edge of the shoulder and your child‘s neck. If necessary, adjust the running of the belt by adjusting the height of the headrest. The height of the headrest can still be adjusted in the car.
ALLACCIARE LA CINTURA DI SICUREZZA DEL BAMBINO
Collocare il bambino nel seggiolino di sicurezza. Tirare la cintura di sicurezza a tre punti e farla passare davanti al bambino, fino al punto di ancoraggio.
Attenzione! Non attorcigliare MAI la cintura!
Sistemare la guida della cintura (m) nel dispositivo di chiusura (l). L’aggancio corretto sarà segnalato dal “CLICK”. Sistemare la cintura per le gambe (n) nelle guide inferiori (k) del seggiolino. Quindi regolare la lunghezza del tratto di cintura per le gambe (n) tirando la parte diagonale della cintura (f) in modo da eliminare qualsiasi lasco. Un fissaggio ottimale della cintura garantisce una maggiore protezione. La cintura di sicurezza diagonale e quella per le gambe dovrebbero essere inserite nella guida inferiore della cintura a lato del dispositivo di chiusura.
Attenzione! Il dispositivo di aggancio della cintura di sicurezza dell’auto
(l) non deve in alcun caso arrivare all’altezza delle fessure in cui scorrono le cinture del seggiolino (k). Se il dispositivo di aggancio delle cinture è troppo lungo, il seggiolino non è adatto a questo tipo di autoveicolo.
La cintura per le gambe (n) deve essere inserita nelle apposite guide (k) disposte su ambo i lati della seduta (d).
Avvertenza! Insegnate fin da subito al Vostro bambino di prestare attenzione alla regolazione della cintura, che dovrà essere sempre ben tesa. Insegnategli a stringerla da solo se necessario.
Attenzione! La cintura di sicurezza per le gambe deve scorrere all’interno delle guide da ambo i lati per garantire la massima protezione in caso di incidente.
A questo punto inserire la cintura di sicurezza diagonale (f) nella fessura di sicurezza del seggiolino all’altezza delle spalle (e).
Prestare la massima attenzione affinché la cintura diagonale (f) passi tra il collo del bambino ed il lato esterno della spalla. Se necessario, sistemarne la posizione regolandol’altezza dell’appoggiatesta. L’altezza dell’appoggiatesta può essere regolata anche quando il seggiolino è fissato all’interno dell’auto.
14
t
IST IHR KIND RICHTIG GESICHERT?
Um die bestmögliche Sicherheit Ihres Kindes zu gewährleisten, prüfen Sie bitte vor Beginn der Fahrt, ob …
•der Beckengurt (n) auf beiden Seiten des Sitzkissens in den unteren Gurtführungen (k) verläuft.
•der Diagonalgurt (f) auf der Gurtschlossseite auch in der unteren Gurtführung (k) des Sitzkissens verläuft.
•der Diagonalgurt (f) durch die rot markierte Gurtführung (g) der Schulterstütze verläuft.
•der Diagonalgurt (f) schräg nach hinten verläuft.
•der gesamte Gurt straff ist und nicht verdreht anliegt.
NEIGUNGSVERSTELLBARE KOPFSTÜTZE
Der CYBEX Solution X2 hat eine neigungsverstellbare Kopfstütze (r), die hilft, dass der Kopf Ihres Kindes beim Einschlafen nicht so leicht nach vorne fällt. Außerdem trägt diese verstellbare Kopfstütze zum Komfort für Ihr Kind bei Autofahrten bei.
Hinweis! Achten Sie bitte darauf, dass der Kopf des Kindes immer in Kontakt mit der neigungsverstellbaren Kopfstütze bleibt, da die Kopfstütze nur so ihre optimierte Seitenaufprall-Schutzfunktion erfüllen kann.
Durch leichtes Anheben der Kopfstütze kann die Neigung der Kopfstütze (r) in drei verschiedene Positionen verstellt werden.
Warnung! Auf keinen Fall darf die Einrastvorrichtung (t) mit Gegenständen blockiert werden. Im Falle eines Unfalls muss die Leichtgängigkeit der Neigungsverstellung gewährleistet sein, da es sonst eventuell zu Verletzungen Ihres Kindes kommen kann.
15
IS YOUR CHILD PROPERLY SECURED?
In order to ensure the maximum safety for your child, please check prior to the ride whether …
•the lap belt (n) runs in the bottom belt guides (k) on both sides of the seat
•the diagonal belt (f) also runs in the bottom belt guide (k) of the seat on the side of the belt buckle
•the diagonal belt (f) runs through the belt guide (g) of the shoulder rest, marked red
•the seat belt (f) runs diagonally to the back
•the entire belt is snugly fastened and not twisted
IL BAMBINO È FISSATO CORRETTAMENTE?
Per garantire la massima sicurezza del bambino è necessario verificare i seguenti punti prima di avviare il veicolo …
•la cintura di sicurezza per le gambe (n) deve passare attraverso le guide di sicurezza (k) su ambo i lati del seggiolino.
•la cintura di sicurezza diagonale (f) deve essere inserita anche nella guida di sicurezza inferiore (k) del seggiolino a lato del dispositivo di aggancio della cintura di sicurezza.
•la cintura di sicurezza diagonale (f) deve passare attraverso la guida di sicurezza
(g) delle spalle contrassegnata in rosso
•la cintura di sicurezza (f) scorre in diagonale all’indietro.
•tutta la cintura dev’essere ben tesa e non attorcigliata.
RECLINING HEADREST
The CYBEX Solution X2 has a reclining headrest (r) preventing your child‘s head from falling forward when asleep. Furthermore, this adjustable headrest contributes to the comfort of your child during the car ride.
Note! Please ensure that the child‘s head always remains in contact with the reclining headrest since otherwise the headrest cannot fulfill its optimal sidecrash protective function.
By slightly lifting the headrest, the inclination of the headrest (r) can be adjusted in three different positions.
Warning! The locking device (t) must never be blocked by any objects! In case of an accident, the free movement of the inclination must be guaranteed since otherwise your child might be injured.
RECLINAZIONE DELL’APPOGGIATESTA
Il seggiolino CYBEX Solution X2 è dotato di un appoggiatesta reclinabile (r) che impedisce alla testa del bambino di protendersi in avanti durante il sonno. Inoltre, fornisce al bambino un maggiore comfort durante il viaggio.
Avvertenza! Verificare che la testa del bambino si trovi sempre a contatto con l‘appoggiatesta reclinabile onde evitare che l’ottima funzione di questo dispositivo di sicurezza in caso di impatto laterale sia vanificata.
Sollevando leggermente l’appoggiatesta (r) è possibile regolarne l’inclinazione in tre diverse posizioni.
Attenzione! Il sistema di bloccaggio (t) non deve mai essere contrastato da ostacoli. E’ indispensabile verificare che il meccanismo di reclinazione sia libero da impedimenti per prevenire ferite al bambino in caso di incidente.
16
|
|
|
|
PFLEGE |
|
|
|
|
|
||
e |
|
e |
|
Um die größtmögliche Schutzwirkung Ihres Kindersitzes zu gewährleisten, ist es |
|
|
|
|
unbedingt notwendig, dass Sie folgendes beachten: |
||
|
|
|
|
• |
Alle wichtigen Teile des Kindersitzes sollten regelmäßig auf Beschädigungen |
|
|
|
|
• |
kontrolliert werden. Die mechanischen Bauteile müssen einwandfrei funktionieren. |
|
|
|
|
Es ist unbedingt darauf zu achten, dass der Kindersitz nicht zwischen harten Teilen |
|
h |
|
|
|
|
wie Fahrzeugtür, Sitzschiene usw. eingeklemmt wird und dadurch beschädigt |
|
|
a |
|
werden kann. |
|
|
|
|
• |
Der Kindersitz muss z.B. nach einem Sturz unbedingt vom Hersteller überprüft |
|
|
|
|
|
||
|
|
|
|
|
werden. |
|
|
|
|
|
|
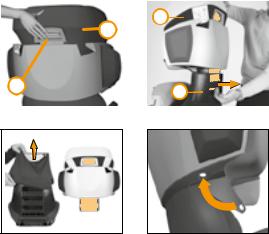
ENTFERNEN DES BEZUGES
Der Bezug besteht aus drei Teilen, die entweder mit Klettband, Druckknöpfen oder Knopflöchern am Kinderautositz befestigt sind. Sobald Sie alle
Befestigungen lösen, können die Einzelteile abgenommen werden.
Um den Bezug wieder zu befestigen, verfahren Sie in umgekehrter Reihenfolge.
Warnung! Der Kindersitz darf keinesfalls ohne Bezug verwendet werden.
ENTFERNEN DES SITZBEZUGS VON DER SITZLEHNE
1.Ziehen Sie durch Betätigen des Verstellgriffs (h) die Kopfstütze (e) soweit wie möglich heraus.
2.Betätigen Sie den Verstellgriff (h) und ziehen Sie gleichzeitig an der unteren Kante der obersten Rippe der Sitzlehne (a), um die Kopfstütze (e) zu lösen. Ziehen
Sie diese nun komplett heraus.
3.Jetzt können Sie den Sitzbezug nach oben hin entfernen.
4.Um die Rückenlehne wieder zusammenzubauen, stecken Sie mit betätigtem
Verstellgriff (h) die Kopfstütze (e) in die Rückenstütze (a).
17
PRODUCT CARE
In order to guarantee the best possible protection of your child seat, it is necessary that you take note of the following:
•All important parts of the child seat should be examined for any damages on a regular basis. The mechanical parts must function flawlessly.
•It is essential that the child safety car seat does not get jammed between hard objects e.g. like the door of the car, seat rail etc. causing possible damage to the seat.
•The child seat must be examined by the manufacturer after a fall or similar situations.
MANUTENZIONE DEL PRODOTTO
Per garantire i massimi standard di sicurezza del seggiolino è necessario prendere nota dei seguenti accorgimenti:
•Tutte le parti importanti del seggiolino di sicurezza per auto devono
essere sottoposte ad un regolare controllo per verificare eventuali danni. Le parti meccaniche devono funzionare correttamente.
•E’ essenziale che il seggiolino non venga danneggiato a causa di un eventuale schiacciamento tra il sedile dell’auto e la porta o da altri ostacoli solidi. Il seggiolino dovrà essere inviato al produttore per un controllo in caso di caduta o altri eventi similari.
REMOVING THE SEAT COVER
The seat cover consists of three parts which are fixed to the seat either by velcros, press buttons or button holes. Once you have released all fixations, the cover parts can be removed.
In order to put the covers back on the seat, proceed in the reversed order as removing them.
Warning! The child seat must never be used without the cover.
REMOVING THE SEAT COVER FROM THE BACKREST
1.Pull the headrest (e) into top position, by using the release handle (h).
2.To release the headrest (e), simultaneously pull the handle (h) and the lower rim of the upper rib of the backrest (a). Now the headrest (e) can be completely detached.
3.Now the cover can be removed.
4.For reassembly pull the adjustment handle (h) and insert the headrest (e) into the backrest (a).
RIMOZIONE DEL RIVESTIMENTO
Il rivestimento è costituito da tre parti unite al seggiolino tramite strisce di velcro, bottoni a pressione o bottoni ad asola. Una volta sganciati tutti i punti di fissaggio, le parti del rivestimento possono essere rimosse.
Per reinserire il rivestimento, eseguire nuovamente le operazioni nell’ordine inverso.
Attenzione! IIl seggiolino di sicurezza non deve mai essere utilizzato senza l’apposito rivestimento.
RIMOZIONE DEL RIVESTIMENTO DELLO SCHIENALE
1.Sollevare il poggiatesta (e) fino al punto di massima estensione attivando la maniglia di sblocco (h).
2.Per sganciare il poggiatesta (e) tirare contemporaneamente la maniglia (h) ed il lembo inferiore della copertura dello schienale (a). A questo punto il poggiatesta
(e) può essere staccato.
3.E il rivestimento tolto.
4.Per il rimontaggio tirare la maniglia di regolazione (h) ed inserire il poggiatesta (e) nello schienale (a).
18
REINIGUNG
Es ist darauf zu achten, dass nur ein Original CYBEX Solution X2 Sitzbezug verwendet wird, da auch der Bezug ein wesentlicher Bestandteil der Funktion ist. Ersatzbezüge erhalten Sie im Fachhandel.
Hinweis! Bitte den Bezug vor der ersten Verwendung waschen. Der Bezug darf bei 30°C im Schonwaschgang gewaschen werden. Sollten Sie mit mehr als 30°C waschen, kann es zu Ausfärbungen kommen. Bitte den Bezug gesondert von anderer Wäsche waschen und keinesfalls maschinell trocknen! Den Bezug keinesfalls in der prallen Sonne trocknen! Die Kunststoffteile können mit einem milden Reinigungsmittel und warmen Wasser gewaschen werden.
Warnung! Bitte auf keinen Fall chemische Reinigungsoder Bleichmittel verwenden!
VERHALTEN NACH EINEM UNFALL
Sollten Sie einen Unfall gehabt haben, können am Kindersitz Beschädigungen auftreten, welche nicht unbedingt offensichtlich erkennbar sind. In diesem Fall muss der Kindersitz unbedingt vom Hersteller geprüft und gegebenenfalls ausgetauscht werden.
PRODUKTLEBENSDAUER
Der CYBEX Solution X2 ist so ausgelegt, dass er für die gesamte maximale Verwendungszeit von ca. 9 Jahren – seine Eigenschaften erfüllt. Da jedoch in Fahrzeugen sehr große Temperaturschwankungen und unvorhersehbare
Belastungen auftreten können, ist es notwendig, folgende Punkte zu beachten.
•Wenn das Fahrzeug längere Zeit der prallen Sonne ausgesetzt ist, muss der Kindersitz aus dem Fahrzeug entfernt oder mit einem hellen Tuch abgedeckt werden.
•Prüfen Sie regelmäßig alle Kunststoffund Metallteile des Sitzes auf Beschädigung oder Veränderung von Form oder Farbe. Stellen Sie eine Veränderung fest, ist
der Kindersitz ungedingt zu entsorgen oder er muss vom Hersteller geprüft und gegebenenfalls ausgetauscht werden.
•Veränderungen des Stoffes insbesondere das Ausbleichen sind nach jahrelanger Verwendung in einem Fahrzeug normal und stellen keine Beeinträchtigung dar.
19
 Loading...