


SOLUTION B-FIX
UN R44/04, Gr. 2/3 15-36 kg
PT ES SK CZ HU PL NL FR IT EN DE
User Guide
DE - WARNUNG! Ohne Genehmigung der Zulassungsstelle dürfen keine Veränderungen am Kindersitz vorgenommen und keine Ergänzungen hinzugefügt werden. Reparaturen dürfen ausschließlich durch Personen vorgenommen werden, die hierfür autorisiert sind. Dabei dürfen stets nur original Bauund Zubehörteile verwendet werden. Die Schutzfunktion des Kindersitzes ist sonst nicht mehr gewährleistet. Warnung! Der Kindersitz bietet nur dann den bestmöglichen Schutz für ihr Kind, wenn Sie die Gebrauchsanweisung genau befolgen.
EN - WARNING! Without the approval of the Type Approval Authority, the child seat may not be modified or added to in any way. Repairs may only be performed by person authorised to this effect. Only original parts and accessories may be used for repairs. Failure to comply with the above will result in the protective function of the child seat no longer being guaranteed. Warning! The child seat only offers optimum protection for your child if you follow the usage instructions precisely.
IT - ATTENZIONE! Senza l'approvazione dell'ufficio di certificazione il seggiolino non può subire modifiche o aggiunte di alcun genere. Le riparazioni possono essere eseguite solo da persone autorizzate in tal senso. Per le riparazioni possono essere usati solo ricambi e accessori originali. Il mancato rispetto di quanto sopra avrà come conseguenza la terminazione della garanzia della funzione protettiva del seggiolino. Attenzione! Il seggiolino offre la protezione ottimale per il bambino solo qualora vengano seguite precisamente le istruzioni per l‘uso.
FR - ATTENTION! Le siège auto pour enfant ne saurait être modifié ou complété sans l’autorisation préalable de l’organisme de certification compétent. Seule une personne autorisée est habilitée à procéder à des réparations. Seuls des pièces ou accessoires originaux peuvent être employés pour les réparations. Toute entorse aux règles précitées compromettra la fonction de protection du siège auto pour enfant. Attention! Le siège auto pour enfant n’offre une protection optimale que si vous suivez précisément les instructions d’utilisation.
NL - BELANGRIJK! Zonder de goedkeuring van het certificeringsinstelling mag het kinderzitje niet worden aangepast en mag er niets aan worden toegevoegd. Reparaties mogen alleen worden uitgevoerd door personen die daartoe bevoegd zijn. Er mogen uitsluitend originele onderdelen en accessoires worden gebruikt voor reparaties. Niet-naleving van het bovenstaande resulteert erin dat de beschermende functie van het kinderzitje niet langer gegarandeerd is. Belangrijk! Het kinderzitje biedt uw kind alleen optimale bescherming als u de handleiding precies volgt.
PL - OSTRZEŻENIE! Bez zgody instytucji certyfikującej produkt, fotelik nie może być w żaden sposób modyfikowany lub zmieniany. Naprawy może dokonywać tylko autoryzowany serwis. Tylko oryginalne części i akceoria mogą być użyte do naprawy. Niezastosowanie się do powyższego może powodować utratę funkcji ochronnych. Uwaga! Fotelik zapewni maksimum bezpieczeństwa tylko wtedy jeśli przestrzegana będzie instrukcja obsługi.
2

HU - FIGYELEM! ATípust Jóváhagyó Hatóság jóváhagyása nélkül a gyermekülést semmilyen módon nem lehet módosítani vagy kiegészíteni. A javításokat csak az arra felhatalmazott személy végezheti. Csak eredeti alkatrészek és kiegészítők használhatók. A fentiek figyelmenkívül hagyása esetén a gyermekülés védőfunkciója
hosszú távon nem garantálható. Figyelem! A gyermekülés csak akkor nyújt optimális védelmet, ha pontosan követi a felhasználói utasításokat.
CZ - VAROVÁNÍ! Bez předchozího svolení schvalovacího orgánu je dětskou sedačku zakázané jakýmkoliv způsobem upravovat nebo k ní přidávat součásti. Opravy může provádět pouze oprávněná osoba. K opravě používejte výhradně originální součásti a příslušenství. Pokud nebudou výše uvedené body dodržené, nemůžeme nadále zaručit bezpečnostní funkce dětské sedačky. Varování! Dětská sedačka poskytuje optimální ochranu pro dítě pouze v případě, že dodržujete pokyny k použití.
SK - VAROVANIE! Bez predchádzajúceho súhlasu schvaľovacieho orgánu je zakázané detskú sedačku akýmkoľvek spôsobom upravovať alebo k nej pridávať súčasti. Opravy môže vykonávať len oprávnená osoba. Na opravu používajte výhradne originálne náhradné diely a príslušenstvo. Ak nebudú hore uvedené pokyny dodržané, nemôžeme naďalej zaručiť bezpečnostné funkcie detskej sedačky. Varovanie! Detská sedačka poskytuje optimálnu ochranu pre dieťa len v prípade, že boli dodržané pokyny na použitie.
ES - ¡Atención! La silla de auto no puede ser modificada ni se le pueden añadir componentes sin la aprobación de la oficina de certificación. Las reparaciones las realizará únicamente una persona autorizada para ello. Sólo se utilizarán recambios y accesorios originales en las reparaciones. El incumplimiento de lo expuesto anteriormente resultará en la pérdida de cobertura por garantía sobre la silla. ¡Atención! La silla de coche solo ofrece una protección óptima para su hijo si sigue las instrucciones de uso de forma precisa.
PT - ATENÇÃO! Sem expressa autorização, a cadeira infantil não poderá ser modificada de nenhuma maneira. As reparações só podem ser feitas por pessoas autorizadas para este efeito. Apenas partes e acessórios originais devem ser utilizados nas reparações. Não ir de encontro ao descrito anteriormente irá fazer com que a proteção da criança não possa ser assegurada. Atenção! A cadeira auto só oferece proteção ótima para a criança quando segue todas as instruções corretamente.
8 | INHALT
9 | CONTENTS
9 | ARGOMENTI
48 | TABLE DES MATIÈRES
49 | INHOUD
49 | SPIS TREŚCI
88 | TARTALOM
89 | OBSAH
89 | OBSAH
126 | CONTENIDO
127 | CONTEÚDO
PT ES SK CZ HU PL NL FR IT EN DE
3
4

DE: Kurzanleitung Gruppe 2/3 (15-36 kg) EN: Brief instructions Group 2/3 (15-36 kg) IT: Istruzioni brevi Gruppo 2/3 (15-36 kg)
FR: Instructions en bref Groupe 2/3 (15-36 kg) NL: Korte handleiding Groep 2/3 (15-36 kg)
PL: Skrócona instrukcja Grupa 2/3 (15-36 kg) HU: Rövid utasítások 2/3. csoport (15-36 kg) CZ: Rychlý návod pro skupinu 2/3 (15–36 kg) SK: Rýchly návod pre skupinu 2/3 (15–36 kg)
ES: Instrucciones abreviadas Grupo 2/3 (15-36 kg) PT: Instruções breves Gr. 2/3 (15-36 kg)
1 |
4 |
7 |
10 |
2 |
3 |
5 |
6 |
|
MAX |
8 |
9 |
11 |
12 |
|
5 |
SOLUTION B-FIX
UN-R44-04
UNIVERSAL
SEMI-UNIVERSAL 15 –36 kg
04301395
CYBEX GmbH
Riedingerstr. 18, 95448 Bayreuth
Germany
6
ZULASSUNG
UN R-44/04
CYBEX Solution B-fix - Gruppe 2/3, 15 bis 36 kg
Sitzerhöher mit Rückenlehne und Kopfstütze.
Empfohlen für:
Alter: ab ca. 3 Jahre bis ca.12 Jahre
Gewicht: 15-36 kg
nur geeignet für Fahrzeugsitze mit Dreipunkt- Automatik-Gurt, die nach UN Regelung
Nr. R16 oder gleichwertigem Standard zugelassen ist
CERTIFICATION
UN R-44/04
CYBEX Solution B-fix - group 2/3, 15 to 36 kg
Seat elevator with backrest and headrest.
Recommended for:
Age: from approx. 3 years to approx. 12 years
Weight: 15-36 kg
Only suitable for vehicle seats with automatic three-point belts approved in accordance with UN regulation 16 or a comparable standard
APPROVAZIONE
UN R-44/04
CYBEX Solution B-fix - Gruppo 2/3, da 15 a 36 kg
Elevatore del seggiolino con schienale e poggiatesta.
Raccomandato per:
Età: da 3 a 12 anni circa Peso: 15-36 kg
Adatto solo ai sedili dei veicoli con cinture automatiche a tre punti approvate ai sensi del regolamento UN R16 o di uno standard equivalente
SEHR GEEHRTE KUNDIN, SEHR GEEHRTER KUNDE!
Vielen Dank, dass Sie sich bei der Wahl eines Kinder sitzes für den Solution B-fix entschieden haben. Bei der
Entwicklung des Kindersitzes standen Sicherheit, Komfort und Bedienfreundlichkeit im Vordergrund. Das Produkt wird unter besonderer Qualitätsüberwachung hergestellt und erfüllt strengste Sicherheitsanforderungen.
!WARNUNG! Damit Ihr Kind richtig geschützt werden kann, ist es unbedingt notwendig, den Kindersitz so zu verwenden, wie es in dieser Anleitung beschrieben wird.
HINWEIS! Durch länderspezifische Anforderungen
(z.B. Farbkennzeichnungen am Kindersitz) können Produktmerkmale in ihrer äußeren Erscheinung variieren. Die korrekte Funktionsweise des Produktes wird davon jedoch nicht beeinflusst.
HINWEIS! Bewahren Sie die Anleitung immer griffbereit in dem dafür vorgesehenen Fach am Kindersitz auf.
DEAR CUSTOMER
Thank you for buying the Solution B-fix. We can assure you that safety, comfort and ease of use were our highest priorities when developing the child seat. This product is manufactured under exceptional quality control and meets the strictest safety requirements.
!WARNING! In order to keep your child properly protected it is absolutely essential that you use the child seat as described in this manual.
NOTE! Due to country-specific requirements (e.g. colour labelling on the child seat), the product features may vary in their external appearance. This, however, does not affect the correct functioning of the product.
NOTE! Always keep this Instruction Manual at hand in the compartment that has been provided for that purpose on the child seat.
GENTILE CLIENTE
Grazie per aver acquistato Solution B-fix. Le assicuriamo che nel progettare il seggiolino auto i nostri principali obiettivi sono stati la sicurezza, il comfort e la facilità di utilizzo. Il prodotto è stato elaborato sotto uno stretto controllo qualitativo e risponde ai più severi standard di sicurezza.
!ATTENZIONE! Per mantenere il bambino adeguatamente protetto è indispensabile utilizzare il seggiolino come descritto in questo manuale.
NOTA BENE! A causa dei requisiti specifici per ciascun Paese (ad esempio, l’etichettatura dei colori sul seggiolino), le caratteristiche del prodotto possono variare nel loro aspetto esterno. Ciò tuttavia non influisce sul corretto funzionamento del prodotto.
NOTA BENE! Raccomandiamo di tenere il manuale sempre a portata di mano e di conservarlo nell’apposito alloggiamento del seggiolino.
IT EN DE
7
DE |
INHALT |
ERSTMONTAGE.............................................................................. |
10 |
DER RICHTIGE PLATZ IM FAHRZEUG....................................... |
12 |
SICHERHEIT IM FAHRZEUG........................................................ |
16 |
DEN SITZ INS FAHRZEUG STELLEN ......................................... |
16 |
BEFESTIGEN DES KINDERSITZES MITTELS |
|
LATCH-CONNECT SYSTEM.......................................................... |
20 |
AUSBAU DES KINDERSITZES..................................................... |
22 |
ANPASSEN AN DIE KÖRPERGRÖSSE ...................................... |
24 |
ANSCHNALLEN DES KINDES ..................................................... |
26 |
IST IHR KIND RICHTIG GESICHERT? - FAHRZEUGGURT |
|
GRUPPE 2/3 (15-36 KG)................................................................. |
30 |
ENTFERNEN DES BEZUGES....................................................... |
32 |
REINIGUNG..................................................................................... |
34 |
PFLEGE............................................................................................ |
36 |
VERHALTEN NACH EINEM UNFALL........................................... |
38 |
ENTSORGUNG............................................................................... |
40 |
GARANTIEBEDINGUNGEN.......................................................... |
42 |
8

EN |
CONTENTS |
IT |
ARGOMENTI |
FIRST INSTALLATION.................................................................... |
11 |
POSITIONING THE SEAT CORRECTLY IN THE VEHICLE...... |
13 |
SAFETY IN THE VEHICLE............................................................. |
17 |
PLACING THE SEAT IN THE VEHICLE....................................... |
17 |
SECURING THE CHILD SEAT USING THE |
|
LATCH-CONNECT SYSTEM.......................................................... |
21 |
REMOVAL OF THE CHILD SEAT.................................................. |
23 |
ADAPTING TO BODY SIZE........................................................... |
25 |
SECURING THE CHILD................................................................. |
27 |
IS YOUR CHILD CORRECTLY SECURED? - VEHICLE BELT |
|
GROUP 2/3 (15-36 KG).................................................................... |
31 |
REMOVING THE SEAT COVER.................................................... |
33 |
CLEANING....................................................................................... |
35 |
CARE & MAINTENANCE................................................................ |
37 |
HOW TO ACT FOLLOWING AN ACCIDENT................................ |
39 |
DISPOSAL........................................................................................ |
41 |
WARRANTY CONDITIONS............................................................ |
43 |
PRIMA INSTALLAZIONE................................................................ |
11 |
POSIZIONE CORRETTA DEL SEGGIOLINO NEL VEICOLO.... |
13 |
SICUREZZA NEL VEICOLO........................................................... |
17 |
COLLOCAZIONE DEL SEGGIOLINO NEL VEICOLO................ |
17 |
FISSAGGIO DEL SEGGIOLINO CON IL SISTEMA |
|
LATCH-CONNECT.......................................................................... |
21 |
RIMOZIONE DEL SEGGIOLINO................................................... |
23 |
REGOLAZIONE IN BASE ALLA CORPORATURA...................... |
25 |
ALLACCIARE IL BAMBINO ALLA CINTURA ............................... |
27 |
IL BAMBINO È MESSO IN SICUREZZA CORRETTAMENTE? - |
|
CINTURADELL’AUTOMOBILE GRUPPO 2/3(15-36 KG).......... |
31 |
RIMOZIONE DELLA FODERA DEL SEGGIOLINO..................... |
33 |
PULIZIA............................................................................................. |
35 |
CURA E MANUTENZIONE............................................................. |
37 |
COME PROCEDERE IN SEGUITO A UN INCIDENTE............... |
39 |
SMALTIMENTO............................................................................... |
41 |
CONDIZIONI DI GARANZIA........................................................... |
43 |
IT EN DE
9
|
4 |
|
2 |
1 |
3 |
2
1
10
ERSTMONTAGE
Der Kindersitz besteht aus einem Sitzkissen (1) und einer Rückenlehne (2) mit höhenverstellbare Kopfstütze. Nur die Kombination der beiden Teile bietet Ihrem Kind den bestmöglichen Schutz und Komfort.
!WARNUNG! Die Bestandteile des Solution B-fix dürfen weder einzeln noch in Verbindung mit Sitzkissen,
Rückenlehnen oder Kopfstützen anderer Hersteller oder anderer Baureihen verwendet werden. Die Zulassung würde in solch einem Fall sofort erlöschen.
Die Rückenlehne (2) wird mit der Führungsnase (3) auf der Achse (4) des Sitzkissens (1) eingehakt.
!WARNUNG! Achten Sie immer darauf, dass die Einzelteile des Kindersitzes niemals gestaucht oder eingeklemmt werden (z.B. beim Schließen der Fahrzeugtür oder beim Verstellen der Rückbank).
HINWEIS! Bewahren Sie die Anleitung immer griffbereit auf
(z. B. im dafür vorgesehenen Fach an der Unterseite des Sitzes).
FIRST INSTALLATION
The child seat consists of a booster seat (1) and a backrest (2). Only the combination of these two parts provides best protection and comfort to your child.
!WARNING! The parts of the Solution B-fix must not be used alone or in combination with boosters, backrests or headrests from other manufacturers or from different product series. In such instances, the certification expires immediately.
PRIMA INSTALLAZIONE
Il seggiolino auto comprende una seduta (1), e uno schienale
(2). Solo la combinazione delle due parti insieme è in grado di garantire la massima protezione e il massimo comfort
al bambino.
!ATTENZIONE! Le parti del seggiolino Solution B-fix non devono essere modificate, usate da sole o in combinazione con sedute, schienali o poggiatesta di altri produttori o di altri modelli . In tali circostanze, l’omologazione perde automaticamente validità.
Connect the backrest (2) to the booster (1) by hooking the guide |
Collegare lo schienale (2) alla seduta (1) agganciando la guida |
lug (3) on the axis (4) of the booster (1). |
(3) all’asse (4) della seduta (1). |
!WARNING! Always ensure that the individual components of the child seat are never compressed or jammed (e.g. by jamming in the car door or when adjusting the back seat).
NOTE! Always keep these instructions to hand (e.g. in the designated compartment on the bottom of the booster seat).
!ATTENZIONE! Verificare sempre che le singole parti del seggiolino non siano mai bloccatie o compresse (ad esempio tra la portiera dell’auto o durante la regolazione del sedile).
NOTA BENE! Tenere sempre a portata di mano queste istruzioni (ad esempio nell'apposito scomparto sul retro dello schienale).
IT EN DE
11
DER RICHTIGE PLATZ IM FAHRZEUG
Der Kindersitz ist mit verstautem Latch-Connect System auf allen Fahrzeugplätzen mit DreipunktAutomatikgurt verwendbar, die im Fahrzeughandbuch für die „universelle“ Verwendung zugelassen sind.
!WARNUNG! Der Sitz ist nicht für die Verwendung mit einem 2-Punkt- oder Beckengurt geeignet. Wird der Sitz mit einem 2-Punkt-Gurt gesichert, kann es bei einem Unfall zu schweren oder gar tödlichen
Verletzungen des Kindes kommen.
Für die Befestigung mit dem Latch-Connect-System besteht eine „semi-universale“ Genehmigung. Aus diesem Grund kann das Latch-Connect System nur in bestimmten Fahrzeugen eingesetzt werden. Die zugelassenen Fahrzeuge entnehmen Sie bitte der beigelegten Fahrzeugtypenliste. Die aktuelle Version erhalten Sie auf www.cybex-online.com.
In Ausnahmefällen kann der Kindersitz auch vorne am Beifahrersitz verwendet werden. Beachten Sie dabei die folgenden Punkte:
•Bei Fahrzeugen mit Airbag sollten Sie den Beifahrersitz so weit wie möglich nach hinten schieben. Beachten Sie jedoch, dass der obere Gurtpunkt des Fahrzeuggurtes hinter der Gurtführung des Kindersitzes bleibt, damit der Fahrzeuggurt ordnungsgemäß aufrollt.
•Die Empfehlungen des Fahrzeugherstellers sind unbedingt zu befolgen.
12
POSITIONING THE SEAT CORRECTLY IN THE VEHICLE
The child seat with stored Latch-Connect System system can be used on all vehicle seats with automatic three-point safety belts approved in the vehicle manual for, “universal” use.
!WARNING! The seat is not suitable for use with a two-point or lap belt. If the seat is secured using a two-point belt, an accident may result in severe or even fatal injuries to the child.
A “semi-universal” certification is given to restraint systems that are connected to the car through the Latch-Connect-System. For this reason, the Latch-Connect System can only be used in certain vehicles. Please refer to the enclosed vehicle type list for approved vehicles. You can obtain the most up-to-date version from www.cybex-online.com.
In exceptional cases, the child seat may also be used on the front passenger seat. Please note the following in this case:
•In cars with airbags, you should push the passenger seat back as far as possible. When doing so, however, ensure that the upper pivot point of the safety belt is behind the belt feed point of the child seat, that the belt can retract correctly.
•Always comply with the recommendations of the vehicle manufacturer.
POSIZIONE CORRETTA DEL SEGGIOLINO NEL VEICOLO
Il seggiolino, con Latch-Connect System rientrato nella base, può essere utilizzato su tutti i sedili con cinture di sicurezza automatiche a tre punti approvate dal manuale della vettura per uso ‘universale’.
!ATTENZIONE! Il seggiolino è inadatto all’uso con una cintura subaddominale o a due punti. Gli incidenti possono causare lesioni gravi o mortali al bambino in caso di messa in sicurezza con una cintura a due punti.
Ai sistemi di ritenuta collegati alla vettura mediante sistema Latch-Connect-System è data una omologazione ‘semiuniversale’. Gli Latch-Connect System sono perciò utilizzabili solo in alcuni veicoli. Consultare la lista di tipi di veicoli allegata per conoscere i veicoli approvati. La versione sempre aggiornata della lista è disponibile nel nostro sito al link: www.cybex-online.com.
In casi eccezionali, il seggiolino può essere utilizzato anche sul sedile del passeggero anteriore. In questo caso tenere conto di quanto segue:
•Nelle auto dotate di airbag il sedile del passeggero va spinto il più indietro possibile. Nel fare ciò accertarsi però che il punto di snodo superiore della cintura di sicurezza si trovi dietro alla guida della cintura del seggiolino.
•Rispettare sempre le raccomandazioni del costruttore del veicolo.
IT EN DE
13
!WARNUNG! Der Diagonalgurt muss schräg nach hinten verlaufen und darf nie nach vorn zum oberen
Gurtpunkt in Ihrem Fahrzeug führen. Sollte dies nicht einzustellen sein z.B. durch Vorschieben des Autositzes oder Verwendung auf einem anderen
Sitzplatz, so ist der Kindersitz für dieses Fahrzeug nicht geeignet.
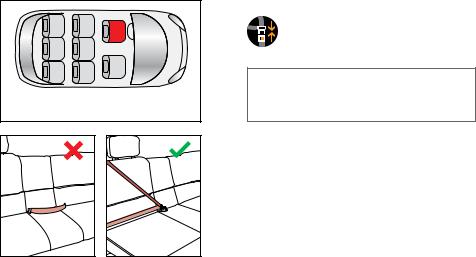
!WARNUNG! Gepäckstücke oder andere Gegenstände im Fahrzeug, welche bei einem Unfall
Verletzungen verursachen können, müssen immer gut befestigt werden. Sie können zu tödlichen Geschossen im Fahrzeug werden.
!WARNUNG! Auf Fahrzeugplätzen, die quer zur
Fahrtrichtung angeordnet sind, ist die Verwendung des Sitzes nicht zulässig. Auf rückwärtsgerichteten
Fahrzeugsitzen, wie z.B. in einem Van oder Minibus, ist die Verwendung zulässig, sofern der Fahrzeugsitz für die Beförderung eines
Erwachsenen zugelassen ist. Zu beachten ist, dass die Fahrzeugkopfstütze bei rückwärtsgerichtetem Einbau nicht entfernt werden darf!
HINWEIS! Bitte lassen Sie Ihr Kind nie unbeaufsichtigt im Fahrzeug zurück.
14
!WARNING! The diagonal belt must run back at a recline and must never run forward to the upper belt point in your vehicle. If it is not possible to adjust the seat in this way, e.g. by pushing the child seat forward or using it on another seat, this child seat is not suitable for your vehicle.
!WARNING! Luggage or other objects present in the vehicle that may cause injury in the event of an accident must always be firmly secured. Otherwise, they may be thrown, causing fatal injuries.
!WARNING! The child seat may not be used on child seats facing to the side of the direction of travel. Use of the child seat is permitted on rear-facing seats, e.g. in a van or minibus, provided that the seat is permitted for transporting an adult. Please note that the vehicle headrest must not be removed when fitting on a rear-facing seat! Even if not in use, the child seat must always be secured with the safety belt.
Note! Never leave your child unattended in the vehicle.
!ATTENZIONE! La cintura diagonale deve sempre scorrere indietro inclinata e non deve mai scorrere in avanti verso il punto superiore della cintura nel veicolo. Nel caso non sia possibile regolare il sedile in questo modo, ad esempio spingendo avanti il sedile o usando un altro sedile, il seggiolino non sarà adatto all’uso in questo veicolo.
!ATTENZIONE! Bagagli o altri oggetti presenti nel veicolo che possono causare lesioni in caso di incidente devono essere fissati saldamente. In caso contrario potrebbero essere scagliati e causare lesioni mortali.
!ATTENZIONE! Il seggiolino non è utilizzabile sui sedili rivolti lateralmente rispetto alla direzione di marcia. L‘utilizzo del seggiolino auto è consentito nei sedili rivolti contrari al senso di marcia, ad esempio nei furgoncini o nei minibus, a condizione che il sedile sia omologato per il trasporto dell‘adulto. Non rimuovere il poggiatesta del sedile del veicolo durante l’installazione del seggiolino nei sedili rivolti contrari al senso di marcia. Anche quando non si trasporta il bambino il seggiolino auto va assicurato con la cintura.
NOTA BENE! Non lasciare mai il tuo bambino incustodito all’interno dell’auto
IT EN DE
15
 2
2


 5
5 
16
SICHERHEIT IM FAHRZEUG
!WARNUNG! Der Kindersitz muss, auch dann wenn er nicht benutzt wird, immer korrekt mit dem Fahrzeuggurt im Fahrzeug befestigt sein. Bereits bei einer Notbremsung oder einem geringen Aufprall können unbefestigte Teile andere Mitfahrer und Sie selbst verletzen.
Achten Sie zum Schutz aller Fahrzeuginsassen stets
darauf, dass...
•die umklappbaren Rückenlehnen der Fahrzeugsitze eingerastet sind und sich in einer aufrechten
Position befinden.
•bei Einbau des Kindersitzes auf dem Beifahrersitz, dieser in der hintersten Position steht.
•im Fahrzeug alle beweglichen Gegenstände gesichert sind.
•alle Personen im Fahrzeug angeschnallt sind.
DEN SITZ INS FAHRZEUG STELLEN
Stellen Sie den Kindersitz auf den entsprechenden Fahrzeugsitz im Auto.
•Achten Sie unbedingt darauf, dass die Rückenlehne (2) des
Solution B-fix flächig an der Rückenlehne des Fahrzeugsitzes anliegt. Bei Verwendung des Latch-Connect Systems können Sie den Abstand mit dem Versteller (5) einstellen.
•Sollte die Kopfstütze des Fahrzeuges störend sein, ziehen Sie diese ganz heraus oder nehmen Sie diese ganz ab (Ausnahme siehe Abschnitt „DER RICHTIGE PLATZ IM FAHRZEUG“).

SAFETY IN THE VEHICLE |
SICUREZZA NEL VEICOLO |
!WARNING! The child seat must always be secured correctly with the vehicle belt in the vehicle even when not in use. In case of an emergency brake or accident, an unsecured child seat may injure other passengers or you.
In order to guarantee the best possible safety for all passengers
make sure that...
•the foldable backrests in the vehicle are locked in their upright position.
•when installing the child seat on the front passenger seat, adjust the vehcile seat in rearmost position.
•you properly secure all objects likely to cause injury in the case of an accident.
•all passengers in the vehicle are buckled up.
PLACING THE SEAT IN THE VEHICLE
Place the child seat on the appropriate seat in the car.
•Always ensure that the entire surface of the backrest (2) of the Solution B-fix is placed against the backrest of the vehicle seat. When using the Latch-Connect System, you can adjust the distance using the adjuster (5).
•If the headrest of the vehicle is in the way, pull it out all the way or remove it completely (for exceptions to this, please refer to the section (“POSITIONING THE SEAT CORRECTLY IN THE VEHICLE”).
!ATTENZIONE! Il seggiolino deve sempre essere assicurato correttamente con la cintura presente nel veicolo anche quando il veicolo non è in uso. Nel caso di una frenata di emergenza o di un uno scontro, un seggiolino assicurato male puo ferire voi o altri passeggeri.
Per garantire la miglior sicurezza per tutti i passeggeri assicurarsi che:
•gli schienali regolabili dei sedili del veicolo siano bloccati in posizione eretta.
•quando il seggiolino viene installato sul sedile anteriore, regolare il sedile nella posizione più arretrata possibile.
•assicurare adeguatamente tutti gli oggetti presenti nel veicolo in quanto possono diventare proiettili pericolosi in caso
di incidente.
•tutti i passeggieri abbiano le cinture allacciate.
COLLOCAZIONE DEL SEGGIOLINO NEL VEICOLO
Posizionare il seggiolino sul sedile veicolare adatto.
•Accertarsi sempre che l‘intera superficie dello schienale (2) del Solution B-fix poggi completamente contro lo schienale del sedile veicolare. Se necessario è possibile regolare la distanza agendo sul regulatore (5).
•Se il poggiatesta del veicolo è di ingombro, alzarlo del tutto o rimuoverlo completamente (per eccezioni, si prega di consultare la sezione „POSIZIONAMENTO CORRETTO DEL SEGGIOLINO NEL VEICOLO“).
IT EN DE
17
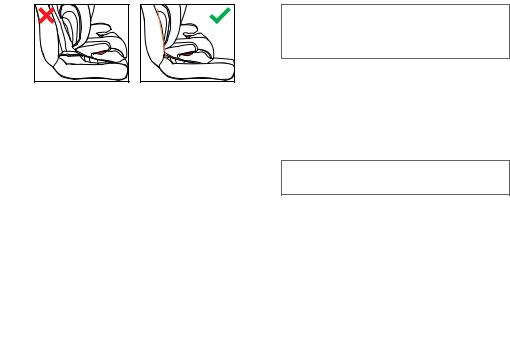
!WARNUNG! Die Rückenlehne des CYBEX Kindersitzes muss an der Lehne des Fahrzeuges flächig aufliegen. Um den größtmöglichen Schutz für das
Kind zu gewährleisten, muss sich der Sitz in einer normalen aufrechten Position befinden!
HINWEIS! An einigen Autositzen aus empfindlichem Material
(z.B. Velours, Leder, etc.) können durch die Benutzung von Kindersitzen mögliche Gebrauchsspuren und/oder Abfärbungen auftreten. Um das zu vermeiden, können Sie z.B. eine Decke oder ein Handtuch unterlegen. Ferner weisen wir in diesem Zusammenhang auf unsere Reinigungshinweise in dieser Gebrauchsanleitung hin, die vor der ersten Verwendung des Sitzes unbedingt beachtet werden sollten.
!WARNUNG! Benutzen Sie niemals andere als die in der Bedienungsanleitung beschriebenen und am Sitz markierten Punkte, um den Kindersitz zu befestigen.
18
!WARNING! The full surface of the backrest of the
CYBEX child seat must be against the backrest of the vehicle. To ensure maximum protection for your child, the seat must be in a normal upright position!
NOTE! On some car seats made of sensitive materials (e.g. suede, leather etc.), the use of child seats may leave marks and/ or cause discolouration. To prevent this, you can place a blanket or towel underneath it, for example. Please also refer in this connection to our cleaning advises in these usage instructions; these cleaning instructions must be observed prior to using the seat for the first time.
!WARNING! Do not use any load bearing contact points other than those described in the instructions and marked on the child restraint.
!ATTENZIONE! L‘intera superficie dello schienale del seggiolino CYBEX deve poggiare contro lo schienale del veicolo. Per assicurare la massima protezione per il bambino il sedile deve trovarsi nella normale posizione eretta!
NOTA BENE! Su alcuni sedili veicolari realizzati in materiali delicati (come pelle scamosciata, pelle, ecc.) l'uso di seggiolini può lasciare tracce e/o causare scoloriture. Questo è evitabile utilizzando ad esempio una coperta o un asciugamano come appoggio. Al riguardo vedere anche le istruzioni di pulizia nelle presenti istruzioni per l‘uso; le istruzioni di pulizia devono essere consultate prima del primo uso del seggiolino.
!ATTENZIONE! Non utilizzare punti di contatto di carico diversi da quelli descritti nelle istruzioni e contrassegnati nel sistema di ritenuta.
IT EN DE
19
6
7 |
5 |
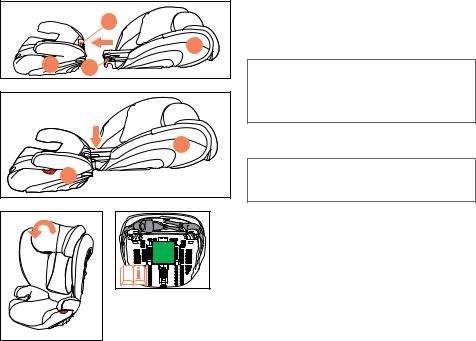
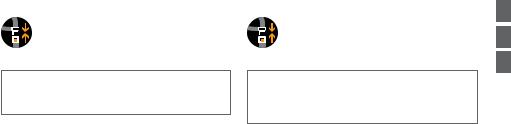
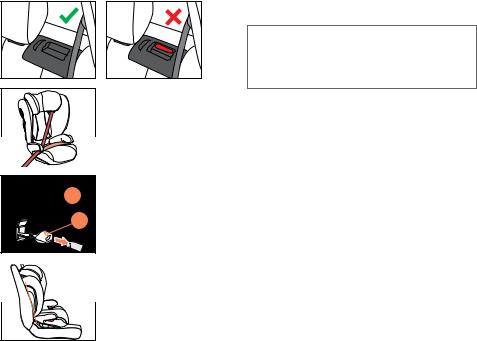
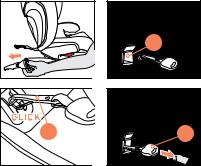
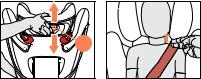
BEFESTIGEN DES KINDERSITZES MITTELS LATCHCONNECT SYSTEM
Mit dem Latch-Connect System können Sie den Solution B-fix mit dem Fahrzeug verbinden und so die Sicherheit Ihres Kindes erhöhen. Ihr Kind muss weiterhin mit dem 3-Punkt-Gurt Ihres Fahrzeuges angeschnallt werden.
HINWEIS! Die ISOFIX Befestigungspunkte (6) sind zwei
Metalllaschen pro Sitzplatz und befinden sich zwischen Rückenlehne und Sitzfläche des Fahrzeugsitzes. Im Zweifelsfall nehmen Sie die Bedienungsanleitung Ihres Fahrzeuges zu Hilfe.
•Verlängern sie den Gurt des Latch-Connect-Systems durch Betätigen des Verstellers (5).
•Befestigen sie die Latch-Connect Haken (7) an den ISOFIX Befestigungspunkten (6) des Fahrzeugs.
•Straffen sie das Latch-Connect System durch Ziehen am freien Ende des Gurtes, bis die Position des Kindersitzes korrekt eingestellt ist.
•Vergewissern Sie sich, dass der Sitz gut hält, indem Sie versuchen ihn aus den ISOFIX Befestigungspunkten (6) herauszuziehen.
HINWEIS! Beachten Sie dazu den Abschnitt „DEN SITZ INS FAHRZEUG STELLEN“.
20
SECURING THE CHILD SEAT USING THE LATCHCONNECT SYSTEM
Using the Latch-Connect System system, you can fix the Solution B-fix to the vehicle, thereby increasing your child’s safety. The child still needs to be secured with the three-point belt of your vehicle.
NOTE! The ISOFIX fixture points (6) are two metallic clips for each seat and are positioned between the backrest and the seating surface of the vehicle seat. In case of doubt, please refer to the driver’s manual of your vehicle.
•Elongate the straps of the Latch-Connect System by using the adjuster (5).
•Attach the Latch-Connect hooks (7) to the ISOFIX attachment points (6).
•Tighten the Latch-Connect System by pulling the strap on the adjuster until the position of the child seat is adjusted correctly.
•Ensure that the seat is secure by trying to pull it out of the
ISOFIX fixture points (6).
HINWEIS! Note the information in the section “PLACING THE SEAT IN THE VEHICLE”.
FISSAGGIO DEL SEGGIOLINO CON IL SISTEMA LATCHCONNECT
Con il sistema Latch-Connect System è possibile fissare il Solution B-fix al veicolo, aumentando così la sicurezza del bambino. Il bambino deve essere allacciato utilizzando la cintura a tre punti del veicolo.
NOTA BENE! I punti di ancoraggio ISOFIX (6) sono due clip metalliche per ogni sedile, posizionate tra lo schienale e la seduta del sedile del veicolo. In caso di dubbio consultare il manuale istruzioni del proprio veicolo.
•Allungare le cinture del Latch-Connect System utilizzando il regolatore (5).
•Fissare il Latch-Connect System ai punti di ancoraggio ISOFIX (6).
•Serrare il Latch-Connect System tirando la cintura sul regolatore fino a quando la posizione del seggiolino auto non
è stata regolata correttamente.
•Accertarsi che il seggiolino sia in sicurezza tentando di tirarlo fuori dai punti di ancoraggio ISOFIX (6).
NOTA BENE! Consultare la sezione “COLLOCAZIONE DEL SEGGIOLINO NEL VEICOLO”.
IT EN DE
21
5 |
7 |
|
AUSBAU DES KINDERSITZES
Führen Sie die Einbauschritte in umgekehrter Reihenfolge durch.
•Die gestrafften Gurte mit Hilfe des Verstellers (5) lockern.
•Die Haken (7) auf beiden Seiten von den ISOFIX Befestigungspunkten lösen.
•Entfernen Sie den Kindersitz.
•Das Latch-Connect System kann im unteren Teil des Kindersitzes verstaut werden.
22

REMOVAL OF THE CHILD SEAT
Perform the installation steps in the reverse order.
•Release the tightened straps using the adjuster (5).
•Disconnect the latches (7) on both sides.
•Remove the child seat.
•You can store the Latch-Connect system in the booster of the child seat.
RIMOZIONE DEL SEGGIOLINO
Seguire il procedimento per l’installazione nell’ordine inverso.
•Rilasciare i connettori (7) agendo sul regolatore (5).
•Sganciare i connettori (7) su entrambi i lati.
•Estrarre il seggiolino.
•Ritirare i connettori (7) nella posizione di trasporto agendo sul regolatore (5).
IT EN DE
23
8 |
|
ANPASSEN AN DIE KÖRPERGRÖSSE |
|
|
Einstellen der Kopfstütze |
|
MAX |
• Die Kopfstütze muss so eingestellt werden, dass der Abstand |
|
zwischen den Schultern des Kindes und der Kopfstütze nicht |
||
|
||
|
breiter als 2cm (ca. 2 Finger) ist. |
|
|
• Ziehen Sie den Verstellhebel (8) an der Rückseite |
|
|
der Kopfstütze, und führen Sie die Kopfstütze in die |
|
|
gewünschte Position. |
HINWEIS! Nur eine in optimaler Höhe eingestellte Kopfstütze bietet den größtmöglichen Schutz und Komfort für Ihr Kind und gewährleistet außerdem den optimalen Verlauf des
Diagonalgurtes. Die Höhenverstellung kann beim Solution B-fix in 12 Positionen erfolgen.
24

ADAPTING TO BODY SIZE
Adjustment of the headrest
•The headrest must be adjusted so that max. 2cm (ca. two finger‘s width) or less remains free between the child’s shoulder and the headrest.
•Push the adjustment button (8) on the rear side of the headrest and move it into the desired position.
NOTE! Only an optimally adjusted headrest can offer your child maximum protection and comfort while ensuring that the diagonal belt can be fitted smoothly. The height of the Solution B-fix can be adjusted to one of twelve positions.
REGOLAZIONE IN BASE ALLA CORPORATURA
Regolazione del poggiatesta
•Il poggiatesta deve essere regolato in modo che ci siano 2cm (ca. due dita) liberi tra le spalle del bambino e il poggiatesta.
•Premere la leva di regolazione (8) sulla parte bassa del poggiatesta e muovere fino alla posizione desiderata.
NOTA BENE! Soltanto se regolato correttamente il poggiatesta
è in grado di offrire al vostro bambino la massima sicurezza ed il massimo comfort e nello stesso tempo garantire che la cintura diagonale sia nella posizione corretta. Solution B-fix può essere regolato in altezza in dodici posizioni.
IT EN DE
25
13 
9 
 10
10
13 |
|
11 |
14 |
|
15
12 13 |
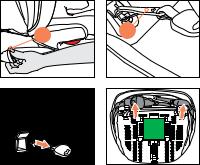
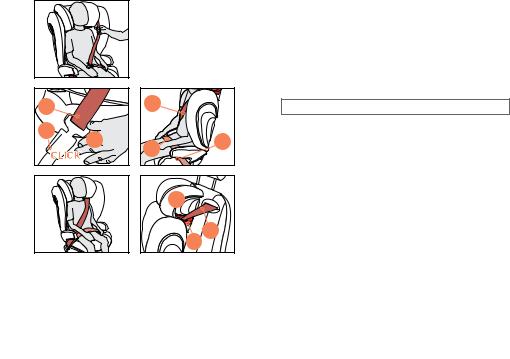
ANSCHNALLEN DES KINDES
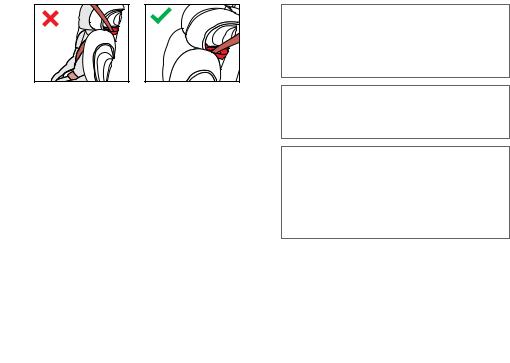
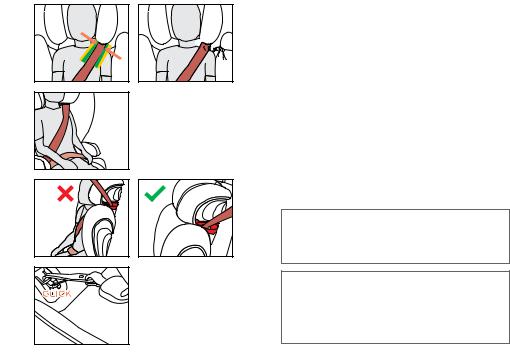
•Setzen Sie Ihr Kind in den Kindersitz. Ziehen Sie den Dreipunktgurt weit heraus und führen Sie diesen vor Ihrem Kind entlang zum Gurtschloss (9).
HINWEIS! Der Dreipunktgurt darf nur über die dafür vorgesehenen Führungen verlaufen. Die Gurtführung wird in diesem Handbuch genau beschrieben und ist zudem am Kindersitz rot markiert.
!WARNUNG! Den Gurt auf keinen Fall verdrehen.
•Stecken Sie die Gurtzunge (10) in das Gurtschloss (9). Dieses muss mit einem hörbaren „KLICK“ einrasten.
•Als nächstes legen Sie den Beckengurt (11) in die rot gekennzeichneten unteren Gurtführungen (14) des Kindersitzes ein.
•Ziehen Sie nun kräftig am Diagonalgurt (13), um den Beckengurt (11) zu straffen. Je enger der Gurt anliegt, desto besser kann er vor Verletzungen schützen. Auf der Seite des Gurtschlosses (9) müssen der Diagonalgurt (13) und der Beckengurt (11) zusammen in die untere Gurtführung (14) eingelegt sein.
•Der Beckengurt (11) sollte auf beiden Seiten des Sitzkissens in den rot gekennzeichneten unteren Gurtführungen (14) liegen.
•Nun führen Sie den Diagonalgurt (13) durch die obere Gurtführung (12) in der Kopfstütze (15) bis er sich innerhalb der Gurtführung befindet.
HINWEIS! Bringen Sie Ihrem Kind von Anfang an bei, immer auf eine straffe Gurtführung zu achten und bei Bedarf, selbst den
Gurt festzuziehen.
26
SECURING THE CHILD
•Place your child in the child seat. Pull the three-point belt right out and feed it along the belt buckle (9) in front of your child.
NOTE! The three-point belt must only be passed through the designated routings. The belt routings are described in detail in this manual and are marked in red on the child seat.
!WARNING! Never twist the belt.
•Insert the belt tongue (10) into the belt buckle (9). It must lock into place with an audible “CLICK”.
•Next, place and tighten the lap belt (11) in the red colored lower belt guides (14) of the child seat.
•Now pull the diagonal belt (13) firmly to tighten the lap belt
(11). The tighter the belt sits, the better it provides protection from injury. On the side of the belt buckle (9), the diagonal belt (13) and the lap belt (11) must be inserted together in the lower belt guide (14).
•The lap belt (11) should have been fed through the lower belt guides (14) on both sides of the booster seat.
•Now feed the diagonal belt (13) through the upper belt guide
(12)in the headrest (15) until it is inside the belt guide.
NOTE! Teach your child from the start to always ensure that the belt is tight and, if necessary, how to tighten the belt themselves.
ALLACCIARE IL BAMBINO ALLA CINTURA
•Collocare il bambino nel seggiolino. Estrarre ampiamente la cintura a tre punti e farla scorrere fino al fermaglio della cintura
(9) davanti al bambino.
NOTA BENE! La cintura a tre punti deve passare solo tra i passaggi designati. Il passaggio per le cinture è descritto nel dettaglio in questo manuale ed evidenziato nel seggiolino auto.
!ATTENZIONE! Non torcere mai la cintura.
•Inserire la linguetta della cintura (10) nel fermaglio della cintura (9). Il blocco in posizione deve essere segnalato da uno scatto udibile.
•Collocare successivamente la cintura subaddominale (11) nelle guide rosse della cintura inferiori (14) del seggiolino.
•Ora tirare saldamente la cintura diagonale (13) per tendere la cintura subaddominale (11). Maggiormente tesa è la sede della cintura, maggiore è la protezione dalle lesioni. Cintura diagonale (13) e cintura subaddominale (11) vanno inserite assieme nella guida cintura inferiore (14) a lato del fermaglio della cintura (9).
•La cintura subaddominale (11) dovrebbe passare attraverso le guide della cintura inferiori (14) su ambo i lati del cuscino di seduta.
•Far passare ora la cintura diagonale (13) attraverso la guida della cintura superiore (12) nel poggiatesta (15) fino a che non si troverà nella guida della cintura.
NOTA BENE! Insegnare al bambino fin dall’inizio a controllare sempre che la cintura sia tesa e a tenderla autonomamente se necessario.
IT EN DE
27
15 |
13 |
|
11 |
13 |
|
MAX |
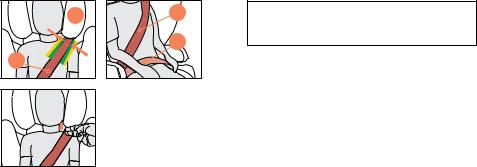
!WARNUNG! Der Beckengurt (11) muss auf beiden Seiten so tief wie möglich über der Leistenbeuge
Ihres Kindes verlaufen, um im Falle eines Unfalls optimal wirken zu können.
Achten Sie darauf, dass der Diagonalgurt (13) zwischen Schulteraußenkante und Hals Ihres Kindes verläuft. Falls erforderlich, passen Sie durch Verstellen der Kopfstützenhöhe den Gurtverlauf an. Die Höhe der Kopfstütze (15) kann auch im eingebauten Zustand im Auto eingestellt werden.
28

!WARNING! The lap belt (11) must run as low as possible on both sides along your child’s groin to have optimum effect in the event of an accident.
Ensure that the diagonal belt (13) runs between the outside of the shoulder and the neck of your child. If necessary, adjust the height of the headrest to change the position of the belt. The height of the headrest (15) can still be adjusted while in the car.
!ATTENZIONE! La cintura subaddominale (11) deve scorrere più bassa possibile su ambo i lati lungo l’inguine del bambino per avere l’effetto ottimale in caso di incidente.
Accertarsi che la cintura diagonale (13) scorra tra l’esterno della spalla e il collo del bambino. Se necessario regolare l’altezza del poggiatesta per cambiare la posizione della cintura. L’altezza del poggiatesta (15) è regolabile anche in auto.
IT EN DE
29
 MAX
MAX


30
IST IHR KIND RICHTIG GESICHERT? - FAHRZEUGGURT
GRUPPE 2/3 (15-36 KG)
Um die bestmögliche Sicherheit Ihres Kindes zu gewährleisten, prüfen Sie bitte immer vor Beginn der Fahrt, ob…
•die Kopfstütze richtig eingestellt ist.
•der Beckengurt auf beiden Seiten des Sitzkissens in den rot gekennzeichneten unteren Gurtführungen verläuft und straff und tief sitzt.
•der Diagonalgurt auf der Gurtschlossseite auch in der unteren Gurtführung des Sitzes verläuft.
•der Diagonalgurt durch die rot markierte obere Gurtführung der Kopfstütze verläuft.
•der Diagonalgurt schräg nach hinten verläuft.
•der gesamte Gurt straff ist und nicht verdreht am Körper des
Kindes anliegt.
•bei Verwendung des Latch-Connect Systems: dass der Sitz beidseitig mit den Konnektoren in den ISOFIX
Befestigungspunkten eingerastet ist und der Latch-Gurt gut gestrafft ist.
!WARNUNG! Das Fahrzeuggurtschloss darf keinesfalls über die Armlehne reichen. Ist die Gurtpeitsche zu lang, ist der Kindersitz für eine Verwendung auf dieser Position im Fahrzeug nicht geeignet. Bitte wenden Sie sich im Zweifelsfall an den Hersteller.
!WARNUNG! Bitte lassen Sie Ihr Kind nie unbeaufsichtigt im Fahrzeug zurück. Die Kunststoffteile des Kindersitzes heizen sich in der Sonne auf. Ihr
Kind kann sich daran verbrennen. Schützen Sie Ihr Kind und den Kindersitz vor intensiver Sonneneinstrahlung (z.B. indem Sie ein helles Tuch über den Sitz legen).
 Loading...