

Page 1

CyberLink
PhotoDirector 2011
User’s Guide
Page 2

Copyright and Disclaimer
All rights reserved. No part of this publication may be reproduced, stored in a retrieval
system, or transmitted in any form or by any means electronic, mechanical,
photocopying, recording, or otherwise without the prior written permission of
CyberLink Corporation.
To the extent allowed by law, PHOTODIRECTOR IS PROVIDED “AS IS”, WITHOUT
WARRANTY OF ANY KIND, EITHER EXPRESS OR IMPLIED, INCLUDING WITHOUT
LIMITATION ANY WARRANTY FOR INFORMATION, SERVICES, OR PRODUCTS PROVIDED
THROUGH OR IN CONNECTION WITH PHOTODIRECTOR AND ANY IMPLIED
WARRANTIES OF MERCHANTABILITY, FITNESS FOR A PARTICULAR PURPOSE,
EXPECTATION OF PRIVACY, OR NON-INFRINGEMENT.
BY USING THIS SOFTWARE, YOU AGREE THAT CYBERLINK WILL NOT BE LIABLE FOR ANY
DIRECT, INDIRECT, OR CONSEQUENTIAL LOSS ARISING FROM THE USE OF THIS
SOFTWARE OR MATERIALS CONTAINED EITHER IN THIS PACKAGE.
The terms and conditions here under shall be governed and construed in accordance
with the laws of Taiwan.
PhotoDirector is a registered trademark along with other company and product names
mentioned in this publication, used for identification purposes and remain the
exclusive property of their respective owners.
International Headquarters
Mailing Address
Web Site
Telephone
Fax
CyberLink Corporation
15F., No. 100, Minquan Rd., Xindian Dist.
New Taipei City 231, Taiwan (R.O.C.)
www.cyberlink.com
886-2-8667-1298
886-2-8667-1300
Copyright © 2011 CyberLink Corporation. All rights reserved.
Page 3

Contents
Introduction............................................ 1
Welcome .................................................................................................................... 1
Features ................................................................................................................ 1
DirectorZone ....................................................................................................... 2
Updating PhotoDirector ................................................................................. 2
System Requirements ........................................................................................... 3
Importing Photos ................................... 5
Supported File Formats ........................................................................................ 5
Importing Photos into the Library .................................................................... 5
Apply During Import ........................................................................................7
The PhotoDirector Workspace................ 9
PhotoDirector Modules ......................................................................................10
Library ..................................................................................................................10
Adjustment ........................................................................................................10
Slideshow ...........................................................................................................10
Library/Adjustment/Slideshow Panel ...........................................................10
Library Panel ......................................................................................................11
Adjustment Panel ............................................................................................16
Slideshow Panel ...............................................................................................16
Photo Browser Panel ...........................................................................................16
Searching for Photos ......................................................................................18
Photo Viewer Window ........................................................................................19
Selecting View Mode .....................................................................................19
i
Page 4

CyberLink PhotoDirector
Selecting Viewer Display Mode ..................................................................20
Adjustment History .........................................................................................21
Viewer Zoom .....................................................................................................22
PhotoDirector Preferences ................................................................................22
General Preferences .......................................................................................22
Project Preferences .........................................................................................23
DirectorZone Preferences ............................................................................23
File Handling Preferences ............................................................................23
Adjustments ......................................... 25
Making Photo Adjustments ..............................................................................25
Creating Virtual Photos .................................................................................25
Histogram ...........................................................................................................26
Regional Adjustment Tools .........................................................................27
White Balance ...................................................................................................38
Tone .....................................................................................................................40
Level .....................................................................................................................40
HSL/Color ...........................................................................................................41
Black and White Mix .......................................................................................44
Detail ....................................................................................................................45
Vignette ..............................................................................................................46
Copying Adjustments .........................................................................................47
Using Adjustment Presets .................................................................................48
Downloading Presets from DirectorZone ..............................................48
Saving Custom Presets ..................................................................................49
Applying Presets on Photos ........................................................................49
Uploading Presets to DirectorZone ..........................................................50
Exporting/Import Presets .............................................................................50
Viewing Adjustment History .............................................................................51
Turning Adjustments On/Off ............................................................................51
Exporting Photos .................................. 53
The Export Photo Process ..................................................................................53
ii
Page 5

Contents
Export Profiles ...................................................................................................55
Printing and Sharing Photos................ 57
Printing Photos ......................................................................................................57
Sharing Photos .......................................................................................................57
Uploading Photos to Facebook .................................................................57
Uploading Photos to Flickr ..........................................................................58
Slideshows............................................ 61
Creating Photo Slideshows ...............................................................................61
Producing Slideshows ...................................................................................62
Sharing Slideshow Videos on YouTube ..................................................62
PhotoDirector Hotkeys ......................... 65
Technical Support................................. 71
Before Contacting Technical Support ...........................................................71
Web Support ..........................................................................................................72
Index .................................................... 73
iii
Page 6

CyberLink PhotoDirector
iv
Page 7

Chapter 1:
Introduction
This chapter introduces CyberLink PhotoDirector and provides an overview of all
its features. It also outlines the system requirements for installing and using the
CyberLink PhotoDirector program.
Note: this document is for reference and informational use only. Its content and the
corresponding program are subject to change without notice.
Welcome
Welcome to the CyberLink family of digital media tools. CyberLink PhotoDirector is
a photography program that lets you manage and adjust your digital photos. You
can then share your photos on Facebook or Flickr, use them in slideshows,
produce slideshow videos you can upload to YouTube, and much more.
Features
This section outlines some of the main features of the CyberLink PhotoDirector
program.
• Import and organize all your photos in the library for easy browsing and
editing.
• View each individual photo’s metadata information.
• Add and embed keyword tags and copyright information in photos.
• Crop and rotate photos, or apply touch-ups such as red-eye and spot removal.
• Modify photo color and white balance with easy to use adjustment controls.
• Sharpen photos and correct photos that contain unwanted vignetting or
image noise.
• Create dazzling photo slideshows and output them as video files.
• Share photos on Facebook and Flickr, and upload created photo slideshows
directly to YouTube.
1
Page 8

CyberLink PhotoDirector
DirectorZone
DirectorZone is a web service that lets you download adjustment presets created
by other users, so you can use them on your photos. You may also share your own
custom presets by uploading them to DirectorZone.
To access the benefits of DirectorZone, click the Sign in to DirectorZone link on
the top of the CyberLink PhotoDirector window.
Go to http://directorzone.cyberlink.com to view more information on the features
and benefits of the DirectorZone web site.
Updating PhotoDirector
Software upgrades and updates (patches) are periodically available from
CyberLink. CyberLink PhotoDirector automatically prompts you when either is
available.
Note: you must connect to the Internet to use this feature.
To update your software, do this:
1. Open the Upgrade Information window by doing one of the following:
- click the button.
- click on the PhotoDirector logo in the top right corner, and then on the
Upgrade button in the About PhotoDirector window.
2. Click the feature you would like to upgrade to, or the patch you want to update
CyberLink PhotoDirector with.
3. A web browser window opens, where you can purchase product upgrades or
download the latest patch update.
2
Page 9

Chapter 1: Introduction
System Requirements
The system requirements listed below are recommended as minimums for using
the CyberLink PhotoDirector program.
System Requirements
CPU Processor • Intel Pentium D 3.0 GHz CPU with hyper-threading
or equivalent AMD CPU is minimal.
Screen Resolution • 1024 X 768, 16-bit color or above.
Operating System • Microsoft Windows 7 (32 bit and 64 bit).
• Microsoft Windows Vista Home Premium, Business,
Ultimate, or Enterprise (32 bit and 64 bit).
• Microsoft Windows XP with Service Pack 3.
Memory • 2 GB is required.
Graphics Card • 128 MB VRAM and above.
Hard Disk Space • 1 GB of disk space for application and
documentation.
3
Page 10

CyberLink PhotoDirector
4
Page 11

Chapter 2:
Importing Photos
The first step when using CyberLink PhotoDirector is to import your photos into
the program. CyberLink PhotoDirector supports a variety of different photo file
types, including most camera RAW file formats.
Supported File Formats
CyberLink PhotoDirector supports the following photo file formats:
Photos: JPEG, TIFF.
RAW photo formats: CyberLink PhotoDirector also supports the import of most
camera RAW photo formats.
Importing Photos into the Library
You can import photos into CyberLink PhotoDirector from your computer’s hard
drive, a digital camera, and also from removable devices, such as memory cards
and portable hard drives.
To import photos into CyberLink PhotoDirector, do this:
1. Click on Library, and then on the Import button at the bottom of the library
panel.
2. Select one of the following import options:
- Photos: select to import individual photo files. Once selected, browse to
and then select all of the photos on your computer/removable device that
you want to import, and then click Open. Thumbnails of all the photos
display in the Photo Import window.
Note: if the photo files you want to import are not displayed in the current folder,
ensure that the correct file type is selected in the bottom right corner of the Select
Some Photos dialog.
- Folder: select to import a folder that contains your photos. Once selected,
browse to and then select the folder on your computer/removable device
that you want to import photos from, and then click Select Folder.
Thumbnails of all the photos in the selected folder display in the Photo
Import window.
5
Page 12
CyberLink PhotoDirector
- From Camera: select to import photos directly from a digital camera or a
card reader. Ensure that your camera is connected to your computer (and
turned on) and then select From Camera to import photos from it. Once
selected, the Photo Import window displays. Select your camera (or card
reader) from the Source drop-down to display thumbnails of all the photos
in the Photo Import window.
Note: you can use in the bottom right of the preview window to resize
the photo thumbnails.
3. Select Include subfolders, if you are importing photos from a folder, device, or
digital camera, to display and import photos that are in any subfolders.
4. Select Exclude possible duplicates to have CyberLink PhotoDirector filter out
any photos that were imported previously.
5. Manually select the thumbnails of the photos you want to import, or use the
(deselect all) and (select all) buttons if necessary.
6. Select one of the following two import options:
- Keep in current location: keeps the photos in their original source
location.
- Make extra copy in: select this option if you want CyberLink PhotoDirector
to copy the imported photos to another location you select in the
Destination drop-down.
7. If copying the photos to another location, click to select the Destination
where the imported photos are copied. You can also click to edit the name
of the photo folders in this location, if required.
8. If copying the photos to another location, you can Organize the photos by
selecting one of the following:
- Put in Single Folder: puts all of the photos in one folder.
- By Original Folder Structure: duplicates the original folder structure from
the source location.
6
Page 13

Chapter 2: Importing Photos
- By Capture Date: puts the photos in a series of folders, labelled by the date
they were captured. Click to set the date format for the folder naming.
9. Click Import. CyberLink PhotoDirector imports the photos into your project
library.
Apply During Import
CyberLink PhotoDirector can apply adjustment presets to photos during the
import process. You can also begin organizing your photos by adding copyright
information and keyword tags as they are imported.
Note: if you cannot find the Apply During Import section of the Photo Import
window, click on the right edge of the window to display it.
•
Apply preset: select to apply the adjustment preset you select from the dropdown to all of the photos during import. See "Using Adjustment Presets" on
page 48 for information on creating adjustment presets.
• Copyright: in the field provided, enter in the copyright text you would like to
embed in each photo. The copyright information can be viewed and edited
later on the Metadata tab in the library panel.
• Ta gs : in the field provided, enter in the keyword tags you want to apply to each
photo, separated by a semi colon.
7
Page 14

CyberLink PhotoDirector
8
Page 15
Chapter 3:
A
BD
C
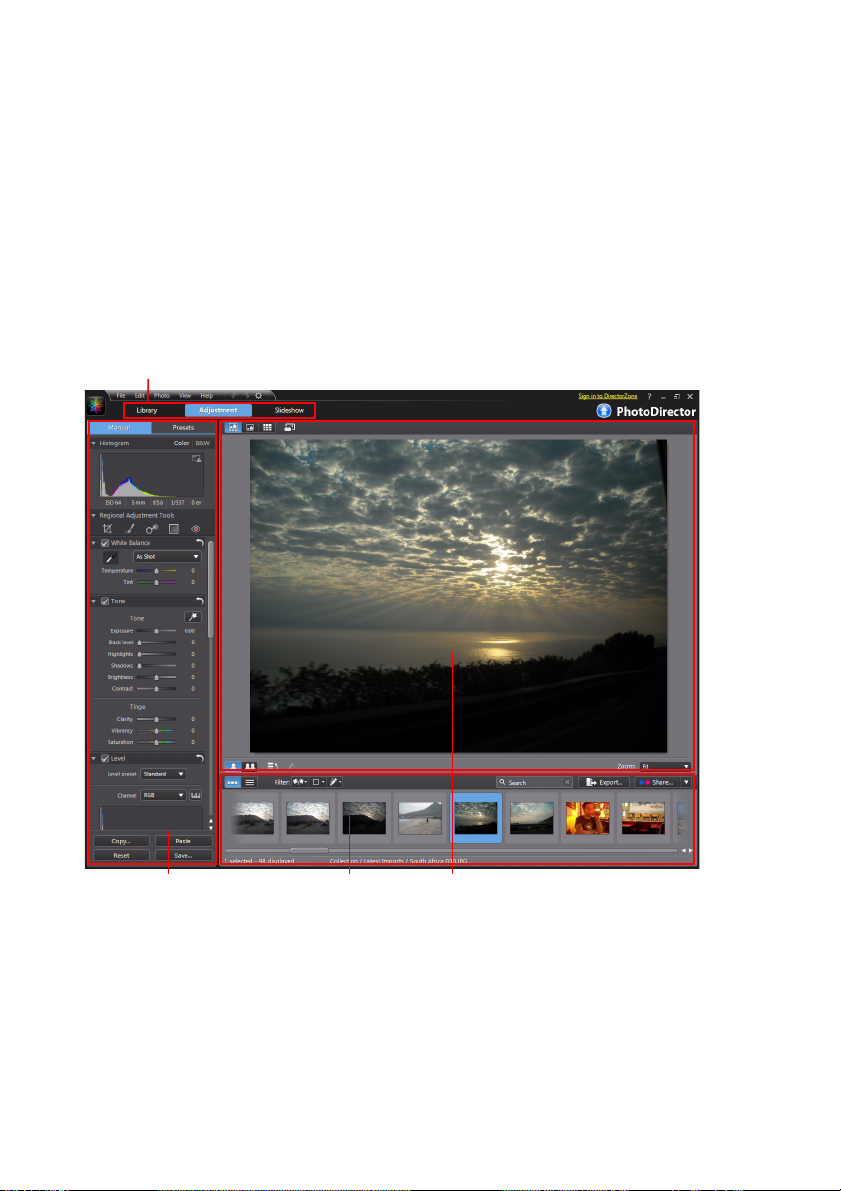
The PhotoDirector Workspace
This chapter outlines the CyberLink PhotoDirector workspace, and all of its
features. Getting familiar with the workspace is helpful, because it is where you
spend all of your time when using CyberLink PhotoDirector.
A - PhotoDirector Modules, B - Library/Adjustment/Slideshow Panel, C - Photo Browser Panel, D - Photo
Viewer Window
9
Page 16

CyberLink PhotoDirector
PhotoDirector Modules
CyberLink PhotoDirector is comprised of three main modules: Library,
Adjustment, and Slideshow.
Library
Click the Library button to open the photo library of CyberLink PhotoDirector.
When you import photos into CyberLink PhotoDirector, they are stored in the
photo library. Once in the library you can organize them in a smart collection,
folder, album, and by keyword tags. See "Library Panel" on page 11 for more
information.
Adjustment
The adjustment module is where you touch up and make edits to the photos in
your library. Click the Adjustment button apply presets, crop and rotate photos,
apply gradients, remove spots and red-eye, and adjust white balance, sharpness,
color, and much, much more. See "Making Photo Adjustments" on page 25 for
more information.
Slideshow
In this module you can use your photos to create slideshows with background
music, and then export them as video files or upload them directly to YouTube.
Select the Slideshow button to access the slideshow module. See "Slideshows" on
page 61 for more information on all the features in this module.
Library/Adjustment/Slideshow Panel
The panel on the left side of the CyberLink PhotoDirector window that is
displaying is dependent on which module of the program you are in. The
following outlines each of the three panels and some of the available features.
10
Page 17

Chapter 3: The PhotoDirector Workspace
Library Panel
The library panel is where you import, organize, and view all of the photos in
CyberLink PhotoDirector. It also provides access to the metadata information for
each individual photo.
The library panel has two tabs: Project and Metadata. To access either tab, simply
click on it to view its contents.
Project Tab
Click Project to access all of the photos in the library. When photos are imported
into the library, a CyberLink PhotoDirector project database keeps track of photo
location, and associated photo information, including adjustments you make to
each photo. If required you can add new projects, open existing projects, or export
smart collections, albums, folders, and tags as new projects.
On the Project tab you can also organize imported photos by album, folder,
keyword tags, and more.
Smart Collection
CyberLink PhotoDirector automatically organizes your photos in a Smart
Collection for easy browsing. Every time you import, rate, or reject photos,
CyberLink PhotoDirector updates the Smart Collection.
• All Photos: select to view all the photos you have imported into the current
project database.
• Latest Imports: select to view the photos that were most recently imported
into the library.
• 1 Star or Better: select to view photos you have rated 1 or more stars.
• 5 Stars: select to view all the photos you have rated 5 stars.
• Rejected: select to view all the rejected photos.
Right-click on a Smart Collection folder to export the photos, or create a new
project that contains just the photos in the selected collection. You can also
Rename, Edit or Delete some folders out of the Smart Collection.
You can also create a custom Smart Collection based on rules you specify. To
create a custom Smart Collection, do this:
1. Select the Project tab, and then click in the Smart Collection section.
11
Page 18

CyberLink PhotoDirector
2. Select Create Smart Collection.
3. Enter the information in the fields as follows:
- Name: enter a name for the new collection of photos.
- Match: select whether to match at least one (Any) of the rules, All of the
rules, or None of them.
4. Use the drop-down boxes to set the rules for the type of photos that you want
to include in the Smart Collection.
5. Click on Create to finish. CyberLink PhotoDirector creates the collection based
on your selected rules.
Folders
When photos are imported into the library, CyberLink PhotoDirector organizes
them into folders based on the structure of the import source location.
Right-click on a folder to:
• Synchronize Folder: select to ensure the folder is up-to-date. Use this feature if
the photos were added, deleted, or moved out of the folder. Synchronize
folders as follows:
Synchronizing folder options
If CyberLink PhotoDirector detects any changes, the following related options
become enabled.
- Import new photos: if photos were added to the folder, this option
becomes enabled. Select it to import the specified number of photos into
the folder.
- Show import dialog before importing: select if you want to display the
Photo Import window before importing. If you do not select this option,
CyberLink PhotoDirector performs a background import of the photos.
- Remove missing photos: if there are missing photos in the folder, this
option becomes enabled. Select it to remove the specified number of
photos from the folder. Click the Show Missing Photos button to see which
photos are missing.
Click the Synchronize button to begin the process.
• Find Missing Folder: select to locate the selected folder if it was moved to a
different location. Click the button to specify the New location of the
missing folder.
12
Page 19
Chapter 3: The PhotoDirector Workspace
• Export Photos: select to export the photos, with the any adjustments made
applied, in the selected folder. See "Exporting Photos" on page 53 for more
information.
• Export Folder as New Project: select to create a new project database that
only includes the photos in the selected folder.
• Remove from Library: select to remove the selected folder, and all of the
photos it contains, from the library.
• Locate on Disk: select to view the selected folder, and all of its contents, in
Windows Explorer.
• Rename Folder: select to give the selected folder a different name.
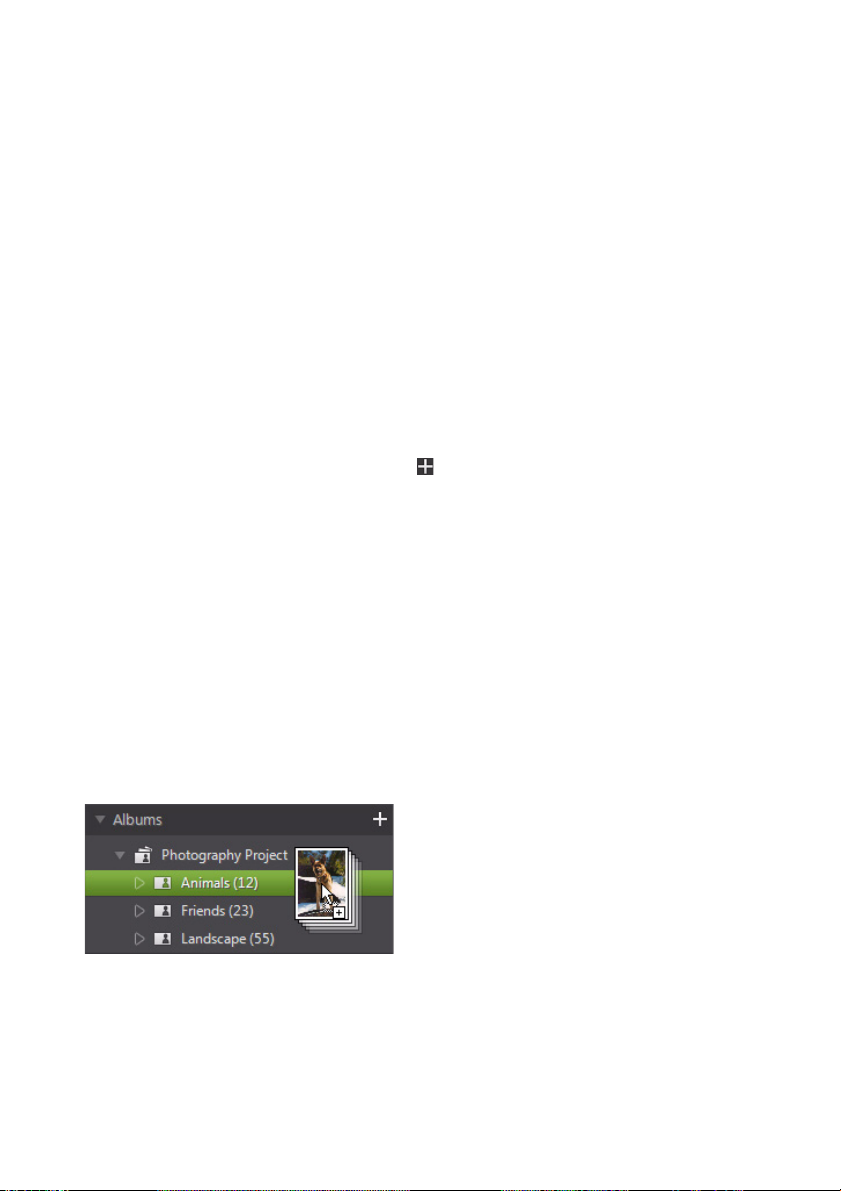
Albums
You can organize your photos in custom albums. To create a new album, do this:
1. Select the Project tab, and then click in the Albums section.
2. In the pop-up menu that displays:
- select Create Album with Selected Photos to create a new album that
contains all the current photos you have selected.
- select Create Empty Album to create an album that does not have any
photos in it.
- select Create Empty Album Set to create a new album set. Album sets are
comprised of a number of albums that you can group together. You cannot
add photos directly into an album set, but it can contain multiple albums
comprised of a number of photos.
3. Enter an Album name in the dialog that displays, and then click Create to add
it to the library.
To add photos into albums in the library, just drag them from the photo browser
panel to the album in the library.
Right-click on an album to:
• Export Album as New Project: select to create a new project database that
only includes the photos in the selected album.
13
Page 20
CyberLink PhotoDirector
• Export Photos: select to export the photos, with any applied adjustments
applied to them, in the selected album. See "Exporting Photos" on page 53 for
more information.
• Rename: select to give the selected album a different name.
• Delete: select to delete the selected album from the library. Any photos it
contains are not removed from the project library.
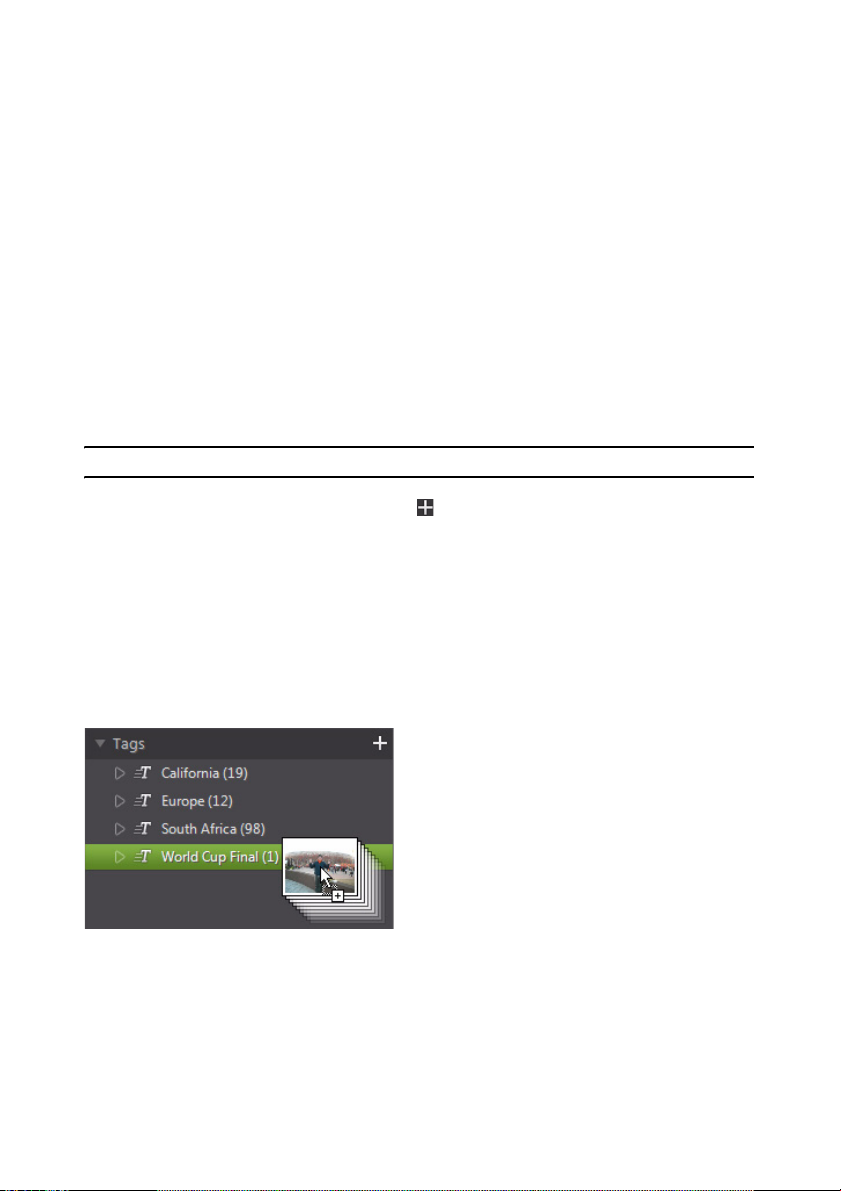
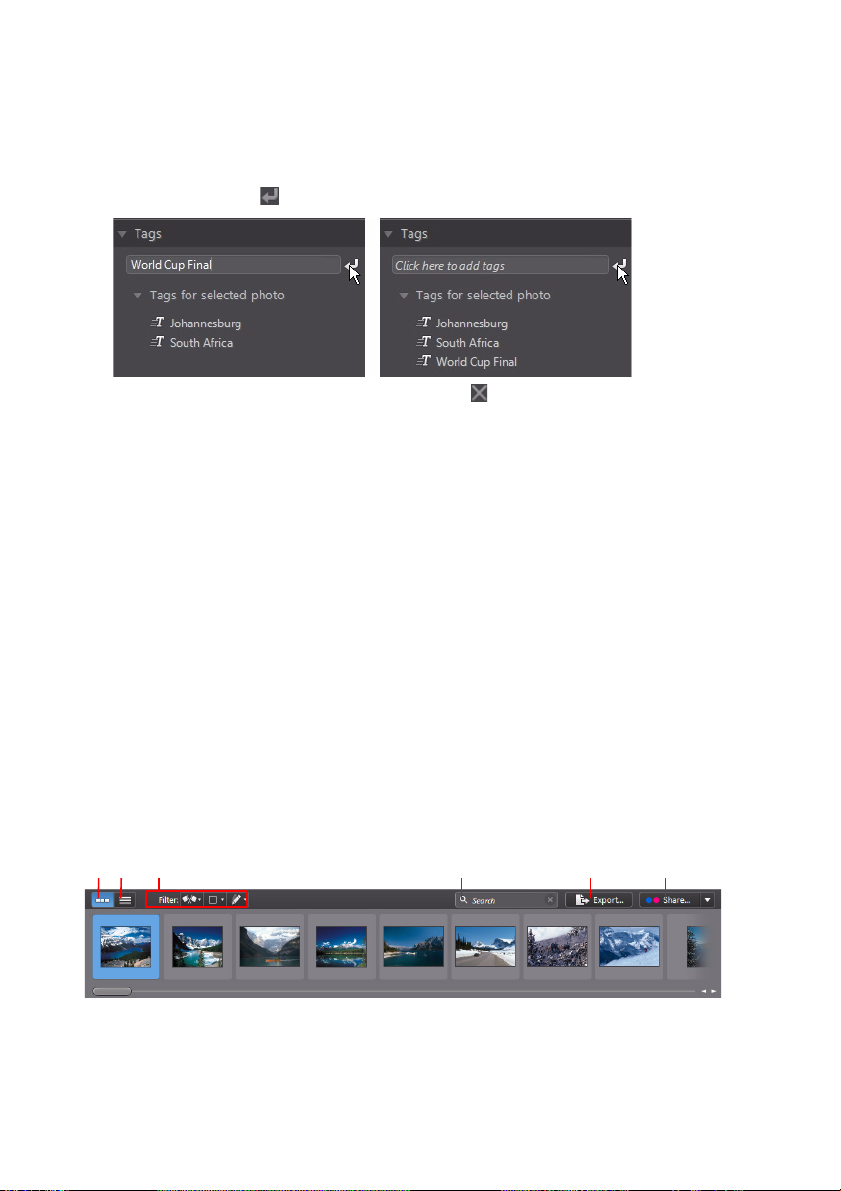
Tags
You can add keyword tags to photos in the project library. Tags are useful for
photo management and when sharing photos, as users search by tag keywords to
find photos they are interested in.
To create a new tag, do this:
Note: you can also create new tags on the Metadata tab.
1. Select the Project tab, and then click in the Tags section.
2. In the pop-up menu that displays:
- select Create Tag to create new tag in the project library.
- select Create Tag with Selected Photos to create a new tag and then add
them to all the current photos you have selected.
3. Enter an Tag nam e in the dialog that displays, and then click Create to add it to
the library.
To add keyword tags to photos in the library, just drag photos from the photo
browser panel to the tag in the library.
Right-click on a tag to:
• Export Tag as New Project: select to create a new project database that only
includes the photos with the selected tag.
14
Page 21
Chapter 3: The PhotoDirector Workspace
• Export Photos: select to export the photos, with the any applied adjustments
applied to them, with the selected tag. See "Exporting Photos" on page 53 for
more information.
• Rename: select to give the selected tag a different name.
• Delete: select to delete the selected tag from the library. Any photos with the
tag are not removed from the project library.
Metadata Tab
Click the Metadata tab to view detailed embedded information for the current
photos that are selected. Included on the Metadata tab are camera details and
information about the captured photo, including date capture, shutter speed,
exposure information.
Note: the photo metadata available on the Metadata tab is dependent on the
information that was embedded in the photo when it was shot.
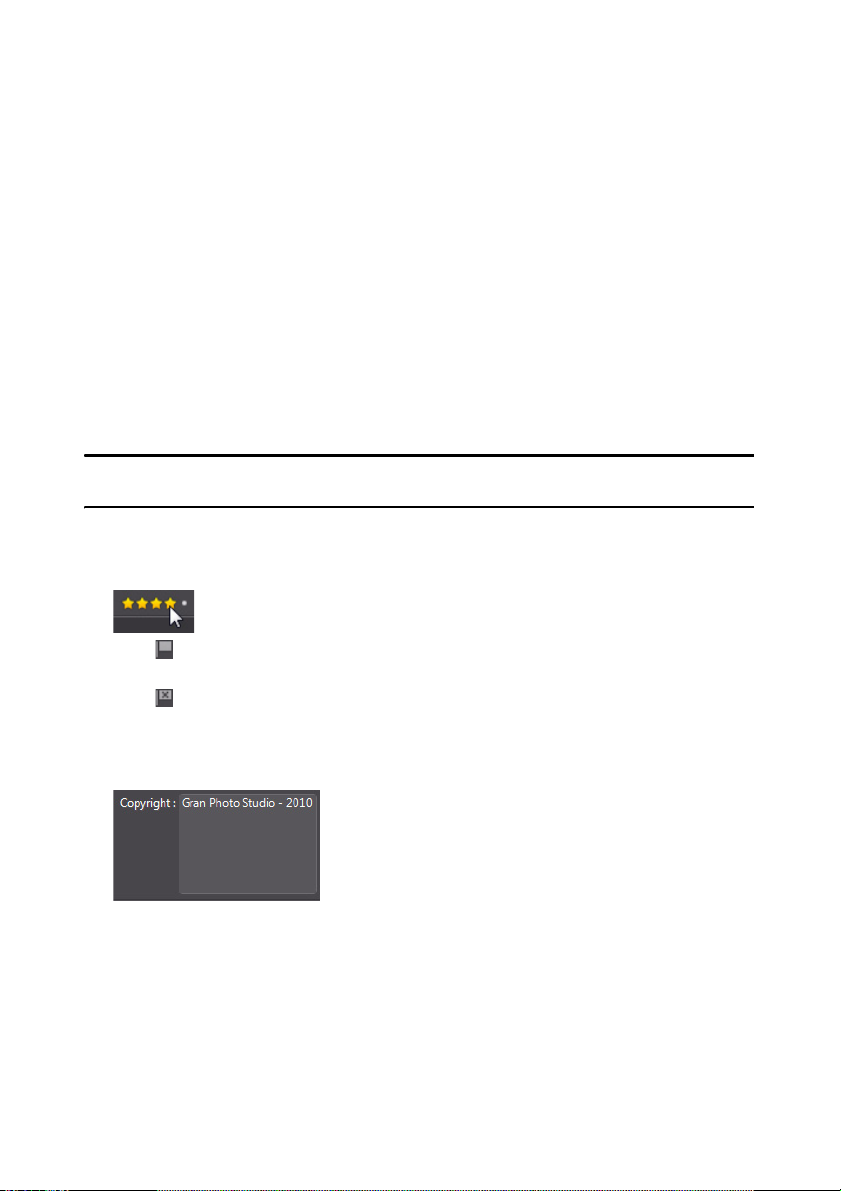
On the Metadata tab you can also:
• rate each photo by selecting the desired star rating.
• click to flag a photo that you like and may want to use later. You can then
filter flagged photos in the photo browser panel later.
• click to reject a photo you do not like.
• add copyright information to your photos. To do this, select all the photos you
want to add copyright information to, click in the space next to the Copyright
item in metadata, and then enter the copyright info in the field provided.
15
Page 22
CyberLink PhotoDirector
A B C E FD
• select Ta gs to view all the tags for the selected photos. If required, you can
create a new tag for all the selected photos by entering it in the field provided
and then clicking .
• hover your mouse over a tag and then click to remove it from a photo.
Adjustment Panel
The adjustment panel displays when in the adjustment window and contains all of
the tools you use to touch up and edit your photos. See "Adjustments" on page 25
for a detailed description of the all the tools available on the adjustment panel.
Slideshow Panel
When in the slideshow module, you can set slideshow preferences and settings on
the slideshow panel. See "Slideshows" on page 61 for detailed information about
the controls on the slideshow panel.
Photo Browser Panel
The photo browser panel is where you can browse through all the photos in your
project library. When you select a collection, folder, album, tag, etc. in the library
panel, all the photos it contains display in the photo browser panel.
A - Thumbnail View, B - List View, C - Filter Photos, D - Search, E - Export Photos, F - Share Photos
16
Page 23
Chapter 3: The PhotoDirector Workspace
Select a photo in the panel to display it in the photo viewer window.
Note: the time it takes for CyberLink PhotoDirector to load a preview of the photo, is
dependent on the preview quality selected in File Handing Preferences. See Preview
cache in "File Handling Preferences" on page 23 for more information.
While browsing through photos in the panel, you can:
• select to browse through photos in a thumbnail view that includes large
photo thumbnails.
• select to view more detailed information about photos, including date
captured, aperture, and shutter speed. In list view you can sort the photos in
the panel by clicking on a column header.
Note: for best results when sorting photos in list view, try the Browser Only mode. See
"Selecting View Mode" on page 19 for more information.
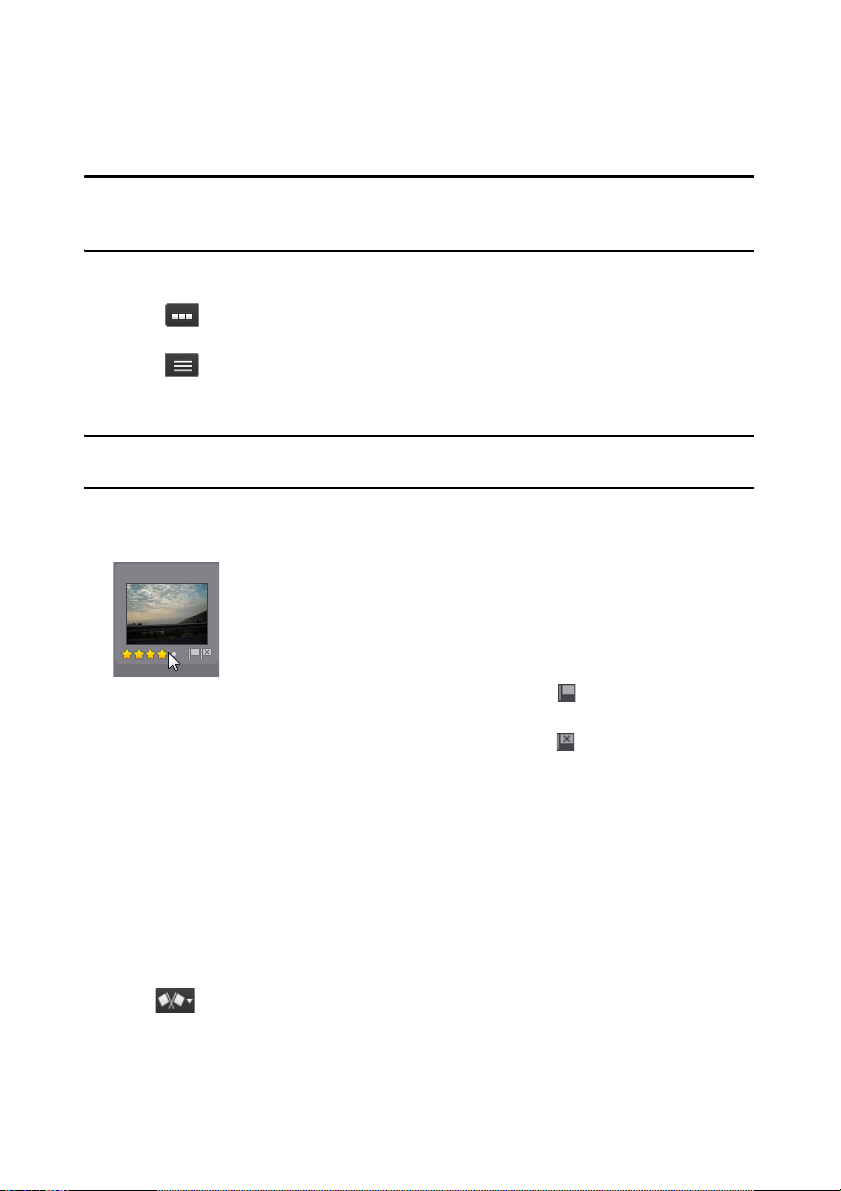
when in thumbnail view, select a photo and then rate it by selecting the
•
desired star rating.
• when in thumbnail view, select a photo and then click to flag a photo that
you like and may want to use later.
• when in thumbnail view, select a photo and then click to reject a photo you
do not like or want to use.
• you can also group photos using color labels. To label, right-click on a photo in
the photo browser panel, select the Label option, and then a color from the
list.
• right-click on a photo in the panel (or in the viewer) and then select Show
Photos in Same Folder to only display photos in the Library that are in the
same folder as the selected photo.
• right-click on a photo in the panel (or in the viewer) and then select Show
Photos in Same Album to only display photos in the Library that are in the
same album as the selected photo.
• click and then select an item in the list to filter the photos in the panel by
their flagged and rejected status.
17
Page 24
CyberLink PhotoDirector
• click and then select an item in the list to filter the photos in the panel by
their label.
• click and then select an option in the list to filter the photos in the panel
by whether they have been adjusted or not.
• right-click on a photo and select Create Virtual Photo to create another copy
you can use for editing. See "Creating Virtual Photos" on page 25 for more
information.
• click Export to export, with the adjustments applied to them, the selected
photos. See "Exporting Photos" on page 53 for more information.
• click Share to upload the selected photos to Flickr or Facebook. See "Sharing
Photos" on page 57 for more information.
• Double-click in the photo browser panel to hide it from view and get a larger
view of the current photo (viewer only mode). Double-click on the photo
viewer canvas area to again display the browser panel (viewer & browser
mode).
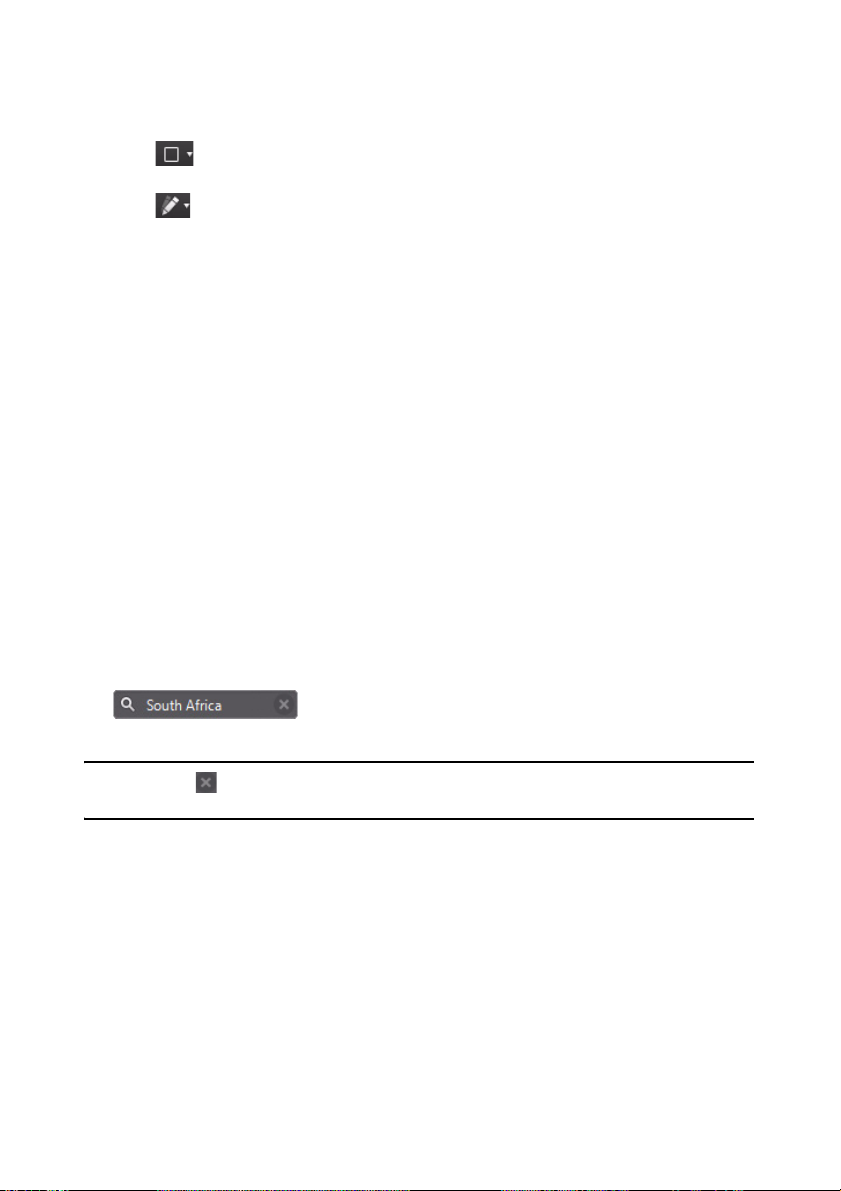
Searching for Photos
If you are looking for specific photos in the browser panel, use the search function
to find them using keyword tags.
To search for photos in the browser panel, do this:
1. Enter in a keyword in the search field located on top of the browser panel.
2. CyberLink PhotoDirector filters the photos based on the keywords entered.
Note: click on to clear the search results and display all the photos in the browser
panel.
18
Page 25

Chapter 3: The PhotoDirector Workspace
ADB
E F G
C
Photo Viewer Window
The photo viewer window displays a preview of a photo selected in the photo
browser panel. Any adjustments you make to photos are viewable in the
photo viewer window as well.
A - Select View Mode, B - View at Full Screen, C - Secondary Monitor Display Mode, D - Select Viewer
Display Mode, E - View Adjustment History, F - Show Original Photo, G - Viewer Zoom
Selecting View Mode
In the top left of the photo viewer window, select one of the following view modes
when browsing through and viewing photos in CyberLink PhotoDirector:
• Viewer & Browser Mode - select to display the photo viewer window and
the photo browser panel for easy browsing and viewing of photos.
• Viewer Only Mode - select to display a larger view of the photos.
• Browser Only Mode - select to display a large photo browser panel. This
view is ideal when sorting through photos when in list view.
19
Page 26

CyberLink PhotoDirector
When previewing photos in the project library or when making adjustments,
select to view the current photo at full screen. Once in full screen mode, you
can click to display the library/adjustment panel if required.
Selecting Viewer Display Mode
The photo viewer window has several display modes, including compare, mirror,
and also the ability to view photos on more than one display device.
Note: if you have more than one display device connected to your computer, the
primary device is listed as Main Monitor, while the secondary device is listed as
Secondary Monitor. Click the
mode options.
Click the buttons in the bottom left corner of the photo viewer window to set the
display mode.
Note: the buttons/modes that are available is dependent on which CyberLink
PhotoDirector module you are currently within.
Main Monitor
button to view the secondary monitor display
• Show one - shows one preview window for the selected photo in the
library and adjustment modules.
• Compare two - when browsing through photos in your project library,
use this display mode to compare two different photos in the library. The
photo on the left (Current) is the photo you are comparing to other (Candidate)
photos. Click the Set as Current button to set the Candidate photo as the
Current photo, or the one you are using to compare. If zoomed in on a photo in
this mode, the following buttons are available:
- Link focus - select to link the movement of two photos you are
comparing when zoomed in.
- Sync - select to quickly sync the zoomed in focus area of both photos
you are comparing.
• Show multiple - when browsing through photos in your project library,
use this display mode to show multiple photos at once. To select multiple
photos, hold down the Ctrl key on your keyboard and select as many photos as
20
Page 27

Chapter 3: The PhotoDirector Workspace
you want. In this view you can rate, flag, and reject each of the photos. Hover
your mouse over a photo and then click the X in the top right corner to remove
it from the view, if required.
• Compare before/after - when in the adjustment module, click this
button to display before and after panels, or a comparison between the
original photo (Before) and the photo with the adjustments applied (After).
There are four available comparison modes you can choose from:
- Side by side - select to compare adjustments to photos side by side.
- Split - left/right - select to split the photo, with the left half containing
the original photo, and the right half of the photo with the adjustments
applied.
- To p/ b ot to m - select to compare adjustments to photos top to
bottom.
- Split - top/bottom - select to split the photo, with the top half
containing the original photo, and the bottom half of the photo with the
adjustments applied.
Secondary Monitor
If you have more than one monitor connected to your computer and have
extended your desktop, click the button and select the display mode for the
secondary monitor.
• Mirror: duplicates the viewer display on the secondary monitor.
• Alternative: provides a secondary view of the photos you are viewing. For
example, if you are viewing a photo in normal mode, the photo displays at full
screen on the secondary monitor. If you are in compare two mode, select one
of the two photos to have it display at full screen on the secondary monitor.
• None: select if you don’t want anything displayed on your secondary
monitor.
Adjustment History
Click to view a history of all the adjustments you have made to the current
photo you are viewing. See "Viewing Adjustment History" on page 51 for more
information.
You can also click and hold the button to quickly view the original photo
during the adjustment process.
21
Page 28

CyberLink PhotoDirector
Viewer Zoom
When previewing photos in the photo viewer window, use the Zoom drop-down
to set the size of the photo preview. Select Fit to resize the selected photo so that
is fits in the viewer window.
When you zoom in or out on a photo, a thumbnail of the viewer displays above the
drop-down. Click and drag the available box to change the focus area to suit your
zooming requirements.
PhotoDirector Preferences
Use the CyberLink PhotoDirector preferences to set the UI language, project
backup frequency, file handling, and more.
To set your preferences in CyberLink PhotoDirector, select File > Preferences from
the menu, or click the button.
General Preferences
In the Preferences window, select the General tab. The available options are as
follows:
Language
• Use system default language: select this option for the language display to
be the same as the language of your operating system.
• User defined: select this option and then select the language from the drop-
down list that you want to use.
Update
• Automatically check for software updates: select to periodically check for
updates or new versions of PhotoDirector automatically.
22
Page 29

Chapter 3: The PhotoDirector Workspace
Project Preferences
In the Preferences window, select the Project tab. The available options are as
follows:
Project backup
It is recommended that you regularly back up your projects. Backing up your
projects regularly ensures that you do not lose any of the adjustments or changes
you made to your photos.
• Auto backup reminder: select from the drop-down how often you want
CyberLink PhotoDirector to remind you to back up projects. Click the Back Up
Now button to back up the project now.
• Back up to: click to set the folder on your computer where project
backups are stored.
Project information:
In this section CyberLink PhotoDirector displays the current project information,
including date created and the date of the last backup.
DirectorZone Preferences
In the Preferences window, select the DirectorZone tab. The available options are
as follows:
Auto sign in
• Auto sign in to DirectorZone when PhotoDirector is launched: select this
option and then enter in your e-mail address and password to automatically
sign in to DirectorZone when the program is opened. If you do not have a
DirectorZone account, click on the Get an Account button.
File Handling Preferences
In the Preferences window, select the File Handling tab. The available options are
as follows:
Preview cache
When you select a photo in the browser panel, the time it takes for the photo to
load is dependent on quality of the preview rendered. CyberLink PhotoDirector
lets you render a preview of each photo (which is saved in the preview cache
location folder) to enable faster load times when browsing through them.
23
Page 30

CyberLink PhotoDirector
• Location: the location on your computer where the preview data is saved.
• Maximum size: specify the maximum size allowed for the preview data on
your computer’s hard drive.
• Preview quality: specifies the current preview quality of the photos. If you
would like to render previews to improve quality or free up disk space, just
select the updated preview quality from the list.
24
Page 31

Chapter 4:
Adjustments
This chapter outlines all of the adjustments you can make to your photos in
CyberLink PhotoDirector. It also provides a description of adjustment presets, and
how you can use them to quickly edit your photos.
Making Photo Adjustments
Click on the Adjustment button and then on the Manual tab to begin making
adjustments to your photos. Any adjustments you make are not auto-applied to
the original photo file. CyberLink PhotoDirector keeps a log of all the adjustments
you want to make, and then applies them to each photo when it is exported,
printed, shared, etc. This leaves the original photo untouched.
At any time during the adjustment process, you can:
• click to quickly peek at the original photo.
• click to view a log of the adjustments applied on a photo in Adjustment
History. See "Viewing Adjustment History" on page 51 for more information.
• click Reset at the bottom of the adjustment panel to revert all the changes
back to the original photo.
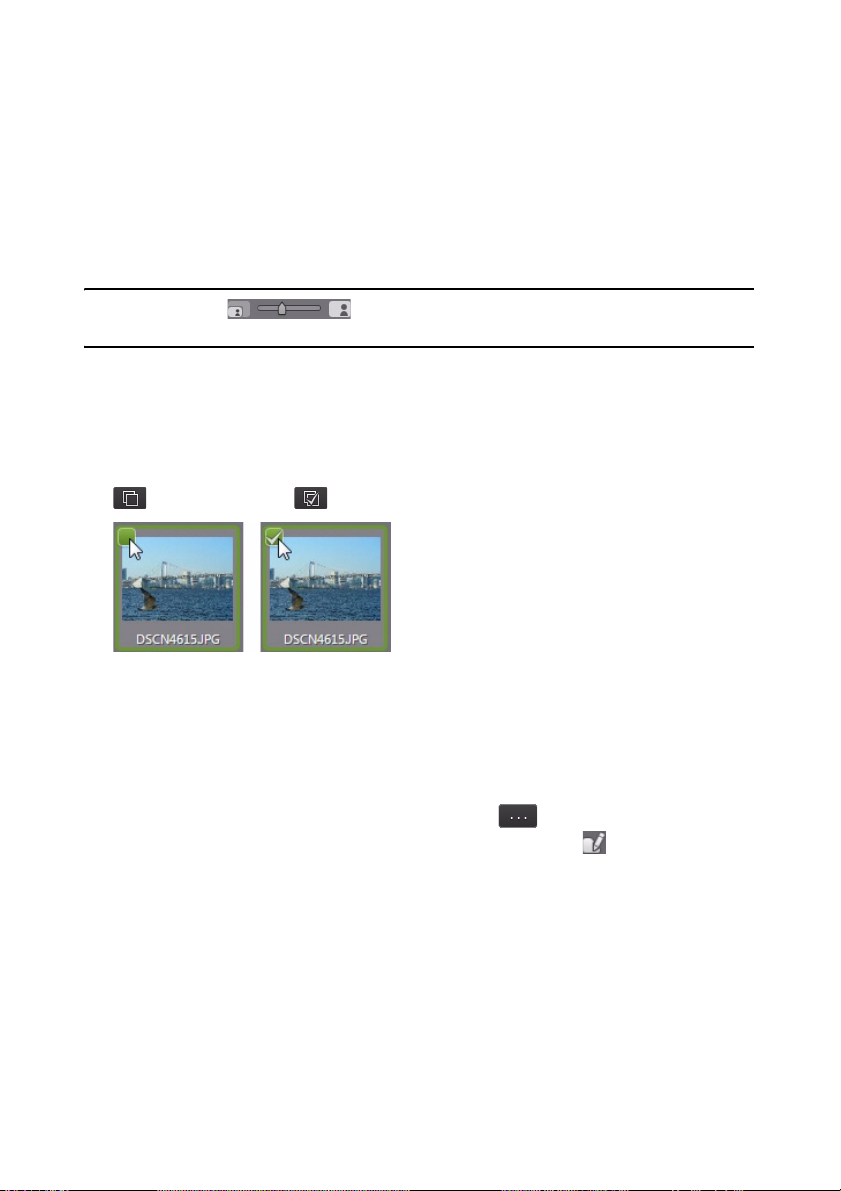
Creating Virtual Photos
Before you begin making adjustments to your photos, you can duplicate them by
creating virtual copies. To do this, right click on a photo in the photo browser
panel and select Create Virtual Photo.
Virtual photos are not physical photos on your hard drive until you export them.
This allows you to make a different set of adjustments on the same photo,
simultaneously, and then export the different resulting photos together.
You can create as many virtual copies as you want. They are indicated in the photo
browser panel as shown below.
25
Page 32

CyberLink PhotoDirector
Histogram
The histogram is a graphical representation of the color tone distribution in a
selected photo. Below the histogram is some metadata information for the photo.
The X axis of the graph represents the RGB color tone value between 0 and 255,
while the Y axis indicates the number of pixels in the photo that have this value.
The histogram is created with the three RGB (red, green, and blue) color values
given to each pixel in a photo. The gray portions indicate where all three colors
overlap on the histogram, while yellow, magenta, and cyan appear when two of
the colors overlap.
Note: hover the mouse pointer over any pixel on the selected photo to view its RGB
tone value in the histogram.
Converting Photos to Black and White
You can instantly convert a selected photo to black and white using the histogram.
To convert, select B&W. To convert back, select Color on the top of the histogram.
Note: after you convert a photo to black and white, the Black and White section of the
adjustment panel is enabled. See "Black and White Mix" on page 44 for details on
adjusting the lightness in black and white photos.
Viewing Exposed Areas
The histogram can be used to determine if the photo was shot correctly. A photo
with a histogram that arcs towards the left, indicates the photo was underexposed
(contains a lot of dark pixels), while one that arcs towards the right means there
was an overexposure (lots of lighter pixels).
26
Page 33

Chapter 4: Adjustments
Click to view the areas of a photo that were so over and underexposed that all
detail was lost, or clipped, in that area.
The areas that are overexposed are indicated in red. The areas of the photo that
are underexposed, in blue. Click to hide these areas.
Regional Adjustment Tools
Use the regional adjustment tools if you want to modify only a specific area of a
photo. You can also use these tools to crop, rotate, remove spots and red-eye, and
more.
The following sections outline the features and functions available in the regional
adjustment tools of CyberLink PhotoDirector.
• Cropping and Rotating Photos
• Using the Adjustment Brush
• Removing Spots
• Using a Gradient Mask
• Removing Red-Eye
To begin using a regional adjustment tool, just select it from the available icons.
Note: if required when using the regional adjustments tools, press and hold the
spacebar on your keyboard, and then use the mouse to zoom or pan on the selected
photo during the adjustment process.
27
Page 34

CyberLink PhotoDirector
Cropping and Rotating Photos
You can crop out portions of a photo you do not want, and rotate them up to 45
degrees for an effect or to straighten them if they are a little crooked or uneven.
To assist you when cropping and rotating photos, select a Tool overlay from the
drop-down in the bottom right of the photo viewer window. Use the overlay that
will best guide and assist you to more precisely crop and straighten a photo.
Cropping Photos
To crop a photo, do this:
1. Click to display the available crop and rotate options.
2. To crop, do one of the following:
- click to manually crop out a section. Click and drag on the photo to
manually set the crop area.
- select a crop area shape from the Aspect drop-down. To create a custom
shape, select Enter Custom, enter the Aspect ratio values in the field
provided, and then click OK.
Note: click if you want to manually resize the crop area’s aspect ratio. Click if you
want the crop area to maintain its aspect ratio.
3. Click and drag the corners and sides of the crop area to resize, if necessary.
4. Click inside the shape and drag to move the crop area, if necessary.
5. Click Done to crop the photo.
Rotating Photos
To rotate a photo, do this:
Note: when you rotate a photo, some portions are cropped to make it square. You can
rotate photos 90 degrees by right clicking on it and selecting Rotate Right/Left.
1. Click to display the available crop and rotate options.
2. To rotate, do one of the following:
- click and then click and drag on the photo to draw a line along the part
you want to be horizontal or vertical. For best results, draw on a straight line
28
Page 35

Chapter 4: Adjustments
in the photo that you know should be level, as shown in the example
below.
- click and drag the Angle slider until the photo appears to be level.
29
Page 36

CyberLink PhotoDirector
- hover the mouse outside the crop area until the mouse pointer becomes
curved. Then click and drag on the photo to manually rotate it.
3. Click inside the crop area and drag to move it, if necessary. You can also resize
the crop area as well.
4. Click Done. CyberLink PhotoDirector crops out the excess portions of the
photo to make it square.
Using the Adjustment Brush
You can use the adjustment brush to select, or brush, just the parts of a photo that
you want to adjust.
To use the adjustment brush, do this:
Note: you can adjust multiple areas of the photo using masks. See "Using Masks for
Multiple Brush Adjustments" on page 32 for more information.
30
Page 37

Chapter 4: Adjustments
1. Click to open the adjustment brush controls.
2. Click and drag on the photo to apply a brush stroke. CyberLink PhotoDirector
displays a mask color on the area you apply.
Note: the mask disappears as soon as you start adjusting the brush options. See "Using
Masks for Multiple Brush Adjustments" on page 32 for more information.
3. Set the adjustment brush options as follows:
- Brush/Eraser: select the Brush to apply the set adjustments. Use the
Eraser if you make some errors using the brush and want to remove areas
of the applied adjustments.
- Size: use the slider to set the size of the brushed or erased area. You can
also use the mouse scroll wheel to adjust the diameter of the brush.
- Feather: use the slider to set the transition level between the area being
brushed and the pixels around the area. The area between the inner and
outer circle is the size of the gradient that CyberLink PhotoDirector uses to
create a smooth transition between the areas.
- Flow: use the slider to set the amount of adjustment applied with a brush
stroke.
- Fit to edges: select this option to limit applied adjustments to areas of the
photo that have a similar properties. CyberLink PhotoDirector auto applies
them for you based on your brush strokes.
4. Set the type of adjustment you want to make using the available sliders:
- Exposure: use to adjust areas of the photo that are over or underexposed.
A negative value darkens overexposed areas, while a positive value lightens
underexposed areas.
- Brightness: use to adjust the brightness in parts of the photo.
- Contrast: use to adjust contrast, or the difference between light and dark
areas of the photo.
- Saturation: use to adjust the intensity of a color in certain areas of the
photo.
- Clarity: use to adjust the clarity of details in the photo.
- Sharpness: use to enhance definition of objects and content in the photo.
- Blue/Yellow: use to adjust the color level of blues and yellows in the photo.
- Green Magenta: use to adjust the photo’s green and magenta levels.
5. Click and drag on the other areas of the photo where the adjustments should
be applied. Use the sliders to further refine the adjustments as required.
6. Click Done to finish the adjustments and close the panel.
31
Page 38

CyberLink PhotoDirector
Using Masks for Multiple Brush Adjustments
You can make up to five different brush adjustments on a photo. When you modify
the adjustment options and use the brush to apply them to a photo, a mask is auto
created and labelled by color.
The mask label is visible in the Mask drop-down at the top of the brush panel.
To create a new adjustment mask, do this:
1. Select New from the Mask drop-down to create a new mask.
2. Apply a brush stroke and then use the sliders to set the adjustments as
required for the second adjustment.
3. CyberLink PhotoDirector labels the mask with another color in the Mask dropdown.
4. CyberLink PhotoDirector marks each mask on the photo with the color label.
32
Page 39

Chapter 4: Adjustments
5. Click the color label to toggle the masks on and off, and view the areas of the
photo where each of the adjustments was applied.
33
Page 40

CyberLink PhotoDirector
Removing Spots
The spot removal tool lets you fix any imperfections or blemishes in a photo.
To remove spots, do this:
1. Click to open the spot removal tools.
2. Set the spot removal options as follows:
- Clone/Heal: select and use Clone if you want to copy an area of the photo
and use it to cover up the spot. Select and use Heal to touch up the spot
using the photo information (texture, lighting, and shading) that surrounds
it.
- Size: use the slider to set the size of area that the tool covers up.
- Feather: use the slider to set the transition level between the area being
covered up and the pixels around the area.
- Opacity: use the slider to set the transparency of the applied cover up.
3. Click on the part of the photo you want to touch up and then drag the spot
removal tool to the part of the photo you want the spot to resemble.
4. Click Done to finish the adjustments and close the panel.
34
Page 41

Chapter 4: Adjustments
Using a Gradient Mask
Use the gradient mask to apply adjustments gradually across a large area of a
photo.
To use a gradient mask, to this:
1. Click to open the gradient mask tools.
2. Click and drag on the photo to set the gradient across a portion of the photo.
CyberLink PhotoDirector displays a mask color on the area you apply.
Note: the mask disappears as soon as you start adjusting the gradient mask options.
See "Using Multiple Gradient Masks" on page 35 for more information.
3. Set the type of adjustments you want the gradient mask to use as follows.
- Exposure: use to adjust areas of the photo that are over or underexposed.
A negative value darkens overexposed areas, while a positive value lightens
underexposed areas.
- Brightness: use to adjust the brightness in parts of the photo.
- Contrast: use to adjust contrast, or the difference between light and dark
areas of the photo.
- Saturation: use to adjust the intensity of a color in certain areas of the
photo.
- Clarity: use to adjust the clarity of details in the photo.
- Sharpness: use to enhance definition of objects and content in the photo.
- Blue/Yellow: use to adjust the color level of blues and yellows in the photo.
- Green Magenta: use to adjust the photo’s green and magenta levels.
4. Click Done to finish the adjustments and close the panel.
Using Multiple Gradient Masks
You can use up to five gradient masks on a photo in CyberLink PhotoDirector.
When you modify the adjustment options and use the gradient mask on the
photo, CyberLink PhotoDirector auto creates a mask labelled by color.
The mask label is visible in the Mask drop-down at the top of the gradient mask
panel.
To create a new gradient mask, do this:
35
Page 42

CyberLink PhotoDirector
1. Select New from the Mask drop-down to create a new mask.
2. Click and drag on the photo to set the gradient across a different portion of the
photo.
3. Use the sliders to set the adjustments as required for the second gradient
mask.
4. CyberLink PhotoDirector labels the mask with another color in the Mask dropdown.
5. CyberLink PhotoDirector marks each gradient mask on the photo with the
color label.
36
Page 43

Chapter 4: Adjustments
6. Click the color label to toggle the masks on and off, and view the areas of the
photo where the gradient was applied.
Removing Red-Eye
You can remove red-eye from photos using the tool in regional adjustments.
To remove red-eye, do this:
1. Click to open the remove red-eye tools.
37
Page 44

CyberLink PhotoDirector
2. On the photo, click in the center of the affected eye, and drag the mouse to
resize a color spot that is placed over the red-eye.
3. CyberLink PhotoDirector should auto detect the red-eye, and then fix it for you.
If it is unable to detect it properly, click and drag the applied spot to center it
over the red area, and then use the available sliders to manually fix it as follows:
- Pupil size: use the slider to resize the spot on the red area of the pupil.
- Darken: use the slider to darken the spot to the desired color.
4. Click Done to finish the adjustments and close the panel.
White Balance
Use white balance for color correction or you can use it to adjust the color
temperature of a photo to create a specific atmosphere. A warmer color shifts light
toward the yellows and reds; a colder color shifts light toward the blues and
greens.
To adjust the atmosphere of a photo using white balance, do this:
1. Drag the Te mp er a tu re slider to adjust the color temperature in the photo. A
negative value applies a colder temperature, while a positive value applies an
atmosphere that is warmer.
2. Drag the Tint slider to adjust the color level of in the photo.
To use white balance to color correct a photo, do one of the following:
• click and then use the eye dropper to select a pixel in the photo that you
believe should be grey.
CyberLink PhotoDirector auto corrects the color in the photo.
38
Page 45

Chapter 4: Adjustments
• select Auto in the drop-down to have CyberLink PhotoDirector auto adjust
white balance and correct the color for you.
Note: to reset the white balance back to the original color values, select As Shot in the
drop-down.
White Balance on RAW Photos
When adjusting the white balance on camera RAW photo formats, there are
several white balance presets available.
Select a preset from the list to have CyberLink PhotoDirector auto adjust the white
balance for you.
39
Page 46

CyberLink PhotoDirector
Tone
In this section of the adjustment panel, the sliders available adjust the tone of the
entire photo, while the Tinge sliders let you modify the clarity, vibrancy, and
saturation levels. Use the histogram to assist you in the adjustment of some of the
options.
To adjust the tonal level of your photos, do this:
1. Click to have CyberLink PhotoDirector automatically adjust the color tone
in the selected photo.
2. Manually adjust color tone using the available sliders as follows:
- Exposure: use on photos that are over or underexposed. A negative value
darkens the all the colors in the photo, while a positive value lightens them.
- Black level: use to darken the colors in the photo that are close to blacks.
Doing so can enhance color contrast and make shadows stand out more.
- Highlights: is applied to areas of photos that are overexposed to recover
detail in the highlights and brighter areas.
- Shadows: use to help enhance detail in dark sections of the photo by
lightening shadows and underexposed areas.
- Brightness: use to adjust the overall brightness of the photo by lightening
the midtone colors only.
- Contrast: use to adjust contrast, or the difference between light and dark
areas of the photo.
3. Manually adjust the sliders to adjust the photo tinge as follows:
- Clarity: use to adjust photo clarity. Dragging the slider to the right makes
the photo appear crisper, while to the left makes it appear more "dreamy".
- Vibrancy: use to make the colors in a photo brighter and more vivid, by
enhancing the duller colors.
- Saturation: use to adjust the saturation of color in a photo. A negative
value moves the colors towards black and white, while a positive value
increases the overall intensity of color in the photo.
Level
In the level section of the adjustment panel you can redefine the color in the
photo by adjusting the RGB color levels. You can adjust using the available presets
or manually with the histogram.
40
Page 47

Chapter 4: Adjustments
To redefine the color using the available presets, select a preset from the Level
preset drop-down list that best suits the selected photo.
To manually redefine the color in photo, do this:
1. In the Channel drop-down, select whether you want to adjust just the Red,
Green, or Blue color levels. Select RGB to adjust all three levels at once.
Note: if the photo is in black and white, the only channel available is for luminance, or
overall brightness of the photo.
2. Click to display the midtone controls.
3. Click and drag the sliders to adjust the color levels in the photo.
Note: in the above example, the colors in the photo are changed by redefining how
many pixels should have a value of 0.
Dragging the sliders on the left, right, makes the colors in the photo darker. While
dragging sliders left make the colors brighter.
HSL/Color
In the HSL/color section you can fine tune the color in a photo by adjusting its hue,
saturation, and lightness. CyberLink PhotoDirector lets you adjust the color in two
different ways, but with the similar results.
Note: if you converted the selected photo to black and white, the HSL/color section
displays as Black and White. See "Black and White Mix" on page 44 for details on
adjusting the lightness in black and white photos.
41
Page 48

CyberLink PhotoDirector
HSL
When you enter the HSL/color section of the adjustment panel, the HSL controls
display.
These sliders let you adjust the entire hue, saturation, or lightness of a photo at the
same time.
Hue
Click on Hue to fine tune the shade or purity of a specific color the photo. Use the
sliders to adjust the eight color band ranges as required.
You can also click on , and then click and (while holding the mouse button
down) drag on a specific color in the photo. Drag the mouse up to increase the
hue, or down to decrease it.
Saturation
Click on Saturation to adjust the saturation of color in the photo. Dragging the
sliders to right increases the amount of that color in the photo, while dragging it to
the left reduces it. If you drag the slider all the way to the left, you can completely
remove a color from the photo.
Use to adjust the color saturation by clicking on a color in the photo and then
dragging the mouse up or down. While holding the mouse button down,
42
Page 49

Chapter 4: Adjustments
dragging the mouse up increases the color saturation. Dragging the mouse down
decreases it.
Lightness
Click on Lightness to adjust color brightness. For each of the eight colors listed,
you can adjust how light or dark the specific color is.
Use to adjust the lightness of a specific color in the photo. Just click on the
color and drag the mouse up to increase the brightness, or drag it down to
decrease, making the color darker.
Color
You can also adjust the hue, saturation, and lightness of one specific color using
the color palette. Click on Color to display the color palette and available sliders.
To use, select a color on the palette and then use the sliders to adjust the hue,
saturation, and lightness as required. See the HSL descriptions above for
information on the effects of using these sliders. Click on HSL to return to the HSL
sliders.
43
Page 50

CyberLink PhotoDirector
Black and White Mix
When you convert photos to black and white in the histogram, this section
becomes enabled, replacing the HSL/Color section. In it you can adjust the overall
image lightness of the converted photos.
Use the Lightness sliders to adjust the brightness of the original colors, which are
now black and white.
Use to adjust the lightness of a specific area of the photo. Just click on the
area and then drag the mouse up to increase the brightness, or drag it down to
decrease, making the area darker.
44
Page 51

Chapter 4: Adjustments
Detail
You can adjust the sharpness in a photo in the detail section. The sharpness is
applied to edges in a photo to enhance photo detail, where possible.
Magnifier
You can use the Magnifier to get a better view of the applied sharpness on a
particular area of the photo. To change the area that is magnified, just click in the
Magnifier and then drag your mouse to change the area of focus.
If the area you want to magnify is in a completely different area of the photo, it is
faster to change the area of focus in the Magnifier by clicking on . Then click on
the area of the photo you want to magnify.
Adjusting Sharpness
To adjust the sharpness in the photo, use the available sliders as follows:
• Amount: use this slider to adjust the amount of sharpness applied to the
photo.
• Radius: use the slider to adjust the radius or range of sharpness applied to
edges in the photo.
Note: to see the radius mask, ensure that Show affected areas is selected. When
enabled, dragging the slider lets you see the applied range of sharpness.
•
Edge mask: use the slider to apply a mask over on the detected edges in the
photo. Once a mask is applied, CyberLink PhotoDirector only applies the
sharpness to the masked areas, leaving the surrounded areas untouched.
Note: to see the edge mask, ensure that Show affected areas is selected. When
enabled, dragging the slider lets you see the detected edges in the photo.
45
Page 52

CyberLink PhotoDirector
Noise Reduction
Applying sharpness and other adjustments to photos may result in some image
noise appearing on them. Use the following sliders to reduce the noise as
required:
• Luminance: use this slider to slightly adjust the color brightness, by reducing
any unwanted light grey spots in a photo that cause luminance noise.
• Detail: use this slider to adjust/recover detail in the photo that may be lost
when reducing luminance noise from a photo.
• Color: use this slider to slightly adjust the overall color saturation, by reducing
any unwanted color spots in a photo that cause color noise.
• Detail: use this slider to adjust/recover detail in the photo that may be lost
when reducing color noise from a photo.
Vignette
In the vignette section of the adjustment panel you can correct photos that have a
vignette effect on them caused by the camera or lighting environment the photo
was shot in. You can also add a custom vignetting effect to photos.
Vignette Removal
Use the following sliders to remove an unwanted vignette effect on photos that
was caused by a camera lens or the lighting environment:
• Amount: use this slider to adjust the level of vignette removal on the photo.
• Midpoint: drag the midpoint slider to the left to increase the size of the area
(towards the center of the photo) where the vignette removal is applied. Drag
it right to decrease the size, towards the corners.
Vignetting Effect
You can add custom vignetting effects to photos in CyberLink PhotoDirector.
Note: the vignetting effect sliders also remove unwanted vignette effect on photos,
however the degree of application is greater.
46
Page 53

Chapter 4: Adjustments
• Shade: use this slider to adjust the shade of the vignetting effect. Dragging the
slider to the left darkens the corners of the photo towards black, while
dragging it right lightens them towards white.
• Size: use this slider to adjust the size of the vignetting effect. Dragging the
slider to the left increases the size of the vignette effect, closing in a circle on
the center of the photo.
• Roundness: use this slider to adjust the overall shape of the vignetting effect.
• Feather: use this slider to adjust the edge sharpness of the vignetting effect.
Dragging the slider to the left makes the edge blunt, while to right uses more
of a variant.
Copying Adjustments
When you have finished applying adjustments to a photo, you can copy all of the
adjustments you made and apply them to other photos by pasting them. This is
useful if you took several photos in the same lighting environment and you need
to apply similar adjustments.
To copy and apply adjustments to other photos in the library, do this:
1. At the bottom of the adjustment panel, click Copy.
2. In the Adjustment Copy window, select or deselect any adjustment types as
required. This allows you to customize the copied adjustment if required.
3. Click the Copy button.
4. In the photo browser panel, browse to and select all of the photos you want
apply the adjustments to.
5. Click the Paste button at the bottom of the adjustment panel to apply the
adjustments to the selected photos.
47
Page 54

CyberLink PhotoDirector
Using Adjustment Presets
Adjustment presets are a saved set of adjustments that you can apply to your
photos. You can also download and import presets created by other users, or save
your own to use on other photos or share them by uploading to DirectorZone.
Click on the Presets tab to display the available adjustment presets.
Downloading Presets from DirectorZone
CyberLink PhotoDirector supplies you with some custom adjustment presets that
you can use on your photos. On the Presets tab, these default adjustment presets
are available in the Default Presets section.
To download additional adjustment presets from DirectorZone, do this:
1. Click on . CyberLink PhotoDirector launches DirectorZone in your default
web browser.
2. You must first sign in to DirectorZone to download templates. If you don't have
an account, click the Sign up link at the top of the page to get one for free.
3. Select the PhotoDirector tab to display all the available adjustment presets
you can download.
4. Find a preset you want to download, and then click the Download link
underneath it.
48
Page 55

Chapter 4: Adjustments
5. Click Download again.
6. Save the template to your computer. Find the location on your computer
where you saved the preset .pdadj file, and then double-click on it to install it in
the Presets window.
Saving Custom Presets
You can save all the adjustments you made on a photo into a custom preset, so
that you can use them on other photos.
To save a custom adjustment preset, do this:
1. Click on when on the Presets tab, or at the bottom of the Manual tab click
on Save.
2. In the New Preset window, enter the following information:
- Name: enter a custom name for the new preset.
- Save in: select which preset folder on the Presets tab you want to save the
preset in. Select New Folder if you want to save the custom preset in a new
folder.
3. Select or deselect any adjustment types as required. This allows you to
customize the adjustment if required.
Note: by default, all adjustment types are selected.
4. Click the Save button.
Note: before saving the preset, click the Share button if you want to upload it to
DirectorZone. See "Uploading Presets to DirectorZone" on page 50 for more
information on uploading presets to DirectorZone.
Applying Presets on Photos
You can apply any of the adjustments presets in the Presets window on photos in
your library.
To apply adjustment presets on photos, do this:
1. Select the photos you want to apply presets to in the photo browser panel and
the click on the Presets tab.
49
Page 56

CyberLink PhotoDirector
2. Hover your mouse over each available preset to preview the current photo
with the adjustment applied.
3. Click on the adjustment preset you want to use to apply it.
Uploading Presets to DirectorZone
You can share the custom presets you create by uploading them to DirectorZone.
To upload custom presets to DirectorZone, do this:
1. Select the preset that you want to upload and then click .
2. Follow the detailed steps in the Upload to DirectorZone wizard to complete
the upload process.
3. Click Close once the upload is complete.
Exporting/Import Presets
You can export your adjustment presets for import and use on another computer.
To export an adjustment preset, do this:
1. Right-click on a preset and then select Export.
2. Enter a file name for the preset, and then select the location where you want to
export it.
3. Click Save. CyberLink PhotoDirector saves the preset in the .pdadj file format.
To import an adjustment preset, do this:
Note: you can only import adjustment presets in the .pdadj file format via this import
method. If you are trying to import an adjustment preset in the .pdadj format that you
downloaded from DirectorZone, just double click on it.
1. Within the Downloaded Preset or My Created Presets section, click on and
then select Import.
2. Browse to location of the preset file and then select Open to complete the
import.
50
Page 57

Chapter 4: Adjustments
Viewing Adjustment History
Click on the button below the photo viewer to view a history of all the
adjustments you made to the selected photo in CyberLink PhotoDirector.
Hover your mouse over an item in the adjustment history to view in the thumbnail
what the photo looked like at that moment in the adjustment history.
If required, select an item to revert the photo back to that adjustment. Click Apply
to close the Adjustment History window.
Turning Adjustments On/Off
You can turn off a set of adjustments applied to a photo instantly. This allows you
to reset the one type of adjustments, instead of resetting all the adjustments by
clicking Reset.
To do this, just deselect the check box associated to the applied adjustments.
At any time you can turn the adjustments back on by re-selecting the check box.
Note: you can also click the button if you would like to reset a set of adjustments
back to the default values.
51
Page 58

CyberLink PhotoDirector
52
Page 59

Chapter 5:
Exporting Photos
When you make adjustments to photos, the last step is to export them. CyberLink
PhotoDirector keeps a log of all the adjustments you want to make to a photo, and
exporting it applies all these adjustments and creates a new photo file for you.
You can export multiple photos at once or export them one at a time. To export
photos in CyberLink PhotoDirector, select the photos, folder, album, collection,
etc., and then select
The Export Photo Process
You can export one or more photos from many different locations in the program,
but the process is always the same.
To export photos in CyberLink PhotoDirector, do this:
1. If required, select a custom export profile from the Use profile drop-down list.
See "Export Profiles" on page 55 for detailed information on creating and using
export profiles.
2. In the Export Destination section of the Photo Export window, specify the
export location as follows:
• Location options: specify whether you want to:
- Put in Different Folder: exports the photos into a different folder than
where the original photos are located.
- Keep in Same Location as Original Photos: exports the photos to the
same folder as the original photos.
- Different Folder but Maintain Original Structure: exports the photos into
a different folder, but uses the same folder structure as in the original folder
for consistency.
• Folder: specify the folder that photos are exported to as follows:
- Click on to specify a specific folder on your computer where the
photos are exported to.
- Put in subfolder: select this option if you want to place the exported
photos in a new subfolder. Input the name of the new folder in the field
provided.
- Add exported photos to current project: select this option if you want to
add the photos into the library after they are exported.
Export Photos or click the Export button.
53
Page 60

CyberLink PhotoDirector
• File naming conflicts: select from the drop-down what you want CyberLink
PhotoDirector to do if it encounters photos with the same file names in the
export folder.
3. In the Naming section of the Photo Export window, if required, specify the
naming conventions used on the exported photo files as follows:
Note: see the Example field at the bottom of Naming section to view an example of
the naming that will be used on the exported photos.
Format: select the format of the file name CyberLink PhotoDirector uses to
•
auto name each exported photo. Select File Name if you want photos to have
the same file name as the originals.
• Custom name: if you want the photos to have new custom name, select one of
the custom name options from the Format drop-down and then enter the
name in the field provided.
• Start number: if you want the file name to contain a number sequence, specify
the starting number in the field provided.
4. In the Output Settings and Size section of the Photo Export window, if
required, you can specify the file format and quality. This is also where you can
resize the exported photos:
• Format: specify whether you want to export the photos in the JPEG or TIFF file
format.
• Quality: if exporting in the JPEG format, use the slider to set the quality of the
exported photo. The higher the quality, the larger the resulting photo file sizes.
If exporting in the TIFF format, select ZIP in the Compression drop-down if
you want to compress the photos during export.
• Keep original photo resolution: select this option if you don’t want the
photos resized during the export process. Select the Don’t re-compress photo
if original is a JPEG and no adjustments were made if you don’t want
CyberLink PhotoDirector to re-compress the photos that you did not make any
adjustments on.
• Resize to fit: select this option if you want CyberLink PhotoDirector to resize
the photos during the export process. In the drop-down provided, specify the
new size as follows:
- Longer Sides to Specified Size: select this option to specify a new length
for the longest side of each photo in the field provided.
- Width or Height to Specified Size: select this option to specify the width
or height of each photo in the fields provided. CyberLink PhotoDirector will
54
Page 61

Chapter 5: Exporting Photos
resize photos to the specified size, and ensure the photos maintain their
current aspect ratio.
- Shorter Sides to Specified Size: select this option to specify a new length
of shortest side of each photo in the field provided.
• Don’t increase photo resolution: select this option if you don’t want
CyberLink PhotoDirector to increase the resolution of photos whose original is
smaller than the specified size. Selecting this option can prevent loss of quality.
• Sharpen after resizing: select this option if you want CyberLink PhotoDirector
to apply sharpness to each photo after resizing.
5. In the Metadata section of the Photo Export window, if required, specify the
export location as follows:
• Remove EXIF: select this option if you want CyberLink PhotoDirector to
remove the Exchangeable Image Format (EXIF) data from each photo, if it
exists.
• Write tags into metadata: select if you want any keyword tags added to be
embedded into the metadata of each photo.
• Write copyright info into metadata: select if you want any copyright
information added to be embedded into the metadata of each photo.
6. Click Export. CyberLink PhotoDirector will export all the photos as specified.
Export Profiles
Once you have customized the Export Preferences in the Photo Export window,
you can save it as a custom export profile that you can use again later.
To create a new export profile, do this:
1. In the Photo Export window, set the export preferences as required.
2. Click on .
3. Enter in a Name in the field provided.
4. Click on OK to save it in the Use profile list.
Note: if you make any changes to a profile, just click the button to save the
changes. Click the button to delete the selected export profile if required.
55
Page 62

CyberLink PhotoDirector
56
Page 63

Chapter 6:
Printing and Sharing Photos
Once you have finished organizing and adjusting your photos, you can print high
resolution copies out. You can also share your photos on both Facebook and Flickr.
Printing Photos
CyberLink PhotoDirector lets you print out photos in a variety of sizes, and even
with multiple photos on a single page.
To print out your photos, do this:
1. In the photo browser panel, select the photos you want to print out.
2. In the File menu, select Print Selected Photos.
3. In the Photo Print window, set the print options as follows:
- Layout: select the desired layout for your printed photos.
- Printer: select the printer you want to print the photos out on. Click to
set up the printer, if required.
- Fit: select how you want the photos to fit into the printing space.
- No. of copies: enter the number of copies you want to print out.
4. Click on Print. CyberLink PhotoDirector prints out the selected photos.
Sharing Photos
You can share photos in your library with others by uploading them to both
Facebook and Flickr.
Uploading Photos to Facebook
To share your photos by uploading them to Facebook, do this:
1. In the project library, select the collection/folder/album or keyword tag that
contains the photos you want to share.
2. In the photo browser panel, select all of the photos you want to upload.
3. Click above the panel and ensure Facebook is selected: .
57
Page 64

CyberLink PhotoDirector
4. Click on Share to launch the upload wizard.
5. If required, follow the instructions to authorize the upload of photos to your
Facebook account, and then click Continue.
6. Select the Facebook album you want to upload the photos to in the Add to
album drop down as follows:
- Add to Existing Album: select this option if you want to upload the photos
to an album that already exists on Facebook. Select the album you want to
upload it to from the list.
- Create and Add to New Album: select to add it to a new album. Enter the
new album info in the fields provided, including the album Privacy.
7. If required, enter a Description of the photo in Photo Settings. This
description is included on every photo you upload.
8. Click the Upload button to complete the upload process.
Uploading Photos to Flickr
To share your photos by uploading them to Flickr, do this:
1. In the project library, select the collection/folder/album or keyword tag that
contains the photos you want to share.
2. In the photo browser panel, select all of the photos you want to upload.
3. Click above the panel and ensure Flickr is selected: .
4. Click on Share to launch the upload wizard.
5. If required, follow the instructions to authorize the upload of photos to your
Flickr account, and then click Continue.
6. Select the Flickr set you want to upload the photos to in the Add to set drop
down as follows:
- Add to Existing Set: select this option if you want to upload the photos to
a set that already exists on Flickr. Select the set you want to upload it to
from the list.
- Create and Add to New Set: select to add it to a new set. Enter the new Set
name.
- Don’t Add to Any Sets: select if you don’t want to include in a set on Flickr.
7. Set the Photo Settings as follows:
- Include tags: select this option if you want any applied keyword tags to be
included during the upload process. The tags will be visible on Flickr.
58
Page 65

Chapter 6: Printing and Sharing Photos
- Resize when uploading: select this option if you want CyberLink
PhotoDirector to resize each photo before uploading. Once selected, select
the File size from the drop-down.
8. Set the desired Privacy Settings for the uploaded photos.
9. Click the Upload button to complete the upload process.
59
Page 66

CyberLink PhotoDirector
60
Page 67

Chapter 7:
Slideshows
You can use your photos in CyberLink PhotoDirector to create dazzling photo
slideshows. These slideshows can be exported as video files or uploaded to
YouTube to share with others.
Creating Photo Slideshows
To create a photo slideshow, do this:
1. In the project library, select the collection/folder/album or keyword tag that
contains the photos you want to include in your slideshow.
2. Click on Slideshow to open the slideshow module.
3. In the photo browser panel, drag the photos you want to include in the
slideshow to the preview window.
Note: you can rearrange the photo order by dragging each photo to a new position, as
required.
4. Click the button to add text captions on photos in your slideshow. You can
also combine with color boards to create titles and credits.
5. Click the button to add a color board, or blank colored slide into the
slideshow. Color boards let you insert a break into your slideshow, or you can
use them for titles and credits. Select the color of the color board from the
color panel, and then click Add Color Board.
6. Set the slideshow Style as follows:
- Effect: select the effect used in the slideshow. Fad e adds a fade in and fade
out effect between the photos in your slideshow. Wipe Left Soft uses a
wipe effect between slides. Motion adds pan and zoom effects to make
your slideshow more engaging with the appearance of motion.
- Aspect ratio: select the aspect ratio of the slideshow.
- Background music: select this option if you want to add background
music to your slideshow. Click and select the music file you want to
use as the background music in your slideshow.
- Duration: select the duration you want each photo displayed, before
progressing to the next photo in the slideshow. Select Fit to Music to set
61
Page 68

CyberLink PhotoDirector
the length of the slideshow to match the duration of the select background
music.
7. Click the play button to preview the slideshow.
Producing Slideshows
You can produce your photo slideshows and export them as video files in the
H.264 AVC, MPEG-4, or WMV format. You can also share the resulting video on
YouTube.
To produce a slideshow, do this:
1. Click the Produce button.
2. Specify the Output folder, or the location where the produced video file is
saved.
3. Select the video output format (H.264 AVC, MPEG-4, WMV) by selecting the
corresponding button.
4. Select the video file Profile you want to use from the drop-down.
5. If required, set the Audio format for the audio in the outputted video file.
6. Click Produce to begin. CyberLink PhotoDirector proceeds to produce and
create the slideshow video file.
7. Click OK when production is complete.
Sharing Slideshow Videos on YouTube
You can share a slideshow by uploading it to YouTube. During the upload process,
CyberLink PhotoDirector first produces it as a high quality video suitable for
YouTube.
To share a slideshow video on YouTube, do this:
1. Once you are done creating your slideshow, click Share.
2. Enter your YouTube account Username and Password, and then click Sign In
to continue. If you need to create a YouTube account, click the Get an account
link.
Note: select the Remember me check box if you want CyberLink PhotoDirector to save
your username and password so you won’t have to enter them next time, and skip
automatically to the next window.
62
Page 69

Chapter 7: Slideshows
3. In the next upload window, select the Quality of the produced video, and then
specify where the produced file is stored on our computer. Click Next to
continue.
Note: select Remove output file after upload if you want CyberLink PhotoDirector to
delete the produced slideshow video file from your computer after it is uploaded to
You Tu be.
4. In the next wizard window, enter the details about your video as follows:
- Title: enter the title of your slideshow video.
- Description: enter in a short description of your slideshow video.
- Tag s: enter in several tags, separated by a comma, that describe your video.
Tags are keywords that people can search for on YouTube.
Note: you must enter a title, description, and at least one tag before you can upload
your video.
- Category: select the relevant video category type from the available list.
- select whether to share your video with the world (Public) or set it as
Private.
Note: select the Share this video on DirectorZone option if you want to share the
slideshow video on DirectorZone as well.
5. Click Next to continue to the copyright and disclaimer window. Verify that your
media is not copyrighted and then click Next to begin the upload process.
6. Once the upload process is done, click on Close to close the wizard window
and return to CyberLink PhotoDirector.
63
Page 70

CyberLink PhotoDirector
64
Page 71

Chapter 8:
PhotoDirector Hotkeys
The following is a list of the hotkeys available in CyberLink PhotoDirector for your
convenience:
Hotkey Description Module Available
File/Project Features
Ctrl+I Import photos in the library. Library
Ctrl+N Create new project. Library, Adjustment, Slideshow
Ctrl+O Open existing project. Library, Adjustment, Slideshow
Ctril+E Export selected photos. Library, Adjustment
Ctrl+P Print selected photos. Library, Adjustment
Alt+C Open PhotoDirector
preferences.
Library, Adjustment, Slideshow
Ctrl+S Save and apply current
adjustments to photo.
Ctrl+Shift+S Save and apply current
adjustments as a new photo.
Right arrow key Go to next photo in the
browser panel.
Left arrow key Go to previous photo in the
browser panel.
Wor ksp ace
F3 Switch to thumbnail view in
browser panel.
F4 Switch to list view in browser
panel.
F6 Switch to viewer & browser
mode in photo viewer
window.
Library, Adjustment
Library, Adjustment
Library, Adjustment, Slideshow
Library, Adjustment, Slideshow
Library, Adjustment, Slideshow
Library, Adjustment, Slideshow
Library, Adjustment
65
Page 72

CyberLink PhotoDirector
Hotkey Description Module Available
F7 Switch to viewer only mode
in photo viewer window.
F8 Switch to browser only
mode in photo viewer
window.
Alt+2 Toggle compare mode on/
off.
Enter Set as current when
comparing two photos.
Alt+3 Toggle show multiple mode
on/off.
Alt+1 Toggle show one mode on/
off.
Ctrl+Alt+M Toggle mirror mode on/off
(secondary monitor only).
Ctrl+Alt+A Toggle alternative mode on/
off (secondary monitor only).
Ctrl+Alt+N Select to display nothing on
the secondary monitor.
F Toggle full screen mode. Library, Adjustment
Alt+L Open library module. Library, Adjustment, Slideshow
Alt+A Open adjustment module. Library, Adjustment, Slideshow
Alt+S Open slideshow module. Library, Adjustment, Slideshow
Library, Adjustment
Library, Adjustment
Library, Adjustment
Library
Library
Library, Adjustment
Library, Adjustment
Library, Adjustment
Library, Adjustment
F1 Open PhotoDirector help. Library, Adjustment, Slideshow
Operational
Ctrl+Z Undo last adjustment
setting.
Ctrl+Y Redo last adjustment
setting.
Adjustment
Adjustment
66
Page 73

Chapter 8: PhotoDirector Hotkeys
Hotkey Description Module Available
Ctrl+R Reset adjustments to default
settings.
Ctrl+A Select all photos in the
browser panel.
Ctrl+D Deselect all photos in the
browser panel.
Ctrl+[ Rotate photo left 90 degrees. Library, Adjustment, Slideshow
Ctrl+] Rotate photo right 90
degrees.
S Turn flag for selected photo
on/off.
X Turn rejection for selected
photo on/off.
U Clear all flags for selected
photo.
0 Remove rating from selected
photo.
1 Set selected photo rating as 1.Library, Adjustment, Slideshow
2 Set selected photo rating as 2.Library, Adjustment, Slideshow
Adjustment
Library, Adjustment, Slideshow
Library, Adjustment, Slideshow
Library, Adjustment, Slideshow
Library, Adjustment, Slideshow
Library, Adjustment, Slideshow
Library, Adjustment, Slideshow
Library, Adjustment, Slideshow
3 Set selected photo rating as 3.Library, Adjustment, Slideshow
4 Set selected photo rating as 4.Library, Adjustment, Slideshow
5 Set selected photo rating as 5.Library, Adjustment, Slideshow
Ctrl+0 Remove label from selected
photo.
Library, Adjustment, Slideshow
67
Page 74

CyberLink PhotoDirector
Hotkey Description Module Available
Ctrl+1 Set label for selected photo
as red.
Ctrl+2 Set label for selected photo
as blue.
Ctrl+3 Set label for selected photo
as green.
Ctrl+4 Set label for selected photo
as yellow.
Ctrl+5 Set label for selected photo
as purple.
Ctrl+Shift+C Copy adjustment settings for
use on other photos.
Ctrl+Shift+V Paste copied adjustments to
selected photos.
Ctrl+’ Create a virtual photo for the
selected photo.
Delete Delete the selected photos
from the library.
- Remove a photo from viewer
when viewing multiple
photos.
Spacebar Zoom to fit/100%. Library, Adjustment
Ctrl+Mouse
wheel
Zoom in/out on photo in
viewer window. Resize photo
thumbnails in browser panel
when in browser only mode.
Library, Adjustment, Slideshow
Library, Adjustment, Slideshow
Library, Adjustment, Slideshow
Library, Adjustment, Slideshow
Library, Adjustment, Slideshow
Adjustment
Adjustment
Library, Adjustment, Slideshow
Library, Adjustment, Slideshow
Library
Library, Adjustment
Esc Cancel regional adjustment. Adjustment
F2 Rename selected folder/
album/tag/preset.
Library, Adjustment, Slideshow
68
Page 75

Chapter 8: PhotoDirector Hotkeys
Hotkey Description Module Available
J Show/hide over and
underexposed areas of
current photo.
Alt+T Apply auto tone on current
photo.
Alt+W Apply auto white balance on
current photo.
Adjustment
Adjustment
Adjustment
69
Page 76

CyberLink PhotoDirector
70
Page 77

Chapter 9:
Technical Support
This chapter contains technical support information. It includes all the
information to find the answers you need to assist you. You may also find
answers quickly by contacting your local distributor/dealer.
Note: for more helpful tips on using the program, please visit our user forum.
Before Contacting Technical Support
Please take advantage of one of CyberLink’s free technical support options:
• consult the user’s guide or the online help installed with your program.
• refer to the Knowledge Base in the Support section of the CyberLink web site.
http://www.cyberlink.com/prog/support/cs/index.do
The FAQs may have information and helpful hints that are more current than the
User Guide and online help.
When contacting technical support by email or phone, please have the following
information ready:
• registered activation key (Your activation key can be found on the CD cover,
the Box cover, or in the email received after you purchased CyberLink products
on the CyberLink store).
• the product name, version and build number, which generally can be found by
clicking on the product name image on the user interface.
• the version of Windows installed on your system.
• hardware devices on your system (capture card, sound card, VGA card) and
their specifications.
• the wording of any warning messages that were displayed (You may want to
write this down or take a screen capture).
• a detailed description of the problem and under what circumstances it
occurred.
71
Page 78

CyberLink PhotoDirector
Web Support
Solutions to your problems are available 24 hours a day at no cost on the
CyberLink web sites:
Note: you must first register as a member before using CyberLink web support.
CyberLink provides a wide range of web support options, including FAQs, in the
following languages:
Language Web Support URL
English
Traditional Chinese
Japanese
Italian
German
French
Spanish
Note: CyberLink’s user community forum is only available in English and German.
http://www.cyberlink.com/prog/support/cs/index.do
http://tw.cyberlink.com/prog/support/cs/index.do
http://support.jp.cyberlink.com
http://it.cyberlink.com/prog/support/cs/index.do
http://de.cyberlink.com/prog/support/cs/index.do
http://fr.cyberlink.com/prog/support/cs/index.do
http://es.cyberlink.com/prog/support/cs/index.do
72
Page 79

Index
A
Adjustments
black and white
detail 45
histogram 26, 40
history 21
HSL/color 41
level 40
presets 48
regional tools 27
reset 25
resetting 51
tone 40
turning off/on 51
vignette 46
white balance 38
Albums 13
B
26
C
Clarity 31, 35, 40
Clipped areas 27
Clone 34
Color 41
Color board 61
Color palette 43
Contrast 31, 35, 40
Copyright 7
Crop
photos
tool overlay 28
28
D
Detail 45, 46
DirectorZone
downloading from
overview 2
preferences 23
uploading to 50
Download
presets
48
48
Background music 61
Backup 23
Black and white 26, 44
Black level 40
Brightness 31, 35, 40
Brush 31
E
Edge mask 45
Eraser 31
Export
photos
profiles 55
Exposure 31, 35, 40
53
73
Page 80

CyberLink PhotoDirector
F
Facebook 57
Fading 61
Feather 31, 47
File handling
preferences
Fit to edges 31
Flag 15, 17
Flow 31
Folders 12
Synchronizing 12
Format 54
Full screen 20
H
Heal 34
Highlights 40
Histogram 26
level 40
History 21
Hotkeys 65
HSL 41
Hue 42
23
destination 6
organizing 6
photos 5
L
Label 17
Level 40
Level preset 41
Lightness 43
black and white 44
Link focus 20
List view 17
Luminance 46
M
Magnifier 45
Metadata 15
Midpoint 46
Motion 61
I
Import
adding copyright
apply during 7
applying presets 7
applying tags 7
74
N
Noise reduction 46
7
O
Original photo 21, 25
Overexposed 26
Page 81

Index
Overlay
28
P
Photo browser
view mode
Photos
black and white
create virtual 18, 25
cropping 28
export 53
flagging 15, 17
importing 5
labeling 17
loading previews 23
original 25
printing 57
rating 15, 17
rejecting 15, 17
search for 18
sharing 57
supported formats 5
view original 21
Preferences 22
Presets 48
downloading 48
uploading 50
Preview cache 23
Preview quality 24
Print 57
Profiles 55
Projects 11
backing up 23
19
26
Q
Quality 54
R
Radius 45
Rate 15, 17
RAW 5
Red-eye 37
Regional adjustment tools 27
Reject 15, 17
Remove
red-eye
spots 34
vignette 46
Reset 51
Resize 54
RGB 26
Rotate 28
Roundness 47
37
S
Saturation 31, 35, 40, 42
Search 18
Shadows 40
Share 57
Sharpness 31, 35, 45
Slideshow
music
61
Smart collection 11
creating 12
75
Page 82

CyberLink PhotoDirector
Spot removal
Straighten
tool overlay
Supported formats 5
Sync focus 20
Synchronize folder 12
System requirements 3
34
28
T
Tags 7, 14
Temperature 38
Thumbnail view 17
Tint 38
Tone 40
Tool overlay 28
Turn off/on 51
U
Underexposed 26
Upload
presets
50
Vignetting effect 46
Virtual photo 18, 25
W
White balance 38
Wipe left soft 61
Z
ZIP 54
V
Vibrancy 40
View mode 19
Views
list
17
thumbnail 17
Vignette removal 46
76
 Loading...