

Page 1
Pedometer
Operation and Safety Notes
licznik kroków z radiem
Wskazówki dotyczące obsługi i bezpieczeństwa
léPéSSzámláló
Kezelési és biztonsági utalások
Števec korakov
Navodila za upravljanje in varnostna opozorila
krokoměr
Pokyny pro obsluhu a bezpečnostní pokyny
krokomer
Pokyny pre obsluhu a bezpečnostné pokyny
Schrittzähler
Bedienungs- und Sicherheitshinweise
H14347
4
Page 2

GB Operation and Safety Notes Page 5
PL Wskazówki dotyczące obsługi i bezpieczeństwa Strona 16
HU Kezelési és biztonsági utalások Oldal 28
SI Navodila za upravljanje in varnostna opozorila Stran 39
CZ Pokyny pro obsluhu a bezpečnostní pokyny Strana 50
SK Pokyny pre obsluhu a bezpečnostné pokyny Strana 61
DE / AT / CH Bedienungs- und Sicherheitshinweise Seite 72
Page 3
A
1
B
6
5
4
7
13
12
10
11
2
3
8
9
3
Page 4
C
14
15
30
29
16
D
28
27
26
25 22 21 2024 23
17
18
19
4
Page 5

Table of Contents
Introduction
Proper use ......................................................................................................................Page 6
Description of parts .......................................................................................................Page 6
Technical Data ..............................................................................................................Page 6
Supply scope .................................................................................................................Page 7
Safety
General Safety Information ..........................................................................................Page 7
Safety Instructions for Batteries ....................................................................................Page 8
Before you start
Removing the isolating strip ..........................................................................................Page 8
Getting started......................................................................................................Page 8
Hold mode / Count mode .............................................................................................Page 9
Setting parameters .......................................................................................................Page 9
Setting the day of the week ..........................................................................................Page 10
Using the pedometer ....................................................................................................Page 10
Viewing current training records ..................................................................................Page 11
Viewing the weekly record ...........................................................................................Page 11
Using the countdown function ......................................................................................Page 12
Using the stopwatch......................................................................................................Page 12
Alarm function ...............................................................................................................Page 13
Using the panic alarm ...................................................................................................Page 13
Restore factory settings .................................................................................................Page 13
Changing the batteries .................................................................................................Page 13
Cleaning and Care .............................................................................................Page 14
Disposal ......................................................................................................................Page 14
5 GB
Page 6
Introduction
Pedometer
Q
Introduction
Familiarise yourself with the prod-
uct before using it for the first time.
In addition please refer carefully to
the operating instructions below and the safety
advice. Use the product only as described
and for the indicated purpose. Keep these
instructions in a safe place. If you pass the
product on to anyone else, please ensure that
you also pass on all the documentation.
Q
Proper use
This pedometer records the number of steps
taken, distance covered and time elapsed.
The pedometer also displays average speed,
maximum speed and current speed as well as
calories and fat burned, and fat burned in per
cent. The device also functions as a stop-watch,
timer alarm and as a panic alarm. Any other
use or modification of the device constitute improper use and may result in injury and / or
damage to the device. The manufacturer is not
liable for damage caused by improper use.
The device is not intended for commercial use.
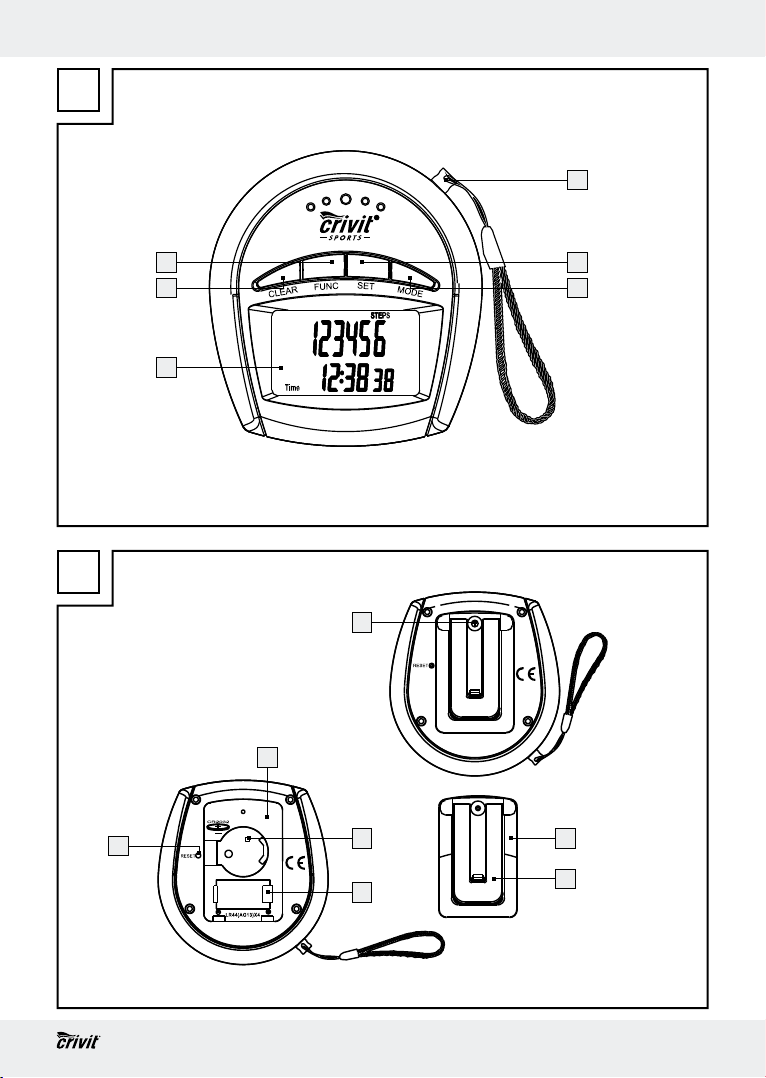
8
Battery compartment cover
9
Belt clip
10
Battery CR2032 (3 V, lithium)
11
Batteries LR44 (1.5 V, alkali)
12
RESET button
13
Battery compartment
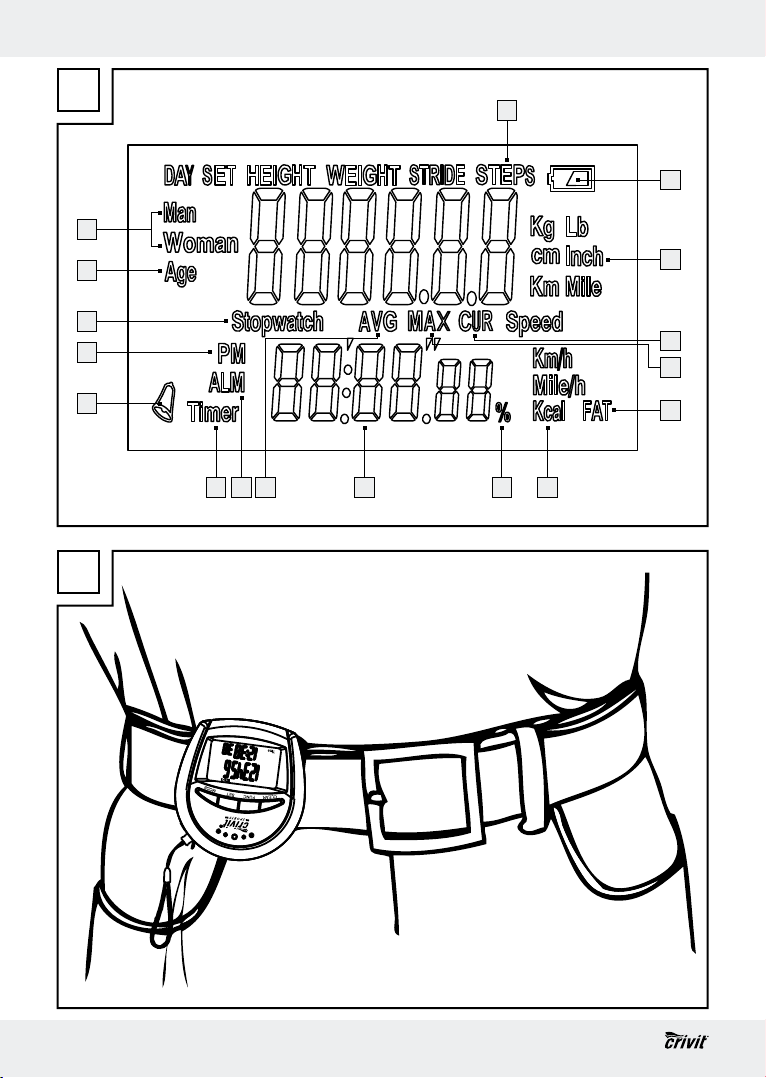
Display:
14
Function bar
15
Low battery indicator
kg, cm, km; lb, inch, mile – symbol
16
(size indicator)
17
CUR Speed / km / h - symbol
(current speed)
18
MAX Speed / km / h - symbol
(maximum speed)
19
Fat-burning symbol
20
kcal symbol (kilocalories)
21
Fat-burning in %
22
Multifunction display
23
AVG Speed / km / h icon
(average speed)
24
Alm symbol
25
Time / Timer display (time / elapsed time)
/ Countdown
26
Alarm icon
27
PM icon
28
Stopwatch display
Age
29
30
Sex (MAN / WOMAN)
Q
Description of parts
Device:
1
Panic alarm plug with wrist strap
2
SET button
3
MODE button
4
Display
5
CLEAR button
6
FUNC button
7
Screw
6 GB
Note: It is not possible to switch off the LCD
screen on the device. However, the power
consumption required to operate the LCD is
very low and comparable to that of a wristwatch.
Q
Technical Data
Measuring method: pendulum
Step display: 999,999 steps
Page 7
Introduction / Safety
Distance display: 9999.99 km
Calorie display: 9999.99 kcal
Length of stride: 30 - 200 cm (can be set
to 1 cm accuracy) /
10 - 80 inch
Default: 60 cm / 25 inch
Adjustable
user weight: 30 - 200 kg (can be set
to 1 kg accuracy) /
60 – 400 lb
Default: 60 kg / 120 lb
Age: 5 – 99
Default: 18
Sex: Man / Woman
Default: Man
Height: 60 – 250 cm /
20 – 100 inch
Default: 60 cm / 65 inch
Stopwatch /
Countdown
(timing range): 59 minutes /
59.59 seconds
Time unit: 12 / 24 hr
Default: 24 hr
Batteries: 4 x LR44 battery
(1.5 V
1 x CR2032 battery
(3 V
Permissible
temperature range: 0 - 50 °C
Dimensions: approx. 76 x 70 x
40 mm (W x H x D)
Weight:
Pedometer
(without battery): approx. 53 g
Q
Supply scope
1 Pedometer (with ripcord for panic alarm)
4 Batteries LR44 (1.5 V
, alkaline)
, lithium)
, alkali)
1 Battery CR2032 (3 V , lithium)
1 Operating manual
Safety
WARNING!
information and instructions. Failure to comply
with the safety information and instructions
may result in an electric shock, fire and / or
severe injuries.
YOU SHOULD STORE ALL SAFETY INFORMATION AND INSTRUCTIONS IN A SAFE
PLACE IN CASE YOU NEED TO REFER TO
THEM AGAIN IN THE FUTURE!
General Safety
Please read all safety
Information
J
INFANTS AND CHILDREN! Never
leave children unattended with the packaging material or the product. The packaging material carries a risk of suffocation,
and there is a risk of fatal injury by
strangulation. Children often underestimate
dangers. Always keep children away
from the product. This is not a toy.
WARNING!
Batteries can be swallowed, which may
represent a danger to life. If a battery has
been swallowed, medical help is required
immediately.
J Do not use the device if it is damaged.
Damaged devices represent a danger of
death from electric shock!
J Do not expose the device to
- extreme temperatures,
WARNING!
FATAL INJURY AND RISK
OF ACCIDENTS FOR
DANGER TO LIFE!
RISK OF
7 GB
Page 8
Safety / Before you start / Getting started
- strong vibrations,
- heavy mechanical loads,
- direct sunlight,
- moisture / rain.
Otherwise there is a danger that the
device will be damaged.
J Please note that the guarantee does not
cover damage caused by incorrect handling, non-compliance with the operating
instructions or interference with the device
by unauthorised individuals.
J Under no circumstances should you take
the device apart. Improper repairs may
place the user in considerable danger.
Repairs should only be carried out by
specialist personnel.
Safety Instructions
for Batteries
J Remove the batteries from the device if
they are not going to be used for a
prolonged period.
J
J Make sure that the polarity is correct
J If necessary, clean the batteries and
J Insert the battery type CR2032 and the
J Remove spent batteries immediately from
J Batteries must not be disposed of in the
CAUTION! DANGER OF
EXPLOSION! The batteries
must never be recharged!
when you insert a battery. This is indicated
in the battery compartment
device contacts with a dry cloth before
inserting the batteries.
four batteries type LR44 into the device.
Otherwise the pedometer will not work
properly.
the device. There is an increased danger
of leaks!
normal domestic waste!
13
.
J Every consumer is legally obliged to dis-
pose of batteries in the proper manner!
J Keep batteries away from children; do
not throw them in the fire, short-circuit
them or take them apart.
J If the above instructions are not complied
with, the batteries may discharge themselves beyond their end voltage. There is
then a danger of leaking. If the batteries
have leaked inside your device, you
should remove them immediately in order
to prevent damage to the device!
J Avoid contact with the skin, eyes and mu-
cous membranes. Any parts of the body
coming into contact with battery acid
should be rinsed off with copious amounts
of water and / or a doctor contacted if
necessary!
J Only use the type of battery specified.
Q
Before you start
Q
Removing the isolating strip
The batteries are already installed in the
device on delivery.
j Pull the insulating strip at the back of the
appliance off in the direction indicated by
the arrow. An acoustic signal will sound.
Your pedometer is now ready to be configured.
Q
Getting started
Before using the device for the first time, you
have to set the following parameters: unit of
measurement (metric or US system), length of
step, body weight, height, age, sex, time unit
(12-hour/24-hour clock), current time, alarm
8 GB
Page 9
Getting started
function. Otherwise the functions of the
pedometer cannot be used properly.
Note: After you have set all the parameters
before using it for the first time, you can
change the parameters at any time. The only
thing you cannot change at a later date is the
unit of measurement (metric or US system). If
you wish to change the unit of measurement,
13
or press the
10, 11
you will have to remove all the batteries
from the battery compartment
RESET button
12
. This process resets the preset
values again.
Q
Hold mode / Count mode
When you start the device, the pedometer is
automatically in count mode.
Note: In hold mode the measuring functions of the pedometer are disabled.
j Press and hold the MODE button
3
for
about 3 seconds. An acoustic signal will
sound. The display
will flash alter-
nately with the number of the steps.
j Press and hold the MODE button
3
for
approx. 3 seconds to enter count
mode. You will hear a signal.
disappears.
Q
Setting parameters
j When you start to operate the device for
the first time or switch the device to hold
mode (see “Hold mode/counting mode”),
you can set or change various parameters.
j To do so, press the SET button
2
, to get
to set mode. The word “SET” will light
up in the LC display.
j The indicators kg, cm, km or lb, inch, mile
flash. Press the buttons MODE
16
3
5
or CLEAR
to set the desired unit of
measurement (metric or US system).
j Confirm your entry by pressing the SET
2
button
in the function bar
. The word STRIDE will appear
14
. The cm symbol 16
and the preset value 60 cm / 25 inch flash
in the LC display. Press the buttons MODE
3
or CLEAR 5 in order to set the desired length of your stride.
Note: You can specify a stride length of
between 30 to 200 cm / 10 to 80 inch.
Tip: Press the MODE 3 or CLEAR 5
button for about 3 seconds. This will speed
up the process of setting the values. You
can use this fast way of setting the parameters for the setting procedures that follow.
j Confirm the entry by pressing the SET
2
button
in the functionbar
. The word WEIGHT will appear
14
. The kg symbol 16
and the preset value 60 kg / 120 lb flash
in the LC display. Press the buttons MODE
3
or CLEAR 5 to set the desired weight.
Note: You can specify a weight of
between 30 to 200 kg / 60 to 400 lb.
j Confirm the entry by pressing the SET
2
button
in the function bar
. The word HEIGHT will appear
14
. The preset value
flashes in the LC Display. Press the MODE
3
or CLEAR 5 button to enter the desired
value.
Note: A value between 60 and 250 cm /
20 and 100 inch can be entered.
j Confirm your settings by pressing the
SET button
AGE
2
. The LC display shows the
29
indicator and the number 18 as
the preset value. Press the MODE
5
CLEAR
button to enter the desired age.
Note: Any age between 5 and 99 years
can be entered.
j Confirm the entry by pressing the SET
. The words MAN or WOMAN
2
button
will light up. Press the buttons MODE
3
or
3
9 GB
Page 10

Getting started
or CLEAR 5 in order to set the desired sex.
j Confirm the entry by pressing the SET
2
button
. The word Time 25 as well as
(24-hour format) or (12-hour
format) will light up. Press the buttons
3
MODE
or CLEAR 5 to set the desired
time format.
Note: The PM symbol
27
in the 12-hour
format stands for afternoon/evening.
j Confirm the entry by pressing the SET
2
button
. The word time 25 will appear
and the hour of the multifunction display
will flash. Press the buttons MODE
5
CLEAR
in order to set the desired time.
3
j Confirm the entry by pressing the SET
2
button
display
MODE
. The minutes in the multifunction
22
will flash. Press the buttons
3
or CLEAR 5 in order to set the
desired time.
j Confirm the entry by pressing the SET
2
button
. The word ALM 24 will light up
and the hour of the multifunction display
will flash. Press the buttons MODE
5
CLEAR
in order to set the desired
3
alarm time.
j Confirm the entry by pressing the SET
2
button
display
MODE
. The minutes of the multifunction
22
will flash. Press the button
3
in order to set the desired
alarm time.
j Confirm the entry by pressing the SET
2
button
. The device is now in hold
mode again.
IMPORTANT! The CLEAR button
5
has a different function after setting the
alarm. Press the CLEAR button
5
to
activate the alarm. The alarm symbol
will appear in the LC display. Press the
CLEAR button
alarm. The alarm symbol
5
again to deactivate the
26
will go out
(see also “Alarm function”).
Q
Setting the day of the week
j Switch the device to hold mode (see
“Hold mode / Count mode”).
j Press the FUNC button
on the function bar
j Press the SET button
14
.
2
. The number for
the day of the week starts to flash.
j Press the buttons MODE
to set the required day of the week. The
different numbers have the following
22
or
meanings:
Monday = 1
Tuesday = 2
Wednesday = 3
Thursday = 4
Friday = 5
Saturday = 6
Sunday = 7
j Press the SET button
2
to confirm your
entry.
22
j Press the FUNC button
or
return to hold mode.
Q
Using the pedometer
For this function, the device must be in count
mode (see “Hold mode / Count mode”).
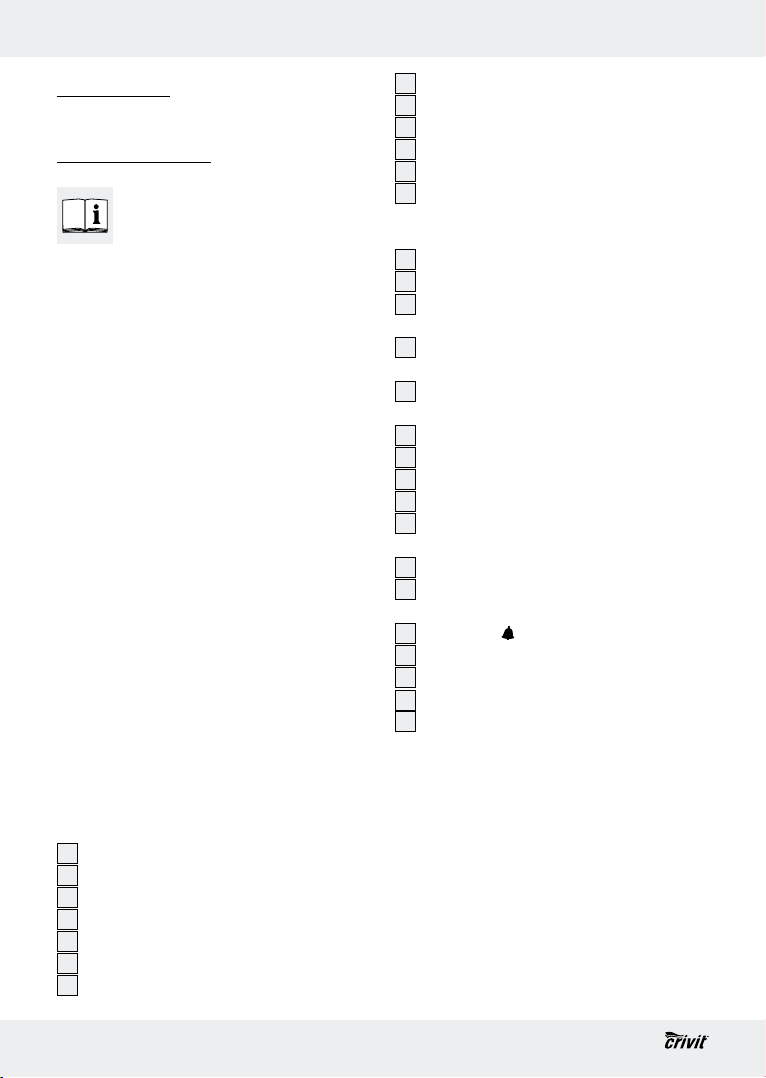
j Attach the pedometer tightly onto your
belt using the belt clip
9
IMPORTANT! The pedometer must be
secured properly and safely. This is the
only way to ensure accurate measurement.
26
The pedometer now registers the jolts of the
body and records the number of steps taken,
the distance covered, the time required and
calculates the current speed, the maximum
speed and the average speed as well as the
calories consumed, the body fat burnt and
6
. DAY appears
3
or CLEAR 5
6
3 times to
(see Fig. D).
10 GB
Page 11
Getting started
the body fat burnt in %. The pedometer automatically detects whether you are walking or
running.
Note: The recorded values are approximate.
A varying stride length and external factors
such as clothing, terrain etc. can hinder exact
measurement.
Tip! Switch the device to hold mode to
prevent unwanted measurement (route to
training location etc.) (see “Hold mode /
Count mode”).
Q
Viewing current training
records
For this function, the device must be in count
mode (see “Hold mode / Count mode”).
j Press the MODE button
on the function bar
steps taken appears on the LCD screen
Other training data appear on the LCD
4
screen
. Press the MODE button 3 to
switch from one item to the next.
It is possible to display the following:
Time
km
kcal
Fat
Fat in %
Timer
CUR Speed
MAX Speed
AVG Speed
25
16
20
19
21
25
17
18
23
Note: Only after you have exercised non-stop
for 20 – 30 minutes will your body start to
burn fat. That is why it will take a while before
the amount of fat you have burnt (in kg/lb)
and the amount of fat you have burnt in %
3
. STEPS appears
14
. The number of
4
= current time
= distance covered
= calories burned
= Fat-burning in kg / lb
= Fat-burning in %
= elapsed time
= current speed
= maximum speed
= average speed
19
21
are indicated in the LC display.
Q
Viewing the weekly record
For this function, the device must be in count
mode (see “Hold mode / Count mode”).
Note: The pedometer stores the distance
covered and the calories burned for the current
week of training. You also have the option of
viewing separate training days.
Note: The record for a week always starts
on a Monday. Please note that all the data
recorded in the week is always deleted at
midnight on Sunday.
Note: The current daily records are automatically stored in the weekly record every day
at midnight and reset to 0.
Note: Either the large CR2032 battery or
the small LR44 batteries are used to store the
data. All the stored data are erased if all the
batteries are out of the device at the same time.
.
j Press the FUNC button
6
to switch to
function mode. DAY appears on the
function bar
14
. The km 16 and kcal 20
icons and the corresponding data for the
entire week of training appear on the
LCD screen.
j Press the MODE button
3
to switch from
one training day to the next. The km
and kcal
20
icons and the corresponding
data for each of the training days appear
on the LCD screen.
Note: The days of the week are repre-
sented by numbers (see “Setting the day
of the week”). If no number appears
under DAY, the LCD is displaying the
results for the entire week of training.
Note: Please note that the records for
Day 7 are not displayed. Day 7 is either
the current day or has not yet occurred in
16
11 GB
Page 12
Getting started
the current week of training.
j Press the FUNC button
6
3 times to get
back to counting mode.
Note: Please note that you can only delete
data for the week as a whole – not for separate
training days (see “Restore factory settings”).
Q
Using the countdown
function
Note: The countdown can count down from
up to 23:59.59 hours.
Using the countdown function
separately (the device is in counting
or hold mode):
j Press the FUNC button
to countdown mode. The “Timer” indi-
cator flashes in the LC display.
j Press the button SET
countdown will flash. Press the buttons
3
MODE
or CLEAR 5 in order to set
the desired number of hours.
j Confirm the entry by pressing the SET
2
button
. The minutes of the countdown
will flash. Press the buttons MODE
5
CLEAR
in order to set the desired
number of minutes.
j Confirm the entry by pressing the SET but-
2
ton
. The second display will flash. Press
the buttons MODE
to set the desired number of seconds.
j Confirm the entry by pressing the SET
2
button
.
j Press the MODE button
countdown.
j Press the MODE button
the countdown.
6
in order to get
2
. The hour of the
3
3
or CLEAR 5 in order
3
to start the
3
again to stop
or
j Press the MODE button
3
again to
continue the countdown.
j If you wish to cancel the countdown, first
press the MODE button
3
to stop the
countdown and then press the CLEAR
5
button
to set the countdown to 0.
j As soon as the countdown has come to
an end, an acoustic signal will sound.
j Press the FUNC
MODE button
6
, CLEAR 5, SET 2 or
3
to deactivate the acoustic
signal.
j Press the FUNC button
6
twice to get
back into counting mode.
Q
Using the stopwatch
Note: The stopwatch measures time up to a
maximum of 59:59.99 (minutes / seconds).
Beyond this amount the multifunction display
22
is automatically reset to 00:00.00 and continues
counting.
Using the stopwatch alone
(the device is in count or hold mode):
j Press the FUNC button
6
3 times to get
back to stopwatch mode. The word
Stopwatch
28
will light up in the LC display.
Note: The pedometer is not active in
stopwatch mode.
appears on
the LCD.
j Press the MODE button
3
to start the
stopwatch.
j Press the MODE button
3
again to stop
the stopwatch.
j Press the CLEAR button
5
to set the stop-
watch to 0.
j Press the FUNC button
6
to return to
count mode.
12 GB
Page 13
Getting started
Using the stopwatch with the
pedometer (the device must be in
count mode):
j Press the FUNC button
6
3 times to get
into stopwatch mode. The word Stop-
28
watch
j Press the MODE button
will light up in the LC display.
3
to start the
stopwatch.
j Press the FUNC button
6
to switch to
count mode. The pedometer is active.
The stopwatch continues running in the
background.
j Press the FUNC button
6
3 times to
return to stopwatch mode.
j Press the MODE button
3
again to stop
the stopwatch.
j Press the CLEAR button
5
to set the stop-
watch to 0.
Note: The stopwatch can only be set to
0 in stopwatch mode.
j Press the FUNC button
6
to return to
count mode.
Q
Alarm function
j Set the required alarm time (see “Setting
parameters”).
Note: The set alarm is activated every
day. The alarm signal rings for approx.
1 minute.
j Press the FUNC
MODE button
6
, CLEAR 5, SET 2 or
3
to deactivate the audible
signal.
Q
Using the panic alarm
j The alarm is triggered when the panic
alarm plug
1
is pulled out of the device.
j Pull out the panic alarm plug
1
on the
wrist strap to trigger the panic alarm.
j Insert the panic alarm plug
1
back into
the device to switch off the panic alarm.
Note: Four new LR44 batteries will sound
the panic alarm for about five minutes. We
recommend that you test the panic alarm
briefly when you wish to use the pedometer.
Replace the four LR44 batteries without delay
if the low battery state indicator
Q
Restore factory settings
15
illuminates.
j If the equipment is exposed to a strong
electro-magnetic high-frequency field, or
if there is electro-static discharge, this may
lead to malfunctions. If malfunctions do
occur, for example the buttons do not
reach or the display is shown incorrectly,
press the RESET button
12
to reset the
equipment to the factory defaults. Use a
thin, pointed object to do this. The malfunctions should then be eliminated.
IMPORTANT! Please note that this will
delete all data. It will then be necessary
to reset all the parameters.
Q
Changing the batteries
The device takes two different battery types.
Note: You should replace the smaller batteries
(type LR44) immediately when the low battery
state indicator
15
illuminates. If the smaller
batteries (type LR44) become exhausted or
low in charge, then the panic alarm and
pedometer functions cannot be used. Do not
use the pedometer without the larger battery
(CR2032) in place or with a discharged larger
battery (CR2032). The data storage function
13 GB
Page 14
Getting started / Cleaning and Care / Disposal
is not available to you if the larger battery
(CR2032) is discharged or not in place.
Note: Either the large CR2032 battery or
the small LR44 batteries are used to store the
data. All the stored data are erased if all the
batteries are out of the device at the same time.
j Release the screw
partment cover
7
on the battery com-
8
using a small appropriate screwdriver (not included). Remove
the cover (see Fig. B).
j Take out the exhausted batteries.
Note: Use a pointed object (e.g. paper
clip) to remove the batteries.
j Insert four new batteries type LR44
(1.5 V
CR2032 (3 V
) and / or one battery type
).
Note: Make sure you fit the batteries the
right way round (polarity). The correct
polarity is shown inside the battery
compartment
j Put the battery compartent cover
on to the battery compartment
13
.
8
back
13
. The
LC display comes on automatically.
j Fasten the battery compartment lid
back onto the battery compartment
by tightening the screw
7
by means of a
8
13
Phillips screwdriver.
Q
Disposal
The packaging is made entirely of
recyclable materials, which you
may dispose of at local recycling
facilities.
Contact your local refuse disposal authority
for more details of how to dispose of your
worn-out product.
To help protect the environment,
please dispose of the product
properly when it has reached the
end of its useful life and not in the
household waste. Information on
collection points and their opening
hours can be obtained from your
local authority.
Faulty or used batteries must be recycled in
accordance with Directive 2006 / 66 / EC.
Please return the batteries and / or the device
to the available collection points.
Environmental damage
through incorrect disposal
Pb Hg
of the batteries!
Q
Cleaning and Care
j Clean the outside of the device only with
a soft dry cloth. Use a slightly dampened
soft cloth to remove more stubborn dirt.
j Do not under any circumstances use liquids
or cleaning agents, as they will damage
the device.
14 GB
Batteries may not be disposed of with the usual
domestic waste. They may contain toxic
heavy metals and are subject to hazardous
waste treatment rules and regulations. The
chemical symbols for heavy metals are as
follows: Cd = cadmium, Hg= mercury,
Pb = lead. That is why you should dispose of
used batteries at a local collection point.
Page 15
EMC
Product Description:
Pedometer
Model-no.: H14347
Version: 11 / 2010
15 GB
Page 16

Spis zawartości
Wstęp
Użytkowanie zgodne z przeznaczeniem ................................................................. Strona 17
Opis części ................................................................................................................. Strona 17
Dane techniczne ........................................................................................................Strona 18
Zakres dostawy .......................................................................................................... Strona 18
Bezpieczeństwo
Wskazówki ogólne dotyczące bezpieczeństwa ..................................................... Strona 18
Wskazówki dotyczące bezpieczeństwa baterii ...................................................... Strona 19
Przed uruchomieniem
Usunąć pasek izolacyjny ........................................................................................... Strona 20
Uruchomienie
Tryb hold / Tryb liczenia ............................................................................................ Strona 20
Ustawienie parametrόw ............................................................................................Strona 20
Ustawienie dnia tygodnia .........................................................................................Strona 22
Użytkowanie licznika kroków ...................................................................................Strona 22
Wywoływanie aktualnych wartości treningowych ................................................. Strona 22
Wywoływanie przeglądu tygodnia ......................................................................... Strona 23
Zastosowanie funkcji „Countdown“ .........................................................................Strona 24
Zastosowanie stopera ...............................................................................................Strona 24
Funkcja alarmu ........................................................................................................... Strona 25
Zastosowanie alarmu „Panika“.................................................................................Strona 25
Przywrócenie ustawień fabrycznych .......................................................................Strona 25
Wymiana baterii ........................................................................................................ Strona 26
Czyszczenie i pielęgnacja .......................................................................Strona 26
Usuwanie ............................................................................................................... Strona 26
16 PL
Page 17
Wstęp
Licznik kroków z radiem
Q
Wstęp
Przed uruchomieniem urządzenia
po raz pierwszy zapoznaj się z nim.
W tym celu przeczytaj uważnie
poniższą instrukcję obsługi oraz wskazówki
dotyczące bezpieczeństwa. Użytkuj urządzenie
tylko tak, jak to opisano i tylko w podanych
dziedzinach zastosowania. Przechowuj
starannie niniejszą instrukcję. Przy przekazywaniu urządzenia osobom trzecim, przekaż
wraz z nią również całą przynależną
dokumentację.
Q
Użytkowanie zgodne z
przeznaczeniem
Niniejszy krokomierz dokonuje pomiaru ilości
krokόw, pokonanego dystansu oraz wymaganego czasu. Dalsze wartości pomiarowe to
średnia prędkość, maksymalna prędkość i
aktualna prędkość oraz ilość spalonych kalorii,
spalanie tłuszczu i spalanie tłuszczu w
procentach. Dodatkowo urządzenie to wyposażone jest w radio, stoper oraz funkcję
alarmu jak rόwnież alarmu typu „Panika“.
Inny sposób użytkowania lub zmiany dokonane
w produkcie traktowane są, jako niezgodne z
przeznaczeniem i mogą wiązać się z niebezpieczeństwem odniesienia obrażeń i / lub
uszkodzenia urządzenia. Za szkody powstałe
w wyniku użytkowania produktu w sposób
niezgodny z jego przeznaczeniem producent
nie ponosi odpowiedzialności. Urządzenie nie
jest przeznaczone do użytku profesjonalnego.
Q
Opis części
Urządzenie:
Wtyk alarmu „Panika“ z bransoletką
1
Przycisk „SET“
2
Przycisk „MODE“
3
Wyświetlacz
4
Przycisk “CLEAR”
5
Przycisk “FUNC”
6
Śruba
7
Pokrywa pojemnika na baterie
8
Klips
9
Bateria CR2032 (3 V, litowa)
10
Baterie LR44 (1,5 V, alkaliczne)
11
Przycisk “RESET”
12
Pojemnik na baterie
13
Wyświetlacz:
Listwa funkcyjna
14
Wskaźnik niskiego stanu baterii
15
Symbol „kg“, „cm“, „km“; „lb“, „inch“,
16
„mile“ (wskaźnik wielkości)
Symbol „CUR Speed / km / h“
17
(aktualna prędkość)
Symbol “MAX Speed / km / h”
18
(maksymalna prędkość)
Symbol spalania tłuszczu
19
Symbol „kcal“ (kilokalorie)
20
Spalanie tłuszczu w %
21
Wskaźnik uniwersalny
22
Symbol “AVG Speed / km / h”
23
(średnia prędkość)
Symbol „ALM“
24
Wskaźnik “Time / Timer (godzina /
25
mierzony czas) / Countdown”
Symbol „Alarm“
26
Symbol „PM“
27
Wskaźnik „Stopwatch“ (stoper)
28
Wiek
29
Płeć (MAN / WOMAN)
30
17 PL
Page 18
Wstęp / Bezpieczeństwo
Wskazówka: Wyświetlacza LC nie da się
wyłączyć. Zużycie prądu przez wyświetlacz LC
jest jednak bardzo małe i można je porównać
ze zużyciem energii przez zegarek ręczny.
Q
Dane techniczne
Metoda pomiarowa: Metoda wahadłowa
Wskaźnik krokόw: 999.999 krokόw
Wskaźnik odległości: 9999,99 km
Wskaźnik kalorii: 9999,99 kcal
Długość kroku: 30 – 200 cm (precy-
zyjnie dostosowane do
1 cm) / 10 – 80 inch
Ustawienie wstępne: 60 cm / 25 inch
Regulowana
waga użytkownika: 30 – 200 kg (precyzyj-
nie dostosowane do
1 kg) / 60 – 400 lb
Ustawienie wstępne: 60 kg / 120 lb
Wiek: 5 – 99
Ustawienie wstępne: 18
Płeć: Mężczyzna / Kobieta
Ustawienie wstępne: Mężczyzna
Wzrost: 60 – 250 cm /
20 – 100 inch
Ustawienie wstępne: 60 cm / 65 inch
Stoper / Countdown
(zakres ujęcia): 59 minut /
59,99 sekund
Format czasu: 12 / 24 godziny
Ustawienie wstępne: 24 godziny
Baterie: 4 x bateria LR44
(1,5 V
1 x bateria CR2032
(3 V
Dopuszczalny
zakres temperatury: 0 – 50 °C
Wymiary: ok. 76 x 70 x 40 mm
(szer. x wys. x głęb.)
, alkaliczna)
, litowa)
Ciężar:
Krokomierz
(bez baterii): ok. 53 g
Q
Zakres dostawy
1 Krokomierz (z odrywanym przewodem do
alarmu „Panika“)
4 Baterie LR44 (1,5 V
1 Bateria CR2032 (3 V
1 Instrukcja obsługi
, alkaliczne)
, litowa)
Bezpieczeństwo
OSTRZEŻENIE!
wskazówki dotyczące bezpieczeństwa oraz
instrukcje. Zaniedbania w przestrzeganiu
wskazówek dotyczących bezpieczeństwa i
instrukcji mogą spowo dować porażenie
prądem elektrycznym, pożar i / lub ciężkie
obrażenia ciała.
PRZECHOWUJ WSZYSTKIE WSKAZÓWKI
DOTYCZĄCE BEZPIECZEŃSTWA I
INSTRUKCJE NA PRZYSZŁOŚĆ!
Przeczytaj wszystkie
Wskazówki
ogólne dotyczące
bezpieczeństwa
J
WYPADKU DLA MAŁYCH DZIECI
ORAZ DZIECI! Nigdy nie pozostawiać
dzieci bez nadzoru z materiałem opakowaniowym i z produktem. Opakowanie
stwarza ryzyko uduszenia się. Dzieci
często nie doceniają niebezpieczeństw.
OSTRZEŻENIE!
GROŻENIE ŻYCIA I NIEBEZPIECZEŃSTWO
ZA-
18 PL
Page 19
Bezpieczeństwo
Trzymać dzieci z dala od produktu.
Produkt nie jest zabawką.
OSTRZEŻENIE!
stwo utraty życia! Baterie mogą zostać
połknięte, co może zagrażać życiu. Jeżeli
bateria została połknięta, to należy natychmiast skorzystać z pomocy lekarskiej.
J Nie włączaj urządzenia do eksploatacji,
gdy jest ono uszkodzone. Uszkodzone
urządzenia oznaczają niebezpieczeństwo
utraty życia wskutek porażenia prądem
elektrycznym!
J Nie narażaj urządzenia
- na żadne ekstremalne temperatury,
- na silne wibracje,
- na silne narażenia mechaniczne,
- na żadne bezpośrednie promieniowanie
słoneczne,
- żadnej wilgoci / żadnym opadom.
W przeciwnym razie grozi uszkodzenie
urządzenia.
J Pamiętaj o tym, że uszkodzenia spowo-
dowane niewłaściwym posługiwaniem się
urządzeniem, nieprzestrzeganiem instrukcji
obsługi lub ingerencją w urządzenie
osób nieautoryzowanych są wyłączone z
gwarancji.
J W żadnym wypadku nie rozbieraj
urządzenia na części. Wskutek nieprawidłowych napraw mogą powstać poważne
niebezpieczeństwa dla użytkownika.
Wykonywania napraw zlecaj wyłącznie
fachowcom.
Niebezpieczeń-
Wskazówki dotyczące
bezpieczeństwa baterii
J
baterii!
J Przy wkładaniu baterii zwrócić uwagę na
J W razie potrzeby oczyść zestyk baterii i
J Należy założyć do urządzenia zarόwno
J Wyczerpane baterie niezwłocznie usu-
J Baterie nie należą do odpadów pocho-
J Każdy użytkownik jest ustawowo zobo-
J Trzymaj baterie z daleka od dzieci, nie
J W przypadku nieprzestrzegania wskazó-
J Unikaj kontaktu ze skórą, oczyma i
J Należy stosować jedynie baterie
OSTROŻNIE! NIEBEZPIE-
CZEŃSTWO EKSPLOZJI!
Nigdy nie ładować ponownie
prawidłowe ułożenie biegunów! Bieguny
oznaczone są w gnieździe baterii
urządzenia przed założeniem baterii.
baterię typu CR2032, jak rόwnież cztery
baterie typu LR44. W przeciwnym razie
krokomierz nie funkcjonuje dokładnie.
waj z urządzenia. Istnieje zwiększone
niebezpieczeństwo wycieku!
dzących z gospodarstw domowych!
wiązany do prawidłowego usuwania
baterii do odpadów!
wrzucaj ich do ognia, nie zwieraj ich ani
nie rozbieraj na części.
wek baterie mogą zostać rozładowane
poza ich napięcie końcowe. Istnieje
wówczas niebezpieczeństwo wycieku.
Gdyby baterie miały wycieknąć w twoim
urządzeniu, to natychmiast je wyjmij, aby
zapobiec uszkodzeniom urządzenia!
śluzówkami. W razie kontaktu z kwasem
bateryjnym przepłucz odnośne miejsce
dużą ilością wody i / lub wezwij lekarza!
podanego typu.
13
.
J W przypadku dłuższego nieużywania
urządzenia należy wyjąć z niego baterie.
19 PL
Page 20
Przed uruchomieniem / Uruchomienie
Q
Przed uruchomieniem
Q
Usunąć pasek izolacyjny
W momencie dostawy urządzenie
wyposażone jest w baterie.
j Należy wyciągnąć pasek izolacyjny z tyłu
urządzenia w kierunku strzałki. Rozlega
się sygnał dźwiękowy.
Państwa krokomierz gotowy jest do
przeprowadzenia ustawień.
Q
Uruchomienie
Przed pierwszym zastosowaniem, należy
ustawić następujące parametry: jednostkę masy
(system metryczny lub system amerykański),
długość kroku, ciężar ciała, wzrost, wiek,
płeć, jednostkę czasową (12 / 24 godziny),
aktualną godzinęt, funkcję alarmu. W przeciwnym razie funkcje krokomierza nie są
przydatnie wykorzystane.
Wskazόwka: Po ustawieniu wszystkich
parametrów przed pierwszym zastosowaniem urządzenia, można w każdej chwili
zmienić poszczególne parametry. Nie można
jedynie dokonać zmiany jednostki masy
(jednostki metrycznej lub systemu amerykańskiego). Chcą Państwo zmienić jednostkę
masy, należy wyjąć wszystkie baterie
z pojemnika na baterie
cisk „RESET”
. W procesie tym zostaną po-
12
lub uruchmić przy-
13
10, 11
nownie ustawione wszystkie wstępnie ustawione wartości.
Q
Tryb hold / Tryb liczenia
W trakcie uruchomienia urządzenia krokomierz
znajduje się automatycznie w trybie
liczenia.
Wskazόwka: W trybie hold funkcja
pomiarowa krokomierza jest wyłączona.
j Należy nacisnąć i przytrzymać na czas
ok. 3 sekund przycisk „MODE“
Rozlega się sygnał dźwiękowy. Wskaźnik
miga na przemian z liczbą krokόw
i w wyświetlaczu ukazuje się słowo „SET“.
j Należy nacisnąć i przytrzymać na czas
ok. 3 sekund przycisk „MODE“
przejść do trybu liczenia. Rozlega się
sygnał dźwiękowy. Wskaźnik
Q
Ustawienie parametrόw
j Jeśli urządzenie zostaje poraz pierwszy
uruchomione lub urządzenie zostaje
załączone do trybu hold (zobacz „Tryb
hold / Tryb liczenia“), można ustawić lub
zmienić rόżne parametry.
j Należy w tym celu nacisnąć przycisk
„SET“
, aby przejść do trybu
2
ustawiania. Wskaźnik „SET“ ukazuje
się na wyświetlaczu LC.
j Wskaźniki „kg“, „cm“, „km“ lub „lb“, „inch“,
„mile“
cisnąć przycisk „MODE“
5
zaczynają migać. Należy na-
16
lub „CLEAR“
3
, aby nastawić żądaną jednostkę masy
(metryczną lub system amerykański).
j Zapis należy potwierdzić, naciskając
przycisk „SET“
. W listwie funkcyjnej 14
2
ukazuje się wskaźnik „STRIDE“. W
wyświetlaczu LC miga symbol „cm“
oraz wstępnie ustawiona wartość 60 cm
lub 25 inch. Należy nacisnąć przycisk
.
3
, aby
3
gaśnie.
16
20 PL
Page 21
Uruchomienie
„MODE“ 3 lub „CLEAR“ 5, aby
ustawić żądaną długość.
Wskazόwka: Długość kroku można
ustawić w zakresie od 30 do 200 cm lub
10 do 80 inch.
Rada: Należy nacisnąć i przytrzymać na
czas ok. 3 sekund przycisk „MODE“
lub „CLEAR“
. W ten sposόb osiąga
5
się przyspieszone ustawienie wartości.
Taki sposόb przyspieszonego ustawiania
można rόwnież wykorzystać do następnych
procesόw ustawiania wartości.
j Należy potwierdzić zapis, naciskając
przycisk „SET“
. W listwie funkcyjnej 14
2
ukazuje się wskaźnik „WEIGHT“. W
wyświetlaczu LC miga symbol „kg“
16
jak rόwnież wstępnie ustawiona wartość
60 kg lub 120 lb. Należy nacisnąć
przycisk „MODE“
lub „CLEAR“ 5,
3
aby ustawić żądany ciężar.
Wskazόwka: Ciężar można ustawić w
zakresie 30 do 200 kg lub 60 do 400 lb.
j Należy potwierdzić zapis, naciskając
przycisk „SET“
. W listwie funkcyjnej 14
2
ukazuje się wskaźnik „HEIGHT“. W listwie
funkcyjnej miga wstępnie ustawiona wartość. Należy nacisnąć przycisk „MODE“
lub „CLEAR“ 5, aby ustawić żądany
3
wzrost.
Wskazόwka: Wzrost można ustawić
w zakresie od 60 do 250 cm lub 20 do
100 Inch.
j Należy potwierdzić zapis, naciskając
przycisk „SET“
ukazuje się wskaźnik „AGE“
. W wyświetlaczu LC
2
, jak
29
rόwnież liczba 18, jako wstępnie ustawiona
wartość. Należy nacisnąć przycisk
„MODE“
lub „CLEAR“ 5, aby ustawić
3
żądany wiek.
Wskazόwka: Wiek można ustawić w
zakresie od 5 do 99 lat.
j Należy potwierdzić zapis, naciskając
przycisk „SET“
. Wskaźnik „MAN“ lub
2
„WOMAN“ świeci. Należy nacisnąć
przycisk „MODE“
3
aby ustawić żądaną płeć.
j Należy potwierdzić zapis, naciskając
3
przycisk „SET“
2
jak rόwnież
lub
(format 12 godzin) świeci.
. Wskaźnik „Time“ 25,
(format 24 godziny)
Należy nacisnąć przycisk „MODE“
lub „CLEAR“
, aby ustawić żądany
5
format.
Wskazόwka: Symbol „PM“
ustawiony jest w formacie 12 godzin po
południu.
j Należy potwierdzić zapis, naciskając
przycisk „SET“
. Wskaźnik „Time“ 25
2
ukazuje się i wskaźnik godzin wskaźnika
uniwersalnego
przycisk „MODE“
miga. Należy nacisnąć
22
3
aby ustawić żądany czas.
j Należy potwierdzić zapis, naciskając
przycisk „SET“
. Wskaźnik minut
2
wskaźnika uniwersalnego
nacisnąć przycisk „MODE“
„CLEAR“
, aby ustawić żądany czas.
5
j Należy potwierdzić zapis, naciskając
przycisk „SET“
. Wskaźnik „Alm“ 24
2
ukazuje się i wskaźnik godzin wskaźnika
uniwersalnego
przycisk „MODE“
miga. Należy nacisnąć
22
lub „CLEAR“ 5,
3
aby ustawić żądany czas alarmu.
j Należy potwierdzić zapis, naciskając
przycisk „SET“
. Wskaźnik munut
2
wskaźnika uniwersalnego
nacisnąć przycisk „MODE“
ustawić żądany czas alarmu.
j Należy potwierdzić zapis, naciskając
przycisk „SET“
. Urządzenie znajduje
2
się ponownie w trybie hold.
WAŻNE! Przycisk „CLEAR“
po ustawieniu alarmu inną funkcję. Należy
lub „CLEAR“ 5,
3
27
lub „CLEAR“ 5,
miga. Należy
22
lub
3
miga. Należy
22
, aby
3
posiada
5
21 PL
Page 22
Uruchomienie
nacisnąć przycisk „CLEAR“ 5, aby uaktywnić alarm. Symbol „Alarm“
ukazuje
26
się w wyświetlaczu LC. Należy ponownie
nacisnąć przycisk „CLEAR“
czyć alarm. Symbol „Alarm“
, aby wyłą-
5
gaśnie
26
(zobacz rόwnież „Funkcja alarmu“).
Q
Ustawienie dnia tygodnia
j Urządzenie należy załączyć do trybu
hold (zobacz „Tryb hold / Tryb liczenia“).
j Należy nacisnąć przycisk „FUNC“
W listwie funkcyjnej
ukazuje się
14
.
6
wskaźnik „DAY“.
j Należy nacisnąć przycisk „SET“
. Miga
2
liczba dnia tygodnia.
j Należy nacisnąć przycisk „MODE“
„CLEAR“
, aby ustawić żądany dzień
5
lub
3
tygodnia. Różne cyfry mają następujące
znaczenie:
Poniedziałek = 1
Wtorek = 2
Środa = 3
Czwartek = 4
Piątek = 5
Sobota = 6
Niedziela = 7
j Należy nacisnąć przycisk „SET“
2
, aby
potwierdzić zapis.
j Należy nacisnąć 3 razy przycisk
„FUNC”
, aby powrόcić do trybu
6
hold.
Q
Użytkowanie licznika
kroków
Dla tej funkcji urządzenie musi znajdować się
w trybie liczenia (patrz „Tryb Hold / Tryb
liczenia“).
j Zamocować licznik kroków za pomocą
klipsa
do paska (patrz ilustracja D).
9
WAŻNE! Licznik kroków należy zamo-
cować mocno i pewnie. Tylko w ten sposób zapewnimy dokładne pomiary.
Krokomierz rejestruje wstrząsy ciała i ujmuje
liczbę uczynionych krokόw, pokonany dystans,
potrzebny czas i oblicza aktualne tempo,
maksymalne tempo oraz średnią prędkość, jak
rόwnież zużycie kalorii, spalony tłuszcz w %.
Krokomierz rozpoznaje automatycznie, czy
osoba znajduje się w marszu lub w biegu.
Wskazówka: W przypadku obliczonych
wartości chodzi o wartości w przybliżeniu.
Zmieniająca się długość kroków oraz czynniki
zewnętrzne takie jak odzież, rodzaj terenu
itp. uniemożliwiają wykonanie dokładnych
pomiarów.
Rada: Aby uniknąć niepożądanych
pomiarów (droga na trening, itp.) należy
przełączyć urządzenie na tryb Hold (patrz
„Tryb Hold / Tryb liczenia“).
Q
Wywoływanie aktualnych
wartości treningowych
Dla tej funkcji urządzenie musi znajdować
się w trybie liczenia (patrz „Tryb Hold /
Tryb liczenia “).
j Należy nacisnąć przycisk „MODE“
W listwie funkcyjnej
ukazuje się
14
wskaźnik „STEPS“. Wyświetlacz LC
wskazuje liczbę uczynionych krokόw.
Dodatkowo ukazują się w wyświetlaczu
LC
dalsze wartości treningowe. Należy
4
nacisnąć przycisk „MODE“
3
przenieść się z jednej wartości treningowej do następnej.
, aby
.
3
4
22 PL
Page 23
Uruchomienie
Możliwe są następujące wskaźniki:
Time
km
kcal
Fat
= aktualny czas
25
= pokonany dystans
16
= zużyte kalorie
20
= spalanie tłuszczu w
19
kg / lb
Fat in %
= spalanie tłuszczu w
21
procentach
Timer
CUR Speed
MAX Speed
AVG Speed
= mierzony czas
25
= aktualna prędkość
17
= maksymalna prędkość
18
= średnia prędkość
23
Wskazόwka: Dopiero po upływie
20 – 30 minut ciągłego treningu, organizm
rozpoczyna spalanie tłuszczu. Dlatego też
wskaźniki spalania tłuszczu w kg / lb
spalania tłuszczu w %
ukazują się w
21
19
oraz
wyświetlaczu LC dopiero po upływie pewnego
czasu.
Q
Wywoływanie przeglądu
tygodnia
Dla tej funkcji urządzenie musi znajdować
się w trybie liczenia (patrz „Tryb Hold /
Tryb liczenia“).
Wskazówka: Licznik kroków zapamiętuje
pokonany dystans oraz ilość zużytych kalorii
w bieżącym tygodniu treningowym.
Możemy też wyświetlić wartości dla poszczególnego dnia treningowego.
Wskazówka: Zapis tygodniowy rozpoczyna
się zawsze w poniedziałek. Należy pamiętać,
że zapis tygodniowy jest całkowicie kasowany
w niedzielę o godzinie 24:00.
Wskazówka: Aktualne zapisy dzienne
przenoszone są w sposób automatyczny
codziennie o godzinie 24:00 do rejestru
tygodniowego i równolegle ulegają wyzerowaniu.
Wskazόwka: Do zapisywania danych
używane są albo duże baterie CR2032 lub
małe baterie LR44. W przypadku
rόwnoczesnego usunięcia wszystkich baterii z
urządzenia, zapisane dane zostają usunięte.
j Wcisnąć przycisk FUNC
do trybu funkcji. Na pasku funkcji
, aby przejść
6
14
pojawia się wskazanie DAY. Na wyświetlaczu LC pojawiają się symbole km
oraz kcal
, a także przynależne wartości
20
16
z całego tygodnia treningowego.
j Wcisnąć przycisk MODE
, aby przejść
3
od jednego dnia treningowego do następnego. Na wyświetlaczu LC pojawiają
się symbole km
i kcal 20 oraz
16
przynależne wartości z poszczególnych
dni treningowych.
Wskazówka: Dni tygodnia oznaczone
są przy tym cyframi (patrz „Ustawianie
dnia tygodnia “). Jeśli pod wskazaniem
DAY nie pojawia się żadna cyfra,
wyświetlacz LC wskazuje wartości dla
całego tygodnia treningowego.
Wskazówka: Należy pamiętać, że
zapisy dla dnia 7 nie są wskazywane.
Dzień 7 jest albo dniem aktualnym albo
nie nastąpił jeszcze w bieżącym tygodniu
treningowym.
j Należy nacisnąć 3 razy przycisk
„FUNC“
, aby powrόcić do trybu
6
liczenia.
Wskazόwka: Należy pamiętać, że możliwe
jest jedynie usunięcie zapisόw z całego tygodnia, nie poszczegόlnych dni treningowych
(zobacz „ Powrόt do stanu fabrycznego“).
23 PL
Page 24

Uruchomienie
Q
Zastosowanie funkcji
„Countdown“
Wskazόwka: Funkcja „Countdown“ ujmuje
przedział czasu do 23:59.59 godzin.
Oddzielne stosowanie funkcji
„Countdown“ (Urządzenie znajduje
się w trybie liczenia lub w trybie
hold.):
j Należy nacisnąć przycisk „FUNC“
aby przejść do trybu „Countdown“.
W wyświetlaczu LC miga wskaźnik „Timer“.
j Należy nacisnąć przycisk SET
nik godzin funkcji „Countdown” miga.
Należy nacisnąć przycisk „MODE”
lub „CLEAR”
, aby ustawić żądaną
5
godzinę.
j Należy potwierdzić zapis, naciskając
przycisk „SET”
. Wskaźnik minut funkcji
2
„Countdown” miga. Należy nacisnąć
przycisk „MODE”
lub „CLEAR” 5,
3
aby ustawić żądaną minutę.
j Należy potwierdzić zapis, naciskając
przycisk „SET“
. Wskaźnik sekund
2
funkcji „Countdown“ miga. Należy nacisnąć przycisk „MODE“
, aby ustawić żądaną sekundę.
5
lub „CLEAR“
3
j Należy potwierdzić zapis, naciskając
przycisk „SET“
.
2
j Należy nacisnąć przycisk „MODE“
aby rozpocząć odliczanie.
j Należy ponownie nacisnąć przycisk
„MODE“
, aby zatrzymać odliczanie.
3
j Należy ponownie nacisnąć przycisk
„MODE“
, aby kontynuować odliczanie.
3
j Jeśli zamierza się zatrzymać odliczanie,
należy najpierw nacisnąć przycisk
„MODE“
, aby zatrzymać odliczanie i
3
następnie nacisnąć przycisk „CLEAR“
aby ustawić odliczanie na 0.
. Wskaź-
2
,
6
3
,
3
5
j Po upływie odliczania rozlega się sygnał
dźwiękowy.
j Należy nacisnąć przycisk „FUNC“
„CLEAR“
, „SET“ 2 lub „MODE“ 3,
5
aby wyłączyć sygnał dźwiękowy.
j Należy nacisnąć 2 razy przycisk
„FUNC“
, aby powrόcić do trybu
6
liczenia.
Q
Zastosowanie stopera
Wskazόwka: Stoper odlicza czas do
maksymalnej wartości 59:59,99 (minuty /
sekundy). Po przekroczeniu tej wartości,
wskaźnik uniwersalny
przeskakuje auto-
22
matycznie z powrotem na 00:00,00 i odlicza
dalej.
Oddzielne stosowanie stopera
(Urządzenie znajduje się w trybie
liczenia lub w trybie hold.):
j Należy nacisnąć 3 razy przycisk
„FUNC“
, aby przejść do trybu
6
stopera. W wyświetlaczu LC ukazuje
się wskaźnik „Stopwatch“
28
.
Wskazόwka: W trybie stopera
licznik krokόw nie jest aktywny. Wskaźnik
ukazuje się w wyświetlaczu LC.
j Należy nacisnąć przycisk „MODE“
aby rozpocząć pomiar czasu.
j Należy ponownie nacisnąć przycisk
„MODE“
, aby zatrzymać pomiar czasu.
3
j Należy nacisnąć przycisk „CLEAR”
aby ustawić stoper na 0.
j Należy nacisnąć przycisk „FUNC”
aby powrόcić do trybu liczenia.
Zastosowanie stopera z krokomierzem (Urządzenie musi się znajdować
,
w trybie liczenia.):
,
6
,
3
,
5
,
6
24 PL
Page 25
Uruchomienie
j Należy nacisnąć 3 razy przycisk
„FUNC”
, aby przejść do trybu
6
stopera. W wyświetlaczu LC ukazuje
się wskaźnik „Stopwatch”
28
.
j Należy nacisnąć przycisk „MODE”
aby rozpocząć pomiar czasu.
j Należy nacisnąć przycisk „FUNC”
aby przejść do trybu
liczenia. Krokomierz jest aktywny. Stoper
odmierza czas w tle.
j Należy nacisnąć 3 razy przycisk
„FUNC”
, aby powrόcić do trybu
6
stopera.
j Należy ponownie nacisnąć przycisk
„MODE”
, aby zatrzymać pomiar czasu.
3
j Należy nacisnąć przycisk „CLEAR”
aby ustawić stoper na 0.
Wskazόwka: Stoper można ustawić na
pozycję 0 jedynie w trybie stopera.
j Należy nacisnąć przycisk „FUNC”
aby powrόcić do trybu liczenia.
Q
Funkcja alarmu
j Należy ustawić żądany czas alarmu
(zobacz „Ustawienie parametrόw“).
Wskazόwka: Ustawiony alarm jest
czynny codziennie. Sygnał alarmowy
trwa ok. 1 minuty.
j Należy nacisnąć przycisk „FUNC”
„CLEAR”
, „SET” 2 lub „MODE” 3,
5
aby wyłączyć sygnał.
Q
Zastosowanie alarmu
„Panika“
j Alarm zostanie wywołany, gdy wtyk
alarmu „Panika“
z urządzenia.
zostanie wyciągnięty
1
j Należy wyciągnąć wtyk alarmu „Panika“
na bransoletce, aby wywołać alarm
1
„Panika“.
j Należy włożyć ponownie wtyk alarmu
,
3
„Panika“
do urządzenia, aby wyłą-
1
czyć alarm.
,
6
Wskazόwka: Cztery nowe baterie LR44
wytrzymują podczas aktywnego alarmu
„Panika“ okres 5 minut. Zalecamy przeprowadzenie krόtkiego testu funkcji alarmu „Panika“
w przypadku chęci zastosowania krokomierza.
Proszę niezwłocznie wymienić wszystkie
cztery baterie LR44, kiedy zapali się wskaźnik
niskiego stanu baterii
,
5
Q
Przywrócenie ustawień
15
.
fabrycznych
,
6
j Jeśli urządzenie narażone zostanie na
działanie silnego pola elektromagnetycznego o wysokiej częstotliwości, może, tak
jak w przypadku wyładowania elektrostatycznego, dojść do zakłóceń w jego
działaniu. Jeśli dojdzie do takich zakłóceń,
np. przyciski przestają reagować lub
wyświetlacz pracuje nieregularnie, należy
przełączyć urządzenie wciskając przycisk
RESET
,
6
tego celu należy użyć cienkiego, ostro
zakończonego przedmiotu. Zakłócenia w
działaniu urządzenia powinny zostać w
ten sposób usunięte.
WAŻNE! Należy uwzględnić to, że taka
operacja powoduje skasowanie wszystkich
danych. Wszystkie parametry należy
wówczas ustawić od nowa.
na ustawienia fabryczne. Do
12
25 PL
Page 26

Uruchomienie / Czyszczenie i pielęgnacja / Usuwanie
Q
Wymiana baterii
Niniejsze urządzenie zaopatrzone jest w
dwa rόżnorodne typy baterii.
Wskazόwka: Mniejsze baterie (typ LR44)
należy natychmiast wymienić, kiedy zapali
się wskaźnik niskiego stanu baterii
15
. Przy
pustych lub braku małych baterii (typ LR44)
nie ma możliwości zastosowania alarmu
„Panika“ oraz krokomierza. Krokomierza nie
należy stosować z pustą względnie bez dużej
baterii (CR2032). W przypadku pustej lub
braku dużej baterii (CR2032) nie dysponują
państwo funkcją zapisywania danych.
Wskazόwka: Do zapisywania danych
używana jest duża baterie CR2032 lub małe
baterie LR44. W przypadku rόwnoczesnego
usunięcia wszystkich baterii z urządzenia,
zapisane dane zostają usunięte.
j Proszę zwolnić śrubę
pojemnika do baterii
na pokrywie
7
za pomocą
8
małego śrubokręta krzyżowego (poza
zasięgiem dostawy). Proszę ściągnąć
pokrywę (zobacz rys. B).
j Proszę usunąć zużyte baterie.
Wskazόwka: Do usuwania baterii
należy stosować szpiczastego przedmiotu
(np. spinacza).
j Proszę założyć cztery nowe baterie typu
LR44 (1,5 V
typu CR2032 (3 V
) oraz / lub jedną baterię
).
Wskazόwka: Należy zwracać uwagę
na właściwą polaryzację. Jest ona
oznakowana w pojemniku na baterie
13
j Należy ponownie założyć pokrywę
pojemnika na baterie
. Wyświetlacz
13
LC załącza się automatycznie.
j Należy ponownie zamocować pokrywę
pojemnika na baterie
na baterie
, dokręcając śrubę 7 za
13
na pojemniku
8
pomocą śrubokręta krzyżowego.
Q
Czyszczenie i pielęgnacja
j Urządzenie czyścić tylko z zewnątrz przy
pomocy miękkiej, suchej ściereczki. W
przypadku silniejszego zabrudzenia
ściereczkę można lekko zwilżyć.
j W żadnym przypadku nie używać cieczy
ani środków myjących, ponieważ mogą
one uszkodzić urządzenie.
Q
Usuwanie
Opakowanie wykonane jest z ma-
teriałów przyjaznych środowisku,
które można usuwać w miejscowych
punktach przetwarzania materiałów
wtórnych.
Informacje o możliwościach dotyczących
wyrzucania otrzymać można w urzędzie
miejskim lub gminnym.
Nie należy wyrzucać zużytego
produktu, w celu ochrony środowiska, do domowego kosza na śmieci,
lecz w odpowiednio do tego
przeznaczonych miejscach.
Informacji o punktach zbiorczych i
ich godzinach otwarcia udziela
odpowiedni urząd.
Uszkodzone lub zużyte baterie muszą być
poddane procesowi recyklingu zgodnie z
wytyczną 2006 / 66 / EC. Baterie i / lub urzą-
.
dzenie należy zdać w lokalnym punkcie
zbiorczym.
Zagrożenie dla środowiska
na skutek niewłaściwego
Pb Hg
usuwania baterii!
26 PL
Page 27

Baterii nie wolno wyrzucać do odpadów
komunalnych. Mogą one zawierać trujące
metale ciężkie i dlatego należy je traktować
jak odpady niebezpieczne. Chemiczne symbole metali ciężkich są następujące: Cd =
kadm, Hg = rtęć, Pb = ołów. Dlatego też
zużyte baterie należy przekazywać do
komunalnych punktów gromadzenia odpadów
niebezpiecznych.
EMC
Oznaczenie produktu:
Licznik kroków z radiem
Nr modelu: H14347
Wersja: 11 / 2010
Usuwanie
27 PL
Page 28

Tartalomjegyzék
Bevezető
Rendeltetésszerű használat ........................................................................................ Oldal 29
A részek megnevezése ............................................................................................... Oldal 29
Műszaki adatok .......................................................................................................... Oldal 30
A szállítmány tartalma ................................................................................................ Oldal 30
Biztonság
Általános biztonsági tudnivalók ................................................................................. Oldal 30
Az elemekre vonatkozó biztonsági tudnivalók ......................................................... Oldal 31
Az üzembevétel előtt
A szigetelőcsík eltávolítása ......................................................................................... Oldal 31
Üzembevétel
Hold-módus / számlálás-módus .................................................................................. Oldal 32
A paraméterek beállítása ........................................................................................... Oldal 32
A hét napjának a beállítása ....................................................................................... Oldal 33
A lépésszámláló használata ....................................................................................... Oldal 34
Aktuális edzési értékek lehívása ............................................................................... Oldal 34
Heti adatáttekintés előhívása ..................................................................................... Oldal 34
A countdown használata ........................................................................................... Oldal 35
A stopperóra használata ............................................................................................ Oldal 36
Riasztási funkció .......................................................................................................... Oldal 36
A pánik-riasztás használata ........................................................................................ Oldal 37
Kiszállítási állapotba helyezés ................................................................................... Oldal 37
Az elemek cseréje ....................................................................................................... Oldal 37
Tisztítás és ápolás ............................................................................................ Oldal 37
Megsemmisítés ................................................................................................... Oldal 38
28 HU
Page 29

Bevezető
Lépésszámláló
Q
Bevezető
Az első üzembevétel előtt ismer-
kedjen a készülékkel. Ebből a célból
olvassa el figyelmesen a következő
Használatinutasítást és a biztonsági tudniva
lókat. A készüléket csak a leírtaknak megfelelően
és a megadott alkalmazási területeken
használja. Őrizze meg jól ezt az utasítást. A
készülék továbbadása esetén harmadiknak kézbesítse vele annak a teljes dokumentációját is.
Q
Rendeltetésszerű használat
Ez a lépésszámláló a megtett lépések számát,
a megtett távolságot és az ahhoz szükséges
időt regisztrálja. További kijelzett értékek az
átlagsebesség, a legnagyobb sebesség és az
aktuális sebesség, valamint az elhasznált
kalóriák mennyisége, a zsírégetés és a zsírégetés százalékban megadva. A készülék
kiegészítőleg óra, stopperóra és és riasztási
funkcióval, valamint pánik-riasztással is el van
látva. Más alkalmazások, vagy a készülék
megváltoztatása nem rendeltetésszerűnek
számítanak és sérülésveszélyeket és / vagy a
készülék megkárosítását okozhatják. A rendeltetésétől eltérő alkalmazásokból származó
károkért a gyártó nem áll jót. A készülék nem
ipari használatra készült.
diszplé
4
CLEAR-gomb
5
FUNC-gomb
6
csavar
7
elemrekesz fedél
8
öv-csíptető
9
CR2032 (3 V, litium) elem
10
LR44 (1,5 V, alkáli) elemek
11
RESET-gomb
12
elemrekesz
13
Diszplé:
funkciósáv
14
alacsony elem-töltésállapot kijelzés
15
kg, cm, km; lb, inch, mile-szimbólum
16
(mennyiség kijelzések)
CUR Speed / km / h-szimbólum
17
(aktuális sebesség)
MAX Speed / km / h-szimbólum
18
(legnagyobb sebesség)
zsírégetés-szimbólum
19
kcal-szimbólum (kilokalóriák)
20
zsírégetés %-ban
21
többcélú kijelzés
22
AVG Speed / km / h-szimbólum
23
(átlagsebesség)
ALM-szimbólum
24
Time / Timer-kijelzés (időpont /
25
mért idő) / countdown
riasztás-szimbólum
26
PM-szimbólum
27
Stopwatch-kijelzés (stopperóra)
28
életkor
29
nem (MAN / WOMAN)
30
Q
A részek megnevezése
Készülék:
pánik-riasztás dugó karpánttal
1
SET-gomb
2
MODE-gomb
3
Utalás: A készülék LC-displayét nem lehet
kikapcsolni. Az LC-display üzeméhez szükséges
áramfogyasztás nagyon kicsi és egy karóra
áramfogyasztásához hasonlítható.
29 HU
Page 30

Bevezető / Biztonság
Q
Műszaki adatok
Mérési módszer: inga módszer
Lépészám kijelzés: 999.999 lépésig
Távolság kijelzés: 9999,99 km-ig
Kalória kijelzés: 9999,99 kcal
Lépéshossz: 30 – 200 cm (1 cm-es
pontossággal beállítha-
tó) / 10 – 80 inch
Előre beállítva: 60 cm / 25 inch
Beállítható
használói
testsúly: 30 – 200 kg (1 kg-os
pontossággal beállítha-
tó) / 60 – 400 lb
Előre beállítva: 60 kg / 120 lb
Életkor: 5 – 99
Előre beállítva: 18
Nem: férfi / nő
Előre beállítva: férfi
Testmagasság: 60 – 250 cm /
20 – 100 inch
Előre beállítva: 60 cm / 65 inch
Stopperóra /
countdown
(mérhető tartomány): 59 perc /
59,99 másodperc
Idő-formátum: 12 / 24 órás
Előre beállítva: 24 órás
Elemek: 4 x LR44 (1,5 V
alkáli) elem
1 x CR2032 (3 V
litium) elem
Megengedett
hőmérsékleti
tartomány: 0 – 50 °C
Méretek: kb. 76 x 70 x 40 mm
(sz x ma x mé)
Súlyok:
lépésszámláló
(elem nélkül): kb. 53 g
,
Q
A szállítmány tartalma
1 lépésszámláló (riasztó-pánttal
pánik-riasztáshoz)
4 LR44 (1,5 V
1 CR2032 (3 V
1 Használati útmutató
, Alkalien) elem
, Lithium) elem
Biztonság
FIGYELMEZTETÉS!
összes biztonsági tudnivalót és utasítást. A
biztonsági tudnivalók és utasítások betartásánál
elkövetett mulasztások áramütést, tűz kitörését
és / vagy súlyos sérüléseket okozhatnak.
ŐRIZZE MEG JÓL A JÖVŐ SZÁMÁRA AZ
ÖSSZES BIZTONSÁGI TUDNIVALÓT ÉS
UTASÍTÁST!
Olvassa el az
Általános biztonsági
tudnivalók
J
KEK SZÁMÁRA! Sohase hagyja a
gyerekeket felügyelet nélkül a csomagolóanyagokkal és a termékkel. A csoma-
,
golóanyagok által fulladásveszély és
stranguláció általi életveszély áll fenn. A
gyerekek gyakran lebecsülik a veszélyeket.
Tartsa a gyerekeket a terméktől mindig
távol. A termék nem játékszer.
FIGYELMEZTETÉS!
Az elemek lenyelhetők, és az életveszélyes
lehet. Ha valaki egy elemet lenyelt, azonnal
orvoshoz kell fordulni.
FIGYELMEZTETÉS!
ÉLET- ÉS BALESETVESZÉLY
KISGYEREKEK ÉS GYERE-
ÉLETVESZÉLY!
30 HU
Page 31

Biztonság / Az üzembevétel előtt
J Ne vegye üzembe a készüléket, ha az
sérült. A sérült készülékek áramütés általi
életveszélyt jelentenek!
J Ne tegye ki a készüléket
- szélsőséges hőmérsékletek,
- erős rezgések,
- erős mechanikai terhelések,
- közvetlen napsugarak,
- ne tegye ki nedvességnek / esőnek.
Ellenkező esetben a készülék
megkárosodása fenyeget.
J Vegye figyelembe, hogy azokra a károso-
dásokra, amelyeket szakszerűtlen kezelés,
a Használati utasítás figyelmen kívül
hagyása, vagy feljogosítással nem rendelkező személyek beavatkozása okozott a
garancia nem érvényes.
J A készüléket semmiképpen se szedje szét.
Szakszerűtlen javítások által a használó
számára jelentős veszélyek jöhetnek
létre. Javításokat csak szakemberekkel
végeztessen.
Az elemekre
vonatkozó biztonsági
tudnivalók
készülékbe. Ellenkező esetben a lépés-
számláló nem működhet helyesen.
J A lemerült elemeket távolítsa el azonnal a
készülékből. Fokozott kifutásveszély áll
fenn!
J Az elemek nem tartoznak a háztartási
szemétbe!
J A törvény minden fogyasztót kötelez
arra, hogy az elemeket szabályszerűen
mentesítse!
J Tartsa az elemeket a gyerekektől távol,
azokat ne dobja a tűzbe, ne zárja rövidre
és ne szedje szét.
J Az utasításoknak a figyelmen kívül hagyása
esetén az elemek a végső feszültségük
alá merülhetnek. Ebben az esetben kifutás
veszélye áll fenn. Ha az elemek a készülékben kifutottak, a készülék megkárosodásának az elkerülésére vegye ki azokat
azonnal a készülékből!
J Kerülje el az elemsavnak a bőrrel, szemmel
és nyálkahártyával való érintkezését. Ha
az elemsavhoz hozzáér, mossa le az
érintett helyet bőven vízzel és / vagy
forduljon orvoshoz!
J Csak a megadott elem-típusokat használja.
J Távolítsa el az elemeket a készülékből,
ha azokat hosszabb időn keresztül nem
használták.
J
J A behelyezés alkalmával ügyeljen a
J Szükség esetén a behelyezés előtt tisztítsa
J Helyezze be úgy a CR2032 típusú ele-
VIGYÁZAT! ROBBANÁS-
VESZÉLY! Sohase töltse fel
újra az elemeket!
helyes polarításra! Azt az elemrekeszben
megjelölték.
13
meg az elemek és a készülék kapcsait.
met mint a négy LR44 típusú elemet a
Q
Az üzembevétel előtt
Q
A szigetelőcsík eltávolítása
A készülék már a kiszállításnál el van látva az
elemekkel.
j Húzza ki a nyíl irányában a készülék hátsó
oldalán a szigetelő csíkot. Felhangzik egy
hangjelzés.
A készülék most készen áll a beállításokra.
31 HU
Page 32

Üzembevétel
Q
Üzembevétel
Az első használat előtt a következő paramétereket kell beállítani: mértékegységeket
(metrikus ill. US-rendszerű), lépéshossz, testsúly,
magasság, életkor, nem, idő-formátum
(12 / 24 Stunden), aktuális időpont, riasztási
funkció. Ellenkező esetben a lépésszámláló
funkcióit nem lehet értelemszerűen használni.
Utalás: Ha az első használat előtt egyszer
mindegyik paramétert beállította, az egyes
paramétereket bármikor megváltoztathatja.
Csak a mértékegységeket (metrikus ill. USrendszerű) nem lehet utólag megváltoztatni.
Ha a mértékegységeket meg szeretné változtatni, akkor ki kell vennie az elemrekeszből
az elemeket
RESET-gombot
, vagy működtetnie kell a
10, 11
. Ezzel az eljárással az
12
13
előre beállított adatok újra visszaállítódnak.
Q
Hold-módus /
számlálás-módus
Az üzembevétel alkalmával a lépésszámláló
automatikusan a számlálási-módusban
van.
Utalás: A hold-módusban a lépésszámláló
mérési funkciói üzemen kívül vannak.
j Tartsa a MODE-gombot
percig lenyomva. Felhangzik egy hangjelzés. A
kijelzés felváltva a lépések
számával villog és a diszplén megjelenik
a SET szó.
j A számlálási-módusba jutáshoz
tartsa kb. 3 másodpercig a MODEgombot
lenyomva. Felhangzik egy
3
hangjelzés. A
kb. 3 másod-
3
kijelzés kialszik.
Q
A paraméterek beállítása
j Amikor a készüléket első alkalommal
veszi üzembe, vagy ha a készüléket a
hold-módusba kapcsolja (lásd a
„Hold-módus / számlálás-módus“-t), a
külömböző paramétereket beállíthatja
vagy megváltoztathatja.
j Ebből a célból a bevitel-módusba
jutáshoz nyomja meg a SET-gombot
Az LC-diszplén megjelenik a SET kijelzés.
j A kg, cm, km ill. lb, inch, mile kijelzések
felvillannak. A kívánt mértékegység
(metrikus ill. US-rendszerű) beállításához
nyomja meg a MODE
gombot.
ill. CLEAR 5
3
j Erősítse meg a bevitelét a SET-gomb
megnyomásával. A funkciósávon
megjelenik a STRIDE kijelzés. Az LCdiszplén felvillan a cm-szimbólum
valamint az előre beállított 60 cm ill.
25 inch érték. A kívánt lépéshossz
beállításához nyomogassa a MODE
ill. CLEAR
gombokat.
5
Utalás: A lépéshosszt 30-tól 200 cm-ig
ill. 10-től 80 inch-ig terjedő tartományban
lehet beállítani.
Tipp: Tartsa a MODE 3 ill. CLEAR 5
gombokat kb. 3 másodperig lenyomva.
Így az értékek gyorsított beállítását éri el.
Ezt a gyorsított beállítást a következő
beállítási eljárások alkalmával is
alkalmazhatja.
j Erősítse meg a bevitelét a SET-gomb
megnyomásával. A funkciósávon
megjelenik a WEIGHT-kijelzés. Az LCdiszplén felvillan a kg-szimbólum
valamint az előre beállított 60 kg ill.
120 lb érték. A kívánt testsúly beállításához
nyomogassa a MODE
ill. CLEAR 5
3
gombokat.
14
14
16
16
.
2
16
2
3
2
32 HU
Page 33

Üzembevétel
Utalás: A testsúlyt a 30-tól 200 kg-ig ill.
60-től 400 lb-ig terjedő tartományban
lehet beállítani.
j Erősítse meg a bevitelét a SET-gomb
megnyomásával. A funkciósávon
14
2
megjelenik a HEIGHT-kijelzés. A funkciósávon felvillan az előre beállított érték.
A kívánt testmagasság beviteléhez
nyomogassa a MODE
ill. CLEAR 5
3
gombokat.
Utalás: 60 és 250 cm ill. 20 és 100 inch
közötti testmagasságot lehet beállítani.
j Erősítse meg a bevitelét a SET-gomb
2
megnyomásával. Az LC-diszplén megjelenik
az AGE
kijelzés, valamint a előre
29
beállított értékként a 18-as számjegy. A
kívánt életkor beállításához nyomogassa
a MODE
ill. CLEAR 5 gombokat.
3
Utalás: 5 és 99 éves közötti életkort
lehet bevinni.
j Erősítse meg a bevitelét a SET-gomb
2
megnyomásával. Felvillan a MAN ill.
WOMAN kijelzés. A kivánt nem
beállításához nyomja meg a MODE
ill. CLEAR
gombot.
5
j Erősítse meg a bevitelét a SET-gomb
3
2
megnyomásával. Felvillannak a Time
kijelzés
formátum) ill.
, valamint a (24-órás
25
(12-órás formátum). A
kívánt időformátum beállításához nyomja
meg a MODE
Utalás: A PM-szimbólum
ill. CLEAR 5 gombot.
3
a 12-órás
27
formátumnál a délutánt jelenti.
j Erősítse meg a bevitelét a SET-gomb
2
megnyomásával. Megjelenik a Time
kijelzés
és a többcélú kijelző 22
25
óraszámok kijelzése villog. A kívánt időpont
beállításához nyomogassa a MODE
ill. CLEAR
gombot.
5
j Erősítse meg a bevitelét a SET-gomb
megnyomásával. A többcélú kijelző
3
2
22
percek kijelzése villog. A kívánt időpont
beállításához nyomogassa a MODE
ill. CLEAR
gombokat.
5
j Erősítse meg a bevitelét a SET-gomb
megnyomásával. Megjelenik az Almkijelzés
és a többcélú kijelző 22 óra-
24
számok kijelzése villog. A kívánt riasztási
időpont beállításához nyomogassa a
MODE-
ill. CLEAR
3
gombokat.
5
j Erősítse meg a bevitelét a SET-gomb
megnyomásával. A többcélú kijelző
percek kijelzése villog. A kívánt riasztási
időpont beállításához nyomogassa a
MODE-gombot
.
3
j Erősítse meg a bevitelét a SET-gomb
megnyomásával. A készülék most újra a
hold-módusban található.
FONTOS! A riasztás beállításánál a
CLEAR-gombnak
egy másik funkciója
5
van. A riasztás aktiválásához nyomja
meg a CLEAR-gombot
megjelenik a riasztás-szimbólum
. Az LC-diszplén
5
riasztás deaktiválásához nyomja meg újra
a CLEAR-gombot
kialszik (lásd a „Riasztási funkció“-t).
26
. A riasztás-szimbólum
5
Q
A hét napjának a beállítása
j Kapcsolja a készüléket a hold-módusba
(lásd a „ Hold-módus / számláló-módus“-t).
j Nyomja meg a FUNC-gombot
funkciósávon
megjelenik a DAY.
14
j Nyomja meg a SET-gombot
napját jelző szám villog.
j A kívánt heti nap beállításához nyomja
meg a MODE
ill. CLEAR 5 gombot.
3
A külömböző számjegyek jelentése a
következő:
hétfő = 1
kedd = 2
szerda = 3
csütörtök = 4
. A hét
2
3
2
2
22
2
. A
26
. A
6
33 HU
Page 34

Üzembevétel
péntek = 5
szombat = 6
vasárnap = 7
j A bevitele megerősítéséhez nyomja meg
a SET-gombot
.
2
j Ahhoz, hogy újra a hold-módusba
jusson nyomja meg 3-szor a FUNCgombot
Q
A lépésszámláló használata
,.
6
Ehhez a funkcióhoz a készülék a Számlálási-
módus ban kell legyen (lásd a „Hold-módus /
Számlálási-módus“-t).
j Erősítse a lépésszámlálót az övklipsz
segítségével
szorosan az övére (lásd
9
az D ábrát).
FONTOS! A lépésszámlálót biztosan és
szilárdan kell rögzíteni. Pontos mérés csak
így lehetséges.
A lépésszámláló érzékeli a test ingaszerű
mozgásait és regisztrálja a megtett lépéseket,
az ahhoz elhasznált időt, és kiszámítja az
aktuális sebességet, a legnagyobb sebssséget
és az átlagsebességet, valamint az elhasznált
kalória mennyiséget, az elégett zsírmennyiséget
és az elégett zsírmennyiséget %-ban. A
lépésszámláló automatikusan felismeri, hogy
Ön áll e, vagy jár.
Utalás: A meállapított értékek megközelítő
értékek. Változó lépéshosszak, valamint külső
tényezők, mint pld. a ruházata, a terep vagy
hasonlók a pontos mérést nem teszik lehetővé.
Q
Aktuális edzési értékek
lehívása
Ehhez a funkcióhoz a készüléknek a
Számlálási-módus ban kell lenni (lásd a
„Hold-módus / Számlálási-módus“-t).
j Myomja meg a MODE-gombot
funkciósávon
zés. Az LC-diszplé
megjelenik a STEPS kijel-
14
kijelzi a megtett
4
lépések számát. Az LC-diszplén
. A
3
4
kiegészítőleg további tréning-értékek is
megjelennek. Az egyik tréning-értékről a
következőre jutáshoz nyomja meg a
MODE-gombot
.
3
A következő kijelzések lehetségesek:
Time
km
kcal
= aktuális időpont
25
= megtett út
16
= elhasznált kalória-
20
mennyiség
Fat
Fat in %
Timer
AVG Speed
CUR Speed
MAX Speed
= zsírégetés kg / lb
19
= zsírégetés százalékban
21
= mért idő
25
= átlagsebesség
23
= aktuális sebesség
17
= legnagyobb sebesség
18
Utalás: Csak 20 – 30 perces állandó tréning
után kezdi el a teste a testzsír elégetését.
Ezért az LC-diszplén a zsírégetés kg / lb-ban
és a zsírégetés %-ban
kijelzések csak egy
21
19
bizonyos idő elteltével jelennek meg.
Q
Heti adatáttekintés
előhívása
Tipp: A nem kívánt mérések ( aa tréninghez
vezető út, vagy hasonlók) elkerülésére a
kérdéses időben kapcsolja a készüléket a
Hold-módusra (lásd a „Hold-módus /
Számlálási-módus“-t).
34 HU
Ehhez a funkcióhoz a készüléknek a
Számlálási-módus ban kell lenni (lásd a
„Hold-módus / Számlálási-módus“-t).
Utalás: A lépésszámláló tárolja a folyó hét
folyamán megtett útat, valamint az elhasznált
Page 35

Üzembevétel
kalóriákat. Alternatívaként az egyes edzési
napokat is előhívhatja.
Utalás: Az adatok heti tárolása mindig hétfőn
kezdődik. Vegye figyelembe, hogy a hét
folyamán tárolt adatok minden vasárnap 24
órakor teljesen törlődnek.
Utalás: Az aktuális napi adatokat a készülék
naponta 24 órakor automatikusan a heti
adatáttekintésbe tárolja és azokat ezáltal a
0-ra helyezi.
Utalás: Az adatok tárolásához a készülék a
nagy CR2032-elemet vagy a kis LR44elemeket használja. Ha mindegyik elemet a
készülékből egyszerre eltávolítja, mindegyik
tárolt adat törlődik.
j A Funkció-módusba futáshoz nyomja
meg a FUNC-gombot
megjelenik a DAY kijelzés. Az LC-
14
displayn megjelennek a km
. A funkció-lécen
6
és kcal 20
16
szimbólumok, valamint a teljes edzési hét
azokhoz tartozó értékei.
j Az egyik edzési napról a másikra való
jutáshoz nyomja meg a MODE-gombot
Az LC-displayn megjelennek a km
a kcal
szimbólumok, valamint az
20
16
3
és
egyes edzési napok hozzájuk való értékei.
Utalás: A hét napjait számjegyekkel
jelölték meg (lásd a „A hét napjának a
beállítása“-t). Ha a DAY kijelzés alatt
számjegy nem jelenik meg, az LC-display
a teljes edzési hét értékeit jelzi ki.
Utalás: Vegye figyelembe, hogy a 7.
nap adatait a készülék nem jelzi ki. A 7.
nap az aktuális nap, vagy az aktuális
héten még nem fordult elő.
j A számlálás-módusba való
visszajutáshoz nyomja meg 3-szor a
FUNC-gombot
.
6
Utalás: Vegye figyelembe, hogy csak a
teljes hét folyamán regisztrált adatokat –
nem az egyes napokét – tudja törölni (lásd a
„Kiszállítási állapotra való visszaállítás“-t).
Q
A countdown használata
Utalás: A countdown 23:59.59 órás
időtartamot foghat át.
A countdown különálló használata
(A készülék a számlálás- vagy a
hold-módusban található.):
j A countdown-módusba jutáshoz
nyomja meg a FUNC-gombot
LC-diszplén felvillan a „Timer“ kijelzés.
j Nyomja meg a SET-gombot
2
A countdown órák számának a kijelzése
villog. A kívánt óraszám beállításához
nyomogassa a MODE
ill. CLEAR 5
3
gombot.
j Erősítse meg a bevitelét a SET-gomb
megnyomásával. A contdown percek
kijelzése villog. A kívánt percszám beállí-
.
tásához nyomogassa a MODE
CLEAR
gombot.
5
j Erősítse meg a bevitelét a SET-gomb meg-
nyomásával
. A contdown másodpercek
2
kijelzése villog. A kívánt másodpercszám
beállításához nyomogassa a MODE
ill. CLEAR
gombot.
5
j Erősítse meg a bevitelét a SET-gomb
megnyomásával
.
2
j A countdown beindításához nyomja meg
a MODE-gombot
.
3
j A countdown leállításához nyomja meg
újra a MODE-gombot
.
3
j A countdown folytatásához nyomja meg
a MODE-gombot
3
újra.
j Ha a countdownt meg szeretné szakítani,
akkor előbb a countdown leállításához
nyomja meg a MODE-gombot
3
. Az
6
.
ill.
3
és utána
2
3
35 HU
Page 36

Üzembevétel
a countdown 0-ra állításához a CLEARgombot
.
5
j Mihelyt a countdown lejárt, felhangzik
egy hangjelzés.
j A hangjelzés deaktiválásához nyomja
meg a FUNCvagy MODE-gombok
, CLEAR- 5, SET- 2
6
egyikét.
2
j A számláló-módusra való
visszajutáshoz nyomja meg 2-szer a
FUNC-gombot
Q
A stopperóra használata
.
6
Utalás: A stopperóra az időt méri 59:59,99
(percek / másodpercek) értékig. He ezt az
értéket túllépi, a többcélú kijelzés
automa-
22
tikusan 00:00,00-ra ugrik vissza és tovább
méri az időt.
A stopperóra különálló használata
(A készülék a számlálás- vagy a
hold-módusban található.):
j A stopperóra-módusba jutáshoz
nyomja meg 3-szer a FUNC-gombot
.
6
Az LC-diszplén megjelenik a Stopwatchkijelzés
28
.
Utalás: A stopperóra-módusban a
lépésszámláló nem aktiv. Az LC-diszplén
megjelenik a
kijelzés.
j Az időmérés beindításához nyomja meg
a MODE-gombot
.
3
j Az időmérés leállításához nyomja meg
újra a MODE-gombot
.
3
j A stopperóra 0-ra állításához nyomja
meg a CLEAR-gombot
.
5
j A számlálás-módusba való visszaju-
táshoz nyomja meg a FUNC-gombot
6
A stopperórának a lépésszámlálóval
történő használata (A készüléknek a
számlálás- módusban kell lennie.):
j A stopperóra-módusba jutáshoz
nyomja meg 3-szer a FUNC-gombot
Az LC-diszplén megjelenik a Stopwatchkijelzés
28
.
j Az időmérés beindításához nyomja meg
a MODE-gombot
.
3
j A számlálás-módusba való váltáshoz
nyomja meg a FUNC-gombot
lépésszámláló aktiv. A háttérben a stopperóra tovább jár.
j A stopperóra-módusba visszatéréshez
nyomja meg 3-szor a FUNC-gombot
j Az időmérés leállításához nyomja meg
újra a MODE-gombot
.
3
j A stopperóra 0-ra állításához nyomja
meg a CLEAR-gombot
.
5
Utalás: A stopperórát csak a
stopperóra-módusban lehet
0-ra állítani.
j A számlálás-módusba való visszaju-
táshoz nyomja meg a FUNC-gombot
Q
Riasztási funkció
j Állítsa be a kívánt riasztási időpontot (lásd
a „A paraméterek beállítása“ fejezetet).
Utalás: A beállított riasztás naponta
aktiválódik. A riasztási hangjelzés
kb. 1 percig hallatszik.
j A hangjelzés deaktiválásához nyomja
meg a FUNCvagy MODE-Taste
, CLEAR- 5, SET- 2
6
egyikét.
3
.
.
6
. A
6
.
6
.
6
36 HU
Page 37

Q
A pánik-riasztás használata
j A riasztás kioldása akkor következik be, ha
a pánik-riasztás dugót
a készülékből
1
kihúzzák.
j A pánik-riasztás kioldásához húzza ki a
karpántnál fogva a pánik-riasztás dugót
1
j A riasztás kikapcsolásához dugja a
pánik- riasztás dugót
újra a készülékbe.
1
Utalás: Négy új LR44-elem aktivált pánikriasztás esetén négy perc alatt merül le. Ajánljuk,
hogy tesztelje le röviden a pánik-riasztás
funkciót, mielőtt a lépésszámlálót használná.
Cserélje ki azonnal a négy LR44-elemet, ha az
alacsony elem-töltésállapot kijelzés
Q
Kiszállítási állapotba
15
kigyúl.
helyezés
j Ha a készülék erős magas frekvenciájú
elektromagnetikus mező hatásának van
kitéve, ugyanúgy mint elektrosztatikus
kisüléseknél, működési zavarok léphetnek
fel. Ha ilyen működési zavarok állnak elő,
pld. a gombok a megnyomásra nem reagálnak vagy a displayn rendellenességek
jelentkeznek, helyezze vissza a készüléket
a RESET-kapcsoló
kiszállítási állapotba. Használjon erre a
célra egy vékony és hegyes tárgyat. A
hibás működés ezáltal elhárítható.
FONTOS! Vegye figyelembe, hogy
ezáltal minden adatot töröl. Az összes
paramétert újra be kell állítani.
megnyomásával a
12
Üzembevétel / Tisztítás és ápolás
Utalás: Cserélje ki azonnak a kisebb elemeket
(LR44 típusú), ha az alacsony elem-töltésállapot kijelzés
elemek (LR44 típusú) esetén a pánik-riasztást
és a lépésszámlálót nem lehet használni. Ne
használja a lépésszámlálót üres, ill.hiányzó
nagy elem (CR2032) esetén. Üres, vagy
.
hiányzó nagy elem (CR2032) esetén az
adattárolási funkció nem áll a rendelkezésére.
Utalás: Az adatok tárolásához a készülék a
nagy CR2032-elemet vagy a kis LR44-elemeket
használja. Ha mindegyik elemet a készülékből
egyszerre eltávolítja, mindegyik tárolt adat
törlődik.
j Oldja ki a csavart
fedelén
segítségével (nem része a szállítmánynak).
Húzza le az elemrekesz fedelét (lásd a B
ábrát).
j Távolítsa el az elhasznált elemeket.
Utalás: Az elemek eltávolításához
használjon egy hegyes tárgyat (pld. egy
iratkapcsot).
j Helyezzen be négy LR44 típusú
(1,5 V
(3 V
Utalás: Eközben ügyeljen a helyes
polarításra. Azt az elemrekeszben
megjelölték.
j Helyezze be újra az elemrekesz fedelét
Az LC-diszplé automatikusan bekapcsolódik.
j Erősítse az elemrekesz fedelét
elemrekeszre
a csillagcsavarhúzóval szorosra húzza.
kigyúl. Üres, vagy hiányzó kis
15
az elemrekesz
7
egy kis csillagcsavarhúzó
8
) és / vagy egy CR2032 típusú
) elemet.
8
úgy, hogy a csavart 7
13
13
8
újra az
.
Q
Az elemek cseréje
A készülék két külömböző elemtípussal van
ellátva.
Q
Tisztítás és ápolás
j A készüléknek csak a külsejét tisztítsa
meg egy puha, száraz törlőkendővel.
Erősebb szennyeződéseknél használjon
37 HU
Page 38

Tisztítás és ápolás / Megsemmisítés
egy enyhén megnedvesített puha
törlőkendőt.
j Semmiképpen se használjon erre a célra
folyadékokat és tisztítószereket sem, mivel
azok a készüléket megkárosítják.
Q
Megsemmisítés
A csomagolás környezetbarát
anyagokból áll, melyeket a helyi
újrahasznosító gyűjtőhelyeken tud
leadni.
A kiszolgált termék megsemmisítésének
lehetőségeiről tájékozódjon a községi vagy
városi önkormányzatnál.
A kiszolgált terméket a környezet-
védelem érdekében ne dobja a
háztartási hulladékba, hanem
gondoskodjon a szakszerű hulladékkezelésről. A gyűjtőhelyekről és
azok nyitvatartási idejéről az
illetékes önkormányzatnál tájékozódhat.
juttassa el az elhasznált elemeket egy községi
gyűjtőhelyre.
EMC
Termékmegnevezés:
Lépésszámláló
Modellszám: H14347
Verzió: 11 / 2010
A hibás vagy elhasznált elemeket a 2006 /
66 / EC irányelv értelmébenreciklálni kell.
Juttassa vissza az elemeket és / vagy a
készüléket az ajánlott gyűjtőcégeken keresztül.
Az elemek hibás mentesítése
miatt előálló környezeti
Pb Hg
károsodások!
Az elemeket nem szabad a háztartási szeméttel
mentesíteni. Mérgező hatású nehézfémeket
tartalmazhatnak és ezért különleges kezelöést
ígénylő hulladékoknak számítanak. A
nehézfémek szimbólumai a következők: Cd =
kádmium, Hg = higany, Pb = ólom. Ezért
38 HU
Page 39

Kazalo
Uvod
Predvidena uporaba .....................................................................................................Stran 40
Opis delov .....................................................................................................................Stran 40
Tehnični podatki ............................................................................................................Stran 41
Obseg dobave ..............................................................................................................Stran 41
Varnost
Splošna varnostna opozorila .......................................................................................Stran 41
Varnostna opozorila o baterijah ..................................................................................Stran 42
Pred začetkom uporabe
Odstranjevanje izolacijskega traku .............................................................................Stran 42
Začetek uporabe ................................................................................................Stran 42
Način hold / način štetja ..............................................................................................Stran 43
Nastavljanje parametrov ..............................................................................................Stran 43
Nastavljanje dneva v tednu .........................................................................................Stran 44
Uporaba števca korakov ..............................................................................................Stran 44
Priklic aktualnih vrednosti treninga ...............................................................................Stran 45
Priklic tedenskega pregleda ..........................................................................................Stran 45
Uporaba odštevanja časa ............................................................................................Stran 46
Uporaba štoparice ........................................................................................................Stran 46
Funkcija alarma .............................................................................................................Stran 47
Uporaba alarma v primeru panike ..............................................................................Stran 47
Ponovna vzpostavitev stanja dobave ..........................................................................Stran 47
Menjavanje baterij ........................................................................................................Stran 48
Čiščenje in nega ...................................................................................................Stran 48
Odstranitev .............................................................................................................Stran 48
39 SI
Page 40

Uvod
Števec korakov
Q
Uvod
Pred prvim začetkom uporabe se
seznanite z izdelkom. V ta namen
pozorno preberite naslednja
navodila za uporabo in varnostna opozorila.
Napravo uporabljajte samo skladno z opisom
in le za navedena področja uporabe. To
navodilo dobro shranite. Če napravo predate
tretjim osebam, jim izročite tudi vse dokumente.
Q
Predvidena uporaba
Ta števec korakov registrira število opravljenih
korakov, prehojeno progo in potreben čas.
Dodatne prikazane vrednosti so povprečna
hitrost, najvišja hitrost in aktualna hitrost kot
tudi poraba kalorij, izgorevanje maščob in
izgorevanje maščob v odstotkih. Dodatno je
naprava opremljena z uro, funkcijo štoparice
in alarma kot tudi z alarmom v primeru panike.
Dodatno je naprava opremljena z uro, funkcijo
radia, štoparice in alarma. Uporabljanje v
druge namene ali spreminjanje naprave ni v
skladu z določili in lahko vodi do nevarnosti
poškodb oseb in / ali povzročitve škode na
napravi. Za škodo, nastalo pri nestrokovni
uporabi, izdelovalec ne prevzame jamstva.
Naprava ni namenjena za profesionalno
uporabo.
tipka MODE
3
prikazovalnik
4
tipka CLEAR
5
tipka FUNC
6
vijak
7
pokrov predalčka za baterije
8
zaponka za pas
9
baterija CR2032 (3 V, litij)
10
baterije LR44 (1,5 V, Alkaline)
11
tipka RESET
12
predalček za baterije
13
Prikazovalnik:
vrstica s funkcijami
14
prikaz za nizko stanje baterij
15
simbol kg, cm, km; lb, inch, mile
16
(prikaz postavk)
simbol CUR Speed / km / h
17
(aktualna hitrost)
simbol MAX Speed / km / h
18
(najvišja hitrost)
simbol za izgorevanje maščob
19
simbol kcal (kilokalorije)
20
izgorevanje maščob v %
21
večnamenski prikazovalnik
22
simbol AVG Speed / km / h
23
(povprečna hitrost)
simbol ALM
24
prikaz Time / Timer (urni čas /
25
izmerjeni čas) / odštevanje časa
simbol za alarm
26
simbol PM
27
prikaz Stopwatch (štoparica)
28
starost
29
spol (MAN / WOMAN)
30
Q
Opis delov
Naprava:
vtič za alarm v primeru panike z
1
zapestnim paščkom
tipka SET
2
40 SI
Opozorilo: LC prikazovalnika naprave se
ne da izklopiti. Poraba toka za delovanje LC
prikazovalnika pa je zelo majhna in je primerljiva s porabo zapestne ure.
Page 41

Uvod / Varnost
Q
Tehnični podatki
Merilna metoda: nihalna metoda
Prikaz korakov: 999.999 korakov
Prikaz oddaljenosti: 9999,99 km
Prikaz kalorij: 9999,99 kcal
Dolžina koraka: 30 – 200 cm
(nastavljivo na 1 cm
natančno) /
10 – 80 inch
Prednastavitev: 60 cm / 25 inch
Nastavljiva teža
uporabnika: 30 – 200 kg
(nastavljivo na 1 kg
natančno) /
60 – 400 lb
Prednastavitev: 60 kg / 120 lb
Starost: 5 – 99
Prednastavitev: 18
Spol: moški / ženski
Prednastavitev: moški
Telesna višina: 60 – 250 cm /
20 – 100 inch
Prednastavitev: 60 cm / 65 inch
Štoparica /
odštevanje časa
(območje registriranja): 59 minut /
59,99 sekund
Časovni format: 12 / 24 ur
Prednastavitev: 24 ur
Baterije: 4 x baterija LR44
(1,5 V
1 x baterija CR2032
(3 V
Dovoljeno
temperaturno
območje: 0 – 50 °C
Dimenzije: pribl. 76 x 70 x 40 mm
(Š x V x G)
Teža:
Števec korakov
(brez baterije): pribl. 60 g
, Alkaline)
, litij)
Q
Obseg dobave
1 števec korakov (s potezno vrvico za alarm v
primeru panike)
4 baterije LR44 (1,5 V
1 baterija CR2032 (3 V
1 navodilo za uporabo
, Alkaline)
, litij)
Varnost
OPOZORILO!
opozorila in navodila. Neupoštevanje
varnostnih opozoril in navodil lahko povzroči
električni udar, požar in / ali hude poškodbe.
VSA VARNOSTNA OPOZORILA IN
NAVODILA SHRANITE ZA PRIHODNJO
UPORABO!
Preberite vsa varnostna
Splošna varnostna
opozorila
J
ZA MALČKE IN OTROKE! Otrok z
embalažnim materialom in izdelkom nikoli
ne pustite nenadzorovanih. Obstaja
nevarnost zadušitve zaradi embalažnega
materiala in življenjska nevarnost zaradi
strangulacije. Otroci pogosto podcenjujejo
nevarnosti. Otrokom nikoli ne dovolite
zadrževanja v bližini izdelka. Ta izdelek
ni igrača.
OPOZORILO!
NEVARNOST! Baterije se lahko pogol-
tne, kar je lahko življenjsko nevarno. Če
je nekdo pogoltnil baterijo, je treba takoj
poiskati medicinsko pomoč.
OPOZORILO!
VLJENJSKA NEVARNOST
IN NEVARNOST NESREČ
ŽIVLJENJSKA
ŽI-
41 SI
Page 42

Varnost / Pred začetkom uporabe / Začetek uporabe
J Naprave ne uporabljajte, če je poškodo-
vana. Poškodovane naprave predstavljajo
življenjsko nevarnost zaradi udara
električnega toka!
J Naprave ne izpostavljajte
- ekstremnim temperaturam,
- močnim vibracijam,
- močnim mehanskim obremenitvam,
- direktnim sončnim žarkom,
- vlagi / dežju.
V nasprotnem primeru grozi nevarnost,
da se bo naprava poškodovala.
J Upoštevajte, da je iz garancije izključena
škoda, ki je posledica neustrezne uporabe,
neupoštevanja navodila za uporabo ali
posegov s strani nepooblaščenih oseb,
ter deli, ki se hitro obrabijo.
J Naprave na noben način ne razstavljajte.
Zaradi nestrokovnih popravil lahko pride
do nastanka znatne nevarnosti za
uporabnika. Popravila naj opravljajo
samo strokovnjaki.
Varnostna opozorila o
baterijah
J Iztrošene baterije takoj odstranite iz
naprave. Obstaja povečana nevarnost
iztekanja!
J Baterije ne sodijo med hišne odpadke!
J Vsak uporabnik je zakonsko zavezan, da
baterije odstrani skladno s predpisi!
J Baterije hranite zunaj dosega otrok, ne
mečite jih v ogenj, ne povzročite kratkega
stika baterij in jih ne razstavljajte.
J V primeru neupoštevanja navodil se lahko
baterije izpraznijo preko končne napetosti.
V tem primeru obstaja nevarnost iztekanja.
Če bi baterije v Vaši napravi iztekale, jih
takoj vzemite ven, da preprečite škodo na
napravi!
J Izogibajte se stiku s kožo, z očmi in s
sluznicami. Če pridete v stik s kislino iz
baterij, prizadeto mesto sperite z veliko
vode in / ali poiščite zdravniško pomoč!
J Uporabljajte samo navedena tipa baterij.
Q
Pred začetkom uporabe
Q
Odstranjevanje
izolacijskega traku
J Iz naprave odstranite baterije, če naprave
dlje časa ne uporabljate.
J
J Pri vstavljanju pazite na pravilno polariza-
J Kontakte baterije in naprave pred
J V napravo vložite tako baterijo tipa
42 SI
POZOR! NEVARNOST
EKSPLOZIJE! Baterij nikoli
ponovno ne polnite!
cijo! Ta je prikazana v predalčku za
baterije
vstavljanjem baterije očistite, če je to
potrebno.
CR2032 kot tudi štiri baterije tipa LR44. V
nasprotnem primeru števec korakov ne
more pravilno delovati.
13
.
Naprava je pri dobavi že opremljena z
baterijo.
j Izolacijski trak na hrbtni strani naprave
potegnite ven v smeri puščice. Zasliši se
signalni ton.
Vaš števec korakov je zdaj pripravljen za
urejanje.
Q
Začetek uporabe
Pred prvo uporabo morate nastaviti naslednje
parametre: merska enota (metrični sistem oz.
Page 43

Začetek uporabe
sistem ZDA), dolžina koraka, telesna teža,
velikost, starost, spol, časovna enota (12 / 24
ur), aktualni urni čas, funkcija alarma. V
nasprotnem primeru se funkcij števca korakov
ne da smiselno uporabljati.
Opozorilo: Potem ko pred prvo uporabo
enkrat nastavite vse parametre, lahko posamezne parametre kadarkoli spremenite. Samo
merske enote (metrični sistem oz. sistem ZDA)
se naknadno ne da spremeniti. Če želite mersko
enoto spremeniti, morate obe bateriji
odstraniti iz predalčka za bateriji
sniti tipko RESET
. Pri tem postopku se pred-
12
13
,
10
11
ali priti-
hodno nastavljene vrednosti zopet nastavijo.
Q
Način hold / način štetja
Na začetku uporabe naprave se števec
korakov avtomatsko nahaja v načinu štetja.
Opozorilo: V načinu hold merilne funkcije
števca korakov ne delujejo.
j Pritisnite tipko MODE
in jo držite
3
pritisnjeno pribl. 3 sekunde. Zasliši se
signalni ton. Prikaz
utripa izmenično
s številom korakov in na prikazovalniku se
prikaže beseda SET.
j Pritisnite tipko MODE
in jo držite
3
pritisnjeno pribl. 3 sekunde, da pridete v
način štetja. Zasliši se signalni ton. Prikaz
se ugasne.
Q
Nastavljanje parametrov
j Če napravo uporabljate prvič ali jo
preklopite v način hold (glejte »Način
hold / način štetja«), lahko nastavljate oz.
spreminjate različne parametre.
j V ta namen pritisnite tipko SET
pridete v način za vnos. Na LC prikazovalniku se pojavi prikaz SET.
j Prikazi kg, cm, km oz. lb, inch, mile
začnejo utripati. Pritisnite tipko MODE
oz. CLEAR
, da nastavite želeno mersko
5
enoto (metrični sistem oz. sistem ZDA).
j Vaš vnos potrdite s pritiskom na tipko SET
. V vrstici s funkcijami 14 se prikaže
2
prikaz STRIDE. Na LC prikazovalniku
utripata simbol cm
in prednastavljena
16
vrednost 60 cm oz. 25 inch. Pritisnite tipko
MODE
oz. CLEAR 5, da nastavite
3
želeno dolžino koraka.
Opozorilo: Dolžino koraka se da
nastaviti v območju od 30 do 200 cm oz.
10 do 80 inch.
Nasvet: Tipko MODE 3 oz. CLEAR 5
držite pritisnjeno pribl. 3 sekunde. Tako
dosežete pospešeno nastavljanje vrednosti.
To hitro nastavitev lahko uporabljate tudi
za naslednje postopke nastavitve.
j Vaš vnos potrdite s pritiskom na tipko SET
. V vrstici s funkcijami 14 se prikaže
2
prikaz WEIGHT. Na LC prikazovalniku
utripata simbol kg
in prednastavljena
16
vrednost 60 kg oz. 120 lb. Pritisnite tipko
MODE
oz. CLEAR 5, da nastavite
3
želeno težo.
Opozorilo: Težo se da nastaviti v
območju od 30 do 200 kg oz. 60 do
400 lb.
j Vaš vnos potrdite s pritiskom na tipko SET
. V vrstici s funkcijami 14 se prikaže
2
prikaz HEIGHT. V vrstici s funkcijami začne
utripati prednastavljena vrednost. Pritisnite
tipko MODE
oz. CLEAR 5, da
3
nastavite želeno velikost.
Opozorilo: Velikost se da nastaviti v
območju od 60 do 250 cm oz. 20 do
100 inch.
2
, da
16
3
43 SI
Page 44

Začetek uporabe
j Vaš vnos potrdite s pritiskom na tipko SET
. Na LC prikazovalniku se pojavi prikaz
2
AGE
in številka 18 kot prednastavljena
29
vrednost. Pritisnite tipko MODE
CLEAR
, da nastavite želeno starost.
5
oz.
3
Opozorilo: Nastaviti se da starost od
5 do 99 let.
j Vaš vnos potrdite s pritiskom na tipko SET
. Prikaza MAN oz. WOMAN posvetita.
2
Pritisnite tipko MODE
oz. CLEAR 5,
3
da nastavite želen spol.
j Vaš vnos potrdite s pritiskom na tipko SET
. Prikažeta se prikaza Time 25 in
2
(24-urni format) oz.
Pritisnite tipko MODE
(12-urni format).
oz. CLEAR 5,
3
da nastavite želen časovni format.
Opozorilo: Simbol PM
v 12-urnem
27
formatu pomeni popoldne.
j Vaš vnos potrdite s pritiskom na tipko SET
. Pojavi se prikaz Time 25 in prikaz ur
2
na večnamenskem prikazovalniku
utripa. Pritisnite tipko MODE
CLEAR
, da nastavite želen čas.
5
3
22
oz.
j Vaš vnos potrdite s pritiskom na tipko SET
. Prikaz minut na večnamenskem
2
prikazovalniku
MODE
3
utripa. Pritisnite tipko
22
oz. CLEAR 5, da nastavite
želen čas.
j Vaš vnos potrdite s pritiskom na tipko SET
. Pojavi se prikaz Alm 24 in prikaz ur
2
na večnamenskem prikazovalniku
utripa. Pritisnite tipko MODE
CLEAR
, da nastavite želen čas alarma.
5
3
22
oz.
j Vaš vnos potrdite s pritiskom na tipko SET
. Prikaz minut na večnamenskem
2
prikazovalniku
MODE
3
utripa. Pritisnite tipko
22
, da nastavite želen čas alarma.
j Vaš vnos potrdite s pritiskom na tipko SET
. Naprava se zdaj zopet nahaja v na-
2
činu hold.
POMEMBNO! Tipka CLEAR
ima pri
5
nastavljanju alarma drugo funkcijo. Priti-
snite tipko CLEAR
Simbol za alarm
, da alarm aktivirate.
5
se pojavi na LC
26
prikazovalniku. Ponovno pritisnite tipko
CLEAR
za alarm
, da alarm deaktivirate. Simbol
5
se ugasne (glejte tudi
26
»Funkcija alarma«).
Q
Nastavljanje dneva
v tednu
j Napravo preklopite v način hold (glejte
»Način hold / način štetja«).
j Pritisnite tipko FUNC
funkcijami
se prikaže prikaz DAY.
14
j Pritisnite tipko SET
tednu utripa.
j Pritisnite tipko MODE
da nastavite želen dan v tednu. Različne
številke imajo naslednje pomene:
ponedeljek = 1
torek = 2
sreda = 3
četrtek = 4
petek = 5
sobota = 6
nedelja = 7
j Za potrditev vašega vnosa pritisnite tipko
SET
.
2
j 3-krat pritisnite tipko FUNC
pridete v način hold.
Q
Uporaba števca korakov
Za to funkcijo se mora naprava nahajati v
načinu štetja (glejte „Način hold / način
štetja“).
j Števec korakov s pomočjo zaponke za
pas
dobro pritrdite na pas (glejte sl. D).
9
POMEMBNO! Števec korakov mora biti
. V vrstici s
6
. Številka za dan v
2
oz. CLEAR 5,
3
, da zopet
6
44 SI
Page 45

Začetek uporabe
varno in dobro pritrjen. Samo na ta način
so možne natančne meritve.
Števec korakov zdaj registrira tresljaje telesa
in meri število opravljenih korakov, prehojeno
razdaljo, potrebni čas ter izračunava aktualno
hitrost, najvišjo hitrost in povprečno hitrost ter
porabo kalorij, izgorevanje maščob in izgorevanje maščob v %. Števec korakov avtomatsko
prepozna, ali hodite ali tečete.
Opozorilo: Pri registriranih vrednostih gre
za približne vrednosti. Spremenljiva dolžina
koraka ter eksterni faktorji kot so obleka,
teren ipd. onemogočajo natančno merjenje.
Nasvet: Napravo preklopite v način
hold, da preprečite neželene meritve (pot do
treninga ipd.) (glejte „Način hold / način
štetja“).
Q
Priklic aktualnih vrednosti
treninga
Za to funkcijo se mora naprava nahajati v
načinu štetja (glejte „Način hold / način
štetja“).
j Pritisnite tipko MODE
cijami
prikazovalnik
se prikaže prikaz STEPS. LC
14
4
opravljenih korakov. Dodatno se na LC
prikazovalniku
4
dnosti treninga. Pritisnite tipko MODE
da pridete od ene vrednosti treninga do
naslednje.
Možni so naslednji prikazi:
Time
km
kcal
Fat
= aktualni urni čas
25
= prehojena proga
16
= porabljene kalorije
20
= izgorevanje maščob v
19
. V vrstici s funk-
3
prikazuje število
pojavijo še druge vre-
kg / lb
3
Fat in %
= izgorevanje maščob v
21
odstotkih
Timer
CUR Speed
MAX Speed
AVG Speed
= izmerjeni čas
25
= aktualna hitrost
17
= najvišja hitrost
18
= povprečna hitrost
23
Opozorilo: Šele ko nepretrgano trenirate
20 – 30 minut, začne vaše telo izgorevati
maščobe. Zaradi tega se prikaza za
izgorevanje maščob v kg / lb
maščob v %
na LC prikazovalniku prikažeta
21
in izgorevanje
19
šele čez nekaj časa.
Q
Priklic tedenskega pregleda
Za to funkcijo se mora naprava nahajati v
načinu štetja (glejte „Način hold / način
štetja“).
Opozorilo: Števec korakov shranjuje
prehojeno progo ter porabljene kalorije
tekočega tedna treninga. Po želji lahko
prikličete tudi posamezne dneve treninga.
Opozorilo: Zapisovanje tedna se začne
vedno v ponedeljek.
Upoštevajte, da se zapisovanje tedna ob
nedeljah od 24. uri vedno zbriše.
Opozorilo: Aktualno zapisovanje dneva
se vsak dan ob 24. uri avtomatsko shrani v
tedenski pregled in s tem ponastavi na 0.
Opozorilo: Za shranjevanje podatkov se
uporablja bodisi veliko baterijo CR2032
bodisi majhne baterije LR44. Če iz naprave
,
istočasno odstranite vse baterije, se vse
shranjene vrednosti izbrišejo.
j Pritisnite tipko FUNC
, da pridete v
6
način za funkcije. V vrstici s funkcijami
se prižge prikaz DAY. Na LC prikazo-
14
valniku se pojavita simbola km
16
in kcal
45 SI
Page 46

Začetek uporabe
20 ter pripadajoče vrednosti celotnega
tedna treninga.
j Pritisnite tipko MODE
, da pridete z
3
enega dneva treninga na naslednjega.
Na LC prikazovalniku se pojavita simbola
km
in kcal 20 ter pripadajoče vredno-
16
sti posameznega dneva treninga.
Opozorilo: Dnevi v tednu so pri tem
označeni s številkami (glejte „Nastavljanje dneva v tednu“). Če se pod prikazom
DAY številka ne pokaže, LC prikazovalnik
prikaže vrednosti za celotni teden treninga.
Opozorilo: Upoštevajte, da zapisova-
nja za 7. dan niso prikazana. 7. dan je
bodisi aktualni dan ali pa se v tekočem
tednu treninga še ni zgodil.
j 3-krat pritisnite tipko FUNC
, da zopet
6
pridete nazaj v način štetja.
Opozorilo: Prosimo upoštevajte, da lahko
zapisovanja zbrišete samo za celotni teden –
ne za posamezne dneve treninga (glejte
„Vzpostavitev stanja dobave“).
Q
Uporaba odštevanja časa
Opozorilo: Odštevanje časa zajema
časovno obdobje do 23:59.59 ur.
Ločena uporaba odštevanja časa
(naprava se nahaja v načinu štetja
ali v načinu hold):
j Pritisnite tipko FUNC
, da pridete v na-
6
čin za odštevanje časa. Na LC
prikazovalniku utripa prikaz „Timer“.
j Pritisnite tipko SET
. Prikaz ur v odšte-
2
vanju časa utripa. Pritisnite tipko MODE
oz. CLEAR
, da nastavite želeno
5
število ur.
j Vaš vnos potrdite s pritiskom na tipko SET
. Prikaz minut v odštevanju časa utripa.
2
Pritisnite tipko MODE
oz. CLEAR 5,
3
da nastavite želeno število minut.
j Vaš vnos potrdite s pritiskom na tipko SET
. Prikaz sekund v odštevanju časa utripa.
2
Pritisnite tipko MODE
oz. CLEAR 5,
3
da nastavite želeno število sekund.
j Vaš vnos potrdite s pritiskom na tipko
SET
.
2
j Pritisnite tipko MODE
, da zaženete
3
odštevanje časa.
j Ponovno pritisnite tipko MODE
odštevanje časa zaustavite.
j Ponovno pritisnite tipko MODE
odštevanje časa nadaljujete.
j Če želite odštevanje časa prekiniti, najprej
pritisnite tipko MODE
, da odštevanje
3
časa zaustavite in nato tipko CLEAR
da odštevanje časa ponastavite na 0.
j Takoj ko se odštevanje časa izteče, se
zasliši signalni ton.
j Pritisnite tipko FUNC
SET
ali MODE 3, da signalni ton
2
, CLEAR 5,
6
deaktivirate.
j 2-krat pritisnite tipko FUNC
6
pridete nazaj v način štetja.
Q
Uporaba štoparice
Opozorilo: Štoparica šteje čas do maksi-
malne vrednosti 59:59,99 (minute / sekunde).
Ko je vrednost prekoračena, večnamenski
prikazovalnik
avtomatsko skoči nazaj na
22
00:00,00 in šteje naprej.
Ločena uporaba štoparice (naprava
se nahaja v načinu štetja ali v načinu
3
hold):
, da
3
, da
3
,
5
, da zopet
46 SI
Page 47

Začetek uporabe
j 3-krat pritisnite tipko FUNC 6, da pridete
v način za štoparico. Na LC prikazo-
valniku se pojavi prikaz Stopwatch
28
.
Opozorilo: V načinu za štoparico števec
korakov ni aktiven. Na LC prikazovalniku
se pojavi prikaz
j Pritisnite tipko MODE
.
, da začnete
3
merjenje časa.
j Ponovno pritisnite tipko MODE
3
, da
merjenje časa zaustavite.
j Pritisnite tipko CLEAR
, da štoparico
5
ponastavite na 0.
j Pritisnite tipko FUNC
, da zopet pridete
6
nazaj v način štetja.
Uporaba štoparice s števcem korakov
(naprava se mora nahajati v načinu
štetja):
j 3-krat pritisnite tipko FUNC
, da pridete
6
v način za štoparico. Na LC prikazo-
valniku se pojavi prikaz Stopwatch
j Pritisnite tipko MODE
3
, da začnete
28
.
merjenje časa.
j Pritisnite tipko FUNC
6
, da
preklopite v način štetja. Števec korakov
je aktiven. Štoparica v ozadju teče naprej.
j 3-krat pritisnite tipko FUNC
, da se vr-
6
nete v način za štoparico.
j Ponovno pritisnite tipko MODE
3
, da
merjenje časa zaustavite.
j Pritisnite tipko CLEAR
, da štoparico
5
ponastavite na 0.
Opozorilo: Štoparico se lahko ponastavi
na 0 samo v načinu za štoparico.
j Pritisnite tipko FUNC
, da zopet pridete
6
nazaj v način štetja.
Q
Funkcija alarma
j Nastavite želen čas alarma (glejte
„Nastavljanje parametrov“).
Opozorilo: Nastavljeni alarm se aktivira
vsak dan. Alarmni signal se zasliši za
pribl. 1 minuto.
j Pritisnite tipko FUNC
SET
ali MODE 3, da signalni ton
2
, CLEAR 5,
6
deaktivirate.
Q
Uporaba alarma v primeru
panike
j Alarm se sproži, kadar se vtič alarma v
primeru panike
j Vtič alarma v primeru panike
potegne ven iz naprave.
1
potegnite
1
ven za zapestni pašček, da sprožite
alarm v primeru panike.
j Vtič alarma v primeru panike
zopet
1
vtaknite v napravo, da alarm izklopite.
Opozorilo: Štiri nove baterije LR44 zdržijo
približno pet minut pri aktiviranem alarmu v
primeru panike. Priporočamo, da alarm v
rimeru panike na kratko testirate, če želite
uporabljati števec korakov. Štiri baterije LR44
nemudoma zamenjajte, če se zasveti prikaz
za nizko stanje baterij
Q
Ponovna vzpostavitev
15
.
stanja dobave
j Če je naprava izpostavljena močnemu
elektromagnetnemu, visokofrekvenčnemu
polju, lahko, prav tako kot v primeru
elektrostatične razelektritve, pride do
motenj v delovanju. Če bi prišlo do takšnih
motenj v delovanju, npr. če tipke ne reagirajo več ali se na prikazovalniku vidne
47 SI
Page 48

Začetek uporabe / Čiščenje in nega / Odstranitev
nepravilnosti, napravo s pritiskom na
stikalo RESET
ponastavite nazaj v
12
stanje dobave. V ta namen uporabite tanek,
koničast predmet. Napaka v delovanju bi
morala biti nato odpravljena.
POMEMBNO! Upoštevajte, da bodo pri
tem zbrisani vsi podatki. Vse parametre je
potrebno ponovno nastaviti.
Q
Menjavanje baterij
Naprava je opremljena z dvema različnima
tipoma baterij.
Opozorilo: Manjše baterije (tip LR44)
morate zamenjati takoj, ko se zasveti prikaz
za nizko stanje baterij
. Če je manjša bate-
15
rija (tip LR44) prazna ali manjka, alarma v
primeru panike in števca korakov ne morete
uporabljati. Števca korakov s prazno večjo
baterijo (CR2032) oziroma brez nje ne uporabljate. V primeru prazne ali manjkajoče
večje baterije (CR2032) funkcija shranjevanja
podatkov ni na razpolago.
Opozorilo: Za shranjevanje podatkov se
uporablja bodisi veliko baterijo CR2032
bodisi majhne baterije LR44. Če iz naprave
istočasno odstranite vse baterije, se vse
shranjene vrednosti izbrišejo.
j Vijak
pokrova predalčka za baterije
7
odvijte z ustreznim križnim izvijačem
8
(ni vsebovan v obsegu dobave). Pokrov
snemite (glejte sl. B).
j Iztrošeni bateriji vzemite ven.
Opozorilo: Uporabite nek koničast
predmet (npr. pisarniško sponko), da
odstranite baterije.
j Vstavite štiri nove baterije tipa LR44
(1,5 V
CR2032 (3 V
) in / ali eno baterijo tipa
).
Opozorilo: Pri tem pazite na pravilno
polarizacijo. Ta je prikazana v predalčku
za bateriji
j Pokrov predalčka za bateriji
13
.
zopet
8
nataknite. LC prikazovalnik se avtomatsko
vklopi.
j Pokrov predalčka za bateriji
pritrdite na predalček za bateriji
zopet
8
13
, tako
da s pomočjo križnega izvijača privijete
vijak
.
7
Q
Čiščenje in nega
j Napravo čistite samo zunanje z mehko,
suho krpo. V primeru hujše umazanije
uporabljajte rahlo navlaženo, mehko krpo.
j Nikakor ne uporabljajte tekočin in čistilnih
sredstev, ker le-ta napravo poškodujejo.
Q
Odstranitev
Embalaža je sestavljena iz okolju
prijaznih materialov, ki jih lahko
reciklirate preko krajevnih otokov
za recikliranje.
O možnostih odstranjevanja izrabljenih
električnih naprav vprašajte na vaši občinski
ali mestni upravi.
Ko je vaš izdelek odslužil, ga zaradi
varovanja okolja ne odvrzite med
hišne odpadke, temveč ga odstranite okolju prijazno. O zbirnih
mestih in njihovih delovnih časih se
lahko pozanimate pri vaši občinski
upravi.
48 SI
Page 49

Pokvarjene ali iztrošene baterije je treba reciklirati v skladu z direktivo 2006 / 66 / EC.
Baterije in / ali napravo oddajte na enem od
ponujenih zbirnih mestih.
Škoda na okolju zaradi
napačnega odstranjevanja
Pb Hg
baterij!
Baterij se ne sme odstraniti skupaj s hišnimi
odpadki! Lahko vsebujejo strupene težke kovine
in so podvržene določilom za ravnanje z
nevarnimi odpadki. Kemični simboli težkih
kovin so naslednji: Cd = kadmij, Hg = živo
srebro, Pb = svinec. Zato iztrošene baterije
oddajte na komunalnem zbirnem mestu.
EMC
Oznaka izdelka:
Števec korakov
Št. modela.: H14347
Verzija: 11 / 2010
Odstranitev
49 SI
Page 50

Seznam obsahu
Úvod
Použití ke stanovenému účelu....................................................................................Strana 51
Popis dílů ....................................................................................................................Strana 51
Technické údaje .........................................................................................................Strana 52
Rozsah dodávky ........................................................................................................Strana 52
Bezpečnost
Všeobecné bezpečnostní pokyny .............................................................................Strana 52
Bezpečnostní pokyny k bateriím ...............................................................................Strana 53
Před uvedením do provozu
Odstranění izolačního proužku ................................................................................. Strana 53
Uvedení do provozu ..................................................................................... Strana 53
Režim Hold / čítací režim ........................................................................................... Strana 54
Nastavení parametrů ................................................................................................. Strana 54
Nastavení dne v týdnu ...............................................................................................Strana 55
Použití čítače kroků ....................................................................................................Strana 55
Vyvolání aktuálních hodnot tréninku ......................................................................... Strana 56
Vyvolání týdenního přehledu ....................................................................................Strana 56
Použití Countdown ..................................................................................................... Strana 57
Použití stopek..............................................................................................................Strana 57
Funkce alarmu ............................................................................................................ Strana 58
Použití alarmu paniky ................................................................................................Strana 58
Opětné vytvoření dodávacího stavu ......................................................................... Strana 58
Výměna baterií ........................................................................................................... Strana 58
Čistění a ošetřování ....................................................................................... Strana 59
Likvidace do odpadu ...................................................................................Strana 59
50 CZ
Page 51

Úvod
Krokoměr
Q
Úvod
Před prvním uvedením do provozu
se seznamte se zařízením. Ktomu
si pozorně přečtěte následující
návod kobsluze a bezpečnostní pokyny. P
oužívejte zařízení jen popisovaným způsobem
a pouze pro uvedené oblasti použití. Tento
návod si dobře uschovejte. Všechny podklady
vydejte dále s předáním zařízení třetímu.
Q
Použití ke stanovenému
účelu
Tento čítač kroků registruje počet vykonaných
kroků, ušlou dráhu a potřebný čas. Dalšími
zobrazenými hodnotami jsou průměrná
rychlost, nejvyšší rychlost a aktuální rychlost,
jakož i spotřeba kalorií, spalování tuku a spalování tuku v procentech. Navíc je zařízení vybaveno hodinami, funkcí stopek a alarmu, jakož i alarmem paniky. Jiná použití a změny na
zařízení neplatí jako použití ke stanovenému
účelu a mohou mít za následek nebezpečí
poranění a / nebo poškození zařízení. Za škody
vzniklé z použití k nestanovenému účelu nepřevezme výrobce ručení. Zařízení se nehodí
pro průmyslové použití.
Tlačítko CLEAR
5
Tlačítko FUNC
6
Šroub
7
Víko schránky na baterie
8
Klips na opasek
9
Baterie CR2032 (3 V, lithium)
10
Baterie LR44 (1,5 V, alkalická)
11
Tlačítko RESET
12
Schránka na baterie
13
Displej:
Lišta funkcí
14
Zobrazení pro nízký stav baterie
15
kg, cm, km; libra, palec, míle-symbol
16
(zobrazení veličiny)
CUR Speed / km / h-symbol
17
(aktuální rychlost)
MAX Speed / km / h-symbol
18
(nejvyšší rychlost)
Symbol spalování tuku
19
kcal-symbol (kilokalorie)
20
Spalování tuku v %
21
Víceúčelové zobrazení
22
AVG Speed / km / h-symbol
23
(průměrná rychlost)
ALM-symbol
24
Time / zobrazení časovače (hodinový
25
čas / naměřený čas) / countdown
Symbol alarmu
26
Symbol PM
27
Stopwatch-zobrazení (stopky)
28
Věk
29
Pohlaví (MAN (muž) / WOMAN(žena))
30
Q
Popis dílů
Zařízení:
Zástrčka alarmu paniky s páskem na
1
zápěstí
Tlačítko SET
2
Tlačítko MODE
3
Displej
4
Upozornění: LC displej zařízení nelze
vypnout. Spotřeba proudu kprovozu displeje
LC je velmi malá a lze ji srovnat se spotřebou
proudu náramkových hodinek.
51 CZ
Page 52

Úvod / Bezpečnost
Q
Technické údaje
Metoda měření: Kyvadlová metoda
Zobrazení kroků: 999.999 kroků
Zobrazení vzdálenosti: 9999,99 km
Zobrazení kalorií: 9999,99 kcal
Délka kroků: 30 – 200 cm
(lze nastavit přesně na
1 cm ) / 10 – 80 palec
Přednastavení: 60 cm / 25 palec
Nastavitelná
hmotnost uživatele: 30 - 200 kg
(lze přesně nastavit na
1 kg ) / 60 – 400 lb
Přednastavení: 60 kg / 120 lb
Věk: 5 – 99
Přednastavení: 18
Pohlaví: žena / muž
Přednastavení: muž
Tělesná výška: 60 – 250 cm /
20 – 100 palec
Přednastavení: 60 cm / 65 palec
Stopky / Countdown
(registrovaná oblast): 59 minut /
59,99 vteřin
Časový formát: 12 / 24 hodin
Přednastavení: 24 hodin
Baterie: 4 x baterie LR44
(1,5 V
1 x baterie CR2032
(3 V
Povolený rozsah
teploty: 0 – 50 °C
Rozměry: cca. 76 x 70 x 40 mm
(Š x V x H)
Hmotnost:
Čítač kroků
(bez baterie): cca. 53 g
, alkalická
, lithium)
Q
Rozsah dodávky
1 čítač kroků (s odtrhovací šňůrou pro alarm
paniky)
4 baterie LR44 (1,5 V
1 baterie CR2032 (3 V
1 návod k obsluze
, alkalická)
, lithium)
Bezpečnost
VÝSTRAHA!
bezpečnostní pokyny a instrukce. Zanedbání
při dodržování bezpečnostních pokynů a
instrukcí mohou způsobit úraz elektrickým
proudem, požár a / nebo závažná poranění.
USCHOVEJTE VŠECHNY
BEZPEČNOSTNÍ POKYNY A INSTRUKCE
PRO BUDOUCNOST!
Přečtěte si všechny
Všeobecné
bezpečnostní pokyny
J
A DĚTI! Nikdy nenechejte děti bez do-
zoru sobalovým materiálem a výrobkem.
Existuje nebezpečí udušení obalovým
materiálem a ohrožení života strangulací.
Děti často podcení nebezpečí. Chraňte
výrobek před dětmi. Výrobek není hračkou.
VÝSTRAHA!
NÍ ŽIVOTA! Baterie lze spolknout, což
může být životu nebezpečné. Spolkla-li se
baterie, musí se okamžitě přivolat lékařská
pomoc.
J Nikdy neuvádějte výrobek do provozu,
je-li poškozený. Poškozená zařízení
VÝSTRAHA!
PEČÍ OHROŽENÍ ŽIVOTA
A ÚRAZU PRO MALÉ DĚTI
NEBEZPEČÍ OHROŽE-
NEBEZ-
52 CZ
Page 53

Bezpečnost / Před uvedením do provozu / Uvedení do provozu
znamenají nebezpečí ohrožení života
úrazem elektrickým proudem!
J Nevystavujte výrobek
- extrémním teplotám,
- silným vibracím,
- silným mechanickým namáháním,
- přímému slunečnímu záření,
- vlhkosti / dešti.
Jinak hrozí poškození zařízení.
J Mějte na paměti, že poškození způsobená
neodborným zacházením, nedbáním na
návod kobsluze nebo zásahem neautorizované osoby jsou vyloučeny ze záruky.
J Zařízení nikdy nerozbírejte. Při neodbor-
ných opravách mohou vzniknout značná
nebezpečí pro uživatele. Opravy nechejte
provést jen odborným personálem.
Bezpečnostní pokyny
k bateriím
J Odstraňte baterie ze zařízení v případě,
že se zařízení delší dobu nepoužívá.
J
J Při vložení dbejte na správnou polaritu!
J Kontakt baterií a zařízení před vložením,
J Do zařízení vložte jak baterii typu
J Opotřebované baterie neprodleně ze
J Baterie nepatří do domácího odpadu!
J Každý spotřebitel je zákonně povinen
POZOR! NEBEZPEČÍ EX-
PLOZE! Nikdy baterie znovu
nenabíjejte!
Polarita je zobrazena ve schránce na
baterie
je-li zapotřebí, očistěte.
CR2032, tak i čtyři baterie typu LR44.
Jinak čítač kroků nefunguje správně.
zařízení odstraňte. Existuje nebezpečí
vytečení!
baterie náležitě zlikvidovat!
13
.
J Chraňte baterie před dětmi, neodhazujte je
do ohně, nezkratujte je a nerozebírejte je.
J Při nedbání pokynů se mohou baterie
vybít přes jejich koncové napětí. Existuje
nebezpečí vytečení. Vpřípadě, že ve
vašem zařízení vytekly baterie, okamžitě
je vyjměte, aby se zamezilo škodám na
zařízení.
J Vyhněte se kontaktu s pokožkou, očima a
sliznicemi. Při kontaktu skyselinou baterie
opláchněte postižené místo dostatečným
množstvím vody a / nebo vyhledejte lékaře.
J Používejte jen udané typy baterií.
Q
Před uvedením do provozu
Q
Odstranění izolačního
proužku
Při dodávce je zařízení už vybaveno bateriemi.
j Vytáhněte izolační proužek na zadní
straně zařízení ve směru šipky. Zazní signální tón.
Váš čítač kroků je nyní připraven kseřízení.
Q
Uvedení do provozu
Před uvedením do provozu musíte nastavit
následující parametry: Měrná jednotka (metrický, popř. US systém), délka kroku, tělesná
hmotnost, výška, věk, pohlaví, časová jednotka
(12 / 24 hodin), aktuální hodinový čas, funkce
alarmu. Jinak nelze funkce čítače kroků
důmyslně používat.
Upozornění: Všechny parametry nastavené
před prvním použitím můžete kdykoli jednotlivě
měnit. Jen měrnou jednotku (metrický nebo
americký systém) nelze dodatečně měnit.
53 CZ
Page 54

Uvedení do provozu
Chcete-li změnit měrnou jednotku, musíte
všechny baterie
rie
odejmout nebo stisknout tlačítko RESET
13
. Před každým postupem se znovu nastaví
12
ze schránky na bate-
10, 11
přednastavené hodnoty.
Q
Režim Hold / čítací režim
Při uvedení zařízení do provozu se automaticky
nachází čítač korků včítacím režimu.
Upozornění: V režimu Hold jsou funkce
měření čítače kroků mimo provoz.
j Držte stisknuté tlačítko MODE
po
3
dobu cca. 3 vteřiny. Zazní signální tón.
Zobrazení
se rozbliká střídavě s
počtem kroků a na displeji se objeví slovo
SET.
j Stiskněte po dobu cca. 3 vteřin tlačítko
MODE
, abyste přepnuli do čítacího
3
režimu. Zazní signální tón. Zobrazení
zhasne.
Q
Nastavení parametrů
j Uvedete-li zařízení poprvé do provozu
nebo přepnete-li zařízení do režimu
Hold ( viz „Režim Hold / čítací režim“),
můžete nastavit, popř. pozměnit různé
parametry.
j Stiskněte tlačítko SET
, abyste přepnuli
2
do zadávacího režimu. Zobrazení
SET se objeví na displeji LC.
j Rozblikají se zobrazení kg, cm, km, popř. lb,
palec, míle
popř. CLEAR
. Stiskněte tlačítko MODE 3,
16
, abyste nastavili požado-
5
vanou měrnou jednotku (metrický, popř.
americký systém).
j Zadání potvrďte stisknutím tlačítka SET
V liště funkcí
se objeví zobrazení
14
2
STRIDE. Na displeji LC se objeví symbol
cm
, jakož i přednastavená hodnota
16
60 cm, popř. 25 palec. Stiskněte tlačítka
MODE
, popř. CLEAR 5, abyste
3
nastavili požadovanou délku kroku.
Upozornění: Délku kroku lze nastavit v
rozmezí 30 bis 200 cm, popř. 10 až 80
palec.
TIP: Držte tlačítka MODE 3, popř.
CLEAR
po dobu cca. 3 vteřin stisknutá.
5
Tak docílíte zrychleného nastavení hodnot.
Toto rychlé nastavení můžete užít i pro
následující nastavovací postupy.
j Zadání potvrďte stisknutím tlačítka SET
V liště funkcí
se objeví zobrazení
14
WEIGHT. Na displeji LC se rozbliká
symbol kg
, jakož i přednastavená
16
hodnota 60 kg, popř. 120 lb. Stiskněte
tlačítka MODE
, popř. CLEAR 5,
3
abyste nastavili požadovanou hmotnost.
Upozornění: Hmotnost lze nastavit v
rozmezí 30 až 200 kg, popř. 60 až 400 lb.
j Zadání potvrďte stisknutím tlačítka SET
V liště funkcí
se objeví zobrazení
14
HEIGHT. Vliště funkcí se rozbliká přednastavená hodnota. Stiskněte tlačítko
MODE
, popř. CLEAR 5, abyste
3
zadali požadovanou výšku.
Upozornění: Lze nastavit výšku v
rozmezí 60 a 250 cm, popř. 20 a 100
palec.
j Zadání potvrďte stisknutím tlačítka SET
Na displeji LC se objeví zobrazení AGE
jakož i číslo 18 jako přednastavená hodnota. Stiskněte tlačítko MODE
CLEAR
, abyste nastavili požadovaný
5
věk.
Upozornění: Lze zadat věk v rozmezí
5 až 99 let.
j Zadání potvrďte stisknutím tlačítka SET
.
. Rozsvítí se zobrazení MAN, popř.
2
WOMAN. Stiskněte tlačítka MODE
, popř.
3
.
2
.
2
.
2
,
29
,
3
54 CZ
Page 55

Uvedení do provozu
popř. CLEAR 5, abyste nastavili požadované pohlaví.
j Zadání potvrďte stisknutím tlačítka SET
Rozsvítí se zobrazení Time
, jakož i
25
(24hodinový formát), popř.
(12hodinový formát). Stiskněte tlačítka
MODE
, popř. CLEAR 5, abyste
3
nastavili požadovaný formát času.
Upozornění: Symbol PM
27
platí v
12hodinovém formátu pro odpoledne.
j Zadání potvrďte stisknutím tlačítka SET
Objeví se zobrazení Time
a bliká zob-
25
razení hodin víceúčelového zobrazení
Stiskněte tlačítka MODE
CLEAR
, abyste nastavili požadovaný
5
, popř.
3
čas.
j Zadání potvrďte stisknutím tlačítka SET
Zobrazení minut víceúčelového zobrazení
bliká. Stiskněte tlačítka MODE 3, popř.
22
CLEAR
, abyste nastavili požadovaný
5
čas.
j Zadání potvrďte stisknutím tlačítka SET
Objeví se zobrazení Alm
a bliká zob-
24
razení hodin víceúčelového zobrazení
Stiskněte tlačítko MODE
, abyste nastavili čas alarmu.
5
popř. CLEAR
3
j Zadání potvrďte stisknutím tlačítka SET
Zobrazení minut víceúčelového zobrazení
bliká. Stiskněte tlačítko MODE 3,
22
abyste nastavili čas alarmu.
j Zadání potvrďte stisknutím tlačítka SET
Zařízení se nyní opět nachází v režimu
Hold.
DŮLEŽITÉ! Tlačítko CLEAR
má při
5
nastavení alarmu jinou funkci. K aktivaci
alarmu stiskněte tlačítko CLEAR
LC displeji se objeví symbol alarmu
5
. Na
26
deaktivaci funkce alarmu stiskněte znovu
tlačítko CLEAR
. Symbol alarmu 26
5
zhasne (viz také „funkce alarmu“).
Q
Nastavení dne v týdnu
.
j Zapněte zařízení do režimu Hold (viz
2
„režim Hold / čítací režim“).
j Stiskněte tlačítko FUNC
. V liště funkcí 14
6
se objeví zobrazení DAY.
j Stiskněte tlačítko SET
. Bliká číslice pro
2
den vtýdnu.
j Stiskněte tlačítko MODE
, abyste nastavili požadovanou hodnotu
5
dne v týdnu. Různé číslice mají následující
.
2
3
významy:
pondělí = 1
.
22
úterý = 2
středa = 3
čtvrtek = 4
pátek = 5
.
2
sobota = 6
neděle = 7
j Stiskněte tlačítko SET
, abyste zadání
2
potvrdili.
j Stiskněte 3krát tlačítko FUNC
.
2
znovu přepnuli do režimu Hold.
.
22
Q
Použití čítače kroků
.
2
Pro tuto funkci se musí zařízení nacházet v
čítacím režimu (viz „Režim Hold / čítací
režim“).
.
2
j Čítač kroků upevněte prostřednictví klipsu
na opasek
pevně na opasku (viz. D).
9
DŮLEŽITÉ! Čítač kroků musí být bezpečně
a pevně připevněn. Jen tak jsou možná
přesná měření.
. K
Čítač kroků nyní registruje chvění těla a registruje počet vykonaných kroků, ušlou dráhu,
potřebný čas a vypočítá aktuální rychlost,
nejvyšší rychlost a průměrnou rychlost, jakož i
spotřebu kalorií, spálený tělesný tuk a spálený
, popř. CLEAR
, abyste
6
55 CZ
Page 56

Uvedení do provozu
tělesný tuk v %. Čítač kroků automaticky
rozpozná, chodíte-li nebo běžíte-li.
Upozornění: U vyšetřených hodnot se jedná
o přibližné hodnoty. Proměnlivá délka kroků,
jakož i externí činitelé, jako je oblečení, terén
aj. neumožní přesné měření.
Tip: Kzabránění nežádoucích měření
(cesta ktréninku aj.) zapněte zařízení do
režimu Hold (viz „Režim Hold / čítací
režim“).
Q
Vyvolání aktuálních
hodnot tréninku
Pro tuto funkci se musí zařízení nacházet v
čítacím režimu (viz „Režim Hold / čítací
režim“).
j Stiskněte tlačítko MODE
se objeví zobrazení STEPS. Na displeji
14
LC
se zobrazí počet vykonaných kroků.
4
Navíce se na displeji LC
hodnoty tréninku. Stiskněte tlačítko
MODE
, abyste se dostali k další
3
hodnotě tréninku.
Jsou možná následující zobrazení:
Time
km
kcal
tuk
tuk v %
Timer
CUR Speed
MAX Speed
AVG Speed
= aktuální hodinový čas
25
= ušlá dráha
16
= spotřebované kalorie
20
= spalování tuku v kg / lb
19
= spalování tuku v
21
= naměřený čas
25
= aktuální rychlost
17
= nejvyšší rychlost
18
= průměrná rychlost
23
Upozornění: Teprve trénujete-li plynule po
dobu 20 – 30 minut, zahájí vaše tělo spalovat
tuk. Proto se teprve po určité době se objeví na
. V liště funkcí
3
objeví další
4
procentech
dipleji LC zobrazení spalování tuku kg / lb
a spalování tuku v % 21.
19
Q
Vyvolání týdenního
přehledu
Pro tuto funkci se musí zařízení nacházet v
čítacím režimu (viz „Režim Hold / čítací
režim“).
Upozornění: Čítač kroků uloží prošlou dráhu,
jakož i spotřebované kalorie tohoto týdne
tréninku do paměti. Volitelně můžete také
vyvolat jednotlivé dny tréninku.
Upozornění: Týdenní záznamy se zahájí
vždy vpondělí. Mějte na paměti, že týdenní
záznamy se vneděli ve 24 hodin kompletně
vymažou.
Upozornění: Aktuální denní záznamy se
denně ve 24 hodin automaticky vtýdenním
přehledu uloží a tím nastaví na 0.
Upozornění: K uložení dat se použije buď
velká baterie CR2032 nebo malé baterie
LR44. Jakmile všechny baterie odstraníte ze
zařízení, vymažou se všechna uložená data.
j Stiskněte tlačítko FUNC
přepnuli do funkčního režimu. V liště
funkcí
se objeví zobrazení DAY. Na
14
displeji LC se objeví symboly km
kcal
, jakož i příslušné hodnoty celého
20
týdne tréninku.
j Stiskněte tlačítko MODE
dostali kdalšímu dni tréninku. Na displeji
LC se objeví symboly km
jakož i příslušné hodnoty jednotlivých dní
tréninku.
Upozornění: Dny v týdnu jsou přitom
označeny číslicemi (viz „Nastavení dne v
týdnu“). Neobjeví-li se pod zobrazením
DAY číslice, zobrazí se na displeji LC
hodnoty pro celý týden tréninku.
, abyste
6
, abyste se
3
a kcal 20,
16
16
a
56 CZ
Page 57

Uvedení do provozu
Upozornění: Mějte na paměti, že se
pro den 7 záznamy nezobrazí. Den 7 je
buď aktuálním dnem nebo se v běžném
týdnu tréninku nevyskytl.
j Stiskněte 3krát tlačítko FUNC
, abyste
6
znovu přepnuli do čítacího režimu.
Upozornění: Mějte na paměti, že můžete
záznamy vymazat jen pro celý týden – ne
pro jednotlivé dny tréninku (viz „Vytvoření
dodávacího stavu“).
Q
Použití Countdown
Upozornění: Countdown registruje
časové období až do 23:59.59 hodin.
Samostatné použití Countdown
(Zařízení se nachází včítacím režimu
nebo vrežimu Hold.):
j Stiskněte tlačítko FUNC
, abyste znovu
6
přepnuli do režimu Countdown. Na
displeji LC se objeví zobrazení „Timer“.
j Stiskněte tlačítko SET
. Zobrazení hodin
2
countdownu bliká. Stiskněte tlačítka
MODE
, popř. CLEAR 5, abyste
3
nastavili požadovaný počet hodin.
j Zadání potvrďte stisknutím tlačítka SET
2
Zobrazení minut countdownu bliká. Stiskněte tlačítka MODE
, popř. CLEAR 5,
3
abyste nastavili požadovaný počet minut.
j Zadání potvrďte stisknutím tlačítka SET
2
Zobrazení vteřin countdownu bliká. Stiskněte tlačítka MODE
, popř. CLEAR 5,
3
abyste nastavili požadovaný počet vteřin.
j Zadání potvrďte stisknutím tlačítka SET
2
j Kzahájení countdownu stiskněte tlačítko
MODE
.
3
j K zastavení countdownu stiskněte znovu
tlačítko MODE
.
3
j K pokračování countdownu stiskněte
znovu tlačítko MODE
.
3
j Chcete-li countdown přerušit, stiskněte
nejprve tlačítko MODE
, abyste Count-
3
down zastavili a pak tlačítko CLEAR
abyste Countdown nastavili na 0.
j Po uplynutí countdownu zazní signální tón.
j Stiskněte tlačítko FUNC
SET
nebo MODE 3, abyste signální
2
, CLEAR 5,
6
tón deaktivovali.
j Stiskněte 2krát tlačítko FUNC
6
znovu přepnuli do čítacího režimu.
Q
Použití stopek
Upozornění: Stopky čítají čas až do
maximální hodnoty 59:59,99 (minut / vteřin).
Překročí-li se tato hodnota, skočí víceúčelové
zobrazení
automaticky zpět na 00:00,00
22
a čítá dále.
Samostatné použití stopek (Zařízení
se nachází včítacím režimu nebo
vrežimu Hold.):
j Stiskněte 3krát tlačítko FUNC
6
znovu přepnuli do režimu stopek.
Na displeji LC se objeví zobrazení Stopwatch
.
28
.
Upozornění: V režimu stopek není
čítač kroků aktivní. Na displeji LC se objeví
zobrazení
j Kzahájení měření času stiskněte tlačítko
.
MODE
.
.
3
j K zastavení měření času stiskněte znovu
tlačítko MODE
j Knastavení stopek na 0 stiskněte tlačítko
.
CLEAR
5
j Stiskněte tlačítko FUNC
.
3
.
, abyste znovu
6
přepnuli do čítacího režimu.
5
abyste
, abyste
,
57 CZ
Page 58

Uvedení do provozu
Použití stopek sčítačem kroků
(Zařízení se musí nacházet včítacím
režimu.):
j Stiskněte 3krát tlačítko FUNC
, abyste
6
znovu přepnuli do režimu stopek.
Na displeji LC se objeví zobrazení Stopwatch
28
.
j Kzahájení měření času stiskněte tlačítko
MODE
j Stiskněte tlačítko FUNC
.
3
, abyste znovu
6
přepnuli do čítacího režimu.
Čítač kroků je aktivní. Stopky běží vpozadí
dále.
j Stiskněte 3krát tlačítko FUNC
, abyste
6
znovu přepnuli do režimu stopek.
j K zastavení měření času stiskněte znovu
tlačítko MODE
.
3
j Knastavení stopek na 0 stiskněte tlačítko
CLEAR
.
5
Upozornění: Stopky lze nastavit na 0
jen v režimu stopek.
j Stiskněte tlačítko FUNC
, abyste znovu
6
přepnuli do čítacího režimu.
Q
Funkce alarmu
j Nastavte požadovaný čas alarmu (viz
„Nastavení parametrů“).
Upozornění: Nastavený alarm se
aktivuje denně. Signál alarmu zazní po
dobu cca. 1 minuty.
j Stiskněte tlačítko FUNC
SET
nebo MODE 3, abyste signální
2
, CLEAR 5,
6
tón deaktivovali.
Q
Použití alarmu paniky
j Alarm se vyvolá, je-li zástrčka alarmu
paniky
vytažena ze zařízení.
1
j K vyvolání alarmu vytáhněte zástrčku
paniky alarmu
zpásku na zápěstí.
1
j K vypnutí alarmu zastrčte zástrčku alarmu
paniky
znovu do zařízení.
1
Upozornění: Čtyři nové baterie LR44 vydrží
asi pět minut při aktivovaném alarmu paniky.
Chcete-li čítač kroků používat, doporučujeme
krátce testovat funkci alarmu paniky. Čtyři
baterie LR44 neprodleně vyměňte, rozsvítí-li
se indikace pro nízký stav baterií
Q
Opětné vytvoření
15
.
dodávacího stavu
j Zařízení je vystaveno silnému elektromag-
netickému, vysokofrekvenčnímu poli. Stejně
jako vpřípadě elektrostatického výboje
může dojít kporuchám funkce. V případě,
že došlo k takovým poruchám funkce,
např. tlačítka nereagují nebo se na displeji
vyskytnou nepravidelnosti, nastavte
zařízení stisknutím spínače RESET
do dodávacího stavu. Použijte ktomu
tenký, špičatý předmět. Chybná funkce by
pak měla být odstraněna.
DŮLEŽITÉ! Mějte na paměti, že se
veškerá data vymažou. Všechny parametry
se musí znovu nastavit.
Q
Výměna baterií
Zařízení je opatřeno dvěma různými typy baterií.
Upozornění: Menší baterie (typ LR44) byste
měli okamžitě vyměnit, rozsvítí-li se indikace
pro nízký stav baterií
. Při prázdné nebo
15
chybějící menší baterii (typ LR44) nelze použít
alarm paniky a čítač kroků. Čítač kroků byste
neměli používat s prázdnou větší baterií
(CR2032) nebo bez ní. Funkce uložení
12
zpět
58 CZ
Page 59

Uvedení do provozu / Čistění a ošetřování / Likvidace do odpadu
dat vám není k dispozici při prázdné nebo
chybějící větší baterií (CR2032).
Upozornění: K uložení dat se použije buď
velká baterie CR2032 nebo malé baterie
LR44. Jakmile všechny baterie odstraníte ze
zařízení, vymažou se všechna uložená data.
j Uvolněte šroub
rie
malým šroubovákem na šrouby s
8
na schránce na bate-
7
křížovou drážkou (není zahrnut v rozsahu
dodávky). Odtáhněte kryt (viz obr. B).
j Opotřebované baterie odstraňte.
Upozornění: K odstranění baterií
použijte špičatý předmět (např. kancelářské
sponky).
j Vložte čtyři nové baterie typu LR44
(1,5 V
CR2032 (3 V
) a / nebo baterii typu
).
Upozornění: Přitom dbejte na správnou
polaritu. Polarita je zobrazena ve schránce
na baterie
j Kryt schránky na baterie
13
.
znovu
8
nasaďte. Displej LC se automaticky zapne.
j Víko schránky na baterie
znovu na schránku na baterie
šroub
šroubovákem na šrouby s
7
upevníte
8
13
tím, že
křížovou drážkou utáhnete.
Q
Likvidace do odpadu
Balení je vyrobeno z ekologických
materiálů, které můžete odstranit
do odpadu v místních sběrnách
tříděného odpadu.
Informujte se o možnostech odstranění
použitého výrobku do odpadu u Vaší místní
obecní nebo městské správy.
Neodhazujte použitý výrobek, v
zájmu ochrany životního prostředí,
do domácího odpadu. Zajistěte
jeho odbornou likvidaci do tříděného
odpadu. Informujte se o sběrnách
tříděného odpadu a o jejich otevíracích dobách u příslušné správy v
místě Vašeho bydliště.
Defektní nebo vybité baterie se podle směrnice
2006 / 66 / EC musí recyklovat. Baterie
a / nebo zařízení odevzdejte do nabízených
sběren zpět.
Ekologické škody v
důsledku chybného
Pb Hg
zlikvidování baterií!
Q
Čistění a ošetřování
j Zařízení čistěte jen zvenku měkkou suchou
tkaninou. Při silnějších znečistěných
použijte mírně navlhčenou, měkkou tkaninu.
j Nikdy nepoužívejte kapaliny a čisticí
prostředky, neboť tyto zařízení poškozují.
Baterie se nesmí zlikvidovat vdomácím odpadu.
Mohou obsahovat jedovaté těžké kovy a
podléhají zpracování zvláštního odpadu.
Chemické symboly těžkých kovů: Cd = kadmium, Hg = rtuť, Pb = olovo. Proto odevzdejte
opotřebované baterie u komunální sběrny.
59 CZ
Page 60

EMC
Označení výrobku:
Krokoměr
Model č.: H14347
Verze: 11 / 2010
60 CZ
Page 61

Úvod
Používanie v súlade s určením ..................................................................................Strana 62
Opis dielov ................................................................................................................. Strana 62
Technické údaje .........................................................................................................Strana 63
Rozsah dodávky ........................................................................................................Strana 63
Bezpečnosť
Všeobecné bezpečnostné upozornenia ................................................................... Strana 63
Bezpečnostné upozornenia k batériám .................................................................... Strana 64
Pred uvedením do prevádzky
Odstránenie izolačného pásika ................................................................................ Strana 64
Uvedenie do prevádzky
Režim zastavenia / počítací režim.............................................................................Strana 65
Nastavenie parametrov ............................................................................................. Strana 65
Nastavenie dňa v týždni ...........................................................................................Strana 66
Používanie krokomera ...............................................................................................Strana 67
Zobrazenie aktuálnych tréningových hodnôt...........................................................Strana 67
Zobrazenie prehľadu týždňa .................................................................................... Strana 67
Použitie odpočítavania .............................................................................................. Strana 68
Použitie stopiek ...........................................................................................................Strana 69
Funkcia alarmu ........................................................................................................... Strana 69
Používanie výstražného alarmu ................................................................................Strana 69
Obnovenie stavu ako pri dodaní .............................................................................. Strana 70
Výmena batérií ........................................................................................................... Strana 70
Obsah
Čistenie a údržba ............................................................................................. Strana 70
Likvidácia ............................................................................................................... Strana 71
61 SK
Page 62

Úvod
Krokomer
Q
Úvod
Pred prvým uvedením do prevádzky
sa oboznámte s prístrojom. Za
týmto účelom si pozorne prečítajte
nasledujúci návod na obsluhu a bezpečnostné
upozornenia. Prístroj používajte len v súlade s
opisom a v uvedených rozsahoch použitia.
Tento návod dôkladne uschovajte. Ak prístroj
odovzdávate tretím osobám, priložte k nemu
aj všetky podklady.
Q
Používanie v súlade
s určením
Tento krokomer zaznamenáva počet prejdených krokov, prejdenú trasu a čas, ktorý je na
to potrebný. Ďalšie udávané hodnoty sú
priemerná rýchlosť, maximálna rýchlosť a
aktuálna rýchlosť a taktiež spotreba kalórií,
spaľovanie tuku a spaľovanie tuku v percentách.
Dodatočne je prístroj vybavený hodinami,
funkciou stopiek a alarmu, ako aj výstražným
alarmom. Iné použitia alebo úpravy prístroja
sú v rozpore s účelom použitia a môžu mať
za následok nebezpečenstvá poranenia a /
alebo poškodenia prístroja. Výrobca nepreberá
ručenie za škody vzniknuté v dôsledku
používania v rozpore s určením. Prístroj nie je
určený na komerčné použitie.
displej
4
tlačidlo CLEAR
5
tlačidlo FUNC
6
skrutka
7
kryt priečinka na batérie
8
spona na pripevnenie k opasku
9
batéria CR2032 (3 V, lítiová)
10
batérie LR44 (1,5 V, alkalické)
11
tlačidlo RESET
12
priečinok na batérie
13
Displej:
funkčná lišta
14
ukazovateľ nízkeho stavu batérií
15
symbol kg, cm, km; lb, inch, mile
16
(ukazovateľ veličiny)
symbol CUR Speed / km / h
17
(aktuálna rýchlosť)
symbol MAX Speed / km / h
18
(maximálna rýchlosť)
symbol spaľovania tuku
19
symbol kcal (kilokalórie)
20
spaľovanie tuku v %
21
viacúčelový ukazovateľ
22
symbol AVG Speed / km / h
23
(priemerná rýchlosť)
symbol ALM
24
indikátor Time / Timer (čas /
25
nameraný čas) / Countdown
symbol alarmu
26
symbol PM
27
ukazovateľ Stopwatch (stopky)
28
vek
29
pohlavie (MAN / WOMAN)
30
Q
Opis dielov
Gerät:
zástrčka výstražného alarmu s náramkom
1
tlačidlo SET
2
tlačidlo MODE
3
62 SK
Upozornenie: LC displej prístroja sa nedá
vypnúť. Spotreba energie na prevádzku LC
displeja je však veľmi nízka adá sa
porovnať snáramkovými hodinkami.
Page 63

Úvod / Bezpečnosť
Q
Technické údaje
Metóda merania: kyvadlová metóda
Ukazovateľ krokov: 999.999 krokov
Ukazovateľ
vzdialenosti: 9999,99 km
Ukazovateľ kalórií: 9999,99 kcal
Dĺžka kroku: 30 - 200 cm (možnosť
presnosti nastavenia na
1 cm) / 10 – 80 inch
Prednastavenie: 60 cm / 25 inch
Nastaviteľná
hmotnosť užívateľa: 30 - 200 kg (možnosť
presnosti nastavenia na
1 kg) / 60 – 400 lb
Prednastavenie: 60 kg / 120 lb
Vek: 5 – 99
Prednastavenie: 18
Pohlavie: muž / žena
Prednastavenie: muž
Telesná výška: 60 – 250 cm /
20 – 100 inch
Prednastavenie: 60 cm / 65 inch
Stopky /
odpočítavanie
(rozsah snímania): 59 minút /
59,99 sekúnd
Časový formát: 12 / 24 hodín
Prednastavenie: 24 hodín
Batérie: 4 x batéria LR44
(1,5 V
1 x batéria CR2032
(3 V
Povolený teplotný
interval: 0 - 50 °C
Rozmery: cca 76 x 70 x 40 mm
(š x v x h)
Hmotnosť:
Krokomer
(bez batérie): cca 60 g
, alkalická)
, lítiová)
Q
Rozsah dodávky
1 krokomer (s trhacou šnúrou pre výstražný
alarm)
4 batérie LR44 (1,5 V
1 batéria CR2032 (3 V
1 návod na obsluhu
, alkalické)
, lítiová)
Bezpečnosť
VAROVANIE!
pečnostné upozornenia a pokyny. Zanedbanie dodržiavania bezpečnostných upozornení
a pokynov môže spôsobiť zásah elektrickým
prúdom, požiar a / alebo závažné poranenia.
USCHOVAJTE VŠETKY BEZPEČNOSTNÉ
UPOZORNENIA A POKYNY PRE NESKORŠIE POUŽITIE!
Prečítajte si všetky bez-
Všeobecné
bezpečnostné
upozornenia
J
STVO ÚRAZU PRE MALÉ I STARŠIE
DETI! Nikdy nenechávajte deti bez dozoru
s obalovým materiálom a výrobkom.
Existuje nebezpečenstvo zadusenia
obalovým materiálom a nebezpečenstvo
ohrozenia života v dôsledku uškrtenia.
Deti často podceňujú nebezpečenstvá.
Deti držte vždy mimo dosahu výrobku.
Výrobok nie je určený na hranie.
VAROVANIE!
OHROZENIA ŽIVOTA! Batérie sa dajú
prehltnúť, čo môže byť životunebezpečné.
VAROVANIE!
PEČENSTVO OHROZENIA
ŽIVOTA A NEBEZPEČEN-
NEBEZPEČENSTVO
NEBEZ-
63 SK
Page 64

Bezpečnosť / Pred uvedením do prevádzky
Ak došlo k prehltnutiu batérie, treba ihneď
vyhľadať lekársku pomoc.
J Prístroj neuvádzajte do prevádzky vtedy,
ak je poškodený. Poškodené prístroje
predstavujú životné nebezpečenstvo v
dôsledku zásahu elektrickým prúdom!
J Prístroj nevystavujte
- extrémnym teplotám,
- silným vibráciám,
- silným mechanickým zaťaženiam,
- priamemu slnečnému žiareniu,
- vlhkosti / dažďu.
V opačnom prípade hrozí poškodenie prístroja.
J Nezabúdajte, že poškodenia v dôsledku
neodbornej manipulácie, nedodržania
návodu na obsluhu alebo zásahu zo strany
neautorizovanej osoby sú zo záruky
vylúčené.
J Prístroj v žiadnom prípade nerozoberajte.
V dôsledku neodborných opráv môžu
vzniknúť značné nebezpečenstvá pre
užívateľa. Opravami poverte len odborníkov.
Bezpečnostné
upozornenia
k batériám
J Batérie, ktoré sa dlhší čas nepoužívali,
vyberte z prístroja.
J
J Pri vkladaní dbajte na správnu polaritu!
J Kontakt batérie a prístroja pred vložením
J Vložte do prístroja batériu typu CR2032
POZOR! NEBEZPEČEN-
STVO EXPLÓZIE!
Batérie nikdy nedobíjajte!
Tá je znázornená vpriečinku na batérie
v prípade potreby očistite.
a taktiež štyri batérie typu LR44. Inak
nemôže krokomer správne fungovať.
13
J Vybité batérie ihneď vyberte z prístroja.
Existuje zvýšené nebezpečenstvo ich
vytečenia!
J Batérie nepatria do domového odpadu!
J Každý spotrebiteľ je zo zákona povinný
likvidovať batérie náležitým spôsobom!
J Batérie držte mimo dosahu detí,
neodhadzujte ich do ohňa, neskratujte
ich, ani ich nerozoberajte.
J Pri nedodržaní upozornení sa batérie
môžu vybiť nad konečné napätie. Vtedy
existuje nebezpečenstvo vytečenia. Ak
došlo k vytečeniu batérií v prístroji, ihneď
ich vyberte, aby ste predišli poškodeniu
prístroja!
J Vyhýbajte sa styku s pokožkou, očami a
sliznicou. Pri styku s kyselinou batérie
opláchnite zasiahnuté miesto veľkým
množstvom vody a / alebo vyhľadajte
lekára!
J Používajte len uvedené typy batérií.
Q
Pred uvedením
do prevádzky
Q
Odstránenie izolačného
pásika
Prístroj má pri dodávke vložené batérie.
j Vytiahnite izolačný pásik na zadnej
strane prístroja vsmere šípky. Zaznie
signalizačný tón.
Váš krokomer je teraz pripravený na nastavenie.
.
64 SK
Page 65

Uvedenie do prevádzky
Q
Uvedenie do prevádzky
Pred prvým použitím musíte nastaviť nasledujúce parametre: jednotku miery (metrický,
resp. americký systém), dĺžku kroku, telesnú
hmotnosť, výšku, vek, pohlavie, časovú jednotku
(12 / 24 hodín), aktuálny čas, funkciu alarmu.
Vopačnom prípade sa nedajú funkcie
krokomera zmysluplne využívať.
Upozornenie: Po nastavení všetkých
parametrov pred prvým použitím môžete
jednotlivé parametre kedykoľvek zmeniť. Len
jednotka miery (metrický, resp. americký systém
sa dodatočne nedá zmeniť. Keď chcete
jednotku miery zmeniť, musíte vybrať všetky
batérie
bo stlačiť tlačidlo RESET
z priečinka na batérie 13 ale-
10, 11
. Pri tomto postu-
12
pe sa znovu nastavia vopred nastavené hodnoty.
Q
Režim zastavenia /
počítací režim
Pri uvedení prístroja do prevádzky sa krokomer
automaticky nachádza vpočítacom režime.
Upozornenie: Vrežime zastavenia sú
meracie funkcie krokomera mimo prevádzky.
j Podržte cca 3 sekundy stlačené tlačidlo
MODE
Ukazovateľ
krokov a na displeji sa objaví slovo SET.
j Stlačte na cca 3 sekundy tlačidlo
MODE
režimu. Zaznie signalizačný tón.
Ukazovateľ
. Zaznie signalizačný tón.
3
striedavo bliká s počtom
pre prechod do počítacieho
3
zhasne.
Q
Nastavenie parametrov
j Keď prístroj prvýkrát uvádzate do
prevádzky, alebo keď ho prepnete do
režimu zastavenia (pozri kapitolu
„Režim zastavenia / počítací režim“),
môžete nastaviť, resp. pozmeniť rôzne
parametre.
j Stlačte za týmto účelom tlačidlo SET
2
pre prechod do režimu zadávania
údajov. Na LC displeji sa objaví ukazovateľ SET.
j Ukazovatele kg, cm, km, resp. lb, inch,
mile
blikajú. Stlačte tlačidlo MODE 3,
16
resp. CLEAR
pre nastavenie požado-
5
vanej jednotky miery (metrický, resp.
americký systém).
j Potvrďte svoje zadanie stlačením tlačidla
SET
. Vo funkčnej lište 14 sa objaví
2
ukazovateľ STRIDE. Na LC displeji bliká
symbol cm
, ako aj prednastavená
16
hodnota 60 cm, resp. 25 inch. Stlačte
tlačidlo MODE
, resp. CLEAR 5 pre
3
nastavenie požadovanej dĺžky kroku.
Upozornenie: Dĺžka kroku sa dá
nastaviť v rozmedzí od 30 do 200 cm,
resp. od 10 do 80 inch.
Tip: Podržte tlačidlo MODE 3, resp.
CLEAR
stlačené cca 3 sekundy. Tak
5
dosiahnete zrýchlené nastavenie hodnôt.
Toto zrýchlené nastavenie môžete použiť
aj pre nasledujúce priebehy nastavenia.
j Potvrďte svoje zadanie stlačením tlačidla
SET
. Vo funkčnej lište 14 sa objaví
2
ukazovateľ WEIGHT. Na LC displeji bliká
symbol kg
, ako aj prednastavená
16
hodnota 60 kg, resp. 120 lb. Stlačte
tlačidlo MODE
, resp. CLEAR 5 pre
3
nastavenie požadovanej hmotnosti.
Upozornenie: Hmotnosť sa dá nastaviť
v rozmedzí od 30 do 200 kg, resp. od
60 do 400 lb.
65 SK
Page 66

Uvedenie do prevádzky
j Potvrďte zadanie stlačením tlačidla SET 2.
Vo funkčnej lište
sa objaví ukazovateľ
14
HEIGHT. Vo funkčnej lište bliká prednastavená hodnota. Stlačte tlačidlo
MODE
, resp. CLEAR 5 pre nastavenie
3
požadovanej výšky.
Upozornenie: Nastaviť sa dá výška od
60 do 250 cm, resp. od 20 do 100 inch.
j Potvrďte svoje zadanie stlačením tlačidla
SET
. Na LC displeji sa objaví
2
ukazovateľ AGE
a taktiež číslo 18 ako
29
prednastavená hodnota. Stlačte tlačidlo
MODE
, resp. CLEAR 5 pre nastavenie
3
požadovaného veku.
Upozornenie: Zadať sa dá vek od
5 do 99 rokov.
j Potvrďte svoje zadanie stlačením tlačidla
SET
. Rozsvietia sa ukazovatele MAN,
2
resp. WOMAN. Stlačte tlačidlo MODE
resp. CLEAR
pre nastavenie požado-
5
3
vaného pohlavia.
j Potvrďte svoje zadanie stlačením tlačidla
SET
. Rozsvietia sa ukazovatele Time 25,
2
ako aj
(24-hodinový formát), resp.
(12-hodinový formát). Stlačte tlačidlo
MODE
, resp. CLEAR 5 pre nastavenie
3
požadovaného časového formátu.
Upozornenie: Symbol PM
označuje
27
pri 12-hodinovom formáte popoludnie.
j Potvrďte svoje zadanie stlačením tlačidla
SET
. Objaví sa ukazovateľ Time 25 a
2
ukazovateľ hodín viacúčelového ukazovateľa
bliká. Stlačte tlačidlo MODE 3,
22
resp. CLEAR
pre nastavenie požado-
5
vaného času.
j Potvrďte svoje zadanie stlačením tlačidla
SET
. Ukazovateľ minút viacúčelového
2
ukazovateľa
MODE
bliká. Stlačte tlačidlo
22
, resp. CLEAR 5 pre nastavenie
3
požadovaného času.
j Potvrďte svoje zadanie stlačením tlačidla
SET
. Objaví sa ukazovateľ Alm 24 a
2
ukazovateľ hodín viacúčelového ukazovateľa
bliká. Stlačte tlačidlo MODE 3
22
resp. CLEAR
pre nastavenie požadova-
5
ného času alarmu.
j Potvrďte svoje zadanie stlačením tlačidla
SET
. Ukazovateľ minút viacúčelového
2
ukazovateľa
MODE
bliká. Stlačte tlačidlo
22
pre nastavenie požadovaného
3
času alarmu.
j Potvrďte svoje zadanie stlačením tlačidla
SET
. Prístroj sa teraz opäť nachádza
2
vrežime zastavenia.
DÔLEŽITÉ! Tlačidlo CLEAR
5
nastavovaní alarmu inú funkciu. Stlačte
tlačidlo CLEAR
pre aktivovanie alarmu.
5
Na LC displeji sa objaví symbol alarmu
Stlačte znovu tlačidlo CLEAR
5
deaktivovanie alarmu. Symbol alarmu
zhasne (pozri taktiež kapitolu „Funkcia
,
alarmu“).
Q
Nastavenie dňa v týždni
j Prepnite prístroj dorežimu zastavenia
(pozri kapitolu „Režim zastavenia /
počítací režim“).
j Stlačte tlačidlo FUNC
lište
sa objaví ukazovateľ DAY.
14
j Stlačte tlačidlo SET
. Vo funkčnej
6
. Číslica pre deň v
2
týždni bliká.
j Stlačte tlačidlo MODE
pre nastavenie požadovaného dňa v
5
, resp. CLEAR
3
týždni. Rôzne číslice majú nasledujúce
významy:
Pondelok = 1
Utorok = 2
Streda = 3
Štvrtok = 4
Piatok = 5
Sobota = 6
Nedeľa = 7
má pri
pre
26
26
.
66 SK
Page 67

Uvedenie do prevádzky
j Stlačte tlačidlo SET 2 pre potvrdenie
Vášho zadania.
j Stlačte 3-krát tlačidlo FUNC
6
pre
opätovný prechod do režimu zasta-
venia.
Q
Používanie krokomera
Pre používanie tejto funkcie sa musí prístroj
nachádzať vpočítacom režime (pozri
„Režim zastavenia / počítací režim“).
j Pripevnite krokomer pomocou spony
na upevnenie
pevne kopasku (pozri
9
obr. D).
DÔLEŽITÉ! Krokomer musí byť bezpečne
apevne pripevnený. Teraz sú možné
presné merania.
Krokomer teraz registruje otrasy tela azaznamenáva počet vykonaných krokov, prejdenú
trasu, potrebný čas avypočíta aktuálnu
rýchlosť, maximálnu rýchlosť a priemernú
rýchlosť, ako ajspotrebu kalórií, spálený
telesný tuk a spálený telesný tuk v %. Krokomer
automaticky rozozná, či idete alebo bežíte.
Upozornenie: Pri určených hodnotách ide
opribližné hodnoty. Premenlivá dĺžka kroku,
ako aj externé faktory ako oblečenie, terén,
apod. neumožňujú presné meranie.
Q
Zobrazenie aktuálnych
tréningových hodnôt
Pre používanie tejto funkcie sa musí prístroj
nachádzať vpočítacom režime (pozri
„Režim zastavenia / počítací režim“).
j Stlačte tlačidlo MODE
lište
sa objaví ukazovateľ STEPS. LC
14
displej
zobrazí počet vykonaných kro-
4
kov. Navyše sa na LC displeji
ďalšie tréningové hodnoty. Stlačte tlačidlo
MODE
pre prechod od jednej
3
tréningovej hodnoty k nasledujúcej.
Možné sú nasledujúce ukazovatele:
Time
km
kcal
Fat
Fat in %
Timer
CUR Speed
MAX Speed
AVG Speed
= aktuálny čas
25
= prejdená trasa
16
= spotrebované kalórie
20
= spaľovanie tuku v kg / lb
19
= spaľovanie tuku v
21
= nameraný čas
25
= aktuálna rýchlosť
17
= maximálna rýchlosť
18
= priemerná rýchlosť
23
Upozornenie: Vaše telo začne spaľovať
tuk až po nepretržitom trénovaní v trvaní 20
– 30 minút. Preto sa na LC displeji objavia až
po určitom čase ukazovatele pre spaľovanie
tuku v kg / lb
a spaľovanie tuku v % 21.
19
. Vo funkčnej
3
percentách
objavia
4
Tip: Prepnite prístroj dorežimu
zastavenia, aby ste sa vyhli neželaným
meraniam (cesta na tréning apod.) (pozri
„režim zastavenia / počítací režim“).
Q
Zobrazenie prehľadu
týždňa
Pre používanie tejto funkcie sa musí prístroj
nachádzať vpočítacom režime (pozri
„Režim zastavenia / počítací režim“).
Upozornenie: Krokomer ukladá prejdenú
trasu, ako aj spotrebované kalórie prebiehajúceho tréningového týždňa do pamäte.
67 SK
Page 68

Uvedenie do prevádzky
Alternatívne si môžete zobraziť aj jednotlivé
dni vtýždni.
Upozornenie: Záznam týždňa začína
vždy vpondelok. Majte na pamäti, že sa
týždenný záznam kompletne vymaže vždy v
nedeľu o24. hodine.
Upozornenie: Aktuálne denné záznamy
sa uložia denne o24. hodine automaticky do
prehľadu týždňa atým sa nastavia na 0.
Upozornenie: Na uloženie údajov sa
používa buď veľká batéria CR2032 alebo
malé batérie LR44. Keď z prístroja vyberiete
súčasne všetky batérie, všetky uložené údaje
sa vymažú.
j Stlačte tlačidlo FUNC
, aby ste sa
6
dostali do režimu funkcií. Vo funkčnej
lište
sa objaví indikátor DAY (deň).
14
Na LC displeji sa zobrazia symboly km
akcal
, ako aj ktomu patriace hodnoty
20
16
celého tréningového týždňa.
j Stlačte tlačidlo MODE
pre prechod od
3
jedného tréningového dňa k nasledujúcemu.
Na LC displeji sa zobrazia symboly km
akcal
, ako aj ktomu patriace hodnoty
20
16
jednotlivých tréningových dní.
Upozornenie: Dni vtýždni sa pritom
zobrazia pomocou číslic (pozri „Nastavenie dní v týždni“). Ak sa pod indikátorom
DAY nezobrazí žiadna číslica, zobrazia sa
na LC displeji hodnoty za celý tréningový
týždeň.
Upozornenie: Všimnite si, že záznamy
pre deň 7 sa nezobrazujú. Deň 7 je buď
aktuálny deň alebo sa vprebiehajúcom
dni tréningového týždňa ešte nevyskytol.
j Stlačte 3-krát tlačidlo FUNC
pre opä-
5
tovný návrat do počítacieho režimu.
Upozornenie: Prosím, všimnite si, že
záznamy môžete vymazať len za celý týždeň
– nie za jednotlivé tréningové dni (pozri
kapitolu „Obnovenie stavu pri dodaní“).
Q
Použitie odpočítavania
Upozornenie: Odpočítavanie zahŕňa
časový interval až 23:59.59 hodín.
Oddelené používanie odpočítavania
(prístroj sa nachádza vpočítacom
režime alebo v režime zastavenia):
j Stlačte tlačidlo FUNC
pre prechod
6
do režimu odpočítavania. Na LC
displeji bliká ukazovateľ „Timer“.
j Stlačte tlačidlo SET
. Ukazovateľ hodín
2
odpočítavania bliká. Stlačte tlačidlo
MODE
požadovaného počtu hodín.
, resp. CLEAR 5 pre nastavenie
3
j Potvrďte svoje zadanie stlačením tlačidla
SET
. Ukazovateľ minút odpočítavania
2
bliká. Stlačte tlačidlo MODE
CLEAR
počtu minút.
pre nastavenie požadovaného
5
3
, resp.
j Potvrďte svoje zadanie stlačením tlačidla
SET
. Ukazovateľ sekúnd odpočítavania
2
bliká. Stlačte tlačidlo MODE
CLEAR
pre nastavenie požadovaného
5
3
, resp.
počtu sekúnd.
j Potvrďte svoje zadanie stlačením tlačidla
SET
.
2
j Stlačte tlačidlo MODE
pre spustenie
3
odpočítavania.
j Stlačte znovu tlačidlo MODE
3
pre
zastavenie odpočítavania.
j Stlačte znovu tlačidlo MODE
3
pre
pokračovanie v odpočítavaní.
j Keď chcete odpočítavanie prerušiť, stlačte
najskôr tlačidlo MODE
pre zastavenie
3
odpočítavania a následne tlačidlo
CLEAR
pre vynulovanie odpočítavania.
5
68 SK
Page 69

Uvedenie do prevádzky
j Po uplynutí odpočítavania zaznie
signalizačný tón.
j Stlačte tlačidlo FUNC
SET
alebo MODE 3 pre deaktivovanie
2
, CLEAR 5,
6
signalizačného tónu.
j Stlačte 2-krát tlačidlo FUNC
6
pre
návrat do počítacieho režimu.
Q
Použitie stopiek
Upozornenie: Stopky počítajú čas až do
maximálnej hodnoty 59:59,99 (minúty /
sekundy). Keď sa táto hodnota prekročí, vráti
sa viacúčelový ukazovateľ
automaticky
22
späť na 00:00,00 apočíta ďalej.
Oddelené používanie stopiek
(prístroj sa nachádza vpočítacom
režime alebo režime zastavenia):
j Stlačte 3-krát tlačidlo FUNC
6
pre
prechod do režimu stopiek. Na LC
displeji sa objaví ukazovateľ Stopwatch
28
Upozornenie: Vrežime stopiek nie
je krokomer aktívny. Na LC displeji sa
objaví ukazovateľ
j Stlačte tlačidlo MODE
.
pre spustenie
3
merania času.
j Stlačte znovu tlačidlo MODE
3
pre
zastavenie merania času.
j Stlačte tlačidlo CLEAR
pre vynulovanie
5
stopiek.
j Stlačte tlačidlo FUNC
pre návrat do
6
počítacieho režimu.
Používanie stopiek skrokomerom
(prístroj sa musí nachádzať vpočítacom režime):
j Stlačte 3-krát tlačidlo FUNC
6
prechod do režimu stopiek. Na LC
displeji sa objaví ukazovateľ Stopwatch
j Stlačte tlačidlo MODE
pre spustenie
3
merania času.
j Stlačte tlačidlo FUNC
pre prechod
6
do počítacieho režimu. Krokomer je
aktívny. Stopky bežia na pozadí ďalej.
j Stlačte 3-krát tlačidlo FUNC
6
vrat do režimu stopiek.
j Stlačte znovu tlačidlo MODE
zastavenie merania času.
j Stlačte tlačidlo CLEAR
pre vynulovanie
5
stopiek.
Upozornenie: Stopky sa dajú
vynulovať len vrežime stopiek.
j Stlačte tlačidlo FUNC
pre návrat do
6
počítacieho režimu.
Q
Funkcia alarmu
j Nastavte požadovaný čas alarmu (pozri
kapitolu „Nastavenie parametrov“).
.
Upozornenie: Nastavený čas alarmu
sa aktivuje denne. Signál alarmu znie po
dobu cca 1 minúty.
j Stlačte tlačidlo FUNC
SET
alebo MODE 3 pre deaktivovanie
2
, CLEAR 5,
6
signalizačného tónu.
Q
Používanie výstražného
alarmu
j Alarm sa spustí vtedy, keď sa z prístroja
vytiahne zástrčka výstražného alarmu
j Vytiahnite zástrčku výstražného alarmu
na náramku pre spustenie výstražného
alarmu.
pre
pre ná-
pre
3
28
.
.
1
1
69 SK
Page 70

Uvedenie do prevádzky / Čistenie a údržba
j Pre vypnutie alarmu zasuňte zástrčku
výstražného alarmu
znovu do prístroja.
1
Upozornenie: Štyri nové batérie LR44
vydržia pri aktivovanom výstražnom alarme
asi päť minút. Keď chcete krokomer použiť,
odporúčame krátky test funkcie výstražného
alarmu. Ak sa rozsvieti ukazovateľ nízkeho
stavu batérií
, ihneď vymeňte štyri batérie
15
LR44.
Q
Obnovenie stavu ako pri
dodaní
j Vprípade, že je prístroj vystavený silnému
elektromagnetickému, vysokofrekvenčnému
poľu, môže, tak ako aj vprípade
elektrostatického výboja, dôjsť kfunkčným
poruchám. Vprípade, že by došlo
ktakýmto funkčným poruchám, napr.
tlačidlá nereagujú alebo displej ukazuje
nepravidelnosti, uveďte prístroj stlačením
spínača RESET
Použite na to tenký ostrý predmet. Chybná
funkcia by potom mala byť odstránená.
DÔLEŽITÉ! Vezmite na vedomie, že sa
vymažú všetky údaje. Všetky parametre
sa musia nastaviť nanovo.
do stavu ako pri dodaní.
12
(CR2032). Funkcia uloženia údajov nie je pri
prázdnej alebo chýbajúcej väčšej batérii
(CR2032) kdispozícii.
Upozornenie: Na uloženie údajov sa
používa buď veľká batéria CR2032 alebo
malé batérie LR44. Keď z prístroja vyberiete
súčasne všetky batérie, všetky uložené údaje
sa vymažú.
j Povoľte skrutku
batérie
8
na kryte priečinka na
7
pomocou malého krížového
skrutkovača (nie je obsiahnutý v rozsahu
dodávky). Stiahnite kryt (pozri obr. B).
j Vyberte vybité batérie.
Upozornenie: Použite špicatý predmet
(napr. kancelársku spinku) na odstránenie
batérií.
j Vložte štyri nové batérie typu LR44
(1,5 V
CR2032 (3 V
) a / alebo jednu batériu typu
).
Upozornenie: Dodržte pritom správnu
polaritu. Tá je znázornená v priečinku na
batérie
j Znovu nasaďte kryt priečinka na batérie
13
.
8
LC displej sa automaticky zapne.
j Kryt priečinka na batérie
pripevnite na priečinok na batérie
dotiahnutím skrutky
znovu
8
13
pomocou krížového
7
skrutkovača.
.
Q
Výmena batérií
Prístroj je vybavený dvomi batériami rôzneho
typu.
Upozornenie: Menšie batérie (typ LR44)
by ste mali ihneď vymeniť, keď sa rozsvieti
ukazovateľ nízkeho stavu batérií
. Vprípade
15
vybitej alebo chýbajúcej malej batérie (typ
LR44) sa výstražný alarm a krokomer nedajú
použiť. Krokomer by ste nemali používať s
vybitou, resp. chýbajúcou väčšou batériou
70 SK
Q
Čistenie a údržba
j Prístroj očistite len zvonku jemnou, suchou
handričkou. Pri silnom znečistení použite
jemne navlhčenú mäkkú handričku.
j Vžiadnom prípade nepoužívajte kvapaliny
ačistiace prostriedky, lebo tie môžu
prístroj poškodiť.
Page 71

Q
Likvidácia
Obal pozostáva z ekologicky
nezávadných materiálov, ktoré
môžete vhadzovať do recyklačných
kontajnerov.
Informácie o možnostiach likvidácie
opotrebovaného produktu získate na Vašej
správe obce alebo mesta.
Keď produkt doslúžil, v záujme
ochrany životného prostredia ho
nelikvidujte spolu s domácim
odpadom, ale zabezpečte, aby
bol produkt zlikvidovaný odborným
spôsobom. Informácie o zberných
miestach a ich otváracích hodinách
získate na Vašej kompetentnej
správe.
Chybné alebo použité batérie sa musia
odovzdať na recykláciu podľa smernice
2006 / 66 / EC. Odovzdajte batérie a /
alebo prístroj prostredníctvom uvedených
zberných miest.
Likvidácia
EMC
Označenie produktu:
Krokomer
Model č.: H14347
Verzia: 11 / 2010
Škody na životnom prostredí
v dôsledku nesprávnej
Pb Hg
likvidácie batérií!
Batérie sa nesmú likvidovať spolu s domovým
odpadom. Môžu obsahovať jedovaté ťažké
kovy a podliehajú manipulácii ako nebezpečný
odpad. Chemické značky ťažkých kovov sú
nasledovné: Cd = kadmium, Hg = ortuť, Pb =
olovo. Spotrebované batérie preto odovzdajte
v komunálnej zberni.
71 SK
Page 72

Inhaltsverzeichnis
Einleitung
Bestimmungsgemäße Verwendung ..............................................................................Seite 73
Teilebeschreibung .........................................................................................................Seite 73
Technische Daten ..........................................................................................................Seite 74
Lieferumfang ..................................................................................................................Seite 74
Sicherheit
Allgemeine Sicherheitshinweise ...................................................................................Seite 74
Sicherheitshinweise zu Batterien ..................................................................................Seite 75
Vor der Inbetriebnahme
Isolierstreifen entfernen .................................................................................................Seite 75
Inbetriebnahme
Hold-Modus / Zähl-Modus ...........................................................................................Seite 76
Parameter einstellen ......................................................................................................Seite 76
Wochentag einstellen ...................................................................................................Seite 77
Schrittzähler verwenden ...............................................................................................Seite 78
Aktuelle Trainingswerte abrufen ...................................................................................Seite 78
Wochenübersicht abrufen ............................................................................................Seite 79
Countdown verwenden ................................................................................................Seite 79
Stoppuhr verwenden.....................................................................................................Seite 80
Alarmfunktion ................................................................................................................Seite 81
Panikalarm verwenden .................................................................................................Seite 81
Lieferzustand wiederherstellen .....................................................................................Seite 81
Batterien wechseln ........................................................................................................Seite 81
Reinigung und Pflege ......................................................................................Seite 82
Entsorgung ...............................................................................................................Seite 82
72 DE/AT/CH
Page 73

Einleitung
Schrittzähler
Q
Einleitung
Machen Sie sich vor der ersten
Inbetriebnahme mit dem Gerät ver-
traut. Lesen Sie hierzu aufmerksam
die nachfolgende Bedienungsanleitung und
die Sicherheitshinweise. Benutzen Sie das
Gerät nur wie beschrieben und für die angegebenen Einsatzbereiche. Bewahren Sie diese
Anleitung gut auf. Händigen Sie alle Unterlagen bei Weitergabe des Gerätes an Dritte
ebenfalls mit aus.
Q
Bestimmungsgemäße
Verwendung
Dieser Schrittzähler erfasst die Anzahl der
getätigten Schritte, die zurückgelegte Strecke
und die benötigte Zeit. Weitere Anzeigewerte
sind Durchschnittsgeschwindigkeit, Höchstgeschwindigkeit und aktuelle Geschwindigkeit
sowie Kalorienverbrauch, Fettverbrennung
und Fettverbrennung in Prozent. Zusätzlich ist
das Gerät mit einer Uhr, einer Stoppuhr- und
Alarmfunktion sowie einem Panikalarm
ausgestattet. Andere Verwendungen oder
Veränderungen des Geräts gelten als nicht
bestimmungsgemäß und können Verletzungsgefahren und / oder Beschädigungen des
Gerätes nach sich ziehen. Für aus bestimmungswidriger Verwendung entstandene Schäden
übernimmt der Hersteller keine Haftung. Das
Gerät ist nicht für den gewerblichen Einsatz
bestimmt.
Q
Teilebeschreibung
Gerät:
1
Panikalarm-Stecker mit Armband
2
SET-Taste
3
MODE-Taste
4
Display
5
CLEAR-Taste
6
FUNC-Taste
7
Schraube
8
Batteriefachdeckel
9
Gürtelclip
10
Batterie CR2032 (3 V, Lithium)
11
Batterien LR44 (1,5 V, Alkalien)
12
RESET-Taste
13
Batteriefach
Display:
14
Funktionsleiste
15
Anzeige für niedrigen Batteriestand
16
kg, cm, km; lb, inch, mile-Symbol
(Größenanzeige)
17
CUR Speed / km / h-Symbol
(aktuelle Geschwindigkeit)
18
MAX Speed / km / h-Symbol (Höchstge-
schwindigkeit)
19
Fettverbrennungssymbol
20
kcal-Symbol (Kilokalorien)
21
Fettverbrennung in %
22
Mehrzweckanzeige
23
AVG Speed / km / h-Symbol
(Durchschnittsgeschwindigkeit)
24
ALM-Symbol
25
Time / Timer- Anzeige
(Uhrzeit / gemessene Zeit) / Countdown
26
Alarm-Symbol
27
PM-Symbol
28
Stopwatch-Anzeige (Stoppuhr)
29
Alter
30
Geschlecht (MAN / WOMAN)
73 DE/AT/CH
Page 74

Einleitung / Sicherheit
Hinweis: Das LC-Display des Gerätes lässt
sich nicht ausschalten. Der Stromverbrauch
zum Betrieb des LC-Displays ist aber sehr
gering und lässt sich mit dem einer Armbanduhr vergleichen.
Q
Technische Daten
Messmethode: Pendelmethode
Schrittanzeige: 999.999 Schritte
Entfernungsanzeige: 9999,99 km
Kalorienanzeige: 9999,99 kcal
Schrittlänge: 30 - 200 cm (auf 1 cm
genau einstellbar) /
10 – 80 inch
Voreinstellung: 60 cm / 25 inch
Einstellbares
Nutzergewicht: 30 - 200 kg (auf 1 kg
genau einstellbar) /
60 – 400 lb
Voreinstellung: 60 kg / 120 lb
Alter: 5 – 99
Voreinstellung: 18
Geschlecht: Mann / Frau
Voreinstellung: Mann
Körpergröße: 60 – 250 cm /
20 – 100 inch
Voreinstellung: 60 cm / 65 inch
Stoppuhr / Countdown
(Erfassungsbereich): 59 Minuten /
59,59 Sekunden
Zeitformat: 12 / 24 S tunden
Voreinstellung: 24 Stunden
Batterien: 4 x Batterie LR44
(1,5 V
1 x Batterie CR2032
(3 V
Zulässiger
Temperaturbereich: 0-50 °C
Maße: ca. 76 x 70 x 40 mm
(B x H x T)
, Alkalien)
, Lithium)
Gewicht:
Schrittzähler
(ohne Batterie): ca. 53 g
Q
Lieferumfang
1 Schrittzähler (mit Abreißkordel für Panikalarm)
4 Batterien LR44 (1,5 V
1 Batterie CR2032 (3 V
1 Bedienungsanleitung
, Alkalien)
, Lithium)
Sicherheit
WARNUNG!
hinweise und Anweisungen. Versäumnisse bei
der Einhaltung der Sicherheitshinweise und
Anweisungen können elektrischen Schlag,
Brand und / oder schwere Verletzungen
verursachen.
BEWAHREN SIE ALLE SICHERHEITSHINWEISE UND ANWEISUNGEN FÜR DIE
ZUKUNFT AUF!
Allgemeine
Lesen Sie alle Sicherheits-
Sicherheitshinweise
J
KINDER! Lassen Sie Kinder niemals
unbeaufsichtigt mit dem Verpackungsmaterial und Produkt. Es besteht Erstickungsgefahr durch Verpackungsmaterial und
Lebensgefahr durch Strangulation. Kinder
unterschätzen häufig die Gefahren. Halten
Sie Kinder stets vom Produkt fern. Das
Produkt ist kein Spielzeug.
WARNUNG!
UND UNFALLGEFAHR
FÜR KLEINKINDER UND
LEBENS-
74 DE/AT/CH
Page 75

Sicherheit / Vor der Inbetriebnahme
WARNUNG!
Batterien können verschluckt werden, was
lebensgefährlich sein kann. Ist eine Batterie
verschluckt worden, muss sofort medizinische Hilfe in Anspruch genommen werden.
J Nehmen Sie das Gerät nicht in Betrieb,
wenn es beschädigt ist. Beschädigte
Geräte bedeuten Lebensgefahr durch
elektrischen Schlag!
J Setzen Sie das Gerät
- keinen extremen Temperaturen,
- keinen starken Vibrationen,
- keinen starken mechanischen
Beanspruchungen,
- keiner direkten Sonneneinstrahlung,
- keiner Feuchtigkeit / keinem Regen aus.
Andernfalls droht eine Beschädigung des
Gerätes.
J Beachten Sie, dass Beschädigungen durch
unsachgemäße Handhabung, Nichtbeachtung der Bedienungsanleitung oder
Eingriff durch nicht autorisierte Personen
von der Garantie ausgeschlossen sind.
J Nehmen Sie das Gerät keinesfalls ausein-
ander. Durch unsachgemäße Reparaturen
können erhebliche Gefahren für den
Benutzer entstehen. Lassen Sie Reparaturen
nur von Fachkräften durchführen.
Sicherheitshinweise
LEBENSGEFAHR!
zu Batterien
J Reinigen Sie Batterie- und Gerätekontakt
vor dem Einlegen falls erforderlich mit
einem trockenen Tuch.
J Legen Sie sowohl die Batterie vom Typ
CR2032 als auch die vier Batterien vom
Typ LR44 in das Gerät ein. Andernfalls
kann der Schrittzähler nicht richtig funktionieren.
J Entfernen Sie erschöpfte Batterien umge-
hend aus dem Gerät. Es besteht erhöhte
Auslaufgefahr!
J Batterien gehören nicht in den Hausmüll!
J Jeder Verbraucher ist gesetzlich verpflichtet,
Batterien ordnungsgemäß zu entsorgen!
J Halten Sie Batterien von Kindern fern,
werfen Sie sie nicht ins Feuer, schließen
Sie sie nicht kurz und nehmen Sie sie
nicht auseinander.
J Bei Nichtbeachtung der Hinweise können
die Batterien über ihre Endspannung hinaus entladen werden. Es besteht dann die
Gefahr des Auslaufens. Falls die Batterien
in Ihrem Gerät ausgelaufen sein sollten,
entnehmen Sie diese sofort, um Schäden
am Gerät vorzubeugen!
J Vermeiden Sie den Kontakt mit Haut,
Augen und Schleimhäuten. Bei Kontakt
mit Batteriesäure spülen Sie die betroffene
Stelle mit reichlich Wasser ab und / oder
suchen Sie einen Arzt auf!
J Verwenden Sie nur die angegebenen
Batterietypen.
J Entfernen Sie die Batterien, wenn sie län-
gere Zeit nicht verwendet worden sind,
aus dem Gerät.
J
J Achten Sie beim Einlegen auf die richtige
VORSICHT! EXPLOSIONS-
GEFAHR! Laden Sie Batterien
niemals wieder auf!
Polarität! Diese wird im Batteriefach
angezeigt.
13
Q
Vor der Inbetriebnahme
Q
Isolierstreifen entfernen
Das Gerät ist bei Lieferung bereits mit Batterien
bestückt.
75 DE/AT/CH
Page 76

Vor der Inbetriebnahme / Inbetriebnahme
j Ziehen Sie den Isolierstreifen auf der Rück -
seite des Geräts in Pfeilrichtung heraus.
Es ertönt ein Signalton.
Ihr Schrittzähler ist nun bereit zum Einrichten.
Q
Inbetriebnahme
Vor dem ersten Gebrauch müssen Sie folgende
Parameter einstellen: Maßeinheit (metrisches
bzw. US-System), Schrittlänge, Körpergewicht,
Größe, Alter, Geschlecht, Zeiteinheit (12/24
Stunden), aktuelle Uhrzeit, Alarmfunktion.
Andernfalls können die Funktionen des Schrittzählers nicht sinnvoll genutzt werden.
Hinweis: Nachdem Sie vor dem ersten
Gebrauch einmal alle Parameter eingestellt
haben, können Sie jederzeit die einzelnen
Parameter ändern. Lediglich die Maßeinheit
(metrisches bzw. US-System) lässt sich im
Nachhinein nicht verändern. Wenn Sie die
Maßeinheit ändern wollen, müssen Sie alle
Batterien
entnehmen oder die RESET-Taste
10, 11
aus dem Batteriefach 13
12
betätigen.
Bei diesem Vorgang werden die voreingestellten
Werte wieder eingestellt.
Q
Hold-Modus / Zähl-Modus
Bei Inbetriebnahme des Geräts befindet sich
der Schrittzähler automatisch im Zähl-Modus.
Hinweis: Im Hold-Modus sind die Messfunktionen des Schrittzählers außer Betrieb.
j Halten Sie die MODE-Taste
3
ca. 3 Sekunden lang gedrückt. Es ertönt ein Signalton.
Die Anzeige
blinkt wechselseitig mit
der Anzahl der Schritte auf und das Wort
SET erscheint im Display.
j Halten Sie die MODE-Taste
3
ca. 3 Sekunden lang gedrückt, um in den Zähl-Mo-
dus zu gelangen. Es ertönt ein Signalton.
Die Anzeige
Q
Parameter einstellen
erlischt.
j Wenn Sie das Gerät zum ersten Mal in
Betrieb nehmen oder das Gerät in den
Hold-Modus schalten (siehe „HoldModus / Zähl-Modus“), können Sie
verschiedene Parameter einstellen bzw.
abändern.
j Drücken Sie dazu die SET-Taste
2
, um in
den Eingabe-Modus zu gelangen. Die
Anzeige SET erscheint auf dem LC-Display.
j Die Anzeigen kg, cm, km bzw. lb, inch,
16
mile
blinken auf. Drücken Sie die
Taste MODE
3
bzw. CLEAR 5, um die
gewünschte Maßeinheit (metrisches bzw.
US-System) einzustellen.
j Bestätigen Sie Ihre Eingabe durch Drücken
der SET-Taste
2
. In der Funktionsleiste 14
erscheint die Anzeige STRIDE. Im LC-Display
blinken das cm-Symbol
16
sowie der
voreingestellte Wert 60 cm bzw. 25 inch
auf. Drücken Sie die Tasten MODE
bzw. CLEAR
5
, um die gewünschte
3
Schrittlänge einzustellen.
Hinweis: Die Schrittlänge lässt sich in
einem Bereich von 30 bis 200 cm bzw. 10
bis 80 inch einstellen.
Tipp: Halten Sie die Tasten MODE 3
bzw. CLEAR
5
für ca. 3 Sekunden
gedrückt. So erreichen Sie ein beschleunigtes Einstellen der Werte. Diese Schnelleinstellung können Sie auch für die
folgenden Einstellvorgänge nutzen.
j Bestätigen Sie Ihre Eingabe durch Drücken
der SET-Taste
2
. In der Funktionsleiste 14
erscheint die Anzeige WEIGHT. Im LC-
76 DE/AT/CH
Page 77

Inbetriebnahme
Display blinken das kg-Symbol 16 sowie
der voreingestellte Wert 60 kg bzw. 120 lb
auf. Drücken Sie die Tasten MODE
bzw. CLEAR
5
, um das gewünschte
3
Gewicht einzustellen.
Hinweis: Das Gewicht lässt sich in einem
Bereich von 30 bis 200 kg bzw. 60 bis
400 lb einstellen.
j Bestätigen Sie die Eingabe durch Drücken
der SET-Taste
2
. In der Funktionsleiste 14
erscheint die Anzeige HEIGHT. In der
Funktionsleiste blinkt der voreingestellte
Wert auf. Drücken Sie die Taste MODE
bzw. CLEAR
5
, um die gewünschte Größe
3
einzugeben.
Hinweis: Es lässt sich eine Größe
zwischen 60 und 250 cm bzw. 20 und
100 Inch einstellen.
j Bestätigen Sie Ihre Eingabe durch Drücken
der SET-Taste
die Anzeige AGE
2
. Im LC-Display erscheint
29
sowie die Zahl 18
als voreingestellter Wert. Drücken Sie die
Taste MODE
3
bzw. CLEAR 5, um das
gewünschte Alter einzustellen.
Hinweis: Es lässt sich ein Alter von 5 bis
99 Jahren eingeben.
j Bestätigen Sie Ihre Eingabe durch Drücken
der SET-Taste
2
. Die Anzeigen MAN
bzw. WOMAN leuchten auf. Drücken Sie
die Taste MODE
3
bzw. CLEAR 5, um
das gewünschte Geschlecht einzustellen.
j Bestätigen Sie Ihre Eingabe durch Drücken
der SET-Taste
sowie
2
. Die Anzeigen Time 25
(24-Stunden-Format) bzw.
(12-Stunden-Format) leuchten auf.
Drücken Sie die Tasten MODE
5
CLEAR
, um das gewünschte Zeitformat
3
bzw.
einzustellen.
Hinweis: Das PM-Symbol
27
steht im
12-Stunden-Format für nachmittags.
j Bestätigen Sie Ihre Eingabe durch Drücken
der SET-Taste
2
. Die Anzeige Time 25
erscheint und die Stundenanzeige der
Mehrzweckanzeige
Sie die Tasten MODE
22
blinkt. Drücken
3
bzw. CLEAR 5,
um die gewünschte Zeit einzustellen.
j Bestätigen Sie Ihre Eingabe durch Drücken
der SET-Taste
der Mehrzweckanzeige
Sie die Taste MODE
2
. Die Minutenanzeige
22
blinkt. Drücken
3
bzw. CLEAR
um die gewünschte Zeit einzustellen.
j Bestätigen Sie Ihre Eingabe durch Drücken
der SET-Taste
2
. Die Anzeige Alm 24
erscheint und die Stundenanzeige der
Mehrzweckanzeige
Sie die MODE-
22
blinkt. Drücken
3
bzw. CLEAR-Taste 5,
um die gewünschte Alarmzeit einzustellen.
j Bestätigen Sie Ihre Eingabe durch Drücken
der SET-Taste
Mehrzweckanzeige
die MODE-Taste
2
. Die Minutenanzeige der
22
blinkt. Drücken Sie
3
, um die gewünschte
Alarmzeit einzustellen.
j Bestätigen Sie Ihre Eingabe durch Drücken
der SET-Taste
2
. Das Gerät befindet sich
nun wieder im Hold-Modus.
WICHTIG! Die CLEAR-Taste
5
hat nach
der Einstellung des Alarms eine andere
Funktion. Drücken Sie die CLEAR-Taste
um den Alarm zu aktivieren. Das Alarm-
26
Symbol
Drücken Sie die CLEAR-Taste
erscheint im LC-Display.
5
erneut,
um den Alarm zu deaktivieren. Das
Alarm-Symbol
26
erlischt (siehe auch
„Alarmfunktion“).
Q
Wochentag einstellen
j Schalten Sie das Gerät in den
Hold-Modus (siehe „Hold-Modus /
Zähl-Modus“).
j Drücken Sie die FUNC-Taste
Funktionsleiste
14
erscheint die Anzeige
6
. In der
DAY.
5
,
5
,
77 DE/AT/CH
Page 78

Inbetriebnahme
j Drücken Sie die SET-Taste 2. Die Ziffer
für den Wochentag blinkt.
j Drücken Sie die Taste MODE
5
CLEAR
, um den gewünschten Wochen-
3
bzw.
tag einzustellen. Die verschiedenen Ziffern
haben folgende Bedeutungen:
Montag = 1
Dienstag = 2
Mittwoch = 3
Donnerstag = 4
Freitag = 5
Samstag = 6
Sonntag = 7
j Drücken Sie die SET-Taste
2
, um Ihre
Eingabe zu bestätigen.
j Drücken Sie 3-mal die FUNC-Taste
6
,
um wieder in den Hold-Modus zu
gelangen.
Q
Schrittzähler verwenden
Für diese Funktion muss sich das Gerät im
Zähl-Modus befinden (siehe „Hold-Modus /
Zähl-Modus“).
j Befestigen Sie den Schrittzähler mittels
des Gürtelclips
9
fest am Gürtel (siehe
Abb. D).
WICHTIG! Der Schrittzähler muss sicher
und fest befestigt sein. Nur so sind genaue
Messungen möglich.
Der Schrittzähler registriert nun die Erschütterungen des Körpers und erfasst die Anzahl
der getätigten Schritte, die zurückgelegte
Strecke, die benötigte Zeit und errechnet die
aktuelle Geschwindigkeit, die Höchstgeschwindigkeit und die Durchschnittsgeschwindigkeit
sowie den Kalorienverbrauch, das verbrannte
Körperfett und das verbrannte Körperfett in %.
Der Schrittzähler erkennt automatisch, ob Sie
gehen oder laufen.
Hinweis: Bei den ermittelten Werten handelt
es sich um Näherungswerte. Eine variierende
Schrittlänge sowie externe Faktoren wie Kleidung, Gelände o.ä. ermöglichen keine exakte
Messung.
Tipp! Schalten Sie das Gerät in den
Hold-Modus, um unerwünschte Messungen
(Weg zum Training o.ä.) zu vermeiden (siehe
„Hold-Modus / Zähl-Modus“).
Q
Aktuelle Trainingswerte
abrufen
Für diese Funktion muss sich das Gerät im
Zähl-Modus befinden (siehe „Hold-Modus /
Zähl-Modus“).
j Drücken Sie die MODE-Taste
Funktionsleiste
14
erscheint die Anzeige
STEPS. Das LC-Display
zahl der getätigten Schritte an. Zusätzlich
erscheinen weitere Trainingswerte im LCDisplay
4
. Drücken Sie die MODE-Taste
3
, um von einem Trainingswert zum
nächsten zu gelangen.
Folgende Anzeigen sind möglich:
Time
km
kcal
Fat
25
= aktuelle Uhrzeit
16
= zurückgelegte Strecke
20
= verbrauchte Kalorien
19
= Fettverbrennung in
kg / lb
Fat in %
21
= Fettverbrennung in
Prozent
Timer
CUR Speed
25
= gemessene Zeit
17
=
aktuelle Geschwindigkeit
3
4
zeigt die An-
. In der
78 DE/AT/CH
Page 79

Inbetriebnahme
MAX Speed 18 = Höchstgeschwindigkeit
AVG Speed
23
= Durchschnittsge-
schwindigkeit
Hinweis: Erst wenn Sie 20 – 30 Minuten
kontinuierlich trainieren, beginnt Ihr Körper Fett
zu verbrennen. Deshalb erscheinen erst nach
einiger Zeit die Anzeigen Fettverbrennung in
19
kg/lb
und Fettverbrennung in % 21 im
LC-Display.
Q
Wochenübersicht abrufen
Für diese Funktion muss sich das Gerät im
Zähl-Modus befinden (siehe „Hold-Modus /
Zähl-Modus“).
Hinweis: Der Schrittzähler speichert die
zurückgelegte Strecke sowie die verbrauchten
Kalorien der laufenden Trainingswoche.
Wahlweise können Sie auch die einzelnen
Trainingstage abrufen.
Hinweis: Die Wochenaufzeichnung startet
immer montags. Beachten Sie, dass die
Wochenaufzeichnung jeweils sonntags um
24 Uhr komplett gelöscht wird.
Hinweis: Die aktuellen Tagesaufzeichnungen
werden täglich um 24 Uhr automatisch in der
Wochenübersicht gespeichert und somit auf 0
gesetzt.
Hinweis: Es werden entweder die große
CR2032-Batterie oder die kleinen LR44-Batterien zur Speicherung der Daten benutzt.
Wenn Sie alle Batterien gleichzeitig aus dem
Gerät entfernen, werden alle gespeicherten
Daten gelöscht.
dazugehörigen Werte der gesamten
Trainingswoche.
j Drücken Sie die MODE-Taste
3
, um von
einem Trainingstag zum nächsten zu
gelangen. Im LC-Display erscheinen die
Symbole km
16
und kcal 20 sowie die
dazugehörigen Werte der einzelnen
Trainingstage.
Hinweis: Die Wochentage werden da-
bei durch Ziffern gekennzeichnet (siehe
„Wochentag einstellen“). Erscheint unter
der Anzeige DAY keine Ziffer, zeigt das
LC-Display die Werte für die gesamte
Trainingswoche an.
Hinweis: Beachten Sie, dass die Auf-
zeichnungen für Tag 7 nicht angezeigt
werden. Tag 7 ist entweder der aktuelle
Tag oder er kam in der laufenden
Trainingswoche noch nicht vor.
j Drücken Sie 3-mal die FUNC-Taste
6
, um
in den Zähl-Modus zurückzugelangen.
Hinweis: Bitte beachten Sie, dass Sie die
Aufzeichnungen nur für die gesamte Woche
– nicht für einzelne Trainingstage – löschen
können (siehe „Lieferzustand wieder herstellen“).
Q
Countdown verwenden
Hinweis: Der Countdown erfasst einen
Zeitraum von bis zu 23:59,59 Stunden.
Countdown separat verwenden
(Das Gerät befindet sich im Zähloder Hold-Modus.):
j Drücken Sie die FUNC-Taste
6
den Funktions-Modus zu gelangen. In
der Funktionsleiste
14
erscheint die Anzeige DAY. Im LC-Display erscheinen die
Symbole km
16
und kcal 20 sowie die
, um in
j Drücken Sie die FUNC-Taste
6
, um in
den Countdown-Modus zu gelangen.
Im LC-Display blinkt die Anzeige „Timer“ auf.
j Drücken Sie die Taste SET
2
. Die
Stundenanzeige des Countdowns blinkt.
79 DE/AT/CH
Page 80

Inbetriebnahme
Drücken Sie die Tasten MODE 3 bzw.
5
CLEAR
, um die gewünschte Stunden-
zahl einzustellen.
j Bestätigen Sie Ihre Eingabe durch
Drücken der SET-Taste
2
. Die Minutenanzeige des Countdowns blinkt. Drücken
Sie die Tasten MODE
3
bzw. CLEAR 5,
um die gewünschte Minutenzahl einzustellen.
j Bestätigen Sie Ihre Eingabe durch Drücken
der SET-Taste
2
. Die Sekundenanzeige
des Countdowns blinkt. Drücken Sie die
Tasten MODE
3
bzw. CLEAR 5, um die
gewünschte Sekundenzahl einzustellen.
j Bestätigen Sie Ihre Eingabe durch Drücken
der SET-Taste
j Drücken Sie die MODE-Taste
2
.
3
, um den
Countdown zu starten.
j Drücken Sie die MODE-Taste
3
erneut,
um den Countdown zu stoppen.
j Drücken Sie die MODE-Taste
3
erneut,
um den Countdown fortzusetzen.
j Wenn Sie den Countdown abbrechen
wollen, drücken Sie zunächst die MODE-
3
Taste
, um den Countdown anzuhalten
und anschließend die CLEAR-Taste
5
,
um den Countdown auf 0 zu setzen.
j Sobald der Countdown abgelaufen ist,
ertönt ein Signalton.
j Drücken Sie die FUNC-
2
SET-
oder MODE-Taste 3, um den
6
, CLEAR- 5,
Signalton zu deaktivieren.
j Drücken Sie die FUNC-Taste
6
2-mal, um
in den Zähl-Modus zurückzugelangen.
Q
Stoppuhr verwenden
Hinweis: Die Stoppuhr zählt die Zeit bis zu
einem Maximalwert von 59:59,99 (Minuten /
Sekunden). Wenn der Wert überschritten ist,
springt die Mehrzweckanzeige
22
automa-
tisch auf 00:00,00 zurück und zählt weiter.
Stoppuhr separat verwenden (Das
Gerät befindet sich im Zähl- oder
Hold-Modus.):
j Drücken Sie 3-mal die FUNC-Taste
6
, um
in den Stoppuhr-Modus zu gelangen.
Im LC-Display erscheint die Anzeige
Stopwatch
28
.
Hinweis: Im Stoppuhr-Modus ist der
Schrittzähler nicht aktiv. Die Anzeige
erscheint im LC-Display.
j Drücken Sie die MODE-Taste
3
, um die
Zeitmessung zu starten.
j Drücken Sie die MODE-Taste
3
erneut,
um die Zeitmessung zu stoppen.
j Drücken Sie die CLEAR-Taste
5
, um die
Stoppuhr auf 0 zu setzen.
j Drücken Sie die FUNC-Taste
6
, um in
den Zähl-Modus zurückzugelangen.
Stoppuhr mit Schrittzähler verwenden
(Das Gerät muss sich im Zähl-Modus
befinden.):
j Drücken Sie 3-mal die FUNC-Taste
6
, um
in den Stoppuhr-Modus zu gelangen.
Im LC-Display erscheint die Anzeige
Stopwatch
j Drücken Sie die MODE-Taste
28
.
3
, um die
Zeitmessung zu starten.
j Drücken Sie die FUNC-Taste
6
, um in
den Zähl-Modus zu wechseln. Der
Schrittzähler ist aktiv. Die Stoppuhr läuft
im Hintergrund weiter.
j Drücken Sie 3-mal die FUNC-Taste
6
,
um in den Stoppuhr-Modus zurückzukehren.
j Drücken Sie die MODE-Taste
3
erneut,
um die Zeitmessung zu stoppen.
80 DE/AT/CH
Page 81

Inbetriebnahme
j Drücken Sie die CLEAR-Taste 5, um die
Stoppuhr auf 0 zu setzen.
Hinweis: Die Stoppuhr kann nur im
Stoppuhr-Modus auf 0 gesetzt werden.
j Drücken Sie die FUNC-Taste
6
, um in
den Zähl-Modus zurückzugelangen.
Q
Alarmfunktion
j Stellen Sie die gewünschte Alarmzeit ein
(siehe „Parameter einstellen“).
Hinweis: Der eingestellte Alarm aktiviert
sich täglich. Das Alarmsignal ertönt für
ca. 1 Minute.
j Drücken Sie die FUNC-
2
SET-
oder MODE-Taste 3, um den
6
, CLEAR- 5,
Signalton zu deaktivieren.
Q
Panikalarm verwenden
j Der Alarm wird ausgelöst, wenn der Panik-
alarm-Stecker
1
aus dem Gerät gezogen
wird.
j Ziehen Sie den Panikalarm-Stecker
1
am Armband heraus, um den Panikalarm
auszulösen.
j Stecken Sie den Panikalarm-Stecker
1
wieder in das Gerät, um den Alarm auszuschalten.
Hinweis: Vier neue LR44-Batterien halten
ungefähr fünf Minuten bei aktiviertem Panikalarm. Wir empfehlen, kurz die PanikalarmFunktion zu testen, wenn Sie den Schrittzähler
benutzen wollen. Wechseln Sie unverzüglich
die vier LR44-Batterien aus, falls die Anzeige
für niedrigen Batteriestand
15
aufleuchtet.
Q
Lieferzustand
wiederherstellen
j Falls das Gerät einem starken elektro-
magnetischen, hochfrequenten Feld ausgesetzt ist, kann es, ebenso wie im Falle
von elektrostatischer Entladung, zu Funktionsstörungen kommen. Falls es zu solchen
Funktionsstörungen kommen sollte, z.B.
die Tasten nicht mehr reagieren oder das
Display Unregelmäßigkeiten aufweist,
versetzen Sie das Gerät durch Drücken
der RESET-Taste
zurück. Verwenden Sie dazu einen dünnen,
spitzen Gegenstand. Die Fehlfunktion sollte
dann beseitigt sein.
WICHTIG! Beachten Sie, dass sämtliche
Daten gelöscht werden. Alle Parameter
müssen neu eingestellt werden.
Q
Batterien wechseln
Das Gerät ist mit zwei unterschiedlichen
Batterietypen versehen.
Hinweis: Sie sollten die kleineren Batterien
(Typ LR44) umgehend wechseln, wenn die
Anzeige für niedrigen Batteriestand
leuchtet. Bei leerer oder fehlender kleiner
Batterie (Typ LR44) können Panikalarm und
Schrittzähler nicht verwendet werden. Sie sollten den Schrittzähler mit leerer bzw. ohne
größere Batterie (CR2032) nicht verwenden.
Die Datenspeicherungs-Funktion steht Ihnen
bei leerer oder fehlender größerer Batterie
(CR2032) nicht zu Verfügung.
Hinweis: Es werden entweder die große
CR2032-Batterie oder die kleinen LR44-Batterien zur Speicherung der Daten benutzt.
Wenn Sie alle Batterien gleichzeitig aus dem
Gerät entfernen, werden alle gespeicherten
Daten gelöscht.
12
in den Lieferzustand
15
auf-
81 DE/AT/CH
Page 82

Inbetriebnahme / Reinigung und Pflege / Entsorgung
j Lösen Sie die Schraube 7 am Batteriefach-
8
deckel
Schraubendreher (nicht im Lieferumfang
enthalten). Ziehen Sie die Abdeckung ab
(siehe Abb. B).
j Entfernen Sie verbrauchte Batterien.
Hinweis: Benutzen Sie einen spitzen
Gegenstand (z.B. Büroklammer), um die
Batterien zu entfernen.
j Legen Sie vier neue Batterien vom Typ
LR44 (1,5 V
vom Typ CR2032 (3 V
Hinweis: Achten Sie dabei auf die
richtige Polarität. Diese wird im Batteriefach
j Setzen Sie die Abdeckung des Batterie-
fachs
schaltet sich automatisch ein.
j Befestigen Sie den Batteriefachdeckel
wieder auf dem Batteriefach
Sie die Schraube
schlitzschraubendrehers anziehen.
Q
Reinigung und Pflege
j Reinigen Sie das Gerät nur äußerlich mit
einem weichen, trockenen Tuch. Verwenden Sie bei stärkeren Verschmutzungen
ein leicht angefeuchtetes, weiches Tuch.
j Verwenden Sie in keinem Fall Flüssigkeiten
und keine Reinigungsmittel, da diese das
Gerät beschädigen.
mit einem kleinen Kreuzschlitz-
) und / oder eine Batterie
) ein.
13
angezeigt.
8
wieder ein. Das LC-Display
13
7
anhand des Kreuz-
8
, indem
Möglichkeiten zur Entsorgung des ausgedienten Produkts erfahren Sie bei Ihrer Gemeinde
oder Stadtverwaltung.
Werfen Sie Ihr Produkt, wenn es
ausgedient hat, im Interesse des
Umweltschutzes nicht in den Hausmüll, sondern führen Sie es einer
fachgerechten Entsorgung zu.
Über Sammelstellen und deren
Öffnungszeiten können Sie sich bei
Ihrer zuständigen Verwaltung informieren.
Defekte oder verbrauchte Batterien müssen
gemäß Richtlinie 2006 / 66 / EC recycelt
werden. Geben Sie Batterien und / oder das
Gerät über die angebotenen Sammeleinrichtungen zurück.
Umweltschäden durch
falsche Entsorgung der
Pb Hg
Batterien!
Batterien dürfen nicht über den Hausmüll
entsorgt werden. Sie können giftige Schwermetalle enthalten und unterliegen der Sondermüllbehandlung. Die chemischen Symbole
der Schwermetalle sind wie folgt: Cd = Cadmium, Hg = Quecksilber, Pb = Blei. Geben
Sie deshalb verbrauchte Batterien bei einer
kommunalen Sammelstelle ab.
Q
Entsorgung
Die Verpackung besteht aus umwelt-
82 DE/AT/CH
freundlichen Materialien, die Sie
über die örtlichen Recy clingstellen
entsorgen können.
EMC
Produktbezeichnung:
Schrittzähler
Modell-Nr.: H14347
Version: 11 / 2010
Page 83

IAN 56018
Milomex Ltd.
c/o Milomex Services
Hilltop Cottage
Barton Road
Pulloxhill
Bedfordshire
MK45 5HP
UK
© by ORFGEN Marketing
Last Information Update · Stan informacji · Információk állása
Stanje informacij · Stav informací · Stav informácií · Stand der Informationen:
12 / 2010 · Ident.-No.: H14347122010-4
4
 Loading...