


Floor air-pump
Standing Air Pump
Instruction Manual 2
Pompka
Instrukcja obsługi 6
Állópumpa
Kezelési útmutató 10
Tlačilka
Navodila za uporabo 14
Svislá nožní pumpa
Návod k použití 18
Stojanová nožná hustilka (čerpadlo)
Návod na obsluhu 22
Standfußpumpe
Bedienungsanleitung 26
PL
HU
SI
SK
GB IE
CZ
DE AT CH

Standing Air Pump Dated: 01.03.2011
Instruction Manual
Congratulations on your purchase of this high-quality standing air pump. For safety reasons
we request that you read through the instruction manual and the safety notes it contains as
carefully as possible and to save this, as it can always be helpful if you encounter any problems
with your air pump. The instruction manual is a set component of this product and must be
included if the product is passed on to any third party.
Intended use:
This standing air pump is suitable for infl ating all conventional bicycle tyres. Other uses or modifi cations to the product are considered non-intended usage and can lead to risk of injury and
damages. The distributor bears no liability for damages resulting from non-intended usage. The
product is not intended for commercial use.
Warnings:
You can infl ate all bicycle tyres up to the pump’s indicated maximum tyre
pressure (max. 8 bar / 116 PSI) or to the tyre manufacturer’s indicated maximum tyre pressure. This can usually be found on the tyre wall. The indicated
maximum values may not be exceeded at any time. Defective or damaged
air pumps may no longer be used due to risk of injury. Defective standing air
pumps must be properly disposed of. Repairs are not possible.
Due to the high operating force and the risks associated with this, the product is not suited for use by children or persons with physical and/or mental
disabilities. Please note that the pump plunger and pump cylinder become
very hot over longer periods of pumping due to the friction between them.
For this reason, you should only grasp the pump on the pump handle after
pumping in order to avoid burns.
Due to the risk of injury, a defective or damaged standing air pump may
never be used.
Package contents:
1 x standing air pump
1 x metal adapter for balls,
2 x plastic adapters for air mattresses, infl atable toys, etc.
Technical data:
Type: Standing air pump
Service Centre Nr: 63785 / IAN Nr. 64302
Nominal pressure: 6 bar / 87 PSI
Nominal excess pressure: 8 bar / 116 PSI
Pressure hose length: 62 cm
Production date: 2011
Warranty: 3 years
Distributor & service address:
Internationales Service Center
Schönbornstr. 14
54295 Trier / Germany
Tel. Nr.: 0049 (0) 651 436 6452
E-Mail: service@internationales-service-center.de
www.internationales-service-center.de
Cleaning & care instructions!
- clean with a damp cloth
- do not immerse in water
- Regularly inspect the standing air pump’s screw joints for secure attachment before use.
Maintenance:
The standing air pump is maintenance-free.
Storage instructions!
Please save the product information! The instruction manual is a set component of this product
and must be included if the product is passed on to any third party.
Disposal:
The packaging is made of 100% environmentally-friendly materials which you can dispose of
via your local recycling points. Please obtain information about the disposal options for the
standing air pump from your community or municipal government.
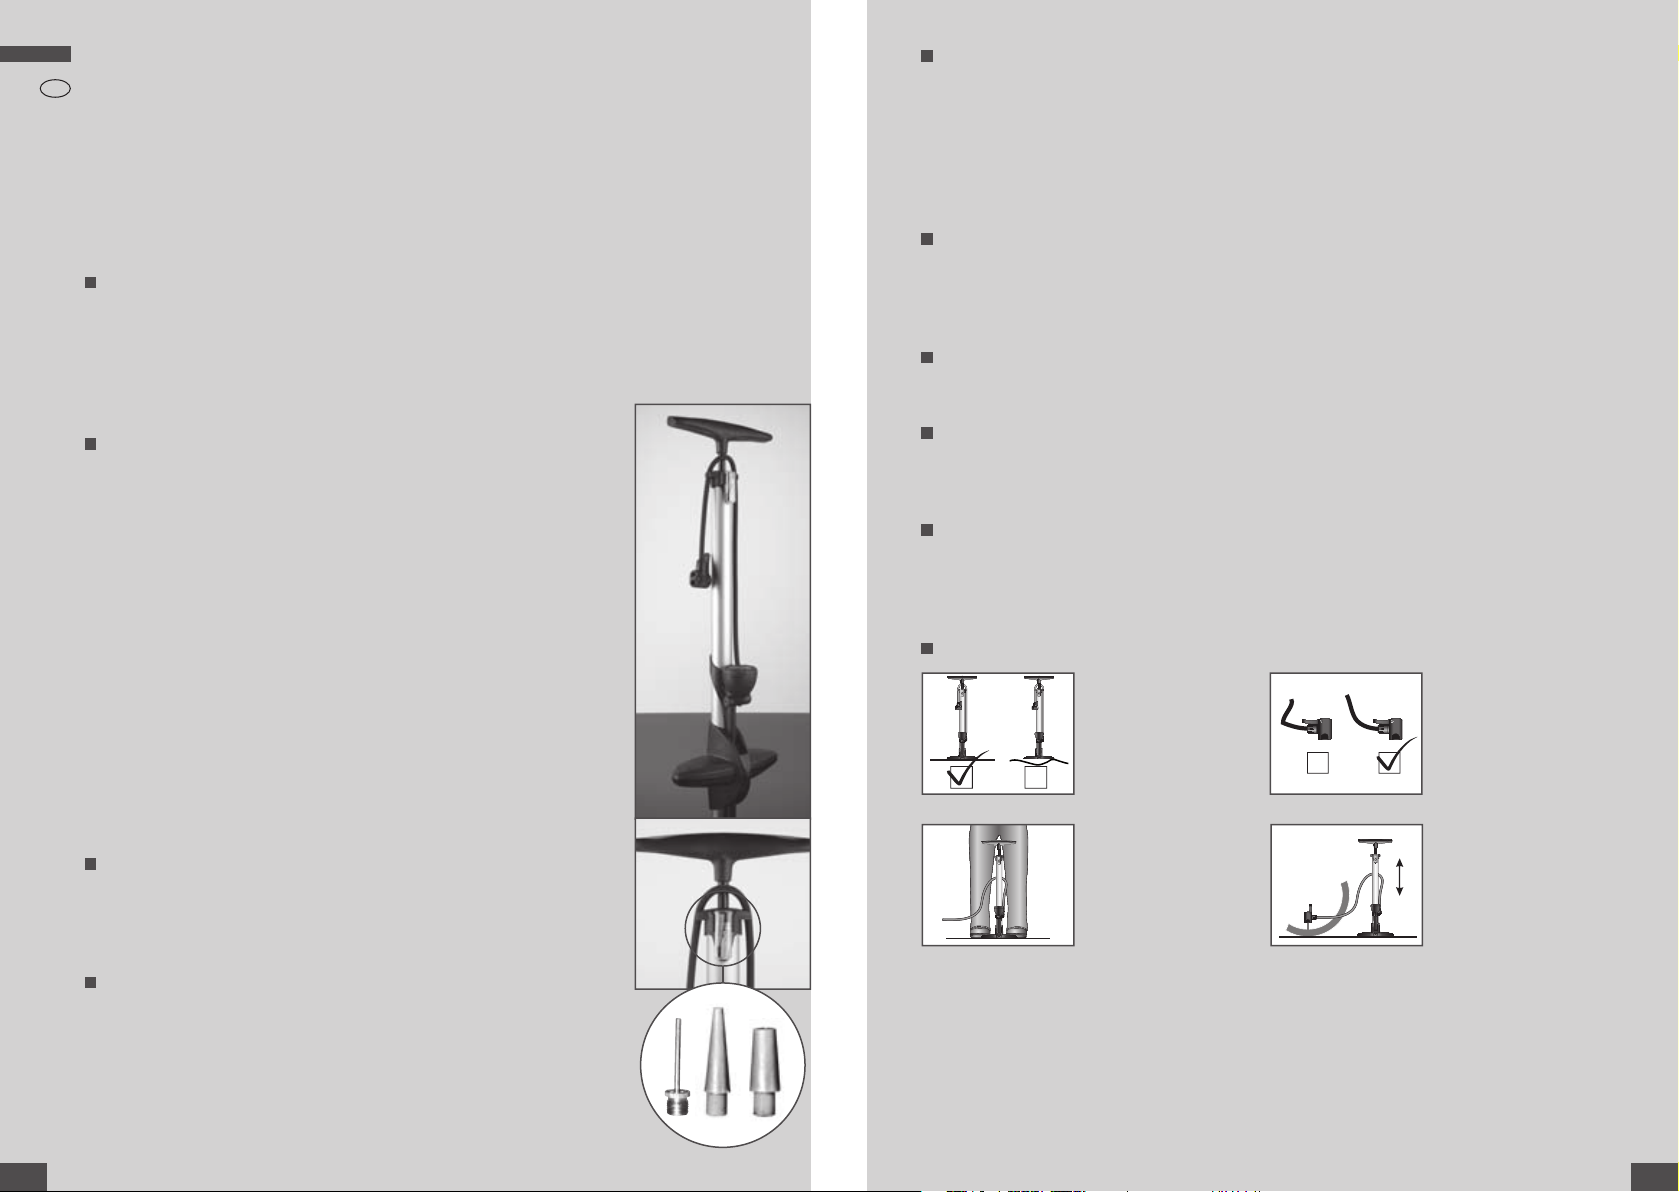
Operation of the standing air pump:
GB
IE
Place the standing air
pump on a level and
stable surface.
There must be no
kinks in the pump
hose.
During pumping, please
always position yourself
with both feet on the
foot plate of the standing air pump to ensure
it won’t fall over.
Operate the pump
handle in a smooth
and even manner and
not too quickly.
2 3
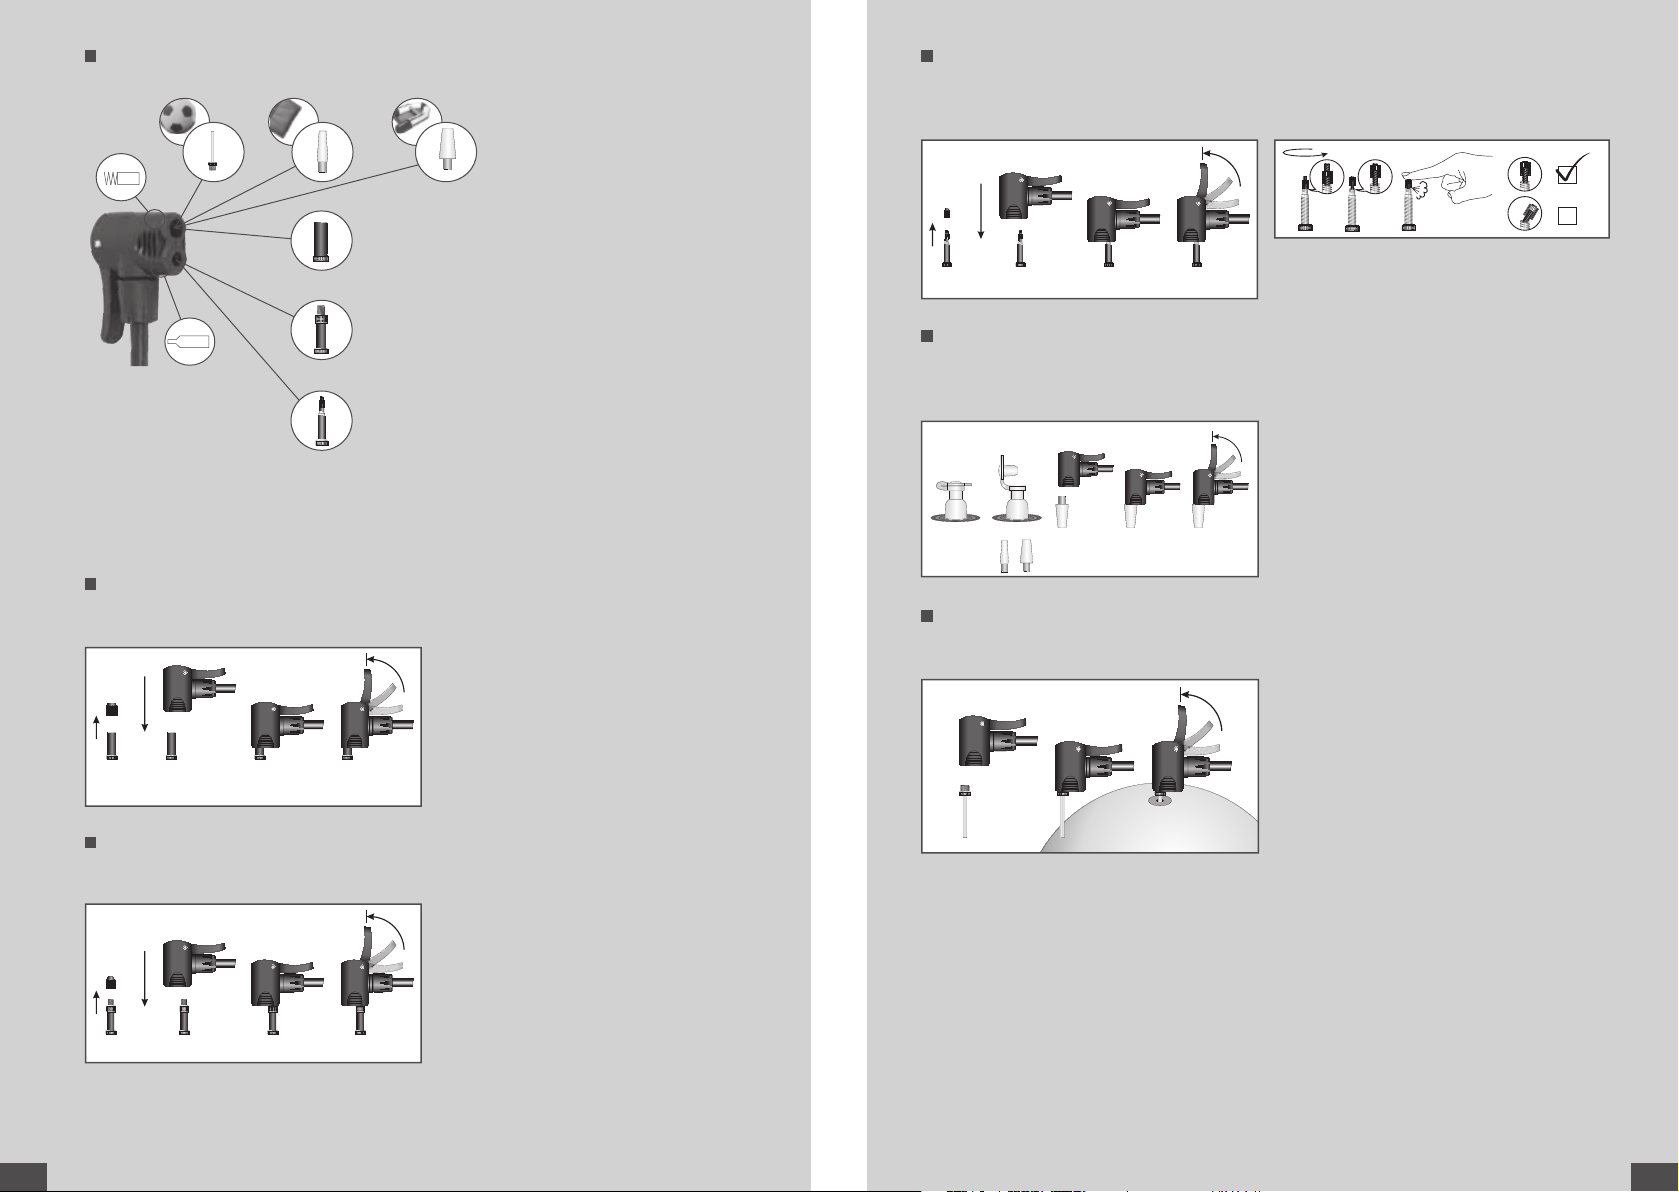
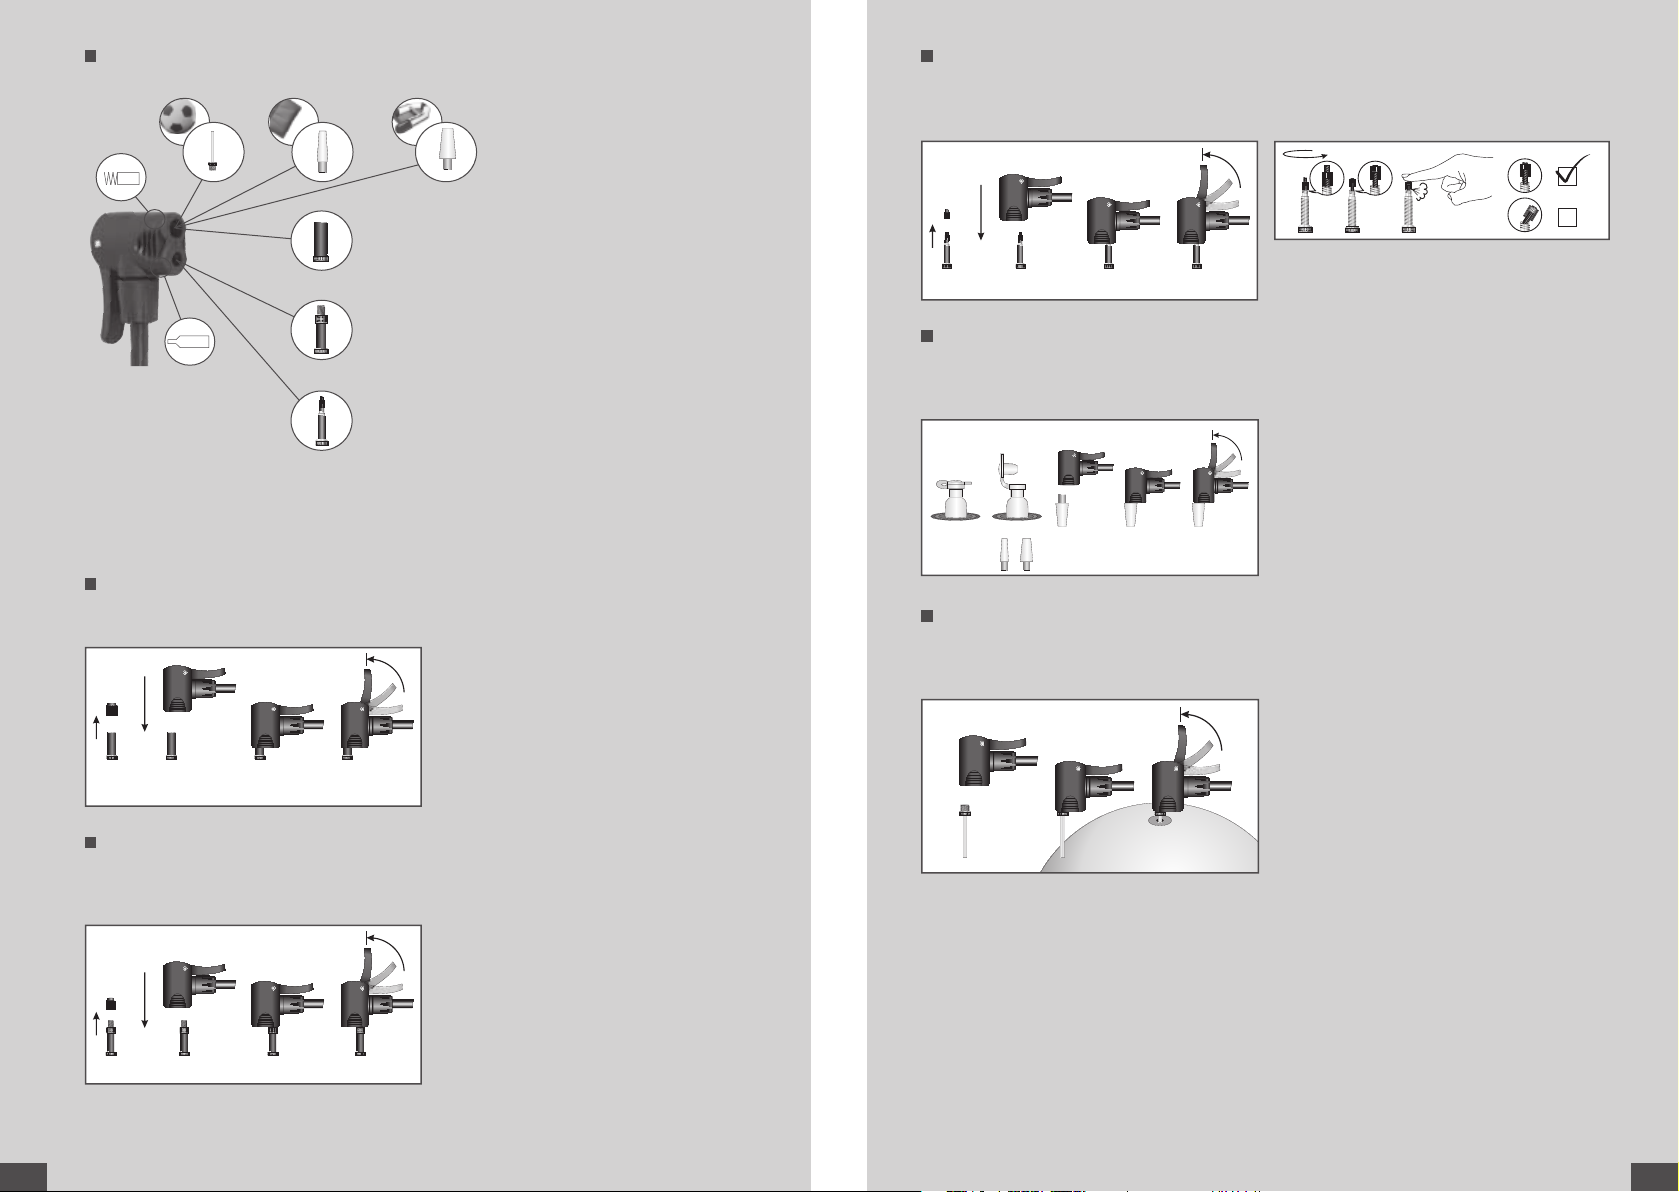
Operation of the dual head and adapters:
e.g. balls e.g. air mattresses e.g. infl atable boats
Infl ating bicycle tyres with a Schrader valve:
First remove the dust protection cap (1). Insert the dual head with the large opening into the
valve (2). To lock in place, please fold up the lever of the dual head (3).
Infl ating bicycle tyres with a Dunlop valve:
First remove the dust protection cap (1). Insert the dual head with the small opening into the
valve (2). To lock in place, please fold up the lever of the dual head (3).
Infl ating bicycle tyres with a Presta valve:
First remove the dust protection cap (1). Detach the valve nut (2a-2c). Insert the dual head
with the small opening into the valve (3). To lock in place, please fold up the lever of the dual
head (4).
Infl ating air mattresses, infl atable boats, infl atable toys, etc.:
First open the valve plug (1). Select the appropriate plastic adapter and insert it into the large
opening of the dual head (2). To lock in place, please fold up the lever of the dual head (3).
Now insert the adapter into the object to be infl ated (4).
Infl ating balls:
Insert the metal adapter in the large opening of the dual head (1). To lock in place, please fold
up the lever of the dual head (2). Now insert the adapter into the ball (3).
For infl ating bicycle tyres with a Schrader valve, e.g.
on automobiles, handcarts and trailers.
For infl ating bicycle tyres with a Dunlop valve, e.g. on
city/trekking bikes.
For infl ating bicycle tyres with a Presta valve, e.g. on
racing bicycles and mountain bikes.
(Valves not included)
To lock in place, please
fold up the lever of the
dual head.
dual head
1 2 3
1 2 3
1
2
3
1 2 43
1 43
2a 2b 2c
4 5
Pompka Stan: 01.03.2011
Instrukcja obsługi
Gratulujemy zakupu tej wysokowartościowej pompy na stopce. Ze względów bezpieczeństwa
prosimy o dokładne przeczytanie niniejszej instrukcji obsługi oraz zawartych w niej wskazówek
bezpieczeństwa, a także jej przechowywanie, tak aby w razie wystąpienia problemów mogła
służyć pomocą. Instrukcja obsługi jest stałym składnikiem produktu i w przypadku jego przekazania osobom trzecim powinna zostać również przekazana.
Zastosowanie zgodne z przeznaczeniem:
Pompka ta przeznaczona jest do napompowania wszelkich dostępnych opon rowerowych. Inne
zastosowanie lub zmiana konstrukcji produktu uznawana jest jako niezgodna z przeznaczeniem
i może prowadzić do powstania ryzyka w postaci urazów i uszkodzeń. Za szkody powstałe w wyniku zastosowania niezgodnego z przeznaczeniem, dystrybutor nie ponosi odpowiedzialności.
Produkt ten nie jest przeznaczony do zastosowania komercyjnego.
Ostrzeżenia:
Wszystkie opony rowerowe mogą zostać napompowane do maks. ciśnienia
powietrza pompki (maks. 8 bar / 116 PSI) lub do podanego maks. ciśnienia
powietrza podanego przez producenta opony. Wartość tę można odnaleźć
z reguły z boku opony. Podane wartości maksymalne nie mogą być nigdy
przekroczone. Nieprawidłowo działające lub uszkodzone pompki nie mogą
być nadal używane ze względu na niebezpieczeństwo powstania urazów.
Uszkodzone pompki muszą zostać zutylizowane w fachowy sposób. Naprawa nie jest możliwa.
Ze względu na użycie dużych sił do uruchomienia oraz związanego z tym
ryzyka, produkt ten nie jest przeznaczony do użytkowania przez dzieci
lub osoby upośledzone ruchowo lub psychicznie. Prosimy pamiętać, że
z powodu tarcia pomiędzy tłokiem pompki i cylindrem pompki w trakcie
dłuższego pompowania dochodzi do ich silnego nagrzania. Z tego powodu
po napompowaniu należy pompkę chwytać tylko za rączkę pompki w celu
uniknięcia oparzeń.
Ze względu na zagrożenie urazem nie wolno nigdy użytkować nieprawidłowo
działającej lub uszkodzonej pompki.
Zakres dostawy:
1 x pompka
1 x adapter metalowy do piłek,
2 x adapter z tworzywa sztucznego do materaców, nadmuchiwanych zabawek itp.
Dane techniczne:
Typ: pompka
Service-Center-Nr: 63785 / IAN Nr. 64302
Ciśnienie znamionowe: 6 bar / 87 PSI
Nadciśnienie znamionowe: 8 bar / 116 PSI
Długość przewodu ciśnieniowego: 62 cm
Data produkcji: 2011
Gwarancja: 3 lata
PL
Dystrybutor & adres serwisu:
Internationales Service Center
Schönbornstr. 14
54295 Trier / Germany
Tel. Nr.: 0049 (0) 651 436 6452
E-Mail: service@internationales-service-center.de
www.internationales-service-center.de
Czyszczenie & wskazówka dotycząca pielęgnacji!
- czyścić wilgotną szmatką
- nie zanurzać do wody
- regularnie kontroluj mocowania śrubowe pompki przed jej użyciem.
Konserwacja:
Pompka jest bezobsługowa.
Wskazówka dotycząca przechowywania!
Prosimy o przechowywanie informacji o produkcie! Instrukcja obsługi jest stałą częścią produktu i w przypadku przekazania produktu osobom trzecim, musi zostać również przekazana.
Utylizacja:
Opakowanie składa się w 100% z materiałów przyjaznych środowisku, które może zostać zutylizowane przez miejscowe punkty recyklingu. Na temat możliwości utylizacji pompki prosimy
poinformować się w swoim urzędzie gminy lub urzędzie miasta.
Obsługa pompki:
Pompkę należy
postawić na stabilnym i
równym podłożu.
Przewód pompki nie
może być zaginany.
W trakcie pompowania
należy zawsze obiema
stopami stanąć na
powierzchni dla stóp
pompki w celu zabezpieczenia jej przed
przewróceniem.
Uchwyt pompki należy
poruszać równomiernie i nie za szybko.
6 7
Obsługa podwójnej głowicy i adapterów:
np. piłki np. materace np. pontony
Pompowanie opon rowerowych z zaworkiem Schradera:
Usuń najpierw kapturek ochrony przed pyłem (1). Wsadź podwójną głowicę większym otworem
na zawór (2). W celu blokady podnieś do góry wtyk dźwigni w podwójnej głowicy (3).
Pompowanie opon rowerowych z zaworem Dunlopa:
Najpierw usuń kapturek ochronny przed pyłem (1). Wsadź podwójną głowicą mniejszym otworem na zawór (2). W celu zablokowania należy do góry podnieść wtyk dźwigni w podwójnej
głowicy (3).
Do napompowania opon rowerowych z zaworkiem
Schradera, np. samochody osobowe, taczki i przyczepy.
Do pompowania opon rowerowych z zaworkiem Dunlopa, np. w rowerach typu City-/Trekking.
Do pompowania opon rowerowych z zaworem typu
Sclaverand (Presto), np. w rowerach wyścigowych i
MTB.
(zaworki nie są zawarte w dostawie)
W celu zblokowania
należy do góry podnieść
dźwignię podwójnej
głowicy.
głowica podwójna
Pompowanie opon rowerowych z zaworem typu Sclaverand:
Najpierw usuń kapturek ochronny przed pyłem (1). Odkręć nakrętkę zaworu (2a-2c). Wsadź
podwójną głowicą mniejszym otworem na zawór (3). W celu zablokowania należy do góry
podnieść wtyk dźwigni w podwójnej głowicy (4).
Pompowanie materaców, pontonów, nadmuchiwanych zabawek itp:
Otwórz najpierw zatyczkę zaworu (1). Wybierz pasujący adapter z tworzywa sztucznego i nasadź
go na duży otwór podwójnej głowicy (2). W celu zablokowania należy do góry podnieść wtyk
dźwigni w podwójnej głowicy (3). Następnie wsadź adapter w przedmiot do napompowania (4).
Pompowanie piłek:
W tym należy włożyć adapter metalowy w duży otwór podwójnej głowicy (1). W celu zablokowania należy do góry podnieść wtyk dźwigni w podwójnej głowicy (2). Następnie adapter należy
wetknąć w piłkę (3).
1 2 3
1 2 3
1
2
3
1 2 43
1 43
2a 2b 2c
8 9

Állópumpa Kiadás: 2011.03.01.
Kezelési útmutató
Köszönjük, hogy ezen magas minőségű pumpa megvásárlása mellett döntött. Biztonsági
okokból kérjük olvassa gondosan végig a kezelési útmutatót és a benne található biztonsági
utalásokat. Őrizze meg ezeket, mivel az állópumpánál jelentkező esetleges gondok esetén
segítséget nyújthatnak. A leírás a termék állandó részét képezi és továbbadása esetén mellékelni kell.
Rendeltetés szerinti használat:
Ez az állópumpa mindegyik, a kereskedelemben kapható, kerékpár felpumpálására alkalmas. Egyéb alkalmazások ill. változtatások a terméken nem rendeltetés szerinti használatnak
minősülnek és balesetveszélyt okozhatnak ill. a pumpa károsodását vonhatják maguk után. A
nem rendeltetés szerinti használatból eredő károkért a forgalmazó nem vállal felelősséget. A
termék ipari használatra nem alkalmas.
Figyelmeztető utalások:
Minden kerékpár kerék a pumpa megadott max. légnyomásáig (max. 8 bar
/ 116 PSI), vagy a kerékgyártó által megadott max. légnyomásig fújható
fel. Ezen adatok gumi oldalán találhatók. A megadott max. értékek semmi
esetben sem léphetők túl. Hibás vagy sérült légpumpákat a balesetveszély
elkerülése érdekében nem szabad használni. A hibás állópumpákat az
előírásoknak megfelelően el kell távolítani, javításukra nincs lehetőség.
A magas üzemeltetési erők és az ezzal kapcsolatos veszélyek miatt a
terméket gyermekek és testileg/szellemileg károsult személyek nem használhatják. Kérjük ügyeljen arra, hogy a pumpa dugattyúja és hengere a dörzsmozgás miatt hosszabb idejű használat esetén erősen felmelegedik. Ezért
az égési veszélyek elkerülése érdekében felpumpálás után az állópumpát
mindig a fogantyújánál ajánlott megfogni.
A balesetveszély elkerülése érdekében sohasem szabad hibás vagy károsodott állópumpát használni.
Szállítási csomag:
1 x állópumpa
1 x fém adapter labdákhoz,
2 x műanyag adapter gumimatracokhoz, felfújható játékokhoz stb.
Műszaki adatok:
Típus: Állópumpa
Szervízközponti szám: 63785 / IAN 64302 sz.
Névleges nyomás: 6 bar / 87 PSI
Névleges túlnyomás: 8 bar / 116 PSI
Nyomótömlő hossza: 62 cm
Gyártás ideje: 2011
Garancia: 3 év
HU
Forgalmazói & szervízcím:
Internationales Service Center
Schönbornstr. 14
54295 Trier / Germany
Tel. Nr.: 0049 (0) 651 436 6452
E-Mail: service@internationales-service-center.de
www.internationales-service-center.de
Tisztítási & ápolási utalás
- Nedves kendővel tisztítani
- Nem szabad vízbe mártani
- Használat előtt ellenőrizze rendszeresen az állópumpa csavarozásait rögzítettségükre.
Karbantartás:
Az állópumpa karbantartás mentes.
Tárolási utalás
Kérjük őrizze meg a termékinformációt! A leírás a termék állandó részét képezi és továbbadása
esetén mellékelni kell.
Eltávolítás:
A csomagolás 100%-ban környezetbarát anyagokból áll, amelyek a helyi újrahasznosító szerveknél eltávolíthatók. Az állópumpa eltávolítási lehetőségeiről kérjük érdeklődjön a polgármesteri hivatalnál vagy a városi kormányzatnál.
Az állópumpa kezelése:
Állítsa az állópumpát
szilárd és egyenes
felületre.
A pumpa tömlőjét
nem szabad megtörni.
Pumpálás közben
álljon mindig mindkét
lábbal az állópumpa
lábtartójára, hogy ne
dőlhessen el.
A pumpa fogantyúját
egyenletesen és ne túl
gyorsan nyomja le.
10 11
 Loading...