

Page 1
EXERCISE & BALANCE BOARD
EXERCISE & BALANCE BOARD
Instructions for use
FITNESS BOARD
Bruksanvisning
ACCESSOIRE DE FITNESS
Notice d’utilisation
FITNESS-BOARD
Gebrauchsanweisung
IAN 93156
KUNTOILULAUTA
Käyttöohje
FITNESS-BOARD
Brugervejledning
FITNESS-BOARD
Gebruiksaanwijzing
DE/AT/CH
Page 2

2
Page 3
Contents/Sisällysluettelo/Innehållsförteckning/Indholdsfortegnelse/
Table des matieres/Inhoudsopgave/Inhaltsverzeichnis
Contents ............................................................... 6
Technical specifications ...................................... 6
Intended use ........................................................ 6
Safety notice regarding use ..........................6 - 7
Exercise notice .................................................... 7
Warming up and stretching .......................... 7 - 8
Workout ........................................................ 8 - 11
Maintenance, storage ...................................... 11
Instructions for disposal .................................... 11
3 years warranty .............................................. 12
Personal workout information .......................... 13
Innehåll .............................................................. 22
Tekniska data .................................................... 22
Ändamålsenlig användning ............................. 22
Säkerhetsinformation för användning ......22 - 23
Träningsinformation .......................................... 23
Uppvärmning och stretching .................... 23 - 24
Träning ....................................................... 24 - 27
Skötsel, förvaring .............................................. 27
Information om avfallshantering ...................... 27
3 års garanti ...................................................... 28
Personlig träningsdata ...................................... 29
Contenu ............................................................. 38
Caractéristiques techniques ............................. 38
Utilisation conforme .......................................... 38
Consignes de sécurité relatives à
l’utilisation .................................................. 38 - 39
Indications relatives à l’entraînement .............. 39
S‘échauffer et s‘étirer ............................... 39 - 40
Entraînement .............................................. 41 - 44
Entretien, rangement ......................................... 44
Conseils relatifs à l‘élimination des déchets .... 44
3 ans de garantie ............................................. 44
Données personnelles d‘entraînement ............ 45
Sisältö ............................................................... 14
Tekniset tiedot .................................................... 14
Määräystenmukainen käyttö ........................... 14
Käyttöä koskevat turvallisuusohjeet .......... 14 - 15
Harjoitteuluohjeita ............................................ 15
Alkulämmittely ja venyttely ....................... 15 - 16
Harjoittelu .................................................. 16 - 19
Hoito ja säilytys ................................................ 19
Hävittämisohjeet ............................................... 19
3 vuoden takuu ................................................. 19
Henkilökohtaiset harjoittelutiedot .................... 20
Levering ............................................................. 30
Tekniske data .................................................... 30
Bestemmelsesmæssig anvendelse ................... 30
Sikkerhedshenvisninger til brug ................ 30 - 31
Træningsanvisninger ......................................... 31
Opvarmning og stræk .............................. 31 - 32
Træning ...................................................... 32 - 35
Pleje, opbevaring .............................................. 35
Henvisninger til bortskaffelse ........................... 35
3 års garanti ...................................................... 36
Personlige træningsdata .................................. 37
Leveromvang ..................................................... 46
Technische gegevens ........................................ 46
Doelmatig gebruik ............................................ 46
Veiligheidsinstructies voor het gebruik .....46 - 47
Trainingsinstructies ............................................ 47
Warming-up en stretchen ......................... 47 - 48
Training ...................................................... 49 - 52
Onderhoud, opbergen ..................................... 52
Opmerking met betrekking tot de
verwijdering ...................................................... 52
3 jaar garantie .................................................. 52
Persoonlijke trainingsgegevens ........................ 53
Lieferumfang ...................................................... 54
Technische Daten .............................................. 54
Bestimmungsgemäße Verwendung ................. 54
Sicherheitshinweise zur Benutzung ..........54 - 55
Trainingshinweise .............................................. 55
Aufwärmen und Dehnen .......................... 55 - 56
Training ...................................................... 57 - 60
Pflege, Lagerung ............................................... 60
Hinweise zur Entsorgung ................................. 60
3 Jahre Garantie .............................................. 60
Persönliche Trainingsdaten .............................. 61
3
Page 4
A B
C
E
D
F
4
Page 5
G H
I
J
5
Page 6
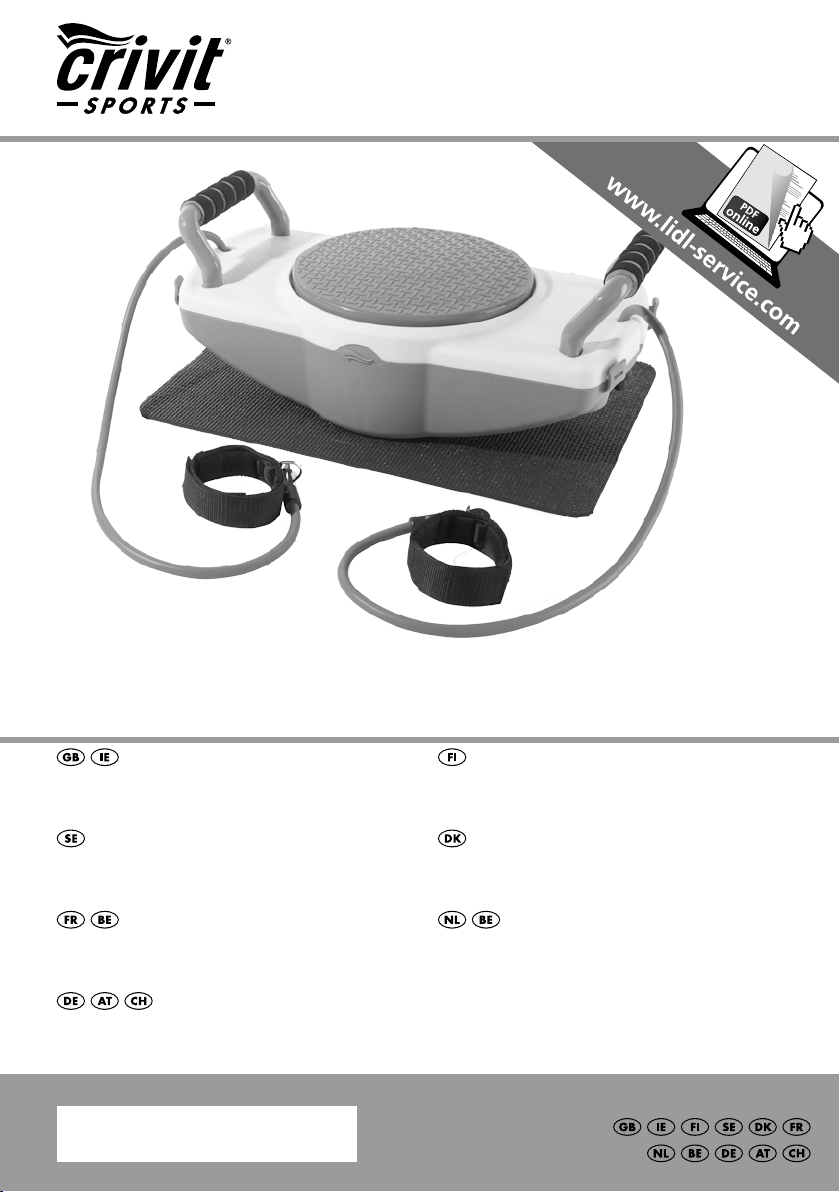
Congratulations!
With your purchase you have decided on a
high-quality product. Get to know the product
before you start to use it.
Carefully read the following operating instructions. Use the product only as described and
only for the given areas of application.
Keep these instructions safe. When passing the
product on to a third party, always make sure
that the documentation is included.
Contents
1 x Exercise & balance board
2 x Handles
2 x Resistance bands
1 x Exercise mat
1 x DVD with exercise examples
1 x Poster with exercise examples
1 x Instructions for use
Technical specifications
This exercise equipment complies with the
EN 957-1/2 class H
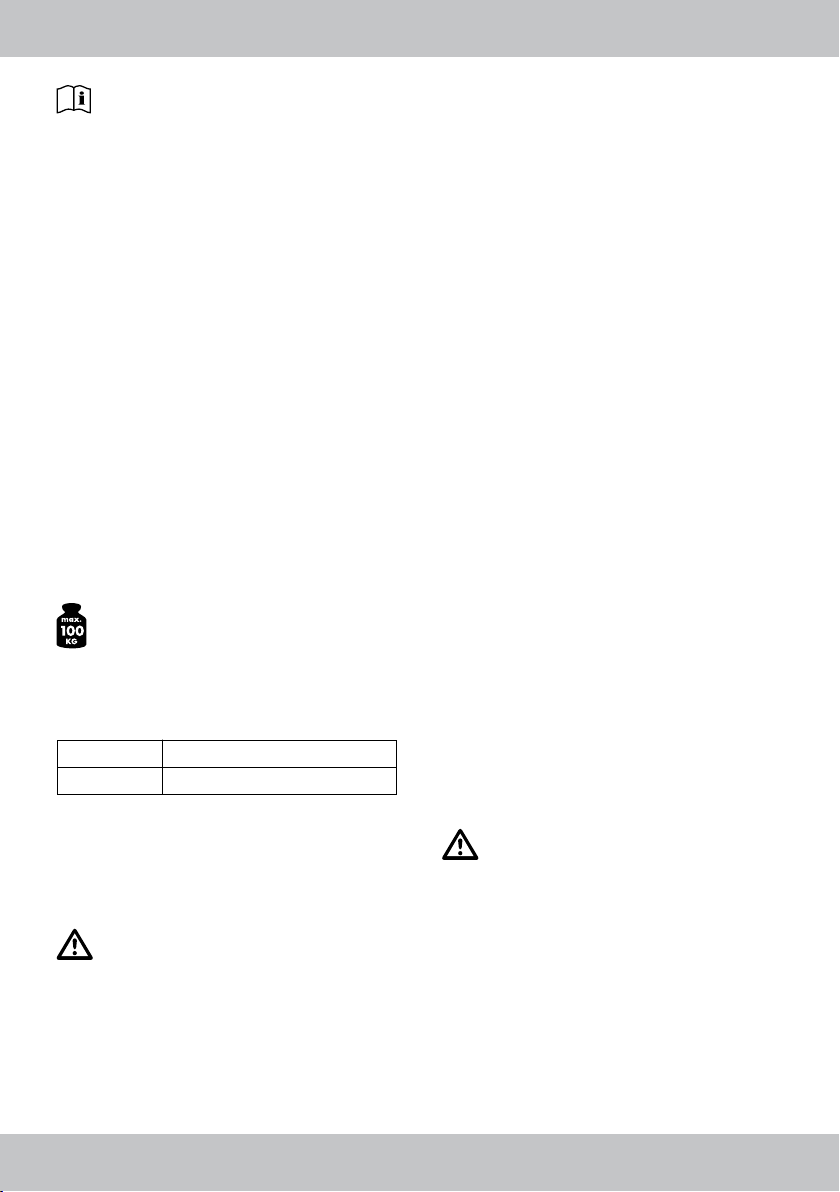
Max. weight of the user: 100kg
Dimensions: approx. 50 x 30 x 15cm
Product weight: approx. 2.270g
Strength chart expander
Length (cm): 120 140 160 185 230
Strength (N): 13 19.5 25 30 42
Intended use
This equipment is designed for private use only
and must not be used for commercial, medical or
therapeutic purposes.
Safety notice regarding
use
Warning! Danger of injury!
• This fitness board is designed for a maximal
body weight of 100kg. Do not use this pro duct if you are heavier than this weight.
• Please consult your doctor before you start
your workout. Please ensure that your health
is in a suitable condition for the workout.
• Always keep the instructions manual with the
exercise guidelines handy.
• Stick to the workout guidelines which are
specified in these instructions. Otherwise, you
risk seriously damaging your health.
• Overexertion and working out too much can
cause severe injuries. Always remember to
warm up before exercising and work within
your capabilities. If you suffer from physical
discomfort, feeling weak or tired immediately
stop your workout and contact your doctor.
• Check before each use that the fitness board is
correctly set–up for the respective exercise.
• Only use this product in firm level flooring and
away from stairs and landings.
• Ensure that the fitness board sits firmly and
securely on the ground so that it does not slide
away.
• Always use the accompanying protective mats
to protect delicate flooring (e.g. parquet).
• For a safe workout you need sufficient space.
Please make sure before the workout that there
is at least 1m of clear space around the
device.
• The product can only ever be used by one
person at a time.
• The resistance bands may exclusively be used
with the fitness board.
• If you use the product as a balance board
with the resistance bands never stand on the
turntable.
Special caution – danger of
injury for children!
• Do not let children use this product unsuper vised. Make them aware of the correct use of
the device and supervise them. Only allow
them to use this if they are sufficiently mentally
and physically developed. This device is not a
toy.
6 GB/IE
Page 7
Damage through wear and
tear
• The product may only be used if it is in impec cable condition. Always check the product
before each use. The safety of the fitness board can only be guaranteed if it is regularly
checked for damage and wear and tear.
• The resistance bands may not be stretched
further than 2.30m.
• Regularly check the resistance bands. Check
for rips and damage. Defective parts must no
longer be used.
• Protect the device from high temperatures and
moisture.
• Use, exclusively, the original additional parts.
Exercise notice
The following exercises only show a range of
exercises. You can find further exercises in the
relevant specialised literature.
• Wear comfortable sports clothes and shoes.
• Warm yourself up before every workout and
gradually cool down. Please read our recom mendations on warming up and cooling down.
• Ensure that you have sufficient space surroun ding you for your workout.
• Do the exercises at a level tempo.
• Keep to the instructed sequence of movements.
Caution! Avoid working out too
intensely!
When starting to workout 2-3 minutes per exer cise is sufficient. With daily workouts you could
extend that in a week to 5-10 minutes.
However, the maximum workout time of 1 hour
should not be exceeded.
• Take sufficient breaks between exercises and
ensure that you drink enough.
Caution!
• If you feel discomfort or unwell stop
the exercise immediately and contact
your doctor.
• Do not stretch the resistance bands
longer than 2.30m.
• The strength chart shows how much
power is needed to pull the resistance
bands to the corresponding length.
The tolerance range for the power:
+/- 20% (See strength chart for the ex pander under Technical Information).
Warming up and stretching
Take enough time to warm up and cool down
before and after each workout. The following
exercises have been designed for this purpose.
Repeat each of the respective exercises 2–3
times.
Warming up your neck muscles
• Stand in a relaxed position. Using your hand,
pull your head gently to the left and then to
the right. This exercise helps stretch both sides
of your neck.
• Make circular movements with your head,
changing the direction. Repeat until your neck
feels loose and relaxed.
Warming up your arms and
shoulders
• Stretch one arm out sideways in front of your
chest and using your other hand, carefully
press it towards your body. After a while
change arms. Remember not to press beyond
the point of feeling a slight pull in your arm.
• Alternatively, move your arms over and behind
your head in a bent position and using your
other hand, gently press down on your elbow.
• Grasp your hands behind your back and
carefully pull them upwards. If you bend the
upper part of your body forwards, all the
muscles will be warmed up.
• To loosen up your shoulders, carefully make
circular movements with both shoulders – first
towards the front, then towards the back.
• Pull your shoulders upwards several times and
then let them fall back down again.
After repeating this exercise a few times, your
shoulders should feel warm and loose.
7GB/IE
Page 8
Warming up and stretching your
leg muscles
• Stand up straight with your right leg bent
upwards. Hold your leg with your right hand
for a while. To make this exercise easier, you
can hold onto something with your other hand,
e.g. a wall or a table. Repeat with your other
leg.
• Stand with your legs apart and bend one of
your knees slightly. Hold this position for a
while before changing legs. This exercise helps
stretch the inside of your legs.
• Warm up your ankles by taking one foot off
the floor and slowly making circular move ments to the left and then to the right. After a
while, change feet.
Overview of the exercised
muscle groups
The following muscle groups are
primarily focussed on during the
corresponding exercises:
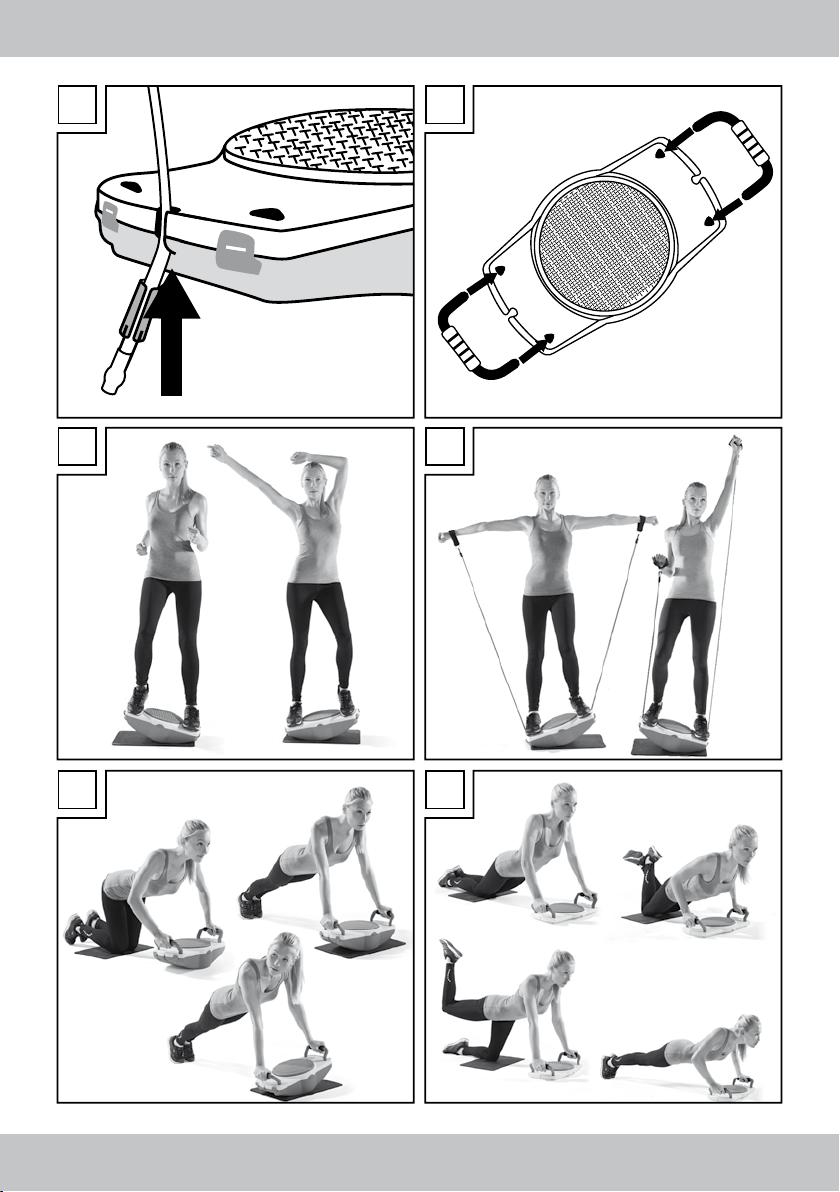
Fig. C
Balance board
Fig. D
Balance board with
resistance bands
Fig. E
Balance board with
handles
Fig. F
Press-up board
Fig. G
Press-up board with
resistance bands
Fig. H
Twist board
Fig. I
Twist board with
resistance bands
Leg muscles
Arm, leg and
shoulder muscles
Arm, shoulder and
chest muscles
Arm, leg and lower
back muscles
Arm and leg muscles
Torso muscles
Upper body muscles
Workout
Balance board (Fig. C)
Note!
This exercise requires complete ankle
movement. If in doubt contact your
doctor!
Caution! Danger of injury!
When using the balance board never
stand on the turntable!
Recommended workout duration:
Beginners: 2-3 minutes
Intermediates: 5-10 minutes
Set-up and workout
All you need for this exercise is the mat for slip
resistance. Open the board at the side flap
locks and take out the resistance bands and the
handles. Then close the board again and place
it on the mat.
• Carefully position yourself on the fitness board
and slowly begin rocking from one side to the
other. Make sure your movements are calm
and consistent. Initially, use your arms to keep
your balance.
• After you have a feel for the movement, you
can also move your arms as you would when
you are slowly jogging. Gradually increase
the speed to a slow run.
• When you feel confident enough, swing your
arms above your head, to exercise your entire
body.
• Try out various movements and positions with
your arms.
Balance board with resistance
bands (Fig. D)
NOTE:
You must only perform this exercise if
your ankles are fully mobile. If in doubt,
please consult your doctor.
When using this equipment as a balance board,
never stand on the turntable, otherwise risk of
injury will occur.
The resistance bands must not be stretched longer than 2.30m. The tolerance for the strength:
+/- 20%.
8 GB/IE
Page 9

Recommended workout duration:
Beginners: 2-3 minutes
Intermediates: 5-10 minutes
Set-up and workout
The board also remains closed during this exercise. Attach the resistance bands to both sides of
the fitness board. To do so, pull the ends of the
bands to the length required to thread them into
the side openings on the board.
To remove the resistance bands later on, pull
them back out of the openings by slightly stretching them (Fig. A).
Place the balance board on the rubber mat.
• Pick up the handles of the resistance bands
and carefully position yourself on the board.
• Carefully begin to rock sideways until you find
your balance and get a feel for the movement.
• Alternately stretch your arms upwards. In the
process, your right arm should be stretched
upwards when your right leg rocks downwards
– and vice versa.
• When you feel comfortable enough, increase
the intensity and keep moving your arms back
and forth or alternately move your arms to the
left and right, away from your body.
• This exercise works on all muscle groups of
your body!
Balance board with handles
(Fig. E)
Recommended workout duration:
Beginners: 2-3 minutes
Intermediates: 5-10 minutes
Set-up and workout
The board remains closed for this exercise. Insert
the ends of the handles into the holes on the
fitness board (see Fig. B). To remove the handles
later on, firmly pull on them while jiggling them
free. The rubber mat is also intended as a support for your knees during this exercise.
When performing this exercise, please also
make sure that you keep your back straight.
Avoid arching your back.
• Kneel on the rubber mat and pick up the
handles on the board. Bend slightly forward
and begin rocking gently back and forth.
At the same time, keep your back straight.
• When you feel strong enough, continue this
exercise in a sit-up position. To do so, place
the board on the rubber mat, pick up the
handles and position your feet approx. two
thirds of your body length to the back.
Here, please also make sure you do not
arch your back.
Press-up board (Fig. F)
Recommended workout duration:
Beginners: 2-3 minutes
Intermediates: 5-10 minutes
Set-up and workout
To use this equipment as a press-up board, you
simply have to remove the bottom of the board.
To do this, open the side flap locks and put the
bottom of the board to one side. The handles
remain at the top of the board.
When performing these exercises, make sure
your back is straight. Avoid arching your back.
• Kneel in front of the fitness board on the
rubber mat and pick up the handles. Slowly
move your body up and down.
• To increase the resistance, take your feet off
the floor and cross them behind your buttocks.
This is a type of sit-up.
• To strengthen your leg muscles, take one knee
off the floor while kneeling and stretch your
leg slowly a few times upwards behind you.
Then change legs. You can also alternate after
each stretch.
• To increase the level of difficulty, take your
knees off the floor and stretch your legs out
to the back. Now, do a sit-up. Keep your back
straight and do not overdo it. It is more impor tant to perform this exercise properly than to
achieve a high number of sit-ups.
9GB/IE
Page 10

Press-up board with resistance
bands (Fig. G)
Recommended workout duration:
Beginners: 2-3 minutes
Intermediates: 5-10 minutes
Set-up and workout
The handles remain on the board for the following exercise. The resistance bands must also be
attached to both sides of the fitness board.
To do this, pull the ends of the bands to the
length required for threading them into the side
openings on the board.
• Fasten the resistance bands to your feet with
the loops.
1. Take the same position as in the exercise on
the press-up board without the resistance
bands. Put your hands around the grips and
place your feet parallel on the floor.
• In this position, lift your knee from the floor
and extend your leg up and out behind you in
a controlled manner a few times. Then change
legs. You could also change after each leg
extension.
2. Lie flat on your back. To support your head
and spine, place your head on the underside
of the fitness board.
• Lie as if you were standing, with your feet at a
90° angle on the board.
• Take the resistance band’s grips in your hand
and hold them out sideways at a 90° angle
from your body.
• Your legs stay stretched and exert pressure
against the press-up board.
• Alternate moving your left and right hand
towards your shoulders.
3. Sit on the rubber mat. Put your feet at a 90°
angle on the press-up board. Take the grip of
the resistance band in your hands.
• Bend your arms next to your body and slightly
bend your back towards the floor. Thereby
you keep your shoulders and arms in the initial
position.
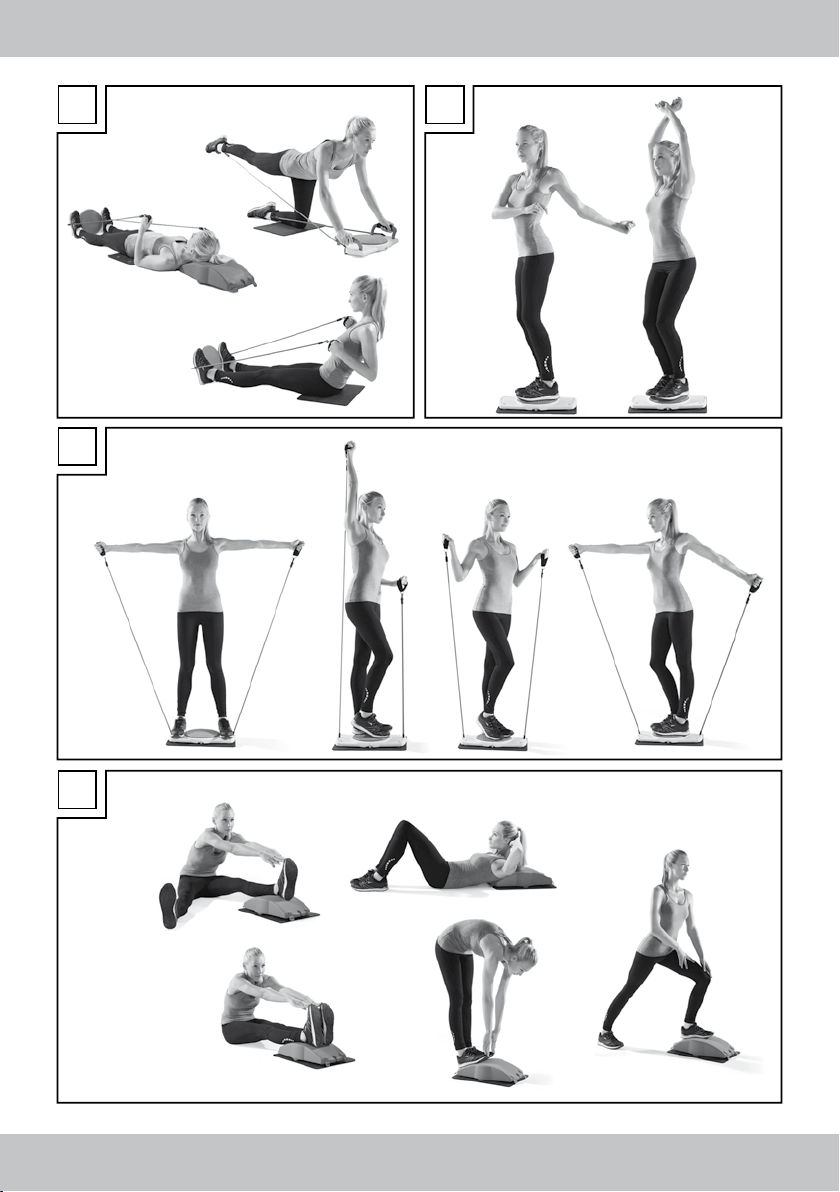
Twist board (Fig. H)
Recommended workout duration:
Beginners: 2-3 minutes
Intermediates: 5-10 minutes
Set-up and workout
You only need the top of the fitness board for
this exercise. Remove the handles and resistance
bands as described above.
• Place the top of the board on the rubber mat
and carefully get onto the twist board.
• Turn back and forth slowly until you feel
stable. Twisting movements are possible in
both directions up to 40°.
• At first, use your arms to get your balance.
Later on, you can use your arms to accompany
the movements sideways.
• To increase the level of difficulty and the
exercise intensity, bend down while doing this
exercise.
• When you are completely stable, you can
change the position of your arms. For exam ple, you can lift them over your head while
doing the movement.
• For an „active break“, place the twist board
on a wide stool and carry out the exercises
while sitting.
Twist board with resistance
bands (Fig. I)
Recommended workout duration:
Beginners: 2-3 minutes
Intermediates: 5-10 minutes
Set-up and workout
You only need the top of the fitness board and
the resistance bands for this exercise. These are
attached to the sides as described above.
Place the board on the rubber mat.
The band may not be stretched longer than
2.30m. Tolerance range for the force: +/- 20%.
• Start slowly. First, use the resistance bands to
stabilise. Do the same movements you did with
the twist board exercises without the resistance
bands.
10 GB/IE
Page 11

• Sideways rotational movements are possible in
both directions up to 40°.
• When you feel stable, you can work out
your arms next. Try arm movements in different
directions. Move your arms simultaneously or
alternate your left and right arm. You deter mine the speed and the level of difficulty.
• Now, carefully position yourself next to the
twister (or turntable) on the fitness board.
Alternately stretch your arms sideways above
your head. When doing so, make sure your
body remains straight. The movement is just
from the arms.
• After a while, use both arms simultaneously.
You can also carry out this movement for wards.
NOTE! The following exercises are also
suitable as stretching exercises before
and after working out with the fitness
board.
Stretching board (Fig. J)
Recommended workout duration:
Beginners: 2-3 minutes
Intermediates: 5-10 minutes
Set-up and workout
You only need the bottom part of the fitness
board to use it as a stretching board. Place it
upside down on the rubber mat.
• Sit on the floor in front of the fitness board
and place your feet on it. Your legs should be
stretched out, as far as possible.
• Hold your feet using both hands and pull
your head as far as it goes towards your
knees. Repeat several times.
• Now, take one leg off the fitness board and
place it on the floor stretched out sideways.
Repeat the exercise alternating between your
right and left leg.
• Position yourself in a forward lunge with one
leg on the fitness board. Slowly stretch for wards and while doing so, bend your front
leg. The more you bend, the more intense
the exercise is. In order to increase the level
of difficulty, move your back leg further back.
Try to maintain this position for a while and
then change legs.
• You can also try to touch the ground with the
knee of your back stretched leg. This addition ally stretches your upper thigh.
• Sit-Ups:
Warning! Sit-ups can lead to spinal injuries.
To exercise your stomach muscles, lay down
on your back with your shoulders on the
board. Put your hands loosely on the back of
your head and slowly move your upper body
towards your knees. When doing so, look
straight ahead and avoid arching your back.
Keep your hands on the back of your head
without applying any pressure.
• To stretch all of the back leg muscles, stand on
the board with your feet pointed upwards.
Keep your legs stretched out. Now try to
touch your toes with the tips of your fingers.
Repeat several times.
Maintenance, storage
The product must be stored dry and clean at
normal room temperature.
IMPORTANT! Only clean using water; never
with aggressive cleaning products. Wipe dry
using a normal cleaning cloth.
Instructions for disposal
Please dispose of the packaging and the
product in an environmentally-friendly manner!
Dispose of this product via an authorised waste
disposal company or via your local council.
Please observe the current regulations.
11GB/IE
Page 12
3 years warranty
The product was produced with great care and
under constant supervision. You receive a threeyear warranty for this product from the date of
purchase. Please retain your receipt.
The warranty applies only to material and
workmanship and does not apply to misuse or
improper handling. Your statutory rights, especially the warranty rights, are not affected by this
warranty.
With regard to complaints, please contact the
following service hotline or contact us by e-mail.
Our service employees will advise as to the
subsequent procedure as quickly as possible.
We will be personally available to discuss the
situation with you.
Any repairs under the warranty, statutory guarantees or through goodwill do not extend the
warranty period. This also applies to replaced
and repaired parts. Repairs after the warranty
are subject to a charge.
IAN: 93156
Service Great Britain
Tel.: 0871 5000 720
(£ 0.10/Min.)
E-Mail: deltasport@lidl.co.uk
Service Ireland
Tel.: 1890 930 034
(0,08 EUR/Min., (peak))
(0,06 EUR/Min., (off peak))
E-Mail: deltasport@lidl.ie
You can also find spare parts for your product at:
www.delta-sport.com, category Service - Lidl Spare Parts
Service
12 GB/IE
Page 13

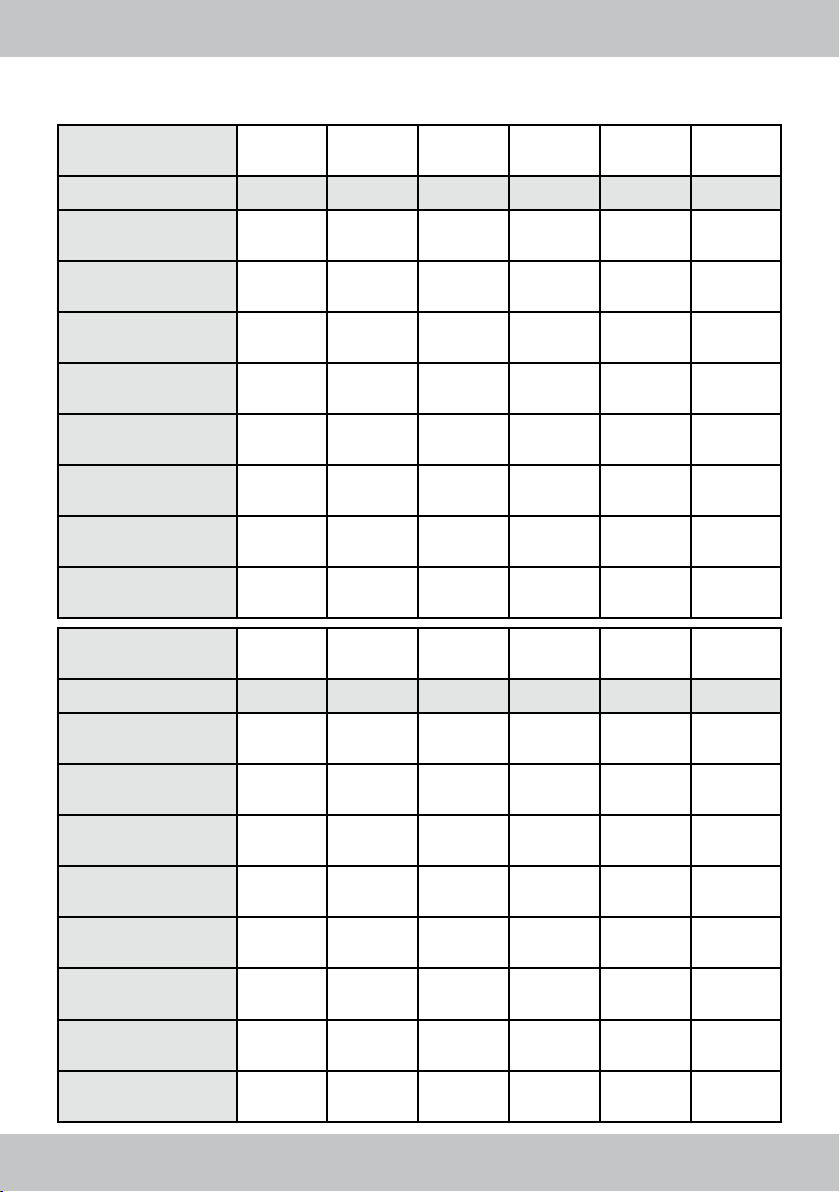
Personal workout information
Date
Exercise Sets
Balance board
Balance board with
handles
Balance board with
resistance bands
Twist board
Press-up board
Twist board with
resistance bands
Press-up board with
resistance bands
Stretching board
Date
Exercise Sets
Balance board
Repetitions
Repetitions
Sets
Sets
Repetitions
Repetitions
Sets
Sets
Repetitions
Repetitions
Balance board with
handles
Balance board with
resistance bands
Twist board
Press-up board
Twist board with
resistance bands
Press-up board with
resistance bands
Stretching board
13GB/IE
Page 14
Onnittelumme!
Olet hankkinut itsellesi korkealaatuisen tuotteen.
Tutustu tuotteeseen ennen ensimmäistä käyttöä.
Lue käyttöohje huolellisesti läpi. Käytä tuotetta
vain ohjeissa kuvatulla tavalla ja mainitussa
tarkoituksessa. Säilytä käyttöohje myöhempää
tarvetta varten. Jos annat tuotteen eteenpäin,
liitä käyttöohje tuotteen mukaan.
Sisältö
1 x kuntoilulauta
2 x kahva
2 x fitnessnauha
1 x suojamatto
1 x DVD-levy sis. harjoitteluohjeita
1 x juliste sis. harjoitteluohjeita
1 x käyttöohje
Tekniset tiedot
Kuntoilulaite vastaa standardia EN 957-1/2
luokka H
Käyttäjän maksimipaino: 100 kg
Mitat: n. 50 x 30 x 15cm
Tuotteen paino: n. 2.270 g
Fitnessnauhojen vastustaulukko
Pituus (cm): 120 140 160 185 230
Voima (N): 13 19,5 25 30 42
Määräystenmukainen käyttö
Tuote on tarkoitettu yksityiskäyttöön eikä sitä saa
käyttää kaupallisiin tai lääketieteellisiin tarkoituksiin tai hoitolaitteena.
Käyttöä koskevat
turvallisuusohjeet
Varoitus! Loukkaantumisvaara!
• Tätä kuntoilulautaa saa käyttää korkeintaan
100 kg painavat henkilöt. Älä käytä tuotetta,
jos painosi ylittää tämän rajoituksen.
• Kysy neuvoa lääkäriltäsi, ennen kuin aloitat
harjoittelun. Varmista, että tämäntyyppinen
harjoittelu ei vaaranna terveyttäsi.
• Säilytä käyttöohjetta ja harjoitteluohjeita aina
lähettyvilläsi.
• Noudata ehdottomasti tässä käyttöohjeessa
olevia harjoitteluohjeita! Muutoin voit vaar antaa terveytesi.
• Liikarasitus ja liiallinen harjoittelu saattavat
aiheuttaa vakavia vammoja. Muista lämmittää
lihakset ennen harjoittelua ja harjoittele
nykyisen kuntotasosi mukaan. Keskeytä har joittelu välittömästi, jos sinulla on kipuja, sinua
huimaa tai väsyttää ja ota yhteyttä lääkäriisi.
• Tarkista aina ennen käyttöä, että kuntoilulauta
on asennettu oikein kutakin harjoitusta varten.
• Käytä tuotetta vain kiinteällä, tasaisella pinna lla äläkä aseta sitä portaiden tai korokkeiden
läheisyyteen.
• Varmista, että kuntoilulauta on asetettu tukeva sti lattialle, ettei se pääse liukumaan paikalta an.
• Käytä aina tuotteeseen kuuluvaa suojamattoa,
jotta herkät lattiat (esim. parketti) voidaan
suojata vaurioilta.
• Tarvitset riittävän ison tilan, jotta voit harjoitella
turvallisesti. Pidä huolta, että laitteen ympärille
jää vähintään 1 m vapaata tilaa.
• Tuotetta saa käyttää vain yksi henkilö kerralla an.
• Kuntoilunauhoja saa käyttää ainoastaan kunto ilulaudan yhteydessä.
• Kun käytät tuotetta tasapainoilulautana yhdes sä kuntoilunauhojen kanssa älä koskaan asetu
kääntyvän levyn päälle.
Noudata erityistä varovai-
suutta – Lasten loukkaantumis vaara!
• Älä anna lasten käyttää tuotetta ilman val vontaa. Opasta heitä laitteen oikeassa käytös sä ja valvo käyttöä. Salli tuotteen käyttö vain,
jos lapsen henkinen ja ruumiillinen kehitys riit tävät laitteen käyttöön. Laitetta ei ole tarkoi tettu leluksi.
14
FI
Page 15
Kulumisesta johtuvat vaarat
• Tuotetta saa käyttää vain moitteettomassa
kunnossa. Tarkista tuote aina ennen käyttöä.
Kuntoilulaudan turvallisuus voidaan taata vain,
jos tuote tarkistetaan säännöllisesti, ettei siinä
ole vaurioita tai kulumia.
• Kuntoilunauhoja ei saa venyttää 2,30 m pitem miksi.
• Tarkista kuntoilunauhat säännöllisesti. Tarkista,
ettei niissä ole repeämiä tai muita vaurioita.
Vaurioituneita osia ei saa käyttää.
• Suojaa laitetta korkeilta lämpötiloilta ja kosteu delta.
• Käytä ainoastaan alkuperäisiä varaosia.
Harjoitteuluohjeita
Seuraavat harjoitukset kattavat vain osan mahdollisista harjoituksista. Lisää harjoituksia löydät
aihetta koskevasta kirjallisuudesta.
• Käytä mukavaa urheiluasua ja lenkkitossuja.
• Lämmitä lihakset aina ennen harjoittelua ja tee
loppuvenyttelyt. Lue alkulämmittelyä ja loppu venyttelyä koskevat suosituksemme.
• Varmista, että laitteen ympärillä on tarpeeksi
tilaa harjoitella.
• Tee liikkeet tasaisessa tahdissa.
• Harjoittele annettujen ohjeiden mukaisesti.
Huomio! Vältä liiallista
harjoittelua!
Harjoittelun alkuvaiheessa riittää 2-3 minuuttia
per harjoitus. Harjoitellessasi päivittäin voit
nostaa harjoitusajan 5-10 minuuttiin viikon
kestäneen harjoittelun jälkeen. Harjoittelun ei
tulisi kuitenkaan ylittää 1 tuntia.
• Pidä tarpeeksi pitkiä taukoja harjoitusten välis sä ja juo tarpeeksi.
Huomio!
• Keskeytä harjoittelu välittömästi, jos
sinulla on kipuja tai voit huonosti sekä
ota yhteyttä lääkäriisi.
• Älä venytä kuntoilunauhoja 2,30 m
pitemmiksi.
• Voimataulukosta näet, kuinka paljon
tarvitset voimaa, jotta voit vetää kun toilunauhoja tiettyyn pituuteen.
Voiman toleranssialue: +/- 20 %
(kuntoilunauhojen voimataulukko
katso kohdasta Tekniset tiedot).
Alkulämmittely ja venyttely
Lämmittele lihakset aina ennen harjoittelua ja
verryttele aina harjoittelun jälkeen. Seuraavassa
muutama helppo liike lämmittelyyn ja loppuverryttelyyn. Kukin liike tulisi toistaa 2-3 kertaa.
Kaula- ja niskalihasten
alkulämmittely
• Seiso rennossa asennossa. Taivuta pääsi
sivulle ja paina päätä kädelläsi rauhallisesti.
Toista liike kummallekin sivulle. Liike venyttää
hyvin kaulan lihaksia.
• Käännä päätä sivulta toiselle. Toista, kunnes
niskasi tuntuu rentoutuneelta.
Käsivarsien ja olkapäiden
alkulämmittely
• Pidä toinen käsivarsi poikittain ojennettuna
rintakehän yli ja paina sitä toisella kädellä
kohti rintakehää. Toista toisella kädellä.
Paina vain sen verran, että tunnet kevyen
vedon.
• Vie käsivarsi koukistettuna pään yli taaksepäin
niin, että kyynärpää osoittaa ylös. Paina toisel la kädellä kevyesti kyynärpäästä. Toista toisel la kädellä.
• Laita kädet ristiin selän takana ja vedä niitä
varovasti ylöspäin. Kun taivutat samalla ylä vartaloasi eteenpäin, lämmittävä vaikutus
ulottuu myös muihin lihaksiin.
• Rentouta olkapäät pyörittelemällä niitä varova sti – ensin eteenpäin sitten taaksepäin.
• Vedä olkapäät muutaman kerran korviin ja
päästä rentona alas. Muutaman toiston
jälkeen olkapäidesi tulisi tuntua lämpimiltä ja
rennoilta.
FI
15
Page 16
Reisilihasten lämmittely ja
venyttely
• Seiso selkä suorana, taivuta oikea jalka
taakse ja ota oikealla kädellä kiinni nilkasta.
Pysy asennossa hetki. Voit pitää toisella
kädellä kiinni esim. seinästä tai pöydästä.
Toista venytys toisella jalalla.
• Venytä sisäreidet. Ota askel sivulle – seiso
hajareisin paikallasi ja nojaa toisen jalan
puoleen. Pysy jonkin aikaa tässä asennossa,
ennen kuin vaihdat venytyksen toiselle puo lelle.
• Lämmittele myös nilkat. Nosta jalka lattiasta ja
pyörittele jalkaterää hitaasti ensin yhteen ja
sitten toiseen suuntaan. Tee sama toisella
jalalla.
Harjoitettavat lihasryhmät
Liikkeet vahvistavat pääasiallisesti
seuraavia lihasryhmiä:
kuva C
Tasapainolauta
kuva D
Tasapainolauta ja
fitnessnauhat
kuva E
Tasapainolauta ja
kahvat
kuva F
Punnerruslauta
kuva G
Punnerruslauta ja
fitnessnauhat
kuva H
Pyörivä levy
kuva I
Pyörivä levy ja
fitnessnauhat
Reisilihakset
Käsivarsi-, reisi- ja
olkapäälihakset
Käsivarsi-, olkapää- ja
rintalihakset
Käsivarsi-, reisi- ja
alaselän lihakset
Käsivarsi- ja
reisilihakset
Keskivartalon lihakset
Ylävartalon lihakset
Harjoittelu
Tasapainoilulauta (kuva C)
Huomautus!
Tämän harjoituksen saat suorittaa vain
jos pystyt liikuttamaan kunnolla nilkkaniveliäsi. Jos olet asiasta epävarma ota
yhteyttä lääkäriisi.
Huomio! Loukkaantumisvaara!
Älä koskaan asetu kääntyvän levyn
päälle kun käytät tuotetta tasapainoilulautana!
Liikkeen suositeltu kesto:
Aloittelijat: 2-3 minuuttia
Edistyneet: 5-10 minuuttia
Laudan kokoaminen ja harjoittelu
Tätä harjoitusta varten tarvitset lisäosista vain
suojamaton estämään laudan liukumisen. Avaa
laudan sivuilla olevat lukitukset ja ota fitnessnauhat ja kahvat esille. Sulje sitten lauta ja aseta se
suojamatolle.
• Asetu varovasti laudalle ja aloita tasapai noilu hitaasti keinuen sivulta toiselle. Tee liike
rauhallisesti ja tasaisesti. Voit levittää kädet, jos
se auttaa pitämään tasapainon paremmin.
• Kun pystyt pitämään tasapainon voit liikuttaa
käsiäsi kuten hitaasti kävellessäsi.
Nopeuta vauhtia vähitellen muistuttamaan
kevyttä juoksua.
• Kun olosi tuntuu varmalta voit heiluttaa käsiä
pääsi yläpuolella, niin että saat koko vartalon
mukaan liikkeeseen.
• Kokeile käsivarsillasi eri liikkeitä ja asentoja.
Tasapainolauta ja fitnessnauhat
(kuva D)
HUOMIO!
Tämän harjoituksen saat suorittaa vain,
jos nilkkanivelesi liikkuvat normaalisti.
Jos olet asiasta epävarma ota yhteyttä
lääkäriisi.
Älä koskaan asetu pyörivän levyn päälle, kun
käytät laitetta tasapainoiluun fitnessnauhojen
kanssa! Loukkaantumisvaara!
Nauhoja ei saa venyttää 2,30 m pitemmälle.
Voiman toleranssialue: +/- 20 %.
16
FI
Page 17

Liikkeen suositeltu kesto:
Aloittelijat: 2-3 minuuttia
Edistyneet: 5-10 minuuttia
Laudan kokoaminen ja harjoittelu
Lauta pysyy suljettuna myös tämän harjoituksen
aikana. Kiinnitä fitnessnauhat laudan molempiin
päihin. Vedä nauhojen päät hieman pidemmälle,
jotta voit pujottaa ne laudan sivuilla olevista
aukoista läpi. Poista nauhat harjoittelun jälkeen
vetämällä ne kevyesti venyttämällä aukoista ulos
(kuva A).
Aseta tasapainolauta suojamatolle.
• Ota nauhojen lenkeistä kiinni ja nouse varova sti laudalle.
• Aloita keinuminen varovasti liikkumalla sivulta
toiselle, kunnes olet löytänyt tasapainosi ja
olosi tuntuu varmalta.
• Suorista käsivartesi vuoronperään ylöspäin.
Kun oikea käsivarsi suoristuu ylöspäin oikea
jalka keinuu alaspäin – ja päinvastoin.
• Kun tunnet olosi varmaksi vaikeuta harjoitusta
liikuttamalla käsivarsiasi eteen ja taakse tai
liikuta niitä vuoronperään vasemmalle ja oike alle vartalosta poispäin.
• Tämä liike tehoaa vartalon kaikkiin lihaksiin.
Tasapainolauta ja kahvat
(kuva E)
Liikkeen suositeltu kesto:
Aloittelijat: 2-3 minuuttia
Edistyneet: 5-10 minuuttia
Laudan kokoaminen ja harjoittelu
Lauta pysyy suljettuna myös tämän harjoituksen
aikana. Työnnä kahvojen päät kuntoilulaudassa
oleviin reikiin (katso kuva B). Irrota kahvat harjoituksen jälkeen vetämällä niitä kevyesti ravistamalla. Suojamattoa voi käyttää tämän liikkeen
aikana myös polvien pehmusteena.
Pidä selkä suorana harjoituksen ajan.
Vältä notkistamasta selkää.
• Polvistu kumimatolle ja ota laudan kahvoista
kiinni. Taivuta itseäsi hieman eteenpäin ja
aloita kevyt keinuminen. Pidä selkä suorana.
• Jos tunnet olosi varmasti, vaikeuta liikettä
hieman asettumalla lankkuasentoon.
Aseta lauta kumimatolle, ota kahvoista kiinni
ja laita jalat noin kaksi kolmasosaa vartalon
pituudesta taaksepäin. Vältä taas notkistama sta selkää.
Punnerruslauta (kuva F)
Liikkeen suositeltu kesto:
Aloittelijat: 2-3 minuuttia
Edistyneet: 5-10 minuuttia
Laudan kokoaminen ja harjoittelu
Irrota laudasta alaosa, kun haluat käyttää sitä
punnerruslautana. Avaa laudan sivuilla olevat
lukitukset ja aseta alaosa sivuun. Kahvat jätetään
laudan yläosaan. Pidä selkä suorana harjoituksen ajan. Vältä notkistamasta selkää.
• Polvistu matolle laudan eteen ja ota laudan
kahvoista kiinni. Punnerra hitaasti ylös ja alas.
• Voit muunnella harjoitusta koukistamalla polvet
ja ristimällä nilkat. Tämä on muunnelma etuno japunnerruksesta.
• Vahvista reisilihaksia nostamalla toista jalkaa
nilkka edellä muutaman kerran rauhallisesti
ylös. Vaihda sitten jalkaa. Voit vaihtaa jalkaa
myös jokaisen liikkeen jälkeen.
• Voit nostaa harjoituksen vaikeusastetta nosta malla molemmat polvet ylös ja suoristamalla
jalat taaksepäin. Tee sitten etunojapunnerruk sia. Pidä selkä suorana äläkä rasita itseäsi
liikaa. Harjoittelun kannalta tärkeämpää on
sen oikea suoritus kuin punnerrusten lukumää rä.
Punnerruslauta ja fitnessnauhat
(kuva G)
Liikkeen suositeltu kesto:
Aloittelijat: 2-3 minuuttia
Edistyneet: 5-10 minuuttia
Laudan kokoaminen ja harjoittelu
Seuraavassa harjoituksessa kahvat jätetään
lautaan. Tämän lisäksi fitnessnauhat täytyy kiinnittää laudan molempiin päihin. Vedä nauhojen
päät hieman pidemmälle, jotta voit pujottaa ne
laudan sivuilla olevista aukoista läpi.
17
FI
Page 18

• Kiinnitä kuntoilunauhojen lenkit jalkoihisi.
1. Asetu samaan asentoon kuin harjoitellessasi
punnerruslaudalla ilman kuntoilunauhoja.
Kätesi pitävät kahvoista kiinni, jalat on asetettu
rinnakkain lattialle.
• Nosta polvi lattiasta tässä asennossa ja ve nytä jalkaa rauhallisin liikkein muutaman
kerran ylös taaksepäin. Tee sama toisella jalal la. Voit vaihtaa jalkaa myös jokaisen venytyk sen jälkeen.
2. Asetu selinmakuulle. Aseta pääsi toisinpäin
käännetylle kuntoilulaudalle päätä ja selkäran kaa tukemaan.
• Aseta jalat makuuasennossa, niin kuin seisoisit
sen päällä, 90° kulmaan laudalle.
• Pidä kuntoilunauhojen kahvoista kiinni ja pidä
niitä kehosi vieressä 90° kulmassa.
• Jalat pysyvät suoristettuina ja painavat punner ruslautaa vasten.
• Liikuta nyt vuoronperään vasempaa ja oikeaa
kättä olkapäiden suuntaan.
3. Asetu istumaan kumimatolle. Aseta jalat
istuvassa asennossa 90° kulmaan punner ruslaudalle.
• Pidä kuntoilunauhojen kahvoista kiinni.
• Koukista käsivarret kehosi molemmin puolin ja
kallista selkääsi hieman taaksepäin. Olkapäät
ja käsivarret pysyvät alkuasennossa.
Pyörivä levy (kuva H)
Liikkeen suositeltu kesto:
Aloittelijat: 2-3 minuuttia
Edistyneet: 5-10 minuuttia
Laudan kokoaminen ja harjoittelu
Tässä harjoituksessa tarvitset vain laudan yläosan. Irrota kahvat ja fitnessnauhat kuten edellä
on neuvottu.
• Aseta yläosa matolle ja astu varovasti
pyörivälle levylle.
• Pyöritä levyä hitaasti molempiin suuntiin,
kunnes tunnet olosi varmaksi. Levyllä voit
tehdä 40° käännöksiä molempiin suuntiin.
• Levitä kätesi, pitääksesi paremmin tasapainon.
Harjoituksen edetessä voit liikuttaa käsiäsi
sivuilla vartalon kääntyessä.
• Voit nostaa harjoituksen vaikeusastetta ja
vaikutusta koukistamalla polviasi.
• Kun tunnet olosi varmaksi voit muuttaa käsiesi
asentoa. Nosta ne esim. pääsi yläpuolelle
pyörittäessäsi levyä.
• Voit pitää ”aktiivisen tauon” asettamalla
laudan leveälle jakkaralle ja tehdä harjoituk sen istuallasi.
Kääntyvä lauta ja fitnessnauhat
(kuva I)
Liikkeen suositeltu kesto:
Aloittelijat: 2-3 minuuttia
Edistyneet: 5-10 minuuttia
Laudan kokoaminen ja harjoittelu
Tätä harjoitusta varten tarvitset vain kuntoilulaudan yläosan fitnessnauhat. Nauhat kiinnitetään
laudan sivuille kuten edellä on neuvottu. Aseta
lauta matolle.
Nauhaa ei saa venyttää 2,30 m pitemmälle.
Voiman toleranssialue: +/- 20 %.
• Aloita hitaasti. Käytä fitnessnauhoja ensin
tasapainon vakauttamiseen. Tee samat liikkeet
kuten käyttäessäsi pyörivää levyä ilman nauho ja.
• Voit tehdä 40° käännöksiä molempiin suuntiin.
• Kun tunnet olosi varmaksi liikuta myös käsiäsi.
Kokeile käsiliikkeitä eri suuntiin. Liikuta käsiäsi
samanaikaisesti tai vaihtele vasemman ja
oikean käden välillä. Voit itse päättää nopeu den ja vaikeusasteen.
• Asetu sitten varovasti laudalle pyörivän levyn
viereen. Suorista molemmat käsivartesi
vuoronperään pään yläpuolelle. Muista pitää
vartalosi suorana. Liike lähtee yksistään käsi stä.
• Muuta liikettä jonkin ajan päästä niin, että
liikutat käsiä samanaikaisesti ylös. Voit tehdä
liikkeen myös eteen-taakse.
HUOMAUTUS! Seuraavat harjoitukset
sopivat myös hyvin venyttelyyn ennen
ja jälkeen harjoittelun.
18
FI
Page 19

Venyttelylauta (kuva J)
Liikkeen suositeltu kesto:
Aloittelijat: 2-3 minuuttia
Edistyneet: 5-10 minuuttia
Laudan kokoaminen ja harjoittelu
Tarvitset vain laudan alaosan kun käytät lautaa
venyttelyyn. Aseta se ylösalaisin kumimatolle.
• Asetu istumaan lattialle laudan eteen ja aseta
jalkasi laudalle. Jalkojen tulee olla mahdolli simman suorina.
• Kosketa molemmin käsin jalkateriä ja taivuta
päätä kohti jalkoja. Toista harjoitus muutaman
kerran.
• Ota sitten toinen jalka pois laudalta ja aseta
se lattialle sivulle suoristettuna. Toista harjoitus
oikealla ja sitten vasemmalla jalalla.
• Ota haara-askel eteen ja aseta toinen jalka
laudalle. Nojaa hitaasti laudalla olevan jalan
suuntaan. Mitä enemmän koukistat jalkaa,
sitä tehokkaammin harjoitus vaikuttaa.
Nosta vaikeusastetta liikuttamalla takana
olevaa jalkaa kauemmaksi taaksepäin.
Pysy tässä asennossa jonkin aikaa ja vaihda
sitten jalkaa.
• Voit tämän lisäksi koskettaa maata takana
olevan jalan polvella. Näin venytät myös
reiden yläosaa.
• Istumaannousut:
Huomio! Istumaannousu saattaa vahingoittaa
selkärankaa.
Vatsalihaksia voit harjoittaa asettamalla ol
kapäät laudalle selkä lautaan päin. Aseta
kätesi rentoina niskaan ja liikuta ylävartaloasi
hitaasti polviesi suuntaan. Katso eteenpäin,
älä notkista selkää. Kädet tukevat niskaa
kevyesti päätä painamatta.
• Venytä reisien takaosaa asettumalla laudalle
niin, että varpaat osoittavat hieman ylöspäin.
Pidä jalat suorina. Yritä sitten koskettaa var paita sormenpäilläsi. Toista harjoitus muuta man kerran.
Hoito ja säilytys
Säilytä tuote aina kuivassa, puhtaassa ja
huoneenlämpöisessä paikassa.
TÄRKEÄÄ! Puhdista vain pelkällä vedellä, älä
käytä koskaan voimakkaita puhdistusaineita.
Kuivaa puhdistusliinalla.
Hävittämisohjeet
Hävitä pakkaus ja tuote ympäristöystävällisesti
lajittelemalla. Hävitä tuote jätehuoltoliikkeen tai
kuntasi jätehuollon kautta. Noudata voimassa
olevia määräyksiä.
3 vuoden takuu
Tämä tuote on valmistettu erityistä tarkkuutta
noudattaen ja jatkuvan tarkastuksen alaisena.
Tälle tuotteelle saat kolmen vuoden takuun ostopäivästä lähtien. Säilytä kassakuitti huolellisesti.
Takuu koskee ainoastaan materiaali- ja valmistusvirheitä ja raukeaa, jos tuotetta käytetään
vääränlaisesti tai ei määräysten mukaisesti.
Tämä takuu ei rajoita laissa määrättyjä oikeuksiasi, erikoisesti koskien takuu- ja reklamointioikeuksia.
Mahdollisissa reklamaatiotapauksissa ota meihin
yhteyttä soittamalla allaolevaan asiakaspalvelunumeroon tai lähettämällä viesti sähköpostitse.
Asiakaspalvelijamme sopivat kanssasi tarvittavista toimenpiteistä mitä pikimmin. Palvelemme
sinua joka tapauksessa henkilökohtaisesti.
Mahdolliset korjaukset, jotka on suoritettu
tämän takuun, laillisen reklamointioikeuden tai
harkintaoikeuden perusteella eivät pidennä
takuuaikaa. Tämä koskee myös vaihdettuja ja
korjattuja osia. Takuuajan päätyttyä suoritetut
korjaukset ovat maksullisia.
IAN: 93156
Huolto Suomi
Tel.: 010309 3582
E-Mail: deltasport@lidl.fi
Varaosia tuotteeseesi löydät myös osoitteesta:
www.delta-sport.com, välilehdestä Palvelu - Lidl varaosapalvelu
19
FI
Page 20
Harjoittelutaulukko
Päivämäärä
Liike Sarjat Toistot Sarjat Toistot Sarjat Toistot
Tasapainolauta
Tasapainolauta ja
kahvat
Tasapainolauta ja
fitnessnauhat
Pyörivä levy
Punnerruslauta
Pyörivä levy ja
fitnessnauhat
Punnerruslauta ja
fitnessnauhat
Venyttelylauta
Päivämäärä
Liike Sarjat Toistot Sarjat Toistot Sarjat Toistot
Tasapainolauta
Tasapainolauta ja
kahvat
Tasapainolauta ja
fitnessnauhat
Pyörivä levy
Punnerruslauta
Pyörivä levy ja
fitnessnauhat
Punnerruslauta ja
fitnessnauhat
Venyttelylauta
20
FI
Page 21

21FI
Page 22

Grattis!
Med ditt köp har du bestämt dig för en högvärdig produkt. Lär känna produkten innan första
användningen. För detta ändamål bör du noga
läsa igenom efterföljande bruksanvisning.
Använd produkten endast i överensstämmelse
med beskrivningen och endast för nämnda
användningsändamål. Förvara denna manual
väl. Om du ger produkten vidare glöm inte att
samtidigt överlämna alla handlingar.
Innehåll
1 x Fitness Board
2 x Handtag
2 x Fitnessband
1 x Fitnessmatta
1 x DVD med träningsexempel
1 x Affisch med träningsexempel
1 x Bruksanvisning
Tekniska data
Träningsredskapet motsvarar EN 957-1/2
Klass H
Max brukarvikt: 100 kg
Mått: ca 50 x 30 x 15 cm
Artikelns vikt: ca 2.270 g
Krafttabell expander
Längd (cm): 120 140 160 185 230
Kraft (N): 13 19,5 25 30 42
Ändamålsenlig användning
Redskapet har konstruerats för privat användning
och får ej användas för kommersiella, medicinska eller terapeutiska ändamål.
Säkerhetsinformation för
användning
Varning! Risk för personskador!
• Denna Fitness Board är konstruerad för en
maximal brukarvikt på 100 kg. Använd inte
produkten om du väger över 100 kg.
• Konsultera läkare innan du börjar träna.
Förvissa dig om, att ditt hälsotillstånd är
lämpligt för träningen.
• Förvara alltid bruksanvisningen med övningsin struktionerna i närheten.
• Håll dig exakt till träningsinstruktionerna, som
beskrivs i denna handledning! Möjlig risk för
hälsoskador.
• Vid för stor ansträngning och överträning
föreligger risk för allvarliga personskador.
Glöm inte att alltid värma upp före träning,
och träna inte hårdare än din prestations förmåga tillåter. Avbryt omedelbart träningen
på artikeln och kontakta läkare vid besvär,
svaghetskänsla eller trötthet.
• Kontrollera före varje användning, om din
Fitness Board monterats korrekt för respektive
övning.
• Använd denna artikel endast på hårda, jämna
underlag och placera den inte in närheten av
trappor eller avsatser.
• Förvissa dig om, att din Fitness Board står sä kert och rakt på golvet och inte kan halka
iväg.
• Använd alltid den medföljande skyddsmattan,
för att skydda ömtåliga golv (t.ex. parkett) mot
skador.
• För en säker träning behöver du tillräckligt
med plats. Beakta vid träningen, att du behö ver minst 1 m fritt utrymme kring hela tränings redskapet.
• Artikeln får endast användas av en person i
taget.
• Träningsbanden får endast användas tillsam mans med din Fitness Board.
• Ställ dig aldrig på plattan när du använder
produkten som balansboard med tränings banden.
Se upp – risk för att barn
skadar sig!
• Låt barn aldrig använda produkten utan
uppsikt. Instruera dem om rätt användning av
redskapet och håll dem under uppsikt.
Låt barnet endast använda redskapet om
barnets psykiska och fysiska förmåga tillåter
det. Redskapet är inte lämpligt att användas
som leksak.
22
SE
Page 23

Risker på grund av slitage
• Artikeln får endast användas i felfritt skick.
Kontrollera artikeln före varje användning.
Din Fitness Boards säkerhet kan endast ga ranteras, om den kontrolleras regelbundet med
avseende på skador och slitage.
• Träningsbanden får inte dras ut längre än till
2,30 m.
• Kontrollera träningsbanden regelbundet.
Kontrollera dem med avseende på sprickor
och skador. Defekta delar får inte användas.
• Skydda ditt redskap mot höga temperaturer
och fukt.
• Använd endast original reservdelar.
Träningsinformation
Efterföljande övningar är endast ett urval.
Fler övningar hittar du i tillämplig facklitteratur.
Använd bekväma sportkläder och gymnastikskor.
• Värm upp före varje träning och avsluta
träningen långsamt. För detta ändamål läs
våra rekommendationer för uppvärmning och
nedvarvning.
• Se till, att du har tillräckligt med plats runt om
när du tränar.
• Utför övningarna med ett regelbundet tempo.
• Håll dig till de angivna rörelseförloppen.
OBS! Undvik för hög tränings-
intensitet!
När du börjar med träningen räcker det bra
med 2-3 minuter per övning. Vid daglig trä ning kan du efter ca. en vecka öka intensiteten
till 5-10 minuter. Den maximala träningstiden
bör dock inte överskrida 1 timme.
• Gör tillräckligt med paus mellan övningarna
och glöm inte att dricka.
OBS!
• Vid besvär eller illamående måste
övningarna avbrytas omedelbart och
läkare uppsökas.
• Sträck inte träningsbanden längre än
2,30 m.
• Krafttabellen visar vilken kraft som
krävs för att man ska kunna dra
ut träningsbanden till motsvarande
längd. Toleransområde för kraft:
+/- 20 % (krafttabell expander se
tekniska data).
Uppvärmning och stretching
Ta tillräckligt med tid före och efter varje träning
för att värma upp och varva ner. Nedan visar vi
några enkla övningar för detta ändamål. Du bör
upprepa resp. övningar 2 till 3 gånger.
Uppvärmning av musklerna i
halsen och nacken
• Stå avslappnat och för huvudet mjukt med en
hand först till vänster och sedan till höger.
Denna övning sträcker ut halsens sidor.
• Gör sedan cirkelrörelser i båda riktningarna
med huvudet. Upprepa dessa övningar tills
nacken känns mjuk och avslappnad.
Uppvärmning av armar och
axlar
• Håll en arm utsträckt framför bröstet och tryck
den försiktigt mot kroppen med den andra
handen. Byt arm efter en liten stund. Tänk på
att bara trycka så hårt att du endast känner en
liten tänjning i armen.
• Böj nu en arm i taget över huvudet och bakåt
och tryck ned armbågen lätt med den andra
handen.
• Koppla ihop händerna bakom ryggen och dra
dem försiktigt uppåt. Om du nu böjer över
kroppen framåt så får alla muskler en optimal
uppvärmning.
• För att göra axlarna rörligare, gör mjuka
cirkelrörelser med båda axlarna – först en
stund åt det ena hållet och sedan åt det andra.
• Dra upp axlarna några gånger och låter dem
falla ner igen. Efter ett par gånger bör dina
axlar kännas varma och mjuka.
SE
23
Page 24

Uppvärmning och stretching av
benmusklerna
• Ställ dig rakt och håll fast det böjda högra
benet en stund med handen. För att lättare
kunna utföra denna övning kan du hålla fast
dig med en hand, t.ex. i väggen eller i ett
bord. Denna stretchövning upprepar du sedan
med det andra benet.
• Gör ett utfallssteg åt sidan – ställ dig bredbent
och böj dig ner något med det ena benet.
Håll denna position ett tag innan du byter ben.
Med denna övning tänjer du insidan av låren.
• Värm upp dina fotleder genom att lyfta den
ena foten och göra långsamma cirkelformade
rörelser, först i den ena och sedan i den andra
riktningen. Byt fot efter ett tag.
Översikt över tränade
muskelgrupper
Följande muskelgrupper tränas
huvudsakligen i samband med resp.
övning:
Bild C
Balance board
Bild D
Balance board med
träningsband
Bild E
Balance board med
handtag
Bild F
Press-up board
Benmuskler
Armar, benmuskler
och axlar
Armar, axlar och
bröstmuskler
Armar, ben och nedre
ryggmuskulaturen
Träning
Balance board (bild C)
Hänvisning!
Denna övning får endast utföras om
dina fotleder är fullt rörliga. Uppsök
läkare om du är tveksam!
OBS! Risk för personskador!
Ställ dig aldrig på den roterande skivan
när du använder redskapet som balansboard!
Rekommenderad träningstid:
Nybörjare: 2-3 minuter
Erfarna utövare: 5-10 minuter
Montering och träning
För denna övning kan du använda underläggsmattan från extradelarna som halkskydd.
Öppna din Board på luckorna på sidorna och
ta ut träningsbanden och handtagen. Därefter
stänger du din Board och ställer den på underläggsmattan.
• Ställ dig försiktigt på din Fitness Board och
börja gunga lätt från sida till sida. Utför lugna,
regelbundna rörelser. Använd armarna för att
hålla balansen.
• När du har fått en känsla för rörelsen kan du
även röra på armarna, precis som när du går
sakta. Öka hastigheten efter hand till en lätt
joggning.
• När du känner dig säker kan du svänga med
armarna över huvudet, så att hela kroppen
tränas.
• Prova olika rörelser och positioner med armar
na.
Bild G
Press-up board med
träningsband
Bild H
Twist board
Bild I
Twist board med
träningsband
24
SE
Armar och
benmuskler
Bålens muskler
Överkroppen
Page 25

Balance board med träningsband (bild D)
OBS!
Denna övning får endast utföras om din
fotled är fullkomligt rörlig. Konsultera
läkare om du är osäker!
Ställ dig aldrig på den roterande skivan när du
använder redskapet som Balanceboard!
Risk för personskador!
Bandet får inte töjas längre än 2,3 m.
Toleransområde för kraft: +/- 20 %.
Rekommenderad träningstid:
Nybörjare: 2-3 minuter
Erfarna utövare: 5-10 minuter
Montering och träning
Även vid denna övning är din Board stängd. Sätt
fast träningsbanden på Fitness Boardens båda
sidor så här: Dra ändarna underifrån genom
hålen i sidorna på överdelen. För att ta bort
träningsbanden igen efteråt drar du ut dem ur
spåren med en lätt töjning (bild A).
Ställ din Balanceboard på gummimattan.
• Ta tag i träningsbandens handtag och ställ dig
försiktigt på din Board.
• Börja att gunga försiktigt i sidled tills du hittat
balansen och fått den rätta känslan för rörel sen.
• Sträck omväxlande armarna uppåt. Låt den
högra armen peka uppåt när det högra benet
gungar nedåt – och vice versa.
• När du känner dig säker ökar du intensiteten
och för armarna framåt och bakåt, eller rör
armarna omväxlande till vänster och höger
bort från kroppen.
• Med denna övning tränar du alla muskelgrup per i din kropp!
Balance board med handtag
(bild E)
Rekommenderad träningstid:
Nybörjare: 2-3 minuter
Erfarna utövare: 5-10 minuter
Montering och träning
Vid denna övning är din Board stängd. Sätt fast
handtagens ändar i hålen på din Fitness Board
(se bild B).
För att senare ta bort handtagen drar du hårt i
dem samtidigt som du skakar dem lätt. Gummimattan används vid denna övning som underlag
för ditt knä. Håll ryggen rak. Undvik svankrygg.
• Ställ dig på knä framför din Fitness Board, ta
tag i handtagen och böj dig lätt framåt. Börja
med en lätt gungning. Håll ryggen rak.
• Om du känner dig tillräckligt stark kan du
fortsätta övningen i armhävningsställning.
Det gör du genom att ställa din Board på
gummimattan, ta tag i handtagen och placera
fötterna bakåt motsvarande ca två tredjedelar
av din kroppslängd. Undvik svankrygg även
här.
Press-up board (bild F)
Rekommenderad träningstid:
Nybörjare: 2-3 minuter
Erfarna utövare: 5-10 minuter
Montering och träning
För att använda din Fitness Board som Press-up
board behöver du nu endast ta bort undersidan.
Det gör du genom att öppna luckorna på sidorna och ta bort underdelen. Handtagen ska ligga
kvar på din Boards överdel.
Håll alltid ryggen rak när du utför dessa övningar. Undvik svankrygg.
• Ställ dig på knä på gummimattan framför din
Fitness Board och ta tag i handtagen. Rör nu
sakta kroppen upp och ner.
• Du kan variera denna övning genom att lyfta
fötterna från golvet och korsa dem bakom
rumpan för att på så sätt göra ett slags arm hävningar.
• För att stärka benmusklerna går du ner på
knä, lyfter ett knä från golvet och sträcker
benet sakta ett par gånger bakåt uppåt.
Därefter byter du ben. Du kan även byta efter
varje gång du sträcker.
• För att öka svårighetsgraden lyfter du ditt knä
från golvet och sträcker ut benen bakåt.
Gör nu armhävningar. Håll ryggen rak och
överansträng dig inte. För träningseffekten är
det viktigare att övningen utförs rätt än att den
upprepas många gånger.
SE
25
Page 26

Press-up board med träningsband (bild G)
Rekommenderad träningstid:
Nybörjare: 2-3 minuter
Erfarna utövare: 5-10 minuter
Montering och träning
Under efterföljande övning ska handtagen ligga
kvar på din Board. Dessutom ska träningsbanden fästas på din Fitness Boards båda sidor.
För att göra detta, dra i bandens ändar och för
in dem i de öppningar som finns på din Boards
sidor.
• Sätt fast träningsbanden på dina fötter med
hjälp av öglorna.
1. Inta samma kroppsställning som vid övningen
på din Press-up board utan träningsband.
Med händerna tar du tag om handtagen,
fötterna befinner sig parallellt på golvet.
• I denna position lyfter du ett knä från golvet
och sträcker benet med lugna rörelser några
gånger bakåt uppåt. Därefter byter du ben.
Du kan också byta efter varje sträckning.
2. Lägg dig rakt på ryggen. Som stöd för huvud
och ryggrad placerar du ditt huvud på din
Fitness Boards bakvända undersida.
• Ställ i liggande position dina fötter upp, precis
som när du står, i 90° vinkel på din board.
• Ta träningsbandens handtag i händerna och
håll dem i 90° vinkel vid sidan på kroppen.
• Benen är sträckta hela tiden och utövar ett
mottryck mot din Press-up board.
• Rör nu omväxlande den vänstra och högra
handen i riktning mot axeln.
3. Sätt dig på gummimattan. Fötterna placerar
du i sittande position i 90° vinkel på din
Press-up board.
• Ta träningsbandens handtag i händerna.
• Vinkla armarna bredvid din kropp och luta
ryggen lätt bakåt. Därvid stannar axlar och
armar i utgångsläget.
Twist board (bild H)
Rekommenderad träningstid:
Nybörjare: 2-3 minuter
Erfarna utövare: 5-10 minuter
Montering och träning
För den här övningen behöver du endast ovansidan på din Fitness Board. Ta bort handtagen
och träningsbanden enligt beskrivningen ovan.
• Ställ ovansidan på gummimattan och ställ dig
försiktigt på din Twist board.
• Börja med långsamma vridrörelser tills du
känner dig säker. Med din Twist board är
vridrörelser upp till 40° i båda riktningar
möjliga.
• Använd dina armar för att hålla balansen.
Senare kan du låta armarna följa med
rörelserna i sidled.
• Du kan öka svårighetsgraden genom att gå
ned på knä under övningen och sedan resa
dig igen.
• När du känner dig säker kan du förändra
armarnas position. Lyft dem t.ex. över huvudet
medan du utför rörelsen.
• För en “aktiv paus“ ställer du din Twist board
på en bred pall och utför övningarna sittande.
Twist board med träningsband
(bild I)
Rekommenderad träningstid:
Nybörjare: 2-3 minuter
Erfarna utövare: 5-10 minuter
Montering och träning
För denna övning behöver du endast ovandelen
på din Fitness Board och träningsbanden.
Dessa monteras på sidorna enligt beskrivningen.
Ställ din Board på gummimattan.
Bandet får inte töjas längre än 2,3 m.
Toleransområde för kraften: +/- 20 %.
• Börja långsamt. Använd träningsbanden som
balanshjälp till en början. Utför samma
rörelser som vid träningen med din Twist board
utan band.
• Det är möjligt att utföra vridrörelser i sidled
upp till 40° i båda riktningarna.
26
SE
Page 27

• När du känner dig säker kommer armarna till
användning. Prova med armrörelser i olika rik tningar. Rör armarna samtidigt eller rör vänstra
och högra armen omväxlande. Du bestämmer
själv tempo och svårighetsgrad.
• Ställ dig nu försiktigt vid sidan av twistern (den
roterande skivan) på din Fitness Board.
Sträck ut armarna en och en åt sidan och upp
över huvudet. Se till att hålla kroppen rak.
Det är armarna som står för rörelsen.
• Efter ett tag använder du båda benen samti digt. Du kan även utföra denna rörelse framåt.
TIPS: De efterföljande övningarna är
också bra som stretchövningar före och
efter träningen med din Fitness Board.
Stretching board (bild J)
Rekommenderad träningstid:
Nybörjare: 2-3 minuter
Erfarna utövare: 5-10 minuter
Montering och träning
För att använda din Fitness Board som Stretching-board behöver du endast underdelen.
Lägg den omvänd på gummimattan.
• Sätt dig på golvet framför din Fitness Board
och lägg upp fötterna på den. Benen ska vara
så sträckta som möjligt.
• Ta tag om dina fötter med händerna och dra
ditt huvud i riktning mot knäna. Upprepa övnin gen ett antal gånger.
• Ta nu ner ett ben från din Fitness Board och
placera det utsträckt i sidled på golvet.
Upprepa övningen omväxlande med det
högra och vänstra benet.
• Ställ dig med ett utfallssteg framåt – med ett
ben på din Fitness Board. Sträck dig långsamt
framåt samtidigt som du böjer på det främre
benet. Ju djupare du böjer benet, desto inten sivare är övningen. För att öka svårighets graden flyttar du det bakre benet längre bak.
Håll ställningen ett ögonblick och byt sedan
ben.
• Du kan dessutom röra vid golvet med ditt
bakre knä. På detta sätt sträcker du ut det
övre låret ytterligare.
• Situps:
OBS! Situps kan orsaka skador på ryggraden.
För att träna magmusklerna, lägg dig på rygg
med axlarna mot din Board. Placera händer na löst bakom huvudet och rör kroppen sakta
i riktning mot knäna. Titta framåt och undvik
svankrygg. Händerna vilar på bakhuvudet
utan att trycka.
• För att tänja hela den bakre benmuskulaturen
ställer du dig på din Board med tårna pekan de uppåt. Håll benen sträckta. Försök nu att
röra vid tårna med dina fingertoppar.
Upprepa övningen ett antal gånger.
Skötsel och förvaring
Redskapet måste alltid förvaras torr och ren i ett
tempererat utrymme.
VIKTIGT! Får endast rengöras med vatten, aldrig
med starka rengöringsmedel. Torka torrt med en
trasa.
Information om
avfallshantering
Förpackning och redskap måste källsorteras och
avfallshanteringen utföras miljövänligt! Låt ett
auktoriserat företag eller kommunen ta hand om
avfallshanteringen. Beakta gällande föreskrifter.
SE
27
Page 28

3 års garanti
Produkten är producerad med stor noggrannhet
och under ständig kontroll. Du får tre års garanti
på produkten från och med köpdatumet.
Spara ditt kassakvitto. Garantin gäller endast för
material- och fabrikationsfel och upphör att gälla
vid felaktig eller icke ändamålsenlig användning.
Dina lagliga rättigheter, i synnerhet garantirätter,
begränsas ej av denna garantin.
Vid eventuella reklamationer, vänd dig till nedanstående service-hotline eller maila oss.
Våra servicemedarbetare kommer att i samråd
med dig fastlägga den fortsatta handläggningen. Du erhåller alltid en personlig konsultation.
Garantitiden förlängs ej på grund av reparationer som utförts på grund av garanti, lagstadgad
garanti eller kulans. Detta gäller även för utbytta
och reparerade delar.
Reparationer som måste utföras efter garantins
utgång är kostnadspliktiga.
IAN: 93156
Service Sverige
Tel.: 0770 930739
E-Mail: deltasport@lidl.se
Service Suomi
Tel.: 010309 3582
E-Mail: deltasport@lidl.fi
Reservdelar till din produkt hittar du dessutom på:
www.delta-sport.com, under rubriken service - Reservdelsservice Lidl
28
SE
Page 29

Personliga träningsdata
Datum
Övning Set Reps Set Reps Set Reps
Balance-board
Balance-board med
handtag
Balance-board med
träningsband
Twist-board
Press-up-board
Twist-board med
träningsband
Press-up-board med
träningsband
Stretching-board
Datum
Övning Set Reps Set Reps Set Reps
Balance-board
Balance-board med
handtag
Balance-board med
träningsband
Twist-board
Press-up-board
Twist-board med
träningsband
Press-up-board med
träningsband
Stretching-board
SE
29
Page 30

Tillykke!
Med dit køb har du valgt et kvalitetsprodukt.
Gør dig fortrolig med produktet inden den første
ibrugtagning. Læs i denne forbindelse opmærksom den efterfølgende brugsvejledning.
Brug kun produktet som beskrevet og til de oplyste formål. Gem denne vejledning godt. Hvis du
giver produktet videre til tredje, giv ligeledes alle
bilag med.
Levering
1 x Fitness-board
2 x Greb
2 x Kondibånd
1 x Kondimåtte
1 x DVD med træningseksempler
1 x Poster med træningseksempler
1 x Brugervejledning
Tekniske data
Træningsapparatet svarer til EN 957-1/2
klasse H
Maks. brugsvægt: 100 kg
Mål: ca. 50 x 30 x 15 cm
Artikelvægt: ca. 2.270 g
Krafttabel Ekspander
Længde (cm): 120 140 160 185 230
Kraft (N): 13 19,5 25 30 42
Bestemmelsesmæssig
anvendelse
Artiklen er udviklet til privat brug og må ikke
anvendes til kommercielle, medicinske eller
terapeutiske formål.
Sikkerhedshenvisninger
til brug
Advarsel! Fare for kvæstelser!
• Dette fitnessboard er beregnet til en maks.
kropsvægt på 100 kg. Anvend ikke produktet,
når Deres kropsvægt ligger over det.
• Konsulter Deres læge inden De begynder med
træningen. Vær sikker på at De sundhedsmæs sigt er egnet til træningen.
• Opbevar altid betjeningsvejledningen med
øvelsesanvisningerne i nærheden.
• Hold Dem strengt til træningsanvisningerne,
som er angivet i denne vejledning! Ellers
består der risiko for sundhedsmæssige skader.
• Ved for stor anstrengelse og overtræning er
der fare for alvorlige skader. Tænk altid på
at varme op inden træningen og træn som det
svarer til Deres aktuelle ydeevne. Ved lidelser,
svaghedsfornemmelse eller træthed afbryd
træningen på artiklen omgående og kontakt
Deres læge.
• Kontrollér inden hver brug om fitness-boarded
blev monteret korrekt til hver enkelt øvelse.
• Brug artiklen kun på fast jævn undergrund
og stil den ikke op i nærheden af trapper eller
forhøjninger.
• Kontrollér at fitness-boarded står sikkert og lige
på gulvet, så det ikke rutsjer væk.
• Anvend altid den medleverede beskyttelses måtte for at beskytte sarte gulve (f.eks. parket)
mod skader.
• For en sikker træning har De brug for tilstræk kelig plads. Bemærk at der i hver retning er
mindst 1 meter afstand til apparatet ved
træningen.
• Artiklen må altid kun bruges af en person ad
gangen.
• Træningsbåndene må udelukkende bruges i
forbindelse med fitness-boarded.
• Når De anvender produktet som balance board med træningsbånd, så stil Dem aldrig
op på drejeskiven.
Særlig advarsel – fare for
børnekvæstelser!
• Lad børn ikke bruge dette produkt uden at
være under opsyn. Henvis til den rigtige
anvendelse af apparatet og behold opsynet.
Tillad kun brugen, når børnenes åndelige
eller kropsmæssige udvikling tillader dette.
Dette apparat er ikke egnet som legetøj.
30
DK
Page 31

Farer gennem slid
• Artiklen må kun anvendes i fejlfri tilstand.
Kontrollér artiklen inden hver brug. Fitness boardeds sikkerhed kan kun garanteres, når
det regelmæssigt kontrolleres for skader og
slid.
• Træningsbåndene må ikke strækkes mere end
2,30 m.
• Kontrollér regelmæssigt træningsbåndene.
Kontrollér disse for revner og beskadigelser.
Defekte dele må ikke anvendes mere.
• Beskyt apparatet imod høje temperaturer og
fugt.
• Anvend udelukkende original-reservedele.
Træningsanvisninger
De efterfølgende øvelser repræsenterer kun et
udvalg. Yderligere øvelser finder De i indgående
faglitteratur.
• Bær bekvem sportsbeklædning og sportssko.
• Varm op inden hver træning og lad træningen
klinge af efterhånden. Læs hertil vores anbefa linger til opvarming og udstrækning.
• Kontrollér at De har tilstrækkelig plads rundt
omkring Dem.
• Udfør øvelserne i et jævnt tempo.
• Overhold de foregivne bevægelsesforløb.
Advarsel! Undgå en for høj
træningsintensitet!
Når De begynder med træningen, så er
2-3 minutter per øvelse tilstrækkelig. Ved den
daglige træning kan De efter omkring en uge
forlænge tiden med 5-10 minutter. Den maksi male træningstid bør dog ikke overstige 1
time.
• Hold tilsrækkeligt lange pauser mellem
øvelserne og drik nok.
Advarsel!
• Ved lidelser eller ubehag afslut om gående øvelserne og kontakt Deres
læge.
• Stræk træningsbåndene ikke mere
end 2,30 m.
• Krafttabellen viser hvilken kraft der
er brug for, for at trække trænings båndene til den tilsvarende længde.
Toleranceområde for kraften: +/- 20%
(krafttabel expander, se under teknis ke data).
Opvarmning og stræk
Før og efter hver træning bruges tilstrækkelig tid
til opvarmning, henholdsvis strækøvelser. I det
følgende viser vi dig nogle simple øvelser. Du
bør gentage de enkelte øvelser 2 til 3 gange.
Opvarmning af hals- og
nakkemusklerne
• Stå afslappet. Træk hovedet blødt, med en
hånd, først til venstre og så til højre. Ved hjælp
af denne øvelse bliver siderne på din hals
strakt.
• Drej hovedet fra side til side. Gentag denne
øvelser indtil din nakke føles løs og afslappet.
Opvarmning af armene og
skuldrene
• Hold en arm strakt lige ud med tommelfin geren op og tryk armen forsigtigt ned med
den anden hånd. Skift efter et stykke tid over
til den anden arm. Vær opmærksom på kun at
trykke fast, indtil du mærker et let trækken.
• Før skiftevis en arm bøjet bagud over hovedet
og tryk med den anden hånd albuen let
nedad.
• Læg deres hænder over kors bag ryggen og
træk disse forsigtigt opad. Hvis du samtidig
bøjer overkroppen forover, opvarmes alle
muskler optimalt.
• Til løsning af skulderpartiet lad begge du
skuldrene kredse forsigtigt – først et stykke
tid fremad, så bagud.
• Træk skuldrene nogle gange opad og lad dem
så falde nedad igen. Efter et par gentagelser
burde dine skuldre føle sig varme og løsnet.
DK
31
Page 32

Opvarmning og stræk af
benmusklerne
• Stå oprejst og hold med højre hånd det højre
bøjede ben fast et stykke tid. For lettere at kun ne gennemføre denne øvelse kan du med den
anden hånd f.eks. holde fast ved en væg eller
et bord. Denne strækøvelse gentages efterføl gende med det andet ben.
• Træd et skridt til siden – stå med spredte ben
og gå ned i knæ på det ene ben. Hold denne
stilling et stykke tid, inden du skifter ben.
Med denne øvelse strækker du indersiden af
benet.
• Opvarmning af knoglerne. Løft den ene fod fra
gulvet og lad den kredse først i den ene, så
den anden retning. Efter et stykke tid skifter du
over til den anden fod.
Oversigt over belastede
muskelgrupper
Følgende muskelgrupper bliver ved de
enkelte øvelser hovedsageligt belastet:
Bill. C
Balance-board
Bill. D
Balance-board med
træningsbånd
Bill. E
Balance-board med
greb
Bill. F
Press-Up-Board
Bill. G
Press-Up-Board med
træningsbånd
Bill. H
Twistboard
Bill. I
Twistboard med
træningsbånd
Benmuskler
Arm-, ben- og
skuldermuskler
Arm-, skulder- og
brystmuskler
Arm, ben- og
rygmuskler forneden
Arm- og benmuskler
Mavemuskler
Overkropsmuskler
Træning
Balance-board (Bill. C)
Henvisning!
Denne øvelse må De kun udføre ved
fuldkommen springledsbevægelighed. I
tvivlstilfælde kontakt Deres læge!
Advarsel! Fare for skader!
Stil Dem under brugen som balanceboard aldrig på drejeskiven!
Anbefalet varighed:
Nybegyndere: 2-3 minutter
Øvede: 5-10 minutter
Opbygning og træning
Til denne øvelse skal du bruge underlagsmåtten
som skridsikkert underlag. Åben boarded ved
lukkeklapperne på siden og tag træningsbåndene og holdegrebene ud. Derefter lukker du
boarded og stiller det på måtten.
• Stil dig forsigtigt op på kondiboarded og start
langsomt med at vippe fra side til side.
Vær opmærksom på at det skal være rolige,
jævne bevægelser. Brug i starten armene for
at holde balancen.
• Når du har fået en fornemmelse for bevægel sen, kan du bevæge armene som ved langs omt løb. Øg hastigheden efterhånden til let
løb.
• Når du føler dig sikker, kan du svinge armene
over hovedet, så hele kroppen trænes.
• Afprøv forskellige bevægelser og stillinger
med armene.
Balance-board med træningsbånd (Bill. D)
HENVISNING!
Denne øvelse må De kun udføre ved
fuldstændig bevægelighed i ankelleddet. I tvivlstilfælde kontakt da lægen!
Stil Dem under brugen af Balance-boarded
aldrig på drejeskiven! Fare for skader!
Båndet må aldrig strækkes længere ud end
2,30 m. Toleranceområde for kraften: +/- 20%.
32
DK
Page 33

Anbefalet varighed:
Nybegyndere: 2-3 minutter
Øvede: 5-10 minutter
Opbygning og træning
Boarded forbliver også ved denne øvelse lukket.
Fastgør træningsbåndene på begge sider af kondiboarded. Træk dertil båndenes ender noget
i længden, for at stikke dem ind i boardeds
sideåbninger. For senere at fjerne træningsbåndene, træk dem under let udstrækning igen ud af
sideåbningerne (Bill. A).
Stil Balance-boarded på gummimåtten.
• Tag træningsbåndenes greb i hænderne og
træd forsigtigt op på boarded.
• Begynd med at gynge forsigtigt fra side til
side, indtil du har fundet balancen og har fået
en fornemmelse for bevægelsen.
• Stræk skiftevis armene opad. Højre arm skal
vise opad når det højre ben gynger nedad –
og omvendt.
• Når du føler dig sikker, øger du intensiteten
og udfører armenes bevægelser frem og
tilbage, eller bevæg armene skiftevis venstre
og højre væk fra kroppen.
• Med denne øvelse træner De alle deres krops
muskelgrupper!
Balance-board med greb (Bill. E)
Anbefalet varighed:
Nybegyndere: 2-3 minutter
Øvede: 5-10 minutter
Opbygning og træning
Boarded forbliver lukket ved denne øvelse.
Stik grebenes ender i kondiboardeds huller
(se Bill. B). Til senere fjernelse af grebene træk
under let rysten kraftigt i håndtagene.
Gummimåtten tjener ved denne øvelse delvist
som underlag for deres knæ. Vær ved denne
øvelse opmærksom på en strakt ryg. Undgå en
svajet ryg.
• Lig på knæ på gummimåtten og tag boardeds
greb i hænderne. Bøj dig noget forover og be gynd med at gynge svagt. Hold derved ryg gen strakt.
• Når du føler dig stærk nok, så fortsæt med
denne øvelse i håndliggende stilling. Til det
stiller du boarded på gummimåtten, tager
grebene i hænderne og sætter fødderne
med omkring to trediedele af kroppens læng de bagud. Vær også her absolut opmærksom
på at undgå svajet ryg.
Press-Up-Board (Bill. F)
Anbefalet varighed:
Nybegyndere: 2-3 minutter
Øvede: 5-10 minutter
Opbygning og træning
Til anvendelse som press-up-board skal du kun
fjerne undersiden hos deres kondiboard. Åben
til dette formål lukkeklapperne på siden og
læg underdelen til side. Grebene forbliver ved
boardeds overdel.
Vær ved disse øvelser opmærksom på en strakt
ryg. Undgå en svajet ryg.
• Læg dig på knæ på gummimåtten foran kon
diboarded og tag boardeds greb i hænderne.
Bevæg nu deres krop op og ned.
• De kan variere denne øvelse, idet De løfter
fødderne fra gulvet og lægger disse over kors
bag bagdelen. Derved drejer det sig om en
variant til håndligningsstillingen.
• Til styrkelse af benmusklerne løfter du et knæ
fra knælende stilling og strækker benet med
rolige bevægelser et par gange bagud og
opad. Derefter skifter du over til det andet
ben. Du kan også skifte efter hvert stræk.
• Til forøgelse af sværhedsgraden løfter du
knæene fra gulvet og strækker benene helt
bagud. Lav nu armstrækninger. Hold ryggen
strakt og overdriv det ikke. Vigtigere for
træningseffekten er den ordentlige gennem
førelse af bevægelserne end antallet af
armstrækninger.
DK
33
Page 34

Press-Up-Board med træningsbånd (Bill. G)
Anbefalet varighed:
Nybegyndere: 2-3 minutter
Øvede: 5-10 minutter
Opbygning og træning
Til den følgende øvelse forbliver grebene på
boarded. Ud over det skal træningsbåndene
fastgøres på begge sider af kondiboarded. Træk
dertil båndenes ender noget i længden, for at
stikke disse ind i boardeds sideåbninger.
• Fastgør træningsbåndene ved hjælp af
løkkerne ved Deres fødder.
1. Indtag den samme holdning som hos øvelsen
ved press-up-boarded uden træningsbånd.
Deres hænder griber om grebene, fødderne
ligger parallelt på gulvet.
• Løft i denne position et knæ fra gulvet og
stræk benet i rolige bevægelser et par gange
bagud opad. Derefter skifter De ben. De kan
også skifte efter hvert stræk.
2. Læg Dem flad på ryggen. Som støtte for ho ved og hvirvelsøjle anbringer De Deres hove de på fitness-boardeds omvendte underside.
• Stil i liggende position fødderne sådan, som
ville De stå i en 90° vinkel på boarded.
• Tag træningsbåndenes greb i Deres hænder
og hold Dem i 90° vinkel ved siden af krop pen.
• Benene forbliver strakte og udøver modtryk
mod press-up-boarded.
• Bevæg nu skiftevis den venstre og højre hånd i
skulderretning.
3. Sæt Dem på gummimåtten. Fødderne plad serer De i siddende position i 90° vinkel på
press-up-boarded.
• Tag træningsbåndenes greb i hænderne.
• Vinkel armene ved siden af Deres krop mod
og nej Deres ryg let bagud. Derved forbliver
arme og skuldre i udgangsposition.
Twistboard (Bill. H)
Anbefalet varighed:
Nybegyndere: 2-3 minutter
Øvede: 5-10 minutter
Opbygning og træning
Ved denne øvelse har du kun brug for kondiboardeds overside. Fjern grebene og træningsbåndene som beskrevet ovenfor.
• Stil oversiden på gummimåtten og stig forsig tigt op på twistboarded.
• Drej langsomt frem og tilbage, indtil du føler
dig sikker. Med twistboarded er drejninger
indtil 40° i begge retninger mulige.
• Brug i første omgang armene, til at holde
balancen. Senere kan du lade armene
ledsage sidebevægelserne.
• For at øge sværhedsgraden og trænings intensiteten, kan du gå ned i knæ ved
denne bevægelse.
• Når du er helt sikker, kan du ændre armenes
position. Løft f.eks. disse op over hovedet
under bevægelsen.
• For at holde en „aktiv pause“, så stil twist board ed på en bred skammel og udfør
øvelserne siddende.
Twistboard med træningsbånd
(Bill. I)
Anbefalet varighed:
Nybegyndere: 2-3 minutter
Øvede: 5-10 minutter
Opbygning og træning
Du skal kun bruge kondiboardeds overside og
træningsbåndene til denne øvelse. Disse bliver
som beskrevet ovenfor, fastgjort på siderne. Stil
boarded på gummimåtten.
Båndet må ikke strækkes længere ud end
2,30 m. Toleranceområde for kraften: +/- 20%.
• Start langsomt. Benyt i første omgang
træningsbåndene til at stabilisere. Udfør de
samme bevægelser som ved twistboardtræ ning uden bånd.
34
DK
Page 35

• Drejebevægelserne til siden er op til 40° i
begge retninger mulige.
• Når du føler dig sikker, kommer dine arme til
indsats. Afprøv armbevægelserne i forskellige
retninger. Bevæg armene samtidigt eller skift
fra venstre til højre armbevægelse.
De bestemmer selv tempo og sværhed.
• Stil Dem nu forsigtigt ved siden af twisteren
(drejeskiven) på kondiboarded. Stræk armene
skiftevis op over hovedets side. Vær opmærk som på, at kroppen derved forbliver strakt.
Bevægelsen går alene ud fra armene.
• Efter et stykke tid bruger De begge arme
samtidigt. De kan også udføre denne bevæ gelse fremadrettet.
HENVISNING! De følgende øvelser
egner sig også godt som strækøvelser
inden og efter træningen med kondiboarded.
Stretchingboard (Bill. J)
Anbefalet varighed:
Nybegyndere: 2-3 minutter
Øvede: 5-10 minutter
Opbygning og træning
Til brugen som stretchingboard skal du kun
bruge kondiboardeds underside. Læg det omvendt på gummimåtten.
• Sæt dig på gulvet foran kondiboarded og læg
dine fødder derpå. Benene bør være så
strakte som muligt.
• Rør med begge hænder dine fødder og træk
dit hoved så langt som muligt i retning af knæ.
Gentag denne øvelse nogle gange.
• Tag nu et ben ned fra kondiboarded og læg
det udstrakt mod siden. Gentag denne øvelse
skiftevis med det højre og det venstre ben.
• Stil dig med fødderne let adskilt med den ene
fod fremad - med et ben op på kondiboarded.
Stræk dig langsomt fremad, hvorved du bøjer
det forreste ben. Desto mere du bøjer benet,
desto intensivere er øvelsen. For at øge svær hedsgraden, så bevæg det bagerste ben
længere bagud. Hold stillingen hver gang kort
og skift så over til det andet ben.
• Du kan samtidig, med det bagerste knæ,
berøre gulvet. Derigennem strækker du
overlåret yderligere.
• Sit-Ups:
Advarsel! Ved Sit-Ups kan det komme til
hvirvelsøjleskader.
For at træne dine mavemuskler, så læg dig
med skuldrene baglæns på boarded. Læg
dine hænder løst bag på nakken og bevæg
din overkrop langsom i retning af dine knæ.
Kig imens fremad og undgå en svajet ryg.
Hænderne befinder sig ved nakken, uden at
udøve tryk.
• Til stræk af de samlede benmuskler, så stil dig
med opad bøjede fødder på boarded. Hold
benene udstrakte. Prøv nu på, at berøre dine
tæer med fingerspidserne. Gentag denne
øvelse nogle gange.
Pleje, opbevaring
Opbevar altid artiklen tørt og rent i et tempereret
rum.
VIGTIGT! Rengøres kun med vand, aldrig med
kraftige plejemidler. Tørres efterfølgende af med
en rengøringsklud.
Henvisninger til bortskaffelse
Bortskaf venligst emballage og artikel miljøvenligt og sorteret! Bortskaf artiklen via et godkendt
renovationsforetagende eller via din kommunale
myndighed. Overhold de aktuelt gældende
forskrifter.
DK
35
Page 36

3 års garanti
Produktet er fremstillet med største omhu og
under vedvarende kontrol. Der ydes en garanti
på tre år fra købsdatoen på dette produkt.
Opbevar venligst kvitteringen fra købet.
Garantien gælder kun for materiale- og
fabrikationsfejl og bortfalder ved misbrug eller
uhensigtsmæssig anvendelse. Deres lovpligtige
rettigheder, særligt garantikrav, begrænses ikke
af denne garanti.
Ved eventuelle klager bedes du henvende
dig til nedenstående service-hotline eller tage
kontakt til os via e-mail. Medarbejderne i vores
kundetjeneste vil så aftale den videre fremgangsmåde med dig. Vi vil under alle omstændigheder
rådgive dig personlig.
Garantiperioden forlænges ikke ved eventuelle reparationer inden for garantien eller ved
kulance. Dette gælder også for udskiftede
og reparerede dele. Efter udløb af garantien
er forefaldende reparationer forbundet med
omkostninger.
IAN: 93156
Service Danmark
Tel.: 32 710005
E-Mail: deltasport@lidl.dk
Reservedele til deres produkt finder de også under:
www.delta-sport.com, rubrik service - reservedelservice Lidl
36 DK
Page 37

Personlige træningsdata
Dato
Øvelse
Balanceboard
Balanceboard med
greb
Balanceboard med
træningsbånd
Twistboard
Press-Up-board
Twistboard med
træningsbånd
Press-Up-board med
træningsbånd
Stretchingboard
Dato
Øvelse
Balanceboard
Satser Gentagelser Satser Gentagelser Satser Gentagelser
Satser Gentagelser Satser Gentagelser Satser Gentagelser
Balanceboard med
greb
Balanceboard med
træningsbånd
Twistboard
Press-Up-board
Twistboard med
træningsbånd
Press-Up-board med
træningsbånd
Stretchingboard
37DK
Page 38

Félicitations !
Vous avez acquéri un produit de haute qualité.
Apprenez à connaître le produit avant sa première utilisation. Lisez pour cela attentivement le
mode d’emploi suivant. N’utilisez le produit que
comme décrit et pour les zones d’application
indiquées. Veuillez conserver ce mode d’emploi.
Transmettez tous les documents en cas de cessation du produit à une tierce personne.
Contenu
1 x Accessoire de fitness
2 x Poignées
2 x Élastiques de fitness
1 x Tapis de fitness
1 x DVD avec exemples d’exercices
1 x Poster avec exemples d’exercices
1 x Notice d’utilisation
Caractéristiques techniques
L‘appareil d‘entraînement répond à la norme
EN 957-1/2 classe H
Poids utilisateur max. : 100 kg
Dimensions : env. 50 x 30 x 15 cm
Poids de l‘article : env. 2.270 g
Tableau des forces pour l’extenseur
Longueur (cm) : 120 140 160 185 230
Force (N) : 13 19,5 25 30 42
Utilisation conforme
L‘article est destiné à l‘usage privé et ne peut
pas être utilisé à des fins commerciales, médicales ou thérapeutiques.
Consignes de sécurité
relatives à l’utilisation
Attention ! Risque de blessure !
• Cette planche de fitness a été étudiée pour
supporter un poids maximum de 100 kg.
N’utilisez pas l‘appareil si votre poids est
supérieur à 100 kg.
• Consultez votre médecin généraliste avant
de commencer l’entraînement. Assurez-vous
que vous êtes physiquement apte à effectuer
l’entraînement.
• Veuillez toujours conserver à portée de main
ce mode d’emploi qui explique les exercices.
• Veuillez suivre strictement les directives
d’entraînement définies dans le présent mode
d’emploi ! Le cas contraire, sachez que des
problèmes de santé graves pourraient sur venir !
• Des efforts trop importants ou un surentraîne ment pourraient causer de graves blessures.
Pensez bien à vous échauffer avant chaque
séance d’entraînement et effectuez toujours
les exercices correspondant à votre niveau de
performance du moment. En cas de troubles,
de sensation de faiblesse ou de fatigue, veuil lez interrompre immédiatement l’entraînement
sur la planche et contacter votre médecin.
• Avant chaque utilisation de la planche de
fitness, assurez-vous qu’elle présente le
montage approprié pour l’exercice que vous
allez pratiquer.
• L’article doit être exclusivement utilisé sur un
terrain stable et plan. Ne l’installez jamais à
proximité d’un escalier ou de paliers.
• Veuillez toujours vous assurer que la planche
de fitness est installée stablement et de maniè re sûre sur le sol afin qu’elle ne dérape pas.
• Utilisez toujours le tapis de protection inclus
afin de protéger les sols sensibles (parquet,
p.ex.) contre les risques d’endommagements.
• Pour vous entraîner en toute sécurité, vous
avez besoin de suffisamment d‘espace.
Assurez un espace libre d’un mètre minimum
autour de l’appareil.
• L’appareil ne doit être utilisé que par une
personne à la fois.
• Les bandes de fitness s’utilisent exclusivement
en association avec la planche de fitness.
• Si vous utilisez le produit comme planche
d’équilibre avec les bandes de fitness, ne vous
positionnez jamais sur la plaque tournante.
38 FR/BE
Page 39

Prudence particulière –
risque de blessure pour les
enfants !
• Ne laissez pas les enfants utiliser ce produit
sans surveillance. Expliquez-leur la procédure
correcte d’utilisation de l’appareil et surveillez les. Vous pouvez autoriser les enfants à utiliser
l’appareil seulement si leur croissance phy sique et leur développement mental le permet tent. Cet appareil ne doit pas être utilisé
comme jouet.
Dangers liés à l’usure
• L’appareil doit être utilisé uniquement s‘il est
en parfait état. Vérifiez l’appareil avant toute
utilisation. La sécurité de la planche de fitness
ne peut être garantie que si son état (absence
d’endommagement ou d’usure) est contrôlé
régulièrement.
• L’étirement maximum des bandes de fitness est
de 2,30 m.
• Contrôlez régulièrement l’état des bandes
de fitness en vérifiant qu’elles ne comportent
aucune déchirure ou détérioration. Les pièces
défectueuses ne doivent plus être utilisées.
• Placez l‘appareil à l‘abri d‘une humidité ou
d‘une chaleur excessive.
• Utilisez exclusivement des pièces de rechange
d’origine.
Indications relatives à
l’entraînement
Les exercices suivants ne sont qu‘un aperçu du
choix que l’appareil peut offrir. Vous pourrez
consulter d‘autres exercices dans des manuels
spécialisés.
• Portez une tenue de sport confortable et de
bonnes chaussures de sport.
• Echauffez-vous avant chaque entraînement et
diminuez progressivement l’intensité des exer cices. Veuillez à ce sujet consulter nos recom mandations relatives à l’échauffement.
• Assurez-vous que vous disposez de suffi samment d’espace autour de vous avant de
commencer votre entraînement.
• Effectuez les exercices à un rythme régulier.
• Respectez les enchaînements de mouvements
définis.
Attention ! Evitez les entraîne
ments trop intensifs !
Si vous commencez seulement votre entraîne ment, 2 à 3 minutes par exercice suffisent.
Si vous effectuez l’entraînement tous les jours,
la durée par exercice peut être augmentée,
jusqu’à 5-10 minutes. Toutefois, veuillez ne pas
dépasser 1 heure d’entraînement.
• Faites des pauses suffisamment longues entre
chaque exercice et buvez suffisamment.
Attention !
• Cessez immédiatement les exercices si
vous ne vous sentez pas bien et con tactez votre médecin.
• L’étirement maximum des bandes de
fitness est de 2,30 m.
• Le tableau des forces montre quelle
est la force nécessaire à l’étirement
des bandes de fitness (en fonction des
longueurs d’étirement). Plage de to lérance pour la force : +/- 20%
(tableau des forces pour étirement :
cf. Données techniques).
S‘échauffer et s‘étirer
Avant et après chaque entraînement, prenez
suffisamment de temps pour vous échauffer et
vous étirer. Nous allons vous présenter quelques
exercices simples à réaliser ; pour cela vous
devez répéter chaque exercice 2 à 3 fois.
Échauffer les muscles du cou et
de la nuque
• Placez-vous de manière détendue. Tirez votre
tête d‘une main doucement vers la gauche
puis vers la droite. Grâce à cet exercice, vous
étirez les côtés de votre cou.
• Faites tourner votre tête en alternance dans les
deux directions. Répétez ces exercices jusqu‘à
ce que votre nuque soit lâche et que vous vous
sentiez détendu.
39FR/BE
Page 40

Échauffer les bras et les épaules
• Étendez un bras devant votre poitrine et
appuyez-le avec l‘autre main doucement
contre votre corps. Après un instant, changez
de bras. Pensez à appuyer uniquement jusqu‘à
ce que vous ressentiez un léger tiraillement.
• Ensuite, passez un bras plié vers l‘arrière par
dessus la tête et, avec l‘autre main sur le cou de, appuyez-le légèrement vers le bas.
• Rejoignez vos mains derrière le dos et tirez-les
avec précaution vers le haut. Si vous penchez
maintenant votre buste vers l‘avant, tous vos
muscles seront parfaitement échauffés.
• Pour relâcher les épaules, tourner les avec
précaution – pendant un moment vers l‘avant,
puis vers l‘arrière.
• Enfin, remontez et laissez retomber les
épaules plusieurs fois. Après quelques
répétitions, vos épaules devraient être échauf fées et plus souples.
Échauffer et étirer les muscles
des jambes
• Installez-vous droit et tenez avec la main droite
la jambe droite pliée pendant un instant.
Pour réaliser plus facilement cet exercice, vous
pouvez vous tenir avec l‘autre main, par exem ple à un mur ou à une table. Répétez ensuite
cet exercice de stretching avec l‘autre jambe.
• Faites un pas sur le côté – écartez bien les
jambes et pliez légèrement un genou.
Maintenez cette position pendant un moment
avant de changer de jambe. Avec cet exerci ce, vous étirez les côtés intérieurs de vos
jambes.
• Échauffez vos chevilles en levant un pied du
sol et en le faisant tourner lentement dans
une direction puis dans l‘autre. Après un
instant, changez de pied.
Aperçu des groupes de muscles
sollicités
Les groupes de muscles suivants sont
sollicités principalement au cours des
différents exercices :
Ill. C
Planche d‘équilibre
Ill. D
Planche d‘équilibre
avec élastiques
Ill. E
Planche d‘équilibre
avec poignées
Ill. F
Planche de press-up
Ill. G
Planche de press-up
avec élastiques
Ill. H
Planche de twist
Ill. I
Planche de twist avec
élastiques
Musculation des
jambes
Musculation des bras,
des jambes et des
épaules
Musculation des bras,
des épaules et de la
poitrine
Musculation des
bras, des jambes et
muscles inférieurs
du dos
Musculation des bras
et des jambes
Musculation du torse
Musculation du haut
du corps
40 FR/BE
Page 41

Entraînement
Planche d’équilibre (ill. C)
Attention !
Vous ne pouvez effectuer cet exercice
que si vos chevilles sont parfaitement
mobiles. En cas de doute, contactez
votre médecin !
Attention ! Risque de blessure !
Si vous utilisez le mode « planche
d’équilibre », ne vous positionnez
jamais sur la plaque tournante !
Durée recommandée :
Débutants : 2-3 minutes
Avancés : 5-10 minutes
Montage et entraînement
Pour effectuer cet exercice, le seul accessoire
nécessaire est le tapis de sol antiglisse. Ouvrez
la planche avec les clapets latéraux et retirez les
élastiques ainsi que les poignées de maintien.
Enfin, fermez la planche et placez-la sur le tapis.
• Placez-vous avec précaution sur la planche
fitness et commencez lentement à vous ba lancer sur les côtés. Effectuez des mouvements
calmes et réguliers. Servez-vous de vos bras
tout d’abord pour garder l‘équilibre.
• Une fois confiant du contrôle de vos mou vements, vous pouvez alors en plus bouger
les bras comme si vous marchiez lentement.
Augmentez peu à peu la vitesse pour arriver
à une course légère.
• Si vous êtes sûr de vous, placez les bras
au dessus de la tête puis balancez-vous afin
d’entraîner tout le corps.
• Essayez différents mouvements et différentes
positions de bras.
Planche d‘équilibre avec
élastiques (ill. D)
REMARQUE !
Ne réalisez cet exercice que si les articulations de vos chevilles sont en parfaite
condition. En cas de doute, consultez
votre médecin !
Pendant l‘utilisation en tant que planche
d‘équilibre, ne vous placez jamais sur la
plaque rotative ! Risque de blessure !
L’élastique ne doit pas être tendu à plus de
2,30 m.
Plage de tolérance pour la force : +/- 20 %.
Durée recommandée :
Débutants : 2-3 minutes
Avancés : 5-10 minutes
Montage et entraînement
Au cours de cet exercice, la planche reste à
nouveau fermée. Fixez les élastiques sur les deux
côtés de la planche fitness. Pour cela, tendez un
peu les extrémités des élastiques afin de les enfiler dans les ouvertures latérales de la planche.
Si vous souhaitez retirer les élastiques plus tard,
ôtez-les à nouveau des ouvertures en les tendant
légèrement (ill. A).
Placez la planche d‘équilibre sur le tapis de sol.
• Prenez les poignées des élastiques dans les
mains puis montez avec précaution sur la
planche.
• Commencez par vous balancer avec précau tion sur le côté jusqu‘à ce que vous ayez
trouvé votre équilibre et une aisance pour le
mouvement.
• Étirez vos bras à tour de rôle vers le haut.
Pendant que le bras droit montre vers le haut,
la jambe droite se balance vers le bas - et
inversement.
• Une fois sûr de vous, augmentez l‘intensité
puis effectuez des mouvements de bras en
avant et en arrière ou bien tendez-les loin du
corps vers la gauche et la droite.
• Avec cet exercice, vous entraînez tous les
groupes de muscle de votre corps !
41FR/BE
Page 42

Planche d‘équilibre avec
poignées (ill. E)
Durée recommandée :
Débutants : 2-3 minutes
Avancés : 5-10 minutes
Montage et entraînement
La planche reste fermée lors de cet exercice.
Enfichez les extrémités des poignées dans les
trous de la planche de fitness (ill. B). Pour ensuite
détacher les poignées, tirez dessus en les secouant légèrement. Pendant cet exercice, le tapis
sert partiellement de support pour vos genoux.
Gardez le dos droit pendant cet exercice.
Évitez de vous cambrer.
• Agenouillez-vous sur le tapis et prenez les
poignées de la planche dans les mains.
Penchez-vous vers l‘avant et commencez à
vous balancer légèrement. Gardez le dos
droit.
• Si vous vous sentez suffisamment fort, continu ez cette exercice en position de pompes.
Pour cela, placez la planche sur le tapis en
gomme, prenez les poignées dans les mains
puis positionnez les pieds vers l‘arrière, à
environ deux tiers de la longueur du corps.
Veillez ici aussi à ce que votre dos ne se
courbe pas.
Planche de press-up (ill. F)
Durée recommandée :
Débutants : 2-3 minutes
Avancés : 5-10 minutes
Montage et entraînement
Afin d‘utiliser votre planche comme planche de
press-up, il vous suffit de retirer la partie inférieure de la planche fitness. Ouvrez les clapets de
fermeture latéraux et posez la partie inférieure
sur le côté. Les poignées restent sur la partie
supérieure de la planche.
Gardez le dos droit pendant cet exercice.
Évitez de vous cambrer.
• Agenouillez-vous sur le tapis en gomme devant
la planche fitness et prenez les poignées de la
planche dans les mains. Ensuite, bougez votre
corps lentement vers le haut puis vers le bas.
• Vous pouvez varier cet exercice en décollant
les pieds du sol et en les croisant derrière les
fesses. Il s‘agit d‘une variante des pompes.
• Pour renforcer les muscles des jambes, mettez vous en position agenouillée, décollez un
genou du sol puis étendez l’autre jambe
doucement. Répétez ce mouvement plusieurs
fois vers le haut et en arrière. Ensuite, changez
de jambe. Vous pouvez également changer
après chaque étirement.
• Pour augmenter la difficulté, décollez le genou
du sol puis étendez les 2 jambes vers l‘arrière.
Faites maintenant des pompes. Maintenez
votre dos droit et n‘exagérez pas. Pour que
l‘entraînement soit efficace, la réalisation
correcte des mouvements est plus importante
que le nombre de pompes.
Planche de press-up avec
élastiques (ill. G)
Durée recommandée :
Débutants : 2-3 minutes
Avancés : 5-10 minutes
Montage et entraînement
Pour l‘exercice suivant, les poignées restent sur
la planche. De plus, les élastiques doivent être
fixées sur les deux côtés de la planche fitness.
Pour cela tendez un peu les extrémités des
élastiques afin de les enfiler dans les ouvertures
latérales de la planche.
• Fixez les bandes de fitness à vos pieds à
l’aide des boucles.
1. Adoptez la même position que celle requise
pour l’exercice sur la planche press-up sans
bandes de fitness. Vos mains serrent les poig
nées et vos pieds sont parallèles sur le sol.
• Dans cette position, décollez un genou du sol
et étirez lentement et à plusieurs reprises votre
jambe vers le haut et en arrière, puis changez
de jambe. Vous pouvez également alterner à
chaque extension.
2. Allongez-vous sur le dos. Pour soutenir votre
tête et votre colonne vertébrale, positionnez
votre tête sur la face inférieure retournée de la
planche de fitness.
42 FR/BE
Page 43

• En position allongée, disposez vos pieds
comme vous le feriez en position debout, à
90° sur la planche.
• Saisissez les poignées des bandes de fitness
avec vos mains et maintenez-les dans un angle
de 90° par rapport au corps.
• Gardez vos jambes tendues et exercez une
pression contre la planche press-up.
• Ensuite déplacez alternativement votre main
gauche et votre main droite en direction de
l’épaule.
3. Asseyez-vous sur le tapis en caoutchouc.
Placez vos pieds en position assise sur la
planche press-up en formant un angle de
90°.
• Saisissez les poignées des bandes de fitness
avec vos mains.
• Repliez vos bras le long de votre corps et
penchez légèrement votre dos vers l’arrière.
Vos épaules et vos bras conservent leur positi on de départ.
Planche de twist (ill. H)
Durée recommandée :
Débutants : 2-3 minutes
Avancés : 5-10 minutes
Montage et entraînement
Pour effectuer cet exercice, vous avez uniquement besoin du côté supérieur de la planche
fitness. Retirez les poignées et les élastiques
comme décrit plus haut.
• Placez la partie supérieure sur le tapis et
montez avec précaution sur la planche de
twist.
• Tournez-vous lentement des deux côtés jusqu‘à
ce que vous vous sentiez bien en place.
La planche de twist permet des rotations de
max. 40° dans les deux sens.
• Servez-vous de vos bras tout d‘abord pour
garder l‘équilibre. Plus tard, servez-vous de
vos bras pour accompagner des mouvements
latéraux.
• Pour augmenter le degré de difficulté et
l‘intensité de l‘entraînement, vous pouvez
vous agenouiller pendant ce mouvement.
• Si vous êtes vraiment sûr, vous pouvez modifier
la position de vos bras. Passez-les par exemple
au dessus de la tête tout en continuant vos
mouvements.
• Pour une « pause active », placez la planche
de twist sur un tabouret large puis effectuez
des exercices en position assise.
Planche de twist avec élastiques
(ill. I)
Durée recommandée :
Débutants : 2-3 minutes
Avancés : 5-10 minutes
Montage et entraînement
Pour effectuer cet exercice, vous avez uniquement besoin du côté supérieur de la planche
fitness et des élastiques. Celles-ci sont fixées,
comme décrit ci-dessus, sur les côtés. Placez la
planche sur le tapis en gomme.
L’élastique ne doit pas être tendu à plus de
2,30 m.
Plage de tolérance pour la force : +/- 20 %.
• Commencez lentement. Servez-vous des
bandes tout d’abord pour vous stabiliser.
Effectuez les mêmes mouvements que sur la
planche de twist sans les bandes.
• Des mouvements rotatifs latéraux sont possi bles jusqu‘à 40° dans les deux directions.
• Une fois sûr de vous, essayez différents mouve ments de bras. Bougez vos bras en même
temps et alternez entre le bras gauche et le
bras droit. Déterminez vous-même le rythme et
la vitesse.
• Placez-vous alors sur la planche fitness avec
une jambe de chaque côté du twister (la
plaque rotative). Étendez vos bras à tour de
rôle sur le côté de votre tête. Gardez le corps
droit. Le mouvement part entièrement des bras.
• Après un moment, utilisez les deux bras en
même temps. Vous pouvez également effectu er ce mouvement vers l‘avant.
REMARQUE ! Les exercices suivants sont
également parfaits pour s‘étirer avant
et après l‘entraînement avec la planche
fitness.
43FR/BE
Page 44

Planche de stretching (ill. J)
Durée recommandée :
Débutants : 2-3 minutes
Avancés : 5-10 minutes
Montage et entraînement
Pour l‘utilisation comme planche de stretching,
vous avez uniquement besoin de la partie
inférieure de planche. Installez-la à l’envers sur
le tapis.
• Asseyez-vous devant la planche fitness et
posez vos pieds dessus. Les jambes doivent
rester le plus tendu possible.
• Attrapez vos pieds avec les deux mains et tirez
votre tête aussi loin que possible en direction
des genoux. Répétez cet exercice plusieurs
fois.
• Soulevez ensuite une jambe de la planche de
fitness et tendez-là sur le sol. Répétez
l‘exercice à tour de rôle avec la jambe droite
et la jambe gauche.
• Mettez une jambe sur la planche fitness.
Étirez-vous lentement vers l‘avant jusqu‘à ce
que la jambe avant se plie. Plus la jambe est
pliée, plus l‘exercice est intense. Pour aug menter la difficulté, déplacez l’autre jambe
plus loin vers l‘arrière. Maintenez brièvement
la position et changez ensuite de jambe.
• Vous pouvez en plus toucher le sol avec le
genou arrière. Ainsi, vous étendez en plus le
haut de la cuisse.
• Sit-Ups:
Attention ! Lors des sit-ups, il existe un risque
de blessure à la colonne vertébrale.
Pour entraîner vos muscles abdominaux,
tournez-vous sur le dos et placez vos épaules
sur la planche. Placez vos mains de manière
détendue à l‘arrière de la tête et déplacez le
haut de votre corps lentement en direction de
vos genoux. Regardez ce faisant vers l‘avant
et évitez de vous cambrer. Les mains sont pla cées derrière la tête sans exercer de pression.
• Pour étirer tous les muscles arrière des jambes,
placez les pieds pliés sur le haut de la
planche. Gardez les jambes étirées. Essayez
maintenant de toucher vos orteils avec le bout
des doigts. Répétez cet exercice plusieurs fois.
Entretien et rangement
Toujours ranger l‘article dans un endroit sec,
propre et tempéré.
IMPORTANT ! Ne jamais utiliser de produits
nettoyants agressifs, laver uniquement à l‘eau.
Ensuite, sécher avec un chiffon.
Conseils relatifs à
l‘élimination des déchets
Merci de jeter l‘emballage et l‘article conformément aux règles de recyclage afin de préserver
l‘environnement! Éliminez l‘article en fonction de
la réglementation actuelle en vigueur.
3 ans de garantie
Le produit a été fabriqué avec le plus grand soin
et sous un contrôle permanent. Vous avez sur ce
produit une garantie de trois ans à partir de la
date d’achat. Conservez le ticket de caisse.
La garantie est uniquement valable pour les
défauts de matériaux et de fabrication, elle perd
sa validité en cas de maniement incorrect ou non
conforme. Vos droits légaux, tout particulièrement les droits relatifs à la garantie, ne sont pas
limitées par cette garantie.
En cas d‘éventuelles réclamations, veuillez vous
adresser à la hotline de garantie indiquée cidessous ou nous contacter par e-mail.
Nos employés du service client vous indiqueront
la marche à suivre le plus rapidement possible.
Nous vous renseignerons personnellement dans
tous les cas.
La période de garantie n‘est pas prolongée par
d’éventuelles réparations sous la garantie, les
garanties implicites ou le remboursement.
Ceci s‘applique également aux pièces remplacées et réparées. Les réparations nécessaires
sont à la charge de l’acheteur à la fin de la
période de garantie.
IAN : 93156
Service Belgique
Tel. : 070 270 171
(0,15 EUR/Min.)
E-Mail : deltasport@lidl.be
Veuillez trouver les pièces de rechange pour votre produit sur :
www.delta-sport.com, rubrique Service - Service des pièces de
rechange Lidl
44 FR/BE
Page 45

Données personnelles d‘entraînement
Date
Exercice
Planche d‘équilibre
Planche d‘équilibre
avec poignées
Planche d‘équilibre
avec élastiques
Planche de twist
Planche de press-up
Planche de twist avec
élastiques
Planche de press-up
avec élastiques
Planche de stretching
Date
Exercice
Planche d‘équilibre
Mouvements Répétitions Mouvements Répétitions Mouvements Répétitions
Mouvements Répétitions Mouvements Répétitions Mouvements Répétitions
Planche d‘équilibre
avec poignées
Planche d‘équilibre
avec élastiques
Planche de twist
Planche de press-up
Planche de twist avec
élastiques
Planche de press-up
avec élastiques
Planche de stretching
45FR/BE
Page 46

Hartelijk gefeliciteerd!
Met de aankoop hebt u gekozen voor een
hoogwaardig product. Maak u daarom voor
de eerste ingebruikname vertrouwd met het
product. Lees hiervoor deze gebruiksaanwijzing
aandachtig door. Gebruik het product alleen
zoals beschreven en uitsluitend voor de aangegeven doeleinden. Bewaar de handleiding
zorgvuldig. Als u het product aan derden geeft,
dient u ook deze documenten te overhandigen.
Leveromvang
1 x Fitness-board
2 x Handvat
2 x Fitnessband
1 x Fitnessmat
1 x DVD met trainingsvoorbeelden
1 x Poster met trainingsvoorbeelden
1 x Gebruiksaanwijzing
Technische gegevens
Trainingstoestel is conform EN 957-1/2 klasse H
Max. gebruikersgewicht: 100 kg
Afmetingen: ca. 50 x 30 x 15 cm
Artikelgewicht: ca. 2.270 g
Krachttabel expander
Lengte (cm): 120 140 160 185 230
Kracht (N): 13 19,5 25 30 42
Doelmatig gebruik
Het artikel is ontwikkeld voor privégebruik en
mag niet voor commerciële, medische of therapeutische doeleinden worden gebruikt.
Veiligheidsinstructies
voor het gebruik
Waarschuwing! Gevaar voor letsel!
• Dit fitness-board is ontwikkeld voor een maxi maal lichaamsgewicht van 100 kg. Gebruik
het product niet, als u meer weegt.
• Consulteer uw arts, voordat u begint met de
training begint. Wees er zeker van, dat u wat
de gezondheid betreft geschikt bent voor het
trainen.
• Bewaar de gebruiksaanwijzing met de oefe ningen altijd binnen handbereik.
• Houd u altijd aan de trainingsinstructies, die
in deze handleiding worden gegeven! Anders
bestaat er gevaar voor ernstig medisch letsel.
• Bij te grote inspanning en te veel training be staat kans op zwaar letsel. Denk eraan, voor
het training altijd een warm-up uit te voeren,
en train op een niveau dat bij uw conditie
past. In geval van klachten, als u zich zwak
of moe voelt dient u de training op het product
direct af te breken en een arts te raadplegen.
• Controleer voor ieder gebruik of het fitness board voor de desbetreffende oefening cor rect gemonteerd werd.
• Gebruik het product alleen op een stevige,
vlakke ondergrond en plaats hem niet in de
buurt van trappen en verhogingen.
• Zorg ervoor, dat het fitness-board veilig en
recht op de vloer staat, zodat het niet weg kan
glijden.
• Gebruik altijd de meegeleverde bescherm mat, om gevoelige vloeren (bijv. parket) tegen
beschadigingen te beschermen.
• Voor een veilige training hebt u voldoende
plaats nodig. Let er tijdens het trainen op, dat
u in iedere richting tenminste 1 m ruimte om
het product hebt.
• Het product mag uitsluitend door één persoon
op hetzelfde moment gebruikt worden.
• De trainingsbanden mogen uitsluitend in com binatie met het fitness-board worden gebruikt.
• Als u het product als balanceboard met
trainingsbanden gebruikt, mag u nooit op de
draaischijf gaan staan.
46 NL/BE
Page 47

Wees bijzonder voorzichtig –
letselgevaar voor kinderen!
• Laat kinderen het product nooit zonder toe zicht gebruiken. Maak op het juiste gebruik
van het product attent en houd het kind in de
gaten. Sta het gebruik uitsluitend toe, als de
geestelijke en lichamelijke ontwikkeling van
het kind dit toestaat. Dit product is niet geschikt
als speelgoed.
Gevaren door slijtage
• Het product mag alleen in een feilloze toe stand worden gebruikt! Controleer het product
voor ieder gebruik. De veiligheid van het
fitness-board kan alleen worden gewaar borgd, als het regelmatig op beschadigingen
en slijtage wordt gecontroleerd.
• De trainingsbanden mogen niet langer dan op
2,30 m worden uitgerekt.
• Controleer de trainingsbanden regelmatig.
Controleer deze op scheuren en beschadi gingen. Defecte onderdelen mogen niet meer
worden gebruikt.
• Bescherm het product tegen hoge tempera turen en vocht.
• Gebruik alleen originele reserveonderdelen.
Trainingsinstructies
De volgende oefeningen vormen slechts een
kleine selectie. Verdere oefeningen vindt u de
vakliteratuur.
• Draag comfortabele sportkleding en sport
schoenen.
• Warm u voor het trainen op en laat bouw de
training ook langzaam af. Lees hiertoe onze
aanbevelingen voor de warming-up en
cooling-down.
• Zorg ervoor, dat u bij de training voldoende
plaats om zich hebt.
• Voer de oefeningen met een gelijkmatig
tempo uit.
• Neem de voorgeschreven uitvoering van de
bewegingen in acht.
Let op! Vermijd een te hoge
trainingsintensiteit!
Als u begint met trainen, zijn 2-3 minuten per
oefening voldoende. Bij dagelijkse training kunt
u de duur na ongeveer een week op 5-10 minuten verhogen. De maximale trainingsduur mag
echter niet langer dan 1 uur bedragen.
• Las tussen de oefeningen voldoende lange
pauzes in en drink voldoende.
Let op!
• Bij klachten of ongesteldheid dient u
de oefeningen direct te onderbreken
en een arts te raadplegen.
• Rek de trainingsbanden niet langer uit
dan 2,30 m.
• De krachttabel toont, welke kracht
nodig is, om de trainingsbanden op
de desbetreffende lengte te trekken.
Tolerantiebereik voor de kracht:
+/- 20% (krachttabel expander zie
technische gegevens).
Warming-up en stretchen
Neem voor en na het trainen voldoende tijd
voor de warming up en cooling down. Wij laten
u een paar eenvoudige oefeningen hiervoor
zien. U dient de desbetreffende oefeningen
telkens 2 tot 3 keer te herhalen.
Warming-up van de hals- en
nekspieren
• Ga in een ontspannen positie staan. Trek uw
hoofd met één hand zachtjes naar links, ver volgens naar rechts. Door deze oefening
stretcht u de zijkant van uw hals.
• Laat uw hoofd afwisselend in beide richtingen
draaien. Herhaal deze oefeningen, totdat uw
nek zich soepel en ontspannen aanvoelt.
47NL/BE
Page 48

Warming-up van de armen en
schouders
• Houd uw arm zijdelings gestrekt voor uw borst
en druk deze met de andere hand voorzichtig
tegen uw lichaam. Doe hetzelfde ook met de
andere arm. Denk eraan, dat u slechts zo
stevig drukt, totdat u een lichte stretch voelt.
• Buig om beurten de arm over uw hoofd naar
achteren en druk met de andere hand aan de
elleboog de arm lichtjes naar beneden.
• Kruis uw handen achter uw rug en trek ze
voorzichtig naar boven. Als u hierbij uw
bovenlichaam naar voren buigt, krijgen uw
spieren een optimale warm-up.
• Om de schouderspieren los te maken maakt
u voorzichtig draaibewegingen met beide
schouders – eerst een poosje naar voren,
dan naar achteren.
• Vervolgens trekt u uw schouders een paar keer
naar boven en laat u ze vervolgens weer
vallen. Na een paar herhalingen voelen uw
schouders warm en soepel aan.
Warming-up en stretchen van de
beenspieren
• Ga rechtop staan en houd met de rechter
hand het gebogen been een poosje vast.
Voor het makkelijke uitvoeren van deze
oefening kunt u zich met de andere hand bijv.
aan de muur of aan een tafel vasthouden.
Deze stretch-oefening herhaalt u vervolgens
met het andere been.
• Neem een stap naar de zijkant – ga hiervoor
met de benen breed staan en buig één knie
dan een beetje. Blijf een poosje in deze posi tie, voordat u het andere been traint. Met deze
oefening stretcht u de binnenkant van uw
benen.
• Warm uw enkels op, door de ene voet van de
vloer te nemen en deze langzaam eerst in de
ene, dan in de andere richting te draaien.
Na een poosje is de andere voet aan de
beurt.
Overzicht van te trainen
spiergroepen
De volgende spiergroepen worden
bij de desbetreffende oefeningen
hoofdzakelijk getraind:
afb. C
Balance-board
afb. D
Balance-board met
trainingsbanden
afb. E
Balance-board met
handvatten
afb. F
Press-up-board
afb. G
Press-up-board met
trainingsbanden
afb. H
Twistboard
afb. I
Twistboard met
trainingsbanden
Beenspieren
Arm-, been- en
schouderspieren
Arm-, schouder- en
borstspieren
Arm, been en
onderste rugspieren
Arm- en beenspieren
Torsospieren
Spieren van het
bovenlichaam
48 NL/BE
Page 49

Training
Balance-board (afb. C)
Opmerking!
Deze oefening mag u alleen bij volledige beweegbaarheid van de enkel
uitvoeren. In geval van twijfel dient u
contact op te nemen met uw arts!
Let op! Gevaar voor letsel!
Ga tijdens het gebruik als balanceboard nooit op de draaischijf staan!
Aanbevolen duur:
Beginners: 2-3 minuten
Gevorderden: 5-10 minuten
Montage en training
Voor deze oefening hebt u van de extra onderdelen slechts de mat als antislipmat nodig.
Open het board bij de zijdelingse afsluitkleppen
en haal de trainingsbanden uit en de handgrepen eruit. Vervolgens sluit u het board en plaatst
u het op de mat.
• Ga voorzichtig op het Fitness-board staan en
begin langzaam zijdelings heen en weer te
wippen. Let op gelijkmatige, rustige bewegin gen. Gebruik de armen in eerste instantie, om
in evenwicht te blijven.
• Als u de bewegingen onder de knie hebt, kunt
u de armen zoals tijdens het lopen meebewe
gen. Verhoog de snelheid langzaam maar
zeker totdat u langzaam rent.
• Als u het gevoel hebt de oefening onder de
knie te hebben, kunt u uw armen boven uw
hoofd bewegen en op deze manier het hele
lichaam trainen.
• Probeer de verschillende bewegingen en
posities van de armen uit.
Balance-board met trainingsbanden (afb. D)
OPMERKING!
Deze oefening mag u alleen bij volledige beweegbaarheid van de enkel
uitvoeren. In geval van twijfel dient u
contact op te nemen met uw arts!
Ga tijdens het gebruik als balance-board nooit
op de draaischijf staan! Verwondingsgevaar!
Ga tijdens het gebruik als balance-board met
trainingsbanden nooit op de draaischijf staan!
Verwondingsgevaar!
De band mag niet langer dan op 2,30 m worden uitgerekt. Tolerantiebereik voor de kracht:
+/- 20%.
Aanbevolen duur:
Beginners: 2-3 minuten
Gevorderden: 5-10 minuten
Montage en training
Het board blijft ook bij deze oefening gesloten.
Bevestig de trainingsbanden aan de zijkanten
van het Fitness-board. Trek hiervoor de uiteinden
van de banden een beetje lang, om ze in de
zijdelingse openingen van het board te haken.
Om de trainingsbanden later te verwijderen,
trekt u ze door ze lichtjes te rekken weer uit de
uitsparingen (afb. A).
Plaats het balance-board op de antislipmat.
• Neem de handvatten van de trainingsbanden
vast en ga voorzichtig op het board staan.
• Begin voorzichtig zijwaarts te schommelen,
totdat u in evenwicht bent en het gevoel hebt,
de beweging onder de knie te hebben.
• Strek afwisselend de armen naar boven.
Hierbij bevindt zich de rechter arm boven, als
het rechter been naar beneden schommelt –
en omgedraaid.
• Als u het gevoel hebt, de oefening onder de
knie te hebben, kunt u de intensiteit verhogen
en de beweging van de armen naar voren
en terug, of afwisselend links en rechts van het
lichaam weg bewegen.
• Met deze oefening traint u alle spiergroepen
van uw lichaam!
49NL/BE
Page 50

Balance-board met handvatten
(afb. E)
Aanbevolen duur:
Beginners: 2-3 minuten
Gevorderden: 5-10 minuten
Montage en training
Het board blijft bij deze oefening gesloten.
Steek de uiteinden van de handvatten in de
gaten van het Fitness-board (zie afb. B).
Voor het later verwijderen van de handvatten
trekt u er stevig aan terwijl u ze een beetje
schudt. De antislipmat is bij deze oefening deels
bedoeld als de ondergrond voor uw knieën.
Let tijdens deze positie erop, dat de rug recht
blijft. Vermijd een holle rug.
• Kniel op de antislipmat en pak de handvatten
van het board in de handen. Buig een beetje
naar voren en begin nu lichtjes te schommelen.
Houd hierbij uw rug recht.
• Als u het gevoel hebt, sterk genoeg te zijn,
kunt u de oefening verder als push-ups
uitvoeren. Hiervoor plaatst u het board op
de antislipmat, pakt de handvatten vast en
plaatst uw voeten ongeveer tweederde van uw
lichaamslengte naar achteren. Let er per sé
op, dat u geen holle rug maakt.
Press-up-board (afb. F)
Aanbevolen duur:
Beginners: 2-3 minuten
Gevorderden: 5-10 minuten
Montage en training
Voor het gebruik als press-up-board hoeft u
alleen maar de onderkant van het Fitness-board
te verwijderen. Open voor dit doeleinde de
zijdelingse afsluitkleppen en leg het onderste
gedeelte aan de kant. De handvatten bijven aan
het bovenste gedeelte van het board.
Let bij deze oefening op, dat de rug recht blijft.
Vermijd een holle rug.
• Kniel voor het Fitness-board op de antislipmat
en pak de handvatten van het board in de
handen. Beweeg vervolgens uw lichaam
langzaam omhoog en omlaag.
• U kunt deze oefening afwisselen, door de
voeten van de vloer te nemen en ze achter uw
achterwerk te kruisen. Hierbij gaat het om een
variant van de push-up.
• Ter versteviging van de beenspieren neemt u in
knielende positie een knie van de vloer en
strekt u dit been met rustige bewegingen een
paar keer naar achteren en boven.
Vervolgens is het andere been aan de beurt.
U kunt ook na iedere strekbeweging wisselen.
• Om de moeilijkheidsgraad te verhogen neemt
u de knieën van de vloer en strekt u uw benen
naar achteren door. Maak nu push-ups.
Houd de rug gestrekt en overdrijf het niet.
Belangrijker voor het trainingseffect is de
correcte uitvoering van de bewegingsproces sen als het aantal push-ups.
Press-up-board met trainingsbanden (afb. G)
Aanbevolen duur:
Beginners: 2-3 minuten
Gevorderden: 5-10 minuten
Montage en training
Voor de volgende oefeningen pakt u de
handvatten van het board vast. Bovendien moet
u de trainingsbanden aan de zijkanten van
het Fitness-board bevestigen. Trek hiervoor de
uiteinden van de banden een beetje lang, om
ze in de zijdelingse openingen van het board te
haken.
• Bevestig de trainingsbanden met behulp van
de lussen aan uw voeten.
1. Neem dezelfde positie in als bij de oefening
aan het press-up-board zonder trainingsban den. Uw handen houden de handvatten vast,
de voeten liggen parallel op de vloer.
• Neem in deze positie een knie van de vloer
en strek het been met rustige bewegingen
een paar keer naar achteren en naar boven
uit. Vervolgens is het andere been aan de
beurt. U kunt ook na iedere strekbeweging
wisselen.
2. Ga vlak op uw rug liggen. Als steun voor uw
hoofd en wervelkolom plaatst u uw hoofd op
de omgedraaide onderkant van het fitness board.
50 NL/BE
Page 51

• Plaats in liggende positie de voeten, alsof u
staat, in een hoek van 90° op het board.
• Pak de grepen van de trainingsbanden in uw
handen en houd ze in een hoek van 90°
naast het lichaam.
• De benen blijven gestrekt en oefenen een
tegendruk op het press-up-board uit.
• Beweeg nu om beurten uw linker- en rechter hand richting uw schouders.
3. Ga op de rubberen mat zitten. De voeten
plaatst u in zittende positie in een hoek van
90° op het press-up-board.
• Pak de grepen van de trainingsbanden in de
handen.
• Buig uw armen naast uw lichaam en hel uw
rug een beetje naar achteren. Hierbij blijven
de schouders en armen in de uitgangspositie.
Twistboard (afb. H)
Aanbevolen duur:
Beginners: 2-3 minuten
Gevorderden: 5-10 minuten
Montage en training
Bij deze oefening hebt u slechts de bovenkant
van het Fitness-board nodig. Verwijder de
handvatten en trainingsbanden zoals hierboven
beschreven.
• Plaats de bovenkant op de antislipmat en ga
voorzichtig op het twistboard staan.
• Draai langzaam heen en weer, totdat u het
gevoel hebt, de oefening onder de knie te
hebben. Met het twistboard zijn draaiingen tot
40° in beide richtingen mogelijk.
• Gebruik de armen in eerste instantie om in
evenwicht te blijven. Later kunnen uw armen u
met zijwaartse bewegingen begeleiden.
• Om de moeilijkheidsgraad en de trainingsin tensiteit te verhogen, kunt u bij deze beweging
uw knieën buigen.
• Als u helemaal het gevoel hebt, de oefening
onder de knie te hebben, kunt u de positie
van uw armen veranderen. Til ze bijv. tijdens
de beweging boven uw hoofd.
• Voor een „actieve pauze“ plaatst u het
twistboard op een brede kruk en voert u de
oefeningen al zittend uit.
Twistboard met trainingsbanden
(afb. I)
Aanbevolen duur:
Beginners: 2-3 minuten
Gevorderden: 5-10 minuten
Montage en training
U hebt bij deze oefening alleen het bovenste
gedeelte van het Fitness-board en de trainingsbanden nodig. Deze worden zoals hierboven
beschreven aan de zijkanten bevestigd.
Plaats het board op de antislipmat.
De band mag niet langer dan op 2,30 m worden uitgerekt. Tolerantiebereik voor de kracht:
+/- 20%.
• Begin langzaam. Gebruik de trainingsbanden
in eerste instantie ter stabilisatie. Voer dezelfde
bewegingen uit als bij het twistboard-training
zonder banden.
• De zijdelingse draaibewegingen zijn tot 40°
in beide richtingen mogelijk.
• Als u het gevoel hebt, de oefening onder de
knie te hebben, kunt u uw armen gebruiken.
Probeer de armbewegingen in verschillende
richtingen uit. Beweeg de armen gelijktijdig of
wissel de linker en rechter arm af. U bepaalt
het tempo en de moeilijkheidsgraad.
• Ga nu voorzichtig naast de twister (de draai schijf) op het Fitness-board staan. Strek de
armen om beurten zijdelings boven uw hoofd.
Let erop, dat het lichaam hierbij recht blijft.
De beweging wordt alleen door de armen
uitgevoerd.
• Na een poosje gebruikt u beide armen gelijk tijdig. U kunt deze beweging ook naar voren
en achteren uitvoeren.
OPMERKING! De volgende oefeningen
zijn goed geschikt als stretchoefening
voor en na het trainen met het Fitnessboard.
51NL/BE
Page 52

Stretching-board (afb. J)
Aanbevolen duur:
Beginners: 2-3 minuten
Gevorderden: 5-10 minuten
Montage en training
Voor het gebruik als stretching-board hebt u
slechts de onderkant van het fitnessboard nodig.
Plaats het omgedraaid op de antislipmat.
• Ga voor het fitnessboard op de vloer zitten
en leg uw voeten erop. De benen dienen zo
ver mogelijk gestrekt te worden.
• Raak met beide handen uw voeten aan en trek
uw hoofd zo ver mogelijk richting uw knieën.
Herhaal deze oefening enkele malen.
• Neem nu één been van het fitnessboard en
plaats het zijdelings gestrekt op de vloer.
Herhaal de oefening afwisselend met uw
rechter en linker been.
• Ga met één been naar voren staan - met één
been op het fitnessboard. Strek nu langzaam
naar voren, waarbij u het voorste been buigt.
Des te dieper u het been buigt, des te intensie
ver is de oefening. Om de moeilijkheidsgraad
te verhogen, beweegt u het achterste been
verder naar achteren. Blijf gedurende een
korte periode in deze positie en wissel dan
van been.
• U kunt bovendien met de achterste knie de
vloer aanraken. Hierdoor wordt het bovenste
gedeelte van uw bovenbeen extra gestretchd.
• Sit-ups:
Attentie! Bij sit-ups kan letsel aan de wervel kolom ontstaan.
Om uw buikspieren te trainen, gaat u met
uw schouders naar beneden op het board
liggen. Plaats uw handen hierbij losjes tegen
uw achterhoofd en beweeg uw bovenlichaam
langzaam richting uw knieën. Kijk hierbij naar
voren en voorkom een holle rug. De handen
bevinden zich achter uw hoofd, zonder druk
uit te oefenen.
• Om de complete achterste beenspieren te
stretchen gaat u met naar boven geknikte
voeten op het board staan. Houd uw benen
doorgestrekt. Probeer nu, met de vingertoppen
uw tenen aan te raken. Herhaal deze oefening
enkele malen.
Onderhoud en opbergen
Het artikel altijd droog en schoon bij kamertemperatuur bewaren.
BELANGRIJK! Alleen met water reinigen, nooit
met bijtende reinigingsmiddelen. Vervolgens met
een schoonmaakdoekje afdrogen.
Opmerking met betrekking
tot de verwijdering
Verpakking en product dienen op een milieuvriendelijke manier, soort bij soort, te worden
verwijderd! Verwijder het product via een
erkende afvalverwijderaar of via uw gemeentelijke instantie. Neem de momenteel geldende
voorschriften in acht.
3 jaar garantie
Het product is geproduceerd met grote zorg en
onder voortdurende controle. U ontvangt een
garantie van drie jaar op dit product, vanaf
de datum van aankoop. Bewaar alstublieft uw
aankoopbewijs.
De garantie geldt alleen voor materiaal- en fabricagefouten en vervalt bij foutief of oneigenlijk
gebruik. Uw wettelijke rechten, met name het
garantierecht, worden niet beïnvloed door deze
garantie. In geval van reclamaties dient u zich
aan de beneden genoemde service-hotline te
wenden of zich per e-mail met ons in verbinding
te zetten. Onze servicemedewerkers zullen de
verdere handelswijze zo snel mogelijk met u
afspreken. Wij zullen u in ieder geval persoonlijk
te woord staan.
De garantieperiode wordt na eventuele reparaties en op basis van de garantie, wettelijke
garantie of coulance niet verlengd. Dit geldt ook
voor vervangen en gerepareerde delen.
Na afloop van de garantieperiode dienen eventuele reparaties te worden betaald.
IAN: 93156
Service België
Tel.: 070 270 171
(0,15 EUR/Min.)
E-Mail: deltasport@lidl.be
Reserve onderdelen voor uw product vindt u ook via:
www.delta-sport.com, rubriek Service - reserve-onderdelenservice Lidl
52 NL/BE
Page 53

Persoonlijke trainingsgegevens
Datum
Oefening
Balance-board
Balance-board met
handvatten
Balance-board met
trainingsbanden
Twistboard
Press-up-board
Twistboard met
trainingsbanden
Push-up-board met
trainingsbanden
Stretching-board
Datum
Oefening
Balance-board
Aantal sets Herhalingen Aantal sets Herhalingen Aantal sets Herhalingen
Aantal sets Herhalingen Aantal sets Herhalingen Aantal sets Herhalingen
Balance-board met
handvatten
Balance-board met
trainingsbanden
Twistboard
Press-up-board
Twistboard met
trainingsbanden
Push-up-board met
trainingsbanden
Stretching-board
53NL/BE
Page 54

Herzlichen Glückwunsch!
Mit Ihrem Kauf haben Sie sich für ein hochwertiges Produkt entschieden. Machen Sie sich vor
der ersten Verwendung mit dem Produkt vertraut.
Lesen Sie hierzu aufmerksam die nachfolgende
Gebrauchsanweisung. Benutzen Sie das Produkt
nur wie beschrieben und für die angegebenen
Einsatzbereiche.
Bewahren Sie diese Anleitung gut auf.
Händigen Sie alle Unterlagen bei Weitergabe
des Produkts an Dritte ebenfalls mit aus.
Lieferumfang
1 x Fitness-Board
2 x Griff
2 x Fitnessband
1 x Fitnessmatte
1 x DVD mit Trainingsbeispielen
1 x Poster mit Trainingsbeispielen
1 x Gebrauchsanweisung
Technische Daten
Trainingsgerät entspricht der EN 957-1/2
Klasse H
Max. Benutzergewicht: 100 kg
Maße: ca. 50 x 30 x 15 cm
Artikelgewicht: ca. 2.270 g
Krafttabelle Expander
Länge (cm): 120 140 160 185 230
Kraft (N): 13 19,5 25 30 42
Bestimmungsgemäße
Verwendung
Der Artikel ist für den privaten Gebrauch konzipiert und darf nicht für kommerzielle, medizinische oder therapeutische Zwecke verwendet
werden.
Sicherheitshinweise zur
Benutzung
Warnung! Verletzungsgefahr!
• Dieses Fitness-Board ist für ein maximales
Körpergewicht von 100 kg ausgelegt.
Verwenden Sie das Produkt nicht, wenn Ihr
Körpergewicht darüber liegt.
• Konsultieren Sie Ihren Arzt, bevor Sie mit dem
Training beginnen. Stellen Sie sicher, dass Sie
für das Training gesundheitlich geeignet sind.
• Bewahren Sie die Gebrauchsanweisung mit
den Übungsvorgaben stets griffbereit auf.
• Halten Sie sich streng an die Trainingsvor gaben, die in dieser Anleitung vorgegeben
sind! Sonst drohen ernste gesundheitliche
Schäden.
• Bei zu hoher Anstrengung und Übertraining
drohen schwere Verletzungen. Denken Sie da ran, sich vor dem Training immer aufzuwär men, und trainieren Sie Ihrer aktuellen
Leistungsfähigkeit entsprechend.
Bei Beschwerden, Schwächegefühl oder
Müdigkeit brechen Sie das Training auf dem
Artikel sofort ab und kontaktieren Sie Ihren
Arzt.
• Kontrollieren Sie vor jeder Benutzung, ob das
Fitness-Board für die jeweilige Übung korrekt
montiert wurde.
• Verwenden Sie den Artikel nur auf festem,
ebenem Untergrund und stellen Sie ihn nicht in
der Nähe von Treppen und Absätzen auf.
• Stellen Sie sicher, dass das Fitness-Board
sicher und gerade auf dem Boden steht,
damit es nicht wegrutscht.
• Verwenden Sie immer die mitgelieferte Schutz matte, um empfindliche Böden (z.B. Parkett)
vor Beschädigungen zu schützen.
• Für ein sicheres Training benötigen Sie aus reichend Platz. Beachten Sie beim Training,
dass in jede Richtung mindestens 1 m Freiraum
um das Gerät vorhanden ist.
• Der Artikel darf immer nur von einer Person
zur Zeit benutzt werden.
• Die Trainingsbänder dürfen ausschließlich in
Verbindung mit dem Fitness-Board verwendet
werden.
54 DE/AT/CH
Page 55

• Wenn Sie das Produkt als Balance-Board mit
Trainingsbändern verwenden, stellen Sie sich
nie auf die Drehscheibe.
Besondere Vorsicht –
Verletzungsgefahr für Kinder!
• Lassen Sie Kinder dieses Produkt nicht unbe aufsichtigt nutzen. Weisen Sie sie auf die
richtige Nutzung des Gerätes hin und be halten Sie die Aufsicht. Erlauben Sie die
Benutzung nur, wenn die geistige und körper liche Entwicklung der Kinder dies zulässt.
Als Spielzeug ist dieses Gerät nicht geeignet.
Gefahren durch Verschleiß
• Der Artikel darf nur in einwandfreiem Zustand
verwendet werden. Prüfen Sie den Artikel vor
jedem Gebrauch. Die Sicherheit des Fitness Boards kann nur gewährleistet werden, wenn
es regelmäßig auf Schäden und Verschleiß
geprüft wird.
• Die Trainingsbänder dürfen nicht länger als
auf 2,30 m gedehnt werden.
• Prüfen Sie regelmäßig die Trainingsbänder.
Kontrollieren Sie diese auf Risse und Be schädigungen. Defekte Teile dürfen nicht
mehr verwendet werden.
• Schützen Sie das Gerät vor hohen Tempe raturen und Feuchtigkeit.
• Verwenden Sie ausschließlich Original-Ersatz teile.
Trainingshinweise
Die nachfolgenden Übungen stellen nur eine
Auswahl dar. Weitere Übungen finden Sie in
einschlägiger Fachliteratur.
• Tragen Sie bequeme Sportbekleidung und
Turnschuhe.
• Wärmen Sie sich vor jedem Training auf und
lassen Sie das Training allmählich abklingen.
Lesen Sie hierzu unsere Empfehlungen zum
Auf- und Abwärmen.
• Stellen Sie sicher, dass Sie beim Training
ausreichend Platz um sich herum haben.
• Führen Sie die Übungen mit gleichmäßigem
Tempo aus.
• Halten Sie sich an die vorgegebenen
Bewegungsabläufe.
Achtung! Vermeiden Sie eine zu
hohe Trainingsintensität!
Wenn Sie mit dem Training beginnen, sind
2-3 Minuten pro Übung ausreichend.
Bei täglichem Training können Sie die Dauer
nach etwa einer Woche auf 5-10 Minuten
steigern. Die maximale Trainingszeit sollte
jedoch 1 Stunde nicht überschreiten.
• Machen Sie zwischen den Übungen ausrei chend lange Pausen und trinken Sie genug.
Achtung!
• Bei Beschwerden oder Unwohlsein
beenden Sie sofort die Übungen und
kontaktieren Sie Ihren Arzt.
• Dehnen Sie die Trainingsbänder nicht
länger als 2,30 m.
• Die Krafttabelle zeigt, welche Kraft
benötigt wird, um die Trainingsbänder
auf die entsprechende Länge zu zie hen. Toleranzbereich für die Kraft:
+/- 20% (Krafttabelle Expander siehe
unter Technische Daten).
Aufwärmen und Dehnen
Nehmen Sie sich vor und nach jedem Training
ausreichend Zeit zum Auf- bzw. Abwärmen.
Im Folgenden zeigen wir Ihnen hierzu einige
einfache Übungen. Sie sollten die jeweiligen
Übungen jeweils 2- bis 3-mal wiederholen.
Aufwärmen der Hals- und
Nackenmuskulatur
• Stellen Sie sich entspannt hin. Ziehen Sie Ihren
Kopf mit einer Hand sanft zuerst nach links,
dann nach rechts. Durch diese Übung werden
die Seiten Ihres Halses gedehnt.
• Lassen Sie Ihren Kopf abwechselnd in beide
Richtungen kreisen.
Wiederholen Sie diese Übungen, bis sich Ihr
Nacken locker und entspannt anfühlt.
55DE/AT/CH
Page 56

Aufwärmen der Arme und
Schultern
• Halten Sie einen Arm seitlich gestreckt vor Ihre
Brust und drücken Sie ihn mit der anderen
Hand vorsichtig zum Körper. Wechseln Sie
nach einer Weile den Arm. Denken Sie daran,
nur so fest zu drücken, bis Sie ein leichtes
Ziehen verspüren.
• Führen Sie abwechselnd einen Arm gebeugt
über den Kopf nach hinten und drücken mit
der anderen Hand am Ellenbogen leicht nach
unten.
• Verschränken Sie Ihre Hände hinter dem
Rücken und ziehen Sie sie vorsichtig nach
oben. Wenn Sie dabei den Oberkörper nach
vorne beugen, werden alle Muskeln optimal
aufgewärmt.
• Zur Lockerung der Schulterpartie kreisen Sie
vorsichtig beide Schultern – erst eine Weile
nach vorn, dann nach hinten.
• Ziehen Sie die Schultern einige Male nach
oben und lassen Sie sie wieder fallen. Nach
ein paar Wiederholungen sollten sich Ihre
Schultern warm und locker anfühlen.
Aufwärmen und Dehnen der
Beinmuskulatur
• Stellen Sie sich gerade hin und halten Sie mit
der rechten Hand das angewinkelte rechte
Bein eine Weile fest. Zur leichteren Durch führung dieser Übung können Sie sich mit der
anderen Hand z.B. an einer Wand oder einem
Tisch festhalten. Diese Dehnübung wieder holen Sie anschließend mit dem anderen Bein.
• Machen Sie einen Ausfallschritt zur Seite –
stellen Sie sich dazu breitbeinig hin und gehen
Sie mit dem einen Bein etwas in die Knie.
Halten Sie diese Position eine Weile, bevor Sie
das Bein wechseln. Mit dieser Übung dehnen
Sie die Innenseiten Ihrer Beine.
• Wärmen Sie Ihre Knöchel auf, indem Sie einen
Fuß vom Boden nehmen und ihn langsam
erst in der einen, dann in der anderen
Richtung kreisen lassen. Nach einer Weile
wechseln Sie den Fuß.
Übersicht beanspruchter
Muskelgruppen
Folgende Muskelgruppen werden bei
den jeweiligen Übungen hauptsächlich
beansprucht:
Abb. C
Balance-Board
Abb. D
Balance-Board mit
Trainingsbändern
Abb. E
Balance-Board
mit Griffen
Abb. F
Press-Up-Board
Abb. G
Press-Up-Board mit
Trainingsbändern
Abb. H
Twist-Board
Abb. I
Twist-Board mit
Trainingsbändern
Beinmuskulatur
Arm-, Bein- und
Schultermuskulatur
Arm-, Schulter- und
Brustmuskulatur
Arm-, Bein- und untere
Rückenmuskulatur
Arm- und
Beinmuskulatur
Torsomuskulatur
Oberkörper-
muskulatur
56 DE/AT/CH
Page 57

Training
Balance-Board (Abb. C)
Hinweis!
Diese Übung dürfen Sie nur bei vollkommener Sprunggelenksbeweglichkeit
ausführen. Im Zweifelsfall kontaktieren
Sie Ihren Arzt!
Achtung! Verletzungsgefahr!
Stellen Sie sich während der Nutzung
als Balance-Board nie auf die Drehscheibe!
Empfohlene Dauer:
Anfänger: 2-3 Minuten
Fortgeschrittene: 5-10 Minuten
Aufbau und Training
Für diese Übung benötigen Sie von den
Zusatzteilen lediglich die Unterlegmatte als
Rutschschutz. Öffnen Sie das Board an den
seitlichen Schließklappen und entnehmen Sie
Trainingsbänder und Haltegriffe. Anschließend
schließen Sie das Board und stellen es auf die
Unterlegmatte.
• Stellen Sie sich vorsichtig auf das Fitness-Board
und beginnen Sie langsam, seitlich zu wippen.
Achten Sie auf ruhige, gleichmäßige Bewe gungen. Nutzen Sie die Arme zunächst, um
die Balance zu halten.
• Haben Sie ein Gefühl für die Bewegung
bekommen, können Sie die Arme wie beim
langsamen Laufen dazubewegen. Steigern
Sie die Geschwindigkeit allmählich zu einem
leichten Lauf.
• Wenn Sie sich sicher fühlen, können Sie mit
den Armen über dem Kopf schwingen, so dass
der gesamte Körper trainiert wird.
• Probieren Sie verschiedene Bewegungen und
Positionen der Arme aus.
Balance-Board mit Trainingsbändern (Abb. D)
HINWEIS!
Diese Übung dürfen Sie nur bei vollkommener Sprunggelenksbeweglichkeit
ausführen. Im Zweifelsfall kontaktieren
Sie Ihren Arzt!
Stellen Sie sich während der Nutzung als
Balance-Board mit Trainingsbändern nie auf die
Drehscheibe! Verletzungsgefahr!
Das Band darf nicht länger als 2,30 m gedehnt
werden. Toleranzbereich für die Kraft: +/- 20%.
Empfohlene Dauer:
Anfänger: 2-3 Minuten
Fortgeschrittene: 5-10 Minuten
Aufbau und Training
Das Board bleibt auch bei dieser Übung
geschlossen. Befestigen Sie die Trainingsbänder
an beiden Seiten des Fitness-Boards. Ziehen Sie
dazu die Enden der Bänder etwas in die Länge,
um sie in den seitlichen Öffnungen des Boards
einzufädeln. Um die Trainingsbänder später zu
entfernen, ziehen Sie sie unter leichtem Dehnen
wieder aus den Aussparungen (Abb. A).
Stellen Sie das Balance-Board auf die Gummimatte.
• Nehmen Sie die Griffe der Trainingsbänder
in die Hände und besteigen Sie vorsichtig das
Board.
• Beginnen Sie, vorsichtig seitwärts zu schau keln, bis Sie Ihr Gleichgewicht gefunden und
ein Gefühl für die Bewegung bekommen
haben.
• Strecken Sie abwechselnd Ihre Arme nach
oben. Dabei zeigt der rechte Arm nach oben,
wenn das rechte Bein nach unten schaukelt –
und umgekehrt.
• Wenn Sie sich sicher fühlen, steigern Sie die
Intensität und führen die Bewegung der Arme
vor und zurück aus, oder bewegen Sie die
Arme abwechselnd links und rechts vom
Körper weg.
• Mit dieser Übung trainieren Sie alle Muskel gruppen Ihres Körpers!
57DE/AT/CH
Page 58

Balance-Board mit Griffen
(Abb. E)
Empfohlene Dauer:
Anfänger: 2-3 Minuten
Fortgeschrittene: 5-10 Minuten
Aufbau und Training
Das Board bleibt bei dieser Übung geschlossen.
Stecken Sie die Enden der Griffe in die Löcher
auf dem Fitness-Board (siehe Abb. B). Zum späteren Entfernen der Griffe ziehen Sie sie unter
leichtem Rütteln kräftig daran. Die Gummimatte
dient bei dieser Übung teilweise als Unterlage
für Ihre Knie. Achten Sie bei dieser Übung auf
einen geraden Rücken. Vermeiden Sie ein Hohlkreuz.
• Knien Sie sich auf die Gummimatte und
nehmen Sie die Griffe des Boards in die
Hände. Beugen Sie sich etwas nach vorn und
beginnen Sie, leicht zu schaukeln. Halten Sie
dabei den Rücken gerade.
• Wenn Sie sich stark genug fühlen, setzen Sie
diese Übung in der Liegestütze fort. Dazu
stellen Sie das Board auf die Gummimatte,
nehmen die Griffe in die Hände und setzen
die Füße um etwa zwei Drittel der Körper länge nach hinten. Achten Sie auch hier
unbedingt darauf, ein Hohlkreuz zu ver meiden.
Press-Up-Board (Abb. F)
Empfohlene Dauer:
Anfänger: 2-3 Minuten
Fortgeschrittene: 5-10 Minuten
Aufbau und Training
Zur Nutzung als Press-Up-Board müssen Sie
lediglich die Unterseite Ihres Fitness-Boards
entfernen. Öffnen Sie zu diesem Zweck die
seitlichen Schließklappen und legen Sie das
Unterteil zur Seite. Die Griffe verbleiben am
Oberteil des Boards.
Achten Sie bei dieser Übung auf einen geraden
Rücken. Vermeiden Sie ein Hohlkreuz.
• Knien Sie sich vor dem Fitness-Board auf die
Gummimatte und nehmen Sie die Griffe des
Boards in die Hände. Bewegen Sie nun Ihren
Körper langsam rauf und runter.
• Sie können diese Übung variieren, indem Sie
die Füße vom Boden nehmen und hinter dem
Gesäß überkreuzen. Dabei handelt es sich um
eine Variante der Liegestütze.
• Zur Stärkung der Beinmuskulatur nehmen Sie
in kniender Position ein Knie vom Boden und
strecken das Bein in ruhigen Bewegungen ein
paar Mal nach hinten oben. Danach wechseln
Sie das Bein. Sie können auch nach jeder
Streckung abwechseln.
• Zur Erhöhung der Schwierigkeit nehmen Sie
die Knie vom Boden und strecken Sie die
Beine nach hinten durch. Machen Sie nun
Liegestütze. Halten Sie den Rücken gerade
und übertreiben Sie es nicht. Wichtiger für den
Trainingseffekt ist die ordentliche Durchführung
der Bewegungsabläufe als die Anzahl der
Liegestütze.
Press-Up-Board mit Trainingsbändern (Abb. G)
Empfohlene Dauer:
Anfänger: 2-3 Minuten
Fortgeschrittene: 5-10 Minuten
Aufbau und Training
Für die folgende Übung bleiben die Griffe am
Board. Zusätzlich müssen die Trainingsbänder
an beiden Seiten des Fitness-Boards befestigt
werden. Ziehen Sie dazu die Enden der Bänder
etwas in die Länge, um sie in den seitlichen
Öffnungen des Boards einzufädeln.
• Befestigen Sie die Trainingsbänder mithilfe der
Schlaufen an Ihren Füßen.
1. Nehmen Sie die gleiche Haltung ein wie bei
der Übung am Press-Up-Board ohne Trainings bänder. Ihre Hände umgreifen die Griffe, die
Füße liegen parallel auf dem Boden.
• Nehmen Sie in dieser Position ein Knie vom
Boden und strecken Sie das Bein in ruhigen
Bewegungen ein paar Mal nach hinten oben.
Danach wechseln sie das Bein. Sie können
auch nach jeder Streckung abwechseln.
2. Legen Sie sich flach auf den Rücken.
Als Stütze für Kopf und Wirbelsäule platzieren
Sie Ihren Kopf auf der umgedrehten Unterseite
des Fitness-Boards.
58 DE/AT/CH
Page 59

• Stellen Sie in liegender Position die Füße, wie
als würden Sie darauf stehen, im 90° Winkel
auf das Board.
• Nehmen Sie die Griffe der Trainingsbänder
in Ihre Hände und halten Sie sie im 90°
Winkel neben dem Körper.
• Die Beine bleiben gestreckt und üben Gegen druck gegen das Press-Up-Board aus.
• Bewegen Sie nun abwechselnd die linke und
rechte Hand in Richtung Schulter.
3. Setzen Sie sich auf die Gummimatte.
Die Füße platzieren Sie in sitzender Position im
90° Winkel auf dem Press-Up-Board.
• Nehmen Sie die Griffe der Trainingsbänder in
die Hände.
• Winkeln Sie die Arme neben Ihrem Körper an
und neigen Sie Ihren Rücken leicht nach
hinten. Dabei bleiben Schultern und Arme in
Ausgangsposition.
Twist-Board (Abb. H)
Empfohlene Dauer:
Anfänger: 2-3 Minuten
Fortgeschrittene: 5-10 Minuten
Aufbau und Training
Bei dieser Übung benötigen Sie nur die Oberseite des Fitness-Boards. Entfernen Sie Griffe und
Trainingsbänder wie oben beschrieben.
• Stellen Sie die Oberseite auf die Gummimatte
und steigen Sie vorsichtig auf das Twist-Board.
• Drehen Sie sich langsam hin und her, bis Sie
sich sicher fühlen. Mit dem Twist-Board sind
Drehungen bis 40° in beide Richtungen
möglich.
• Nutzen Sie Ihre Arme zunächst, um das
Gleichgewicht zu halten. Später können Sie
mit den Armen die Seitwärtsbewegungen
begleiten.
• Um den Schwierigkeitsgrad und die Trainings intensität zu erhöhen, können Sie in dieser
Bewegung in die Knie gehen.
• Wenn Sie völlig sicher sind, können Sie die
Position Ihrer Arme verändern. Heben Sie sie
z.B. während der Bewegung über Ihren Kopf.
• Für eine „aktive Pause“ stellen Sie das Twist Board auf einen breiten Hocker und absol vieren die Übungen im Sitzen.
Twist-Board mit Trainingsbändern (Abb. I)
Empfohlene Dauer:
Anfänger: 2-3 Minuten
Fortgeschrittene: 5-10 Minuten
Aufbau und Training
Sie benötigen für diese Übung nur die Oberseite
des Fitness-Boards und die Trainingsbänder.
Diese werden wie oben beschrieben an den
Seiten befestigt. Stellen Sie das Board auf die
Gummimatte.
Das Band darf nicht länger als 2,30 m gedehnt
werden. Toleranzbereich für die Kraft: +/- 20%.
• Beginnen Sie langsam. Benutzen Sie die
Trainingsbänder zunächst zum Stabilisieren.
Machen Sie die gleichen Bewegungen wie
beim Twist-Board-Training ohne Bänder.
• Die seitlichen Drehbewegungen sind bis zu
40° in beide Richtungen möglich.
• Wenn Sie sich sicher fühlen, kommen Ihre
Arme zum Einsatz. Probieren Sie Armbewe gungen in verschiedene Richtungen aus.
Bewegen Sie die Arme gleichzeitig oder
wechseln Sie den linken und rechten Arm ab.
Sie selbst bestimmen Tempo und Schwierigkeit.
• Stellen Sie sich nun vorsichtig neben den
Twister (die Drehscheibe) auf das Fitness Board. Strecken sie die Arme abwechselnd
seitlich über Ihren Kopf. Achten Sie darauf,
dass der Körper dabei gerade bleibt.
Die Bewegung geht allein von den Armen aus.
• Nach einer Weile benutzen Sie beide Arme
gleichzeitig. Sie können diese Bewegung auch
nach vorne hin durchführen.
HINWEIS! Die folgenden Übungen eignen sich auch gut als Dehnübungen vor
und nach dem Training mit dem FitnessBoard.
Stretching-Board (Abb. J)
Empfohlene Dauer:
Anfänger: 2-3 Minuten
Fortgeschrittene: 5-10 Minuten
Aufbau und Training
Für die Nutzung als Stretching-Board benötigen
Sie nur die Unterseite des Fitness-Boards. Legen
Sie sie umgedreht auf die Gummimatte.
59DE/AT/CH
Page 60

• Setzen Sie sich auf den Boden vor das Fitness Board und legen Sie Ihre Füße darauf. Die
Beine sollten weitestmöglich gestreckt sein.
• Fassen Sie mit beiden Händen Ihre Füße und
ziehen Sie Ihren Kopf soweit Sie können in
Richtung Knie. Wiederholen Sie diese Übung
einige Male.
• Nehmen Sie jetzt ein Bein vom Fitness-Board
und legen Sie es seitlich gestreckt auf den Bo den. Wiederholen Sie die Übung abwech selnd mit dem rechten und dem linken Bein.
• Stellen Sie sich im Ausfallschritt nach vorn - mit
einem Bein auf dem Fitness-Board. Strecken
Sie sich langsam nach vorne, wobei Sie das
vordere Bein beugen. Je tiefer Sie das Bein
beugen, desto intensiver ist die Übung. Um die
Schwierigkeit zu erhöhen, bewegen Sie das
hintere Bein weiter nach hinten. Halten Sie die
Stellung jeweils kurz und wechseln Sie dann
das Bein.
• Sie können zusätzlich mit dem hinteren Knie
den Boden berühren. Dadurch dehnen Sie
den oberen Oberschenkel zusätzlich.
• Sit-Ups:
Achtung! Bei Sit-Ups kann es zu Wirbelsäulen verletzungen kommen.
Um Ihre Bauchmuskeln zu trainieren, legen Sie
sich mit den Schultern rücklings auf das Board.
Legen Sie Ihre Hände locker an den Hinter kopf und bewegen Sie Ihren Oberkörper lang sam in Richtung Ihrer Knie. Schauen Sie dabei
nach vorne und vermeiden Sie ein Hohlkreuz.
Die Hände liegen am Hinterkopf, ohne Druck
auszuüben.
• Zur Dehnung der gesamten hinteren Bein muskulatur stellen Sie sich mit nach oben
geknickten Füßen auf das Board. Halten Sie
die Beine durchgestreckt. Nun versuchen Sie,
mit den Fingerspitzen Ihre Zehen zu berühren.
Wiederholen Sie diese Übung einige Male.
Pflege, Lagerung
Den Artikel immer trocken und sauber in einem
temperierten Raum lagern.
WICHTIG! Nur mit Wasser reinigen, nie mit
scharfen Pflegemitteln. Anschließend mit einem
Reinigungstuch trocken wischen.
Hinweise zur Entsorgung
Verpackung und Artikel bitte umweltgerecht und
sortenrein entsorgen! Entsorgen Sie den Artikel
über einen zugelassenen Entsorgungsbetrieb
oder über Ihre kommunale Gemeindeverwaltung. Beachten Sie die aktuell geltenden
Vorschriften.
3 Jahre Garantie
Das Produkt wurde mit großer Sorgfalt und unter
ständiger Kontrolle produziert. Sie erhalten auf
dieses Produkt drei Jahre Garantie ab Kaufdatum. Bitte bewahren Sie den Kassenbon auf.
Die Garantie gilt nur für Material- und Fabrikationsfehler und entfällt bei missbräuchlicher oder
unsachgemäßer Behandlung. Ihre gesetzlichen
Rechte, insbesondere die Gewährleistungsrechte, werden durch diese Garantie nicht eingeschränkt.
Bei etwaigen Beanstandungen wenden Sie sich
bitte an die unten stehende Service-Hotline oder
setzen Sie sich per E-Mail mit uns in Verbindung.
Unsere Servicemitarbeiter werden das weitere
Vorgehen schnellstmöglich mit Ihnen abstimmen.
Wir werden Sie in jedem Fall persönlich beraten.
Die Garantiezeit wird durch etwaige Reparaturen aufgrund der Garantie, gesetzlicher
Gewährleistung oder Kulanz nicht verlängert.
Dies gilt auch für ersetzte und reparierte Teile.
Nach Ablauf der Garantie anfallende Reparaturen sind kostenpflichtig.
IAN: 93156
Service Deutschland
Tel.: 0800-5435111
E-Mail: deltasport@lidl.de
Service Österreich
Tel.: 0820 201 222
(0,15 EUR/Min.)
E-Mail: deltasport@lidl.at
Service Schweiz
Tel.: 0842 665566
(0,08 CHF/Min.,
Mobilfunk max. 0,40 CHF/Min.)
E-Mail: deltasport@lidl.ch
Ersatzteile zu Ihrem Produkt finden Sie auch unter:
www.delta-sport.com, Rubrik Service - Ersatzteilservice Lidl
60 DE/AT/CH
Page 61

Persönliche Trainingsdaten
Datum
Übung Sätze Wdh Sätze Wdh Sätze Wdh
Balance-Board
Balance-Board mit
Griffen
Balance-Board mit
Trainingsbändern
Twist-Board
Press-Up-Board
Twist-Board mit
Trainingsbändern
Press-Up-Board mit
Trainingsbändern
Stretching-Board
Datum
Übung Sätze Wdh Sätze Wdh Sätze Wdh
Balance-Board
Balance-Board mit
Griffen
Balance-Board mit
Trainingsbändern
Twist-Board
Press-up-Board
Twist-Board mit
Trainingsbändern
Press-up-Board mit
Trainingsbändern
Stretching-Board
61DE/AT/CH
Page 62

6263DE/AT/CH
Page 63

Page 64

DELTA-SPORT HANDELSKONTOR GMBH
Wragekamp 6 • D-22397 Hamburg
Version: 12/2013
Delta-Sport-Nr.: FB-1539
IAN 93156
 Loading...