


Hydraulic Log Splitter
Vedklyv
Hydraulisk vedkløyver Hydraulihalkoja Holzspalter
Important!
Read the entire instruction manual carefully and make sure that you fully understand
it before you use the equipment. Keep the manual for future reference.
Viktig information:
Läs hela bruksanvisningen noggrant och försäkra dig om att du har förstått den innan du använder utrustningen. Spara manualen för framtida bruk.
Viktig informasjon:
Les disse anvisningene nøye og forsikre deg om at du forstår dem før du tar produktet i bruk. Ta vare på anvisningene for seinere bruk.
Tärkeää tietoa:
Lue nämä ohjeet huolellisesti ja varmista että olet ymmärtänyt ne, ennen kuin alat käyttää laitetta. Säilytä ohjeet myöhempää tarvetta varten.
Wichtiger Hinweis:
Vor Inbetriebnahme die komplette Bedienungsanleitung durchlesen und aufbewahren.
ENGLISH
SVENSKA
NORSK
SUOMI
DEUTSCH
ART.NO |
MODEL |
18-3038 |
WS4T-37-UK |
30-9285 |
WS4T-37 |
Ver. 20131104 Original instructions Bruksanvisning i original Original bruksanvisning Alkuperäinen käyttöohje Original Bedienungsanleitung

Hydraulic Log Splitter
ART.NO. 18-3038 |
MODEL WS4T-37-UK |
30-9285 |
WS4T-37 |
Warning! When using electrical hand tools you must always follow general safety rules to avoid danger of fire, electrical shock and personal injury. Before using the product, read the entire manual and retain it for later use. Always disconnect the plug from the socket before servicing and adjusting the product.
General safety rules
1.Keep the working space clean.
Cluttered areas and work tables are an accident waiting to happen.
2.Do not use the machine in a dangerous environment.
Electrical machinery should not be used on damp or wet surfaces or in the rain. Ensure that lighting in the working space is satisfactory. Ensure that ventilation is good when the work creates a lot of dust. Never use electrical machinery/tools where they can cause a fire or explosion!
3.Avoid electrical shocks.
Avoid physical contact with earthed objects such as water pipes, radiators, the kitchen stove etc. when using electrical machinery/tools.
4.Keep away from children and unauthorized personnel.
All children and unauthorized personnel should keep at a safe distance from electrical machinery/tools and electrical cables in the working space.
5.Store the machinery in a childproof manner.
Keep electrical machinery/tools locked up or out of reach of children when not being used.
6.Do not force the machine.
It carries out the job more efficiently and safely at the intended feed speed.
7.Use the correct tools.
Do not force the tools or auxiliary equipment to carry out work for which it is not designed.
8.Wear appropriate clothing.
No baggy clothes, gloves, necklaces, rings, bracelets or other jewellery which can get caught in rotating parts. Non-slip shoes are recommended. Wear a hairnet (or similar) if you have long hair.
9.Always wear safety goggles.
Always wear safety goggles, normal glasses are not sufficient! Use a protective mask if the work creates a lot of dust.
10.Use a dust extractor.
Use dust extractor to extract and collect dust and chippings if supplied. Ensure that the equipment is used correctly and is emptied when necessary.
11.Do not manhandle the power cable.
Never carry the machine by its power cable. Do not tug at the cable. Pull out the plug to disconnect the electricity. Ensure that the power cord does not come into contact with heat, oil or sharp edges.
12.Ensure that the work-piece is securely fastened.
Use clamps or a vice where possible as this enables you to use the tool with both hands. This is safer than holding the work-piece with one hand.
13.Do not overreach.
Ensure that you stand safely and with good balance at all times.
ENGLISH
3

14. |
Keep the tools in working order. |
|
|
Ensure that they are clean and that the cutting edges are sharp for an optimal and safe result. Follow |
|
ENGLISH |
the recommendations in the manual regarding lubrication and change of fittings. Check the power cable |
|
regularly. If it is damaged it should be changed by a qualified service technician. Check all extension cables |
||
|
||
|
regularly to ensure that they are not damaged. Ensure that the handles and controls of the machinery/tools |
|
|
are dry, clean and completely free from oil, grease etc. |
|
15. |
Switch the power off. |
|
|
Pull out the plug and press the emergency stop button before servicing and when changing fittings such as |
|
|
planer tools, drill bits, knives, abrasive belts or blades. |
|
16. |
Remove all spanners and service tools. |
|
|
Make a habit of checking that all spanners and service tools are removed from the machinery before |
|
|
switching on the power. |
|
17. |
Avoid starting unintentionally. |
|
|
Do not carry a tool with your finger on the switch if the cable is plugged into a socket. Ensure that the switch |
|
|
is in the off position when connecting the plug. |
|
18. |
Use the correct extension cables. |
|
|
When using extension cables outdoors, only use those which are intended for outdoor use. Use extension |
|
|
cables with a sufficient conductivity. Uncoil the entire cable! |
|
19. |
Use common sense and be careful. |
|
|
Think twice before carrying out a working operation so that you can carry it out in a safe manner! |
|
|
Do not use the machinery/tool when you are tired, under the influence of medication etc. |
|
20. |
Ensure that all parts are intact. |
|
|
Before starting the machinery check: that all safety guards and other parts are intact and serve their |
|
|
purpose, that all moving parts can rotate freely and are correctly aligned, that no moving parts can get |
|
|
caught, that no defects have arisen and that no other circumstances can affect the work. A safety guard or |
|
|
other part that has been damaged must be repaired by an expert or changed. Damaged power cables and |
|
|
switches must always be changed by an expert. Never use the tool if you cannot switch it off or start it in |
|
|
a safe manner. |
|
21. |
Use recommended fittings. |
|
|
Using fittings that have not been recommended may cause accidents and personal injury. |
|
22. |
Must be repaired by a qualified technician. |
|
|
The machinery conforms to current safety requirements. Repairs on the machinery must always be carried |
|
|
out by an expert using genuine replacement parts. Otherwise the tool may cause accidents or personal |
|
|
injury. |
|
23. |
Electrical tools should be connected to the mains via an earth fault breaker for personal safety. |
|
|
The product must not be altered or used for working operations for which it is not designed! Check |
|
|
regularly that all screws and nuts are properly tightened. |
4

Special safety regulations for log splitters
• Retain the manual and ensure that it goes with the machine when lent out etc. |
ENGLISH |
• Never try to change the pressure settings. It is set at the factory to exert a maximum pressure of 4 tonnes. |
|
• Read the warning labels on the machine and make sure they are legible. |
|
• Ensure that the socket has the correct voltage before connecting the log splitter (230 V). |
|
Incorrect setting may lead to serious personal injury, impaired function or machine damage. |
|
• Use safety goggles, ear protectors and safety boots when necessary. |
|
• Always stand so that you can carry out all working operations with good balance and hold the switch and |
|
pressure lever with both hands. |
|
• Keep hands and fingers at a safe distance from the pressure plate and cleaving wedge. As always when |
|
working with machines, use common sense and be careful. |
|
• Ensure that people and animals are not around the machine as sharp wood chips my shoot out with |
|
great force. |
|
• Always disconnect the plug from the socket before servicing and when not in use and make sure that |
|
children cannot start the log splitter. |
|
• Just to be sure, connect the log splitter to a socket via an earth fault breaker. |
|
• Never use the log splitter in the rain or in extreme humidity. |
|
• Never use the machine if the power cable or other parts are damaged. Defective part must be replaced |
|
by an expert. |
|
• Keep the working space clean and make sure that the electric motor cooling is not hindered by rubbish |
|
covering the cooling flange or the cooling air intake. |
|
• Note! Unscrew the air screw (13) 3–4 revolutions, so that a noticeable air current can be felt during usage. |
|
Otherwise the seals in the hydraulic system may be damaged and make the log splitter unfit for use. |
|
• Before use, ensure that the push rod nuts are fastened as the log splitter might be damaged otherwise. |
|
Product markings and safety symbols on the machine |
|
Warning! Risk of injury from moving parts. Beware. Keep hands away from moving parts during |
|
the entire cleaving process. |
|
Warning! Risk of injury from moving parts when removing a jammed log. Do not remove it with your |
|
hands - use a tool. |
|
Warning! Risk of injury from moving parts. Always be aware of how the pressure plate moves. |
|
It is forbidden for anyone but the machine operator to be within the working area of the machine. |
|
Keep children, pets and unauthorized personnel out of the working area of the machine. |
|
Switch off the machine and disconnect the plug from the socket when not using the machine, |
|
before cleaning and service. |
|
Consider the environment, take care of waste oil according to local environment regulations. |
|
Ensure that the machine is not damaged before use. Check again that the power cord is undamaged, |
|
if there are any loose screws/nuts and if the operating levers work well. |
|
Read the manual! |
|
Read the entire manual and try to understand the machine’s work cycle. |
|
Use safety goggles! |
|
Protect your eyes against shooting wood chips. Use safety goggles or a visor. |
|
Use gloves! |
|
Use safety boots! |
|
Use safety boots with steel toe caps which protect against falling objects. |
|
5
ENGLISH
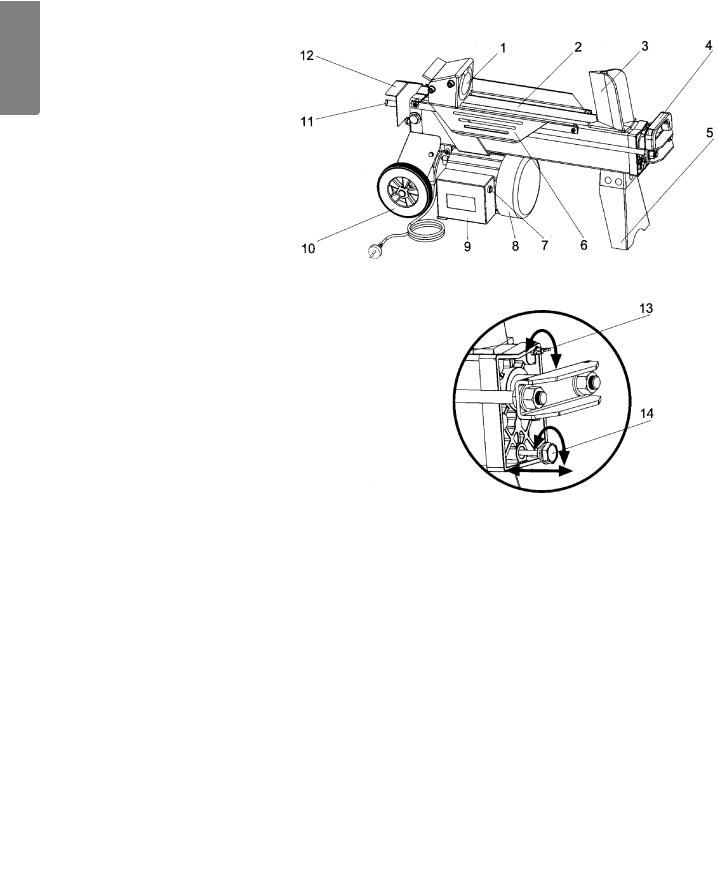
Product description
Components
1.Pressure plate
2.Cleaving table
3.Cleaver
4.Handle
5.Brace
6.Lateral supports
7.Power switch
8.Motor
9.Electricity box
10.Wheels for use when moving short distances
11.Operating lever
12.Safeguard for operating lever
13.Bleeding screw
14.Oil plug and dipstick
The package box contains
A.Log splitter
B.Brace
C.Manual
D.Brace
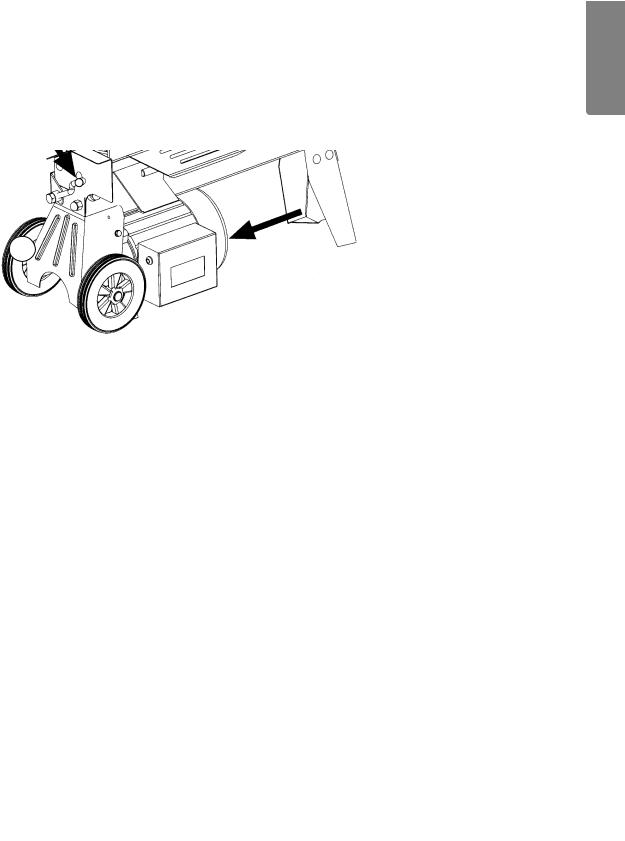
Assembly
Assemble the brace using the bolts enclosed.
6

Preparation
1. |
Place the log splitter on a flat and stable work surface at a practical height. |
ENGLISH |
|
2. |
Connect the power cable to a socket, preferably via an earth fault breaker. Remember to place the cable |
||
|
|||
|
so that it will not damaged when working the log splitter. |
|
|
3. |
Unscrew the air screw (13) 3–4 revolutions, so that a noticeable air current can be felt during use. |
|
Working with the log splitter
1.Always place the side with the least amount of knots against the cleaver and always cleave along the grain.
2.Place the log so that it is stable. Use the work bench lateral supports.
3.Start the motor by pressing and then holding down the switch (7).
4.Start the hydraulics: Push the operation lever (11) down (keeping the switch depressed)
5.The pressure plate on the piston rod will now press the piece of wood against the cleaver.
6.Release the operating lever and switch to complete the cleavage (when the log has been split).
Note! The pressure plate automatically stops approx. 12–14 cm from the cleaver.
11
•Note! If cleaving does not start within 5 seconds in spite of full pressure: release the operating lever and switch and let the pressure plate retract. Then turn the log 90 degrees or turn it around and try again.
•Note! Close the air screw (13) during transport and when storing the machine as oil can seep out. When storing the machine with the air screw open for long periods of time, the oil absorbs moisture from the air which can lead to the hydraulic system rusting inside.
•Note! Do not cleave using only the upper part of the cleaver as the imbalance might damage the log splitter.
7

If the log jams
ENGLISH |
• Stop the cleaving. |
|
• When the pressure plate has returned to its original position: place a wooden wedge under the jammed log. |
||
• Start the log splitter and push the wedge in using the pressure plate. |
||
|
||
|
• If necessary, repeat using a larger wedge. |
Note! Never try to get a piece of wood out which is under pressure by chopping at it. It can splinter at high velocity which can lead to personal injury or damage to the log splitter.
8

Maintenance
Changing the hydraulic oil
The hydraulic oil has to be changed at regular intervals (approx. 150 hrs) according to the following:
1.Ensure that the pressure plate is in its original position and disconnect the power cord.
2.Unscrew the oil plug.
3.Lift the pull handle and tip the log splitter over a collecting vessel which holds at least 4 litres and wait until all the oil has run out.
4.Tip the log splitter so that the motor side is up and fill using good quality hydraulic oil (approx. 2.4 litres)
5.Wipe the dipstick and place it in the tank when the log splitter is in a vertical position. Pull it back out and take a reading. The oil level should be between the two markings on the dipstick.
6.Clean the oil plug and screw it back properly so that the oil does not leak out.
7.Check the oil level regularly and when necessary, top it up.
Keep the cleaver sharp!
•Keep the cleaver sharp by regularly filing off the burrs of the cutting edge using a fine-toothed metal file.
Other Maintenance
•Always unplug the plug before servicing or making adjustments.
•Ensure that all power cables, plugs and switches are undamaged and in good working order.
•Clean all of the surfaces on the log splitter using a brush and dry cloths.
•Store the machine in a dry, clean and non-corrosive environment out of reach of children. Ensure that the storage temperature does not fall below −25° C.
•Ensure that all screws and nuts are fastened, especially the drawbar nuts (beside the handle).
Protect the environment
Sort your waste and recycle products instead of throwing them away. All machines, hoses and packing material should be sorted and handled according to local environmental regulations.
ENGLISH
9

Troubleshooting
ENGLISH |
Problem |
Possible cause |
Suitable measure |
|
|
|
|
The machine failed to |
The log is wrongly placed. |
Turn around or rotate the log. |
|
cleave the piece of wood. |
|
|
|
|
The hardness or diameter of |
Try decreasing the diameter or length |
|
|
|
||
|
|
the log is too great. |
before cleaving. |
|
|
|
|
|
|
The cleaver is blunt or damaged. |
Sharpen the cleaver (see Maintenance). |
|
|
|
|
|
|
Oil leakage. |
Find the leakage and let a qualified |
|
|
|
technician repair it. Top up the oil. |
|
|
|
|
|
|
Pressure regulator wrongly adjusted. |
Let a qualified technician with access |
|
|
|
to testing equipment repair it. |
|
|
|
|
|
The pressure plate |
Oil pressure too low - air in |
Check the level and if required top up |
|
moves abruptly with |
the system. |
the oil or repair leakage. |
|
a jarring sound |
|
|
|
and strong vibrations. |
|
|
|
|
|
|
|
Oil leakage around |
Air pockets in the hydraulic system |
Loosen the bleeding screw 3–4 revolutions |
|
the piston or other |
during operation. |
before starting operation. |
|
component. |
|
|
|
The air screw has not been tightened |
Tighten the bleeding screw before transport. |
|
|
|
||
|
|
before transport. |
|
|
|
|
|
|
|
The oil plug is not tightened |
Tighten the oil plug. |
|
|
sufficiently. |
|
|
|
|
|
|
|
The hydraulic valve and/or packing |
Contact retailer. |
|
|
are worn out. |
|
|
|
|
|
Technical specification
Model |
WS4T-37 |
Motor |
230 V AC 50Hz |
Effect |
1500 W |
Enclosure class |
IP54 |
Cleaving capacity* |
Ø 5–25 cm, length 37 cm |
Recommended working temperature |
+5° C to +40° C |
Cleaving force |
4 tonnes |
Hydraulic pressure |
16 Mpa |
Amount of hydraulic oil |
2.4 litres |
Dimensions |
Length 770 mm |
|
Width 250 mm |
|
Height 460 mm |
Weight |
37 kg |
*The stated values are for guidance. The capacity depends on the hardness of the piece of wood, diameter and the amount of knots.
10

ENGLISH
11

|
Number |
Name |
Amount |
|
1 |
Cylinder |
1 |
ENGLISH |
2 |
O-ring gasket |
1 |
|
3 |
Piston |
1 |
|
4 |
O-ring gasket (inner) |
1 |
|
5 |
Spring (5.5-47-667) |
1 |
|
6 |
Piston rod |
1 |
|
7 |
Nut, M14 |
2 |
|
8 |
Handle |
1 |
|
9 |
Bolt M6-15 |
2 |
|
10 |
Gasket, 14 mm |
2 |
|
11 |
Nut, M14 |
2 |
|
12 |
Operating lever |
1 |
|
13 |
Operating lever |
1 |
|
14 |
Operating lever |
1 |
|
15 |
Domed cap nut |
3 |
|
16 |
Gasket |
2 |
|
17 |
Nut M10 |
2 |
|
18 |
Gasket |
4 |
|
19 |
Side, (left) |
1 |
|
20 |
Steel ball 6 mm |
1 |
|
21 |
Spring |
1 |
|
22 |
Adjusting screw for pressure limiter, m8-10 |
1 |
|
23 |
Copper packing 9 - 12 |
1 |
|
24 |
Cover screw |
1 |
|
25 |
Locking ring for valve piston |
1 |
|
26 |
Spring |
1 |
|
27 |
Valve piston |
1 |
|
28 |
Cylinder sealing, 55-3 |
1 |
|
29 |
O-ring gasket for valve 10.6-1.8 |
4 |
|
30 |
Valve sensor |
1 |
|
31 |
Valve cylinder |
1 |
|
32 |
Copper packing 16-32 |
1 |
|
33 |
Plug |
1 |
|
34 |
Pressure plate |
1 |
|
35 |
Nut, M10 |
4 |
|
36 |
Pull bracket |
1 |
|
37 |
Bolt, M10-25 |
4 |
|
38 |
Friction plate |
2 |
|
39 |
Stand/Oil tank |
1 |
|
40 |
Stud bolt |
4 |
|
41 |
Side (right) |
1 |
|
42 |
Piston rod sealing |
1 |
|
43 |
Air screw |
1 |
|
44 |
Packing |
1 |
|
45 |
Dipstick |
1 |
|
46 |
Lateral supports |
2 |
|
47 |
Bolt, M6-10 |
4 |
|
48 |
Centre cover |
2 |
|
49 |
Wheel |
2 |
|
50 |
Locking ring for wheels |
2 |
|
51 |
Bolt M6-20 |
2 |
|
52 |
Gasket |
2 |
|
53 |
Wheel bracket |
1 |
|
54 |
Nut, M6 |
2 |
|
55 |
Bolt, M8-45 |
6 |
|
56 |
O-ring gasket, inner diameter 10.6 mm |
2 |
|
57 |
Hydraulic pump side |
1 |
|
58 |
Slide bearing |
2 |
|
59 |
Axel |
1 |
|
60 |
Pump wheel |
2 |
|
61 |
Pump house |
1 |
|
62 |
Pin |
2 |
|
63 |
Bolt, M5-185 |
3 |
|
64 |
O-ring gasket pump house |
2 |
|
65 |
Nut M8 |
1 |
|
66 |
Bolt, M8-35 |
1 |
|
67 |
Sealing for motor axel |
1 |
|
68 |
Feather key |
1 |
|
69 |
Motor |
1 |
|
70 |
Gasket |
3 |
|
71 |
Spring washer |
3 |
|
72 |
Side motor/pump |
1 |
|
73 |
Locking ring for drive shaft |
2 |
|
74 |
Steel ball, diameter 2.5 mm |
2 |
|
75 |
Bolt, M8-20 |
3 |
|
76 |
Bolt, M8-10 |
5 |
|
77 |
Brace |
1 |
12

Vedklyv
ART.NR. 18-3038 |
MODELL WS4T-37-UK |
30-9285 |
WS4T-37 |
Varning! När du använder elektriska handverktyg ska alltid följande generella säkerhetsregler följas, för att undvika brandfara, elektrisk chock och personskada. Läs hela bruksanvisningen innan du använder produkten och spara den för framtida bruk. Dra alltid ut nätsladdens stickpropp ur el-uttaget innan service och justering av produkten!
Generella säkerhetsregler för din och andras säkerhet
1.Håll arbetsutrymmet rent.
Belamrade ytor och bord inbjuder till olyckor.
2.Använd inte maskinen i riskfylld miljö.
Elmaskiner skall inte användas på fuktiga, våta ytor eller vid regn. Se till att belysningen är god
iarbetsutrymmet. Sörj för god luftväxling vid dammande arbeten. Använd aldrig elektriska maskiner/verktyg där de kan förorsaka brand eller explosion!
3.Undvik elektrisk chock.
Undvik kroppskontakt med jordade föremål som vattenledning, element, köksspis etc. samtidigt som du använder el-maskiner/verktyg.
4.Håll undan barn och besökare.
Alla barn och besökare bör befinna sig på säkerhetsavstånd från el-maskiner/verktyg eller elkablar
iarbetsutrymmet.
5.Förvara maskinerna barnsäkert.
Förvara el-maskiner/verktyg inlåsta eller utom räckhåll för barn när de inte används!
6.Pressa inte maskinen.
Den gör jobbet bättre och säkrare med avsedd matningshastighet.
7.Använd rätt verktyg.
Pressa inte ett verktyg eller en tillsats att göra ett arbetsmoment som den inte är gjord för.
8.Bär lämplig klädsel.
Inga löst sittande kläder, vantar, halsband, ringar, armband eller andra smycken som kan fastna i roterande delar. Halksäkra skor rekommenderas. Bär hårnät (motsv.) om du har långt hår.
9.Bär alltid skyddsglasögon!
Bär alltid skyddsglasögon, vanliga glasögon räcker inte! Använd också dammfilter eller skyddsmask vid dammande arbeten.
10.Använd utsug.
Använd utsugningsutrustning för att ta bort och samla damm och spån, om maskinen är avsedd för det, se till att utrustningen används på rätt sätt och töms vid behov.
11.Misshandla inte nätsladden.
Bär aldrig maskinen i nätsladden. Ryck inte i sladden, utan dra i stickproppen när du bryter strömmen. Se till att nätsladden inte kommer i kontakt med värme, olja eller vassa kanter.
SVENSKA
13

|
12. |
Sätt fast ämnet ordentligt. |
|
|
Använd tvingar eller skruvstycke där det går, då kan du hantera verktyget med två händer Det är säkrare |
|
|
än att hålla fast ämnet med ena handen. |
|
13. |
Sträck dig inte för långt. |
|
|
Se till att du hela tiden står säkert med god balans. |
|
14. |
Håll verktygen i trim. |
|
|
Se till att de är rena och eggarna vassa för optimal effekt och ett säkert resultat. Följ manualens |
SVENSKA |
|
rekommendationer för smörjning och byte av tillbehör. Kontrollera nätsladden regelbundet, om den är |
|
skadad ska den bytas av en kvalificerad servicetekniker. Syna alla skarvsladdar regelbundet så att de inte är |
|
|
|
|
|
|
skadade. Se till att maskinens/verktygets handtag och reglage är torra, rena och helt fria från olja, fett etc. |
|
15. |
Slå av strömmen. |
|
|
Dra ur stickproppen och tryck in nödstopp, före service och vid byte av tillbehör som hyvelstål, borrar, skär, |
|
|
slipband eller blad. |
|
16. |
Ta bort alla nycklar och serviceverktyg. |
|
|
Gör det till en vana att kontrollera att alla nycklar och serviceverktyg är borttagna från maskinen |
|
|
innan du slår på strömmen. |
|
17. |
Undvik oavsiktlig start. |
|
|
Bär inte ett verktyg med ett finger på strömbrytaren/avtryckaren om sladden sitter i ett uttag. |
|
|
Se till att strömbrytaren står på OFF när du sätter in stickproppen. |
|
18. |
Använd rätt skarvsladdar. |
|
|
Om du använder skarvsladdar utomhus, använd endast de som är avsedda för utomhusbruk. |
|
|
Använd skarvsladdar med tillräcklig ledararea, rulla ut hela sladden! |
|
19. |
Använd sunt förnuft och var försiktig. |
|
|
Tänk efter innan du utför ett arbetsmoment, så att du kan utföra det på ett säkert sätt! Använd inte |
|
|
maskinen/verktyget när du är trött, påverkad av mediciner etc. |
|
20. |
Kontrollera att alla delar är oskadade. |
|
|
Kontrollera innan du startar verktyget: att alla skydd och övriga delar är oskadade och fyller sin funktion, att |
|
|
rörliga delar kan rotera fritt och är rätt inriktade, att inga rörliga delar kan fastna, att ingen defekt uppstått |
|
|
och andra omständigheter som kan påverka arbetets utförande. Ett skydd eller någon annan del som |
|
|
skadats, skall repareras fackmässigt eller bytas ut. Skadade nätsladdar och strömbrytare ska alltid bytas ut |
|
|
av fackman. Använd aldrig verktyget om du inte kan stänga av eller starta det på ett betryggande sätt. |
|
21. |
Använd rekommenderade tillbehör. |
|
|
Användning av ej rekommenderade tillbehör kan vålla olyckor eller risk för personskada. |
|
22. |
Repareras endast av kvalificerad tekniker. |
|
|
Verktyget överensstämmer med gällande säkerhetskrav. Reparationer av verktyget ska alltid utföras |
|
|
av fackman, med originalreservdelar, annars kan verktyget vålla olyckor eller risk för personskada. |
|
23. |
El-verktyg bör anslutas till elnätet via en jordfelsbrytare för personskydd. Produkten får inte ändras |
|
|
eller användas till arbetsmoment som den inte är avsedd för! Kontrollera regelbundet att alla skruvar |
|
|
och muttrar är ordentligt åtdragna! |
14

Särskilda säkerhetsföreskrifter för vedklyv
• Spara bruksanvisningen, se till att den medföljer maskinen vid ev. utlåning. |
|
|
• Läs maskinens varningsdekaler och se till att de är läsbara. |
|
|
• Kontrollera att eluttaget har rätt spänning innan vedklyven ansluts (230 V). |
|
|
• Försök aldrig att själv ändra tryckinställningen Den är inställd på fabriken för att ge max tryckkraft på 4 ton. |
|
|
Felaktig inställning kan leda till försämrad funktion eller att allvarliga personoch maskinskador uppstår. |
|
|
• Använd skyddsglasögon, hörselskydd och skyddsskor vid behov. |
|
|
• Stå alltid så att du kan utföra alla arbetsmoment med god balans och håll strömbrytare och tryckspak med |
|
|
båda händerna. |
SVENSKA |
|
• Håll händer och fingrar på säkert avstånd från tryckplatta och klyvkil, använd som vanligt vid arbete |
||
med alla maskiner, ditt sunda förnuft och var försiktig när du jobbar. |
||
|
||
• Se till att inte människor och djur uppehåller sig i närheten av maskinen, vassa träflisor kan flyga omkring |
|
|
med stor kraft. |
|
|
• Dra alltid ur nätsladdens stickpropp ur el-uttaget vid service och uppehåll i arbetet och se till att inga barn |
|
|
kan starta vedklyven. |
|
|
• Anslut vedklyven till ett el-uttag via en jordfelsbrytare, för säkerhets skull! |
|
|
• Använd aldrig vedklyven i regn eller extremt fuktig väderlek. |
|
|
• Använd aldrig maskinen om elkabel, strömbrytare eller någon annan del är skadad, defekt del ska bytas av |
|
|
fackman. |
|
|
• Håll rent på arbetsplatsen, se till att inte elmotorns kylning förhindras genom att skräp täcker kylflänsarna |
|
|
eller kylluftsintaget. |
|
|
• Obs! Skruva ut luftskruven (13) 3-4 varv, så att en märkbar luftström kan märkas under drift, annars kan |
|
|
tätningarna i hydraulsystemet skadas och göra vedklyven obrukbar. |
|
|
• Kontrollera innan användning att muttrarna till dragstängerna sitter fast, annars kan vedklyven skadas. |
|
|
Produktmärkning med säkerhetssymboler på maskinen |
|
|
Varning! Klämrisk, var uppmärksam, håll undan händerna från rörliga delar under hela klyvmomentet. |
|
|
Varning! Klämrisk när du tar bort ett vedstycke som har fastnat, ta inte bort det med händerna, |
|
|
använd något verktyg. |
|
|
Varning! Klämrisk, var alltid uppmärksam på hur tryckplattan rör sig. |
|
|
Det är förbjudet för andra än maskinoperatören att vistas i maskinens riskområde! |
|
|
Håll undan barn, husdjur och besökare från maskinens riskområde! |
|
|
Stäng av maskinen och dra ut nätsladdens stickpropp ur eluttaget när inte maskinen används |
|
|
och före rengöring och service! |
|
|
Tänk på miljön, hantera spillolja enligt lokala miljöregler. |
|
|
Kontrollera att maskinen är oskadad innan användning, kontrollera särskilt att elkabeln är oskadad, |
|
|
om det finns lösa skruvar/muttrar och om manöverreglagen fungerar bra. |
|
|
Läs bruksanvisningen! |
|
|
Läs hela bruksanvisningen och försök förstå maskinens arbetssätt. |
|
|
Använd skyddsglasögon! |
|
|
Skydda ögonen mot flygande flisor. Använd skyddsglasögon eller visir. |
|
|
Använd handskar! |
|
|
Använd skyddsskor! |
|
|
Använd skyddsskor med skyddståhätta som skyddar mot nedfallande föremål. |
|
15

SVENSKA
Produktbeskrivning
Komponenter
1.Tryckplatta
2.Klyvbord
3.Klyvkniv
4.Handtag
5.Stödben
6.Sidostöd
7.Strömbrytare
8.Motor
9.El-box
10.Hjul för kortare förflyttning
11.Manöverspak
12.Skydd för manöverspak
13.Luftningsskruv
14.Oljeplugg med oljesticka
Förpackningen innehåller
A.Vedklyv
B.Stödben
C.Bruksanvisning
D.Påse med bultar till stödben
Montering
Montera stödbenet med de medföljande bultarna.
16
Förberedelser
1.Placera vedklyven på en plan och stabil arbetsyta med lagom arbetshöjd.
2.Anslut elkabeln till ett eluttag, helst via jordfelsbrytare, tänk på att dra kabeln så att den inte kan skadas vid arbete med vedklyven.
3.Skruva ut luftskruven (13) 3–4 varv, så att en märkbar luftström kan märkas under drift.
Börja arbeta med vedklyven
1. |
Lägg alltid den minst kvistiga sidan av trästycket mot klyvkniven, klyv alltid i fiberriktningen. |
SVENSKA |
|
||
2. |
Placera trästycket så att det ligger stabilt, använd arbetsbordets sidostöd som hjälp. |
|
3. |
Starta motorn genom att trycka in och hålla kvar strömbrytaren (7). |
|
4. |
Starta hydrauliken: Tryck ner manöverspaken (11) (med intryckt strömbrytare). |
|
5. |
Tryckplattan pressar trästycket mot klyvkniven. |
|
6. |
Släpp manöverspaken och strömbrytaren för att avsluta klyvningen, när trästycket har delats. |
|
Obs! Tryckplattan stannar automatiskt ca 12–14 cm från klyvkniven.
11
•Obs! Om trästycket inte börjar klyvas inom 5 sekunder trots fullt tryck: släpp tryckspak
och strömbrytare och låt tryckplattan gå tillbaka, vrid trästycket 90º eller vänd det och prova igen.
•Obs! Stäng luftskruven (13) vid transport och lagring av maskinen, annars kan oljan läcka ut. Vid längre förvaring med öppen luftskruv absorberar oljan den fukt som finns i luften det kan leda till att hydraulsystemet rostar invändigt.
•Obs! Klyv inte med bara den övre delen av klyvkniven, vedklyven kan skadas vid snedbelastning.
17
 Loading...