


Wallpaper
Stripper
Tapetborttagare
Tapetfjerner
Tapetinpoistaja
Tapetenentferner
Important!
Read the entire instruction manual carefully and make sure that you fully understand
it before you use the equipment. Keep the manual for future reference.
Viktig information:
Läs hela bruksanvisningen noggrant och försäkra dig om att du har förstått den innan du använder utrustningen. Spara bruksanvisningen för framtida bruk.
Viktig informasjon:
Les disse anvisningene nøye og forsikre deg om at du forstår dem, før du tar produktet i bruk. Ta vare på anvisningene for seinere bruk.
Tärkeää tietoa:
Lue nämä ohjeet huolellisesti ja varmista että olet ymmärtänyt ne, ennen kuin alat käyttää laitetta. Säilytä ohjeet myöhempää tarvetta varten.
Wichtiger Hinweis:
Vor Inbetriebnahme die komplette Bedienungsanleitung durchlesen und aufbewahren.
ENGLISH
SVENSKA
NORSK
SUOMI
DEUTSCH
ART.NO. MODEL 18-3134 PS-ZP-20-UK 40-7022 PS-ZP-20
Ver. 20130719 Original instructions Bruksanvisning i original Original bruksanvisning Alkuperäinen käyttöohje Original Bedienungsanleitung

ENGLISH
Wallpaper Stripper
ART.NO 18-3134 |
MODEL PS-ZP-20-UK |
40-7022 |
PS-ZP-20 |
Please read the entire instruction manual before using and save it for future use. We apologise for any text or photo errors and any changes of technical data.
If you have any questions concerning technical problems please contact our Customer Service Department (see address on reverse).
Safety
•Before starting to use the tool, check that it is complete and undamaged. The tool or its accessories must not be used if they have been dropped or damaged in any way.
•The power lead should be checked regularly.
If the power cable is damaged it can only be replaced by the retailer or qualified service technician.
•The nozzle of tool must not be pointed in the direction of electrical appliances or fittings.
•Never open the lid of the water tank or unscrew the hose during use or before the tool has cooled. Wait at least 5 minutes after the tool has been unplugged.
•Do not move the stripper by pulling the lead, use the handle.
•Do not stand on the tool and avoid standing on the hose.
•Keep the hose in order. If it should kink or become tangled, unplug the stripper at once and let it cool down before rectifying the fault.
•Make sure that the mains power at the socket is 230 V AC, that extension leads have an area of at least 1.5 mm² and that an RCD is fitted.
•Do not cover or block the pressure relief valve.
•Place the wallpaper stripper on an even and level surface, otherwise it might overheat.
•Always hold the steam pad away from your face. Watch out for drops of water, especially when working over head height.
•Use only clean water and do not overfill.
•Never add detergent or other chemicals to the water.
•Never direct the steam towards people, animals or anything that might be damaged.
•Always unplug the tool from the wall socket after use and before cleaning.
•Never leave the tool unattended whilst it is plugged in.
•Never place the tool close to sources of heat such as fires, radiators, fan heaters, etc.
•The tool is fitted with a thermostat that regulates the temperature and prevents overheating. If the temperature continues to rise above working temperature, unplug the tool immediately. Send the tool in for service.
•Never cover the tool during or directly after use.
2
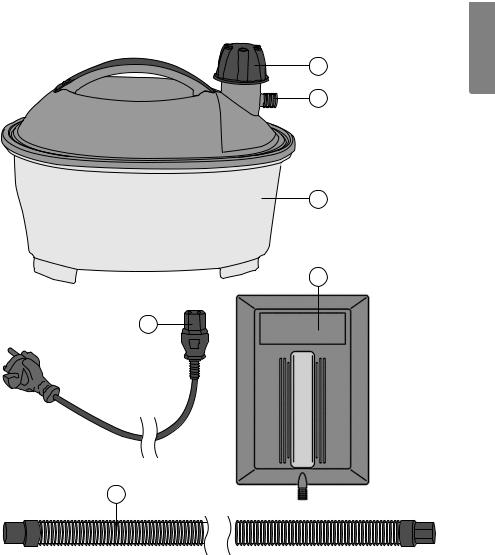
Product description
1
2
3
5
4
6
|
|
|
|
|
|
|
|
|
|
|
|
|
|
|
|
|
|
|
|
|
|
|
|
1. |
Lid with pressure relief valve |
4. |
Mains lead |
||||
2. |
Steam outlet |
5. |
Steam pad |
||||
3. |
Water tank |
6. |
Hose |
||||
ENGLISH
3

ENGLISH
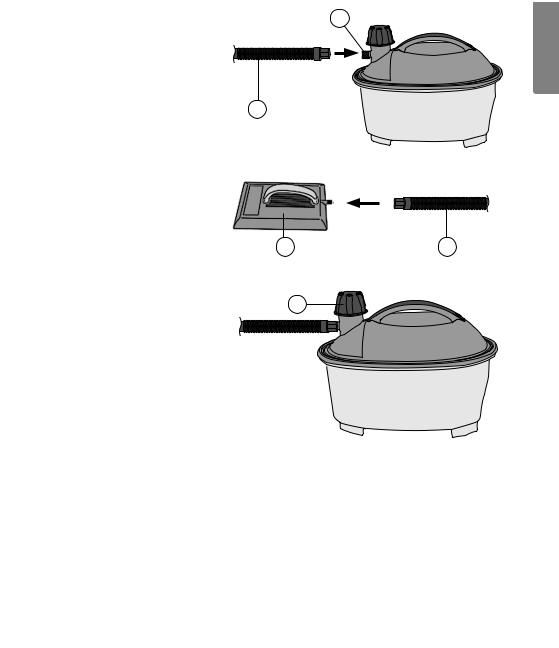
Assembly
NOTE: Always unplug the tool from the wall socket before changing accessories.
Assembly
1. Connect one end |
2 |
of the hose (6) to the steam outlet (2).
6
2. Connect the steam pad (5) to the other end of the hose (6).
5 |
6 |
3. Remove the lid (1). |
1 |
Fill the water tank |
|
with clean water |
|
up to the maximum |
|
level, no higher. |
|
Then replace the lid. |
|
NOTE:
•Do not overfill the water tank and do not let the water level drop below the minimum mark.
•Do not use additives or chemicals.
4

Operation
NOTE: Make sure that all connections are tight before starting to use the stripper. Make sure that your power supply is 230 V AC, 50 Hz.
1. |
Connect the mains lead (4) |
|
|
|
to the water tank (3). |
4 |
|
2. |
Connect the lead to the wall socket. |
||
|
|||
3. |
Steam will be produced after |
|
|
|
about 15 minutes, depending |
|
|
|
on the amount of water and its |
|
|
|
temperature. Sometimes a little |
|
|
|
water can seep out through |
3 |
|
|
the steam pad before it has turned |
||
|
|
||
|
into steam. This is quite normal. |
|
4.After use, unplug the stripper from the wall socket.
5.Allow the tool to cool before moving or emptying it.
Removing wallpaper
Hold the steam pad against the surface for approximately 10 seconds.
Move the steam pad slowly across the surface of the wallpaper. The wallpaper should now come off easily with the help of a scraper. Certain types of wallpaper can take longer to dislodge and might not come off at the first attempt.
Tip
When the water is low, unplug the tool and let the water tank cool for at least 5 minutes before taking off the lid and topping up the water level. Watch out for the steam! Similarly, when you have finished using the stripper, let it cool before emptying it. Always store the stripper with an empty tank.
Safety cut-off
A safety cut-off prevents the heating element from overheating if the water level drops too low. If the water stops boiling during use, it might be because of the safety cut-off. Wait 5 minutes before taking off the lid and topping up the water. The safety cut-off resets itself after 15 minutes, and work can be resumed.
Pressure relief valve
The wallpaper stripper is equipped with a pressure relief valve. If too much pressure builds up inside the tank, the relief valve allows steam and a little water to escape. Overpressure can be caused by the hose being blocked or overfilled. If this should occur; unplug the stripper from the wall socket and let it cool before checking
the valve/hose. Under no circumstances must the pressure relief valve be blocked. A little water and steam might escape from the valve during normal use.
Unplug the stripper from the wall socket and wait at least 5 minutes before removing the hose or other accessory.
ENGLISH
5

ENGLISH |
Descaling |
citric acid can be found in any supermarket. |
|
|
• The appliance should be descaled as and when required, depending on how |
|
hard the water is and how often the stripper is used. Descaling agents such as |
|
• Switch the stripper off and unplug it from the wall socket. |
|
• Pour the descaling solution into the tank. One pint of descaling solution should |
|
be enough. |
|
• Disconnect the hose and switch the stripper on. |
|
• Allow the descaling solution to boil for about 5 minutes. |
|
• Switch the stripper off and unplug it from the wall socket. Allow the solution |
|
to remain in the tank for about 10 minutes. Let both the tool and the solution |
|
cool down. |
|
• Empty the tool and flush it out with clean water. |
Disposal
Follow local ordinances when disposing of this product. If you are unsure of how to dispose of this product, please contact your municipality.
Specifications
Power |
2000 W |
Water capacity |
4 litres |
Mains supply |
230 V AC, 50 Hz |
IP class |
IPX4 |
Use from one tank |
Approx. 80 minutes |
Safety cut-off |
At 115 °C |
Mains lead |
2 metres |
Hose |
3 metres |
Steam pad |
200 × 275 mm |
6

Tapetborttagare
ART.NR 18-3134 |
MODELL PS-ZP-20-UK |
40-7022 |
PS-ZP-20 |
Läs igenom hela bruksanvisningen före användning och spara den sedan för framtida bruk. Vi reserverar oss för ev. textoch bildfel samt ändringar av tekniska data. Vid tekniska problem eller andra frågor, kontakta vår kundtjänst (se adressuppgifter på baksidan).
Säkerhet
•Före användning, kontrollera att utrustningen är hel och att inga defekter finns. Utrustningen får inte användas om den tappats eller om skador på andra sätt uppkommit på verktyget eller dess tillbehör.
•Nätsladden bör regelbundet kontrolleras. Om nätsladden är skadad får denna endast bytas ut av försäljningsstället eller kvalificerad serviceverkstad.
•Verktygets munstycke/stråle får aldrig riktas direkt mot elektroniska apparater eller elinstallationer.
•Öppna aldrig locket till vattenbehållaren eller skruva av slangen under användning eller innan verktyget svalnat, vänta minst 5 minuter efter att stickkontakten dragits ur.
•Dra ej i slangen för att förflytta tapetborttagaren, håll alltid i handtagen.
•Stå ej på apparaten och undvik att kliva på slangen.
•Håll ordning på slangen så den inte trasslar och viker sig, skulle detta inträffa dra genast ur stickkontakten och låt apparaten svalna innan felet åtgärdas.
•Kontrollera att nätspänningen i eluttaget är 230 V AC, att skarvkablarna har en area av minst 1,5 mm² och att en jordfelsbrytare är installerad.
•Täck inte över eller blockera övertrycksventilen.
•Placera tapetborttagaren på en jämn och plan yta, den riskerar annars att bli överhettad.
•Håll alltid ångplattan ifrån ansiktet, se upp för heta vattendroppar, speciellt vid tapetborttagning i tak och områden ovan huvudet.
•Använd endast rent vatten och överfyll inte.
•Tillsätt aldrig rengöringsmedel eller andra kemikalier i vattnet.
•Rikta aldrig ångan mot personer, djur eller annat som kan ta skada.
•Dra alltid nätsladdens stickkontakt ur vägguttaget efter användning samt före rengöring av verktyget.
•Lämna aldrig apparaten obevakad så länge strömmen är ansluten.
•Placera aldrig verktyget i närheten av värmekällor så som eld, element, värmare, varmluftsfläktar etc.
•Verktyget innehåller en termostat som reglerar temperaturen och förhindrar överhettning. Om temperaturen ändå fortsätter att stiga, drag genast ur nätsladden och sluta använd verktyget. Sänd in produkten för service.
•Täck aldrig över verktyget under, eller direkt efter användning.
SVENSKA
7

Produktbeskrivning
1
2
SVENSKA
3
5
4
6
|
|
|
|
|
|
|
|
|
|
|
|
|
|
|
|
|
|
|
|
|
|
|
|
1. |
Lock med övertrycksventil |
4. |
Nätsladd |
||||
2. |
Ångutgång |
5. |
Ångplatta |
||||
3. |
Vattentank |
6. |
Slang |
||||
8
Att komma igång
OBSERVERA: Tag alltid ur nätsladden från vägguttaget innan du sätter dit eller tar bort tillbehör.
Montering
2
1. Anslut ena ändan av slangen (6) till
ångutgången (2).
6
2. Anslut ångplattan (5) till den andra ändan av slangen (6).
5 |
6 |
3. Ta bort locket (1). |
1 |
|
Fyll vattentanken med |
||
|
||
rent vatten, dock |
|
|
inte högre upp än |
|
|
maxnivån. Sätt sedan |
|
|
tillbacka locket. |
|
OBSERVERA:
•Överfyll inte vattentanken och låt inte nivån sjunka under minimumnivån.
•Använd inga tillsatser eller kemikalier.
SVENSKA
9
 Loading...