


GT 18
Grass Trimmer
Grästrimmer
Gresstrimmer
Ruohotrimmeri
Rasentrimmer
Important!
Read the entire instruction manual carefully and make sure that you fully understand
it before you use the equipment. Keep the manual for future reference.
Viktig information:
Läs hela bruksanvisningen noggrant och försäkra dig om att du har förstått den innan du använder utrustningen. Spara bruksanvisningen för framtida bruk.
Viktig informasjon:
Les disse anvisningene nøye og forsikre deg om at du forstår dem, før du tar produktet i bruk. Ta vare på anvisningene for seinere bruk.
Tärkeää tietoa:
Lue nämä ohjeet huolellisesti ja varmista että olet ymmärtänyt ne, ennen kuin alat käyttää laitetta. Säilytä ohjeet myöhempää tarvetta varten.
Wichtiger Hinweis:
Vor Inbetriebnahme die komplette Bedienungsanleitung sorgfältig durchlesen und aufbewahren.
ENGLISH
SVENSKA
NORSK
SUOMI
DEUTSCH
Art.no |
Model |
18-4632 |
DCGT102B-UK |
31-1325-1 |
DCGT102B |
31-1326 |
DCGT102 |
Ver. 20141107 Original instructions Bruksanvisning i original Original bruksanvisning Alkuperäinen käyttöohje Original Bedienungsanleitung
SVERIGE
Kundtjänst |
tel: 0247/445 00 |
|
fax: 0247/445 09 |
|
e-post: kundservice@clasohlson.se |
Internet |
www.clasohlson.se |
Post |
Clas Ohlson AB, 793 85 INSJÖN |
NORGE
Kundesenter |
tlf.: 23 21 40 00 |
|
faks: 23 21 40 80 |
|
e-post: kundesenter@clasohlson.no |
Internett |
www.clasohlson.no |
Post |
Clas Ohlson AS, Postboks 485 Sentrum, 0105 OSLO |
SUOMI
Asiakaspalvelu |
puh.: 020 111 2222 |
|
sähköposti: info@clasohlson.fi |
Internet |
www.clasohlson.fi |
Osoite |
Clas Ohlson Oy, Maistraatinportti 4 A, 00240 HELSINKI |
UNITED KINGDOM
Customer Service |
contact number: 020 8247 9300 |
|
e-mail: customerservice@clasohlson.co.uk |
Internet |
www.clasohlson.co.uk |
Postal |
10 – 13 Market Place |
|
Kingston Upon Thames |
|
Surrey |
|
KT1 1JZ |
DEUTSCHLAND
Kundeservice |
Unsere Homepage www.clasohlson.de besuchen |
|
und auf Kundenservice klicken. |
2

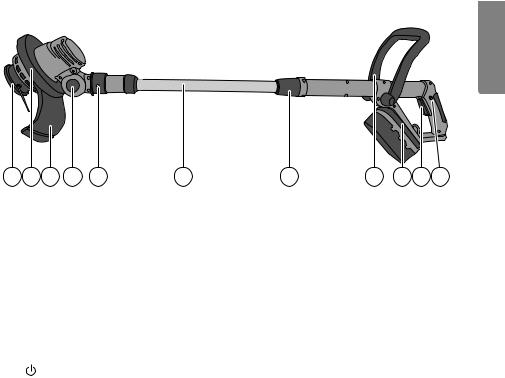
GT18 Grass Trimmer
Art.no 18-4632 |
Model DCGT102B-UK |
31-1325-1 |
DCGT102B |
31-1326 |
DCGT102 |
Please read the entire instruction manual before use and save it for future reference. We reserve the right for any errors in text or images and for making any necessary technical changes to this document. If you should have any questions concerning technical problems please contact our Customer Services.
Contents |
|
Safety................................................................................................ |
4 |
General Safety Requirements – EN 60745-1........................................................... |
4 |
Specific Safety Instructions for Grass Trimmers..................................................... |
7 |
Grass trimmer symbol explanation.......................................................................... |
8 |
Product description....................................................................... |
9 |
Assembly........................................................................................ |
10 |
Front handle................................................................................................................ |
10 |
Safety guard................................................................................................................ |
11 |
Edging wheel.............................................................................................................. |
11 |
Charging........................................................................................ |
11 |
Charging the battery................................................................................................. |
11 |
Overload protection and other safety features...................... |
12 |
Operating instructions................................................................ |
13 |
Setup............................................................................................................................ |
13 |
Switching the trimmer on........................................................... |
13 |
Care and maintenance................................................................ |
14 |
Changing the trimmer line....................................................................................... |
14 |
Troubleshooting guide............................................................... |
16 |
Disposal.......................................................................................... |
16 |
Specifications................................................................................ |
16 |
Grass Trimmer............................................................................................................. |
16 |
Charger......................................................................................................................... |
16 |
ENGLISH
3

ENGLISH
Safety
General Safety Requirements – EN 60745-1
General safety instructions for power tools
Warning: Read all the instructions. Failure to adhere to the following instructions may lead to electric shocks, fires and/or serious injury.
SAVE THESE INSTRUCTIONS.
The term “power tools” in the warning text below refers to your handheld mains operated or battery operated tool.
1) Work area safety
a)Keep the work area clean and well illuminated. Cluttered and poorly lit areas invite accidents.
b)Do not use power tools in explosive environments, such as in the presence of flammable liquids, gases or dust. Power tools generate sparks that can easily ignite dust or fumes.
c)Keep children and other bystanders away from the area where you are using the power tool. Distractions can cause you to lose concentration and control of the tool.
2) Electrical safety
a)The power tool plug must fit correctly into the wall socket. Never modify
the plug in any way. Never use an adaptor together with earthed power tools.
Unmodified plugs and suitable wall sockets minimize the risk of electric shocks.
b)Avoid physical contact with earthed objects such as pipes, radiators, ovens and refrigerators. There is an increased risk of receiving an electrical shock if your body is earthed.
c)Do not expose the power tool to rain or other wet conditions. Water entering a power tool will increase the risk of electric shock.
d)Do not abuse the mains lead. Never use the lead to carry the tool or pull the plug from a wall socket. Keep the lead away from heat, oil, sharp edges and moving parts. Damaged or tangled leads increase the risk of electric shock.
e)When using power tools outdoors, use an extension lead that is suitable for this purpose. The use of an extension lead designed for outdoor use decreases the risk of electric shocks.
f)If the use of the power tool in a wet environment is unavoidable, a wall socket equipped with a residual current device (RCD) should be used. Use of an RCD significantly reduces the risk of electric shock.
4

3) |
Personal safety |
|
a) |
Pay attention to what you are doing and use common sense when using |
ENGLISH |
|
drugs, alcohol or medication. One moment of inattention while using a power |
|
|
power tools. Never use power tools if you are tired or under the influence of |
|
|
tool may result in a serious injury. |
|
b) |
Wear protective clothing. Always wear safety glasses. Using protective |
|
|
clothing such as dust masks, non-slip safety shoes, helmets and ear defenders |
|
|
decreases the risk of injury. |
|
c) |
Avoid accidental starts. Make sure that the power switch is set to OFF before |
|
|
plugging the power tool into a wall socket, fitting the battery or picking up/ |
|
|
carrying the power tool. Carrying a power tool with your finger on the power |
|
|
switch/trigger or connecting the power tool to a wall socket when the power |
|
|
switch is set to ON is inviting an accident. |
|
d) |
Remove all service tools/keys before switching on the power tool. A service |
|
|
tool left on a rotating part of the power tool may result in personal injury. |
|
e) |
Do not overreach. Keep proper footing and balance at all times. This ensures |
|
|
better control over the power tool in unexpected situations. |
|
f) |
Wear suitable clothing. Do not wear loose-fitting clothing or jewellery. |
|
|
Keep hair, clothes and gloves away from moving parts. Loose-fitting clothes, |
|
|
jewellery or long hair could become caught in moving parts. |
|
g) |
If equipment for dust extraction or collecting is available make sure it is |
|
|
connected and used properly. Use of dust collection equipment can reduce |
|
|
dust related hazards. |
|
4) Use and maintenance of the power tool
a)Do not force the power tool. Use a power tool suitable for the work you are about to perform. The proper power tool will perform the task better and safer if used at the correct feed rate.
b)Never use the power tool if the power switch does not switch the tool on and off properly. All power tools that cannot be controlled by the power switch are dangerous and must be repaired.
c)Unplug the lead from the wall socket or remove the battery before making any adjustments, changing accessories or storing the power tool. These precautions reduce the risk of the power tool starting unexpectedly.
d)Store power tools that are not being used out of children’s reach. Do not allow people who are unfamiliar with the tool or these instructions to operate the tool. Power tools can be dangerous if they fall into the hands of inexperienced users.
e)Maintain power tools. Check for any incorrect settings, parts that catch, broken parts or anything else which may cause the power tool to
malfunction. If something is damaged it must be repaired before use. Many accidents are caused by poorly maintained power tools.
5

|
f) |
Keep cutting tools sharp and clean. Properly maintained cutting tools with sharp |
|
ENGLISH |
|
blades are less likely to bind and are easier to control. |
|
g) |
Use the power tool, and any accessories in accordance with these |
||
|
|||
|
|
instructions, take into consideration the working conditions and the work |
|
|
|
that is to be performed. Using the power tool for a purpose other than that for |
|
|
|
which it is intended could result in a dangerous situation. |
5) The use and maintenance of cordless power tools
a)Only charge the battery using a charger recommended by the manufacturer.
A charger suitable for one type of battery pack can pose a fire hazard if used for another type of battery pack.
b)Only use the cordless power tool with specially designated battery packs.
Use of other battery packs may create a risk of injury and fire.
c)When the battery pack is not in use, keep it away from other metal objects like paper clips, coins, keys, nails, screws or other small objects that can make a connection from one terminal to another. Shorting the battery terminals together may cause burns or a fire.
d)Under extreme conditions or if the battery is mistreated, electrolyte may leak from the battery pack. Avoid contact with this liquid. If contact accidentally occurs, rinse your skin with water. If the electrolyte contacts your eyes, seek medical help. Electrolyte which has leaked from the battery pack can cause irritation or burns.
6) Service
a)Repairs and service should only be performed by qualified tradesmen, and only with original spare parts. This guarantees that the safety of the power tool is maintained.
6

Specific Safety Instructions for Grass Trimmers
• This grass trimmer is not intended for use by persons (including children) with |
ENGLISH |
knowledge, unless they have been given supervision or instruction concerning |
|
reduced physical, sensory or mental capabilities, or lack of experience and |
|
the safe use of the grass trimmer by a person responsible for their safety. |
|
• Never let children operate or play with the grass trimmer. Keep it out of reach of children. |
|
• Wear sturdy footwear, long trousers, safety glasses and gloves. |
|
• Keep anyone standing close by at a safe distance from the grass trimmer. |
|
• Keep children and pets out of the work area. Stones and other debris can be |
|
ejected by the grass trimmer. Switch the grass trimmer off immediately should any |
|
onlookers, adults, children or pets, come within 5 metres. |
|
• Only use the grass trimmer in good light conditions. |
|
• If the grass trimmer has been subjected to any shocks or impacts it must be |
|
checked for damage. Any defect or damage must be repaired before the grass |
|
trimmer is used. Make sure the trimmer head is securely fastened on. If it is loose |
|
or damaged the grass trimmer must not be used. |
|
• Always inspect the grass trimmer before use. |
|
• The safety guard must always be fitted before the grass trimmer is used. The grass |
|
trimmer must not be used if the safety guard is damaged or missing. |
|
• Before starting to use the grass trimmer, check the area to be trimmed for foreign |
|
objects such as stones or cables. |
|
• Always hold the grass trimmer firmly. Hold it in both hands. |
|
• Never attach metal cutting lines to this grass trimmer. |
|
• Keep the ventilation openings of the trimmer head free from debris. Remove any |
|
grass or leaves. |
|
• The line will continue to rotate after the motor has been turned off. Wait until |
|
the line has completely stopped before servicing. |
|
• The grass trimmer must not be exposed to rain or moisture. |
|
• Make sure that you are familiar with all the controls and settings before using |
|
the grass trimmer. |
|
• Keep hands and feet away from the trimmer head and line at all times and |
|
especially when switching the motor on. |
|
• Be careful when adjusting the trimmer line; do not switch the motor on until you |
|
are holding the grass trimmer in the correct way. |
|
• Only use the grass trimmer with parts and accessories recommended by |
|
the manufacturer. |
|
• Always remove the battery before inspecting, cleaning or adjusting the grass |
|
trimmer and when it is not in use. |
|
• Keep proper footing and balance at all times. |
|
• Avoid directing the trimmer head towards immovable objects when the trimmer |
|
head is spinning, as they could damage the grass trimmer. |
|
• Do not attempt to stop the trimmer head with hands or feet, let it stop by itself. |
|
• Avoid operating the grass trimmer on gravel paths, gravel covered yards or other |
|
places where stones could be ejected. |
|
7

ENGLISH
Grass trimmer symbol explanation
WARNING! Grass trimmers can be dangerous.
Read the instruction manual.
Do not expose the grass trimmer to rain or moisture.
Wear eye protection.
Keep all persons and animals at a safe distance from the grass trimmer.
8
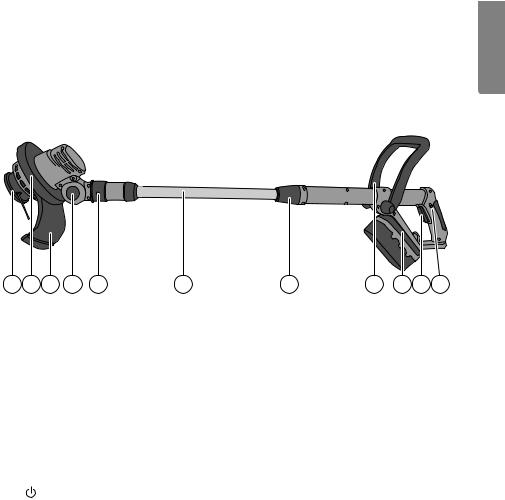
Product description
18-4632, 31-1325-1 comes with a rechargeable 18 V battery pack and charger. 31-1326 comes without a battery pack or charger. It is the perfect complement to users already in possession of an 18 V LXC battery pack and charger.
The picture shows the assembled grass trimmer, parts 2 and 3 are not attached when sold.
ENGLISH
1 |
2 |
3 |
4 |
5 |
6 |
7 |
8 |
9 |
10 |
11 |
1.Trimmer head.
2.Edging wheel.
3.Safety guard.
4.Release button for adjusting the trimmer head angle to one of its 5 fixed positions.
5.Catch for twisting the trimmer head to one of its 3 fixed positions. Push the catch forward towards the trimmer head.
6.Telescopic handle.
7.Locking knob for adjusting the length of the telescopic shaft. Twist clockwise to unlock and anticlockwise to lock.
8.Adjustable front handle.
9.Battery holder for an LXC battery pack (battery only included with 18-4362 and 31-1325-1).
10.[ ] Trigger.
11.Safety switch for preventing unintentional operation. Hold the button in before pulling the trigger.
9
ENGLISH
Assembly
Note: Remove the battery from the grass trimmer if one is fitted.
Note: When sold, the grass trimmer shaft is contracted to enable it to fit into the box. The first time the telescopic shaft is extended, it passes
a non-return pawl creating a new end-stop.
The shaft will then only be able to contract as far as the new end-stop.
Retracted when sold |
Max retracted length once having |
|
been extended |
Front handle
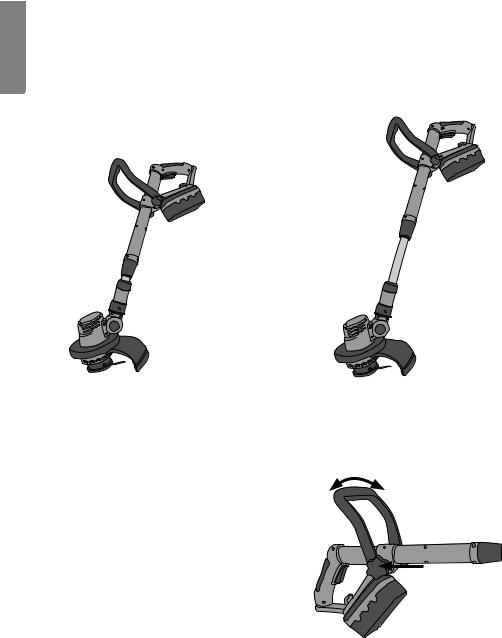
Attach the front handle to the shaft. The handle can be mounted so that it leans forwards or backwards. Tighten the handle locking knob.
10
Safety guard
1.Push the safety guard (3) into the groove in the trimmer head (1).
2.Fasten the safety guard to the trimmer head using the included screw.
Note: Handle the guard carefully; it has a very sharp blade on it (indicated by the arrow).
Edging wheel
The grass trimmer comes with an edging wheel. It consists of two parts which click together to surround the trimmer head.
It is used for trimming edges.
ENGLISH
Charging
Charging the battery
Temperature range for charging and storing the battery: 0–40 ºC.
1.Remove the battery from the power tool by pressing the battery release button and sliding the battery out. If the battery feels very warm, as after hard use, allow it to cool properly before charging.
2.Connect the charger to a wall socket. The green LED will come on after a few seconds.
3.Insert the battery into the charger. Whilst the battery is charging, the green LED will shine steadily and the red LED will flash once per second. (Should the battery be fully charged when it is put into the charger, nothing will happen i.e. the green LED will keep shining steadily and the red LED will remain off).
4.When charging is complete, press the battery release catch and remove it from the charger.
11
ENGLISH
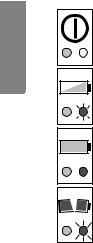
Steady green light and red light off:
The charger is connected to the power supply but is not charging. (Nothing happens if a fully-charged battery is connected to the charger)
1/sec |
Red light flashing once per second and steady green light: |
|
Charging is in progress. |
||
|
||
|
Steady green and red light: |
|
|
The battery has been fully charged. |
|
3/sec |
Red light flashing three times per second and steady green light: |
|
Faulty battery. |
||
|
Overload protection and other safety features
The machine/battery has a number of safety features that prevent damage to the machine and battery during use.
•During short high-load situations the overload protection may turn off the machine/ battery. This protection resets automatically. Set the on/off switch to [ I ], wait a few seconds, ensure that there is no load and then restart the machine. The machine should now function normally again.
•During high-load for extended periods the overheating protection may turn off the machine/battery. The protection resets itself but the machine cannot be restarted until it has returned to normal operating temperature. Let the machine cool properly before trying to restart it. Adverse temperatures can occur in direct sunlight and should therefore be avoided.
•The battery has low-voltage protection which operates when the battery becomes discharged. The low-voltage protection turns off the machine automatically and the battery then needs to be recharged.
12
Operating instructions
Setup
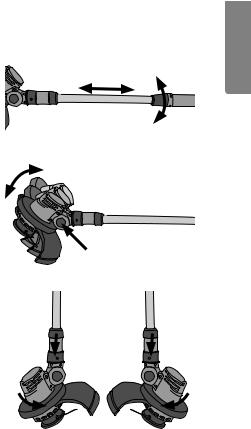
1. Adjust the length of the telescopic shaft (6) to suit your height. Twist the locking knob (7) clockwise to release the shaft, adjust
the length and then twist the locking knob anticlockwise to tighten.
2. Adjust the angle of the trimmer head by holding in the button (4) and moving
the head to one of the 5 settings. Release the button when the trimmer head is at the desired setting.
3.The trimmer head can be rotated and set to one of 3 fixed settings. Slide the springloaded catch (5) forward towards
the trimmer head, twist the trimmer head into one of its fixed settings and then release the catch.
Switching the trimmer on
1.Hold down the safety switch (11) on the rear handle.
2.Start the trimmer by pressing in the power trigger (10).
3.Release the power trigger to stop the motor.
ENGLISH
13
ENGLISH
Care and maintenance
Note: Always remove the battery before cleaning, adjusting or transporting the tool.
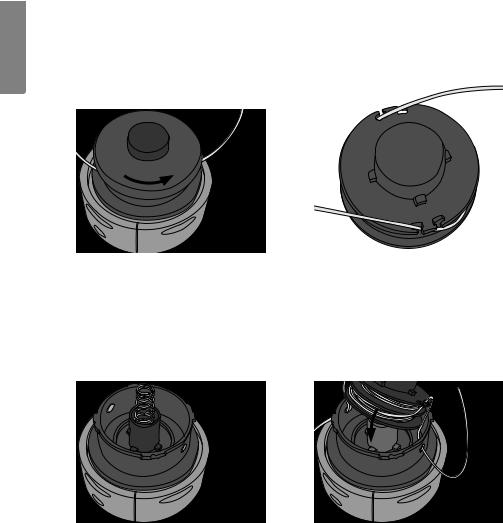
Changing the trimmer line
1.Open the trimmer head by twisting the bottom, “the cover”, anticlockwise to remove it. The line spool can then be removed. Take care not to lose the spring located under the spool.
3.Place the spring in the trimmer head with the wider end at the bottom
of the cylinder and the narrow end pointing up towards the spool.
2.Take a new spool and line and make sure that the line passes through the notches in the spool and that the ends of the line stick out about 15 cm to make fitting easier.
4.Thread the ends of the line through the holes in the side of the trimmer head and place the spool on top of the spring in the trimmer head.
14
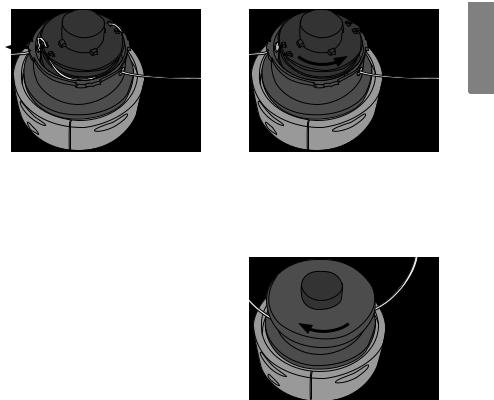
ENGLISH
5.Pull gently on the ends of the line so that it comes out of the notches in the spool.
7.Refit the bottom cover, which has
a bayonet fitting. Push it down whilst simultaneously twisting it clockwise until it won’t turn any further.
6.If there is an unnecessary length of line protruding from the spool, turn the spool anticlockwise to wind the line back onto the spool until
only about 5–6 cm of line sticks out.
Note: Wear safety glasses and make sure that there are no bystanders nearby when starting the grass trimmer after new line has been fitted because any excess cut off line will fly out at high speed.
•Check regularly to ensure that no grass and twigs have built up around the spindle.
•Check before each use that the power trigger and safety switch are undamaged and work correctly.
•Clean the exterior of the trimmer with a soft brush or cloth, do not use water, solvents or polish.
•Regularly remove all dirt, especially from around the motor ventilation slits on the trimmer head.
•Store the grass trimmer in a safe, dry place out of the reach of children.
•Store the battery at a temperature of 0–40 °C.
•For long-term storage the battery should be fully charged at least every 6 months.
15

Troubleshooting guide
ENGLISH |
|
|
|
Problem |
Action |
||
|
|||
|
|
|
|
|
The tool does not start. |
• The battery is discharged or incorrectly fitted. |
|
|
|
|
|
|
Poor battery operating time. |
• The battery is not fully charged. |
|
|
|
• The battery needs replacing. |
|
|
|
|
|
|
The battery does not |
• The battery is not correctly inserted into the charger. |
|
|
charge. |
• The battery or charger contacts are dirty. |
|
|
|
• The mains adaptor is not plugged in correctly. |
|
|
|
• Check to see if there is power at the wall socket. |
|
|
|
• The charger or its cable is damaged. |
|
|
|
• The mains adaptor is defective. |
|
|
|
• The battery needs replacing. |
|
|
|
|
Disposal
This product should be disposed of in accordance with local regulations. If you are unsure what to do, contact your local authority.
Specifications
Grass Trimmer
Battery |
LXC 18 V/2 Ah lithium-ion battery |
No-load speed |
8000 min-1 |
Operating time |
25–40 min |
Cutting diameter |
230 mm |
Strand diameter |
1.2 mm |
Sound pressure |
LpA 72 dB (A), K: 3 dB |
Sound power |
LwA 93 dB (A) K: 3 dB |
Vibration |
Rear handle 6.531 m/s², K: 1.5 m/s² |
|
Front handle 6.764 m/s², K: 1.5 m/s² |
Weight (incl. battery) |
2 kg |
Charger
Input |
230 V AC, 50 Hz, 75 W |
Output |
18 V DC |
Charging current |
2.5 A |
Charging time |
40 min |
16

Grästrimmer GT18
Art.nr 18-4632 |
Modell DCGT102B-UK |
31-1325-1 |
DCGT102B |
31-1326 |
DCGT102 |
Läs igenom hela bruksanvisningen före användning och spara den sedan för framtida bruk. Vi reserverar oss för ev. textoch bildfel samt ändringar av tekniska data.
Vid tekniska problem eller andra frågor, kontakta vår kundtjänst (se adressuppgifter på insidan av omslaget).
Innehållsförteckning |
|
Säkerhet......................................................................................... |
18 |
Generella säkerhetsföreskrifter – EN 60745-1...................................................... |
18 |
Särskilda säkerhetsföreskrifter för grästrimmer.................................................. |
21 |
Förklaring av symbolerna på grästrimmern......................................................... |
22 |
Produktbeskrivning..................................................................... |
23 |
Montering...................................................................................... |
24 |
Handtag....................................................................................................................... |
24 |
Skydd............................................................................................................................ |
25 |
Stödhjul........................................................................................................................ |
25 |
Laddning........................................................................................ |
25 |
Laddning av batteri................................................................................................... |
25 |
Överbelastning och skydd......................................................... |
26 |
Användning................................................................................... |
27 |
Inställningar................................................................................................................ |
27 |
Starta trimmern............................................................................ |
27 |
Skötsel och underhåll.................................................................. |
28 |
Byte av trimmertråd.................................................................................................. |
28 |
Felsökningsschema..................................................................... |
30 |
Avfallshantering........................................................................... |
30 |
Specifikationer............................................................................. |
30 |
Grästrimmer................................................................................................................ |
30 |
Laddare........................................................................................................................ |
30 |
SVENSKA
17

SVENSKA
Säkerhet
Generella säkerhetsföreskrifter – EN 60745-1
Generella säkerhetsinstruktioner för elektriska handverktyg
Varning! Läs alla instruktioner. Om nedanstående instruktioner inte följs kan detta leda till elektrisk stöt, brand eller allvarlig skada.
SPARA DESSA INSTRUKTIONER.
Termen ”elektriskt handverktyg” i varningstexten nedan refererar till ditt nätanslutna eller batteridrivna handverktyg.
1) Arbetsutrymmet
a)Håll arbetsutrymmet rent och väl upplyst. Belamrade och mörka utrymmen inbjuder till olyckor.
b)Använd inte elektriska handverktyg i explosiva miljöer, som i närheten av lättantändliga vätskor, gaser eller damm. Elektriska handverktyg genererar gnistor som kan antända damm eller ångor.
c)Håll undan barn och åskådare medan du använder det elektriska handverktyget. Störningsmoment kan göra att du tappar kontrollen över verktyget.
2) Elektrisk säkerhet
a)Det elektriska handverktygets stickpropp måste passa i vägguttaget. Modifiera aldrig stickproppen på något vis. Använd aldrig adapter tillsammans med jordade elektriska handverktyg. Omodifierade stickproppar och passande vägguttag minskar risken för elektrisk stöt.
b)Undvik kroppskontakt med jordade föremål, t.ex. rör, element, köksspis och kylskåp. Det innebär ökad risk för elektrisk stöt om din kropp är jordad.
c)Utsätt inte det elektriska handverktyget för regn eller våta förhållanden.
Om vatten tränger in i ett elektriskt handverktyg ökar det risken för elektrisk stöt.
d)Misshandla inte nätsladden. Använd aldrig nätsladden för att bära, dra eller rycka stickproppen ur vägguttaget. Håll undan nätsladden från värme, olja, vassa kanter och rörliga delar. Skadade eller trassliga nätsladdar ökar risken för elektrisk stöt.
e)När du använder ett elektriskt handverktyg utomhus, använd en skarvsladd anpassad för detta ändamål. Användning av en skarvsladd för utomhusbruk minskar risken för elektrisk stöt.
f)Om det inte går att undvika att det elektriska handverktyget används i fuktig miljö, använd ett vägguttag utrustat med jordfelsbrytare. Användning av jordfelsbrytare minskar risken för elektrisk stöt.
18

3) |
Personlig säkerhet |
|
a) |
Var uppmärksam på vad du gör och bruka sunt förnuft när du använder |
|
|
ett elektriskt handverktyg. Använd inte ett elektriskt handverktyg om du |
|
|
är trött eller påverkad av droger, alkohol eller medicinering. Ett ögonblicks |
|
|
ouppmärksamhet när du använder ett elektriskt handverktyg kan resultera i allvarlig |
|
|
personskada. |
|
b) |
Använd skyddsutrustning. Bär alltid skyddsglasögon. Att vid behov använda |
|
|
skyddsutrustning, t.ex. andningsskydd, halksäkra skyddsskor, hjälm och |
SVENSKA |
|
hörselskydd, minskar risken för personskada. |
|
c) |
Undvik oavsiktlig start. Se till att strömbrytaren är i läge OFF innan du |
|
|
ansluter stickproppen till vägguttaget, ansluter batteriet eller lyfter upp/bär |
|
|
det elektriska handverktyget. Att bära ett elektriskt handverktyg med ett finger |
|
|
på strömbrytaren/avtryckaren eller att ansluta ett elektriskt handverktyg till elnätet |
|
|
när strömbrytaren är i läge ON inbjuder till olyckor. |
|
d) |
Ta bort alla serviceverktyg/nycklar innan du slår på det elektriska |
|
|
handverktyget. Ett kvarglömt serviceverktyg på en roterande del av det elektriska |
|
|
handverktyget kan resultera i personskada. |
|
e) |
Sträck dig inte för långt. Se till att du står stadigt med god balans hela tiden. |
|
|
Detta möjliggör bättre kontroll över det elektriska handverktyget i oväntade |
|
|
situationer. |
|
f) |
Bär lämplig klädsel. Bär inte löst sittande kläder eller smycken. Håll undan |
|
|
hår, kläder och handskar från rörliga delar. Lösa kläder, smycken och långt hår |
|
|
kan fastna i rörliga delar. |
|
g) |
Om utrustning för utsugning och uppsamling av damm finns tillgänglig, se till |
|
|
att denna är ansluten och används på ett korrekt sätt. Användning av dessa |
|
|
hjälpmedel kan minska dammrelaterade faror. |
|
4) Användning och underhåll av det elektriska handverktyget
a)Pressa inte det elektriska handverktyget. Använd ett elektriskt handverktyg som är avsett för det arbetsmoment du utför. Korrekt elektriskt handverktyg gör jobbet bättre och säkrare med avsedd matningshastighet.
b)Använd inte det elektriska handverktyget om strömbrytaren inte slår på och stänger av verktyget. Alla elektriska handverktyg som inte kan kontrolleras med strömbrytaren är farliga och måste repareras.
c)Ta stickproppen ur vägguttaget eller ta ur batteriet innan du utför några justeringar, byter tillbehör eller lägger undan det elektriska handverktyget för förvaring. Dessa förebyggande skyddsåtgärder minskar risken för att starta det elektriska handverktyget oavsiktligt.
d)Förvara elektriska handverktyg som inte används utom räckhåll för barn och låt inte personer som inte är förtrogna med det elektriska handverktyget eller dessa instruktioner använda det. Elektriska handverktyg är farliga om de kommer i händerna på ovana användare.
19

e) |
Underhåll elektriska handverktyg. Kontrollera om något är felinställt, om |
|
|
rörliga delar kärvar, om delar har gått sönder eller om något annat har |
|
|
inträffat som kan påverka funktionen hos det elektriska handverktyget. |
|
|
Om något är skadat måste det repareras före användning. Många olyckor |
|
|
beror på dåligt underhållna elektriska handverktyg. |
|
f) |
Håll skärverktyg vassa och rena. Ordentligt underhållna skärverktyg med vassa |
|
|
eggar är mindre benägna att kärva och lättare att kontrollera. |
|
g) |
Använd det elektriska handverktyget, tillbehör etc. enligt dessa instruktioner, |
|
SVENSKA |
ta hänsyn till arbetsförhållanden och till det arbete som ska utföras. |
|
Användning av det elektriska handverktyget för andra arbeten än vad det är ämnat |
||
|
||
|
för kan resultera i en farlig situation. |
5) Användning och skötsel av sladdlösa elektriska handverktyg
a)Ladda endast med en av tillverkaren specificerad laddare. En laddare som är avsedd för en typ av batteripack kan skapa brandfara om den används till en annan typ av batteripack.
b)Använd endast sladdlösa elektriska handverktyg med batteripack som är speciellt anpassade. Användning av andra batteripack kan skapa risk för skada och brand.
c)När inte batteripacken används ska den hållas undan från metallföremål som gem, mynt, nycklar, spikar, skruvar eller andra metallföremål som kan kortsluta batteripackens kontakter. Kortslutning av batteriets poler kan medföra brännskada eller brand.
d)Om batteripacken misshandlas kan vätska läcka ut från batteripacken; undvik kontakt med vätskan. Om du trots allt kommer i kontakt med den, spola med vatten. Om vätskan kommer i kontakt med ögonen, sök
medicinsk hjälp. Vätska som har läckt ut från batteripacken kan orsaka irritation eller brännskada.
6) Service
a)Låt behörig personal utföra service och reparationer, och endast med originalreservdelar. Detta garanterar att säkerheten hos det elektriska handverktyget behålls.
20
Särskilda säkerhetsföreskrifter för grästrimmer
• Grästrimmern får inte användas av personer (inklusive barn) med begränsad fysisk, sensorisk eller psykisk förmåga eller som saknar erfarenhet/kunskap om grästrimmerns användningssätt samt risker, undantaget om personen handleds och undervisas av en person som ansvarar för personens säkerhet.
• Låt aldrig barn använda eller leka med grästrimmern, förvara grästrimmern utom räckhåll för barn.
• Bär alltid kraftiga skor och långa byxor samt skyddsglasögon och handskar. |
SVENSKA |
|
• Håll personer som står i närheten på betryggande avstånd från grästrimmern. |
||
|
||
• Se till att inga barn eller husdjur uppehåller sig i närheten. Stenar och andra |
|
|
föremål kan kastas iväg. Stäng genast av grästrimmern om någon vuxen, barn eller |
|
|
husdjur uppehåller sig närmare än 5 meter. |
|
|
• Använd endast grästrimmern vid bra ljusförhållanden. |
|
|
• Om grästrimmern har varit utsatt för stöt eller slag måste den kontrolleras |
|
|
beträffande skador, den måste då repareras före användning. Om trimmerhuvudet |
|
|
sitter löst eller är skadat får inte grästrimmern användas. |
|
|
• Kontrollera grästrimmerns funktion före användning. |
|
|
• Skyddet ska alltid vara monterat vid användning av grästrimmern. Grästrimmern |
|
|
får inte användas om skyddet är trasigt. |
|
|
• Kontrollera före användning att det inte finns några stenar, kablar, rep eller andra |
|
|
främmande föremål i området som ska trimmas. |
|
|
• Håll alltid grästrimmern stadigt. Håll den i båda handtagen. |
|
|
• Montera aldrig skärande verktyg av metall. |
|
|
• Håll rent runt motorns kylluftsöppningar på trimmerhuvudet. Ta bort gräs och löv. |
|
|
• Kniven fortsätter att snurra efter att motorn stängts av. Vänta tills den har stannat |
|
|
helt före service etc. |
|
|
• Grästrimmern får inte utsättas för regn eller hög luftfuktighet. |
|
|
• Se till att du känner till hur alla reglage och inställningar fungerar före användning. |
|
|
• Håll undan händer och fötter från trimmerhuvudet och trimmertråden, särskilt när |
|
|
motorn startas. |
|
|
• Var försiktig vid justering av trimmertråd, starta inte motorn förrän du håller |
|
|
i grästrimmern på rätt sätt. |
|
|
• Grästrimmern får endast användas tillsammans med tillbehör som rekommenderas |
|
|
av tillverkaren. |
|
|
• Ta alltid bort batteriet före kontroll, rengöring eller justering samt när grästrimmern |
|
|
inte används. |
|
|
• Se till att du står stadigt när du använder grästrimmern. |
|
|
• Undvik att rikta trimmerhuvudet mot fasta föremål när trimmerhuvudet snurrar, |
|
|
annars kan grästrimmern skadas. |
|
|
• Försök inte att stoppa skärhuvudet med händer eller fötter, låt det alltid stanna av |
|
|
sig självt. |
|
|
• Undvik att använda grästrimmern i närheten av grusvägar, gård med |
|
|
grusbeläggning eller annan plats där stenar kan kastas iväg. |
|
21

SVENSKA
Förklaring av symbolerna på grästrimmern
Allmänna varningar för riskmoment.
Läs bruksanvisningen.
Utsätt inte grästrimmern för regn eller fukt.
Använd skyddsglasögon.
Håll andra personer på betryggande avstånd från grästrimmern.
22
Produktbeskrivning
18-4632, 31-1325-1 Levereras komplett med 18 V-batteri och laddare.
31-1326 Levereras som tillbehör till dig som redan har 18 V LXC-batteri och laddare (batteri och laddare säljs separat).
Bilden visar grästrimmern monterad, 2 och 3 är inte monterade vid leverans.
SVENSKA
1 |
2 |
3 |
4 |
5 |
6 |
7 |
8 |
9 |
10 |
11 |
1.Trimmerhuvud.
2.Stödhjul.
3.Skydd.
4.Spärr för justering av trimmerhuvudets vinkel i 5 fasta lägen.
5.Spärr för vridning av trimmerhuvudet i 3 fasta lägen. Tryck spärren framåt mot trimmerhuvudet.
6.Teleskopskaft.
7.Låsvred för justering av teleskopskaftets längd. Vrid medurs för att öppna och moturs för att låsa.
8.Justerbart främre handtag.
9.Batterihållare för LXC-batteri (batteri medföljer endast 18-4632 och 31-1325-1).
10.[ ] Strömbrytare.
11.Säkerhetsspärr för att förhindra oavsiktlig start. Håll in knappen innan strömbrytaren trycks in.
23
 Loading...