


Router
Handöverfräs
Håndoverfres
Käsiyläjyrsin
Handoberfräse
ART.NO |
MODEL |
18-3071 |
M1R-KZ3-8-UK |
30-9313 |
M1R-KZ3-8 |
Important! |
ENGLISH |
|
Read the entire instruction manual carefully |
|
|
and make sure that you fully understand |
|
|
it before you use the equipment. Keep the |
|
|
manual for future reference. |
|
|
Viktig information: |
|
|
Läs hela bruksanvisningen noggrant och |
|
|
försäkra dig om att du har förstått den |
SVENSKA |
|
innan du använder utrustningen. Spara |
||
bruksanvisningen för framtida bruk. |
|
|
Viktig informasjon: |
|
|
Les disse anvisningene nøye og forsikre deg om |
|
|
at du forstår dem, før du tar produktet i bruk. |
|
|
Ta vare på anvisningene for seinere bruk. |
|
|
Tärkeää tietoa: |
|
|
Lue nämä ohjeet huolellisesti ja varmista |
|
|
että olet ymmärtänyt ne, ennen kuin alat |
NORSK |
|
käyttää laitetta. Säilytä ohjeet myöhempää |
||
|
||
tarvetta varten. |
|
|
Wichtiger Hinweis: |
|
|
Vor Inbetriebnahme die komplette |
|
|
Bedienungsanleitung durchlesen und |
|
|
aufbewahren. |
|
|
|
SUOMI |
DEUTSCH
Ver. 20140923
Original instructions
Bruksanvisning i original
Original bruksanvisning
Alkuperäinen käyttöohje
Original Bedienungsanleitung

Router
ART.NO. 18-3071 MODEL M1R-KZ3-8-UK
30-9313 M1R-KZ3-8
Please read the entire instruction manual before using and save it for future use. We apologise for any text or photo errors and any changes of technical data.
If you have any questions concerning technical problems please contact our Customer Service Department (see address on reverse).
General Safety Instructions
Warning! Read all the instructions. Failure to adhere to the following instructions may lead to electric shocks, fires and/or serious injury. The term electrical hand tools in the warning text below is referring to your mains operated or battery operated hand tool.
SAVE THE INSTRUCTIONS.
1) The work space
a) Keep the work space clean and well illuminated. Cluttered and poorly lit areas invite accidents.
b) Do not use electrical hand tools in explosive environments, i.e. nearby flammable liquids, gas or dust. Electrical hand tools generate sparks that could easily ignite dust or fumes.
c) Keep away from children and other spectators while using the electrical hand tool. Distractions can make you lose your concentration and control.
2) Electrical safety
a)The electrical hand tool’s plug must fit correctly in the wall socket. Never modify the plug in any way. Never use an adaptor together with earthed electrical hand tools. Unmodified plugs and suitable wall sockets decrease the risk of electric shock.
b)Avoid body contact with earthed objects, such as pipes, radiators, ovens or refrigerators. There is an increased risk of electrical shock if your body
is earthed.
c)Do not expose the electrical hand tool to rain or other wet conditions.
If water gets inside an electrical hand tool it increases the risk of electrical shock.
d)Do not misuse the lead. Never use the lead to carry, drag or pull the plug out of the wall socket. Keep the lead away from heat, oil, sharp edges and movable parts. Damaged or tangled leads increase the risk of electrical shock.
e)When you use an electrical hand tool outdoors; use an extension cord suitable for this purpose. Use of an extension cord for outdoor use decreases the risk of electrical shock.
ENGLISH
3

3) Personal safety
ENGLISH |
a) |
the influence of drugs, alcohol or medication. One moment of not paying |
|
Pay attention to what you do and use common sense when using electrical |
|
|
|
hand tools. Never use an electrical hand tool if you are tired or under |
|
|
attention while using an electrical hand tool may result in serious injury. |
|
b) |
Use protective equipment. Always use safety glasses. Using protective |
|
|
equipment such as a face mask, slip resistant protective shoes, a helmet and |
|
|
ear defenders when needed decreases the risk of injury. |
|
c) |
Avoid unexpected starts. Make sure that the switch is set to OFF before |
|
|
you connect the device to the wall socket. Never carry an electrical hand |
|
|
tool with one finger on the trigger or never connect the hand tool to a wall |
|
|
socket when the switch is set to ON, since it may result in injury. |
|
d) |
Remove all service tools/keys before switching on the hand tool. A forgotten |
|
|
service tool on a rotating part of the electrical hand tool may result in injury. |
|
e) |
Do not overreach. Make sure you stand steady and well balanced at all |
|
|
times. This gives better control in unexpected situations. |
|
f) |
Wear suitable clothing. Do not wear loose fitting clothes or jewellery. |
|
|
Keep hair, clothes and gloves away from movable parts. Loose fitting clothes, |
|
|
jewellery or long hair could get caught in movable parts. |
|
g) |
If the equipment for suctioning or collecting dust is available make sure it |
|
|
is connected and used properly. Using technical aids may reduce dust related |
|
|
hazards. |
4) Use and maintenance of the electrical hand tool
a)Do not overdrive the hand tool. Use a hand tool suitable for the work you are to perform. At the correct rate of feed, the correct tool will carry out the work better and more safely.
b)Never use the electrical hand tool if the switch does not work properly to turn on and shut off the tool. All electrical hand tools that can not be operated by the switch are dangerous and must be repaired.
c)Unplug the lead from the wall socket before making any adjustments, changes of accessories or storing the electrical hand tool away. These precautions reduce the risk of unexpected start of the electrical hand tool.
d)Store electrical hand tools that are not being used out of reach from children. Do not let people unfamiliar with the electrical hand tool or its instructions use it. Electrical hand tools can be dangerous if they get into the hands of inexperienced users.
e)Maintenance of electrical hand tools. Check if something is incorrectly set, if movable parts are getting jammed, or parts are broken or something else that might cause the electrical hand tool to malfunction. If something is damaged it must be repaired before use. Many accidents are caused by poorly maintained electrical hand tools.
4

f) |
Keep the tools sharp and clean. Properly maintained cutting tools with sharp |
|
|
|
blades are less likely to jam and are easier to control. |
ENGLISH |
|
g) |
Use the electrical hand tool, accessories and such according to |
||
|
|||
|
the instructions and in a way suitable for the type of electrical hand tool |
|
|
|
used. Using the electrical hand tool for work other than that for which it is |
|
|
|
intended could result in a dangerous situation. |
|
5) Service
a)Repairs and service should only be performed by qualified persons, and only with original spare parts. This guarantees the safety of the electrical hand tool.
Safety symbols
Read the entire instruction manual before use.
Always use ear protection.
Always use protective glasses or a visor and breathing protection.
Technical Specifications
Power Supply |
230 V AC, 50 Hz |
Power |
1200 W |
No-Load Speed |
11500–30000 rpm |
Max. Cutting Depth |
40 mm |
Collets |
6 + 8 mm |
Sound Pressure (LpA) |
86 dB(A), K: 3 dB(A) |
Sound Power (LwA) |
97 dB(A), K: 3 dB(A) |
Vibration Value |
ah 6.23 m/s², K: 1.5 m/s² |
5

ENGLISH
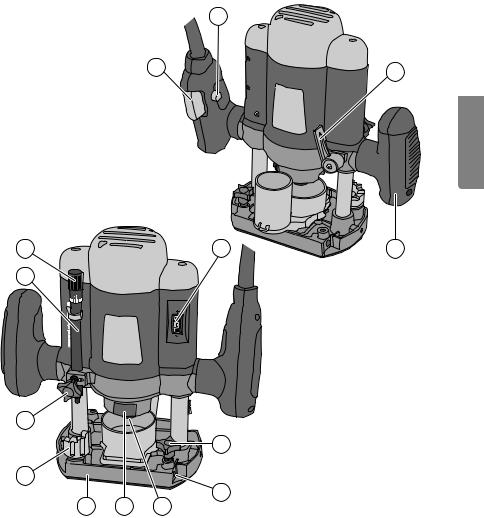
Product description |
2 |
1 |
3 |
|
6 |
7 |
8
9
10 11 12
1.Power Switch
2.Safety Catch
3.Height Adjustment Locking Lever
4.Handle
5.Speed Selector
6.Depth Stop Fine-Adjustment Screw
7.Depth Stop
5 |
4 |
14
13
8.Depth Stop Locking Knob
9.Depth Set Block
10.Base Plate
11.Spindle Lock Button
12.Collet Nut
13.Hole for Parallel Guide
14.Parallel Guide Locking Knob
6

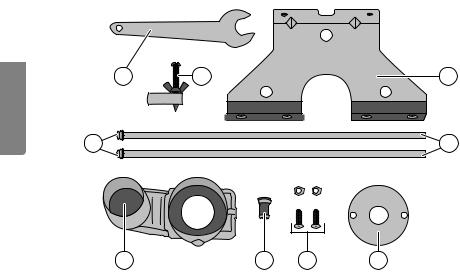
Accessories
15  16
16
19
20 |
21 |
22 |
23 |
15.Spanner
16.Hole Cutting Tool
17.Parallel Guide
18.Guide Rods
19.Screws
20.Extractor Duct
21.Collet 6 & 8 mm (one fitted in machine)
22.Template Guide and Extractor Duct Machine Screws
23.Template Guide
ENGLISH
17
18 |
7
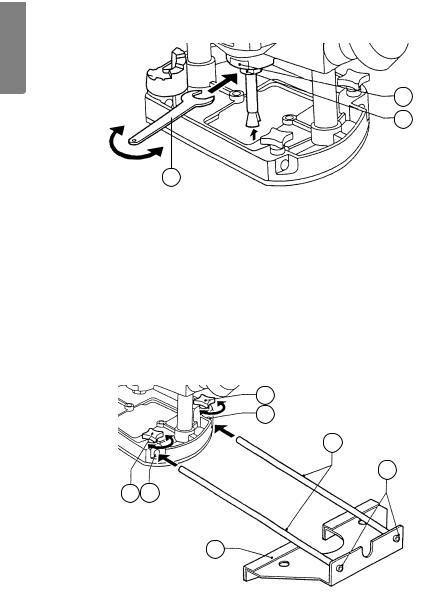
Router cutting fitting
ENGLISH
11
12
15
Important!
•Unplug the router before any service or adjustment.
•Bear in mind that the cutter shank diameter must be compatible with both the collet size and speed.
•Turn the router upside down.
•Press in the spindle lock button (11).
•Undo the nut (12) using the spanner (15).
•Insert the cutter using the appropriate collet, 6 or 8 mm.
•Tighten the collet nut using the spanner.
Attaching and adjusting the parallel guide
14
13
18
19
14 13
17
•Secure the two guide rods (18) to the parallel guide (17) using the screws (19).
•Undo the locking knobs (14).
•Slide the parallel guide rods through the holes (13).
•Adjust to a suitable setting.
•Tighten the locking knobs (14).
8
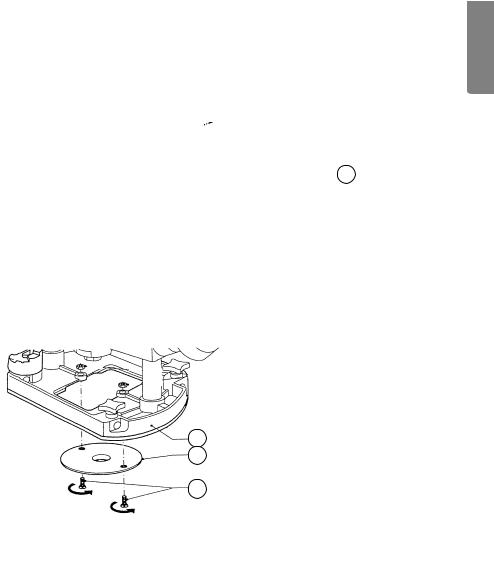
Attaching the circle cutting pin
The router can be used to cut arcs and circles using the hole cutting attachment.
1.Drill a hole in the centre of the circle that is to be removed.
2.Remove the parallel guide, but leave one of the guide rods.
3.Attach the hole cutting attachment (16) to the end of the guide rod.
4.Set the correct radius for the circle.
5.Tighten the guide rod locking knob.
6.Stick the point of the hole cutting attachment into the centre hole.
7.With the on/off switch set to OFF,
move the router around the circle |
16 |
to check if it is the right size and make any adjustments.
8. Cut the circle in stages, lowering the router cutter about 2 mm on each circuit. Do not try to cut too deeply in one go.
Attaching the template guide and extractor duct
10
23
22
•Place the extractor duct on the base plate (10).
•Turn the machine upside down and insert the template guide (23).
•Screw both the template guide and extractor duct to the base plate using the same two machine screws (22).
•If the dust extractor duct is not required use the two nuts to fit onto the ends of the machine screws.
ENGLISH
9
ENGLISH
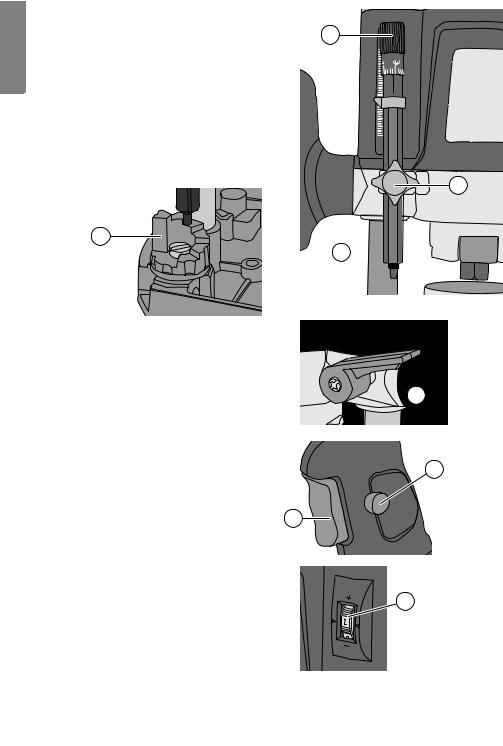
Setting cutter depth
•The router is equipped with a depth stop (7) which is adjusted by turning the locking screw (8).
When a rough setting has been made fine adjustments can be made using the adjustment screw (6).
•By turning the depth set block (9) the depth of cut can be altered to one of 7 fixed settings.
9
•The locking lever (3) is for raising or lowering the height of the router
body. We recommend that the router is locked when cutting as it is most stable in that position.
Switching On/Off
Switching on: Hold in the safety catch (2) and
the power switch (1). Switching off: Release the power
switch. 1
6
8
7

 3
3
2
Setting the speed |
|
Select the speed by turning the speed |
5 |
selector (5). After running the tool at low |
|
speed for a long time, one should let |
|
the motor run at maximum speed for |
|
about 3 minutes to cool it down. |
|
10
Troubleshooting
|
|
|
ENGLISH |
|
Symptom |
Possible cause |
Remedy |
||
|
||||
|
|
|
|
|
The machine does |
No power. |
Check the power point. |
|
|
not start. |
|
|
|
|
Worn brushes. |
Contact us in case of motor |
|
||
|
|
|||
|
|
or electrical faults. |
|
|
|
Short circuit. |
|
||
|
|
|
||
|
|
|
|
|
|
Faulty power switch. |
|
|
|
|
|
|
|
|
The machine |
Worn/damaged cutter/bit. |
Sharpen or change |
|
|
runs slowly. |
|
the cutter/bit. |
|
|
|
|
|
|
|
|
Speed too low. |
Do not press down too hard. |
|
|
|
|
|
|
|
|
The motor is overheated. |
|
|
|
|
|
|
|
|
Strange noise. |
Mechanical fault. |
Contact us in case of motor |
|
|
|
|
or electrical faults. |
|
|
|
Faulty windings. |
|
||
|
|
|
||
|
|
|
|
|
Strong vibrations. |
Loose cutter/bit. |
Tighten the tool and make |
|
|
|
|
sure it is set correctly. |
|
|
|
|
|
|
|
Sparks in the motor. |
Brushes jammed. |
Contact us in case of motor |
|
|
|
|
or electrical faults. |
|
|
|
Winding short circuited. |
|
||
|
|
|
||
|
|
|
|
|
|
Dirt on commutator. |
|
|
|
|
|
|
|
Maintenance
Warning:
•Always unplug the machine before carrying out any maintenance or repairs.
•Always keep the motor’s ventilation openings free of dust and debris.
•Regularly clean the machine using a cloth moistened with a little detergent.
•Never use solvents.
Disposal
Follow local ordinances when disposing of this product. If you are unsure about how to dispose of this product contact your municipality.
11

SVENSKA
Handöverfräs
ART.NR 18-3071 |
MODELL M1R-KZ3-8-UK |
30-9313 |
M1R-KZ3-8 |
Läs igenom hela bruksanvisningen före användning och spara den sedan för framtida bruk. Vi reserverar oss för ev. textoch bildfel samt ändringar av tekniska data.
Vid tekniska problem eller andra frågor, kontakta vår kundtjänst (se adressuppgifter på baksidan).
Generella säkerhetsinstruktioner
Varning! Läs alla instruktioner. Om nedanstående instruktioner inte följs kan detta leda till elektrisk stöt, brand och/eller allvarlig skada. Termen elektriskt handverktyg i varningstexten nedan refererar till ditt nätanslutna eller batteridrivna handverktyg.
SPARA DESSA INSTRUKTIONER.
1) Arbetsutrymmet
a) Håll arbetsutrymmet rent och väl upplyst. Belamrade och mörka utrymmen inbjuder till olyckor.
b) Använd inte elektriska handverktyg i explosiva miljöer, som i närheten av lättantändliga vätskor, gaser eller damm. Elektriska handverktyg genererar gnistor som kan antända damm eller ångor.
c) Håll undan barn och åskådare medan du använder det elektriska handverktyget. Störningsmoment kan göra att du tappar kontrollen.
2) Elektrisk säkerhet
a)Det elektriska handverktygets stickpropp måste passa i vägguttaget. Modifiera aldrig stickproppen på något vis. Använd aldrig adapter tillsammans med jordade elektriska handverktyg. Omodifierade stickproppar och passande vägguttag minskar risken för elektrisk stöt.
b)Undvik kroppskontakt med jordade föremål, som rör, element, köksspis eller kylskåp. Det finns ökad risk för elektrisk stöt om din kropp är jordad.
c)Utsätt inte det elektriska handverktyget för regn eller våta förhållanden.
Om vatten tränger in i ett elektriskt handverktyg ökar det risken för elektrisk stöt.
d)Misshandla inte nätsladden. Använd aldrig nätsladden för att bära, dra eller rycka stickproppen ur vägguttaget. Håll nätsladden undan från värme, olja, vassa kanter och rörliga delar. Skadade eller trassliga nätsladdar ökar risken för elektrisk stöt.
e)När du använder ett elektriskt handverktyg utomhus, använd en skarvsladd anpassad för detta ändamål. Användning av en skarvsladd för utomhusbruk minskar risken för elektrisk stöt.
12

3) Personlig säkerhet
a) |
Var uppmärksam på vad du gör och använd sunt förnuft när du använder |
|
|
ett elektriskt handverktyg. Använd inte ett elektriskt handverktyg om du |
|
|
är trött eller påverkad av droger, alkohol eller medicinering. Ett ögonblicks |
|
|
ouppmärksamhet när du använder ett elektriskt handverktyg kan resultera i |
|
|
allvarlig personskada. |
|
b) |
Använd skyddsutrustning. Bär alltid skyddsglasögon. Användning av |
|
|
skyddsutrustning som andningsskydd, halksäkra skyddsskor, hjälm och |
SVENSKA |
|
hörselskydd vid behov minskar risken för personskada. |
|
c) |
Undvik oavsiktlig start. Se till att strömbrytaren är i läge OFF innan du |
|
|
ansluter stickproppen till vägguttaget. Att bära ett elektriskt handverktyg med |
|
|
ett finger på strömbrytaren/avtryckaren eller att ansluta ett elektriskt handverktyg |
|
|
till elnätet när strömbrytaren är i läge ON inbjuder till olyckor. |
|
d) |
Tag bort alla serviceverktyg/nycklar innan du slår på det elektriska |
|
|
handverktyget. Ett kvarglömt serviceverktyg på en roterande del av det |
|
|
elektriska handverktyget kan reslutera i personskada. |
|
e) |
Sträck dig inte för långt. Se till att du står stadigt med god balans |
|
|
hela tiden. Detta möjliggör bättre kontroll i oväntade situationer. |
|
f) |
Bär lämplig klädsel. Bär inte löst sittande kläder eller smycken. Håll hår, |
|
|
kläder och handskar undan från rörliga delar. Lösa kläder, smycken eller långt |
|
|
hår kan fastna i rörliga delar. |
|
g) |
Om utrustning för utsugning och uppsamling av damm finns tillgängligt, |
|
|
se till att denna är ansluten och används ordentligt. Användning av dessa |
|
|
hjälpmedel kan minska dammrelaterade faror. |
|
4) Användning och underhåll av det elektriska handverktyget
a)Pressa inte det elektriska handverktyget. Använd ett elektriskt handverktyg som är avsett för det arbetsmoment du utför. Korrekt elektriskt handverktyg gör jobbet bättre och säkrare med avsedd matningshastighet.
b)Använd inte det elektriska handverktyget om strömbrytaren inte slår på och stänger av verktyget. Alla elektriska handverktyg som inte kan kontrolleras med strömbrytaren är farliga och måste repareras.
c)Tag stickproppen ur vägguttaget innan du utför några justeringar, byter tillbehör eller lägger undan det elektriska handverktyget för förvaring.
Dessa åtgärder i förebyggande syfte minskar risken för att starta det elektriska handverktyget oavsiktligt.
d)Förvara elektriska handverktyg som inte används utom räckhåll för barn och låt inte personer som inte är förtrogna med det elektriska
handverktyget eller dessa instruktioner använda det. Elektriska handverktyg är farliga om de kommer i händerna på ovana användare.
e)Underhåll elektriska handverktyg. Kontrollera om något är felinställt, om rörliga delar kärvar, om delar har gått sönder eller något annat som kan påverka funktionen av det elektriska handverktyget. Om något är
skadat måste det repareras före användning. Många olyckor beror på dåligt underhållna elektriska handverktyg.
13

SVENSKA
f)Håll verktygen vassa och rena. Ordentligt underhållna skärverktyg med vassa eggar är mindre benägna att kärva och lättare att kontrollera.
g)Använd det elektriska handverktyget, tillbehör och liknande enligt instruktionerna och på det sätt som är ämnat för just den typen av elektriskt handverktyg, och ta även hänsyn till arbetsförhållandena och den typ av arbete som ska utföras. Användning av det elektriska handverktyget för arbeten andra än vad det är ämnat för kan resultera i en farlig situation.
5) Service
a)Låt behörig personal utföra service och reparationer, endast med originalreservdelar. Detta garanterar att säkerheten på det elektriska handverktyget behålls.
Produktmärkning med säkerhetssymboler
Läs hela bruksanvisningen!
Använd alltid hörselskydd.
Använd alltid skyddsglasögon och munskydd.
Tekniska Specifikationer
Strömförsörjning |
230 V AC, 50 Hz |
Effekt |
1200 W |
Varvtal obelastad |
11500–30000 rpm |
Max. fräsdjup |
40 mm |
Spännhylsor |
6 + 8 mm |
Ljudtryck (LpA) |
86 dB(A), K: 3 dB(A) |
Ljudeffekt (LwA) |
97 dB(A), K: 3 dB(A) |
Vibrationsvärde |
ah 6,23 m/s², K: 1,5 m/s² |
14
Produktbeskrivning  2
2
1 |
3 |
|
SVENSKA
6 |
5 |
4 |
7 |
|
8 |
|
|
|
|
|
|
|
|
14 |
|
|
9 |
|
|
|
|
|
|
|
|
13 |
|
|
10 |
11 |
12 |
|
|
1. |
Strömbrytare |
|
|
8. |
Låsskruv för djupanslag |
2. |
Säkerhetsspärr |
|
|
9. |
Roterbart snabbanslag |
3. |
Låsspak för höjning/sänkning |
|
10. Basplatta |
||
4. |
Handtag |
|
|
11. Spindellås |
|
5. |
Ratt för inställning av varvtal |
|
12. Låsmutter för spännhylsa |
||
6. |
Ratt för fininställning av djupanslag |
13. Hål för parallellanslag |
|||
7. |
Djupanslag |
|
|
14. Låsskruv för parallellanslag |
|
15
Tillbehör
15 |
16 |
17 |
SVENSKA |
|
19 |
18 |
20 |
21 |
22 |
23 |
15.Nyckel
16.Håltagningsverktyg
17.Parallellanslag
18.Styrningar till parallelanslaget
19.Skruvar
20.Adapter för spånsugning
21.Spännhylsa 6 & 8 mm (en sitter monterad i maskinen)
22.Skruv till kopierhylsan och adaptern för spånsugning
23.Kopierhylsa
16
 Loading...