

COMPRO E600F Startup Manual

VideoMate
Vista E600F HW2 PCIe
TV Tuner Card
Start Up Guide
Compro Technology, Inc.
www.comprousa.com

2
Copyright © 2001-2008. Compro Technology, Inc. No part of this
document may be copied or reproduced in any form or by any means
without the prior written consent of Compro Technology, Inc.
Compro, VideoMate, Poladyne, Play with Power, and the Compro
logo are trademarks of Compro Technology, Inc. Other names and
marks are trademarks of their respective owners.
Compro makes no warranties with respect to this documentation and
disclaims any implied warranties of merchantability, quality, or fitness
for any particular purpose. The information in this document is subject
to change without notice. COMPRO reserves the right to make
revisions to this publication without obligation to notify any person or
entity of any such changes.
Compro Technology, Inc.
Tel. +886 2 2918 0169, Fax +886 2 2915 2389
4/F, No.12, Alley 6, Lane 45, Pao Shin Road
Hsintein City, Taipei, Taiwan.
www.comprousa.com

3
Table of Contents
About VideoMate Vista E600F HW2 PCIe TV Tuner Card
........................................................................................ 4
VideoMate Vista E600F Package Contents ............................ 5
VideoMate Vista E600F Connectors............................... 6
MCE Remote for Vista E600F TV Card .......................... 7
Hardware Installation ...................................................... 9
Software Installation...................................................... 12
Remote Power On/Off................................................... 13
ComproDTV Vista Gadget Tool for Vista ...................... 15
ComproDTV MCE Add-In.............................................. 17
HID (Human Interface Device) for Compro Remote................ 18
Open and close the ComproDTV 4 control panel ......... 19
ComproDTV 4 ............................................................... 20
ComproFM 2 ................................................................. 27
Troubleshooting ............................................................ 28

4
About VideoMate Vista E600F HW2 PCIe TV
Tuner Card
Compro VideoMate E600F is a PCI Express analog TV/FM capture card,
which brings universal analog TV/FM broadcasts to your desktop PC. It turns
your computer into a home entertainment center by bringing you analog TV
viewing, video/audio capturing, and high quality component video input. It also
certified for Windows Vista 32/64 bit system.
MINIMUM SYSTEM REQUIREMENTS
z 1.7 GHz Pentium IV or equivalent CPU for DVD-Quality recording or
timeshifting
z 512 MB System Memory
z Sound card.
z Open PCI Express x1 slot.
z CD-ROM drive for software installation.
z Windows XP SP2 or Vista x86/x64
z 50 MB free disk space for basic software installation.
RECOMMENDED SYSTEM REQUIREMENTS
To use all the features of VideoMate Vista E600F PCIe card, your PC should
meet the following requirements.
z P4 2.4 GHz or above for PIP/POP
z 1.0 GB System Memory
z Sound card
z Open PCI Express x1 slot.
z CD-ROM for software installation
z Windows XP SP2 or Vista x86/x64
z Update the latest drivers of VGA, motherboard, and soundcard from
vendors.
z 50 MB free space for software installation
z ATX power supply and a computer case with a separate power switch
cable from power on button.

5
VideoMate Vista E600F Package Contents
Vista E600F
PCIe TV card
IR Receiver
Installation CD
Start Up Guide
MCE Remote
I-type to F-type
TV Converter
FM Antenna
6 in 1 video/audio
input cable
Power Up cable
Ulead Software CD
Batteries
Low-profile
Bracket
6
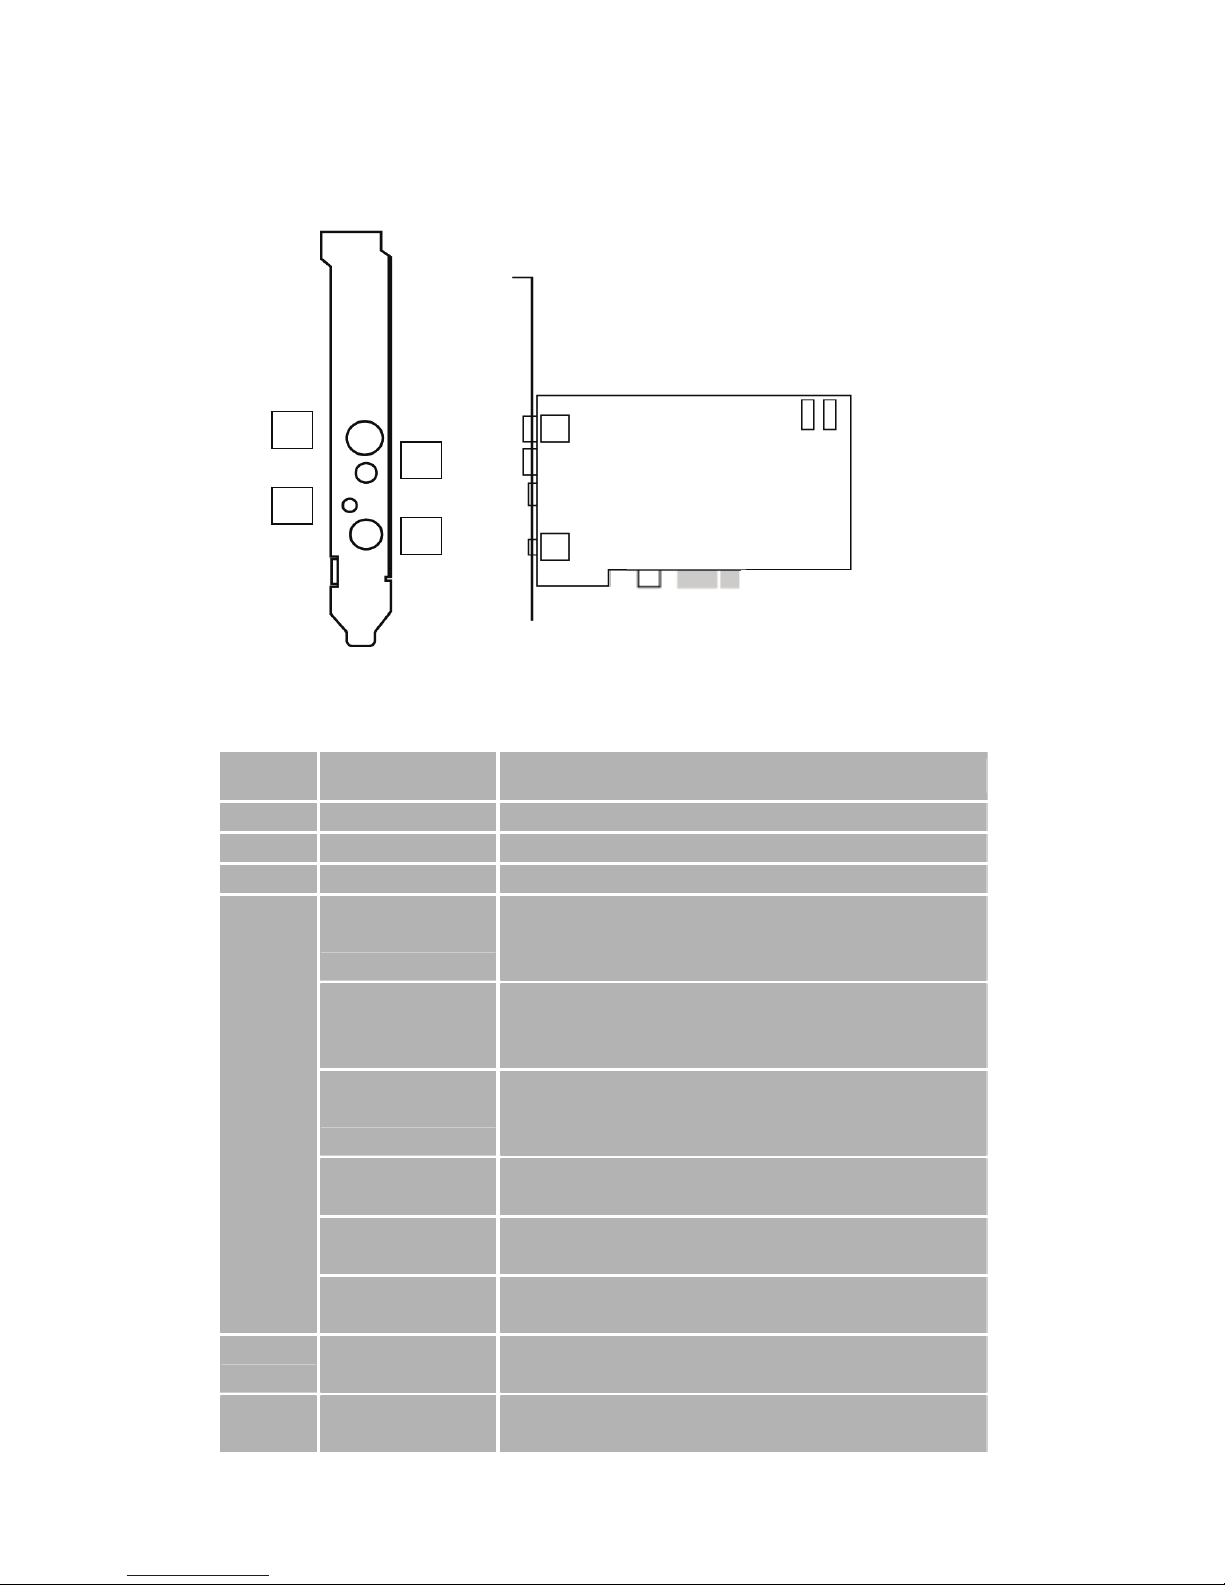
VideoMate Vista E600F Connectors
Item Function Description
1 TV Tuner-In Analog TV cable/antenna input
2 FM Tuner-In Connect to an FM antenna feed.
3 IR Connect the IR receiver here.
Audio-In
(Blue)
Use an audio patch cable to connect to an audio source,
such as a VCR, DVD or VCD. (Option for audio patch
cable, not included in the package )
S-Video-In
(Black)
Use an S-Video patch cable to connect to a video source,
such as a VCR, DVD or VCD. (Option for S-video patch
cable, not included in the package )
Composite-In
(Yellow)
Use a Composite video patch cable to connect to a video
source, such as a VCR, DVD or VCD. (Option for
composite video patch cable, not included in the package )
Component Video
Input (Green)
Connect to the video device with component video output
(Component video cable not included in the package)
Component Video
Input (Red)
Connect to the video device with component video output
(Component video cable not included in the package)
4
9-pin
connector
for (6 in 1
converter
cable)
Component Video
Input (Blue)
Connect to the video device with component video output
(Component video cable not included in the package)
5 To C a s e P o w e r
Switch
Connect the ATX Power Switch cable of your computer
case here.
6 To Mainboard Power
Switch Connector
Use the supplied power switch patch cable to connect to
the ATX Power Switch pins on the mainboard.
5 6
7
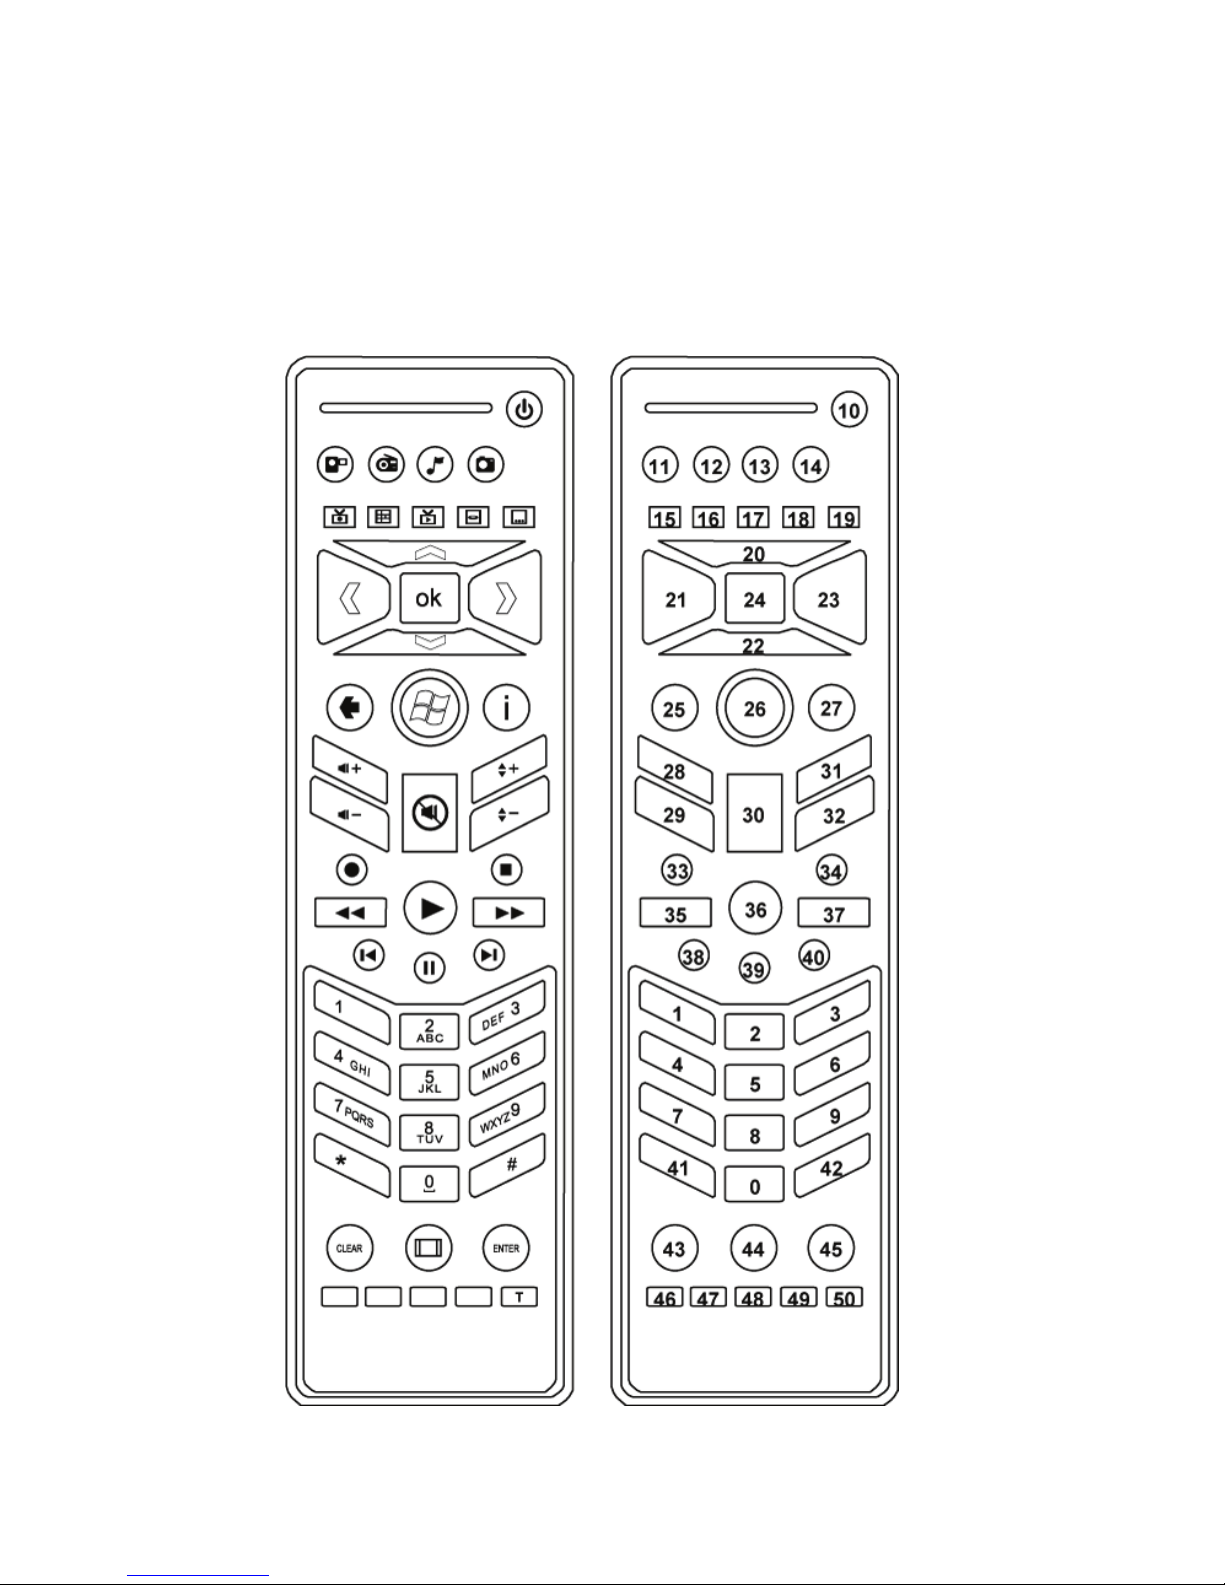
MCE Remote for Vista E600F TV Card
Compro VideoMate Vista E600F bundles the easy-to-use Microsoft certified
remote control to controls the Media Center and also ComproDTV, ComproFM
software. Some keys are special designed for Windows Vista
Premium/Ultimate, it may not be used in Windows XP system.

8
No. ComproDTV 4 ComproFM 2
Windows Media
Center (MCE)
0-9
Number Key Preset stations Number Key
10
Into sleep mode Into sleep mode Into sleep mode
11
Videos (MCE) Videos (MCE) Videos (MCE)
12
Radio (MCE) Radio (MCE) Radio (MCE)
13
Music (MCE) Music (MCE) Music (MCE)
14
Pictures (MCE) Pictures (MCE) Pictures (MCE)
15
Recorded TV (MCE) Recorded TV (MCE) Recorded TV (MCE)
16
MCE Guide MCE Guide MCE Guide
17
Live TV (MCE) Live TV (MCE) Live TV (MCE)
18
DVD Menu (MCE) DVD Menu (MCE) DVD Menu (MCE)
19
DVD Sub (MCE) DVD Sub (MCE) DVD Sub (MCE)
20 Up arrow or select
Mono/Stereo/SAP
Up arrow Up arrow
21 Replay
or switch TV format
Scan channel(Down) Left arrow
22
Down arrow
or snapshot
Down arrow Down arrow
23 Advance in
Timeshifting
Scan channel(Up) Right arrow
24
OK Playlist OK
25
EPG (US only) Open on-line help Back
26
Media Center Media Center Media Center
27
Zoom In/Out Max/Min More
28
Volume up Volume up Volume up
29
Volume down Volume down Volume down
30
Mute Mute Mute
31
Channel up Channel up Channel up
32
Channel down Channel down Channel down
33
Record Record Record
34
Stop/Live Stop/LIVE Stop/LIVE
35
Replay/Rewind Rewind Rewind
36
Timeshift Play/Pause Play/Pause Play/Pause
37
Advance/Fast forward Fast forward Fast forward
38
The last channel The last channel Skip rewind
9
Hardware Installation
Warning
Unplug your PC’s main power cord before installing VideoMate Vista
E600F PCIe card. Failure to do so may cause damage to your VideoMate
Vista E600F PCIe card and void your warranty.
1. Shut down your computer and unplug main power cord.
2. Remove the computer case cover.
Power Up Connections
39
Timeshift Play/Pause Play/Pause Play/Pause
40
Change scale of screen ----- Skip Forward
41
----- Enter frequency -----
42
Channel surf ----- -----
43
Sleep function Sleep function Clear
44
ComproDTV ComproDTV Zoom
45
Playlist Playlist Enter
46
C.C Language ----- Red
47
ComproDVD ComproDVD Green
48
ComproDTV ComproDTV Yellow
49
ComproFM ComproFM Blue
50
Setup Setup Teletext on/off
10
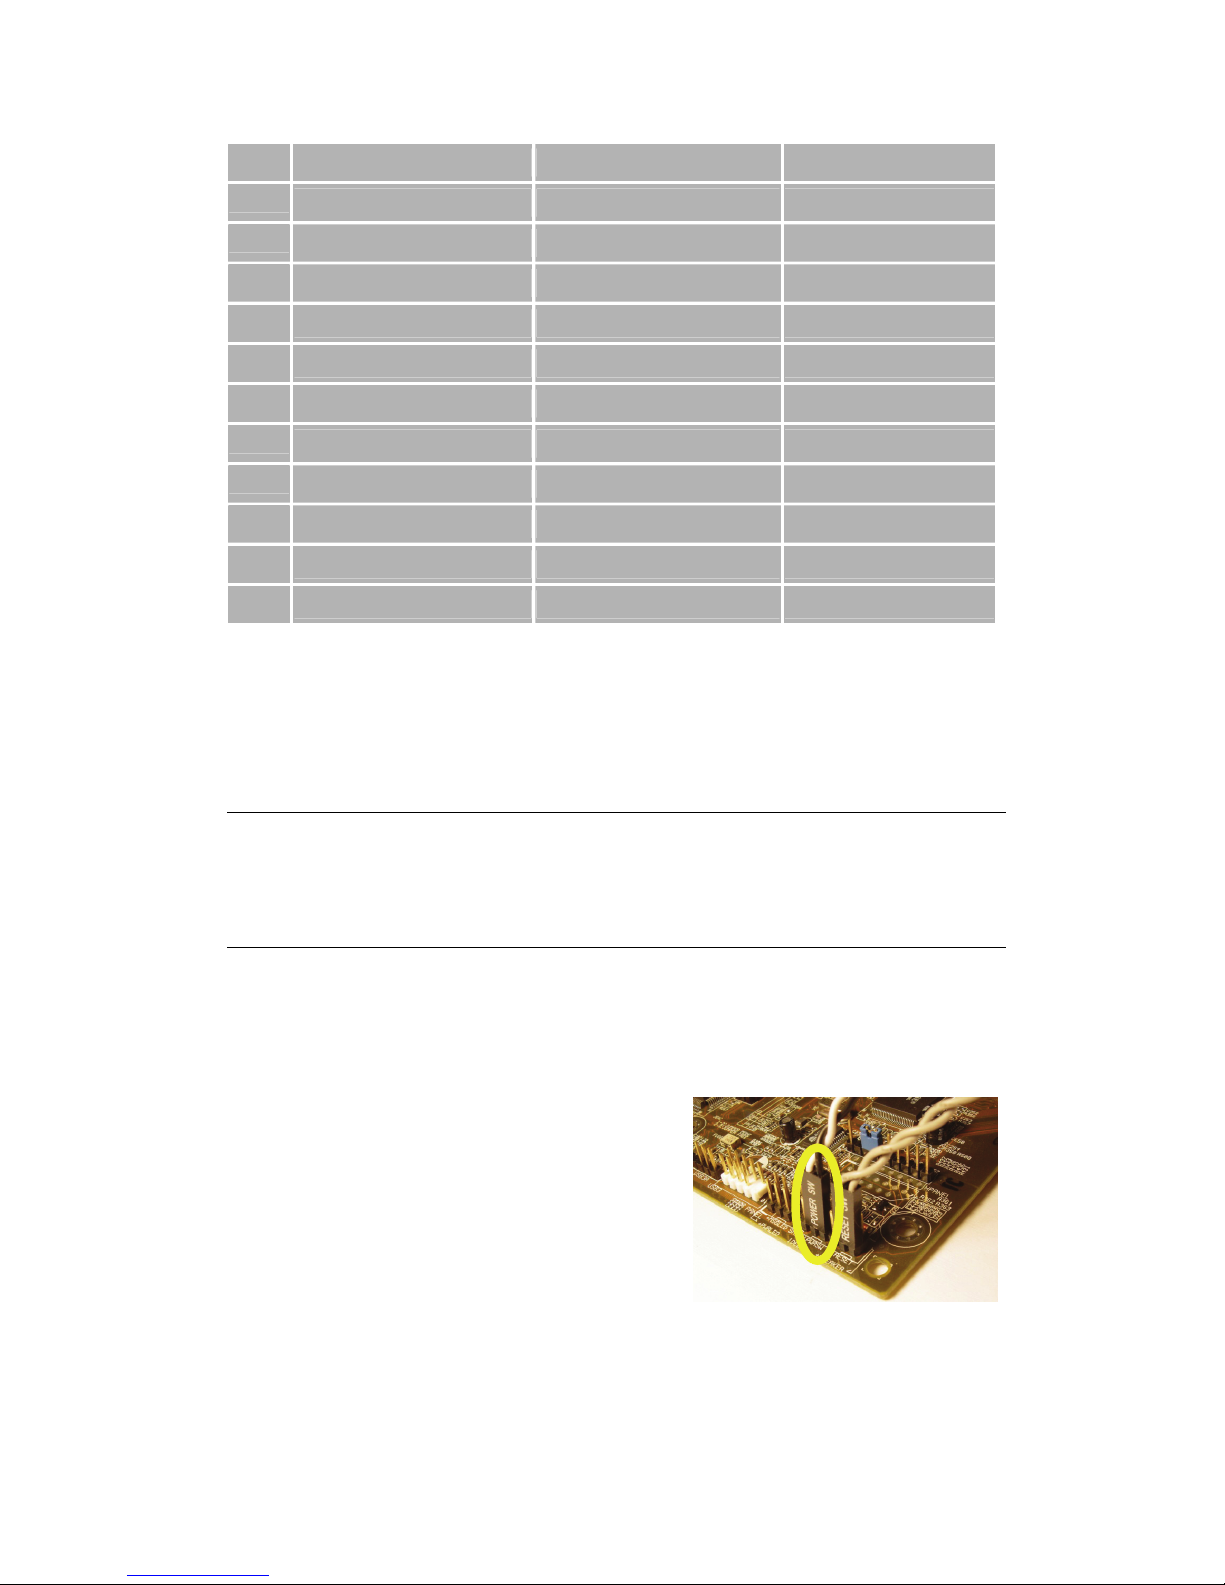
3. Locate the ATX power switch pins on your computer case and trace the
wires to the power switch connector on your mainboard. The ATX power
switch cable is normally a twisted pair cable with a two-pin connector as
shown above.
Note
On the mainboard, the ATX power switch pins are usually labeled “POWER
SW” or similar. It is vital to remember the position of these pins for a later step
in the installation process.
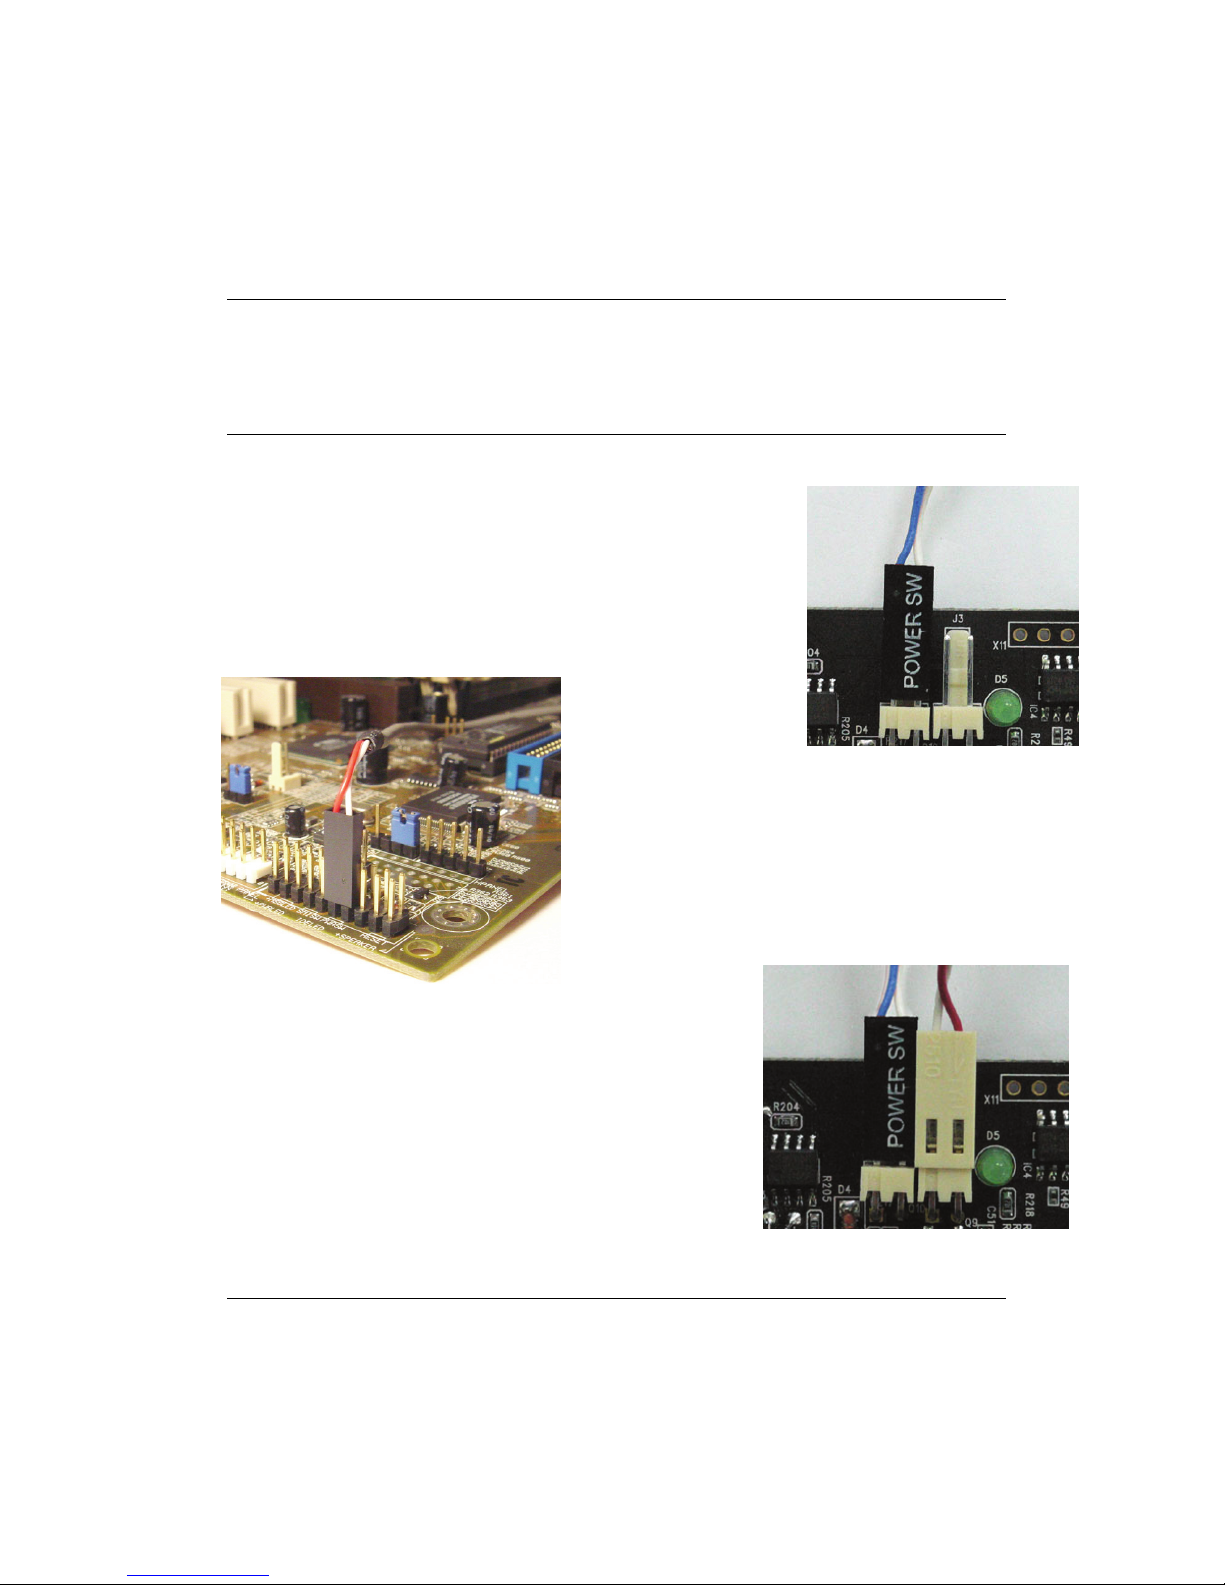
4. Unplug the ATX power switch cable from the
mainboard and connect it to the white connector
named “JS1” on the VideoMate Vista E600F PCIe
card, as shown on the right.
5. Connect the black socket of Power Up
patch cable to the power switch
connector on the mainboard.
6. Connect the white socket of Power Up patch
cable to the connector named “JS2” on the
VideoMate Vista E600F PCIe Tuner card.
Note
Double check your work. If you plug the cables into the incorrect pins, your
PC may not start or function improperly.
 Loading...