

Page 1
Bedienungsanleitung/Garantie
Gebruiksaanwijzing/Garantie • Mode d’emploi/Garantie
Instrucciones de servicio/Garantía • Manual de instruções/Garantia
Istruzioni per l’uso/Garanzia • Bruksanvisning/Garanti
Instruction Manual/Guarantee • Instrukcja obsługi/Gwarancja
Návod k použití/Záruka • A használati utasítás/Garancia
Руководство по эксплуатации/Гарантия
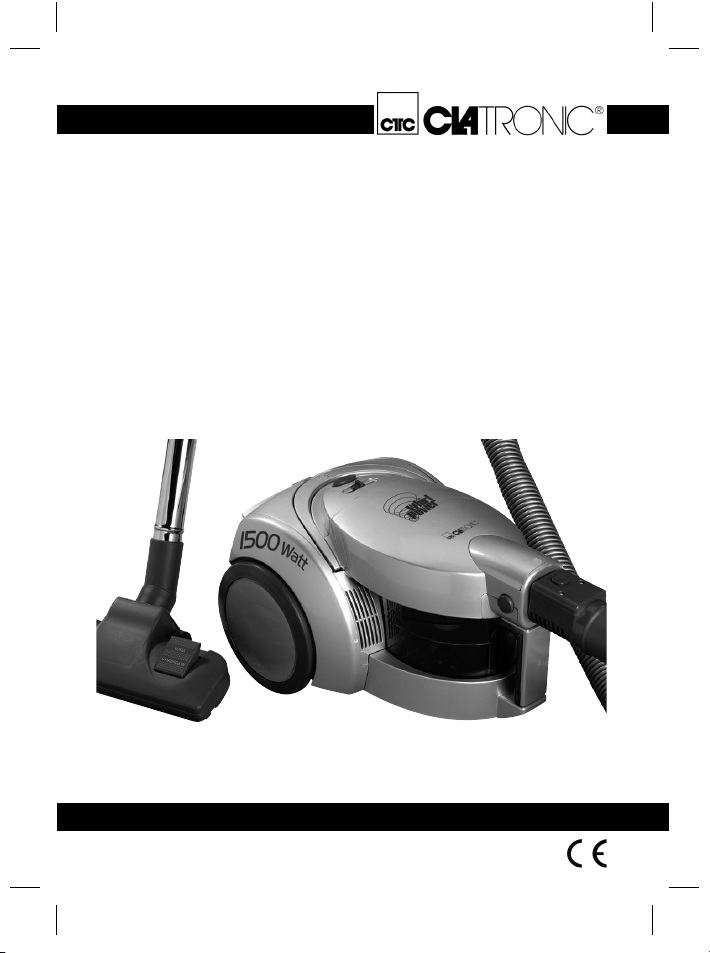
Bodenstaubsauger
Stofzuiger • Aspirateur-traîneau
Aspiradora • Aspirador
Aspirapolvere a carrello • Gulvstøvsuger
Floor-type vacuum cleaner • Odkurzacz
Porszívó • Vysavač koberců
Пылесос
BS 1240
05-BS 1240 Neu 1 22.04.2005, 9:39:00 Uhr
Page 2

Inhalt
Inhoud • Sommaire • Indice • Índice • Indice • Innhold
Contents • Spis treści • Obsah • Tartalom • Содержание
Übersicht Bedienelemente . . . . . . . . . . . . . . . . . . . . . . . . . . Seite 3
D
Bedienungsanleitung . . . . . . . . . . . . . . . . . . . . . . . . . . . . . . . Seite 4
Garantie . . . . . . . . . . . . . . . . . . . . . . . . . . . . . . . . . . . . . . . . . Seite 9
Overzicht bedieningselementen . . . . . . . . . . . . . . . . . . . . . . Pagina 3
NL
Gebruiksaanwijzing . . . . . . . . . . . . . . . . . . . . . . . . . . . . . . . . Pagina 11
Garantie . . . . . . . . . . . . . . . . . . . . . . . . . . . . . . . . . . . . . . . . . Pagina 16
Aperçu des éléments de commande . . . . . . . . . . . . . . . . . . Page 3
F
Mode d’emploi . . . . . . . . . . . . . . . . . . . . . . . . . . . . . . . . . . . . Page 18
Garantie . . . . . . . . . . . . . . . . . . . . . . . . . . . . . . . . . . . . . . . . . Page 23
Vista de conjunto Elementos de mando . . . . . . . . . . . . . . . . Página 3
E
Instrucciones de servicio . . . . . . . . . . . . . . . . . . . . . . . . . . . . Página 25
Garantia . . . . . . . . . . . . . . . . . . . . . . . . . . . . . . . . . . . . . . . . . Página 30
Vista geral dos elemntos de comando . . . . . . . . . . . . . . . . . Página 3
P
Manual de instruções . . . . . . . . . . . . . . . . . . . . . . . . . . . . . . . Página 32
Garantía . . . . . . . . . . . . . . . . . . . . . . . . . . . . . . . . . . . . . . . . . Página 37
I Descrizione dei singoli pezzi . . . . . . . . . . . . . . . . . . . . . . . . Pagina 3
Istruzioni per l’uso . . . . . . . . . . . . . . . . . . . . . . . . . . . . . . . . . Pagina 39
Garanzia . . . . . . . . . . . . . . . . . . . . . . . . . . . . . . . . . . . . . . . . . Pagina 44
Oversikt over betjeningselementer . . . . . . . . . . . . . . . . . . . . Side 3
N
Bruksanvisning . . . . . . . . . . . . . . . . . . . . . . . . . . . . . . . . . . . . Side 46
Garanti . . . . . . . . . . . . . . . . . . . . . . . . . . . . . . . . . . . . . . . . . . Side 51
Control element overview . . . . . . . . . . . . . . . . . . . . . . . . . . . Page 3
GB
Instruction Manual . . . . . . . . . . . . . . . . . . . . . . . . . . . . . . . . . Page 52
Guarantee . . . . . . . . . . . . . . . . . . . . . . . . . . . . . . . . . . . . . . . Page 57
Przegląd elemetów obsługi . . . . . . . . . . . . . . . . . . . . . . . . . . Strona 3
PL
Instrukcja obsługi . . . . . . . . . . . . . . . . . . . . . . . . . . . . . . . . . . Strona 59
Gwarancja . . . . . . . . . . . . . . . . . . . . . . . . . . . . . . . . . . . . . . . Strona 64
Přehled obsluhovací prvky . . . . . . . . . . . . . . . . . . . . . . . . . . Strana 3
CZ
Návod k použití . . . . . . . . . . . . . . . . . . . . . . . . . . . . . . . . . . . Strana 67
Záruka . . . . . . . . . . . . . . . . . . . . . . . . . . . . . . . . . . . . . . . . . . Strana 72
A hasznalt elemek megtekintése . . . . . . . . . . . . . . . . . . . . . . Oldal 3
H
A hasznalati utasítás . . . . . . . . . . . . . . . . . . . . . . . . . . . . . . . Oldal 74
Garancia . . . . . . . . . . . . . . . . . . . . . . . . . . . . . . . . . . . . . . . . . Oldal 79
Обзор управляющих элементов . . . . . . . . . . . . . . . . . . . . . стр. 3
RUS
Руководство по эксплуатации . . . . . . . . . . . . . . . . . . . . . . . стр. 81
Гарантия . . . . . . . . . . . . . . . . . . . . . . . . . . . . . . . . . . . . . . . . стр. 86
2
05-BS 1240 Neu 2 22.04.2005, 9:39:05 Uhr
Page 3
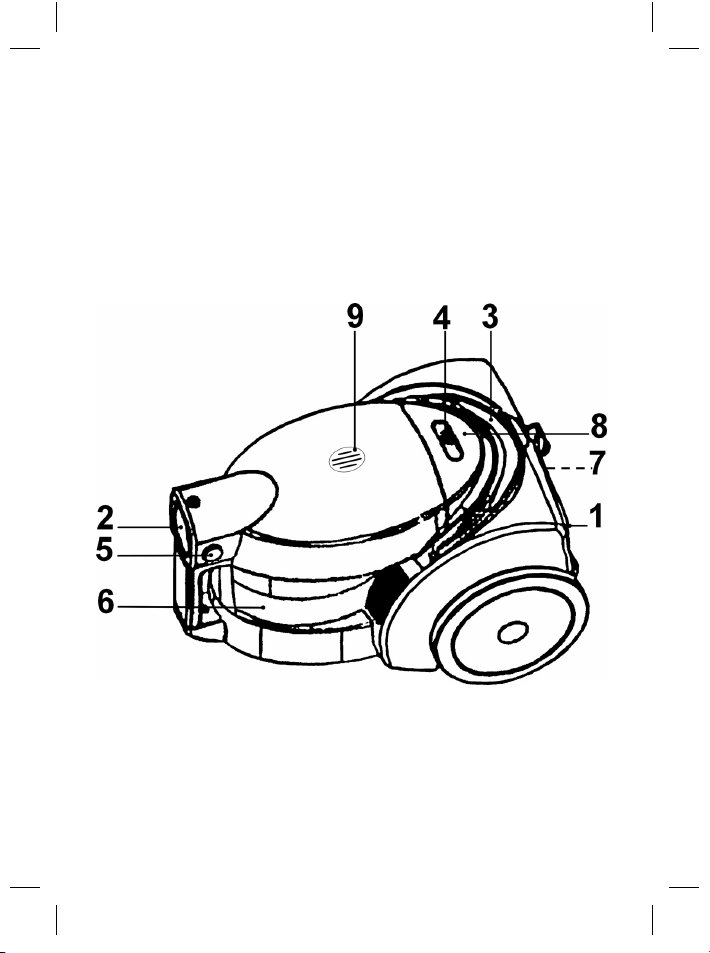
Übersicht der Bedienelemente
Overzicht van de bedieningselementen • Liste des différents éléments de commande
Indicación de los elementos de manejo • Descrição dos elementos
Elementi di comando • Oversikt over betjeningselementene
Overview of the Components •
Přehled ovládacích prvků • A kezelő elemek áttekintéseé
Обзор деталей прибора
Przegląd elementów obłsugi
3
05-BS 1240 Neu 3 22.04.2005, 9:39:06 Uhr
Page 4

D
• Lesen Sie vor Inbetriebnahme dieses Gerätes die Bedienungsanleitung sehr
sorgfältig durch und bewahren Sie diese inkl. Garantieschein, Kassenbon und
nach Möglichkeit den Karton mit Innenverpackung gut auf.
• Benutzen Sie das Gerät ausschließlich für den privaten und den dafür
vorgesehenen Zweck. Dieses Gerät ist nicht für den gewerblichen Gebrauch
bestimmt. Benutzen Sie es nicht im Freien (außer es ist für den bedingten
Einsatz im Freien vorgesehen). Halten Sie es vor Hitze, direkter Sonneneinstrahlung, Feuchtigkeit (auf keinen Fall in Flüssigkeiten tauchen) und scharfen
Kanten fern. Benutzen Sie das Gerät nicht mit feuchten Händen. Bei feucht
oder nass gewordenem Gerät sofort den Netzstecker ziehen. Nicht ins Wasser
greifen.
• Schalten Sie das Gerät aus und ziehen Sie immer den Stecker aus der
Steckdose (ziehen Sie am Stecker, nicht am Kabel) wenn Sie das Gerät nicht
benutzen, Zubehörteile anbringen, zur Reinigung oder bei Störung.
• Betreiben Sie das Gerät nicht unbeaufsichtigt. Sollten Sie den Arbeitsplatz
verlassen, schalten Sie das Gerät bitte immer aus, bzw. ziehen Sie den Stecker aus der Steckdose (ziehen Sie am Stecker, nicht am Kabel).
• Um Kinder vor Gefahren elektrischer Geräte zu schützen, sorgen Sie bitte
dafür, dass das Kabel nicht herunter hängt und Kinder keinen Zugriff auf das
Gerät haben.
• Prüfen Sie Gerät und Kabel regelmäßig auf Schäden. Ein beschädigtes Gerät
bitte nicht in Betrieb nehmen.
• Reparieren Sie das Gerät nicht selbst, sondern suchen Sie bitte einen
autorisierten Fachmann auf. Um Gefährdungen zu vermeiden, ein defektes
Netzkabel bitte nur vom Hersteller, unserem Kundendienst oder einer ähnlich
qualifi zierten Person durch ein gleichwertiges Kabel ersetzen lassen.
• Verwenden Sie nur Original-Zubehör.
• Beachten Sie bitte die nachfolgenden „Speziellen Sicherheitshinweise...“.
Allgemeine Sicherheitshinweise
Spezielle Sicherheitshinweise
• Saugen Sie keine Feuchtigkeit, bzw. Flüssigkeiten auf!
• Saugen Sie keine heiße Asche, spitze oder scharfe Gegenstände!
• Benutzen Sie das Gerät nicht in Feuchträumen!
• Saugen Sie niemals ohne Filter. Prüfen Sie stets den korrekten Sitz der Filter
nach dem Einsetzen!
• Halten Sie während des Betriebes Haare, Kleidung und Körperteile von der
Staubsaugerdüse fern!
• Halten Sie den Staubsauger von Wärmequellen wie Radiatoren, Öfen usw.
fern!
4
05-BS 1240 Neu 4 22.04.2005, 9:39:07 Uhr
Page 5

Übersicht der Bedienelemente
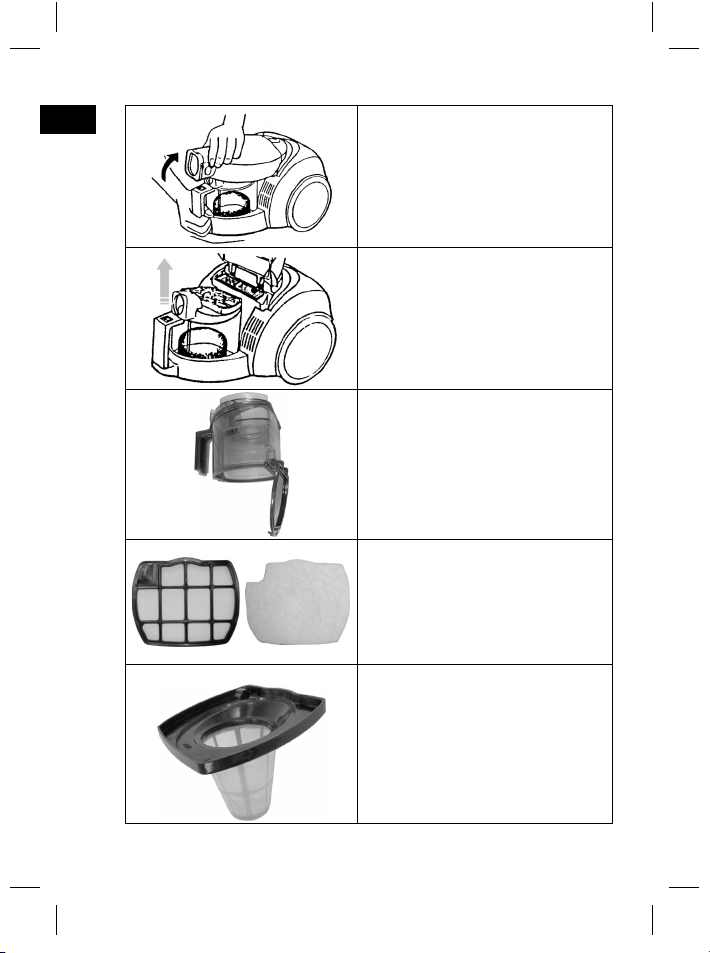
1 Abdeckung Auslassfi lter 5 Taste Filtergehäuse
2 Schlauchanschluss 6 Staubbehälter mit Filtereinsatz
3 Tragegriff mit Taste 7 Kabel
zur Kabelaufwicklung 8 Ein/Aus-Schalter
4 Saugleistungsregler 9 Nebenluftventil
Inbetriebnahme
1. Stecken Sie den Saugschlauch in den Sauganschluss, bis er mechanisch
einrastet.
2. Um den Schlauch wieder zu lösen, drücken Sie auf den Knopf am Saugschlauch.
3. Halten Sie den Knopf gedrückt und ziehen Sie dann den Schlauch heraus.
4. Stecken Sie ggf. das Saugrohr am Griffstück auf.
Benutzen des Gerätes
1. Montieren Sie das Zubehör.
2. Wickeln Sie die benötigte Kabellänge ab, stecken Sie den Netzstecker in eine
vorschriftsmäßig installierte Schutzkontaktsteckdose 230 V, 50 Hz und schalten Sie das Gerät mit dem Ein-/ Ausschalter ein.
3. Stellen Sie die Saugleistung mit dem Saugleistungsregler ein.
4. Saugen Sie nun mit gleichmäßiger Geschwindigkeit. Andrücken ist nicht nötig.
5. Hinweis: Achten Sie auf die durch die Kabellänge begrenzte Reichweite!
Saugleistungsregler
Niedrige Saugleistung: Für Gardinen, empfi ndliche Stoffe.
Mittlere Saugleistung: Für hochfl orige Veloursteppiche und Textilböden.
Hohe Saugleistung: Für robuste Teppiche und Fußböden.
Aufwickelvorrichtung für Netzkabel
Bitte ziehen Sie das Netzkabel max. bis zur gelben Markierung. Ziehen Sie das
Kabel auf keinen Fall bis zur roten Markierung, da die Kabelaufwicklung Schaden
nehmen kann. Solche Schäden fallen nicht in den Garantieanspruch.
Aufwickeln
Drücken Sie die Taste für Kabelaufwicklung und führen Sie das Kabel nach. Halten Sie das Kabel fest, um ein herumschlagen zu vermeiden.
Teleskop-Saugrohr
1. Es ermöglicht eine individuelle Anpassung auf Ihre Körpergröße. Entriegeln
Sie die Kupplung durch Drehen des dicken Saugrohrteils nach links.
D
5
05-BS 1240 Neu 5 22.04.2005, 9:39:08 Uhr
Page 6

2. Verschieben Sie die Saugrohre wie gewünscht. Zum Verriegeln drehen Sie
D
das dicke Saugrohrteil nach rechts.
Düsenaufsätze
Fugen/Bürstdüse: Zum Saugen in Ecken und Schlitzen. Bitte beachten
Bodendüse: Zur Reinigung von Teppichen oder glatten Flächen.
Die Bodendüse ist, zur leichteren Führung, mit Rollen
Teppich: Achten Sie beim Saugen von Teppichen
Zum Saugen von z.B. glatten Flächen drücken Sie
Luftschieber
Öffnen Sie den Luftschieber am Schlauchgriff zur Luftregulierung oder, um an der
Düse haftende Teile zu lösen.
Filter
Ihr Gerät verfügt über 3 Filtersysteme.
1. Transparenter Staubauffangbehälter
• Das herkömmliche Staubbeutelsystem wurde ersetzt durch einen transparenten Staubauffangbehälter. In ihm werden grober Schmutz und kleinste
Schwebepartikel durch die hohe Strömungsgeschwindigkeit aus der
„Saugluft“ gewirbelt.
• Der lästige Erwerb von Staubbeuteln entfällt.
• An dem leicht zu entleerenden Behälter lässt sich die Staubmenge jeder
Zeit gut ablesen.
• Haben die Staubrückstände die MAX-Marke am Staubbehälter erreicht,
gehen Sie wie folgt vor:
Sie, dass es sich bei der Fugen/Bürstdüse um einen
„2 in 1“ Aufsatz handelt.
ausgestattet und für den jeweiligen Betrieb verstellbar.
darauf, dass die Bürsten an der Bodendüse deaktiviert
sind. Ist dies nicht der Fall, drücken Sie den Hebel an
der Bodendüse mit dem Fuß nach vorne.
den Hebel mit dem Fuß bitte zurück. Dies aktiviert die
Bürsten (Sie können dies daran erkennen, dass die
Bürsten an der Bodendüse sichtbar sind).
6
05-BS 1240 Neu 6 22.04.2005, 9:39:08 Uhr
Page 7
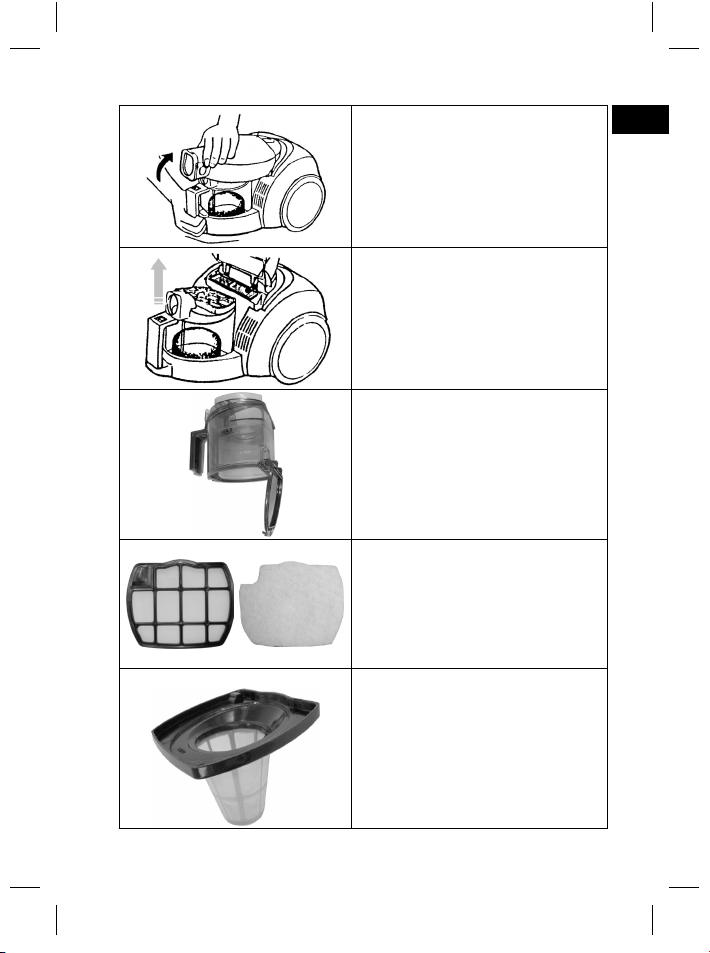
D
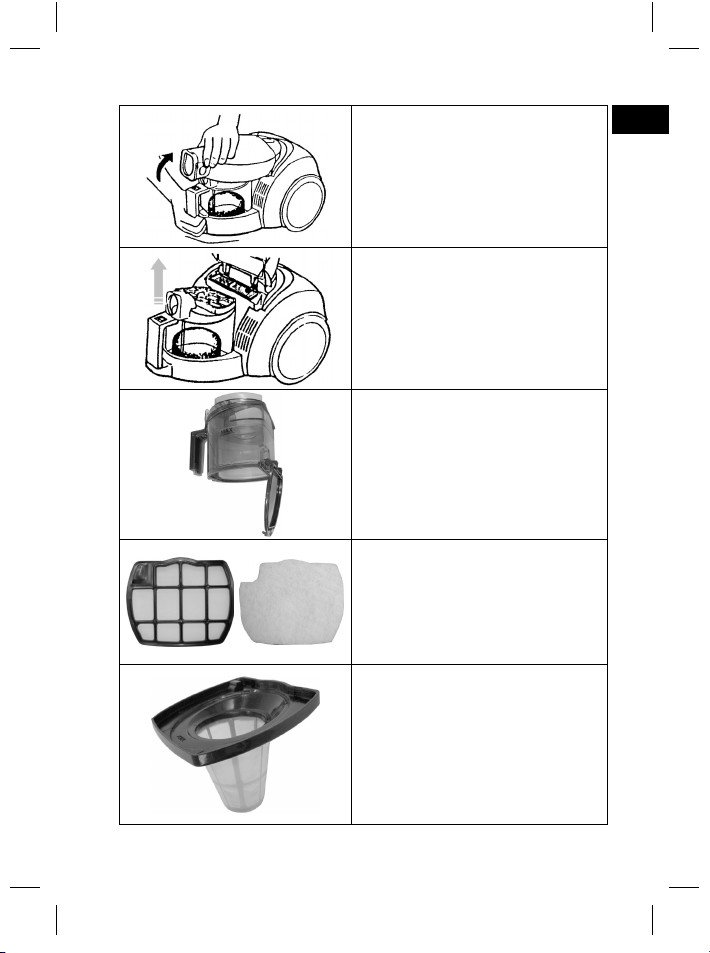
Drücken Sie die Taste 5, um das Filtergehäuse zu öffnen.
Entnehmen Sie den Staubbehälter.
Entleeren Sie den Staubbehälter!
Drücken Sie dazu die Taste am Staubbehälter. Schließen Sie im Anschluss
den Deckel des Staubbehälters wieder.
Entnehmen Sie die Filterkassette
und das Filtervlies. Reinigen Sie die
Filter durch Ausklopfen und sanftes
Ausbürsten.
Bei stärkeren Verschmutzungen:
Beides in einer leichten Seifenlauge
waschen, anschließend ausspülen und
trocknen lassen.
Entnehmen Sie den Filterkorb. Reinigen
Sie den Filterkorb durch Ausklopfen und
sanftes Ausbürsten.
Bei stärkeren Verschmutzungen: in
einer leichten Seifenlauge waschen,
anschließend ausspülen und trocknen
lassen.
Hinweis: Auch wenn die Filter sauber
erscheinen können sie durch feinen
Staub zugesetzt sein.
7
05-BS 1240 Neu 7 22.04.2005, 9:39:09 Uhr
Page 8
D
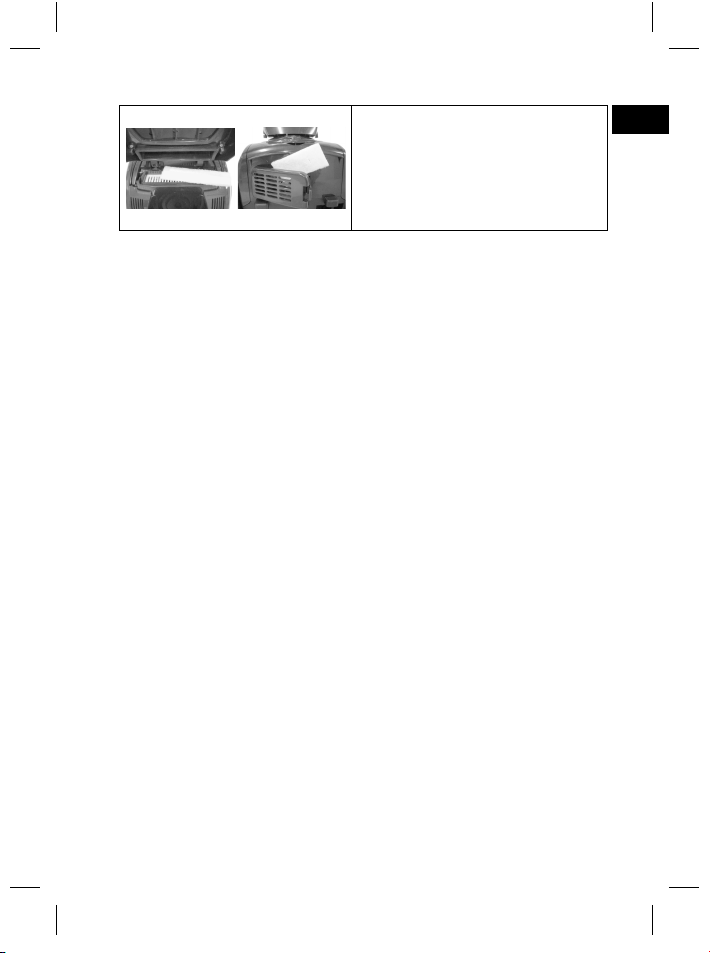
Motorschutzfi lter
• Nach jedem dritten Entleeren oder bei stärkeren Verschmutzungen reinigen Sie die Filter, indem Sie fl ießendes Wasser entgegen der Blasrichtung
durch das Filtervlies laufen lassen.
• Setzen Sie diese nur vollständig getrocknet wieder ein!
Bitte beachten Sie diesen wichtigen Hinweis!
• Die Reinigung kann je nach Einsatzbedingungen, z. B. beim Saugen von
feinen Staub, auch nach kürzerer Zeit nötig werden.
• Sollte die Saugleistung Ihres Staubsaugers nachlassen, reinigen Sie bitte
die Filter, wie beschrieben.
• Wenn die Saugleistung plötzlich während des Betriebes nachlässt kann
dies auf eine Verstopfung der Filter hinweisen.
Mögliche Ursache: Wegen der verstopften Filter wird durch das Nebenluftventil (9) Kühlluft für den Motor gesogen. Dies geschieht zum Schutze
des Motors.
Schalten Sie das Gerät aus. Reinigen Sie die Filter nass wie beschrieben.
Nehmen Sie den Betrieb nur mit trocknen Filtern wieder auf.
Ersatz Auslassfi lter, sowie Hauptfi lter erhalten Sie bei unserer Hotline.
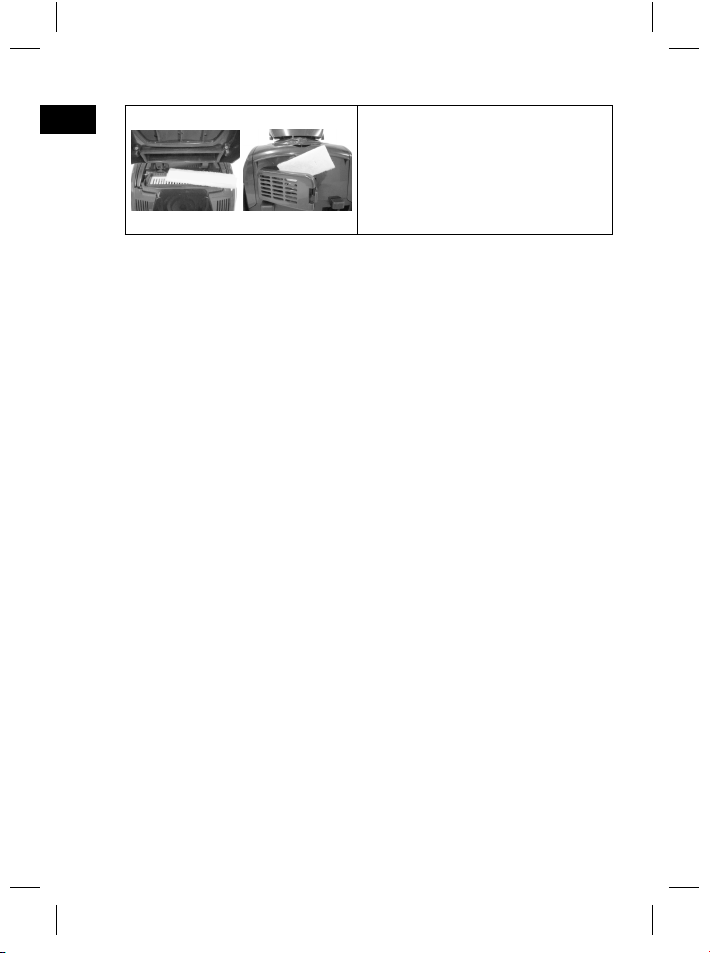
Entnehmen Sie den Motorschutzfi lter
und den Ausblasfi lter. Reinigen Sie die
Filter durch Ausklopfen und sanftes
Ausbürsten.
Bei stärkeren Verschmutzungen:
Beides in einer leichten Seifenlauge
waschen, anschließend ausspülen und
trocknen lassen.
Reinigung und Aufbewahrung
Reinigung
• Ziehen Sie vor der Reinigung den Netzstecker aus der Steckdose!
• Reinigen Sie das Gehäuse mit einem trockenen Tuch.
• Reinigen Sie den Motorschutzfi lter bei etwa jeder 3. Entleerung. Reinigen Sie
den Filter in warmem Wasser, ohne Zusätze. Setzen Sie diesen nur vollständig
getrocknet ein.
Aufbewahrung
• Rollen Sie das Kabel komplett ein.
• Stecken Sie den Haken der Düse an der Unterseite des Gerätes in die
Parkhilfe.
8
05-BS 1240 Neu 8 22.04.2005, 9:39:10 Uhr
Page 9
Garantie
Wir übernehmen für das von uns vertriebene Gerät eine Garantie von 24 Monaten
ab Kaufdatum (Kassenbon).
Innerhalb der Garantiezeit beseitigen wir unentgeltlich die Mängel des Gerätes
oder des Zubehörs*), die auf Material- oder Herstellungsfehler beruhen, durch
Reparatur oder, nach unserem Ermessen, durch Umtausch. Garantieleistungen
bewirken weder eine Verlängerung der Garantiefrist, noch beginnt dadurch ein
Anspruch auf eine neue Garantie!
Als Garantienachweis gilt der Kaufbeleg. Ohne diesen Nachweis kann ein kostenloser Austausch oder eine kostenlose Reparatur nicht erfolgen.
Im Garantiefall geben Sie bitte das komplette Gerät in der Originalverpackung
zusammen mit dem Kassenbon an Ihren Händler.
*) Schäden an Zubehörteilen führen nicht automatisch zum kostenlosen Umtausch
des kompletten Gerätes. Wenden Sie sich in diesem Fall bitte an unsere Hotline!
Glasbruchschäden bzw. Brüche von Kunststoffteilen sind grundsätzlich kostenpfl ichtig!
Sowohl Defekte an Verbrauchszubehör bzw. Verschleißteilen (z.B. Motorkohlen,
Knethaken, Antriebsriemen, Ersatzfernbedienung, Ersatzzahnbürsten, Sägeblättern usw.), als auch Reinigung, Wartung oder der Austausch von Verschleißteilen,
fallen nicht unter die Garantie und sind deshalb kostenpfl ichtig!
Die Garantie erlischt bei Fremdeingriff.
Nach der Garantie
Nach Ablauf der Garantiezeit können Reparaturen kostenpfl ichtig vom entsprechenden Fachhandel oder Reparaturservice ausgeführt werden.
Bedeutung des Symbols „Mülltonne“
Schonen Sie unsere Umwelt, Elektrogeräte gehören nicht in den Hausmüll.
Nutzen Sie die für die Entsorgung von Elektrogeräten vorgesehenen Sammelstel-
len und geben dort Ihre Elektrogeräte ab die Sie nicht mehr benutzen werden.
Sie helfen damit die potenziellen Auswirkungen, durch falsche Entsorgung, auf die
Umwelt und die menschliche Gesundheit zu vermeiden.
Sie leisten damit Ihren Beitrag zur Wiederverwertung, zum Recycling und zu
anderen Formen der Verwertung von Elektro- und Elektronik-Altgeräten.
D
9
05-BS 1240 Neu 9 22.04.2005, 9:39:11 Uhr
Page 10

Informationen, wo die Geräte zu Entsorgen sind, erhalten Sie über Ihre Kommu-
D
nen oder die Gemeindeverwaltungen.
In vielen Ländern der EU ist die Entsorgung von Elektro- und Elektronik-Altgeräten
über den Haus- und/oder Restmüll ab 13.8.2005 verboten.
In Deutschland ab 23.3.2006.
Service
Sehr geehrter Kunde,
ca. 95% aller Reklamationen sind leider auf Bedienungsfehler zurück zu führen
und könnten ohne Probleme behoben werden, wenn Sie sich telefonisch oder
über E-mail mit unserer für Sie eingerichteten Service-Hotline in Verbindung
setzen.
Wir bitten Sie daher, bevor Sie Ihr Gerät an den Händler zurückgeben, diese
Hotline zu nutzen. Hier wird Ihnen, ohne das Sie Wege auf sich nehmen müssen,
schnell geholfen.
Für technische Fragen haben wir für Sie folgende Telefon-Hotline eingerichtet:
Verschleißteile und Ersatzteile für unsere Unterhaltungselektronik (soweit diese
nicht vom Fachmann ausgewechselt werden müssen) wie z. B. Fernbedienungen,
Bedienteilklappen, Lautsprecherblenden usw. können Sie mit Angabe des Gerätetyps unter folgender E-mail-Adresse bestellen:
Interessieren Sie sich für weitere Clatronic-Produkte?
Besuchen Sie doch einmal unsere Homepage unter
Clatronic International GmbH
Industriering Ost 40
D-47906 Kempen/Germany
0 21 52 / 20 06 – 888
hotline@clatronic.de
www.clatronic.de oder www.clatronic.com
10
05-BS 1240 Neu 10 22.04.2005, 9:39:12 Uhr
Page 11

Algemene veiligheidsinstructies
• Lees vóór de ingebruikname van dit apparaat de handleiding uiterst zorgvuldig
door en bewaar deze goed, samen met het garantiebewijs, de kassabon en zo
mogelijk de doos met de binnenverpakking.
• Gebruik het apparaat uitsluitend privé en uitsluitend voor de voorgeschreven
toepassing. Dit apparaat is niet geschikt voor commercieel gebruik (tenzij het
bedoeld is voor beperkt gebruik in de buitenlucht). Bescherm het tegen hitte,
directe zonnestralen, vocht (i geen geval in vloeistoffen dompelen) en scherpe
kanten. Gebruik het apparaat niet met vochtige handen. Bij vochtig of nat geworden apparaat onmiddellijk de stroomtoevoer onderbreken. Niet in het water
grijpen.
• Schakel het apparaat uit en onderbreek altijd de stroomtoevoer (trek aan de
steker, nooit aan de kabel) wanneer u het apparaat niet gebruikt, hulpstukken
aanbrengt, reinigt of wanneer storingen optreden.
• Laat het ingeschakelde apparaat niet zonder toezicht werken. Schakel het
apparaat altijd uit of trek de steker uit de contactdoos (trek aan de steker, niet
aan de kabel) voordat u de werkplek verlaat.
• Bescherm kinderen tegen gevaren en zorg ervoor dat kabels nooit los omlaag
hangen en dat het apparaat buiten het bereik van kinderen blijft.
• Controleer regelmatig of het apparaat beschadigingen vertoont. Een beschadigd apparaat mag niet in gebruik worden genomen.
• Repareer het apparaat nooit zelf, maar breng het naar een geautoriseerde
vakman. Voorkom gevaren en laat een defecte kabel altijd alleen door de
fabrikant, onze technische dienst of een eender gekwalifi ceerde persoon
vervangen door een soortgelijke kabel.
• Gebruik alleen originele reserveonderdelen.
• Neem de onderstaande “Speciale veiligheidsinstructies“ in acht.
Speciale veiligheidsinstructies
• Zuig nooit vocht of vloeistoffen op!
• Zuig nooit hete as, spitse of scherpe voorwerpen op!
• Gebruik het apparaat niet in vochtige ruimten!
• Zuig nooit zonder fi lter. Controleer altijd of de fi lter en na het plaatsen correct
zit!.
• Houd tijdens het zuig in haar een, kleding en lichaamsdelen van de zuigmond
verwijderd!
• Houd de stofzuiger ver verwijderd van warmtebronnen zoals radiatoren,
kachels enz.!
NL
11
05-BS 1240 Neu 11 22.04.2005, 9:39:12 Uhr
Page 12

NL
1 Afdekking uitlaatfi lter 5 Toets fi lterbehuizing
2 Slangaansluiting 6 Stofopvangbak met fi lterinzet
3 Draaggreep met toets 7 Kabel
4 Zuigkrachtregelaar 9 Secundaire luchtklep
Overzicht van de bedieningselementen
voor de kabeloprolling 8 Aan-/uitschakelaar
Ingebruikname
1. Steek de zuigslang in de opening van het stofvak totdat hij mechanisch inklikt.
2. Druk op de knop aan de zuigslang om de slang weer los te maken.
3. Houd de knop ingedrukt en een trek de slang eruit.
4. Steek eventueel de zuigbuis op de handgreep.
Bediening van het apparaat
1. Monteer het hulpstuk.
2. Rol de benodigde kabel lengte af, sluit de netsteker aan op een correct geïnstalleerde en geaarde contactdoos 230 V, 50 Hz en schakel het apparaat in
met de aan-/uitschakelaar.
3. Stel de zuigkracht in met behulp van de zuigkrachtregelaar.
4. Zuig nu met gelijkmatige snelheid. U hoeft geen druk uit te oefenen.
5. Opmerking: let erop dat de kabel slechts een beperkte reikwijdte heeft!
Zuigkrachtregelaar
Geringe zuigkracht: voor gordijnen en gevoelige stoffen
Gemiddelde zuigkracht: voor hoogpolige tapijten en textiele vloerbedekkingen
Hoge zuigkracht: voor robuuste tapijten en men vloerbedekking in
Oprolvoorziening voor netkabel
Trek de netkabel maximaal uit tot de gele markering. Trek de netkabel in geen
geval uit tot de rode markering, omdat daardoor de kabeloprolling beschadigd kan
worden. Dergelijke schade valt niet onder de garantieverlening.
Oprollen
Druk op de toets voor de kabeloprolling en voer de kabel met u mee. Houd de
kabel vast zodat hij niet rondslingert.
Telescoopbuis
1. U kunt de telescoopbuis aanpassen aan uw persoonlijke lichaamslengte. Draai
het dikke gedeelte van de zuigbuis naar links om de koppeling te ontgrendelen.
2. Verschuif de buis naar wens. Om de koppeling te vergrendelen draait u het
dikke gedeelte van de zuigbuis naar rechts.
12
05-BS 1240 Neu 12 22.04.2005, 9:39:13 Uhr
Page 13

Mondstukken
Voegenmondstuk /
borstelmondstuk: voor het zuigen in hoeken en spleten
Let op dat het bij het vloer-/bortselmondstuk gaat om
een “2 in 1”-hulpstuk.
Vloermondstuk: voor de reiniging van vloerbedekking of gladde opperv-
lakken.
Het vloermondstuk is voor een betere geleiding met
rollen uitgerust en verstelbaar.
Tapijt: Zorg er bij het stofzuigen van tapijten voor dat
de borstels aan het vloermondstuk gedeactiveerd
zijn. Is dit niet het geval, druk dan de hendel aan het
vloermondstuk met de voet naar voren.
Om b.v. gladde vlakken te zuigen, drukt u de hendel
met de voet terug. Dit activeert de borstels (ze zijn dan
zichtbaar aan het vloermondstuk).
Luchtschuif
Open de luchtschuif aan de slanggreep om de luchttoevoer te regelen of om aan
het mondstuk hangende deeltjes te verwijderen.
Filter
Uw apparaat beschikt over 3 fi ltersystemen.
1. Transparante stofopvangbak
• Het gebruikelijke stofzaksysteem werd door een transparante stofopvangbak vervangen. In deze bak worden grove verontreinigingen en kleinste
zweefdeeltjes door de hoge stroomsnelheid uit de “zuiglucht” gewerveld.
• Het lastige bijkopen van stofzakken behoort tot het verleden.
• Aan de eenvoudig te legen stofbak kunt u te allen tijde de stofhoeveelheid
goed afl ezen.
• Wanneer de stofresten de MAX-markering hebben bereikt, voert u de
volgende stappen uit:
NL
13
05-BS 1240 Neu 13 22.04.2005, 9:39:13 Uhr
Page 14
NL
Druk op de toets (5) om de fi lterbehuizing te openen.
Verwijder de stofopvangbak.
Leeg het stofvak!
Druk hiervoor op de toets aan de stofopvangbak. Vergrendel vervolgens het
deksel van de stofopvangbak weer.
Verwijder de fi ltercassette en het fi ltervlies. Reinig de fi lter door deze uit te
kloppen en zacht uit te borstelen.
Bij hardnekkige verontreinigen:
was cassette en fi lter uit in een milde
zeepsop, spoel ze vervolgens uit en laat
ze drogen.
Verwijder de fi lterkorf. Reinig de fi lterkorf door deze uit te kloppen en zacht
uit te borstelen.
Bij hardnekkige verontreinigen: was
hem in een milde zeepsop, spoel hem
vervolgens uit en laat hem drogen.
Opmerking: ook wanneer een fi lter
schoon lijkt, kan hij zonder meer dichtgeslibd zijn met fi jnstof.
14
05-BS 1240 Neu 14 22.04.2005, 9:39:14 Uhr
Page 15
Verwijder de motorveiligheidsfi lter en de
uitblaasfi lter. Reinig de fi lter door deze
Motorveiligheidsfi lter
• Reinig de fi lters na iedere derde leging of bij ernstige verontreinigingen,
door stromend water tegen de blaasrichting door het fi ltervlies te laten
lopen.
• Plaats het fi ltervlies pas weer wanneer het volledig gedroogd is!
Neem deze belangrijke aanwijzing in acht!
• De reiniging kan al naargelang de toepassingsvoorwaarden bijv. bij het
zuigen van fi jnstof, ook al vroeger nodig zijn.
• Wanneer het zuigvermogen van uw stofzuiger minder wordt, reinigt u de
fi lters zoals beschreven.
• Wanneer het zuigvermogen tijdens het bedrijf plotseling minder wordt, kan
dit het gevolg zijn van een verstopte fi lter.
Mogelijk oorzaak: op grond van de verstopte fi lter wordt door de secundaire
luchtklep (9) koellucht voor de motor aangezogen. Dit geschiedt ter beveiliging
van de motor.
Schakel het apparaat uit. Reinig de fi lters nat - zoals eerder beschreven.
Zet het bedrijf alléén voort met een droge fi lter.
uit te kloppen en zacht uit te borstelen.
Bij hardnekkige verontreinigen: was
beide in een milde zeepsop, spoel ze
vervolgens uit en laat ze drogen.
Reinigen en bewaren
Reinigen
• Trek vóór de reiniging eerst de netsteker uit de contactdoos!
• Reinig de buitenkant met een droge doek.
• Reinig de motorbeveiligingsfi lter na ongeveer iedere 3 leging. De fi lter bevindt
zich achter de stofzak. Reinig de fi lter in warm water zonder toevoegingen en
plaats hem pas wanneer hij volledig gedroogd is.
Bewaren
• Rol de kabel volledig op.
• Steek de haak van het mondstuk aan de onderzijde van het apparaat in de
parkeerhulp.
NL
15
05-BS 1240 Neu 15 22.04.2005, 9:39:15 Uhr
Page 16

Dit apparaat is gekeurd conform de op dit moment van toepassing zijnde CE-
NL
richtlijnen zoals bijvoorbeeld elektromagnetische compatibiliteit en laagspanningsvoorschriften en is geconstrueerd volgens de nieuwste veiligheidstechnische
voorschriften.
Technische wijzigingen voorbehouden!
Garantie
Voor het door ons geleverde apparaat verlenen wij een garantie van 24 maanden
vanaf koopdatum (kassabon).
Eventuele gebreken aan het apparaat of aan het toebehoren*) die zijn ontstaan
door productie- of materiaalfouten verhelpen wij binnen deze periode kosteloos
door middel van reparatie of, naar ons oordeel, door vervanging. Eventuele
garantiegevallen verlengen noch de geldigheidsduur van de garantie, noch begint
daardoor een nieuwe garantieperiode!
Het koopbewijs geldt als garantiebewijs. Zonder dit bewijs kan geen kosteloze
reparatie of vervanging plaatsvinden.
Geef in garantiegevallen het complete apparaat in de originele verpakking
samen met de kassabon af bij uw handelaar.
*) Schade aan onderdelen leidt niet automatisch tot kosteloze vervanging van het
complete apparaat. Neem in dit geval contact op met onze hotline! De reparatie
van glasbreuk of breuk van kunststofonderdelen wordt altijd berekend!
Niet defecten aan de hulpstukken of aan de slijtende onderdelen (bijv. koolborstels, deeghaken, drijfriemen, reserveafstandsbediening, reservetandenborstels,
zaag bladen enz.), maar ook reiniging, onderhoud of de vervanging van slijtende
delen vallen niet onder de garantie en geschieden altijd tegen berekening!
Bij ingrepen door derden komt de garantieverlening te vervallen.
Na de garantieperiode
Na afl oop van de garantieperiode kunnen reparaties tegen berekening worden
uitgevoerd door de betreffende vakhandelaar of de technische dienst.
16
05-BS 1240 Neu 16 22.04.2005, 9:39:22 Uhr
Page 17
Betekenis van het symbool “Vuilnisemmer”
Bescherm ons milieu, elektrische apparaten horen niet in het huisafval.
Maak voor het afvoeren van elektrische apparaten gebruik van de voorgeschreven
verzamelpunten en geef daar de elektrische apparaten af die u niet meer gebruikt.
Daardoor helpt u de potentiële effecten te voorkomen die een verkeerde afvoer op
het milieu en de menselijke gezondheid kunnen inwerken.
Op deze wijze levert u uw bijdrage aan het hergebruik, de recycling en andere
verwerkingsvormen voor oude elektronische en elektrische apparaten.
Voor informatie over verzamelpunten voor uw apparaten kunt u contact opnemen
met uw gemeente of gemeenteadministratie.
In veel landen van de EU is de afvoer van oude elektronische en elektrische appa-
raten via het huisafval en/of het grof vuil sinds 13.08.2005 verboden.
In Duitsland vanaf 23.03.2006.
NL
17
05-BS 1240 Neu 17 22.04.2005, 9:39:23 Uhr
Page 18

F
• Lisez attentivement ce mode d’emploi avant de mettre l’appareil en marche
pour la première fois. Conservez le mode d’emploi ainsi que le bon de garantie, votre ticket de caisse et si possible, le carton avec l’emballage se trouvant
à l’intérieur.
• N’utilisez cet appareil que pour un usage privé et pour les taches auxquelles il
est destiné. Cet appareil n’est pas prévu pour une utilisation professionnelle.
Ne l’utilisez pas en plein air (sauf s’il est indiqué que vous pouvez le faire).
Protégez-le de la chaleur, des rayons directs du soleil, de l’humidité (ne le
plongez en aucun cas dans l’eau) et des objets tranchants. N’utilisez pas cet
appareil avec des mains humides. S’il arrive que de l’humidité ou de l’eau
atteignent l’appareil, débranchez aussitôt le câble d’alimentation. Ne touchez
pas les parties mouillées.
• Arrêtez l’appareil et débranchez toujours le câble d’alimentation de la prise de
courant (tirez sur la fi che, pas sur le câble) si vous n’utilisez pas l’appareil, si
vous installez les accessoires, pour le nettoyage ou en cas de panne.
• Ne laissez jamais fonctionner l’appareil sans surveillance. Arrêtez toujours
l’appareil ou débranchez le câble d’alimentation (en tirant sur la fi che et non
pas sur le câble) si vous devez vous absenter.
• Pour protéger les enfants des risques engendrés par les appareils électriques
, veillez à ce que le câble ne pende pas de l’appareil et que l’appareil ne soit
pas à portée des enfants.
• Contrôlez régulièrement l’appareil et le câble. Ne mettez pas l’appareil en
marche s’il est endommagé.
• Ne réparez pas l’appareil vous-même. Contactez plutôt un technicien qualifi é.
Pour éviter toute mise en danger, ne faites remplacer le câble défectueux que
par un câble équivalent et que par le fabricant, notre service après-vente ou
toute personne de qualifi cation similaire.
• N’utilisez que les accessoires d’origine.
• Respectez les „conseils de sécurité spécifi ques à cet appareil“ ci-dessous ...
Conseils généraux de sécurité
Conseils de sécurité spécifi ques à cet appareil
• N’aspirez jamais d’emplacement humide ou de liquide !
• N’aspirez jamais de cendres chaudes, d’objets pointus ou tranchants !
• N’utilisez jamais cet appareil dans des endroits humides !
• N’aspirez jamais sans fi ltre. Vérifi ez toujours que le fi ltre est correctement
installé !
• N’approchez jamais les embouts de l’appareil en utilisation de cheveux, vêtements et parties du corps !
• Maintenez l’aspirateur à l’écart de sources de chaleur comme radiateurs,
fours, etc. !
18
05-BS 1240 Neu 18 22.04.2005, 9:39:23 Uhr
Page 19

Liste des différents éléments de commande
Chape filtre de sortie
1
Raccordement du tuyau
2
Poignées comprenant une
3
touche d’enroulement du câble
Variateur de puissance d’aspiration
4
Touche boîtier de filtre
5
Bac à poussière avec filtre
6
Câble
7
Bouton Marche / Arrêt
8
9 Soupape latérale d’air
Avant la première utilisation
1. Introduisez le tuyau d’aspiration dans l’ouverture du compartiment à sac à
poussière jusqu’à ce que celui-ci se bloque.
2. Pour retirer le tuyau d’aspiration, appuyer sur le bouton.
3. Maintenez le bouton enfoncé tout en retirant le tuyau de l’ouverture.
4. Fixer si nécessaire le tuyau d’aspiration à la poignée.
Utilisation de l’appareil
1. Fixez l’accessoire souhaité.
2. Déroulez la longueur de câble désirée. Branchez-le dans une prise de courant
en bon état de fonctionnement de 230 V, 50 Hz. et mettez l’appareil en marche
à l’aide du bouton Marche/Arrêt.
3. Réglez la puissance d’aspiration à l’aide du variateur de puissance.
4. Aspirez maintenant avec régularité. Il est inutile d’exercer une pression pendant que vous aspirez.
5. Remarque : tenez compte du rayon d’action limité dû à la longueur de câble!
Variateur de puissance d’aspiration
Faible puissance: pour rideaux, tissus fragiles.
Puissance moyenne: pour tapis à poil long et revêtements de sol textiles
Forte puissance: pour tapis et moquettes robustes
Dispositif de rangement du câble d’alimentation
Vous êtes priés de ne dérouler le câble d’alimentation que jusqu’à la marque
jaune. Ne le déroulez en aucun cas jusqu’à la marque rouge, cela risque
d’endommager le dispositif. Tout endommagement de ce type n’est pas couvert
par la garantie.
Rangement du câble
Appuyez sur le bouton de rangement du câble tout en guidant le câble. Maintenez le câble fermement entre vos doigts pour éviter qu’il ne s’agite de façon
incontrôlée.
F
19
05-BS 1240 Neu 19 22.04.2005, 9:39:23 Uhr
Page 20

Tuyau d’aspiration téléscopique
F
1. Cela permet d’adapter l’appareil à la taille de chacun. Pour dévisser le raccord,
tournez la partie plus épaisse du tube vers la gauche.
2. Adaptez la longueur du tuyau à souhait. Pour le visser, tournez la partie plus
épaisse du tube vers la droite.
Embouts
Embout suceur / brosse: pour aspirer dans les coins et les fentes.
Bec pour sols: pour le nettoyage de tapis et moquettes ou de surfaces
La tuyère pour le sol est munie de rouleaux pour une
Tapis : en aspirant les tapis, veillez à ce que les bros-
Pour aspirer par exemple des surfaces lisses, appuyez
Régulateur d’air
Ouvrez le régulateur d’air situé sur la poignée du tuyau pour contrôler le débit d’air
ou libérer un objet plaqué sur l’embout.
Filtre
Votre aspirateur dispose de 3 systèmes de fi ltres:
1. Un bac transparent de récupération de la poussière
• Le système habituel de sac à poussière a été remplacé par un bac
transparent de récupération de la poussière par lequel les particules de
poussière les plus grosses comme les plus fi nes sont récupérées dans l’air
aspiré grâce à la grande vitesse du fl ux d’air.
• Plus besoin de penser à l’achat astreignant des sacs à poussière.
• La quantité de poussière peut facilement être relevée à tout moment sur le
bac facile à vider.
• Lorsque les résidus de poussière auront atteint les valeurs maximales près
du bac à poussière, vous procéderez comme suit:
20
Il est important de remarquer que l’accessoire embout
suceur/brosse est un accessoire “2 en 1”.
lisses.
utilisation plus aisée. Elle est également réglable en
fonction des travaux à effectuer.
ses de la tuyère pour le sol soient désactivées. Si tel
n’est pas le cas, pressez vers l’avant le levier situé sur
la tuyère pour le sol, à l’aide de votre pied.
sur le levier avec votre pied pour le faire revenir en
arrière. Cela active les brosses (vous pourrez vous en
rendre compte car les brosses seront visibles sur la
tuyère pour le sol).
05-BS 1240 Neu 20 22.04.2005, 9:39:24 Uhr
Page 21
F
Pour ouvrir le boîtier du fi ltre, appuyez
sur la touche 5.
Enlevez le container de poussière.
Videz le bac à poussière!
Enfoncez pour cela la touche du bac à
poussière. Refermez ensuite à nouveau
le bac.
Retirez la cassette fi ltre et le fi ltre en tissu. Nettoyez les fi ltres en les secouant
et en les brossant légèrement.
En cas de fortes salissures: Lavez les
deux fi ltres dans une eau légèrement
savonneuse. Rincez ensuite et laissez
sécher.
Retirez le panier à fi ltre. Nettoyez le
panier à fi ltre en le secouant et en le
brossant légèrement.
En cas de fortes salissures: Lavez le
panier à fi ltre dans une eau légèrement
savonneuse. Rincez ensuite et laissez
sécher.
Remarque: Même lorsqu’ils paraissent
propres, les fi ltres peuvent être chargés
de poussière fi ne.
21
05-BS 1240 Neu 21 22.04.2005, 9:39:24 Uhr
Page 22

F
Filtre de protection du moteur
• Après trois vidages ou en cas de fortes salissures, lavez les fi ltres en
laissant couler de l’eau sur le fi ltre tissu dans le sens inverse du passage
de l’air.
• Ne les replacez dans l’appareil que lorsqu’ils sont complètement secs!
Prière de suivre cette indication très importante!
• Le nettoyage peut être plus souvent nécessaire selon les conditions
d’utilisation, par ex. en cas d’aspiration de poussière fi ne.
• Si l’effi cacité de votre aspirateur diminue, nettoyez les fi ltres comme indi-
qué.
• Si la puissance de votre aspirateur diminue soudainement pendant le
fonctionnement, cela peut être le signe d’un bouchage de fi ltre.
Causes possibles: Le bouchage du fi ltre fait que la soupape latérale d’air (9)
alimente le moteur en air frais, en vue de protéger le moteur.
Arrêtez l’appareil. Lavez le fi ltre à l’eau comme indiqué.
Ne remettez votre appareil en marche que lorsque le fi ltre est sec.
Retirez le fi ltre protection moteur et le
fi ltre de sortie. Nettoyez les fi ltres en les
secouant et en les brossant légèrement.
En cas de fortes salissures: Lavez les
deux fi ltres dans une eau légèrement
savonneuse. Rincez ensuite et laissez
sécher.
Entretien et rangement
Entretien
• Débranchez toujours le câble d’alimentation de la prise de courant avant le
nettoyage!
• Nettoyez les parois de l’appareil avec un torchon sec.
• Lavez le fi ltre de protection du moteur après avoir vidé le bac à poussière
env. 3 fois. Celui-ci se trouve derrière le sac à poussière. Lavez le fi ltre à l’eau
chaude, sans détergent. Placez-le à nouveau dans l’appareil lorsqu’il est
complètement sec.
Rangement
• Enroulez complètement le câble.
• Introduisez le crochet de l’embout sur la partie inférieure de l’appareil, en
position d’attente.
22
05-BS 1240 Neu 22 22.04.2005, 9:39:25 Uhr
Page 23

Cet appareil a été contrôlé d’après toutes les directives européennes actuelles
applicables, comme par exemple concernant la compatibilité électromagnétique
et la basse tension. Cet appareil a été fabriqué en respect des réglementations
techniques de sécurité les plus récentes.
Sous réserve de modifi cations techniques.
Garantie
Nous accordons une garantie de 24 mois à dater de la date d’achat (ticket de
caisse) pour l’appareil que nous vendons.
Pendant la durée de la garantie, nous éliminons gratuitement les défauts de l’appareil ou des accessoires *) découlant d’un vice de matériau ou de fabrication au
moyen d’une réparation ou, selon notre estimation, au moyen d’un remplacement.
Les prestations dans le cadre de la garantie n’entraînent aucune prorogation de la
durée de garantie et ne donnent pas droit à une nouvelle garantie !
Le justifi catif de garantie est le reçu. Sans ce justifi catif, aucun remplacement
gratuit ni aucune réparation gratuite ne peuvent être effectués.
En cas de recours à la garantie, ramenez votre appareil complet, dans son
emballage d‘origine, accompagné de votre preuve d‘achat, à votre revendeur.
*) Les endommagements de pièces d’accessoires ne justifi ent pas automatiquement l’échange gratuit de l’appareil complet. Contactez alors notre centrale
téléphonique! La casse de pièces en verre ou en plastique est dans tous les cas
à votre charge!
Les défauts sur les accessoires ou les pièces d’usure (p.ex. les charbons de moteurs, crochets, courroies d’entraînement, télécommande de rechange, brosses
à dents de rechange, lames de scies etc.) ainsi que le nettoyage, l’entretien ou le
remplacement de pièces d’usure ne sont pas garantis et sont donc payants !
En cas d’intervention étrangère, la garantie devient caduque.
Après la garantie
Après écoulement de la durée de garantie, les réparations peuvent être effectuées, contre paiement, par le commerce spécialisé ou le service de réparation.
F
23
05-BS 1240 Neu 23 22.04.2005, 9:39:26 Uhr
Page 24

F
Signifi cation du symbole „Elimination“
Protégez votre environnement, ne jetez pas vos appareils électriques avec les
ordures ménagères.
Utilisez, pour l’élimination de vos appareils électriques, les bornes de collecte
prévues à cet effet où vous pouvez vous débarrasser des appareils que vous
n’utilisez plus.
Vous contribuez ainsi à éviter les impacts potentiels dans l’environnement et sur la
santé de chacun, causés par une mauvaise élimination de ces déchets.
Vous contribuez aussi au recyclage sous toutes ses formes des appareils électriques et électroniques usagés.
Vous trouverez toutes les informations sur les bornes d’élimination des appareils
auprès de votre commune ou de l’administration de votre communauté.
L’élimination des appareils électriques et électroniques usagés dans les ordures
ménagères et/ou ordures séparées sera interdite dans beaucoup de pays de
l’Union européenne à partir du 13-8-2005.
En Allemagne à partir du 23-3-2006.
24
05-BS 1240 Neu 24 22.04.2005, 9:39:26 Uhr
Page 25

Indicaciones generales de seguridad
• Antes de la puesta en servicio de este aparato lea detenidamente el manual
de instrucciones y guarde este bien incluido la garantía, el recibo de pago y si
es posible también el cartón de embalaje con el embalaje interior.
• Solamente utilice el aparato para el uso privado y para el fi n previsto. Este
aparato no está destinado para el uso profesional. No lo utilice al aire libre (en
excepto que esté destinado para el uso limitado al aire libre). No lo exponga
al calor, a la entrada directa de rayos de sol, a la humedad ( en ningún caso
sumerja el aparato en agua) y a los cantos agudos. No utilice el aparato con
las manos húmedas. En caso de que el aparato esté húmedo o mojado retire
de momento la clavija de la caja de enchufe. No tocar el agua.
• Desconecte el aparato y siempre retire la clavija de la caja de enchufe (tire de
la clavija no del cable), cuando no quiera utilizar el aparato, montar piezas o
en caso de limpieza o defectos.
• No utilice el aparato sin vigilancia. En caso de que tenga que dejar su lugar de
trabajo, desconecte siempre el aparato o retire la clavija de la caja de enchufe
(por favor tire de la clavija y no del cable).
• Para evitar que los niños se hagan daños eléctricos, siempre tenga atención,
que el cable no cuelgue hacia abajo y que los niños no tengan acceso al
aparato.
• Controle regularmente si el aparato o el cable tiene defectos. No ponga en
servicio un aparato defecto.
• No repare el aparato por su cuenta, sino vaya a un establecimiento autorizado. Para evitar peligros, deje sustituir un cable defecto por uno de la misma
calidad solamente por el fabricante, nuestro servicio al cliente o una similar
persona cualifi cada.
• Solamente utilice accesorios originales.
• Por favor tenga atención a las “Indicaciones especiales de seguridad…“ indicadas a continuación.
Indicaciones especiales
• ¡No aspiren nunca agua u otro líquido!
• ¡No aspiren nunca cenizas calientes, objetos agudos o cortantes!
• ¡No utilice el aparato en locales húmedos!
• Nunca aspire sin fi ltro. ¡Siempre compruebe el correcto ajuste de la bolsa que
acaba de colocar!
• ¡Durante el funcionamiento mantenga apartado de la boquilla del aspirador, el
pelo, piezas de ropa o extremidades del cuerpo!
• ¡Mantenga la aspiradora apartada de fuentes de calor como radiodores,
estufas etc.!
E
25
05-BS 1240 Neu 25 22.04.2005, 9:39:27 Uhr
Page 26

E
1
2
3
4
Indicación de los elementos de manejo
Cobertura filtro de salida
Conexión de la manguera
Asa de transporte con tecla con cartucho filtrante
para el enrollamiento de cable
Regulador de la potencia
de aspiración
Tecla carcasa de filtro
5
Depósito de polvo
6
Cable
7
Conectador / desconectador
8
9 Válvula de aire adicional
Puesta en marcha
1. Introduzca la manguera aspirante en la apertura del compartimiento para la
bolsa de aspirador, hasta que encaje mecánicamente.
2. Para soltar de nuevo la manguera aspirante, presione el botón en la manguera
aspirante!
3. Mantenga el botón apretado y retire ahora la manguera.
4. En caso de que sea necesario, encaje el tubo aspirador en la empuñadura.
Uso del aparato
1. Monte el accesorio.
2. Desenrolle el cable necesitado, introduzca la clavija en una caja de enchufe
con tomatierra 230 V, 50 Hz instalada según reglamento y conecte el aparato
con el conectador / desconectador.
3. Ajuste el poder de aspiración con el regulador de poder de aspiración.
4. Aspire ahora en una velocidad constante. No es necesario apretar.
5. Nota: ¡Tenga atención con el alcanze del cable, ya que es limitado!
Regulador de poder de aspiración
Poder de aspiración bajo: Para cortinas, telas delicadas.
Poder de aspiración medio: Para moquetas de terciopelo con pelo alto o
Poder de aspiración alto: Para moquetas robustas y suelos.
Dispositivo para el enrollamiento de cable
Por favor tire del cable solamente hasta la marcación amarilla. Nunca tire hasta
la marcación roja, ya que el enrollamiento de cable se podría estropear. Dichos
daños no caen en la garantía.
Enrollamiento
Presione la tecla para el enrollamiento de cable y guie el cable. Mantenga el
cable para evitar que se enrolle.
suelos de textil.
26
05-BS 1240 Neu 26 22.04.2005, 9:39:27 Uhr
Page 27

Tubo telescópico de aspiración
1. El tubo le posibilita una adaptación individual a su altura. Desbloquee el enganche girando la parte gruesa del tubo aspirador hacia la izquierda.
2. Adapte los tubos de aspiración como usted lo desee. Para el bloqueo gira
parte gruesa del tubo aspirador hacia la derecha.
Boquillas
Tobera para juntas /
tobera de cepillo: Para la aspiración en esquinas y ranuras.
Tobera para el suelo: Para la limpieza de moquetas o superfi cies llanas.
La tobera de suelo está equipada con ruedas para un
Alfombras: al aspirar alfombras tenga en cuenta que
Para aspirar por ejemplo superfi cies lisas coloque la
Pasador de aire
Abra el pasador de aire en la empuñadura de la manguera para la regulación de
aire o para soltar piezas que se hayan quedado pegadas en la boquilla.
Filtro
Su aparato dispone de un sistema de fi ltros de 3 fi ltros.
1. Recipiente colector de polvo en transparente
• El sistema convencional de fi ltro de llenado de polvo se ha sustituido
por un recipiente colector de polvo en transparente. Este es capaz de
absorber, por su alta velocidad de circulación, impurezas graves y mínimas
partículas fl otantes del aire aspirado.
• Se ahorra la molesta compra de fi ltros de llenado de polvo.
• En el fi ltro de fácil vaciado se puede comprobar en todo momento la canti-
dad de polvo.
• Si los residuos de polvo han alcanzado la indicación MAX en el recipiente
colector de polvo, proceda como indicado a continuación:
Tenga atención que en respecto a la tobera para
juntas / - de cepillo se trata de una pieza sobrepuesta
“2 en 1”.
manejo más fácil y se puede regular según el tipo de
servicio.
los cepillos en la tobera de suelo estén desactivados.
En caso contrario, presione la palanca en la tobera de
suelo con el pie hacia delante.
palanca con el pie hacia detrás. Esto activa los cepillos (Se puede reconocer porque los cepillos se ven en
la tobera de suelo).
E
27
05-BS 1240 Neu 27 22.04.2005, 9:39:28 Uhr
Page 28

E
Presione la tecla 5 para abrir la carcasa
de fi ltro.
Retire la bolsa de llenado de polvo.
¡Vacíe el recipiente de llenado de polvo!
Para ello, pulse la tecla en el recipiente
de llenado de polvo. A continuación
cierre otra vez la tapadera del recipiente
de llenado de polvo.
Retire el cartucho de fi ltro y el velo de
fi ltro. Limpie el fi ltro golpeando y cepillando éste suavemente.
En caso de suciedad extrema: Limpie
ambas cosas en un leve baño jabonoso, a continuación enjuagar y secar
28
bien las piezas.
Retire la cesta de fi ltro. Limpie la cesta
de fi ltro golpeando y cepillando ésta
suavemente.
En caso de suciedad extrema: Limpie
la cesta en un leve baño jabonoso, a
continuaci¡on enjuagar y secar bien la
pieza.
Nota: Aunque los fi ltros parezcan que
están limpios, podrían estar sucios por
una fi na capa de polvo.
05-BS 1240 Neu 28 22.04.2005, 9:39:28 Uhr
Page 29

Retire el fi ltro protector del fi ltro y el fi ltro
de soplado. Limpie el fi ltro golpeando y
cepillando éste suavemente.
Filtro protector del motor
• Después de cada tercer vaciado o en caso de suciedad extrema limpie
el fi ltro, dejando pasar agua corriente por el velo de fi ltro en contra de la
dirección de soplado.
• ¡Coloque éste solamente en estado totalmente seco!
¡Se ruega prestar atención a esta nota importante!
• La limpieza puede ser necesaria también después de un corto periodo de
tiempo, por ejemplo al aspirar polvo muy fi no.
• En caso de que la potencia de aspiración de su aspiradora se reduzca,
limpie por favor los fi ltros como indicado.
• Si durante el funcionamiento la potencia de aspiración se reduce de forma
repentina, podría ser la causa de un atascamiento en los fi ltros.
Posible causa: A causa de los fi ltros atascados se aspira por la válvula de
aire adicional (9) aire frío para el motor. Esto ocurre para proteger el motor.
Desconecte el aparato. Limpie los fi ltros de forma húmeda, como indicado.
Retome el funcionamiento solamente con los fi ltros secos.
En caso de suciedad extrema: Limpie
ambas cosas en un leve baño jabonoso, a continuación enjuagar y secar
bien las piezas.
Limpieza y almacenamiento
Limpieza
• ¡Antes de cada limpieza retire la clavija de la caja de enchufe!
• Limpie la carcasa de motor con un paño húmedo.
• Limpie el fi ltro protector del motor aproximadamente después de cada 3. vaciado. En caso de que sea necesario, lave el fi ltro en agua caliente, sin aditivos.
Solamente coloque de nuevo el fi ltro, cuando está seco por completo.
Almacenamiento
• Enrolle el cable por completo.
• Enganche la tobera en la parte inferior del aparato en la ayuda de estacionamiento.
E
29
05-BS 1240 Neu 29 22.04.2005, 9:39:29 Uhr
Page 30

Este aparato se ha examinado según las normativas actuales y vigentes de la
E
Comunidad Europea, como p.ej. compatibilidad electromagnética y directiva de
baja tensión y se ha construido según las más nuevas especifi caciones en razón
de la seguridad.
No reservamos el derecho de efectuar modifi caciones técnicas.
Garantía
Para el aparato comercializado por nosotros nos responsabilizamos con una
garantía de 24 meses a partir de la fecha de compra (factura de compra).
Durante el período de garantía nos encargamos gratuítamente de los defectos del
aparato y de los accesorios*), que se hayan originado por defectos del material o
de la fabricación. Dependiendo de nuestra estimación se realizará una reparación
o un cambio. ¡Los servicios de garantía no prolangan la garantía, ni se incia por
ello un período nuevo de garantía!
Como comprobante para la garantía es válido la factura de compra. Sin este
comprobante no se podrá realizar un cambio o una reparación gratuíta.
En caso de garantía entregue el aparato completo en su embalaje original
junto con la factura a su agente comerciante.
*) Defectos en las piezas de accesorio, no signifi can automáticamente el recambio
gratuito del aparato completo. ¡En este caso dirijase por favor a nuestra linea
de atención al cliente! ¡Rotos de vidrio o roturas en las piezas de plástico deben
pagarse siempre por el cliente !
Defectos en los accesorios de uso o en las piezas de desgaste (p.ej. escobillas de
carbón del motor, varillas amasadoras, correas de transmisión, mando a distancia
de repuesto, cepillos de dientes de repuesto, hojas de sierra etc.), como también
la limpieza, mantenimiento o el recambio de piezas de desgaste no recaen en la
garantía e irán al cargo del cliente!
En caso de intervención ajena se expira la garantía.
Después de la garantía
Después de haber expirado la garantía se pueden realizar las reparaciones por
el concesionario o por el servicio de reparaciones. Los gastos irán al cargo del
cliente.
30
05-BS 1240 Neu 30 22.04.2005, 9:39:29 Uhr
Page 31

Signifi cado del símbolo „Cubo de basura“
Proteja nuestro medio ambiente, aparatos eléctricos no forman parte de la basura
doméstica.
Haga uso de los centros de recogida previstos para la eliminación de aparatos
eléctricos y entregue allí sus aparatos eléctricos que no vaya a utilizar más.
Ayudará en evitar las potenciales consecuencias, a causa de una erronéa eliminación de desechos, para el medio ambiente y la salud humana.
Con ello, contribuirá a la recuperación, al reciclado y a otras formas de reutilización de los aparatos viejos eléctricos y electrónicos.
La información cómo se debe eliminar los aparatos, se obtiene en su ayuntamiento o su administración municipal.
En varios países de la UE se prohibe a partir del 13.8.2005 la eliminación de
aparatos viejos eléctricos y electrónicos a través de la basura doméstica y/o del
vertido residual.
En Alemania a partir del 23.3.2006.
E
31
05-BS 1240 Neu 31 22.04.2005, 9:39:30 Uhr
Page 32

P
• Antes de pôr este aparelho a funcionar, leia muito atentamente as instruções
de emprego e guarde-as muito bem, juntamente com o talão de garantia, o
talão de compra e, tanto quanto possível, a embalagem com os elementos
interiores.
• Utilize o aparelho exclusivamente para fi ns privados e para a fi nalidade para a
qual o mesmo foi concebido. Este aparelho não se destina a fi ns comerciais.
Não o utilize ao ar livre (a não ser que o mesmo possa ser usado ao ar livre
sob determinadas condições). Mantenha-o protegido do calor, de irradiação
solar directa, da humidade (não o imergir de forma alguma em quaisquer líquidos) e de arestas aguçadas. Não utilize o aparelho com as mãos molhadas.
No caso de o aparelho fi car húmido ou molhado, retire imediatamente a fi cha
da tomada. Não tocar na água.
• Sempre que não utilizar o aparelho, ou desejar montar acessórios, ou queira
limpá-lo, ou ainda em caso de avarias, deverá desligá-lo e retirar a fi cha da
tomada (puxe pela fi cha e não pelo fi o).
• O aparelho não deverá funcionar sem vigilância. No caso de ter de se ausen-
tar do local onde o aparelho estiver a funcionar, desligue-o sempre ou retire a
fi cha da tomada (puxe pela fi cha e não pelo fi o).
• Para proteger as crianças dos perigos relacionados com aparelhos eléctricos,
nunca deixe os fi os pendurados e atente em que as crianças não possam
chegar a tais aparelhos.
• Verifi que regularmente se o aparelho ou o fi o têm alguns danos. Nunca ponha
a funcionar um aparelho com quaisquer danos.
• Não tente reparar o aparelho, dirija-se a um técnico da especialidade,
devidamente autorizado. Para evitar quaisquer perigos, é favor substituir um
fi o danifi cado por um fi o da mesma qualidade. Tal deverá ser efectuado pelo
fabricante, pelos nossos serviços de assistência ou por outra pessoa com as
mesmas qualifi cações.
• Utilize apenas acessórios de origem.
• É favor observar as seguintes „Instruções especiais de segurança...“.
Instruções gerais de segurança
Instruções especiais de segurança
• Não aspire humidades nem líquidos!
• Não aspire cinzas quentes, nem objectos pontiagudos ou aguçados!
• Não utilize o aparelho em divisões com solos molhados!
• Não aspire nunca sem saco. Após substituição do saco, verifi que sempre se o
mesmo se encontra na posição correcta!
• Durante o funcionamento, mantenha a roupa, o corpo e os cabelos afastados
do bocal do aspirador!
• Mantenha o aspirador afastado de fontes de calor, tais como radiadores,
fogões, etc.!
32
05-BS 1240 Neu 32 22.04.2005, 9:39:30 Uhr
Page 33

Descrição dos elementos
Tampa do filtro de escape
1
Ligação para o tubo flexível
2
Pega com tecla para dispositivo de filtragem
3
enrolamento do fio
Regulador do volume
4
de aspiração
Tecla para a caixa do filtro
5
Recipiente de lixo com
6
Fio
7
Interruptor de ligar/desligar
8
9 Válvula para ar adicional
Primeira utilização
1. Introduza o tubo fl exível na abertura do compartimento do saco, até fi car
engatado.
2. Para voltar a tirar o tubo fl exível, pressione o botão do mesmo tubo.
3. Mantenha o botão pressionado e retire o tubo.
4. Se necessário, introduza o tubo de aspiração na extremidade do tubo fl exível.
Utilização do aparelho
1. Faça a montagem dos acessórios.
2. Desenrole o fi o até ter o comprimento pretendido, introduza a fi cha numa
tomada com protecção de contactos, de 230 voltes, 50 Hz, devidamente
instalada, e ligue o aparelho carregando no interruptor.
3. Seleccione a potência de aspiração no respectivo regulador.
4. Aspire agora a uma velocidade constante. Não é necessário exercer qualquer
pressão.
5. Nota: tome em consideração que o comprimento do fi o é limitado!
Regulador da potência de aspiração
Potência de aspiração baixa: para cortinas, tecidos delicados.
Potência de aspiração média: para alcatifas de pelo alto e solos têxteis.
Potência de aspiração elevada: para alcatifas, tapetes e solos robustos.
Dispositivo de enrolamento do fi o
Para desenrolar o fi o, é favor puxá-lo, no máximo, até à marcação amarela. Não
o puxe até à marcação vermelha, pois o dispositivo poderá estragar-se. Tais
estragos não estão incluídos na garantia.
Enrolamento
Pressione o botão para enrolamento e vá puxando o fi o. Segure neste para evitar
que o mesmo bate contra qualquer lado.
P
33
05-BS 1240 Neu 33 22.04.2005, 9:39:31 Uhr
Page 34

Tubo telescópico
P
1. Para uma adaptação individual à altura de cada utente. Destrave o acoplamento, girando para a esquerda a parte mais grossa do tubo de aspiração.
2. Deslize o tubo até fi car com a altura pretendida. Para travar, gire o tubo de
aspiração mais grosso para a direita.
Bocais
Bocal para frestas /
Bocal para escovar: para aspirar cantos e frestas.
Bocal de piso: para aspirar tapetes, alcatifas ou superfícies lisas.
O bocal de piso é equipado com rolos para ser mais
Tapetes: tome a precaução na aspiração de tapetes
Para a aspiração de, por exemplo, superfícies lisas,
Entrada de ar
Abra a entrada do ar que se encontra na extremidade do tubo fl exível, no caso de
pretender regular o ar ou para soltar as peças que se encontrem no bocal.
Filtros
O aspirador dispõe de 3 sistemas de fi ltragem
1. Recipiente transparente
• O sistema tradicional de sacos foi substituído por um recipiente trans-
parente. Em consequência da alta velocidade com que funciona, este
remove não só a sujidade mais grosseira mas também as partículas mais
pequenas que se encontram no “ar aspirado”.
• Torna-se desnecessária a incómoda compra de sacos novos.
• Poderá ver-se a qualquer altura a quantidade de lixo que se encontra no
recipiente. Esvaziá-lo é uma questão extremamente fácil.
• Logo que a quantidade de lixo tenha atingido a marcação MAX, proceda
da forma seguinte:
34
Tome em consideração que no caso do bocal para
frestas e para escovar se trata de “duas peças numa”.
facilmente guiado e ajustado para a respectiva operação.
para que as escovas no bocal de piso estejam desactivadas. Se isso não for o caso, aperte a alavanca no
bocal de piso para frente, com o pé.
aperte a alavanca de volta com o pé. Isso activa as
escovas (isso pode ser reconhecível quando as escovas se tornam visíveis no bocal de piso).
05-BS 1240 Neu 34 22.04.2005, 9:39:31 Uhr
Page 35

P
Pressione a tecla 5 para abrir a caixa
do fi ltro.
Retire o recipiente do lixo.
Despeje o saco do lixo.
Para tal, pressione a tecla do compartimento do saco. Torne a fechar a tampa
deste compartimento.
Retire a cassete do fi ltro e o fi ltro têxtil.
Proceda à sua limpeza, sacudindo-o e
escovando-o com cuidado.
No caso de grande sujidade: lavar
ambos em água com detergente, passá-los por água e deixá-los enxugar.
Retire o cesto do fi ltro. Proceda à sua
limpeza, sacudindo-os e escovando-os
com cuidado.
No caso de grande sujidade: lave-o
em água com detergente, passe-o por
água e deixe-o enxugar.
Nota: mesmo que os fi ltros pareçam
estar limpos, poderão estar cheios de
pó fi no.
35
05-BS 1240 Neu 35 22.04.2005, 9:39:31 Uhr
Page 36

P
Filtro para protecção do motor
• Sempre que despejar os fi ltros pela terceira vez, ou no caso de verifi car
que os mesmos estão muito sujos, proceda à sua lavagem à torneira,
deixando a água correr pelo fi ltro têxtil no sentido contrário ao do escape.
• Volte a colocar os fi ltros no seu lugar, só depois de estarem bem enxutos!
Tome muita atenção à nota seguinte!
• Poderá ser necessário proceder à limpeza dos fi ltros após um curto tempo
de utilização, dependendo tal dos materiais aspirados. No caso de poeiras
fi nas, tal limpeza será necessária mais cedo.
• No caso de verifi car que o seu aparelho aspira com menos força, proceda
à limpeza dos fi ltros da forma acima descrita.
• Se o aspirador perder repentinamente força durante o funcionamento, tal
poderá dever-se a uma obstrução dos fi ltros.
Causa possível: Devido ao facto de os fi ltros estarem entupidos, a válvula de
ar adicional (9) aspirará ar refrigerado para o motor. Esta acção destina-se a
proteger o motor.
Desligue o aspirador. Proceda à lavagem dos fi ltros da forma descrita acima.
Só torne a pôr o aspirador a funcionar com os fi ltros secos.
Retire o fi ltro de protecção do motor e o
fi ltro de escape. Proceda à sua limpeza,
sacudindo-os e escovando-os com
cuidado.
No caso de grande sujidade: lavar
ambos em água com detergente, passá-los por água e deixá-los enxugar.
Limpeza e arrecadação
Limpeza
• Antes de limpar o aspirador, retire a fi cha da tomada.
• Limpe a caixa com um pano seco.
• Proceda à limpeza do fi ltro protector ao motor depois de ca. 3. esvaziamentos.
O fi ltro encontra-se por trás do saco. Lave-o em água quente, sem detergentes. Volte a colocá-lo só depois de ter enxugado completamente.
Arrecadação
• Enrole o fi o até ao fi m.
• Introduza no dispositivo para arrumação, o gancho do bocal que se encontra
na parte inferior do aspirador.
36
05-BS 1240 Neu 36 22.04.2005, 9:39:32 Uhr
Page 37

Este aparelho foi controlado nos termos das actuais directivas da CEE aplicáveis,
tais como inocuidade electromagnética e directiva sobre baixa tensão, e fabricado
de acordo com as mais novas prescrições da segurança técnica.
Reserva-se o direito de alterações!
Garantia
O aparelho vendido pela nossa empresa tem uma garantia de 24 meses a partir
da data da compra (talão).
Durante o período de garantia, procederemos à remoção grátis - por reparação,
ou, segundo a nossa decisão, por substituição - das defi ciências do aparelho
ou dos acessórios*) que provenham de erros de material ou de fabricação. A
prestação de serviços relacionados com a garantia não prolongarão a mesma,
nem iniciarão um novo prazo de garantia!
O talão de compra consistirá prova desta garantia. Sem o mesmo, não será
possível proceder-se a qualquer troca ou reparação grátis.
Em caso de garantia, entregue o aparelho completo, juntamente com o talão de
compra, na loja onde o mesmo foi comprado.
*) No caso de danos em quaisquer acessórios, não será efectuada automáticamente uma substituição completa do aparelho. Contacte neste caso a nossa
hotline! Danos causados por quebras de peças de vidro ou de plástico terão de
ser pagos pelo cliente!
Não estão incluídos na garantia quaisquer defeitos de acessórios ou de peças
que se desgastem (como, por exemplo, carvões do motor, varinhas, correias do
motor, telecomandos, escovas de dentes, folhas de serra, etc.), nem a limpeza, a
manutenção ou a substituição de peças que se desgastem, devendo tais despesas ser reembolsadas!
A garantia terminará sempre que tenha havido intervenção alheia nos aparelhos.
Após a garantia
Após a expiração do prazo de garantia, poderão ser efectuados arranjos por pessoal especializado, ou pelos nossos serviços de reparações, contra reembolso.
P
37
05-BS 1240 Neu 37 22.04.2005, 9:39:33 Uhr
Page 38

P
Signifi cado do símbolo „contentor do lixo“
Poupe o nosso meio ambiente, não deite aparelhos eléctricos para o lixo doméstico.
Dirija-se ao locais destinados à recolha especial de aparelhos eléctricos e entregue aí os aparelhos que não pretende continuar a utilizar.
Desta forma, contribuirá para ajudar a evitar os potenciais efeitos perniciosos que
um falso depósito de objectos usados terão, tanto no que diz respeito ao ambiente, como à saúde humana.
Dará igualmente a sua contribuição para o reaproveitamento de materiais, para a
reciclagem e outras formas de aproveitamento de aparelhos eléctricos e electrónicos usados.
Receberá, nas autarquias e juntas de freguesia, informações sobre os locais onde
poderá entregar tais aparelhos.
Em muitos países da UE, será proibido depositar aparelhos eléctricos e electrónicos usados no lixo doméstico a partir de 13.8.2005.
Na Alemanha, a partir de 23.3.2006.
38
05-BS 1240 Neu 38 22.04.2005, 9:39:33 Uhr
Page 39

Norme di sicurezza generali
• Prima di mettere in funzione questo apparecchio, leggere molto attentamente le
istruzioni per l’uso e conservarle con cura unitamente al certifi cato di garanzia,
allo scontrino e, se possibile, alla scatola di cartone con la confezione interna.
• Utilizzare l’apparecchio esclusivamente per scopi privati e conformemente al
tipo di applicazione previsto. Questo prodotto non è stato concepito ai fi ni di
un impiego in ambito industriale. Non utilizzarlo all’aperto (a meno che non
sia contemplato un particolare tipo di uso all’aperto nel rispetto di specifi che
condizioni). Proteggerlo dal calore, nonché dall’esposizione diretta ai raggi solari e dall’umidità (non immergerlo mai in sostanze liquide) e tenerlo a distanza
da oggetti con spigoli affi lati. Non utilizzare l’apparecchio con le mani umide.
Nel caso in cui si bagni o si inumidisca l’apparecchio, staccare immediatamente la spina. Evitare il contatto con l’acqua.
• Disattivare l’apparecchio e staccare sempre la spina dalla relativa presa
(si raccomanda di afferrare il connettore e non il cavo quando si effettua questa
operazione) allorché non si utilizza l’apparecchio, quando si applicano degli accessori oppure nel caso in cui lo si debba pulire o si siano manifestate anomalie.
• Non mettere in funzione l’ apparecchio senza sorveglianza. Se si dovesse assentarsi dal posto di lavoro, spegnere e disconnettere sempre l’ apparecchio,
(prendendo in mano la spina, non tirando il cavo).
• Allo scopo di proteggere i bambini contro i pericoli che possono derivare dagli
apparecchi elettrici, accertarsi che non vi siano cavi pendenti e che i bambini
non possano accedere in alcun modo all’apparecchio stesso.
• Controllare periodicamente l’apparecchio per verifi care che non vi siano danni.
Non mettere in funzione l’apparecchio nel caso in cui sia guasto.
• Non tentare di riparare l’apparecchio, bensì rivolgersi a un tecnico autorizzato. Al fi ne di evitare l’insorgere di situazioni di pericolo, si raccomanda di
contattare il costruttore, il nostro servizio di assistenza tecnica o un tecnico
ugualmente qualifi cato per la sostituzione del cavo di alimentazione difettoso
con un cavo equivalente.
• Utilizzare esclusivamente accessori originali.
• Rispettare le seguenti “Speciali norme di sicurezza...“.
Speciali norme di sicurezza
• Non utilizzare l’apparecchio per aspirare sostanze liquide o umide.
• Non utilizzare l’apparecchio per aspirare ceneri ancora calde oppure oggetti
affi lati o acuminati.
• Non utilizzare l’apparecchio in ambienti umidi.
• Non utilizzare mai l’apparecchio senza fi ltro. Dopo aver usato l’aspirapolvere,
accertarsi sempre che il fi ltro sia installato correttamente nella posizione
corrispondente.
• Durante l’utilizzo dell’apparecchio, tenere la bocchetta dell’aspiratore lontana
da capelli, abiti e da altre parti del corpo.
• Tenere l’aspiratore lontano dalle fonti di calore quali i radiatori, il forno, ecc.
39
I
05-BS 1240 Neu 39 22.04.2005, 9:39:34 Uhr
Page 40

I
Coperchio filtro di scarico
1
Collegamento del tubo flessibile
2
Impugnatura con tasto guarnizione per filtro
3
per l’avvolgimento del cavo
Regolatore della potenza
4
di aspirazione
Elementi di comando
Tasto alloggiamento filtro
5
Contenitore della polvere con
6
Cavo
7
Interruttore On/Off
8
9 Valvola per aria laterale
Messa in funzione
1. Inserire il tubo fl essibile di aspirazione nell’apposita apertura dello scomparto del
sacchetto di spolvero, fi nché esso non si innesti correttamente in posizione.
2. Per staccare nuovamente il tubo fl essibile, è suffi ciente premere il pulsante
situato sullo stesso tubo fl essibile di aspirazione.
3. Tenere premuto il pulsante ed estrarre quindi il tubo fl essibile.
4. Eventualmente infi lare il tubo di aspirazione nell’impugnatura.
Utilizzo dell’apparecchio
1. Montare gli accessori.
2. Srotolare il cavo in modo da ottenere la lunghezza desiderata e collegare
quindi la spina in una presa con messa a terra da 230 V, 50 Hz installata
conformemente alle disposizioni vigenti in materia. Successivamente, mettere
in funzione l’apparecchio azionando l’interruttore di attivazione/disattivazione.
3. Regolare la potenza di aspirazione servendosi dell’apposito regolatore di
potenza.
4. Utilizzare quindi l’apparecchio operando in modo da usare una velocità sempre costante. Non è necessario esercitare pressione sull’apparecchio.
5. Avvertenza: prestare attenzione al raggio d’azione consentito, il quale dipende
dalla lunghezza del cavo!
Regolatore della potenza di aspirazione
Potenza di aspirazione bassa: per tende e materiali delicati
Potenza di aspirazione media: per tappeti in velluto a pelo lungo e
Potenza di aspirazione elevata: per pavimenti e tappeti robusti
Dispositivo avvolgicavo per il cavo di allacciamento alla rete
Si raccomanda di estrarre il cavo soltanto fi no al contrassegno in colore giallo.
Non tirare mai, in nessun caso, il cavo sino al contrassegno rosso, in quanto il
dispositivo avvolgicavo potrebbe danneggiarsi. I danni di questo genere non sono
coperti da garanzia.
per pavimenti in tessuto
40
05-BS 1240 Neu 40 22.04.2005, 9:39:34 Uhr
Page 41

Riavvolgimento del cavo
Premere il pulsante relativo al dispositivo avvolgicavo e accompagnare il cavo con
la mano. Si consiglia di tenere il cavo, in modo da impedire movimenti violenti e
disordinati del medesimo.
Tubo di aspirazione telescopico
1. Questo tubo di aspirazione consente di effettuare una regolazione
dell’apparecchio stesso in funzione della propria specifi ca altezza. Sbloccare il
giunto girando verso sinistra la parte spessa del tubo di aspirazione.
2. Regolare quindi i tubi di aspirazione conformemente alle proprie esigenze. Per
sbloccare girare verso destra il tubo di aspirazione spesso.
Bocchette
Bocchetta per giunti /
per spazzole per la pulizia in corrispondenza di angoli e fessure.
Notare che sotto l’ espressione: bocchetta per giunti /
spazzole si tratta di un accessorio „2 in 1“.
Bocchetta per pavimento: per la pulizia di tappeti o superfi ci lisce.
Per poter essere guidata con più facilità la bocchetta
per pavimeni tè dotata di rulli ed è regolabile in funzio-
ne del lavoro previsto.
Tappeti: nella pulizia di tappeti fare attenzione che
le spazzole della bocchetta per pavimento siano
rientrate. Altrimenti portare la leva della bocchetta per
pavimenti in avanti spingendola con il piede.
Per la pulizia per es. di superfi ci lisce portare la
leva indietro spingendo con il piede in modo da far
fuoriuscire le spazzole (questo si può riconoscere dal
fatto che le spazzole della bocchetta per pavimento
saranno visibili).
Valvola di registro dell’aria
Aprire la valvola di registro dell’aria situata sull’impugnatura del tubo fl essibile in
modo da regolare la quantità di aria oppure per staccare le parti rimaste aderenti
alla bocchetta.
I
41
05-BS 1240 Neu 41 22.04.2005, 9:39:34 Uhr
Page 42

Filtri
I
L’apparecchio dispone di 3 sistemi di fi ltri.
1. Raccoglipolvere trasparente
• Il sistema tradizionale di raccolta della polvere in un sacchetto è stato
sostituito da un raccoglipolvere trasparente. In questo raccoglipolvere
tutto viene girato a mulinello grazie all’elevata velocità di corrente dall’aria
“aspirata”: dai pezzi di sporco più grossi alle particelle di polvere più fi ni.
• Non serve più ricomprare i sacchetti.
• Il raccoglipolvere è facile da svuotare e possiede un indicatore per rilevare
la quantità del contenuto.
• Quando i residui di polvere hanno raggiunto la tacca MAX sul raccoglipolvere, procedere come qui di seguito descritto:
Premere il tasto 5 per aprire
l’alloggiamento del fi ltro.
Togliere il contenitore della polvere.
Svuotare il sacchetto di polvere!
Per questo premere il tasto che si trova
sul sacchetto di polvere. In seguito
chiudere nuovamente il coperchio del
sacchetto.
42
05-BS 1240 Neu 42 22.04.2005, 9:39:35 Uhr
Page 43

Estrarre la cassetta portafi ltro e il tessuto fi ltrante. Pulire il fi ltro spazzolandolo
e battendolo leggermente .
Se si hanno sporcizie forti: Lavare
entrambi in una leggera lisciva di
sapone, in seguito sciacquare e lasciar
asciugare.
Estrarre il contenitore del fi ltro. Pulire
il contenitore del fi ltro spazzolandolo e
battendolo leggermente.
Se si hanno sporcizie forti: lavare in
una lisciva di sapone leggera, in seguito
sciacquare e lasciar asciugare.
Nota: Anche se i fi ltri sembrino puliti,
essi possono essere intasati con polvere molto fi ne.
Estrarre il fi ltro per la protezione del
motore e il fi ltro per l‘ emissione esterna
di aria. Pulire i fi ltri battendoli e spazzo-
Filtro salv
a
m
oto
re
landoli leggermente.
Se si hanno sporcizie forti: Lavare
entrambi in una lisciva leggera di
sapone, in seguito sciacquare e lasciar
asciugare.
• Dopo aver svuotato per la terza volta oppure se ci sono sporcizie forti, pulire i fi ltri lasciando scorrere l‘ acqua nel tessuto fi ltrante in direzione oposta
all‘ aspirazione.
• Inserirli unicamente se sono ben asciutti!
Notare bene questa indicazione!
• La pulizia può essere necessaria anche dopo brevi periodi, a seconda
delle condizioni dell’ uso, p. e. aspirando polvere fi ne.
• Se la potenza di aspirazione dovesse diminuire, pulire il fi ltro come descritto.
• Se la potenza di aspirazione dovesse diminuire improvvisamente durante l’
uso, la causa potrebbe essere un intasamento del fi ltro.
Possibile causa: A causa dell’ intasamento dei fi ltri viene aspirata aria fredda
per il motore tramite la valvola per aria laterale (9). Questo avviene per proteggere il motore.
Spegnere l’ apparecchio. Lavare i fi ltri come descritto.
Riprendere l’ uso dell’ apparecchio unicamente con fi ltri asciutti.
I
43
05-BS 1240 Neu 43 22.04.2005, 9:39:42 Uhr
Page 44

I
Pulizia
• Prima di procedere alla pulizia, è indispensabile staccare la spina dalla presa
di rete.
• Pulire l’alloggiamento servendosi di un panno asciutto.
• Pulire il fi ltro di protezione del motore ogni 3. svuotamenti. Questo fi ltro è
situato dietro il sacchetto di spolvero. Pulire il fi ltro utilizzando dell’acqua calda
senza additivi. Si raccomanda di inserire il fi ltro esclusivamente dopo averlo
asciugato perfettamente.
Conservazione
• Riavvolgere completamente il cavo.
• Inserire il gancio della boccketta nella parte inferiore dell’ apparecchio del
supporto di appoggio.
Questo apparecchio è stato controllato sulla base di tutte le direttive CE attuali in
vigore in questo settore, quali per esempio la normativa in materia di compatibilità
elettromagnetica e la direttiva in materia di bassa tensione, ed è stato costruito
conformemente alle norme di sicurezza più moderne.
Con riserva di apportare modifi che tecniche.
Pulizia e conservazione
Garanzia
Per l’apparecchio da noi messo in commercio ci assumiamo una garanzia di
24 mesi dalla data di acquisto (scontrino).
Durante la garanzia noi ci impegniamo ad eliminare gratuitamente i guasti
dell’apparecchio o degli accessori*), dovuti a difetti di materiale o di fabbricazione,
riparandoli o, a nostra discrezione, sostituendoli. Le prestazioni in garanzia danno
luogo a una proroga della garanzia né danno diritto ad una nuova garanzia!
Per la garanzia è suffi ciente lo scontrino di acquisto. Senza questo scontrino non
sussiste il diritto né ad una sostituzione né ad una riparazione gratuita.
Nel caso si ricorra alla garanzia, restituire al rivenditore l’apparecchio completo in
ogni sua parte, nell’imballaggio originale unitamente allo scontrino.
*) Danni agli accessori non giustifi cano automaticamente lo scambio gratuito
dell’apparecchio completo. Si prega di mettersi in contatto con la nostra centrale
telefonica. Danni alle parti di vetro oppure fratture ai pezzi di materia plastica sono
obbligatoriamente a spese del cliente.
44
05-BS 1240 Neu 44 22.04.2005, 9:39:43 Uhr
Page 45

La riparazione di pezzi d’uso ovvero soggetti a logoramento (cursori, ganci
impastatori, cinghie di trasmissione, telecomandi di ricambio, spazzolini di ricambio, lame di seghe ecc.) come anche operazioni di pulizia e manutenzione o la
sostituzione di pezzi soggetti a logoramento non rientrano nella garanzia e quindi
sono a pagamento!
La garanzia si annulla nel caso di intervento da parte di terzi.
Dopo la garanzia
Al termine della garanzia le riparazioni possono essere eseguite dietro pagamento
dal corrispettivo negozio specializzato o servizio riparazioni.
Signifi cato del simbolo „Eliminazione“
Salvaguardare l’ ambiente, gli elettrodomestici non vanno eliminati come rifi uti
domestici.
Per l’ eliminazione degli elettrodomestici, fare uso die posti di raccolta previsti per
questo tipo e porre quegli elettrodomestici che non sono più in uso.
Si contribuisce così ad evitare un effetto potenziale sull’ ambiente e sulla salute,
dovuto magari ad una eliminazione sbagliata.
Questo signifi ca un contributo personale alla riutilizzazione, al riciclaggio e altre
forme di utilizzazione di elettrodomestici ed apparecchi elettronici usati.
Si possono trovare le corrispondenti informazioni sugli appositi luoghi di raccolta,
nelle amministrazioni die comuni.
In molti paesi della Comunità Europea l’ eliminazione di elettrodomestici oppure
apparecchi elettronici è vietata se eseguita insieme ai rifi uti domestici. Questo vale
a partire dal 13.8.2005.
In Germania a partire dal 23.3.2006.
I
45
05-BS 1240 Neu 45 22.04.2005, 9:39:43 Uhr
Page 46

N
• Les nøye gjennom bruksanvisningen før du tar apparatet i bruk. Ta godt vare
på bruksanvisningen, garantibeviset, kassalappen og helst også esken med
innvendig emballasje.
• Apparatet må bare brukes til private formål og de formål det der er beregnet
på. Dette apparatet er ikke ment for industriell bruk. Det må ikke benyttes
utendørs (bortsett fra hvis det bare er beregnet på utendørs bruk). Hold det
unna varme, direkte solskinn, fuktighet (senk det aldri ned i væsker) og skarpe
kanter. Ikke bruk apparatet hvis du er fuktig på hendende. Hvis apparatet har
blitt fuktig eller vått, må du trekke ut støpselet med en gang. Ikke kom borti
vannet.
• Slå av apparatet og trekk alltid støpselet ut av stikkontakten (trekk i støpselet,
ikke i ledningen) når du ikke bruker apparatet, fest tilbehørsdeler for rengjøring
eller ved feil.
• Ikke bruk apparatet uten oppsikt. Hvis du forlater arbeidsplassen, må du alltid
slå apparatet av eller trekke støpselet ut av stikkontakten (trekk i støpselet,
ikke i ledningen.
• For å beskytte barn mot farer forbundet med elektriske apparater, må du alltid
sørge for at ledningen ikke henger ned, og at apparatet ikke er tilgjengelig for
barn.
• Kontroller jevnlig om det er skader på apparat og ledning. Skadede apparater
må ikke brukes.
• Ikke reparer apparatet selv. Oppsøk en autorisert fagmann. Hvis en nettledning er defekt, må du sørge for at den kun skiftes ut med en lik ledning, for
slik å unngå farer. Dette må gjøres av produsenten, vår kundetjeneste eller en
lignende kvalifi sert person.
• Bruk bare originaltilbehør.
• Legg merke til “Spesielle sikkerhetsanvisninger” nedenfor.
Generelle sikkerhetsanvisninger
Spesielle sikkerhetsanvisninger
• Ikke sug opp fuktighet eller væsker!
• Ikke sug opp varm aske, spisse eller skarpe gjenstander!
• Ikke bruk apparatet i våtrom!
• Bruk aldri støvsugeren uten fi lter. Kontroller at fi lteret sitter korrekt etter at du
har satt det inn!
• Hold hår, klær og kroppsdeler borte fra støvsugermunnstykket når støvsugeren
er i drift!
• Hold støvsugeren borte fra varmekilder som radiatorer, ovner osv.!
46
05-BS 1240 Neu 46 22.04.2005, 9:39:44 Uhr
Page 47

Oversikt over betjeningselementer
Deksel utsugingsfilter
1
Slangetilkobling
2
Bærehåndtak med knapp
3
for ledningsoppvikling
Sugeeffektregulator
4
Knapp for filterhus
5
Støvbeholder med filterinnsats
6
Ledning
7
Bryter
8
9 Ekstra lufteventil
Ta i bruk apparatet
1. Stikk slangen inn i sugetilkoblingen til den går mekanisk i lås.
2. For å løsne slangen igjen trykker du på knappen på slangen.
3. Hold knappen inne og dra deretter ut slangen.
4. Fest ev. røret til håndtaksdelen.
Bruke apparatet
1. Monter tilbehøret.
2. Kveile ut nødvendig ledningslengde, stikk deretter støpselet inn i en forskriftsmessig installert jordet kontakt, 230 V, 50 Hz, og slå apparatet på med
bryteren.
3. Still inn sugeeffekten med sugeeffektregulatoren.
4. Arbeid med jevn hastighet. Det er ikke nødvendig å presse.
5. Tips: Husk på at lengden på ledningen gir deg begrenset rekkevidde!
Sugeeffektregulator
Lav sugeeffekt: til gardiner, ømfi ntlige stoffer.
Middels sugeeffekt: til langhårede velurtepper og tekstilgulv.
Høy sugeeffekt: til robuste tepper og gulv.
Oppkveilingsmekanisme for ledningen
Ledningen må bare trekkes ut til det gule merket. Trekk aldri ledningen helt til det
røde merket, da ledningsoppkveilingen kan ta skade av det. Slike skader går ikke
inn under garantien.
Oppkveiling
Trykk på knappen for ledningsoppkveiling og styr ledningen i riktig retning. Hold
fast ledningen for å unngå at den slår rundt.
Teleskoprør
• Gjør det mulig å tilpasse støvsugeren individuelt ut fra kroppshøyde. Løsne
koblingen ved å vri den tykke sugerørsdelen mot venstre.
• Skyv sugerørene slik du vil ha dem. For å låse dem vrir du den tykke sugerørsdelen mot høyre.
N
47
05-BS 1240 Neu 47 22.04.2005, 9:39:44 Uhr
Page 48

Munnstykkeelement
N
Fugemunnstykke/
børstemunnstykke: til suging i hjørner og spalter. Legg merke til at fuge-
Gulvmunnstykke: til rengjøring av tepper eller glatte fl ater.
Gulvmunnstykket er utstyrt med hjul for at det skal
Teppe: Når du skal støvsuge tepper, må du passe
Når du skal støvsuge f.eks. glatte overfl ater, presser
Luftspjeld
Åpne luftspjeldet på slangehåndtaket for å regulere luften eller for å løsne deler
som har festet seg til munnstykket.
Filter
Apparatet har tre fi ltersystemer.
1. Gjennomsiktig støvbeholde
• Det tradisjonelle systemet med støvsugerposer har blitt erstattet av en gjennomsiktig støvbeholder. Den høye strømningshastigheten gjør at alt fra grovt
smuss til de fi neste svevepartikler virvles ut av “sugeluften” og inn i støvbeholderen.
• Du slipper bryet med å kjøpe støvsugerposer.
• Beholderen er enkel å tømme, og det er lett å lese av støvmengden.
• Hvis støvrestene har nådd MAX-merket på støvbeholderen, går du fram på
følgende måte:
/børstemunnstykket er en “2 i 1”-del.
være lettere og styre, og kan justeres alt etter bruk.
på at børstene på gulvmunnstykket er deaktivert. Er
den ikke det, presser du spaken på gulvmunnstykket
forover med foten.
du spaken tilbake med foten. Da aktiveres børstene
(børstene på gulvmunnstykket er synlige).
r
48
05-BS 1240 Neu 48 22.04.2005, 9:39:45 Uhr
Page 49

N
Trykk på knapp 5 for å åpne fi lterhuset.
Ta ut støvbeholderen.
Tøm støvbeholderen!
Trykk på knappen på støvbeholderen.
Lukk lokket på støvbeholderen når du
er ferdig.
Ta ut fi lterkassetten og fi lterfl eecen.
Rengjør fi lteret ved å banke ut av det og
børste forsiktig av det.
Ved sterk tilgrising: Vask begge deler i
svakt såpevann. Skyll og tørk dem.
Ta ut fi lterkurven. Rengjør fi lterkurven
ved å banke ut av den og børste forsiktig av den.
Ved sterk tilgrising: Vask kurven i
svakt såpevann, skyll den og la den
tørke.
Tips: Selv om fi ltrene ser rene ut, kan
de være fulle av fi nt støv.
49
05-BS 1240 Neu 49 22.04.2005, 9:39:45 Uhr
Page 50

N
Beskyttelsesfi lter for motoren
• Hver tredje gang du tømmer fi ltrene, eller hvis de er sterkt tilgriset, bør du
rengjøre dem ved å la det renne vann gjennom fi lterfl eecen mot blåseretningen.
• Ikke sett den inn igjen før de er helt tørre!
NB! Viktig opplysning!
• Det kan også bli nødvendig å rengjøre fi ltrene oftere. Dette avhenger av
hva støvsugeren er brukt til, for eksempel å fjerne fi nt støv.
• Hvis støvsugeren får redusert sugeeffekt, må du rengjøre fi ltrene som
beskrevet ovenfor.
• Hvis sugeeffekten plutselig blir dårligere mens du bruker støvsugeren, kan
det være en indikasjon på at fi ltrene er tilstoppet.
Mulig årsak: Hvis fi ltrene er tilstoppet, suges det kjøleluft til motoren gjennom
den ekstra lufteventilen (9). Det er for å beskytte motoren.
Slå av støvsugeren. Rengjør fi ltrene med vann, som beskrevet ovenfor.
Ikke ta i bruk støvsugeren igjen før fi ltrene er helt tørre.
Ta ut motorbeskyttelsesfi lteret og
utblåsingsfi lteret. Rengjør fi ltrene ved
å banke ut av dem og børste forsiktig
av dem.
Ved sterk tilgrising: Vaske begge
fi ltrene i svakt såpevann, skyll dem og
la dem tørke.
Rengjøring og oppbevaring
Rengjøring
• Trekk støpselet ut av stikkontakten før rengjøring!
• Rengjør kassen med en tørr klut.
• Rengjør beskyttelsesfi lteret for motoren ca. ved hver 3. tømming.
Rengjør fi lteret i varmt vann, uten tilsetningsmidler. Ikke sett det inn igjen før
det har tørket helt.
Oppbevaring
• Rull inn hele ledningen.
• Stikk hektet på munnstykket på undersiden av apparatet inn i parkeringsstøtten.
50
05-BS 1240 Neu 50 22.04.2005, 9:39:46 Uhr
Page 51

Dette apparatet har blitt testet i henhold til alle aktuelle CE-retningslinjer som det
rammes av, f.eks. elektromagnetisk toleranse og direktiver om lavspenning. Det er
laget i henhold til dagens nyeste sikkerhetstekniske forskrifter.
Med forbehold om tekniske endringer!
Garanti
For apparat som vi har solgt, påtar vi oss en garanti på 24 måneder fra kjøpsdato
(kassalapp).
Innenfor garantitiden fjerner vi mangler på apparat eller tilbehør*) uten omkostninger hvis manglene skyldes material- eller produksjonsfeil. Dette gjør vi ved
reparasjon eller – etter vår vurdering – bytting.
Garantiytelser medfører ingen forlengelse av garantitiden, og det oppstår heller
ikke noe krav på en ny garanti på grunn av dette!
Som garantibevis gjelder kjøpsbeviset. Uten dette beviset kan du ikke få byttet
eller reparert apparatet gratis.
I forbindelse med garanti ber vi om at du gir hele apparatet i originalemballasjen
sammen med kassalappen til din forhandler.
*) Skader på tilbehørsdeler fører ikke automatisk til at du får byttet hele apparatet
gratis. I slike tilfeller ber vi deg om å henvende deg til vår hotline! Glasskader eller
sprekker i plastdeler er i prinsippet kostnadspliktige!
Verken defekter på forbrukstilbehør og slitasjedeler (for eksempel motorkull, eltekroker, drivremmer, ekstra fjernbetjening, ekstra tannbørster, sagblader osv.) eller
rengjøring, vedlikehold og utskifting av slitasjedeler går inn under garantien. Slike
ting er derfor kostnadspliktige!
Garantien utgår ved inngrep utenfra.
Etter garantien
Etter at garantitiden har gått ut, kan reparasjoner utføres av den aktuelle faghandelen eller reparasjonsservice mot betaling.
N
51
05-BS 1240 Neu 51 22.04.2005, 9:39:46 Uhr
Page 52

GB
• Read the operating instructions carefully before putting the appliance into
operation and keep the instructions including the warranty, the receipt and, if
possible, the box with the internal packing.
• The appliance is designed exclusively for private use and for the envisaged
purpose. This appliance is not fi t for commercial use. Do not use it outdoors
(except if it is designed to be used outdoors). Keep it away from sources of
heat, direct sunlight, humidity (never dip it into any liquid) and sharp edges. Do
not use the appliance with wet hands. If the appliance is humid or wet, unplug
it immediately. Do not put it in water.
• When cleaning or putting it away, switch off the appliance and always pull out
the plug from the socket (pull on the plug, not the cable) if the appliance is not
being used and remove the attached accessories.
• Do not operate the machine without supervision. If you should leave the work-
place, always switch the machine off or remove the plug from the socket (pull
the plug itself, not the lead).
• To protect children from the dangers posed by electrical appliances, make
sure that the cable is hanging low and that children do not have access to the
appliance.
• Check the appliance and the cable for damage on a regular basis. Do not use
the appliance if it is damaged.
• Do not try to repair the appliance on your own. Always contact an authorized
technician. To avoid the exposure to danger, always have a faulty cable be
replaced only by the manufacturer, by our customer service or by a qualifi ed
person and with a cable of the same type.
• Use only original spare parts.
• Pay careful attention to the following “Special Safety Instructions“.
General Safety Instructions
Special Safety Instructions
• Do not suck up liquids!
• Do not suck up hot ashes or pointed or sharp objects!
• Do not use the appliance in humid rooms!
• Never use without the fi lter. Check that the fi lter is inserted correctly!
• hair, clothing and body parts away from the vacuum nozzle during use!
• Keep the vacuum cleaner away from sources of heat like radiators, ovens, etc.!
Overview of the Components
Cover of outlet filter
1
Hose connection
2
Carrying handle with
3
button for cable take-up
Suction power regulator
4
52
05-BS 1240 Neu 52 22.04.2005, 9:39:47 Uhr
Button for filter housing
5
Dust container with filter insert
6
Cable
7
On/off switch
8
9 Secondary air valve
Page 53

Start-up
1. Insert the vacuum hose in the opening in the dust bag compartment until it
locks in mechanically.
2. To release the hose, press the button on the vacuum hose.
3. Keep the button pressed and pull out the hose.
4. Insert the vacuum tube into the handle if required.
Using the Appliance
1. Fit on the accessory.
2. Unwind the necessary length of cable and insert the plug in a duly installed
230V/50Hz protective contact socket.
3. Set the vacuum power with the vacuum power regulator.
4. Vacuum at a steady speed. There is no need to exert pressure.
5. Attention: pay attention to the range that can be covered with the cable length.
Vacuum power regulator
Low vacuum power: For curtains and delicate fabrics
Medium vacuum power: For long-pile velour carpets and textile fl ooring
High vacuum power: For sturdy rugs and fl oors
Cable winding device
Pull out the cable up to the maximum length indicated with the yellow mark. Never
pull the cable out up to the red mark as the cable winding can be damaged. Said
damages are not covered by the warranty.
Winding
Press the cable winding button and guide the cable. Hold the cable to avoid
wrapping.
Telescopic Suction Tube
1. This makes it possible to adapt the height to your individual body size. Unlock
the coupling by turning the wide section of the suction tube to the left.
2. Move the suction tube as required. To lock the coupling, turn the wide suction
tube to the right.
Nozzle accessories
Crevice nozzle /
brush nozzle: To vacuum corners and slits.
Please note that the crevice/brush nozzle is a „2 in 1“
attachment.
GB
53
05-BS 1240 Neu 53 22.04.2005, 9:39:47 Uhr
Page 54

Floor nozzle: For cleaning carpets or smooth surfaces.
GB
In order to facilitate control, the floor nozzle is fitted with
Carpet: make sure that the brushes on the floor nozzle
In order to vacuum even surfaces, for example, press
Damper
Open the damper on the hose handle to adjust the airfl ow or to release objects
clinging to the nozzle.
Filter
Your machine has three fi lter systems.
1. Transparent dust collection container
• The traditional dust bag system has been replaced by a transparent dust
collection container in which coarse dirt particles and tiny particles fl oating in
the air are swirled out of the suction air by the high speed of the air current.
• The purchase of dust bags is no longer necessary.
• The quantity of dust can be easily read off at any time on the container, which
is also very easy to empty.
• Once the dust level has reached the MAX mark on the dust container, please
proceed as follows:
rollers and can be adjusted to suit the circumstances.
are deactivated when cleaning carpets. If this is not the
case, press the lever on the floor nozzle forwards with
your foot.
the lever back with your foot. This activates the brushes
(you can tell whether this is the case by checking that
the brushes are visible on the floor nozzle).
54
05-BS 1240 Neu 54 22.04.2005, 9:39:48 Uhr
Page 55

GB
Press button 5 to open the fi lter housing.
Remove the dust container.
Please empty the dust container!
To do so, press the button on the dust
container. Then close the lid of the dust
container again.
Remove the fi lter cassette and the fi lter
felt. Clean the fi lters by tapping out the
contents and gentle brushing.
In cases of heavy soiling: Wash both
fi lters in a weak soapy water solution,
rinse out and allow to dry.
Remove the fi lter basket. Clean the fi lter
basket by tapping at the contents and
gentle brushing.
In cases of heavy soiling: Wash in a
weak soapy water solution, rinse out
and allow to dry.
Note: Even if the fi lters may appear to
be clean it is possible that they are still
blocked by fi ne dust.
55
05-BS 1240 Neu 55 22.04.2005, 9:39:48 Uhr
Page 56

GB
Motor Protective Filter
• Every third time the vacuum cleaner is emptied, or in the case of heavy
soiling, please clean the fi lters by allowing running water to fl ow through
the fi lter felt in the opposite direction to which the air passes through.
• The fi lters should only be reinserted when they are completely dry!
Important note!
• Cleaning may become necessary after a shorter time, depending on the
conditions of use, e.g. when vacuuming fi ne dust.
• If the suction power of your vacuum cleaner diminishes please clean the
fi lters as described.
• If the suction power suddenly diminishes during operation this may be due
to the fi lters being locked.
Possible cause: As the fi lters are blocked cooling air for the motor is drawn
through the secondary air valve (9). This occurs in order to protect the motor.
Switch the vacuum cleaner off. Clean the fi lters in soapy water as described
above.
The vacuum cleaner should only be switched on again when the fi lters are dry.
Remove the motor protection fi lter and
den exhaust fi lter. Clean the fi lters by
tapping out its contents and gentle
brushing.
In cases of heavy soiling: Wash both
fi lters in a weak soapy water solution,
rinse out and allow to dry.
Cleaning and storage
Cleaning
• Pull the plug out of the socket before cleaning!
• Clean the casing with a dry cloth.
• Clean the motor protection fi lter approximately every 3. time the vacuum cleaner is emptied. Clean the fi lter in hot water without additives. Put it back into
place only once it is completely dry.
Storage
• Wind the cable completely.
• Insert the hook of the nozzle on the bottom of the vacuum cleaner into the
parking assistance.
56
05-BS 1240 Neu 56 22.04.2005, 9:39:49 Uhr
Page 57

This device has been tested according to all relevant current CE guidelines,
such as electromagnetic compatibility and low voltage directives, and has been
constructed in accordance with the latest safety regulations.
Subject to technical changes without prior notice!
Guarantee
The device supplied by our Company is covered by a 24 month guarantee starting
on the date of purchase (receipt).
During the life of the guarantee any fault of the device or its accessories *) ascribable to material or manufacturing defects will be eliminated free of charge by
repairing or, at our discretion, by replacing it. The guarantee services do not entail
an extension of the life of the guarantee nor do they give rise to any right to a new
guarantee!
Proof of the guarantee is provided by the proof of purchase. Without proof of
purchase no free replacement or repair will be carried out.
If you wish to make a claim under the guarantee please return the entire machine
in the original packaging to your dealer together with the receipt.
*) Damage to accessories does not mean automatic free replacement of the whole
machine. In such cases please contact our hotline. Broken glass or breakage of
plastic parts are always subject to a charge.
Defects to consumables or parts subject to wearing (e.g. motor pistons, kneading
blades, drive shafts, spare remote control, spare toothbrushes, saw blades, etc.)
as well as cleaning, maintenance or the replacement of said parts are not covered
by the guarantee and hence are to be paid!
The guarantee lapses in case of unauthorized tampering.
After the expiry of the guarantee
After the expiry of the guarantee repairs can be carried by the competent dealer or
repair service against the payment of the ensuing costs.
GB
57
05-BS 1240 Neu 57 22.04.2005, 9:39:49 Uhr
Page 58

GB
Meaning of the “Dustbin” Symbol
Protect our environment: do not dispose of electrical equipment in the domestic
waste.
Please return any electrical equipment that you will no longer use to the collection
points provided for their disposal.
This helps avoid the potential effects of incorrect disposal on the environment and
human health.
This will contribute to the recycling and other forms of reutilisation of electrical and
electronic equipment.
Information concerning where the equipment can be disposed of can be obtained
from your local authority.
In many EU countries the disposal of electrical and electronic equipment in the
domestic waste is prohibited from August 13, 2005 on.
In Germany from March 23, 2006 on.
58
05-BS 1240 Neu 58 22.04.2005, 9:39:50 Uhr
Page 59

Ogólne wskazówki bezpieczeństwa
• Przed uruchomieniem urządzenia proszę bardzo dokładnie przeczytać
instrukcję obsługi.Proszę zachować ją wraz z kartą gwarancyjną, paragonem i
w miarę możliwości również kartonem z opakowaniem wewnętrznym.
• Proszę wykorzystywać urządzenie jedynie dla prywatnego celu,jaki został
przewidziany dla urządzenia.Urządzenie to nie zostało przewidziane do użytku
w ramach działalności gospodarczej.Proszę nie korzystać z urządzenia na
zewnątrz (chyba że w określonych warunkach).Proszę trzymać urządzenie
z daleka od ciepła,bezpośredniego promieniowania słonecznego,wilgoci
(w żadnym wypadku nie zanurzać w substancjach płynnych)oraz ostrych
krawędzi.Proszę nie obsługiwać urządzenia wilgotnymi dłońmi.Jeżeli
urządzenie jest wilgotne lub mokre,proszę natychmiast wyciągnąć wtyczkę.
• Jeżeli nie korzystacie Państwo z urządzenia,jeżeli chcecie Państwo
zamontować jakieś akcesoria,w celu wyczyszczenia lub w przypadku jakichkolwiek zakłóceń,proszę zawsze wyłączyć urządzenie i wyjąć wtyczkę z gniazdka
(proszę pociągnąć za wtyczkę,nie za przewód zasilający).
• Pracującego urządzenia nie należy pozostawiać bez nadzoru. Jeżeli
opuszczają Państwo miejsce pracy, należy zawsze pamiętać o wyłączeniu
urządzenia, wzgl. wyjęciu wtyczki z gniazda (należy ciągnąć za wtyczkę, nie
za przewód).
• Aby uchronić dzieci przed niebezpieczeństwem związanym z elektrycznymi
urządzeniami,proszę zadbać o to,aby przewód zasilający nigdy nie wisiał
luźno,oraz aby dzieci nie miały dostępu do urządzenia.
• Proszę regularnie kontrolować urządzenie pod kątem uszkodzeń.Proszę nie
uruchamiać uszkodzonego urządzenia.
• W razie awarii proszę nie naprawiać urządzenia samemu lecz skorzystać z
pomocy autoryzowanego specjalisty. Jeżeli przewód zasilający nieodłączalny
ulegnie uszkodzeniu, to powinien on być wymieniony u producenta lub w
specjalnym zakładzie naprawczym albo przez wykwalifi kowaną osobę w celu
uniknięcia zagrożenia.
• Proszę stosować tylko oryginalne akcesoria.
• Prosimy pamiętać o podanych dalej „Specjalnych wskazówkach dotyczących
bezpiecznego użytkowania“.
PL
Specjalne wskazówki dotyczące bezpiecznego
użytkowania
• Proszę nie wciągać odkurzaczem cieczy lub wilgoci!
• Proszę nie wciągać odkurzaczem gorącego popiołu, przedmiotów ostrych i
ostro zakończonych!
• Proszę nie używać urządzenia w wilgotnych pomieszczeniach!
• Proszę nigdy nie odkurzać bez fi ltra. Po włożeniu fi ltra proszę sprawdzić, czy
został założony prawidłowo!
• Podczas pracy odkurzacza proszę trzymać włosy, ubranie i części ciała z
daleka od końcówki!
59
05-BS 1240 Neu 59 22.04.2005, 9:39:50 Uhr
Page 60

• Proszę trzymać odkurzacz z daleka od źródeł ciepła takich jak promienniki,
PL
piece itd.!
Przegląd elementów obłsugi
Osłona filtra wylotu
1
Przyłączenie węża
2
Uchwyt do noszenia z
3
przyciskiem do nawijania kabla
Regulator mocy zasysania
4
Przycisk Obudowa filtra
5
Pojemnik na kurz z wkładką filtru
6
Przewód
7
Włącznik/wyłącznik
8
Boczny zawór powietrza
9
1. Proszę włożyć węża odkurzacza do otworu kieszeni na worki do kurzu; rura
umieszczona została poprawnie wtedy, gdy usłyszycie Państwo mecha niczne
„kliknięcie”.
2. Aby wyjąć węża należy wcisnąć przycisk znajdujący się na wężu.
3. Proszę trzymać guzik wciśnięty i wyciągać rurę.
4. Proszę wsunąć rurę zasysającą w uchwyt.
Używanie urządzenia
1. Proszę zamontować akcesoria.
2. Proszę wyciągnąć potrzebną długość przewodu, włożyć wtyczkę do przepisowo zainstalowanego gniazda o napięciu 230 V, 50 Hz, a następnie uruchomić
urządzenie wciskając włącznik.
3. Siłę ssania proszę ustawić regulatorem siły ssania.
4. Teraz można rozpocząć odkurzanie w równomiernym tempie. Nie ma
konieczności dociskania końcówek do odkurzanej powierzchni.
5. Wskazówka: proszę pamiętać, że zasięg odkurzacza ograniczony jest
długością przewodu!
Regulator siły ssania
Niski stopień ssania: Do fi ranek, materiałów delikatnych.
Średni stopień ssania: Dywany welurowe i wykładziny dywanowe.
Wysoki stopień ssania: Do mocnych dywanów i podłóg.
Zwijarka do przewodu sieciowego
Przewód sieciowy można wyciągać maksymalnie do żółtego znacznika. W
żadnym wypadku proszę nie wyciągać przewodu do czerwonego znacznika, gdyż
można w ten sposób uszkodzić funkcję zwijania przewodu. Tego typu uszkodzenia
nie są objęte gwarancją.
60
Uruchomienie
05-BS 1240 Neu 60 22.04.2005, 9:39:51 Uhr
Page 61

Zwijanie
Proszę wcisnąć przycisk zwijania przewodu i wprowadzać przewód do odkurzacza. Proszę mocno trzymać przewód, żeby zapobiec jego niekontrolowanym
ruchom.
Teleskopowa rura zasysająca
1. Umożliwia indywidualne dopasowanie urządzenia do Państwa wzrostu. Proszę
odryglować połączenie, kręcąc w lewo grubą część rurki ssącej.
2. Proszę zgodnie z życzeniem ustawić wysokość rury zasysającej. Celem zaryglowania proszę przekręcić w prawo grubą rurkę ssącą.
Końcówki odkurzacza
Dysza do fug/
Dysza ze szczotką: Do odkurzania w kątach i szczelinach.
Dysza do podłogi: Służy do czyszczenia dywanów i powierzchni gładkich.
Dysza do podłógwyposażona jest w rolki dla
Dywan: Podczas odkurzania dywanów należy zwrócić
W przypadku odkurzania np. powierzchni płaskich
Zasuwa powietrza
Zasuwę powietrzną na uchwycie rury otwiera się w celu regulacji powietrza lub
aby umożliwić wypadnięcie przedmiotów, które znajdują się w końcówce i nie
mogą zostać wciągnięte przez odkurzacz.
Proszę wziąć pod uwagę, że w przypadku dyszy do
fug/ dyszy ze szczotką chodzi o nasadkę typu „dwa w
jednym”.
łatwiejszego jej prowadzenia z możliwością
przełączania.
uwagę na to, czy szczotki na dyszy są wyłączone.
Jeżeli nie, wystarczy nacisnąć stopą dźwignię na
dyszy szczotkowej w kierunku „do przodu“.
wystarczy wcisnąć stopą dźwignię z powrotem. W ten
sposób włącza się szczotki (można to łatwo rozpoznać
po szczotkach, które są widoczne na dyszy szczotkowej).
PL
61
05-BS 1240 Neu 61 22.04.2005, 9:39:51 Uhr
Page 62

Filtr
PL
Państwa urządzenie wyposażone jest w 3 systemy fi ltrujące:
1. Przeźroczysty pojemnik pochłaniania kurzu
• Powszechnie stosowany system worków kurzowych został zastąpiony
przeźroczystym pojemnikiem pochłaniania kurzu. Pojemnik ten pochłania
większe zabrudzenia oraz niewielkie cząsteczki kurzu wprowadzane razem
z silnym strumieniem powietrza zasysającego.
• Nie ma konieczności stałego kupowania nowych worków kurzowych.
• Pojemnik łatwo się czyści i w każdej chwili można zobaczyć ilość nagromadzonego w nim kurzu.
• Jeżeli kurz nagromadzony w pojemniku kurzowym osiągnął oznaczenie
MAX, proszę postępować w następujący sposób:
Proszę wcisnąć przycisk 5, by otworzyć
obudowę fi ltra.
Proszę wyjąć pojemnik na kurz.
Proszę opróżnić pojemnik na kurz!
W tym celu proszę wcisnąć przycisk
przy pojemniku na kurz. Następnie
proszę zamknąć z powrotem pokrywkę
pojemnika na kurz.
62
05-BS 1240 Neu 62 22.04.2005, 9:39:51 Uhr
Page 63

Proszę wyjąć kasetę z fi ltrem i włókninę
fi ltrującą. Proszę oczyścić fi ltry przez
wytrzepanie i ostrożne szczotkowanie.
W przypadku większych zabrudzeń:
wymyć obydwa w wodzie z dodatkiem
mydła, następnie wypłukać i osuszyć.
Proszę wyjąć kosz fi ltra. Proszę
oczyścić go przez wytrzepanie i
ostrożne szczotkowanie.
W przypadku większych zabrudzeń:
wymyć w wodzie z dodatkiem mydła,
następnie wypłukać i osuszyć.
Wskazówka: Nawet gdy fi ltry robią
wrażenie czystych, mogą być zanieczyszczone drobnym kurzem.
Proszę wyjąć fi ltr ochronny silnika i fi ltr
wydmuchowy. Proszę oczyścić fi ltry
przez wytrzepanie i ostrożne szczotko-
F
iltr oc
hrony
silnika
wanie.
W przypadku większych zabrudzeń:
wymyć obydwa w wodzie z dodatkiem
mydła, następnie wypłukać i osuszyć.
• Co trzy opróżnienia lub w przypadku większych zabrudzeń proszę czyścić
fi ltry, przepuszczając wodę bieżącą przez włókninę fi ltrującą w kierunku
przeciwnym do kierunku wydmuchu.
• Proszę włożyć je z powrotem tylko po zupełnym wysuszeniu!
Proszę przestrzegać tej ważnej wskazówki!
• Czyszczenie może stać się konieczne także po krótszym czasie, w
zależności od okoliczności użycia, np. przy odkurzaniu drobnego kurzu.
• W przypadku spadku mocy odkurzania proszę czyścić fi ltry zgodnie z
opisem.
• Jeśli moc odkurzania spadnie nagle podczas pracy odkurzacza, może to
oznaczać zapchane fi ltry.
Możliwa przyczyna: z powodu zapchanych fi ltrów przez boczny zawór powietrza (9) wsysane jest chłodne powietrze do silnika. Odbywa się to dla jego
ochrony.
Proszę wyłączyć urządzenie. Proszę czyścić fi ltry na mokro zgodnie z opisem.
Proszę ponownie korzystać z urządzenia tylko po wyschnięciu fi ltrów.
PL
63
05-BS 1240 Neu 63 22.04.2005, 9:39:52 Uhr
Page 64

PL
Czyszczenie
• Przed przystąpieniem do czyszczenia urządzenia proszę wyciągnąć wtyczkę z
gniazda!
• Obudowę należy czyścić suchą szmatką.
• Filtr zabezpieczający silnik proszę czyścić mniej więcej po co 3. opróżnieniu.
Filtr można umyć w ciepłej wodzie bez dodawania środków czyszczących.
Można go ponownie założyć wtedy, gdy jest całkowicie suchy.
Przechowywanie
• Proszę w całości schować przewód.
• Haczyk dyszy proszę włożyć na spodzie odkurzacza do urządzenia
pomocniczego, służącego do przechowywania.
Niniejsze urządzenie odpowiada wymaganiom normy bezpieczeństwa
użytkowania oraz spełnia wymagania dyrektywy niskonapięciowej i
kompatybilności elektromagnetycznej.
Zastrzega się prawo do zmian technicznych!
Czyszczenie i przechowywanie
WARUNKI GWARANCJI
Przyznajemy 24 miesiące gwarancji na produkt licząc od daty zakupu.
W tym okresie będziemy bezpłatnie usuwać w terminie 14 dni od daty dostarc-
zenia wadliwego sprzętu z kartą gwarancyjną do miejsca zakupu wszystkie uszkodzenia powstałe w tym urządzeniu na skutek wady materiałów lub wadliwego
wykonania, naprawiając oraz wymieniając wadliwe części lub (jeśli uznamy za
stosowne) wymieniając całe urządzenie na nowe.
Sprzęt do naprawy powinien być dostarczony w komplecie wraz z dowodem
zakupu oraz z ważną kartą gwarancyjną do sprzedawcy w miarę możliwości
w oryginalnym opakowaniu lub innym odpowiednim dla zabezpieczenia przed
uszkodzeniem. W razie braku kompletnego opakowania fabrycznego, ryzyko uszkodzenia sprzętu podczas transportu do i z miejsca zakupu ponosi reklamujący.
Naprawa gwarancyjna nie dotyczy czynności przewidzianych w instrukcji obsługi,
do wykonania których zobowiązany jest użytkownik we własnym zakresie i na
własny koszt.
64
05-BS 1240 Neu 64 22.04.2005, 9:39:53 Uhr
Page 65

Gwarancja nie obejmuje:
• mechanicznych, termicznych, chemicznych uszkodzeń sprzętu i wywołanych
nimi wad,
• uszkodzeń powstałych w wyniku działania sił zewnętrznych takich jak
wyładowania atmosferyczne, zmiana napięcia zasilania i innych zdarzeń
losowych,
• nieprawidłowego ustawienia wartości napięcia elektrycznego, zasilanie z
nieodpowiedniego gniazda zasilania,
• sznurów połączeniowych, sieciowych, żarówek, baterii, akumulatorów,
• uszkodzeń wyrobu powstałych w wyniku niewłaściwego lub niezgodnego z
instrukcją jego użytkowania, przechowywania, konserwacji, samowolnego
zrywania plomb oraz wszelkich przeróbek i zmian konstrukcyjnych dokonanych
przez użytkownika lub osoby niepowołane,
• roszczeń z tytułu parametrów technicznych wyrobu, o ile są one zgodne z
podanymi przez producenta,
• prawidłowego zużycia i uszkodzeń, które mają nieistotny wpływ na wartość lub
działanie tego urządzenia.
Karta gwarancyjna bez pieczątki sklepu, daty sprzedaży, nie wypełniona,
źle wypełniona, ze śladami poprawek, nieczytelna wskutek zniszczenia, bez
możliwości ustalenia miejsca sprzedaży oraz dołączonego dowodu zakupu jest
nieważna.
Korzystanie z usług gwarancyjnych nie jest możliwe po upływie daty ważności
gwarancji. Gwarancja na części lub całe urządzenie, które są wymieniane kończy
się, wraz z końcem gwarancji na to urządzenie.
Wszystkie inne roszczenia, wliczając w to odszkodowania są wykluczone chyba,
że prawo przewiduje inaczej. Roszczenia wykraczające poza tą umowę nie są
uwzględniane przez tą gwarancję.
Gwarancja na sprzedany towar konsumpcyjny nie wyłącza, nie ogranicza ani
nie zawiesza uprawnień kupującego wynikających z niezgodności towaru z
umową.
Gwarancja oraz zawarte w niej warunki obowiązują na terenie Rzeczpospolitej
Polskiej.
PL
65
05-BS 1240 Neu 65 22.04.2005, 9:39:53 Uhr
Page 66

PL
Znaczenie symbolu „Pojemnik na śmieci“
Proszę oszczędzać nasze środowisko, sprzęt elektryczny nie należy do śmieci
domowych.
Proszę korzystać z punktów zbiorczych, przewidzianych do zdawania sprzętu
elektrycznego, i tam proszę oddawać sprzęt elektryczny, którego już nie będą
Państwo używać.
Tym sposobem pomagają Państwo unikać potencjalnych następstw niewłaściwego
usuwania odpadów, mających wpływ na środowisko i zdrowie ludzi.
Tą drogą przyczyniają się Państwo do ponownego użycia, do recyklingu i do
innych form wykorzystania starego sprzętu elektrycznego i elektronicznego.
Informacje, gdzie można zdać sprzęt, otrzymają Państwo w swoich urzędach
komunalnych lub w administracji gminy.
W wielu krajach UE usuwanie starego sprzętu elektrycznego i elektronicznego do
śmieci domowych i/lub resztkowych jest zakazane od 13.8.2005.
W Niemczech od 23.3.2006.
66
05-BS 1240 Neu 66 22.04.2005, 9:39:54 Uhr
Page 67

Všeobecné bezpečnostní pokyny
• Před uvedením tohoto přístroje do provozu si velmi pozorně přečtěte návod k
obsluze a tento návod spolu se záručním listem, pokladním blokem a podle
možností i s obalem a vnitřním vybavením obalu dobře uschovejte.
• Používejte tento přístroj výlučně pro soukromou potřebu a pro stanovené
účely. Tento přístroj není určen pro komerční použití. Nepoužívejte jej v
otevřeném prostoru (s výjimkou přístrojů, které jsou podmíněné používání
venku určeny). Chraňte jej před horkem, přímým slunečním zářením, vlhkostí
(v žádném případě jej neponořujte do kapalin) a stykem s ostrými hranami.
Nepoužívejte přístroj v případě, že máte vlhké ruce. Jestliže dojde k navlhčení
nebo namočení přístroje, okamžitě vytáhněte zástrčku ze zásuvky. Vyvarujte
se styku s vodou.
• Přístroj vypněte a vždy vytáhněte zástrčku ze zásuvky (tahejte jen za zástrčku,
nikdy ne za kabel), jestliže nebudete přístroj používat, chcete-li namontovat
příslušenství, přístroj vyčistit nebo v případě poruchy.
• Přístroj nesmí zůstat v provozu bez dozoru. Jestliže musíte pracoviště opustit,
vždy přístroj vypněte, resp. vytáhněte zástrčku ze zásuvky (vždy tahejte za
zástrčku, nikdy ne za kabel).
• Abyste ochránili děti před riziky spojenými s elektrickými přístroji, postarejte se
o to, aby kabel nevisel dolů a děti na přístroj nedosáhly.
• Pravidelně kontrolujte přístroj a přívodní kabel z hlediska poškození. Jestliže
přístroj vykazuje nějakou závadu, neuvádějte jej do provozu.
• Neopravujte přístroj vlastními silami, nýbrž vyhledejte autorizovaného
opraváře. Abyste eliminovali rizika, nechejte poškozený přívodní kabel nahradit
kabelem se stejnými hodnotami a to jen výrobcem, naším servisem pro zákazníky nebo jinou kvalifi kovanou osobou.
• Používejte jen originální příslušenství.
• Respektujte, prosím, následující „Speciální bezpečnostní pokyny ...“.
Speziální bezpečnostní pokyny
• Nevysávejte zádnou vlhkost, resp. kapaliny!
• Nevysávejte horký popel, špičaté nebo ostré předměty!
• Nepouzívejte přístroj ve vlhkých prostorech!
• Nikdy nevysávejte bez fi ltrů. Vzdy po nasazení zkontrolujte správné usazení
fi ltrů!
• Během provozu vysavače dbejte na to, aby se do blízkosti sacích nástavců
nedostaly vlasy, části oblečení nebo těla!
• Neukládejte vysavač do blízkosti zdrojů tepla, jako jsou např. radiátory, kamna
atd.!
CZ
67
05-BS 1240 Neu 67 22.04.2005, 9:39:54 Uhr
Page 68

CZ
Kryt filtru na výstupu
1
Připojení hadice vložkou
2
Transportní rukojeť s
3
tlačítkem pro navíjení kabelu
Regulátor výkonu
4
Přehled ovládacích prvků
Tlačítko skříně filtru
5
Odlučovač prachu s filtrační
6
Kabel
7
Vypínač zapnuto/vypnuto
8
Vedlejší vzduchový ventil
9
Uvedení do provozu
1. Zastrčte sací hadici do otvoru přihrádky pro pytlík na prach, az mechanicky
zaklapne.
2. K uvolnění hadice stiskněte tlačítko na sací hadici.
3. Drzte tlačítko stisknuté a hadici vytáhněte.
4. Na rukojeť eventuálně nasaďte sací trubku.
Pouzívání přístroje
1. Namontujte příslušenství.
2. Kabel odviňte v potřebné délce, zástrčku zastrčte do předpisově instalované zásuvky s ochranným kolíkem 230 V, 50 Hz a zapněte přístroj tlačítkem
Zapnuto/Vypnuto.
3. Pomocí regulátoru sacího výkonu nastavte pozadovaný sací výkon.
4. Vysávejte nyní rovnoměrnou rychlostí. Přitlačování nástavce k podkladu není
nutné.
5. Upozornění: Mějte na paměti, ze délka dosah vysavače je omezen délkou
kabelu!
Regulátor sacího výkonu
Nízký sací výkon: pro záclony, citlivé materiály.
Střední sací výkon: pro velurové koberce a textilní podlahové krytinyVysoký sací výkon: pro robustní koberce a podlahy.
Zařízení pro navíjení přívodního kabelu
Prosíme, vytahujte kabel maximálně jen ke zlutému označení. Nevytahujte kabel
v zádném případě az k červenému označení, protoze by mohlo dojít k poškození
samonavíjecího zařízení. Takovéto závady pak nespadají do záručního plnění.
Navíjení
Stiskněte tlačítko pro navíjení kabelu a “doveďte” kabel az do tělesa přístroje.
Drzte jej pevně, aby nedošlo k nezádoucímu úderu do přístroje.
68
05-BS 1240 Neu 68 22.04.2005, 9:39:54 Uhr
Page 69

Teleskopická trubka
1. Teleskopická trubka umožňuje individuální přizpůsobení Vaší tělesné výšce.
Odblokujte spojku otočením silného dílu sací trubice směrem doleva.
2. Nastavte trubku na požadovanou délku. K zajištění otočte silnou sací trubicí
doprava.
Nástavce
Nástavec pro vysávání
spár/Kartáčový nástavec: K vysávání rohů a mezer.
Hubice na podlahu: K čištění koberců nebo hladkých ploch.
Hubice na podlahu je kvůli snadnějšímu vedení
Koberce: Při vysávání koberců dbejte na to, aby
Chcete-li vysávat např. hladké plochy, stiskněte tuto
Vzduchové šoupátko
Vzduchové šoupátko na rukojeti hadice otevřete buďto k regulaci vzduchu nebo k
uvolnění částic, ulpívajících na nástavci.
Filtry
Váš přístroj je vybaven 3 fi ltračními systémy.
1. Transparentní nádobka odlučovače prachu
• Obvyklý systém s pytlíkem na prach byl nahrazen transparentní nádobkou
odlučovače prachu. V něm jsou hrubé nečistoty a nejmenší neusazující
se částice v důsledku vysoké rychlosti proudění z “nasávaného vzduchu”
odloučeny.
• Odpadá obtěžující nákup pytlíků na prach.
• Na odlučovači, který se snadno vyprazdňuje, lze kdykoliv dobře rozpoznat
množství prachu.
• Jestliže množství prachu dosáhne značky MAX na odlučovači prachu, postupujte následovně:
Mějte, prosím, na paměti, že u nástavce pro vysávání
spár/kartáčového nástavce se jedná o nástavec typu
“2 v 1”.
vybavena válečky a lze ji podle potřeby nastavit pro
příslušný režim.
byly kartáčky na podlahové hubici deaktivovány. V
opačném případě stiskněte páčku na podlahové hubici
nohou směrem dopředu.
páčku nohou dozadu. Tím kartáčky aktivujete (poznáte
to podle toho, že jsou kartáčky na podlahové hubici
vidět).
CZ
69
05-BS 1240 Neu 69 22.04.2005, 9:39:55 Uhr
Page 70

CZ
Pro otevření skříně fi ltru stiskněte
tlačítko 5.
Vyjměte nádobu na zachycování
prachu.
Vyprázdněte nádobu na prach!
K tomu zmáčkněte tlačítko na nádobě
na prach. Opětovně zavřete v přípojce
víko nádoby na prach.
Odeberte fi ltrovací pouzdro a sběrný
vak fi ltru. Vyklepáním a lehkým
vykartáčováním vyčistěte fi ltry.
Při větším znečištění: Oba omyjte
v jemném mýdlovém roztoku, poté
vypláchněte a nechte oschnout.
Odejměte fi ltrovací koš. Vyklepáním
a lehkým vykartáčováním vyčistěte
fi ltrovací koš.
Při větším znečištění: omyjte v
jemném mýdlovém roztoku, poté
vypláchněte a nechte oschnout.
Upozornění: I když fi ltry vypadají
čisté, ´mohou být znečištěny jemným
prachem.
70
05-BS 1240 Neu 70 22.04.2005, 9:39:55 Uhr
Page 71

Odejměte fi ltr ochrany motoru a
výfukový fi ltr. Vyklepáním a lehkým
Ochranný fi ltr motoru
• Po každém třetím vyprázdnění nebo při větším znečištění očistěte fi ltry,
tím že necháte téci tekoucí vodu sběrným vakem fi ltru proti směru sání
přístroje.
• Opět tyto fi ltry vložte jen pokud budou zcela osušené!
Prosím, dbejte na toto důležité upozornění!
• Čištění může být podle způsobu využívání, např. při odsávání jemného
prachu, nutné i po kratším čase.
• Pokud by se výkon sání Vašeho vysavače sníží, vyčistěte prosím fi ltry, jak
je to popsáno.
• Pokud náhle během provozu bude výkon sání nevyhovující, mohou být
ucpány fi ltry.
Možná příčina: Kvůli ucpanému fi ltru se bude nasávat studený vzduch
vedlejším vzduchovým ventilem (9) pro motor. Toto se děje proto, aby se
chránil motor.
Vypněte spotřebič. Vyčistěte fi ltry navlhko tak, jak je to popsáno.
Provoz zahajte opět jen se suchými fi ltry.
vykartáčováním vyčistěte fi ltry.
Při větším znečištění: Oba fi ltry omyjte
v jemném mýdlovém roztoku, poté
vypláchněte a nechte oschnout.
Čištění a ulození
Čištění
• Před čištěním vytáhněte zásuvku ze zástrčky!
• Těleso přístroje čistěte suchým hadříkem.
• Ochranný fi ltr motoru čistěte přibližně po každém 3. vyprázdnění.
Filtr čistěte v teplé vodě, bez přísad. Zpět jej nasazujte jen tehdy, jestlize je
zcela suchý.
Ulození
• Zcela naviňte kabel.
• Zastrčte háček nástavce na spodní straně přístroje do parkovací pomůcky.
CZ
71
05-BS 1240 Neu 71 22.04.2005, 9:40:03 Uhr
Page 72

Tento přístroj byl testován podle všech příslušných, v současné době plat-
CZ
ných směrnic CE, jako je např. elektromagnetická kompatibilita a direktiva o
nízkonapěťové bezpečnosti, a byl zkonstruován podle nejnovějších bezpečnostnětechnických předpisů.
Vyhrazujeme si technické změny!
Záruka
Na námi prodaný přístroj poskytujeme záruku v trvání 24 měsíců od data prodeje
(pokladní doklad).
Během záruční lhůty odstraníme bezplatně všechny vady přístroje nebo
příslušenství*), které vzniknou v důsledku vad materiálu nebo výrobních vad, a to
opravou nebo, podle našeho uvážení, formou výměny. Záruční plnění nemají za
následek ani prodloužení záruční doby ani tím nevzniká nárok na novou záruku!
Jako záruční doklad slouží doklad o koupi. Bez tohoto dokladu nelze uskutečnit
bezplatnou výměnu nebo bezplatnou opravu.
V případě uplatnění záruky předejte, prosím, kompletní přístroj v originálním
obalu spolu s pokladním dokladem Vašemu obchodníkovi.
*) Poškození příslušenství není automaticky důvodem pro bezplatnou výměnu
kompletního přístroje. V takovém případě se obraťte na naši Hotline! Prasklé
skleněné resp. plastové díly zásadně podléhají povinnosti úhrady!
Jak na vady na spotřebním příslušenství, resp. dílech podléhajících rychlému
opotřebení (např. uhlíky motoru, hnětací háky, hnací řemeny, náhradní dálkové
ovládání, náhradní zubní kartáčky, pilové listy atd.), tak i na čištění, údržbu nebo
výměnu dílů podléhajících rychlému opotřebení se záruka nevztahuje a je proto
nutno je uhradit!
Záruka zaniká v případě, že dojde k zásahu neautorizovanou osobou.
Po uplynutí záruky
Po uplynutí záruční doby je možno za úplatu provést opravy v příslušném odborném obchodě nebo opravně.
72
05-BS 1240 Neu 72 22.04.2005, 9:40:04 Uhr
Page 73

Význam symbolu „Popelnice“
Chraňte naše životní prostředí, elektropřístroje nepatří do domovního odpadu.
Pro likvidaci elektropřístrojů použijte určených sběrných míst a odevzdejte zde
elektropřístroje, jestliže už nebudete používat.
Pomůžete tak předejít možným negativním dopadům na životní prostředí a lidské
zdraví, ke kterým by mohlo dojít v důsledku nesprávné likvidace.
Přispějete tím ke zhodnocení, recyklaci a dalším formám zhodnocení starých
elektronických a elektrických přístrojů.
Informace o tom, kde lze tyto přístroje odevzdat k likvidaci, obdržíte
prostřednictvím územně správních celků nebo obecního úřadu.
V mnoha zemích Evropské unie bude odevzdávání elektrických a elektronických
přístrojů do domovního a/nebo komunálního odpadu od 13.8.2005 zakázáno.
V Německu od 23.3.2006.
CZ
73
05-BS 1240 Neu 73 22.04.2005, 9:40:04 Uhr
Page 74

H
• A készülék használatba vétele előtt gondosan olvassa végig a használati
utasítást, és őrizze meg a garancialevéllel, a pénztári nyugtával és lehetőleg a
csomagolókartonnal, ill. az abban lévő bélésanyaggal együtt!
• Kizárólag személyi célra használja a készüléket, és csupán arra, amire való!
A készülék nem ipari jellegű használatra készült. Ne használja a szabadban
(hacsak nem a szabadban való, meghatározott korlátok közötti használatra
van szánva)! Ne tegye ki erős hőhatásnak, közvetlen napsugárzásnak és
nedvességnek (semmi esetre se mártsa folyadékba), és óvja az éles szélektől!
Ne használja a készüléket vizes kézzel! Ha a készülék vizes vagy nedves lett,
azonnal húzza ki a konnektorból! Ne nyúljon bele a vízbe!
• Kapcsolja ki a készüléket, és amikor nem használja, tartozékokat helyez rá,
tisztítja, vagy ha zavart észlel, mindig húzza ki a csatlakozó dugaszt a konnektorból!
• Ne működtesse a készüléket felügyelet nélkül! Ha elhagyja a munkahelyet,
mindig kapcsolja ki a készüléket, ill. húzza ki a dugaszt a konnektorból (a
dugasznál, és nem a kábelnél fogva)!
• Annak érdekében, hogy a gyermekeket megvédje az elektromos készülékek
okozta veszélyektől, soha ne hagyja a kábeleket szabadon lógva, és olyan
helyre tegye a készüléket, ahol gyermekek nem férhetnek hozzá!
• Rendszeresen ellenőrizze, hogy nincs-e a készüléken vagy a kábelen sérülés!
Sérült készüléket soha ne helyezzen üzembe!
• A kockázatok elkerülése végett ne maga javítsa a készüléket, hanem keressen fel egy erre kiképzett szakembert! Ha hibás a csatlakozó kábel, csak a
gyártótól, a vevőszolgálatunktól vagy hasonló képzettségű személytől kérjen
helyette azonos értékű másik kábelt!
• Csak eredeti tartozékokat használjon!
• Tartsa be az itt következő „Speciális biztonsági rendszabályokat“ ...
Általános biztonsági rendszabályok
Speciális biztonsági rendszabályok
• Ne szívjon fel a készülékkel nedvességet, ill. folyadékokat!
• Ne szívjon fel forró hamut, hegyes vagy éles tárgyakat!
• Ne használja a készüléket vizeshelyiségekben!
• Soha ne porszívózzon fi lter nélkül! Behelyezés után mindig ellenőrizze, hogy a
fi lter megfelelően fekszik-e fel.
• Működés közben tartsa távol a porszívófejet a hajától, ruházatától és a
testrészeitől!
• Tartsa távol a porszívót olyan hőforrásoktól, mint pl. a radiátorok, kályha stb.!
74
05-BS 1240 Neu 74 22.04.2005, 9:40:05 Uhr
Page 75

A kezelő elemek áttekintése
Kibocsátó filter borítása
1
Tömlőcsatlakozó
2
Hordozófül
3
kábelfelcsévélő gombbal
Szívóteljesítmény-szabályozó
4
A filtertok gombja
5
Szűrőbetétes portartály
6
Kábel
7
Ki-/bekapcsológomb
8
Melléklégszelep
9
Használatba vétel
1. Dugja be a szívótömlőt a porzsáktartó rekesz nyílásába úgy, hogy mechanikusan bekattanjon!
2. A tömlő kioldásához nyomja meg a szívótömlőn lévő gombot!
3. Tartsa a gombot lenyomva, és így húzza ki a tömlőt!
4. Ha szükséges, húzza rá a szívócsövet a fogantyúra!
A készülék használata
1. Szerelje fel a tartozékokat!
2. A kívánt hosszban húzza ki kábelt, dugja a dugaszt előírásszerűen felszerelt
230 V, 50 Hz-es földelt konnektorba, és a ki-/bekapcsológombbal kapcsolja be
a készüléket!
3. Állítsa be a szabályozóval a kívánt szívóteljesítményt!
4. Porszívózzon egyenletes sebességgel! A porszívót nem kell rányomni a felületre!
5. Figyelem: Ügyeljen a kábel hosszúsága által megszabott hatótávolságra!
Szívóteljesítmény-szabályozó
Kis szívóteljesítmény: függönyökhöz, érzékeny anyagokhoz
Közepes szívóteljesítmény: erősen bolyhos velúrszőnyegekhez és
Nagy szívóteljesítmény: masszív szőnyegekhez és padlóhoz.
Kábelfelcsévélő szerkezet
A hálózati kábelt csak a sárga jelölésig húzza ki! Semmi esetre se húzza egészen
a piros jelölésig, mert megsérülhet a kábelfelcsévélő. Az ilyen meghibásodásokra
nem érvényes a garancia!
Felcsévélés
Nyomja meg a kábelfelcsévélő gombot, és vezesse meg kézzel a begördülő
kábelt! Tartsa biztosan, hogy nehogy összetekeredjen!
Teleszkópos szívócső
1. Lehetővé teszi, hogy a cső hosszát a testmagasságához igazítsa. Oldja ki a
csatlakozót a vastag szívócsőcsonk balra fordításával.
szőnyegpadlóhoz
H
75
05-BS 1240 Neu 75 22.04.2005, 9:40:05 Uhr
Page 76

2. Állítsa be a szívócsövet a kívánt hosszúságra! A reteszeléshez fordítsa a
H
vastag szívőcsövet jobbra.
Szívófejek
Résszívófej /
Kefés szívófej: A sarkok és rések tisztítására.
Padlófej: Szőnyegek vagy sima felületek tisztítására.
A padlófejet a könnyű megvezethetőség miatt
Szőnyegek: a szőnyegek tisztításakor fi gyeljünk rá,
Ha viszont pl. sima felületet porszívózunk, akkor a kart
Levegőszabályozó tolattyú
Nyissa fel a tömlőnyélen lévő levegőszabályozó tolattyút, hogy leválassza a szívófejen megtapadt részeket!
Filter
A készüléknek 3 szűrőrendszere van.
1. Átlátszó porgyűjtő tartály
• A hagyományos porzsákos rendszert átlátszó porgyűjtő tartály helyettesíti.
Ebben kavarog a nagy áramlási sebesség folytán a nagyobb szennyeződés
csakúgy, mint a legapróbb lebegő porrészecskék.
• Szükségtelenné válik a terhes porzsákbeszerzés.
• A könnyen üríthető tartályon a pormennyiség bármikor jól leolvasható.
• Ha a pormaradványok szintje elérte a portartályon lévő MAX jelzés szintjét, a
következőképpen járjon el:
Vegye fi gyelembe, hogy a résszívófej / kefés szívófej
esetében „2 az 1-ben” típusú szívófejről van szó.
görgőkkel láttuk el, dőlése a mindenkori felhasználáshoz állítható.
hogy a keféket a szívófejen visszahúzzuk. Ha nem így
lenne, akkor lábunkkal nyomjuk előre a padlófejen lévő
kart.
a lábunkkal húzzuk vissza. Ezzel a kefék aktiválódnak
(ezt arról lehet felismerni, hogy a kefék a padlófejen
láthatóvá válnak).
76
05-BS 1240 Neu 76 22.04.2005, 9:40:06 Uhr
Page 77

H
A fi ltertok felnyitásához nyomja meg az
5-ös gombot.
Vegye ki a portartályt.
Ürítse ki a portartályt!
Ehhez meg kell nyomnia a portartályon
lévő gombot. Utána csukja vissza a
portartály fedelét!
Vegye ki a szűrőkazettát és a
szűrőbetétet! Kiporolással és fi nom
kikeféléssel tisztítsa meg a szűrőket!
Erősebb elszennyeződés esetén:
Mossa ki mindkettőt enyhén szappanos
vízben, utána öblítse ki őket, és hagyja
őket megszáradni!
Vegye ki a szűrőkosarat! Kiporolással
és fi nom kikeféléssel tisztítsa meg a
szűrőkosarat!
Erősebb elszennyeződés esetén:
Mossa ki enyhén szappanos vízben,
utána öblítse ki, és szárítsa meg!
Figyelem: Előfordulhat, hogy a szűrők,
még ha tisztának látszanak is, teli
vannak fi nom porral.
77
05-BS 1240 Neu 77 22.04.2005, 9:40:06 Uhr
Page 78

H
Motorvédő fi lter
• Minden harmadik ürítés után, vagy ha erősebben elszennyeződtek, tisztí-
tsa meg a szűrőket oly módon, hogy a fúvásiránnyal szemben vízsugarat
folyat át a szűrőbetéten!
• A szűrőket mindig csak teljes megszáradás után helyezze vissza!
Vegye fi gyelembe az alábbi fontos tájékoztatást!
• A használat körülményeitől függően, pl. fi nom por beszívása esetén, rövi-
debb időközökben is szükségessé válhat a tisztítás.
• Ha csökkenne a porszívó szívásteljesítménye, a leírt módon tisztítsa meg
a szűrőket!
• Ha működés közben hirtelen lecsökken a szívásteljesítmény, ez annak a
jele lehet, hogy eldugultak a szűrők.
Lehetséges ok: A szűrők eldugulása miatt a készülék a melléklégszelepen
(9) szívja be a motor hűtéséhez szükséges levegőt. Ez a motor óvása végett
történik.
Kapcsolja ki a készüléket. Tisztítsa meg a szűrőket a leírt módon vízzel! Csak
akkor vegye újra használatba a készüléket, amikor a szűrők már megszáradtak.
Vegye ki a motorvédő szűrőt és a
levegőkifúvó-szűrőt! Kiporolva és fi nom
kikefélve tisztítsa meg őket!
Erősebb elszennyeződés esetén:
Mossa ki mindkettőt enyhén szappanos
vízben, utána öblítse ki őket, és hagyja
őket megszáradni!
Tisztítás és tárolás
Tisztítás
• Tisztítás előtt húzza ki a dugaszt a konnektorból!
• A külső burkolatot száraz ruhával törölve tisztára!
• Kb. minden 3. ürítés után tisztítsa meg a motorvédő szűrőt! Mossa ki a fi ltert
meleg vízben, adalékszer nélkül! Akkor helyezze vissza, amikor már teljesen
megszáradt.
Tárolás
• Csévélje fel teljesen a kábelt!
• Dugja a fejen lévő horgot a készülék alsó felén lévő tárolótámaszba!
78
05-BS 1240 Neu 78 22.04.2005, 9:40:07 Uhr
Page 79

Ezt a készüléket az Európa Tanács minden vonatkozó aktuális irányelve szerint
(pl. elektromágnesesség-elviselő képesség vagy kisfeszültség-elviselő képesség)
ellenőriztük, és a legújabb biztonságtechnikai előírások szerint készült.
Megjegyezzük az esetleges müszaki változásokat!
Garancia
Garanciális igényeivel forduljon, kérem, a szerződéses kereskedőjéhez!
A garancia igazolására a pénztári nyugta szolgál. E nélkül az igazolás nélkül sem
díjmentes csere, sem díjtalan javítás nem végezhető.
Garanciális esetben eredeti csomagolásában adja át az alapkészüléket a pénz-
tári bizonylattal együtt annak a kereskedőnek, akitől a készüléket vásárolta!
*) A tartozékok hibái nem eredményezik automatikusan az egész készülék díjtalan
cseréjét. Ilyen esetekben forduljon „forró vonalunkhoz”! Az üvegtörésből, ill. a
műanyag alkatrészek töréséből eredő hibák megszüntetése mindenkor térítésköteles.
Sem az elhasználódó tartozékokban, ill. kopó alkatrészekben (pl. szénkefe,
dagasztóhorog, hajtószíj, póttávvezérlő, pótfogkefe, fűrészlap stb.) bekövetkező
hibák, sem a tisztítás, karbantartás vagy a kopó alkatrészek cseréje nem esik a
garancia hatálya alá, következésképp térítésköteles.
Illetéktelen beavatkozás a garancia megszűnését eredményezi.
A garanciális idő után
A garanciális idő eltelte után a megfelelő szakkereskedésben vagy javítószolgálatnál végeztethet térítésköteles javításokat.
H
79
05-BS 1240 Neu 79 22.04.2005, 9:40:08 Uhr
Page 80

H
A „kuka“ piktogram jelentése
Kímélje környezetünket, az elektromos készülékek nem a háztartási szemétbe
valók!
Használja az elektromos készülékek ártalmatlanítására kijelölt gyűjtőhelyeket,
ott adja le azokat az elektromos készülékeit, amelyeket többé már nem kíván
használni!
Ezzel segítséget nyújt ahhoz, hogy elkerülhetők legyenek azok a hatások,
amelyeket a helytelen „szemétre dobás“ gyakorolhat a környezetre és az emberi
egészségre.
Ezzel hozzájárul az újrahasznosításhoz, a recyclinghoz és a kiöregedett elektromos és elektronikus készülékek értékesítésének egyéb formáihoz.
Az önkormányzatoknál vagy a polgármesteri hivatalokban tájékoztatást kaphat
arról, hogy hova viheti a kiselejtezett készülékeket
Az EU sok országában már 2005. augusztus 13-ától kezdve tilos a kiöregedett
elektromos és elektronikus készülékeket a háztartási szemétbe dobni.
Németországban 2006. márciustól 23-ától.
80
05-BS 1240 Neu 80 22.04.2005, 9:40:08 Uhr
Page 81

Общие указания по технике безопасности
• Перед началом эксплуатации прибора внимательно прочитайте
прилагаемую инструкцию по эксплуатации и сохраните ее в надежном
месте, вместе с гарантийным талоном, кассовым чеком и, по
возможности, картонной коробкой с упаковочным материалом.
• Пользуйтесь прибором только частным образом и по назначению. Прибор
не предназначен для коммерческого использования. Не пользуйтесь
прибором под открытым небом (исключая приборы, эксплуатация
которых под открытым небом допустима). Предохраняйте прибор
от жары, прямых солнечных лучей, влажности (ни в коем случае не
погружайте его в воду) и ударов об острые углы. Не прикасайтесь к
прибору влажными руками. Если прибор увлажнился или намок, тут же
выньте вилку из розетки. Не прикасайтесь к мокрым местам.
• После эксплуатации, монтаже принадлежностей, чистке или поломке
прибора всегда вынимайте вилку из розетки (тяните за вилку, а не за
кабель).
• Не оставляйте включенные электроприборы без присмотра. Если
возникнет необходимость отлучиться, то выключите электроприбор или
выньте вилку из розетки (тяните за вилку, а не за кабель).
• Для защиты детей от поражений электротоком, следите за тем, чтобы
кабель не висел где попало и дети не имели доступа к прибору.
• Регулярно осматривайте прибор и кабель на предмет возможных
повреждений. Ни в коем случае не включайте прибор, имеющий
повреждения.
• Ни в коем случае не ремонтируйте прибор самостоятельно, а
обращайтесь в таком случае за помощью к специалисту, имеющему
соответствующий допуск. Из соображений безопасности, замена сетевого
шнура на равнозначный допускается только через завод-изготовитель,
нашу сервисную мастерскую или соответствующего квалифицированного
специалиста.
• Используйте только оригинальные запчасти.
• Пожалуйста, соблюдайте нижеследующие „Специальные указания по
технике безопасности ...“.
Специальные указания по технике безопасности
• Не пользуйтесь пылесосом для удаления влажной пыли или жидкостей!
• Не пылесосьте горячую золу, острые или режущие предметы!
• Не пользуйтесь электроприбором во влажных помещениях!
• Ни в коем случае не работайте без фильтра. После каждой cмены
фильтра обязательно проверьте его правильную посадку!
• Во время работы держите пылесосную трубу на расстоянии от волос,
одежды и частей тела!
• Держите пылесос на расстоянии от источников тепла таких как:
радиаторы, печи и т.д..
81
RUS
05-BS 1240 Neu 81 22.04.2005, 9:40:08 Uhr
Page 82

RUS
Кожух выпускного фильтра
1
Разъем для подключения
2
пылесосного шланга фильтровальной насадкой
Ручка для переноски с кнопкой
3
механизма смотки кабеля
Pегулятором мощности
4
Обзор деталей прибора
Кнопка отсека фильтра
5
Пылесборник с
6
Сетевой шнур
7
Выключатель
8
9 Побочный воздушный вентиль
Подготовка к работе
1. Вставьте пылесосный шланг в отверстие отсека мешка-пылесборника,
проследите чтобы он механически зафиксировался.
2. Чтобы снять шланг обратно, нажмите на кнопку около него.
3. Держите кнопку нажатой и потяните за шланг.
4. При необходимости вставьте пылесосную трубу в рукоятку.
Порядок работы с электроприбором
1. Насадите необходимую принадлежность.
2. Отмотайте кабель на необходимую длину, вставьте сетевую вилку в
розетку с напряжением сети 230 в, 50 гц, оснащенную устройством
токовой защиты и установленную в соответствии с предписаниями, затем
включите электроприбор, нажав на выключатель ВКЛ/ВЫКЛ.
3. При помощи регулятора установите необходимую мощность.
4. Пылесосьте с равномерной скоростью. Давить нет необходимости.
5. Внимание: следите за радиусом захвата пылесоса, ограниченного длиной
отмотанного кабеля!
Регулятор мощности
Слабая мощность: для занавесей, тонкой материи
Средняя мощность: для велюровых и текстильных полов с длинным
Большая мощность: для грубых ковров и полов
Механизм сматывания сетевого шнура
Пожалуйста не вытягивайте сетевой шнур далее желтой метки. И ни в коем
случае не вытягивайте его до красной метки, это может привести к поломке
механизма сматывания. Подобные поломки не попадают под гарантию.
Сматывание
Нажмите на кнопку механизма сматывания и помаленьку подавайте кабель.
Держите кабель крепко в руках, чтобы предотвратить его хлестание.
ворсом
82
05-BS 1240 Neu 82 22.04.2005, 9:40:09 Uhr
Page 83

Телескопическая пылесосная труба
1. Регулируется индивидуально под ваш рост. Разблокируйте соединение,
провернув толстую часть трубы влево.
2. Отрегулируйте длину пылесосной трубы. Заблокируйте соединение,
провернув толстую часть трубы вправо.
Сопла-насадки
Узкое сопло/
сопло-щетка: для удаления пыли в щелях и пазах.
сдк дл ол: для удаления пыли с ковров и гладких
Дл бол лгкого д сдк дл
Ко: ск коо слд , об
Дл ск, , д оос
Воздушная заслонка
Для регулировки потока воздуха или для освобождения сопла от
присосавшихся к нему предметов откройте воздушную заслонку,
находящуюся на рукоятке.
Фильтр
Пылесос оснащен системой 3-х кратного фильтрования.
1. Прозрачный контейнер-пылесборник
• Обычная система с фильтром-пылесборником заменена
прозрачным контейнером-пылесборником. Крупная и мелкая пыль
отфильтровывается, благодаря мощной, закрученной струе воздуха.
• Закупка новых разовых фильтров отпадает.
• Уровень заполнения контейнера всегда видно, он легко очищается.
• Когда уровень заполнения пылесборника достигнет метки „МАХ“
поступайте следующим образом:
Пожалуйста учтите, что узкое сопло/сопло-щетка
является насадкой „2 в 1“.
поверхностей.
ол олк о сс
соосу бо.
бл дко к сдк дл ол.
ободос д ого д
ок, одс сдк дл ол.
г ого обо оло. !о
ку к ( о д
к сдк дл ол).
RUS
83
05-BS 1240 Neu 83 22.04.2005, 9:40:10 Uhr
Page 84

RUS
Нажмите кнопку 5, чтобы открыть
отсек фильтра.
Выньте мешок-пылесборник.
Прочистите пылесборник!
Для этого нажмите кнопку около
отсека пылесборника. По окончании
опять закройте крышку отсека
палесборника.
Выньте фильтровальную кассету и
фильтровальный войлок. Прочистите
фильтры легким простукиванием,
применяя мягкую кисточку.
При сильном загрязнении: промойте
оба в легком мыльном растворе,
84
в заключении прополоскать и
высушить.
Выньте фильтровальную
корзинку. Прочистите ее легким
простукиванием, применяя мягкую
кисточку.
При сильном загрязнении: промыть
в легком мыльном растворе, в
заключении прополоскать и высушить.
Примечание: даже если фильтр
выглядит чистым он может быть забит
мелкой пылью.
05-BS 1240 Neu 84 22.04.2005, 9:40:10 Uhr
Page 85

Выньте защитный фильтр мотора
и выходной фильтр. Прочистите
фильтры легким простукиванием,
Защитный фильтр мотора
• После каждой третьей чистки или сильного загрязнения промойте
фильтр, направив на него струю проточной воды против направления
всасывания воздуха.
• После полного просыхания вставьте его обратно!
Пожалуйста учтите эти важные примечания!
• Чистка фильтра может стать необходимой и через короткое время, в
зависимости от условий эксплуатации, например если сосать очень
мелкую пыль.
• Если мощность пылесоса ослабла, прочистите фильтр, как это было
описано.
• Если мощность пылесоса во время работы неожиданно ослабеет, это
может быть признаком закупорки фильтра.
Возможные причины: по причине закупорки фильтра, воздух для
охлаждения мотора поступает через побочный воздушный вентиль (9).
Это необходимо для защиты мотора от перегрева.
Выключите пылесос. Промойте фильтр, как это было описано.
Просушите фильтр, вставьте его обратно и только после этого включите
пылесос.
применяя мягкую кисточку.
При сильном загрязнении: промойте
оба в легком мыльном растворе,
в заключении прополоскать и
высушить.
Чистка и хранение
Чистка
• Перед чисткой выньте сетевую вилку из розетки!
• Протрите корпус сухой тряпкой.
• Прочищайте защитный фильтр мотора после каждой 3. чистки мешкапылесборника. Промойте фильтр в теплой воде, без добавок. После
полного высыхания вставьте его обратно.
Хранение
• Полностью смотайте кабель.
• Вставьте крюк сопла в отверстие, находящееся снизу пылесоса.
RUS
85
05-BS 1240 Neu 85 22.04.2005, 9:40:11 Uhr
Page 86

Это изделение прошло все необходимые и актуальные проверки,
RUS
предписанные директивой СЕ, к прим. на электромагнитную совместимость
и соответствие требованиям к низковольтной технике, оно было также
сконструировано и построено с учетом последних требований по технике
безопасности.
Мы оставляем за собой право на технические изменения!
Гарантийное обязательство
Гарантийный срок на территории Российской Федерации устанавливается
полномочными представителями.
Кассовый чек является гарантийным талоном. Без него невозможен
бесплатный ремонт или замена изделия.
В случае возникновжния притензий по гарантии, предъявите изделие в
полнойкомплектации, с оригинальной упаковкой и кассовым чеком
торговой точке, продавшей это изделие.
*) Дефекты принадлежностей не служат причиной для автоматической
замены всего изделия. В этом случае позвоните нам, пожалуйста, по
горячей линии! Разбитые стеклянные и поломаные пластмассовые детали
возмещаются только за дополнительную оплату!
Дефекты изнашиваемых принадлежностей или трущихся деталей (например
контактные щетки моторов, смесительные крюки, приводные ремни,
запасные пульты управления, запасные зубные щетки, пильные полотна
и т.д.), а также чистка, техобслуживание или замена трущихся деталей не
попадают под гарантию, и поэтому проводятся за отдельную оплату!
Гарантия теряется при вскрытии изделия посторонними лицами.
После гарантии
После окончания срока гарантии, ремонт изделий производится за оплату,
соответствующими мастерскими или пунктами сервисного обслуживания.
86
05-BS 1240 Neu 86 22.04.2005, 9:40:12 Uhr
Page 87

05-BS 1240 Neu 87 22.04.2005, 9:40:12 Uhr
Page 88

05-BS 1240 Neu 88 22.04.2005, 9:40:12 Uhr
Page 89

05-BS 1240 Neu 89 22.04.2005, 9:40:12 Uhr
Page 90

Technische Daten
Modell: BS 1240
Bemessungsspannung/
-frequenz: 230 V, 50 Hz
Bemessungsaufnahme: P
P
Schutzklasse: ΙΙ
Dieses Gerät wurde nach allen zutreffenden, aktuellen CE-Richtlinien geprüft, wie
z.B. elektromagnetische Verträglichkeit
und Niederspannungsdirektive und wurde
nach den neuesten sicherheitstechnischen Vorschriften gebaut.
Technische Änderungen vorbehalten!
Bitte führen Sie das ausgediente Gerät
einer umweltgerechten Entsorgung zu.
nom.
max.
1200 W
1500 W
D-47906 Kempen/Germany · Industriering Ost 40
Internet: http://www.clatronic.de · email: info@clatronic.de
05-BS 1240 Neu 90 22.04.2005, 9:40:12 Uhr
Stünings Medien, Krefeld • 04/05
 Loading...