


CA-201

OWNER’S MANUAL
CA-201
Power Amplifier
ENGLISH..........................................................................1
FRANÇAIS
......................................................................3
DEUTSCH
........................................................................5
ESPAÑOL
........................................................................7
NEDERLANDS
..........................................................10
ΕΛΛΗΝΙΚΑ
................................................................12
............................................................................15
SPECIFICATIONS
........................................................17
V1.0
LC
JST
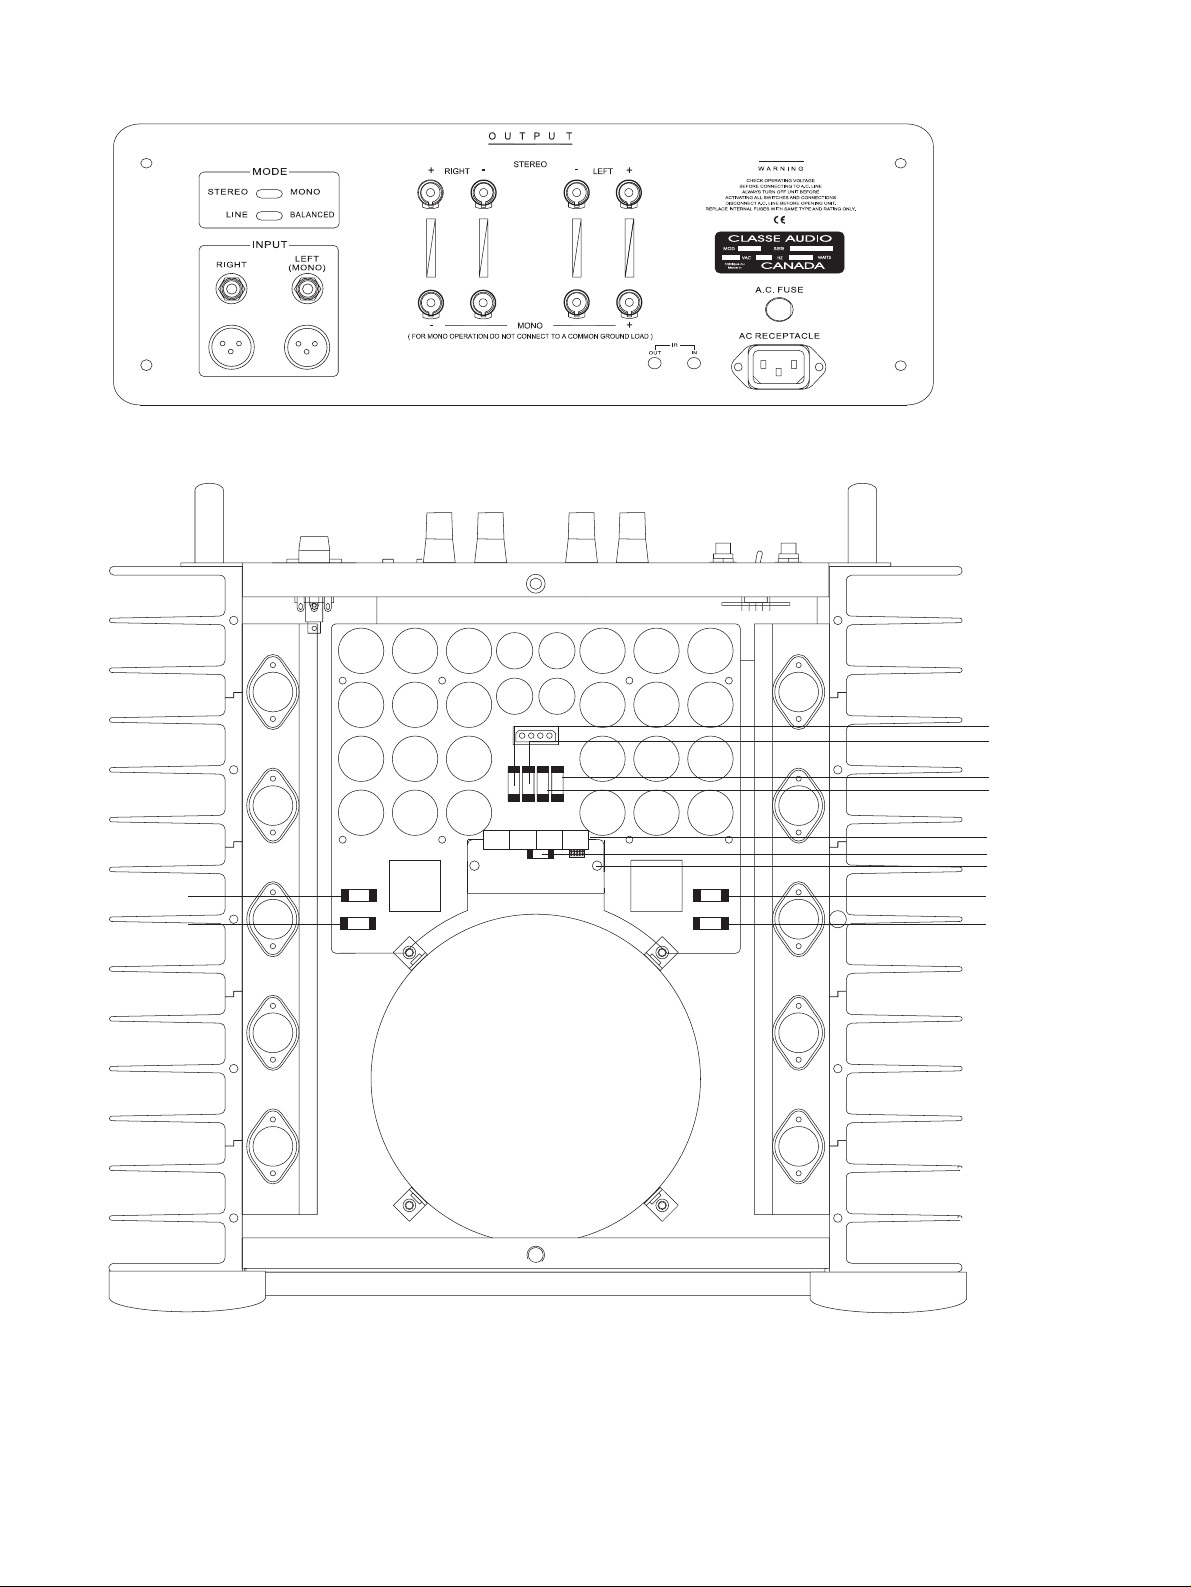
Figure 1 – Rear view
Figure 2 – Top view
Left Channel Right Channel
– Rail fuse
+ Rail fuse
– Rail fuse
+ Rail fuse
ON/OFF jumpers
aux AC fuse
aux AC jumper
J0 J1 J2 J3
+ Mosfet fuse
– Mosfet fuse
+ Mosfet fuse
– Mosfet fuse

J3 J2 J1 J0 ADDRESS RC Button Auto ON Note
XXXX0Amp 1NoQC setting
XXXOut1Amp 2No
X X Out X 2 Amp 3 No
X X Out Out 3 Amp 4 No
X Out X X 4 Amp 5 No
X Out X Out 5 Amp 6 No
X Out Out X 0 Amp 1 No
X Out Out Out 0 Amp 1 Yes Turn on when AC is live
OutXXX0DCNoDC level: 5v=on, 0=off
Out X X Out 1 DC No
Out X Out X 2 DC No
Out X Out Out 3 DC No
Out Out X X 4 DC No
Out Out X Out 5 DC No
Out Out Out X 0 DC No
Out Out Out Out 0 DC Yes ON as plug in
Figure 3 – Jumper settings

1
THANK YOU FROM EVERYONE AT
CLASSÉ
Thank you for purchasing the CLASSÉ CA-201
power amplifier.
We take great pride in offering components
that combine exceptional sonic performance and
long-term reliability. To do that, we have invested
in extraordinary design and manufacturing
facilities. We trust that you will enjoy your
purchase for many years to come.
CLASSÉ DESIGN PHILOSOPHY
All of our components benefit from the same
rigorous design goal: All Classé products must
reproduce music with the harmonic and spatial
integrity typical of fine instruments heard in a
live, unamplified performance.
Single Circuit Design
To this end, we make extensive use of
carefully optimized versions of the same basic
circuit precisely matched to specific power
requirements. This means that all Classé line
level components and power amplifiers benefit
from years of refinement. However, our efforts
do not stop here.
Listening: The Critical Design Element
Once we determine general circuit values
for a particular application, we listen carefully
while exchanging and mixing different parts
(transistors, capacitors, wiring, PC boards, etc.)
and adjusting specific operating voltages within
proper engineering ranges.
Extended Real-World Lifespan
Every Classé component, even the most
affordable, benefits from our painstaking
approach to design parameters. The result is an
optimum balance between the often-conflicting
demands of exceptional performance and longterm reliability. Our most expensive components
gain from even tighter tolerance parts and highly
segmented and exceptionally robust power
supplies with large reserve-current capabilities.
Our Pride in Manufacturing, Your Pride
in Ownership.
We build all of our components to the highest
possible standards. From multi-layer glass-epoxy
circuit boards, the full sized power-supplies, and
the massive faceplates, every Classé product is
a tribute to both the science and art of sound
reproduction. We hope that you derive as much
pleasure and satisfaction in using your Classé as
we did in producing it.
UNPACKING & SET-UP
Your CLASSÉ CA-201 power amplifier is packed
in high den-sity, semi-rigid foam placed in a
special cardboard box. To remove the unit, open
and spread all the top flaps of the box and by its
sides, lift out the entire unit and put it on a large
flat surface. Take it out of the plastic bag and
inspect the unit for any concealed damage. Apart
from this owner‘s manual, please ensure the
following has also been included:
• DETACHABLE A.C. LINECORD
Please report any damage or missing parts to
your dealer immediately.
Place the CA-201 at or near its final set-up
position, allowing 8 inches at the rear for
tightening the speaker output connectors. For
optimum sonic performance, we recommend the
optional CLASSÉ REFERENCE A.C. LINECORD.
Consult your dealer regarding this accessory.
The power transformer in the CA-201 is
located at the front-center of the unit. Ideally,
a few feet should separate this area from
components which potentially could pick up
hum. These include preamplifiers, turntables,
and interconnect cables. In terms of providing
adequate airspace for cooling, a good rule of
thumb is to allow 6 inches above and 3 inches
on each side of the unit.
Check the Serial Number sticker on the back
of the unit for the correct operating voltage.
The CA-201 has one external AC fuse, the
rating of which should be as follows:
LINE VOLTAGE FUSE RATING
100 or 120 V.A.C. 10 AMP SLOW BLOW
125 or 250 volts
220 or 240 V.A.C. 8 AMP SLOW BLOW
250 volts
GENERAL CONNECTIONS
A.C. Line
Insert the linecord into the A.C. receptacle on the
rear of the unit. Please make sure you have
previously hooked up the speakers and
preamplifier to your amplifier before connecting
the AC power cord to the amplifier.
CAUTION: Safety instructions
Disconnect AC line cable while making all
connections. “Floating the ground”, or defeating
the ground on a 3-prong linecord may create a
shock hazard. Connect all interconnect cables
between the electronics before connecting the
A.C. linecords to the wall outlets. This will reduce
the potential shock hazard.
Stereo
Input and output connectors are clearly
marked on the back of the amplifier. Left/Right
connections are oriented from the front of the
unit. Stereo output connections are marked
above the connectors. Switch stereo/mono
switch to STEREO position. (The CA-201 is
preset at the factory for STEREO.)
Use only high quality interconnect and
loudspeaker cables, and make all connections
tight. If the RCA input plugs are loose, remove
them and pinch down the ground leaves slightly
with pliers. Observe correct phasing of the
loudspeaker connections, and tighten. DO NOT
OVERTIGHTEN the output connectors as this can
result to damage your unit.
Mono
Please read through the previous Stereo section
for general notes on securing good connections,
and safety tips. If the unit has been previously
used in stereo, make sure it is OFF, and remove
all connections, including the AC line cable.
Make sure the STEREO/MONO switch is
switched to the MONO position.
NOTE: The Stereo-Mono switch will not operate
if the amplifier is turned on, you will NOT be able
to change from one mode to the other, as the
mode is “locked” while the amplifier is on.
The MONO “Input” is the “left channel input”,
as marked. The unused right channel input is
automatically disconnected. Correct output
phase MONO connections are marked below
the connectors.
Repeat the above MONO settings and
connections on the second CA-201 to be
used for the other channel.
Please remember that the negative output
connection of a bridged amplifier is NOT a
ground. Do not use a “common ground” switchbox set-up. Do not use with electronic crossovers
which have a common ground. Connecting two
bridged amplifiers to a common ground device
of any sort will cause the amplifiers to fail.
IR Out and In:
The CA-201 may also be turned on and off using
our SSP-75 Surround Sound Processor, utilising
the IR OUT and IN jacks. To turn on your CA-201
with the SSP-75, Disconnect you CA201 from
the AC line completely, open the top cover and
locate the 4 internal jumpers inside the CA-201
(see fig. 2) beside the Mosfet fuses. When facing
the amplifier from the front, remove the jumper
located completely to the right and save this
jumper. Re-install the top cover. Install a mini jack
into IR IN at the back of the CA-201 and plug
the other end of the mini jack into the 5VDC
mini jack at the back of your SSP-75. When the
Standby button of the SSP-75 is pressed, it will
now activate the turn on turn off circuitry of
your CA-201. Several amplifiers may be turned
on automatically in sequence or all at once,
depending upon the configuration of the jumper
settings inside the unit (see fig.2) alongside the
Mosfet fuses. The table in Figure 3 tells you
which jumper should be inserted or removed
to obtain the correct sequence on which you
will want your amplifier to turn on.
2
Sequential Turn On
Your CA-201 is factory set as being the 1st
amp (AMP 1) to be turned on in sequence. To
re-program your unit so that it would be the
2nd, 3rd, 4th, 5th or 6th amps to be turned on
in sequence you have to follow this procedure.
Push and hold the power button, when the LED
becomes solid green, release the button and then
press again. The number of times you press will
determine when the amplifier will turn on in
the sequence.
EX: Push and hold power button until solid
green, when power LED is solid green, depress
button and then push 2 times. Then your
amplifier will be the 2nd one to turn on in
the sequence.
CONNECTIONS FOR LINE OR
BALANCED INPUTS:
The CLASSÉ CA-201 power amplifier is
equipped with both line and balanced inputs.
Either one may be used SEPARATELY, BUT NOT
SIMULTANEOUSLY. The balanced inputs must be
connected to a pre-amplifier that has balanced
main outputs. Balanced inter-connects with
“XLR” connectors are also required. Regardless
of the amplifier inputs used, stereo or mono
operation is possible on the CA-201.
Line Inputs
(The default amplifier setting is for “LINE”.) If
you wish to use the amplifier with single-ended
interconnects and the amplifier is set for
BALANCED mode, turn off the amplifier and
move the LINE/BALANCED switch to the position
marked “LINE”.
NOTE: The LINE/BALANCED switch will
not operate if the amplifier is turned on, you
will NOT be able to change from one mode to
the other, as the mode is “locked” while the
amplifier is on. Connect the line interconnects to
the RCA input jacks on the rear panels of
the CA-201. The balanced connectors are
automatically disabled.
Balanced Inputs
(The default amplifier setting is for “LINE”.) If
you wish to use the amplifier with Balanced
interconnects and the amplifier is set for LINE
mode, turn off the amplifier and switch the
LINE/BALANCED switch to the position marked
“BALANCED”. A balanced preamplifier and
balanced interconnect cables are also required.
NOTE: The LINE/BALANCED switch will
not operate if the amplifier is turned on, you
will NOT be able to change from one mode
to the other, as the mode is “locked” while
the amplifier is on. For use with balanced
preamplifiers other than Classé, the wiring of the
3-pin XLR connectors must be matched to that of
the CLASSÉ CA-201 which are wired as follows:
• PIN 1: DRAIN
• PIN 2: POSITIVE (NON-INVERTED)
• PIN 3: NEGATIVE (INVERTED)
All Classé preamplifiers and amplifiers are
configured as above. Some preamplifiers from
other manufacturers have PIN-3 set as the
positive or “HOT” side. If this is true of your
preamplifier, and you wish to maintain absolute
phase throughout your system, the interconnects
must swap connections on one end of the cable
from pin 2 to 3 and from pin 3 to 2. An equally
good way of reversing phase is to swap red for
black (+ for -) on the speaker cable ends at either
their amplifier or speaker end. (Even if your
preamplifier has pin three hot, you should check
with the manufacturer to ensure the preamplifier
does not invert phase internally as well).
Having confirmed or established the correct
phasing, be sure the amplifier is off, then plug
each of the XLR connectors of the balanced
interconnect into the locking XLR connectors
on the rear panel of the CA-201. Push the
connectors in until the locking mechanism clicks.
(To remove the connectors, press the tab above
the connector while pulling gently on the
connector body.)
Mono Operation
As stated above, either the line or balanced
inputs can be used in stereo or mono. Connect
a single interconnect, either line or balanced, to
the left channel input of each amplifier. See the
“Mono” section above for complete details.
NOTE: Neither the Stereo-Mono switch nor
LINE/ BALANCED switch will operate while the
amplifier is turned on. You will NOT be able to
change from one mode to the other, as these
modes are “locked” while the amplifier is on.
Protection circuit
The Classé CA-201 is equipped with rail fuses to
protect the output drivers (GDB6, 6 amps fast
blow. fig.2) and Mosfet fuses (2AG 1/2 PT,
1
/
2
amp fast blow) to protect the Mosfets, which
are used as pre-drivers for the output stage of
the amplifier. In the event that a short circuit
or other problems would occur at the output of
the amplifier, one or more of these fuses may
blow in an attempt to protect the amplifier. In
addition to the fuses, the unit has a circuit for
the detection of unusual distortion characteristics
and/or DC content in the incoming audio signal.
There is also an AC line fuse protecting the unit.
It is located at the back of the unit immediately
above the AC receptacle (see fig.1).
If the protection circuit of the unit is
triggered or any of the fuses has blown,
the FRONT PANEL POWER LED will go to
BLINKING GREEN, indicating a “fault”
condition.
IF THE PROTECTION CIRCUIT HAS
BEEN TRIGGERED, TURN THE CA-201 OFF. After
the situation which has triggered the protection
circuit has been clearly identified and corrected,
attempt to re-start the unit. IF THE UNIT STILL
GOES INTO PROTECTION MODE, OR IF IT
APPEARS THAT PROTECTION FUSES DID BLOW,
CONTACT YOUR LOCAL DEALER. DO NOT TRY
TO CHANGE A BLOWN FUSE. REPLACING A FUSE
WITHOUT CHECKING FOR COMPONENT FAILURE
COULD RESULT IN FURTHER, SERIOUS DAMAGE
TO VITAL COMPONENTS IN YOUR AMPLIFIER.
CONTACT YOUR LOCAL DEALER or Customer
Service at the Classé Audio, Inc
+1(514) 636 63 84.
CA-201 FEATURES:
Newly developed special Classé “UHC
TRANSFER” power supply section. Current
capacity increased above standard units. All
new Classé PCB circuit boards with “UHC
TRANSFER” characteristics. Reduction of wiring
and connections up to 70%. True differential
amplifier circuits from input to output. Both line
and balanced operation externally switchable.
1
/2"
thick brushed Soft Shadow Silver faceplate with
Satin Black curved pillars at both ends.
Notice to all Classé Product owners:
Thank you for your purchase of a Classé Audio
component.
All of us at Classé have taken extreme care to
ensure that your purchase will become a prized
investment. We are proud to inform you that all
Classé Audio components have been officially
approved for the European Community CE mark.
This means that your Classé product has been
subjected to the most rigorous manufacturing
and safety tests in the world, and have proven
to meet or exceed all European Community CE
requirements for unit to unit consistency and
consumer safety.
All of us at Classé Audio wish you many years
of musical enjoyment.
As of July 18, 1996, Classé Audio has been
granted Certificate No: C401CLA1.MGS, which
indicates CE approval for all models of the Classé
Audio product line.
CLASSÉ AUDIO
5070 François Cusson
Lachine, Quebec
Canada H8T 1B3
Telephone: +1 (514) 636-6384
Fax: + 1 (514) 636-1428

3
FRANÇAIS
TOUTE L’ÉQUIPE DE CLASSÉ VOUS
REMERCIE !
Nous vous remercions pour l’achat de ce
amplificateur de puissance CLASSÉ CA-201.
Nous prenons un soin jaloux à concevoir et
proposer des maillons qui associent une
musicalité exceptionnelle avec une fiabilité hors
pair. Pour cela, nous avons choisi un dessin très
original pour nos appareils, et l’avons équipé de
nombreuses fonctions particulièrement
ergonomiques. Nous sommes ainsi certains que
vous profiterez de votre achat pendant de très
nombreuses années.
PHILOSOPHIE DE CONCEPTION
CLASSÉ
Tous nos maillons sont conçus dans le même
souci de perfection et de rigueur : les appareils
Classé doivent reproduire intégralement la
Musique, avec tous ses harmoniques, et le
respect total de la position et de l’ampleur des
instruments dans l’espace. Exactement comme
dans une écoute en direct, sans amplification
électronique aucune.
Un circuit électronique unique
Pour cela, nous utilisons principalement un circuit
électronique de conception unique, reprenant sur
tous nos maillons les mêmes principes de base
adaptés aux demandes en puissance de chaque
appareil. C’est ainsi que tous les
préamplificateurs Ligne et amplificateurs de
puissance Classé bénéficient depuis des années
de la même qualité sonore. Cependant, nos
efforts ne s’arrêtent pas là.
L’écoute : l’élément le plus critique pendant
la conception
Une fois que nous avons déterminé les valeurs
précises de chaque circuit électronique, en
fonction de chaque application particulière, nous
procédons à de très nombreuses écoutes
attentives en modifiant et en associant certains
composants (transistors, condensateurs, câblage,
cartes circuits imprimés, etc.). Puis nous réglons
très précisément les différentes tensions
nécessaires au parfait fonctionnement de ces
composants.
Une durée de vie exceptionnelle
Chaque maillon Classé, même le plus abordable,
bénéficie de cette très soigneuse approche dans
la conception. Le résultat est un équilibre parfait
entre les demandes souvent opposées que
représentent une musicalité exceptionnelle et une
fiabilité à toute épreuve. Dans ces deux
domaines, les gains sont obtenus par l’utilisation
de composants aux tolérances très strictes, avec
une implantation large et soignée, et l’emploi
d’alimentations exceptionnellement robustes,
disposant toujours de très grandes réserves de
courant.
Notre fierté est dans la fabrication. La vôtre
est dans la possession.
Nous construisons donc tous nos maillons selon
les standards en vigueur les plus élevés. Qu’il
s’agisse des circuits imprimés multicouches en
verre époxy, des alimentations surdimensionnées,
ou des très épaisses faces avant des appareils,
chaque appareil Classé devient une référence
dans l’art de maîtriser à la fois la technique
électronique et celui de la reproduction sonore et
musicale. Nous espérons que vous tirerez autant
de plaisir et de satisfaction à utiliser votre
nouveau Classé que nous en avons eu à le
concevoir et à le fabriquer.
DÉBALLAGE & MISE EN SERVICE
Votre amplificateur de puissance CLASSÉ CA-201
est emballé dans une coquille moulée semirigide, placée dans un carton spécial. Pour sortir
l’appareil, ouvrez et repliez tous les rabats
supérieurs du carton, tirez l’ensemble appareil
plus protection interne et posez-le sur une
surface plane. Ôtez le sac plastique de protection
et inspectez soigneusement l’appareil pour
repérer tout dommage éventuel. En plus de ce
manuel d’utilisation, vous trouverez également
dans l’emballage :
• CÂBLE SECTEUR DÉTACHABLE
Veuillez avertir immédiatement votre revendeur
de toute détérioration constatée sur l’appareil,
ou accessoire manquant.
Posez le CA-201 à proximité de sa position
normale, ou directement en place, en veillant à
conserver un espace de 15 à 20 centimètres
derrière ses prises de branchement pour les
enceintes acoustiques. Pour les meilleures
performances musicales possibles, nous vous
conseillons le câble secteur optionnel CLASSÉ
RÉFÉRENCE A.C. LINECORD. Consultez votre
revendeur pour vous procurer cet accessoire.
Le transformateur d’alimentation du CA-201 est
placé au centre et à l’avant du châssis de
l’appareil. Idéalement, les autres maillons du
système susceptibles de capter des parasites dus
au secteur doivent rester éloigner de quelques
centimètres de ce transformateur. Cela inclut les
préamplificateurs, platines tourne-disque et
câbles de liaison. Afin de permettre une bonne
ventilation, conservez un espace d’environ
15 centimètres au-dessus de l’amplificateur, et
une dizaine de centimètres de part et d’autre.
Vérifiez les inscriptions portées sur l’étiquette en
face arrière de l’appareil, indiquant la tension
correcte de fonctionnement. Le CA-201 dispose
aussi d’un fusible de protection secteur externe,
qui doit porter les inscriptions suivantes :
TENSION VALEUR
D’ALIMENTATION DU FUSIBLE
100 ou 120 V AC 10 A, fusion retardée,
125 ou 250 volts
220 ou 240 V AC 8 A, fusion retardée,
250 volts
BRANCHEMENTS GÉNÉRAUX
Câble secteur
Insérez le câble secteur dans la prise
correspondante en face arrière de l’appareil.
Avant cela, vérifiez que les enceintes acoustiques
et le préamplificateur ont été correctement
branches sur l’amplificateur de puissance.
ATTENTION : Instructions de sécurité
Débranchez le câble secteur des que vous
effectuez un branchement. L’utilisation d’une
masse “flottante”, ou l’absence de branchement
effectif de la terre peut être cause
d’électrocution. Branchez toujours tous les câbles
de liaison entre les différents maillons
électroniques avant de brancher les câbles
secteur dans les prises murales. Cela réduit les
risques potentiels d’électrocution.
Stéréo
Les canaux sur les prises d’entrée et de sortie
sont clairement indiqués à l’arrière de
l’amplificateur. Les branchements gauche/droite
(left/right) sont orientés par rapport à la face
avant. Les branchements des sorties stéréo sont
marqués sur les prises correspondantes. Placez le
sélecteur “stereo/mono” sur sa position STÉRÉO.
(Cette position est préréglée en usine).
Utilisez uniquement des câbles de liaison de très
grande qualité, et vérifiez la qualité de tous les
contacts. Si les prises RCA tournent trop
librement, débranchez-les et pliez très
délicatement leurs pattes périphériques avec des
petites pinces. Vérifiez la mise en phase correcte
des enceintes acoustiques (respect du plus et du
moins), et vissez correctement les bornes. NE PAS
CHERCHER A VISSER TROP VIOLEMMENT ces
bornes de sortie, sous peine de détérioration.
Mono
Veuillez lire les indications sur la qualité des
connexions développées dans le paragraphe
précédent “STÉRÉO”. Si l’appareil était
auparavant utilisé en stéréophonie, vérifiez qu’il
soit éteint et débranchez tous les câbles, y
compris le câble secteur. Vérifiez que le sélecteur
MONO/STÉRÉO est placé sur sa position
“MONO”.
NOTE : ce sélecteur n’a aucun effet si
l’amplificateur est encore sous tension, car le
choix reste volontairement “verrouillé” tant que
l’amplificateur est en position de
fonctionnement.
L’entrée à utiliser en mode MONO est l’entrée
gauche (left), comme repéré. L’entrée droite
(right) inutilisée est automatiquement
déconnectée. Les branchements corrects à
respecter en mode MONO sont gravés sous les
prises.
Répétez ces mêmes opérations sur le second
amplificateur CA-201 éventuellement utilisé pour
le second canal.
N’oubliez pas que la prise de sortie négative (le
“moins”) utilisé dans ce mode ponté mono
 Loading...