

Page 1

Page 2
INTRODUCTION
The Clarion BCX100 is a Sonic Bass Enhancer that allows you to choose from
three different fixed 18db per octave lowpass crossover points. It also features
a delayed remote turn-on circuit that will trigger the amplifiers turn-on circuit
3ms later, eliminating any remote turn-on pop.
The BCX100 includes the following features:
• Selectable Lowpass Crossover
• Remote Subwoofer Level Control
• Gold-Plated RCA input/output connectors
• Delayed Remote turn-on circuit
• Power-on LED
• Subsonic Filter
ABOUT THE MANUAL AND WARRANTY
To start enjoying your new Clarion BCX100 Sonic Bass Enhancer, please read
the instructions listed in this manual. Keep all instructions for future reference.
Please fill out and send in the enclosed warranty card to protect your purchase
and aid in warranty service. Also, save your original sales receipt as proof of
purchase.
TABLE OF CONTENTS
Description • • • • • • • • • • • • • • • • • • • • • • • • • • • • • • • • • • • • • •2
Input/Output Connections and Audio Controls • • • • • • • • • • • • • • •3
Mounting Precautions • • • • • • • • • • • • • • • • • • • • • • • • • • • • • • •4
Wiring Precautions • • • • • • • • • • • • • • • • • • • • • • • • • • • • • • • • •4
Applications • • • • • • • • • • • • • • • • • • • • • • • • • • • • • • • • • • • • •6
Troubleshooting • • • • • • • • • • • • • • • • • • • • • • • • • • • • • • • • • • •7
Product Specs • • • • • • • • • • • • • • • • • • • • • • • • • • • • • • • • • • • •7
DESCRIPTION
The Clarion BCX100, Sonic Bass Enhancer contains a lowpass crossover that is
selectable at 70Hz, 90Hz, and 120Hz. The crossover slope is 18db per octave.
The dash mounted bass level control provides a convenient way to adjust the bass
without having to leave your seat.
The BCX100 features a remote turn-on circuit that will turn on the amplifier 3ms
after the system comes on to eliminate any system turn-on pop. The subsonic
filter allows the subwoofer amp to work efficiently by eliminated non-audible
lower frequencies that waste the power output of the amplifier.
2
Page 3
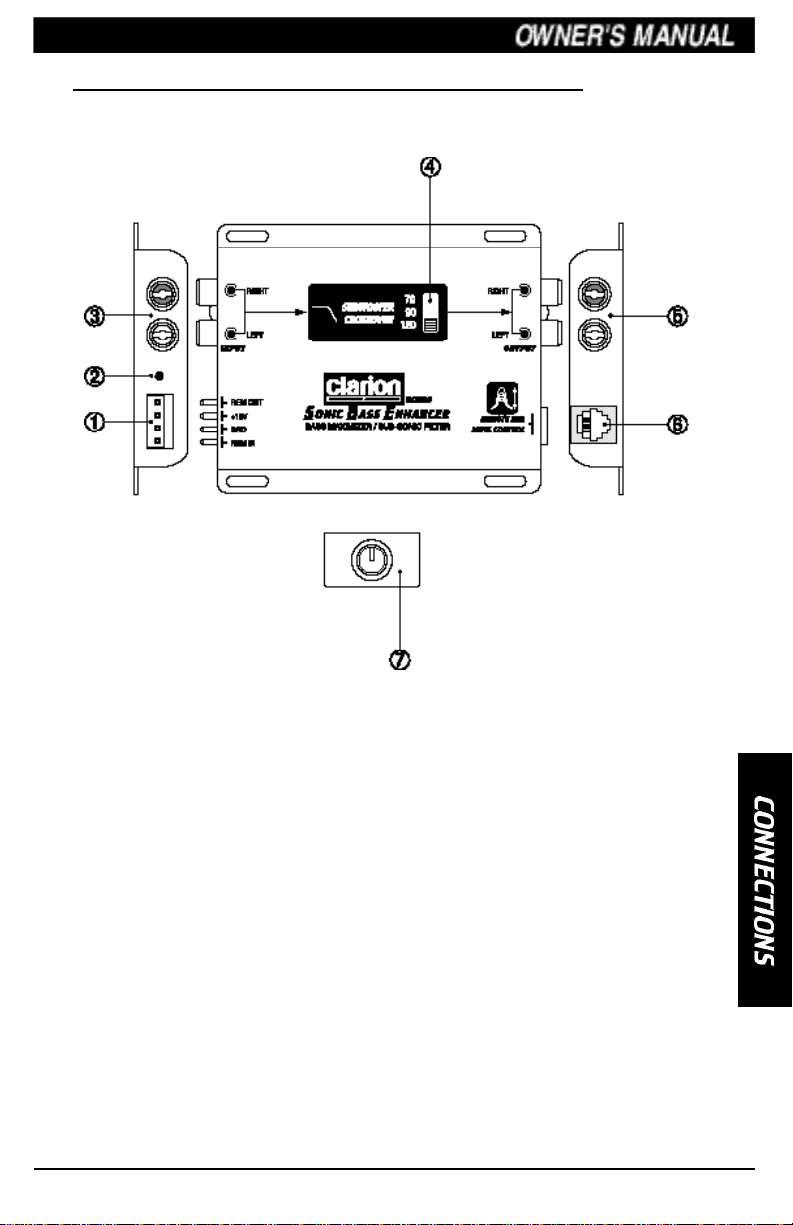
INPUT/OUTPUT CONNECTIONS AND AUDIO CONTROLS
The top panel of BCX100 contains the controls for the crossover as shown
below:
Figure 1-
1 Power Connector
2 Power Indicator
3 RCA Input
4 Sub Bass Frequency Switch
• Power Connector - Four pin connector for power, ground, remote turn-on in,
and remote turn-on out.
• Power Indicator - The power indicator will light up when the Sonic Bass
Enhancer is on.
• Gold-Plated RCA Input/Output Connectors - For increased durability the
BCX100 features Gold-plated RCAconnectors.
• Subwoofer Crossover Frequency Adjustment - Adjusts the crossover
frequency to match your subwoozfer. The crossover frequency can be set to
one of three different settings: 70Hz, 90Hz, and 120Hz.
• Remote Sub Level Control - When the remote sub level control is plugged
into the BCX100, the remote sub level control will adjust the sub output level.
5 RCAOutput
6 Remote Sub Level Connector
7 Remote Sub Level Control
3
Page 4

MOUNTING PRECAUTIONS
The BCX100 Sonic Bass Enhancer can be mounted in any convenient location
in your vehicle that allows access to the controls and is away from moisture.
The flanges on the chassis have mounting holes which can be used as a
template for screw holes. For easy system set-up, mount the Sonic Bass
Enhancer so the front panel controls will be accessible after installation.
In addition, observe the following precautions:
1. Mount the Sonic Bass Enhancer on a rigid surface. Do not install the Sonic
Bass Enhancer on plastic or other combustible materials.
2. Prior to drilling, make sure proposed mounting holes will not cut into the
fuel tank, fuel lines, brake lines (under chassis), or electrical wiring.
3. Avoid mounting to subwoofer enclosures or areas prone to vibration.
Figure 2-
WIRING PRECAUTIONS
Read all wiring precautions. If you are not sure of the connections, contact
your authorized Clarion dealer.
If you are using a source unit, without a remote turn-on lead, the BCX100 can
be turned on with a switched accessory lead. You can find this accessory
power source in the factory harness at the back of the radio. This lead turns on
and off with the key.
4
Page 5

1. Before installation, make sure the source unit Ignition Switch is in the OFF
position.
2. Disconnect the negative (-) lead of the battery before making any power
connections.
3. Aclean chassis ground connection is critical to the performance of your
Clarion BCX100. Use the shortest ground wire possible and securely connect to
the car chassis to minimize resistance and avoid noise problems.
4. Refer to the Figure 3 when making electrical connections. Connect the
Sonic Bass Enhancer’s positive (+) lead via a fuse directly to the positive (+)
terminal on the battery. Use red insulated 18-gauge (or larger) wire for the
Sonic Bass Enhancer’s positive (+) power lead and the same gauge black
insulated wire for the ground.
5. To avoid noise problems, run the Sonic Bass Enhancer’s positive (+) power
lead and the amplifier’s positive (+) power lead along one side of the vehicle to
the battery. Run the remote turn-on wire and RCA audio cables down the
center, and route the speaker wires along the remaining side. If wires must
cross, run them perpendicular to each other.
6. When creating passage holes for the power wire, use grommets to eliminate
any sharp edges created during drilling. This will protect the wire from being
nicked and causing a short circuit.
7. Extra cable can cause signal loss and act as an “antenna” for noise. Use
only high-quality RCA cables that are no longer than necessary to make a
direct connection with the source unit and amplifiers.
Figure 3-
5
Page 6

MOUNTING THE REMOTE LEVEL CONTROL
The BCX100 Remote Sub Level Control can be mounted in any convenient
location in your vehicle that allows access to the control. The flanges on the
chassis have mounting holes which can be used as a template for screw holes.
The chassis can be removed for a ISO insallation by drilling a 3/8” hole in a
blank switch plate on the dash or center console.
In addition, observe the following precautions:
1. Prior to drilling, make sure proposed mounting holes will not cut into any
electrical components or electrical wiring.
Figure 4-
APPLICATION
For BCX100 system set-up refer to Figure 5.
6
Figure 5-
Page 7

SYSTEM SET-UP
1. Set the crossover frequency control to the frequency recommended by the
speaker manufacturer.
2. Adjust the low frequency amplifier gain to optimize system performance.
TROUBLESHOOTING
Problem:
Music is not loud enough with source unit turned up.
Solution:
Output Level Controls are set incorrectly.
Problem:
Music gets loud and distorted with source unit turned up only part way.
Solution:
Output Level Controls are set incorrectly.
Gain Controls on amplifiers are set incorrectly.
Problem:
One channel does not operate.
Solution:
Swap left and right connections at the source unit. If the problem trades sides
in the vehicle, then the source unit is the defective. If the problem stays on the
same side, proceed on.
Swap left and right connections at the input to the Sonic Bass Enhancer. If the
problem trades sides in the vehicle, then the wiring is defective between the
source unit and the crossover. If the problem stays on the same side, proceed
on.
Problem:
Power indicator LED not on, there is no sound.
Solution:
Check the CONSTANT and REMOTE (Switched) wiring connections.
Check the GROUND wiring for good connections.
PRODUCT SPEC
Power Source:
Input current:
Frequency Response:
Crossover Slope Rate:
Output Voltage level:
Dimensions:
14.4 volts DC negative ground
0.5 amp max
26Hz - 120kHz
18dB per octave 3rd order butterworth
3 volts max
4.5in Lx 4in W x 1in H
7
Page 8

661 W. Redondo Beach Blvd.
Gardena, CA90247
1-800-GO-CLARION
www.clarion-usa.com
BCX100-10 Rev.1 (12/00)
 Loading...