

Page 1
10. 規格
FM 調諧器
頻率范圍……87.0 MHz 到 108 MHz
實際靈敏度……11 dBf
50 dB 無噪聲靈敏度……17 dBf
相隔信道專一度……75 dB
立體聲分離度 (1 kHz)……35 dB
頻率響應 (± 3 dB)……30 Hz 到 15 kHz
AM 調諧器
頻率范圍……531 kHz 到 1602 kHz
實際靈敏度……25 μV
磁帶
抖晃率 (WRMS)……0.08%
信道分離 (1 kHz)……45 dB
信噪比……70 μs
(二氧化鉻、鉻化鐵、金屬帶): 58 dB
頻率響應 (± 3 dB)
120 μs(普通)……30 Hz 到 18 kHz
70 μs(二氧化鉻、鉻化鐵、金屬帶)
……30 Hz 到 20 kHz
音頻
最大功率輸出……200 W(50 W x 4 聲道)
連續平均功率輸出……17 W x 4﹐接 4Ω 20 Hz
到 20 kHz, 1% THD
低音控製 (30 Hz)……± 13 dB
高音控製 (10 kHz)……± 10 dB
線路輸出……1.8 V
(在CD A/C 1kHz 10 kΩ 狀態)
整機
電源電壓……14.4 V DC
(10.8 V 到 15.6 V 均可)
耗電……小于 15 A
揚聲器阻抗……4Ω(4Ω 到 8Ω)
重量……1.5 kg
尺寸
……寬 178 mm x 高 50 mm x 深 155 mm
(178 mm)
(155 mm)(19 mm)
(188 mm)
注意︰
• 本規格符合 EIA 標準。
• 由于產品更新的需要﹐規格和設計若有變更﹐恕不
另行通知。
(50 mm)
(58 mm)
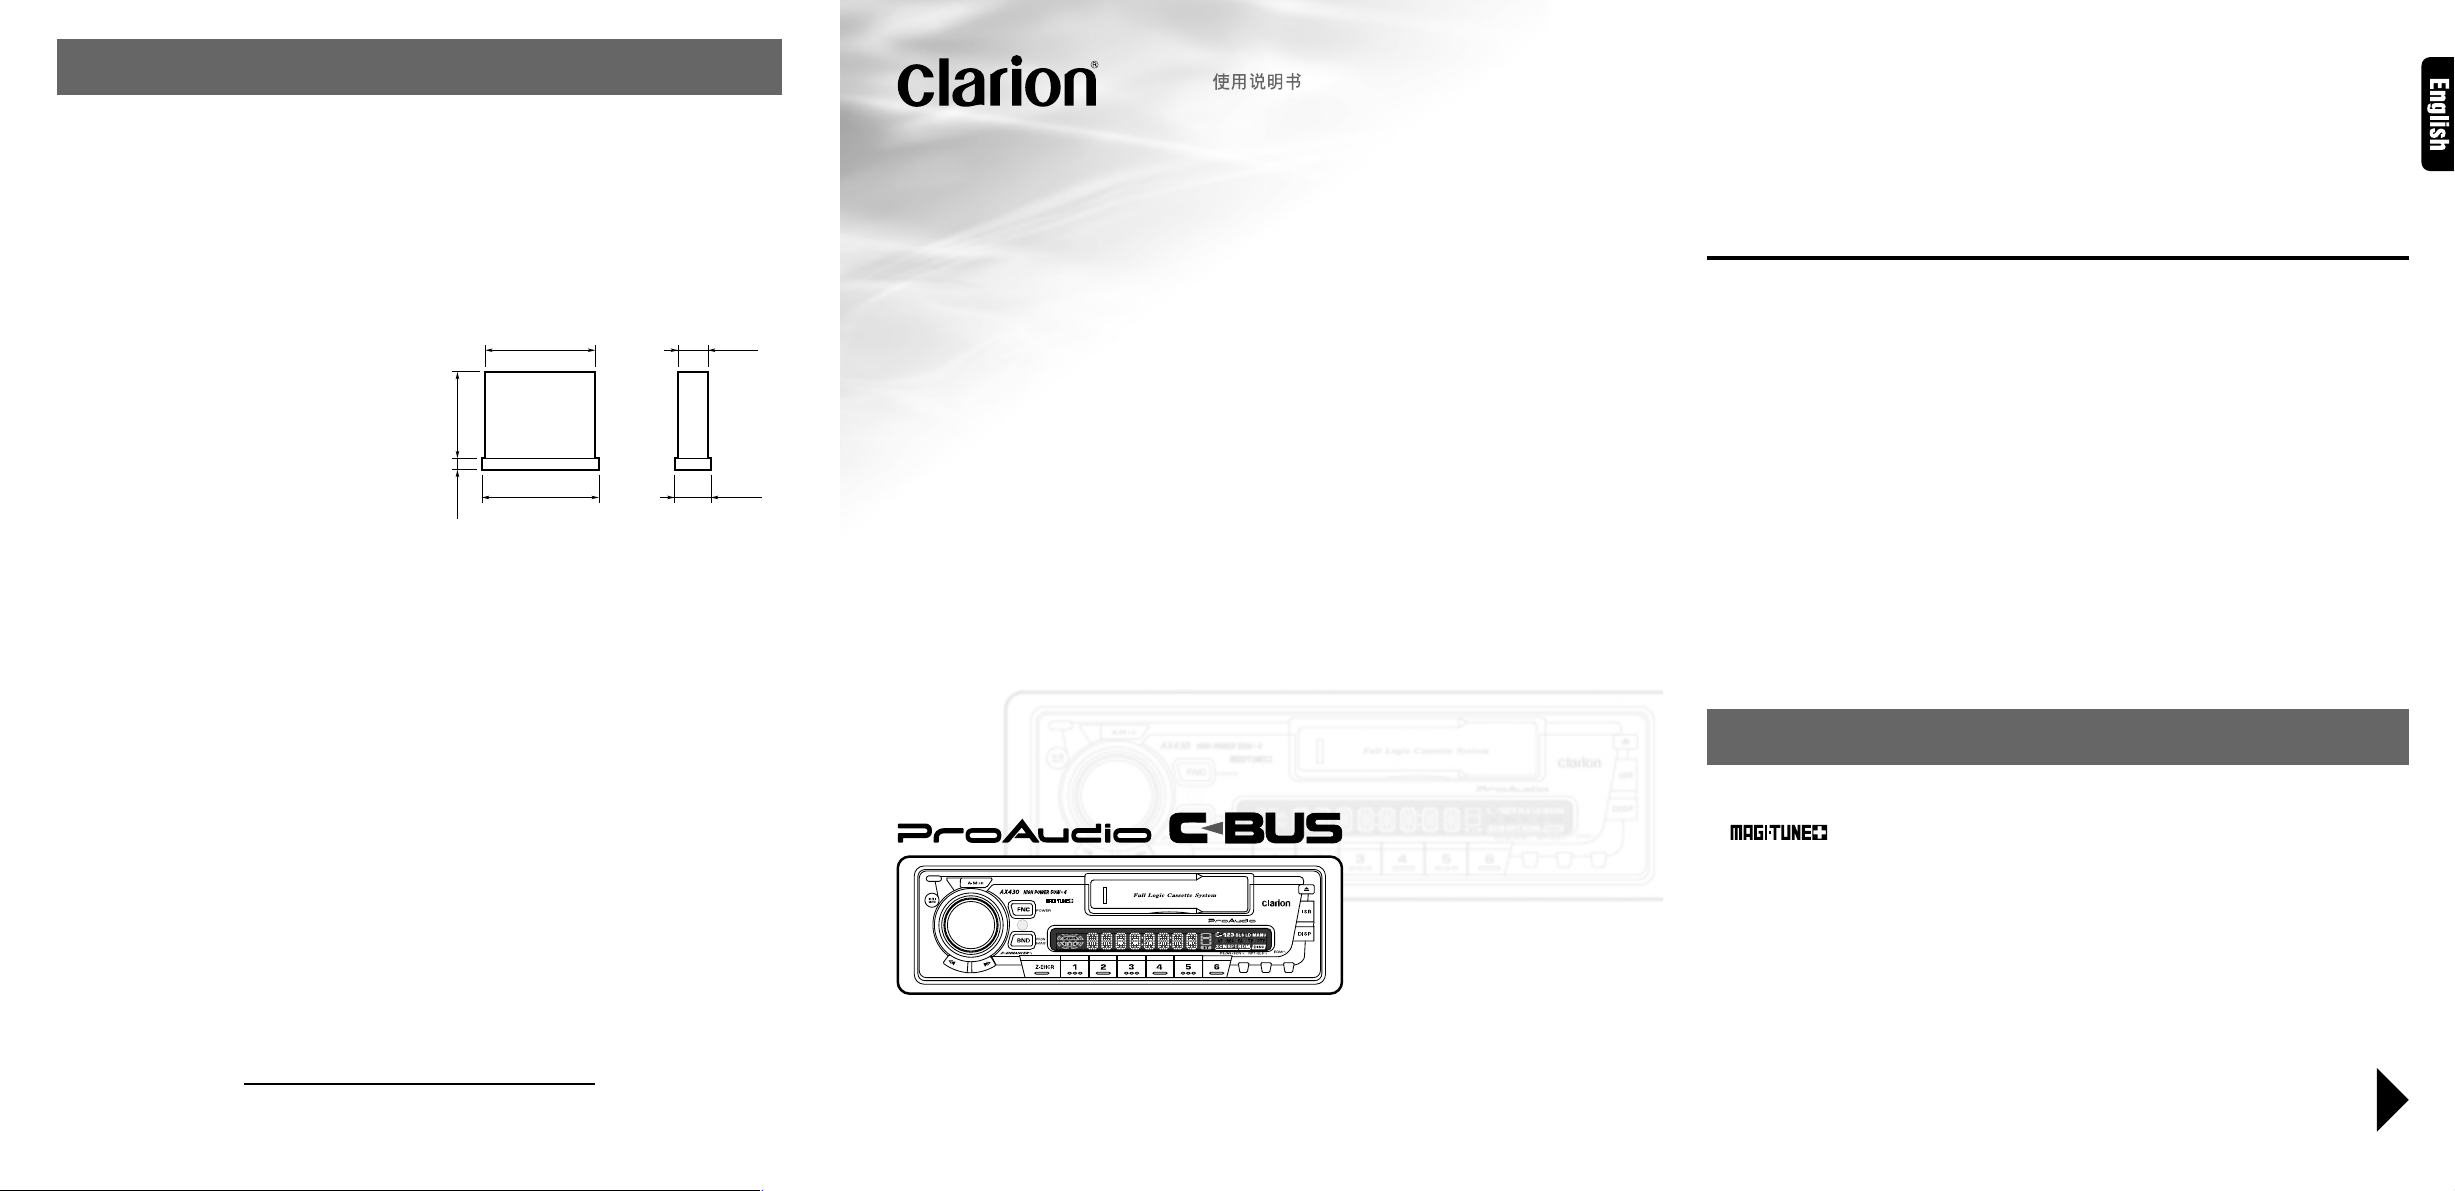
Owner’s manual
AX430
AM/FM CASSETTE PLAYER
WITH CD CHANGER CONTROL
•
AM/FM 盒式放音機
帶有 CD 換片機控製
Thank you for purchasing the Clarion product.
* Please read this owner’s manual in its entirety before operating this equipment.
* After reading this manual, be sure to keep it in a handy place (e.g., glove compartment).
* Check the contents of the enclosed warranty card and keep it carefully with this manual.
Contents
1. FEATURES ................................................................................................................................. 2
2. CONTROLS ................................................................................................................................3
3. NOMENCLATURE...................................................................................................................... 4
Names of Buttons ....................................................................................................................... 4
4. PRECAUTIONS .......................................................................................................................... 4
5. DCP .............................................................................................................................................5
6. REMOTE CONTROL .................................................................................................................. 6
Inserting the Batteries.................................................................................................................6
Functions of Remote Control Unit Buttons ................................................................................ 7
7. OPERATIONS ............................................................................................................................ 8
Basic Operations ........................................................................................................................ 8
Radio Operations ........................................................................................................................ 9
Tape Operations ....................................................................................................................... 11
CD Changer Operations ...........................................................................................................12
8. IN CASE OF DIFFICULTY .......................................................................................................13
9. ERROR DISPLAYS ..................................................................................................................13
10. SPECIFICATIONS ....................................................................................................................14
1. FEATURES
■ DIN Chassis with Detachable Control Panel
■ Z-Enhancer with 3 Mode Sound Selector
■ FM Reception System
■ AM/FM Bands-1 AM, 3 FM/18 FM/6 AM Touchbutton Memory
■ Full Logic Tape Transport with True Function
■ Auto Reverse with Azimuth Adjust
■ Auto Metal Tape EQ
■ Multi-Color LC Display
■ 2-Channel RCA Line Level Output with Fader Control
■ 200 W (50 W × 4) Maximum Power Output
■ Infrared Remote Control
2002/11 (C/A)
Clarion Co., Ltd.
All Rights Reserved. Copyright © 2002: Clarion Co., Ltd.
PE-1712K-E
280-7890-00
Be sure to unfold and read the next page.
請務必展開並閱讀下頁。
AX430 2
Page 2
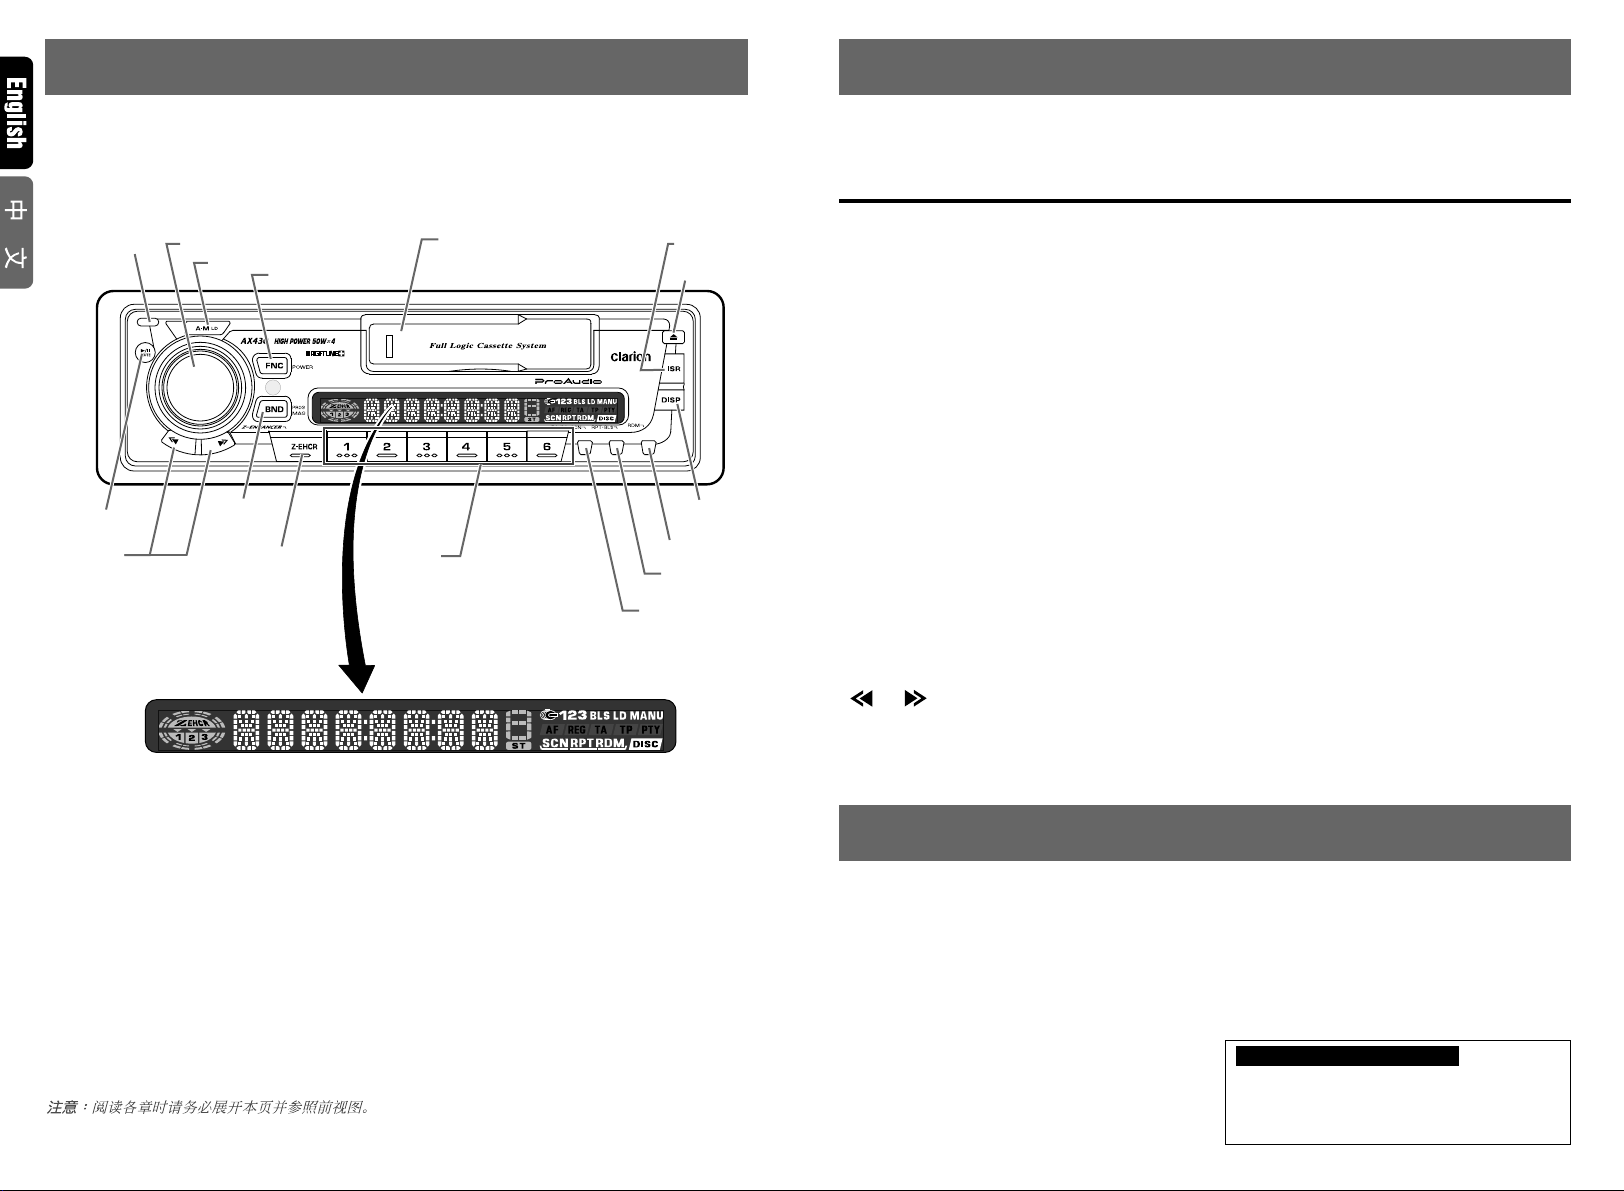
2. CONTROLS
Note:
Be sure to unfold this page and refer to the front diagrams as you read each chapter.
注意︰閱讀各章時務請展開此頁並參照前視圖。
控制鍵
3. NOMENCLATURE
Note:
• Be sure to read this chapter referring to the front diagrams of chapter “2. CONTROLS” on page 3 (unfold).
SOURCE UNIT
[
RELEASE
[s]
[a][d]
DISPLAY /
][
顯示屏顯示屏
顯示屏
顯示屏顯示屏
/ 主機
ROTARY
[
A-M
[
BND
]
]
[
FNC
]
Z-EHCR
Names of Buttons
Cassette Insertion Slot
]
[
]
DIRECT
盒帶插入槽
][
[
SCN
[Q]
[
[
[
RPT
[
ISR
DISP
RDM
]
]
]
]
]
[RELEASE] button
[ROTARY] knob
[A-M] button
• Loudness button
[FNC] button
• Power button
[Q] button
[ISR] button
[DISP] button
[RDM] button
[RPT] button
• Blank Skip button
[SCN] button
• Preset Scan/Auto Store button
[DIRECT] buttons (1 to 6)
[Z-EHCR] button
[BND] button
• Program button
• Magazine button
[ ], [ ] buttons
[ s ] button
• Mute button
Note: Be sure to unfold this page and refer to the front diagrams as you read each chapter.
3 AX430
4.
PRECAUTIONS
1. Tape slack can lead to operating difficulties.
Remove tape slack before inserting a cassette,
particularly when using C-90 or prerecorded
cassettes.
2. Use C-30 to C-90 cassettes. Avoid use of C120 or longer cassettes (The very thin tape
may stretch or break).
3. Clean the head periodically with a good commercial head cleaner. Avoid touching the head
with magnetic or hard objects.
4. Do not oil the cassette mechanism.
4 AX430
5. Always remove the cassette from the mechanism when not in use. Exposure to direct sunlight, extreme temperatures or high humidity
may damage cassettes.
6. The cassette tape will automatically eject from
the mechanism if it is damaged. Always ensure that cassette tapes are in good condition
prior to use.
INFORMATION FOR USERS:.
CHANGES OR MODIFICATIONS TO THIS
PRODUCT NOT APPROVED BY THE MANUFACTURER WILL VOID THE WARRANTY AND
WILL VIOLATE FCC APPROVAL.
Page 3
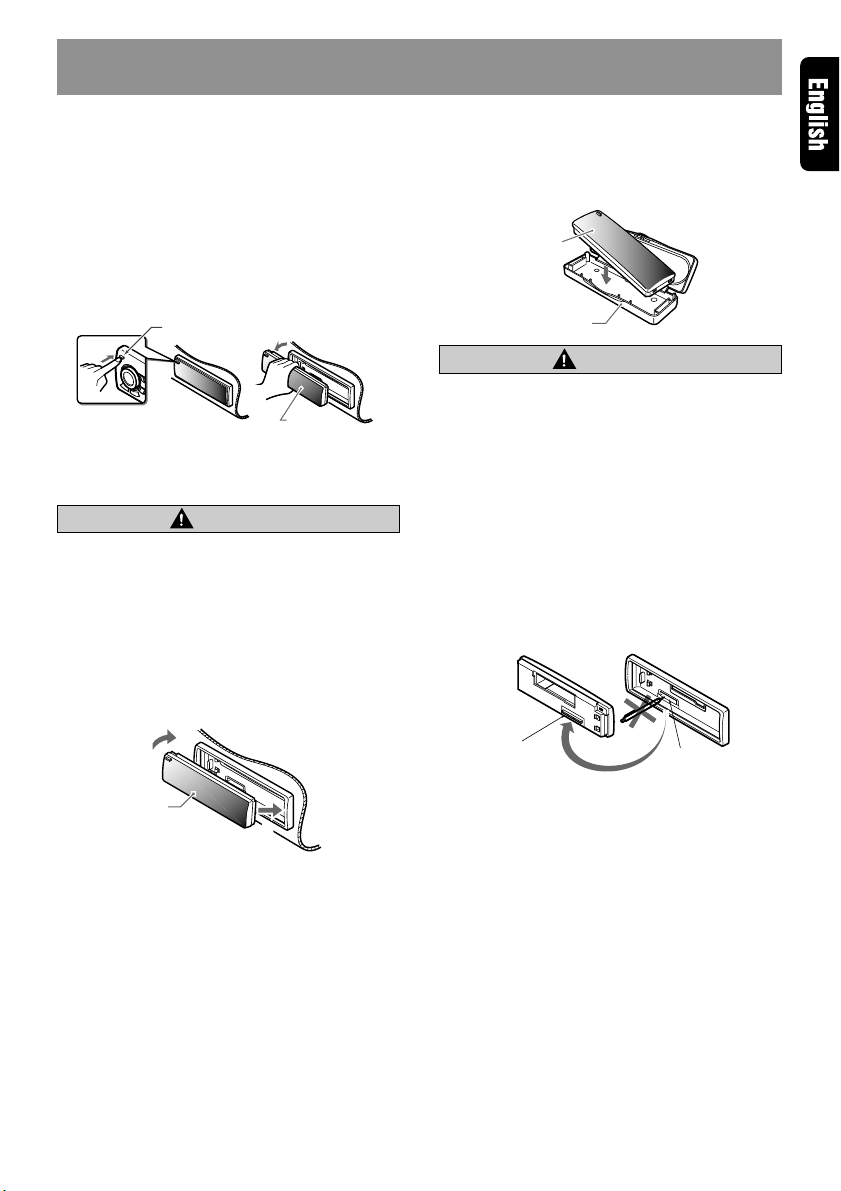
5. DCP
The control panel can be detached to prevent
theft. When detaching the control panel, store it
in the included DCP case to prevent scratches.
We recommend taking the control panel with you
when leaving the car.
Removing the DCP
1. Turn off the power.
2. Press the [RELEASE] button.
[RELEASE] button
DCP
* The DCP is unlocked.
3. Remove the DCP.
CAUTION
Do not insert the DCP from the left side. Doing so may damage it.
Attaching the DCP
1. Insert the right side of the DCP into the main
unit.
2. Insert the left side of the DCP into the main
unit.
Storing the DCP in the DCP Case
Hold the DCP, in the orientation as shown in the
figure below, and put it into the supplied DCP
case. (Ensure the DCP is in the correct orientation.)
DCP
DCP case
CAUTION
• The DCP can easily be damaged by shocks.
After removing it, place it in its case and be
careful not to drop it or subject it to strong
shocks.
• When the [RELEASE] button is pressed and
the DCP is unlocked, the car’s vibrations may
cause it to fall. To prevent damage to the DCP,
always store it in its case after detaching it.
• The connector connecting the source unit
and the DCP is an extremely important part.
Be careful not to damage it by pressing on
it with fingernails, pens, screwdrivers, etc.
DCP Rear Panel Source Unit Front
2.
DCP
DCP
connector
Note:
• If the DCP is dirty, wipe off with a soft, dry cloth.
1.
Source unit
connector
AX430 5
Page 4
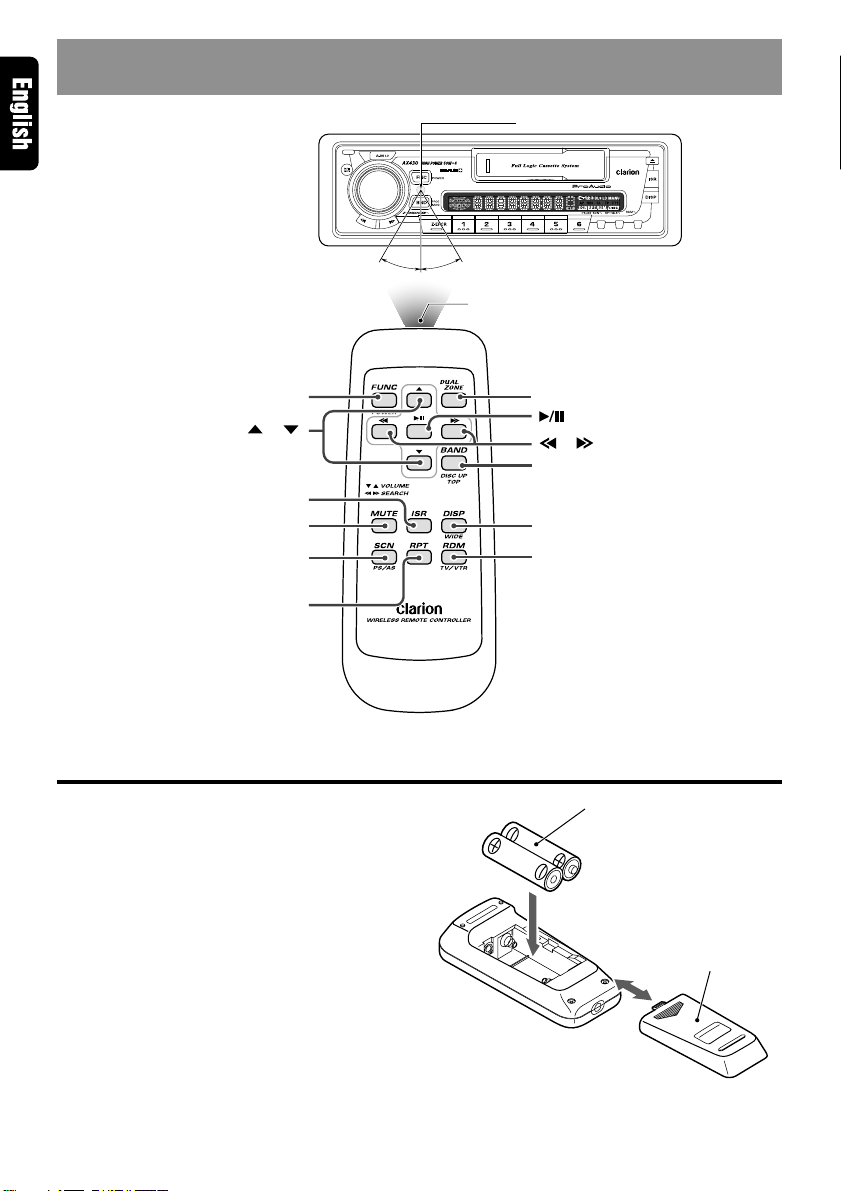
6. REMOTE CONTROL
Remote control unit
[
] [
FUNC
[
],[ ]
[
]
ISR
[
]
MUTE
[
]
SCN
[
]
RPT
Receiver for remote control unit
Operating range: 30˚ in all directions
Signal transmitter
DUAL ZONE
[
]
[
],[ ]
[
BAND
[
DISP
[
RDM
]
]
]
]
Inserting the Batteries
1. Turn the remote control unit over, then slide
the rear cover in the direction of the arrow.
2. Insert the AA (UM-3/1.5V) batteries that came
with the remote control unit facing in the
directions shown in the figure, then close the
rear cover.
Notes:
Using batteries improperly can cause them to
explode. Take note of the following points:
• When replacing batteries, replace both batteries
with new ones.
• Do not short-circuit, disassemble or heat batteries.
• Do not dispose of batteries into fire or flames.
• Dispose of spent batteries properly.
6 AX430
AA (UM-3/1.5V)
Batteries
Rear cover
Rear side
Page 5

Functions of Remote Control Unit Buttons
Button
[FUNC]
[BAND]
[w], [z]
[a], [d] Moves preset channels up
[s] Turns mute on and off. Switches between
[MUTE]
[ISR] Recalls ISR radio station in memory.
[DISP] Switches among main display and clock display.
[SCN] Preset scan.
[RPT] No function. Repeat play.
[RDM] No function. No function. Random play.
* Some of the corresponding buttons on the source unit and remote control unit have different functions.
* [DUAL ZONE] button is not available.
Mode
Turns power on and off. When pressed and held for 1 second: Turns power off.
Switches between radio, Tape and CD changer.
Switches reception band. Switches the side of the
Increases and decreases volume (in all modes).
and down.
Turns mute on and off. Switches between
Press and hold for more than 2 seconds: Stores current station into ISR memory
(radio mode only).
When pressed and held for
2 seconds: Auto store.
Radio
Tape
tape.
Fast-forward and rewinds
tape.
APC fast-forward and
rewind.
playback and pause.
playback and pause.
Fast-forward scan. Scan play.
When pressed and held for
1 second:
Blank tape skip function
turns on and off.
CD changer
Moves the next disc in
increasing order.
Moves tracks up and
down.
When pressed and held for
1 second:
Fast-forward/
fast-backward.
Switches between
playback and pause.
Switches between
playback and pause.
When pressed and held for
1 second: Disc scan play.
Repeat play.
When pressed and held for
1 second: Disc repeat
play.
When pressed and held for
1 second: Disc random
play.
AX430 7
Page 6

7. OPERATION
Note:
• Be sure to read this chapter referring to the front diagrams of chapter “2. CONTROLS” on page 3 (unfold).
Basic Operation
CAUTION
When this unit is turned on, starting and stopping the engine of a car with its volume raised
to the maximum level may harm your hearing.
Be careful about adjusting the volume.
1) Press the [FNC] button.
* To turn the power off, press the [FNC] button
for at least 1 second.
2) Press the [FNC] button to select the opera-
tion mode. The mode switches as follows each
time the [FNC] button is pressed:
Radio ➜ Tape ➜ CD changer ➜ Radio
* If a component is not connected, that opera-
tion mode cannot be selected.
* “CASS” appears when no tape is loaded in
the source unit, and “DISC” appears when
no disc is loaded in the CD changer.
3) Turning the [ROTARY] knob clockwise in-
creases the volume; turning it counterclockwise decreases the volume.
* The volume level is from 0 (minimum) to 33
(maximum).
Audio Mode Adjustments
Press the [A-M] button to select the adjustment
mode. The mode switches as follows each time
the [A-M] button is pressed:
BASS ➜ TREB ➜ BAL ➜ FAD ➜ Previous mode
Adjusting the Bass
1) Press [A-M] button and select “BASS”.
2) Turning the [ROTARY] knob clockwise empha-
sizes the bass; turning it counterclockwise attenuates the bass.
* The factory default setting is “0”. (Adjustment
range: –6 to +6)
3) When the adjustment is complete, press[A-M]
button several times until the function mode is
reached.
8 AX430
Adjusting the Treble
1) Press [A-M] button and select “TREB”.
2) Turning the [ROTARY] knob clockwise emphasizes the treble; turning it counterclockwise attenuates the treble.
* The factory default setting is “0”. (Adjustment
range: –6 to +6)
3) When the adjustment is complete, press [A-M]
button several times until the function mode is
reached.
Adjusting the Balance
1) Press [A-M] button and select “BAL”.
2) Turning the [ROTARY] knob clockwise emphasizes the sound from the right speaker; turning it counterclockwise emphasizes the sound
from the left speaker.
* The factory default setting is “0”. (Adjustment
range: L9 to R9)
3) When the adjustment is complete, press [A-M]
button several times until the function mode is
reached.
Adjusting the Fader
1) Press [A-M] button and select “FAD”.
2) Turning the [ROTARY] knob clockwise emphasizes the sound from the front speakers; turning it counterclockwise emphasizes the sound
from the rear speakers.
* The factory default setting is “0”. (Adjustment
range: F9 to R9)
3) When the adjustment is complete, press [A-M]
button several times until the function mode is
reached.
Setting the Z-enhancer
This unit comes with three types of sound tone
effects stored in memory. Select the one you prefer.
* The factory default setting is “Z-EHCR OFF”.
Each time you press [Z-EHCR] button, the tone
effect changes in the following order.
“Z-ENHANCER 1” ➜ “Z-ENHANCER 2” ➜
“Z-ENHANCER 3” ➜ “Z-EHCR OFF” ➜
“Z-ENHANCER 1”...
Page 7

Basic Operation
Radio Operation
• Z-ENHANCER 1: bass emphasized
• Z-ENHANCER 2: treble emphasized
• Z-ENHANCER 3: bass and treble emphasized
• Z-EHCR OFF: no sound effect
Loudness Function
Press the [A-M] button for at least 1 second to
turn the loudness function on and off.
Switching the Display
Press the [DISP] button to enter the clock display mode.
Operation mode display ➜ Clock display ➜ Operation mode display
Setting the Clock
1) Press the [DISP] button to enter the clock dis-
play mode.
2) Press the [DISP] button for 1 second or longer.
This enables clock editing.
* The editable fields will be indicated by flash.
3) To move between the hour and minute fields,
use the [ ] Left (hour) and [ ] Right
(minute) buttons.
4) To confirm the clock setting, press the [DISP]
button.
Notes:
• If you select another operation mode before com-
pleting the above procedure, the clock setting
operation will be canceled.
• Removing the battery for a check or repair causes
the clock to be reset. Set the clock again in such
a case.
FM Reception
For enhanced FM performance the
tuner includes signal actuated stereo control and
Multipath noise reduction circuits.
Listening to the Radio
1) Press the [FNC] button and select the radio
mode. The radio turns on.
2) To tune in a preset station, first press the [BND]
button and select FM1, FM2, FM3 or AM.
The band changes as follows each time the
[BND] button is pressed:
FM1 ➜ FM2 ➜ FM3 ➜ AM ➜ FM1
3) Use the [DIRECT] buttons to select the de-
sired station.
Mute
Use this function to turn off the sound immediately.
Press the [s] button. The sound turns off and
“MUTE” appears on the display. Press the [s]
button again to cancel the mute mode.
Seek Tuning
1) Press the [BND] button and select the desired
band.
2) Press the [ ] or [ ] button. Seek tuning
automatically stops when a station is found.
Manual Tuning
1) Press the [BND] button and select the desired
band.
2) Press the [BND] button again for more than 1
second. “MANU” lights in the display and the
manual tuning mode is set.
3) Use the [ ] and [ ] buttons to tune in the
desired frequency.
Presetting Stations
A total of 24 stations can be preset, 6 each for
the FM1, FM2, FM3 and AM bands.
Note:
• When a station is preset, the station previously
stored in the memory at that position is cleared.
AX430 9
Page 8

Radio Operation
● Presetting stations manually
1) Press the [BND] button to select the band at
which to store the station.
2) Use the [ ] and [ ] buttons to tune in the
station to be preset.
3) Press the [DIRECT] button at which you want
to store that station for at least 2 seconds.
● Auto store function
1) Press the [BND] button to select the band at
which to store the stations.
2) Press the [SCN] button for at least 2 seconds.
Stations with good reception are automatically
stored at [DIRECT] buttons 1 to 6.
* If there are fewer than 6 stations with good
reception, the stations previously stored at
the remaining buttons are not cleared.
Preset Scanning (Preset Station Scan)
When the [SCN] button is pressed, the preset
memory numbers flash and the stations are tuned
in for 7 seconds each in the order in which they
were stored. Press the [SCN] button again to cancel the preset scanning mode.
Instant Station Recall (ISR)
This function allows you to recall a specific radio
station from any mode. Use it to find stations
quickly when you want to hear specific information (such as traffic announcements) while driving. The ISR station is set to 87.5 MHz upon shipment from the factory.
● ISR memory
1) Press the [FNC] button to select the radio
mode.
2) Tune in the station to be set as the ISR station.
3) Press the [ISR] button for more than 2 seconds
to store that station in the memory as the ISR
station.
● Recalling a station with ISR
Press the [ISR] button from any mode. “ISR”
appears on the display and the set station is
tuned in. To cancel, press the [ISR] button again.
Area Change
Use this to listen to the radio in the United States.
This car stereo is initially set to tune in frequency
intervals of 9 kHz for AM and 50 kHz for FM, the
standard calibrations outside the U.S. When
using the unit in the U.S., use the following procedure to switch the frequency steps and frequency range:
● Switching the area change U.S standard
(New Setting)
1) Set the tuner mode.
2) While pressing the [BND] button, press the
[ ] button.
3) Release the buttons.
This procedure changes the factory setting to
10 kHz steps for AM and 200 kHz steps for
FM.
● Switching the area change outside U.S
(Inital Setting)
1) Set the tuner mode.
2) While pressing the [BND] button, press the
[ ] button .
3) Release the buttons.
Your car stereo will once again be calibrated
to receive outside U.S. transmissions.
● The chart below lists the frequency specifications for the U.S. and other countries.
AM
FM
Frequency
spacing
Frequency
range
Frequency
spacing
Frequency
range
Inital Setting
(outside U.S.)
9 kHz
531 to
1602 kHz
50 kHz
87.0 to
108 MHz
New Setting
(U.S. standard)
10 kHz
530 to
1710 kHz
200 kHz
87.9 to
107.9 MHz
10 AX430
Page 9

Tape Operation
Loading Tapes
Insert the cassette tape into the Cassette insertion slot with the side on which the tape is exposed facing the right. Playback starts automatically.
* The metal tape setting is set automatically when
a metal or chrome tape is loaded.
* When the end of the cassette tape is reached,
the auto reverse mechanism is activated and
the other side of the tape begins playing automatically.
Listening to a tape which is already loaded
Press the [FNC] button to select the tape mode.
Playback begins automatically.
Stopping Playback Temporarily
Press the [s] button. Press the button again
to resume playback.
Ejecting Cassette Tapes
Press the [Q] button. The cassette tape is
ejected.
* The radio mode is set automatically 4 seconds
after the [Q] button is pressed.
Fast-Forwarding and Rewinding
Use the [ ] and [ ] buttons.
: Press this to fast-forward the tape.
: Press this to rewind the tape.
Repeat Function (Repeat Play)
When the [RPT] button is pressed, “RPT” appears on the display and the current track is
played repeatedly. Press the [RPT] button again
to cancel the repeat mode.
Blank Skip Function
Use this function to automatically skip to the beginning of the next recorded section when there
is a blank section of 12 seconds or more on the
tape.
When the [RPT] button is pressed for 1 second
or longer, the blank skip mode is set and “BLS”
appears on the display. Press the [RPT] button
again for 1 second or longer to cancel the blank
skip mode.
Notes:
The APC, scan, repeat and blank skip functions will
not work with the following types of tapes:
• Tapes on which the recording level is low
• Tapes on which there is less than 4 seconds of
blank space between selections
• Tapes on which there are long pauses in the
middle of selections
• Tapes on which there is much noise between
selections
APC (Auto Program Control)
Press the [ ] and [ ] button twice.
: Press this twice to move ahead to the
beginning of the next selection.
: Press this twice to move back to the be-
ginning of the current selection.
Switching to the Other Side of the
Tape
Press the [BND] button. Playback is switched to
the other side of the cassette tape.
FF Scan Function (Intro Music
Scan)
When the [SCN] button is pressed, “SCN” appears on the display, and the first 10 seconds of
all the tracks on the cassette tape are played.
Press the [SCN] button again to stop scanning.
AX430 11
Page 10

CD Changer Operation
When a separately sold CD changer is connected, it can be controlled from the source unit.
Notes:
• Some CDs recorded in CD-R mode may not be
usable.
• Even when recorded in CD-RW mode, some CDs
may not be usable.
Listening to the Disc
Press the [FNC] button and select the CD
changer mode, then the CD starts playing.
Stopping (pausing) Playback
Press the [s] button.
Press the [s] button again to resume playback.
Selection of CDs
Press the [DIRECT] button to select 1 to 6, then
select the CD you wish to play.
Selecting Tracks (songs)
Press the [ ] and [ ] buttons.
: Playback will start from the next track.
: Playback will start from the beginning of
the track currently playing. When this
button is pressed again, the CD will play
from the previous track.
Fast-Forward and Fast-Backward
Press and hold the [ ] and [ ] buttons.
: To fast-forward
: To fast-backward
* Pressing the [ ] / [ ] button for 1 second or
longer will move forward or backward 5 times
faster than normal play, and pressing it for 3
seconds or longer will do the operation 30 times
faster.
Disc scan play
Press and hold the [SCN] button for 1 second or
longer, then the display will show “ ” and
“SCN”, and plays the first 10 seconds of the first
tracks of all the CDs in the CD changer.
Press the [SCN] button again to disengage the
unit from disc play.
* A scan play will start from the first tracks of next
CDs following the one currently playing.
Repeat Play
Press the [RPT] button, then the display shows
“RPT”, then the track currently playing will be
played repeatedly. Press the [RPT] button again
to disengage the unit from repeat play.
Disc repeat play
Press and hold the [RPT] button for 1 second or
longer, then the display shows both the “ ”
and “RPT”, then the disc currently being played
will be played repeatedly.
Press the [RPT] button again to disengage the
unit from disc repeat play.
Random Play
Press the [RDM] button, then the display will
show “RDM”, then the entire tracks on the disc
will be played at random.
Press the [RDM] button again to disengage the
unit from disc random play.
Disc random playback
Press and hold the [RDM] button for 1 second or
longer, then the display will show both the
“ ” and “RDM”, then the entire tracks of
all the discs in the CD changer will be played at
random.
Press the [RDM] button again to disengage the
unit from disc play.
Scan Play (Intro Music Scan)
Press the [SCN] button, then the display shows
“SCN”, then the CD will play the first 10 seconds of all the tracks of all CDs. Press the [SCN]
button again to disengage the unit from scan play.
* A scan play will start from the track following
the one currently playing.
12 AX430
Switching Magazine
This function can be used only when the connected CD changer can store a multiple number
of magazines.
Every time the [BND] button is pressed, the next
magazine will be selected.
Page 11

8. IN CASE OF DIFFICULTY
Problem Cause Measure
Power does not turn on.
(or no sound is produced.)
Sound quality is poor.
No sound while unit can
be operated.
Fuse is blown.
Connections are improper.
Playback head is dirty.
Power ANT lead is shorted
to the ground.
9. ERROR DISPLAYS
If an error occurs, one of the following displays is displayed.
Take the measures described below to eliminate the problem.
Error Display
ERROR 1
ERROR 2
ERROR 4
Tape
ERROR 8
ERROR 2
ERROR 3
ERROR 6
CD changer
Tape cannot be played due to defective
tape such as cut tape.
Tape is caught and cannot be played.
Tape mode cannot be detected.
Tape is caught and cannot be ejected.
A CD inside the CD changer is not
loaded.
A CD inside the CD changer cannot be
played due to scratches, etc.
A CD inside the CD changer cannot be
played because it is loaded upsidedown.
Cause
Replace with a fuse of the same
amperage as the old fuse.
Read the attached “Installation/Wire
Connection Guide” once again and
wire properly.
Use a cleaning tape, etc. to clean the
head.
Turn the unit off, first.
Remove all connecting wires from the
power ANT lead, and turn the unit on,
then re-connect a wire one by one to
the power ANT lead.
When sound is muted again, check
the unit with a wire connected last.
Measure
Eject the tape then replace it with a new
one.
Remove the caught or wound tape.
This is a failure of tape mechanism and
consult your store of purchase.
Eliminate the reason for which the tape
is caught.
This is a failure of CD changer’s mechanism and consult your store of purchase.
Replace with a non-scratched, nonwarped disc.
Eject the disc then reload it properly.
If a display other than one of the displays above appears, press the reset button. If the problem persists, turn the power off and contact your store of purchase.
AX430 13
Page 12

10. SPECIFICATIONS
FM Tuner
Frequency Range……87.0 MHz to 108 MHz
Usable Sensitivity……11 dBf
50 dB Quieting Sensitivity……17 dBf
Alternate Channel Selectivity……75 dB
Stereo Separation (1 kHz)……35 dB
Frequency Response (±3 dB)
……30 Hz to 15 kHz
AM Tuner
Frequency Range……531 kHz to 1602 kHz
Usable Sensitivity……25 µV
Tape
Wow & Flutter (WRMS)……0.08%
Channel Separation (1 kHz)……45 dB
Signal to Noise Ratio
……70 µs (CrO2, FeCr, Metal): 58 dB
Frequency Response (±3 dB)
120 µs (normal)……30 Hz to 18 kHz
70 µs (CrO2, FeCr, Metal)……30 Hz to 20 kHz
Audio
Maximum Power Output……200 W (50 W × 4ch)
Continuous Average Power Output
…… 17 W × 4, into 4 Ω, 20 Hz to 20 kHz, 1%
THD
Bass Control Action (30 Hz)……±13 dB
Treble Control Action (10 kHz)……±10 dB
Line Output……1.8 V (with CD A/C 1kHz 10 kΩ)
General
Power Supply Voltage
……14.4 V DC (10.8 V to 15.6 V allowable)
Current Consumption…… Less than 15 A
Speaker Impedance
……4 Ω (4 Ω to 8 Ω allowable)
Weight……3.3 lb. (1.5 kg)
Dimensions
…… 7" (178 mm) Width × 2" (50 mm) Height
× 6-3/32" (155 mm) Depth
7"
(178 mm)
6-3/32"
(155 mm)
(19 mm)
7-3/8"
(188 mm)
3/4"
Notes:
• Specifications comply with EIA Standards.
• Specifications and design are subject to change
without notice for further improvement.
2"
(50 mm)
2-1/4"
(58 mm)
14 AX430
 Loading...