

Page 1

Clarion AutoPC 310C
Owner’s Manual
CLARION CO. LTD. 1998
All Rights Reserved
Page 2

Precautions
IMPORTANT: READ THE
INSTRUCTIONS CONTAINED IN
THIS MANUAL BEFORE USING THE
CLARION AUTOPC SYSTEM.
SAFETY WARNING! When you see
this symbol !, it means, for your
safety, the vehicle must be stopped to
set or use the Auto PC. Pull over in a
safe and legal manner before
attempting to manually access a
function of the system.
Read and follow instructions
Before using your Windows® CE for
the Auto PC system, read and follow
all instructions and safety information
provided in this Owner’s Manual. Not
following precautions found in this
Owner’s Manual can lead to an
accident or other serious
consequences.
Keep Owner’s Manual in vehicle
When kept in the vehicle, the Owner’s
Manual will be a ready reference for
you and other users unfamiliar with the
Windows CE for the Auto PC system.
Please make certain that before using
the system for the first time, all
persons have access to the Owner’s
Manual and read its instructions and
safety information carefully.
Warning
Operating certain parts of this
system while driving can distract
your attention away from the road,
and possibly cause an accident or
other serious consequences. Do
not change system settings or enter
data non-verbally (using your
hands) while driving. Stop the
vehicle in a safe and legal manner
before attempting these operations.
This is important since while setting
up or changing some functions you
might be required to distract your
attention away from the road and
remove your hands from the wheel.
Voice command control
Many of the functions of the Windows
CE for the Auto PC system can be
accomplished using only voice
commands.
Prolonged views of screen
Do not access any function requiring a
prolonged view of the screen while you
are driving. Pull over in a safe and
legal manner before attempting to
access a function of the system
requiring prolonged attention. Even
occasional short scans to the screen
may be hazardous if your attention has
been diverted away from your driving
task at a critical time.
Volume setting
Do not raise the volume excessively.
Keep the volume at a level where you
can still hear outside traffic and
emergency signals while driving.
Driving while unable to hear these
sounds could cause an accident.
Clarion AutoPC Owner’s Manual
ii
Page 3

Precautions continued
Care in handling
The Clarion AutoPC system is a
sensitive electronic device. As with all
electronic devices, care should be
taken to avoid contact with extreme
heat, cold, or humidity.
Operating at very cold temperatures
At extremely cold temperatures, the
display screen speed may be reduced,
and the display may dim. Also, the
colors on the display may vary
depending on the thermal condition of
the unit itself or the temperature in a
vehicle. These phenomena are the
characteristics of the liquid crystal
display and are not malfunctions.
Handling Detachable Control Panel
Also, special care should be taken
when handling and storing the
Detachable Control Panel (DCP).
Note: The terms “control panel” and
“DCP” are used interchangeably in this
document to refer to the same thing.
Fully close DCP holder after DCP
removal
It is dangerous to keep the DCP holder
at an angle once the DCP is removed.
Be sure that the DCP holder is fully
closed (in the vertical position).
Operating switches and knobs
The slanted control panel may not
maintain its adjusted angle if a button
is pushed too hard.
Cleaning display cover
Turn power off. Clean the display
cover with a lightly damp soft cloth.
Do not pour or spray liquid on the
display as this will damage the unit.
Clarion AutoPC Owner’s Manual
iii
Page 4
Precautions continued
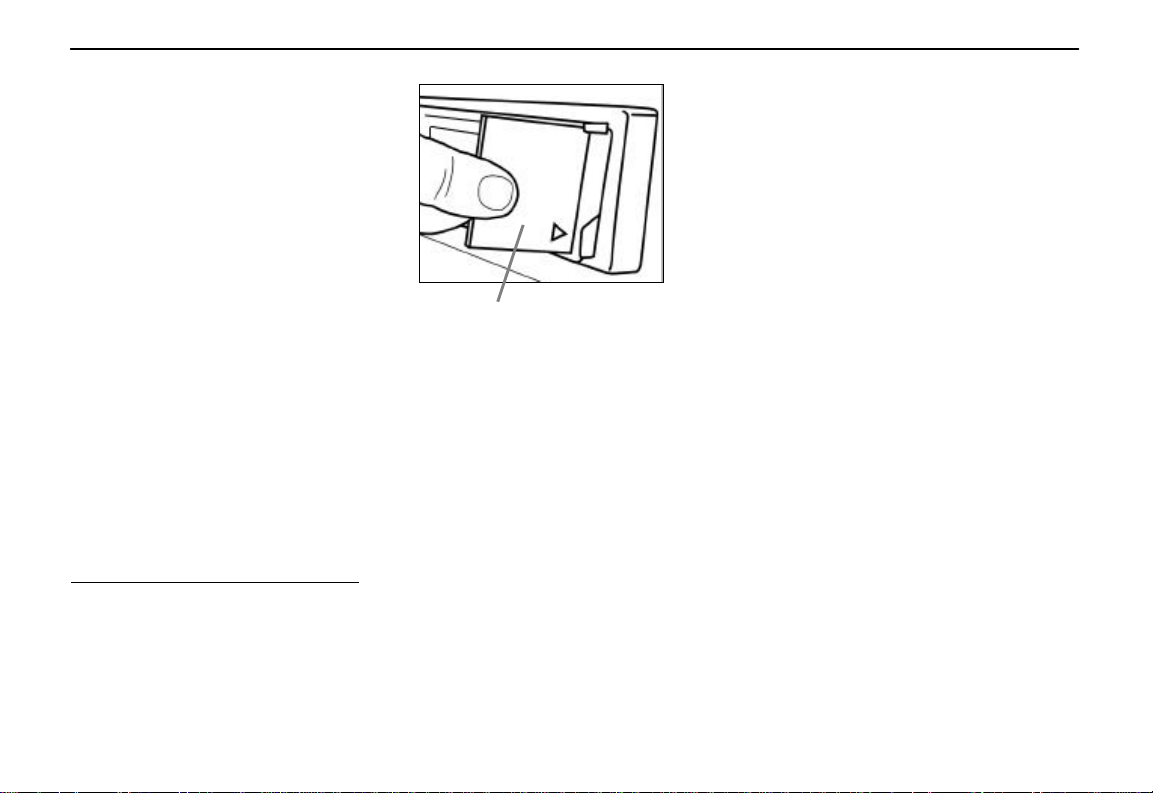
CompactFlashTM 1 (CF) Card
Insertion Slot Cover
The CF Card insertion slot is equipped
with a slot cover in order to prevent the
exposure to debris and to protect
terminals. Be sure to cover the CF
Card insertion slot with the cover when
the slot is not being used.
Inserting the CF Card
The Clarion AutoPC System will
accept CF Cards from most
manufacturers. Warning: CF Card
can be inserted one way only. Make
sure to insert the CF Card with the
manufacturer’s label and arrow
FACING RIGHT of the unit as shown
to the right.
1
CompactFlash is a trademark of
SanDisk Corporation.
Make sure label and
arrow are facing right
Clarion AutoPC Owner’s Manual
iv
Page 5
Precautions continued
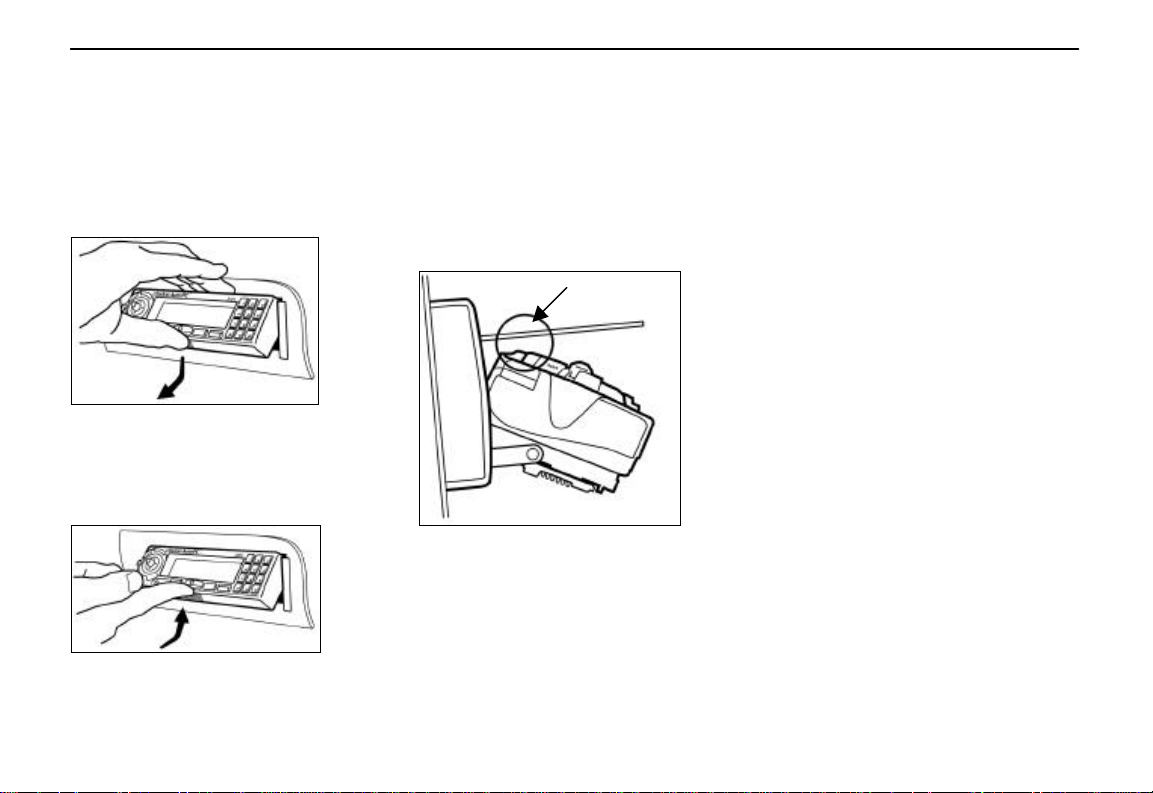
Opening the DCP
Grip the control panel as shown in the
illustration which follows, and pull it
outward and downward in one
continuous motion.
Closing the DCP
Place your index finger immediately
below the Start button, pressing inward
and upward as shown below.
Proper clearance to eject CD
Open the control panel to the lowest
position to allow the CD to be ejected
without causing damage.
Before pressing the eject button, look
to see that the CD will clear the top of
the control panel as illustrated below.
Correct
clearance
Note: If the CD is not manually
removed within approximately 10
seconds after the eject button is
pressed, the CD will be automatically
loaded back into the CD Player.
CD ROM Installation
The vehicle should be parked at a
level location when a higher version of
OS or CD ROM software is installed.
Note: If a vehicle starts up or cranks
up, or if the ACC (accessory) is turned
on or off during the installation, voltage
fluctuation harmful to this unit may
occur. This could result in an
abnormal installation or a malfunction
in the unit.
Power On at time of initial operation
It may take up to 15 seconds to see an
actual display on the unit when it is
initially powered up. This is not a
malfunction.
Clarion AutoPC Owner’s Manual
v
Page 6

Copyright Information
CLARION CO. LTD. 1998
All Rights Reserved
Reproduction, adaptation, or
translation without prior written
authorization is prohibited, except as
allowed under applicable copyright
laws.
Trademarks
Microsoft® and Windows® are either
registered trademarks or trademarks of
Microsoft Corporation in the United
States and/or other countries.
Microsoft products are licensed to
OEMs by Microsoft Licensing, Inc., a
wholly owned subsidiary of Microsoft
Corporation.
CompactFlashTM (CF) Card:
CompactFlash is a trademark of
SanDisk Corporation.
Warranty
This Owner’s Manual creates no
warranties nor does it make any
representations regarding the Auto PC
system on behalf of Clarion. The only
warranty provided by Clarion to the
purchaser is that contained in Clarion’s
published limited warranty for the Auto
PC system. All other purported
warranties and representations
regarding the quality, performance or
the suitability of the Auto PC system
are disclaimed.
Serial Number
Place the serial number sticker for
your Clarion AutoPC system here:
FCC Radio Interference Statement
Operation of the Clarion AutoPC
system is subject to the following two
conditions imposed by the Federal
Communications Commission: (1) this
system may not cause harmful
interference, and (2) this system must
accept any interference received,
including interference that may cause
undesired operation. Changes or
modifications to the equipment without
the express permission of Clarion may
void the authority to use the Clarion
AutoPC system.
Clarion AutoPC Owner’s Manual
vi
Page 7

Contents
Chapter 1 – Introduction.............................................................................................1
Locating the controls.................................................................................................2
Detachable Control Panel (DCP) ..............................................................................6
General Operations................................................................................................. 10
Chapter 2 – Using Speech Commands .....................................................................15
Getting help with speech commands ........................................................................17
Chapter 3 - Getting Ready ........................................................................................19
Display layout.........................................................................................................20
Using Speech to go to a program ............................................................................. 21
Using keys to go to a program.................................................................................22
Navigating within programs....................................................................................24
Clarion AutoPC Owner’s Manual
vii
Page 8

Clock, date, time, and regional setup....................................................................... 26
Using Global Speech Commands.............................................................................29
Using Program Speech Commands .......................................................................... 31
Chapter 4 – Using the Radio .....................................................................................35
Chapter 5 – Using the CD Player..............................................................................43
Chapter 6 – Audio Adjustments................................................................................51
Chapter 7 - Using Address Book...............................................................................55
Address Book command words and keys..................................................................56
Add, edit or delete a contact....................................................................................61
Transfer a contact................................................................................................... 66
Browsing Contacts..................................................................................................67
Protecting Address Book information ...................................................................... 68
Chapter 8 - Using Directions.....................................................................................69
viii
Clarion AutoPC Owner’s Manual
Page 9

Directions command words and keys.......................................................................72
Ways to select a start and destination points............................................................ 73
Commands to enter a start point..............................................................................74
Commands to enter a destination point.................................................................... 82
Calculating the route............................................................................................... 87
Driving the route ..................................................................................................... 90
Chapter 9 - Using Messages ......................................................................................93
Messages command words and keys ........................................................................94
Reviewing Messages................................................................................................96
Saving Messages..................................................................................................... 99
Changing message storage options........................................................................ 100
Chapter 10 – Using Voice Memo.............................................................................103
Recording voice memos.........................................................................................104
Deleting voice memos............................................................................................ 109
Chapter 11 – Customizing Your Auto PC............................................................... 117
Clarion AutoPC Owner’s Manual
ix
Page 10

Add or Change a Password ................................................................................... 120
ASSIST.................................................................................................................. 124
Changing Auto PC Sounds .................................................................................... 125
Speech Command options...................................................................................... 129
Speech factors you can change..............................................................................130
To disable or enable the Wakeup word...................................................................133
Changing Timeouts ............................................................................................... 136
Chapter 12 – Backup/Restore .................................................................................139
Using the CF Card for backup and restore ............................................................ 140
Chapter 13 – Adding/Removing Software and Hardware...................................... 143
Chapter 14 – Tips and Troubleshooting..................................................................145
Tips....................................................................................................................... 145
Troubleshooting.................................................................................................... 151
Specifications........................................................................................................... 157
Clarion AutoPC Owner’s Manual
x
Page 11

Glossary...................................................................................................................159
Index........................................................................................................................163
Clarion AutoPC Owner’s Manual
xi
Page 12

xii
Clarion AutoPC Owner’s Manual
Page 13

Chapter 1 – Introduction
Caution
How to use this
Welcome
manual
Congratulations on purchasing the Clarion AutoPC system, powered by
the Microsoft® Windows® CE operating system. Auto PC makes the
most of your driving experience by combining many features into a device
that fits into the same space normally occupied by your car stereo. Auto
PC is an information and entertainment system for people on the go, and
integrates a compelling graphical user interface with voice control that
keeps your hands on the wheel and eyes on the road.
CAUTION! OPERATE THIS SYSTEM ONLY WHEN SAFE. Taking your
attention away from the road while driving can cause a serious accident.
This manual is designed to be used in two ways:
1. As a general learning tool for you as you begin to operate the Clarion
AutoPC system.
2. As a reference tool for you as you actively expand your uses of the
Clarion AutoPC system.
Clarion AutoPC Owner’s Manual
1
Page 14
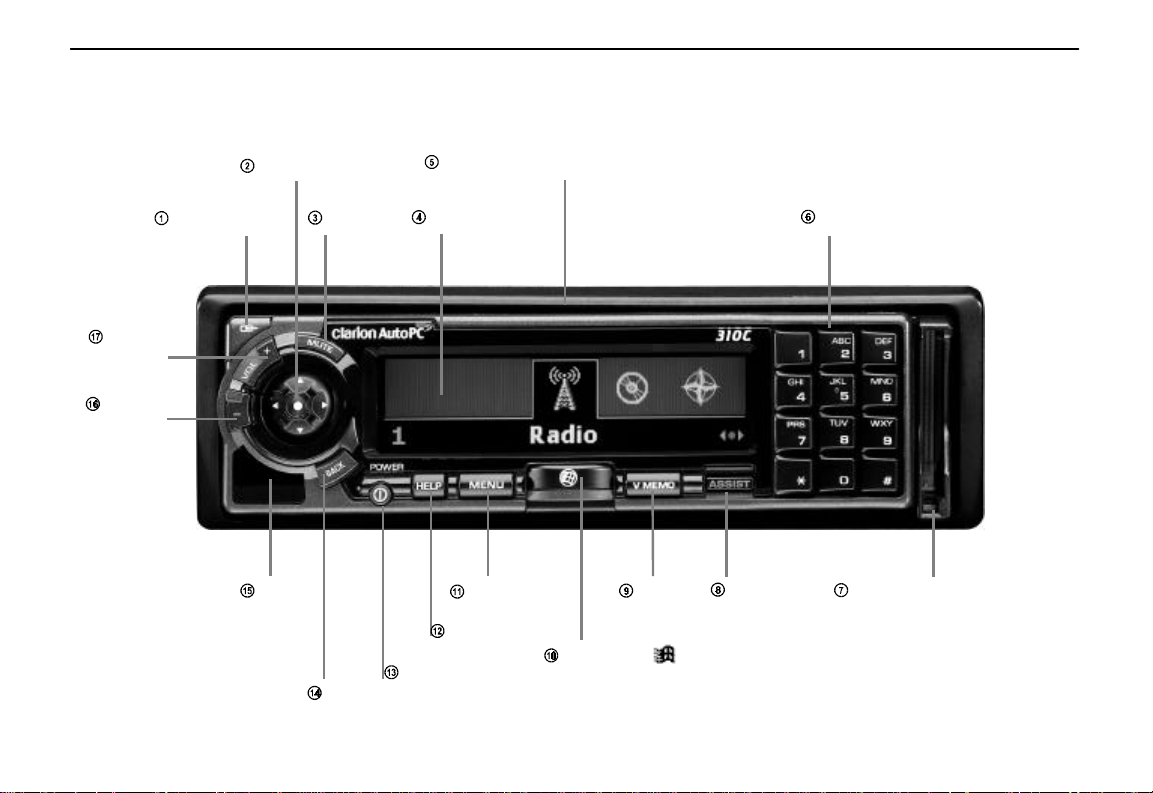
Locating the controls
Memo
2
Volume
up
Volume
down
α-Selector
DCP release
IrDA
(Infrared)
Port
MUTE
BACK
Detachable Control Panel (DCP)
Display
MENU
Voice
HELP
POWER
Start Key
ASSIST
Keys
CompactFlashTM (CF)
Card insertion slot
Clarion AutoPC Owner’s Manual
Page 15
DCP release - Press to remove control
DCP Legend
panel.
αα-Selector - Navigate programs and
options with a single finger.
MUTE – Press to silence audio. HELP – For tips about current screen.
Display - Shows information in color on
the screen.
Detachable Control Panel (DCP) -
Removable for security.
Keys - Use for dialing, entering letters,
numbers, and radio presets.
CompactFlashTM (CF) card insertion
slot - Use CF card to backup and restore
data.
ASSIST - Press to receive locationbased services (optional). Example:
roadside assistance services.
Voice Memo - Record/playback a voice
memo.
Start Key - Display start menu (main
menu).
MENU - Press to get to extra options that
are available with some programs.
POWER – Press to power the unit on
and off.
BACK - Closes the currently displayed
option.
IrDA (Infrared) Port - Transfer data
between Windows CE-based devices.
Volume down - Touch once to decrease
by 1 step. Press and hold for greater
decreases.
Volume up - Touch once to increase by
1 step. Press and hold for greater
increases.
Clarion AutoPC Owner’s Manual
3
Page 16

Fast track to
learning and using
The Index will become
your Auto PC
First, become familiar with the Controls and General Operation of the
Clarion AutoPC system as described in this chapter.
Second, spend 10 minutes previewing this Owner’s Manual:
• Scan the Table of Contents, it shows you the breadth of information
on your Auto PC.
• Glance at the first few chapters, noticing key words in the bolded
headings.
your primary reference
4
• Peruse the Index, as that will be your primary reference when you
need to find specific information on a topic.
Third, study the Using Speech Commands and Getting Started chapters,
then move into using the Radio and CD Player to learn the basics of Auto
PC.
Clarion AutoPC Owner’s Manual
Page 17
αα
-Selector
Manually manipulating
Operation
this selector should only
be carried out for so
long as it can be done
safely.
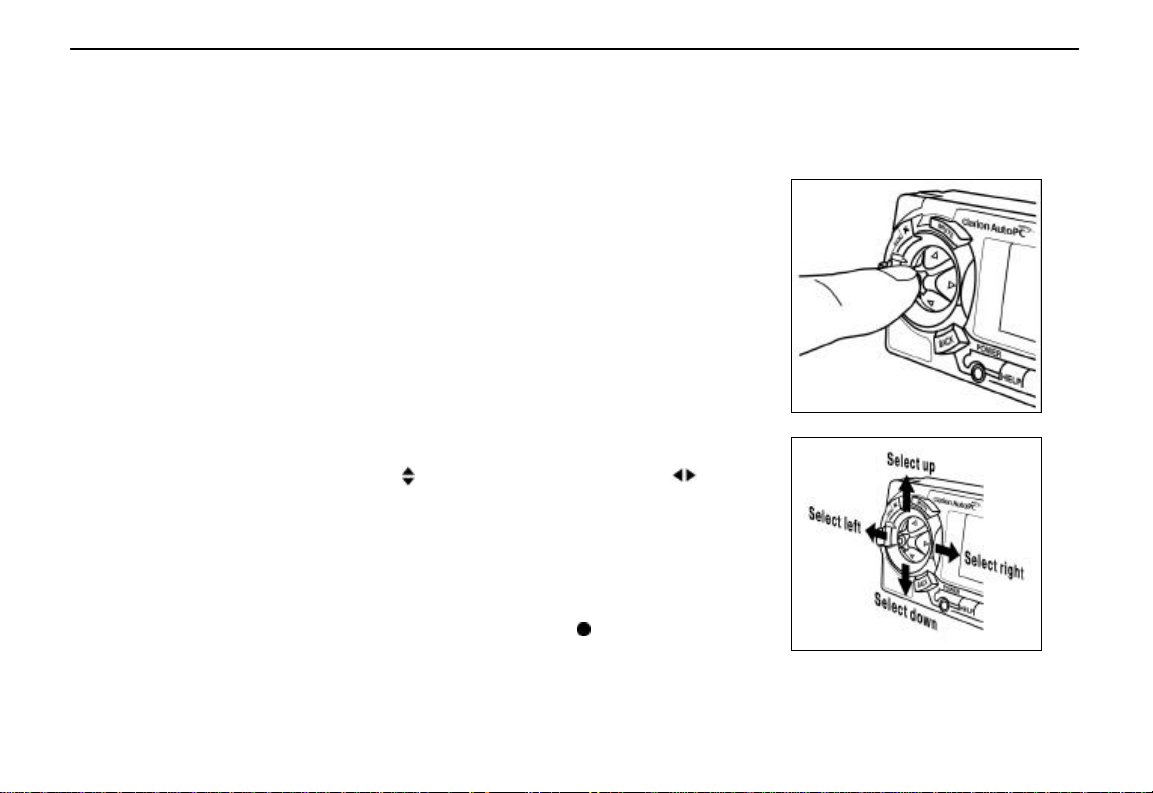
The α-Selector enables you to navigate through various Auto PC
functions with a single finger. This is how you do it:
1. Put your index finger on the
raised center element (has a
white dot) of the α-selector as
shown in the figure. CAUTION!
DO NOT TAKE YOUR EYES
OFF THE ROAD UNLESS IT IS
SAFE TO DO SO.
2. To select the up/down direction
( ) or the left/right direction ( )
tilt the α-selector in the
corresponding direction.
3. To select “enter” push directly
inward on the middle element
with the white dot ( ).
Clarion AutoPC Owner’s Manual
5
Page 18

Detachable Control Panel (DCP)
Removing the DCP
The control panel (Detachable Control Panel) can be detached to prevent
theft. After detaching the control panel, store it in the protective case
provided. We recommend taking it with you when leaving the vehicle.
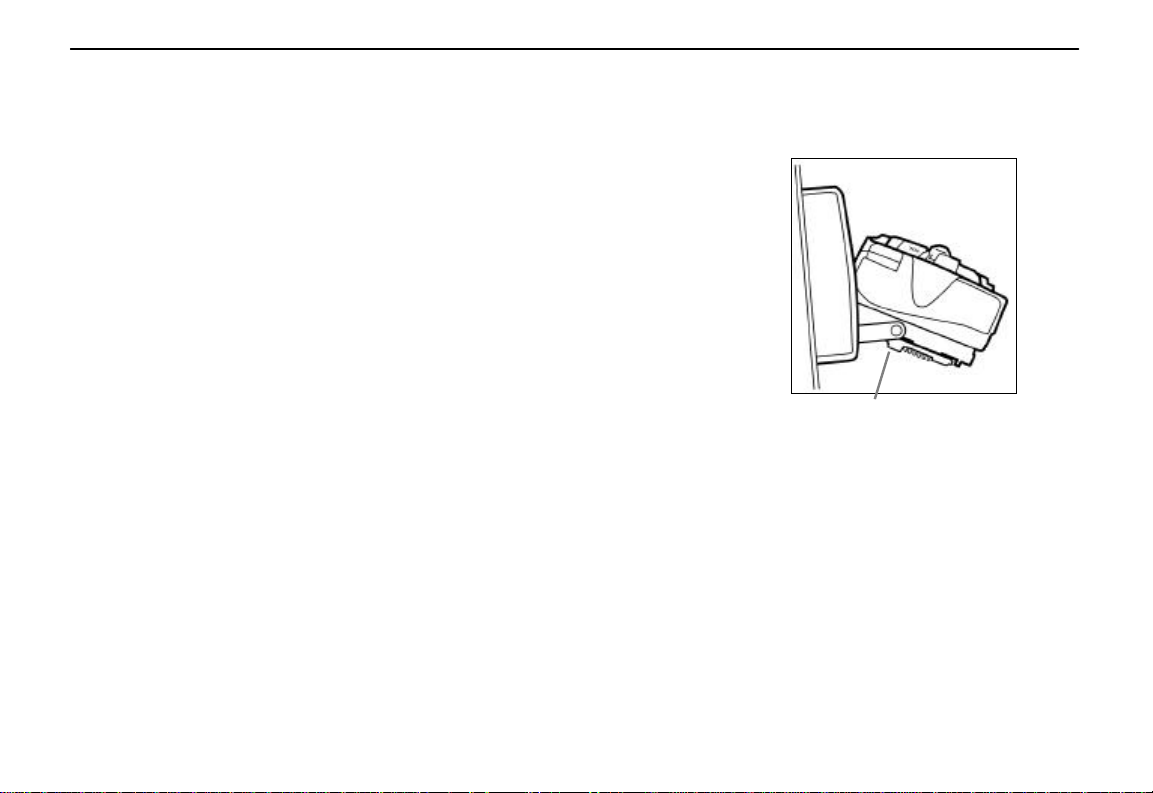
1. Turn the power off.
2. Be sure that the control panel is
fully closed. Press the DCP
release button as illustrated on
the right.
3. Pull the DCP toward you and to
the left to remove it as shown
on the right.
NOTE: Using force to remove the
DCP will damage the unit.
6
Clarion AutoPC Owner’s Manual
Page 19
Detaching the DCP
in lowered position
You can also detach the DCP in its lowered position. The procedure is as
follows:
1. Turn power off.
2. Lower the DCP to its fully open
position
3. With your left index finger, find
the release button as shown in
the drawing. Push upward on
the release button, and pull the
DCP toward you and to the left.
Release button
4. For your safety, return the DCP
holder to the fully closed
position (the vertical position).
Clarion AutoPC Owner’s Manual
7
Page 20

DCP lowered
positions
8
The DCP has three lowered positions, each of which is reinforced by a
clicking sound:
• 60 degrees (partially open)
• 45 degrees
• 30 degrees (fully lowered)
Warnings!
1. The DCP can easily be damaged by shock. After removing it, be
careful not to drop it or subject it to strong shock. After detaching the
control panel, store it in the protective case provided.
2. The connector connecting the source unit and the DCP is extremely
important. Do not press on it with fingernails, screwdrivers, etc.
Doing so may result in unit malfunction or damage.
Clarion AutoPC Owner’s Manual
Page 21
1. Be sure that the DCP holder is
Attaching the DCP
hook
fully closed before attaching the
DCP.
2. Examine the back of the DCP
and notice that there is a
locking hook on the back of the
DCP and that the hook must go
into the receptacle on the
holder.
3. Slide the locking hook on the
back of the DCP into the
receptacle and press inward.
Locking
Receptacle
Clarion AutoPC Owner’s Manual
9
Page 22

General Operations
Power on/off
Clock display
1. Press the POWER button
2. The display lights up immediately. The Auto PC remembers its last
operation mode and will automatically switch to display that mode.
3. To turn off the power to the unit, press the POWER button.
NOTE: Use caution while operating the unit for long periods of time
without running the car’s engine. Draining the car’s battery will prevent
you from starting the car and may possibly shorten the life of the battery.
The clock is displayed when the ignition key is turned to the ACC
(accessory) or IGN (ignition on) positions, even if power to the unit is off.
In some cars, the clock display may momentarily disappear when the
ignition key is turned to the START (starter engage) position. The display
will reappear after the engine has started and the ignition key is released
to the IGN position.
10
Clarion AutoPC Owner’s Manual
Page 23

Volume level is
remembered
Push-To-Talk (PTT)
Charging Backup
NOTE: Be sure to reduce the volume level before shutting off the ignition
key or turning the unit’s power off. The unit remembers the last volume
setting before power was turned off, and it will start with that same setting
when power is turned back on.
Adjusting the
volume
Battery
The volume controls are located on the α-selector. Press the plus (+) key
to increase volume press the minus (-) key to reduce volume. Also, voice
commands are available to adjust volume (see the Using Speech
Commands chapter).
When you press the Push-To-Talk button (PTT), Auto PC will “listen” for
voice commands. This is the same as saying the words, “Auto PC” to
“wakeup” Auto PC.
Backup Battery is not charged in shipment condition, and it will start
charging as soon as the Auto PC is connected to your car’s power source
(Main Battery). When the Backup Battery is charged, the “charging”
indicator disappears from the display.
NOTE: Backup Battery cannot be charged in temperature of less than
18 degrees Fahrenheit.
Clarion AutoPC Owner’s Manual
11
Page 24

Installing or
replacing Coin Cell
Battery
12
1. Turn power off.
2. Turn the vehicle ignition off.
3. Remove the Detachable Control
Panel (see Removing the DCP)
4. Lower the DCP holder as
shown in the picture. Remove
the battery holder by placing the
tip of the flathead screwdriver
on the exposed edge and
pulling the holder outward.
Small flathead
screwdriver
Clarion AutoPC Owner’s Manual
Page 25

5. Place CR2032 Coin Cell Battery
with plus (+) side up in the
battery holder as shown.
6. Install the battery by pushing
the holder into the unit as
shown. Return the DCP holder
to the fully closed position (the
vertical position).
Clarion AutoPC Owner’s Manual
13
Page 26
Where to find
information
To get help from
Auto PC
14
For information on … See …
Speech commands Using Speech Commands chapter or
quick reference material.
Auto PC screens and keys Getting Ready chapter.
To … Do this …
See Help Tips for the
current program screen
Hear which speech
commands are currently
available
Hear speech command
Help and find out how to
use the commands that
are currently available
Press the HELP key on the DCP.
Say Auto PC
What can I say
Say Auto PC
Help
Clarion AutoPC Owner’s Manual
Page 27

Speaking
commands
decisively
Chapter 2 –
Using Speech Commands
Auto PC can understand words and short phrases spoken as commands,
called “speech commands.” Using voice commands while driving allows
you to operate the system without distracting your attention away from the
road or removing your hands from the wheel.
Auto PC doesn’t listen for speech commands all of the time. If you want to
give commands to your Auto PC, you must first wake it up. Also, only a
few commands, called “global commands” are available all of the time.
Many speech commands are specific to a program, and so are called
“program commands.”
Auto PC recognizes command words more effectively when you speak
them decisively, as in a command, and may ignore words when you are
talking normally, as in a conversation.
Clarion AutoPC Owner’s Manual
15
Page 28

Guidelines for
speech commands
If you don’t know
what to say
The Auto PC has been optimized to recognize adult speakers. Use the
following guidelines when giving commands to Auto PC:
1. Remember to wake up Auto PC.
2. Say each command clearly and distinctly, but don’t shout.
3. Wait for the “heard” tone before saying another command.
4. Wait for Auto PC to stop talking, or press the Push-to-Talk (PTT) key
to interrupt.
5. Decrease background noise.
6. You may need to train Auto PC to understand how you say one or
more speech commands. For more information, see the section “To
train or add a custom command word” in the chapter, “Customizing
Your Auto PC.”
If you don’t know what commands you can say, just say “What can I
say?” and Auto PC will tell you which speech commands it is listening
for. You can also say “Help” if you want to know what you can do with
speech commands. The following sections contain more information that
will help you take advantage of the speech capabilities of Auto PC.
16
Clarion AutoPC Owner’s Manual
Page 29
How Auto PC HELP
illustrates voice
“Heard tone”
commands and
response tones
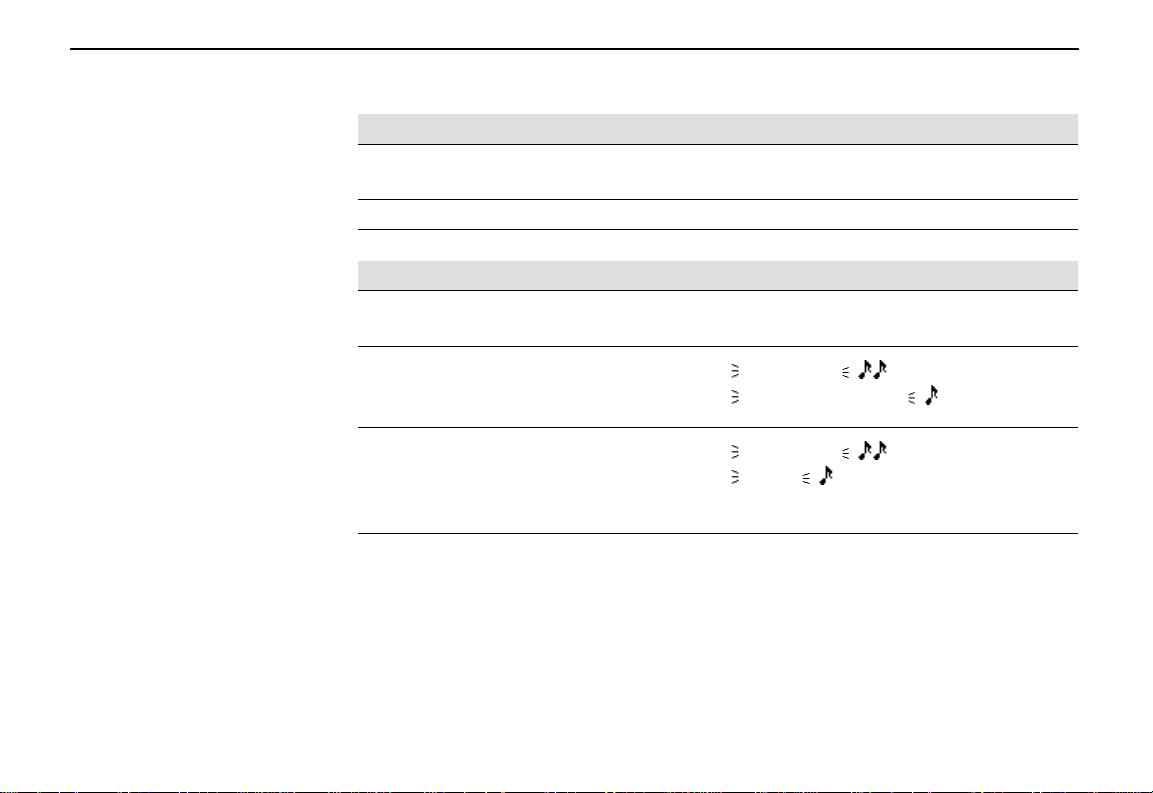
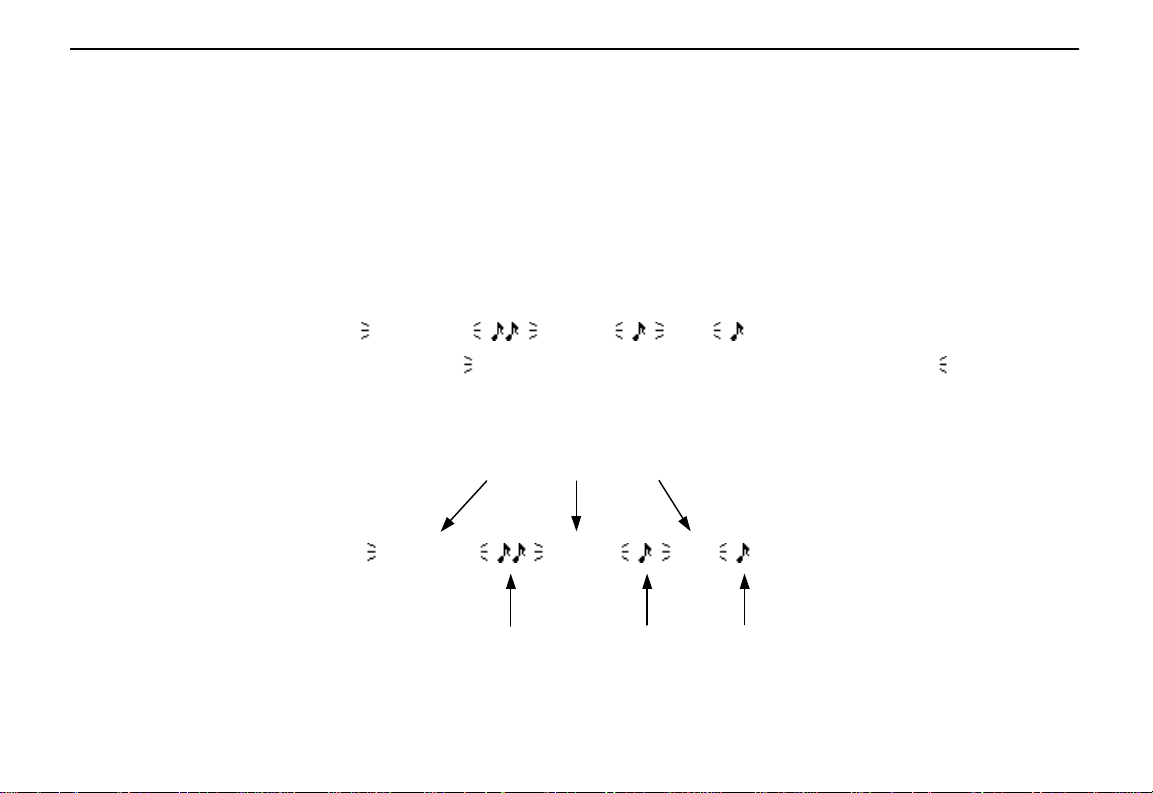
Getting help with speech commands
While in the Start menu you can press HELP to get assistance with
speech commands. You will see voice commands and how Auto PC
responds with musical tones. Auto PC tells you it is “listening” to you with
a specific tone, and that it has “heard” your voice command with another
different tone. You see both the commands and tones represented on
the Auto PC HELP display. For example, speaking “Auto PC” along with
other voice commands will appear as follows on the display:
Auto PC Radio FM
Note that ( ) represents the start of a voice command and ( ) signifies
the end of a voice command. Other conventions used in Auto PC HELP
are explained in this diagram:
Voice commands
Auto PC Radio FM
“Awake tone”
Clarion AutoPC Owner’s Manual
17
Page 30

Tones that help you
give speech
commands
18
If, after saying “Auto PC” you do not hear the “listening tone,” consult the
Tips and Troubleshooting chapter of this manual.
Auto PC has three tones that help you give speech commands:
1. When you wake up Auto PC, you’ll hear the awake tone, and see a
green speech command timeout bar on the bottom of the screen.
2. When Auto PC hears you, you’ll hear a short “heard tone.”
3. When Auto PC stops “listening,” you hear the sleep tone and the
listening timeout bar (green color) disappears.
For examples of how to use speech commands, see the Getting Ready
chapter.
Clarion AutoPC Owner’s Manual
Page 31

Two ways Auto PC
gives you information
Screen-based icons
show what you can do
Chapter 3 - Getting Ready
Before you start using your Clarion AutoPC system, take a few minutes to
become familiar with the unit.
Your Auto PC gives you information in two ways:
1. By displaying information on the screen.
2. Through voice synthesis, Auto PC reads status information or other
requested information.
You can control Auto PC using the keys on the DCP or you can use
speech commands, which are single words or short phrases that provide
shortcuts to commonly used functions.
Start Menu
Small pictures (called
icons) give you a quick
look at what you can do.
Clarion AutoPC Owner’s Manual
19
Page 32

Display layout
Green bar shows how
Blue bar shows when
Program icons 1, 2, …
Current icon number
much “listening” time
Auto PC is “talking”
20
remains
Address Book icon
Green bar (Auto PC is “listening”) or
Blue bar (Auto PC is “talking”)
Press (enter) to go into
Address Book program
Left/right navigation icon
(((
“Listening” timeout expiration status
When you say “Auto PC” or use PTT, Auto PC “listens” for speech
commands and a green bar appears across the bottom of the display.
The green bar gradually disappears as the listening timeout expires.
CAUTION! ONLY LOOK AT THE AUTO PC WHEN IT IS SAFE AND
ONLY FOR AS LONG AS IT IS SAFE TO DO SO. Do not look at the
green bar longer than is safe.
The blue bar appears across the bottom of the display only when Auto PC
is “talking.” While “talking,” Auto PC does not accept voice commands.
Clarion AutoPC Owner’s Manual
Page 33

Hold PTT to make Auto
PC listen
Wake up Auto PC
and go to a program
NOTE: Neither the green bar nor the blue bar is displayed if the listening
timeout is set to Always (see the Customizing your Auto PC chapter).
If you press and hold the PTT key, Auto PC continues listening until you
release the key.
Using Speech to go to a program
You can go to some programs by saying the program name. The program
names available as default global commands are: Radio, CD Player,
Directions, Address Book, and Messages. For information on changing
which program names are available, see “Changing Speech Command
Options” in the chapter, “Customizing Auto PC.” To go to a program that
isn’t selected as a global command, use the keys as described in the next
section.
To Say You’ll hear
Wake up Auto PC
speech recognition
Go to a program
Auto PC (awake tone) and status
information
program name
(speech command
heard)
Clarion AutoPC Owner’s Manual
21
Page 34

22
Example:
Start menu
To Say You’ll hear
Wake up Auto PC
speech recognition
Go to CD Player
program
Auto PC and current program name.
You can eliminate current
program name feedback. See
Customizing Your Auto PC,
Speech feedback.
CD Player
(speech command heard)
Using keys to go to a program
Auto PC has a Start menu that you can use to go to programs. The Start
menu has an icon for each program installed on your Auto PC.
Clarion AutoPC Owner’s Manual
Page 35

To use the keys to
go to a program
Examples
To Press You’ll see
Display the Start menu The Start menu
Select (highlight) a
program icon in the
or
The Start menu cycles
through the program icons
Start menu
Go to the selected
program
Go directly to a program
with the program’s
shortcut number
1
(enter)
or Hold
0-9
The program’s main screen
The program’s main screen,
note: press then 0-9 if
display is not at Start menu
1. To go to the program whose icon is two icons to the right of the
current icon, press, , , .
2. To go to the program whose shortcut number is “3,” press , 3.
1
The first ten programs installed on the Auto PC have shortcut numbers
assigned to them. To reassign the shortcut numbers, see “To reorder the Start
Menu” in the chapter “Customizing Your Auto PC.”
Clarion AutoPC Owner’s Manual
23
Page 36

Navigating within programs
Radio icon
You can navigate within a program by pressing the MENU key on the
DCP. For example, under Radio you may change the Audio Settings:
24
You are here
Current option displayed
is Audio Settings
This is the first of
two radio options
Press (enter) to go
into Audio Settings
Press (up or down) to select
another radio option
Clarion AutoPC Owner’s Manual
Page 37

How commands are shown in this manual
Voice
Voice/Manual:
Manual
Here’s how voice and manual commands are shown in this document.
The Push-To-Talk button (PTT) may be used in place of speaking “Auto
PC” to “wakeup” the Auto PC.
If it looks like this … It means you …
Auto PC … Radio …
AM …
Say “Auto PC,” wait for the “listening tone”
( ), say “Radio,” wait for the “heard tone”
( ), say “AM” and wait for ( ).
means stop your
vehicle to do
manual steps
!!
!!
Voice commands and equivalent manual commands shown side-by-side:
Voice Manual
Auto PC …
Directions …
Many Setup function must be manually carried out. DO NOT ATTEMPT
THESE FUNCTIONS WHILE THE VEHICLE IS MOVING.
Manual !! (Stop your vehicle to do manual steps) Comment
Press Start, and press to Setup
then
!!
to highlight Directions,
Comment
Access Directions
program.
Select the Setup
program.
Clarion AutoPC Owner’s Manual
25
Page 38

Basic setup
To activate clock
display
Adjust for Daylight
Savings Time
The procedures shown here will get you started using your Auto PC.
These are just some of the settings that you can adjust. (See
“Customizing Your Auto PC” later in this manual.)
Clock, date, time, and regional setup
Do clock, date, time, and regional setup by completing the following
procedures:
Manual
Press Start, then to highlight Setup,
and press
Press to select Clock, and press
Press to choose an interval from 10 Sec
… up to 5 min, or leave the setting at
Never (default)
Press to select Adjust for DST and then
(Stop your vehicle to do manual steps) Comment
!!
to choose Yes or No
Highlight the Setup
program and enter it.
Select Clock and enter
the first option screen.
Chose a time interval at
which the clock will be
automatically displayed,
or choose Never display.
Allows Auto PC to
automatically adjust the
Time for Daylight
Savings Time (DST).
26
Clarion AutoPC Owner’s Manual
Page 39

Manual
Set the date
Set the time
Set the time zone
!!
Press to select Set Date, and
press
Press to change the Month--press
to move to next edit box
When the date is set, press BACK
Comment
Select and enter Set Date.
Set the Month, Day and Year.
Return to Set Date screen.
Manual
Press to select Set Time and
! !
Select and enter Set Time.
press
Press to change the Hour--press
to move to next edit box
When the time is set, press BACK
Manual
! !
Press to highlight Time Zone
Return to Set Time screen.
Comments
Select Time Zone.
Press to change the zone Examples: Pacific, Central, . . .
When the zone is set, press BACK
Clarion AutoPC Owner’s Manual
27
Page 40

Manual
Regional setup
Press to select Regional Setup,
and press
! !
Select and enter Regional
Setup.
Change the Regional styles and formats as shown in the table below:
To change this… Press to highlight And then press
Currency Currency
Date style Date style
Distance Distance
Time style Time style
Time format Time Format
Fuel measurement Fuel
28
Clarion AutoPC Owner’s Manual
Page 41

Global speech
commands let you get
To find out which
to programs directly
commands you can
say
Using Global Speech Commands
Global speech commands are available all the time, in any program.
Global commands include speech commands that take you right to many
of the programs on your Auto PC, plus commands that are useful in any
program, such as “Read” and “What time is it?”
To get started using global commands, the following sections show you
some tasks you can do using global commands.
• Have Auto PC tell you what speech commands you can say
• Have Auto PC tell you the time
• Change the volume
You can change which global commands are available in Setup. For more
information, see “Changing Speech Command Options” in the chapter,
“Customizing Your Auto PC.”
Voice Comments
Auto PC ... To wake up Auto PC, if necessary.
What can I say? … Auto PC lists (speaks) the active speech
commands currently available.
Clarion AutoPC Owner’s Manual
29
Page 42

30
To find out the time
To adjust the
volume
Voice Comments
Auto PC ... To wake up Auto PC, if necessary.
What time is it? … Auto PC reads the time aloud. For information
on setting the clock, see the section earlier in this
chapter.
Audio volume can be adjusted by manual controls on the DCP of the Auto
PC or by using the voice commands shown here. There are 3 levels of
volume adjustment, each of which have default presets that you may
customize:
Voice Default preset value
Auto PC ... Volume ... Quiet 5
Auto PC ... Volume ... Normal 12
Auto PC ... Volume ... Loud 20
Auto PC adjusts the volume to the specified level. You can change the
volume level presets using the Audio program (see the Audio
Adjustments chapter).
Clarion AutoPC Owner’s Manual
Page 43

Program commands are
specific to a program
Using Program Speech Commands
Unlike global speech commands, program commands are specific to a
particular program – you can only use them when you are in that
program.
The following sections show you some examples of what you can
accomplish using program commands.
• Go to a radio station preset
• Listen to a CD and change tracks
• Review directions while driving
• Dial a telephone number from Address Book
• Listen to an e-mail message
NOTE: Additional (optional) hardware may be required to accomplish
some of these program commands. For example, to make Auto PC dial
your cell phone, you need the cell phone cradle connected to the
Universal Serial Bus (USB).
Clarion AutoPC Owner’s Manual
31
Page 44

Requirements to
use radio presets
To go to a preset
radio station
32
Requires you to have:
• Set a radio station preset. For more information, see “Setting your
own Preset stations” in the chapters, “Using the Radio, and Audio
Adjustments.”
• Recorded a name (for example, “Classical”) for the preset. For
more information on recording a named preset, see the chapter
“Using the Radio”
Voice Comment
Auto PC ... Radio ... Preset …
<preset name> … Auto PC goes to the preset station
NOTE: You can also go to a preset station by saying Preset , and then
saying the preset number (0-9).
Clarion AutoPC Owner’s Manual
Page 45

To listen to a CD
and change tracks
Requires you to have inserted an audio CD. For more information, see
the chapter, "Using the CD Player."
Voice Comment
Auto PC ... CD Player ... Auto PC goes to the CD player
program and starts playing the CD.
Next … Auto PC goes to the next track on
the CD.
Clarion AutoPC Owner’s Manual
33
Page 46

34
Clarion AutoPC Owner’s Manual
Page 47

Chapter 4 – Using the Radio
The fastest way to learn the Clarion AutoPC system is to try out the
functions you will frequently use. Once you have learned how to set up
and use commands for your radio, everything else is similar and therefore
easy.
The Radio program in Auto PC gives you access to most common radio
functions using speech commands. Using speech commands, you can:
1. Go between AM and FM.
2. Seek forward or backward for the next station.
3. Read the current station frequency and preset label (if any).
4. Go to 20 preset stations, ten each for AM and FM. For each preset,
you can assign a number key and a text label, as well as record the
station name. The preset number key or text label are displayed when
the preset station is shown.
Clarion AutoPC Owner’s Manual
35
Page 48

Finding or tuning a
station
Manually selecting FM,
Using the DCP keys ( ) you can seek to a station, using ( ) you can
fine-tune to a station. Also, you can enter a station number directly with
the numeric keys (0 – 9) after pressing (#). By pressing MENU you can
also go to the Radio options, where you can edit the label and speech
commands for your preset stations.
Selecting AM or FM
AM and turning radio
36
OFF
Voice Manual
vehicle to do manual steps)
Auto PC ...
Radio ...
AM ...
Press Start, then to
highlight Radio, then
to get AM
(Stop your
!!
Comments
To select the Radio
program.
If FM is highlighted, press
to get AM.
FM ... If AM is highlighted, say
“FM” to listen to FM.
With radio on FM, press
to switch to AM; press
again to turn radio
Sequence is FM -> AM ->
OFF. When radio is off,
“Off” shows on the display.
Off.
to turn radio on and
set it to FM
When display reads “Off,”
press to turn radio on.
Clarion AutoPC Owner’s Manual
Page 49

Preset stations and
“Train” Auto PC to
Setting your own
Ways to scan or select
station names
recognize commands
Preset stations
You can establish up to 10 Preset stations for AM and up to 10 Preset
stations for FM.
You can also use your voice to “train” Auto PC to recognize custom voice
commands for your Preset stations. If, for example, you have a favorite
ROCK and CLASSICAL station, you could give them station names such
as ROCK and CLASSICAL.
Once you have selected either AM or FM you will also see the radio
beacon icon and the frequency to which the radio is currently set. The
frequency used in this next example is FM 94.7 (or substitute any working
station in your area) and you will identify this station as Preset 1.
stations
Manual
(Stop your vehicle to do manual steps)
!!
Press lightly once to scan for station 94.7 FM, (easiest) or
Press to incrementally select the specific frequency, 94.7 FM
Press and hold the number “1” on the Key Pad for 2 seconds
Note: The time required for press and hold is customizable; see the
section on Timeouts in the Customize Your Auto PC chapter.
Clarion AutoPC Owner’s Manual
37
Page 50

Note that the Display now reads “Preset 1” in the lower right of the
To listen to a Preset
display. Use the same procedure to set other Preset stations:
• Preset 1, 2, . . . , 9, 0 for AM
• Preset 1, 2, . . . , 9, 0 for FM
station
38
Voice Manual
Auto PC ...
Radio ...
Press Start, then
to highlight Radio
!!
Comment
To select the Radio
program.
and press
FM ... If display reads AM
press twice to get
back to FM
Preset ... Wait for the “heard”
tone.
One …
Press & release 1
on the Key Pad
Station changes to your
preset, and “Preset 1”
appears on screen.
Clarion AutoPC Owner’s Manual
Page 51

Setting your own
station names
You can assign station names for your Preset stations using names of
your choice. This next sequence builds upon the Preset 1 station already
established in the earlier example (ROCK = Preset 1 = 94.7 FM).
Manual
!!
Press Start, then to highlight Radio and then
Press MENU then to select Edit Preset Stations
Press and the display reads “<Record Station Name>”
Press to select the Preset number
Press and display reads “Say Command Word three times at the tone
prompt”--press
Record the Command Word (“ROCK”) three times when prompted by
the tone ( )--wait for the “understood” beep ( ) after each repetition
Display reads: “Custom Command successfully recorded” (for 5
seconds) and then “Station name recorded”
Clarion AutoPC Owner’s Manual
39
Page 52

Change name from
“Preset 1” to
Using lower case letters
“ROCK”
40
Manual
!!
Press Start, then to highlight Radio and then
Press MENU then to select Edit Preset Stations
Press for display to read “<Enter Station Name>” then press
Press to enter the letter “R” then to move to the next spaces and
enter “O” then “C” then “K”
Press to enter the name “ROCK”
Press BACK and notice that the Display now reads “ROCK” in the lower
right corner
You can use lower case letters if you prefer. For example, suppose you
prefer to see “Rock.” Simply move to an upper case letter , then press
down once to change the letter from upper to lower case. Pressing up
will change a lower case letter back to upper case.
You can also use the numeric Keypad to input or edit letters. Refer to
Tips and Troubleshooting chapter for more information on use of the
numeric keypad.
Clarion AutoPC Owner’s Manual
Page 53

Changing Radio
Options
Use the following procedure to adjust audio settings from the Radio
program.
Manual
!!
Press Start, then to highlight Radio and then
Press MENU
Press to select Audio Settings; for more information, see Audio
Adjustments chapter
Clarion AutoPC Owner’s Manual
41
Page 54

42
Clarion AutoPC Owner’s Manual
Page 55

Chapter 5 – Using the CD Player
The Auto PC CD Player program gives you access to advanced play
functions using speech commands. Using speech commands, you can:
• Play and pause the CD
• Delete the current track from the tracks played for the current CD
• Play tracks randomly
• Go to the next or previous track
• Go to the next CD (if you have the optional CD changer)
Using the control panel keys, you can also fast forward, rewind, or enter a
track number. You can also go to the CD Player options menu where you
can control which tracks to play and change the display options for the
CD Player.
Clarion AutoPC Owner’s Manual
43
Page 56

Types of CDs you can use with Auto PC
CD type Comments
Normal consumer
Audio CDs
2 ½ inch consumer
CD Singles
4 ¾ inch computer
CD-ROMs
NOTE: The Auto PC CD mechanism cannot read “Multi session” type
CD-ROMs. These CD-ROMs are typically used for computer database
and data archival applications.
These are the popular compact discs used to
play music.
These CDs can also be used in the Auto PC’s
in-dash player.
CD-ROMS are used by the Directions program
to access map data, and by the Setup
program to install new Auto PC programs. For
more information, see the chapters, “Using
Directions” and “Customizing Your Auto PC.”
44
Clarion AutoPC Owner’s Manual
Page 57

Before operating
the CD Player
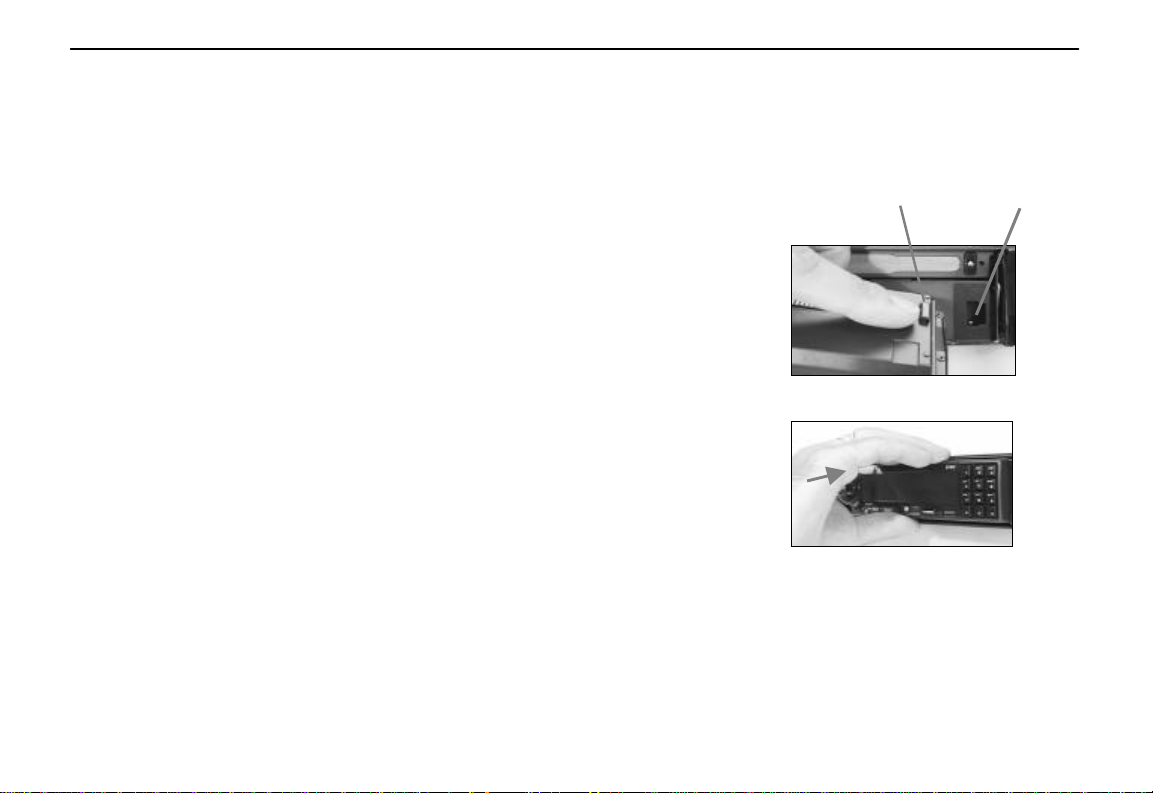
1. Power on the unit and lower the
control panel to allow insertion
of a disc into the CD slot. Grip
the control panel, pulling the
control panel out outward and
downward in one continuous
motion as shown to the right.
2. Place the DCP in the fully open position as shown below. Notice the
position of the CD slot and the eject button.
CD slot
Eject button
Clarion AutoPC Owner’s Manual
45
Page 58

(Before operating the CD Player, continued)
46
3. Look to see that the CD will
clear the top of the control
panel as illustrated on the right.
4. Push the disc into the CD slot
half way, and the drive will pull
it in the rest of the way.
Correct
clearance
Clarion AutoPC Owner’s Manual
Page 59

Voice Manual
Playing CDs
(Stop your vehicle to do
manual steps)
Auto PC …
CD Player…
Press Start, then
to highlight CD
Player, then
Play ...
Pause ...
Next ...
Previous …
Random …
to highlight CD
Player, and MENU
to highlight
Random Playback
!!
Comments/Illustrations
To select the CD Player
program.
Play or pause a track. Note:
Stop has the same effect as
Pause.
Play the next or previous track.
to set On (or Off)
Press BACK
Turns Random play on or off.
If Random is On a symbol ( )
appears in lower right of CD
playback screen:
Clarion AutoPC Owner’s Manual
47
Page 60

Delete track
Fast forward and
Delete or restore
tracks
Voice Manual
Delete ... Deletes track currently playing.
Press MENU
to highlight Disc Play
List, then to see the
Play List
then to delete (or
restore) it
Press BACK to see CD
playback screen
!!
to choose the track,
Comments/Illustrations
backward
Go to a track
48
Manual
Press and hold Fast-forward or backward within a track.
Use buttons 0 – 9
for track number
!!
Comments
Go to a track, examples: 1 or 10 or 35--or use
(one touch) to go forward or back one track at a
time.
Clarion AutoPC Owner’s Manual
Page 61

Change the CD
display options
Change discs
1
Manual
!!
Press MENU
Comments/Illustrations
To see the CD Player options
Press Select Display
Press Select the display you want
Changing Audio
Options
Use the following procedure to adjust audio settings from the CD Player
program.
Manual
!!
Press MENU
Press to select Audio Settings; for more information, see the chapter
on Audio Adjustments
Manual
!!
Press and release
then button 0 – 6
*
Comments/Illustrations
Go to a disc (if you have an optional CD changer).
Press button 0 to use the in-dash CD.
for disc number
1
For a six disc CD Changer system.
Clarion AutoPC Owner’s Manual
49
Page 62

General cautions for
CD handling
1. Do not warp or bend a CD.
2. A CD is vulnerable to heat, so do not leave it near a heater, in the
sun, or anywhere else where it will be exposed to heat.
3. Be careful not to scratch a CD.
4. Do not paste any labels on the disc surface or write anything on the
label surface (printed surface).
5. Do not increase the diameter of the center hole.
6. Do not wipe a CD with alcohol (particularly industrial methyl alcohol),
water, conventional record cleaner solution, static electricity
prevention agent, or similar liquids.
7. Keep fingerprints, oil, and dust off of a CD.
8. If the CD is dirty, wipe it with a soft cloth. Do not use a silicon cloth.
When wiping, always wipe from inside to outside.
9. Never force a CD into or out of the CD slot.
10. Insert a disc so that the playing side is down and the label side is up.
50
Clarion AutoPC Owner’s Manual
Page 63

Chapter 6 – Audio Adjustments
You can change bass and treble, equalizer settings (including named
presets), balance, fade, loudness, and volume presets.
You can access Audio Settings through the Radio or CD Player
programs, or from the Audio program in the Start menu.
Making audio
adjustments from
Audio program
(Start menu)
Voice Manual
vehicle to do manual steps)
Auto PC …
Audio …
Press Start, then to
highlight Audio
to see first Audio
Option
to adjust Bass level
to select Treble,
to adjust level
(Stop your
!!
Comments/Illustrations
Highlight the Audio program.
Adjust level to zero, or to a
plus or minus value.
Adjust level to zero, or to a
plus or minus value.
Clarion AutoPC Owner’s Manual
51
Page 64

(Making audio adjustments continued.)
To change an
equalizer preset
52
Manual
!!
to select Eq and to select the
preset you want to change
Press then to change the
setting, to select another
frequency
To rename the Preset, press
until Rename is shown
Press and edit the name, press
to return to the Eq Edit screen
Comments/Illustrations
Note: Rename is an optional
step, and if not desired, press
BACK to return to Eq screen.
Clarion AutoPC Owner’s Manual
Page 65

(Audio adjustments continued.)
Manual
!!
to select Balance,
to adjust right or left
to select Fade
to adjust front or back
to select Loudness,
to set On or Off
Comments/Illustrations
Adjust sound balance to middle
(zero), or to the left or right side.
Right adjusts fade to the front
and left adjusts it to the back.
Select Loudness On to increase
bass with low volume levels.
to select Volume Presets, then
to adjust level Right is louder, left is quieter.
to select Normal Preset and
to adjust level
to select Loud Preset and to
adjust level
Clarion AutoPC Owner’s Manual
53
Page 66

Here are illustrations of access to audio adjustments from either the
Access Audio from
Radio or CD Player programs.
Access Audio from
Radio program
CD Player program
54
Voice Manual
Auto PC ...
Radio ...
Auto PC …
CD Player…
Press Start, then
to highlight Radio,
then
Menu
Then
Press Start, then
to highlight CD
Player, then
Menu
Then
!!
Comments/Illustrations
To select the Radio
program.
Select the CD Player
program.
Clarion AutoPC Owner’s Manual
Page 67

Chapter 7 - Using Address Book
With Auto PC’s Address Book, you can stay in touch with family, friends,
and business contacts. Address Book stores work and home addresses,
phone, fax and pager numbers, and e-mail addresses to give you quick
access when and where you need it.
Contacts are listed in alphabetical order. Above is a sample display of
Address Book, showing the first name listed under the letter “A.”
Clarion AutoPC Owner’s Manual
55
Page 68

Address Book command words and keys
This table lists some words and key presses used in Address Book.
56
Voice Manual
your vehicle to do
manual steps)
Auto PC …
Address book …
Press Start, then
to highlight
!!
(Stop
Comments
To select the Address
Book program.
Address Book,
then
Letter … "T" …
List …
To hear all names in the
Address Book starting at T.
Press to stop.
Next … or
To highlight a contact.
Previous …
To go to the next letter tab.
Select …
To open contact
information.
Read … To read the current name.
Locate …
<custom command
word> …
To find a contact with
previously recorded
custom command word.
Clarion AutoPC Owner’s Manual
Page 69

The following examples illustrate commands to initiate dialing a number
Example 1: Dialing a
from an existing Address Book entry. Actual dialing of the phone number
requires a cell phone which is an optional accessory.
phone number
Voice Manual
Auto PC …
Address book …
Press Start,
then to
!!
Comments
To select the Address Book
program.
highlight
Address
Book, then
Letter … "P" … To go to a specific letter tab.
Example: the letter “P.”
Next … or
Previous …
or Highlights an entry. finds next
entry. steps through alphabet.
Select … Displays phone number.
Read … Auto PC “reads” the number.
Next … or
Previous …
Dial …
Press MENU,
then to
Goes to Next or Previous number
for this entry and reads it to you.
The unit “asks” if you want to dial
the selected number.
select Dial,
then
Clarion AutoPC Owner’s Manual
57
Page 70

(Dialing a phone number continued.)
58
Voice Manual
!!
Yes … or No … to select
“Yes or “No,”
then
BACK
Comments
If “Yes,” the display shows “Dialing
…” with the associated number.
To return to Address Book List.
Clarion AutoPC Owner’s Manual
Page 71

Example 2:
Recording a custom
Record the custom
name
The following examples illustrate recording and using a custom command
word to dial the phone.
Manual
!!
Press Start, then to highlight Address Book, then
name
to find the entry
Menu and then to find Record Contact Name
: Display reads “Say Command Word three times at the tone prompt.”
: Record “Marvin Adams” three times when prompted by the tone
( )--wait for the “understood” beep ( ) after each repetition
Display reads: “Custom Command successfully recorded” (for 5
seconds) followed by:
The quote marks ( ) to the right of Address Book List indicate a
Custom Command Word now exists for this entry
Clarion AutoPC Owner’s Manual
59
Page 72

Example 3: Using a
custom name to dial
Voice Comments/Illustrations
Auto PC …
To select the Address Book program.
Address book …
60
Locate …
This is displayed:
<Marvin Adams> …
And the unit “reads” the name “Marvin Adams.”
Dial … The unit “asks” if you want to dial the number
(example: Work phone is Preferred Phone).
Yes … or No … If “Yes,” the display shows “Dialing …” with the
associated number. If you say “No,” you may
still choose from other phone numbers by
saying “Next” or “Previous” and the unit will
“read” another number such as Pager or Mobile
phone.
BACK
To return to Address Book List.
Clarion AutoPC Owner’s Manual
Page 73

Add, edit or delete a contact
To enter a new
These procedures help you to share contacts with other mobile devices,
and make changes in Address Book. In the Getting Started chapter you
saw how to customize a radio station name. Adding a new entry to the
Address Book is similar as is seen in the following example.
name
Manual
Press Start, then to
highlight Address Book,
then
MENU and select New
Entry and then
then press to enter the
first letter of the first name
then to move to the
next spaces and enter
more letters
!!
Comments
To select the Address Book program and
see the Address Book List.
To select the New Entry function and see:
Example of partially entered first name:
NOTE: be sure to leave a space between
first and last name.
Clarion AutoPC Owner’s Manual
61
Page 74

(Enter new name continued)
Record the name
Select Preferred
Phone
62
Manual
!!
when name is
entered
to select
alternative
, then to enter the
number, then
BACK
Comments
You are prompted to <Record Contact Name>
Display reads “Say Command Word three
times at the tone prompt.” Press if you want
to skip recording the name.
1. Record the new name three times when
prompted by the tone ( ). Wait for the
“understood” beep ( ) after each repetition.
2. Then the display reads: “Custom
Command successfully recorded”
3. Then the display reads: “Preferred Phone:
Work”
Alternatives are: Work, Home, and Mobile.
Example: You see <enter mobile phone>
Example: You see “Mobile: 555 3456.”
You see “<name> added to Address Book” (for
3 seconds) then the Address Book List.
Clarion AutoPC Owner’s Manual
Page 75

To edit or add to
existing contact
information
Manual
!!
Press Start, then to
Comments
To select the Address Book program.
highlight Address Book,
then
and , then To select a contact.
Press MENU, then use
to select Edit All Fields,
This procedure is required if you want to
edit or add to all contact fields.
then use to set Yes
Press BACK
Use and to edit or add
information
BACK
Display (example) shows the contact with
three icons representing 3 types of
information: Phone, Work and Home.
Use to choose the type of information
to add or edit. Use to choose the field
with the type of information
To start and stop editing.
When done entering, press to accept.
To cancel changes press BACK.
Clarion AutoPC Owner’s Manual
63
Page 76

Data field options
for phone
Data field options
Phone
1. Work 2. Work2 3. Mobile 4. Car
5. Home 6. Home2 7. Pager 8. Assist
Data field options
for work
for home
64
Work
1. Work 2. Fax 3. Email 4. Title
5. Dept 6. Mobile 7. Pager 8. Car
9. Work2 10. Assist 11. Assist# 12. Spouse
13. Web 14. Bday 15. Anvrsry 16. Mr/Ms/..
17. First 18. Middle 19. Last 20. Company
21. Address 22. Addr2 23. Addr3 24. Addr4
25. City 26. State 27. Postal 28. Country
Home
1. First 2. Middle 3. Last 4. Address
5. Addr2 6. Addr3 7. Addr4 8. City
9. State 10. Postal 11. Country 12. Home
13. Fax 14. Email 15. Spouse 16. Web
17. Bday 18. Anvrsry 19. Assist 20. Assist#
21. Mr/Ms/..
Clarion AutoPC Owner’s Manual
Page 77

Manual
To delete a contact
To set a preferred
!!
Press Start, then to
Comments
To select the Address Book program.
highlight Address Book,
then
and , then To select a contact.
MENU, then to highlight
To delete a contact.
Delete, then
to highlight Yes and
press
To confirm deletion. Be sure to check
that the correct contact is being deleted.
phone
Manual
!!
Press Start, then to
Comments
To select the Address Book program.
highlight Address Book,
then
and , then To select a contact.
MENU and select Preferred
To select the Preferred Phone function.
Phone
to highlight Work,
Home, Mobile or Pager,
then BACK
Select Work, Home, Mobile or Pager as
the preferred phone. You can establish a
Preferred Phone for each contact.
Clarion AutoPC Owner’s Manual
65
Page 78

Transfer a contact
To transfer contacts
If you have another mobile device powered by Windows CE, such as the
Handheld PC or Palm-sized PC, you can quickly transfer your contacts to
your Auto PC through the infrared port.
to or from a mobile
device
66
Manual
Press Start, then to
highlight Address Book,
then
and , then To select a contact to send. (This step is
MENU, then to highlight
Send or Receive, then
!!
Comments
To select the Address Book program.
not required for receive.)
To send or receive a contact.
Set your mobile device to receive or send
contacts via the infrared port.
Align your mobile device’s infrared port
with your Auto PC’s infrared port and hold
until Auto PC confirms the contact has
been transferred.
Clarion AutoPC Owner’s Manual
Page 79

NOTE: If you are having trouble transferring data, be sure that your
To locate a contact
infrared ports are aligned. If the problem persists, change your infrared
transfer speed in Setup. (See “Customizing Your Auto PC.”)
Browsing Contacts
You can browse addresses using command words or the keys.
To have Auto PC
read names
Voice Manual
Auto PC …
Address book …
List …
Read … To read one name.
Voice Comment
Auto PC … Address book …
Locate …
<custom command word > …
!!
Comment
Auto PC starts reading
names beginning from the tab
(A, B, C, …) selected.
To stop. All other keys
except ASSIST will also stop.
To find a pre-recorded
contact name.
Clarion AutoPC Owner’s Manual
67
Page 80

To tab through
contacts
68
Voice Manual
Auto PC …
Address book …
Letter … "P" … To go to a specific letter tab.
Next … or
Previous …
!!
Comment
To select the Address Book
program.
To go to the next letter tab.
Example: the letter “P.”
To scroll through contacts.
Protecting Address Book information
If you have phone numbers and addresses in Auto PC that you don’t
have backed up on another mobile device, you may want to back up the
information in case it is lost or corrupted. You also may want to password
protect your data to prevent unauthorized access.
For more information, see "Add or Change a Password" in the chapter
"Customizing Your Auto PC,” and the chapter "Backup/Restore."
Clarion AutoPC Owner’s Manual
Page 81

Chapter 8 - Using Directions
Distraction Hazard
Emergency Services
Use the Auto PC’s driving directions to free yourself from struggling with
maps, and keep your attention focused on the road.
Directions Feature
The Directions feature is intended to provide turn by turn instructions to
get you to a desired destination. Please make certain all persons using
this system carefully read and follow instructions and safety information
fully.
Directions is one of the features of the Windows CE for the Auto PC
system which can require manual (non-verbal) set-up. Attempting to
perform such set-up or insert data while driving can seriously distract your
attention and could cause an accident. Stop the vehicle in a safe and
legal manner before attempting these operations.
Do not rely on the navigation system to route you to emergency services.
Ask local authorities or a “911” operator for these locations. Not all
emergency services such as police, fire stations, hospitals and clinics are
likely to be contained in the navigation map’s database.
Clarion AutoPC Owner’s Manual
69
Page 82

Auto PC can guide you
using a map data CD
Enter a starting point
Potential Map
and a destination
Inaccuracy
With a map data CD, Auto PC can guide you to your destination.
With Auto PC Directions, you enter a starting point and a destination.
Directions calculates a route for you to take, and gives you turn-by-turn
directions on screen and reads the directions to you.
Maps used by this system may be inaccurate because of changes in
roads, traffic controls or driving conditions. Always use good judgment
and common sense when following the suggested routes.
70
Clarion AutoPC Owner’s Manual
Page 83

What you’ll need
Map data CDs are
provided by Clarion
Where to get map data
How to receive GPS
Partners
for your region
satellite signals
You will need a start point and a destination point to give to the Directions
program in order for it to calculate a route and supply you with specific
directions. Start and destination points come from a several sources.
Two important sources are map data CDs and your Address Book.
The Directions program supports map data CDs offered by Clarion
Partners, allowing you to choose CDs appropriate to your area.
Addresses contained in your Address Book may be used as start points
and destinations points. As described in the Address Book Chapter, you
can transfer addresses from a Windows CE-based mobile device (such
as a Handheld or Palm-size PC) through the infrared port to the Address
Book.
To use Auto PC’s Directions, you need a compact disc that contains map
data for the region in which you are traveling. For a list of Clarion
partners offering map CDs supported by Auto PC, go to the web site
www.autopc.com and click on Partners.
To receive GPS satellite signals you will need the optional GPS Receiver.
Contact your Clarion dealer for further information.
Clarion AutoPC Owner’s Manual
71
Page 84

Directions command words and keys
The following table summarizes the words and key presses used in
Directions:
The three key steps
in Directions
72
Voice Manual
vehicle to do manual steps)
Auto PC …
Directions …
Press Start, then to
highlight Directions,
(Stop your
!!
Comment
To select the Directions
program.
then
Press 1 or use to
select Set Start, then
Press 2 or use to
select Set Destination,
Create a new route: Step
1. Set Start Point.
Create a new route: Step
2. Set Destination Point.
then
Go …
Next … or
Previous …
Press 3 or to select
Get Directions, then
Create a new route: Step
3. Calculate Directions.
Go to next or previous
turn.
Read … Read the current turn.
Hold Go to the first or last turn.
List … Hear the remaining turns.
MENU, select Backtrack
Reverse the last route
calculated.
Clarion AutoPC Owner’s Manual
Page 85

Ways to select a start and destination points
Types of locations Start Type Destination Type
1. Current GPS Location
2. Last Destination Yes No
3. Street Address Yes
4. Point of Interest (POI) Yes
5. Intersection Yes
6. Address Book Yes Yes
7. Pocket Streets3 (via IrDA) Yes Yes
How to enter the different types of start and destination points is
explained on the following pages.
1
Only with optional GPS
2
Input from map CD
3
In order to use Pocket Streets input, and import addresses from a hand
held device, you must use MS Pocket Streets V2.51 and Microsoft
Windows CE V2.0.
1
Yes No
2
2
2
Yes
Yes
Yes
2
2
2
Clarion AutoPC Owner’s Manual
73
Page 86

Commands to enter a start point
Insert map data CD
Last destination
Insert the appropriate map CD before using the procedures in this
section. Auto PC may request that you initialize navigation. Insert the
navigation initialization CD and follow the directions. Then insert the map
data CD.
74
Manual
Press Start, then to highlight
Directions, then
Use to highlight Set Start, then
Use to highlight Last Destination,
then
!!
Comment/Illustration
Select Directions program:
Select Set Start function.
Display (example) shows:
for 5 seconds, then automatically shows Set Destination:
Clarion AutoPC Owner’s Manual
Page 87

When using the map data CD for the first time, the Directions program will
Street Address
request that you choose a state, e.g., Michigan, before requesting that
you choose a city within the state. This initial condition is illustrated only
once in the pages which follow, in the description of Street Address.
Manual
!!
Press Start, then to highlight
Directions, then
Use to highlight Set Start, then
Use to highlight Street Address,
then
Use to select the state, then
Use and to highlight the city of
your choice, then
Use and to highlight the street of
your choice, then
Comment/Illustration
Select Directions program.
Select Set Start function.
Pick the Start type, and the
Display shows state directory:
Clarion AutoPC Owner’s Manual
75
Page 88

(Entering Street Address as a start point continued)
Point of Interest
76
Manual
!!
Use or number keys to enter street
number, then
Manual
!!
Press Start, then to highlight
Directions, then
Use to highlight Set Start, then
Use to highlight Point of Interest,
then
Comment/Illustration
Display (example) shows:
for 5 seconds, then automatically shows Set Destination
Comment/Illustration
Select Directions program.
Select Set Start function.
Pick the Start type, and the
Display shows city directory.
Display example:
Clarion AutoPC Owner’s Manual
Page 89

(Entering Point of Interest as a start point continued)
Intersection
Manual
!!
Use and to highlight the city of
your choice, then
Use to highlight the Start POI Type,
then
Use and to highlight the POI of
your choice, then
Manual
!!
Press Start, then to highlight
Directions, then
Use to highlight Set Start, then
Use to highlight Intersection, then
Use and to highlight the city of
your choice, then
Comment/Illustration
Display shows the first of many
types of Points of Interest.
Example: Airport.
Display shows directory of that
POI type. Example: Business.
Display shows confirmation of
Start Point for 5 seconds, then
automatically shows Set
Destination.
Comment/Illustration
Select Directions program.
Select Set Start function.
Display (example) shows:
Clarion AutoPC Owner’s Manual
77
Page 90

(Entering Intersection as a start point continued)
Address Book
78
Manual
!!
Use and to highlight the Start
Street of your choice, then
Use to highlight the Cross Street
of your choice, then
Manual
!!
Press Start, then to highlight
Directions, then
Use to highlight Set Start, then
Use to highlight Address Book,
then
Comment/Illustration
Display shows confirmation of
Start Point for 5 seconds, then
automatically shows Set
Destination.
Comment/Illustration
Select Directions program.
Select Set Start function.
Clarion AutoPC Owner’s Manual
Page 91

(Entering start point from Address Book continued)
Manual
!!
Use and to highlight the contact of
your choice, then
Use and to go to the home or
work address of the contact
Comment/Illustration
Display shows the contact.
Refer to the “briefcase” or
“home” icons to choose
desired address.
Display shows confirmation of
Start Point for 5 seconds,
then automatically shows Set
Destination.
Clarion AutoPC Owner’s Manual
79
Page 92

You can transfer an address entry from a Windows CE-based mobile
Pocket Streets
To transfer a start
device using the infrared port. On your mobile device, you send the
address via the infrared port as illustrated below.
address from a
mobile device
80
Manual
Press Start, then to
highlight Directions, then
Press 1 or use , then
Select Pocket Streets,
then
Align your mobile device’s
infrared port with your
Auto PC’s infrared port
Hold in aligned position
!!
Comment/Illustration
Select Directions program.
Select Set Start function.
Display shows “Looking for IR device …”
(You must use MS Pocket Streets V2.51
and Microsoft Windows CE V2.0.)
Display shows (example):
Hold until “Address Received” appears on
your Auto PC.”
Display shows confirmation of Start Point
for 5 seconds, then automatically shows
Set Destination.
Clarion AutoPC Owner’s Manual
Page 93

GPS
(Requires optional
GPS receiver)
Manual
!!
Press Start, then to highlight
Directions, then
Use to highlight Set Start, then
Use to highlight GPS, then
Comment/Illustration
Select Directions program.
Select Set Start function.
Select GPS.
Display shows confirmation of
Start Point for 5 seconds,
then automatically shows Set
Destination.
Clarion AutoPC Owner’s Manual
81
Page 94

Commands to enter a destination point
Street Address
82
Manual
Selection of start point already
successfully completed
Press to select Set Destination Type,
then use to highlight Street
Address, then
Use and to highlight the city of
your choice, then
Use and to highlight the street of
your choice, then
Use or number keys to enter street
number, then
!!
Comment/Illustration
Display shows:
Display (example) shows:
Display shows confirmation of
Destination Point for 5
seconds, then automatically
shows Get Directions.
Clarion AutoPC Owner’s Manual
Page 95

Manual
Point of Interest
!!
Selection of start point already
successfully completed
Comment/Illustration
Display shows:
Press to select Set Destination
Type, then use to highlight Point of
Interest, then
Use and to highlight the city of
your choice, then
Use to highlight Destination POI
Type, then
Use and to highlight the tab,
e.g. “B” then
Use and to highlight the address
of the POI of your choice, then
Display (example) shows:
Display shows the first of many
destination POI types.
Example: ATM.
Display shows directory of that
POI type. Example: Banks.
Example: You want an ATM at
a Bank of America.
Display shows confirmation of
Destination Point for 5 seconds,
then automatically shows Get
Directions.
Clarion AutoPC Owner’s Manual
83
Page 96

Manual
Intersection
!!
Selection of start point already
Comment/Illustration
Display shows:
successfully completed
Use to highlight Intersection, then
Use and to highlight the city of
Display (example) shows:
your choice, then
Use and to highlight the
Destination Street of your choice, then
Use to highlight the Cross Street of
your choice
Press Display shows confirmation of
Destination Point for 5
seconds, then automatically
shows Get Directions.
84
Clarion AutoPC Owner’s Manual
Page 97

Manual
Address Book
!!
Selection of start point already
successfully completed
Use to highlight Address Book, then
Use and to highlight the contact of
your choice, then
Comment/Illustration
Display shows:
Display shows the contact.
Use and to find the home or work
address of the contact
Refer to the “briefcase” or
“home” icons to choose
desired address.
Press Display shows confirmation
of Destination Point for 5
seconds, then automatically
shows Get Directions.
Clarion AutoPC Owner’s Manual
85
Page 98

Manual
Pocket Streets
!!
Selection of start point
already successfully
completed
Comment/Illustration
Display shows:
86
Press 2 or use , then
Use to highlight Pocket
Streets, then
Select Set Destination function.
Display shows “Looking for IR device …”
(You must use MS Pocket Streets V2.51
and Microsoft Windows CE V2.0.)
Align your mobile device’s
infrared port with your
Display shows “Receiving address from
<name>..”
Auto PC’s infrared port
Hold in aligned position
Hold until “Address Received” appears on
your Auto PC.”
Press Display shows confirmation of Destination
Point for 5 seconds, then automatically
shows Get Directions.
Clarion AutoPC Owner’s Manual
Page 99

Let Your Judgment
Prevail
Calculating the route
When you request a route, Auto PC takes the starting point and
destination you’ve entered and determines a route for you to take.
The Directions navigation system is only an aid. Make your driving
decisions based on your observations of local conditions and existing
traffic regulations. This feature is not a substitute for your personal
judgment. Any route suggestions made by this system should never
replace any local traffic regulations or your personal judgment or
knowledge of safe driving practices.
Clarion AutoPC Owner’s Manual
87
Page 100

You have a choice of a route that includes or excludes freeways. You
To set route
To display safety
also have the option to have Auto PC display safety warnings.
preference
warning
88
Manual
Destination point has already been
selected and confirmed
Press MENU to see Set Route
Preference screen
Use to select Fastest or Local
Roads
Use to select Display Safety
Warning screen, and to select
Yes or No
Press BACK to return to Get
Directions
!!
Comment/Illustration
Display shows:
Display shows “Preference:
Fastest.”
Fastest includes freeways in the
route.
Display shows: “Show Warning:
Yes.”
You are now ready to request a
route, as shown on the next
page.
Clarion AutoPC Owner’s Manual
 Loading...