

Page 1

INSTRUCTION MANUAL
FOR
DIGITAL BLOOD PRESSURE MONITOR
REF CH-671F
English
Español
Português
Deutsch
0801
- Eng 1 -
Page 2

GENERAL REMARKS
General remarks on blood pressure an d blood p re ss ur e
measurement
1. If the cuff is to be deflated quickly, depress “POWER” switch.
2. The attached cuff is suited for a wrist circumstance of 13.5 cm to 19.5
cm.
3. When attaching the cuff, the body of a blood pressure monitor should be
placed on the inside of your wrist.
4. Sel f measuremen t is not therapy! In no case may you change the
dosage of medication prescribed by your physician.
5. In preparation for blood pressure measurement, you should urinate and
then remain relatively still for 10 to 15 minutes prior to measurement.
6. Exercising, eating, drinking, smoking, etc., prior to measurement may
affect the results.
7. Blood pressure varies constantly throughout the day. Measurement
should be made regularly at the same time each day.
8. DO NOT be too impressed by the results of one measurement. Keep a
record of blood pressure variations. Many reading tell a story.
9. Emotional stress may tend to cause blood pressure to rise.
For proper measure of blood pressure
1. Take a deep breath five or six times and then relax before measuring
your blood pressure. If you are tense when taking the measurement, you
will not get a valid reading.
2. Blood pressure will be elevated when you are in a worrisome or irritated
state, suffering from lack of sleep or constipation, or after exercise or a
meal.
3. Wrap the cuff around your wrist snugly. (See page 14)
4. DO NOT measure blood pressure after bathing or drinking.
5. When you feel like relieving yourself, you should do so before measuring
your blood pressure.
6. Measure your blood pressure where the room temperature is about
20°C. DO NOT measure blood pressure when it is too cold (below 10°C)
or too hot (above 40°C) in the room.
- Eng 2 -
Page 3
GENERAL REMARKS
7. DO NOT try to measure blood pressure immediately after drinking
coffee or tea or smoking.
8. Measure blood pressure with a relaxed and quiet posture. Keep
the center of the cuff at the level of your heart, and DO NOT move
your arm or talk.
9. DO NOT measure blood pressure after the cuff has been on your
wrist for a few minute, as you arm will have built up higher blood
pressure, and you will not get valid reading.
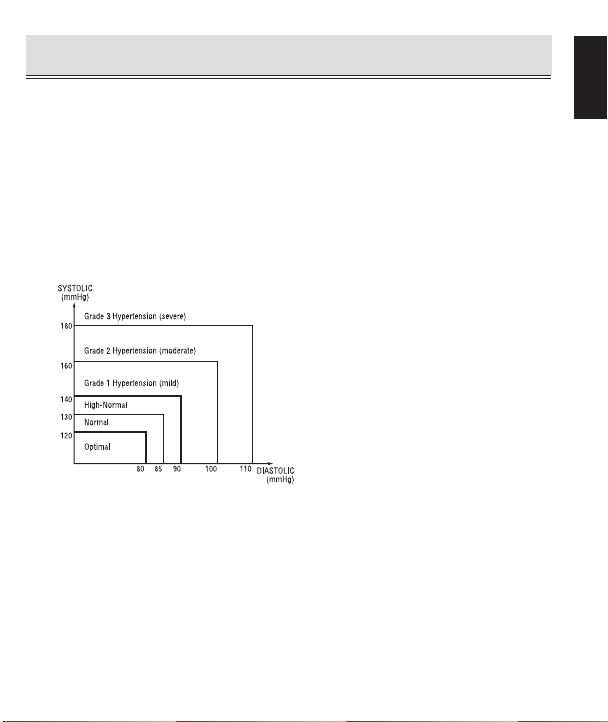
10. Next figure shows the classification of blood pressure according
to WHO-standard.
Remarks:
The graph is not exact,
but may be used as a
guide in understanding
non-invasive blood
pressure measurements.
The device intended for
use in adult population.
Definition and Classification of Blood Pressure Levels
Measure your blood pressure at the same time on a daily basis.
* The blood pressure changes at all times. This means that data
gathered over a long period has great significance instead of data
on just one measurement. It is therefore necessary to measure
your blood pressure on a daily basis. Ideally, you should measure
your blood pressure daily at the same time.
English
- Eng 3 -
Page 4

PRECAUTION FOR USE AND MAINTENANCE
Precautio n for use
1. If you suffer f rom h eart dis ea se, h igh b lood pre ssure or ot her
circula tory di se ase, pl ease cons ult you r do ctor fi rst.
2. If you fee l abnorm al press ure of the cuff duri ng use or any oth er
irregul arity, reduce the pr essur e by immedi ately swit ching off the
power or rem ove th e batter ies an d cons ul t the sale s outlet whe re
purchas ed.
3. If y ou th ink t he me as ured value is a bnorm al or if m easur in g mak es
you feel un well, d is conti nue use and c onsul t yo ur doct or.
4. Measurem ent of blood pres su re may not be possibl e fo r so meone
with a weak p ulse or a rr hythm ia.
5. If bl ood pr essure is me asured repeat edly, cong es tion, swell ing, e tc.
may occur i n some pe op le.
6. If bl ood pressur e is measu red re peate dl y, an a cc urate resul t wi ll not
be achiev ed. An int er val of ab out 10 minu tes sho ul d be allo wed.
7. Consul t y our phys ician be fore use if yo u s uff er a s evere di sorder of
blood circ ul ation in the arms. Fa il ure to do so may ca us e health
hazards .
8. Measur ement may not be p ossib le fo r som eone with an insufficient
blood fl ow in the area to be m ea sured or f re quent irr eg ular
heartbe ats. Co ns ult you r physici an for ju dgment.
9. DO NOT wrap the w ri st cuff a round a n injured w rist.
10. DO NOT wrap th e wr ist cuff to the wri st wher e a drip (in trave nous
infusio n) or blood t ra nsfus io n under m ed ical trea tment. Fa ilure to do
so may caus e an inju ry o r a serio us accide nt.
11. DO NOT use in the vi cinit y of flam mable g ases su ch as ane sthetic
gases bec ause of t he r isk of ig nition an d explo si on.
12. DO N OT use in enri ch ed oxyge n env ironmen ts such as a h ospital ’s
hyperba ric ch amber or oxygen tent becaus e of the ri sk of igniti on
and fire.
13. DO NOT u se a mobi le phone ne ar the un it. Doing so may res ult in
malfunc tion.
14. The power of this bloo d pr essure moni tor may be s hut off by e lectr ostatic di scharge f rom the hum an b ody. This is only a tempor ary
phenome non. You c an m easur e th e bl oo d me saure the b lood
correct ly afte r pressin g the POW ER s witch o nce again .
- Eng 4 -
Page 5

PRECAUTION FOR USE AND MAINTENANCE
15. If you use a c ardiac pa ce maker, con su lt your doc tor befor e us e.
16. Be sur e to us e this uni t only for mea su ring blood pressu re . DO
NOT use i t for any oth er p urpose.
17. DO N OT use th is u nit on an inf ant.
Recaution for maintenance
1. DO N OT stor e th e blood pre ss ure monit or w here it will be
exposed t o di rect sunlig ht, high temp erature (over 60°C ), l ow
tempera tu re (bel ow -20° C) , high re la tive humi dity (ove r 95%) or
in a dusty pl ac e.
2. DO N OT dr op or exp os e the blo od pressu re monito r to unde r
force or vi br ation.
3. Re mo ve the batt ery/bat te ries when n ot in use for a l on g period.
4. DO N OT disa ss emble the a pparatu s.
5. DO NOT be nd t he cuff o r air hose un ne cessari ly.
6. NEVER wi pe t he blood press ur e mo ni tor wi th thi nn er o r benzen e,
as they may d am age it.
7. Wh en the mon itor i s very di rty, wi pe it clean w ith a c loth
moisten ed w ith sterili zi ng alcoho l or a neutr al d etergen t, a nd t hen
wipe it wit h a dr y cloth. DO N OT use th in ner or benz ene.
Nature and frequency of maintenance:
This pro du ct is des ig ned f or use over an extend ed period of time;
however, it is g enerall y rec om mended that it be in spected ever y two
years to en su re proper f unction a nd p erforma nce.
Protect the nature environment:
Please help protect natur al env ir onment by re spectin g natu ral an d/or
local re cy cling re gulatio ns whe n disp os ing of th e batter ie s and the
product s at t he end of the ir useful l iv es.
English
- Eng 5 -
Page 6
PRECAUTION FOR USE AND MAINTENANCE
WEEE MARK
If you want to dispose this product, do not mix with general
household waste. There is a separate collection systems for
used electronics products in accordance with legislation under
the WEEE Directive (Directive 2002/96/EC) and is effective
only within European Union.
Reference European standard:
The blood pressure measuring device corresponds to regulation EN60601-1-2.
The device has been tested and homologated in accordance with
Warning
Name :
Address : FLAT A-B, 4TH FLOOR, HUNG MOU INDUSTRIAL
EN60601-1-2 for EMC. This does not guarantee in any way that the
device will not be affected by electromagnetic interference. Avoid
using the device in high electromagnetic environment.
BUILDING, 62 HUNG TO ROAD, KWUN TONG, KOWLOON,
HONG KONG
( : Manufacturer)
European Representative:
Name : WvW elektronische Geräte Vertrieb GmbH
Address : Fintelmannstraße 20/Eingang, Martin-Heydert-Straße,
D-14109 Berlin, Germany
- Eng 6 -
Page 7
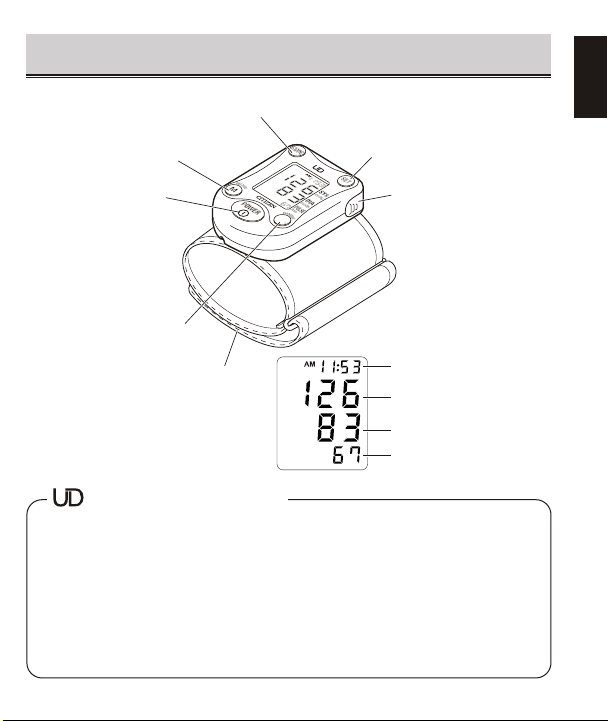
IDENTIFICATION OF PARTS
MODE switch
English
MEMORY switch
POWER switch
MONTHLY AVERAGE switch
Wrist cuff
AV
AV
G
G
SET switch
Battery box
Time/Date display section
Systolic blood
pressure display section
Diastolic blood
pressure display section
Pulse display section
UNIVERSAL DESIGN
Th e product has b een d ev eloped th rough t he con ce pt of
Universal Design to ensure safe and easy use for a wide range
of users. The product, which is designed laying importance on
Universal Design, adopts a product shape and color that
conv ey s an im ag e of “w ar mt h” and “ ge ntleness” and has
functions that cope with hu ma n body, which are “e as y to
understand”, “safety in use” and “easy to use”.
- Eng 7 -
Page 8
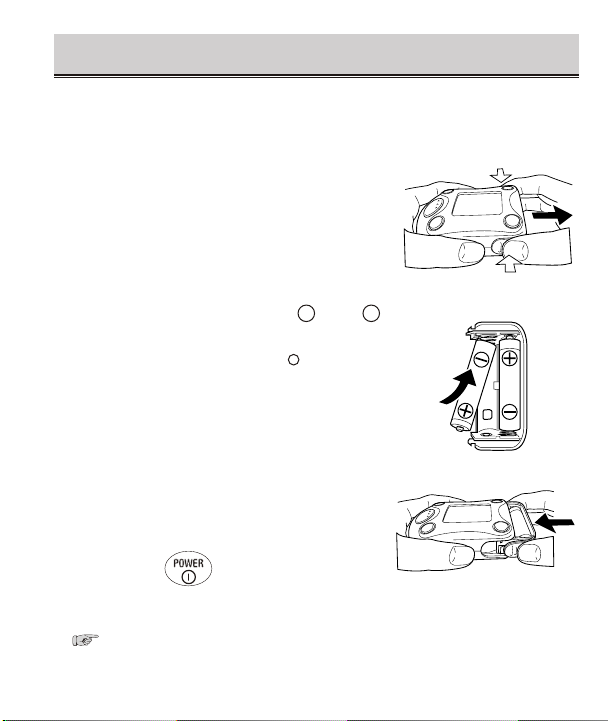
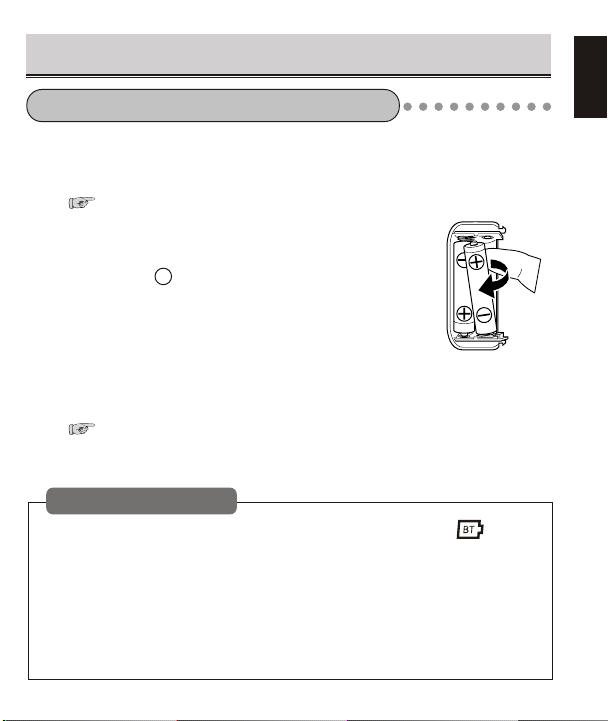
HOW TO LOAD BATTERIES
Remove the battery box from the unit. Install two “AAA” alkaline
batteries, observing the proper battery polarity (“+/–”).
Whi l e pin c hing th e sto p per
1
tabs, pull the battery box in the
dir e ction of the a rrow to
remove from the unit.
Ins ert the bat ter ies int o th e
2
battery box, ensuring a correct
match with posi tiv e + and –
negative terminals.
* The battery goes in negative – side first.
Re-attach the battery box to the
3
unit with the battery’s visible
side facing up.
* Make sure not to depress the switch when
you re-attach the battery box into the main
unit.
* Install the battery box properly. Improper
installatio n may prev ent proper disp lay
when the is pressed.
* After replacing the batteries, be sure to set the
clock.
( See page 10
* The data in memory is kept after the batteries are replaced.
“HOW TO SET THE CLOCK”.)
- Eng 8 -
Push
Push
Page 9
HOW TO UNLOAD BATTERIES
HOW TO UNLOAD BATTERIES
Pull the battery box to remove from
1
the unit.
( See page 8 “HOW TO LOAD BATTERIES”.)
Push up each battery by lifting up its
2
pos i tive + en d si de w i th y o ur
fingertip.
* Use caution when removing batteries that are held
in place by the springs in the battery box. Failure
to do so may cause injury to your fingernail.
Re-attach the battery box to the unit.
3
( See page 8 “HOW TO LOAD BATTERIES”.)
Replacing the batteries
• Replace the batteries with two new “AAA” alkaline batteries when appears
on the display, or when nothing appears on the display when the POWER
switch is pressed.
• Be sure to replace both batteries with new ones.
• Use the commercial alkaline dry cells. Do not use rechargeable batteries.
• Batteries included are for demonstration purposes only. Battery life may be
shorter than specified.
• Dispose of used batteries properly in accordance with local regulations.
English
- Eng 9 -
Page 10

HOW TO SET THE CLOCK
The device is equipped with a built-in clock allowing you to record
your pressure readings with time and date information. Set the
clock properly to keep a precise record of the time and date of your
measurement results. The clock-setting procedure goes in the
following order: Year/Month/Date and then Hour/Minute.
The clock has been factory preset to 12:00AM on January 1, 2004.
After batteries have been replaced, the clock will indicate the time
and date of the most recent measurement data in memory.
Example: Set the clock to 08:05 PM on May 1, 2004.
After making sure that the power is
1
turned off, press and hold for
more than a second.
The last figure of the Year (A.D.) will appear on the
pulse display section and Month/Date will appear
on the Time/Date display section.
The
Year blinks and then will be corrected.
“ ”
Set the “Year”.
2
Press to set the current year.
* The “ ”Year can be set between 04(2004)and
33(2033).
Press .
This will finalize the “ ”Year setting. Th e digits
representing the “ ”Month On the da te di splay
section will flash.
- Eng 10 -
Page 11

HOW TO SET THE CLOCK
Pressing and holding will cause a rapid adjustment of years,
months, days, hours, and minutes.
Set the “Month”.
3
Press to set the current month.
Press .
This will finalize the “Month” setting. The digits
representing the “Date” on the date display section
will flash.
Set the “Date”.
4
Press to set the current date.
Press .
Thi s will finalize the “Date” sett ing. The digits
representing the “Hour” on the time display section
will flash.
English
- Eng 11 -
Page 12

HOW TO SET THE CLOCK
Set the “Hour”.
5
Press to set the current hour.
• The clock displays the time in 12 hour format
using AM/PM.
Press .
Thi s wil l fin ali ze th e “Hour” setting. Th e dig its
repre senti ng the “Minute” on the ti me disp lay
section will flash.
Set the “Minute”.
6
Press to set the current minute.
Press .
This will complete the clock setting procedure. The
device automatically turns off power.
• The “Second” will be set to 00 at the moment
when is pressed.
If is pressed during the correcting procedure for each item,
the unit will automatically turn off the power. However, the corrected
data are saved in this step.
- Eng 12 -
Page 13

POINTS FOR ACCURATE MEASUREMENT
Blood pressure varies with posture, the time of day and numerous
other factors. It is recommended that you measure your blood
pressure at the same time each day in the same posture.
Take a deep breath and
then relax before
measuring blood pressure.
Lightly open your hand
on the table with palm up
and relax your fingers.
Fold up a towel and put it
between your elbow and wrist
to steady your forearm.
Make sure that your posture is correct.
Remain still during measurement.
Wrap the wrist cuff properly.
Make sure that your
posture is correct.
Level the blood pressure
monitor to your heart.
English
DO NOT clench your
fist tightly.
DO NOT place the
monitor on the outside
of your wrist.
- Eng 13 -
Keep the device
stable during
measurement.
Page 14

HOW TO WRAP THE WRIST CUFF
Wrap the wrist cuff around your wrist properly. Improper wrapping
of the cuff may result in measuring errors.
Unfasten and open the wrist cuff.
1
Wrap the cuff around your left
2
wri s t so that t h e monit o r is
positioned on the inside of your
wrist.
• Wrap the wrist cuff on bare skin.
• The wrist cuff is designed to fit wrists from
13.5 to 19.5 cm in circumference.
Loo s ely fit the wri s t c uff by
3
pulling the end of the cuff.
- Eng 14 -
Page 15

HOW TO WRAP THE WRIST CUFF
Position the top edge of the cuff
4
approximately 1 to 2 cm a way
from the crease of your wrist.
Secure the wr ist cuf f w ith the
5
Velcro.
• If the wrist cuff is wrapped too loose or
tight, er rors or incor rect read ings may
result.
English
- Eng 15 -
Page 16

HOW TO MEASURE YOUR BLOOD PRESSURE
Your blood pressure can be readily measured with the push of a
button.
Wrap the wrist cuff around your left wrist.
1
( See page 14 “HOW TO WRAP THE WRIST CUFF”.)
If you have a weak pulse:
Take a measurement so that the center of the unit is positioned over the
artery located on your wrist.
Position of artery
Center of blood pressure monitor
Make sure that your posture is correct.
2
( See page 13 “POINTS FOR ACCURATE MEASUREMENT”.)
- Eng 16 -
Page 17

HOW TO MEASURE YOUR BLOOD PRESSURE
English
Press .
3
Th e ma rk will light up an d st ay on for
approximately 2 seconds.
The cuff will begin to inflate, and the date and
pressure readings will appear on the display.
• D o not mov e you r wr ist o r arm d ur ing
inflation when measurement is in progress.
• Do not press the switch while the unit is
applying pressure.
The mark will ligh t up when the pr ese t
pressure is reached.
- Eng 17 -
AVGAVG
Page 18

HOW TO MEASURE YOUR BLOOD PRESSURE
When a pulse is detected, a pressure reading
will shift to the diastolic pr ess ure display
section. Once the pulse is detected, the
mark will flash with each pulse beat.
When measurement is complete, the cuff will
automatically deflate, releasing the air in the
cuff, and the systolic/diastolic pressure and
pulse rate readings with time and date are
displayed.
• The time and date appear alternately every
2 seconds.
Press to turn off power.
4
• Measurement results are automatically stored
in memory.
Automatic Power Off Function
The device has an automatic power-down feature, which turns off the power
automatically approximately three minutes after measurement is obtained.
- Eng 18 -
Page 19

HOW TO MEASURE YOUR BLOOD PRESSURE
IF YOU DO NOT WISH TO STORE MEASUREMENT RESULTS
Normally, the measurement results are automatically stored. If you
don ’t wan t t o s tore t h e meas urem ent resu lts, e r ase them
immediately after measurement according to the procedure below.
* Once stored, measurement results cannot be cleared individually.
Press and hold for more than 2
1
second s w hil e th e m eas urement
results are displayed.
The message for memo ry clearance (C L) will
appear, and the device will automatically turn off
the power in 2 seconds.
* T his st ep w il l pe rma nen tly de let e t h e
measurement results being displayed so that you
cannot undo th is action to call up them later.
Before proceeding, make sure that you want to
delete them.
English
- Eng 19 -
Page 20

HOW TO CALL UP DATA STORED IN MEMORY
The au tomatic ally s tored data (mea su rement resu lt s) can be ca lled
up for refe re nce.
* The d at a sto re d in memo ry cann ot be calle d up duri ng
measure me nt.
* If the measurem en t r esults are not stored, the d ata in memory
cannot be r ec alled.
Measure me nts sto red in memor y are assigned “a mem ory
number” in th e order of measu rement. This means wh en 90
measure me nts are store d in mem or y, the measure ment havin g a
memory nu mb er of 90 is the m ost recen t.
The devic e ca n store up to 9 0 measure me nts in its me mory.
When more tha n 90 measur em ents have been taken , th e ol dest
measure me nt wil l be erased to make room for the most rec ent
measure me nt.
- Eng 20 -
Page 21

HOW TO CALL UP DATA STORED IN MEMORY
Press .
1
The most recent memory number will appear on
the display.
The data in memory (systolic/diastolic pressure
and pulse rate readings, and the date/time of
measurement) will appear on the display.
• The time and date appear alternately every 2
seconds.
• When is pressed during display of data
in memory, its monthly average data will be
called up.
• To end the display of data in memory, press .
HOW TO CALL UP PREVIOUS MEASUREMENT RESULTS
Press during display of data in memory.
1
Each press will move ONE memory number backward.
English
• To decrease memory numbers rapidly, keep pressing .
- Eng 21 -
Page 22

HOW TO CALL UP MONTHLY AVERAGE DATA
Monthly average data can be readily called up with the push of a
button.
* If the measurements results are not stored, the monthly
average data cannot be recalled.
The device can st ore monthl y average data of up to 12
months (including the current month). This means when the
cu rrent mo nth ch an ges fr om April to Ma y, the mo nt hl y
average data of last May will be automatically erased.
If there is no monthly average
data of the current month, 0
(ze ro) wil l be sh o wn o n th e
display of the monthly average
values (systoli c/diastolic blood
pressure, and pulse rate) for the
current month.
If the monthly average data of
the pul se ra te is out o f th e
measurement range (pulse rate:
39 pulses/min . or less, or 181
pulses/min. or more), the display
of the pulse rate becomes blank.
- Eng 22 -
Page 23

HOW TO CALL UP MONTHLY AVERAGE DATA
Press .
1
The cur re nt mo nt h’s mont hl y avera ge data will
appear on the display.
• “ A” represents average. For example, “A. 5”
means “Average of May”.
• If is pressed during display of monthly
averages of a given month, the month’s most
recent data in memory can be called up. If such
data are not stored in memory, the display will
remain unchanged.
• To end the monthly average display mode, press .
HOW TO CALL UP PREVIOUS MONTHLY AVERAGE DATA
Press during display of the current month’s
1
average data.
Each press will move ONE month backward.
• After reaching the end of all previous months’ average data, it will
loop the display back to the current month’s average data.
- Eng 23 -
English
Page 24

HOW TO DELETE ALL DATA IN MEMORY
All data in memory can be deleted in one operation.
Pre s s and hold and
1
sim u ltane o usly fo r more th an 2
seconds during display of data in
memory.
The message for all memory data deletion (ALL CL)
will ap pea r on the di spl ay. Wh en th e delet ion
pr oce ss is co mp let e, th e dev i ce sh ut s off
automatically.
* This step wi ll pe rmanently cle ar al l data from me mor y. Bef ore
proceeding, make sure you want to clear all data from memory.
* Do no t remove the battery box wh ile the deletion proces s is in
progress. Incomplete deletion process may cause damage to the
data memory function.
- Eng 24 -
Page 25

ABOUT “BLOOD PRESSURE”
English
What is blood pressure?
The heart is a pump that circulates
blood throughout your body. Blood is p umpe d from the heart into the
ar terie s. This pre ss ure is ca ll ed the arte ri al bloo d pr essur e, which
represents, in general, blood pressure. Blood pressure is indicated by
several kinds of pressures such as: systolic pressure that occurs when the
heart pumps blood; and diastolic pressure that occurs just when blood
returns to the heart.
(Systolic)
Artery
Left atrium
Left
The artery wall expands.
ventricle
Contraction
Blood pressure changes at all times.
(Diastolic)
Left atrium
Left
ventricle
Artery
Normal state is restored
to the artery wall.
Dilation
Blood pressure differs
with age, gender and other factors. Blood pressure of one person is likely to
be aff ected by biorhythm of a day, posture, physical activities, ment al
activities, stress and atmospheric temperatures.
It is said that blood pressure of a healthy person varies by 20 to 50 mmHg
within a day.
Time of day
Blood pressure value (mmHg)
Systolic blood pressure
Diastolic blood pressure
- Eng 25 -
Page 26

QUESTIONS AND ANSWERS ON BLOOD PRESSURE
QQQ Why is the blood pressure measured at home different from that
measured at the doctors or a hospital?
A When you have a doctor or nurse measure your blood pressure,
the pressure value is likely to be 10 to 20 mmHg higher than
usual because of concern and nervousness. To know what
affects blood pressure is crucial to your health monitoring.
QQQ What is the benefit of measuring blood
pressure at Home?
A Blood pressure measured at home is
reliable since it can be measured in a
stable and relaxed condition. Doctors
la y i mpo rtanc e o n b lood pre ssu re
measurements taken at home . It is
recommended to measure your blood
pressure at the same time on a daily
basis and to record blood pressure variation.
Always consult your physician for interpretation of your blood
pressure readings and proper treatment.
* Improper interpretation of measurement results may worsen
Caution
your symptoms. Some individuals with hypertension, diabetes,
kidne y disor ders, arteriosc leros is or perip heral vasc ular
disease may see a significant difference in blood pressure
readings taken from the wrist as compared to readings from
the upper arm.
- Eng 26 -
Page 27

ERROR INDICATIONS
DISPLAY MARK CONDITION/CAUSE CORRECTIVE ACTION
Appears when the wrist cuff
is wrapped too loose.
Ap pears whe n your wr is t
moved during the measurement.; or
Appea rs when the cuff is
not wrapped correctly.
Ap pe ar s wh en the blood
pr ess ur e cou ld n ot be
measured accurately.
Ap pe ars whe n th e pu ls e
ra te fa lls o ut sid e the
measuring range (below 39
be at s/ mi n. or ab ov e 18 1
beats/min.)
Appears when the batteries
have run out.
Re-wrap the wrist cuff snugly.
Take another reading, making
sure you remain still.
( See page 14 “HOW TO
WRAP THE WRIST CUFF”.)
Re-w rap the wrist cuff correctly.
Take another reading, making sure
you remai n perfec tly stil l.(
See pag e 14 “HOW TO W RA P
THE WRIST CUFF
Contact the store where it was
purchased or your local service
ce nte r. ( Se e pa ge 30
“
BE FOR E AS KI NG FOR
REPAIR/INSPECTION”.)
Re-w rap the wrist cu ff pro perly.
Take deep breath s to relax, and
measure again.
( See p age 13 “POINTS FOR
ACCURATE MEASUREMENT”.)
Replace two alkaline batteries
with new ones.
( See page 9 “HO W T O
UNLOAD BATTERIES”.)
”
.)
English
The unit does not function
properly.
- Eng 27 -
Cont act the st or e wher e it w as
purcha sed or your l ocal servi ce
cen ter. ( See pa ge 30
“BEFORE ASKI NG FOR
REPAIR/INSPECTION”.)
Page 28

SPECIFICATIONS
Model Number CH-671F
Measurement Principle Oscillometric Method
Measurement Localization Left Wrist
Cuff Soft cuff
Wrist Circumference Range 13.5 to 19.5 cm
Measuring Range Pressure 0 - 280 mmHg
Accuracy Pressure ±3 mmHg
LCD Indication Pressure 3 digits
LCD Viewing Size 34.5(H) x 29.0(W) mm
Switch 5 pcs. (Power, Memory, Monthly Average,
Inflation Automatic inflation by internal pump
Exhaust Electromagnetic quick exhaust valve
Rated Voltage 3 V DC
Power Source 2 “AAA” (LR03) Alkaline batteries
Power Consumption 1 W (During inflation)
Battery Life Approx. 300 times
Pulse 40 - 180 Pulse / Min.
Pulse ±5 % of reading
Pulse 3 digits
Date / Time 4digit with AM/PM mark
Marks :Measuring
:Battery mark
Digit Size SYS/DIA:9.4(H) x 6.5(W) mm /
Pulse:5.0(H) x 3.5(W) mm
Mode, Set)
(180 mmHg, 1 time/day, 22°C)
- Eng 28 -
Page 29

Auto Power off Function Approx. 3 min.
Memory Function Up to 90 measurements
(blood pressure / pulse rate / time & date)
Monthly average data of up to 12 months
(blood pressure / pulse rate)
Clock Display Year / Month / Date / Hour(AM/PM) / Minute
(Month / Date / Hour / Minute to be
displayed during measurement)
Dimensions 80.5(H) x 58.7(W) x 23.5(T) mm
(not including the wrist cuff)
Weight Approx. 100g (not including batteries)
Operating Environment Temperature 10 to 40 °C
Humidity 30 to 85%RH
Storage Environment Temperature -20 to 60 °C
Humidity 10 to 95%RH
Electric Shock Protection Type B equipment
Accessories 2 “AAA” Alkaline batteries, Instruction
manual and Storage Case
* Specifications and des ign may be chan ged withou t any not ice in t he event of
improvements being made.
English
- Eng 29 -
Page 30

BEFORE ASKING FOR REPAIR/INSPECTION
Be sure to check the following before sending your blood pressure
monitor for repair/inspection.
Phenomenon
Display gives no
indication even
when you press
Power switch.
No measurement is
possible.
If your blood pressure readings are abnormally
higher or lower than those taken in hospital:
If your blood pressure readings are abnormally
high or low:
Point to be checked
Check whether batteries
are dead.
Check whether batteries
are installed with incorrect
polarity ( + – ).
Check if the mark has come
on.
Check if the wrist cuff is
wrapped properly.
Did you stay calm during
measurement?
Note that measurement of blood pressure may not be possible
for someone with an extremely weak pulse or cardiac arrhythmia
(irregular pulses).
See page 26.
See pages 13 and 16.
How to repair
Replace all batteries with new
ones.
Load the batteries with correct
polarity.
Wrap the wrist cuff properly.
Measure again, making sure to
remain still.
- Eng 30 -
Page 31

● CITIZEN is a registered trademark of Citizen Holdings CO., Japan.
CITIZEN es una marca registrada de Citizen Holdings CO., Japón.
● Design and Specification are subject to change without notice.
6-1-12, Tanashi-cho, Nishi-Tokyo-shi, Tokyo 188-8511, Japan
http://www.citizen-systems.co.jp/
E-mail: sales-oe@systems.citizen.co.jp
 Loading...