

Page 1
A Division of Cisco Systems, Inc.
GHz
2.4
®
Model No.
802.11b
WIRELESS
WMA11B
Wireless-B
Media Adapter
User Guide
Page 2

Wireless-B Media Adapter
Copyright and Trademarks
Linksys is a registered trademark or trademark of Cisco Systems, Inc. and/or its affiliates in the U.S. and certain
other countries. Copyright © 2003 Cisco Systems, Inc. All rights reserved.
How to Use this Guide
This User Guide has been designed to make understanding networking with the Adapter easier than ever. Look
for the following items when reading this Guide:
This checkmark means there is a Note of interest and
is something you should pay special attention to while
using the Adapter.
This exclamation point means there is a Caution or
Warning and is something that could damage your
property or the Adapter.
This question mark provides you with a reminder about
something you might need to do while using the Adapter.
In addition to these symbols, there are definitions for technical terms that are presented like this:
word: definition.
Also, each figure (diagram, screenshot, or other image) is provided with a figure number and description, like
this:
Figure 0-1: Sample Figure Description
Figure numbers and descriptions can also be found in the “List of Figures” section in the “Table of Contents”.
WMA11B-UG-30912E JL
Page 3

Wireless-B Media Adapter
Table of Content s
Chapter 1: Introduction 1
Welcome 1
What’s in this Guide? 2
Chapter 2: Getting to Know the Wireless-B Media Adapter and Its
Remote Controller 4
Front Panel 4
Back Panel 4
Remote Controller 5
Chapter 3: Connecting the Wireless-B Media Adapter to Your Network for Setup7
Overview 7
Connection to a Wired Network for Setup 7
Connection to a Wireless Network for Setup Using Windows XP Only 8
Chapter 4: Setting up the Wireless-B Media Adapter 9
Overview 9
Running the Setup Wizard 9
Using the Adapter Utility 16
Chapter 5: Connecting the Wireless-B Media Adapter to Your TV and Stereo 18
Overview 18
Instructions 18
Placement Options 21
Using the TV Setup 22
Chapter 6: Using the Media Navigator 26
Overview 26
Music Menus 26
Pictures Menu 29
Help 31
Appendix A: Troubleshooting 32
Common Problems and Solutions 32
Frequently Asked Questions 34
Appendix B: Wireless Security 37
A Brief Overview 37
What Are The Risks? 37
Page 4

Wireless-B Media Adapter
Appendix C: Planning Your Use of the Wireless-B Media Adapter 44
Overview 44
Using the Adapter as Part of Your Wireless Network 44
Using the Adapter as Part of Your Wired Network 44
Appendix D: Creating a Playlist 45
Appendix E: Setting a Static IP Address on Your PC 46
Appendix F: Windows Help 48
Appendix G: Glossary 49
Appendix H: Specifications 55
Appendix I: Warranty Information 57
Appendix J: Regulatory Information 58
Appendix K: Contact Information 61
Page 5

Wireless-B Media Adapter
List of Figures
Figure 2-1: Front Panel 4
Figure 2-2: Back Panel 4
Figure 2-3: Remote Controller 6
Figure 3-1: Example of a Connection to a Wired Computer for Setup 7
Figure 3-2: Example of a Connection to a Wireless-equipped Computer
for Setup 7
Figure 3-3: Connect the Ethernet Network Cable 7
Figure 3-4: Connect the Power 8
Figure 4-1: Welcome Screen 9
Figure 4-2: Installing the Adapter Screen 9
Figure 4-3: Windows Installer Screen 10
Figure 4-4: Microsoft .NET Framework Screen 10
Figure 4-5: Microsoft .NET Framework Package Screen 10
Figure 4-6: License Agreement Screen 11
Figure 4-7: Select Music and Pictures Folders Screen 11
Figure 4-8: Connection for Setup Screen 12
Figure 4-9: Adapter Selection Screen 12
Figure 4-10: Connection after Setup Screen 13
Figure 4-11: Basic Settings Screen 13
Figure 4-12: Basic Wireless Settings Screen 14
Figure 4-13: Wireless Security Settings Screen 15
Figure 4-14: Confirmation Screen 15
Figure 4-15: Congratulations Screen 16
Figure 4-16: Utility Icon 16
Figure 4-17: Select Media Folder Manager 16
Figure 4-18: Media Folder Manager 17
Figure 4-19: Browse for Folder 17
Figure 4-20: Start Menu 17
Page 6

Wireless-B Media Adapter
Figure 5-1: Unplug the Power 18
Figure 5-2: Connection to Your TV and Stereo 19
Figure 5-3: Connection to Your TV Only 20
Figure 5-4: Connect the Power 21
Figure 5-5: Vertical Position 21
Figure 5-6: Welcome Screen 22
Figure 5-7: Windows Installer Screen 22
Figure 5-8: Installing the Adapter Utility Screen 22
Figure 5-9: Microsoft .NET Framework Screen 23
Figure 5-10: Microsoft .NET Framework Package Screen 23
Figure 5-11: License Agreement Screen 23
Figure 5-12: Select Music and Pictures Folders Screen 24
Figure 5-13: Utility Congratulations 24
Figure 5-14: Media Adapter Setup 25
Figure 6-1: Main Menu Screen 26
Figure 6-2: Music Screen 26
Figure 6-3: Choose Music Screen 27
Figure 6-4: All Songs Screen 27
Figure 6-5: Choose Artists Screen 27
Figure 6-6: Now Playing Screen 28
Figure 6-7: Music Options Screen 28
Figure 6-8: Pictures Screen 29
Figure 6-9: Choose Pictures Screen 29
Figure 6-10: Now Showing Screen 29
Figure 6-11: Picture Options Screen 30
Figure 6-12: Help Screen 31
Figure 6-13: Music Help Screen 31
Figure B-1: Warchalking 37
Figure C-1: Example of a Wireless Network 44
Figure C-2: Example of a Wired Network 44
Page 7

Wireless-B Media Adapter
Figure E-1: XP Default Interface 46
Figure E-2: XP Classic Interface 46
Figure E-3: Network Connection 46
Figure E-4: Internet Protocol (TCP/IP) 47
Figure E-5: IP Address 47
Page 8

Wireless-B Media Adapter
Chapter 1: Introduction
Welcome
Thank you for choosing the Wireless-B Media Adapter. This Media Adapter lets you bring the digital pictures and
music stored on your computer to your Home Entertainment Center, without running cables through the house.
Using a wireless connection, the Media Adapter displays your digital photographs on the TV for the whole family
to enjoy. And your digital music collection is finally freed from those little computer speakers and can play in full
glory through your stereo system.
How does the Media Adapter do all of this? The Wireless-B Media Adapter sits by your home stereo and television
and connects to them using standard consumer electronics cables. Then it connects to your home network by
Wireless-B (802.11b) wireless networking, or if you prefer, it can be connected via standard 10/100 Ethernet
cabling. Using the included remote control and the user-friendly menus on your TV, you can browse through the
digital pictures on your computer by folder , filename, or thumbnail. You can view pictures one at a time, or watch
an automatically created slideshow of all the pictures in a given folder. The Media Adapter supports four popular
picture formats: JPG, GIF, TIF and BMP. Use the remote control’s Zoom button to get a close-up of the details in
your pictures.
You can also use the remote to browse your MP3 or WMA formatted music collection by title, artist, genre, folder,
or playlist. Choose the music you want, and let the Wireless-B Media Adapter play it through your stereo system.
You can even let music play in the background while you browse your pictures.
802.11b: an IEEE wireless networking
standard that specifies a maximum
data transfer rate of 11Mbps and an
operating frequency of 2.4GHz.
Ethernet: an IEEE standard network
protocol that specifies how data is
placed on and retrieved from a
common transmission medium.
Use the instructions in this Guide to help you integrate the Media Adapter into your network. These instructions
should be all you need to get the most out of the Wireless-B Media Adapter.
Chapter 1: Introduction
Welcome
1
Page 9

Wireless-B Media Adapter
What’s in this Guide?
This user guide covers the steps for setting up and using the Wireless-B Media Adapter.
• Chapter 1: Introduction
This chapter describes the Adapter’s applications and this User Guide.
• Chapter 2: Getting to Know the Wireless-B Media Adapter and Its Remote Controller
This chapter describes the physical features of the Adapter and its Remote Controller.
• Chapter 3: Connecting the Wireless-B Media Adapter to Your Network for Setup
This chapter instructs you on how to connect the Adapter to your network before you run the Setup Wizard.
• Chapter 4: Setting up the Wireless-B Media Adapter
This chapter instructs you on how to use the Setup Wizard for setup and configuration of the Adapter. It also
explains how to use the Wireless-B Media Adapter Utility on your PC, so you can send pictures and music files
to the Adapter.
• Chapter 5: Connecting the Wireless-B Media Adapter to Your TV and Stereo
This chapter explains how to connect the Adapter to your TV and stereo system. If you prefer to set up the
Adapter from your TV, without using a computer, then refer to this chapter.
• Chapter 6: Using the Media Navigator
This chapter describes the menus of the Media Navigator, which lets you easily select pictures to show and
music to play.
• Appendix A: Troubleshooting
This appendix describes some problems and solutions, as well as frequently asked questions, regarding
installation and use of the Adapter.
• Appendix B: Wireless Security
This appendix discusses security issues regarding wireless networking and measures you can take to help
protect your wireless network.
• Appendix C: Planning Your Use of the Wireless-B Media Adapter
This appendix explains how you can integrate the Wireless-B Media Adapter into your network.
• Appendix D: Creating a Playlist
This appendix instructs you on how to create a playlist for your music selections, if you want to listen to the
songs in a specific sequence.
Chapter 1: Introduction
What’s in this Guide?
2
Page 10

Wireless-B Media Adapter
• Appendix E: Setting a Static IP Address on Your PC
This appendix explains how to set a static IP address on your PC, if you have set a static IP address on the
Adapter and you also need a static IP address set on your PC.
• Appendix F: Windows Help
This appendix describes how you can use Windows Help for instructions about networking, such as installing
the TCP/IP protocol.
• Appendix G: Glossary
This appendix gives a brief glossary of terms frequently used in networking.
• Appendix H: Specifications
This appendix provides the technical specifications for the Adapter.
• Appendix I: Warranty Information
This appendix supplies the warranty information for the Adapter.
• Appendix J: Regulatory Information
This appendix supplies the regulatory information regarding the Adapter.
• Appendix K: Contact Information
This appendix provides contact information for a variety of Linksys resources, including Technical Support.
Chapter 1: Introduction
What’s in this Guide?
3
Page 11
Wireless-B Media Adapter
Chapter 2: Getting to Know the Wireless- B Media Adapter and
Its Remote Controller
Front Panel
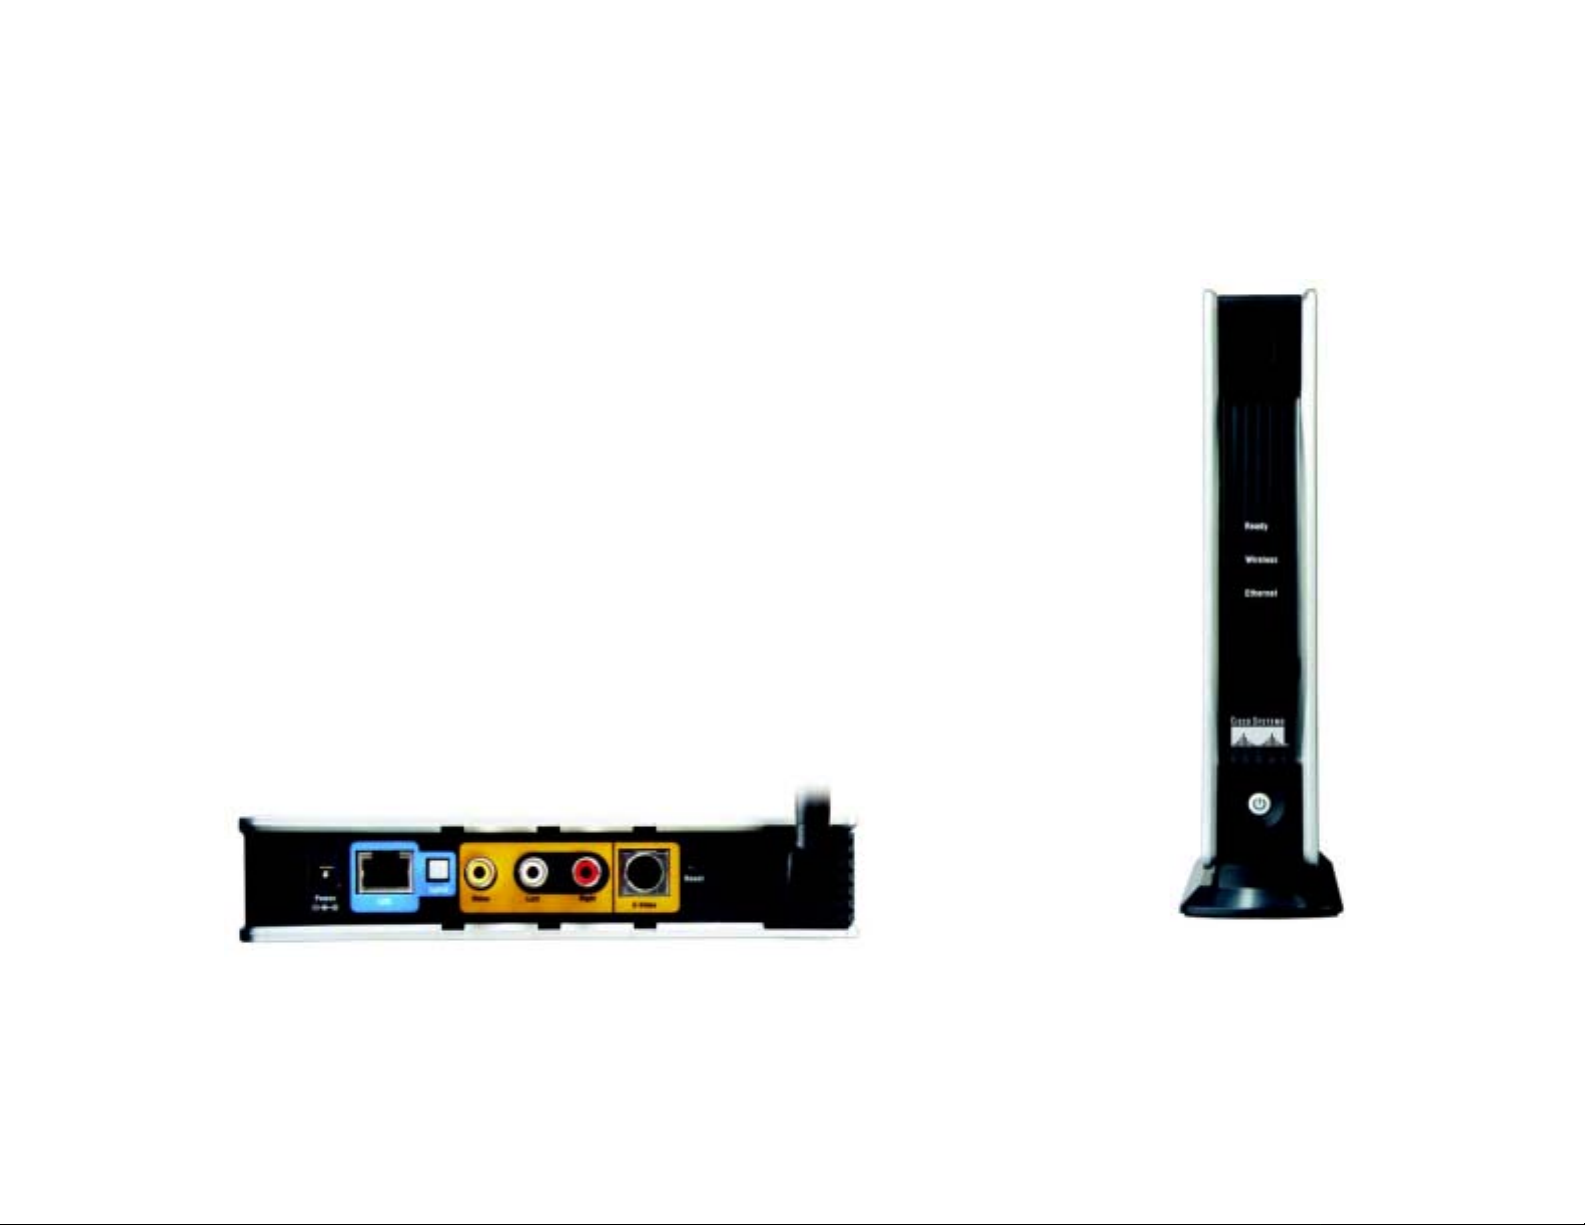
On the Adapter’s front panel, it has three LEDs to let you know how the Adapter is functioning. There is also a
Power button. See Figure 2-1.
Ready Green. The Ready LED flashes when the Adapter is establishing a connection to the host
computer. It stops flashing and stays lit when the Adapter is connected to the host computer.
Wireless Green. The Wireless LED lights up when there is a connection to a wireless network. It flashes
when data is transmitted to or received from the wireless network.
Ethernet Green. The Ethernet LED lights up when there is a connection to a wired network. It flashes
when data is transmitted to or received from the wired network.
(Power) The Power button allows you to power on and off the Adapter.
Back Panel
On the Adapter’s back panel, it features seven ports and two buttons, Uplink and Reset. (See Figure 2-2.)
Figure 2-2: Back P anel
Power The Power port is where you will connect the power adapter.
Chapter 2: Getting to Know the Wireless-B Media Adapter and Its Remote Controller
Front Panel
Figure 2-1: Front Panel
Ethernet: an IEEE standard network protocol
that specifies how data is placed on and
retrieved from a common transmission.
4
Page 12

Wireless-B Media Adapter
LAN The LAN port is where you will connect the Ethernet network cable.
Uplink TheUplink button is used only when the Adapter is connected to a wired network device. If
the Adapter is connected to a PC, then the Uplink button should be pushed in. If the Adapter is
connected to a switch, then the Uplink button should NOT be pushed in. If necessary , push the
Uplink button, and then power the Adapter off and back on again.
Video The Video port is where you will connect the video cable.
Left and Right The Left and Right ports are where you will connect the left and right audio cables.
S-Video The S-Video port is where you will connect the S-video cable.
Reset The Reset button is what you will push if you need to reset the Adapter.
Note: When you want to reset the Adapter to its factory default settings, which are listed below,
press the Reset button and hold it in for 10 seconds.
• IP address: 192.168.1.230
• mode: ad-hoc
• SSID: linksys_wma11b
• channel: 6
• WEP encryption: disabled
(Antenna) The Antenna port is where you will attach the antenna.
LAN (Local Area Network): the computers
and networking products that make up the
network in your home or office.
IP address: the address used to identify a
computer or device on a network.
Ad-hoc: a group of wireless devices
communicating directly to each other (peer-topeer) without the use of an access point.
SSID: your wireless network’s name.
WEP (Wired Equivalent Privacy): a method
of encrypting data transmitted on a wireless
network for greater security.
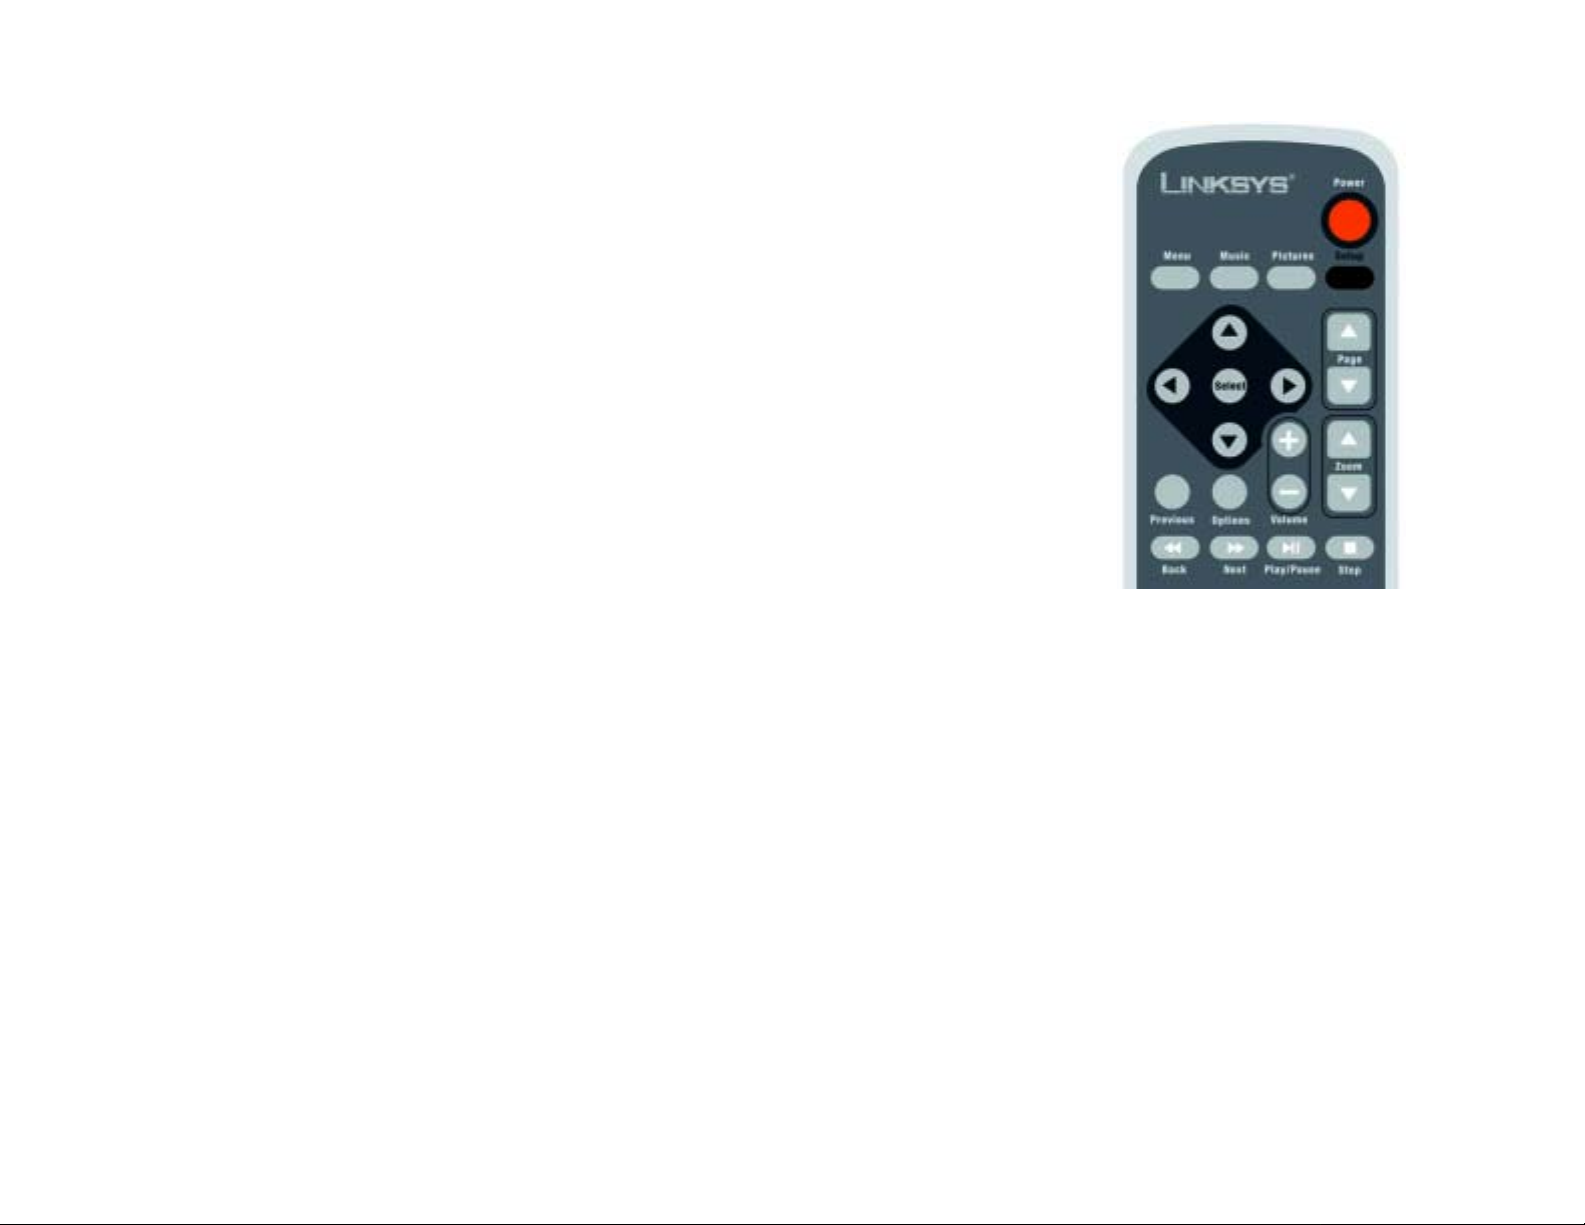
Remote Controller
The Adapter includes a Remote Controller, which features several buttons that allow you to control the Media
Navigator. Use the remote to move through the Navigator’s Music, Pictures, or Help menus on your TV.
Before using the Remote Controller, insert the included AAA batteries into the battery compartment. Make sure
you align the batteries according to the compartment’s diagram.
Here are descriptions of the remote’s various buttons:
Power - This turns the Adapter on or off.
Chapter 2: Getting to Know the Wireless-B Media Adapter and Its Remote Controller
Remote Controller
5
Page 13
Wireless-B Media Adapter
Menu - It displays the main menu.
Music - This displays the Music menu.
Pictures - It displays the Pictures menu.
Setup - As the Adapter is connecting to the TV, press this button to view the TV Setup screen. For more details,
refer to “Chapter 5: Connecting the Wireless-B Media Adapter to Your TV and Stereo.”
Select and arrows - Use the Select button to make a selection, like the Enter key on your computer’s keyboard.
Use the arrow keys to move through menus, songs, or pictures.
Page up and down - Use these buttons to scroll through lists of songs or pictures.
Volume up and down - Press these buttons to control the volume.
Zoom in and out - Use these buttons to make the on-screen picture larger or smaller.
Previous - Press this button to return to the previous screen.
Options - This displays the Music Options menu or the Picture Options menu.
Back - It goes back to the previous song or picture.
Next - This button goes to the next song or picture.
Play/Pause - It plays or pauses the song or slideshow.
Stop - This stops the song or slideshow, depending on which menu you are in.
Chapter 2: Getting to Know the Wireless-B Media Adapter and Its Remote Controller
Remote Controller
Figure 2-3: Remote Controller
6
Page 14
Wireless-B Media Adapter
Chapter 3: Connecting the Wireless- B Media Adapter to Your
Network for Setup
Overview
Connect the Adapter to a network or computer (see Figures 3-1 and 3-2), and then proceed to the appropriate
section for your setup. It is strongly recommended that you connect the Adapter to a wired network for setup.
If you want to set up the Adapter directly from your TV (without using your computer), then proceed to “Chapter 4:
Setting up the Wireless-B Media Adapter.”
NOTE FOR WINDOWS 2000 USERS: You must connect the Adapter to a wired network for setup.
You cannot set up the Adapter from a wireless-equipped PC unless you are running Windows XP.
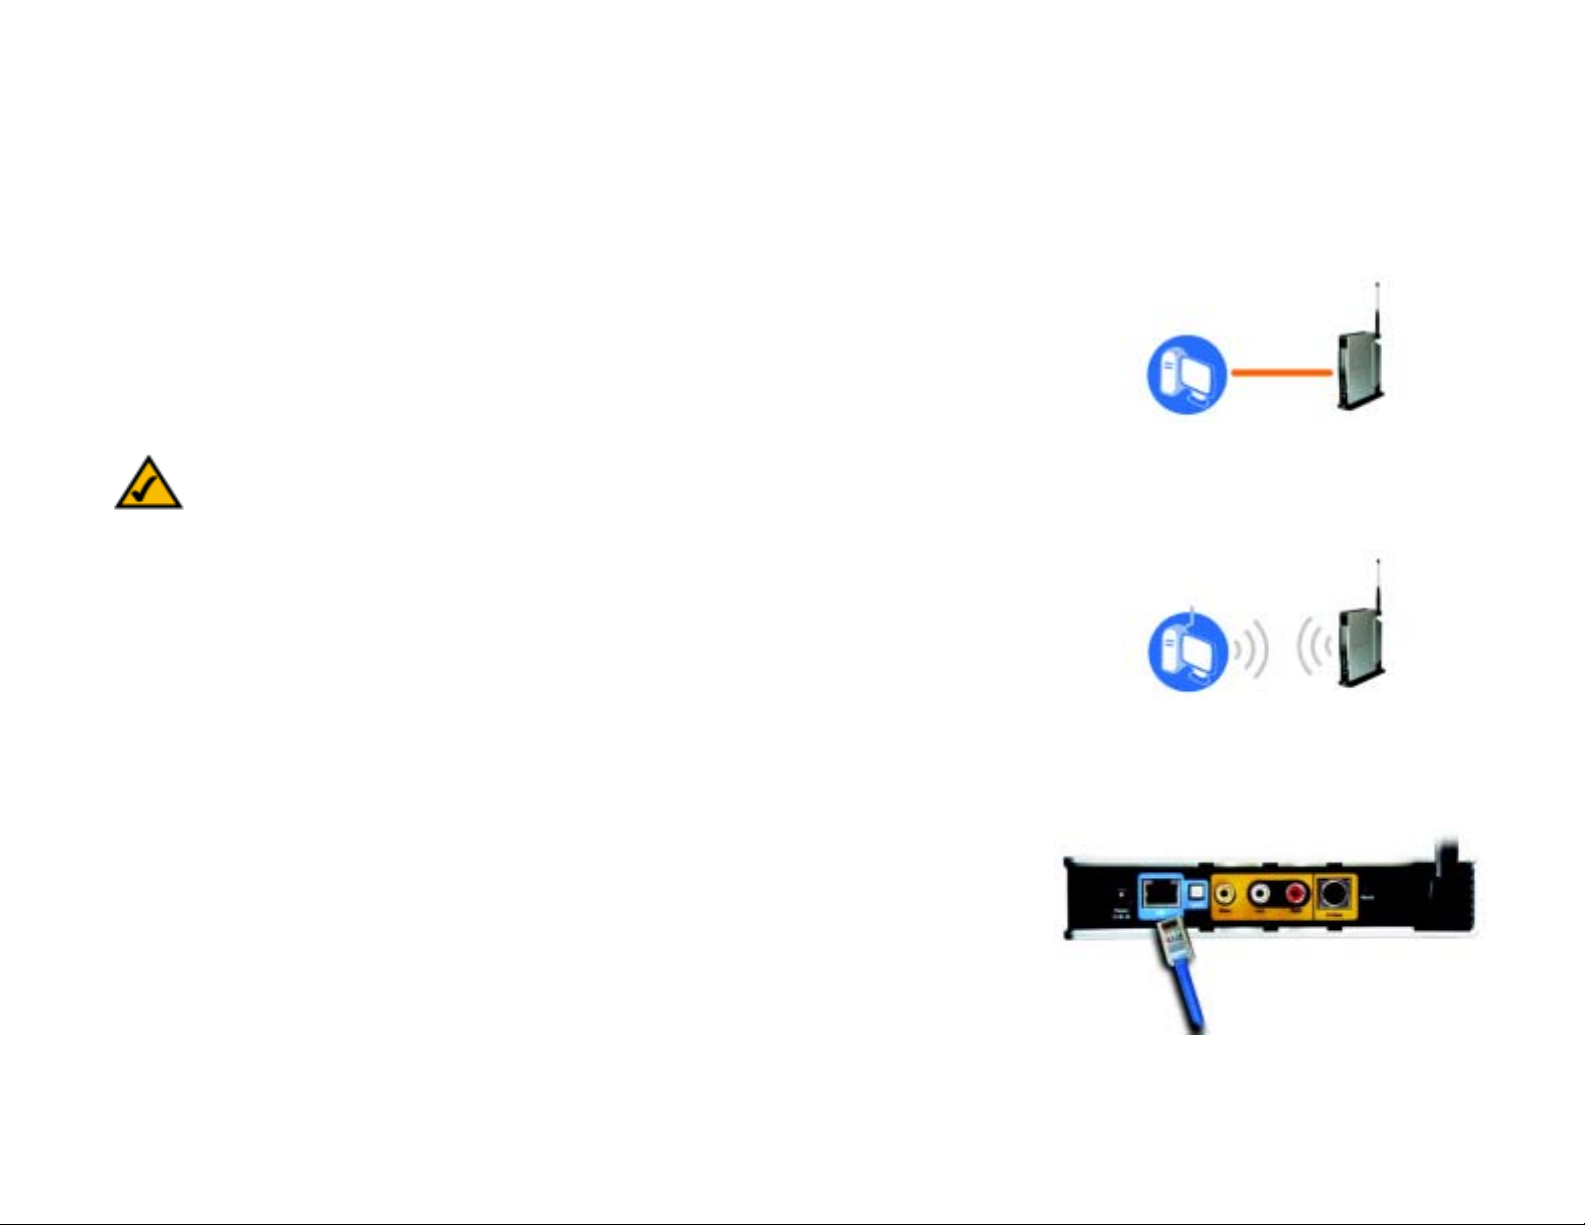
Connection to a Wired Network for Setup
1. Attach the antenna to the Adapter.
Windows 2000
or XP Computer
Figure 3-1: Example of a Connection to a Wired
Computer for Setup
Wireless-B Media
Adapter
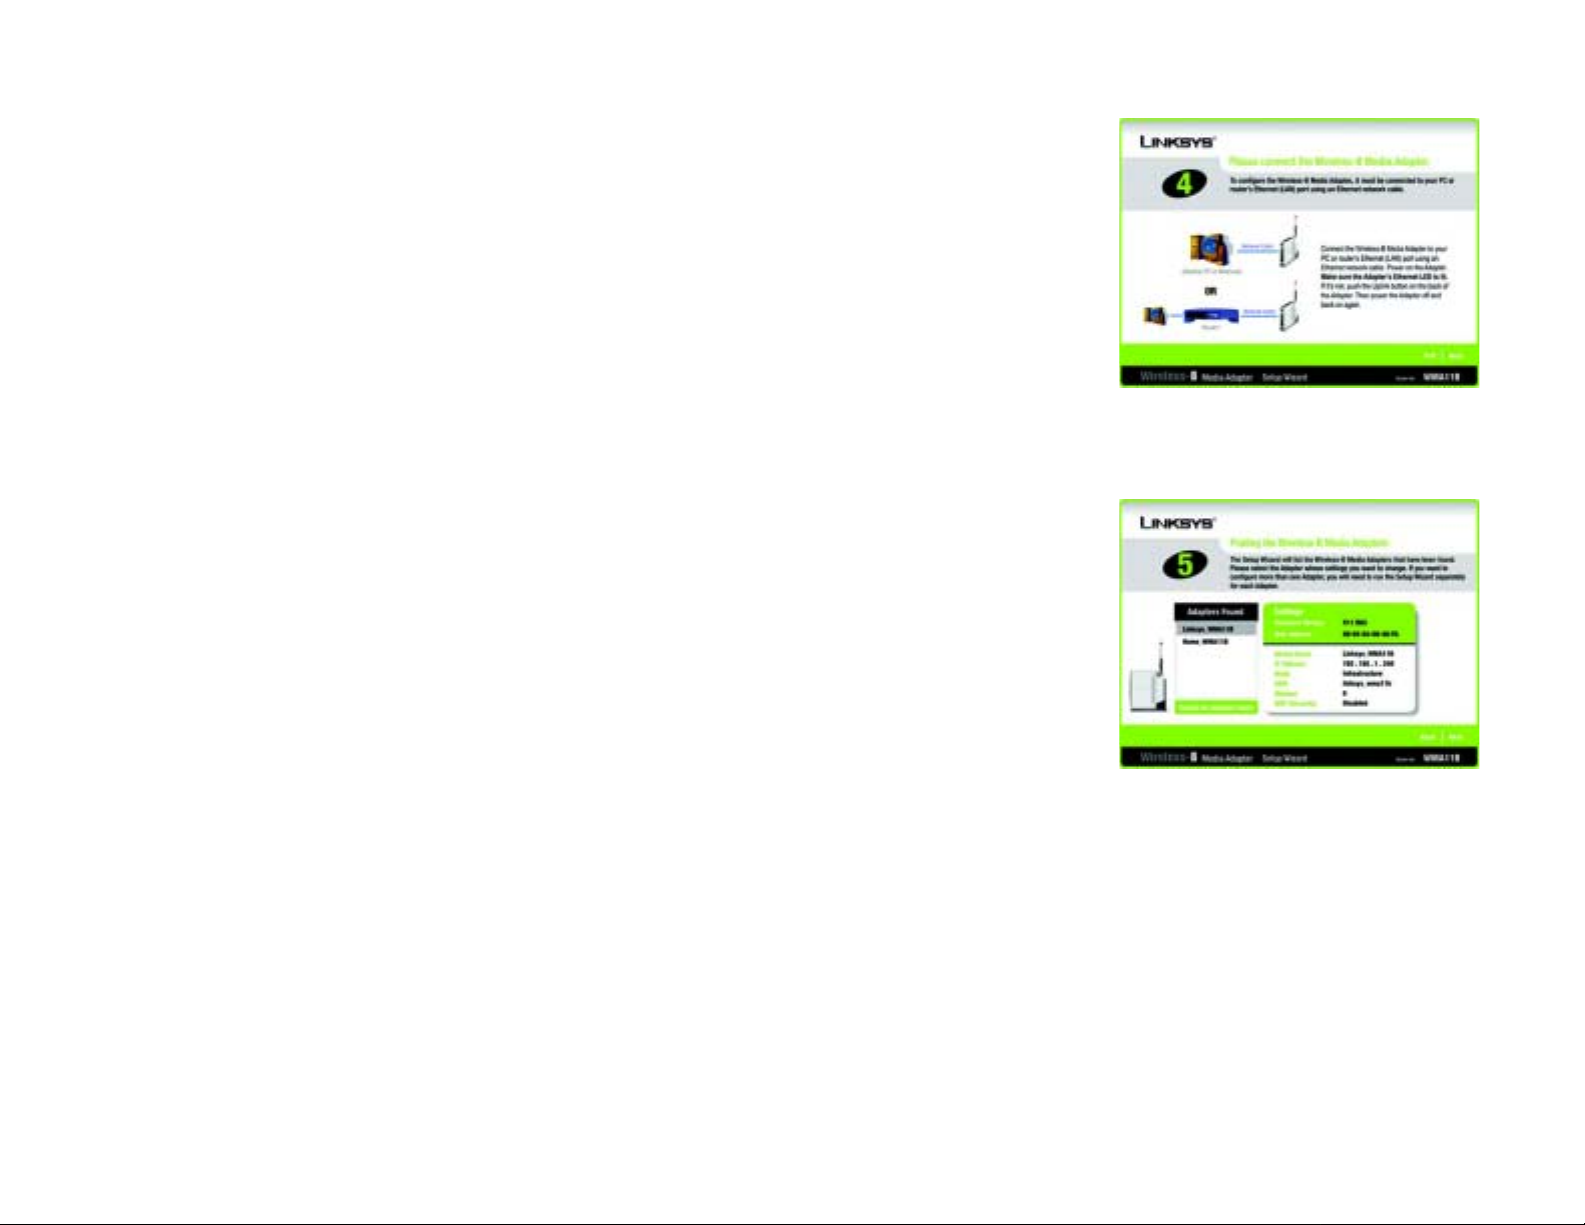
2. Connect the included Ethernet network cable to an Ethernet (LAN) port on your PC, router, or switch.
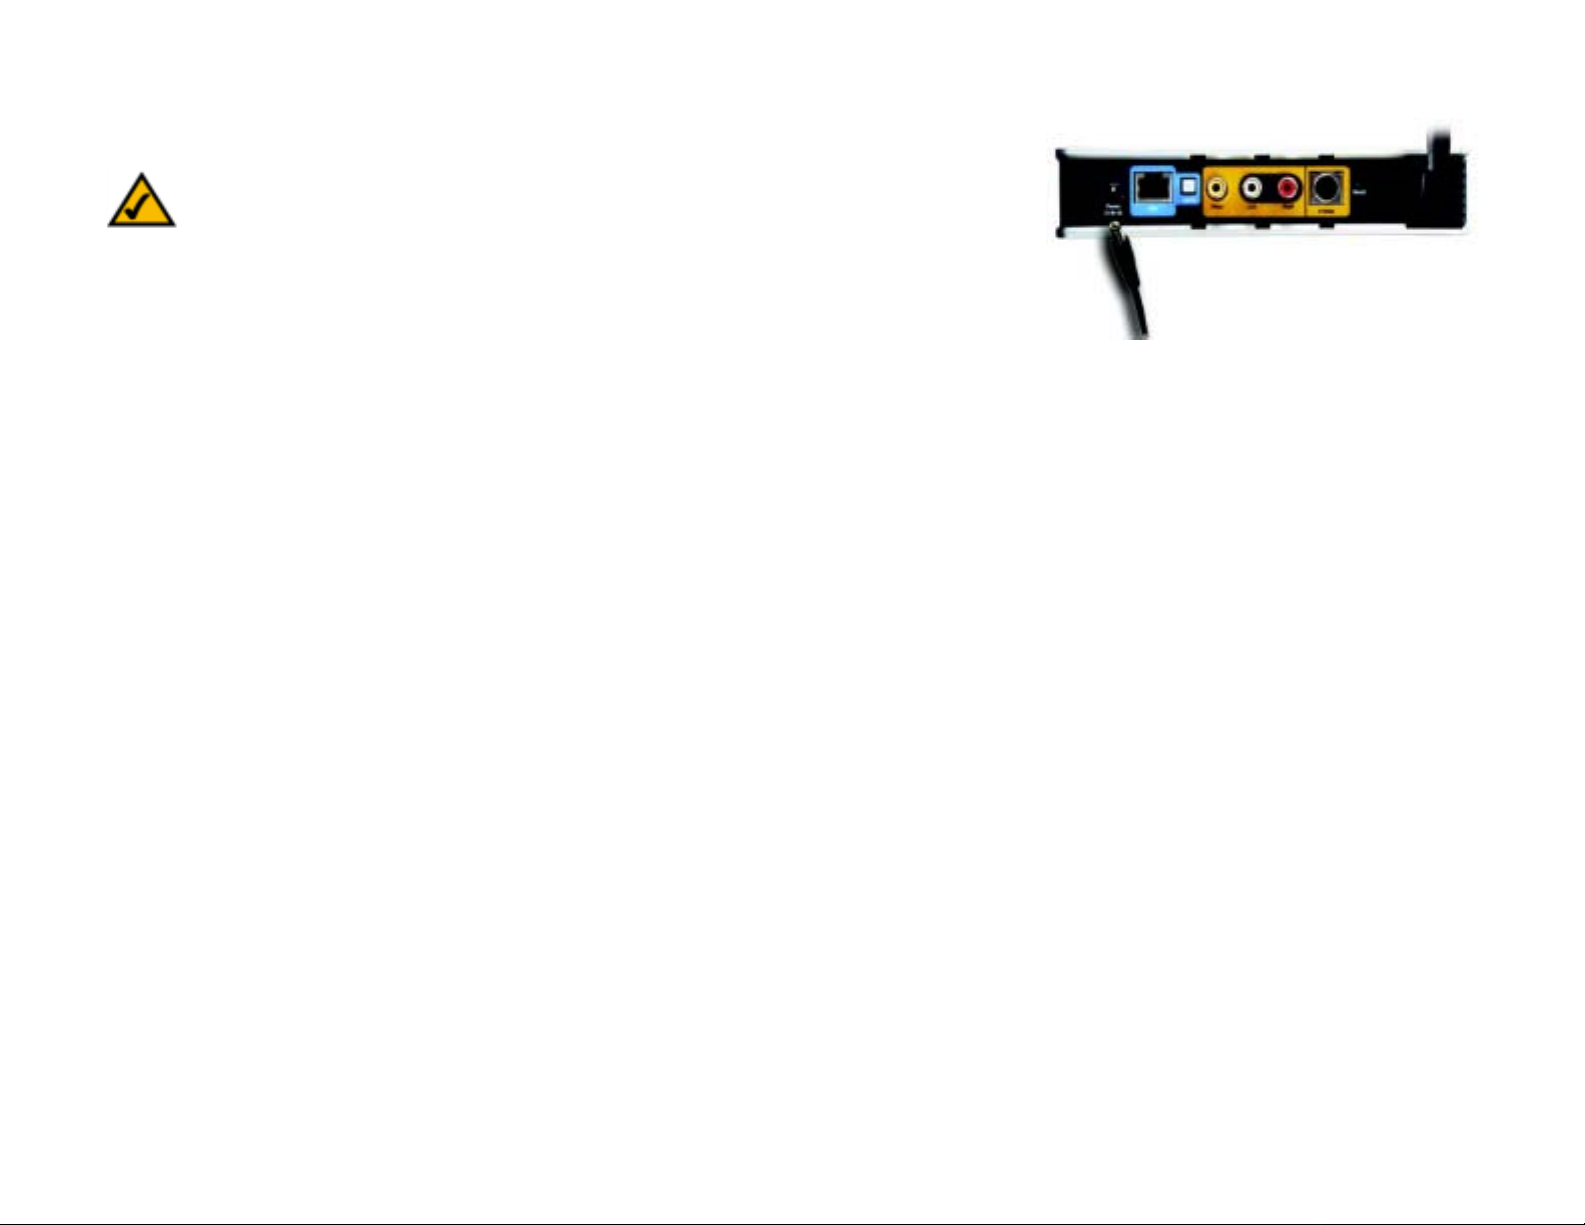
3. Connect the other end of the cable to the LAN port on the Adapter (see Figure 3-3).
4. Connect the included power adapter to the Power port on the Adapter (see Figure 3-4).
5. Plug the power adapter into an electrical outlet.
6. Press the Adapter’s power button, which is located on the Adapter’s front panel.
7. The Ethernet LED will light up. If it does not, then push the Uplink button on the Adapter’s back panel. Power
the Adapter off and back on again. Make sure the cable connections are secure.
Proceed to “Chapter 4: Setting up the Wireless-B Media Adapter.”
Chapter 3: Connecting the Wireless-B Media Adapter to Your Network for Setup
Overview
Windows XP
Computer Only
Figure 3-2: Example of a Connection to a Wireless-
equipped Computer for Setup
Figure 3-3: Connect the Ethernet Network Cable
Wireless-B Media
Adapter
7
Page 15
Wireless-B Media Adapter
Connection to a Wireless Network for Setup Using Windows XP Only
NOTE FOR WINDOWS XP USERS: If your Windows XP computer is NOT using Windows XP’s built-in
wireless network configuration feature (also known as Wireless Zero Configuration), you must
connect the Adapter via an Ethernet network cable using the instructions in the previous section,
“Connection to a Wired Network for Setup.” Once the Adapter is configured, you can disconnect the
Adapter from the wired network and use it via your wireless network.
1. Attach the antenna to the Adapter.
2. Connect the included power adapter to the Power port of the Antenna. See Figure 3-4.
3. Plug the power adapter into an electrical outlet.
4. Press the Adapter’s power button, which is located on the Adapter’s front panel.
5. The Wireless LED will light up.
Proceed to “Chapter 4: Setting up the Wireless-B Media Adapter.”
Figure 3-4: Connect the Power
Chapter 3: Connecting the Wireless-B Media Adapter to Your Network for Setup
Connection to a Wireless Network for Setup Using Windows XP Only
8
Page 16
Wireless-B Media Adapter
Chapter 4: Setting up the Wireless- B Media Adapter
Overview
This chapter will describe the Wireless-B Media Adapter Setup Wizard, which will guide you through the
installation and configuration procedure. When you run the Setup Wizard for the first time, you will be asked to
install the Wireless-B Media Adapter Utility on your PC, which may also be referred to as the host computer. You
must install the Adapter Utility so your PC can send music and pictures to the TV and stereo via the Adapter.
If you want to set up the Adapter using your TV (without running the Setup Wizard on a PC), then go to “Chapter 5:
Connecitng the Wireless-B Media Adapter to Your TV and Stereo.”
Note: Before you can use the Adapter, you must install the Adapter Utility on your Windows 2000 or
XP PC, so your PC will be able to communicate with the Adapter.
Running the Setup Wizard
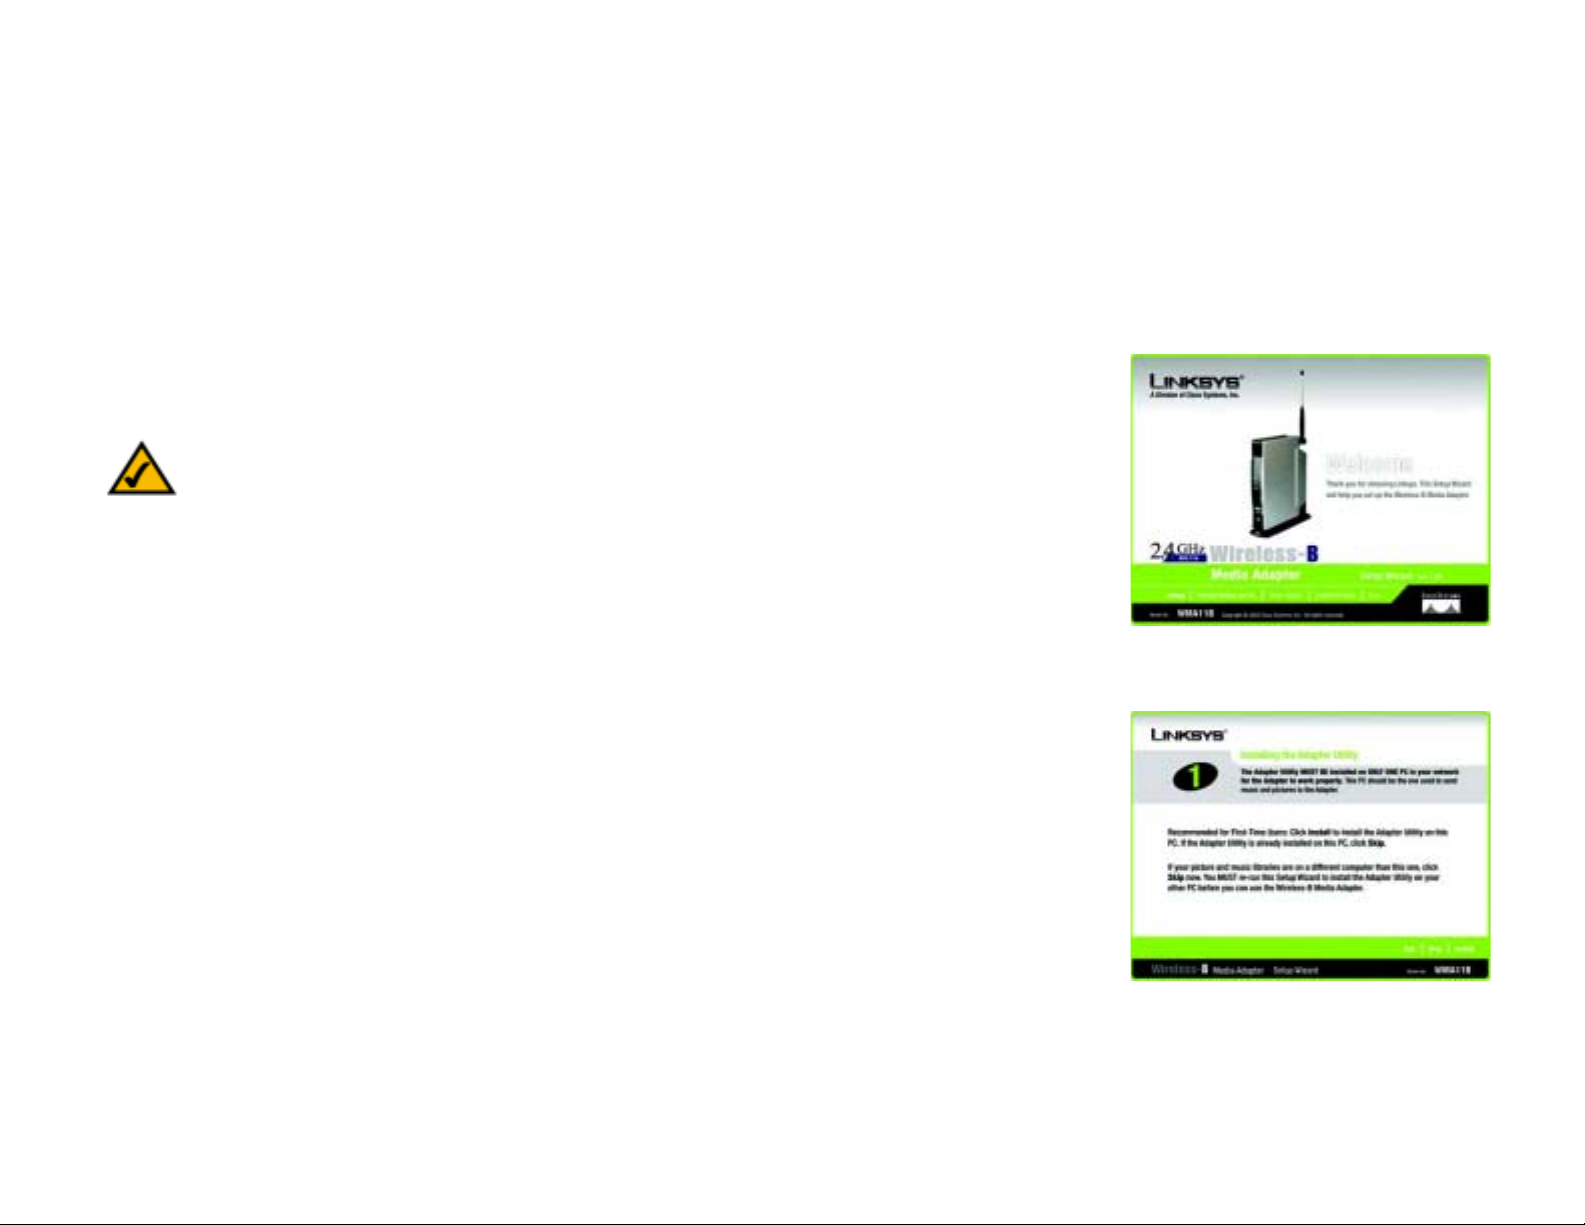
1. Insert the Setup CD-ROM into your PC’s CD-ROM drive . The Setup Wizar d should run automatically, and Figure
4-1 should appear. If it does not, click the Start button and choose Run. In the field that appears, enter
D:\setup.exe (where “D” is the letter of your CD-ROM drive).
Figure 4-1: Welcome Screen
• Setup - Click the Setup button to begin the installation process.
• Install Utility on PC - Click the Install Utility on PC button to install the Adapter’s Utility on your PC.
• User Guide - Click the User Guide button to open the PDF file of this User Guide.
• LINKSYS Web - Click the LINKSYS Web button to visit the Linksys website, www.linksys.com.
• Exit - Click the Exit button to exit the Setup Wizard.
2. To install the Adapter, click the Setup button on the Welcome screen.
3. The screen shown inFigure 4-2 willappear. If you are using the Adapter for the first time, clickInstall to install
the Adapter Utility on your PC. (This Utility will enable your PC to send digital pictures and music files to the
Adapter.) If you have already installed the Adapter Utility on your PC, click Skip and proceed to step 9.
Chapter 4: Setting up the Wireless-B Media Adapter
Overview
Figure 4-2: Installing the Adapter Screen
9
Page 17
Wireless-B Media Adapter
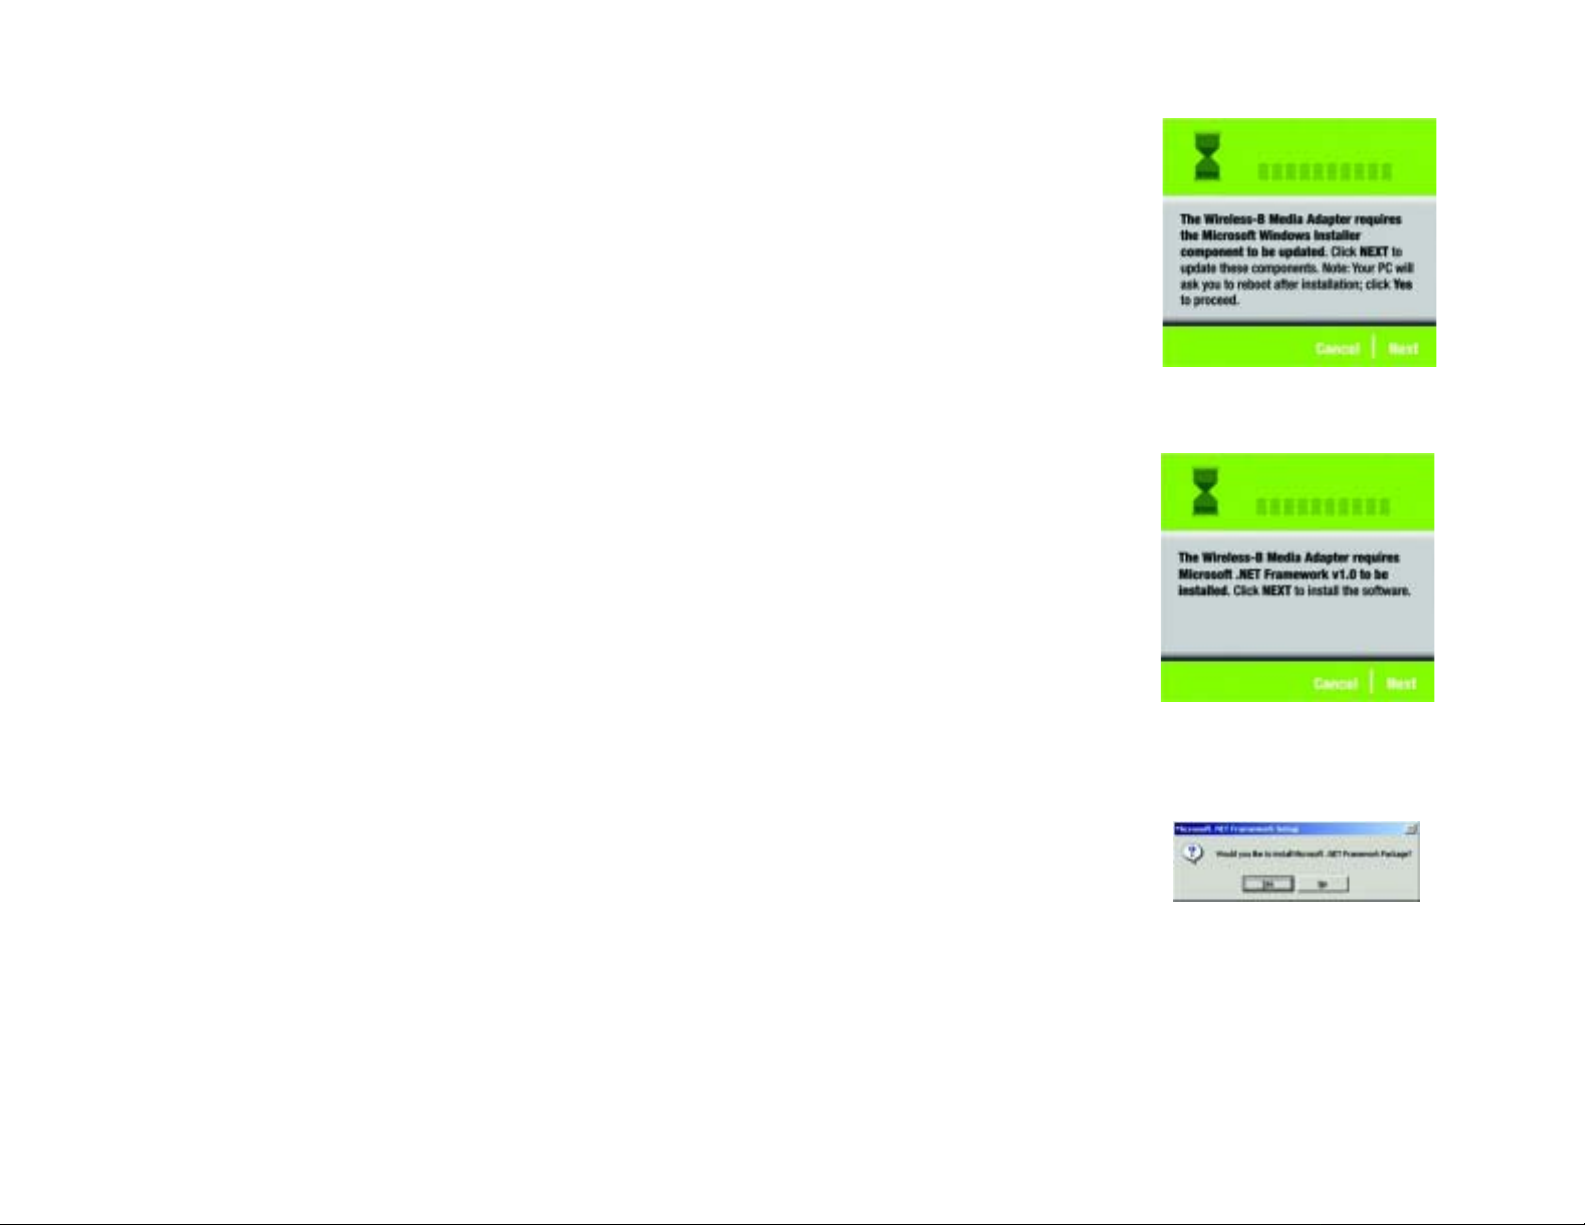
4. If the latest Windows Installer components are not detected on your PC, then you will see Figure 4-3, which
will ask you to update them. Click Next.
After these components are updated, you will be asked to reboot your PC. Click Yes. After the PC reboots, you
will be returned to the screen shown in Figure 4-2. Click Install and proceed to step 5.
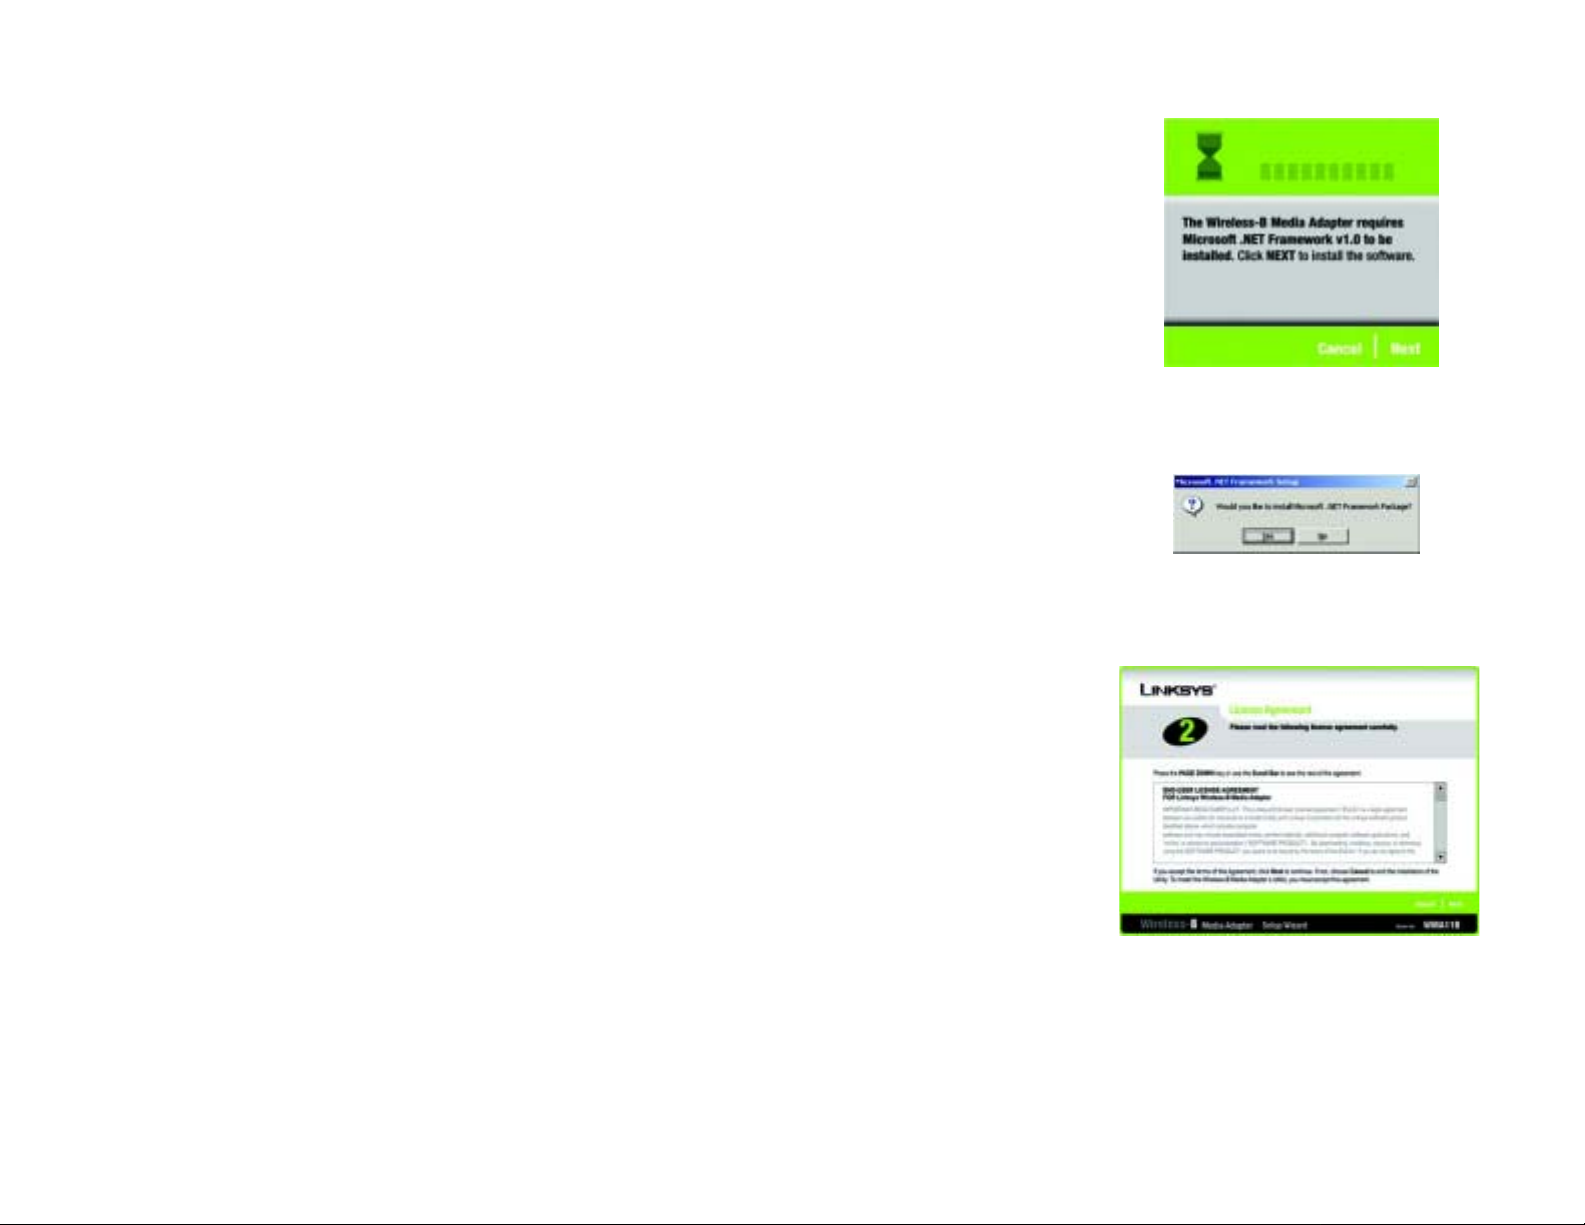
5. If Microsoft .NET Framework version 1.0 is not detected on your PC, then you will see Figure 4-4, which will
ask you to install it. Click Next.
6. Windows will ask you if you want to install the Microsoft .NET Framework Package. Click Yes to proceed.
(This may take a few minutes.)
Figure 4-3: Windows Installer Screen
Chapter 4: Setting up the Wireless-B Media Adapter
Running the Setup Wizard
Figure 4-4: Microsoft .NET Framework
Screen
Figure 4-5: Microsoft .NET Framework
Package Screen
10
Page 18
Wireless-B Media Adapter
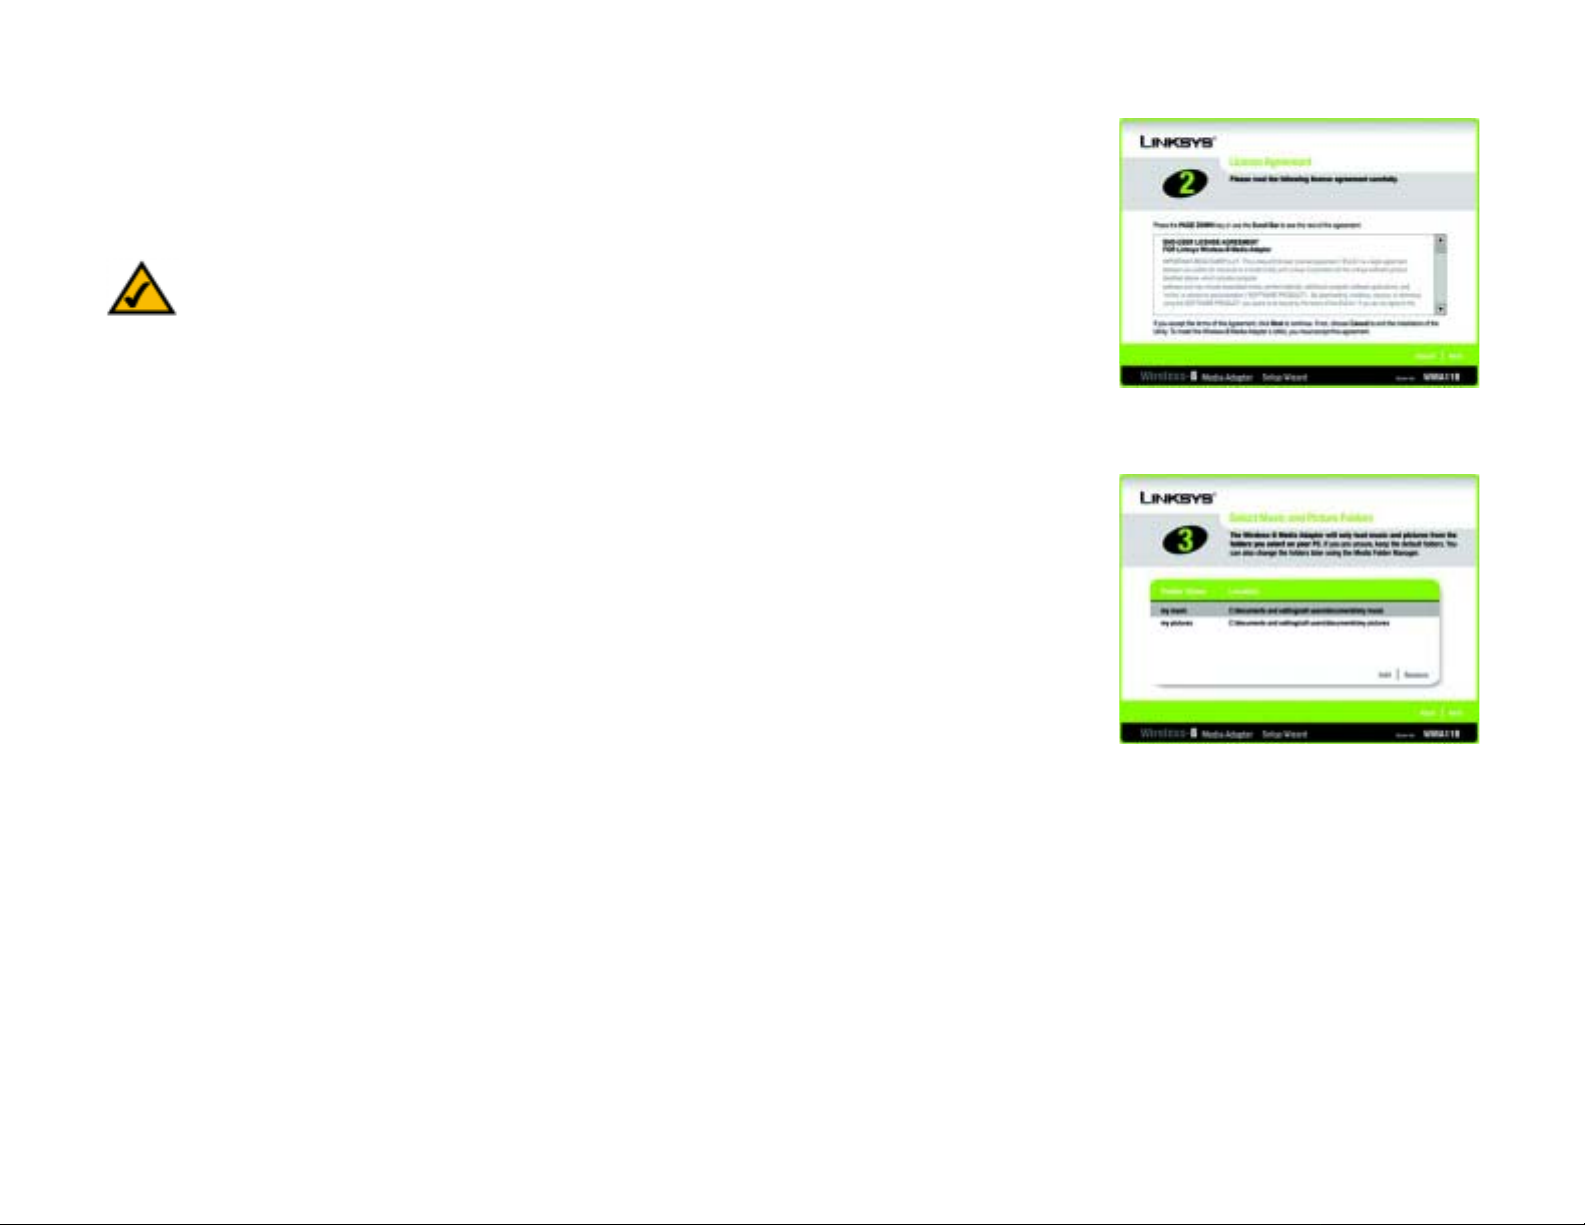
7. Read the License Agreement, and click Next if you accept the Agreement.
8. The Select Music and Picture Folders screen will appear. To use the music and pictures held in the default
folders, click Next. To use a different folder, click Add and follow the on-screen directions.
Note: If your host computer is configured for multiple users and you have access to their folders,
then you can add each user’s folders.
Figure 4-6: License Agreement Screen
Chapter 4: Setting up the Wireless-B Media Adapter
Running the Setup Wizard
Figure 4-7: Select Music and Pictures
Folders Screen
11
Page 19
Wireless-B Media Adapter
9. If you are setting up the Adapter using a wireless-equipped computer, click Next when you see the screen
shown in Figure 4-8. If you are setting up the Adapter using a wired computer, make sure the Adapter’s
Ethernet LED is solidly lit. This indicates that the Adapter is properly connected to your wired network. Then
click the Next button to continue.
10. The screen shown in Figure 4-9 displays a list of Wireless-B Media Adapters that have been found on your
network, along with the settings for the Adapter whose name is highlighted. To select the Adapter you are
currently installing, click its name in the Adapters Found box. Then click the Next button.
Figure 4-8: Connection for Setup Screen
Chapter 4: Setting up the Wireless-B Media Adapter
Running the Setup Wizard
Figure 4-9: Adapter Selection Screen
12
Page 20
Wireless-B Media Adapter
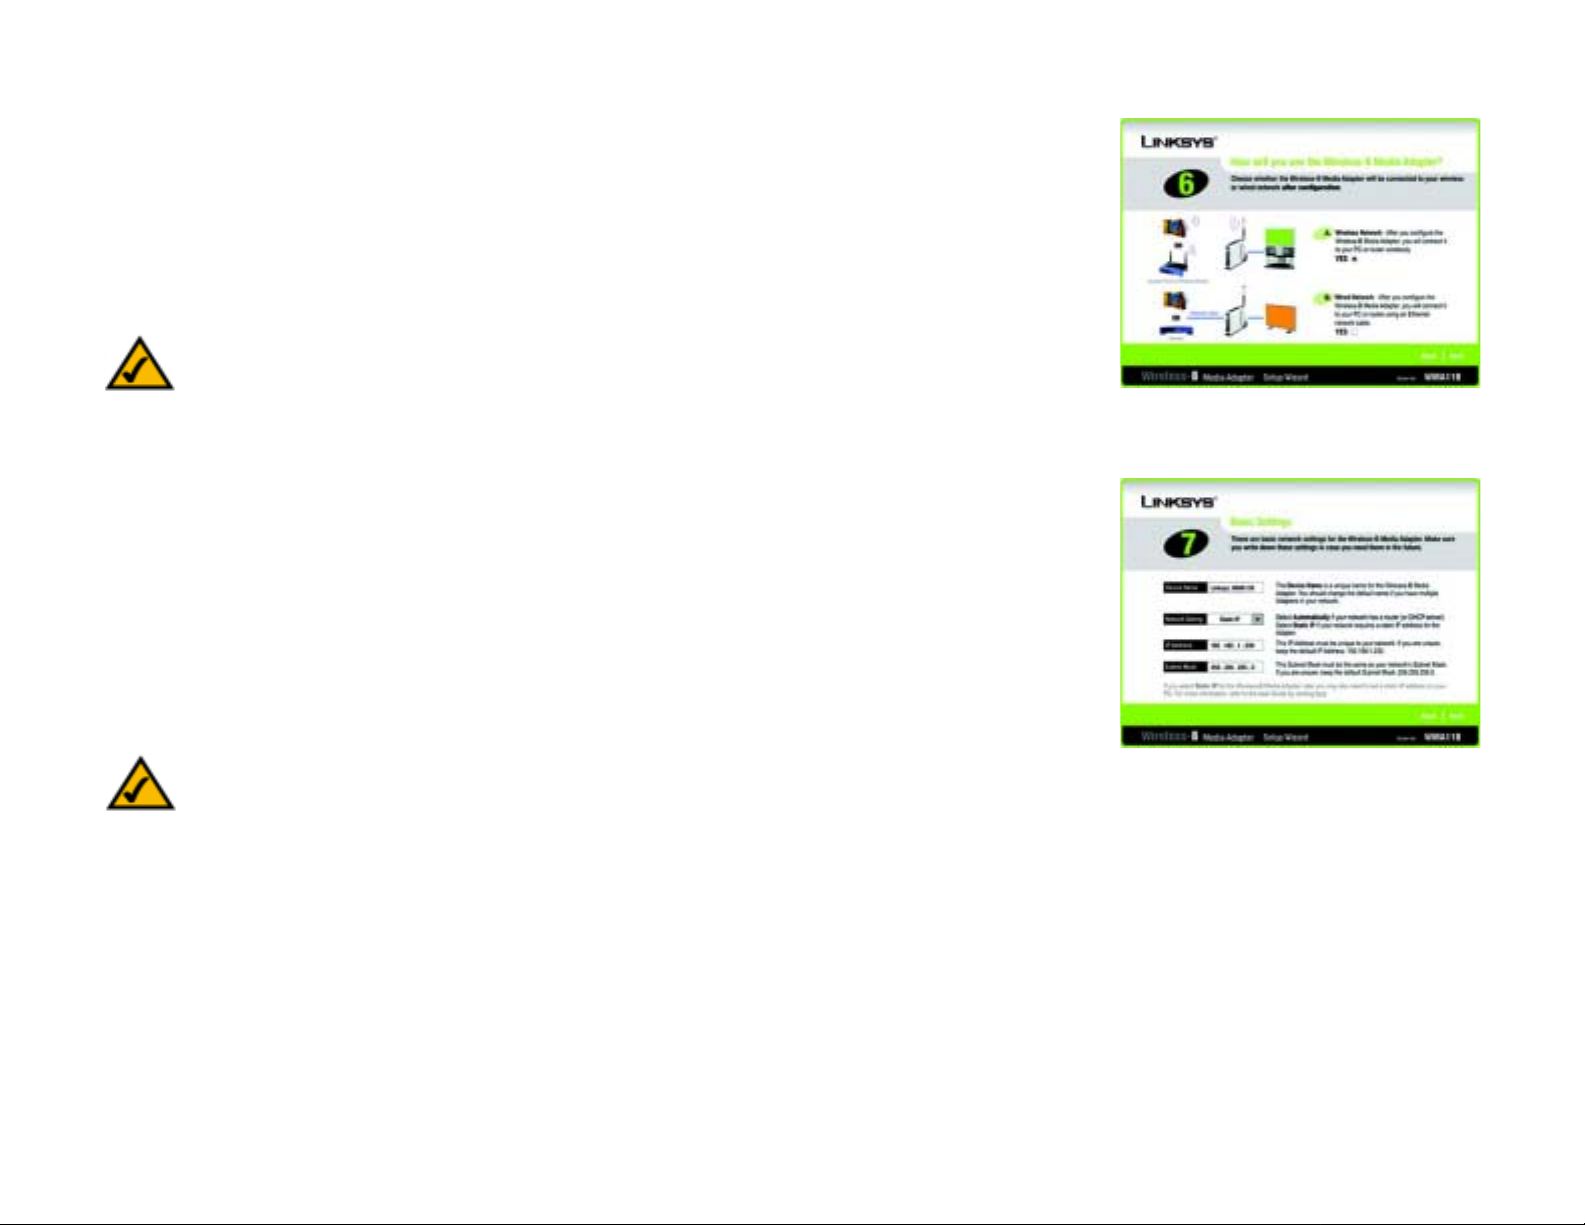
11. On the screen shown in Figure 4-10, choose whether the Adapter will be connected to your wireless or wired
network AFTER you have configured it.
If you will connect the Adapter to your PC or router wirelessly, then click the Yes button for the Wireless
network choice.
If you will connect the Adapter to your PC or router using an Ethernet network cable, then click the Yes button
for the Wired network choice.
Note: For more information, refer to “Appendix C: Planning Your Use of the Wireless-B Media
Adapter.”
Click the Next button.
12. On the Basic Settings screen, shown in Figure 4-11, enter a unique name for the Adapter in the Device Name
field.
If you network has a router or other DHCP server, select Automatically for the Network Setting, and click the
Next button.
If the Adapter requires a static IP address, select Static IP for the Network Setting. Enter a unique IP Address
that is in the range of IP addresses appropriate for your network. In the Subnet Mask field, enter the Subnet
Mask of your network; all devices on your network must use the same Subnet Mask. You must specify an IP
Address and Subnet Mask for the Adapter on this screen. Then click the Next button.
Figure 4-10: Connection after Setup Screen
Note: If you set a static IP address on the Adapter, then you may also need to set a static IP address
on your PC. For instructions, go to “Appendix E: Setting a Static IP Address on Your PC” after you
have set up the Adapter.
Chapter 4: Setting up the Wireless-B Media Adapter
Running the Setup Wizard
Figure 4-11: Basic Settings Screen
Static IP address: a fixed address assigned to
a computer or device connected to a network.
13
Page 21
Wireless-B Media Adapter
13. If you will connect the Adapter to your PC or router using an Ethernet network cable AFTER configuration, then
go to step 15.
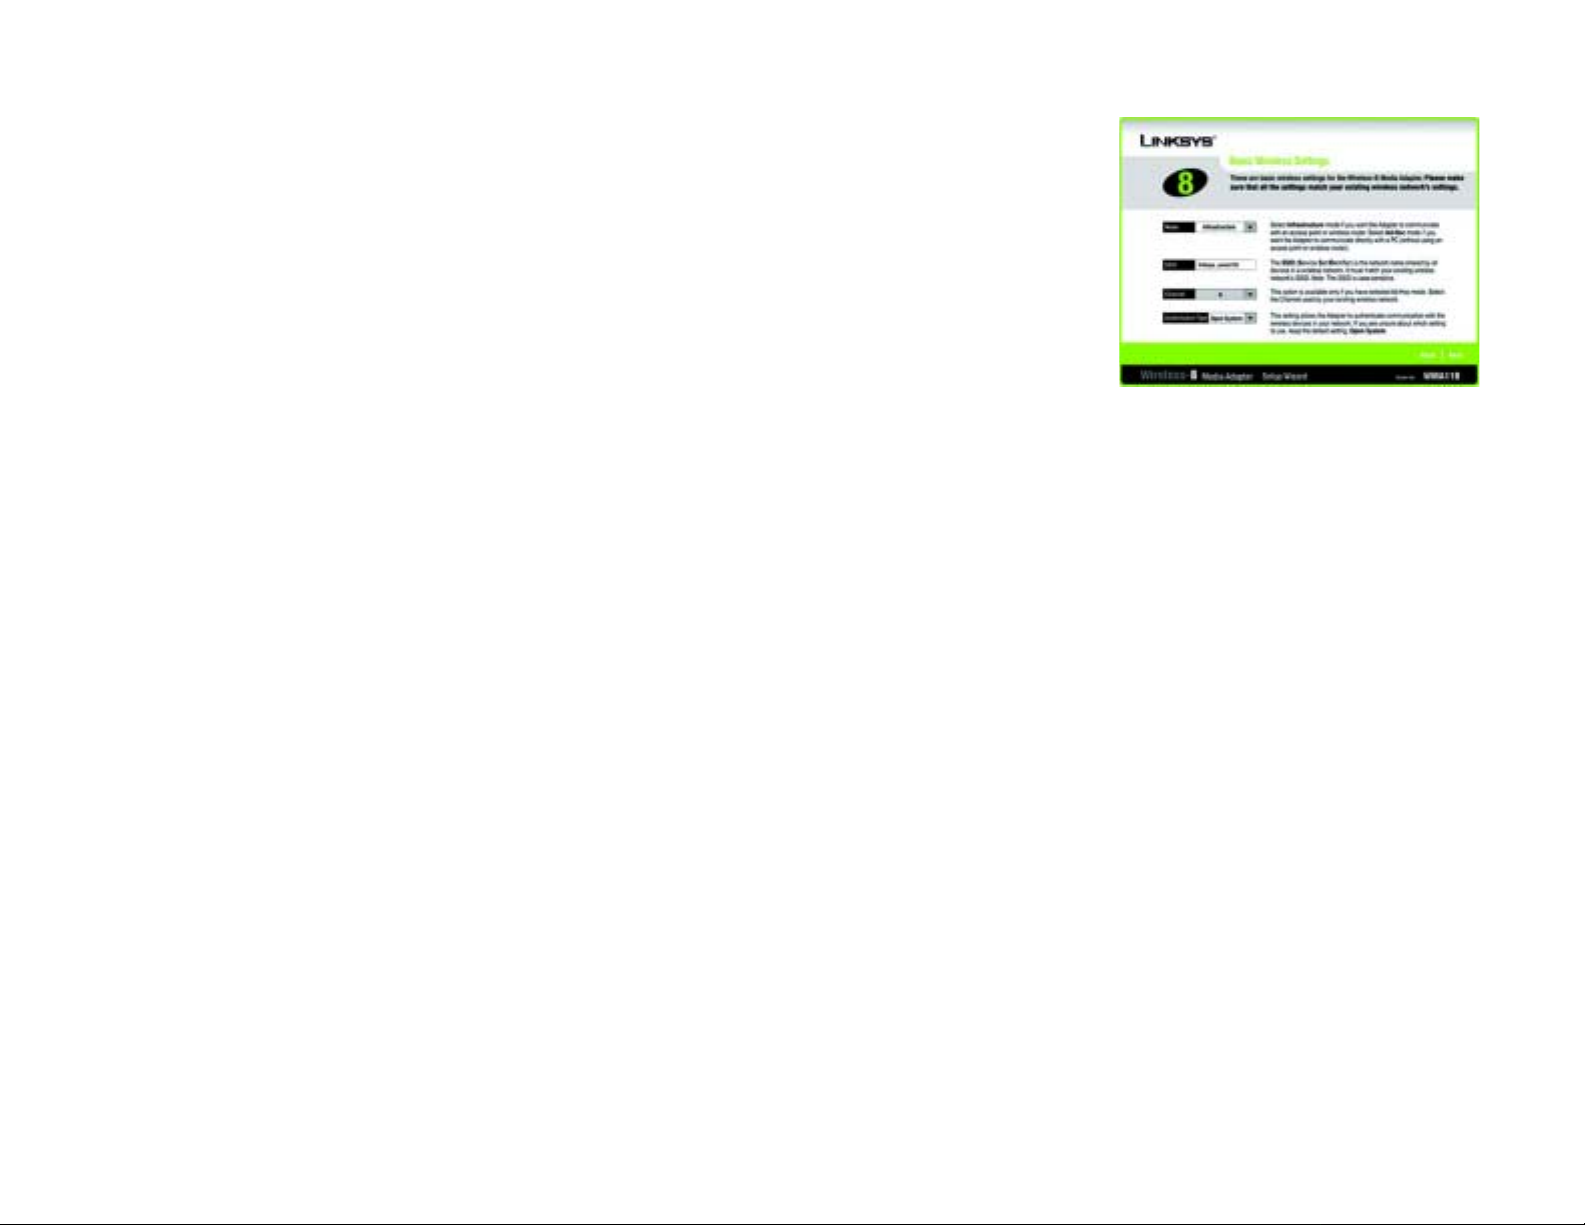
If you will connect the Adapter to your PC or router wirelessly AFTER configuration, then the Basic Wireless
Settings screen will appear, as shown in Figure 4-12.
The Mode setting shows a choice of two wireless modes. Select Infrastructure if you want the Adapter to
communicate using an access point or wireless router. Select Ad-Hoc if you want the Adapter to
communicate directly with a wireless PC.
In the SSID field, enter your wireless network’s SSID or name. This is the unique name shared by all devices
in a wireless network. The SSID is case-sensitive and should have 32 characters or fewer.
If the Adapter is set to Ad-Hoc mode, then select the channel setting of your existing wireless network. This is
the channel on which the network broadcasts its wireless signal.
Figure 4-12: Basic Wireless Settings
Screen
Select the authentication type used by your network, Open System or Shared Key. For Open System
authentication, the sender and recipient do not use a WEP key for authentication. For Shared Key
authentication, the sender and recipient use a WEP key for authentication. If you are not sure about which
setting to use, Linksys recommends that you keep the default setting, Open System.
Click the Next button.
Ad-hoc: a group of wireless devices
communicating directly to each other (peer-topeer) without the use of an access point.
Infrastructure: configuration in which a
wireless network is bridged to a wired network
via an access point.
SSID: your wireless network’s name.
Chapter 4: Setting up the Wireless-B Media Adapter
Running the Setup Wizard
14
Page 22

Wireless-B Media Adapter
14. The Wireless Security Settings screen, shown in Figure 4-13, appears next. To enable WEP encryption, select
a level of WEP encryption, 64-bit or 128-bit, and then enter a Passphrase. If you want to enter the WEP key
manually, then complete the KEY #1 field. (The Adapter’s WEP settings must match the WEP settings of your
existing wireless network.) If you want to disable WEP encryption, keep the default, Disabled. Click the Next
button to continue.
Passphrase - Instead of manually entering a WEP key, you can enter a Passphrase, so a WEP key will be
automatically generated after you click the Next button. The Passphrase is case-sensitive and should have 16
alphanumeric characters or fewer. It must match the passphrase of your wireless network and is compatible
with Linksys wireless products only. (You will have to enter the WEP key(s) manually on any non-Linksys
wireless products.)
KEY #1 - If you are using 64-bit WEP encryption, then the key must consist of exactly 10 hexadecimal
characters. If you are using 128-bit WEP encryption, then the key must consist of exactly 26 hexadecimal
characters. Valid hexadecimal characters are “0”-“9” and “A”-“F”.
15. Review your settings on the Confirmation screen before you save them (see Figure 4-14). Click the Save
button to continue.
Figure 4-13: Wireless Security Settings
Screen
WEP (Wired Equivalent Privacy): a method
of encrypting data transmitted on a wireless
network for greater security.
Passphrase: used much like a password, a
passphrase simplifies the WEP encryption
process by automatically generating the WEP
encryption for Linksys products.
Chapter 4: Setting up the Wireless-B Media Adapter
Running the Setup Wizard
Figure 4-14: Confirmation Screen
15
Page 23

Wireless-B Media Adapter
16. On the Congratulations screen, click the Exit button. The Wireless-B Media Adapter is now properly
configured.
17. If you have installed the Adapter Utility during the Setup Wizard, you will see the Utility’s icon in the system
tray of your taskbar, as shown in Figure 4-16. Proceed to the next section, “Using the Adapter Utility.”
Using the Adapter Utility
The Utility has two purposes. It allows your computer to communicate with the Adapter, so you can send music
and pictures to the TV and stereo. The Utility also lets you easily designate folders that hold music and pictures
for the Adapter.
Note: The Utility can be installed on only one PC in your network.
To use the Adapter, the Utility must be running on your computer. If you close the Utility, then the Adapter will not
work. If you need to re-start the Utility, click the Start button. Click All Programs and Linksys Wireless-B
Media Adapter. Click Adapter Utility to restart the Utility.
There are two ways to access the Utility, through your PC’s system tray or Start menu.
Using the Utility’s Icon in Your PC’s System Tray
To access the Utility, right-click its icon in your PC’s system tray, which is located on the right side of the taskbar.
You will see three choices: Media Folder Manager, About, and Exit (see Figure 4-17). Click Media Folder
Manager to add or remove folders holding music and pictures. Click About to find out the version number of the
Utility. Click Exit to close the Utility.
Figure 4-15: Congratulations Screen
Figure 4-16: Utility Icon
Figure 4-17: Select Media Folder Manager
Chapter 4: Setting up the Wireless-B Media Adapter
Using the Adapter Utility
16
Page 24

Wireless-B Media Adapter
Media Folder Manager
Click Media Folder Manager to open it. The Media Folder Manager screen will appear and list the current
shared media folder(s). See Figure 4-18.
To add a folder:
1. Click the Add button.
2. On the Browse for Folder screen, shown in Figure 4-19, choose the folder you want to add, and click the OK
button. To create a new folder, click the Make New Folder button and follow the on-screen instructions.
Click the Cancel button to return to the Media Folder Manager screen without adding a folder.
3. When you are finished, click the OK button on the Media Folder Manager screen.
To remove a folder:
1. From the list of Selected Media Folders, select the folder you want to remove.
2. Click the Remove button.
3. When you are finished, click the OK button.
Using the Start Menu
Figure 4-18: Media Folder Manager
To access the Utility, click the Start button. Click All Programs and Linksys Wireless-B Media Adapter.
You will see three choices: Adapter Utility, Media Folder Manager, and Uninstall (see Figure 4-20). Click Adapter
Utility to restart the Utility. Click Media Folder Manager to add or remove folders holding music and pictures
(see the “Media Folder Manager” section for instructions). Click Uninstall to remove the Utility from your PC.
Proceed to “Chapter 5: Connecting the Wireless-B Media Adapter to Your TV and Stereo.”
Chapter 4: Setting up the Wireless-B Media Adapter
Using the Adapter Utility
Figure 4-19: Browse for Folder
Figure 4-20: Start Menu
17
Page 25

Wireless-B Media Adapter
Chapter 5: Connecting the Wireless- B Media Adapter to Your
TV and St ereo
Overview
This chapter will explain what to do if you used the Setup Wizard to set up the Adapter and what to do if you want
to set up the Adapter from your TV.
If you used the Setup Wizard, then follow the instructions to disconnect the Adapter from your network, connect
the Adapter to your TV (and stereo, if you have one), and re-connect the Adapter to your network. (You have to
disconnect the Adapter from your network in order to move it to your TV and stereo.)
If you want to set up the Adapter from your TV, then go directly to the “Connecting to Y our TV and Stereo” section
if you have a stereo. Go directly to the “Connecting to Your TV Only” section if you do not have a stereo.
Instructions
1. Press the Adapter’s power button on its front panel to power it off.
Note: Make sure you keep the PC you were using powered on because it will communicate with the
Adapter and send music and pictures.
2. Unplug the power adapter from the Adapter’s Power port and electrical outlet. See Figure 5-1.
3. If you used a wired computer to set up the Adapter, then unplug the Ethernet network cable from the
Adapter’s LAN port and the Ethernet (LAN) port of your PC, router, or switch.
4. Move the Adapter and its power adapter to the TV.
5. If you have a stereo, go to the “Connecting to Your TV and Stereo” section.
If you do not have a stereo, go to the “Connecting to Your TV Only” section.
Chapter 5: Connecting the Wireless-B Media Adapter to Your TV and Stereo
Overview
Figure 5-1: Unplug the Power
18
Page 26
Wireless-B Media Adapter
Connecting to Your TV and Stereo
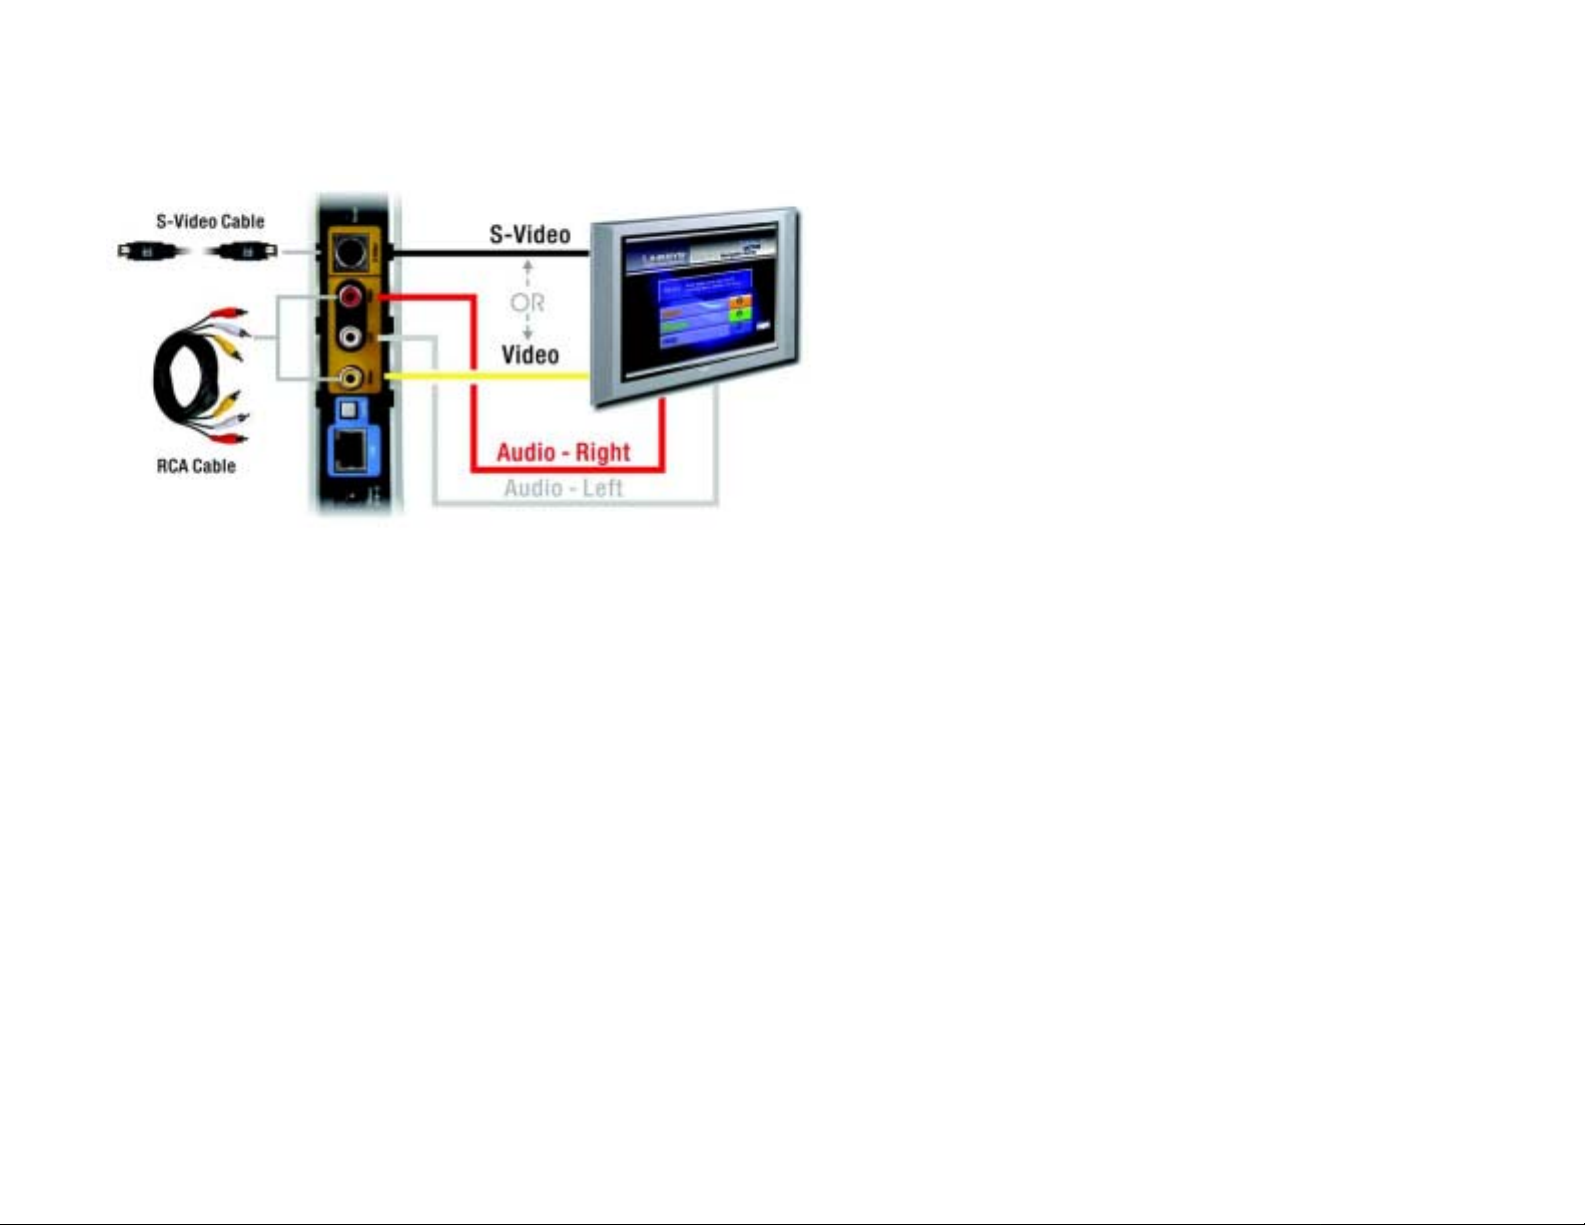
Figure 5-2: Connection to Your TV and Stereo
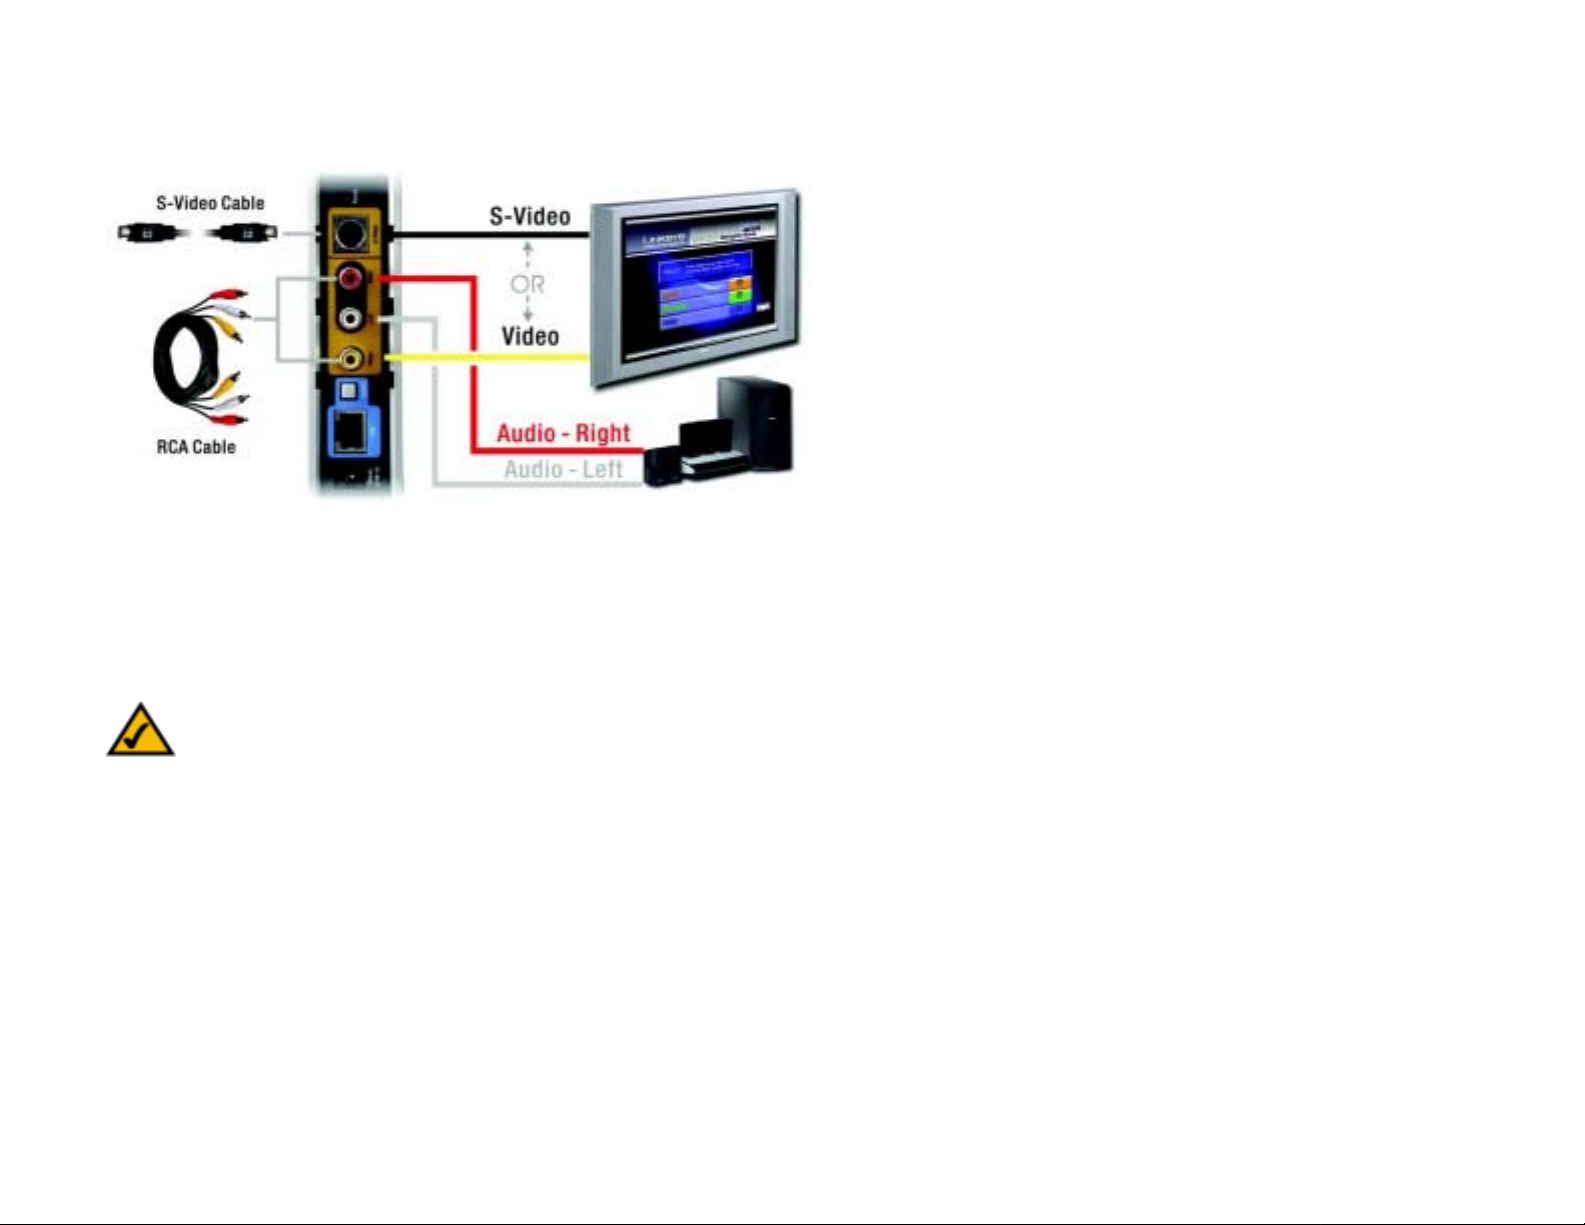
1. Refer to the connection diagram in Figure 5-2. If your TV has an S-video input, then connect the S-video cable
to the Adapter’s S-video port and the TV’s S-VIDEO IN port.
If your TV does NOT have an S-video input, then connect the yellow connectors of the RCA cable to the
Adapter’s Video port and the TV’s VIDEO IN port.
Note: If your TV and stereo are located far apart from each other, you may have to use a separate
RCA cable for the audio connections described in step 2.
2. Connect the red and white connectors of the RCA cable to the Adapter’s Left and Right ports and the stereo’s
AUDIO IN ports.
3. Power on your TV. Select the TV channel or input that the Adapter will use.
4. Power on your stereo, and select the stereo input that the Adapter will use.
5. Proceed to the “Connecting the Adapter to Your Network” section.
Chapter 5: Connecting the Wireless-B Media Adapter to Your TV and Stereo
Instructions
19
Page 27
Wireless-B Media Adapter
Connecting to Your TV Only
Figure 5-3: Connection to Your TV Only
1. Refer to the connection diagram in Figure 5-3. If your TV has an S-video input, then connect the S-video cable
to the Adapter’s S-video port and the TV’s S-VIDEO IN port.
If your TV does NOT have an S-video input, the connect the yellow connectors of the RCA cable to the
Adapter’s Video port and the TV’s VIDEO IN port.
2. Connect the red and white connectors of the RCA cable to the Adapter’s Left and Right ports and the TV’s
AUDIO IN ports.
3. Power on your TV. Select the TV channel or input that the Adapter will use.
4. Proceed to the “Connecting the Adapter to Your Network” section.
Connecting the Adapter to Your Network
1. If the Adapter will connect to your computer through your wireless network, go to step 2.
If the Adapter will connect to your PC through your wired network, then connect the Ethernet network cable to
the Adapter’s LAN port and an Ethernet (LAN) port on a wired network device, such as a router or switch.
Chapter 5: Connecting the Wireless-B Media Adapter to Your TV and Stereo
Instructions
20
Page 28

Wireless-B Media Adapter
2. Connect the power adapter to the Adapter’s Power port and an electrical outlet.
3. Press the Power button on the Adapter’s front panel.
If the Adapter connects to your wireless network, the Wireless LED will light up. Go to step 4.
If the Adapter connects to your wired network, the Ethernet LED will light up. If it does not, then push the
Uplink button on the Adapter’s back panel. Power the Adapter off and back on again. Make sure the cable
connections are secure.
4. If you used the Setup Wizard to set up the Adapter, then the Adapter Utility on your PC will automatically find
the Adapter on your wireless or wired network. The main menu of the Media Navigator will appear on your TV .
(This may take a few seconds).
If you want to set up the Adapter using your TV, proceed to the “Using the TV Setup” section.
5. Insert the batteries into the remote control, and use the arrow and Select buttons to select songs and
pictures.
Proceed to the “Placement Options” section.
Placement Options
Figure 5-4: Connect the Power
To protect the cables attached to the Adapter’s back panel, snap the included cable hood into place. The dark
gray section of the cable hood faces away from the antenna.
There are two ways to place the Adapter. The first way is to place the Adapter horizontally on a surface, so it sits
on four small rubber feet.
The second way is to stand the Adapter vertically on a surface (see Figure 5-5). To use the stand option, follow
these instructions:
1. The Adapter includes a base. Insert the end opposite to the antenna into the base.
2. Snap the Adapter into the base, so it fits snugly.
3. Place the Adapter in an appropriate location, and if necessary , adjust the antenna so that it points straight up
in the air (see Figure 5-5).
If you have already set up the Adapter using the Setup Wizard, then proceed to “Chapter 6: Using the
Media Navigator.”
Chapter 5: Connecting the Wireless-B Media Adapter to Your TV and Stereo
Placement Options
Figure 5-5: Vertical Position
21
Page 29

Wireless-B Media Adapter
Using the TV Setup
Before setting up the Adapter using the TV, decide whether the Adapter will be connected to your wireless or
wired network AFTER you have configured it. For more information, refer to “Appendix C: Planning Y our Use of the
Wireless-B Media Adapter.”
To set up the Adapter using the TV, first you have to install the Adapter Utility on your PC. Follow the instructions
in the “Installing the Adapter Utility” section.
Installing the Adapter Utility
1. Insert the Setup CD-ROM into your PC’s CD-ROM drive . The Setup Wizar d should run automatically, and Figure
5-6 should appear. If it does not, click the Start button and choose Run. In the field that appears, enter
D:\setup.exe (where “D” is the letter of your CD-ROM drive).
2. To install the Adapter Utility, click the Install Utility on PC button on the Welcome screen.
3. If the latest Windows Installer components are not detected on your PC, then you will see Figure 5-7, which
will ask you to update them. Click Next.
After these components are updated, you will be asked to reboot your PC. Click Yes. After the PC reboots, you
see the screen shown in Figure 5-8. Click Next and proceed to step 4.
Figure 5-6: Welcome Screen
Figure 5-7: Windows Installer Screen
Chapter 5: Connecting the Wireless-B Media Adapter to Your TV and Stereo
Using the TV Setup
Figure 5-8: Installing the Adapter Utility
Screen
22
Page 30
Wireless-B Media Adapter
4. If Microsoft .NET Framework version 1.0 is not detected on your PC, then you will see Figure 5-9, which will
ask you to install it. Click Next.
5. Windows will ask you if you want to install the Microsoft .NET Framework Package. Click Yes to proceed.
(This may take a few minutes.)
6. Read the License Agreement shown in Figure 5-11, and click Next if you accept the Agreement.
Figure 5-9: Microsoft .NET Framework
Screen
Figure 5-10: Microsoft .NET Framework
Package Screen
Chapter 5: Connecting the Wireless-B Media Adapter to Your TV and Stereo
Using the TV Setup
Figure 5-11: License Agreement Screen
23
Page 31

Wireless-B Media Adapter
7. The Select Music and Picture Folders screen will appear (see Figure 5-12). To use the music and pictures held
in the default folders, click Next. To use a different folder, click Add and follow the on-screen directions.
Note: If your host computer is configured for multiple users and you have access to their folders,
then you can add each user’s folders.
8. When you see the Congratulations screen, click the Exit button.
For more information about the Adapter Utility, see the “Using the Adapter Utility” section in “Chapter 4:
Setting up the Wireless-B Media Adapter.”
Proceed to the “Setting up the Adapter from Your TV” section.
Setting up the Adapter from Your TV
1. If you haven’t already done so, insert the included AAA batteries into the Remote Controller.
2. When the message, “Please Wait” or “Waiting for Host,” is displayed on your TV, press the Setup button on
the remote. Then the Media Adapter Setup screen will appear (see Figure 5-14).
3. You have several settings to configure. T o use the on-screen keyboard, press the Selectbutton on the remote
to move from the settings down to the keyboard. Then use the remote’s arrow buttons to move around the
keyboard. To enter a character, select the character, and press the Select button on the remote. When you
want to return to the settings, select the on-screen Enter key, and press the Select button on the remote.
Figure 5-12: Select Music and Pictures
Folders Screen
• IP Settings - If the Adapter needs a static IP address, then select Fixed IP and press the Select button. If
the Adapter will be assigned an IP address automatically by a router or other DHCP server, then select
DHCP Client, and press the Select button.
IP Address and Subnet Mask - If you have selected Fixed IP, then enter a unique IP Address that is in the
range of IP addresses appropriate for your network. In the Subnet Mask field, enter the Subnet Mask of
your network; all devices on your network must use the same Subnet Mask.
• Wireless Settings - The Wireless Settings must be configured ONLY if you will use the Adapter as part of
your wireless network after setup. If you will use the Adapter as part of your wired network after setup,
then proceed to step 4.
If your network uses ad-hoc mode, then select Ad-Hoc, and press the Select button. If your network uses
infrastructure mode, then select Infrastructure, and press the Select button.
SSID - Enter the SSID or network name of your wireless network.
Chapter 5: Connecting the Wireless-B Media Adapter to Your TV and Stereo
Using the TV Setup
Figure 5-13: Utility Congratulations
Static IP address: a fixed address assigned to
a computer or device connected to a network.
Ad-hoc: a group of wireless devices
communicating directly to each other (peer-topeer) without the use of an access point.
Infrastructure: configuration in which a
wireless network is bridged to a wired network
via an access point.
24
Page 32

Wireless-B Media Adapter
Channel - Enter the channel setting of your wireless network ONLY if your network uses ad-hoc mode.
WEP Encryption - If your network uses 64-bit encryption, then select 64 bits, and press the Select
button. If your network uses 128-bit encryption, then select 128 bits, and press the Select button. If your
network’s WEP encryption is disabled, then select Disabled, and press the Select button.
Passphrase - If your network uses WEP encryption, you can enter a Passphrase instead of manually
entering a WEP key. Then click the on-screen Enter key, and a WEP key will then be automatically
generated. The Passphrase is case-sensitive and should have 16 alphanumeric characters or fewer. It
must match the passphrase of your wireless network and is compatible with Linksys wireless products
only.
WEP Key - If you want to manually enter a WEP key, enter it in this field, and then click the on-screen
Enter key. For 64-bit WEP, the key includes exactly 10 hexadecimal characters. For 128-bit WEP, the key
includes exactly 26 hexadecimal characters. Valid hexadecimal characters are “0”-“9” and “A”-“F”.
Authentication Type - This setting allows the Adapter to authenticate communication with the wireless
devices in your network. If you select the Open System setting, any device can join a network without
performing any security check. If you select the Shared Key setting, all wireless devices must have the
same WEP keys so that the Adapter and host computer can authenticate each other and start transmitting
data. After making your selection, press the Select button. If you are unsure about which setting to use,
keep the default setting, Open System.
4. When finished, press the Setup button on the remote. The Adapter will save the settings and restart itself.
Figure 5-14: Media Adapter Setup
SSID: your wireless network’s name.
WEP (Wired Equivalent Privacy): a method
of encrypting data transmitted on a wireless
network for greater security.
Proceed to “Chapter 6: Using the Media Navigator.”
Chapter 5: Connecting the Wireless-B Media Adapter to Your TV and Stereo
Using the TV Setup
Passphrase: used much like a password, a
passphrase simplifies the WEP encryption
process by automatically generating the WEP
encryption for Linksys products.
25
Page 33

Wireless-B Media Adapter
Chapter 6: Using the Media Navigator
Overview
This chapter explains how to use the Adapter via the Media Navigator. These are some sample tasks:
• Choose Music
• Play Music
• Choose Pictures
• Start a Slideshow
• Start a Slideshow with Music
After you have set up the Adapter and connected it to your TV and stereo, the main menu will appear (see Figure
6-1). It has three choices:
• Music
•Pictures
•Help
If you haven’t already done so, insert the included AAA batteries into the Remote Controller.
Figure 6-1: Main Menu Screen
To navigate the menus of the Media Navigator, use the directional arrows on the remote. Press the Select button
to make a selection. Press the Menu button to access the main menu at any time.
Note: If your host computer goes into Sleep mode, then you will not be able to use the Adapter. To
prevent Sleep mode:
1. Click the Start button and Control Panel.
2. If your PC is using the Classic interface, double-click Power Options. If your PC is using the
default interface, click Performance and Maintenance and then Power Options.
3. On the Power Schemes screen, select Never for the System standby and System hibernate
settings.
4. Click the OK button.
Music Menus
At any time, you can use the Music button on the remote to access the Music menu.
When you select the Music menu, you see three choices: Choose Music, Now Playing, and Options. See Figure 6-2.
Chapter 6: Using the Media Navigator
Overview
Figure 6-2: Music Screen
26
Page 34

Wireless-B Media Adapter
Choose Music
The Choose Music screen, shown in Figure 6-3, lets you select the music you want to play . Select music by artist
or genre. You can also select music by folder or playlist. Depending on your folders and files, you will see
additional screens offering the available choices. Press the Select button to make a selection.
Note: To organize the music by category, such as artist or genre, your music files must be tagged
with data. If you need to add or edit tags, use your media player software and refer to its
documentation.
All Songs
SelectAll Songs to play every song in your shared music folder (see Figure 6-4). This is useful if you have a small
collection of MP3 and WMA files or if you want to hear all the songs in your digital music library.
Artists or Genres
If you want to play all the songs by a certain artist or all the songs of a certain genre, such as jazz or classical,
select Artists (see Figure 6-5) or Genres. If you choose an artist, then you will be asked to choose a specific
album.
Playlists
To play certain songs in a specific sequence, choose a playlist. This screen displays the playlists that you have
placed in your computer’s shared music folder.
The Adapter can play lists with either of these two extensions, .M3U and .ASX.
After you create a playlist, place it in the shared music folder. See “Appendix D: Creating a Playlist” for more
information.
Folders
If you sort by Folder, you will see all the songs in a given folder. This is useful if you organize your music by
folders on your computer.
Figure 6-3: Choose Music Screen
Figure 6-4: All Songs Screen
Chapter 6: Using the Media Navigator
Music Menus
Figure 6-5: Choose Artists Screen
27
Page 35

Wireless-B Media Adapter
Now Playing
The Now Playing screen, shown in Figure 6-6, shows the title, artist, and album of the song that is currently
playing. You can switch songs using the Next or Back buttons on the remote.
Music Options
You can shuffle the playing order of selected songs and repeat the selections so that the music continues to play .
(See Figure 6-7.) These options are global. In other words, you set them once and they remain in effect until you
change the settings. Use the remote’s arrow buttons to scroll through the settings for these options.
Shuffle
Shuffle the songs that you select, whether it is a folder of music, a genre, an artist, or a playlist. This feature plays
the selected group of titles in a random sequence.
Note: If you select Shuffle, the list that appears on the TV does not change; however, the songs will
play in a random sequence.
Repeat
This option plays the selected songs repeatedly until you change the selection or until you stop the Adapter.
Back
Select Back to return to the previous screen.
How to Play Music
To play music:
1. Press the Music button on the remote, and select Choose Music.
Figure 6-6: Now Playing Screen
Figure 6-7: Music Options Screen
2. Use the arrow and Select buttons on the remote to navigate the All Songs, Artists, Playlists, Genres, or
Folders screens.
3. When you have found the song you want, press the Select button on the remote to start the music.
Chapter 6: Using the Media Navigator
Music Menus
28
Page 36

Wireless-B Media Adapter
4. Use the Play/Pause and Stop buttons on the remote to control music playback while you view the Now Playing
menu on the TV. Use the Next and Back buttons on the remote to move between songs.
Pictures Menu
At any time, you can use the Pictures button on the remote to access the Pictures menu.
When you select the Pictures menu, you have three choices: Choose Pictures, Now Showing, or Options. See
Figure 6-8.
Choose Pictures
The Choose Pictures screen lets you select the pictures to view (see Figure 6-9). You can select All Pictures,
which displays all the pictures in the shared picture folder. You can also sort pictures by their folder location on
the host computer. After you make your selection, the Now Showing screen will automatically appear.
All Pictures
Select All Pictures to show every picture in your shared picture folder. This is useful if you have a small
collection of images.
Folders
If you sort by Folder, you will see all the images in a given folder. This is useful if you organize your pictures by
folders on your computer.
Now Showing
The Now Showing screen, shown in Figure 6-10, displays thumbnail sketches of the selected pictures.
Play: slideshow
To start a slideshow, press the Play button on the remote. Use the Play/Pause, Stop, Next, and Back buttons on
the remote to control your slideshow.
Select: view picture
Figure 6-8: Pictures Screen
Figure 6-9: Choose Pictures Screen
To view a full-screen image, press the Select button when the picture you want is highlighted. While you are
looking at a full-screen image, use the Zoom buttons on the remote to view details of your pictur e or to zoom out.
Chapter 6: Using the Media Navigator
Pictures Menu
Figure 6-10: Now Showing Screen
29
Page 37

Wireless-B Media Adapter
Options: change settings
Press the Options button on your remote to change the slideshow settings, Shuffle Slideshow,Repeat Slideshow,
and Slide Duration.
Picture Options
You can shuffle the order of selected images, repeat the selections so that the slideshow continues until you stop
it, and change the length of time each slide appears during a slideshow. The directional arrows on the remote let
you scroll through the settings for these options. See Figure 6-11.
Shuffle Slideshow
This feature shows the selected pictures in a random sequence.
Note: If you select Shuffle, the list that appears on the TV does not change; however, the pictures will
display in a random sequence.
Repeat Slideshow
This option displays the selected pictures repeatedly until you change the selection or until you stop the
slideshow.
Figure 6-11: Picture Options Screen
Slide Duration
You can change how long a slide remains on-screen during a slideshow. The default value is 5 seconds. Choices
include 3, 5, 10, or 15 seconds.
Back
Select Back to return to the previous screen.
How to Start a Slideshow with Music
To start a slideshow with music:
1. Press the Music button on the remote, and select Choose Music.
Chapter 6: Using the Media Navigator
Pictures Menu
30
Page 38

Wireless-B Media Adapter
2. Use the arrow and Select buttons on the remote to navigate the All Songs, Artists, Playlists, Genres, or
Folders screens.
3. When you have found the song you want, press the Select button on the remote to start the music.
4. Press the Pictures button on the remote.
5. Select Choose Pictures.
6. From the Choose Pictures menu, select a folder to view or select All Pictures.
7. On the Now Showing screen, press the Play/Pause button on the remote to start the slideshow.
Help
For quick instructions on how to play your music files, start a slideshow, or use other features, select Help from
the main menu (see Figure 6-12).
To move through the Help screens (one is shown in Figure 6-13), use the arrow buttons on the remote. Press the
Menu button on the remote to return to the main menu.
Chapter 6: Using the Media Navigator
Help
Figure 6-12: Help Screen
Figure 6-13: Music Help Screen
31
Page 39

Wireless-B Media Adapter
Appendix A: Troubleshooting
This appendix provides solutions to problems that may occur during the installation and operation of the
Wireless-B Media Adapter. Read the description below to solve your problems. If you can't find an answer here,
check the Linksys website at www.linksys.com.
Common Problems and Solutions
1. I have the Adapter connected to my TV, but nothing appears on my TV.
Follow these instructions until your problem is solved:
• Check that the power cable is securely connected to both the electrical outlet and the Adapter.
• Press the Adapter’s Power button to turn it off and on.
• Make sure the video or S-video cable is securely connected to the TV and the Adapter.
• Make sure that the TV channel matches the video input you selected for the connection to the Adapter.
2. I see a start-up message on the TV, but the main menu of the Media Navigator does not appear.
Follow these instructions until your problem is solved:
• Power off the Adapter. Wait a few seconds, and then power on the Adapter.
• Make sure your network is working properly.
• If you are using a wireless connection, make sure the Adapter is within range of the wireless network.
Check the Signal Strength percentage shown at the bottom of the TV. It should say 40% or higher to
ensure successful communication. If the number is too low, consider moving your wireless access point
or router closer to the Adapter. If the Signal Strength percentage continuously displays as 0%, go to
“Problem #7: On the TV, the Signal Strength is 0%. What should I do?”
• If you are using a wired connection, use the TV setup to make sure the Adapter’s network settings are
correct. Refer to the “Using the TV Setup” section of “Chapter 5: Connecting the Wireless-B Media
Adapter to Your TV and Stereo.”
• Reboot your PC.
• Make sure the Adapter Utility’s icon appears in the system tray of your PC’s taskbar. If you do not see the
icon, go to “Problem #8: I don’t see the Utility’s icon in the system tray of my PC’s taskbar. What should I
do?”
3. On my TV, the Choose Music or Choose Pictures menus are empty.
On your host computer , go to the shared folders that you had selected using the Utility Wizard. Make sure they
contain compatible music files (MP3 or WMA) and/or image files (JPG, BMP, GIF, or TIF).
4. The music was running, but then it stopped playing.
Follow these instructions until your problem is solved:
Appendix A: Troubleshooting
Common Problems and Solutions
32
Page 40

Wireless-B Media Adapter
• Press the Music button on the remote. Select the songs you want to play, and press the Play button on
the remote.
• Restart the Adapter.
• Restart the host computer.
• Check the cable connections between the Adapter and the stereo or TV.
• If you are using a wired configuration, check the other cable connections to make sure that both ends are
securely plugged in.
• If you are using a wireless configuration, check the wireless adapter in the host computer.
• Make sure the network is operating properly.
5. The picture won’t change on the TV.
Follow these instructions until your problem is solved:
• Press the Pictures button on the remote. Select the pictures you want to show. Press the Play button to
start the slideshow.
• Restart the Adapter.
• Restart the host computer.
• Check the cable connections between the Adapter and the stereo or TV.
• If you are using a wired configuration, check the other cable connections to make sure that both ends are
securely plugged in.
• If you are using a wireless configuration, check the wireless adapter in the host computer.
• Make sure the network is operating properly.
6. When I pause a song, I cannot move to a different song. What should I do?
If you pause a song, you cannot move to either the previous or ne xt selection. You must press the Play button
first before making another selection.
7. On the TV, the Signal Strength is 0%. What should I do?
(This applies only to wireless usage of the Adapter.)
Follow these instructions until your problem is solved:
• Restart the Adapter. If Signal Strength is still 0%, then do the following:
1. Restart the Adapter.
2. When the message, “Please Wait,” is displayed on your TV , press the Setup button on the remote. The
Media Adapter Setup screen will appear.
3. Make sure the Adapter’s settings match your network’s settings. For more information, refer to the
“Using the TV Setup” section of “Chapter 5: Connecting the Wireless-B Media Adapter to Your TV and
Stereo.”
4. When done, save these settings and restart the Adapter.
• If Signal Strength is still 0%, then follow these instructions:
1. To make sure your wireless network is working, use a different wireless-equipped device to access
your wireless network.
Appendix A: Troubleshooting
Common Problems and Solutions
33
Page 41

Wireless-B Media Adapter
2. If you are using a wireless access point or router to create an infrastructure network, restart it now.
If you are using wireless-equipped computers to create an ad-hoc network, restart them now.
3. Restart the Adapter.
8. I don’t see the Adapter Utility’s icon in the system tray of my PC’s taskbar. What should I do?
Follow these instructions until your problem is solved:
• The icon may be hidden. Click the arrow button of the system tray to expand it.
• If you still do not see the icon, follow these instructions:
1. Click the Start button.
2. Click All Programs and Linksys Wireless-B Media Adapter.
3. Click Adapter Utility to restart the Utility. The Utility’s icon will appear in the system tray.
• If the icon does not appear or you see an error message, do the following:
1. Click the Start button.
2. Click All Programs and Linksys Wireless-B Media Adapter.
3. Click Uninstall to remove the Utility from your PC.
4. Restart the PC.
5. Insert the Setup CD-ROM into your PC’s CD-ROM drive.
6. The Setup Wizard will automatically run. On the Welcome screen, click the Install Utility on PC
button.
7. Follow the on-screen instructions to re-install the Utility. After the Utility has been re-installed, the
Utility’s icon will appear in the system tray.
9. I wait several seconds before the music begins playing or pictures appear. How can I shorten the
wait?
Maximize your host PC’s performance. Follow these instructions until your problem is solved:
• Exit all of your PC’s applications except for the Adapter’s Utility.
• For the Adapter, minimum requirements specify a processor that is 600MHz or faster. If your PC’s
processor is slower than 600MHz, you can upgrade it for better performance.
Frequently Asked Questions
What types of picture files can I show with the Adapter?
The Adapter supports picture files with the following file extensions: BMP, GIF, JPG, JPEG, and TIF. All of these file
types are converted to JPG format when they appear on your TV, so some data loss may occur. This may affect
image quality, so the image quality you see on your TV might not be as good as the image quality you see on
your PC.
What types of music files can I play with the Adapter?
The Adapter supports MP3 and most WMA files. WMA files with Windows Media Digital Rights Management
(DRM) protection are not supported.
Appendix A: Troubleshooting
Frequently Asked Questions
34
Page 42

Wireless-B Media Adapter
What types of playlist files can I use with the Adapter?
The Adapter supports ASX and M3U files. You can create a playlist with one of these extensions using software
such as Music Match, Winamp, or Windows Media Player. For more information, see “Appendix D: Creating a
Playlist.”
I have multiple user accounts on my host computer. Can files from each user appear on the TV when I
use the Adapter?
Yes. Add the media folders for each user to the shared folders list when you run the Utility Wizard or use the
Utility on your host computer. See “Chapter 4: Setting up the Wireless-B Media Adapter Utility.”
Can I play or show files from all the computers on the network using the Adapter?
No. You must move the files to the host computer so that the Adapter’s Utility can access them.
Can I use a firewall in my configuration?
You might find that the host computer and the Adapter cannot communicate through a firewall. If you are using a
Windows XP computer that is running the Windows XP firewall, please disable the firewall before you install the
Adapter . If you use a thir d-party firewall on your home network that is located between the host computer and the
Adapter , then you must either disable it or configure it to accept the Adapter before installation. You might want to
install a hardware firewall to protect your home network from Internet intruders before you install the Adapter.
What happens when I set up shared media folders with lots of data to share?
Sharing a large shared media folder may take some time, depending on the speed of the host computer. You can
access whatever media that is already shared while you wait.
Why are the songs playing in a different order than what I see on the TV menu?
If you select the Shuffle option for a playlist, the Adapter shuffles the songs as it plays them. However, the playlist
that appears on the TV menu does not reflect the shuffle. Instead, it continues to show the original playlist order.
What happens if the connection between the Adapter and the host computer is lost?
If the connection is completely lost, then the pictures stop appearing or the music stops after the 20-second
buffer runs out.
The main menu will appear again when the connection is restored. If it does not, power the Adapter off and back
on again.
What happens if my playlist is extremely long?
If you select more than 1,000 songs to play, it will take a few seconds for the first song to start playing.
Appendix A: Troubleshooting
Frequently Asked Questions
35
Page 43

Wireless-B Media Adapter
Can I play music from a CD using the Adapter?
Yes, if the CD contains MP3 or WMA files. You cannot play standard audio CDs through the Adapter.
What is the best image file type to use for quick performance?
Using the JPG file type will give you the quickest playback.
What is the IEEE 802.11b standard?
It is one of the IEEE standards for wireless networks. The 802.11b standard allows wireless networking hardware
from different manufacturers to communicate, provided that the hardware complies with the 802.11b standard.
The 802.11b standard states a maximum data transfer rate of 11Mbps and an operating frequency of 2.4GHz.
What is ad-hoc mode?
When a wireless network is set to ad-hoc mode, the wireless-equipped computers are configured to
communicate directly with each other. The ad-hoc wireless network will not communicate with any wired
network.
What is infrastructure mode?
When a wireless network is set to infrastructure mode, the wireless network is configured to communicate with a
wired network through a wireless access point or router.
Appendix A: Troubleshooting
Frequently Asked Questions
36
Page 44
Wireless-B Media Adapter
Appendix B: Wireless Security
A Brief Overview
Whenever data—in the form of files, emails, or messages—is transmitted over your wireless network, it is open
to attacks. Wireless networking is inherently risky because it broadcasts information on radio waves. Just like
signals from your cellular or cordless phone can be intercepted, signals from your wireless network can also be
compromised. What are the risks inherent in wireless networking? Read on.
What Are The Risks?
Computer network hacking is nothing new. With the advent of wireless networking, hackers use methods both
old and new to do everything from stealing your bandwidth to stealing your data. There are many ways this is
done, some simple, some complex. As a wireless user, you should be aware of the many ways they do this.
Every time a wireless transmission is broadcast, signals are sent out from your wireless PC or access point, but
not always directly to its destination. The receiving PC or access point can hear the signal because it is within
that radius. Just as with a cordless phone, cellular phone, or any kind of radio device, anyone else within that
radius, who has their device set to the same channel or bandwidth can also receive those transmission.
Wireless networks are easy to find. Hackers know that, in order to join a wireless network, your wireless PC will
typically first listen for “beacon messages”. These are identifying packets transmitted from the wireless network
to announce its presence to wireless nodes looking to connect. These beacon frames are decrypted and contain
much of the network’s information, such as the network’s SSID (Service Set Identifier) and the IP address of the
network PC or access point. The SSID is analogous to the network's name. With this information broadcast to
anyone within range, hackers are often provided with just the information they need to access that network.
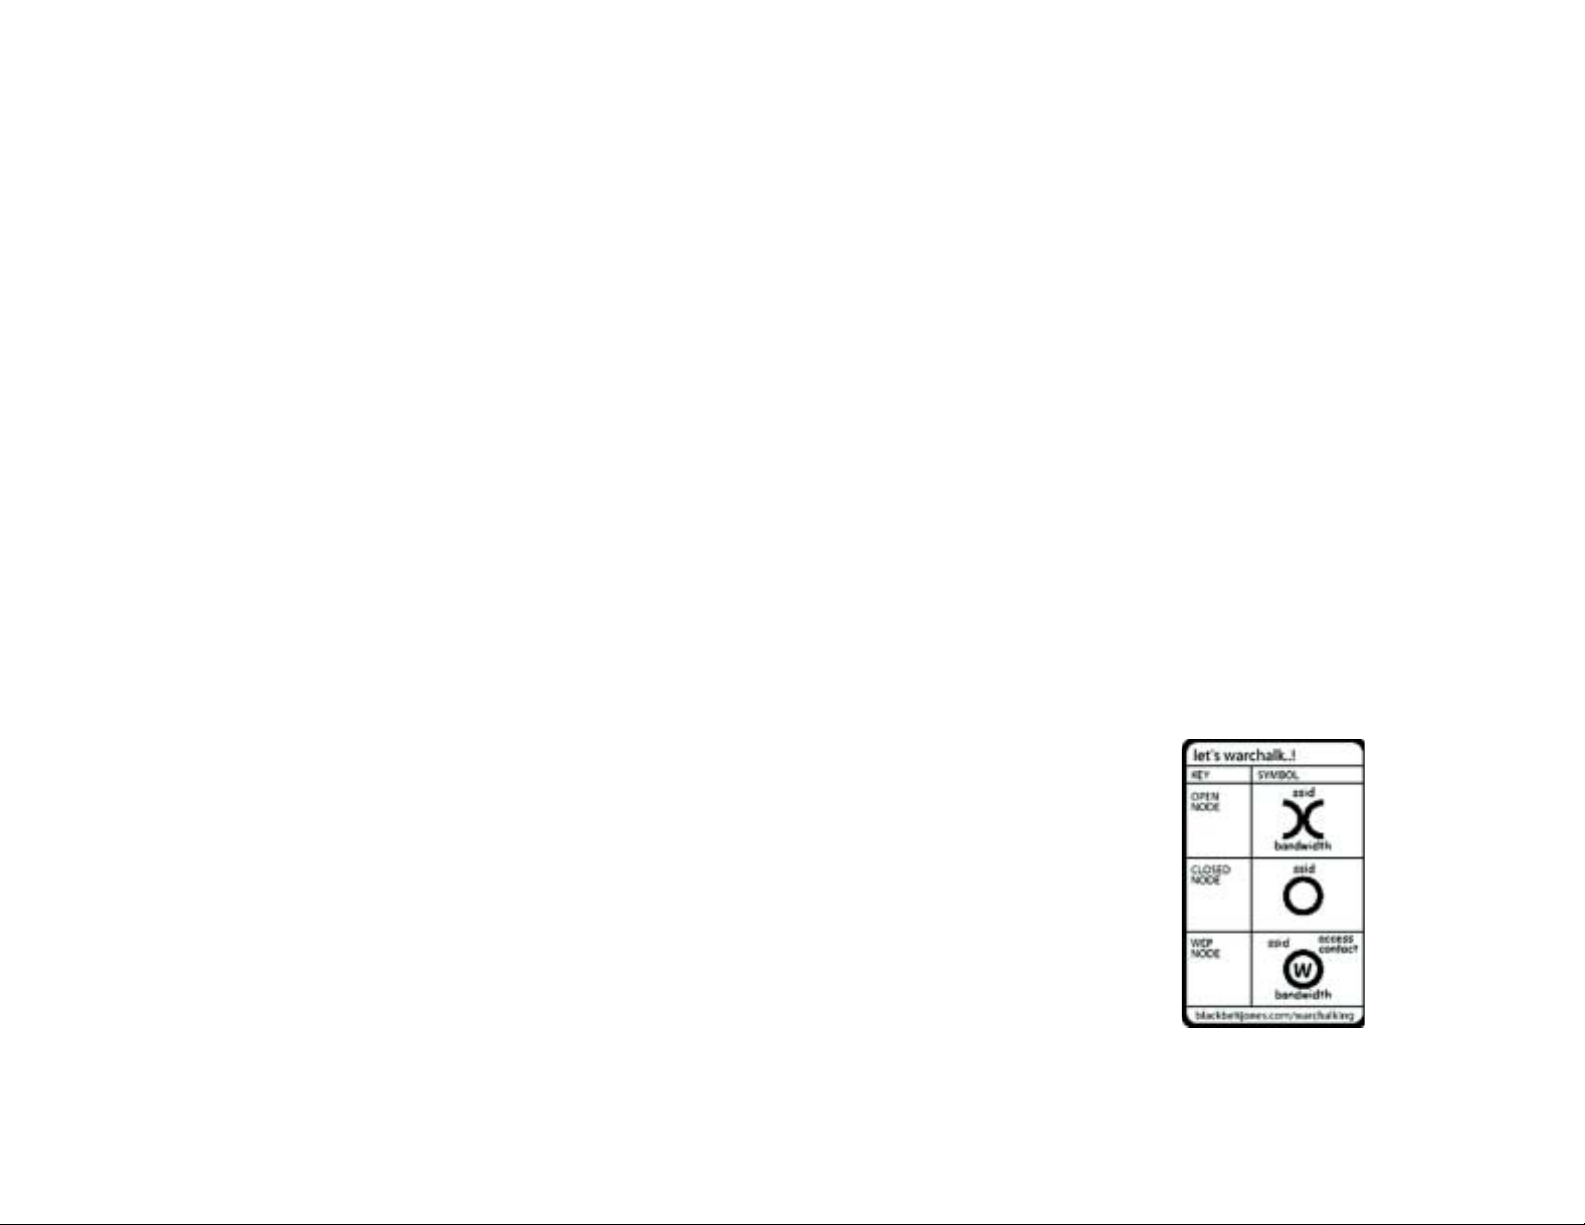
One result of this, seen in many large cities and business districts, is called “Warchalking”. This is the term used
for hackers looking to access free bandwidth and free Internet access through your wireless network. The marks
they chalk into the city streets are well documented in the Internet and communicate exactly where available
wireless bandwidth is located for the taking.
Even keeping your network settings, such as the SSID and the channel, secret won’t prevent a hacker from
listening for those beacon messages and stealing that information. This is why most experts in wireless
networking strongly recommend the use of WEP (Wireless Equivalent Privacy). WEP encryption scrambles your
wireless signals so they can only be recognized within your wireless network.
Appendix B: Wireless Security
A Brief Overview
Figure B-1: Warchalking
37
Page 45

Wireless-B Media Adapter
But even WEP has its problems. WEP’s encryption algorithm is referred to as “simple”, which also means
“weak”, because the technology that scrambles the wireless signal isn’t too hard to crack for a persistent
hacker.
There are five common ways that hackers can break into your network and steal your bandwidth as well as your
data. The five attacks are popularly known as:
1. Passive Attacks
2. Jamming Attacks
3. Active Attacks
4. Dictionary-building or Table Attacks
5. M an-in-the-Middle Attacks
Passive Attacks
There's no way to detect a passive attack because the hacker is not breaking into your network. He is simply
listening (eavesdropping, if you will) to the information your network broadcasts. There are applications easily
available on the Internet that can allow a person to listen into your wireless network and the information it
broadcasts. Information such as MAC addresses, IP addresses, usernames, passwords, instant message
conversations, emails, account information, and any data transmitted wirelessly, can easily be seen by someone
outside of your network because it is often broadcast in clear text. Simply put, any information transmitted on a
wireless network leaves both the network and individual users vulnerable to attack. All a hacker needs is a
“packet sniffer”, software available on the Internet, along with other freeware or shareware hacking utilities
available on the Internet, to acquire your WEP keys and other network information to defeat security.
Jamming Attacks
Jamming Attacks, when a powerful signal is sent directly into your wireless network, can effectively shut down
your wireless network. This type of attack is not always intentional and can often come about simply due to the
technology. This is especially possible in the 2.4 GHz frequency, where phones, baby monitors, and microwave
ovens can create a great deal of interference and jam transmissions on your wireless network. One way to
resolve this is by moving your wireless devices into the 5 GHz frequency, which is dedicated solely to information
transmissions.
Appendix B: Wireless Security
What Are The Risks?
38
Page 46

Wireless-B Media Adapter
Active Attacks
Hackers use Active Attacks for three purposes: 1) stealing data, 2) using your network, and 3) modifying your
network so it's easier to hack in the next time.
In an Active Attack, the hacker has gained access to all of your network settings (SSID, WEP keys, etc.) and is in
your network. Once in your wireless network, the hacker has access to all open resources and transmitted data
on the network. In addition, if the wireless network’s access point is connected to a switch, the hacker will also
have access to data in the wired network.
Further, spammers can use your Internet connection and your ISP’s mail server to send tens of thousands of emails from your network without your knowledge.
Lastly, the hacker could make hacking into your network even easier by changing or removing safeguards such
as MAC address filters and WEP encryption. He can even steal passwords and user names for the next time he
wants to hack in.
Dictionary-Building or Table Attacks
Dictionary-building, or Table attacks, is a method of gaining network settings (SSID, WEP keys, etc.) by analyzing
about a day's worth of network traffic, mostly in the case of business networks. Over time, the hacker can build
up a table of network data and be able to decrypt all of your wireless transmissions. This type of attack is more
effective with networks that transmit more data, such as businesses.
Man-in-the-Middle Attacks
A hacker doesn’t need to log into your network as a user—he can appear as one of the network’s own access
points, setting himself up as the man-in-the-middle. To do this, the hacker simply needs to rig an access point
with your network’s settings and send out a stronger signal that your access point. In this way, some of your
network's PCs may associate with this rogue access point, not knowing the difference, and may begin sending
data through it and to this hacker.
The trade-off for the convenience and flexibility wireless networking provides is the possibility of being hacked
into through one of the methods described here. With wireless networks, even with WEP encryption, open to the
persistent hacker, how can you protect your data? The following section will tell you how to do just that.
Maximizing Wireless Security
Security experts will all tell you the same thing: Nothing is guaranteed. No technology is secure by itself. An
unfortunate axiom is that building the better mousetrap can often create a better mouse. This is why, in the
Appendix B: Wireless Security
What Are The Risks?
39
Page 47

Wireless-B Media Adapter
examples below, your implementation and administration of network security measures is the key to maximizing
wireless security .
No preventative measure will guarantee network security but it will make it more difficult for someone to hack
into your network. Often, hackers are looking for an easy target. Making your network less attractive to hackers,
by making it harder for them to get in, will make them look elsewhere.
How do you do this? Before discussing WEP, let’s look at a few security measures often overlooked.
1) Network Content
Now that you know the risks assumed when networking wirelessly, you should view wireless networks as you
would the Internet. Don’t host any systems or provide access to data on a wireless network that you wouldn't put
on the Internet.
2) Network Layout
When you first lay out your network, keep in mind where your wireless PCs are going to be located and try to
position your access point(s) towards the center of that network radius. Remember that access points transmit
indiscriminately in a radius; placing an access point at the edge of the physical network area reduces network
performance and leaves an opening for any hacker smart enough to discover where the access point is
transmitting.
This is an invitation for a man-in-the-middle attack, as described in the previous section. To perform this type of
attack, the hacker has to be physically close to your network. So , monitoring both your network and your property
is important. Furthermore, if you are suspicious of unauthorized network traffic, most wireless products come
with a log function, with which you can view activity on your network and verify if any unauthorized users have
had access.
3) Network Devices
With every wireless networking device you use, keep in mind that network settings (SSID, WEP keys, etc.) are
stored in its firmware. If they get into the hands of a hacker, so do all of your settings. So keep an eye on them.
4) Administrator passwords
Your network administrator is the only person who can change network settings. If a hacker gets a hold of the
administrator's password, he, too, can change those settings. So, make it harder for a hacker to get that
information. Change the administrator's password regularly.
Appendix B: Wireless Security
What Are The Risks?
40
Page 48

Wireless-B Media Adapter
5) SSID
There are a few things you can do to make your SSID more secure:
a.Disable Broadcast
b.Make it unique
c.Change it often
Most wireless networking devices will give you the option of broadcasting the SSID. This is a option for
convenience, allowing anyone to log into your wireless network. In this case, however, anyone includes hackers.
So don't broadcast the SSID.
A default SSID is set on your wireless devices by the factory. (The Linksys default SSID is “linksys”.) Hackers
know these defaults and can check these against your network. Change your SSID to something unique and not
something related to your company or the networking products you use.
Changing your SSID regularly will force any hacker attempting to gain access to your wireless network to start
looking for that new SSID.
With these three steps in mind, please remember that while SSIDs are good for segmenting networks, they fall
short with regards to security. Hackers can usually find them quite easily.
6) MAC addresses
Enable MAC address filtering if your wireless products allow it. MAC address filtering will allow you to provide
access to only those wireless nodes with certain MAC addresses. This makes it harder for a hacker using a
random MAC address or spoofing (faking) a MAC address.
7) Firewalls
Once a hacker has broken into your wireless network, if it is connected to your wired network, they’ll have
access to that, too. This means that the hacker has effectively used your wireless network as a backdoor through
your firewall, which you've put in place to protect your network from just this kind of attack via the Internet.
You can use the same firewall technology to protect your wired network from hackers coming in through your
wireless network as you did for the Internet. Rather than connecting your access point to an unprotected switch,
swap those out for a router with a built-in firewall. The router will show the access point coming in through its
Internet port and its firewall will protect your network from any transmissions entering via your wireless network.
Appendix B: Wireless Security
What Are The Risks?
41
Page 49

Wireless-B Media Adapter
PCs unprotected by a firewall router should at least run firewall software, and all PCs should run up-to-date
antiviral software.
8) WEP
Wired Equivalent Privacy (WEP) is often looked upon as a panacea for wireless security concerns. This is
overstating WEP's ability. Again, this can only provide enough security to make a hacker’s job more difficult.
WEP encryption implementation was not put in place with the 802.11 standard. This means that there are about
as many methods of WEP encryption as there are providers of wireless networking products. In addition, WEP is
not completely secure. One piece of information still not encrypted is the MAC address, which hackers can use to
break into a network by spoofing (or faking) the MAC address.
Programs exist on the Internet that are designed to defeat WEP. The best known of these is AirSnort. In about a
day, AirSnort can analyze enough of the wireless transmissions to crack the WEP key. Just like a dictionarybuilding attack, the best prevention for these types of programs is by not using static settings, periodically
changing WEP keys, SSID, etc.
There are several ways that WEP can be maximized:
a) Use the highest level of encryption possible
b) Use multiple WEP keys
c) Change your WEP key regularly
Current encryption technology offers 64-bit and 128-bit WEP encryption. If you are using 64-bit WEP, swap out
your old wireless units for 128-bit encryption right away. Where encryption is concerned, the bigger and more
complex, the better. A WEP key is a string of hexadecimal characters that your wireless network uses in two
ways. First, nodes in your wireless network are identified with a common WEP key. Second, these WEP keys
encrypt and decrypt data sent over your wireless network. So, a higher level of security ensures that hackers will
have a harder time breaking into your network.
Setting one, static WEP key on your wireless network leaves your network open the threats even as you think it is
protecting you. While it is true that using a WEP key increases wireless security, you can increase it further by
using multiple WEP keys.
Keep in mind that WEP keys are stored in the firmware of wireless cards and access points and can be used to
hack into the network if a card or access point falls into the wrong hands. Also, should someone hack into your
network, there would be nothing preventing someone access to the entire network, using just one static key.
Appendix B: Wireless Security
What Are The Risks?
42
Page 50

Wireless-B Media Adapter
The solution, then, is to segment your network up into multiple groups. If your network had 80 users and you
used four WEP keys, a hacker would have access to only ¼ of your wireless network resources. In this way,
multiple keys reduce your liability.
Finally , be sure to change your WEP key regularly, once a week or once a day. Using a “dynamic” WEP key , r ather
than one that is static, makes it even harder for a hacker to break into your network and steal your resources.
WEP Encryption
To enable WEP encryption for the Adapter, use the Setup Wizard. Refer to “Chapter 4: Setting up the Wireless-B
Media Adapter.”
Important: Always remember that each
device in your wireless network MUST use
the same WEP encryption method and
encryption key or your wireless network will
not function properly.
Appendix B: Wireless Security
What Are The Risks?
43
Page 51

Wireless-B Media Adapter
Appendix C: Planning Your Use of the Wireless-B Media
Ada pte r
Overview
Before you set up the Adapter, you need to decide how your Windows 2000 or XP computer will send digital
music or pictures to the Adapter; you have a choice of a wireless or wired connection. This information is
necessary for the proper setup and configuration of the Adapter.
Note: The Adapter is designed to work only with Windows 2000 or XP computers.
Using the Adapter as Part of Your Wireless Network
If your wireless-equipped, Windows 2000 or XP computer connects directly to the Adapter, or it connects via an
access point or wireless router (see Figure C-1), then the Adapter is part of your wireless network. If any part of
the connection to the Adapter is wireless, then the overall connection will be considered wireless. The computer
that sends the Adapter pictures and music is also referred to as the host computer. You must install the Adapter
Utility on this computer.
Using the Adapter as Part of Your Wired Network
If your wired Windows 2000 or XP computer connects directly to the Adapter, or it connects via a wired router or
switch (see Figure C-2), then the Adapter is part of your wired network. Within a wired network, the devices are
connected with Ethernet network cables. The computer that sends the Adapter pictures and music is also
referred to as the host computer. You must install the Adapter Utility on this computer.
Windows 2000
or XP Computer
Figure C-1: Example of a Wireless Network
Wireless Access
Point or Router
(optional)
Wireless-B Media
Adapter
Appendix C: Planning Your Use of the Wireless-B Media Adapter
Overview
Windows 2000
or XP Computer
Figure C-2: Example of a Wired Network
Router or Switch
(optional)
Wireless-B Media
Adapter
44
Page 52

Wireless-B Media Adapter
Appendix D: Creating a Playlist
A playlist tells the Adapter to play your music files in a specific sequence. You can use a playlist with either of
these file extensions, .M3U and .ASX. You can use any software that exports a playlist with one of these two
extensions. For example, Windows Media Player is included with Windows 2000 and XP. (If you are using
Windows 2000, Linksys recommends that you use Windows Media Player version 7 or higher.)
Note: Before you create a playlist, make sure the songs you want are in a shared media folder that
the Adapter can access.
Follow these instructions to create a playlist in Windows Media Player version 7 or higher:
1. Open Windows Media Player on the host computer.
2. Click Media Library.
3. Click New Playlist.
4. Enter a name for the Playlist, and click the OK button. The new Playlist appears on the left.
5. Select the songs you want, and drag them to the Playlist’s name on the left.
6. Drag and drop the songs to arrange them in the order you want them to play.
Note: After you have created your playlist, export it to a file so you can save the Playlist file to a
shared media folder that the Adapter can access.
Follow these instructions to export a playlist to a file in Windows Media Player version 7 or higher:
1. Select Playlist.
2. Click File and then Export Playlist to File.
3. En ter a file name, and click Save.
4. Place the Playlist file in a shared folder.
Appendix D: Creating a Playlist
45
Page 53

Wireless-B Media Adapter
Appendix E: Setting a Static IP Address on Your PC
If you need to set a static IP address on your Windows 2000 or XP computer, refer to Windows Help, or follow
these instructions:
1. If your computer uses the Windows XP default interface, then click the Start button. Click Connect To and
then Show all connections. See Figure E-1.
If your computer uses the Windows XP Classic interface, then click the Start button. Click Settings and then
Network Connections. See Figure E-2.
If your computer uses Windows 2000, then click the Start button. Click Settings and then Network and
Dial-up Connections.
2. Right-click the network connection you are using to communicate with the Ada pter. Then click Properties.
See Figure E-3.
Figure E-1: XP Default Interface
Figure E-2: XP Classic Interface
Figure E-3: Network Connection
Appendix E: Setting a Static IP Address on Your PC
46
Page 54

Wireless-B Media Adapter
3. On the General tab, select Internet Protocol (TCP/IP). Then click the Properties button. See Figure E-4.
4. Click the radio button next to Use the following IP address. Complete the IP address and Subnet mask fields
with the appropriate information. Then click the OK button. See Figure E-5.
Figure E-4: Internet Protocol (TCP/IP)
5. Click the OK button again to exit.
Appendix E: Setting a Static IP Address on Your PC
Figure E-5: IP Address
47
Page 55

Wireless-B Media Adapter
Appendix F: Windows Help
All wireless products require Microsoft Windows. Windows is the most used operating system in the world and
comes with many features that help make networking easier. These features can be accessed through Windows
Help and are described in this appendix.
TCP/IP
Before a computer can communicate with an access point or router, TCP/IP must be enabled. TCP/IP is a set of
instructions, or protocol, all PCs follow to communicate over a network. This is true for wireless networks as well.
Your PCs will not be able to utilize wireless networking without having TCP/IP enabled. Windows Help provides
complete instructions on enabling TCP/IP.
Shared Resources
If you wish to share printers, folders, or files over your network, Windows Help provides complete instructions on
using shared resources.
Network Neighborhood/My Network Places
Other PCs on your network will appear under Network Neighborhood or My Network Places (depending upon the
version of Windows you’re running). Windows Help provides complete instructions on adding PCs to your
network.
Appendix F: Windows Help
48
Page 56

Wireless-B Media Adapter
Appendix G: Glos sar y
802.11a - An IEEE wireless networking standard that specifies a maximum data transfer rate of 54Mbps and an
operating frequency of 5GHz.
802.11b - An IEEE wireless networking standard that specifies a maximum data transfer rate of 11Mbps and an
operating frequency of 2.4GHz.
802.11g - An IEEE wireless networking standard that specifies a maximum data transfer rate of 54Mbps, an
operating frequency of 2.4GHz, and backward compatibility with 802.11b devices.
Access Point - Device that allows wireless-equipped computers and other devices to communicate with a wired
network. Also used to expand the range of a wireless network.
Adapter - This is a device that adds network functionality to your PC.
Ad-hoc - A group of wireless devices communicating directly with each other (peer-to-peer) without the use of
an access point.
Backbone - The part of a network that connects most of the systems and networks together, and handles the
most data.
Bandwidth - The transmission capacity of a given device or network.
Beacon Interval - The frequency interval of the beacon, which is a packet broadcast by a router to synchronize a
wireless network.
Bit - A binary digit.
Boot - To start a device and cause it to start executing instructions.
Bridge - A device that connects two different kinds of local networks, such as a wireless network to a wired
Ethernet network.
Broadband - An always-on, fast Internet connection.
Browser - A browser is an application program that provides a way to look at and interact with all the
information on the World Wide Web.
Appendix G: Glossary
49
Page 57

Wireless-B Media Adapter
Buffer - A block of memory that temporarily holds data to be worked on later when a device is currently too busy
to accept the data.
Cable Modem - A device that connects a computer to the cable television network, which in turn connects to the
Internet.
CSMA/CA (Carrier Sense Multiple Access/Collision Avoidance) - A method of data transfer that is used to prevent
data loss in a network.
CTS (Clear To Send) - A signal sent by a device to indicate that it is ready to receive data.
Daisy Chain - A method used to connect devices in a series, one after the other.
Database - A collection of data that is organized so that its contents can easily be accessed, managed, and
updated.
DDNS (Dynamic Domain Name System) - The capability of having a website, FTP, or e-mail server-with a
dynamic IP address-use a fixed domain name.
Default Gateway - A device that forwards Internet traffic from your local area network.
DHCP (Dynamic Host Configuration Protocol) - A protocol that lets one device on a local network, known as a
DHCP server, assign temporary IP addresses to the other network devices, typically computers.
DMZ (Demilitarized Zone) - Removes the Router's firewall protection from one PC, allowing it to be “seen” from
the Internet.
DNS (Domain Name Server) - The IP address of your ISP's server, which translates the names of websites into IP
addresses.
Domain - A specific name for a network of computers.
Download - To receive a file transmitted over a network.
DSL (Digital Subscriber Line) - An always-on broadband connection over traditional phone lines.
DSSS (Direct-Sequence Spread-Spectrum) - A type of radio transmission technology that includes a redundant
bit pattern to lessen the probability of data lost during transmission. Used in 802.11b networking.
DTIM (Delivery Traffic Indication Message) - A message included in data packets that can increase wireless
efficiency.
Appendix G: Glossary
50
Page 58

Wireless-B Media Adapter
Dynamic IP Address - A temporary IP address assigned by a DHCP server.
Encryption - Encoding data to prevent it from being read by unauthorized people.
Ethernet - An IEEE standard network protocol that specifies how data is placed on and retrieved from a common
transmission medium.
Finger - A program that tells you the name associated with an e-mail address.
Firewall - Security measures that protect the resources of a local network from intruders.
Firmware - 1. In network devices, the programming that runs the device. 2. Programming loaded into read-only
memory (ROM) or programmable read-only memory (PROM) that cannot be altered by end-users.
Fragmentation - Breaking a packet into smaller units when transmitting over a network medium that cannot
support the original size of the packet.
FTP (File T ransfer Protocol) - A standard protocol for sending files between computers over a TCP/IP network and
the Internet.
Full Duplex - The ability of a networking device to receive and transmit data simultaneously.
Gateway - A system that interconnects networks.
Half Duplex - Data transmission that can occur in two directions over a single line, but only one direction at a
time.
Hardware - The physical aspect of computers, telecommunications, and other information technology devices.
HTTP (HyperText Transport Protocol) - The communications protocol used to connect to servers on the World
Wide Web.
IEEE (The Institute of Electrical and Electronics Engineers) - An independent institute that develops networking
standards.
Infrastructure - Currently installed computing and networking equipment.
Infrastructure Mode - Configuration in which a wireless network is bridged to a wired network via an access
point.
IP (Internet Protocol) - A protocol used to send data over a network.
IP Address - The address used to identify a computer or device on a network.
Appendix G: Glossary
51
Page 59

Wireless-B Media Adapter
IPCONFIG - A Windows 2000 and XP utility that displays the IP address for a particular networking device.
IPSec (Internet Protocol Security) - A VPN protocol used to implement secure exchange of packets at the IP layer.
ISM band - Radio band used in wireless networking transmissions.
ISP (Internet Service Provider) - A company that provides access to the Internet.
LAN (Local Area Network) - The computers and networking products that make up the network in your home or
office.
MAC (Media Access Control) Address - The unique address that a manufacturer assigns to each networking
device.
Mbps (Megabits Per Second) - One million bits per second; a unit of measurement for data transmission.
Multicasting - Sending data to a group of destinations at once.
NAT (Network Address Translation) - NAT technology translates IP addresses of a local area network to a
different IP address for the Internet.
Network - A series of computers or devices connected for the purpose of data sharing, storage, and/or
transmission between users.
NNTP (Network News Transfer Protocol) - The protocol used to connect to Usenet groups on the Internet.
Node - A network junction or connection point, typically a computer or work station.
OFDM (Orthogonal Frequency Division Multiplexing) - A type of modulation technology that separates the data
stream into a number of lower-speed data streams, which are then transmitted in parallel. Used in 802.11a,
802.11g, and powerline networking.
Packet - A unit of data sent over a network.
Passphrase - Used much like a passwor d, a passphrase simplifies the WEP encryption process by automatically
generating the WEP encryption keys for Linksys products.
Ping (Packet INternet Groper) - An Internet utility used to determine whether a particular IP address is online.
POP3 (Post Office Protocol 3) - A standard protocol used to retrieve e-mail stored on a mail server.
Port - 1. The connection point on a computer or networking device used for plugging in a cable or an adapter. 2.
The virtual connection point through which a computer uses a specific application on a server.
Appendix G: Glossary
52
Page 60

Wireless-B Media Adapter
PPPoE (Point to Point Protocol over Ethernet) - A type of broadband connection that provides authentication
(username and password) in addition to data transport.
PPTP (Point-to-Point Tunneling Protocol) - A VPN protocol that allows the Point to Point Protocol (PPP) to be
tunneled through an IP network. This protocol is also used as a type of broadband connection in Europe.
Preamble - Part of the wireless signal that synchronizes network traffic.
RJ-45 (Registered Jack-45) - An Ethernet connector that holds up to eight wires.
Roaming - The ability to take a wireless device from one access point’s range to another without losing the
connection.
Router - A networking device that connects multiple networks together, such as a local network and the Internet.
RTS (Request To Send) - A packet sent when a computer has data to transmit. The computer will wait for a CTS
(Clear To Send) message before sending data.
Server - Any computer whose function in a network is to provide user access to files, printing, communications,
and other services.
SMTP (Simple Mail Transfer Protocol) - The standard e-mail protocol on the Internet.
SNMP (Simple Network Management Protocol) - A widely used network monitoring and control protocol.
Software - Instructions for the computer. A series of instructions that performs a particular task is called a
“program”.
Spread Spectrum - Wideband radio frequency technique used for more reliable and secure data transmission.
SSID (Service Set IDentifier) - Your wireless network’s name.
Static IP Address - A fixed address assigned to a computer or device that is connected to a network.
Static Routing - Forwarding data in a network via a fixed path.
Subnet Mask - An address code that determines the size of the network.
Switch - 1. Device that is the central point of connection for computers and other devices in a network, so data
can be shared at full transmission speeds. 2. A device for making, breaking, or changing the connections in an
electrical circuit.
Appendix G: Glossary
53
Page 61

Wireless-B Media Adapter
TCP/IP (Transmission Control Protocol/Internet Protocol) - A network protocol for transmitting data that requires
acknowledgement from the recipient of data sent.
Telnet - A user command and TCP/IP protocol used for accessing remote PCs.
TFTP (Trivial File Transfer Protocol) - A version of the TCP/IP FTP protocol that uses UDP and has no directory or
password capability.
Throughput - The amount of data moved successfully from one node to another in a given time period.
Topology - The physical layout of a network.
TX Rate - Transmission Rate.
UDP (User Datagram Protocol) - A network protocol for transmitting data that does not require acknowledgement
from the recipient of the data that is sent.
Upgrade - To replace existing software or firmware with a newer version.
Upload - To transmit a file over a network.
URL (Uniform Resource Locator) - The address of a file located on the Internet.
VPN (Virtual Private Network) - A security measure to protect data as it leaves one network and goes to another
over the Internet.
WAN (Wide Area Network) - The Internet.
WEP (Wired Equivalent Privacy) - A method of encrypting data transmitted on a wireless network for greater
security.
WINIPCFG - A Windows 98 and Millennium utility that displays the IP address for a particular networking device.
WLAN (Wireless Local Area Network) - A group of computers and associated devices that communicate with
each other wirelessly.
Appendix G: Glossary
54
Page 62

Wireless-B Media Adapter
Appendix H: Specif ications
Standards IEEE 802.11b, IEEE 802.3, IEEE 802.3u
Ports 1 10/100 RJ-45 Port, Power Port, S-Video Output,
Composite Video Output, RCA Audio Output
Buttons Power, Uplink
Channels 11 Channels (US, Canada)
13 Channels (Europe)
14 Channels (Japan)
LEDs Ready, Wireless, Ethernet
Transmitted Power 16 dBm
Receive Sensitivity -82 dBm @ 11Mbps
(typical) -85 dBm @ 5.5Mbps
-89 dBm @ 2Mbps
-91 dBm @ 1Mbps
Peak Gain of the 1.5 dBi
Antenna
Security Features WEP Encryption
WEP Key Bits 64, 128-bit
Dimensions 6.30" x 7.48" x 1.97"
(W x H x D) (160 mm x 190 mm x 50 mm)
Unit Weight 13.05 oz. (0.37 kg)
Appendix H: Specifications
55
Page 63

Wireless-B Media Adapter
Power External, 5V DC, 2.0 A
Certifications FCC, CE
Operating Temp. 0ºC to 60ºC (32ºF to 140ºF)
Storage Temp. 0ºC to 85ºC (32ºF to 185ºF)
Operating Humidity 10% to 85%, Non-Condensing
Storage Humidity 5% to 90%, Non-Condensing
Appendix H: Specifications
56
Page 64

Wireless-B Media Adapter
Appendix I: Warranty Information
LIMITED WARRANTY
Linksys warrants to the original end user purchaser (“You”) that, for a period of one year, (the “Warranty Period”) Your
Linksys product will be free of defects in materials and workmanship under normal use. Your exclusive remedy and
Linksys's entire liability under this warranty will be for Linksys at its option to repair or replace the product or refund Your
purchase price less any rebates.
If the product proves defective during the Warranty Period call Linksys Technical Support in order to obtain a Return
Authorization Number. BE SURE TO HA VE YOUR PROOF OF PURCHASE ON HAND WHEN CALLING. When returning a product,
mark the Return Authorization Number clearly on the outside of the package and include a copy of your original proof of
purchase. RETURN REQUESTS CANNOT BE PROCESSED WITHOUT PROOF OF PURCHASE. You are responsible for shipping
defective products to Linksys. Linksys pays for UPS Ground shipping from Linksys back to You only. Customers located
outside of the United States of America and Canada are responsible for all shipping and handling charges.
ALL IMPLIED WARRANTIES AND CONDITIONS OF MERCHANTABILITY OR FITNESS FOR A PARTICULAR PURPOSE ARE LIMITED
TO THE DURATION OF THE WARRANTY PERIOD. ALL OTHER EXPRESS OR IMPLIED CONDITIONS, REPRESENTATIONS AND
WARRANTIES, INCLUDING ANY IMPLIED WARRANTY OF NON-INFRINGEMENT, ARE DISCLAIMED. Some jurisdictions do not
allow limitations on how long an implied warranty lasts, so the above limitation may not apply to You. This warranty gives
You specific legal rights, and You may also have other rights which vary by jurisdiction.
TO THE EXTENT NOT PROHIBITED BY LAW, IN NO EVENT WILL LINKSYS BE LIABLE FOR ANY LOST DATA, REVENUE OR
PROFIT, OR FOR SPECIAL, INDIRECT, CONSEQUENTIAL, INCIDENTAL OR PUNITIVE DAMAGES, HOWEVER CAUSED
REGARDLESS OF THE THEORY OF LIABILITY, ARISING OUT OF OR RELATED TO THE USE OF OR INABILITY TO USE THE
PRODUCT, EVEN IF LINKSYS HAS BEEN ADVISED OF THE POSSIBILITY OF SUCH DAMAGES. IN NO EVENT WILL LINKSYS'
LIABILITY EXCEED THE AMOUNT PAID BY YOU FOR THE PRODUCT.
The foregoing limitations will apply even if any warranty or remedy provided under this Section fails of its essential
purpose. Some jurisdictions do not allow the exclusion or limitation of incidental or consequential damages, so the above
limitation or exclusion may not apply to You.
Please direct all inquiries to: Linksys, P.O. Box 18558, Irvine, CA 92623 USA.
Appendix I: Warranty Information
57
Page 65

Wireless-B Media Adapter
Appendix J: Regulator y Inf ormation
FCC STATEMENT
This product has been tested and complies with the specifications for a Class B digital device, pursuant to Part 15
of the FCC Rules. These limits are designed to provide reasonable protection against harmful interference in a
residential installation. This equipment generates, uses, and can radiate radio frequency energy and, if not
installed and used according to the instructions, may cause harmful interference to radio communications.
However, there is no guarantee that interference will not occur in a particular installation. If this equipment does
cause harmful interference to radio or television reception, which is found by turning the equipment off and on,
the user is encouraged to try to correct the interference by one or more of the following measures:
• Reorient or relocate the receiving antenna
• Increase the separation between the equipment or devices
• Connect the equipment to an outlet other than the receiver's
• Consult a dealer or an experienced radio/TV technician for assistance
FCC Caution: Any change or modification to the product not expressly approved by Linksys could void the user’s
authority to operate the device.
FCC RF Radiation Exposure Statement
To comply with the FCC and ANSI C95.1 RF exposure limits, the antenna(s) for this device must comply with the
following:
• Access points with 2.4 GHz or 5 GHz integrated antenna must operate with a separation distance of at least
20 cm from all persons using the cable provided and must not be co-located or operating in conjunction with
any other antenna or transmitter.
End-users must be provided with specific operations for satisfying RF exposure compliance.
Note: Dual antennas used for diversity operation are not considered co-located.
Appendix J: Regulatory Information
58
Page 66

Wireless-B Media Adapter
INDUSTRY CANADA (CANADA)
This Class B digital apparatus complies with Canadian ICES-003.
Cet appareil numérique de la classe B est conforme à la norme NMB-003 du Canada.
The use of this device in a system operating either partially or completely outdoors may require the user to obtain
a license for the system according to the Canadian regulations.
EC DECLARATION OF CONFORMITY (EUROPE)
Linksys Group declares that the Wireless-B Media Adapter conforms to the specifications listed below, following
the provisions of the European R&TTE directive 1999/5/EC:
For 11Mbps, 2.4 GHz devices with 100 mW radios, the following standards were applied:
• EN 301 489-1, 301 489-17 General EMC requirements for Radio equipment.
• EN 609 50 Safety
• ETS 300-328-2 Technical requirements for Radio equipment.
Caution: This equipment is intended to be used in all EU and EFTA countries. Outdoor use may be restricted to
certain frequencies and/or may require a license for operation. Contact local Authority for procedure to follow.
Note: Combinations of power levels and antennas resulting in a radiated power level of above 100 mW equivalent
isotropic radiated power (EIRP) are considered as not compliant with the above mentioned directive and are not
allowed for use within the European community and countries that have adopted the European R&TTE directive
1999/5/EC.
For more details on legal combinations of power levels and antennas, contact Linksys Corporate Compliance.
• Linksys Group vakuuttaa täten että Wireless-B Media Adapter tyyppinen laite on direktiivin 1999/5/EY
oleellisten vaatimusten ja sitä koskevien näiden direktiivien muiden ehtojen mukainen.
• Linksys Group déclare que la Wireless-B Media Adapter est conforme aux conditions essentielles et aux
dispositions relatives à la directive 1999/5/EC.
• Dans le cas d'une utilisation privée, à l'extérieur d'un bâtiment, au-dessus d'un espace public, aucun
enregistrement n'est nécessaire pour une distance de moins de 300m. Pour une distance supérieure à 300m
un enregistrement auprès de l'IBPT est requise. Pour une utilisation publique à l'extérieur de bâtiments, une
licence de l'IBPT est requise. Pour les enregistrements et licences, veuillez contacter l'IBPT.
Appendix J: Regulatory Information
59
Page 67

Wireless-B Media Adapter
• France F:
2.4 GHz Bande : les canaux 10, 11, 12, 13 (2457, 2462, 2467, et 2472 MHz respectivement) sont
complétement libres d'utilisation en France (en utilisation intérieur). Pour ce qui est des autres canaux, ils
peuvent être soumis à autorisation selon le départment. L'utilisation en extérieur est soumis à autorisation
préalable et très restreint.
Vous pouvez contacter l'Autorité de Régulation des Télécommunications (http://www.art-telecom.fr) pour de
plus amples renseignements.
2.4 GHz Band: only channels 10, 11, 12, 13 (2457, 2462, 2467, and 2472 MHz respectively) may be used fr eely
in France for indoor use. License required for outdoor installations.
Please contact ART (http://www.art-telecom.fr) for procedure to follow.
Appendix J: Regulatory Information
60
Page 68

Wireless-B Media Adapter
Chapter K: Contact Inf ormation
Need to contact Linksys?
Visit us online for information on the latest products and updates
to your existing products at: http://www.linksys.com or
ftp.linksys.com
Can't find information about a product you want to buy
on the web? Do you want to know more about networking
with Linksys products? Give our advice line a call at: 800-546-5797 (LINKSYS)
Or fax your request in to: 949-261-8868
If you experience problems with any Linksys product,
you can call us at: 800-326-7114
Don't wish to call? You can e-mail us at: support@linksys.com
If any Linksys product proves defective during its warranty period,
you can call the Linksys Return Merchandise Authorization
department for obtaining a Return Authorization Number at: 949-261-1288
(Details on Warranty and RMA issues can be found in the Warranty
Information section in this Guide.)
Appendix K: Contact Information
61
 Loading...