


Cisco ATA 186 User Manual

Configuring and Troubleshooting an ATA 186 with
Cisco IOS Gatekeepers
Document ID: 19084
Introduction
Prerequisites
Requirements
Components Used
Conventions
Network Diagram
Registering the ATA 186 with the Gatekeeper
Adding Security
Authenticate the Endpoint at the Gatekeeper with an H.323 ID
Authenticate the Endpoint at the Gatekeeper with an E.164 Address
Authenticate the Endpoint at the Gatekeeper with an H.323 ID and Password
Authenticate the Endpoint at the Gatekeeper with an E.164 Address and Password
Authenticate the Endpoint at the Gatekeeper with an H.323 ID and Password Using the
Separator
Verify
Troubleshoot
Troubleshoot the Gatekeeper
Troubleshoot the ATA 186
Sample Debugs for Calls Made from the ATA 186
NetPro Discussion Forums − Featured Conversations
Related Information
Introduction
The Cisco Analog Telephone Adaptor (ATA) 186 is a handset−to−Ethernet adaptor that interfaces regular
analog phones with IP−based telephony networks. The ATA 186 has two voice ports that can only support
legacy analog touch tone telephones. Unlike the regular Foreign Exchange Station (FXS) ports, these can not
be interfaced with a private branch exchange (PBX) because the ATA 186 can not send out digits on these
ports. With this configuration, you can use both voice ports with different E.164 addresses on each.
Prerequisites
Requirements
This document assumes that the reader is familiar with the content in the Cisco ATA 186 Basic Configuration
document.
This configuration requires ATA 186 to be at version 2.0 or later, using the H.323 feature set.
Ensure that there is IP connectivity between the ATA 186, gateway, and gatekeeper devices. Also, ensure that
the ATA 186 is accessible through the web server method for further configuration.
Components Used
The information in this document is based on these software and hardware versions:
ATA 186 with version 2.12•
Cisco 3640 with Cisco IOS® Software Release 12.1 as a gateway•
Cisco 2600 with Cisco IOS Software Release 12.2 as a gatekeeper•
The information presented in this document was created from devices in a specific lab environment. All of the
devices used in this document started with a cleared (default) configuration. If you are working in a live
network, ensure that you understand the potential impact of any command before using it.
Conventions
For more information on document conventions, refer to the Cisco Technical Tips Conventions.
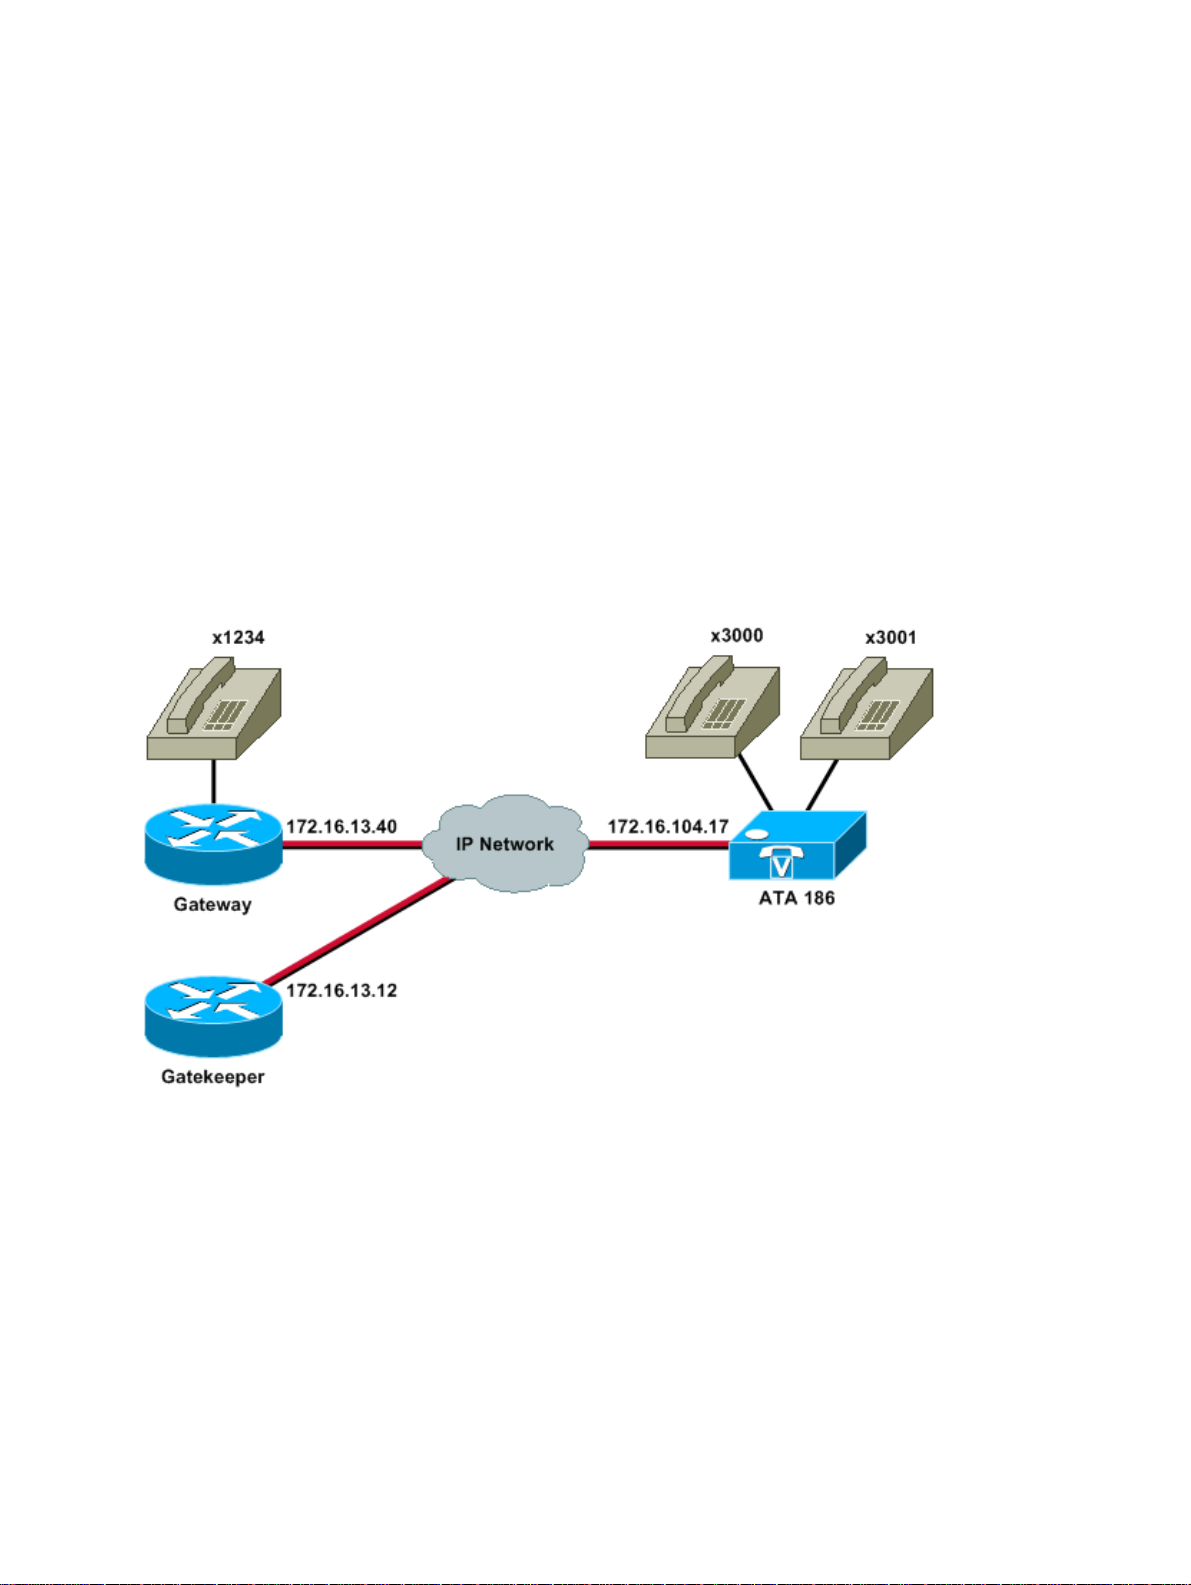
Network Diagram
This document uses this network setup:
Registering the ATA 186 with the Gatekeeper
Follow these instructions to register the ATA 186 with the gatekeeper.
In a web browser Address or Location field, type the URL http://ip_address_of_ata/dev to access the
1.
ATA 186 configuration screen, where ip_address_of_ata is the IP address of the ATA 186 you are
registering.
In this example, the URL is http://172.16.104.117/dev. The Cisco ATA 186 Configuration window
appears.
Note: The underlined fields are the relevant configured parameters for this scenario.
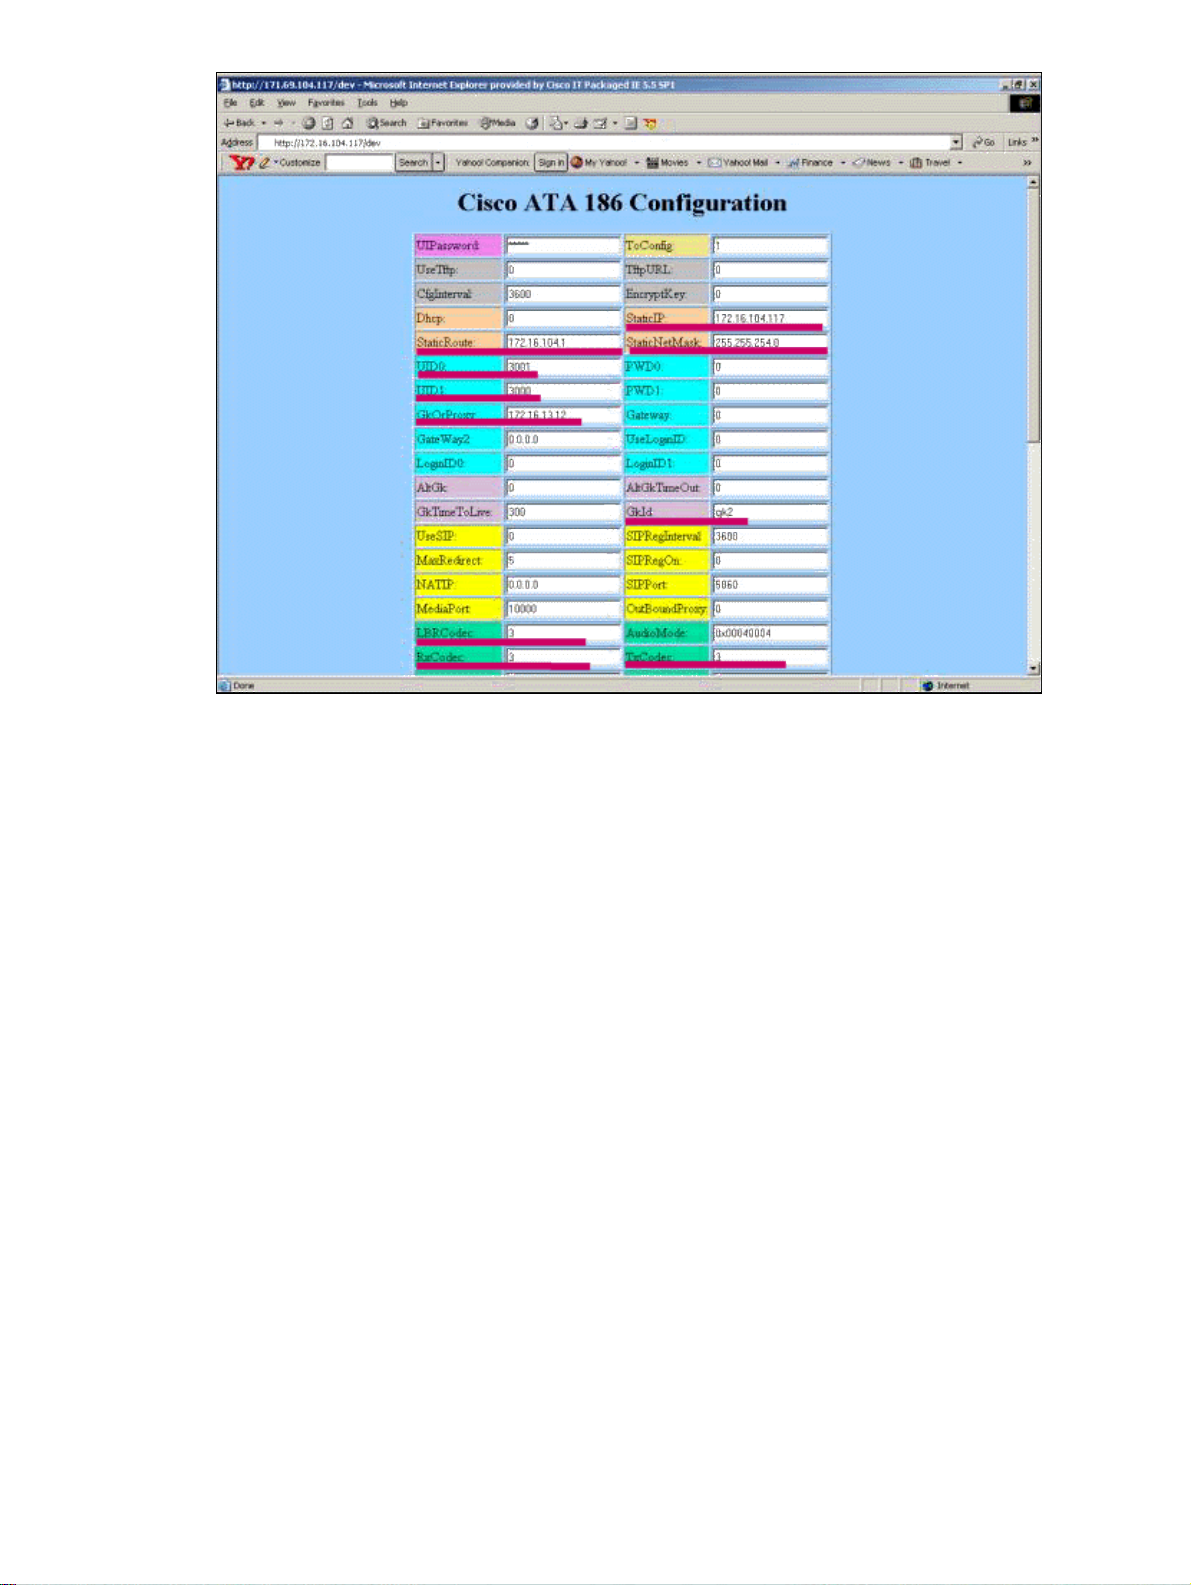
IP addressing can be done statically or dynamically, as explained in the Cisco ATA 186 Basic
Configuration document. In the previous screen, the static IP address is used.
In the Cisco ATA 186 Configuration window, configure these fields:
2.
UID0 and UID1Configure the E.164 addresses of voice ports 0 and 1.
♦
Both voice ports can not have the same E.164 address, as the ATA 186 can not hunt if one of
the ports is busy. If both voice ports are assigned the same E.164 address, the call will always
be sent to the first voice port. If this port is busy, the busy signal is sent to the caller.
RxCodec and TxCodecConfigure the codec ID.
♦
G.723.1codec ID 0.◊
G.711acodec ID 1.◊
G.711ucodec ID 2.◊
G.729acodec ID 3.◊
In the configuration shown below, the G.729r8 codec is used on the ATA 186 and on the
gateway.
LBRCodecConfigure as 0 or 3, based on the chosen codec.
♦
LBRC is 0G.723.1 codec is available to both FXS ports at any time. Each line can
◊
maintain two G.723.1 calls in a non−conference state. Therefore, up to four G.723.1
calls can be maintained in the Cisco ATA 186. An example is call waiting.
LBRC is 3G.729a is available to one of the two FXS ports on a
◊
first−come−first−served basis. If the Cisco IOS gateway is configured with the
default G.729 codec, only one ATA 186 port can be used. To prevent the second call
from failing, configure a voice codec−class on the gateway to negotiate the second
call using a G.711 codec. For detailed information, refer to the Codec Negotiation
section of the Understanding Codecs: Complexity, Hardware Support, MOS, and
Negotiation document.
GKOrProxyConfigure the IP address of the gatekeeper.
♦
Once this is done, anything that is dialed from the ATA 186 voice ports is sent to the
gatekeeper.
Click the Apply button and then reload the page.
3.
The ATA 186 takes 10 seconds to reconfigure itself.
These examples are relevant configurations for the Cisco IOS gatekeeper and gateway:
2610−Gatekeeper
interface Ethernet0/0
ip addreinterface Ethernet0/0
ip address 172.16.13.12 255.255.255.224
half−duplex
h323 interface
h323 h323−id pro
h323 gatekeeper ipaddr 172.16.13.12
h323 t120 bypass
!
dial−peer cor custom
!
!
!
gatekeeper
zone local gk2 cisco.com 172.16.13.12
no shutdown
!
3640−Gateway
interface Ethernet0/0
ip address 172.16.13.40 255.255.255.224
half−duplex
!
ip classless
ip route 0.0.0.0 0.0.0.0 172.16.13.33
ip http server
!
!
!
voice−port 3/0/0
!
voice−port 3/0/1
!
dial−peer cor custom
!
!
!
dial−peer voice 1 pots
destination−pattern 34
port 3/0/0
!
dial−peer voice 2 pots
destination−pattern 45
port 3/0/1
!
dial−peer voice 100 pots
destination−pattern 1234
port 3/0/0
!
dial−peer voice 3000 voip
destination−pattern 300.
session target ras
!−−− Dial−peer to send the calls to ATA.
!
Adding Security
As of ATA software release 2.12, the options in this section are available to add security.
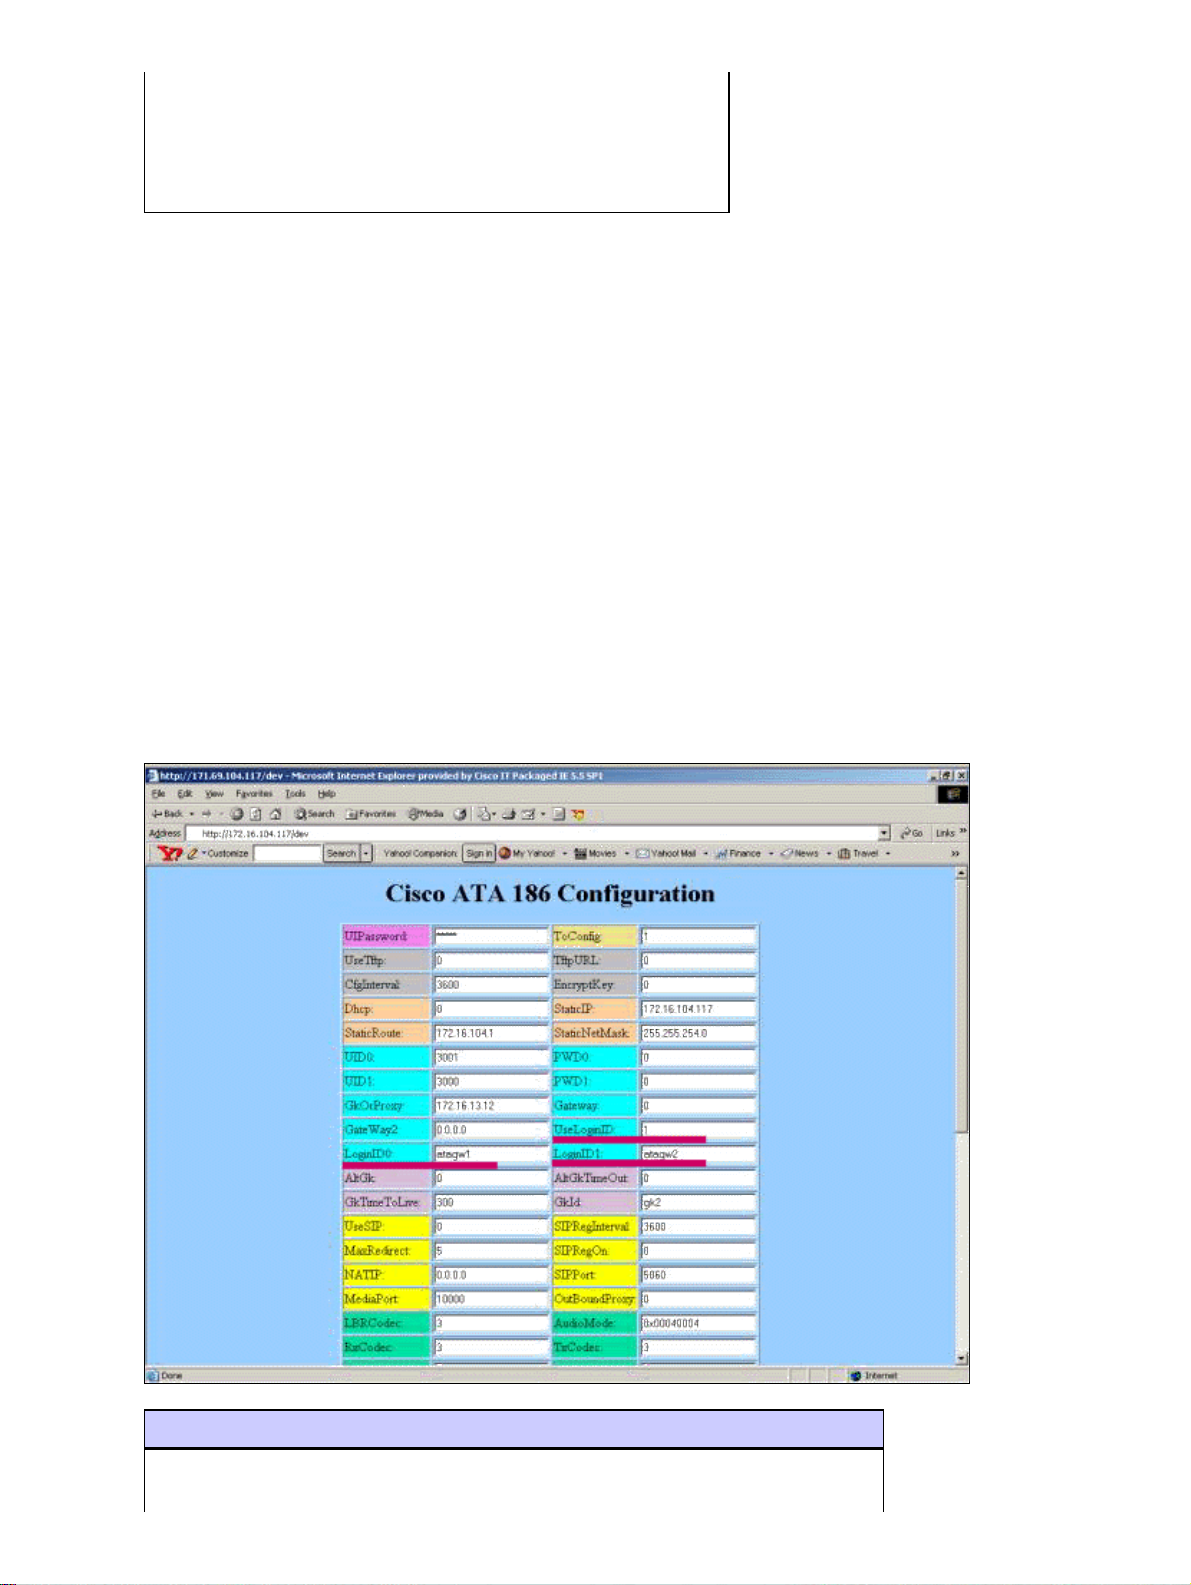
Authenticate the Endpoint at the Gatekeeper with an H.323 ID
Follow these steps to configure the ATA 186 to register with the H.323 ID:
Set the AutMethod field to 0 (the default is 1).
1.
The hexadecimal value that is to be configured for this field is 0x0.
Set the UseLoginID field to 1.2.
Configure LoginID0 and LoginID1, with the H.323 IDs for the ATA 186.
3.
The ATA 186 registers as two different H.323 terminals, one for each port.
This is a sample working configuration for the gatekeeper when using ATA with the H.323 ID authentication
method:
2610−Gatekeeper
aaa authentication login default local
aaa authentication login cisco none
 Loading...