


LX501/LW401/LWU421/
LX601i/LW551i/LWU501i
S e t u p G u i d e
020-000504-02

LX501/LW401/LWU421/
LX601i/LW551i/LWU501i
ENGLISH
FRANÇAIS
DEUTSCH
ESPAÑOL
ITALIANO
NORSK
NEDERLANDS
PORTUGUÊS
Setup Guide User’s Manual (concise)
Please read this user’s manual thoroughly to ensure the proper use of this product.
Manuel d’utilisation (résumé)
Nous vous recommandons de lire attentivement ce manuel pour bien assimiler le fonctionnement de l'appareil.
Bedienungsanleitung (Kurzform)
Um zu gewährleisten, dass Sie die Bedienung des Geräts verstanden haben, lesen Sie dieses Handbuch bitte sorgfältig.
Manual de usuario (resumen)
Lea atentamente el manual de usuario del proyector para garantizar un uso adecuado del mismo.
Manuale d'istruzioni (breve)
Vi preghiamo di leggere attentamente il manuale d'istruzioni per garantire una corretta comprensione delle istruzioni.
Brukerhåndbok (konsis)
Vennligst les denne brukerhåndbok grundig for å være garantert driftssikker bruk.
Gebruiksaanwijzing (beknopt)
Lees deze gebruikershandleiding grondig door, zodat u de werking ervan begrijpt en correct gebruik verzekerd is.
Instruções do proprietário (conciso)
Leia atentamente o presente manual do utilizador para garantir a utilização correcta por via da sua compreensão.


 )
) 

 *
*
|
|
|
|
|
|
|
|
|
|
|
|
|
|
|
|
|
|
Bruksanvisningens (koncis)
Läs denna bruksanvisning noga för att förstå alla instruktionerna för ett korrekt bruk.
Руководство пользователя (краткое)
Пожалуйста, внимателъно прочтите данное руководство полъзователя для ознакомления и нравильно использования.
Käyttäjän ohjekirja (suppea)
Lue käyttäjän ohjekirja huolellisesti varmistaaksesi, että ymmärrät miten laitetta käytetään oikein.
Podręcznik użytkownika (skrócony)
Przeczytaj dokładnie i ze zrozumieniem niniejszy podręcznik użytkownika, aby zapewnić prawidłowe użytkowanie urządzenia.
SVENSKA
РУССКИЙ
SUOMI
POLSKI
020-000504-02

LX501/LX601i/LW401/LW551i/LWU421/LWU501i
Projector
LX501/LW401/LWU421/
LX601i/LW551i/LWU501i
Setup Guide User's Manual (concise)
Thank you for purchasing this projector.
Please read through this manual before using this product, in order to use safely and utilize well the product.
 WARNING ►Before using this product, be sure to read all manuals for this product. After reading them, store them in a safe place for future reference. ►Heed all the warnings and cautions in the manuals or on the product. ►Follow all the instructions in the manuals or on the product.
NOTE • In this manual, unless any comments are accompanied, “the manuals” means all the documents provided with this product, and “the product” means this projector and all the accessories came with the projector.
ENGLISH
Contents |
|
|
|
First of all............................................ |
2 |
Entries and graphical symbols explanation ...... |
2 |
Important safety instruction .............................. |
2 |
Regulatory notices.............................. |
3 |
About Electro-Magnetic Interference ................ |
3 |
About Waste Electrical and Electronic Equipment... |
4 |
Contents of package........................... |
4 |
Preparing for the remote control......... |
5 |
Arrangement....................................... |
6 |
Connecting with your devices............. |
7 |
Fastening the adapter cover............... |
8 |
Fastening the cable holder ................. |
8 |
Setup Guide
|
|
Connecting power supply ................... |
9 |
Turning on the power........................ |
10 |
Adjusting the projector's elevator ..... |
11 |
Adjusting the lens position................ |
11 |
Displaying the picture ....................... |
12 |
Turning off the power........................ |
13 |
Replacing the lamp........................... |
14 |
Cleaning and replacing the air filter .. |
16 |
Using the CD manual ....................... |
18 |
Specifications ................................... |
19 |
Troubleshooting |
|
- Warranty and after-service ........... |
21 |
1 |
020-000504-02 Rev. 1 (06-2012) |

LX501/LX601i/LW401/LW551i/LWU421/LWU501i
First of all
Entries and graphical symbols explanation
The following entries and graphical symbols are used for the manuals and the product as follows, for safety purpose. Please know their meanings beforehand, and heed them.
 WARNING This entry warns of a risk of serious personal injury or even death.
 CAUTION This entry warns of a risk of personal injury or physical damage.
NOTICE This entry notices of fear of causing trouble.
Important safety instruction
The followings are important instructions for safely using the product. Be sure to follow them always when handling the product. The manufacturer assumes no responsibility for any damage caused by mishandling that is beyond normal usage defined in these manuals of this projector.
 WARNING ►Never use the product in or after an abnormality (ex. giving off smoke, smelling strange, took a liquid or an object inside, broken, etc.) If an abnormality should occur, unplug the projector urgently.
►Situate the product away from children and pets.
►Keep small parts away from children and pets. If swallowed, consult a physician immediately for emergency treatment.
►Do not use the product when there is fear of a thunderbolt.
►Unplug the projector from the power outlet if the projector is not used for the time being.
►Do not connect the projector to a power supply while no lens unit is attached to it. ►Do not open or remove any portion of the product, unless the manuals direct it. For internal maintenance, leave it to your dealer or their service personnel.
►Use only the accessories specified or recommended by the manufacturer. ►Do not modify the projector or accessories.
►Do not let any things or any liquids enter to the inside of the product. ►Do not wet the product.
►Do not place the projector where any oils, such as cooking or machine oil, are used. Oil may harm the product, resulting in malfunction, or falling from the mounted position. ►Do not apply a shock or pressure to this product.
-Do not place the product on an unstable place such as the uneven surface or the leaned table.
-Do not place the product unstably. Place the projector so that it does not protrude from the surface where the projector is placed on.
-Place your hands on the grip on the bottom of the projector when carrying the projector.
-Remove all the attachments including the power cord and cables, from the projector when carrying the projector.
►Do not look into the lens and the openings on the projector, while the lamp is on. ►Do not approach the lamp cover and the exhaust vents, while the projection lamp is on. Also after the lamp goes out, do not approach them for a while, since too hot.
2
Setup Guide 020-000504-02 Rev. 1 (06-2012)

LX501/LX601i/LW401/LW551i/LWU421/LWU501i
Regulatory notices
About Electro-Magnetic Interference
This is a Class A product. In a domestic environment this product may cause radio interference in which case the user may be required to take adequate measures.
This product may cause interference if used in residential areas. Such use must be avoided unless the user takes special measures to reduce electromagnetic emissions to prevent interference to the reception of radio and television broadcasts.
In Canada
This Class A digital apparatus complies with Canadian ICES-003.
In the US and places where the FCC regulations are applicable
This device complies with part 15 of the FCC Rules. Operation is subject to the following two conditions: (1) This device may not cause harmful interference, and (2) this device must accept any interference received,
including interference that may cause undesired operation.This equipment has been tested and found to comply with the limits for a Class A digital device, pursuant to Part 15 of the FCC Rules.
These limits are designed to provide reasonable protection against harmful interference when the equipment is operated in a commercial environment. This equipment generates, uses, and can radiate radio frequency energy and, if not installed and used in accordance with the instruction manual, may cause harmful interference to radio communications. Operation of this equipment in a residential area is likely to case harmful interference in which case the user will be required to correct the interference at his own expense.
INSTRUCTIONS TO USERS: Some cables have to be used with the core set. Use the accessory cable or a designated type cable for the connection. For cables that have a core only at one end, connect the core to the projector.
CAUTION: Changes or modifications not expressly approved by the party responsible for compliance could void the user’s authority to operate the equipment.
ENGLISH
3
Setup Guide 020-000504-02 Rev. 1 (06-2012)

LX501/LX601i/LW401/LW551i/LWU421/LWU501i
Regulatory notices (continued)
About Waste Electrical and Electronic Equipment
The mark is in compliance with the Waste Electrical and Electronic Equipment Directive 2002/96/EC (WEEE).
The mark indicates the requirement NOT to dispose the equipment including any spent or discarded batteries or accumulators as unsorted municipal waste, but use the return and collection systems available. If the batteries or accumulators included with this equipment, display
the chemical symbol Hg, Cd, or Pb, then it means that the battery has a heavy metal content of more than 0.0005% Mercury or more than, 0.002% Cadmium, or more than 0.004% Lead.
Contents of package
Your projector should come with the items shown below. Check that all the items are included. Require of your dealer immediately if any items are missing.
(1)Remote control with two AA batteries
(2)Power cord
(3)Computer cable
(4)HDMITM-DVI cable
(5)Lens cover
(6)User’s manuals (Book x1, CD x1)
(7)Security label
(8)Application CD
(9)Adapter cover
(10)Cable holder
(1) |
(5) |
|
|
|
(6) |
(2)
(7)
(3) |
(8) |
(4) |
(9) |
(10) 
 WARNING ►Keep small parts away from children and pets. Take care not to put in the mouth. If swallowed, consult a physician immediately for emergency treatment.
NOTICE ►It is recommended that the adapter cover or the cable holder is used with the USB wireless adapter (optional) to prevent the adapter from becoming detached and to avoid the risk of burns.
NOTE • Keep the original packing materials for future reshipment. Be sure to use the original packing materials when moving the projector. Use special caution for the lens.
• The projector may make a rattling sound when tilted, moved or shaken, since a flap to control the air flow inside of the projector has moved. Be aware that this is not a failure or malfunction.
4
Setup Guide 020-000504-02 Rev. 1 (06-2012)
LX501/LX601i/LW401/LW551i/LWU421/LWU501i
Preparating for remote control
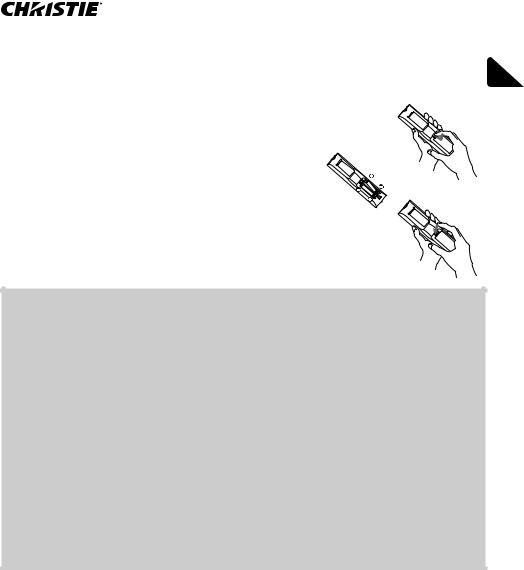
Please insert the batteries into the remote control before using it. If the remote control starts to malfunction, try to replace the batteries. If you will not use the remote control for long period, remove the batteries from the remote control and store them in a safe place.
1. Holding the hook part of the battery cover, remove it.
2. |
Align and insert the two AA batteries |
2 |
(HITACHI MAXELL or HITACHI MAXELL |
|
|
|
ENERGY, Part No.LR6 or R6P) according to |
3 |
|
their plus and minus terminals as indicated in |
|
|
the remote control. |
|
|
Replace the battery cover in the direction of the arrow |
|
3. and snap it back into place. |
|
|
 WARNING ►Always handle the batteries with care and use them only as directed. Improper use may result in battery explosion, cracking or leakage, which could result in fire, injury and/or pollution of the surrounding environment.
•When replacing the batteries, replace both of the batteries with new batteries of the same type. Do not use a new battery with a used battery.
•Be sure to use only the batteries specified. Do not use batteries of different types at the same time. Do not mix a new battery with used one.
•Make sure the plus and minus terminals are correctly aligned when loading a battery.
•Keep a battery away from children and pets.
•Do not recharge, short circuit, solder or disassemble a battery.
•Do not place a battery in a fire or water. Keep batteries in a dark, cool and dry place.
•If you observe battery leakage, wipe out the leakage and then replace a battery. If the leakage adheres to your body or clothes, rinse well with water immediately.
•Obey the local laws on disposing the battery.
5
Setup Guide 020-000504-02 Rev. 1 (06-2012)
LX501/LX601i/LW401/LW551i/LWU421/LWU501i
Arrangement
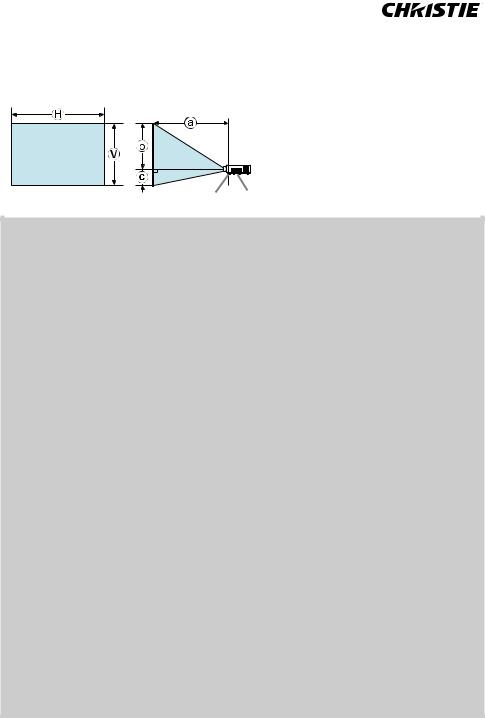
Refer to tables T-1 to T-5 at the back of this manual as well as the following to determine the screen size and projection distance. The values shown in the table are calculated for a full size screen.
x : Screen size Projector top : Projection distance  , : Screen height
Elevator feet Projector bottom
 WARNING ►Install the projector where you can access the power outlet easily.
►Install the projector in a stable horizontal position.
•Do not use any mounting accessories except the accessories specified by the manufacturer. Read and keep the manuals of the accessories used.
•For special installation such as ceiling mounting, be sure to consult your dealer beforehand. Specific mounting accessories and services may be required.
•Do not put the projector on its side, front or rear position.
•Do not attach nor place anything on the projector unless otherwise specified in the manual.
►Do not install the projector near thermally conductive or flammable things. ►Do not place the projector where any oils, such as cooking or machine oil, are used.
►Do not place the projector in a place where it may get wet.
 CAUTION ►Place the projector in a cool place with sufficient ventilation.
•Keep a space of 30 cm or more between a side of the projector and other objects such as walls.
•Do not stop up, block nor cover the projector's vent holes.
•Do not place the projector at places that are exposed to magnetic fields, doing so can cause the cooling fans inside the projector to malfunction.
►Avoid placing the projector in smoky, humid or dusty place.
• Do not place the projector near humidifiers.
NOTICE ►Position the projector to prevent light from directly hitting the projector’s remote sensor.
►Do not place the product in a place where radio interference may be caused. ►Set the ALTITUDE of the SERVICE item in the OPTION menu correctly. It is recommended to leave it at AUTO usually. If the projector is used with a wrong setting, it may cause damage to the projector itself or the parts inside. For details, see User Manual - Operating Guide.
6
Setup Guide 020-000504-02 Rev. 1 (06-2012)
LX501/LX601i/LW401/LW551i/LWU421/LWU501i
Connecting with your devices
Before connecting the projector to a device, consult the manual of the device to confirm that the device is suitable for connecting with this projector and prepare the required accessories, such as a cable in accord with the signal of the device.
Consult your dealer when the required accessory did not come with the product or the accessory is damaged.
After making sure that the projector and the devices are turned off, perform the connection, according to the following instructions. Refer to figures F-1 to F-4 at the back of this manual.
For details, see User Manual - Operating Guide. Before connecting the projector to a network system, be sure to read User Manual - Network Guide too.
 WARNING ►Use only the appropriate accessories. Otherwise it could cause a fire or damage the projector and devices.
•Use only the accessories specified or recommended by the projector’s manufacturer. It may be regulated under some standard.
•Neither disassemble nor modify the projector and the accessories.
•Do not use the damaged accessory. Be careful not to damage the accessories. Route a cable so that it is neither stepped on nor pinched out.
 CAUTION ►For a cable with a core at only one end, connect the end with the core to the projector. That may be required by EMI regulations.
►Before connecting the projector to a network system be sure to obtain the consent of the administrator of the network.
►Do not connect the LAN port to any network that might have the excessive voltage.
►The designated USB wireless adapter that is sold as an option is required to use the wireless network function of this projector.
►Before removing the USB storage device from the port of the projector, be sure to use the REMOVE USB function on the thumbnail screen to secure your data. Before you insert or pull out the USB wireless adapter from the projector, turn off the power of the projector and pull out the power cord’s plug from the outlet. Do not touch the USB wireless adapter while the projector is receiving AC power.
NOTE • Do not turn on or off the projector while connected to a device in operation, unless that is directed in the manual of the device.
•Some input ports are selectable in the use. For details, see User Manual -
Operating Guide.
•Be careful not to mistakenly connect a connector to a wrong port.
•If an oversized USB storage device blocks the LAN port, use a USB extension cable to connect the USB storage device.
ENGLISH
7
Setup Guide 020-000504-02 Rev. 1 (06-2012)

LX501/LX601i/LW401/LW551i/LWU421/LWU501i
Fastening the adapter cover
Use the supplied adapter cover to prevent |
Tab |
|
the USB wireless adapter from coming |
|
|
off easily. When using the adapter cover, |
|
|
connect the USB wireless adapter to the |
1 |
|
further USB TYPE A port from the LAN |
||
|
||
port. |
|
1. Loosentriangle.the screw marked with a
2. Insert the tab of the cover into the hole at the upper right of the USB TYPE A ports in the
direction of the arrow. 3. Align the screw holes on the projector and the cover.
Then insert the screw removed from the projector into the hole and tighten the screw.
2
3
 WARNING ►Keep small parts away from children and pets. Take care not to put in the mouth.
Fastening the cable holder
Use the supplied cable holder to prevent the USB wireless adapter and the HDMITM cables from becoming detached.
When using the cable holder, connect the USB wireless adapter to the further USB TYPE A port from the LAN port.
1. Remove the screw marked with a triangle and the screw marked with a
diamond.
2. Open the cable holder clip and then align the screw holes on the projector
and the holder. Then insert the screw removed from the projector into the hole and tighten the screw.
3. Snap the clip closed to secure the HDMITM cables in place.
1
2, 3
Cable holder
 WARNING ►Keep small parts away from children and pets. Take care not to put in the mouth.
8
Setup Guide 020-000504-02 Rev. 1 (06-2012)
LX501/LX601i/LW401/LW551i/LWU421/LWU501i
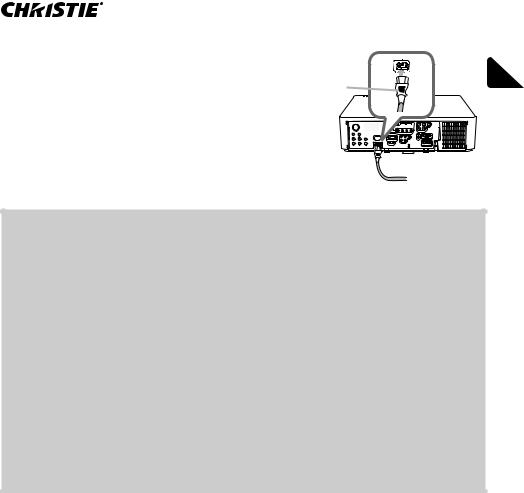
Connecting power supply
1. Put the connector of the power cord into the AC IN (AC inlet) of the projector.
2. Firmly plug the power cord’s plug into the outlet. In a couple of seconds after the power
supply connection, the POWER indicator will light up in steady orange.
Please remember that when the DIRECT POWER ON function activated, the connection of the power supply make the projector turn on.
AC IN 

Power cord
 WARNING ►Do not connect the projector to a power supply while no lens unit is attached to it.
►Please use extra caution when connecting the power cord, as incorrect or faulty connections may result in fi re and/or electrical shock.
•Do not touch the power cord with a wet hand.
•Only use the power cord that came with the projector. If it is damaged, consult your dealer to get a new one. Never modify the power cord.
•Only plug the power cord into an outlet whose voltage is matched to the power cord. The power outlet should be close to the projector and easily accessible. Remove the power cord for complete separation.
•Do not distribute the power supply to multiple devices. Doing so may overload the outlet and connectors, loosen the connection, or result in fi re, electric shock or other accidents.
•Connect the ground terminal for the AC inlet of this unit to the ground terminal of the building using an appropriate power cord (bundled).
NOTICE ►This product is also designed for IT power systems with a phase- to-phase voltage of 220 to 240 V.
ENGLISH
9
Setup Guide 020-000504-02 Rev. 1 (06-2012)
LX501/LX601i/LW401/LW551i/LWU421/LWU501i
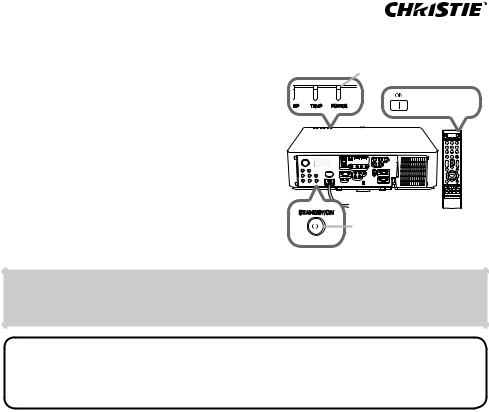
Turning on the power
1. Make sure that the power cord is firmly and correctly connected to the projector and the outlet.
2. Make sure that the POWER indicator is lighted in steady orange. Then remove the lens cover.
3. Press the STANDBY/ON button on the projector or the ON button on the remote control. The projection lamp will light up and the
POWER indicator will begin blinking in green. When the power is completely on, the indicator will stop blinking and light in steady green.
 WARNING ►A strong light is emitted when the projector’s power is on. Do not look into the lens of the projector or look inside of the projector through any of the projector’s openings.
NOTE • Please power on the projector prior to the connected devices.
• The projector has the DIRECT POWER ON function, which can make the projector automatically turn on. For more information, please see User Manual - Operating Guide.
10
Setup Guide 020-000504-02 Rev. 1 (06-2012)
LX501/LX601i/LW401/LW551i/LWU421/LWU501i
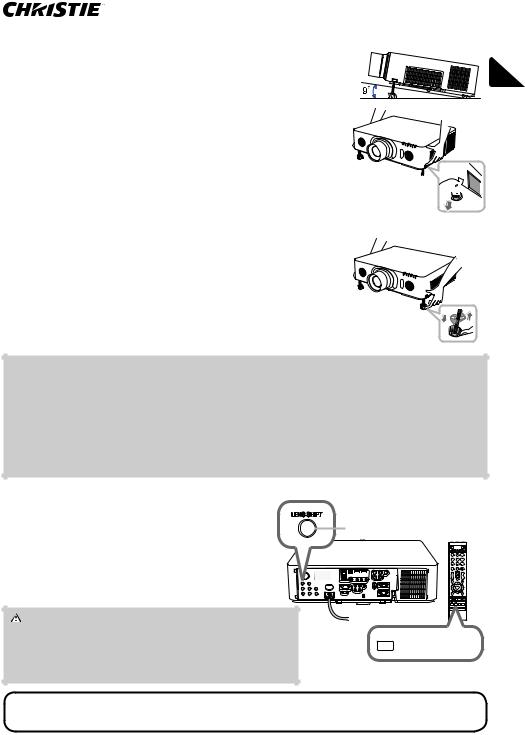
Adjusting the projector’s elevator
When the place to put the projector is slightly uneven to the left or right, use the elevator feet to place the projector horizontally. Using the feet can also tilt the projector
in order to project at a suitable angle to the screen, elevating the front side of the projector within 9 degrees. This projector has 2 elevator feet and 2 elevator buttons. An elevator foot is adjustable while pushing the elevator button on the same side as it.
1. Holding the projector, push the elevator buttons to loose the elevator feet.
2. Positionheight. the front side of the projector to the desired 3. Release the elevator buttons in order to lock the
elevator feet.
4. After making sure that the elevator feet are locked, put the projector down gently.
5. If necessary, the elevator feet can be manually twisted to make more precise adjustments. Hold the projector when twisting the feet.
To loose an 


 elevator foot, push
  the elevator button
on the same side as it.
To finely adjust, twist the foot.
 CAUTION ►Do not handle the elevator buttons without holding the projector, since the projector may drop down.
►Do not tilt the projector other than elevating its front within 9 degrees using the adjuster feet. A tilt of the projector exceeding the restriction could cause malfunction or shortening the lifetime of consumables, or the projector itself. Only for LX601i, LW551i and LWU501i, it is possible to install the projector for any direction with specified mounting accessories.
ENGLISH
Adjusting the lens position
Shifting the lens position shifts the projection |
LENS SHIFT button |
position. |
|
After pressing the LENS SHIFT button on the |
|
control panel or the remote control, use the |
|
cursor buttons to shift the lens position. |
|
 CAUTION ►Do not put your fingers or any other things around the lens. The moving lens could catch them in the space around the lens and result in an injury.


 LENS SHIFT button
NOTE • The projector may ignore operation by buttons while moving the lens.
• Generally, better image quality can be got when the lens is set to the center.
11
Setup Guide 020-000504-02 Rev. 1 (06-2012)
LX501/LX601i/LW401/LW551i/LWU421/LWU501i
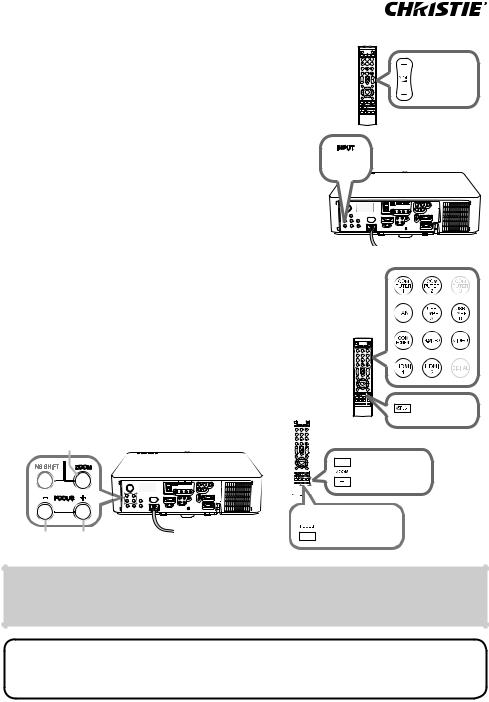
Displaying the picture
1. Activate your signal source. Turn the signal source on, and make it send the signal to the projector.
2. Use the VOL + / - buttons to adjust the volume.
3. Press the INPUT button on the projector. Each time you press the button, the projector switches its input port in turn.
You can also use the remote control to select an input signal. Press any of the buttons from
COMPUTER 1 / 2, LAN, USB TYPE A / B, HDMI 1 / 2, COMPONENT, S-VIDEO or VIDEO to select the input signal from each port.
4. Press the ASPECT button on the remote control. Each time you press the button, the projector switches the mode for aspect ratio in turn.
5. Use the ZOOM + / - buttons on the remote control or ZOOM button and ◄/► cursor buttons on the projector to adjust the screen size.
6. Use the FOCUS + / - buttons on the projector or the remote control to focus the picture.
ZOOM button
VOL + / - buttons

 INPUT button
Buttons for input ports
ASPECT button
ZOOM + / - buttons
 FOCUS + / -
buttons
FOCUS - / + buttons
 CAUTION ►If you wish to have a blank screen while the projector's lamp is on, use the lens shutter or AV MUTE function (see User Manual - Operating Guide). Taking any other action may cause the damage on the projector.
NOTE • The ASPECT button does not work when no proper signal is inputted.
• For the details of how to adjust the picture, please see User Manual - Operating Guide.
12
Setup Guide 020-000504-02 Rev. 1 (06-2012)
LX501/LX601i/LW401/LW551i/LWU421/LWU501i
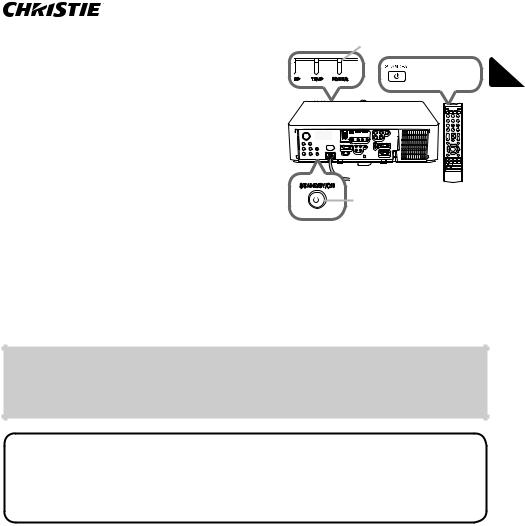
Turning off the power
1. Press the STANDBY/ON button on the projector or the STANDBY button on
the remote control. The message “Power off?” will appear
on the screen for about 5 seconds.
2. Press the STANDBY/ON or STANDBY button again while the message appears. The projector lamp will go off, and the
POWER indicator will begin blinking in orange. Then the POWER indicator will
stop blinking and light in steady orange when the lamp cooling is complete.
3. Attach the lens cover, after the POWER indicator turns to steady orange.
Do not turn the projector on for about 10 minutes or more after turning it off. Also, do not turn the projector off shortly after turning it on. Such operations might cause the lamp to malfunction or shorten the lifetime of some parts including the lamp.
 WARNING ►Do not touch around the lamp cover and the exhaust vents during use or just after use, since it is too hot.
►Remove the power cord for complete separation. The power outlet should be close to the projector and easily accessible.
NOTE • Please power off the projector after any connected devices are powered off.
• This projector has the AUTO POWER OFF function that can make the projector turn off automatically. For more information, please see User Manual - Operating Guide.
ENGLISH
13
Setup Guide 020-000504-02 Rev. 1 (06-2012)
LX501/LX601i/LW401/LW551i/LWU421/LWU501i
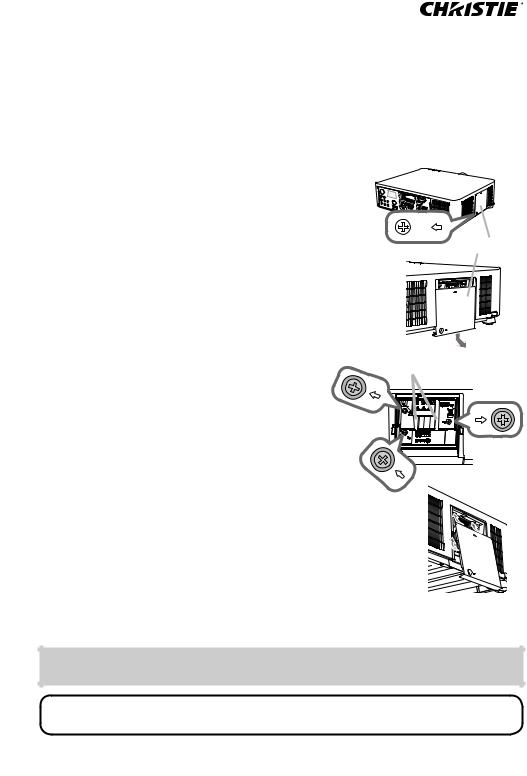
Replacing the lamp
A lamp has finite product life. Using the lamp for long periods of time could cause the pictures darker or the color tone poor. Note that each lamp has a different lifetime, and some may burst or burn out soon after you start using them. Preparation of a new lamp and early replacement are recommended. To prepare a new lamp, make contact with your dealer and tell the lamp type number.
Type number <LX501, LW401, LWU421> : 003-120707-01 (DT01285) <LX601i, LW551i, LWU501i> : 003-120708-01 (DT01295)
1. |
Turn the projector off, and unplug the power cord. |
3 |
Allow the projector to cool for at least 45 minutes. |
|
|
|
Prepare a new lamp. If the projector is mounted |
|
2. with specified mounting accessories, or if the lamp |
|
|
|
has broken, also ask the dealer to replace the lamp. |
|
In case of replacement by yourself, follow the following |
Lamp cover |
|
procedure. |
|
|
3. Loosen the screw (marked by arrow) of the lamp cover and then slide down and lift the lamp cover to remove it.
4. Loosen the 3 screws (marked by arrow) of the lamp, and slowly pull the lamp out by the handles.
Never loosen any other screws.
|
Insert the new lamp, and retighten firmly the |
Handles |
4, 5 |
5. 3 screws of the lamp that are loosened in |
|
||
|
the previous process to lock it in place. |
|
|
|
While putting the interlocking parts of the lamp |
|
|
6. cover and the projector together, slide the lamp |
|
|
|
|
cover back in place. Then firmly fasten the |
|
|
|
screw of the lamp cover. |
|
|
|
Turn the projector on and reset the lamp time |
|
|
7. using the LAMP TIME item in the OPTION menu. |
|
6 |
|
(1) |
Press the MENU button to display a menu. |
|
|
(2) Point at the ADVANCED MENU in the menu using the ▼/▲ |
|
||
|
button, then press the ► button. |
|
|
(3) |
Point at the OPTION in the left column of the menu using |
|
|
|
the ▼/▲button, then press the ► button. |
|
|
(4) |
Point at the LAMP TIME using the ▼/▲ button, then press |
|
|
(5) |
the ► button. A dialog will appear. |
|
|
Press the ► button to select “OK” on the dialog. It performs resetting the lamp time. |
|||
 CAUTION ►Do not touch the interior of the projector, while the lamp is taken out.
NOTE • Please reset the lamp time only when you have replaced the lamp, for a suitable indication about the lamp.
14
Setup Guide 020-000504-02 Rev. 1 (06-2012)
|
|
LX501/LX601i/LW401/LW551i/LWU421/LWU501i |
|
HIGH VOLTAGE |
|
Replacing the lamp (continued) |
|
|
HIGH TEMPERATURE |
HIGH PRESSURE |
|
 WARNING ►The projector uses a high-pressure mercury glass lamp. The lamp can break with a loud bang, or burn out, if jolted or scratched, handled while hot, or worn over time. Note that each lamp has a different lifetime, and some may burst or burn out soon after you start using them. In addition, if the bulb bursts, it is possible for shards of glass to fly into the lamp housing, and for gas containing mercury and dust containing fine particles of glass to escape from the projector’s vent holes.
►About disposal of a lamp: This product contains a mercury lamp; do not put it in a trash. Dispose of it in accordance with environmental laws.
•For lamp recycling, go to www.lamprecycle.org (in the US).
•For product disposal, consult your local government agency or www.eiae.org (in the US) or www.epsc.ca (in Canada).
For more information, ask your dealer.
outlet |
• Before replacing the lamp, turn the projector off and unplug the power |
|
|
||
|
cord, then wait at least 45 minutes for the lamp to cool sufficiently. |
|
|
Handling the lamp while hot can cause burns, as well as damaging the lamp. |
|
|
• Never unscrew except the appointed (marked by an arrow) screws. |
|
|
• Do not open the lamp cover while the projector is suspended from |
|
|
• If the lamp should break (it will make a loud bang when it does), |
|
|
unplug the power cord from the outlet, and make sure to request a |
|
|
replacement lamp from your local dealer. Note that shards of glass |
|
|
could damage the projector’s internals, or cause injury during handling, |
|
|
so please do not try to clean the projector or replace the lamp yourself. |
|
Disconnect • If the lamp should break (it will make a loud bang when it does), |
||
the plug |
ventilate the room well, and make sure not to inhale the gas or fine |
|
from the |
particles that come out from the projector's vent holes, and not to get |
|
power |
them into your eyes or mouth. |
|
|
a ceiling. This is dangerous, since if the lamp’s bulb has broken, the |
|
|
shards will fall out when the cover is opened. In addition, working in |
|
|
high places is dangerous, so ask your local dealer to have the lamp |
|
|
replaced even if the bulb is not broken. |
|
|
• Do not use the projector with the lamp cover removed. At the lamp |
|
|
replacing, make sure that the screws are screwed in firmly. Loose |
|
|
screws could result in damage or injury. |
|
|
• Use only the lamp of the specified type. Use of a lamp that does not |
|
|
meet the lamp specifications for this model could cause a fire, damage or |
|
|
shorten the life of this product. |
|
|
• If the lamp breaks soon after the first time it is used, it is possible |
|
|
that there are electrical problems elsewhere besides the lamp. If this |
|
|
happens, consult your local dealer or a service representative. |
|
|
• Handle with care: jolting or scratching could cause the lamp bulb to burst during use. |
|
|
• Using the lamp for long periods of time, could cause it dark, not to light |
|
|
up or to burst. When the pictures appear dark, or when the color tone |
|
|
is poor, please replace the lamp as soon as possible. Do not use old |
|
|
(used) lamps; this is a cause of breakage. |
|
Setup Guide |
15 |
020-000504-02 Rev. 1 (06-2012) |
ENGLISH
LX501/LX601i/LW401/LW551i/LWU421/LWU501i
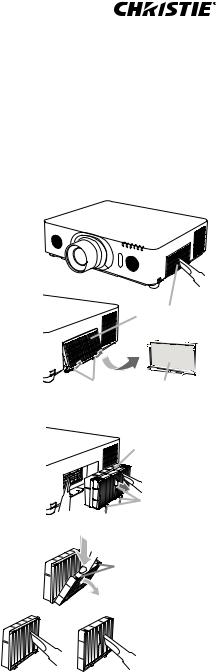
Cleaning and replacing the air filter
Please check and clean the air filter periodically. When the indicators or a message prompts you to clean the air filter, comply with it as soon as possible. The filter unit with 2 sheets of filters is inside of the filter cover. An extra air filter is also attached to inner side of the filter cover. If one of the filters is damaged or heavily soiled, replace whole filter set with a new one.
Request for a filter set with the following type number from your dealer when purchasing a new one.
Type number : 003-004135-01 (UX38241)
1. Turn the projector off, and unplug the power cord. Allow the projector to sufficiently cool down.
2. Use a vacuum cleaner on and around the filter cover.
3. Pick and pull up the filter cover knobs to take it off.
4. Press up slightly the bottom side knobs to unlock the bottom side of the filter unit. Pull
the center knob to take the filter unit off.
5. Use a vacuum cleaner for the filter vent of the projector and the outer side of the filter unit.
6. The filter unit consists of two parts. Press down around the interlocking parts to
unlock, then separate the two parts.
7. Use a vacuum cleaner for the inner side of each part of the filter unit to clean them up. If the filters are damaged or heavily soiled, replace them with the new ones.
8. Combine the two parts to reassemble the filter unit.
9. Put the filter unit back into the projector.
(continued on next page)
2
3 |
Filter cover |
Filter cover |
Extra |
knobs |
air filter |
4, 5 |
Filter unit |
|
Filter unit |
|
knobs |
6
Interlocking parts
7
16
Setup Guide 020-000504-02 Rev. 1 (06-2012)
LX501/LX601i/LW401/LW551i/LWU421/LWU501i
Cleaning and replacing the air filter (continued)
10. Put the filter cover back into the place.
11. Turn the projector on and reset the filter time using the FILTER TIME item in the EASY MENU.
(1)Press the MENU button to display a menu.
(2)Point at the FILTER TIME using the ▲/▼ cursor buttons, then press the ► cursor (or the ENTER / the RESET) button. A dialog will appear.
(3)Press the ► cursor button to select the “OK” on the dialog. It performs resetting the filter time.
 WARNING ► Before taking care of the air filter, make sure the power cable is not plugged in, then allow the projector to cool sufficiently.
►Use only the air filter of the specified type. Do not use the projector without the air filter or the filter cover. It could result in a fire or malfunction to the projector.
►Clean the air filter periodically. If the air filter becomes clogged by dust or the like, internal temperatures rise and could cause a fire, a burn or malfunction to the projector.
NOTE • Please reset the filter time only when you have cleaned or replaced the air filter, for a suitable indication about the air filter.
• The projector may display the message such as the “CHECK THE AIR FLOW” or turn off the projector, to prevent the internal heat level rising.
ENGLISH
17
Setup Guide 020-000504-02 Rev. 1 (06-2012)

LX501/LX601i/LW401/LW551i/LWU421/LWU501i
Using the CD manual
The other manuals for this product are written into the included CD-ROM titled “Projector User Manual”. Before using the CD-ROM, please read the following to ensure the proper use.
 System requirements
The system for using the CD-ROM requires the following.
Windows®: OS:Windows® XP, Windows Vista®, Windows® 7 or later Macintosh®: OS:Mac OS® 10.2 or later
CD-ROM/DVD-ROM drive
Applications: Microsoft® Internet Explorer®6.0 and Adobe® Acrobat® Reader® 8.0 or late
 How to use the CD
1. Insert CD into computer’s CD-ROM/DVD-ROM drive.
Windows®: In a while, Web browser automatically starts. Start up window comes up.
Macintosh®: (1) Double-click on the “Projectors” icon appeared on the desktop screen.
(2) When “main.html” file is clicked, Web browser will start and Initial window will appear.
2.Click the model name of your projector first, and then click language you want from the displayed list. The User manual (detailed) will open.
 CAUTION ►Only use the CD-ROM in a computer CD/DVD drive. The CD-ROM is designed for computer use only. NEVER INSERT THE CD-ROM INTO A NON-COMPUTER CD/DVD PLAYER! Inserting the CD-ROM into an incompatible CD/DVD drive may produce a loud noise, which in turn MAY RESULT IN EAR AND SPEAKER DAMAGE!
•After using CD-ROM, please put it into CD case and keep it. Please keep the CD neither in direct sunlight nor in a high temperature and high humidity environment.
NOTE • The information in the CD-ROM is subject to change without notice. Please check our website where you may find the latest information for this projector. ( )
•No responsibility is taken for any obstacle and defect to hardware and software of your computer as a result of the use of the CD-ROM.
•All or Any part of the information in the CD-ROM must not be copied, reproduced or republished without notice to our company.
18
Setup Guide 020-000504-02 Rev. 1 (06-2012)

|
LX501/LX601i/LW401/LW551i/LWU421/LWU501i |
|
|
Specifications |
|
||
|
|
|
|
Item |
Specification |
|
|
|
|
|
|
Product name |
Liquid crystal projector |
|
|
|
|
|
ENGLISH |
|
LX501, LX601i: |
|
|
|
|
|
|
|
786,432 pixels (1024 horizontal x 768 vertical) |
|
|
Liquid Crystal |
LW401, LW551i: |
|
|
Panel |
1,024,000 pixels (1280 horizontal x 800 vertical) |
|
|
|
LWU421, LWU501i: |
|
|
|
2,304,000 pixels (1920 horizontal x 1200 vertical) |
|
|
Lamp |
LX501, LW401, LWU421: 245 W UHP |
|
|
LX601i, LW551i, LWU501i: 330 W UHP |
|
|
|
|
|
|
|
Speaker |
8 W x2 |
|
|
|
LX501, LW401, LWU421: |
|
|
Power supply, |
AC100-120 V: 3.8 A, AC220-240 V: 1.9 A |
|
|
Rated current |
LX601i, LW551i, LWU501i: |
|
|
|
AC100-120 V: 4.9 A, AC220-240 V: 2.4 A |
|
|
|
LX501, LW401, LWU421: |
|
|
Power |
AC100-120 V: 375 W, AC220-240 V: 355 W |
|
|
consumption |
LX601i, LW551i, LWU501i: |
|
|
|
AC100-120 V: 480 W, AC220-240 V: 455 W |
|
|
Temperature |
0 ~ 40 °C (Operating) |
|
|
range |
|
|
|
|
|
|
|
Size |
498 (W) x 135 (H) x 396 (D) mm |
|
|
* Not including protruding parts. Refer to figure F-5 at the |
|
|
|
|
back of this manual. |
|
|
Weight (mass) |
LX501, LW401, LWU421: approx. 8.4 kg |
|
|
LX601i, LW551i, LWU501i: approx. 8.8 kg |
|
|
|
|
|
|
|
(continued on next page) |
|
||
19
Setup Guide 020-000504-02 Rev. 1 (06-2012)

LX501/LX601i/LW401/LW551i/LWU421/LWU501i
Regulatory notices (continued)
Item |
Specification |
||
|
|
|
|
|
COMPUTER IN1 ............................ |
D-sub 15 pin mini jack x1 |
|
|
COMPUTER IN2 (H, V, G/Y, B/Cb/Pb, R/Cr/Pr) .... BNC jack x5 |
||
|
HDMI 1 .................................................... |
HDMI connector x1 |
|
|
HDMI 2 .................................................... |
HDMI connector x1 |
|
|
MONITOR OUT .............................. |
D-sub 15 pin mini jack x1 |
|
|
COMPONENT (Y, Cb/Pb, Cr/Pr) ........................ |
RCA jack x3 |
|
|
S-VIDEO .............................................. |
Mini DIN 4 pin jack x1 |
|
|
VIDEO ................................................................ |
RCA jack x1 |
|
Ports |
AUDIO IN1 ................................ |
3.5 mm (stereo) mini jack x1 |
|
AUDIO IN2 |
3.5 mm (stereo) mini jack x1 |
||
|
|||
|
AUDIO IN3 (L, R) ............................................... |
RCA jack x2 |
|
|
AUDIO OUT (L, R) ............................................. |
RCA jack x2 |
|
|
USB TYPE A .................................. |
USB type A connector x2 |
|
|
USB TYPE B .................................. |
USB type B connector x1 |
|
|
CONTROL ............................................... |
D-sub 9 pin plug x1 |
|
|
LAN ................................................................... |
RJ45 jack x1 |
|
|
REMOTE CONTROL IN ............ |
3.5 mm (stereo) mini jack x1 |
|
|
REMOTE CONTROL OUT ........ |
3.5 mm (stereo) mini jack x1 |
|
|
Lamp: <LX501, LW401, LWU421> 003-120707-01 (DT01285) |
||
Optional parts |
<LX601i, LW551i, LWU501i> 003-120708-01 (DT01295) |
||
Filter set: 003-004135-01 (UX38241) |
|||
|
|||
|
* For more information, please consult your dealer. |
||
20
Setup Guide 020-000504-02 Rev. 1 (06-2012)

LX501/LX601i/LW401/LW551i/LWU421/LWU501i
Troubleshooting - Warranty and after-service
If an abnormal operation (such as smoke, strange odor or excessive sound) should occur, stop using the projector immediately.
Otherwise if a problem occurs with the projector, first refer to “Troubleshooting” of
User Manual - Operating Guide, Network Guide and Instant Stack Guide, and run through the suggested checks.
If this does not resolve the problem, please consult your dealer or service company. They will tell you what warranty condition is applied.
Please check the following web address where you may find the latest information for this projector.
http://www.christiedigital.com
NOTE • The information in this manual is subject to change without notice.
•The illustrations shown in this manual are one example for explanation. On your projector, there may be some differences from the illustrations.
•The manufacturer assumes no responsibility for any errors that may appear in this manual.
•The reproduction, transfer or copy of all or any part of this document is not permitted without express written consent.
ENGLISH
Trademark acknowledgment
•Mac®, Macintosh® and Mac OS® are registered trademarks of Apple Inc.
•Pentium® is a registered trademark of Intel Corp.
•Adobe® and Acrobat®, Reader® are registered trademarks of Adobe Systems Incorporated.
•Microsoft®, Internet Explorer®, Windows®, Windows NT® and Windows Vista® are registered trademarks of Microsoft Corporation in the U.S. and/or other countries.
•HDMITM, the HDMI logo and High-Definition Multimedia Interface are trademarks or registered trademarks of HDMI Licensing LLC in the United States and other countries.
•Blu-ray DiscTM and Blu-rayTM are trademarks of Blu-ray Disc Association.
All other trademarks are the properties of their respective owners.
End User License Agreement for the Projector Software
•Software in the projector consists of the plural number of independent software modules and there exist our copyright or/and third party copyrights for each of such software modules.
•Be sure to read “End User License Agreement for the Projector Software” which is separated document. (in the CD)
21
Setup Guide 020-000504-02 Rev. 1 (06-2012)

LX501/LX601i/LW401/LW551i/LWU421/LWU501i
Setup Guide |
020-000504-02 Rev. 1 (06-2012) |

LX501/LX601i/LW401/LW551i/LWU421/LWU501i
Projecteur
LX501/LW401/LWU421/
LX601i/LW551i/LWU501i
Manuel d'utilisation (résumé)
Merci d'avoir acheté ce projecteur.
Nous vous remercions de lire attentivement le présent manuel avant d’utiliser le produit afin de respecter toutes les consignes de sécurité garantissant un fonctionnement optimal.
 AVERTISSEMENT ►Avant d'utiliser ce produit s'assurer d'avoir lu tous les manuels relatifs à celui-ci. Après les avoir lus, rangez-les dans un endroit sûr pour pouvoir vous y reporter par la suite.
►Veuillez observer tous les avertissements et les précautions des manuels ou du produit.
►Veuillez suivre toutes les instructions des manuels ou du produit.
REMARQUE • Sauf mention contraire, ‘‘les manuels’’ désignent ici l’ensemble des documents livrés avec le produit, et ‘‘le produit’’ désigne le présent projecteur ainsi que l’ensemble des accessoires livrés avec ce dernier.
FRANÇAIS
Table des matières |
|
|
|
Préliminaires....................................... |
2 |
Explication des conventions et symboles......... |
2 |
Instructions de sécurité importantes................. |
2 |
Réglementations................................. |
3 |
À propos des interférences |
|
électro-magnétiques.................... |
3 |
À propos des déchets d’équipements |
|
électriques et électroniques......... |
4 |
Contenu de l’emballage...................... |
4 |
Préparer la télécommande ................. |
5 |
Disposition.......................................... |
6 |
Connecter vos appareils..................... |
7 |
Attacher le couvercle d’adaptateur..... |
8 |
Serrage du porte-câble....................... |
8 |
|
|
Connexion électrique.......................... |
9 |
Mise sous tension............................. |
10 |
Réglage de l’élévateur du projecteur... |
11 |
Réglage de la position de l’objectif... |
11 |
Affichage de l'image ......................... |
12 |
Mise hors tension ............................. |
13 |
Remplacement de la lampe.............. |
14 |
Nettoyer et remplacer le filtre à air ... |
16 |
Utiliser le manuel sur CD.................. |
18 |
Caractéristiques techniques ............. |
19 |
Dépannage |
|
- Garantie Et Service Après-vente... |
21 |
1
Manuel d'utilisation (résumé) 020-000504-02 Rev. 1 (06-2012)

LX501/LX601i/LW401/LW551i/LWU421/LWU501i
Préliminaires
Explication des conventions et symboles
À des fins de sécurité, les conventions et symboles graphiques suivants sont utilisés comme suit tout au long des manuels et du produit. Veuillez en prendre connaissance et les respecter.
 AVERTISSEMENT Cette convention avertit d’un risque de blessure corporelle potentiellement mortelle.
 ATTENTION Cette convention avertit d’un risque de blessure corporelle ou de détérioration du produit.
AVIS Cette convention signale des problèmes potentiels.
Instructions de sécurité importantes
Les instructions de sécurité suivantes doivent être respectées pour une utilisation sécurisée du produit. Respectez toujours ces instructions lors de la manipulation du produit. Le fabricant décline toute responsabilité en cas de dégâts matériels causés par une erreur de manipulation ne faisant pas partie de l’usage normal décrit dans les manuels de ce projecteur.
 AVERTISSEMENT ►N’utilisez jamais ce produit en cas d’anomalie (par ex : émission de fumée, odeurs étranges, projection de liquide ou pénétration d’objets étrangers etc.). En cas d’anomalie, débranchez immédiatement le projecteur.
►Tenez le produit hors de portée des enfants et des animaux.
►Conserver les petites pièces à l’écart des enfants et des animaux. En cas d'ingestion, consulter immédiatement un médecin afin qu'il prescrive un traitement d'urgence. ►N’utilisez pas le produit en cas d’orage.
►Débranchez le projecteur de la prise d’alimentation lorsqu’il n’est pas utilisé. ►N’ouvrez jamais le produit et ne tentez pas de le démonter, sauf instruction contraire dans les manuels. Faites appel à un revendeur ou un centre d’entretien pour toutes les opérations de maintenance interne.
►Utilisez uniquement les accessoires spécifiés ou recommandés par le fabricant. ►Ne modifiez ni le projecteur ni les accessoires.
►Ne laissez jamais aucun objet ou liquide pénétrer à l’intérieur du produit. ►Ne mouillez pas le produit.
►Ne placez pas le projecteur dans un endroit où sont utilisées des huiles, comme de l’huile de cuisson ou de l’huile de machine. L’huile peut affecter le produit, entraînant undysfonctionnement ou une chute depuis l’emplacement d’installation.
►Ne soumettez le produit à aucun choc ni aucune pression.
-Ne placez pas le produit dans un endroit instable tel qu’une surface inégale ou une table inclinée.
-Posez le produit de manière stable. Placez le projecteur de manière à ce qu’il ne dépasse pas de la surface sur laquelle il est posé.
-Pour transporter le projecteur, positionner les mains sur la prise en main située sous l'unité.
-Lors du transport, ôtez tous les accessoires, y compris le cordon et les câbles d’alimentation.
►Ne regardez pas à l’intérieur du projecteur ni dans les ouvertures pendant que la lampe est allumée.
►Ne vous approchez pas du couvercle de la lampe et des orifices d’aération pendant que la lampe de projection est allumée. De même, restez à distance pendant quelques minutes après l’extinction de la lampe pour lui laisser le temps de refroidir.
2
Manuel d'utilisation (résumé) 020-000504-02 Rev. 1 (06-2012)

LX501/LX601i/LW401/LW551i/LWU421/LWU501i
Réglementations
À propos des interférences électro-magnétiques
Le présent appareil est un produit de classe A. En environnement domestique, ce produit est susceptible de provoquer des interférences radio-électriques, auquel cas l’utilisateur devra prendre les mesures adéquates.
Ce produit peut provoquer des interférences s’il est utilisé dans une zone résidentielle. Une telle utilisation doit être évitée à moins que l’utilisateur ne prenne des mesures spéciales pour réduire les émissions électromagnétiques afin
d’empêcher les interférences nuisibles à la réception d’émissions radio et télévisées.
Au Canada
Cet appareil numerique de la classe A est conforme a la norme NMB-003 du Canada.
Aux États-Unis et les pays soumis aux réglementations de la FCC
Cet appareil est conforme à la partie 15 des règles de la FCC. Le fonctionnement est sujet aux deux conditions suivantes: (1) Cet appareil ne causera pas d’interférences dangereuses (2) cet appareil doit accepter toute interférence reçue, y compris les interférences pouvant entraîner un dysfonctionnement.
Cet équipement a été testé et est conforme aux limites d’un dispositif numérique de catégorie A, selon la Partie 15 de la réglementation FCC.
FRANÇAIS
Ces limites ont pour vocation d’assurer une protection raisonnable contre les interférences nuisibles lorsque l’équipement est utilisé en environnement commercial.
Cet équipement génère, utilise et est susceptible d’émettre des radiofréquences. S’il n’est pas installé et utilisé conformément au manuel d’instruction, il risque donc de provoquer des interférences nuisibles aux radiocommunications. L’utilisation de cet équipement en zone résidentielle est susceptible de provoquer des interférences nuisibles. Il incombe alors à l’utilisateur de corriger ces interférences.
INSTRUCTIONS AUX UTILISATEURS: Certains câbles doivent être utilisés avec l’ensemble des noyaux. Utilisez le câble accessoire ou un câble du type désigné pour le branchement. Pour les câbles n’ayant qu’un noyau à une extrêmité, branchez le noyau au projecteur.
ATTENTION: Les changements ou modifications non expressément approuvés par la partie responsable de la conformité peuvent interdire l’utilisation de l’équipement.
3
Manuel d'utilisation (résumé) 020-000504-02 Rev. 1 (06-2012)

LX501/LX601i/LW401/LW551i/LWU421/LWU501i
Réglementations (suite)
À propos des déchets d’équipements électriques et électroniques
Le marquage est en conformité avec la directive 2002/96/EC du DEEE (déchets d’équipements électriques et électroniques). Ce marquage indique l’obligation de ne pas déposer cet équipement comprenant des piles ou batteries déchargées ou usées dans des décharges publiques, mais d’utiliser les systèmes spécifiques de retour et récupération disponibles. Si les piles ou batteries se trouvant avec cet équipement portent le symbole chimique Hg, Cd ou Pb, cela signifie qu’elles ont une teneur en métal lourd de plus de 0,0005% de Mercure, de plus de 0,002% de Cadmium ou de plus de 0,004% de Plomb.
Contenu de l’emballage
Votre projecteur doit être accompagné des éléments qui sont indiqués ci-dessous. Vérifier que tous les accessoires sont inclus. Si l'un ou l'autre des accessoires n'est
pas présent dans l'emballage, contactez immédiatement votre revendeur.
(1)Télécommande avec deux piles AA
(2)Cordon d’alimentation
(3)Câble d’ordinateur
(4)Câble DVI-HDMI™
(5)Capuchon d’objectif
(6)Manuel d’utilisation (Livre x1, CD x1)
(7)Étiquette de sécurité
(8)CD logiciels
(9)Couvercle d'adaptateur
(10)Porte-câble
(1) |
(5) |
|
|
|
(6) |
(2)
(7)
(3) |
(8) |
(4) |
(9) |
(10) 
 AVERTISSEMENT ►Conserver les petites pièces à l’écart des enfants et des animaux. Ne pas mettre dans la bouche. En cas d'ingestion, consulter immédiatement un médecin afin qu'il prescrive un traitement d'urgence.
AVIS ►Il est recommandé que le couvercle de l'adaptateur ou le portecâble soit utilisé avec l'adaptateur USB sans fil (en option) pour empêcher l'adaptateur de se détacher et pour éviter un risque de brûlure.
REMARQUE • Conservez l'emballage d'origine pour une ré-expédition future. Pour déplacer le projecteur, s’assurez de bien utiliser l’emballage d’origine. Faites particulièrement attention à la partie de l’objectif.
• Le projecteur peut émettre un bruit de cliquetis lorsqu’il est incliné, déplacé ou secoué, si un volet contrôlant le flux de l’air à l’intérieur du projecteur a bougé. Sachez qu’il ne s’agit pas d’une défaillance ou d’un dysfonctionnement.
4
Manuel d'utilisation (résumé) 020-000504-02 Rev. 1 (06-2012)
 Loading...