


 Loading...
User Manual
020-001451-01
HS Series
4K7-HS/4K10-HS

NOTICES
COPYRIGHT AND TRADEMARKS
Copyright ©2018 Christie Digital Systems USA Inc. All rights reserved.
All brand names and product names are trademarks, registered trademarks or trade names of their respective holders.
GENERAL
Every effort has been made to ensure accuracy, however in some cases changes in the products or availability could occur which may not be reflected in this document. Christie reserves the right to make changes to specifications at any time without notice. Performance specifications are typical, but may vary depending on conditions beyond Christie's control such as maintenance of the product in proper working conditions. Performance specifications are based on information available at the time of printing. Christie makes no warranty of any kind with regard to this material, including, but not limited to, implied warranties of fitness for a particular purpose. Christie will not be liable for errors contained herein or for incidental or consequential damages in connection with the performance or use of this material. Canadian manufacturing facility is ISO 9001 and 14001 certified.
WARRANTY
Products are warranted under Christie’s standard limited warranty, the complete details of which are available by contacting your Christie dealer or Christie. In addition to the other limitations that may be specified in Christie’s standard limited warranty and, to the extent relevant or applicable to your product, the warranty does not cover:
a.Problems or damage occurring during shipment, in either direction.
b.Problems or damage caused by combination of a product with non-Christie equipment, such as distribution systems, cameras, DVD players, etc., or use of a product with any non-Christie interface device.
c.Problems or damage caused by misuse, improper power source, accident, fire, flood, lightning, earthquake, or other natural disaster.
d.Problems or damage caused by improper installation/alignment, or by equipment modification, if by other than Christie service personnel or a Christie authorized repair service provider.
e.Problems or damage caused by use of a product on a motion platform or other movable device where such product has not been designed, modified or approved by Christie for such use.
f.Except where the product is designed for outdoor use, problems or damage caused by use of the product outdoors unless such product is protected from precipitation or other adverse weather or environmental conditions and the ambient temperature is within the recommended ambient temperature set forth in the specifications for such product.
g.Defects caused by normal wear and tear or otherwise due to normal aging of a product.
The warranty does not apply to any product where the serial number has been removed or obliterated. The warranty also does not apply to any product sold by a reseller to an end user outside of the country where the reseller is located unless (i) Christie has an office in the country where the end user is located or (ii) the required international warranty fee has been paid.
The warranty does not obligate Christie to provide any on site warranty service at the product site location.
PREVENTATIVE MAINTENANCE
Preventative maintenance is an important part of the continued and proper operation of your product. Failure to perform maintenance as required, and in accordance with the maintenance schedule specified by Christie, will void the warranty.
REGULATORY
The product has been tested and found to comply with the limits for a Class A digital device, pursuant to Part 15 of the FCC Rules. These limits are designed to provide reasonable protection against harmful interference when the product is operated in a commercial environment. The product generates, uses, and can radiate radio frequency energy and, if not installed and used in accordance with the instruction manual, may cause harmful interference to radio communications. Operation of the product in a residential area is likely to cause harmful interference in which case the user will be required to correct the interference at the user’s own expense.
CAN ICES-3 (A)/NMB-3 (A)
(A ) , .
ENVIRONMENTAL
The product is designed and manufactured with high-quality materials and components that can be recycled and reused. This symbol  means that electrical and electronic equipment, at their end-of-life, should be disposed of separately from regular waste. Please dispose of the product appropriately and according to local regulations. In the European Union, there are separate collection systems for used electrical and electronic products. Please help us to conserve the environment we live in!

Content
Introduction . . . . . . . . . . . . . . . . . . . . . . . . . . . . . . . . . . . . . . . . . . . . . . . . . . . . . |
. 8 |
Safety and warning guidelines . . . . . . . . . . . . . . . . . . . . . . . . . . . . . . . . . . . . . . . . . . . |
.8 |
AC/power precautions . . . . . . . . . . . . . . . . . . . . . . . . . . . . . . . . . . . . . . . . . . . . . . |
.9 |
Installation safety and warning guidelines . . . . . . . . . . . . . . . . . . . . . . . . . . . . . . . . |
.9 |
Laser safety precautions . . . . . . . . . . . . . . . . . . . . . . . . . . . . . . . . . . . . . . . . . . . . |
.9 |
Product labels . . . . . . . . . . . . . . . . . . . . . . . . . . . . . . . . . . . . . . . . . . . . . . . . . . . |
10 |
Projector overview . . . . . . . . . . . . . . . . . . . . . . . . . . . . . . . . . . . . . . . . . . . . . . . . . . . |
12 |
Contact your dealer . . . . . . . . . . . . . . . . . . . . . . . . . . . . . . . . . . . . . . . . . . . . . . . . . . . |
12 |
Key features . . . . . . . . . . . . . . . . . . . . . . . . . . . . . . . . . . . . . . . . . . . . . . . . . . . . . . . . |
12 |
How the projector works . . . . . . . . . . . . . . . . . . . . . . . . . . . . . . . . . . . . . . . . . . . . . . . |
13 |
List of components . . . . . . . . . . . . . . . . . . . . . . . . . . . . . . . . . . . . . . . . . . . . . . . . . . . |
13 |
Product documentation . . . . . . . . . . . . . . . . . . . . . . . . . . . . . . . . . . . . . . . . . . . . . . . . |
14 |
Related documentation . . . . . . . . . . . . . . . . . . . . . . . . . . . . . . . . . . . . . . . . . . . . . |
14 |
Site requirements . . . . . . . . . . . . . . . . . . . . . . . . . . . . . . . . . . . . . . . . . . . . . . . . . . . . |
14 |
Physical operating environment . . . . . . . . . . . . . . . . . . . . . . . . . . . . . . . . . . . . . . . |
14 |
Power connection . . . . . . . . . . . . . . . . . . . . . . . . . . . . . . . . . . . . . . . . . . . . . . . . . |
15 |
Projector components . . . . . . . . . . . . . . . . . . . . . . . . . . . . . . . . . . . . . . . . . . . . . . . . . |
15 |
Front view . . . . . . . . . . . . . . . . . . . . . . . . . . . . . . . . . . . . . . . . . . . . . . . . . . . . . . |
15 |
Rear view . . . . . . . . . . . . . . . . . . . . . . . . . . . . . . . . . . . . . . . . . . . . . . . . . . . . . . |
16 |
Left view . . . . . . . . . . . . . . . . . . . . . . . . . . . . . . . . . . . . . . . . . . . . . . . . . . . . . . . |
16 |
Right view . . . . . . . . . . . . . . . . . . . . . . . . . . . . . . . . . . . . . . . . . . . . . . . . . . . . . . |
17 |
Built-in keypad . . . . . . . . . . . . . . . . . . . . . . . . . . . . . . . . . . . . . . . . . . . . . . . . . . . . . . |
18 |
Input/Output (I/O) panel . . . . . . . . . . . . . . . . . . . . . . . . . . . . . . . . . . . . . . . . . . . . . . . |
19 |
IR remote keypad . . . . . . . . . . . . . . . . . . . . . . . . . . . . . . . . . . . . . . . . . . . . . . . . . . . . |
20 |
Turning on the projector . . . . . . . . . . . . . . . . . . . . . . . . . . . . . . . . . . . . . . . . . . . . . . . |
22 |
Turning off the projector . . . . . . . . . . . . . . . . . . . . . . . . . . . . . . . . . . . . . . . . . . . . . . . |
22 |
LED status indicator . . . . . . . . . . . . . . . . . . . . . . . . . . . . . . . . . . . . . . . . . . . . . . . . . . |
23 |
Status LED . . . . . . . . . . . . . . . . . . . . . . . . . . . . . . . . . . . . . . . . . . . . . . . . . . . . . |
23 |
Shutter LED . . . . . . . . . . . . . . . . . . . . . . . . . . . . . . . . . . . . . . . . . . . . . . . . . . . . . |
23 |
Adjusting the size and position . . . . . . . . . . . . . . . . . . . . . . . . . . . . . . . . . . . . . . 24
Setting the image size preset . . . . . . . . . . . . . . . . . . . . . . . . . . . . . . . . . . . . . . . . . . . . 24 Setting the position of display image . . . . . . . . . . . . . . . . . . . . . . . . . . . . . . . . . . . . . . . 25 Setting the digital size of display image . . . . . . . . . . . . . . . . . . . . . . . . . . . . . . . . . . . . . 25
4K7-HS/4K10-HS User Manual |
3 |
020-001451-01 Rev. 1 (10-2018)
Copyright ©2018 Christie Digital Systems USA Inc. All rights reserved.

Content
Setting the digital position of display image . . . . . . . . . . . . . . . . . . . . . . . . . . . . . . . . . . 25 Geometry correction . . . . . . . . . . . . . . . . . . . . . . . . . . . . . . . . . . . . . . . . . . . . . . . . . . 25 Saving geometry correction . . . . . . . . . . . . . . . . . . . . . . . . . . . . . . . . . . . . . . . . . . 25 Applying geometry correction . . . . . . . . . . . . . . . . . . . . . . . . . . . . . . . . . . . . . . . . . 26 Warping the image . . . . . . . . . . . . . . . . . . . . . . . . . . . . . . . . . . . . . . . . . . . . . . . . 26 Applying the saved warp file . . . . . . . . . . . . . . . . . . . . . . . . . . . . . . . . . . . . . . . . . 26 Adjusting horizontal keystone . . . . . . . . . . . . . . . . . . . . . . . . . . . . . . . . . . . . . . . . . 27 Adjusting the vertical keystone . . . . . . . . . . . . . . . . . . . . . . . . . . . . . . . . . . . . . . . . 27 Adjusting horizontal pincushion . . . . . . . . . . . . . . . . . . . . . . . . . . . . . . . . . . . . . . . 28 Adjusting vertical pincushion . . . . . . . . . . . . . . . . . . . . . . . . . . . . . . . . . . . . . . . . . 28 Adjusting 4-corner . . . . . . . . . . . . . . . . . . . . . . . . . . . . . . . . . . . . . . . . . . . . . . . . 28 Enabling auto warp filter . . . . . . . . . . . . . . . . . . . . . . . . . . . . . . . . . . . . . . . . . . . . 29 Adjusting warp filter . . . . . . . . . . . . . . . . . . . . . . . . . . . . . . . . . . . . . . . . . . . . . . . 29 Resetting geometry correction setting . . . . . . . . . . . . . . . . . . . . . . . . . . . . . . . . . . . 29 Creating edge blending . . . . . . . . . . . . . . . . . . . . . . . . . . . . . . . . . . . . . . . . . . . . . . . . 29 Enabling basic image blending . . . . . . . . . . . . . . . . . . . . . . . . . . . . . . . . . . . . . . . . 29 Blending multiple images . . . . . . . . . . . . . . . . . . . . . . . . . . . . . . . . . . . . . . . . . . . . 30 Applying the saved blend file . . . . . . . . . . . . . . . . . . . . . . . . . . . . . . . . . . . . . . . . . 30
Adjusting the image settings . . . . . . . . . . . . . . . . . . . . . . . . . . . . . . . . . . . . . . . . 32
Adjusting the brightness . . . . . . . . . . . . . . . . . . . . . . . . . . . . . . . . . . . . . . . . . . . . . . . |
32 |
Adjusting the contrast . . . . . . . . . . . . . . . . . . . . . . . . . . . . . . . . . . . . . . . . . . . . . . . . . |
32 |
Adjusting the color space . . . . . . . . . . . . . . . . . . . . . . . . . . . . . . . . . . . . . . . . . . . . . . . |
32 |
Adjusting the image sharpness . . . . . . . . . . . . . . . . . . . . . . . . . . . . . . . . . . . . . . . . . . . |
33 |
Setting up 3D display . . . . . . . . . . . . . . . . . . . . . . . . . . . . . . . . . . . . . . . . . . . . . . . . . |
33 |
Setting 3D format . . . . . . . . . . . . . . . . . . . . . . . . . . . . . . . . . . . . . . . . . . . . . . . . . |
33 |
Inverting 3D signal . . . . . . . . . . . . . . . . . . . . . . . . . . . . . . . . . . . . . . . . . . . . . . . . |
34 |
Setting the 3D sync output signal . . . . . . . . . . . . . . . . . . . . . . . . . . . . . . . . . . . . . . |
34 |
Setting the frame delay . . . . . . . . . . . . . . . . . . . . . . . . . . . . . . . . . . . . . . . . . . . . . |
34 |
Setting the left/right (L/R) reference . . . . . . . . . . . . . . . . . . . . . . . . . . . . . . . . . . . . |
34 |
Setting the input levels . . . . . . . . . . . . . . . . . . . . . . . . . . . . . . . . . . . . . . . . . . . . . . . . |
35 |
Adjusting the color gain . . . . . . . . . . . . . . . . . . . . . . . . . . . . . . . . . . . . . . . . . . . . . |
35 |
Adjusting the color offset . . . . . . . . . . . . . . . . . . . . . . . . . . . . . . . . . . . . . . . . . . . . |
35 |
Resetting the input levels . . . . . . . . . . . . . . . . . . . . . . . . . . . . . . . . . . . . . . . . . . . |
35 |
Configuring picture settings . . . . . . . . . . . . . . . . . . . . . . . . . . . . . . . . . . . . . . . . . . . . . |
36 |
Saving customized picture setting . . . . . . . . . . . . . . . . . . . . . . . . . . . . . . . . . . . . . . . . . |
36 |
Setting the contrast ratio . . . . . . . . . . . . . . . . . . . . . . . . . . . . . . . . . . . . . . . . . . . . . . . |
37 |
Enabling the image freeze . . . . . . . . . . . . . . . . . . . . . . . . . . . . . . . . . . . . . . . . . . . . . . |
37 |
Setting the high dynamic range . . . . . . . . . . . . . . . . . . . . . . . . . . . . . . . . . . . . . . . . . . |
37 |
4K7-HS/4K10-HS User Manual |
4 |
020-001451-01 Rev. 1 (10-2018)
Copyright ©2018 Christie Digital Systems USA Inc. All rights reserved.

|
Content |
Setting up Motion Estimate and Motion Compensation . . . . . . . . . . . . . . . . . . . . . . . |
. . . . 38 |
Adjust the color of the image . . . . . . . . . . . . . . . . . . . . . . . . . . . . . . . . . . . . . . . . |
. . . . 38 |
Adjusting primary colors . . . . . . . . . . . . . . . . . . . . . . . . . . . . . . . . . . . . . . . . |
. . . . 38 |
Setting the wall color . . . . . . . . . . . . . . . . . . . . . . . . . . . . . . . . . . . . . . . . . . |
. . . . 40 |
Adjusting the color value based on gamma setting . . . . . . . . . . . . . . . . . . . . . . . . . |
. . . . 40 |
Adjusting the white peaking . . . . . . . . . . . . . . . . . . . . . . . . . . . . . . . . . . . . . . . . . |
. . . . 40 |
Adjusting the color temperature . . . . . . . . . . . . . . . . . . . . . . . . . . . . . . . . . . . . . . |
. . . . 41 |
Setting the Real Black threshold . . . . . . . . . . . . . . . . . . . . . . . . . . . . . . . . . . . . . . |
. . . . 41 |
Configuring the HDMI setting . . . . . . . . . . . . . . . . . . . . . . . . . . . . . . . . . . . . . . . . |
. . . . 41 |
Configuring system settings . . . . . . . . . . . . . . . . . . . . . . . . . . . . . . . . . . . . . |
. . . 42 |
Changing the language . . . . . . . . . . . . . . . . . . . . . . . . . . . . . . . . . . . . . . . . . . . . |
. . . . 42 |
Enabling Low Latency Mode . . . . . . . . . . . . . . . . . . . . . . . . . . . . . . . . . . . . . . . . . |
. . . . 42 |
Adjusting lens settings . . . . . . . . . . . . . . . . . . . . . . . . . . . . . . . . . . . . . . . . . . . . . |
. . . . 43 |
Setting up lens type . . . . . . . . . . . . . . . . . . . . . . . . . . . . . . . . . . . . . . . . . . . |
. . . . 43 |
Aligning the image with zoom and focus . . . . . . . . . . . . . . . . . . . . . . . . . . . . . |
. . . . 43 |
Adjusting lens position . . . . . . . . . . . . . . . . . . . . . . . . . . . . . . . . . . . . . . . . . |
. . . . 43 |
Saving lens setting . . . . . . . . . . . . . . . . . . . . . . . . . . . . . . . . . . . . . . . . . . . . |
. . . . 44 |
Applying the previous lens setting . . . . . . . . . . . . . . . . . . . . . . . . . . . . . . . . . . |
. . . . 44 |
Locking the lens motor . . . . . . . . . . . . . . . . . . . . . . . . . . . . . . . . . . . . . . . . . |
. . . . 44 |
Resetting the lens to home position . . . . . . . . . . . . . . . . . . . . . . . . . . . . . . . . . |
. . . . 44 |
Selecting screen image orientation . . . . . . . . . . . . . . . . . . . . . . . . . . . . . . . . . . . . |
. . . . 45 |
Adjusting on-screen display menus . . . . . . . . . . . . . . . . . . . . . . . . . . . . . . . . . . . . |
. . . . 45 |
Determining the on-screen display position . . . . . . . . . . . . . . . . . . . . . . . . . . . |
. . . . 45 |
Setting the transparency of the on-screen display position . . . . . . . . . . . . . . . . . |
. . . . 45 |
Setting time out for on-screen display . . . . . . . . . . . . . . . . . . . . . . . . . . . . . . . |
. . . . 45 |
Showing Messages . . . . . . . . . . . . . . . . . . . . . . . . . . . . . . . . . . . . . . . . . . . . . . . |
. . . . 46 |
Changing the splash screen . . . . . . . . . . . . . . . . . . . . . . . . . . . . . . . . . . . . . . . . . |
. . . . 46 |
Setting up password protection . . . . . . . . . . . . . . . . . . . . . . . . . . . . . . . . . . . . . . . |
. . . . 46 |
Changing password . . . . . . . . . . . . . . . . . . . . . . . . . . . . . . . . . . . . . . . . . . . . . . . |
. . . . 46 |
Setting up power mode . . . . . . . . . . . . . . . . . . . . . . . . . . . . . . . . . . . . . . . . . . . . |
. . . . 47 |
Setting the standby mode . . . . . . . . . . . . . . . . . . . . . . . . . . . . . . . . . . . . . . . |
. . . . 47 |
Setting the AC power . . . . . . . . . . . . . . . . . . . . . . . . . . . . . . . . . . . . . . . . . . |
. . . . 47 |
Setting the time for auto shutdown . . . . . . . . . . . . . . . . . . . . . . . . . . . . . . . . . |
. . . . 47 |
Setting the sleep timer . . . . . . . . . . . . . . . . . . . . . . . . . . . . . . . . . . . . . . . . . |
. . . . 48 |
Enabling high altitude setting . . . . . . . . . . . . . . . . . . . . . . . . . . . . . . . . . . . . . . . . |
. . . . 48 |
Adjusting the back light settings . . . . . . . . . . . . . . . . . . . . . . . . . . . . . . . . . . . . . . |
. . . . 48 |
Setting the hot key . . . . . . . . . . . . . . . . . . . . . . . . . . . . . . . . . . . . . . . . . . . . . . . |
. . . . 48 |
4K7-HS/4K10-HS User Manual |
5 |
020-001451-01 Rev. 1 (10-2018)
Copyright ©2018 Christie Digital Systems USA Inc. All rights reserved.

Content
Configuring communications . . . . . . . . . . . . . . . . . . . . . . . . . . . . . . . . . . . . . . . . 50
Setting the projector communication . . . . . . . . . . . . . . . . . . . . . . . . . . . . . . . . . . . . . . . 50 Setting network environment . . . . . . . . . . . . . . . . . . . . . . . . . . . . . . . . . . . . . . . . . . . . 51 Adjusting LAN setting . . . . . . . . . . . . . . . . . . . . . . . . . . . . . . . . . . . . . . . . . . . . . . 51 Adjusting WLAN setting . . . . . . . . . . . . . . . . . . . . . . . . . . . . . . . . . . . . . . . . . . . . . 51 Adjusting network setting . . . . . . . . . . . . . . . . . . . . . . . . . . . . . . . . . . . . . . . . . . . 52 Setting serial port baud rate . . . . . . . . . . . . . . . . . . . . . . . . . . . . . . . . . . . . . . . . . 52 Enabling serial port echo . . . . . . . . . . . . . . . . . . . . . . . . . . . . . . . . . . . . . . . . . . . . 52 Setting serial port path . . . . . . . . . . . . . . . . . . . . . . . . . . . . . . . . . . . . . . . . . . . . . 52 Using web user interface . . . . . . . . . . . . . . . . . . . . . . . . . . . . . . . . . . . . . . . . . . . . . . . 53 System requirement . . . . . . . . . . . . . . . . . . . . . . . . . . . . . . . . . . . . . . . . . . . . . . . 53 Logging on to the web user interface . . . . . . . . . . . . . . . . . . . . . . . . . . . . . . . . . . . . 53 Setting the system notification . . . . . . . . . . . . . . . . . . . . . . . . . . . . . . . . . . . . . . . . . . . 54
Configuring input settings . . . . . . . . . . . . . . . . . . . . . . . . . . . . . . . . . . . . . . . . . . |
55 |
Setting main input source . . . . . . . . . . . . . . . . . . . . . . . . . . . . . . . . . . . . . . . . . . . . . |
. 55 |
Setting second input source . . . . . . . . . . . . . . . . . . . . . . . . . . . . . . . . . . . . . . . . . . . . |
. 55 |
Enabling second input source . . . . . . . . . . . . . . . . . . . . . . . . . . . . . . . . . . . . . . . . . . . . |
55 |
Swapping main input and second input source . . . . . . . . . . . . . . . . . . . . . . . . . . . . . . . . |
55 |
Setting the size of second input source . . . . . . . . . . . . . . . . . . . . . . . . . . . . . . . . . . . . . |
56 |
Setting up the display layout with two input sources . . . . . . . . . . . . . . . . . . . . . . . . . . . . |
56 |
Input sources layout and size . . . . . . . . . . . . . . . . . . . . . . . . . . . . . . . . . . . . . . . . . |
56 |
Setting the input searching method . . . . . . . . . . . . . . . . . . . . . . . . . . . . . . . . . . . . . . . . |
57 |
Configuring light settings . . . . . . . . . . . . . . . . . . . . . . . . . . . . . . . . . . . . . . . . . . |
58 |
Setting light source mode . . . . . . . . . . . . . . . . . . . . . . . . . . . . . . . . . . . . . . . . . . . . . . |
58 |
Adjusting the light power . . . . . . . . . . . . . . . . . . . . . . . . . . . . . . . . . . . . . . . . . . . . . . . |
59 |
Calibrating the light sensor . . . . . . . . . . . . . . . . . . . . . . . . . . . . . . . . . . . . . . . . . . . . . . |
59 |
Diagnostic tools . . . . . . . . . . . . . . . . . . . . . . . . . . . . . . . . . . . . . . . . . . . . . . . . . . 60
Viewing projector information . . . . . . . . . . . . . . . . . . . . . . . . . . . . . . . . . . . . . . . . . . . . 60 Selecting a test pattern . . . . . . . . . . . . . . . . . . . . . . . . . . . . . . . . . . . . . . . . . . . . . . . . 60 Restoring factory default settings . . . . . . . . . . . . . . . . . . . . . . . . . . . . . . . . . . . . . . . . . 61
Signal connectivity specifications . . . . . . . . . . . . . . . . . . . . . . . . . . . . . . . . . . . . . 62
Inputs . . . . . . . . . . . . . . . . . . . . . . . . . . . . . . . . . . . . . . . . . . . . . . . . . . . . . . . . . . . . 62 Picture-in-picture/picture-by-picture (PIP/PBP) compatibility . . . . . . . . . . . . . . . . . . . . . . . 65
Regulatory . . . . . . . . . . . . . . . . . . . . . . . . . . . . . . . . . . . . . . . . . . . . . . . . . . . . . . 66
Safety . . . . . . . . . . . . . . . . . . . . . . . . . . . . . . . . . . . . . . . . . . . . . . . . . . . . . . . . . . . . 66
4K7-HS/4K10-HS User Manual |
6 |
020-001451-01 Rev. 1 (10-2018)
Copyright ©2018 Christie Digital Systems USA Inc. All rights reserved.

Content
Laser safety . . . . . . . . . . . . . . . . . . . . . . . . . . . . . . . . . . . . . . . . . . . . . . . . . . . . . . . . 66 Electro-magnetic compatibility . . . . . . . . . . . . . . . . . . . . . . . . . . . . . . . . . . . . . . . . . . . 66 Emissions . . . . . . . . . . . . . . . . . . . . . . . . . . . . . . . . . . . . . . . . . . . . . . . . . . . . . . 66 Immunity . . . . . . . . . . . . . . . . . . . . . . . . . . . . . . . . . . . . . . . . . . . . . . . . . . . . . . 67 Environmental . . . . . . . . . . . . . . . . . . . . . . . . . . . . . . . . . . . . . . . . . . . . . . . . . . . . . . 67
4K7-HS/4K10-HS User Manual |
7 |
020-001451-01 Rev. 1 (10-2018)
Copyright ©2018 Christie Digital Systems USA Inc. All rights reserved.

Introduction
This manual is intended for Christie qualified installers and trained operators of 4K7-HS/4K10-HS projection systems.
For complete 4K7-HS/4K10-HS product documentation and technical support, go to www.christiedigital.com.
Safety and warning guidelines
Read all safety and warning guidelines before installing or operating the projector. This projector must be operated in an environment that meets the operating range specification. Use only the attachments and/or accessories recommended by Christie. Use of others may result in the risk of fire, shock, or personal injury.
Warning! If not avoided, the following could result in death or serious injury.
• Do not expose the product to moisture.
•Do not operate the product without all of its covers in place.
•This product must be installed within a restricted access location not accessible by the general public.
•Only personnel who are trained on the precautions for the restricted access location can be granted entry to the area.
•FIRE HAZARD! Keep hands, clothes, and all combustible material away from the concentrated light beam of the projector.
•TRIP OR FIRE HAZARD! Position all cables where they cannot contact hot surfaces, be pulled, be tripped over, or damaged by persons walking on or objects rolling over the cables.
•SHOCK HAZARD! Disconnect the product from AC before installing, moving, servicing, cleaning, removing components, or opening any enclosure.
•OPTICAL RADIATION HAZARD! Disconnect the power plug from the AC outlet if the product is not being used for an extended period of time.
•Do not allow anything to rest on the power cord.
•Always provide proper ventilation for the product to prevent overheating.
Caution! If not avoided, the following could result in minor or moderate injury.
• Only Christie qualified technicians are permitted to open product enclosures.
• All procedures must be performed by Christie qualified technicians.
Notice. If not avoided, the following may result in equipment or property damage.
•Always use a lens plug when installing or moving the product. This prevents contaminants from entering the product.
•Only use cleaning solutions recommended by Christie. All other cleaning solutions may cause product damage and will void the warranty.
4K7-HS/4K10-HS User Manual |
8 |
020-001451-01 Rev. 1 (10-2018)
Copyright ©2018 Christie Digital Systems USA Inc. All rights reserved.
Introduction
AC/power precautions
Read all AC/power precautions before installing or operating the projector.
Warning! If not avoided, the following could result in death or serious injury.
• FIRE HAZARD! Do not use a power cord, harness, or cable that appears damaged.
•FIRE OR SHOCK HAZARD! Do not overload power outlets and extension cords.
•SHOCK HAZARD! Only use the AC power cord provided with the product or recommended by Christie.
•FIRE AND SHOCK HAZARD! Do not attempt operation unless the power cord, power socket, and power plug meet the appropriate local rating standards.
•SHOCK HAZARD! Do not attempt operation if the AC supply is not within the specified voltage and current, as specified on the license label.
•SHOCK HAZARD! The AC power cord must be inserted into an outlet with grounding.
•SHOCK HAZARD! Disconnect the product from AC before installing, moving, servicing, cleaning, removing components, or opening any enclosure.
•Install the product near an easily accessible AC receptacle.
Installation safety and warning guidelines
Read all installation safety and warning guidelines before installing the projector.
Warning! If not avoided, the following could result in death or serious injury.
• High leakage current present when connected to IT power systems.
Caution! If not avoided, the following could result in minor or moderate injury.
• ELECTRICAL and BURN HAZARD! Use caution when accessing internal components.
• Only Christie qualified technicians are authorized to use the tools provided in the toolbox.
Laser safety precautions
This product is classified as Class 1 Laser Product-Risk Group 2 according to IEC 60825-1:2014 complies with FDA regulations 21 CFR 1040.10 and 1040.11 as a Risk Group 2, LIP (Laser Illuminated Projector) as defined in IEC 62471:2006 except for deviations pursuant to Laser Notice
No. 50, dated June 24, 2007.
Warning! If not avoided, the following could result in death or serious injury.
• This projector has a built-in Class 4 laser module. Never attempt to disassemble or modify the projector.
•Any operation or adjustment not specifically instructed in the User manual creates the risk of hazardous laser radiation exposure.
•Do not open or disassemble the projector as this may cause damage or exposure to laser radiation.
•Do not stare into beam when the projector is on. The bright light may result in permanent eye damage.
•When turning on the projector, make sure no one within projection range is looking into the lens.
•Follow the control, adjustment, or operation procedures to avoid damage or injury from exposure of laser radiation.
•The instructions for the assembly, operation, and maintenance include clear warnings concerning precautions to avoid possible exposure to hazardous laser radiation.
4K7-HS/4K10-HS User Manual |
9 |
020-001451-01 Rev. 1 (10-2018)
Copyright ©2018 Christie Digital Systems USA Inc. All rights reserved.
Introduction
Product labels
Learn about the labels that may be used on the product. Labels on your product may be yellow or black and white.
General hazards
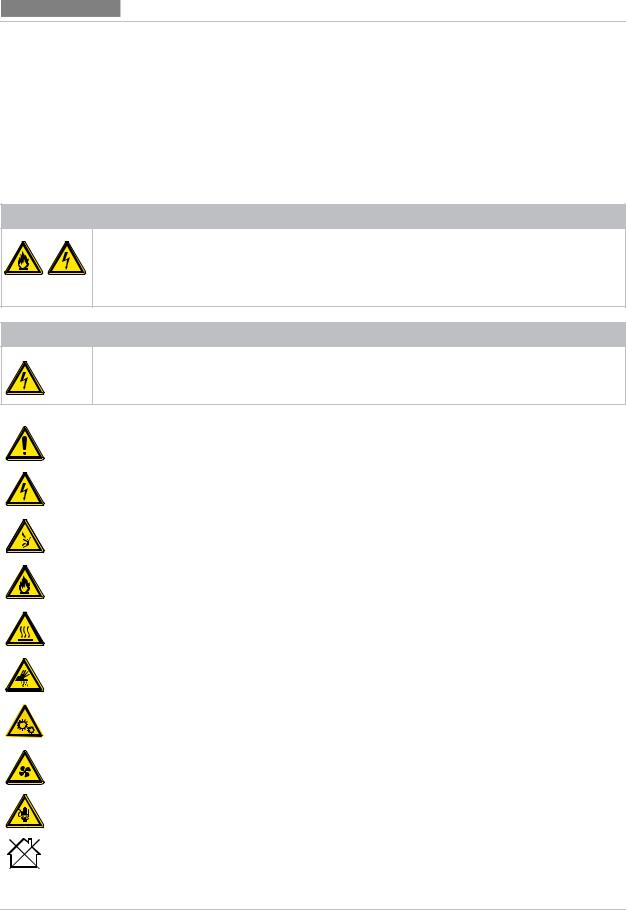
Hazard warnings also apply to accessories once they are installed in a Christie product that is connected to power.
Fire and Shock Hazard
To prevent fire or shock hazards, do not expose this product to rain or moisture.
Do not alter the power plug, overload the power outlet, or use it with extension Cords.
Do not remove the product enclosure.
Only Christie qualified technicians are authorized to service the product.
Electrical Hazard
Risk of electric shock.
Do not remove the product enclosure.
Only Christie qualified technicians are authorized to service the product.
General hazard.
Electric shock hazard. To avoid personal injury, disconnect all power sources before performing maintenance or service.
Electrocution hazard. To avoid personal injury, always disconnect all power sources before performing maintenance or service procedures.
Fire hazard. To avoid personal injury and property damage, follow the instructions provided in this document.
Hot surface hazard. To avoid personal injury, allow the product to cool for the recommended cool down time before performing maintenance or service.
Burn hazard. To avoid personal injury, allow the product to cool for the recommended cool down time before performing maintenance or service.
Moving parts hazard. To avoid personal injury, keep hands clear and loose clothing tied back.
Fan hazard. To avoid personal injury, keep hands clear and loose clothing tied back. Always disconnect all power sources before performing maintenance or service procedures.
Voltage hazard. To avoid personal injury, always disconnect all power sources before performing maintenance or service procedures.
Not for household use.
4K7-HS/4K10-HS User Manual |
10 |
020-001451-01 Rev. 1 (10-2018)
Copyright ©2018 Christie Digital Systems USA Inc. All rights reserved.
Introduction
Mandatory action
Consult the service manual.
Disconnect all power sources before performing maintenance or service procedures.
Electrical labels
Indicates the presence of an earth ground.
Laser labels
Do not look into the projector lens when the laser is on. The bright light may result in permanent eye damage.
This projector has been classified as Class 1 Laser ProductRisk Group 2 according to IEC 60825-1:2014, IEC 62471:2006, and IEC 62471-5:2015.
4K7-HS/4K10-HS User Manual |
11 |
020-001451-01 Rev. 1 (10-2018)
Copyright ©2018 Christie Digital Systems USA Inc. All rights reserved.

Introduction
Projector overview
The 4K7-HS/4K10-HS projector is a professional, 4K UHD resolution projector system using Digital Light Processing (DLP™) technology from Texas Instruments. It provides high standard of image quality along with high degree of flexibility, providing great alternatives for fixed installation environments to enhance users visual experience.
Contact your dealer
Record the information about your projector and keep this information with your records to assist with the servicing of your projector. If you encounter a problem with your Christie projector, contact
your dealer.
Purchase record
Dealer:
Dealer or Christie Sales/Service contact phone number:
Projector serial number:
The serial number can be found on the license label located on the display panel
Purchase date:
Installation date:
Ethernet settings
Default gateway
Projector IP address
Subnet mask
Key features
Understand the important features of the projector.
•4K UHD (3840x2160) resolution with high brightness performance
•Lens suite options for installation flexibility
•Projection lens compatibility:
•Horizontal offset ranges with half image size: +/-60%
•Vertical offset ranges with half image size: +/-140%
Measurements comply with industry standards where offset is calculated as a ratio of the number of pixels shifted up or down to half image size.
•Christie Twist™ allows for easy and quick blending and warping
•Full HD 3D technology with frame sequential up to 120Hz
•A wide range of connectivity including 3G-SDI, HDBaseT, and 3D inputs
•Optional HDBaseT 4K card supports HD video streaming through RJ45
4K7-HS/4K10-HS User Manual |
12 |
020-001451-01 Rev. 1 (10-2018)
Copyright ©2018 Christie Digital Systems USA Inc. All rights reserved.

Introduction
•360 degrees projection enabled by laser light source
•Compatible with HDR content
•Motion Enhancement and Motion Compensation (MEMC) technology for smooth picture quality when projecting fast motion video
•Wireless desktop display using wireless dongle (optional)
•SNMP traps and email notifications
•All video formats can be resized to full screen either horizontally or vertically while maintaining aspect ratio
•The projector can be operated using any of the following:
•The built-in keypad, the infrared (IR) remote keypad, a wired remote keypad, a PC/ device using serial communications (Ethernet or RS232)
•A web page using Ethernet or from a PC or device using a wireless USB dongle (optional)
How the projector works
The 4K7-HS/4K10-HS projector accepts a variety of input signals for a wide range of commercial projection applications.
Designed with solid-state illumination light sources and phosphor technology, the red, green and blue color elements are segmented through a phosphor wheel and then modulated by one Digital Micromirror Device (DMD) panel responding to incoming data streams of digitized red, green and blue color information. As these digital streams flow from the source, light from the responding on pixels of the DMD panel is reflected, converged and then projected to the screen through projection lenses, where all pixel reflections are superimposed in sharp full-color images.
List of components
This projector comes with all the items listed below. Check to make sure your package is complete. If anything is missing, contact your dealer.
•AC power cord
•IR remote keypad and batteries
•Product Safety Guide
4K7-HS/4K10-HS User Manual |
13 |
020-001451-01 Rev. 1 (10-2018)
Copyright ©2018 Christie Digital Systems USA Inc. All rights reserved.

Introduction
Product documentation
For installation, setup, and user information, see the product documentation available on the Christie Digital Systems USA Inc. website at www.christiedigital.com. Read all instructions before using or servicing this product.
1.Access the documentation from the Christie website:
•Go to this URL: http://bit.ly/2JtghsE or https://www.christiedigital.com/en-us/business/products/projectors/1-chip-dlp/hs-series
•Scan the QR code using a QR code reader app on a smartphone or tablet.
2. On the product page, select the model and switch to the Downloads tab.
Related documentation
Additional information on the projector is available in the following documents.
•4K7-HS/4K10-HS Installation and Setup Guide (P/N: 020-001449-XX)
•4K7-HS/4K10-HS Product Safety Guide (P/N: 020-001450-XX)
•4K7-HS/4K10-HS User Manual (P/N: 020-001451-XX)
•4K7-HS/4K10-HS Specification Guide (P/N: 020-001452-XX)
•4K7-HS/4K10-HS Service Manual (P/N: 020-001453-XX)
•4K7-HS/4K10-HS Serial Commands Guide (P/N: 020-102782-XX)
•Twist User Guide (P/N: 020-101380-XX)
Site requirements
To safely install and operate the projector, the instalation location must meet these minimum requirements.
Physical operating environment
Provides specifications for the operating environment.
•Ambient temperature (operating): 0°C to 40°C (32°F to 104°F) up to 2500 ft
•Humidity (non-condensing): 10% to 85% RH
•Operating altitude: 10,000 ft maximum at 0 to 30°C ambient temperature
4K7-HS/4K10-HS User Manual |
14 |
020-001451-01 Rev. 1 (10-2018)
Copyright ©2018 Christie Digital Systems USA Inc. All rights reserved.

Introduction
Power connection
The projector uses an universal AC power system that allows the projector to operate at full brightness with a power supply of 100-240 VAC or 200-240 VAC, depending on the regions. Operating the device outside of this voltage range may cause unsatisfactory operation or damage to the projector. To ensure safe operation, only use the AC power cord provided with the product or
recommended by Christie.
Model name |
Power requirements |
|
|
|
|
4K7-HS/4K10-HS |
100-240 |
VAC, 50/60 Hz, 12A |
|
200-240 |
VAC, 50/60 Hz, 6 A (rated for China, India, and Korea) |
|
100 VAC, 50/60 Hz, 12 A, 1050 W (rated for Japan) |
|
|
110-240 |
VAC, 50/60 Hz, 10 A (rated for Taiwan) |
|
|
|
Projector components
Identify the main components of the projector.
Front view
Identify the main components on the front of the projector.
4
USB WIFI
1 |
2 |
3 |
ID |
Part name |
Description |
|
|
|
1 |
Projection lens |
Allows powered and automatic lens shifting and adjustment: vertical and |
|
|
horizontal offsets, zoom, and focus. |
|
|
|
2 |
Front IR sensor |
Receives signals from the IR remote keypad. Keep the signal path to the |
|
|
sensors unobstructed for uninterrupted communication with the projector. |
|
|
|
3 |
Adjustable feet |
Raises or lowers the feet to level the projector. |
|
|
|
4 |
USB WIFI |
Connects to a wireless dongle. Slide the left front cover downwards to |
|
|
access the USB WIFI port. |
|
|
|
4K7-HS/4K10-HS User Manual |
15 |
020-001451-01 Rev. 1 (10-2018) |
|
Copyright ©2018 Christie Digital Systems USA Inc. All rights reserved.

Introduction
Rear view
Identify the main components on the rear of the projector.
1
2
ID |
Part name |
Description |
|
|
|
1 |
Rear IR sensor |
Receives signals from the IR remote keypad. Keep the signal path |
|
|
unobstructed for uninterrupted communication with the projector. |
|
|
|
2 |
Cooling air vents (exhaust) |
Provides cooling to the projector. Keep these vents unobstructed to prevent |
|
|
the projector from overheating. |
|
|
|
Left view
Identify the main components on the left side of the projector.
1 |
ID |
Part name |
Description |
|
|
|
1 |
Cooling air vents (intake) |
Provides cooling to the projector. Keep these vents unobstructed to prevent |
|
|
the projector from overheating. |
|
|
|
4K7-HS/4K10-HS User Manual |
16 |
020-001451-01 Rev. 1 (10-2018)
Copyright ©2018 Christie Digital Systems USA Inc. All rights reserved.

Introduction
Right view
Identify the main component on the right side of the projector.
1 |
|
2 |
HDBaseT |
3G-SDI IN |
3G-SDI OUT |
|
|
T16A/250V~ |
|
|
3 |
|
|
4 |
|
|
5 |
|
|
6 |
ID |
Part name |
Description |
|
|
|
1 |
Input/Output (I/O) panel |
Connects the projector to external devices. |
|
|
|
2 |
Built-in keypad |
Controls the projector. |
|
|
|
3 |
Fuse |
Fuse T16 A/250 VAC. |
|
|
|
4 |
Power button |
Powers the projector on or off. |
|
|
|
5 |
AC input |
Connects to the supplied power adapter (100-240 VAC). |
|
|
|
6 |
Kensington lock |
Secures the projector to counter tops, tables, and so on. |
|
|
|
4K7-HS/4K10-HS User Manual |
17 |
020-001451-01 Rev. 1 (10-2018)
Copyright ©2018 Christie Digital Systems USA Inc. All rights reserved.

Introduction
Built-in keypad |
|
|
The built-in keypad controls the projector. |
|
|
1 |
7 |
|
8 |
||
|
||
2 |
9 |
|
3 |
10 |
|
4 |
5 |
11 |
6 |
12 |
|
ID |
Button |
Description |
|
|
|
1 |
AUTO |
Automatically optimizes an image. |
|
|
|
2 |
POWER |
Turns the projector on or off. |
|
|
|
3 |
SHUTTER |
Displays or blanks the video image. |
|
|
|
4 |
OSD |
Hides or shows the on-screen display (OSD) menus. |
|
|
|
5 |
HELP |
Displays the instructions for source connection. |
|
|
|
6 |
MENU |
Displays the menus. |
|
|
|
7 |
Arrow keys |
Adjusts a setting up or down, or navigate within a menu. |
|
|
|
8 |
INPUT |
Selects an input for the main or picture in picture/picture by picture (PIP/ |
|
|
PBP) image. |
|
|
|
9 |
FOCUS |
Adjusts the focus. |
|
|
|
10 |
LENS |
Adjusts the lens vertical or horizontal offset setting. |
|
|
|
11 |
ZOOM |
Adjusts the zoom. |
|
|
|
12 |
BACK |
Returns to the previous level or exits the menus if at top level. |
|
|
|
4K7-HS/4K10-HS User Manual |
18 |
020-001451-01 Rev. 1 (10-2018)
Copyright ©2018 Christie Digital Systems USA Inc. All rights reserved.
Introduction
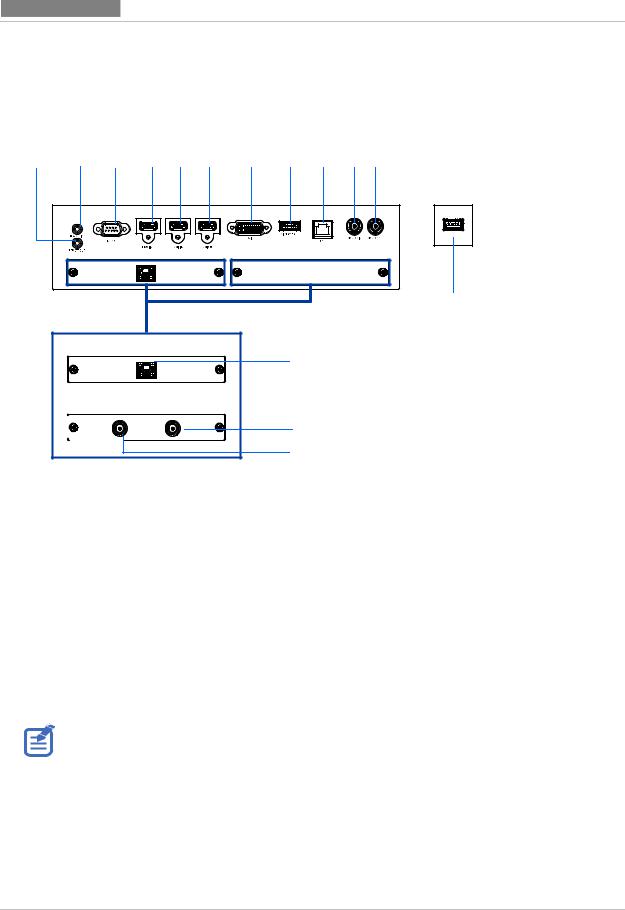
Input/Output (I/O) panel
Identify the components of the Input/Output (I/O) panel.
Right view
1 |
2 |
3 |
4 |
5 |
6 |
7 |
8 |
9 |
10 |
11 |
Front view
USB WIFI
HDBaseT
HDBaseT
3G-SDI IN |
3G-SDI OUT |
||||||
|
|
|
|
|
|
|
|
12
13
14
15
ID |
Connector name |
ID |
Connector name |
|
|
|
|
|
|
1 |
REMOTE OUT |
9 |
RJ45 (10/100 Mbps) |
|
|
|
|
|
|
2 |
REMOTE IN |
10 |
3D |
SYNC IN |
|
|
|
|
|
3 |
RS232 |
11 |
3D |
SYNC OUT |
|
|
|
|
|
4 |
HDMI IN1 |
12 |
USB WIFI (5 V/500 mA) |
|
|
|
|
|
|
5 |
HDMI IN2 |
13 |
HDBaseT |
|
|
|
|
|
|
6 |
HDMI OUT |
14 |
3G-SDI OUT |
|
|
|
|
|
|
7 |
DVI |
15 |
3G-SDI IN |
|
|
|
|
|
|
8 |
DISPLAYPORT |
|
|
|
|
|
|
|
|
The extension card can be chosen between HDBaseT and 3G-SDI IN/3G-SDI OUT.
4K7-HS/4K10-HS User Manual |
19 |
020-001451-01 Rev. 1 (10-2018)
Copyright ©2018 Christie Digital Systems USA Inc. All rights reserved.
Introduction
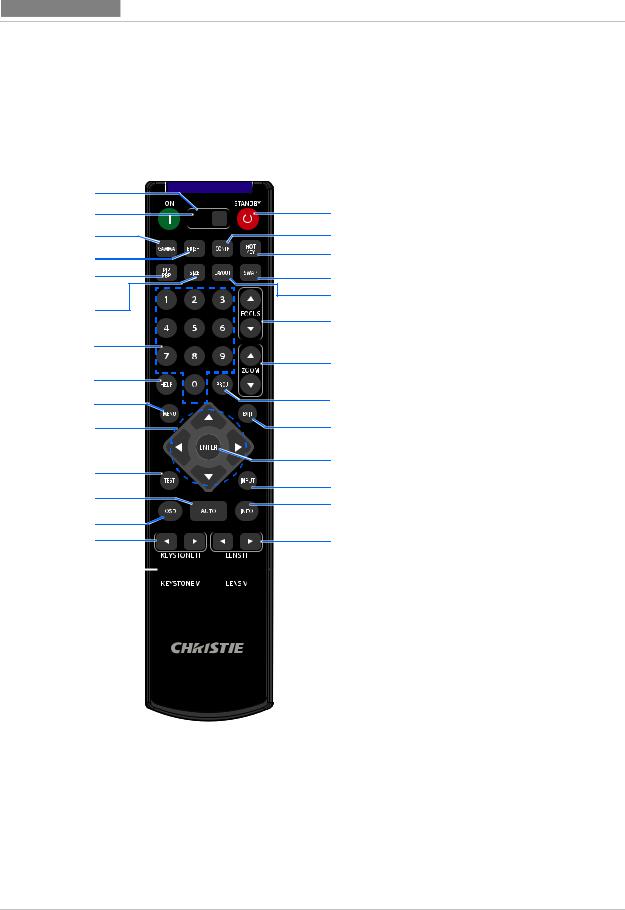
IR remote keypad
The IR remote keypad communicates with the projector by way of wireless communications.
Use a cable length of 20 m or less. If the length of cable exceeds 20 m, the IR remote keypad may not work correctly.
1 |
|
|
|
|
2 |
|
SHUTTER |
|
16 |
3 |
|
|
|
17 |
4 |
|
|
|
18 |
|
|
|
|
|
5 |
|
|
|
19 |
|
|
|
|
20 |
6 |
VGA |
BNC |
HDMI1 |
21 |
|
|
|
|
|
7 |
HDMI2 |
DVI-D |
DP |
|
|
|
|
|
3G-SDI |
HDBaseT |
22 |
|
CVBS |
|||
8 |
|
23 |
|
9 |
PRESENT. |
||
|
|||
|
|
||
10 |
|
24 |
|
11 |
|
25 |
|
|
26 |
||
12 |
|
||
|
27 |
||
|
|
||
13 |
|
|
|
14 |
|
28 |
15 


 29
29
ID |
Button |
Description |
|
|
|
1 |
SHUTTER |
Displays or blanks the video image. |
|
|
|
2 |
ON |
Turns the projector on. |
|
|
|
3 |
GAMMA |
Adjusts the mid-range levels. |
|
|
|
4K7-HS/4K10-HS User Manual |
20 |
020-001451-01 Rev. 1 (10-2018)
Copyright ©2018 Christie Digital Systems USA Inc. All rights reserved.
|
|
Introduction |
|
|
|
|
|
|
ID |
Button |
Description |
|
|
|
4 |
BRIGHT |
Adjusts the amount of light in the image. |
|
|
|
5 |
PIP |
Turns picture-in-picture/picture-by-picture (PIP/PBP) on or off. |
|
PBP |
|
|
|
|
6 |
SIZE |
Adjusts the PIP/PBP size. |
|
|
|
7 |
Number keys |
Enter a number, such as a channel, value, and so on. The on-screen display |
|
|
(OSD) indicates if a function is not supported. |
|
|
|
8 |
HELP |
Displays the instructions for source connection. |
|
|
|
9 |
MENU |
Displays the menus. |
|
|
|
10 |
Arrow keys |
Adjusts a setting up or down to navigate within a menu. |
|
|
|
11 |
TEST |
Displays a test pattern. |
|
|
|
12 |
AUTO |
Automatically optimizes an image. |
|
|
|
13 |
OSD |
Hides or shows OSD menus. |
|
|
|
14 |
KEYSTONE H |
Adjusts the horizontal keystone. |
|
|
|
15 |
KEYSTONE V |
Adjusts the vertical keystone. |
|
|
|
16 |
STANDBY |
Turns the projector off. |
|
|
|
17 |
CONTR |
Adjusts the difference between dark and light. |
|
|
|
18 |
HOT |
Selects your preset key quickly. |
|
KEY |
|
|
|
|
19 |
SWAP |
Swaps the main and PIP/PBP images. |
|
|
|
20 |
LAYOUT |
Adjusts the PIP/PBP layout. |
|
|
|
21 |
FOCUS |
Adjusts the focus to improve image clarity as required. |
|
|
|
22 |
ZOOM |
Adjusts the zoom to achieve a required image size. |
|
|
|
23 |
PROJ |
Changes the IR remote keypad ID. |
|
|
• To assign an ID, press PROJ + <1 to 9>. |
|
|
• To return to the universal IR remote ID, press PROJ + 0. |
|
|
|
24 |
EXIT |
Returns to previous level or exit menus if at top level. |
|
|
|
25 |
ENTER |
Selects a highlighted menu item, or changes or accepts a value. |
|
|
|
26 |
INPUT |
Selects an input for the main or PIP/PBP image. |
|
|
|
27 |
INFO |
Displays the source image information. |
|
|
|
28 |
LENS H |
Adjusts the position of the image horizontally. |
|
|
|
29 |
LENS V |
Adjusts the position of the image vertically. |
|
|
|
4K7-HS/4K10-HS User Manual |
21 |
020-001451-01 Rev. 1 (10-2018)
Copyright ©2018 Christie Digital Systems USA Inc. All rights reserved.
Loading...