


 Loading...
User Manual
020-101777-08
Boxer 4K
Boxer 4K20 (Bb.4) and Boxer 4K30
(Bb.1)

NOTICES
COPYRIGHT AND TRADEMARKS
Copyright © 2017 Christie Digital Systems USA Inc. All rights reserved.
All brand names and product names are trademarks, registered trademarks or trade names of their respective holders.
GENERAL
Every effort has been made to ensure accuracy, however in some cases changes in the products or availability could occur which may not be reflected in this document. Christie reserves the right to make changes to specifications at any time without notice. Performance specifications are typical, but may vary depending on conditions beyond Christie's control such as maintenance of the product in proper working conditions. Performance specifications are based on information available at the time of printing. Christie makes no warranty of any kind with regard to this material, including, but not limited to, implied warranties of fitness for a particular purpose. Christie will not be liable for errors contained herein or for incidental or consequential damages in connection with the performance or use of this material. Canadian manufacturing facility is ISO 9001 and 14001 certified.
WARRANTY
Products are warranted under Christie’s standard limited warranty, the complete details of which are available by contacting your Christie dealer or Christie. In addition to the other limitations that may be specified in Christie’s standard limited warranty and, to the extent relevant or applicable to your product, the warranty does not cover:
a.Problems or damage occurring during shipment, in either direction.
b.Projector lamps (See Christie’s separate lamp program policy).
c.Problems or damage caused by use of a projector lamp beyond the recommended lamp life, or use of a lamp other than a Christie lamp supplied by Christie or an authorized distributor of Christie lamps.
d.Problems or damage caused by combination of a product with non-Christie equipment, such as distribution systems, cameras, DVD players, etc., or use of a product with any non-Christie interface device.
e.Problems or damage caused by the use of any lamp, replacement part or component purchased or obtained from an unauthorized distributor of Christie lamps, replacement parts or components including, without limitation, any distributor offering Christie lamps, replacement parts or components through the internet (confirmation of authorized distributors may be obtained from Christie).
f.Problems or damage caused by misuse, improper power source, accident, fire, flood, lightening, earthquake or other natural disaster.
g.Problems or damage caused by improper installation/alignment, or by equipment modification, if by other than Christie service personnel or a Christie authorized repair service provider.
h.Problems or damage caused by use of a product on a motion platform or other movable device where such product has not been designed, modified or approved by Christie for such use.
i.Problems or damage caused by use of a projector in the presence of an oil-based fog machine or laser-based lighting that is unrelated to the projector.
j.For LCD projectors, the warranty period specified in the warranty applies only where the LCD projector is in “normal use” which means the LCD projector is not used more than 8 hours a day, 5 days a week.
k.Except where the product is designed for outdoor use, problems or damage caused by use of the product outdoors unless such product is protected from precipitation or other adverse weather or environmental conditions and the ambient temperature is within the recommended ambient temperature set forth in the specifications for such product.
l.Defects caused by normal wear and tear or otherwise due to normal aging of a product.
The warranty does not apply to any product where the serial number has been removed or obliterated. The warranty also does not apply to any product sold by a reseller to an end user outside of the country where the reseller is located unless (i) Christie has an office in the country where the end user is located or (ii) the required international warranty fee has been paid.
The warranty does not obligate Christie to provide any on site warranty service at the product site location.
PREVENTATIVE MAINTENANCE
Preventative maintenance is an important part of the continued and proper operation of your product. Failure to perform maintenance as required, and in accordance with the maintenance schedule specified by Christie, will void the warranty.
REGULATORY
The product has been tested and found to comply with the limits for a Class A digital device, pursuant to Part 15 of the FCC Rules. These limits are designed to provide reasonable protection against harmful interference when the product is operated in a commercial environment. The product generates, uses, and can radiate radio frequency energy and, if not installed and used in accordance with the instruction manual, may cause harmful interference to radio communications. Operation of the product in a residential area is likely to cause harmful interference in which case the user will be required to correct the interference at the user’s own expense.
CAN ICES-3 (A) / NMB-3 (A)
(A ) , .
ENVIRONMENTAL
The product is designed and manufactured with high-quality materials and components that can be recycled and reused. This symbol  means that electrical
and electronic equipment, at their end-of-life, should be disposed of separately from regular waste. Please dispose of the product appropriately and according to local regulations. In the European Union, there are separate collection systems for used electrical and electronic products. Please help us to conserve the environment we live in!

Content
Introduction. . . . . . . . . . . . . . . . . . . . . . . . . . . . . . . . . . . . . . . . . . . . . . . . . . . . . . 7
Safety and warning guidelines. . . . . . . . . . . . . . . . . . . . . . . . . . . . . . . . . . . . . . . . . . . 7 Light intensity hazard distance. . . . . . . . . . . . . . . . . . . . . . . . . . . . . . . . . . . . . . . . . 8 Product labels. . . . . . . . . . . . . . . . . . . . . . . . . . . . . . . . . . . . . . . . . . . . . . . . . . . 9 Projector overview. . . . . . . . . . . . . . . . . . . . . . . . . . . . . . . . . . . . . . . . . . . . . . . . . . 10 Contact your dealer. . . . . . . . . . . . . . . . . . . . . . . . . . . . . . . . . . . . . . . . . . . . . . . . . 10 Key features. . . . . . . . . . . . . . . . . . . . . . . . . . . . . . . . . . . . . . . . . . . . . . . . . . . . . .11 How the projector works. . . . . . . . . . . . . . . . . . . . . . . . . . . . . . . . . . . . . . . . . . . . . . 11 List of components. . . . . . . . . . . . . . . . . . . . . . . . . . . . . . . . . . . . . . . . . . . . . . . . . .11 Site requirements. . . . . . . . . . . . . . . . . . . . . . . . . . . . . . . . . . . . . . . . . . . . . . . . . . 12 Physical operating environment. . . . . . . . . . . . . . . . . . . . . . . . . . . . . . . . . . . . . . . . 12 Power connection. . . . . . . . . . . . . . . . . . . . . . . . . . . . . . . . . . . . . . . . . . . . . . . . 12 Projector components. . . . . . . . . . . . . . . . . . . . . . . . . . . . . . . . . . . . . . . . . . . . . . . . 13 IR remote keypad. . . . . . . . . . . . . . . . . . . . . . . . . . . . . . . . . . . . . . . . . . . . . . . . . . 14 Display panel components. . . . . . . . . . . . . . . . . . . . . . . . . . . . . . . . . . . . . . . . . . . . . 17 Turning the projector on. . . . . . . . . . . . . . . . . . . . . . . . . . . . . . . . . . . . . . . . . . . . . . 18 Projector LED status indicators. . . . . . . . . . . . . . . . . . . . . . . . . . . . . . . . . . . . . . . . 18 Projector LED shutter indicators. . . . . . . . . . . . . . . . . . . . . . . . . . . . . . . . . . . . . . . 19 Turning the projector off. . . . . . . . . . . . . . . . . . . . . . . . . . . . . . . . . . . . . . . . . . . . . . 19
Adjusting the image. . . . . . . . . . . . . . . . . . . . . . . . . . . . . . . . . . . . . . . . . . . . . . . 20
Selecting screen image orientation. . . . . . . . . . . . . . . . . . . . . . . . . . . . . . . . . . . . . . . .20 Setting the image resize preset. . . . . . . . . . . . . . . . . . . . . . . . . . . . . . . . . . . . . . . . . . 20 Adjusting lens settings. . . . . . . . . . . . . . . . . . . . . . . . . . . . . . . . . . . . . . . . . . . . . . . 21 Adjusting offset. . . . . . . . . . . . . . . . . . . . . . . . . . . . . . . . . . . . . . . . . . . . . . . . . .21 Resetting the lens to home position. . . . . . . . . . . . . . . . . . . . . . . . . . . . . . . . . . . . . 21 Aligning the image with lens zoom and focus. . . . . . . . . . . . . . . . . . . . . . . . . . . . . . . 21 Locking the lens motor. . . . . . . . . . . . . . . . . . . . . . . . . . . . . . . . . . . . . . . . . . . . . 22 Determining what lens warnings are displayed. . . . . . . . . . . . . . . . . . . . . . . . . . . . . . 22 Adjusting primary colors. . . . . . . . . . . . . . . . . . . . . . . . . . . . . . . . . . . . . . . . . . . . . . 22 DMD color correction. . . . . . . . . . . . . . . . . . . . . . . . . . . . . . . . . . . . . . . . . . . . . . . . 23 Adjusting color by precise chromaticity values. . . . . . . . . . . . . . . . . . . . . . . . . . . . . . .23 Adjusting color by saturation. . . . . . . . . . . . . . . . . . . . . . . . . . . . . . . . . . . . . . . . . 23 Signal color correction. . . . . . . . . . . . . . . . . . . . . . . . . . . . . . . . . . . . . . . . . . . . . . . 23
Boxer 4K Boxer 4K20 (Bb.4) and Boxer 4K30 (Bb.1) User Manual |
3 |
020-101777-08 Rev. 1 (07-2017)
Copyright © 2017 Christie Digital Systems USA Inc. All rights reserved.

Content
Adjusting the color space. . . . . . . . . . . . . . . . . . . . . . . . . . . . . . . . . . . . . . . . . . . .23 Adjusting color by temperature. . . . . . . . . . . . . . . . . . . . . . . . . . . . . . . . . . . . . . . . 24 Adjusting color values based on gamma function. . . . . . . . . . . . . . . . . . . . . . . . . . . . . 24 Selecting the color correction mode. . . . . . . . . . . . . . . . . . . . . . . . . . . . . . . . . . . . . 24 Correcting for ambient light. . . . . . . . . . . . . . . . . . . . . . . . . . . . . . . . . . . . . . . . . . 25
Setting the frame delay. . . . . . . . . . . . . . . . . . . . . . . . . . . . . . . . . . . . . . . . . . . . . . .25 Enabling film mode detect. . . . . . . . . . . . . . . . . . . . . . . . . . . . . . . . . . . . . . . . . . . . . 25 Adjusting the image sharpness. . . . . . . . . . . . . . . . . . . . . . . . . . . . . . . . . . . . . . . . . . 25 Enabling edge blending. . . . . . . . . . . . . . . . . . . . . . . . . . . . . . . . . . . . . . . . . . . . . . . 26 Blending black levels for multiple projectors. . . . . . . . . . . . . . . . . . . . . . . . . . . . . . . . . . 26
Enabling black level blending. . . . . . . . . . . . . . . . . . . . . . . . . . . . . . . . . . . . . . . . . 26 Adjusting the black level blends. . . . . . . . . . . . . . . . . . . . . . . . . . . . . . . . . . . . . . . .26 Resetting black level blending. . . . . . . . . . . . . . . . . . . . . . . . . . . . . . . . . . . . . . . . . 27 Geometry correction. . . . . . . . . . . . . . . . . . . . . . . . . . . . . . . . . . . . . . . . . . . . . . . . .27 Enabling warping. . . . . . . . . . . . . . . . . . . . . . . . . . . . . . . . . . . . . . . . . . . . . . . . . 27 Correcting the shape of a keystoned image. . . . . . . . . . . . . . . . . . . . . . . . . . . . . . . . 28
Configuring system settings. . . . . . . . . . . . . . . . . . . . . . . . . . . . . . . . . . . . . . . . .30
Setting the date on the projector. . . . . . . . . . . . . . . . . . . . . . . . . . . . . . . . . . . . . . . . . 30 Setting the time on the projector. . . . . . . . . . . . . . . . . . . . . . . . . . . . . . . . . . . . . . . . . 30 Synchronizing the date and time. . . . . . . . . . . . . . . . . . . . . . . . . . . . . . . . . . . . . . . . . 30 Changing the splash screen. . . . . . . . . . . . . . . . . . . . . . . . . . . . . . . . . . . . . . . . . . . . 31 Determining the on-screen display position. . . . . . . . . . . . . . . . . . . . . . . . . . . . . . . . . . 31 Changing the language. . . . . . . . . . . . . . . . . . . . . . . . . . . . . . . . . . . . . . . . . . . . . . . 31 Resuming projector operation after an AC power interruption. . . . . . . . . . . . . . . . . . . . . . . 31 Enabling direct pass-through of HDMI, 3G, and DisplayPort input signals. . . . . . . . . . . . . . . . 32 Informing the source of signal preferences. . . . . . . . . . . . . . . . . . . . . . . . . . . . . . . . . . . 32 Adjusting lamp power. . . . . . . . . . . . . . . . . . . . . . . . . . . . . . . . . . . . . . . . . . . . . . . . 32 BrightSelect™. . . . . . . . . . . . . . . . . . . . . . . . . . . . . . . . . . . . . . . . . . . . . . . . . . . . . 32
Selecting lamps using BrightSelect™. . . . . . . . . . . . . . . . . . . . . . . . . . . . . . . . . . . . . 33
Configuring communications. . . . . . . . . . . . . . . . . . . . . . . . . . . . . . . . . . . . . . . . 34
Enabling projector communication. . . . . . . . . . . . . . . . . . . . . . . . . . . . . . . . . . . . . . . . 34 Setting the remote access level. . . . . . . . . . . . . . . . . . . . . . . . . . . . . . . . . . . . . . . . . . 34 Communicating with Boxer 4K through Art-Net. . . . . . . . . . . . . . . . . . . . . . . . . . . . . . . . 35 Art-Net channel listing. . . . . . . . . . . . . . . . . . . . . . . . . . . . . . . . . . . . . . . . . . . . . 36 Index list for the input channel. . . . . . . . . . . . . . . . . . . . . . . . . . . . . . . . . . . . . . . . 37 Working with macros. . . . . . . . . . . . . . . . . . . . . . . . . . . . . . . . . . . . . . . . . . . . . . . . 39 Adding a macro. . . . . . . . . . . . . . . . . . . . . . . . . . . . . . . . . . . . . . . . . . . . . . . . . .39
Boxer 4K Boxer 4K20 (Bb.4) and Boxer 4K30 (Bb.1) User Manual |
4 |
020-101777-08 Rev. 1 (07-2017)
Copyright © 2017 Christie Digital Systems USA Inc. All rights reserved.

Content
Copying a macro. . . . . . . . . . . . . . . . . . . . . . . . . . . . . . . . . . . . . . . . . . . . . . . . . 40 Editing a macro. . . . . . . . . . . . . . . . . . . . . . . . . . . . . . . . . . . . . . . . . . . . . . . . . .40 Deleting a macro. . . . . . . . . . . . . . . . . . . . . . . . . . . . . . . . . . . . . . . . . . . . . . . . . 40 Configuring the GPIO. . . . . . . . . . . . . . . . . . . . . . . . . . . . . . . . . . . . . . . . . . . . . . . . 41 GPIO connector. . . . . . . . . . . . . . . . . . . . . . . . . . . . . . . . . . . . . . . . . . . . . . . . . .41
Setting up projector profiles. . . . . . . . . . . . . . . . . . . . . . . . . . . . . . . . . . . . . . . . . 43
Creating a new projector profile. . . . . . . . . . . . . . . . . . . . . . . . . . . . . . . . . . . . . . . . . 43 Importing a projector profile. . . . . . . . . . . . . . . . . . . . . . . . . . . . . . . . . . . . . . . . . . . .43 Restoring settings from a profile. . . . . . . . . . . . . . . . . . . . . . . . . . . . . . . . . . . . . . . . . 43 Renaming a projector profile. . . . . . . . . . . . . . . . . . . . . . . . . . . . . . . . . . . . . . . . . . . .44 Exporting a projector profile to an external device. . . . . . . . . . . . . . . . . . . . . . . . . . . . . . 44 Deleting a projector profile. . . . . . . . . . . . . . . . . . . . . . . . . . . . . . . . . . . . . . . . . . . . .44
Backup, restore, and upgrade projector files. . . . . . . . . . . . . . . . . . . . . . . . . . . . 45
Upgrading the Boxer 4K software. . . . . . . . . . . . . . . . . . . . . . . . . . . . . . . . . . . . . . . . .45 Exporting backup settings to an external device. . . . . . . . . . . . . . . . . . . . . . . . . . . . . . . 45 Importing a file from an external device to restore settings. . . . . . . . . . . . . . . . . . . . . . . . 46 Restoring projector default settings. . . . . . . . . . . . . . . . . . . . . . . . . . . . . . . . . . . . . . . 46
Diagnostic tools . . . . . . . . . . . . . . . . . . . . . . . . . . . . . . . . . . . . . . . . . . . . . . . . . . 47
Viewing projector information. . . . . . . . . . . . . . . . . . . . . . . . . . . . . . . . . . . . . . . . . . . 47 Viewing lamp information. . . . . . . . . . . . . . . . . . . . . . . . . . . . . . . . . . . . . . . . . . . . . 47 Adding lamp end-of-life indicator. . . . . . . . . . . . . . . . . . . . . . . . . . . . . . . . . . . . . . . . . 47 Freezing an image. . . . . . . . . . . . . . . . . . . . . . . . . . . . . . . . . . . . . . . . . . . . . . . . . . 47 Test patterns. . . . . . . . . . . . . . . . . . . . . . . . . . . . . . . . . . . . . . . . . . . . . . . . . . . . . 48
Selecting a test pattern. . . . . . . . . . . . . . . . . . . . . . . . . . . . . . . . . . . . . . . . . . . . . 48 Modifying grey level test pattern characteristics. . . . . . . . . . . . . . . . . . . . . . . . . . . . . .48 Modifying ramp test pattern characteristics. . . . . . . . . . . . . . . . . . . . . . . . . . . . . . . . 48 Modifying grid test pattern characteristics. . . . . . . . . . . . . . . . . . . . . . . . . . . . . . . . . 49 Enabling a specific test pattern color. . . . . . . . . . . . . . . . . . . . . . . . . . . . . . . . . . . . .49
Viewing Boxer 4K status. . . . . . . . . . . . . . . . . . . . . . . . . . . . . . . . . . . . . . . . . . . . . . 49 Monitoring projector and lamps with Christie TAP. . . . . . . . . . . . . . . . . . . . . . . . . . . . . . . 49 Running the Boxer 4K interrogator. . . . . . . . . . . . . . . . . . . . . . . . . . . . . . . . . . . . . . . . 50 Identifying where alarm and trap messages are sent. . . . . . . . . . . . . . . . . . . . . . . . . . . . 50 Setting the SNMP read community string. . . . . . . . . . . . . . . . . . . . . . . . . . . . . . . . . . 50 Configuring traps. . . . . . . . . . . . . . . . . . . . . . . . . . . . . . . . . . . . . . . . . . . . . . . . .50 Defining a trap IP address. . . . . . . . . . . . . . . . . . . . . . . . . . . . . . . . . . . . . . . . . . . 51 Restoring factory default settings. . . . . . . . . . . . . . . . . . . . . . . . . . . . . . . . . . . . . . . . .51
Boxer 4K Boxer 4K20 (Bb.4) and Boxer 4K30 (Bb.1) User Manual |
5 |
020-101777-08 Rev. 1 (07-2017)
Copyright © 2017 Christie Digital Systems USA Inc. All rights reserved.

Content
Specifications. . . . . . . . . . . . . . . . . . . . . . . . . . . . . . . . . . . . . . . . . . . . . . . . . . . . 52
Display. . . . . . . . . . . . . . . . . . . . . . . . . . . . . . . . . . . . . . . . . . . . . . . . . . . . . . . . . 52 Control signal compatibility. . . . . . . . . . . . . . . . . . . . . . . . . . . . . . . . . . . . . . . . . . . . 52 Shipped input cards. . . . . . . . . . . . . . . . . . . . . . . . . . . . . . . . . . . . . . . . . . . . . . . . . 53 Optional input cards. . . . . . . . . . . . . . . . . . . . . . . . . . . . . . . . . . . . . . . . . . . . . . . . . 54 Temperature sensor thresholds. . . . . . . . . . . . . . . . . . . . . . . . . . . . . . . . . . . . . . . . . . 54 Warning thresholds for fans. . . . . . . . . . . . . . . . . . . . . . . . . . . . . . . . . . . . . . . . . . . . 55 Warning threshold for liquid cooling module. . . . . . . . . . . . . . . . . . . . . . . . . . . . . . . . . . 56 Power requirements. . . . . . . . . . . . . . . . . . . . . . . . . . . . . . . . . . . . . . . . . . . . . . . . . 56 Physical specifications. . . . . . . . . . . . . . . . . . . . . . . . . . . . . . . . . . . . . . . . . . . . . . . .57 Accessories. . . . . . . . . . . . . . . . . . . . . . . . . . . . . . . . . . . . . . . . . . . . . . . . . . . . . . 57 Regulatory. . . . . . . . . . . . . . . . . . . . . . . . . . . . . . . . . . . . . . . . . . . . . . . . . . . . . . . 58
Safety. . . . . . . . . . . . . . . . . . . . . . . . . . . . . . . . . . . . . . . . . . . . . . . . . . . . . . . 58 Near field communication reader. . . . . . . . . . . . . . . . . . . . . . . . . . . . . . . . . . . . . . . 58 Electro-magnetic compatibility. . . . . . . . . . . . . . . . . . . . . . . . . . . . . . . . . . . . . . . . 58 Environmental. . . . . . . . . . . . . . . . . . . . . . . . . . . . . . . . . . . . . . . . . . . . . . . . . . 59 Environment. . . . . . . . . . . . . . . . . . . . . . . . . . . . . . . . . . . . . . . . . . . . . . . . . . . . . 59
Signal connectivity specifications. . . . . . . . . . . . . . . . . . . . . . . . . . . . . . . . . . . . 60
HBMIC video formats. . . . . . . . . . . . . . . . . . . . . . . . . . . . . . . . . . . . . . . . . . . . . . . . 60 QDPIC video formats. . . . . . . . . . . . . . . . . . . . . . . . . . . . . . . . . . . . . . . . . . . . . . . . 62 TDPIC video formats. . . . . . . . . . . . . . . . . . . . . . . . . . . . . . . . . . . . . . . . . . . . . . . . 62 DDIC video formats. . . . . . . . . . . . . . . . . . . . . . . . . . . . . . . . . . . . . . . . . . . . . . . . . 63 THIC video formats. . . . . . . . . . . . . . . . . . . . . . . . . . . . . . . . . . . . . . . . . . . . . . . . . 63 HDBase-T video formats. . . . . . . . . . . . . . . . . . . . . . . . . . . . . . . . . . . . . . . . . . . . . . 63 3GIC video formats. . . . . . . . . . . . . . . . . . . . . . . . . . . . . . . . . . . . . . . . . . . . . . . . . 64
Boxer 4K Boxer 4K20 (Bb.4) and Boxer 4K30 (Bb.1) User Manual |
6 |
020-101777-08 Rev. 1 (07-2017)
Copyright © 2017 Christie Digital Systems USA Inc. All rights reserved.

Introduction
This manual is intended for Christie qualified installers and trained operators of Christie Boxer 4K projection systems.
For complete Boxer 4K product documentation and technical support, go to www.christiedigital.com.
Safety and warning guidelines
Read all safety and warning guidelines before installing or operating the projector.
This projector must be operated in an environment that meets the operating range specification. Use only the attachments and/or accessories recommended by Christie. Use of others may result in the risk of fire, shock, or personal injury.
Warning! If not avoided, the following could result in death or serious injury.
• This product must be operated in an environment that meets the operating range as specified in this manual.
•Do not look directly into the lens or at the lamp. The extremely high brightness can cause permanent eye damage.
•EXTREME BRIGHTNESS! When accessing a restricted access location for product service or maintenance, avoid exposure to the product beam path by turning the product power off and disconnecting the product from AC power, or by shuttering the lamp to avoid emissions from the front aperture.
•Keep fingers and other body parts away from the moving parts in the product. Tie back long hair, and remove jewelry and loose clothing before manually adjusting the product.
•SHOCK HAZARD! Power supply uses double pole/neutral fusing. Disconnect all power sources before opening the product.
•FIRE HAZARD! Do not exceed 30 A for the breaker to power Input 1 on the projector.
•Install the product near an easily accessible AC receptacle.
•FIRE AND SHOCK HAZARD! Use only the attachments, accessories, tools, and replacement parts specified by Christie.
Caution! If not avoided, the following could result in minor or moderate injury.
• TRIP OR FIRE HAZARD! Position all cables where they cannot contact hot surfaces, be pulled, be tripped over, or damaged by persons walking on or objects rolling over the cables.
•The American Conference of Governmental Industrial Hygienists (ACGIH) recommends occupational UV exposure for an 8-hour day to be less than 0.1 microwatts per square centimeters of effective UV radiation. A workplace evaluation is advised to assure employees are not exposed to cumulative radiation levels exceeding the government guidelines for your area. Be aware that some medications are known to increase sensitivity to UV radiation.
Boxer 4K Boxer 4K20 (Bb.4) and Boxer 4K30 (Bb.1) User Manual |
7 |
020-101777-08 Rev. 1 (07-2017)
Copyright © 2017 Christie Digital Systems USA Inc. All rights reserved.

Introduction
Light intensity hazard distance
This projector has been classified as Risk Group 3 as per the IEC62471 standard due to possible hazardous optical and thermal radiation being emitted.
Warning! If not avoided, the following could result in serious injury.
• PERMANENT/TEMPORARY BLINDNESS HAZARD! No direct exposure to the beam must be permitted.
•PERMANENT/TEMPORARY BLINDNESS HAZARD! Operators must control access to the beam within the hazard distance or install the product at the height (greater than or equal to 3.0 m from the floor to the beam) that prevents exposure of spectators' eyes within the hazard distance.
•EXTREME BRIGHTNESS! Do not place reflective objects in the product light path.
The following diagram and table show the zones for optical and thermal radiation hazard distances:
B
B
A
•Zone A—The light intensity may cause eye damage after a momentary or brief exposure (before a person can avert his or her eye away from the light source). The light may cause skin burns to occur.
•Zone B—The light intensity does not pose a hazard due to the eye’s aversion response to bright light. However, staring directly into the light may still be a hazard.
Projection lens |
Part number |
Zone A (m) |
Zone B (m) |
|
|
|
|
0.72:1 HB fixed lens |
144-110103-XX |
0 to 0.6 |
0.6+ |
|
|
|
|
0.9:1 fixed lens |
144-111014-XX |
0 to 0.7 |
0.7+ |
|
|
|
|
1.13-1.31:1 HB zoom lens |
144-103105-XX |
0 to 1.1 |
1.1+ |
|
|
|
|
1.31-1.63:1 HB zoom lens |
144-104106-XX |
0 to 1.3 |
1.3+ |
|
|
|
|
1.63-2.17:1 HB zoom lens |
144-105107-XX |
0 to 1.7 |
1.7+ |
|
|
|
|
1.99-2.71:1 HB zoom lens |
144-106108-XX |
0 to 2.2 |
2.2+ |
|
|
|
|
2.71-3.89:1 HB zoom lens |
144-107109-XX |
0 to 3.1 |
3.1+ |
|
|
|
|
3.89-5.43:1 HB zoom lens |
144-108100-XX |
0 to 4.2 |
4.2+ |
|
|
|
|
4.96-7.69:1 HB zoom lens |
144-109101-XX |
0 to 6.0 |
6.0+ |
|
|
|
|
Boxer 4K Boxer 4K20 (Bb.4) and Boxer 4K30 (Bb.1) User Manual |
8 |
020-101777-08 Rev. 1 (07-2017)
Copyright © 2017 Christie Digital Systems USA Inc. All rights reserved.
Introduction
Product labels
Learn about the labels that may be used on the product. Labels on your product may be yellow or black and white.
General hazards
General hazard.
Electric shock hazard. To avoid personal injury, disconnect all power sources before performing maintenance or service.
Electrocution hazard. To avoid personal injury, always disconnect all power sources before performing maintenance or service procedures.
Hot surface hazard. To avoid personal injury, allow the product to cool for the recommended cool down time before performing maintenance or service.
Burn hazard. To avoid personal injury, allow the product to cool for the recommended cool down time before performing maintenance or service.
Explosive material hazard. To avoid personal injury, disconnect all power sources before performing maintenance or service, and wear Christie-approved protective clothing.
Bright light hazard. To avoid personal injury, never look directly at the light source.
Pinch hazard. To avoid personal injury, keep hands clear and loose clothing tied back.
Fan hazard. To avoid personal injury, keep hands clear and loose clothing tied back. Always disconnect all power sources before performing maintenance or service procedures.
Not for household use.
Mandatory action
Disconnect all power sources before performing maintenance or service procedures.
Consult the service manual.
Boxer 4K Boxer 4K20 (Bb.4) and Boxer 4K30 (Bb.1) User Manual |
9 |
020-101777-08 Rev. 1 (07-2017)
Copyright © 2017 Christie Digital Systems USA Inc. All rights reserved.

Introduction
Electrical labels
Indicates the presence of a protective earth ground.
Indicates the presence of an earth ground.
Additional hazard labels
Risk Group 3 warning: Indicates a potential optical radiation hazard emitted from this product. Thermal radiation emitted from this product may cause burns.
Projector overview
Learn about the Boxer 4K projector.
The Boxer 4K is a professional quality, easy-to-use projector using Digital Light Processing (DLPTM) technology from Texas Instruments. Integrating smoothly into traditional projection environments, the Boxer 4K interfaces with local networks throughout the world, for multimedia presentations from a variety of formats, to offer stunning wide screen, high resolution 4K images at 60 frames per second.
Contact your dealer
Record the information about your projector and keep this information with your records to assist with the servicing of your projector. If you encounter a problem with your Christie projector, contact your dealer.
Purchase record
Dealer:
Dealer or Christie Sales/Service contact phone number:
Projector serial number:
The serial number can be found on the license label located on the display panel
Purchase date:
Installation date:
Ethernet settings
Default gateway
Projector IP address
Boxer 4K Boxer 4K20 (Bb.4) and Boxer 4K30 (Bb.1) User Manual |
10 |
020-101777-08 Rev. 1 (07-2017)
Copyright © 2017 Christie Digital Systems USA Inc. All rights reserved.
Introduction
Ethernet settings
Subnet mask
Key features
Understand the important features of the projector.
•Built in warp and blend of projected images
•Near field communication
•Multi-lamp module with no lamp alignment required
•Improved lens mount with bayonet style insertion
•Single phase 200-240 V
•Side access to optical adjustments
•4K resolution for flexibility and future proofing
•Omnidirectional operation
•TruLife electronics
•New LCD display to provide information at-a-glance
How the projector works
The Boxer 4K accepts a variety of input signals for projection on front or rear projection screens, typical in commercial or other large screen applications.
High-brightness light is generated by mercury vapor lamps, then modulated by three Digital Micromirror Device (DMD) panels responding to incoming data streams of digitized red, green and blue color information. As these digital streams flow from the source, light from the responding “on” pixels of each panel is reflected, converged and then projected to the screen through one or more projection lenses, where all pixel reflections are superimposed in sharp full-color images.
List of components
Verify all components were received with the projector.
•Power cord for full brightness, six lamp operation
•Power cord for limited power, single lamp operation
•IR remote keypad
Boxer 4K Boxer 4K20 (Bb.4) and Boxer 4K30 (Bb.1) User Manual |
11 |
020-101777-08 Rev. 1 (07-2017)
Copyright © 2017 Christie Digital Systems USA Inc. All rights reserved.

Introduction
Site requirements
To safely install and operate the projector, the installation location must have restricted access for authorized personnel only and meet these minimum requirements.
Physical operating environment
Provides specifications for the operating environment.
•Ambient temperature (operating) 5 to 40°C (41 to 104°F) up to 1500 ft
•Humidity (non-condensing) 10 to 80%
•Operating altitude: 10,000 ft maximum at 5 to 25 degrees Celsius ambient
Power connection
The projector uses an innovative dual AC inlet power system that offers two power modes.
To operate at full brightness (six lamps), power the projector using AC Input 1 if the appropriate high power source is available. To operate in limited power mode (single lamp), power the projector using standard lower power sources using AC Input 2. A different power cord is provided for each power source. A 30A rated wall breaker is required at the installation when using Input 1. A 15A rated wall breaker is required at the installation when using Input 2.
Boxer 4K Boxer 4K20 (Bb.4) and Boxer 4K30 (Bb.1) User Manual |
12 |
020-101777-08 Rev. 1 (07-2017)
Copyright © 2017 Christie Digital Systems USA Inc. All rights reserved.

Introduction
Projector components
Identify the main components of the projector.
A B C D E F G H I J
L |
M |
N |
O |
P |
Q |
R |
|
|
|
|
|
|
S |
|
|
|
|
|
|
T |
|
|
|
|
|
|
U |
K |
|
|
|
|
|
V |
|
|
|
|
|
|
ID |
Component |
Description |
|
|
|||
|
|
|
|
A |
Communication and input |
Connects media sources to either the ports on the option cards or the |
|
|
panel |
IMXB. |
|
|
|
|
|
B |
Mounting and rigging holes |
M12 x 1.75 holes for projector feet installation and offer mounting and |
|
|
|
rigging points. |
|
|
|
|
|
C |
User interface air filter door |
Provides to the user interface air filter. |
|
|
|
|
|
D |
Display panel |
Displays the projector menus and status. |
|
|
|
|
|
E |
Keypad interface |
Controls the projector. |
|
|
|
|
|
F |
Christie TAP Enables |
Android devices to communicate with the projector using near field |
|
|
|
communication. |
|
|
|
|
|
G |
Electronics-side filter door |
Provides access to the electronics-side air filter. |
|
|
|
|
|
H |
Front IR |
Receives transmissions from the IR remote. |
|
|
|
|
|
I |
Lamp-side filter door |
Provides access to the lamp-side air filter. |
|
|
|
|
|
J |
Projection lens |
A variety of lenses can be used with the projector. Available lenses are |
|
|
|
listed in accessories. |
|
|
|
|
|
|
|
||
Boxer 4K Boxer 4K20 (Bb.4) and Boxer 4K30 (Bb.1) User Manual |
13 |
||
020-101777-08 Rev. 1 (07-2017) |
|
|
|
Copyright © 2017 Christie Digital Systems USA Inc. All rights reserved. |
|
||

|
|
Introduction |
|
|
|
ID |
Component |
Description |
|
|
|
K |
Adjustable feet |
Raise or lower these feet when positioning the projector to make sure it |
|
|
is level on all sides so the displayed image appears rectangular without |
|
|
any keystone. |
|
|
|
L |
Service compartment |
Access to fold mirror, optical zoom/focus, and DMD convergence |
|
|
adjustments. |
|
|
|
M |
Tool box |
Provides tools for Christie qualified technicians. |
|
|
|
N |
Rear IR |
Receives transmissions from the IR remote. |
|
|
|
O |
LED status indicator |
Indicates lamp and power status. |
|
|
|
P |
Shutter LED status indicator |
Indicates shutter status. |
|
|
|
Q |
Lamp door |
Access to lamp compartment. |
|
|
|
R |
AC lock |
Locks Input 1 power cord. |
|
|
|
S |
AC Input 2: limited power |
Use this IEC 320-C14 inlet to connect to an appropriately rated power |
|
|
cord (component R) provided for your region. For use in limited power |
|
|
mode. |
|
|
|
T |
AC Input 1: full power |
Use this IEC 309 inlet to connect to an appropriately rated power cord |
|
|
(component S) provided for your region. For use in full power mode. |
|
|
|
U |
Power cord: limited power |
Connects the provided power cord appropriately rated for your region to |
|
|
AC Input 2 for limited power mode. |
|
|
|
V |
Power cord: full power |
Connects the provided power cord appropriately rated for your region to |
|
|
AC Input 1 for full power mode. |
|
|
|
IR remote keypad
The IR remote keypad controls the projector by way of wireless communications from a batterypowered infrared (IR) transmitter.
To use the IR remote, direct the keypad toward the projector’s front or rear IR sensor and press a function key. One of the two IR sensors on the projector will detect the signal and relay the commands for internal processing. The remote also offers a connector for wired connections to the projector.
Boxer 4K Boxer 4K20 (Bb.4) and Boxer 4K30 (Bb.1) User Manual |
14 |
020-101777-08 Rev. 1 (07-2017)
Copyright © 2017 Christie Digital Systems USA Inc. All rights reserved.

Introduction
Button |
Description |
|
|
|
|
A |
Powers the projector lamps on. |
|
|
|
|
B |
Opens the aspect ratio dialog. |
|
|
|
|
C |
Turns the lamps off and puts the projector in standby. |
|
|
|
|
D |
Selects an active or inactive input on any slot. |
|
|
|
|
E |
Not supported. |
|
|
|
Boxer 4K Boxer 4K20 (Bb.4) and Boxer 4K30 (Bb.1) User Manual |
15 |
020-101777-08 Rev. 1 (07-2017)
Copyright © 2017 Christie Digital Systems USA Inc. All rights reserved.

Introduction
Button |
Description |
|
|
|
|
F |
Enter a number, such as menu, item index or value. |
|
|
|
|
G |
Use the arrows to navigate within a menu or to adjust settings. |
|
|
|
|
H |
Selects a highlighted menu item and changes or accepts a value. |
|
|
|
|
I |
Toggles the menus on/off. |
|
|
|
|
J |
Not supported. |
|
|
|
|
K |
Opens the keystone dialog. |
|
|
|
|
L |
Adjusts the lens focus. |
|
|
|
|
M |
Not supported. |
|
|
|
|
N |
Displays a test pattern. |
|
|
|
|
O |
Not supported. |
|
|
|
|
P |
Optimizes the image automatically. |
|
|
|
|
Q |
Opens or closes the shutter. |
|
|
|
|
R |
Not supported. |
|
|
|
|
S |
Initiates a custom action when a number is selected. |
|
|
|
|
T |
Selects a projector in multi-projector installations. |
|
|
|
|
U |
Returns to the previous menu level or exits menus if at the top level. |
|
|
|
|
V |
Displays context-sensitive help. |
|
|
|
|
W |
Arrows adjust the lens offset. |
|
|
|
|
X |
Adjust the lens zoom. |
|
|
|
|
Y |
Opens the OSD position menu. |
|
|
|
|
Z |
Shows or hides the OSD menus. |
|
|
|
|
AA |
Turns the remote backlight on. |
|
|
|
|
AB |
Male XLR connector for wired option. |
|
|
|
Boxer 4K Boxer 4K20 (Bb.4) and Boxer 4K30 (Bb.1) User Manual |
16 |
020-101777-08 Rev. 1 (07-2017)
Copyright © 2017 Christie Digital Systems USA Inc. All rights reserved.
Introduction
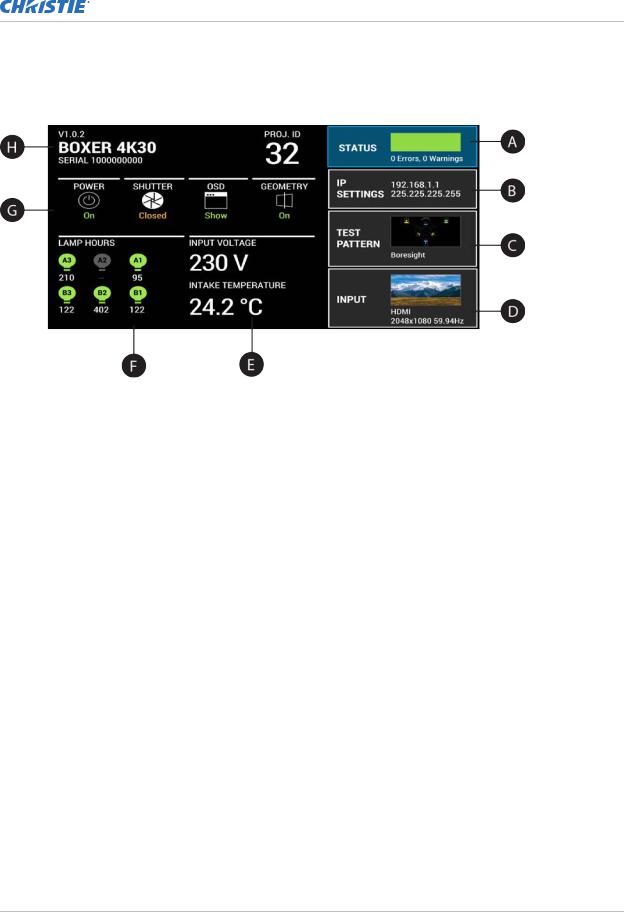
Display panel components
Identify the main components of the display panel (also known as the home page).
ID |
Component |
Description |
|
|
|
|
|
A |
Status |
Contains information about the health of the projector including |
|
|
|
the number of warnings and errors. |
|
|
|
Provides access to the status system. |
|
|
|
|
|
B |
IP Settings |
Displays the IP address and subnet values. |
|
|
|
Provides access to changing the IP settings. |
|
|
|
|
|
C |
Test Pattern |
Displays the currently selected test pattern. If no test pattern is |
|
|
|
selected, Off is displayed. |
|
|
|
Provides access to the list of test patterns. |
|
|
|
|
|
D |
Input |
Displays the signal for the currently selected input. |
|
|
|
Provides access to the list of input signals. |
|
|
|
|
|
E |
Power and Temperature |
Indicates the incoming voltage, measured in Volts, and intake |
|
|
|
temperature, measured in Celsius. |
|
|
|
|
|
F |
Lamp Hours |
Displays the state of the lamps and the number of hours used. |
|
|
|
|
|
G |
Projector and Component |
Indicates the states of the projector and its components. |
|
|
Controls |
|
|
|
|
|
|
H |
Projector Information |
Provides information about the projector such as the projector |
|
|
|
name, serial number, software version, and projector ID. |
|
|
|
|
Boxer 4K Boxer 4K20 (Bb.4) and Boxer 4K30 (Bb.1) User Manual |
17 |
020-101777-08 Rev. 1 (07-2017)
Copyright © 2017 Christie Digital Systems USA Inc. All rights reserved.

Introduction
Turning the projector on
When the projector AC power supply is plugged in, the power is on.
Warning! If not avoided, the following could result in death or serious injury.
• SHOCK HAZARD! Do not attempt operation if the AC supply is not within the specified voltage and power range, as specified on the license label.
1.Plug the projector in to AC power.
The projector automatically powers on when plugged in. The display panel functionality becomes available.
2.To turn the lamps on, press and hold the Power button until you hear a beep.
Projector LED status indicators
Identify the LED state colors and meaning.
LED |
State |
|
Description |
|
|||
|
|
|
|
Blue |
Solid |
Standby |
Lamps are off. Video electronics are off. Projector |
|
|
|
status is OK. |
|
|
|
|
|
Flashing |
Cool down |
Projector is moving to one of the two standby |
|
|
|
states: |
|
|
|
• Lamps are off and video electronics are |
|
|
|
booting up. |
|
|
|
• Lamps are off. Video electronics and lamps are |
|
|
|
cooling down. |
|
|
|
|
Green |
Solid |
Lamps on |
Lamps are on. Projector status is OK. |
|
|
|
|
|
Flashing |
Startup |
Projector is moving to lamp on state. Lamps are |
|
|
|
striking and warming up. Video electronics are |
|
|
|
initializing. |
|
|
|
|
Yellow |
Solid |
Warning in |
Projector is in standby state. A problem exists with |
|
|
standby |
the projector that does not prevent it from |
|
|
|
operating. |
|
|
|
|
|
Flashing yellow/green |
Warning during |
Projector is in a startup state. A problem exists |
|
|
startup |
with the projector that does not prevent it from |
|
|
|
operating. |
|
|
|
|
|
Flashing |
Warning with |
Lamps are on. A problem exists with the projector |
|
|
lamps on |
that will not cause it to shut down. |
|
|
|
|
|
Flashing yellow/blue |
Warning during |
Projector is in a cool down state. Lamps are off. |
|
|
cool down |
Video electronics and lamps are cooling down. A |
|
|
|
problem exists with the projector that does not |
|
|
|
prevent it from operating. |
|
|
|
|
Red |
Solid |
Error in |
Projector is in standby. An error exists that |
|
|
standby |
prevents the projector from starting up. |
|
|
|
|
Boxer 4K Boxer 4K20 (Bb.4) and Boxer 4K30 (Bb.1) User Manual |
18 |
020-101777-08 Rev. 1 (07-2017)
Copyright © 2017 Christie Digital Systems USA Inc. All rights reserved.

|
|
|
Introduction |
|
|
|
|
LED |
State |
|
Description |
|
|
|
|
|
Flashing |
Error |
An error with the projector exists during startup, |
|
|
|
cool down, or when the lamps are off. Projector will |
|
|
|
proceed to shut down. |
|
|
|
|
Off |
|
AC off |
The AC power is off. |
|
|
|
|
Projector LED shutter indicators
Identify the shutter LED state colors and meaning.
LED |
State |
Description |
|
|
|
|
|
Solid magenta |
Shutter closed |
The shutter is closed. |
|
|
|
In standby, the shutter is always automatically closed and |
|
|
|
the magenta light is muted. |
|
|
|
|
|
Off |
Shutter open |
The shutter is open. |
|
|
|
|
Turning the projector off
When powering off in preparation for inspection or maintenance, always disconnect from AC.
1.To turn the lamps off, press and hold the Power button until you hear a beep.
When powering off the projector, allow the projector to complete its cool down cycle. Do not immediately unplug the projector if this can be avoided.
2.To turn off power to the projector, disconnect from AC power.
Boxer 4K Boxer 4K20 (Bb.4) and Boxer 4K30 (Bb.1) User Manual |
19 |
020-101777-08 Rev. 1 (07-2017)
Copyright © 2017 Christie Digital Systems USA Inc. All rights reserved.

Adjusting the image
Adjust the projector image. Christie recommends warming the lens before completing these procedures as focus may change as the lens warms.
Selecting screen image orientation
Specify the orientation to use for the image. The projector supports front projection, rear projection, front projection inverted, or rear projection inverted.
1.Select MENU > Image Settings > Image Orientation.
2.Select the required orientation from the list.
3.To confirm your selection, press Enter.
Setting the image resize preset
Set the image resize preset to determine if an image will display in its native resolution or will resize by maximizing the height, width, both height and width, or to the maximum size while keeping the original aspect ratio.
1.Select MENU > Image Settings > Size & Position > Resize Presets.
2.Select the appropriate resize preset:
•Auto—Maximize for current source.
•No Resizing—Display in native resolution.
•Full Size—Fill the screen, regardless of source.
•Full Width—Fill display width and keep aspect ratio.
•Full Height—Fill display height and keep aspect ratio.
3.Select Enter.
Boxer 4K Boxer 4K20 (Bb.4) and Boxer 4K30 (Bb.1) User Manual |
20 |
020-101777-08 Rev. 1 (07-2017)
Copyright © 2017 Christie Digital Systems USA Inc. All rights reserved.
Loading...