

Page 1
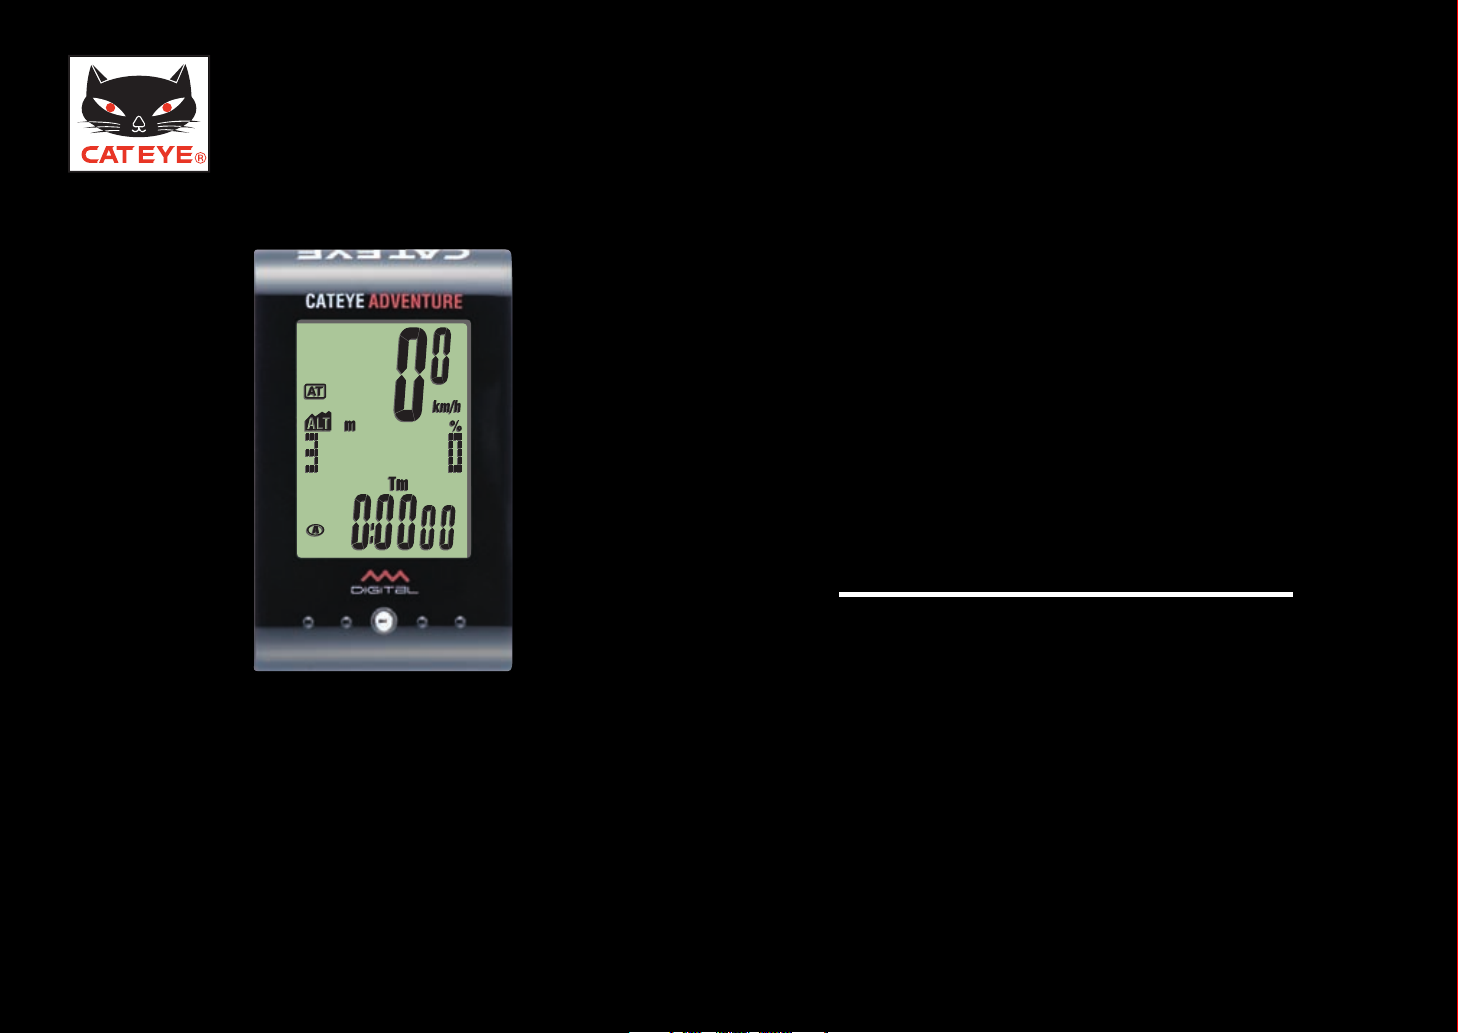
CATEYE ADVENTURE
START
CC-AT200W
Quick Start
Click the button and follow the instructions.
Page 2

Thank you for purchasing our cyclocomputer CATEYE ADVENTURE.
Next
This Quick Start Manual explains how to set up the computer and how to install the
unit on your bicycle.
Please set up the unit according to the specified procedure, then it will be ready for use
as a cyclocomputer.
Before use, read the instruction manual that comes with the product
thoroughly to the end to understand the functions of this unit, and to use it
safely in a correct manner.
Page 3

This PDF contains a movie file.
Next
When you click on the movie screen, a message regarding security appears. Click the
“Trust in the text” or “Play” button to close the message.
Click the screen again to play the movie.
Page 4

CATEYE ADVENTURE
Return to a Cover
Setting up the computer
How to install the speed sensor (Movie)
Sea level altitude correction
How to install the bracket (Movie)
Quick Start Manual
Click the item you wish to view.
Contents
Page 5
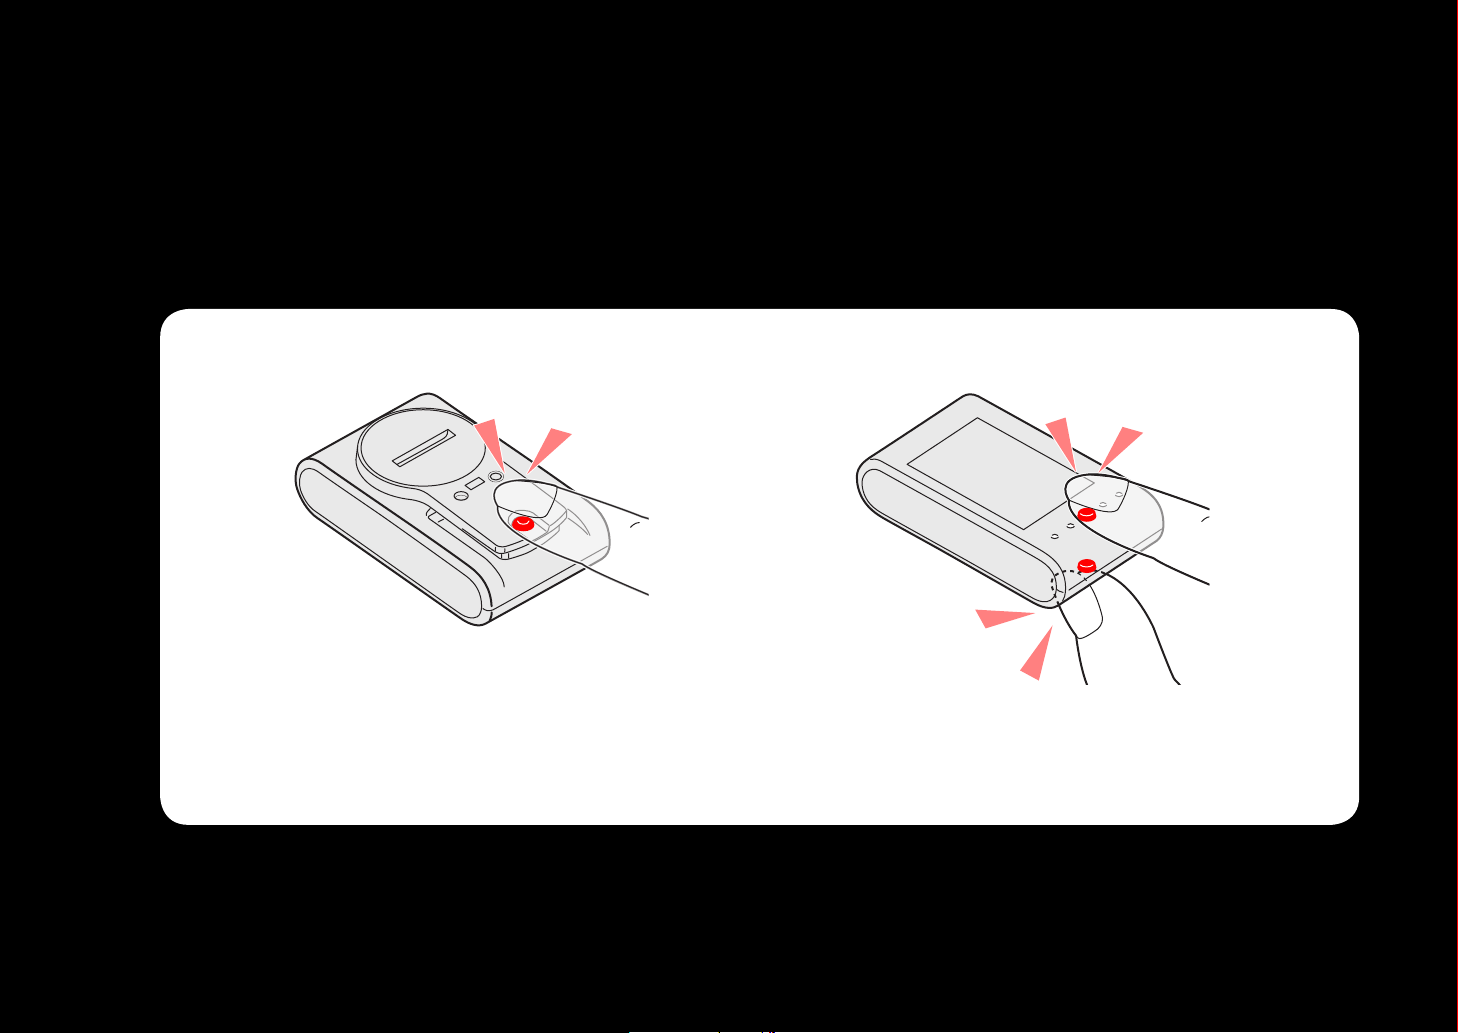
Operation of buttons
Click
Click
Click
Next
Set up the computer by operating the buttons as follows.
Check the button position before you start setting up.
MODE SSE + MODE
Press the MODE button on the back of
the computer.
Press the SSE button on the face of the
computer and the MODE button on the
back simultaneously.
Page 6
CATEYE ADVENTURE
ACAC
MENU
MENU
Return to Contents
Next
Return
Quick Start Manual
Formatting operation
Setting the speed unit
Setting the temperature unit
Entering the tire circumference
Searching the sensor ID
Setting the clock display
Setting up the computer
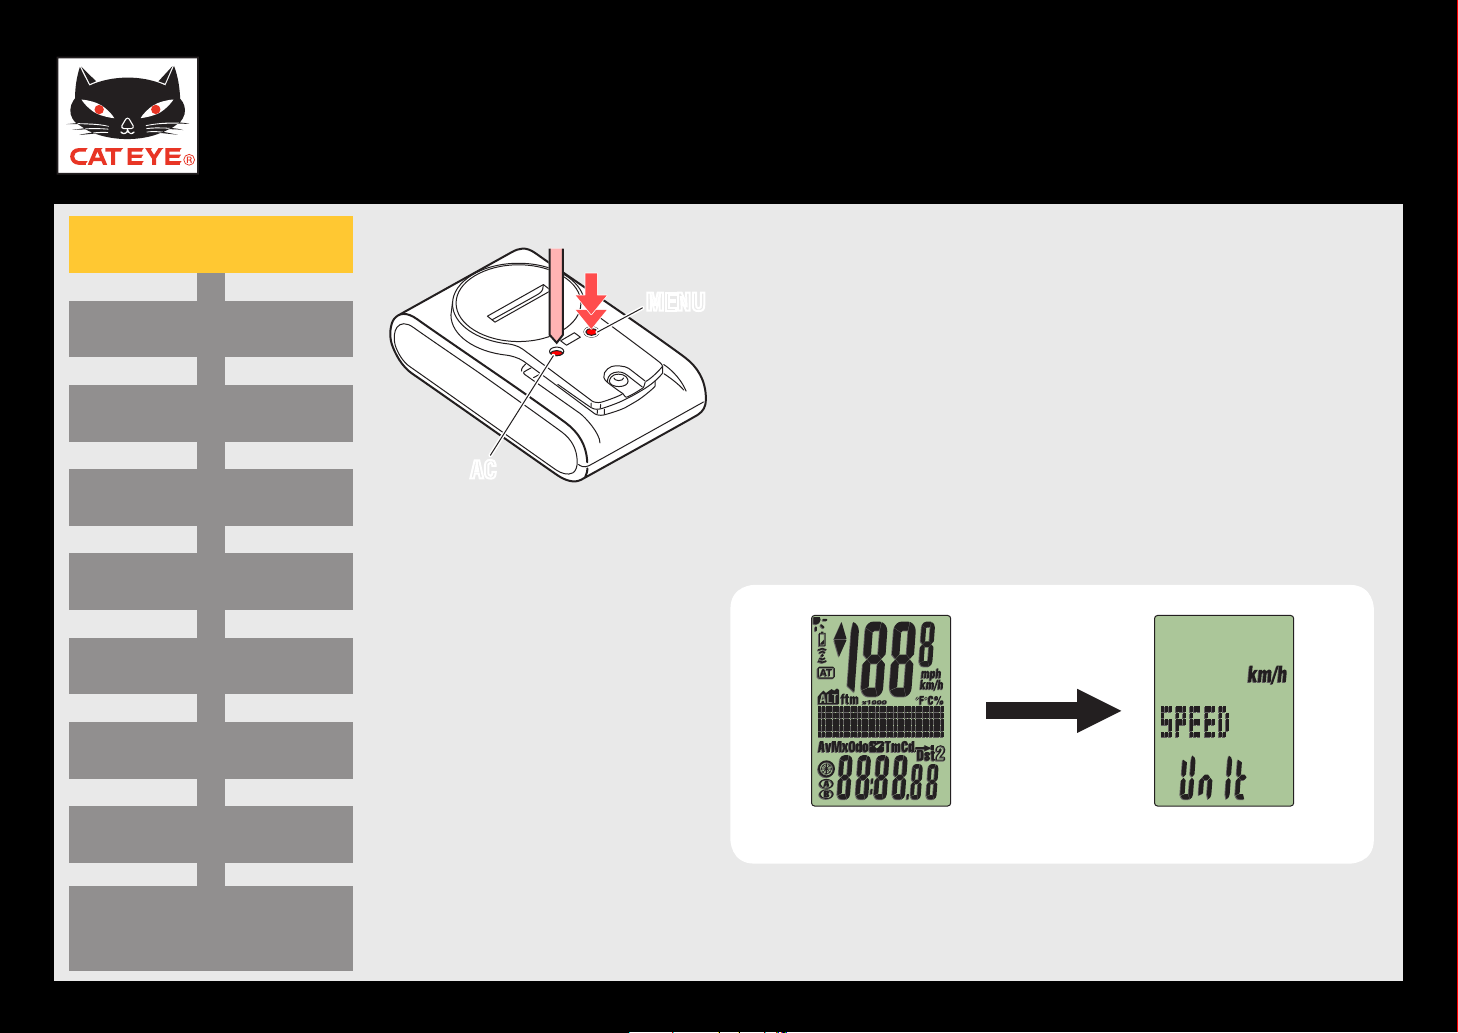
Formatting operation
Press the MENU button on the back of the computer
and the AC button simultaneously.
Press and hold the * MENU button until you release
the AC button.
After full lighting of the screen, the computer switches to the speed unit setting screen to start setup.
Setting the hour
Setting the minute
Measuring screen
(Setup completed)
Full lighting Setting the speed unit
Page 7

CATEYE ADVENTURE
MODE
SSE
MODE
MODE
Return to Contents
Next
Return
Quick Start Manual
Formatting operation
Setting the speed unit
Setting the temperature unit
Entering the tire circumference
Searching the sensor ID
Setting the clock display
Setting the speed unit
Setting up the computer
Setting the speed unit
When the MODE button is pressed, either “km/h” or “mph”
is selected for the speed unit display. Select the display of
your choice.
After selecting, press the SSE button and the MODE button simultaneously to proceed to the next step “Setting
the temperature unit”.
km/h ↔ mph
To the next step
Setting the hour
Setting the minute
Measuring screen
(Setup completed)
(Press SSE / MODE simultaneously)
Page 8
CATEYE ADVENTURE
MENU
MODE
Return to Contents
Next
Return
Quick Start Manual
Formatting operation
Setting the speed unit
Setting the temperature unit
Entering the tire circumference
Searching the sensor ID
Setting the clock display
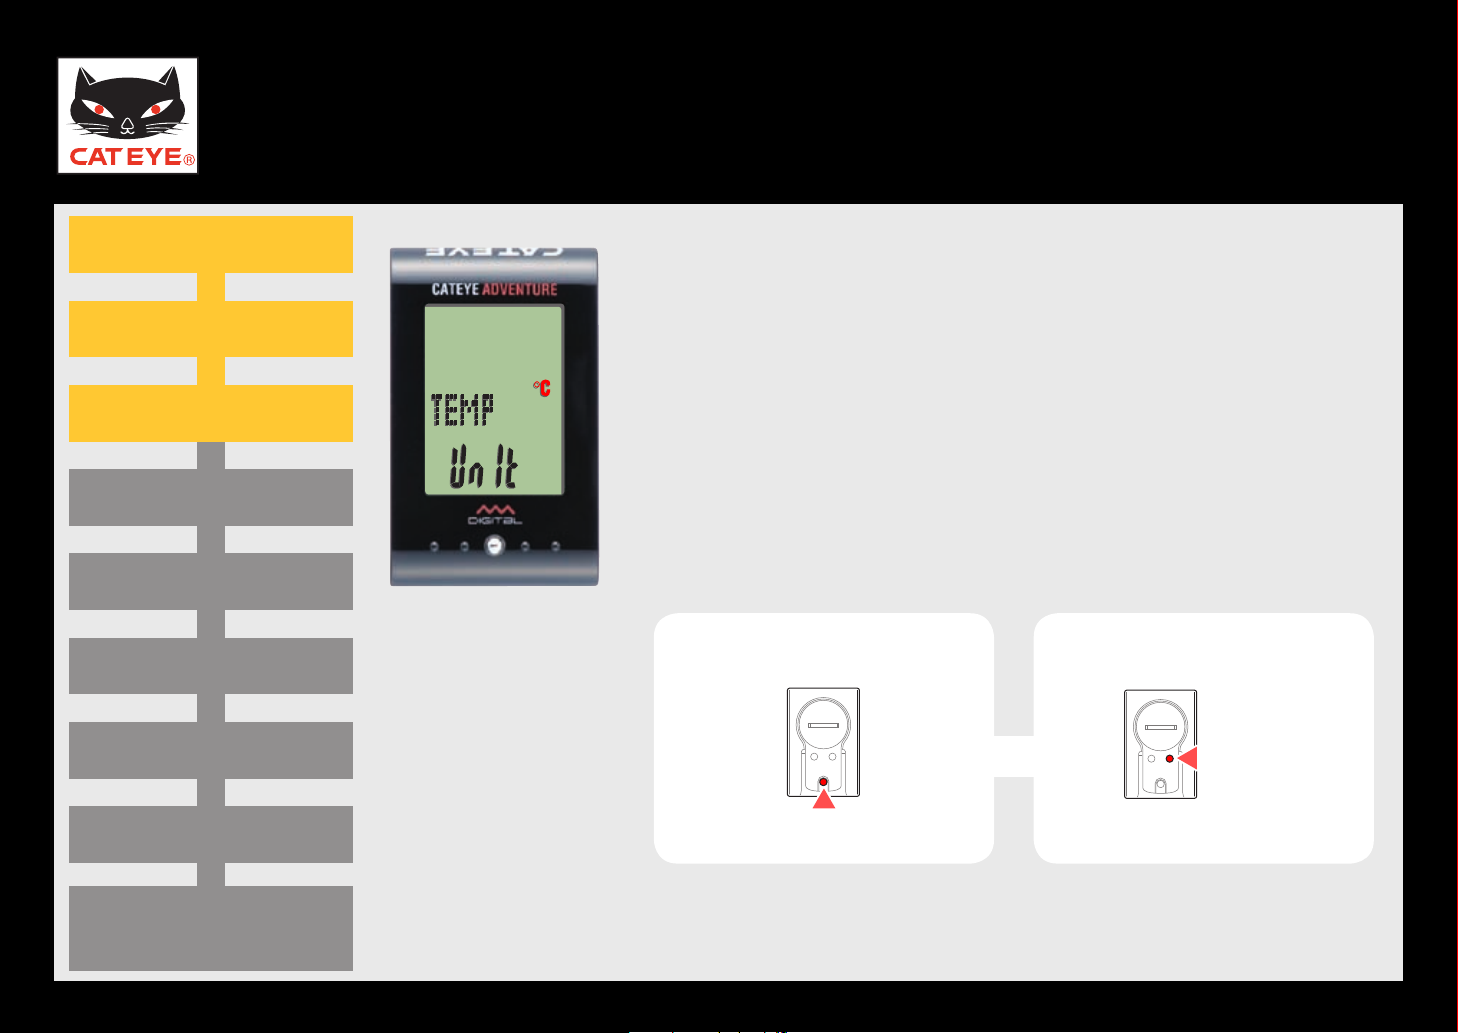
Setting the tempera-
ture unit
Setting up the computer
Setting the temperature unit
When the MODE button is pressed, either “°C” (Celsius)
or “°F” (Fahrenheit) is selected for the temperature unit
display. Select the display of your choice.
After selecting, press the MENU button to proceed to the
next step “Entering the tire circumference”.
˚C ↔ ˚F
To the next step
Setting the hour
Setting the minute
Measuring screen
(Setup completed)
Page 9
CATEYE ADVENTURE
MODE
SSE
MODE
MODE
MENU
Return to Contents
Next
Return
Tire circum-
ference refer-
ence table
Quick Start Manual
Formatting operation
Setting the speed unit
Setting the temperature unit
Entering the tire circumference
Searching the sensor ID
Setting the clock display
Entering the tire
circumference
Setting up the computer
Entering the tire circumference
Enter the tire circumference (mm) of your bicycle with 4
digits using the tire circumference reference table.
Pressing the MODE button increases the value flashing,
and pressing the SSE button and the MODE button simul-
taneously moves to the next digit.
After entering, press the MENU button to proceed to the
next step “Searching the sensor ID”.
Increase the value Move digit
To the next step
Setting the hour
Setting the minute
Measuring screen
(Setup completed)
(Press SSE / MODE
simultaneously)
Page 10
CATEYE ADVENTURE
OK
!
RESETRESET
...
RESETRESET
NO!
Return to Contents
Next
Return
Searching the
sensor ID
(Movie)
Quick Start Manual
Formatting operation
Setting the speed unit
Setting the temperature unit
Entering the tire circumference
Searching the sensor ID
(1/2)
Setting the clock display
Setting up the computer
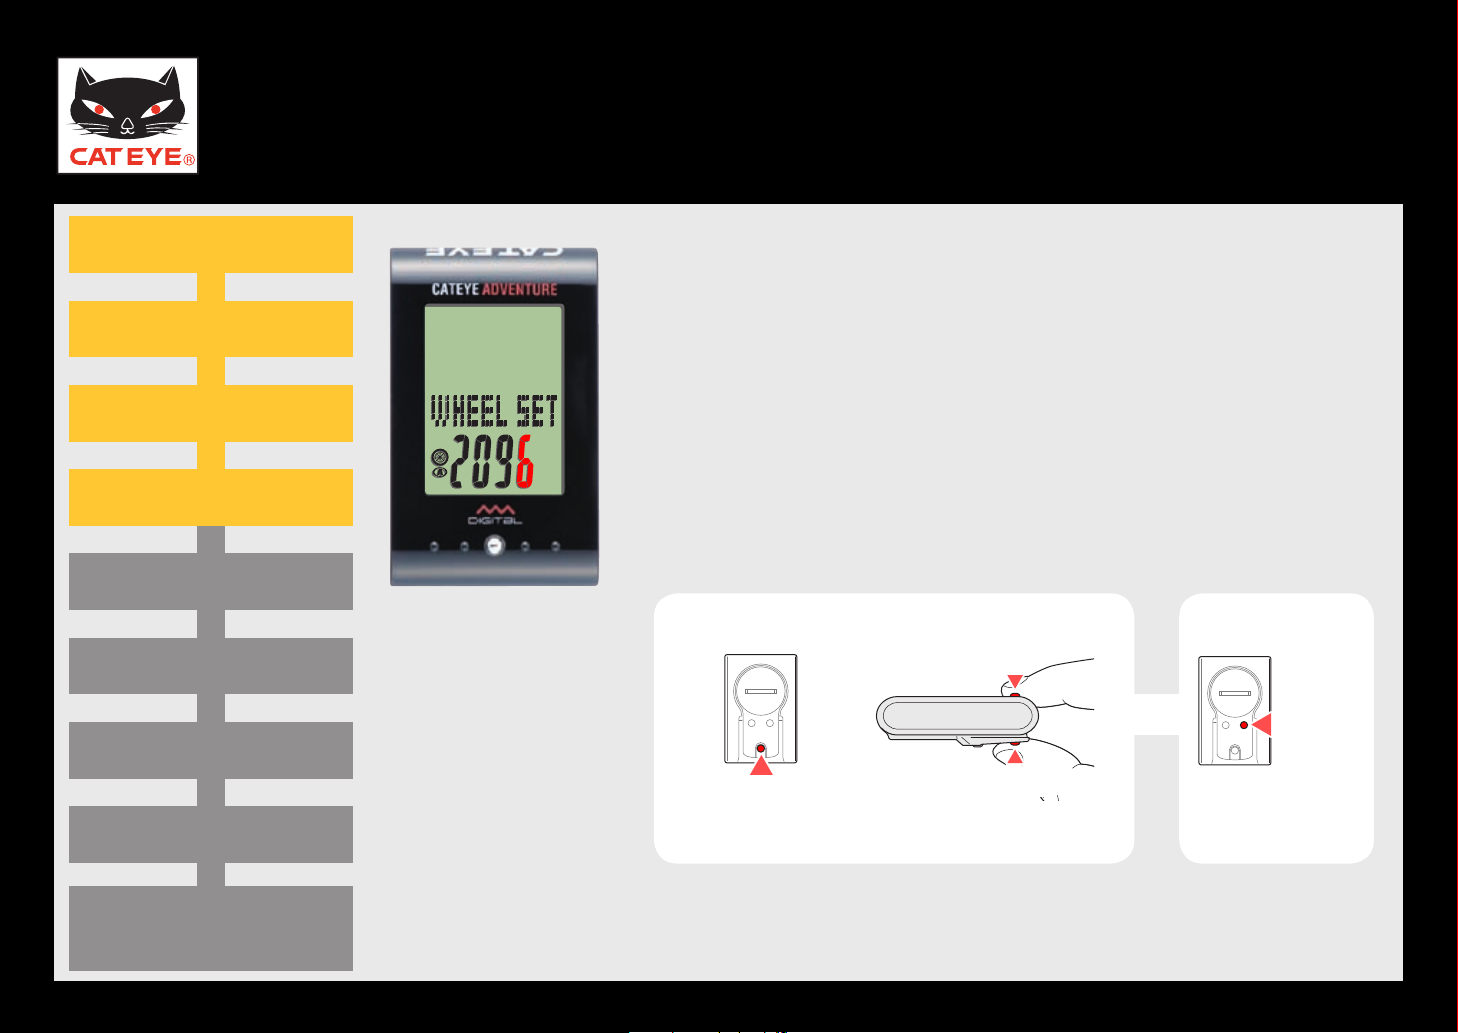
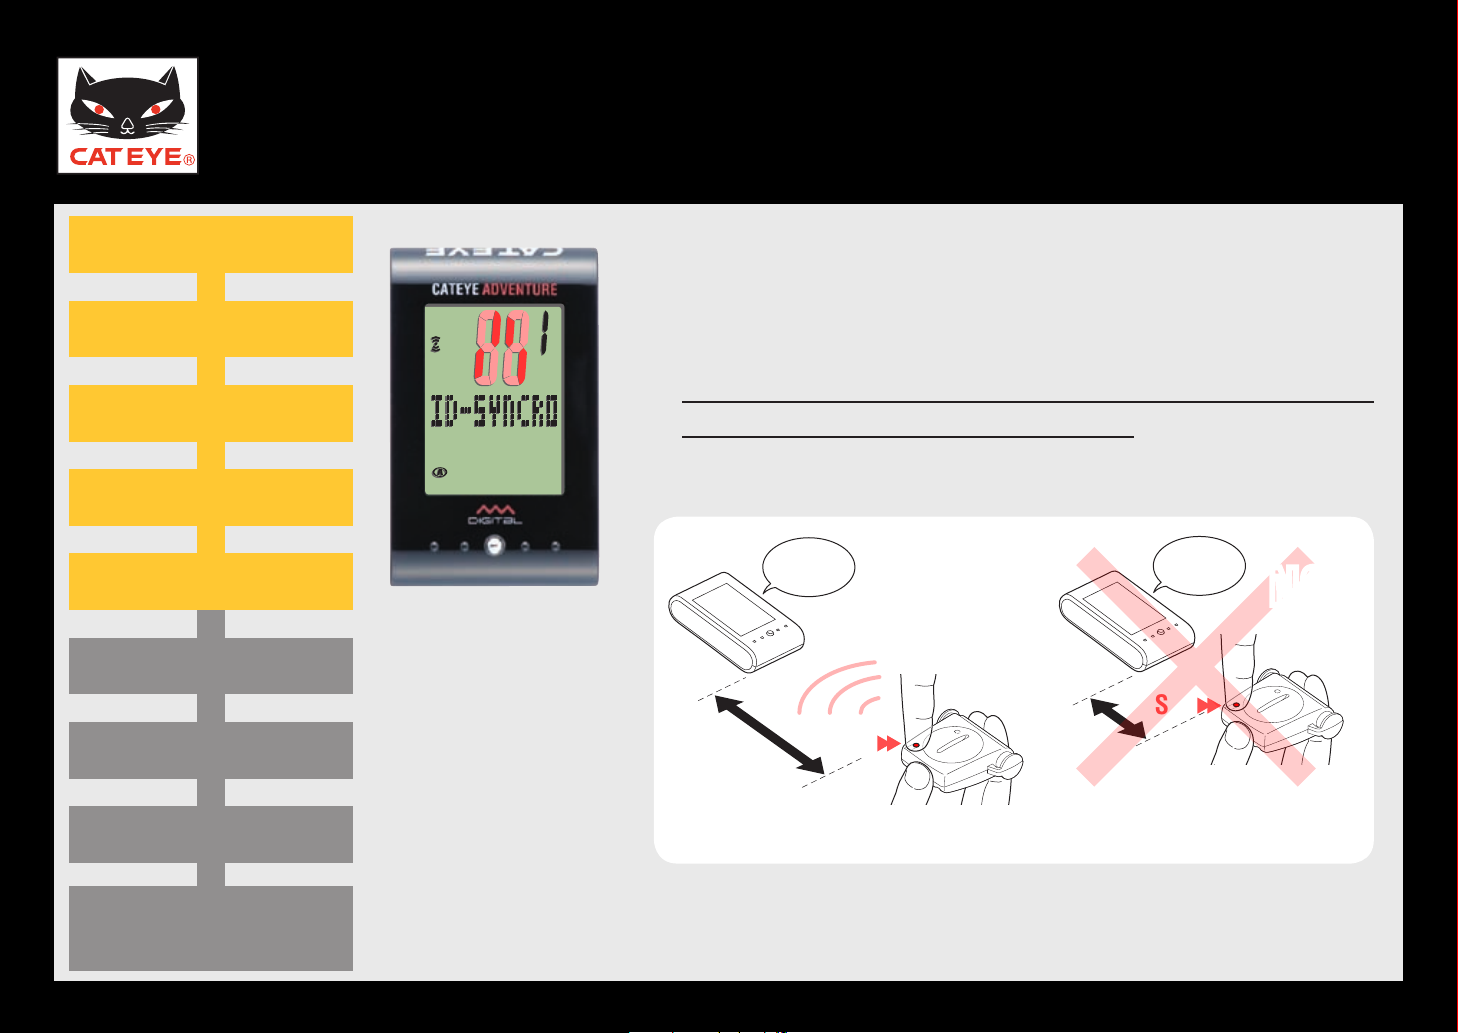
Searching the sensor ID
Keep the computer 30 cm (12”) away from the sensor,
and press and hold the RESET button of the sensor.
A sensor ID signal is sent when you release the * RESET
button after pressing and holding it.
Under going search
of the sensor ID
Setting the hour
Setting the minute
Measuring screen
(Setup completed)
Keep about 30 cm (12”) away. Distance is too close or too far.
Page 11

CATEYE ADVENTURE
Return to Contents
Next
Return
Quick Start Manual
Formatting operation
Setting the speed unit
Setting the temperature unit
Entering the tire circumference
Searching the sensor ID
(2/2)
Setting the clock display
Setting up the computer
Searching the sensor ID
When the computer receives the ID signal from the sensor successfully, it displays the ID number, then proceeds
directly to the setting clock display screen.
Searching of sensor
ID completed
Setting the hour
Setting the minute
Measuring screen
(Setup completed)
Page 12

CATEYE ADVENTURE
MODE
SSE
MODE
MODE
Return to Contents
Next
Return
Quick Start Manual
Formatting operation
Setting the speed unit
Setting the temperature unit
Entering the tire circumference
Searching the sensor ID
Setting the clock display
Clock display
Setting up the computer
Setting the clock display
When the MODE button is pressed, either “12h” or “24h”
is selected for the clock display. Select the display of your
choice.
After selecting, press the SSE button and the MODE button simultaneously to proceed to the next step “Setting
the hour”.
24h ↔ 12h
To the next step
Setting the hour
Setting the minute
Measuring screen
(Setup completed)
(Press SSE / MODE simultaneously)
Page 13

CATEYE ADVENTURE
MODE
SSE
MODE
MODE
Return to Contents
Next
Return
Quick Start Manual
Formatting operation
Setting the speed unit
Setting the temperature unit
Entering the tire circumference
Searching the sensor ID
Setting the clock display
Hour
Setting up the computer
Setting the hour
Pressing the MODE button increases the value flashing
(“Hour” of the clock). Enter any value.
After entering, press the SSE button and the MODE button
simultaneously to proceed to the next step “Setting the
minute”.
Increase the value
To the next step
Setting the hour
Setting the minute
Measuring screen
(Setup completed)
(Press SSE / MODE simultaneously)
Page 14

CATEYE ADVENTURE
MODE
MENU
Return to Contents
Next
Return
Quick Start Manual
Formatting operation
Setting the speed unit
Setting the temperature unit
Entering the tire circumference
Searching the sensor ID
Setting the clock display
Minute
Setting up the computer
Setting the minute
Pressing the MODE button increases the value flashing
(“Minute” of the clock). Enter any value (Pressing and
holding MODE rapidly increases the value.).
After entering, press the MENU button to switch to the
measuring screen.
Increase the value
Setup is completed.
To the measuring screen
Setting the hour
Setting the minute
Measuring screen
(Setup completed)
Page 15

CATEYE ADVENTURE
Return to Contents
Return
Return to Contents
Quick Start Manual
Formatting operation
Setting the speed unit
Setting the temperature unit
Entering the tire circumference
Searching the sensor ID
Setting the clock display
Setting up the computer
Now, setup of the computer is completed.
If the bracket and speed sensor are not installed to your
bicycle, return to Contents, click the movies of how to
install the bracket and speed sensor, and install them according to the instructions.
Measuring screen
Setting the hour
Setting the minute
Measuring screen
(Setup completed)
Page 16

Operation of buttons
Click
Click
Click
Next
The sea level altitude is corrected by operation of buttons as follows.
“Sea level altitude correction” describes the case when the computer is installed on the bracket.*
Operation of the MODE button
Press around the dots on the face of the
computer, without touching the SSE button.
Operation of the SSE + MODE buttons
Press the SSE button along with the
face of the computer.
Page 17

CATEYE ADVENTURE
MODE
Return to Contents
Next
Quick Start Manual
Selecting the correction
method
Entering the sea level
altitude
Applying the sea level
altitude
Sea level altitude correction
This unit determines the altitude by converting the change in atmo-
spheric pressure and temperature, therefore it may cause deviation
from the actual sea level altitude depending on the ever-changing
atmospheric pressure and temperature. It is recommended to correct
the sea level altitude just before measurement.
Press the MODE button to display the sea level altitude on the measuring screen.
1.
2. When you press and hold the MODE button, the screen switches to “Setting
the sea level altitude correction”.
Measuring screen
(sea level altitude display)
Sea level altitude correction
(Press and hold)
Page 18

CATEYE ADVENTURE
Return to Contents
Next
Return
Quick Start Manual
Selecting the correction
method
Entering the sea level
altitude
Applying the sea level
altitude
Sea level altitude correction
The following two methods can be used for the sea level altitude correction.
ADJUST (Sea level altitude correction)•
Enter the altitude at the current point.
Enter the actual value at the point where the sea level altitude is
known, such as the altitude along the seashore, or at a triangulation point sign, etc.
After selecting * ADJUST, press and hold the MODE button and the SSE button
simultaneously to reset to the default (value according to ISO2533).
HOME (Home altitude setting)•
Preset a specific sea level altitude.
Once you preset the sea level altitude of your home in advance,
you can start with the correct sea level altitude by selecting
HOME before starting from your home.
The sea level altitude of your home can be obtained using mapping software, *
such as Google Earth.
Google Earth is a trademark of Google Inc.*
Page 19

CATEYE ADVENTURE
MODE
Return to Contents
Return
Next (when HOME is selected)
Next (when ADJUST is selected)
Quick Start Manual
Selecting the correction
method (1/2)
Entering the sea level
altitude
Applying the sea level
altitude
Sea level altitude correction
Selecting the correction method
When the MODE button is pressed, either “ADJUST” or
“HOME” is selected. Select the correction method of your
choice.
ADJUST ↔ HOME
Correction method
Page 20

CATEYE ADVENTURE
SSE
+
MODE
Return to Contents
Next
Return
Quick Start Manual
Selecting the correction
method (2/2)
Entering the sea level
altitude
Applying the sea level
altitude
Sea level altitude correction
Selecting the correction method
After selecting, press the SSE button and the MODE button simultaneously to proceed to the next step “Entering
the sea level altitude”.
Correction method
To the next step
(Press SSE / MODE simultaneously)
Page 21

CATEYE ADVENTURE
MODE
SSE
+
MODE
Return to Contents
Next
Return
Quick Start Manual
Selecting the correction
method
Entering the sea level
altitude (1/2)
Applying the sea level
altitude
Selection of positive
or negative symbol
Sea level altitude correction
Entering the sea level altitude
When the MODE button is pressed, “+” or “-” is selected.
Select either the positive or negative symbol for the value
you wish to set.
Select “* -” when the sea level altitude is below 0 m.
After selecting, press the SSE button and the MODE button simultaneously to proceed to the next step “Entering
the sea level altitude (2/2)”.
+ ↔ −
To the next step
(Press SSE / MODE simultaneously)
Page 22

CATEYE ADVENTURE
MODE
SSE
+
MODE
Return to Contents
Next
Return
Quick Start Manual
Selecting the correction
method
Entering the sea level
altitude (2/2)
Applying the sea level
altitude
Sea level altitude correction
Entering the sea level altitude
Enter the sea level altitude (a value with 4 digits) of the
current point.
Pressing the MODE button increases the value flashing,
and pressing the SSE button and the MODE button simul-
taneously moves to the next digit.
Sea level altitude
Increase the value Move digit
(Press SSE / MODE simultaneously)
Page 23

CATEYE ADVENTURE
MODE
Return to Contents
Return
Return to Contents
Quick Start Manual
Selecting the correction
method
Entering the sea level
altitude
Applying the sea level
altitude
Sea level altitude correction
Applying the sea level altitude
Once the value you wish to set is displayed, press and
hold the MODE button to return to the measuring screen.
The altitude you set is applied to the sea level altitude on
the measuring screen, and the sea level altitude correction is completed.
Sea level altitude
correction
Sea level altitude
correction
Measuring screen
(Press and hold)
Page 24

CATEYE ADVENTURE
SSE
+
MODE
Return to Contents
Applying the home altitude
Entering the home altitude
Return
Quick Start Manual
Selecting the correction
method (2/2)
Entering the home altitude
Applying the home altitude
Sea level altitude correction
Selecting the correction method
To set a new home altitude, press the SSE button and the
MODE button simultaneously to proceed to the next step
“Entering the home altitude”.
To the next step
Correction method
(Press SSE / MODE simultaneously)
When the home altitude has already been set, proceed to
“Applying the home altitude”.
Page 25

CATEYE ADVENTURE
MODE
SSE
+
MODE
Return to Contents
Next
Return
Quick Start Manual
Selecting the correction
method
Entering the home altitude
(1/2)
Applying the home altitude
Selection of positive
or negative symbol
Sea level altitude correction
Entering the home altitude
When the MODE button is pressed, “+” or “-” is selected.
Select either the positive or negative symbol for the value
you wish to set.
Select “* -” when the sea level altitude is below 0 m.
After selecting, press the SSE button and the MODE button simultaneously to proceed to the next step “Entering
the home altitude (2/2)”.
+ ↔ −
To the next step
(Press SSE / MODE simultaneously)
Page 26

CATEYE ADVENTURE
MODE
SSE
+
MODE
Return to Contents
Next
Return
Quick Start Manual
Selecting the correction
method
Entering the home altitude
(2/2)
Applying the home altitude
Sea level altitude correction
Entering the home altitude
Enter the sea level altitude (a value with 4 digits) you wish
to set as a home altitude, such as the altitude of your
home.
Pressing the MODE button increases the value flashing,
and pressing the SSE button and the MODE button simul-
taneously moves to the next digit.
Home altitude
Increase the value Move digit
(Press SSE / MODE simultaneously)
Page 27

CATEYE ADVENTURE
MODE
Return to Contents
Return
Return to Contents
Quick Start Manual
Selecting the correction
Selecting the correction
method
method
Entering the sea level
Entering the home altitude
Applying the sea level
Applying the home altitude
altitude
altitude
Sea level altitude correction
Applying the home altitude
Once the value you wish to set is displayed, press and
hold the MODE button to return to the measuring screen.
The altitude you set is applied to the home altitude on the
measuring screen, and the sea level altitude correction is
completed.
Home altitude
Sea level altitude
correction
(Press and hold)
Measuring
screen
Page 28

CATEYE ADVENTURE
MODE
Return to Contents
Return to Contents
Return
Quick Start Manual
Selecting the correction
method
Entering the home altitude
Applying the home altitude
Sea level altitude correction
Applying the home altitude
Press and hold of the MODE button to return to the measuring screen.
The altitude you set is applied to the home altitude on the
measuring screen, and the sea level altitude correction is
completed.
Home altitude
Home altitude
(Press and hold)
Measuring
screen
Page 29

CATEYE ADVENTURE
Return to Contents
Quick Start Manual
How to install the bracket
Page 30

CATEYE ADVENTURE
Return to Contents
Quick Start Manual
How to install the speed sensor
Page 31

CATEYE ADVENTURE
L mm
Return to Contents
Return
Quick Start Manual
Tire circumference reference table
ETRTO Tire size L (mm)
47-203 12x1.75 935
54-203 12x1.95 940
40-254 14x1.50 1020
47-254 14x1.75 1055
40-305 16x1.50 1185
47-305 16x1.75 1195
54-305 16x2.00 1245
28-349 16x1-1/8 1290
37-349 16x1-3/8 1300
32-369 17x1-1/4 (369) 1340
40-355 18x1.50 1340
47-355 18x1.75 1350
32-406 20x1.25 1450
35-406 20x1.35 1460
Measure the tire circumference (L) of your bicycle
ETRTO Tire size L (mm)
40-406 20x1.50 1490
47-406 20X1.75 1515
50-406 20x1.95 1565
28-451 20x1-1/8 1545
37-451 20x1-3/8 1615
37-501 22x1-3/8 1770
40-501 22x1-1/2 1785
47-507 24x1.75 1890
50-507 24x2.00 1925
54-507 24x2.125 1965
25-520 24x1 (520) 1753
24x3/4 Tubular 1785
28-540 24x1-1/8 1795
32-540 24x1-1/4 1905
ETRTO Tire size L (mm)
25-559 26x1 (559) 1913
32-559 26x1.25 1950
37-559 26x1.40 2005
40-559 26x1.50 2010
47-559 26x1.75 2023
50-559 26x1.95 2050
54-559 26x2.10 2068
57-559 26x2.125 2070
58-559 26x2.35 2083
75-559 26x3.00 2170
28-590 26x1-1/8 1970
37-590 26x1-3/8 2068
37-584 26x1-1/2 2100
650C Tubular 26x7/8 1920
Setting up the computer
ETRTO Tire size L (mm)
20-571 650x20C 1938
23-571 650x23C 1944
25-571 650x25C 26x1 (571) 1952
40-590 650x38A 2125
40-584 650x38B 2105
25-630 27x1 (630) 2145
28-630 27x1-1/8 2155
32-630 27x1-1/4 2161
37-630 27x1-3/8 2169
18-622 700x18C 2070
19-622 700x19C 2080
20-622 700x20C 2086
23-622
700x23C 2096
25-622 700x25C 2105
ETRTO Tire size L (mm)
28-622 700x28C 2136
30-622 700x30C 2146
32-622 700x32C 2155
700C Tubular 2130
35-622 700x35C 2168
38-622 700x38C 2180
40-622 700x40C 2200
42-622 700x42C 2224
44-622 700x44C 2235
45-622 700x45C 2242
47-622 700x47C 2268
54-622 29x2.1 2288
60-622 29x2.3 2326
Adjust the tire pressure properly. With the rider’s weight applied on the bicycle,
roll the wheel one tire revolution with reference to a marker such as the valve, and
measure the travel distance on the ground.
 Loading...