

Page 1
E
y
e
>
elect ronics
ect ronics
®
<
MULTISPORTS
C
>
C
E
elect ronics
ALTIMETER
AT-110
マルチスポーツアルティメータ
ALTIMETRE MULTISPORT
MULTI-SPORT-HÖHENMESSER
at
nics
<
C
y
E
at
e
<
>
y
E
elect ronics
e
>
C
y
at
at
e
<
C
E
<
C
electr o n
E
>
at
e
y
at
e
y
electr
>
<
>
E
e
C
E
e
y
l
a
y
l
ect ronics
<
>
C
C
elect ronics
at
E
y
e
at
>
<
C
E
<
C
electr o n
y
at
at
e
>
<
E
e
C
E
y
l
a
y
Page 2
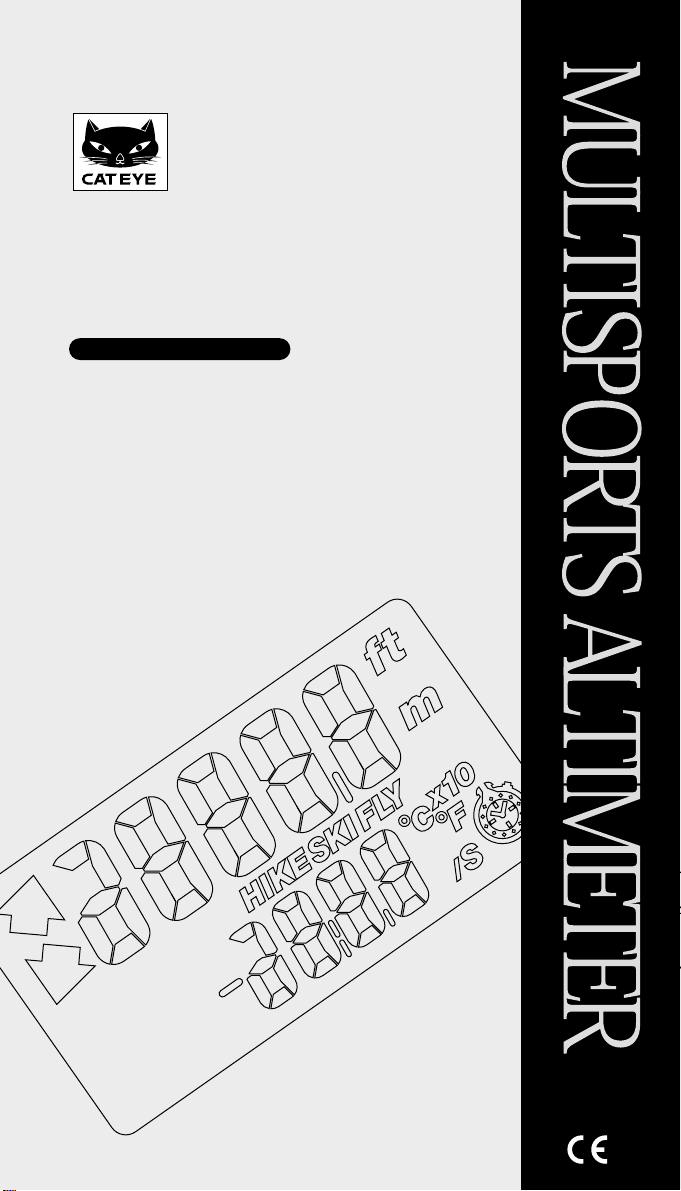
MULTISPORTS ALTIMETER
MODEL AT-110
Instruction Manual
INTRODUCTION
Thank you for purchasing CATEYE Model AT-110.
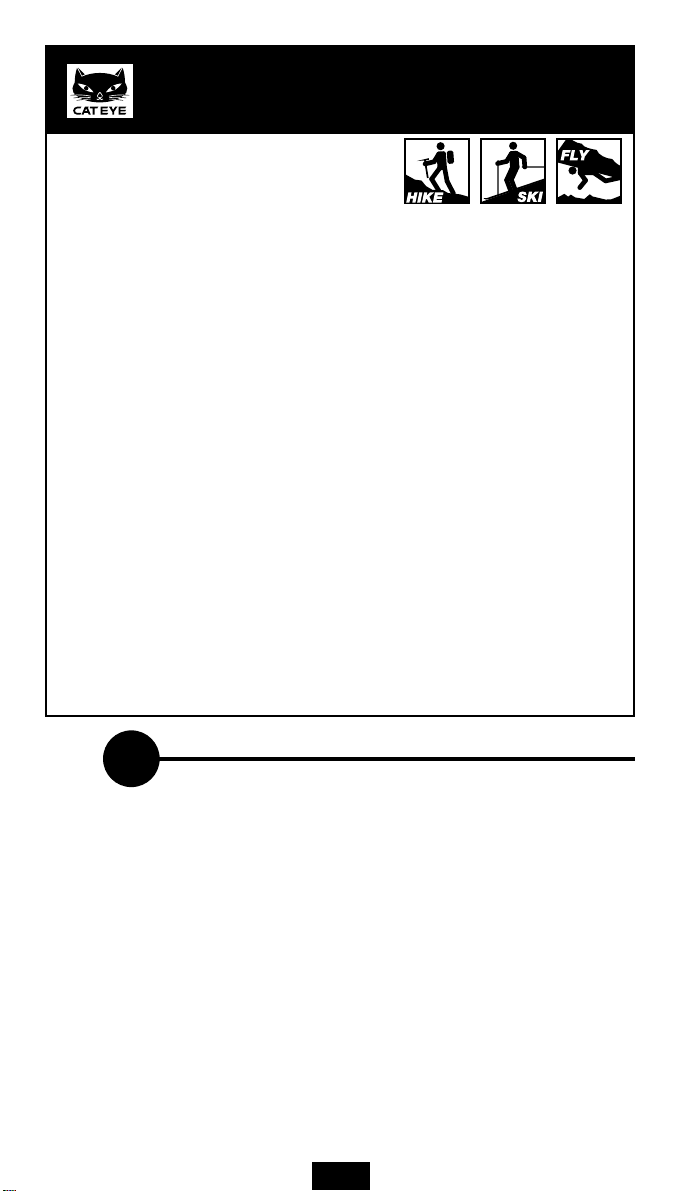
This altimeter is designed to help quantify altitude
data for vertical sports such as, skiing, hiking, climbing, mountaineering, hang-gliding,
parasailing, ballooning, sail-planing and sky-surfing, etc. The patented temperature
compensated pressure captures atmospheric pressure and gives accurate altitude reading in 1 meter or 5 foot resolution. Three types of measuring mode (Hike, Ski and Fly)
allow for meaningful data collection for each sport. The screen has an EL (electroluminescent) backlight for night viewing.
Features:
•Displays altitude with 1 meter or 5 feet resolution up to 6000m or +20,000ft.
•Temperature compensated atmospheric pressure sensor.
•Measures atmospheric temperature.
•Audible and visible alarm in the Fly Mode to easily note any ascent or decent.
•Three types of measuring modes designed for the characteristics of different activities; (Hike, Ski and Fly).
•Shows current altitude in the large display with clock time, temperature, stopwatch,
speed of ascend/descend, altitude gain and loss, on the small display.
•Displays LOG-Book data of highest trip altitude, lowest trip altitude, sum of ascends,
sum of descends.
•Preserves LOG-Book data in memory even after replacing battery.
•Displays in feet or meters, fahrenheit or celsius.
•EL (electro-luminescent) back-lit screen for viewing data at night.
•Audible beep with each button operation.
Before operating, thoroughly familiarize yourself with this manual so that you understand the functions completely. Please keep this manual, along with the warranty card,
for future reference.
INDEX
FOR SAFE OPERATIONS (IMPORTANT) ------------------------------ 2
NAMES --------------------------------------------------------------------------- 2
PREPARATIONS
1. Battery Installation ------------------------------------------------------ 3
2. Data Scale Set Up ------------------------------------------------------ 3
3. Time Set Up -------------------------------------------------------------- 3
4. Attaching Wrist Band---------------------------------------------------3
5. Attaching to Your Body ------------------------------------------------ 3
HOW TO USE AS AN ALTIMETER
1. Functions and Button Operations ----------------------------------- 4
2. Hike Mode ---------------------------------------------------------------- 6
3. Ski Mode ------------------------------------------------------------------8
4. Fly Mode ---------------------------------------------------------------- 10
5. Altitude Correction ---------------------------------------------------- 12
BASIC KNOWLEDGE OF ALTITUDE MEASURING --------------- 12
TROUBLESHOOTING ------------------------------------------------------ 13
DAILY CARE ------------------------------------------------------------------ 13
SPARE ACCESSORIES --------------------------------------------------- 13
SPECIFICATIONS ----------------------------------------------------------- 14
LIMITED WARRANTY ------------------------------------------------------ 14
1
Page 3
FOR SAFE OPERATIONS (IMPORTANT)
For safe and appropriate use, always observe the following.
Caution:
• This altimeter is not intended to be a definitive measuring device.
• Give due consideration to your surroundings. Don’t pay too much attention to the data on the screen when using.
• Safely dispose of old batteries. Don’t place within reach of children. If swallowed, consult a physician immediately.
Note:
• Please note that atmospheric pressure is effected by the weather. The AT-110 calculates altitude from the changes in atmospheric pressure. Even during stable weather
condition, the altitude reading may change as much as 40m or 130ft, over the course
of the day.
• Select the best-suited mode for your activity.
• Never disassemble the main unit. It can not be re-assembled.
• The main unit is loaded with highly sensitive components. A strong impact may result
in malfunctions.
• Never intentionally submerge the main unit under water. Although the main unit is
water-resistant to normal weather conditions it is not designed to be used underwater.
• Don’t leave the main unit exposed to direct sunlight for extended periods of time.
• If the main unit is heated by strong direct sunlight, the temperature sensor inside of
the main unit may give incorrect temperature readings.
• The atmospheric pressure is continually changing. Thus, the data of the current altitude of one location might fluctuate from day to day depending on the weather.
• The Current altitude should be calibrated (corrected) before each use.
• Sudden temperature change such as moving from inside a heated building to a cold
outside can cause temporary incorrect altitude data.
• Static electricity might cause incorrect data.
• In pressurized aircraft the unit will not give a correct altitude.
• If the sensor cover is clogged with mud or sand, it will not measure accurately. Clean
according to “Daily Care” instructions.
• If the main unit or accessories/attachments become dirty with mud etc., gently wash
with mild soap and wipe dry with a soft cloth. Never apply paint thinner, benzine or
alcohol; damage will result.
4 2 5
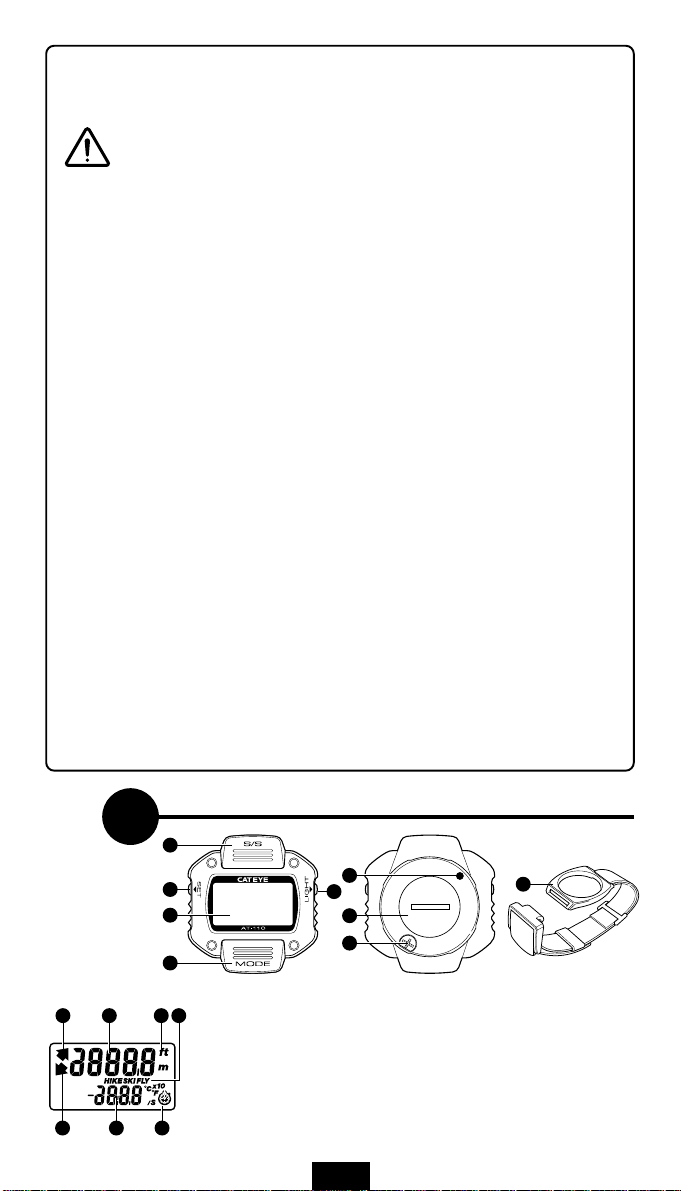
NAMES
B
E
A
C
F
D
G
H
A Display
53 61
1 Large Display
2 Small Display
3 Icon of Ascend
4 Icon of Descend
5 Icon of Scales/Function
6 Icon of Mode
2
AC
I
B S/S Button
C Mode Button
D Light Button
E Set Button
F AC (All Clear) Button
G Battery Cover
H Sensor Cover/Filter
I Wrist Band (Accessory)
Page 4
Close
Open
CR2032
B
E D
PREPARATIONS
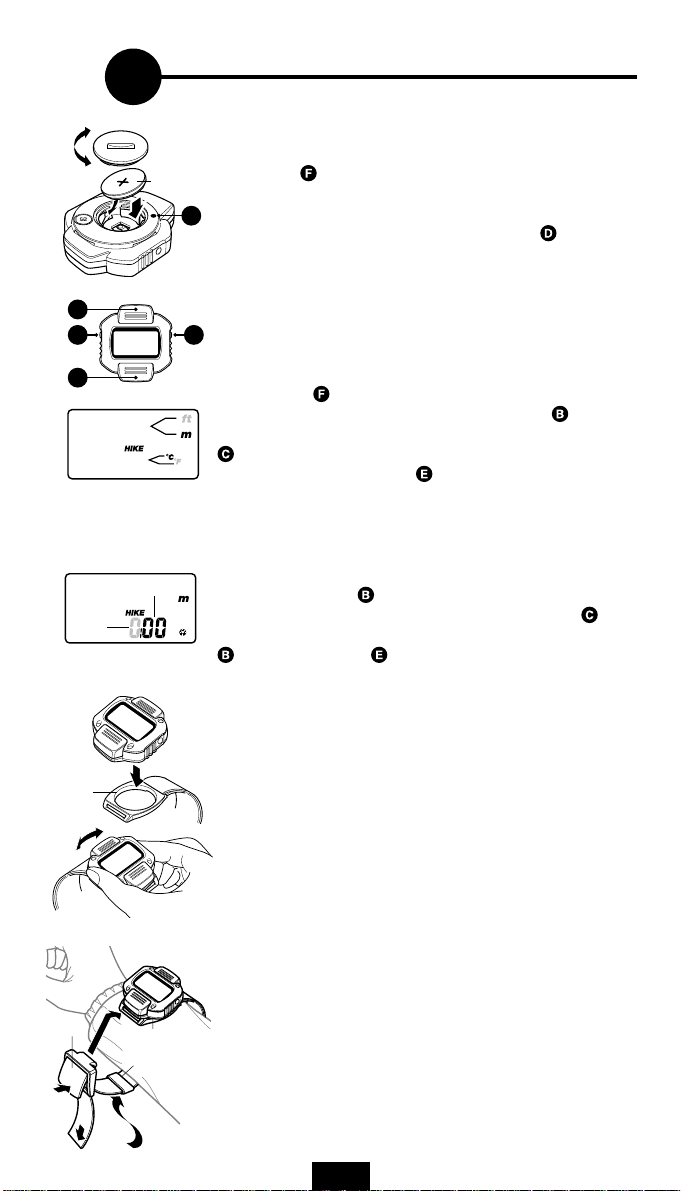
1. Battery Installation
1. Remove the battery cover on the back, with a coin.
2. Insert a new lithium battery (CR2032) with the (+) pole outward,
as illustrated. Close the cover securely.
3. Press the
* Battery Life: approx. 4 months (average use of one hour per day;
varies depending on frequency of use)
F
Note: If the display disappears while press of the
or often shows irregular altitude, replace the battery.
Caution: Dispose of old batteries properly. Keep batteries out of
reach of children. If swallowed, consult a physician immediately.
AC (All Clear) button on the back.
Light button,
C
Temp. simbol
Hours
Ring
Twist
Buckle
3-2
Alt. simbol
2
3-1
Minutes
Press
Ring
Belt loop
4
2. Data Scale Set Up
First, press the AC (All Clear) button; the entire display will illuminate and then “m” and “°C” symbols appear. Press the S/S button
to chose between “°C” (celsius) and “°F” (fahrenheit). Press the
Mode button to chose between “m (meter)” and “ft (feet)”. Select
the desired scale and press the Set button to fix the scale.
Note: If “°C” (celsius) scale is selected a 24-hour clock is displayed. If “°F” (fahrenheit) is selected a 12-hour clock is displayed.
3. Time Set Up
After the data scale is set, the display displays clock set up mode.
With each press of the S/S button, the digits for hours increase by
one. (To increase rapidly, hold down the button.) Press the
button to select the minute digits. Adjust the minutes by pressing the
S/S button. Press the Set button to set the time. After the clock
time is set, the AT-110 defaults to Hike mode.
4. Attaching Wrist Band
Press the main unit onto the ring of the wrist band. It can be mounted
perpendicularly or parallel to the belt. To remove the unit, twist it to
the left or the right.
5. Attaching to Your Body
By using a longer mounting belt (option), the unit can also be attached on your leg, not only on your arm.
1. Adjust the belt length tentatively, according to the part to put the
unit on. (Make it a bit longer than it looks necessary.)
1
2. Roll the belt around the part to wear the unit, and hook the buckle
on the ring with the buckle lever lifted.
3. Pull the belt end to tighten, and lay down the buckle lever.
4. Pass the belt end through the belt loop.
5. To remove the unit, lift the buckle lever and detach the buckle
from the ring.
Note: Lift the buckle lever, when the buckle is attached to/detached from the ring.
Mode
3
Page 5
E
Temperature
Stopwatch
Ascend/Descend
Speed
Altitude
Gain & Loss
Ascend
Descend
Hold down
LOG-BOOK FUNCTION
Sum of Descends
Sum of Ascends
Lowest Trip Alt.
Highest Trip Alt.
B
Button
MAIN
SCREEN
Current Altirude
Clock Time
C
Button
Temperature
B
C
HOW TO USE AS AN ALTIMETER
1. Functions and Button Operations
Before Operation:
The initial value of the Current altitude shown on the display may
not indicate the correct altitude of your location. First read through
this section, and then correct the altitude according to the instructions on page12.
Modes
This unit has three modes; Hike, Ski and Fly. Each mode has its own
characteristics. Select the best-suited mode for your purpose. You
can change the mode during use.
Hike Mode: Suitable for hiking, mountaineering, or other general
activities with gradual changes in altitude.
Ski Mode: Suitable for skiing, snow-boarding, mountain biking, or
other activities where you want to record numbers of
runs.
Fly Mode: Suitable for hang-gliding, paragliding, parajumping,
skysurfing, ballooning, sail-planing or other sky-sports
where there are sudden and significant changes in altitude.
ⓦ How to Shift From One Mode to Another
Hold down the Set button and the mode shifts from Hike to Ski to
Fly.
E
E E
HIKE SKI FLY
Functions
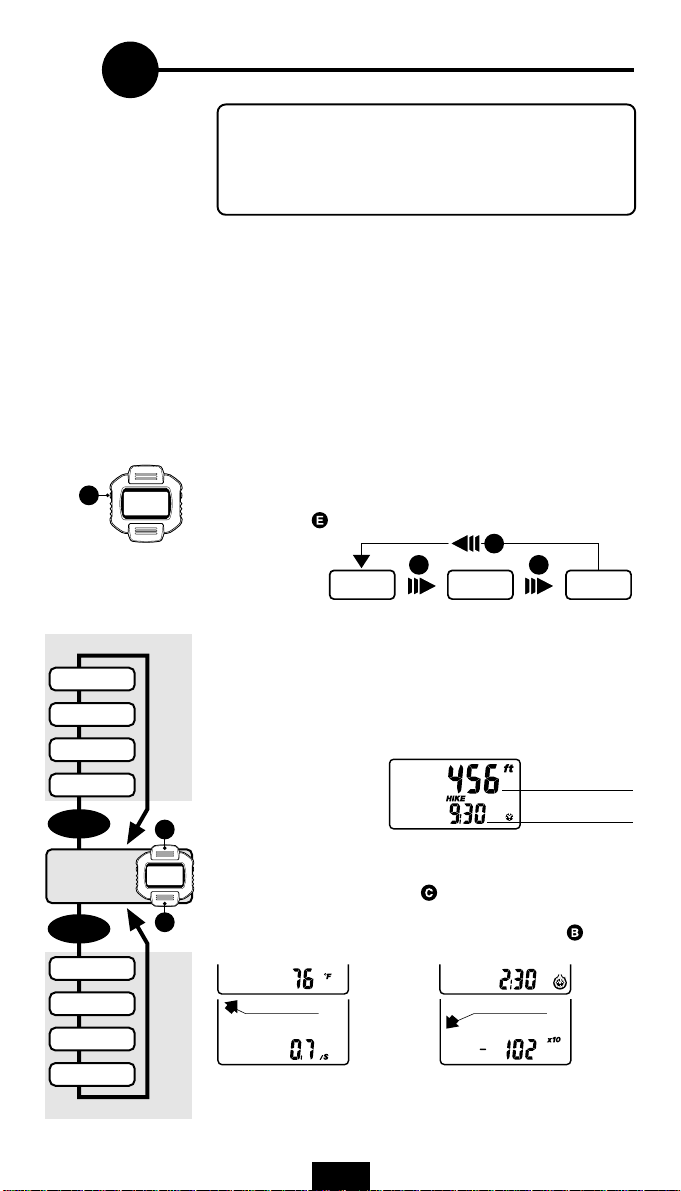
Each of the three modes has a Main Screen, Sub Functions and LOGBook Functions.
ⓦ Main Screen:
The Main Screen gives the basic data of current altitude and time of
day. It is necessary to be in this Main Screen in order to shift between
Sub Functions and LOG-Book Functions.
ⓦ Sub Function:
This function shows current data and conditions, such as temperature, stopwatch, etc. The data appears on the lower display. This
data is accessed by pressing the
data it is being displayed. On the large display, current altitude is
always viewed. To return to the Main Screen, press the
ton in any Sub Function.
HIKE MODE SKI MODE FLY MODE
Current Altitude
Clock Time and Icon
Mode button. The icon tells what
S/S but-
Stopwatch
Asc./Dsc. Speed
Alt. Gain & Loss
SUB FUNCTION
ⓦ LOG-Book Function:
This function shows data stored in memory, such as highest trip altitude, sum of ascends, etc. The data appears on the large display,
and the name of the LOG-Book data is indicated on the small display.
4
Page 6

B
E
C
B
C
E D
F
AC
B
E
C
To cycle from one LOG-Book data to another, press the S/S button.
To return to the Main screen, press the
Highest Trip Altitude Lowest Trip Altitude Sum of Ascends Sum of Descends
* The illustration shows an example of Hike mode.
Using the Stopwatch
In the stopwatch Sub Function the Set button, the stopwatch starts/
stops. To reset it to zero, refer to the following reset operation (press the
S/S button and Mode button simultaneously). When the stopwatch
is active, the stopwatch icon blinks.
Mode button in any time.
Resetting Data
Display the data function you want to reset. Then press the S/S button
Mode button simultaneously. The data resets to zero. If the stop-
and
watch is still active (running), when it is reset, the stopwatch continues
counting after returning to 00:00:00.
Note: If this operation is done in the Main screen, the corrected figure of
the current altitude is reset. (Refer to page 12 - "Altitude Correction".)
Note: If you are resetting the data of highest trip altitude or lowest trip
altitude, firstly the screen shows the largest figure of its range; and then
the reset data becomes the same value as the current altitude.
Light Button
Pressing the Light button will illuminate the EL (electro- luminescent)
back-lit screen for approx. 2 seconds.
Set Button
This button is used: • to shift from one mode to another
• to start/stop the stopwatch
• to calibrate (correct) the current altitude, or to fix
the scale/clock time.
AC (All Clear) Button (on the back)
This button is used to set up the programming of the main unit after having replaced the battery, or when irregular display occurs during use.
When this button is pressed, all displays illuminate and then only the
scale symbols appears. The scale and clock time must be set again according to “PREPARATIONS”.
Preserving LOG-Book Data
The LOG-Book data stored in memory in each mode will not be lost even
after the
served in EE-PROM memory. LOG-Book data is cleared when the
S button and the Mode button are pressed simultaneously and only
then is the displayed LOG data reset. EE-PROM calculates the data from
when the clock time of your unit passes 0:00 every day.
AC (All Clear) button is pressed, because the data is pre-
Power Saving Function
If no buttons are pressed for five minutes, the power saving function automatically starts. To release this function, press either
Set buttons for more than 1 second. If the unit perceives an altitude
change of more than 4 meters or 10 feet, the power saving function is
turned off.
• In the power saving function:
data of altitude and temperature are still updated every 2 minutes.
• In the standard waking mode:
data of altitude is updated every second and temperature is updated
every 20 seconds.
S/S, Mode or
5
S/
Page 7

HIKE
MAIN SCREEN
Current Altitude
Clock Time
B
B
Sum of
Descends
B
Sum of
Ascends
B
Lowest
Trip Altitude
B
Highest
Trip Altitude
B
CORRECTION
E
ALTITUDE
C
C
OF
ACTUAL
E D
C
How to Shift to
Another Mode
Hold down
How to Reset the Data
In the Sub/LOG-book Functions
Press
Simultaneously
Shortcut Key
To return to the Main Screen
from the LOG-Book Function,
press
to the Main Screen from the Sub
Function, press
E
B
C
Mode button. To return
S/S button.
Temperature
C
START
E
STOP
Stopwatch
C
Ascend/
Descend
Speed
C
C
Altitude
Gain & Loss
B
/
SUB FUNCTION LOG-BOOK FUNCTION
6
Page 8

2. Hike Mode
This mode is designed for general activities, such as hiking, mountaineering, cross country, etc.
Its Sub Function and LOG-Book Function is illustrated as follows:
Characteristics of Hike Mode
• Suitable for general activities, such as hiking, etc.
• Desirable for slow change of altitude.
Data
Main Screen
Current altitude: Indicates the current altitude (above sea level) of the present spot on
Clock Time: Shows the present time on the small display. If the temperature scale
Sub Function (Always displays the current altitude on the large display)
Temperature: Measures the atmospheric temperature every 20 seconds and dis-
Stopwatch: Shows the elapsed time from its start to the current point. It is dis-
Ascend/Descend Speed: Indicates the averaged speed of ascend/descend, in the scale of meter
Altitude Gain & Loss: Indicates the altitude difference between the start and the current
LOG-Book Function
Highest Trip Altitude: Indicates the highest altitude ever made since the start to the current
Lowest Trip Altitude: Indicates the lowest altitude ever made since the start to the current
Sum of Ascends: Indicates the total of ascends (altitude gain) on the large display. The
Sum of Descends: Indicates th e to tal of descends (altitude loss) on the large display.
the large display, in 1 meter or 5 foot increments.
is set as “°C” (celsius), the clock reads as a 24-hour clock; if the scale
is set as “°F” (fahrenheit), the clock becomes 12-hour clock.
plays it on the small display, in 1 degree increment.
played in units of minutes and seconds up to ten minutes; and in units
of hours and minutes when it exceeds ten minutes. If the AT-110
clock is set as a 24 hour clock, the stopwatch continues to count up to
24 hours. If the clock-time is set as a 12-hour clock, the stopwatch
continues to count up to 12 hours.
or feet per second, on the small display in increments of 0.1meter per
second or 0.3 feet per second.
point, on the small display. The figure on the display shows the 1/10
value, so the symbol of “x10” appears.
point, on the large display “Ahi” on the small display stands for “Altitude High”.
point, on the large display. “ALo” on the small display stands for “Altitude Low”.
data of descend (altitude loss) is not included. The figure on the display shows the 1/10 value, so the symbol of “x10” appears. “ASC” on
the small display stands for “Altitude Sum Count”.
The data of ascends (altitude gain) is not included. The figure on the
display shows the 1/10 value, so the symbol of “x10” appears. “dSC”
on the small display stands for “Descent Sum Count”.
7
Page 9

B
Sum of
Runs
B
Sum of
Descends
B
SKI
MAIN SCREEN
Current Altitude
Clock Time
B
E D
C
How to Shift to
Another Mode
Hold down
How to Reset the Data
In the Sub/LOG-book Functions
Press
Simultaneously
Shortcut Key
To return to the Main Screen
from the LOG-Book Function,
press
to the Main Screen from the Sub
Function, press
E
B
C
Mode button. To return
S/S button.
Lowest
Trip Altitude
B
Highest
Trip Altitude
B
CORRECTION
E
ALTITUDE
C
Temperature
C
START
E
STOP
Stopwatch
C
Ascend/
Descend
Speed
C
C
Altitude
Gain & Loss
C
OF
ACTUAL
B
/
SUB FUNCTION LOG-BOOK FUNCTION
8
Page 10

3. Ski Mode
This mode is designed for the sport activities, such as skiing, snow-boarding, etc. The special
feature of this mode is that it counts the number of runs or “sum of runs”. The Sub Function and
LOG-Book Function of this mode is illustrated as follows:
Characteristics of Ski Mode
• Suitable for sports that repeat (ascends and descends) runs.
• Desirable for slow change of altitude.
Data
Main Screen
Current altitude: Indicates the current altitude (above sea level) of the present spot on
Clock Time: Shows the present time on the small display. If the temperature scale
Sub Function (Always displays the current altitude on the large display)
Temperature: Measures the atmospheric temperature every 20 seconds and dis-
Stopwatch: Shows the elapsed time from its start to the current point. It is dis-
Ascend/Descend Speed: Indicates the averaged speed of ascend/descend, in the scale of meter
Altitude Gain & Loss: Indicates the altitude difference between the start and the current
LOG-Book Function
Highest Trip Altitude: Indicates the highest altitude ever made since the start to the current
Lowest Trip Altitude: Indicates the lowest altitude ever made since the start to the current
Sum of Descends: Indicates th e to tal of descends (altitude loss) on the large display.
Sum of Runs: Calculates the number of runs, judging from the altitude change, and
the large display, in 1 meter or 5 foot increments.
is set as “°C” (celsius), the clock reads as a 24-hour clock; if the scale
is set as “°F” (fahrenheit), the clock becomes 12-hour clock.
plays it on the small display, in 1 degree increment.
played in units of minutes and seconds up to ten minutes; and in units
of hours and minutes when it exceeds ten minutes. If the AT-110
clock is set as a 24 hour clock, the stopwatch continues to count up to
24 hours. If the clock-time is set as a 12-hour clock, the stopwatch
continues to count up to 12 hours.
or feet per second, on the small display in increments of 0.1meter per
second or 0.3 feet per second.
point, on the small display. The figure on the display shows the 1/10
value, so the symbol of “x10” appears.
point, on the large display. “Ahi” on the small display stands for “Altitude High”.
point, on the large display. “ALo” on the small display stands for “Altitude Low”.
The data of ascends (altitude gain) is not included. The figure on the
display shows the 1/10 value, so the symbol of “x10” appears. “dSC”
on the small display stands for “Descent Sum Count”.
shows it on the large display. “run” on the small display stands for
“Number of Runs”. The AT-110 counts a “run” when a descent of
more than 10 meters’ or 30 feet altitude difference is recorded within
20 seconds. Then next run is counted, only when descend is done
again after ascend of more than 10 meters’ or 30 feet altitude difference is made within 20 seconds (such as when going up with lift).
Thus, a “run” might not be calculated if the ascent is on foot, or slope
is gentle.
9
Page 11

B
Sum of
Descends
B
Sum of
Ascends
B
FLY
MAIN SCREEN
Current Altitude
Clock Time
B
E D
C
How to Shift to
Another Mode
Hold down
How to Reset the Data
In the Sub/LOG-book Functions
Press
Simultaneously
Shortcut Key
To return to the Main Screen
from the LOG-Book Function,
press
to the Main Screen from the Sub
Function, press
E
B
C
Mode button. To return
S/S button.
Lowest
Trip Altitude
B
Highest
Trip Altitude
B
CORRECTION
E
ALTITUDE
C
Temperature
C
START
E
STOP
Stopwatch
C
Vario
C
C
Altitude
Gain & Loss
C
OF
ACTUAL
B
/
SUB FUNCTION LOG-BOOK FUNCTION
10
Page 12

4. Fly Mode
This mode is designed for the sports in the air, such as hang-gliding, para-gliding, sky-diving, etc.
The special feature of this mode, Vario, quickly finds up-wind channels (ascending currents). Its
Sub Function and LOG-Book Function is illustrated as follows:
Characteristics of Fly Mode
• Audible beeps in the Main Screen/Sub Functions allow you to ascent or descent without
looking at screen.
• In the Main Screen/Sub Functions, the icon of ascent/descent is always on so that altitude
change is easily noticeable.
• Desirable for sudden and sharp change of altitude.
Alarms (in the Main Screen/Sub Function)
& beeper : when ascending at a speed faster than +0.25m/s or +0.82f/s
Data
Main Screen
Current altitude: Displays the current altitude of the present location on the large display, in
Clock Time: Shows the present time on the small display. If the temperature scale is set
Sub Function (Always displays the Current altitude on the large display)
Temperature: Measures the atmospheric temperature every 20 seconds and displays it
Stopwatch: Shows the elapsed time from its start to the current point. It is displayed in
Vario: Shows the vertical ascend/descend speed, in the scale of meter or feet per
Altitude Gain & Loss: Indicates the altitude difference between the start and the current point, on
LOG-Book Function
Highest Trip Altitude: Indicates the highest altitude attained since the start to the current point,
Lowest Trip Altitude: Indicates the lowest altitude ever made since the start to the current point,
Sum of Ascends: Indicates the total of ascents (altitude gain) on the large display. The data
Sum of Descends: Indicates the total of descents (altitude loss) on the large display. The data
: when descending at a speed of faster than -0.25m/s or 0.82f/s
: when ascending/descending within the speed of ±0.25m/s or 0.82f/s
1 meter or 5 foot increments. The icon of ascend or descend always appears on the display. If there is no change of the altitude, both icons appear.
as “°C” (celsius), the clock reads as a 24-hour clock; if the scale is set as
“°F” (fahrenheit), the clock becomes 12-hour clock.
on the small display, in 1 degree increment.
units of minutes and seconds up to ten minutes; and in units of hours and
minutes when it exceeds ten minutes. If the AT-110 clock is set as a 24 hour
clock, the stopwatch continues to count up to 24 hours. If the clock-time is
set as a 12-hour clock, the stopwatch continues to count up to 12 hours.
second, on the small display. The increment is 0.5m/s or 1.6ft/s and it easily finds the up-wind channels (ascending currents).
the small display. The figure on the display shows the 1/10 value, so the
symbol of “x10” appears.
Note: In the Fly Mode, the icons of ascend/descend signify the different
meaning from other modes; refer to "Alarms" on the previous page.
on the large display. “Ahi” on the small display stands for “Altitude High”.
on the large display. “ALo” on the small display stands for “Altitude Low”.
of descents (altitude loss) is not included. The figure on the display shows
the 1/10 value, so the symbol of “x10” appears. ”ASC” on the small display
stands for “Ascent Sum Count”.
of ascents (altitude gain) is not included. The figure on the display shows
the 1/10 value, so the symbol of “x10” appears. “dSC” on the small display
stands for “Descent Sum Count”.
11
Page 13

E
795hPa
899hPa
1013hPa
Pressure
B
C
A. S. Level
5. Altitude Correction
Atmospheric pressure changes constantly, due to various weather conditions. As AT-110 calculates the altitude from the atmospheric pressure, it is necessary to correct the current altitude in order to get more
precise data. It is recommended to make corrections whenever a reliable index (such as topographical map or altitude marker is available.
* The basic knowledge of the altitudes of your home, public facilities,
etc. will be useful information for correction.
+
How to Correct the Altitude
B
First, display the Main Screen. Then press the Set button, and the
altitude digits flash. To increase the figure, press the S/S button; to
decrease, press the
C
down the button. Adjust the figure to the correct altitude, and press the
–
Set button to complete this operation.
Mode button. To increase/decrease rapidly, hold
Resetting Standard Atmospheric Scale
After adjusting the altitude to compensate for changes in weather, it may
be helpful to reset the AT-110 to it’s preset standard scale. In the Main
Screen, press the
Mode button and the Set button simultaneously.
This resets the AT-110 to Standard Atmosphere (ISO 2533).
BASIC KNOWLEDGE OF ALTITUDE MEASURING
1. Altitude Measuring of AT-110
The AT-110 contains a highly sensitive atmospheric pressure sensor. It
estimates the altitude by using the “correlation between altitude and pressure” based on the Standard Atmosphere (ISO 2533) of ICAO (International Civil Aviation Organization). Conventional pressure sensors are
affected by temperature and will therefore give errors. The AT-110 is
temperature-compensated every 20 seconds and records in 1 meter or
5 feet resolution. Also, it offers three types of measuring modes; Hike,
Ski and Fly; to give essential altitude data for various sports.
Note: The current altitude data may give an incorrect value temporarily, such as when it is taken out of doors from inside a building.
These temporary incorrect readings are to be expected and are not a
malfunction. Correct readings will return shortly.
2. The Correlation Between Altitude and Pressure
2000M
The higher the altitude gets, the lower the pressure becomes.
At venues of which altitudes are under 500 meters, the pressure decreases by approx. 12hPa per each 100 meters.
1000M
A.S.Level Pressure A.S.Level Pressure A.S.Level Pressure
4500 m 577 hPa 1000 m 899 hPa 300 m 978 hPa
4000 m 616 hPa 900 m 910 hPa 200 m 989 hPa
3500 m 658 hPa 800 m 921 hPa 100 m 1001 hPa
3000 m 701 hPa 700 m 932 hPa 0 m 1013 hPa
2500 m 749 hPa 600 m 943 hPa –100 m 1025 hPa
0M
2000 m 795 hPa 500 m 955 hPa –200 m 1038 hPa
1500 m 845 hPa 400 m 966 hPa –300 m 1050 hPa
3. Weather and Atmospheric Pressure
Changes in weather from a high pressure system (clearer, calmer
weather) to a low pressure system (overcast, rain, storming weather)
can cause a change in the altitude reading of 100 meters, 325 feet or
more. Thunderstorms or other strong low pressure weather conditions
may cause even greater change. Even though the weather appears
stable, the pressure may considerably from morning to evening. Even in
seemingly stable weather, the morning to evening change can be as
much as 30 meters or 100 feet.
12
Page 14

B
E D
C
AC
Sensor cover
Close
Fiter
Open
TROUBLESHOOTING
If a trouble or malfunction occurs, check the following before seeking
technical support.
Trouble/Check Items/Remedy
Buttons do not change the display.
Is the unit in the power saving function?
Press any button for more than 1 second and release this
function.
No display appears. Or the display disappears when the
button is pressed.
Has the battery worn out? Or is it about to wear out?
Replace it with a new one (CR2032). (*After replacing the
battery, be sure to press the
AC (All Clear) button and to
reset the scale and clock time again.)
Incorrect data appears.
F
Static electricity may cause an incorrect readings.
Press the AC (All Clear) button and reset the scale and
clock time again.
The unit does not measure altitude.
Is there anything clogged in the sensor cover?
Clean it off according to "Daily Care". (If the cleaning still
doesn’t work, press the
AC (All Clear) button and reset
the scale and clock time again.)
The current altitude data is incorrect.
Is the correction of the current altitude appropriately done?
The altitude is influenced by the change of the pressure.
Correct it before each use.
The liquid crystal screen is dark and unusual display appears.
Was it left for a long time under direct sunlight?
It returns to normal by being left in the shades. The data will
not be affected.
Display response is slow.
Is it the temperature under 0°C or 32°F?
It returns to normal when the temperature rises. The will not
be affected.
DAILY CARE
If the sensor cover is clogged with mud etc., the unit doesn't measure
altitude. After each use, check the situation of the sensor cover and
take care according to the following instruction.
1. Turn the sensor cover counterclockwise with a screwdriver, and
take it off.
2. Carefully take out the filter inside, and wash the sensor cover and
the filter with clean water.
3. Put the filter back as it was, and close the sensor cover.
Note: The altitude sensor is located under the filter. Be sure not to
insert pins or sharp objects.
SPARE ACCESSORIES
The following parts are available separately.
#166-5150 Lithium Battery (CR2032)
#169-9880 Sensor Cover/Filter
#239-9990/239-9991 Wrist Band / Long Band
Light
#166-5150 #169-9880 #239-9990/239-9991
13
Page 15

SPECIFICATIONS
Function
Main screen
Current altitude –380 - +5870m [–1200 - +19200ft] ±1m [±5ft]
Clock Time 0:00'- 11:59' or 23:59' 1'
Sub Function
HIKE MODE SKI MODE FLY MODE
Temperature °C[°F] –5 - 55°C [23 - 131°F] 1°C [1°F]
Stopwatch 00'00" - 9'59"/00:10' - 23:59'[11:59'] 1"/1'
Ascend/Descend Speed /S 0 - ±200m/s [±299ft/s] ±0.1m/s [±0.3ft/s]
Altitude Gain & Loss x 10 0 - ±2999 x10m [ft] ±1 x10m [ft]
LOG-Book Function
Highest Trip Altitude Ahi –380 - +5870m [–1200 - +19200ft] ±1m [±5ft]
Lowest Trip Altitude ALo –380 - +5870m [–1200 - +19200ft] ±1m [±5ft]
Sum of Ascends ASC(x10) 0 - 29999 x10m [ft] 1 x10m [ft]
Sum of Descends dSC(x10) 0 - –29999 x10m [ft] –1 x10m [ft]
Main screen
Current altitude –380 - +5870m [–1200 - +19200ft] ±1m [±5ft]
Clock Time 0:00'- 11:59' or 23:59' 1'
Sub Function
Temperature °C[°F] –5 - 55°C [23 - 131°F] 1°C [1°F]
Stopwatch 00'00" - 9'59"/00:10' - 23:59' [11:59'] 1"/1'
Ascend/Descend Speed /S 0 - ±200m/s [±299ft/s] ±0.1m/s [±0.3ft/s]
Altitude Gain & Loss x 10 0 - ±2999 x10m [ft] ±1 x10m [ft]
LOG-Book Function
Highest Trip Altitude Ahi –380 - +5870m [–1200 - +19200ft] ±1m [±5ft]
Lowest Trip Altitude ALo –380 - +5870m [–1200 - +19200ft] ±1m [±5ft]
Sum of Descends dSC(x10) 0 - –29999 x10m [ft] –1 x10m[ft]
Sum of Runs run 0 - 255 1
Main screen
Current altitude –380 - +5870m [–1200 - +19200ft] ±1m [±5ft]
Clock Time 0:00'- 11:59' or 23:59' 1'
Sub Function
Temperature °C[°F] –5 - 55°C [23 - 131°F] 1°C [1°F]
Stopwatch 00'00" - 9'59"/00:10' - 23:59'[11:59'] 1"/1'
Ascend/Descend Speed /S 0 - ±200m/s [±299ft/s] ±0.5m/s [±1.6ft/s]
Altitude Gain & Loss x 10 0 - ±2999 x10m [ft] ±1 x10m [ft]
LOG-Book Function
Highest Trip Altitude Ahi –380 - +5870m [–1200 - +19200ft] ±1m [±5ft]
Lowest Trip Altitude ALo –380 - +5870m [–1200 - +19200ft] ±1m [±5ft]
Sum of Ascends ASC(x10) 0 - 29999 x10m [ft] 1 x10m [ft]
Sum of Descends dSC(x10) 0 - –29999 x10m [ft] –1 x10m [ft]
Alarms & beeper when ascending with the speed of more than +0.25m/s
(in the Main Screen/Sub Function)
Controller 4-bit 1-chip microcomputer (crystal controlled oscillator)
Display Liquid crystal (with electro-luminescence backlight)
Operation Sound Piezoelectric buzzer sound
Operating Temperature Range –5 °C - 55 °C [23 °F - 131 °F]
Storage Temperature Range –20 °C - 55 °C [–4 °F - 131 °F]
Power Supply/Service Life Lithium battery (CR2032) x 1 pc./ approx. 4 months (one hour's mea-
Dimension/Weight 56 x 52 x 22.5 mm / 41.5 gram
*The specification and design are subject to change without notice.
suring per day; roughly estimated and varies depending on frequency
of use)
when descending with the speed of more than –0.25m/s
when ascending/descending within the speed of ±0.25m/s
LIMITED WARRANTY
1-Year Warranty: Only Main Unit (excluding battery)
If trouble occurs during normal use specified in this manual, the part is repaired or replaced free of
charge. The service must be performed by CAT EYE Co., Ltd., and the product which needs service must
be returned to CAT EYE Co., Ltd. directly by purchaser. When returning the product for CAT EYE warranty service, pack it carefully, and enclose the warranty certificate and instructions for repair. Please
make sure to type your name and address clearly on the warranty certificate, so that the product can be
shipped back to you as soon as the necessary repair/adjustment is completed. Insurance, handling and
transportation charges to our address shall be borne by the person desiring service. Attachments such as
battery, wrist band, are not included in this warranty. This warranty shall only be applied to the product
itself, and CAT EYE is exempted from any responsibility resulting from the use of the product.
Address for service:
Service & Research Address for United States Consumers:
2-8-25 Kuwazu, Higashi Sumiyoshi-ku Osaka 546 JAPAN
Attention: CAT EYE Customer Service Section
Phone: 81-6-719-7781 FAX: 81-6-719-2362
CAT EYE Service & Research Center
1705 14th St. 115 Boulder, CO 80302
Phone: 303-443-4595 Toll Free: 800-5CATEYE
FAX: 303-473-0006 e-mail: CatEyeUSA@aol.com
14
CO
.,LTD.
Page 16

E
CO
.,LTD.
y
e
>
elect ronics
ect ronics
<
>
C
elect ronics
at
nics
<
C
E
y
E
at
e
<
>
C
y
E
elect ronics
e
>
C
y
at
at
e
<
E
<
C
C
y
at
at
e
>
<
E
e
C
E
y
l
a
y
electr o n
E
>
electr
y
e
>
e
l
ect ronics
<
>
Copyright© 1996
CAT EYE Co., Ltd.
ATM11-960515-2
C
Printed in Japan
0687390
2
C
elect ronics
®
at
E
y
at
2-8-25, Kuwazu, Higashi Sumiyoshi-ku, Osaka 546 Japan
Phone: 81-6-719-7781 Fax: 81-6-719-2362
e
>
U.S. Pat. No. 5236759, Pat. Pending and Design Patented
<
E
<
C
C
y
at
at
e
>
<
E
e
C
E
y
l
a
y
electr o n
 Loading...