

Page 1

Canon T2000
Operatiiig Manual Soundprojector
English version
Page 2

Congratulations on your
new Canon T2000 Sound
Projector which will make
the most of your
Super-8 or Single-8
movies, be they silent or of
the Ektasound type, with
live sound recorded ‘on
location’. If you have
movies taken with a silent
Super-8 or Single-8
camera, the T2000
provides all the facilities
you need to add sound
on a magnetic stripe which
can easily be put onto any
8 mm film after editing. If,
on the other band, you
shoot live-sound films, the
T2000 is not only the
perfect complement to
Page 3

your sound camera, but
will also help you optimize
your live sound by adding
a spoken commentary,
music or special sound
effects. This is particularly
easy in the T2000, in which
advanced electronics take
over level control and even
allow sound to be recorded
on sound so that back
ground music and a
spoken commentary or
special effects can be
conveniently combined on
a single track.
Although operation of
your Canon T2000 is
extremely simple, you
should proceed metho-
dically and with due care
in order to obtain out
standing results and satis
faction. May we therefore
recommend that you read
these instructions very
carefully from cover to
cover and keep them close
to the projector for easy
and quick reference. Fold
out the front and rear flaps
with the nomenclature
while reading the Manual.
Page 4
Canon
SOUND PflOf СТОП
n
Page 5

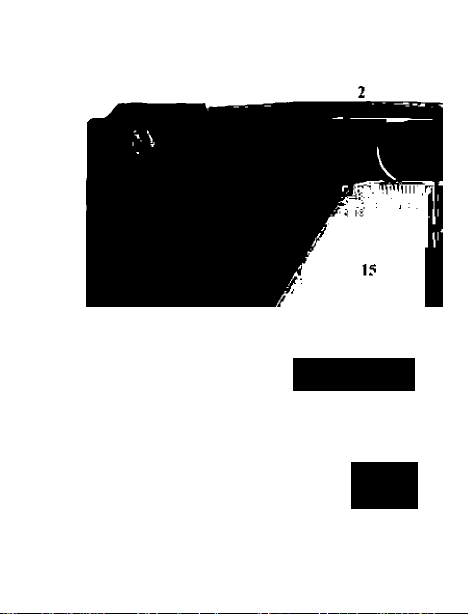
1 Take-up spindle
2 Carrying handle
3 Framing knob
4 Focusing knob
5 Supply arm
6 Supply spindle
7 Film-threading slot
8 Zoom lens
9 Sound input
10 Master switch
11 Record button
12 Volume control
13 Rec/Trick control
14 Input selector
15 Front cover
16 Loop-former button
17 Vertical tilting screw
Page 6

Page 7

Jß
О
e
Я*
e
Page 8

4. A few words about striped
film
Film editing
6. Preparing the projector
for operation
8. Brief instructions
10. Picture controls
Master switch
Framing knob
Focusing knob
Zooming ring of lens
Loop-former button
Speed control
13. Sound input/output
Input
Output
14. Sound controls
Automatic level control
(ALC)
Record button
Volume control
Rec/Trick control
Input selector
17. Projecting your films on
the Canon T2000
20. Recording sound
Recording procedure
Using the microphone
Recording sound on sound
24. Accessories
Care and maintenance of
25. your T2000
Removing the front cover
Removing the lens
Changing the lamp
Cleaning the film path
30. Technical data
Page 9

tt
a
£
«
«
Sound projection is not
■ s
e
predicated on the use of a
sound camera. Any of
your silent films can be
«
provided with a magnetic
stripe to add sound in the
projector. You will be
surprised at the sound
quality you can obtain
from your Canon T2000
and the difference this
added sound can make.
Having silent film striped
with a magnetic track is
quite simple. Your photo
dealer will gladly make the
necessary arrangements. It
is advisable to have a
balancing stripe applied
along the other edge of the
film for uniform thickness
and smooth winding.
Remember, however, that
your movie should be
completely edited before
striping.
If you are using sound car
tridges in your movie
camera, you do not have
to worry about subsequent
striping. In this case, your
T2000 makes it very easy
to fill in sound gaps on
your films, which are quite
natural because there is
not always sufficient
sound on location and
polishing up your original
sound track will give you
much greater satisfaction.
Page 10

The sound-on-sound re
cording feature of your
T2000 even allows you to
add further sound to the
live-sound track to obtain
a well-balanced mixture of
original and ‘studio’
sound.
Before attempting to im
prove the live sound record
ed in your movie camera,
make absolutely sure that
you are completely
familiar with the few
simple manipulations
required for the purpose
on your projector.
Remember that live sound,
once erased, cannot be
brought back. A few trials
on an old film whose
sound track is no longer
needed will greatly im
prove your results.
Page 11

Film editing
The sound in Super-8
sound cameras is recorded
18 frames ahead of the
picture. This is a very
important point to keep in
mind during editing be
cause cutting one of the
two - picture or sound always affects the other.
Before adding further
sound to your sound
movies or putting sound
on silent film, be sure to
complete editing in all its
phases, since additional
editing after putting on the
final sound would disrupt
the latter.
Page 12

Before starting with sound
recording in the projector,
carefully clean your edited
film.
Page 13

s
(D
k
«
a
O
b
e
^ i';
I I*
1. Always carry your pro
£
jector by its handle (2).
a
£
i
a
k
a
use the take-up
Never
spindle (1) or supply arm
(5) for the purpose!
2. fie/ore connecting the
projector to the AC supply,
be sure to check its voltage
setting and compare it
with the available line
voltage. If necessary,
remove the transparent
plastic cover of voltage
selector (18) at the rear of
the projector and use a
coin to set the proper vol
tage rating.
Note that improper vol
tage setting may cause
damage to the projector if
the latter is connected to the
power supply.
Page 14

3. Plug the power cord
into receptacle (19) and
connect it to a wall outlet.
4. Set the projector up at a
suitable distance and
height in front of the
screen, using screws (24)
and (17) for horizontal
leveling and vertical
tilting. Avoid excessive
upward tilting of the
projector, which will
conically distort the screen
image. Instead, try to cen
ter the projector as nearly
as possible on the screen.
Page 15

5. You can now turn
master switch (10) 90° to
the right to switch on the
lamp so that the frame
limits become visible on
the screen. Turn knurled
ring of zoom lens (8) to
vary the size of the screen
image as required. Then
use focusing knob (4) to
prefocus on the frame
edges.
6. Swing out supply arm
(5) and slip supply reel
with film onto spindle (6)
so that the film leader
comes down at the front,
the perforations facing
you. The Canon T2000
will accept reels taking up
to 600 ft or 180 m of
film.
Page 16

7. Attach the auto take-up
reel supplied with the
projector to spindle (1).
Your Canon T2000 is now
ready for operation.
Page 17

a
0
э
1
■ Ё
а
These are intended ex
clusively as a general out
line and for quick future
reference. They cannot
and will not replace the
detailed explanations on
the following pages.
1. Set speed selector (21)
to the speed with which
your film was exposed in
the camera (18 or 24 fps).
Page 18
2. Turn master switch (10)
clockwise to its first stop
and insert film leader
about 4 inches or 10 cm
into the film-threading slot
below the white guide
roller until it is gripped by
the threading mechanism
and automatically wound
on the take-up reel.
3. Turn master switch (10)
further clockwise to either
silent projection or sound
projection, as required.
Page 19
4. Focus by turning knob
(4) and turn knob (3), if
necessary, to adjust the
frame line.
5. Select playback volume
in sound projection by
turning the volume control
12).
(
Page 20
6. When the film has
reached its end, stop the
projector by turning
master switch (10) to zero
and rewind either through
film path or outside by
first attaching the end of
the film to the supply
reel and turning master
switch (10) fully counter
clockwise.
Page 21

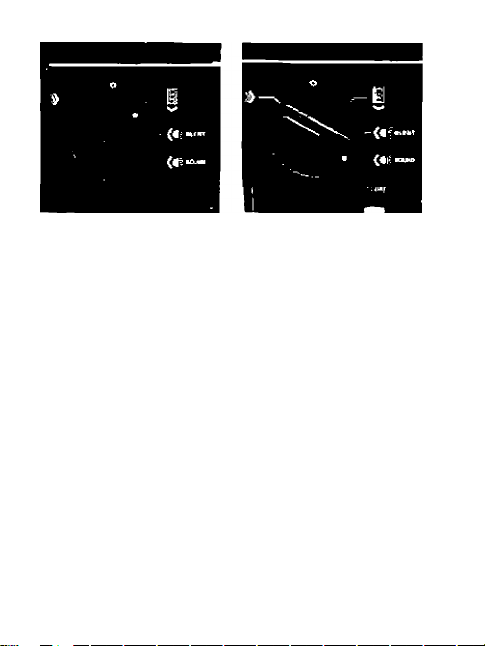
Master switch (10)
This is the main control of
your T2000. Its normal
position is with the white
index dot on the knob
facing up, opposite ‘O'.
Even in this position,
however, the amplifier is
switched on as soon as the
power cord is plugged into
a wall outlet.
The symbols around the
master switch are easy to
understand. The arrows
indicate motion directions.
Clockwise, the first stop
thus stands for film thread
ing (downward motion of
film across film gate). The
next two positions fol
10
lowing clockwise are silent
projection and sound pro
jection.
Counterclockwise rotation
of the master switch will
set your projector for fast
rewind, either through the
film path (should the film
still be attached to the
take-up reel) or outside,
directly from reel to reel.
Page 22

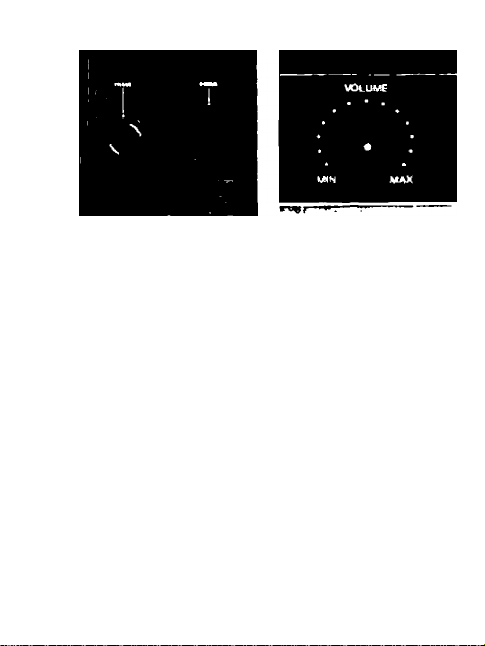
Framing knob (3)
When you start projecting,
it may happen that the
separating line betweeen
frames becomes visible on
the screen. This can easily
be corrected by turning the
framing knob. When the
frame line has been set, it
does not normally require
readjustment during pro
jection.
Focusing knob (4)
The extra-large focusing
knob makes focusing par
ticularly easy and smooth
- a point of major impor
tance in the projection of
Super-8 or Single-8 film
where even very slight
axial shifting of the lens
will result in a noticeable
change in focus on the
screen.
Page 23

Zooouog ring of lens (8)
Your Canon T2000 has an
f/1.5 high-speed zoom lens
with focal lengths ranging
from 16.5 to 30 mm. In
other words, you can vary
the size of the image pro
jected onto the screen
without actually shifting
the projector. This gives
you greater freedom in po
sitioning the projector and
allows easy adaptation to
room conditions.
11
All you have to do to
vary the size of the screen
image is turn the knurled
ring of the lens until the
desired frame size has been
obtained.
Page 24

Loop-former button (16)
A poor splice or damaged
film perforation may inter
fere with proper film trans
port through the projec
tor. If this happens, you
will hear a rattling noise
which can be corrected and
the projector restored to
proper operating condi
tion by pressing the loopformer button once or, if
necessary, several times.
Speed selector (21)
This is a combined picture
and sound control which
determines the speed with
which your film will be
projected. Projection
speed should always be the
same as filming speed in
the camera, unless the pro
jector is used in the silent
mode. In this case, a slight
slow-motion effect can be
obtained by projecting
movies taken at 24 fps in
the 18 fps setting.
Very critical users tend to
shoot their sound movies
at 24 fps, which gives
slightly higher picture and
sound quality but will in-
Page 25

crease film consumption
by one third and also calls
for sufficient light due to
the slightly wider aperture
required to make up for
the faster running speed
and shorter effective ex
posure per frame.
Please note that you eannot,
of course, alternate be
tween sound filming
speeds of 18 and 24 fps
because you can use only
one of these speeds for
projection (per reel) to
avoid sound distortion.
The decision which of the
two speeds to use should
therefore be made before
you start filming.
12
Page 26

The speed control (21) is a
rocker switch. If it is ac
tuated with the projector
running, a rattling noise
may be heard, and you
may have to press the
loop-former button (16).
Page 27

Input(9)
This is a DIN 41524 jack
for connection of the
microphone supplied with
the projector or of an
auxiliary sound source,
such as a tape recorder,
cassette recorder or record
player.
13
Output (22)
This is a DIN 41529 jack
as is generally used for
connecting loudspeakers
to sound equipment. Make
sure that the external spea
ker plugged into this out
put has a 4-ohm rating and
set it up near the screen
for optimum results. The
built-in speaker (23) is au
tomatically disconnected
as an external speaker is
plugged into output (22).
Alternatively, high-impedance headphones (S 600
ohms) may be connected
Page 28

to this output. In this case
also, the built-in speaker is
automatically cut off.
Page 29

«
1
•t*
e
e
u
3
e
Automatic level control
(ALC)
Your Canon T2000 will
automatically control the
recording level, whatever
the input. Operation thus
is greatly simplified, and
the number of trials
required for obtaining
good results reduced to a
minimum.
14
Record button (11)
Recording is possible only
with this button depressed.
It locks in position and
lights up red. It is auto
matically released as
master switch (10) is
turned to another position
(except for silent to sound
projection and vice versa).
The button can be depres
sed only with the master
switch (10) set to silent or
sound projection.
Note:
As a special safeguard,
your Canon T2000 will
not record any sound and thus erase possibly un-
Page 30

retrievable original sound
- unless the Rec/Trick
control (13) is switched on.
For normal, full-level
recording, the Rec/Trick
control (13) should be
turned all the way to its
right-hand stop. In other
words, should you inad
vertently press the Record
button (11), nothing is lost
yet, and you should make
it a rule to keep the Rec/
Trick button on off unless
you actually wish to put on
sound.
Volume control (12)
This serves to control
volume during playback
via the built-in speaker or
an external speaker con
nected to output (22).
The reference points
provided around the knob
serve for orientation and
facilitate resetting to any
given position. The knob is
inoperative during sound
recording.
Page 31

Rec/Trick control (13)
This is a very important
control of your Canon
T2000 because it allows
sound-on-sound recording
and thus puts accom
plished multi-source
sound tracks within easy
reach even of inexperien
ced sound-movie fans.
First and foremost,
however, remember that
the Rec/Trick control has
two functions :
1. It is indispensable for
recording, even if no spe
cial effects are desired. In
this case, the control
should be turned against
15
its right-hand stop
(maximum symbol of
scale). Only in this position
will the full input volume
reach the sound track.
To prevent any inadver
tent erasure of existing
sound, always keep this
control in its off posi
tion when you do not wish
to make a recording.
2. The trick function of
this control takes over for
special effects. Clockwise
rotation of the knob will
gradually increase the re
cording level, thus allow
ing a certain measure of
fading. What’s more, as
Page 32

you turn the knob clock
wise, you will not only in
crease the volume of new
sound on the track, but at
the same time decrease the
volume of previous sound
that may already be on
the same track. In other
words, new recording is
here coupled with pro
portionate partial erasure
which, in the maximum
setting at the right-hand
stop, becomes full erasure
and thus complete re
recording.
The partial erasure feature
means that if you wish to
obtain a straightforward
fade-in on a track which
already carries a record
ing, you will first have to
erase a certain length of
that track fully (with the
trick control turned all the
way to the right but no
sound source connected to
input (9)), then rewind the
film, start the projector in
the recording mode and
turn the trick control
clockwise until you reach
its right-hand stop.
If, on the other hand,
you wish to fade a new
recording into an existing
one on the same track, all
you have to do is start
the projector in the
recording mode and slowly
Page 33

turn the trick control to
maximum position (righthand stop).
Fading out is just as easy
with the trick control as
fading in. Simply turn the
control slowly back to its
off
position, and the sound
will either fade away on a
clean track, or the original
sound will be simul
taneously brought back to
full level as the added
sound recedes.
16
Input selector (14)
This switch has two func
tions :
1. Shifted to the left
(micro), it will cut off the
built-in speaker (23) to
avoid feedback (screeching
noise) during microphone
recording.
2. It adapts the automatic
level control to different
input sources (microphone
in its left-hand setting,
auxiliary source such as a
tape recorder in its righthand setting marked AUX).
Page 34

Take care to shift this
switch to the proper posi
tion after connecting your
source to input (9).
Page 35

o
o
o
M
a
u
o>
£
You are now familiar with 2. Shift speed selector (21)
the different controls and
E
functions of your
E
projector.
To project your movies,
e
proceed as follows:
>>
M
1, All your films should
c
V
have a sufficient length
u
of leader at either end.
«
Before threading, check
the leader on the supply
reel and make sure that it
is neither bent nor
damaged. If necessary, cut
the leader straight at its
front end.
17
at the top of the projector
to the speed used in your
camera for shooting.
Page 36

3. Insert the film leader
into the threading slot (7)
below the white guide
roller and turn master
switch (10) to its threading
position. The leader
should be pushed into the
slot some 4 inches or
10 cm deep, until it is
positively gripped by the
drive mechanism and
automatically threaded
through the film path.
Keep the master, switch on
threading until the leader
emerges in the take-up
reel and is tightly wound
around it. The entire
threading operation from
reel to reel is automatic,
except for insertion of the
leader.
Page 37

4. Turn master switch
further to silent or sound
projection. Your film
image will appear on the
screen.
18
5. Turn knob (4) for fine
focusing and correct
frame line by turning
knob (3), if necessary.
Page 38

6. Adjust the desired play
back volume by turning
knob (12). Make sure that
input selector (14) is in
Aux position if playback
via the built-in loud
speaker (23) is desired.
7. Sit back, relax and
enjoy your home movie
production. Should the
projector make a rattling
noise, protesting against
some torn perforations or
poor splice, press the loopformer button (16) once or
twice.
Page 39

8. When the end of your
film has been reached,
keep the projector running
until all the film has been
wound on the take-up reel.
Then guide the trailing end
of the film past the small
roller between the two
reels and onto the empty
supply reel at the front.
Shift speed selector (21) to
24 fps and turn the master
switch fully counterclock
wise for fast rewinding.
You might also leave the
speed selector on 18 fps.
In this case, however, re
winding will take slightly
longer.
19
Page 40

Alternatively, should the
film not yet have come off
the supply reel, you can
also rewind it through the
film path. Rewinding
speed is the same, and since
all guides are fully released,
there is no undue strain on
the film.
Page 41

w
e
o
•
ee
Your Canon T2000 is not
only designed simply to
project your sound movies
but is, in fact, a kind of
‘magnetic tape recorder’
at the same time. In other
words, you can put new or
additional sound on your
film as well.
20
Recording procedure
May we recommend that
you proceed methodically,
using a test film at first,
whose sound track can be
erased and filled with new
recordings, until the record
ing operation as such is
completely familiar to you
so that you will have no
difficulty starting and
stopping your sound
exactly where the corre
sponding frame appears or
disappears on the screen.
Page 42

For sound recording,
proceed as follows:
1. Connect sound source
to input (9).
2. Shift input selector (14)
to the proper setting for
your source (left for micro
phone recording, right for
auxiliary source, such as
tape recorder or record
player).
Page 43

3. Shift selector (21) to
proper speed and switch
projector to sound
recording.
21
4. When you reach the
point on the film at which
recording should start,
press record button (11)
and, at the same time,
switch on the Rec/Trick
control (13) to fade in your
sound. Alternatively,
should you wish to start
recording at full level
without any fade-in or
should the track contain
some previous recording
that has to be erased, turn
the Rec/Trick control against
its right-hand stop before
starting the projector and
press record button (11) to
start recording.
Page 44

5. To stop recording,
either use Rec/Trick control
(13) to fade out gradually
by turning it fully counter
clockwise to its off position
or stop the projector by
resetting its master switch
to ‘O’. In the latter case,
be sure to reset the Rec/
Trick control afterwards,
unless you wish to con
tinue with another record
ing at full level.
Page 45

As a precaution, always
keep the Rec/Trick control
at its off position to
prevent erroneous erasure.
Important note:
Remember that any
recording will erase part or
all of the previous re
cording. Consequently, be
extremely careful with live
sound recorded in your
sound camera. Whatever
you add to a live-sound
track irretrievably alters or
even erases your original
sound.
During recording, you can
check the sound put on
the sound track through
22
the built-in speaker (input
selector (14) in the Aux
position). This does not
apply to microphone
recording, however, in
which case the input se
lector (14) should be in its
left-hand Micro position,
in which the built-in
speaker is cut off to avoid
feedback.
Page 46

Using the microphone
The microphone supplied
with your projector is of
the omnidirectional type.
In other words, it will pick
up most of the sound
around it. Care should
therefore be taken not to
hold the microphone too
close to the projector, or
running noise may be
picked up.
Hold the microphone at a
constant distance of about
4 inches or 10 cm from
your mouth and speak at a
constant level. Wind the
microphone cord once
around your hand in a
loop to prevent any pulling
on the cord during record
ing. Remember that even
slight tapping against the
microphone, pulling on its
cord or rubbing will be
recorded as disturbing
noise. Also keep the input
selector (14) in its lefthand position (Micro) to
avoid feedback.
Page 47

Recording sound on sound
This technique allows the
mixing of several sound
sources on one and the
same sound track. Techni
cally, this means that you
have to go over the same
sound track again without
erasing it fully. This is
made possible by variable
erasure in the T2000,
which is controlled by the
Rec/Trick control (13). De
pending on the position of
this control, the original
recording on the track will
be erased only partly and
the new recording super
imposed in the correspon
ding proportion. As a
result, it is fairly easy to
23
combine background
music, for example, with a
spoken commentary and,
possibly, special sound
effects.
While the recording proce
dure is as usual, the Rec/
Trick control must here be
kept on off until the addi
tional sound is to be faded
in. Then slowly turn the
trick control to a posi
tion which very likely will
be somewhere in the
medium range of the scale.
The exact position suitable
for your type of source
and background and the
effect desired can easily be
found by some experimen
tation.
Page 48

If several sources are to be
combined on the same
track by this technique,
the following order is
generally found most sa
tisfactory :
First recording: music or
background noise, pos
sibly live sound.
Second recording: speech.
Third recording: special
effects.
Page 49

The following accessories
are supplied with your
Canon T2000:
Auto take-up reel.
Power cord.
Microphone.
Aux cable.
Brush for cleaning film
path.
24
Page 50

In addition, an optional
DV-2 Daylight Viewer is
available that can be at
tached to the front of the
projector and has a small
viewing screen facing the
operator at the controls. It
is designed as an aid in
sound editing and
recording work.
Page 51

о
s
N
"S
Э
О
>>
ф
Your Canon T2000 Sound
Projector will give you
£
many hours of screening
S
я
pleasure if it is handled
Е
with care, following the
instructions in this Manual.
Never force anything and
я
beware of tampering with
£
the machine. Should you
я
have difficulty in obtaining
о
a desired function, consult
your dealer or the Canon
Service directly. If
necessary, turn your
projector over to an
authorized Canon Service
Center for servicing or
repairs.
25
After projection, reset
master switch (10) to ‘0’
before putting the projec
tor away for storage in a
dry, cool place where it is
protected from dust. Also
take care to store your
striped films properly.
Remember that striped
films are equivalent to
magnetic tape and should
not be kept near strong
magnetic fields, such as
loudspeakers.
Since emulsion particles
are bound to build up
along the film path, this
should be cleaned
regularly. Also clean the
front and rear elements of
Page 52

the zoom lens, dusting
them off with a hair brush
and very carefully wiping
them with an absolutely
clean, fluffless linen cloth
to remove stubborn
smudges.
Important note:
Be sure to pull the power
cord before attempting
any of the maintenance
operations described
below!
Removing the front cover
(15)
Removal of the front cover
will give access to the lamp
and the entire film path.
To remove the cover, sim
ply grasp it by its lower
sides and pull it forward.
To replace the cover, slip it
over the various knobs and
use two hands on the
upper right-hand half to
push it until it locks in
place.
Page 53

Removing the lens (8)
1. Take off front cover,
2. Use your left hand to
turn focusing knob (4)
clockwise as far as it will
go.
3. Lightly push in on
zoom lens (8) and turn
focusing knob further
clockwise.
4. Pull lens straight out.
To replace the lens, make
sure that the focusing knob
is at its right-hand stop.
Then insert the lens with
its guide pin engaging the
corresponding slot in the
mount, push it in and turn
the focusing knob counter
clockwise. Replace the
26
Page 54

Changing the lamp
1. Remove front cover.
2. Caution: Wait until the
lamp has cooled down
sufficiently to avoid burns!
3. Turn framing knob (3)
fully counterclockwise.
4. Press down on lamp
holder spring (25) and
swing it out to the left.
5. Withdraw lamp socket,
grasp dichroic reflector at
its front and remove lamp
with reflector by pulling
forward.
6. Plug a new 12 v, 100 w
tungsten-halogen lamp
with dichroic reflector
(supplied by Osram,
Philips, Atlas and Sylva-
nia) into the lamp socket.
Caution: Never touch in
side of reflector or quartz
bulb of lamp with your
bare fingers! Fingerprints
would burn into the glass
and impair illumination.
7. Hold lamp socket with
its two leads facing for
ward and fit lamp reflector
into projections of mount
ing plate.
8. Hold lamp with socket
in this position and swing
in lampholder spring (25),
fitting it under the projec
tion at the forward end of
the mounting plate.
Page 55

9. Check whether the
lamp is firmly seated on
the mounting plate. The
lamp is prefocused and
does not require any
adjustment.
10. Replace front cover.
27
Cleaning the film path
1. Remove front cover
(15).
2. Turn focusing knob (4)
fully clockwise.
Page 56

3. Turn master swi tch (10)
fully counterclockwise
(rewind position). This will
open all film-path guides.
4. Grasp lower end of
pressure-plate assembly
(26) with your left thumb
and index finger, depress
the spring bracket with
your index finger and pull
the assembly straight for
ward, taking care not tilt
it to the left. The pressure
plate and film aperture can
now be cleaned.
Page 57

5. Use the brush supplied
with your projector and
clean the film gate, the film
path leading past the sound
heads (27) and up to the
film exit at the rear.
6. To clean sound heads
(27), use a cotton swab
soaked in alcohol or a
special sound-head spray.
Never touch magnetic
heads with a metallic
object, such as a screwdriv
er!
Replace parts in the reverse
order.
Should you ever wish to
remove a film in mid-reel,
proceed in the same man-
28
Page 58

пег. With master switch
(10) on rewind and the
pressure plate removed,
you can carefully extract
the film from the film path.
To extract the film from
under one of the last rollers
on the left, it is necessary
to pull off the knob of
master switch (10). When
replacing the knob, be
careful to push it on in the
proper position: white
index dot on left ( = rewind
position).
Page 59

Page 60

s
9
a
1
B
i
Canon T2000 Sound
Projector for Super-8
and Single-8 sound or
silent film.
Lens; 16.5-30 mm f/1.5
zoom lens.
Projection lamp: 12 v,
100 w tungsten-halogen
lamp with dichroic reflec
tor.
Film transport: by trans
former motor.
Running speed: 18 fps and
24 fps (silent and sound
projection).
Film threading: automatic
from reel to reel.
Master switch: controlling
film threading, silent pro
jection, sound projection
30
and fast rewind.
Rewind: in-path or
exterior.
Loop former: automatic,
with manual override.
Reel capacity; 600 ft or
180 m.
Power source:
50 Hz, no, 120,220, 230,
240 volts.
60 Hz, 100, 120, 200,
220 volts.
(Electrical equipment
varies to suit local con
ditions.)
Voltage selector provided.
Audio input: DIN 41524
jack for connection of
microphone or auxiliary
source (tape recorder,
cassette recorder, record
Page 61

player, etc.).
Output: one DIN 41529
jack for external 4-ohm
speaker or high-impedance
headphones.
Built-in loudspeaker:
10 watts at 4 ohms.
Recording options: straight
forward and sound-on-
sound recording. Fading
by means of trick control.
Automatic level control
(ALC).
Amplifier:
Output: 6 WRMS/7 watts
music power.
Frequency response at
18fps; 80-8,000 Hz.
at24fps: 80-10,000 Hz.
Monitoring: via built-in
loudspeaker or high-impe
dance headphones con
nected to external-speaker
output. Built-in speaker
can be switched off for
microphone recording.
Speaker is switched off
automatically if externalspeaker output is used.
Accessories: power cord
(2 m), 600ft/180 m auto
take-up reel, microphone,
aux cable and brush.
Optional accessory: DV-2
Daylight Viewer.
Dimensions (nun):
290 (L) X 240(H) x
190 (W).
Weight: 6.1 kg.
Subject to change without
notice.
Page 62

18 Voltage selector
19 AC line input
20 Rear-cover mounting
screws
21 Speed selector
22 External-speaker output
23 Built-in loudspeaker
24 Horizontal leveling screw
Page 63

Page 64

Page 65

Canon
Canon Inc.
11-28, Mita 3-chome, Minato-ku, Tokyo 108, Japan
Europe, Africa and the Middle East
Canon Amsterdam NV
P.O. Box 7907
1008 AC Amsterdam, Netherlands
USA
Canon USA, Ine.
10 Nevada Drive, Lake Success,
Long Island, N.Y. 11042, USA
Central & South America
Canon Latin America, Ine.
Apartado 7022, Panama 5, Panama
Oceania
Canon Australia PTY. LTD.
22 Lambs Road, Artarmon, Sydney,
N.S.W. 2064, Australia
Southeast Asia
Cant« Hong Kong Trading Co., Ltd.
5th Floor 2-6, Fui Yiu Kok Street, Tsuen Wan,
New Territories, Hong Kong
Printed in The Netherlands
by Veenman, Wageningen
English Edition ZB4.59119.EO. 08
© Canon Amsterdam NV, 1980
 Loading...