

Canon S4500 - BJC Color Inkjet, S4500 Printer Manual
The Driver and Utility Guide for Windows Users
describes how to use the following software:
• BJ Printer Driver
• IS Scan Scanner Driver
• IS Scan Plus Utility Program
BUBBLE JET PRINTER
The screen shots in this on-line manual are optimised especially for printing with your printer. For this
reason, the details of the screen shots may look
slightly blurry on the screen of your computer.
V01
Introduction
About Installation Procedures for Software
Before reading this Guide and using the printer, be sure to install the BJ Printer Driver. (Install the IS Scan
Scanner Driver and IS Scan Plus Utility as needed.)
The installation procedures for the software are described in the following manual provided with the printer.
• BJ Printer Driver
When using Windows Me, Windows 98,
Windows 95, Windows 2000 or Windows
NT 4.0 through the parallel interface
Quick Start Guide
→
When using Windows Me, Windows 98 or
Windows 2000 through the USB interface
• IS Scan Scanner Driver and IS Scan Plus Utility
When using Windows Me, Windows 98,
Windows 95, Windows 2000 or Windows
NT 4.0
Quick Start Guide
→
Quick Start Guide
→
Reference Guide
For Windows 2000/Windows NT 4.0 Users
This guide is primarily designed for Windows Me, Windows 98 and Windows 95 users. If you are a Windows
2000 or Windows NT 4.0 user, refer to the Guide for details on printer driver functions. After installing the
driver, the Guide can be accessed by pointing to Start menu → Program → S4500 → Guide.
The features and operation procedures for the IS Scan Scanner Driver and IS Scan Plus Utility are identical
to Windows Me, Windows 98 and Windows 95. Refer to this Driver and Utility Guide for Windows Users and
the Reference Guide.
Copyright
©2000 Canon Inc. All rights reserved. Printed in Japan. Under cop yright laws , this man ual may not be copied,
in whole or in part, without consent of Canon Inc. Under the law, copying includes translation into another language or format.
Trademark Notice
• Canon and BJ are trademarks of Canon Inc.
®
• Microsoft
other countires.
• All other company or product names are trademarks of their respective companies.
, MS-DOS® and Windows NT® are registered trademarks of Microsoft Corporation in the U.S. and
Introduction 2

Contents
BJ Printer Driver
Printer Driver Basics..............................................................................................5
Opening the Printer Properties Dialogue Box .......................................................6
From your application program............................................................................................... 6
Directly from the Start menu................................................................................................... 7
Selecting the Print Mode .......................................................................................8
Selecting a pre-registered print mode ....................................................................................8
Selecting the print mode......................................................................................................... 9
Setting the Page Size..........................................................................................10
Confirming the page size...................................................................................................... 10
Changing the page size (for regular paper sizes)................................................................. 10
Changing the page size (for custom paper sizes)................................................................ 11
Using On-line Help ..............................................................................................12
Finding information on a particular topic............................................................................... 12
Finding information on an operation procedure.................................................................... 12
Closing the Printer Properties Dialogue Box.......................................................13
Enabling on the print settings............................................................................................... 13
Using Background Printing..................................................................................14
About background printing.................................................................................................... 14
BJ Background Monitor........................................................................................................ 15
BJ Backgrounder..................................................................................................................16
Using the BJ Status Monitor................................................................................17
About the operating environment .........................................................................................17
Launching the BJ Status Monitor.......................................................................................... 18
Error and warning display..................................................................................................... 20
Cancelling the print job.........................................................................................................21
Switching the BJ Status Monitor........................................................................................... 21
Using the BJ Printer Monitor ...............................................................................22
About the operating environment .........................................................................................22
Launching the BJ Printer Monitor......................................................................................... 22
Information display of the BJ Printer Monitor........................................................................ 23
Appendices
Uninstalling the BJ Printer Driver.........................................................................25
Uninstalling the BJ Printer Driver with the Uninstaller.......................................................... 25
Contents 3

IS Scan Software
Scanner Driver ....................................................................................................26
The functions of IS Scan → pages 27 to 30.......................................................................26
The functions of IS Scan Plus
Using IS Scan......................................................................................................27
Changing the scanning mode............................................................................................... 27
Selecting a pre-registered scanning mode...........................................................................27
Using the customised scanning mode.................................................................................. 28
Saving the Settings .............................................................................................29
Saving the settings to a file...................................................................................................29
Using the saved settings ......................................................................................................29
Using On-line Help for IS Scan ...........................................................................30
Using on-line Help................................................................................................................ 30
Opening the on-line Help...................................................................................................... 30
Using IS Scan Plus..............................................................................................31
Launching IS Scan Plus .......................................................................................................31
Using Capture Photo...........................................................................................32
Capture Photo screen buttons.............................................................................................. 34
Using Capture Image ..........................................................................................35
Capture Image screen buttons............................................................................................. 36
Printing a Scanned Image...................................................................................37
Editing a Scanned Image ....................................................................................38
Using Copy..........................................................................................................40
Copy screen buttons.............................................................................................................41
Using On-Line Help for IS Scan Plus ..................................................................42
Using on-line Help................................................................................................................ 42
Opening the on-line Help...................................................................................................... 42
→ pages 31 to 42...............................................................26
Appendix
Uninstalling the IS Scan Software.......................................................................43
Index
BJ Printer Driver..................................................................................................44
IS Scan Software.................................................................................................45
Reference Guide
Contents 4

BJ Printer Driver
Printer Driver Basics
The printer driver is a program that converts the text or image files you created with an application program and then
sends the converted data to the printer.
After you connect the printer to your computer, you must install the printer driver. For instructions on installing the
printer driver, refer to the Quick Start Guide.
Printer Driver Basics 5

Opening the Printer Properties Dialogue Box
When you specify the print settings or use maintenance
functions such as print head cleaning, open the Printer
Properties dialogue box. There are two different ways to
open the Printer Properties dialogue box.
Note
This section describes the general procedures for opening the Printer Properties dialogue
box. Depending on the application program you use, different menu items may be used for
printing. For more details, refer to the user’s manual for your application program.
From your application program
You can open the Printer Properties dialogue box from your application program before printing.
1
Select the command used for printing (e.g., “Print” or “Print Setup” in the File menu) in your
application program.
2
Make sure that “Canon S4500” is selected in the Printer box as shown.
If another printer name is displayed, click the down-arrow and then select “Canon S4500”
from the pull-down list.
3
Click the Properties button. The Printer Properties dialogue box opens. Make sure that the
“Main”, “Page Layout”, “Stamp/Background” and “Maintenance” tabs are displayed in the
Printer Properties dialogue box.
Opening the Printer Properties Dialogue Box 6
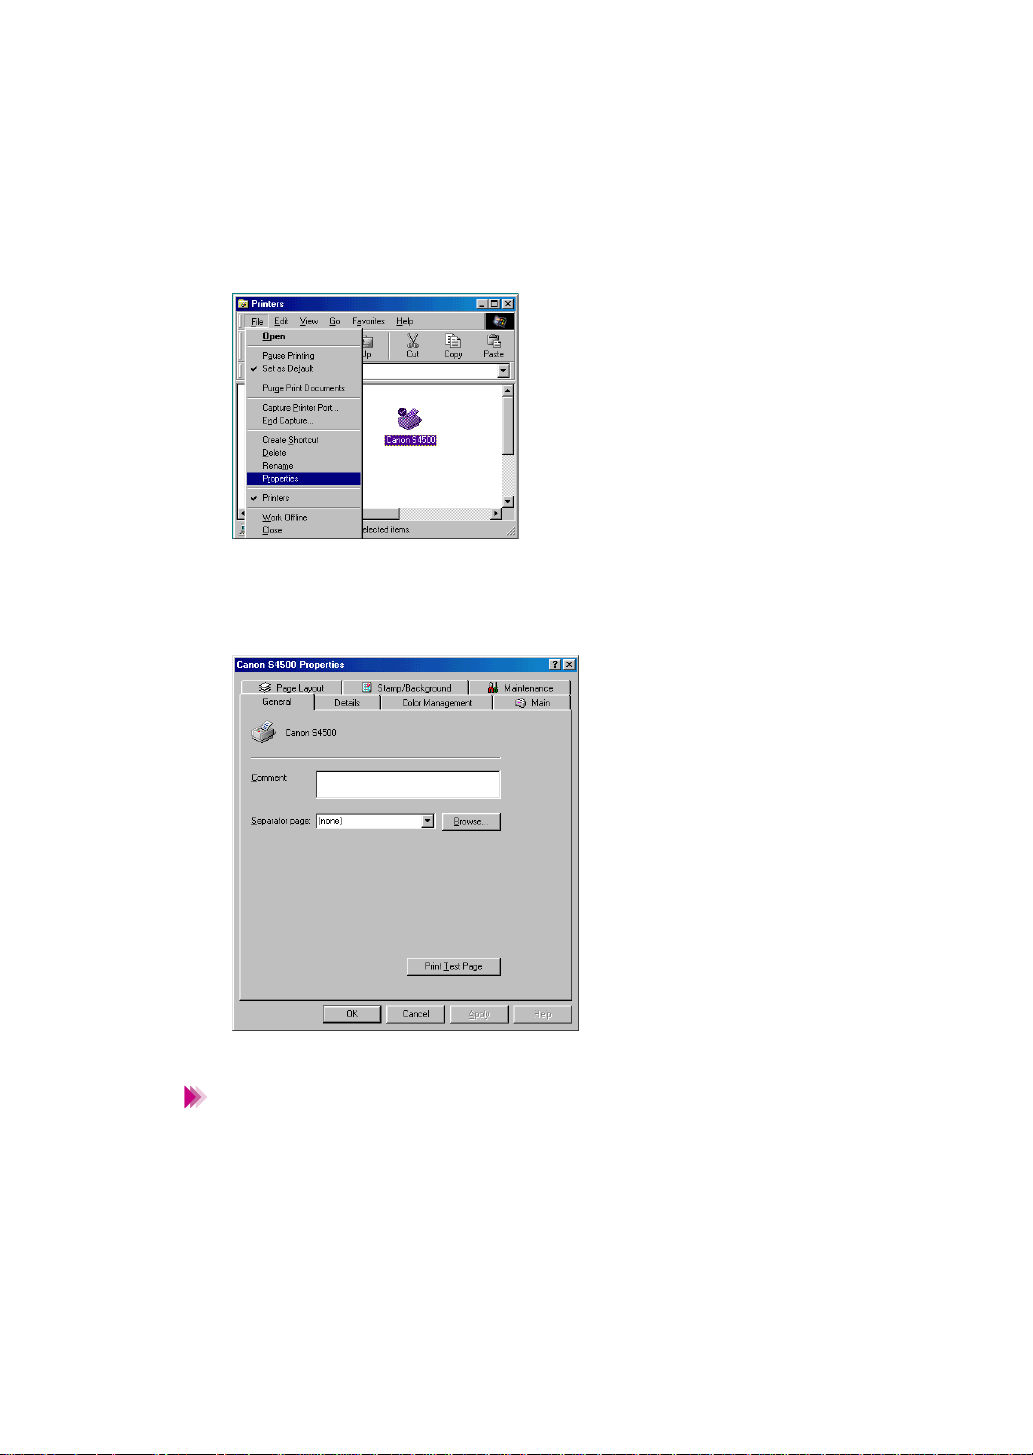
Directly from the Start menu
When you wish to specify print settings that are common to all application programs, open the Printer Properties dialogue box directly from the Start menu. This method is also helpful when you wish to use maintenance
functions such as print head cleaning without starting up an application program.
1
Click the Start button. Point to Settings, then click Printers.
2
When the Printer window is displayed, click the “Canon S4500” icon.
3
Select Properties from the File menu. The Printer Properties dialogue box opens. Make
sure that the “Main”, “Page Layout”, “Stamp/Background” and “Maintenance” tabs are contained in the Printer Properties dialogue box.
Note
When you open the Printer Properties dialogue box directly from the Start menu, some other tabs (e.g., “General” and “Details”) are added by the Windows operating system. For
more details on these additional tabs, refer to your Windows documentation.
Opening the Printer Properties Dialogue Box 7
Selecting the Print Mode
Before you start a print job, open the Printer Properties dialogue box and specify the print mode. The print settings in
the Printer Properties dialogue box allow fine control over
the print quality and colour adjustment, but you can simplify
the setup procedure by selecting the icon in which the most
appropriate print settings are pre-registered.
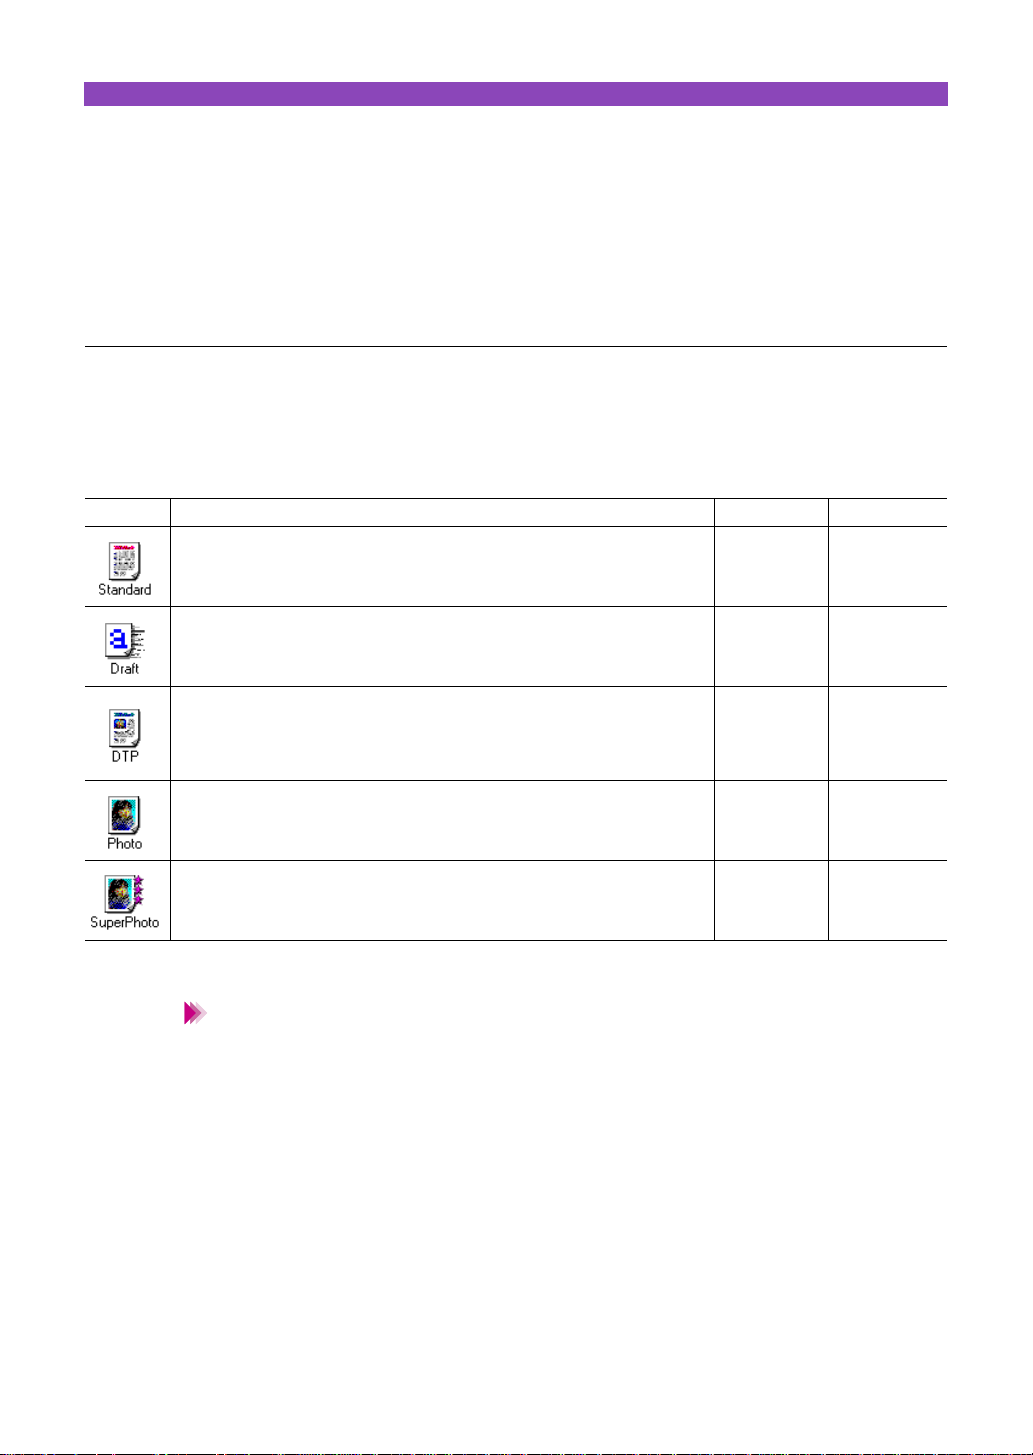
Selecting a pre-registered print mode
The following print modes are pre-registered in the printer driver. When you select an icon in the Choose Print
Mode box, the combination of BJ Cartridge and Media Type settings changes automatically. Select the most
appropriate icon according to your print purpose.
Purpose BJ Cartridge Media Type
For printing documents that consist mostly of text (e.g., word processor
files) at the standard print quality.
Black/
Colour
Plain Paper
Gives priority to print speed rather than print quality. Use this print mode for
trial printing.
Automatically recognises photographs and graphics and prints using the
optimum print settings. This print mode is the best choice when you print
data that contains different elements such as text, tables, graphs and
photographs in the same document.
Produces high print quality for printing photographs and other graphics with
fine gradations of tone.
Produces the best possible print quality for printing photographs. This print
mode is also suitable for printing graphics with fine gradations of tone.
Note
• In addition to the BJ Cartridge and Media Type settings, other print settings are also preregistered in each icon in the Choose Print Mode box. To confirm all pre-registered settings, click the Advanced button after selecting the icon. The settings in the Quality, Special Effects and Colour tabs are the properties of the print mode.
• You can modify the pre-registered print mode settings, as necessary.
Black/
Colour
Black/
Colour
Black/
Colour
Photo/
Colour
Plain Paper
Plain Paper
High
Resolution
Paper
High
Resolution
Paper
Selecting the Print Mode 8
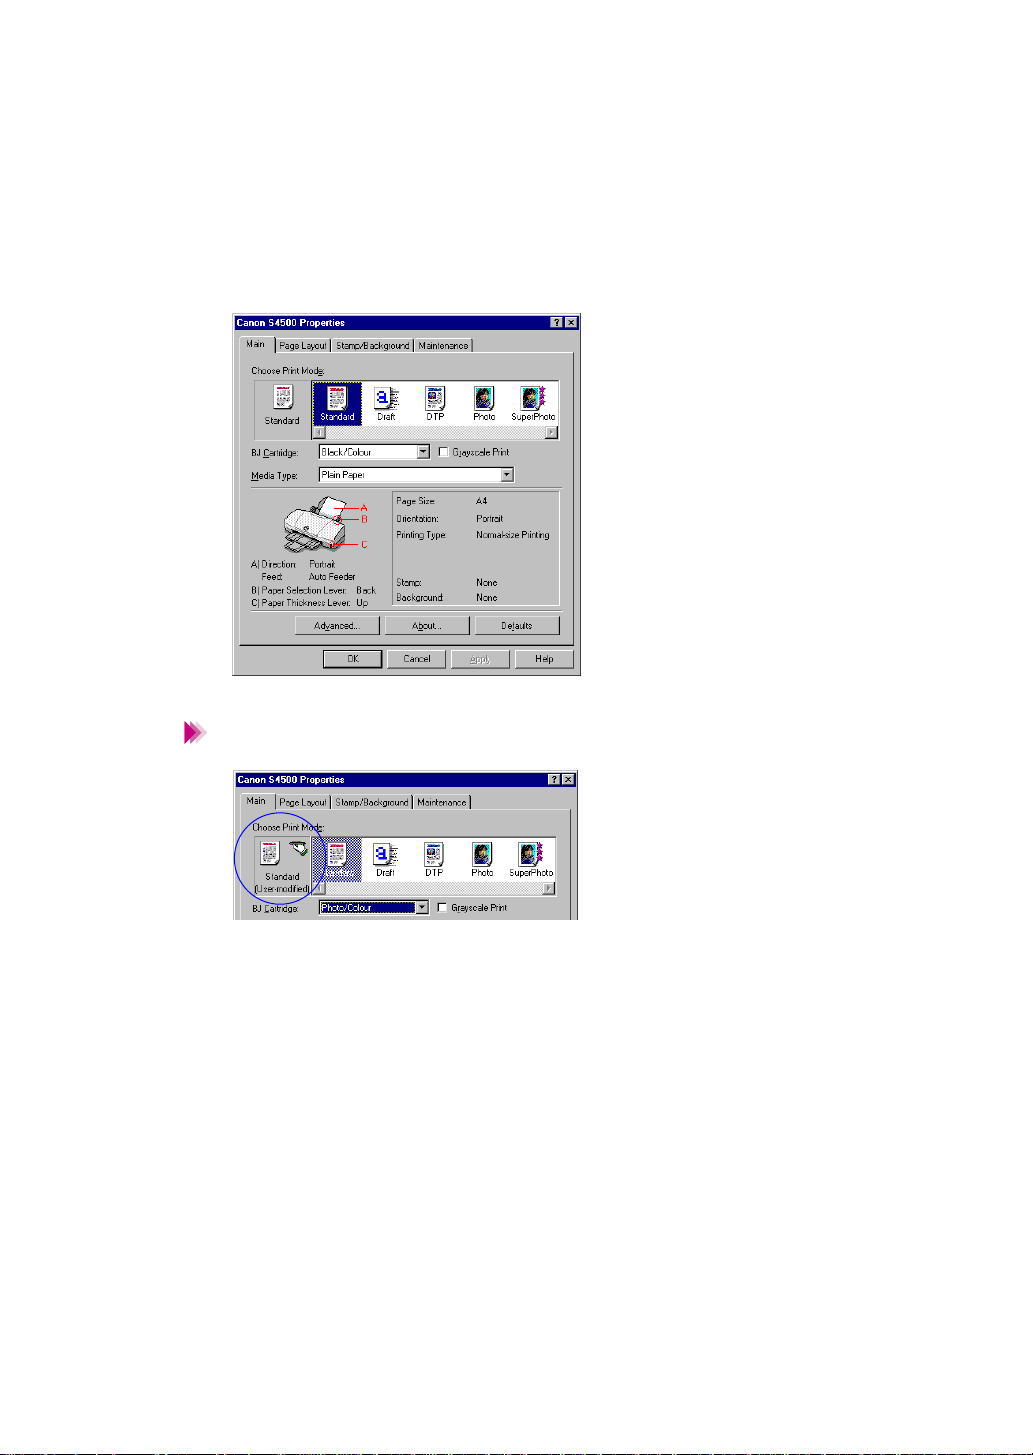
Selecting the print mode
After you select the icon, match the BJ Cartridge and Media Type settings with the BJ Cartridges and print
media installed in the printer.
1
Open the Printer Properties dialogue box, then click the Main tab.
2
Select the desired icon according to the print job in the Choose Print Mode box.
3
Make sure that the BJ Cartridge and Media Type settings are identical to the BJ Cartridges
and print media installed in the printer.
Note
When you change a pre-registered setting in the BJ Cartridge or Media Type box, the icon
which indicates the current settings changes to User-modified.
↑
Current settings
You can start a print job with the User-modified icon, but you can also save and register the
settings in the Choose Print Mode box under a new icon.
Selecting the Print Mode 9
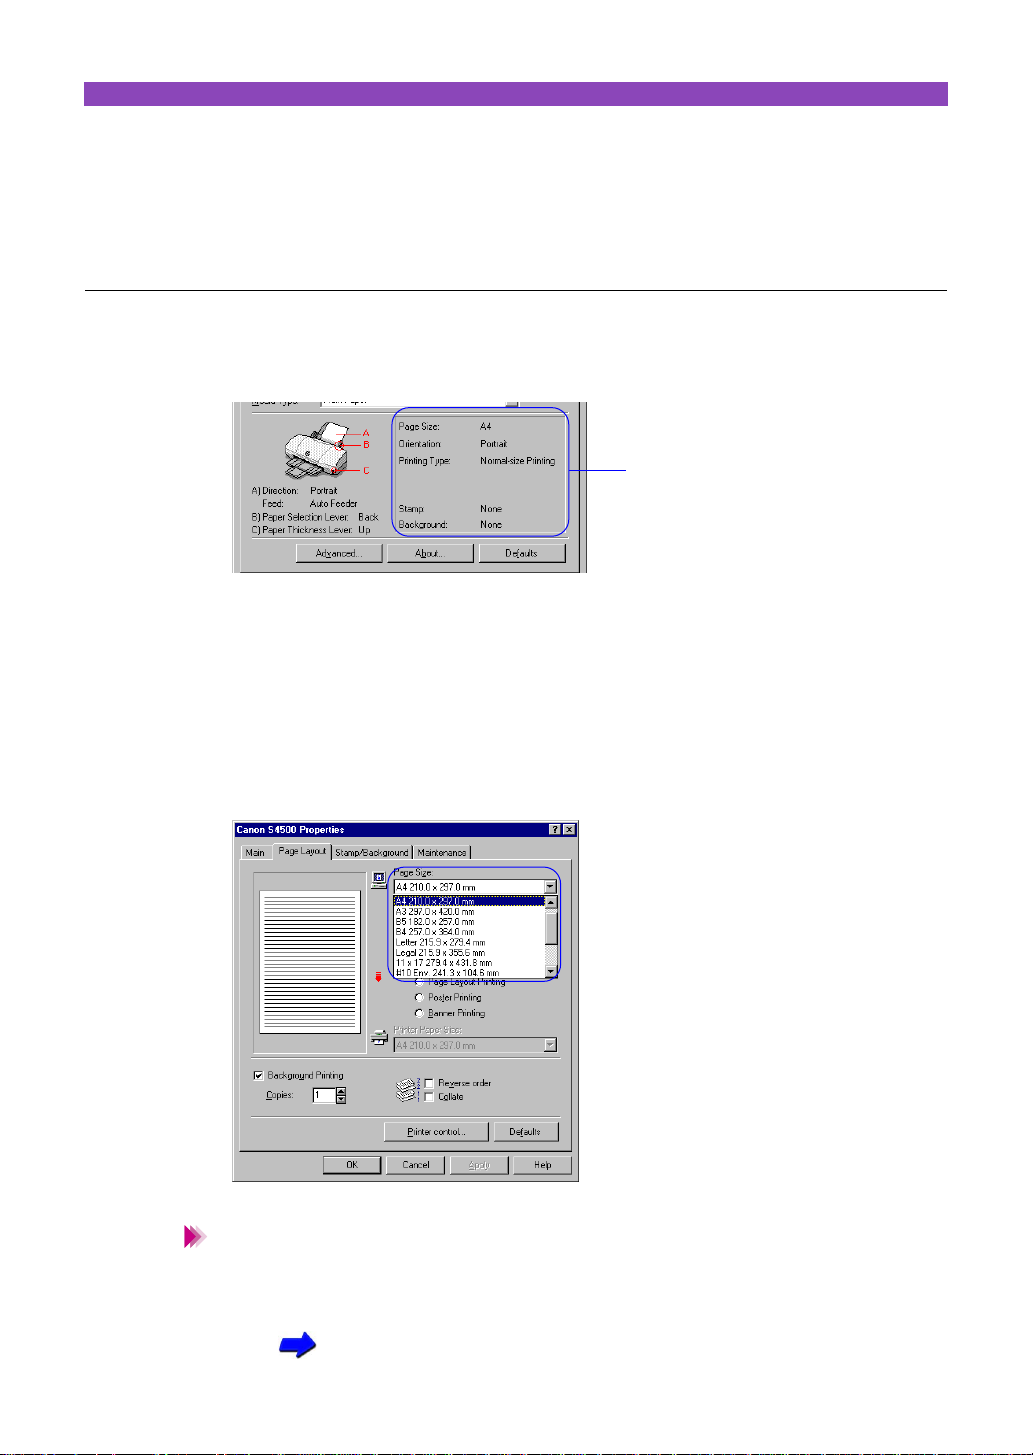
Setting the Page Size
Set the paper size from within the application program before printing. Also make sure that the paper size setting in
the Printer Properties dialogue box is identical to the paper
size setting in the application program.
Confirming the page size
You can view the size of paper you use in the print settings information box of the Main tab. Make sure that
Page Size is identical to the setting in the application program before printing.
Print settings information box
Changing the page size (for regular paper sizes)
When Page Size in the print settings information box is not identical to the setting in the application program,
follow the procedure below.
Note
1
Click the Page Layout tab.
2
Click the down-arrow in the Page Size box, then select the appropriate paper size from the
pull-down list.
Depending on the application program you use, the Page Size box may be greyed out and
unusable. If this occurs, click the Cancel button to close the Printer Properties dialogue
box. Then open the Printer Properties dialogue box from the Start menu and try again.
Opening the Printer Properties dialogue box (directly from the Start menu)
Setting the Page Size 10
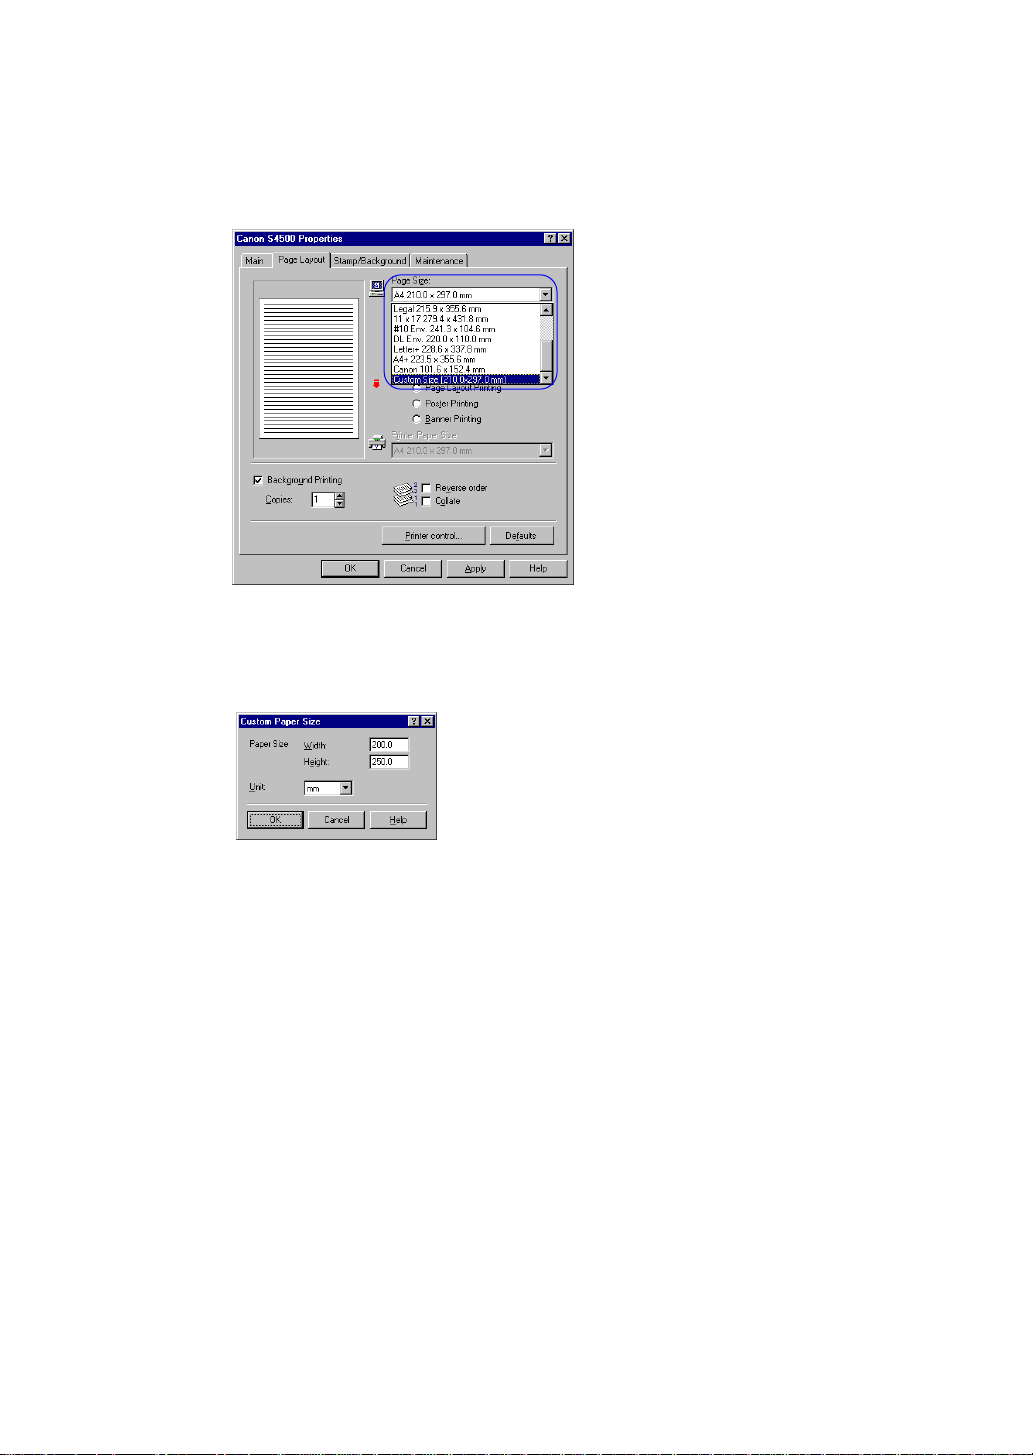
Changing the page size (for custom paper sizes)
When you use custom page sizes, follow the procedure below.
1
Click the Page Layout tab.
2
Click the down-arrow in the Page Size box, then select Custom Size from the pull-down list.
The Custom Paper Size dialogue box is displayed.
3
Select mm or inch for the unit of measurement in the Unit box, and enter the desired width
and height within the following ranges:
Width: 100.0 mm to 297.0 mm (3.94” to 11.69”)
Height: 100.0 mm to 584.2 mm (3.94” to 23.0”)
4
Click the OK button.
Setting the Page Size 11
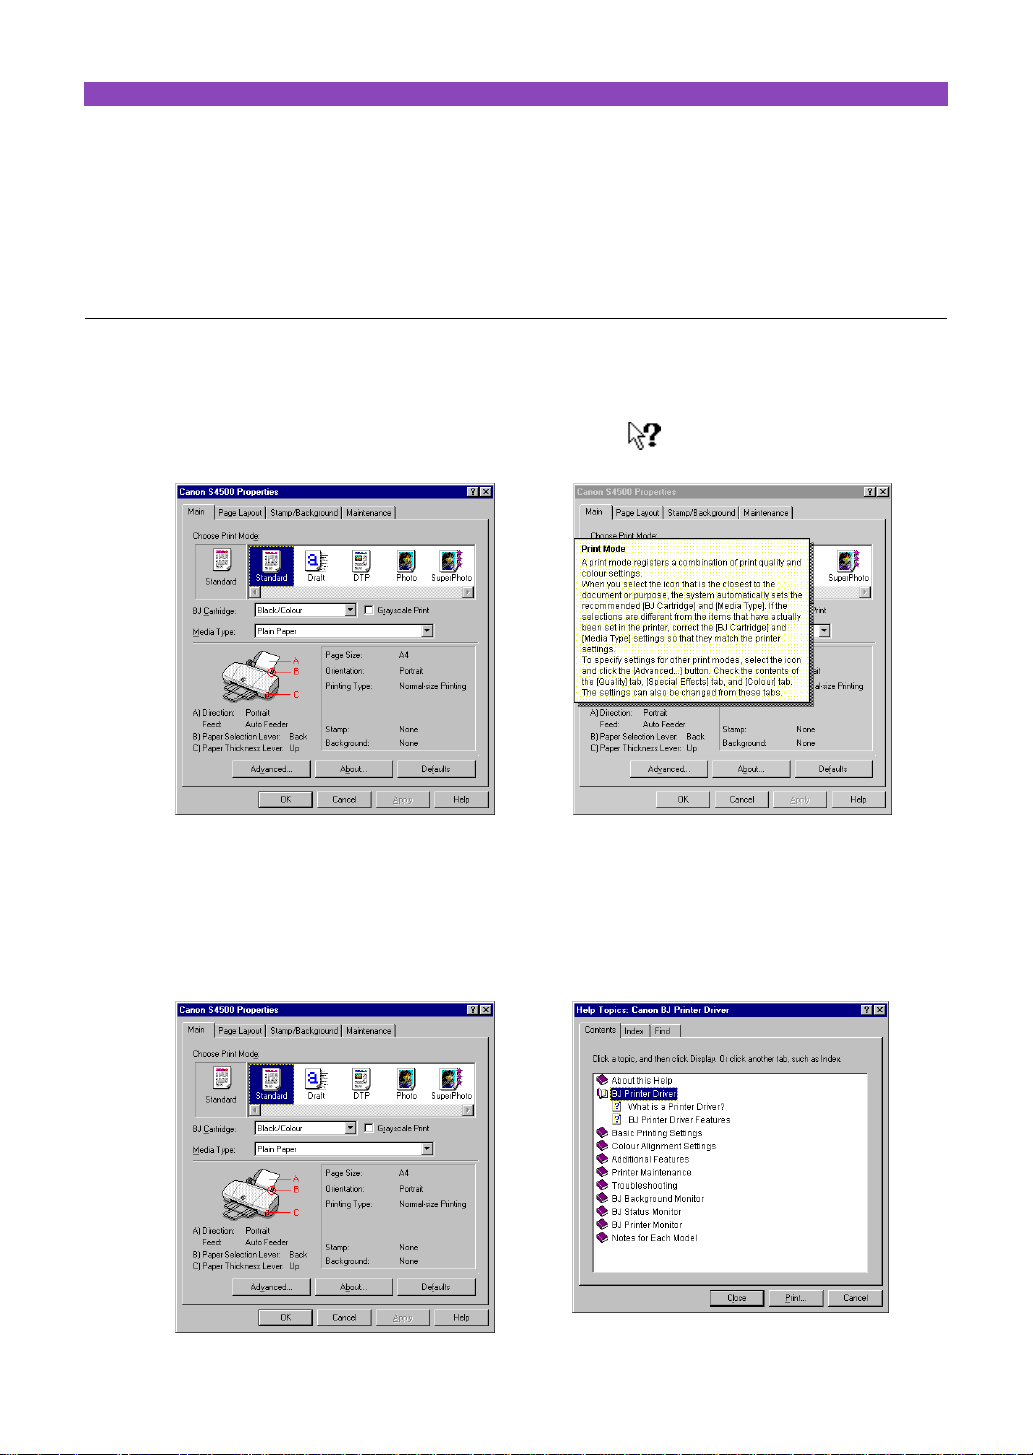
Using On-line Help
When you want to learn about a particular topic, the on-line
Help function provides the necessary information on the
screen of your computer. Use the on-line Help whenever
you need to know more about the functions or features of
the printer driver.
Finding information on a particular topic
1
When you click the “?” button on the upper right corner of the Printer Properties dialogue
box, the shape of the mouse pointer changes to “ ”.
2
Click the desired item to learn more about the item. A detailed explanation appears.
➔
Finding information on an operation procedure
1
Click the Help button on the lower right corner of the Printer Properties dialogue box.
2
When the contents of the BJ Printer Driver Help are displayed, select the desired item to
learn more about the item.
➔
Using On-line Help 12
Closing the Printer Properties Dialogue Box
After the necessary print settings are completed, close the
Printer Properties dialogue box and start your print job.
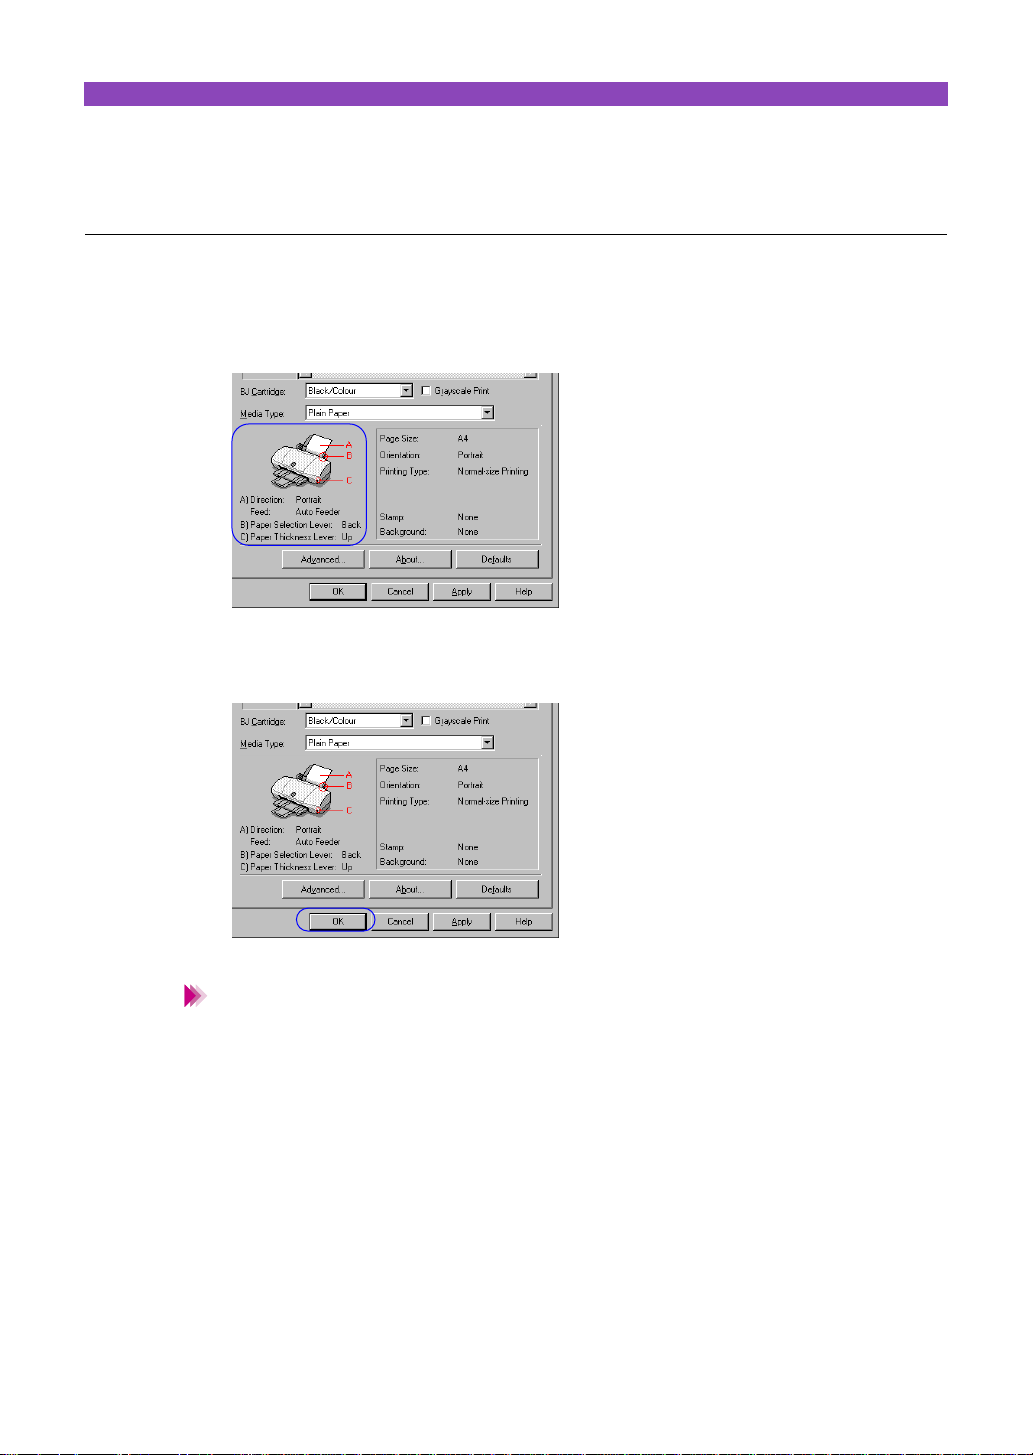
Enabling on the print settings
1
Make sure that the information in the Direction, Feed, Paper Selection Lever and Paper
Thickness Lever in the illustrated guideline is correct.
2
Click the OK button. The print settings become enabled and the Printer Properties dialogue
box closes.
Note
• When you wish to enable the print settings without closing the Printer Properties dialogue
box, click the Apply button.
• When you do not wish to enable the print settings, click the Cancel button.
• When you wish to restore the factory settings, click the Defaults button in each tab.
Closing the Printer Properties Dialogue Box 13

Using Background Printing
Background printing, controlled by the printer driver, allows
you to use other applications in the foreground while long
print jobs which require a long time to complete are being
executed in the background.
About background printing
The print processing method which enables you to do other tasks simultaneously while printing documents is
called “Background Printing”. Normally the printer driver performs this background printing.
The Background Printing check box in the Page Layout tab of the Printer Properties dialogue box. When
Background Printing is enabled, the BJ Background Monitor and BJ Backgrounder are launched before the
printer starts the print job. You can verify information on the print process.
Note
When Background Printing is disabled in the Page Layout tab, the following settings cannot
be used.
Page Layout tab
Page Layout Printing, Poster Printing, Copies, Printer control, Reverse order and Collate
Stamp/Background tab
All stamp and background settings
Quality tab (opened by clicking the Advanced button on the Main tab)
Photo Optimizer PRO
Special Effects tab (opens from the Advanced button in the Main tab)
All Simulate Illustration and Monochrome Effects settings
Using Background Printing 14
 Loading...