

Page 1

Photo
Application
Guide
V2
Page 2

Table of Contents
Table of Contents
Introduction to Photo Applications ........................................................................... 4
Printing with ZoomBrowser EX ................................................................................ 6
Basic Operation Procedure ...................................................................................... 9
Using Canon Utilities ............................................................................................. 13
Starting ZoomBrowser EX ...................................................................................... 14
Creating Panoramic Photo Using PhotoStitch ........................................................ 18
What is Easy-PhotoPrint? ...................................................................................... 19
Using ZoomBrowser EX ........................................................................................ 20
Basic Operations in the Browser Display Area ....................................................... 21
Changing View Mode in the Browser Display Area ................................................ 24
Image Database ..................................................................................................... 27
Processing Image Using Image Viewer ................................................................. 43
Slide Show ............................................................................................................. 47
Time Tunnel ........................................................................................................... 51
Adding Sound to Image .......................................................................................... 52
Processing Image for Sending by E-mail ............................................................... 55
Editing Image Using Other Image Processing Programs ....................................... 58
Importing Images ................................................................................................... 60
Importing Images with the Automation Wizard ....................................................... 61
Setting the Automation Wizard to Download Images ............................................. 65
2
Page 3

Table of Contents
Importing Images Using the Camera Window ........................................................ 69
Importing Images from a TWAIN Device ................................................................ 84
Importing Images by Drag-and-Drop Operation ..................................................... 86
Printing from PhotoRecord .................................................................................... 88
Printing a Photo Index (Index Printing) ................................................................... 89
Custom Layout Printing (Artwork/Layout Album) ................................................... 97
Printing in a Specified Photo Size
(Fixed Photo Size Printing) ................................................................................... 102
Printing in the Borderless Printing Mode (Tiled Photo) ........................................ 107
Printing on Canon Perforated Paper .................................................................... 112
About Canon Perforated Paper ............................................................................ 116
Starting Printing .................................................................................................... 117
Artwork ................................................................................................................ 118
Page Art ............................................................................................................... 121
Changing Layout .................................................................................................. 128
Adding Text .......................................................................................................... 136
Clipping a Photo ................................................................................................... 150
Printing with Easy-PhotoPrint .............................................................................. 152
Starting Easy-PhotoPrint ...................................................................................... 153
Selecting Images .................................................................................................. 154
Selecting Paper .................................................................................................... 156
Layout Printing ..................................................................................................... 158
How to Use Online Help ...................................................................................... 160
Index .................................................................................................................... 165
3
Page 4

Introduction to Photo Applications
Easy-PhotoPrint
Easy-PhotoPrint is a handy application program that allows you to make borderless (full page) prints
from the images you recorded with your digital camera. You can make prints easily, just by selecting
image data and paper size and type.
Easy-PhotoPrint also has simple editing functions such as trimming and rotation of images.
Easy-PhotoPrint supports Exif Print (Exif 2.2). The image captured with an Exif Print-compliant
digital camera can be optimized using data, such as camera settings (white balance, exposure time)
etc, stored at the same time of shooting, yielding extremely high-quality prints.
ZoomBrowser EX
ZoomBrowser EX is an application program that displays the images (stored in the memory card)
you recorded with your digital camera as thumbnails, allowing you to import the selected images
into your computer and view, manage, and edit them. ZoomBrowser EX also allows you to process
the image files already stored in the computer in the same manner.
The image data selected with ZoomBrowser EX can be edited using another application program in
a coordinated fashion.
4
Page 5

PhotoRecord
PhotoRecord allows you to make photo-quality prints from the image data you selected with
ZoomBrowser EX. PhotoRecord can make an index print, print multiple images on a sheet of paper
with them laid out automatically, or print images on Canon perforated paper. With PhotoRecord, you
can add a frame, background, and/or letters to your photo. PhotoRecord also supports basic editing
functions such as trimming, rotation, color adjustment.
PhotoStitch
PhotoStitch allows you to make a panoramic photo from the images you recorded with your digital
camera. PhotoStitch can merge separate images into a panoramic image. With PhotoStitch, you
can make a panoramic photo of a grand view spreading out 360-degrees around you. A desired
number of images can be easily stitched vertically or horizontally, allowing you to take full advantage
of digital photo printing (for example, you can make unique posters with ease). The Wide mode is
useful when you want to create a wide panoramic photo of buildings and other straight-lined objects
with straight lines as natural as the original.
5
Page 6
Printing with ZoomBrowser EX
ZoomBrowser EX enables you to import image data captured with digital cameras or scanners into
a computer and produce photo-quality printouts in a quick and easy fashion. Using ZoomBrowser
EX with a Canon BJ printer and a scanner or digital camera, you can enjoy superb-quality photo
prints.
Custom Layout Printing
(Artwork/Layout Album)
You can arrange images in a desired layout and
apply artwork including clipping, resizing, rotation,
text insertion, and ornamentation with photo
frames and background.
Printing a Photo Index
(Index Printing)
You can print a photo index that contains
thumbnails automatically arranged in a suitable
layout for the selected thumbnail size (large,
medium, or small).
6
Page 7

Printing in a Specified Photo Size
(Fixed Photo Size Printing)
Printing in the Borderless Printing Mode
(Tiled Photo)
You can print images in the specified photo
size.
You can print images with no margins around each
image, so that a single image is printed borderless
along the paper edges and multiple images are
arranged like tiles with no space between them
(available with BJ printers that support the
borderless printing feature).
7
Page 8

Printing on Canon Perforated Paper
You can easily make your images fit on a
sheet of Canon perforated paper such as
<FM-101> or <PC-101S>.
8
Page 9

Basic Operation Procedure
The basic operation steps to capture, import, edit, and print photo images are summarized below.
STEP 1
Shooting / scanning
Acquire images with a digital camera or a scanner.
9
Page 10
STEP 2
Importing images
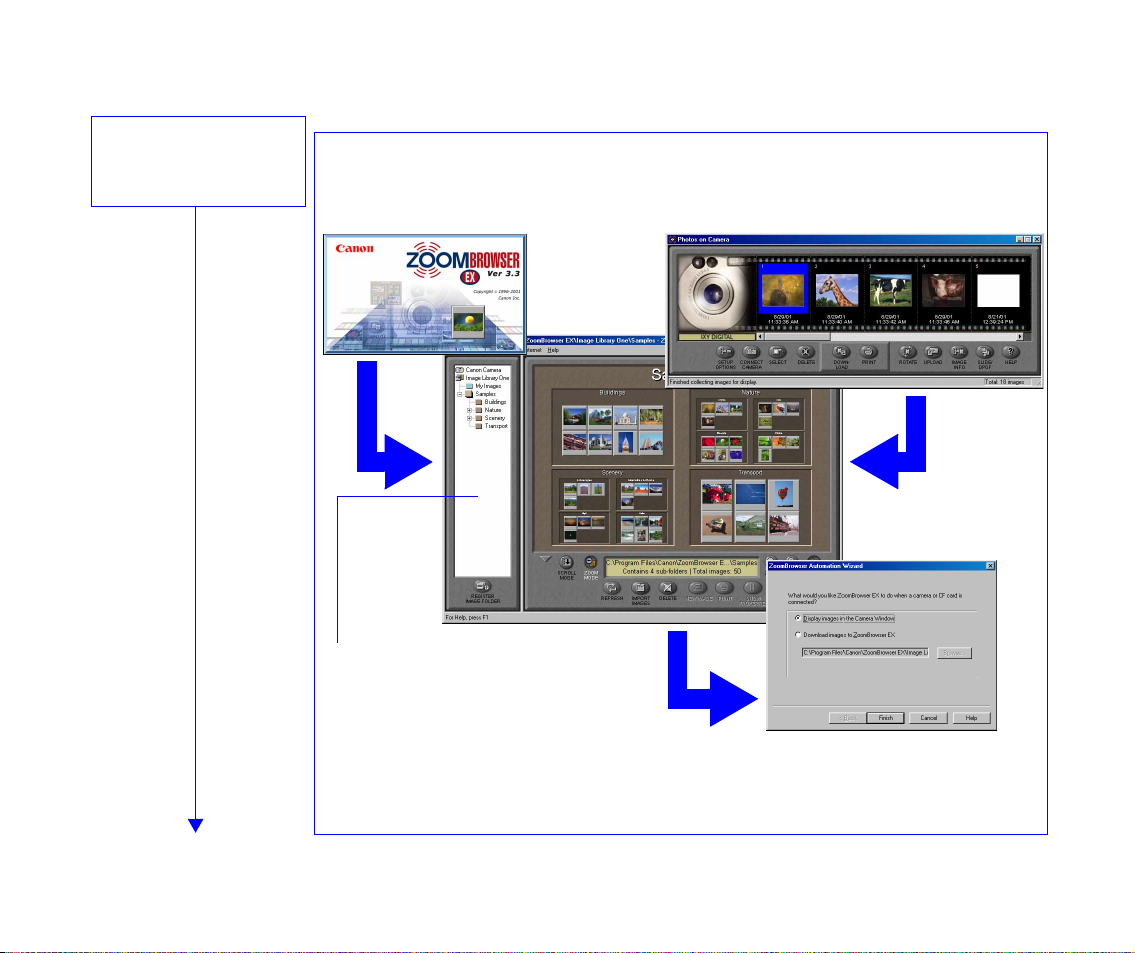
Start ZoomBrowser EX.
ZoomBrowser EX supports
some simple image editing
features.
Using the Camera Window, import
images from a memory card or a
digital camera.
The Automation wizard provides easy
means of importing images.
10
Page 11
STEP 3
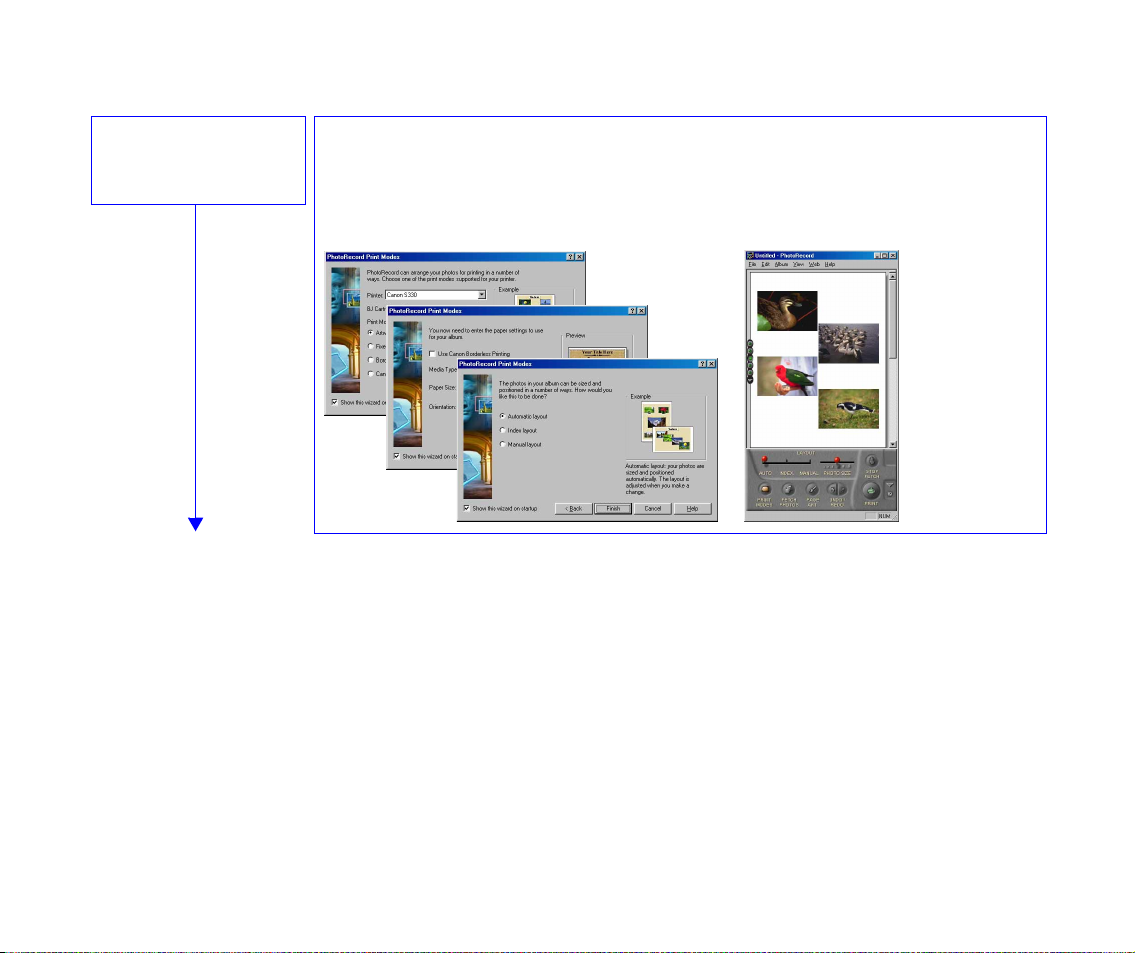
Selecting a layout
Specify the print mode. Just follow the wizard to select a print mode option
from Artwork/Layout album, Index printing, Fixed photo size printing,
Borderless printing (Tiled photo), and Canon perforated paper printing.
11
Page 12
STEP 4
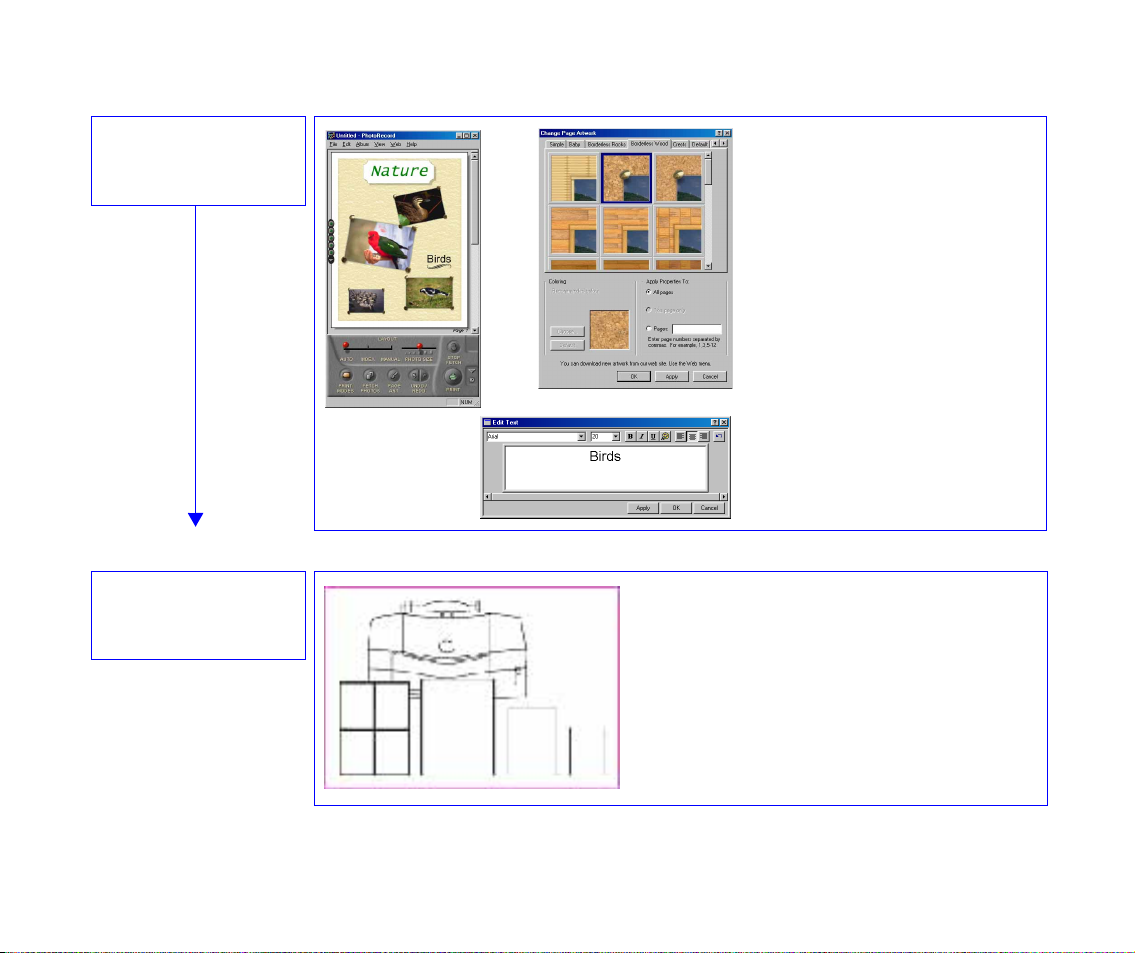
Applying artwork
You can apply artwork
including clipping, resizing,
adding text, and
ornamentation such as adding
photo frames or background
to the imported images.
STEP 5
Printing
The images can be printed on Canon
perforated paper (such as Photo Paper
Pro <PC-101S> or Glossy Photo Card
<FM-101>). Borderless printing is also
supported.
*Some features and paper sizes may not
be supported depending on the models of
printers.
12
Page 13

Using Canon Utilities
Canon Utilities are the application software included in the BJ Solution Disk or Setup Software &
User’s Guide in the CD-ROM that comes with your BJ series printer. These utilities enable you to
display, save (import) to the computer’s hard disk, edit, print the images captured using a digital
camera or scanner.
For the summary of each function, refer to Introduction to Photo Applications.
• Starting ZoomBrowser EX
• Creating Panoramic Photo Using PhotoStitch
• What is Easy-PhotoPrint?
13
Page 14

Starting ZoomBrowser EX
This section describes how to start ZoomBrowser EX.
ZoomBrowser EX supports the following image file types:
bmp Windows bitmap
crw RAW
fpx Flachpix
jpg Joint Photographic Experts Group (JPEG)
tif Tagged Image File Format (TIFF)
pcd KODAK Photo CD
wmf Windows Metafile
Starting ZoomBrowser EX
14
Page 15
Steps
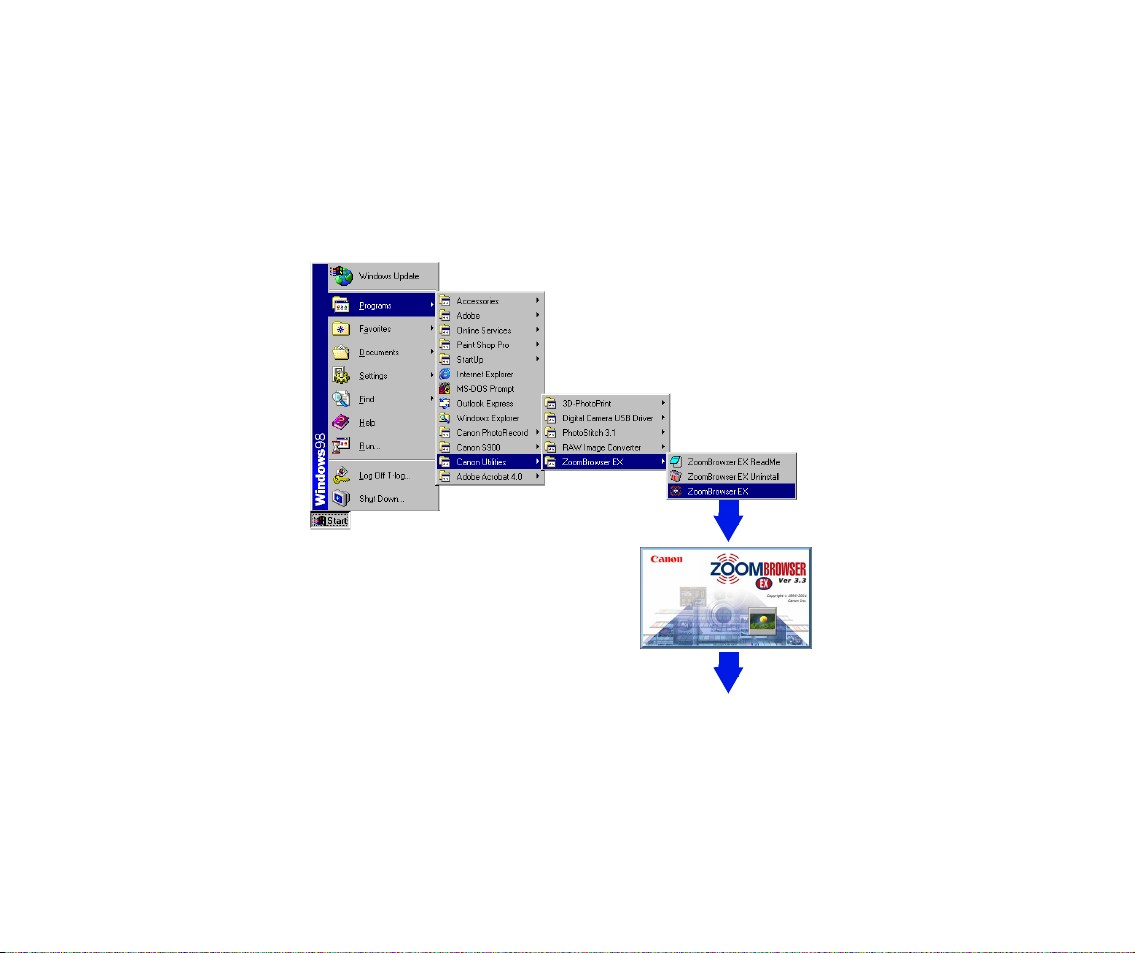
Click Start and select Programs - Canon Utilities - ZoomBrowser EX -
1
ZoomBrowser EX.
ZoomBrowser EX starts and ZoomBrowser EX application window opens.
Starting ZoomBrowser EX
15
Page 16

Note
To learn more about the main window, refer to Basic Operations in the Browser
➤
Display Area.
Starting ZoomBrowser EX
16
Page 17
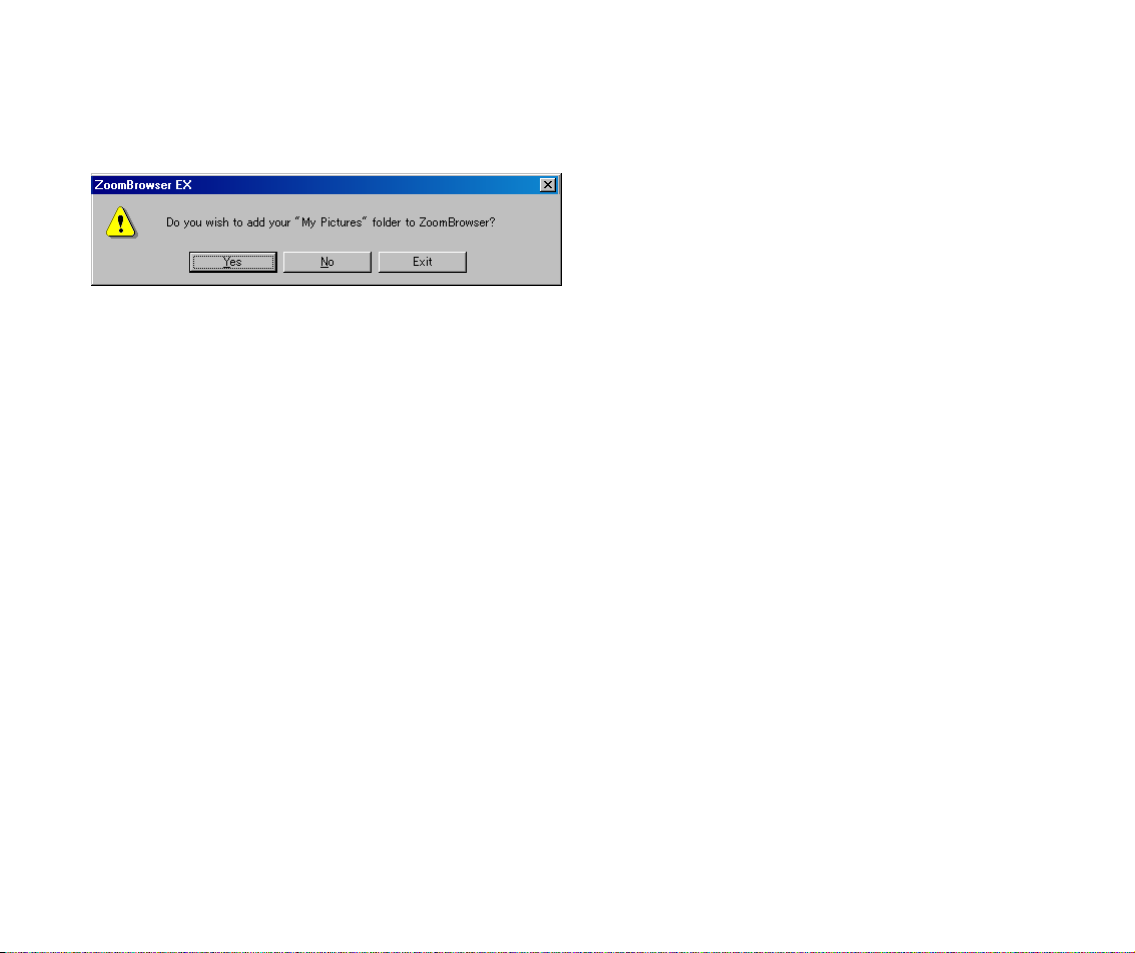
When starting ZoomBrowser EX for the First Time...
When starting ZoomBrowser EX for the first time, you will see a message window as shown below.
Click the Yes button to register the Windows folder named My Picture as an Image Folder of
ZoomBrowser EX. This folder will become an image data storage folder and images imported from
a digital camera or scanner can be stored in this folder. ZoomBrowser displays the thumbnails of the
images stored in this folder in the Browser Display Area.
Click the No button, if you do not want to register the My Picture folder to the ZoomBrowser EX.
This message appears only when the ZoomBrowser EX is started for the first time.
For more detailed information on registering Image Folders, refer to Image Database.
Starting ZoomBrowser EX
17
Page 18
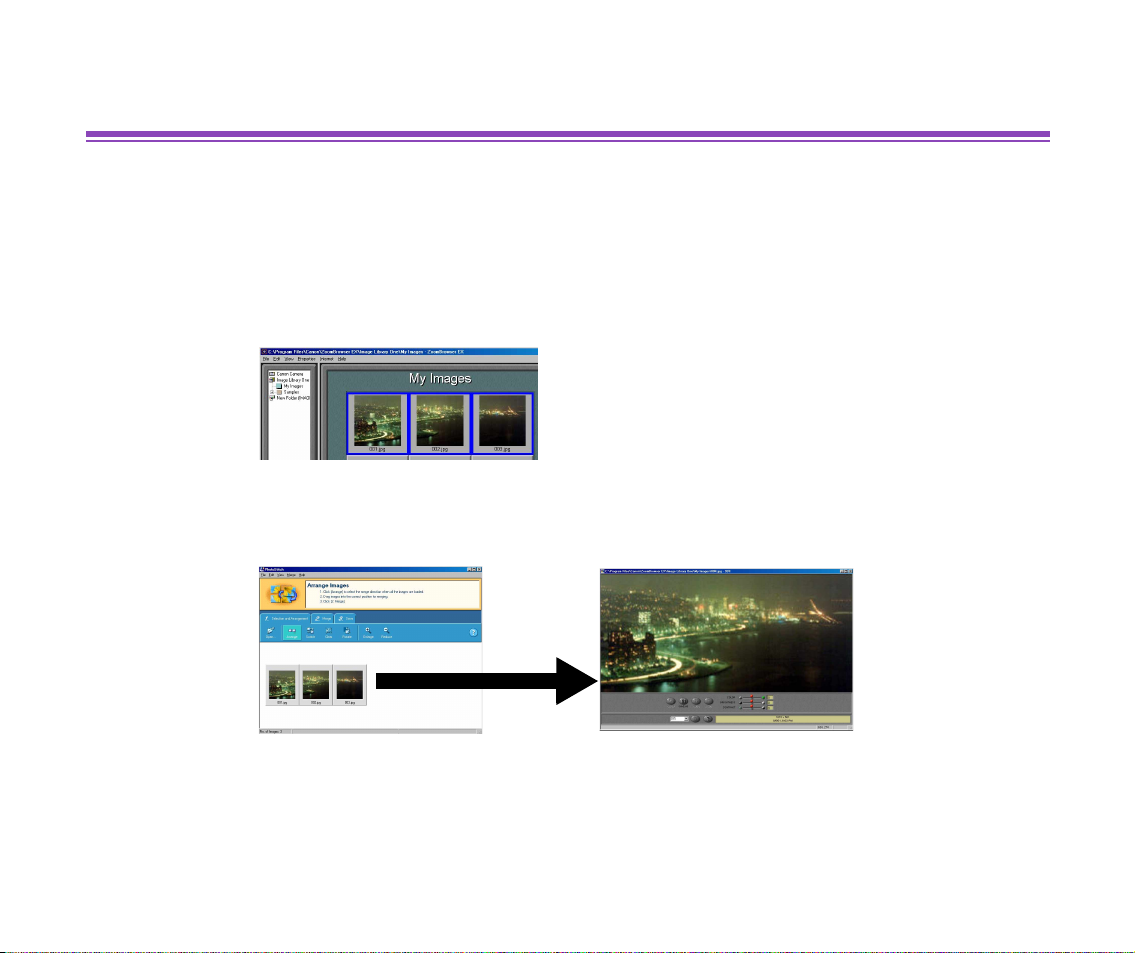
Creating Panoramic Photo Using PhotoStitch
PhotoStitch is an easy-to-use image merger utility which enables you to create a panoramic photo
by merging multiple photos taken with a digital camera.
Steps
In the Browser Display Area of the ZoomBrowser EX, select multiple photo images
1
(thumbnails) to merge.
Open the Edit menu and select the PhotoStitch command.
2
PhotoStitch starts and loads the selected photo images.
Merge as many images as you like either vertically or horizontally by a simple operation, and create
posters and other photo-prints. Also try the wide-mode merging which shows buildings and other
straight-lined objects with straight lines as natural as the original.
For more details on the merging procedure, refer to the Help of PhotoStitch.
Creating Panoramic Photo Using PhotoStitch
18
Page 19
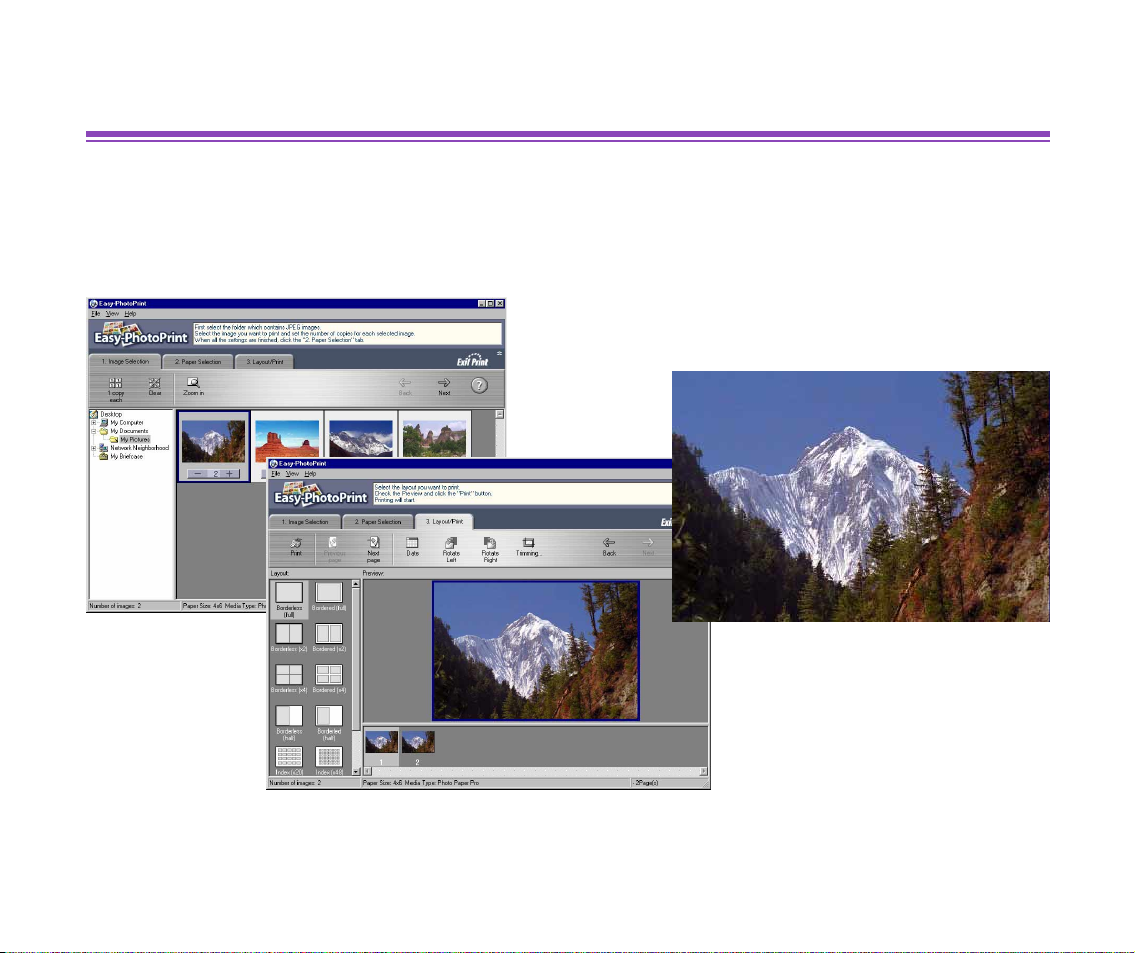
What is Easy-PhotoPrint?
Easy-PhotoPrint allows you to make borderless prints simply by selecting your digital camera
images and the paper size and type. Easy-PhotoPrint is useful when you want to make prints
quickly. Easy-PhotoPrint also has simple editing functions such as trimming and rotation of images.
Easy-PhotoPrint supports Exif Print.
Note
For details on the operation procedure, refer to Printing with Easy-PhotoPrint.
➤
What is Easy-PhotoPrint?
19
Page 20

Using ZoomBrowser EX
This chapter describes the basic operations and the functions of the ZoomBrowser EX.
• Basic Operations in the Browser Display Area
• Changing View Mode in the Browser Display Area
• Image Database
• Processing Image Using Image Viewer
• Slide Show
• Time Tunnel
• Adding Sound to Image
• Processing Image for Sending by E-mail
• Editing Image Using Other Image Processing Programs
20
Page 21
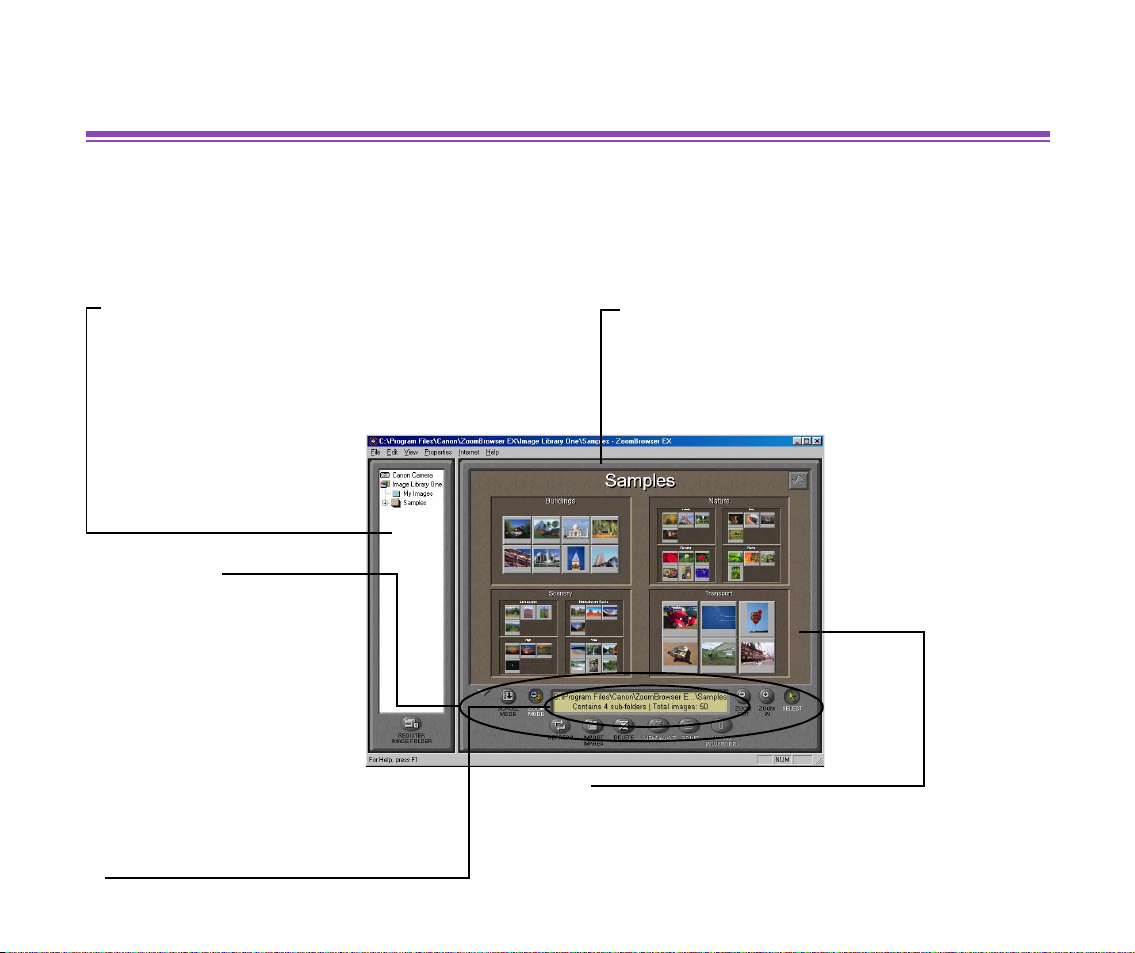
Basic Operations in the Browser Display Area
Part names and basic operations in the Browser Display Area are described in this section.
For more detailed information on working with ZoomBrowser EX, refer to the Help of ZoomBrowser
EX.
Tree View
Displays all the Image Folders and their subfolders that are
registered to ZoomBrowser EX.
When a Canon digital camera is connected to your computer, double-click the Canon Camera icon, and you can
view all the photos stored in the memory card of camera in
the Camera Window.
Control Panel
Control buttons are provided
here. Manage and process
images shown in the
Browser Display Area by
clicking these buttons.
Thumbnails
The information screen shows the number
of subfolders and image files contained in
the current folder.
Reduced images of the files contained in the folder that is currently
selected in the Tree View. You can select images for processing by
clicking the thumbnails.To select two or more images, click the thumbnails one by one while pressing the Ctrl key.
Browser Display Area
Displays the contents of the Image Folder that is
currently selected in the Tree View. Individual
images are shown as thumbnails. You can change
the thumbnail size, the way the information is displayed, the viewing modes, and other settings.
Basic Operations in the Browser Display Area
21
Page 22
MINIMIZE
Click this button to reduce the Control Panel into a miniature window (see the figure on the right). You can mousedrag it anywhere on the computer screen.
buttons
View Mode buttons
ZOOM MODE
Click the
images contained in the folder currently selected in the Tree View, in the reduced form of thumbnails. If the folder
contains subfolders, the contents of the subfolders are also displayed, as thumbnails grouped under subfolder
names.
SCROLL MODE
Click the SCROLL MODE button on the Control Panel to enter the Scroll mode. The Scroll mode displays the
images and subfolders contained in the folder currently selected in the Tree View. The images are shown as
thumbnails, while the subfolders are shown as folder icons.
When in the Scroll Mode, you can zoom in on a desired folder and view its contents, by double-clicking the folder.
ZOOM MODE
button on the Control Panel to enter the Zoom mode. The Zoom mode displays the
SHOW PROPERTIES
Click this to view the information about the image
currently selected in the Browser Display Area.
REFRESH button
Click this to refresh the display of selected images
(thumbnails) or the contents of the selected folder.
IMPORT IMAGES button
Click this to import images from an input device
(digital camera, memory card, etc.), currently connected to the computer.
DELETE button
Click this to delete the images or folders currently selected in the Browser Display Area.
PRINT button
Click this to open the Print submenu in which you can
select Layout or Index printing option. When Layout is
selected, the PhotoRecord Print Modes window opens and
the Print Modes wizard becomes ready to start.
VIEW IMAGE button
Click this to open the Image Viewer and view the selected image.
button
Basic Operations in the Browser Display Area
22
Page 23

Tool switching buttons
Click these buttons to select a tool (mouse pointer) used in the Browser Display Area.
Button Name Function
SELECT
button
Turns the mouse pointer into a selection tool.Select this tool for the usual
operations in ZoomBrowser EX, for example, selecting images and folders.
ZOOM IN
button
ZOOM OUT
button
Turns the mouse pointer into a zoom-in tool.Select this tool for zooming in
or (enlarging) the images (thumbnails) in the Browser Display Area.
Turns the mouse pointer into a zoom-out tool.Select this tool for zooming
out or (reducing) the images (thumbnails) in the Browser Display Area.
Basic Operations in the Browser Display Area
23
Page 24
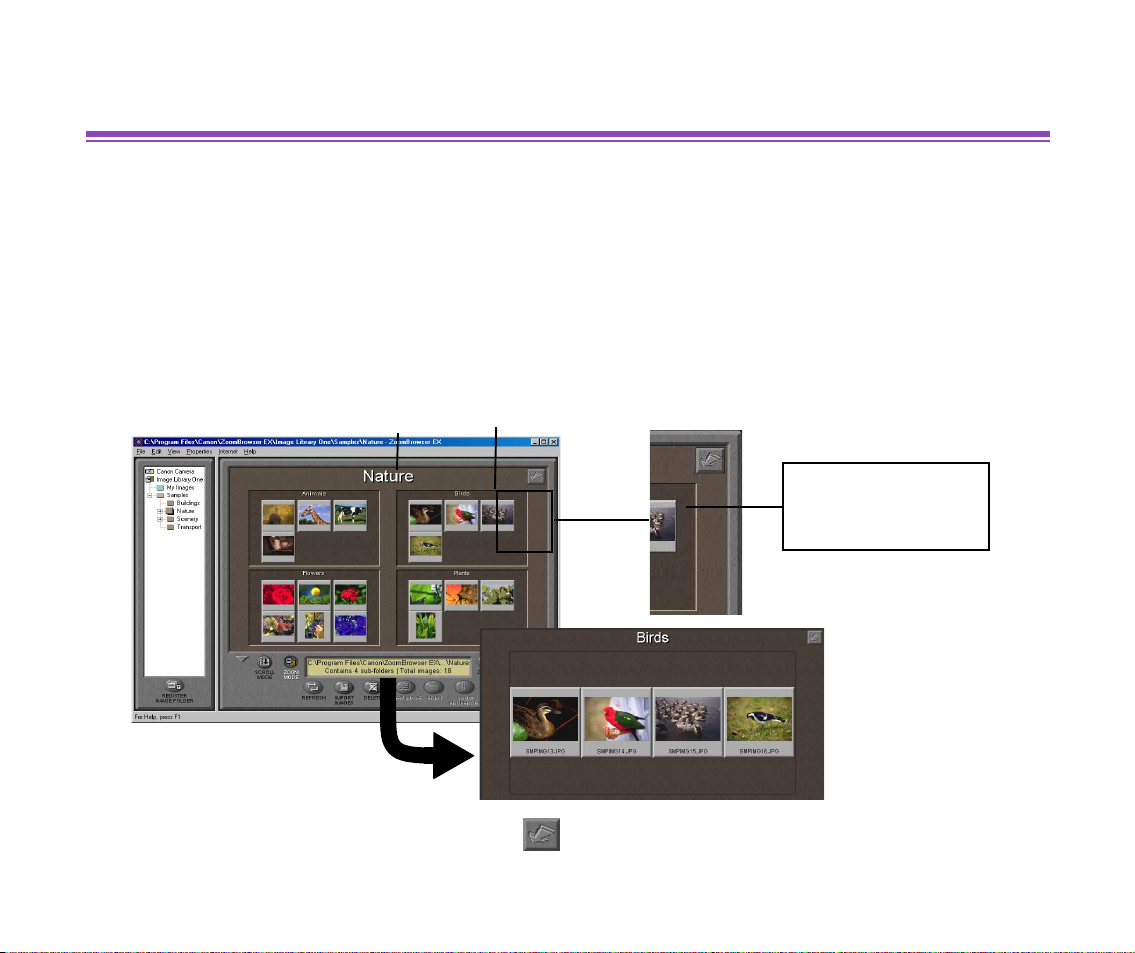
Changing View Mode in the Browser Display Area
There are two View Mode buttons in the Control Panel, the SCROLL MODE button and the ZOOM
MODE button.
■
Zoom Mode
Click the ZOOM MODE button on the Control Panel to enter the Zoom mode. The images contained
in the folder selected in the Tree View are displayed in the reduced form of thumbnails. If the folder
contains subfolders, the contents of the subfolders are also displayed, as thumbnails grouped under
subfolder names.
Folder Subfolder
Double-click the
subfolder background
to zoom in images.
To zoom out the magnified images, click the button on the top-right corner of the Browser
Display Area.
Changing View Mode in the Browser Display Area
24
Page 25
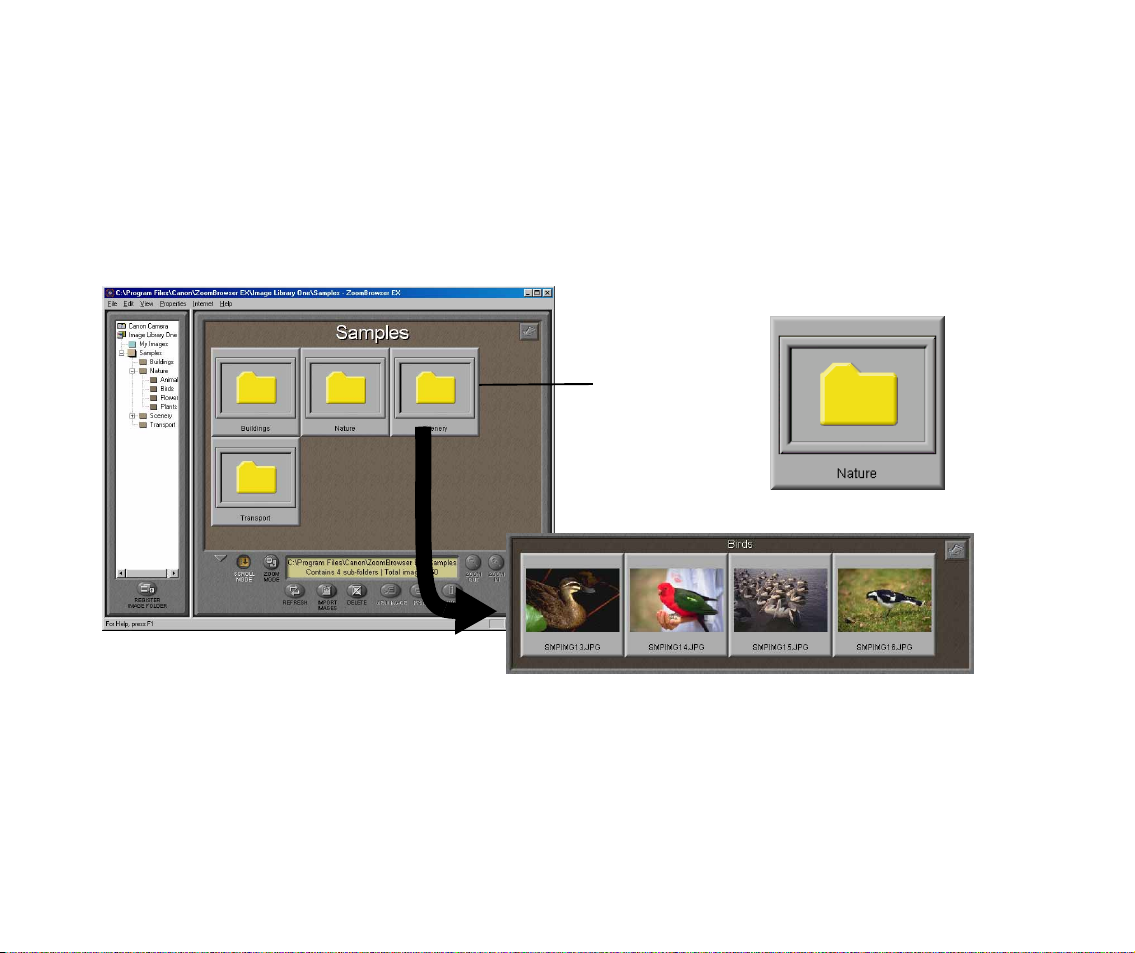
■
Scroll Mode
Click the SCROLL MODE button on the Control Panel to enter the Scroll mode. The images in the
selected folder or subfolders contained in the selected folder are displayed. The images are shown
as thumbnails, while the subfolders are shown as folder icons.When in the Scroll Mode, you can
zoom in the images contained a subfolder by double-clicking the folder icon. This enlarges the view
of the folder contents until it fills the Browser Display Area.
Double-click the
folder icon to zoom
in the images contained in the subfolder.
Changing View Mode in the Browser Display Area
25
Page 26
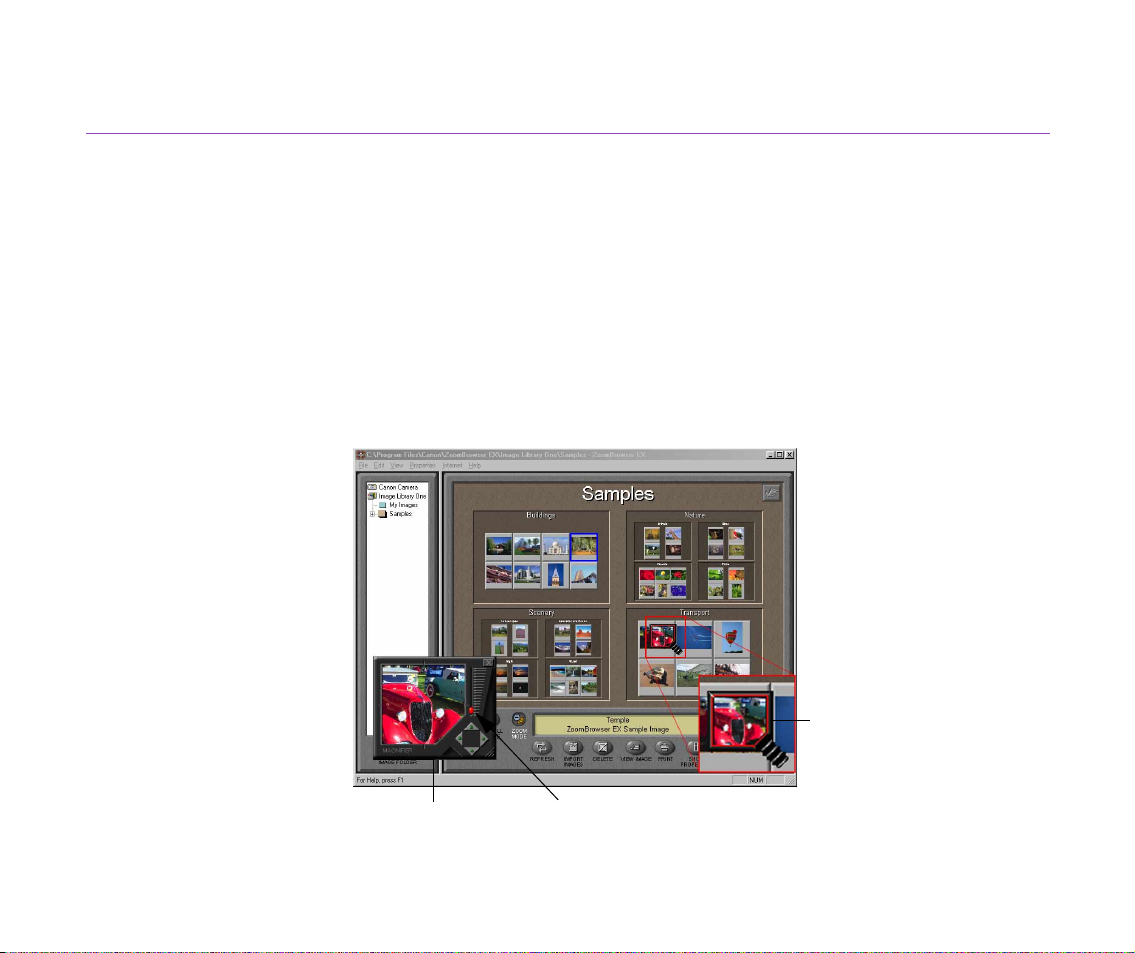
Using Magnifier glass
Some thumbnails are displayed smaller than others, depending on the folder structure. The
Magnifier is a convenient tool for viewing small thumbnails.
To use the Magnifier, select the Magnifier from the View menu.
You can move the Magnifier glass over the Browser Display Area by dragging it with the mouse.
When you want to have a closer look, point the glass to a thumbnail, and view the enlarged image in
the Magnifier window.
To return to the normal view, close the Magnifier window, by clicking the Close button on the top
right corner of the MAGNIFIER window.
MAGNIFIER
window
Magnifier glass
Use the slide control to increase or decrease the magnification.
Changing View Mode in the Browser Display Area
26
Page 27

Image Database
Registering Image Folders is a necessary procedure, if you have image data stored in your hard
disk folders or on removable volumes, and if you want to process, print or manage them from
ZoomBrowser EX. First register the folder/volume which you want to store the image data.
When a folder on the hard disk is registered as an Image Folder, you can save folders and images
in that Folder from the ZoomBrowser EX window. Image data imported from a memory card of
digital camera or other input devices will be saved as image files in those registered Image Folders.
Image Database
27
Page 28
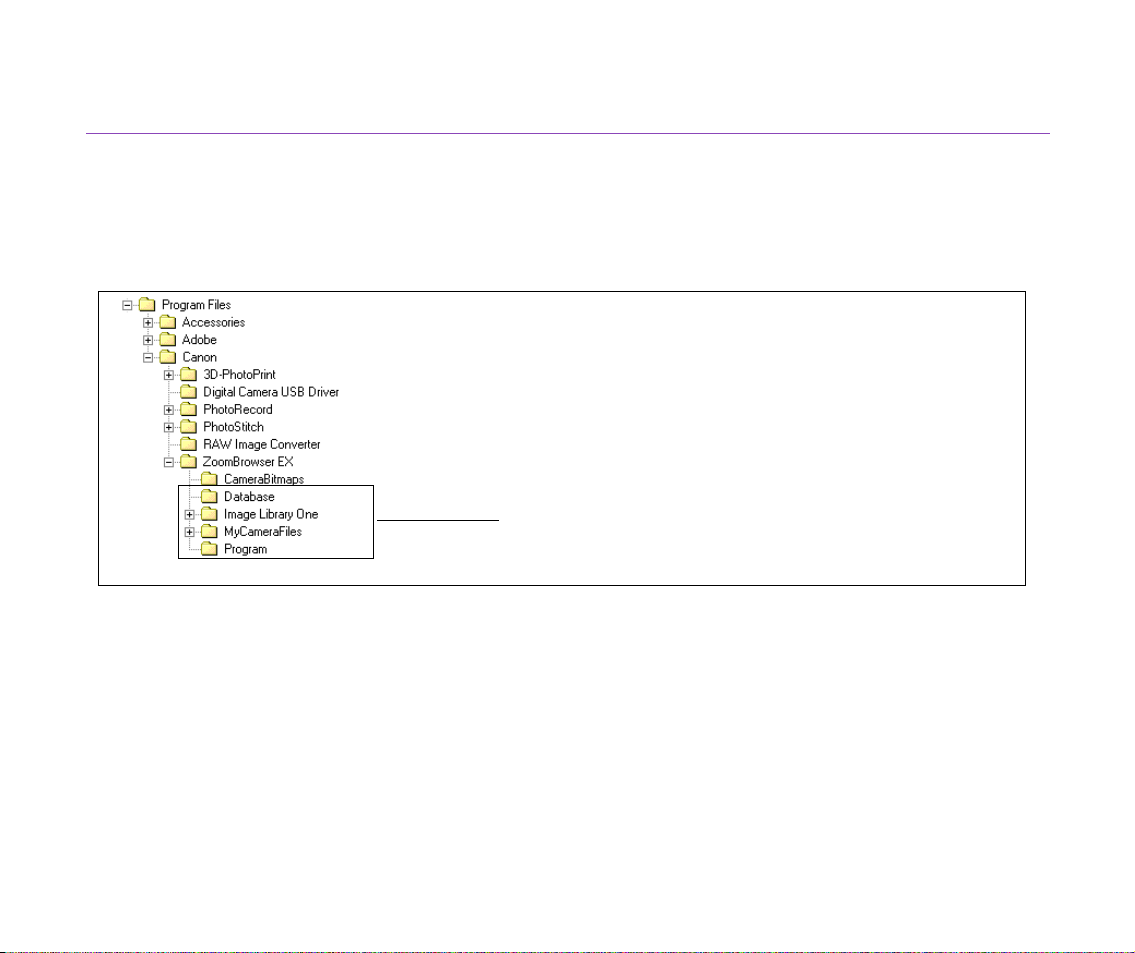
Image Library One
When ZoomBrowser EX is installed in your computer, it automatically creates a default folder
named Image Library One, where it copies its sample image files.
Under this default Folder, you can create a new folder and save the imported images. You can also
create a new Image Folder besides the default one.
Folders that comprises the default Image Folder
Image Database
28
Page 29
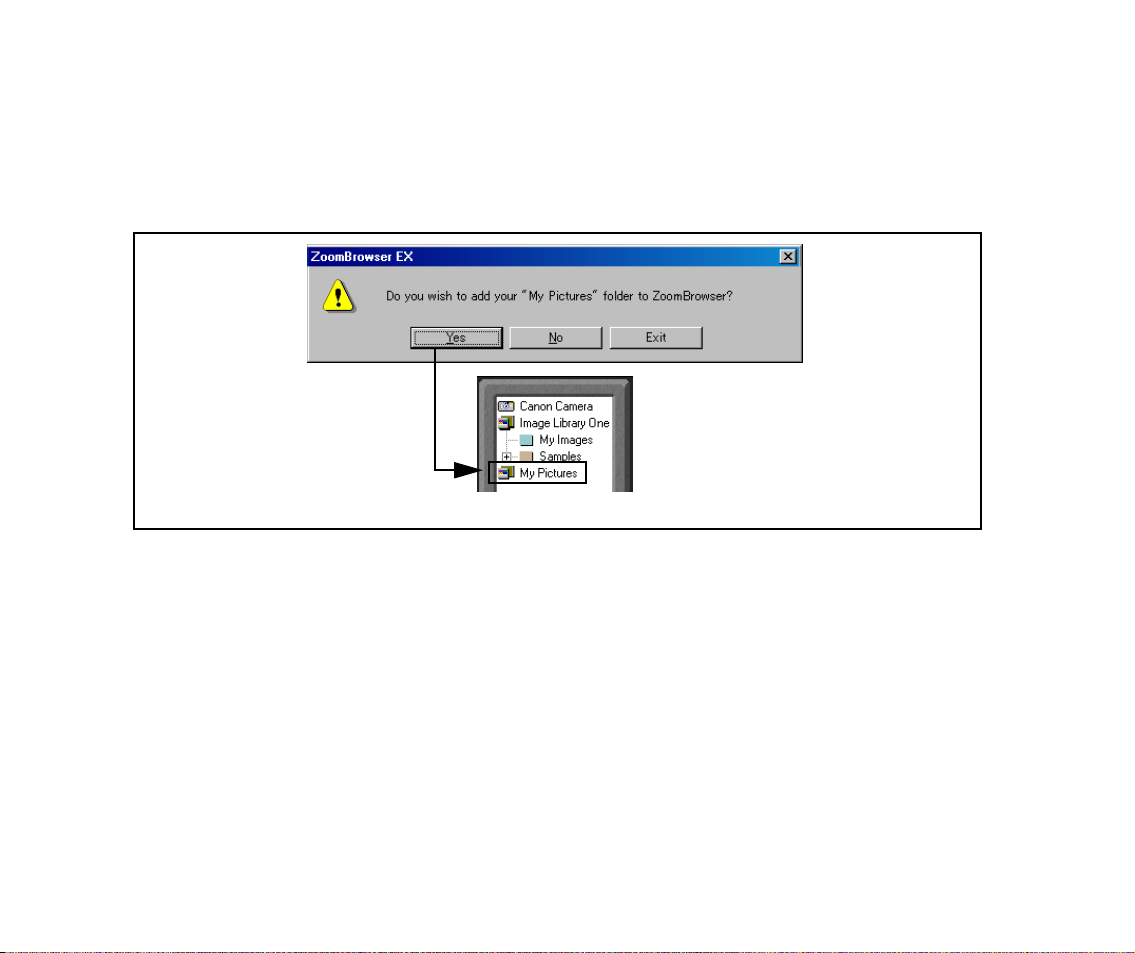
Registering the My Pictures folder as an Image Folder
On starting ZoomBrowser EX for the first time, a message box appears and asks you if you want to
register the My Pictures folder to the ZoomBrowser EX. If you click Yes here, the Windows folder
named My Pictures will be registered as an Image Folder and displayed in the Tree View.
The registered Image Folder
Image Database
29
Page 30
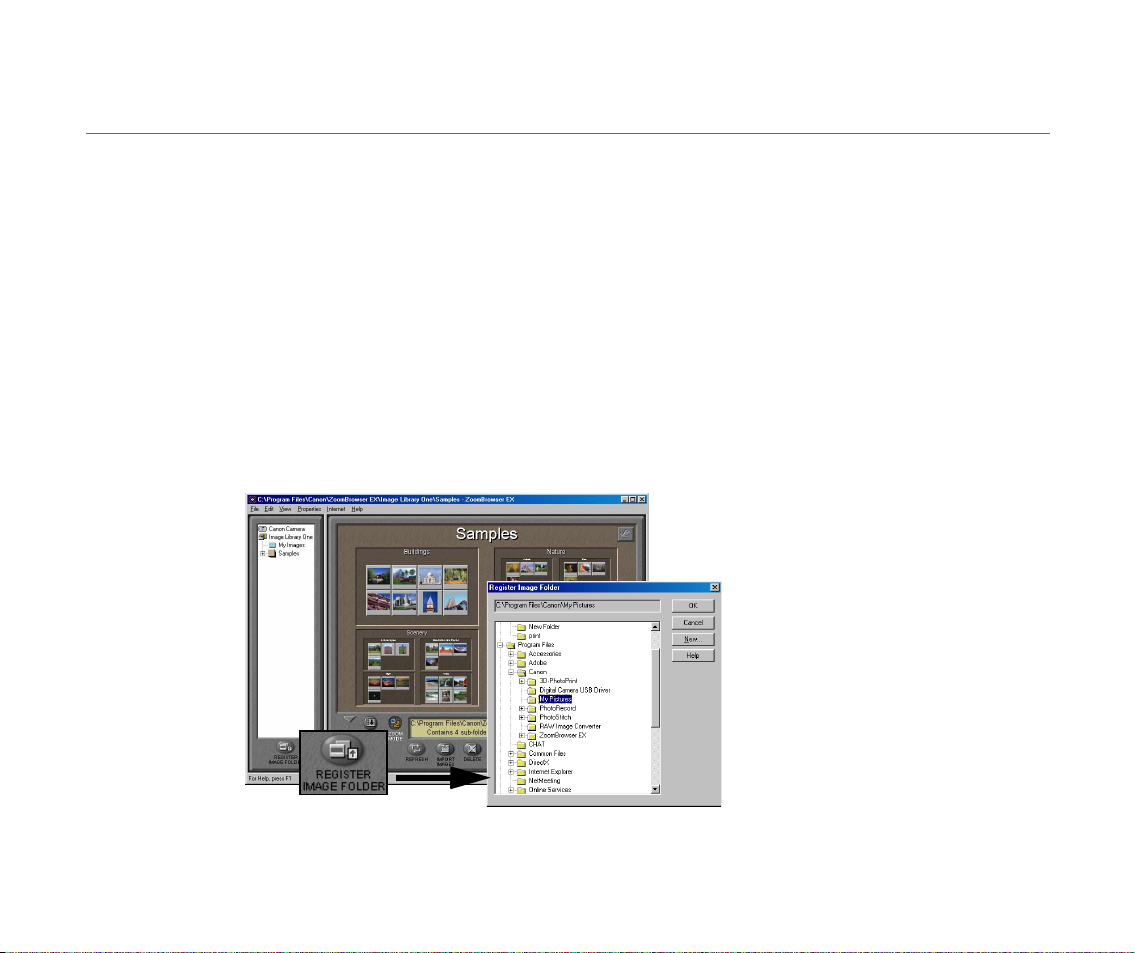
Registering Folders on the Hard Disk as Image Folders
You can select folders on your hard disks and register them as new Image Folders.
To learn how to register removable volumes such as CDs, MOs and FDs, refer to Registering
Removable Volumes as Image Folders.
Steps
Start ZoomBrowser EX.
1
To learn how to start ZoomBrowser EX, refer to Starting ZoomBrowser EX.
Click the REGISTER IMAGE FOLDER button.
2
The Register Image Folder dialog box appears.
Image Database
30
Page 31

From the Register Image Folder dialog box, select the folder which you want to
3
register as an Image Folder, and click the OK button.
The registration message box appears.
Click the OK button.
4
The selected folder will be registered as an Image Folder.
Note
If the selected folder contains any subfolders or image files, the ZoomBrowser EX
➤
database will automatically register those subfolders and image files.
Image Database
31
Page 32

Registering Removable Volumes as Image Folders
You can register removable volumes such as CDs, MOs and FDs, as new Image Folders.
When a volume is registered as an Image Folder, the database acquires its file information,
including the thumbnails, file names and dates of the creation of image data. This enables you to
view and check the contents of the registered volume from the computer screen, even if the volume
itself is not loaded.
To learn how to register folders that are on your hard disks, refer to Registering Folders on the Hard
Disk as Image Folders.
Steps
Load the removable volume which you want to register into the media drive.
1
Be sure to load it before starting ZoomBrowser EX.
Start ZoomBrowser EX.
2
To know how to start ZoomBrowser EX, refer to Starting ZoomBrowser EX.
Image Database
32
Page 33

Click the REGISTER IMAGE FOLDER button.
3
The Register Image Folder dialog box appears.
Select the removable drive, and click the OK button.
4
The registration message box appears.
Click the OK button.
5
The Set Logical Volume Name dialog box appears.
Image Database
33
Page 34

Type in a name for the current volume, and click the OK button.
6
This registers the volume as an Image Folder. The database acquires information
about all the folders and image files contained in that particular volume.
The removable volume will be registered as an Image Folder
named “IMAGELIB.”
Note
Note
If the selected volume has already been given a volume label, the dialog box
➤
displays that volume label as the default name. You can change it if you like, since
a removable volume name is not the same thing as a volume label.
When working with images in a registered removable volume, for example, viewing
➤
them in the Image Viewer, or processing or printing them, you need the volume
actually loaded onto the media drive. If you select an image and try to execute one
of these operations without loading the volume, a message window prompts you to
load it, as shown below.
Insert the volume and click the
the image to the ZoomBrowser EX.
Retry
button to load
Image Database
34
Page 35

Creating New Folders
You can create a new folder within a registered Image Folder or its subfolder.
Steps
On the Tree View, select and right-click with the mouse an Image Folder or a
1
subfolder within which you want to create a new folder.
The pop-up menu opens.
Select the New Folder from the menu.
2
The New Folder dialog box opens.
The selected Image Folder or subfolder is
displayed here. You can change the location of
the new folder to create by specifying a desired
folder from the Create new folder in drop-
down list.
Image Database
35
Page 36

Type in the name for a new folder.
3
Click the OK button.
4
The new folder will be created under the selected Image Folder or subfolder.
The new folder “Digital Camera” is
created.
Image Database
36
Page 37

Changing Location of Image Files
You can move image files to a new location, by drag-and-dropping the thumbnails from the Browser
Display Area onto any folder displayed in the Tree View.
Move an image to a new
location by drag-and-dropping the thumbnail onto
the destination folder.
If you want to move multiple images, select thumbnails while pressing the
Ctrl key, then drag-anddrop the thumbnails onto
the destination folder.
You can also move a whole folder by drag-and-dropping the folder icon to a new location in the Tree
View.
Copy images to
another folder by dragand-dropping the
thumbnails while
pressing the Ctrl key.
To copy an image or folder to a new location, drag-and-drop it while pressing the Ctrl key.
Image Database
37
Page 38

Deleting Images
When an image(s) is displayed and selected in the Browser Display Area, you can delete the image
file(s) by clicking the DELETE button.
1. Select an image (thumbnail) you want to
delete.
2. Click the DELETE button to open the Delete
dialog box.
Note
3. Click the Delete button.
When the Delete button is clicked, the actual image file(s) is completely deleted
➤
from your computer's hard disk or the removable volume.
Image Database
38
Page 39

You can also delete a folder from your computer, by selecting the folder icon in the Tree View and
then clicking the DELETE button.
1. In the Tree View, select the Image
Folder or the subfolder you want to
delete.
2. Click the DELETE button to open the
Delete dialog box.
Note
3. Click the
selected Image Folder or the subfolder.
When the Delete button is clicked, the folder is completely deleted from your
➤
Delete
button to delete the
computer's hard disk or the removable volume, not only the Image Folder (that is,
the actual folder registered as an Image Folder) but also all its subfolders.
Image Database
39
Page 40

Managing Image Folders Using Shortcut Menu
Select a folder or an Image Folder in the Tree View, and right-click with the mouse. This displays a
pop-up menu which offers you the option commands as listed in the table below.
Command Brief explanation of its function
New Folder
Rename Folder Allows you to rename the selected Image Folder or subfolder. Note that this command
Deregister Image Folder
Set Logical Volume
Name
Set Folder Color You can change the color of both the folder icon and the background in the Browser
Remove Folder Color Becomes selectable only when you have selected a folder whose folder color has
Refresh Folder Refresh the contents information (database) of the selected Image Folder or subfolder.
Creates a new folder under the Image Folder or subfolder selected in the Tree View.
Refer to Creating New Folders for more details.
is not for renaming a removable volume registered as an Image Folder.
Deregisters the selected Image Folder. This command does not delete any actual
image files or subfolders contained in the deregistered Image Folder. It only deletes
information on the folder registered to the ZoomBrowser EX.
Becomes selectable only when you have selected a removable volume which is registered as an Image Folder. Allows you to rename the selected volume.
Display Area.
been changed. Clears the current color settings and restores the default color.
This command is also executed using the REFRESH button. Refer to Refreshing View
in the Browser Display Area for more details.
Image Database
40
Page 41

Delete Deletes the selected Image Folder or subfolder. Care must be taken for this command
execution. Once the Delete command is executed, the actual image files and subfolders are completely erased from your computer's hard disk.
This command is also executed using the DELETE button. Refer to Deleting Images
for more details.
Copy Copies the selected Image Folder or subfolder including its all image files and subfold-
ers.
Paste
Properties Becomes selectable only when an Image Folder is selected. Allows you to view the
Pastes the copied Image Folder or subfolder under the selected folder in the Tree
View.
properties of the folder or the removable volume registered as an Image Folder.
Image Database
41
Page 42

Refreshing View in the Browser Display Area
If you perform file management using other file management software such as Windows Explorer,
the ZoomBrowser EX may not always reflect the updates done with other file management software
immediately.
To reflect the updates on the database, select the Image Folder or subfolder which you want to
update in the Tree View, and then click the REFRESH button.
REFRESH
button
Another way to refresh the ZoomBrowser EX database is to use the commands provided in the
View menu.
Command Information to be updated
Refresh Current Folder Contents of the folder currently displayed in the Browser
Display Area.
Refresh Online Registered Folders Data on the whole database of ZoomBrowser EX.
Image Database
42
Page 43

Processing Image Using Image Viewer
You can view the actual image of the selected thumbnail by opening the Image Viewer. First select
the desired image and then click the VIEW IMAGE button.
Double-clicking the selected thumbnail in the Browser Display
Area also opens the
In this window, you can crop and/or adjust colors of the image, and
save the result as a new file.
Image Viewer
window.
VIEW IMAGE
Click this to open the
Image Viewer
The zoom ratio is displayed here.
Specify the desired ratio.
button
Image size, date and
time it was taken are
displayed here.
Processing Image Using Image Viewer
43
Page 44

Cropping Image
Select the portion of the image you want to keep by mouse-dragging over it, and then click the
CROP button. Areas outside the selection will be trimmed away.
Cropped area
CROP
button
Click this to crop along the
trimming line.
Processing Image Using Image Viewer
44
Page 45

Adjusting Image Colors
The color adjustment slider controls allow you to adjust color, brightness and contrast by dragging
them to and fro.
Color adjustment slider controls
Drag them to and fro, to change
color, brightness and contrast.
See how color, brightness and
contrast have been adjusted.
Processing Image Using Image Viewer
45
Page 46

Saving Image after Processing
The processed image can be saved as a new file.
Type in the file name and specify
the file type, then click the Save
button. The image is saved as a
new file.
SAVE AS button
Click this to open the Save As
dialog box.
Processing Image Using Image Viewer
46
Page 47

Slide Show
This function enables you to display the images selected in the Browser Display Area as an
automated slide show. You can view them in sequence using the entire computer screen.
Steps
Select the Slide Show Options from the View menu.
1
The Slide Show Options dialog box opens to allow you to specify a set of
parameters.
Specify how you want to have the images displayed.
2
You can choose the playing mode and apply enhancing effects to the slide show.
When the After a time delay option is selected, move the slide control to specify
the interval after which the show should move on to the next picture.
Slide Show
47
Page 48

Specify how you want to play slide show sequentially using the Loop options.
3
Clicking the sets the sequential image display through to the last image. The
slide show ends and closes after the last image shown.
Clicking the sets the endless sequential image display.
To exit from this endless loop, you will have to press the Esc key or Close Slide
Show button to end and close the slide show.
For details on how to set the parameters, click the Help button in the Slide Show
Options dialog box.
Click the OK button.
4
The Slide Show Options dialog box closes and opens the Browser Display Area
again.
Select the images or folders you want to display in the slide show in the Browser
5
Display Area.
Slide Show
48
Page 49

Select the Slide Show from the View menu.
6
The slide show starts and selected images are displayed in sequence on the entire
computer screen according to the parameters set in the Slide Show Options
dialog box.
Slide Show
49
Page 50

Slide Show Control Buttons
While the slide show is in progress, the control buttons are displayed on the bottom-right corner of
the screen.
Pause/Replay button
Click the
show temporarily.
Pausing the show will turn this into the
Replay button.
Previous Image
Displays the previous
image again.
Pause
button to stop the automated slide
button
Print button
Click this to mark the current image for printing, while a slide show is in
progress. When the show is over, PhotoRecord will automatically start and
layout the selected images for printing.
Next Image
Advances the show to the next image.
button
Close Slide Show button
Click this to exit the slide
show.
When the No Info radio button is selected in the Slide Show Options dialog box, no control buttons
are shown on the screen. If this is the case, right-click to open a pop-up menu as shown below.
Select the corresponding option from this menu.
Slide Show
50
Page 51

Time Tunnel
You can open the Time Tunnel window by selecting the Time Tunnel... from the View menu.
When the Time Tunnel window opens, you see a series of rings which remind you of a time tunnel.
The images in the Browser Display Area, or those contained in the selected folder, will be displayed
in the Time Tunnel, positioned along the lines of the rings automatically. The thumbnails are arrayed
in a sequential order by the date they were shot (file dates). Zoom in or out freely on the rings to
change the arrangement, by moving the slide control or by specifying the date. Choose the display
mode from among Rings, Spiral and Film by simply clicking the switch buttons. You can open the
actual image of the desired thumbnail by double-clicking on it.
Drag the slide control to zoom in and out
on the Time Tunnel.
Rings, Spiral, Display Style settings, Speed
Settings, Date/Time Display Color Settings,
Open, Help and Exit buttons
The Time Tunnel offers a variety of option features, including changing the display mode and
searching through images by file date.
For details on how to set the parameters, click the Help button in the Time Tunnel window.
Note
The Time Tunnel can handle up to 500 images.
➤
Time Tunnel
51
Page 52

Adding Sound to Image
You can associate sound with an image by using the sound feature of ZoomBrowser EX.
Steps for Recording
Select the image to which you want to add sound in the Browser Display Area.
1
Open the Properties menu and select the Add/Remove Sound.
The Sound dialog box appears.
Click the Add button.
2
The Open dialog box appears.
Adding Sound to Image
52
Page 53

Specify the sound file.
3
Selectable sound files are those in the WAV and the MIDI formats.
Click the Open button.
4
The name of the selected file appears in the Sound dialog box.
Click the Remove button here if you want to remove the sound file.
Click the Play button here if you want to play the sound file.
Click the OK button.
5
ZoomBrowser EX takes in the sound data.
When the sound is added, the image thumbnail is marked with a sound symbol on
the top-right corner.
Adding Sound to Image
53
Page 54

Steps for Playing
Select an image thumbnail which has a Sound symbol on the top-right corner.
1
Open the Properties menu, and select the Play Sound command.
2
The Play Sound message box appears and starts playing the sound file.
When it has finished playing, the message box closes. Click the Cancel button to
stop playing.
Adding Sound to Image
54
Page 55

Processing Image for Sending by E-mail
It is simple and easy for you to process images and attach them to an E-mail, if you use
ZoomBrowser EX. Select the images in the Browser Display Area and follow the instructions of the
wizard.
Select the image or images that you want to send in the Browser Display Area, and
1
then select the Send Image(s) by E-mail from the Internet menu.
The wizard starts and the Select Compression dialog box opens.
If you select the Send image(s) without compression option here, the file will be
attached in its original size.
Click the Next button.
2
The wizard goes on to the next step.
Processing Image for Sending by E-mail
55
Page 56

Specify the resizing ratio and the image quality, and then click the Compress
3
button.
The program starts compressing the image files.
The total file size after compression will be calculated and displayed in the bottom
area of the dialog box.
Processing Image for Sending by E-mail
56
Page 57

Click the Next button.
4
The wizard goes on to the next step.
To check how the resized images look on the screen, click the Preview button.
Choose what you want to do with the compressed image files, and then click the
5
Finish button.
This closes the wizard and automatically creates an image file for sending with an
E-mail.
If the Start e-mail program option is selected as the next step in 5. above, your Email application will automatically start when the compression is completed,
allowing you to edit an E-mail message. The images processed by ZoomBrowser
EX will be automatically attached to the E-mail.
If the Save images in a folder option is selected as the next step in 5. above, the
Select Directory dialog box will be displayed. Specify the destination folder to save
the image files and save them as new files.
For details of the operation, click the Help button in the E-mail wizard dialog box.
Processing Image for Sending by E-mail
57
Page 58

Editing Image Using Other Image Processing Programs
ZoomBrowser EX allows you to do more image processing through cooperation with other image
processing programs.
Opening Image Files using Other Image Processing Programs
You can specify your favorite image processing program for editing image files while using
ZoomBrowser EX. When necessary, the image editing program opens automatically and imports
the images that are selected in the Browser Display Area.
Specifying the Image Editing Program
Open the File menu, and select Preferences to open the Preferences dialog box. Select the
Image Editor tab.
Editing Image Using Other Image Processing Programs
58
Page 59

When you select the Edit images using the default editor below: option, open the drop-down list
and select the desired image editing program to be used as default.
When you select the Edit images using the program below: option, click the Browse button to
display the Open dialog box, and specify the desired image editing program.
Click the OK button after selecting the desired image editing program.
Editing Image Using Other Image Processing Programs
59
Page 60

Importing Images
This chapter describes the functionality of ZoomBrowser EX to import/download images from your
digital camera.
• Importing Images with the Automation Wizard
• Setting the Automation Wizard to Download Images
• Importing Images Using the Camera Window
• Importing Images from a TWAIN Device
• Importing Images by Drag-and-Drop Operation
60
Page 61

Importing Images with the Automation Wizard
The Automation Wizard enables you to save a sequence of actions from importing images into your
computer through printing, so that ZoomBrowser EX will automatically repeat the same action
sequence by a simple operation next time.
The Automaiton Wizard starts when you connect a Canon digital camera to your computer or insert
a memory card (Compact Flush card) into the memory card slot of a BJ printer connected to your
computer after starting ZoomBrowser EX.
The Automation Wizard also starts when you connect a non-Canon digital camera or a memory
card reader to your computer after starting ZoomBrowser EX.
Importing Images with the Automation Wizard
61
Page 62

Selecting Automatic Image Downloading
When the Automation Wizard starts for the first time, the ZoomBrowser Automation Wizard dialog
box appears as shown below:
Note
If it is not the first time that the Automation Wizard starts, the ZoomBrowser
➤
Automation dialog box appears, ready to start automatic image downloading
directly. Refer to When the ZoomBrowser Automation dialog box appears for
details.
Importing Images with the Automation Wizard
62
Page 63

Select the automated action which you want ZoomBrowser to perform first when it detects a
connected device such as a digital camera or memory card.
The option items and their actions are as follows:
Option Action Further operation
Display images in
the Camera Window
Download images to
ZoomBrowser EX
When you click the
quit the Automation Wizard, the
Camera Window appears to display all
the images stored in the digital camera
(or memory card).
The Automation Wizard proceeds to
download images. Click the
button to select the folder where to
download the images. Automation
Wizard copies and saves the image
data to the folder specified here.
Finish
button to
Browse
See Importing Images Using the
Camera Window for the rest of the
procedure.
See Setting the Automation Wizard to
Download Images.
Importing Images with the Automation Wizard
63
Page 64

■
When the ZoomBrowser Automation dialog box appears
When the ZoomBrowser Automation dialog box appears instead of the ZoomBrowser
Automation Wizard dialog box, just click the Start button to repeat the same action sequence you
have used to import images last time.
If you want to change the action sequence, click the Modify Settings button to open the
ZoomBrowser Automation Wizard dialog box and reselect the desired actions.
Click the Cancel button to quit the Automation Wizard and return to the Browser Display Area window.
Importing Images with the Automation Wizard
64
Page 65

Setting the Automation Wizard to Download Images
You can download images from the connected device by setting options in the ZoomBrowser
Automation Wizard dialog box. The Automation Wizard saves your settings so that it will
automatically trace the same action sequence when downloading images next time.
Steps
Select the Download images to ZoomBrowser EX option in the ZoomBrowser
1
Automation Wizard dialog box.
Click the Browse button to display a dialog box where you can specify a
2
destination folder to copy the downloaded image data.
Setting the Automation Wizard to Download Images
65
Page 66

Specify the folder and click the Next button.
3
The Automation Wizard proceeds to the next screen.
Setting the Automation Wizard to Download Images
66
Page 67

Select a category of images to download.
4
The image category options are listed below:
Option Action
Note
Download all images
Download new images
Download images marked for
printing
Download images marked for
transfer
For details on the images marked for printing or transfer, refer to the documentation
➤
that comes with your digital camera.
Click the Finish button.
5
ZoomBrowser EX starts downloading the images to the computer.
When image downloading is complete, the following message appears:
Downloads all the images stored in the connected
digital camera or memory card.
Downloads all the images except those already
imported to the ZoomBrowser EX.
Downloads the images marked for printing.
Downloads the images marked for transfer.
Setting the Automation Wizard to Download Images
67
Page 68

Select a radio button to specify the next action to do on the downloaded image
6
data.
The options are described below:
Option Action
Display Slide Show
Layout and Print Images
Print Index
Send by E-mail
Click the OK button.
7
The Automation Wizard closes and the selected action starts automatically.
If you click the Cancel button, the Automation Wizard closes and ZoomBrowser EX
returns to the Browser Display Area window without performing any action.
When the Automation Wizard closes, it saves the selected settings so that it can
trace the same action sequence in the next session.
Displays all the downloaded images in a slide show.
Selects all the downloaded images and perform
custom layout printing.
Selects all the imported images and perform index
printing.
Processes all the downloaded images so that you
can attach them to E-mails and save them in the
specified image folder for E-mail.
Setting the Automation Wizard to Download Images
68
Page 69

Importing Images Using the Camera Window
Using the Camera Window, you can browse through all the images stored in the device connected
to your computer, so that you can select, import, and save desired images in your computer.
Steps
Open the Camera Window.
1
You can open the Camera Window by any one of the following operations:
Operation Data displayed in the Camera Window
(1) Select
(2) Double-click
(3) Select
(4) Click the
From D:\Dcim
the IMPORT IMAGES button submenu.
in the Tree View.
From Canon Cam-
era
from the
IMAGES button submenu.
icon in the Tree View.
from
From D:\Dcim
IMPORT
Canon Camera
All the images stored in the Dcim folders in the target drive
*The IMPORT IMAGES button submenu and the Tree View
show From D:\Dcim, From E:\PWSHOTO, etc. depending on data format of the memory card and the drive name
of the connected device.
*It is required that your computer have the hardware (mem-
ory card reader or PC card adapter for memory cards, etc.)
set up correctly, before importing the image data stored in
a memory card.
All the images stored in the Canon digital camera con-
nected to your computer
*Ensure that the digital camera driver is installed correctly.
Note that this function is not supported by some of the
Canon digital camera products.
Importing Images Using the Camera Window
69
Page 70

(5) Select the Display Images
in the Camera Window
option from the
Browser Automation Wizard dialog box.
(2)
(4)
The Camera Window displays the thumbnails of images stored in the selected device.
All the images stored in the digital camera, memory card, or
any other device specified by the Automation Wizard
Zoom-
(5)
(3)
(1)
Note
For more information on the Camera Window, refer to Basic Operation in the
➤
Camera Window.
Importing Images Using the Camera Window
70
Page 71

From the Tree View, select the target folder where you want to save the image files.
2
Note
To know how to manage folders and libraries, refer to Image Database.
➤
Return to the Camera Window. Click to select photos or images you want to import
3
to your computer.
When you select a thumbnail, the area around the selected thumbnail changes its
color.
The Camera Window displays
the thumbnails of images
contained in the selected
device.
DOWNLOAD button
Importing Images Using the Camera Window
71
Page 72

Click the DOWNLOAD button in the Camera Window.
4
The selected images are saved as files in the computer. The downloaded images
are displayed in the Browser Display Area.
Click the Close button at the upper-right corner of the Camera Window if you want
5
to close the Camera Window now and disconnect the device.
If you want to continue downloading more photos or images, repeat Steps 3 and 4.
Importing Images Using the Camera Window
72
Page 73

Basic Operation in the Camera Window
The Camera Window shows thumbnails of the photos or images contained in the device connected
to your computer, so you can browse through all the images in the device.
This subsection describes how to use the control buttons in the Camera Window.
Importing Images Using the Camera Window
73
Page 74

Elements in the Camera Window
The Camera Window shows thumbnails of all the images stored in the device connected to your
computer. Each thumbnail is associated with the image file information.
The Camera Window also provides options that enable you to import and print the images.
To select an image, click its thumbnail. Blue borders mark the selected image. To select two or more
files, click the images one by one while pressing the Ctrl key.
Thumbnails
Photos or images stored in the connected device are displayed as thumbnails here. When an
image is selected, its background turns blue.
(1) SETUP OPTIONS
(2) CONNECT CAMERA
(3) SELECT
(4) DELETE
(5) DOWNLOAD
(6) PRINT
(11) HELP
(10) SLIDE/DPOF
(9) IMAGE INFO
(8) UPLOAD
(7) ROTATE
Importing Images Using the Camera Window
74
Page 75

Device image
When ZoomBrowser EX detects
a connected device, the Camera
Window shows an image to
indicate the device type.
Memory card or non-Canon
digital camera
Canon digital camera
Note
If photos were shot in the Stitch Assist mode of Canon digital camera, they are
➤
displayed with special marks and icons. Click the mark to start the PhotoStitch
utility and merge photos to create a panoramic image.
Importing Images Using the Camera Window
75
Page 76

(1) SETUP OPTIONS
Click the SETUP OPTIONS button to display a setting menu containing the following options.
Menu option Function
Camera Settings
Communication Settings
My Camera
Note
These setup options are available only when the connected digital camera is a
➤
Canon product. The dialog box offers somewhat different parameters depending on
the product type.
Displays a dialog box that allows you to confirm or change date, owner
information, and other settings for the connected camera.
Displays a dialog box that allows you to change the settings for the
communication port to which the camera is connected.
Displays a dialog box that allows you to change the My Camera settings
(only when a camera that supports the My Camera function is connected).
(2) CONNECT CAMERA
Click the CONNECT CAMERA button to restart the connection process. All the thumbnails are
reloaded from the camera into the computer.
Note
The CONNECT CAMERA function is available only when the connected digital
➤
camera is a Canon product.
Importing Images Using the Camera Window
76
Page 77

(3) SELECT
Click the SELECT button to display the selection menu as shown below:
Selects all the images currently displayed in the Camera
Window.
Selects all the images in the Camera Window except
those already imported. The mark
in the top left corner of a thumbnail,
as shown in the figure, indicates
that the image has already been
imported.
Selects all the images marked for printing in the Camera
Window.
Deselects all the images in the Camera Window.
Importing Images Using the Camera Window
77
Page 78

(4) DELETE
Use the DELETE button to clear the selected images completely from the device. If you select an
image or images and click the DELETE button, a message appears as shown below:
Click Yes if you want to clear the images completely from the device. If you do not want to clear
them, click No. The deleted images cannot be restored.
(5) DOWNLOAD
Use the DOWNLOAD button to copy images from the connected device to the specified folder in the
Tree View of ZoomBrowser EX.
Select the images to download, and then click the DOWNLOAD button. Downloading starts and a
monitor window appears, so that you can check the progress of downloading.
When copying is finished, the monitor window closes. If you want to cancel downloading while in
progress, click the Cancel button in the monitor window.
The icon that appears at one corner of a thumbnail indicates that the corresponding image
has already been imported to your computer.
Importing Images Using the Camera Window
78
Page 79

(6) PRINT
Use the PRINT button to print images by activating the PhotoRecord utility. First select the images
to print, and then click the PRINT button and select either Easy-PhotoPrint, Layout or Index from
the PRINT button pop-up submenu.
Selecting Easy-PhotoPrint starts Easy-PhotoPrint. By following a simple operation procedure, you
can make a borderless (full page) print easily.
Select Layout to activate PhotoRecord. The selected photos are loaded automatically.
Select Index to display the Index Print Settings dialog box.
Note
For details on the printing procedure, refer to Printing from PhotoRecord.
➤
(7) ROTATE
Use the ROTATE button to rotate a thumbnail. A thumbnail is a reduced image of the actual file.
First select the thumbnail to rotate, and then click the ROTATE button. A menu opens as shown
below:
Rotates the selected thumbnail 90 degrees anticlockwise.
Rotates the selected thumbnail 90 degrees clockwise.
Rotates the selected thumbnail 180 degrees.
Rotating a thumbnail does not affect the actual image data, although the image is automatically
rotated when it is copied to your computer.
Importing Images Using the Camera Window
79
Page 80

(8) UPLOAD
Use the UPLOAD button to copy images from your computer to the connected device. Click the
UPLOAD button to open a dialog box and select the images to copy to the device. When an image
or images are selected, the Save to Camera dialog box appears as shown below:
Specify the image size, select the resize option, and click the
Save to Camera button. This starts copying the selected
images to the connected device.
Another way of copying images to the connected device is to mouse-drag the images in the Browser
Display Area and drop them onto the thumbnail area.
Importing Images Using the Camera Window
80
Page 81

(9) IMAGE INFO
Use the IMAGE INFO button to view the date of shot, the EV compensation, and other information
concerning a photo.
First select a photo image, and click the IMAGE INFO button. The Camera Properties for Image
window opens as shown below:
Note
You can use this function only when the connected digital camera is a Canon
➤
product.
Importing Images Using the Camera Window
81
Page 82

(10) SLIDE/DPOF button
Click the SLIDE/DPOF button to display the Edit Slide/DPOF window.
You can use this dialog box to edit the camera's slide shows or its DPOF print settings, and write
them onto the camera’s memory.
Note
You can use this function only when the connected digital camera is a Canon
➤
product.
Importing Images Using the Camera Window
82
Page 83

(11) HELP
Click the HELP button to display the About Camera Window or the Help for the Camera Window.
About Camera Window
shows product information of
the Camera Window
that
Importing Images Using the Camera Window
83
Page 84

Importing Images from a TWAIN Device
TWAIN is a standardized protocol for transferring image data between a digital camera, scanner or
other digital image device and a computer.
This section describes how to import images from a TWAIN-compliant device to your computer.
Steps
Note
Ensure that the digital camera or scanner is connected properly.
•
➤
Ensure that the TWAIN driver is already installed in your computer.
•
Start ZoomBrowser EX.
1
Refer to Starting ZoomBrowser EX for the procedure to start ZoomBrowser EX.
Click the IMPORT IMAGES button to open a pop-up submenu. Select Select
2
Source from the menu.
The Select Source dialog box appears.
Open the list box under Select a data source, select the connected TWAIN device,
3
and then click the OK button.
The ZoomBrowser EX main window opens.
Importing Images from a TWAIN Device
84
Page 85

From the Tree View, select the folder where you want to save the imported image files.
4
Ensure that the contents of the selected folder are displayed in the Browser Display
Area.
Click the IMPORT IMAGES button, and then select the connected TWAIN device
5
from the IMPORT IMAGES pop-up submenu.
The TWAIN device selected in Step 4 is
added as an image source option to the
IMPORT IMAGES pop-up submenu.
The TWAIN driver window for the selected TWAIN device opens.
Follow the instructions in the TWAIN driver window to import images from the
6
device.
Close the TWAIN driver window to return to the ZoomBrowser EX.
7
The imported images are saved in the folder currently displayed in the Browser
Display Area.
Note
If you use the procedure herein to import images from a Canon digital camera that
➤
supports ZoomBrowser EX, image file information such as the date of shooting and
situation of shot is not saved in the ZoomBrowser EX’s database. Use the
procedure in Importing Images Using the Camera Window if you want to import
images with such information.
Importing Images from a TWAIN Device
85
Page 86

Importing Images by Drag-and-Drop Operation
You can import images from a variety of storage media by simply drag-and-dropping the file icons
onto the Browser Display Area. The files are registered in the library or folder currently displayed in
the ZoomBrowser EX window. Use this easy method of registering image files from your hard disks,
CDs, and MOs, without invoking the Register Image Folder function.
Drop onto the Tree View Drop onto the Browser Display
Area
You can also drag-and-drop the icons onto the target library/folder displayed in the Tree View. Then
the files will be registered in the ZoomBrowser EX database.
Note that when the files are stored in your hard disk (drive C), the drag-and-drop operation moves
the actual files into the database. If you want to register them by copying, not moving the actual
data, drag-and-drop the icons while pressing the Ctrl key.
Note
To know what file types are supported by the database, refer to Starting
➤
ZoomBrowser EX.
Importing Images by Drag-and-Drop Operation
86
Page 87

■
Importing Images by Using the Windows Explorer
The libraries and folders registered in ZoomBrowser EX exist in your computer disks as actual
folders. It means that you can register new images by using the Windows Explorer. Register new
image files and folders in ZoomBrowser EX by copying them to the folders that are already
registered.
Note
For more information on libraries and registered folders of ZoomBrowser EX, refer
➤
to the Image Database.
Activate the Windows Explorer. Select the desired item and copy/move it to a
1
medium or a folder that is already registered as a library or folder of ZoomBrowser
EX.
You can also copy/move two or more files and folders in a single step.
From the Tree View of ZoomBrowser EX, select the library or folder which contains
2
the newly added image data.
Right-click with the mouse to open the pop-up menu, and select Refresh Folder.
3
This refreshes the content information (database) of the selected library or folder,
by registering the new image data added through the Windows Explorer.
Importing Images by Drag-and-Drop Operation
87
Page 88

Printing from PhotoRecord
This chapter describes how to print your photos using a variety of photo-printing features of the
PhotoRecord utility. When using ZoomBrowser EX, select the photos (or folder) you want to print
from either the Browser Display Area or the Camera Window, and then click the PRINT button and
select Layout from the submenu. The PhotoRecord utility will automatically start to provide the
following functions:
• Printing a Photo Index (Index Printing)
• Custom Layout Printing (Artwork/Layout Album)
• Printing in a Specified Photo Size (Fixed Photo Size Printing)
• Printing in the Borderless Printing Mode (Tiled Photo)
• Printing on Canon Perforated Paper
• About Canon Perforated Paper
• Starting Printing
88
Page 89

Printing a Photo Index (Index Printing)
One way to print a photo index is to activate PhotoRecord, select the Layout mode to set the photo
size, background, and other properties, and then output the print data. The other and easier way is
to use the PRINT button in the ZoomBrowser EX window. One click on the button starts printing
directly from ZoomBrowser EX.
ZoomBrowser EX prints all the selected photos in an
automated layout.
If you also want to print the file names and/or dates of the
photos, open the Preferences dialog box and specify the
captions.
Printing a Photo Index (Index Printing)
89
Page 90

An Easy Way to Print an Index
You can print a photo index directly from ZoomBrowser EX, just by clicking the PRINT button.
Steps
Select the photos or folders of which you want to make an index from the Browser
1
Display Area of ZoomBrowser EX, and then click the PRINT button to open the
pop-up submenu.
Note
If you want to select two or more photos, click the photo images while pressing the
➤
Ctrl key.
Printing a Photo Index (Index Printing)
90
Page 91

Select Index from the PRINT button pop-up submenu.
2
The Index Print Settings dialog box appears.
The number of pages varies depending on
the number of photos, paper settings, and
the thumbnail size.
Printing a Photo Index (Index Printing)
91
Page 92

Specify the Thumbnail size, Media Type, Paper Size, Orientation, and Print
3
quality options.
You can select a thumbnail size from Small, Medium, and Large.
If you want to add a background image, click the Set Page Art button to open the
Change Page Artwork dialog box. Specify an image to go with your pages.
(Large)
Click the OK button.
4
The printer starts printing.
(Medium)
Printing a Photo Index (Index Printing)
(Small)
92
Page 93

Previewing the Layout before Printing an Index
You can preview the page layout on the screen before printing a photo Index.
Steps
Select the photos of which you want to make an index from the Browser Display
1
Area of ZoomBrowser EX. Click the PRINT button and select Layout from the
PRINT button pop-up submenu.
PhotoRecord starts and the PhotoRecord Print Modes dialog box opens, ready to
start the Print Modes wizard.
Select the desired printer. Select Artwork/Layout album from the Print Mode
2
options.
Printing a Photo Index (Index Printing)
93
Page 94

Click the Next button to proceed to the next step.
3
Specify Media Type, Paper Size, and Orientation.
4
The Preview area shows the print image in relation to the current settings.
Clicking the Set Page Margins button allows you to widen or narrow the area for
printing the image data.
Click the Next button to proceed to the next step.
5
Printing a Photo Index (Index Printing)
94
Page 95

Select Index layout.
6
Select the thumbnail size from the Photo size drop-down list.
7
You can select from Small, Medium, and Large.
Click the Finish button.
8
The PhotoRecord window opens. It automatically positions the selected photos to
fit the current paper settings.
Printing a Photo Index (Index Printing)
95
Page 96

The Album Control Panel in the
contains the controls shown below. These controls
enable you to access various artwork options.
PhotoRecord
window
Artwork Options
In the Artwork/Layout album mode, you can clip or resize your photos, arrange
them in a desired layout, add text, and add photo frames and background.
Starting Printing
Click the PRINT button to start printing.
Printing a Photo Index (Index Printing)
96
Page 97

Custom Layout Printing (Artwork/Layout Album)
The Artwork/Layout album option allows you to arrange your photos in a desired layout and apply
a variety of artwork including clipping, resizing, rotation, text insertion, and ornamentation with photo
frames and background. See Artwork for details on the artwork features.
You can add a page
title.
See Inserting a Page Title.
You can add photo
frames and background
to make an ornamented
album.
See Page Art.
You can clip or trim a
photo.
See Clipping a Photo.
You can add photo
captions.
See Adding and
Positioning Text.
You can move, resize, or
rotate the photos for
graphic effects.
See Changing Layout.
Custom Layout Printing (Artwork/Layout Album)
97
Page 98

Setting the Print Mode
Specify the size and position of each photo and arrange the photos in a desired layout.
Steps
Select a photo or photos to print from the Browser Display Area, click the PRINT
1
button, and select Layout from the PRINT button pop-up submenu.
PhotoRecord starts and the PhotoRecord Print Modes window opens, ready to
start the Print Modes wizard.
The options in this window vary depending on the printer type.
Select the desired printer from the Printer list and select Artwork/Layout album
2
from the Print Mode options.
Custom Layout Printing (Artwork/Layout Album)
98
Page 99

Click the Next button to proceed to the next step.
3
Specify Media Type, Paper Size, and Orientation.
4
The Preview area shows the print image in relation to the current settings.
Clicking the Set Page Margins button allows you to widen or narrow the area for
printing the album page.
You can enable the Borderless Printing function by selecting the Use Canon
Borderless Printing check box.
Note
The Use Canon Borderless Printing check box is available only when you are
➤
using a printer that supports the feature of borderless printing.
Custom Layout Printing (Artwork/Layout Album)
99
Page 100

Click the Next button to proceed to the next step.
5
Specify how the photos should be arranged on the album page.
6
Select Automatic layout to have the photos automatically arranged by
PhotoRecord.
Select Index layout to use the Index Printing feature.
Select Manual layout to position the photos temporarily so that you may freely
rearrange them.
Custom Layout Printing (Artwork/Layout Album)
100
 Loading...