

Page 1
ENGLISHFRANÇAISČESKYEESTILATVIEŠU
LIETUVIŠKAI
Quick Start Guide
Guide de démarrage rapide
Stručná příručka
Kiirstardi juhend
Darba uzsākšanas rokasgrāmata
Greito parengimo instrukcija
Beüzemelési útmutató
Szybkie wprowadzenie
Краткое руководство по началу работы
Kratka navodila za postavitev in uporabo
Stručná príručka
Hızlı Kurulum Kılavuzu
Коротка інструкція з користування
E14
QT5-0689-V02
MAGYARPOLSKIРУССКИЙ
SLOVENŠČINA
SLOVENSKY
TÜRKÇE
УКРАЇНСЬКА
Page 2

This product uses the following copyrighted software:
exit.c
environ.c
Copyright © 1990 The Regents of the University of California.
All rights reserved.
Redistribution and use in source and binary forms are permitted provided that
the above copyright notice and this paragraph are duplicated in all such forms
and that any documentation, advertising materials, and other materials related
to such distribution and use acknowledge that the software was developed by
the University of California, Berkeley. The name of the University may not be
used to endorse or promote products derived from this software without
specific prior written permission.
THIS SOFTWARE IS PROVIDED ''AS IS'' AND WITHOUT ANY EXPRESS OR
IMPLIED WARRANTIES, INCLUDING, WITHOUT LIMITATION, THE IMPLIED
WARRANTIES OF MERCHANTABILITY AND FITNESS FOR A PARTICULAR
PURPOSE.
Copyright © 1995, 1996 Cygnus Support.
All rights reserved.
Redistribution and use in source and binary forms are permitted provided that
the above copyright notice and this paragraph are duplicated in all such forms
and that any documentation, advertising materials, and other materials related
to such distribution and use acknowledge that the software was developed at
Cygnus Support, Inc. Cygnus Support, Inc. may not be used to endorse or
promote products derived from this software without specific prior written
permission.
THIS SOFTWARE IS PROVIDED ''AS IS'' AND WITHOUT ANY EXPRESS OR
IMPLIED WARRANTIES, INCLUDING, WITHOUT LIMITATION, THE IMPLIED
WARRANTIES OF MERCHANTABILITY AND FITNESS FOR A PARTICULAR
PURPOSE.
impure.c
string.h
_ansi.h
Copyright © 1994, 1997 Cygnus Solutions.
All rights reserved.
Redistribution and use in source and binary forms are permitted provided that
the above copyright notice and this paragraph are duplicated in all such forms
and that any documentation, advertising materials, and other materials related
to such distribution and use acknowledge that the software was developed at
Cygnus Solutions. Cygnus Solutions may not be used to endorse or promote
products derived from this software without specific prior written permission.
THIS SOFTWARE IS PROVIDED ''AS IS'' AND WITHOUT ANY EXPRESS OR
IMPLIED WARRANTIES, INCLUDING, WITHOUT LIMITATION, THE IMPLIED
WARRANTIES OF MERCHANTABILITY AND FITNESS FOR A PARTICULAR
PURPOSE.
Page 3

Quick Start Guide
Table of Contents
How to Use the Documentation Provided 2
Reading the On-screen Manuals 3
Preparing the Machine 4
Installing the MP Drivers 6
Introduction 7
Selecting the Language for the LCD 8
Loading Printing Paper 9
Basic Operation for the Operation Panel 11
Printing from Your Computer 13
Scanning Images 15
Copying 16
Printing from a Memory Card 17
Photo Printing from Photo 21
Printing Photographs Directly from a Compliant Device 23
Replacing an Ink Tank 30
ENGLISH
Page 4

Exif Print
ENGLISH
This machine supports ExifPrint.
Exif Print is a standard for enhancing the communication between digital cameras and
printers. By connecting to an Exif Print-compliant digital camera, the camera’s image data at
the time of shooting is used and optimized, yielding extremely high quality prints.
Canadian Radio Interference Regulations
This digital apparatus does not exceed the Class B limits for radio noise emissions from a
digital apparatus as set out in the interference-causing equipment standard entitled “Digital
Apparatus,” ICES-003 of the Industry Canada.
Cet appareil numérique respecte les limites de bruits radioélectriques applicables aux
appareils numériques de Classe B prescrites dans la norme sur le matériel brouilleur NMB003 d'Industrie Canada intitulée « Appareils numériques ».
International ENERGY STAR® Program
As an ENERGY STAR® Partner, Canon Inc. has determined that this product meets the
ENERGY STAR guidelines for efficiency.
The International ENERGY STAR
®
Office Equipment Program is a global
program that promotes energy saving through the use of computer and
other office equipment. The program backs the development and
dissemination of products with functions that effectively reduce energy
consumption. It is an open system in which business can participate
voluntarily. The targeted products are office equipment such as computers,
monitors, printers, faxes and copiers.
Their standards and logos are uniform among participating nations.
Power Requirements
Never use a power supply voltage other than that supplied in the country of purchase. Using
the incorrect voltage could cause a fire or electric shock. The correct power supply voltages
and frequencies are as follows:
AC 100-240 V, 50/60 Hz
About Consumables
Consumables (ink tanks / FINE Cartridges) are available for 5 years after production has
stopped.
.
Also read the Safety Precautions in the User’s Guide on-screen manual. Observe the warnings and
cautions to avoid personal injury or damage to the machine.
Model Number: K10287 (MP600)
Page 5
Safety Precautions
Warning
z This product emits low level magnetic flux. If you use a cardiac pacemaker and feel abnormalities,
please move away from this product and consult your doctor.
z Never attempt to plug the power cord into the power outlet or unplug the power cord when your hands
are wet.
z Never damage, modify, stretch, or excessively bend or twist the power cord. Do not place heavy objects
on the power cord.
z Never use any power supply other than the standard power supply available in the country of purchase.
Using the incorrect voltage and frequency could cause a fire or electric shock.
z Always push the plug all the way into the power outlet.
Caution
z For safety reasons, store ink tanks out of the reach of small children.
z Do not drop or shake ink tanks as this may cause the ink to leak out and stain your clothes and hands.
European Union (and EEA) only.
This symbol indicates that this product is not to be disposed of with your
household waste, according to the WEEE Directive (2002/96/EC) and your
national law. This product should be handed over to a designated collection
point, e.g., on an authorized one-for-one basis when you buy a new similar
product or to an authorized collection site for recycling waste electrical and
electronic equipment (EEE). Improper handling of this type of waste could
have a possible negative impact on the environment and human health due to
potentially hazardous substances that are generally associated with EEE. At
the same time, your cooperation in the correct disposal of this product will
contribute to the effective usage of natural resources. For more information
about where you can drop off your waste equipment for recycling, please
contact your local city office, waste authority, approved WEEE scheme or your
household waste disposal service.
For more information regarding return and recycling of WEEE products,
please visit www.canon-europe.com/environment
(EEA: Norway, Iceland and Liechtenstein)
.
ENGLISH
For Customers in Europe, Middle-East, Africa and
Russia only
For Canon Customer Support contacts, please see the back cover of the European Warranty
Systems (EWS) Booklet or visit www.canon-europe.com.
Canon Europa N.V., Bovenkerkerweg 59-61, 1185 XB Amstelveen, The Netherlands
Bluetooth ID: B02954
1
Page 6
ENGLISH
How to Use the Documentation Provided
Easy Setup Instructions (Printed documentation)
Be sure to read this sheet first.
This sheet includes instructions for setting up your machine and getting it ready
for use.
Quick Start Guide (This guide)
Read this guide when starting to use the machine.
After following instructions in the Easy Setup Instructions, we recommend you
read this guide to familiarize yourself with the basic operation of some of the
main functions that can be performed on your machine.
On-screen Manuals
User’s Guide
Read this guide when starting to use the machine.
If the Quick Start Guide does not provide you enough information please refer to
the User’s Guide which can be installed from the Setup CD-ROM. This guide
provides detailed instructions for:
z printing from your computer
z direct photo printing from selected digital cameras
z copying
z scanning
Additional guides are also available for advanced features.
Scanning Guide
Refer to this guide for full instructions on scanning operation and settings.
Printer Driver Guide
Refer to this guide for full instructions on printer driver setting.
Photo Application Guide
Refer to this guide for instructions on using the various application software
included on the Setup CD-ROM.
Bluetooth User’s Guide
Refer to this guide for full instructions of printing from computers and devices
that support Bluetooth communication, and on troubleshooting them.
2 How to Use the Documentation Provided
Page 7

Reading the On-screen Manuals
Along with this Quick Start Guide, on-screen manuals are also supplied with your machine. For
detailed instructions on installing the on-screen manuals, refer to your setup sheet.
Important
For users in countries outside the USA, Canada and South America:
For information on how to print on DVD/CDs, refer to the DVD CD Print Guide on-screen manual.
You can view the on-screen manuals in the following way:
To view the on-screen manual, double-click the MP600 On-screen Manual shortcut icon on the
desktop, or click Start > All Programs (or Programs) > Canon MP600 Manual > MP600 On-
screen Manual.
System Requirements
Browser: Windows
Note
z Microsoft Internet Explorer® 5.0 or later must be installed.
z The on-screen manual may not be displayed properly depending on your operating system or
Internet Explorer version. We recommend that you keep your system up to date with Windows
Update.
To view the on-screen manual, double-click the MP600 On-screen Manual alias on the desktop.
Note
Users in Asia
If you installed the User’s Guide from the Manual folder in the Setup CD-ROM, open the folder in which
you copied the User’s Guide and double-click top.htm.
®
HTML Help Viewer
ENGLISH
System Requirements
Browser: Help Viewer
Note
z The on-screen manual may not be displayed properly depending on your operating system. We
recommend that you keep your system up to date.
z We recommend using Safari as your Web browser to view the HTML format on-screen
manuals. If Safari is not installed on your computer, download it from Apple Computer, Inc.
website and install it.
3Reading the On-screen Manuals
Page 8
ENGLISH
Preparing the Machine
Be sure to read your setup sheet first for setting up your machine and getting it ready for use.
Unpack the machine
Please confirm the included items against the illustration printed on the lid of the packing box.
Important
z Do not connect the USB cable until after the software is installed.
z A USB cable is necessary to connect the machine with your computer.
1 Turn on the machine.
Caution
Be sure to remove the tapes before you turn on the machine.
Note
z The tape position is subject to change.
z If an unintended language is displayed on the LCD, press the Back button to return to the
Language selection screen.
2 Install the Print Head.
Caution
Do not touch internal parts other than the Print Head Lock Lever.
Important
If the Scanning Unit (Printer Cover) is open for more than 10 minutes, the Print Head Holder
moves to the right side. In this case, close the Scanning Unit (Printer Cover), and open it again.
Note
z There might be some transparent or light blue ink on the inside of the bag the print head comes
in, or the inside of the protective cap - this has no effect on print quality. Be careful not to get ink
on yourself when handling these items.
z Do not reattach the protective cap once it has been removed.
3 Install the ink tanks.
Important
z Make sure that all the ink tanks are installed in the correct position, matching the label. The
machine cannot be used unless all the ink tanks are installed.
z Wait for about 2 minutes, until the machine has stopped making operating noises, before
proceeding.
Note
z Be sure to remove the clear film from the ink tank in the exact order as shown in step 3 of your
setup sheet.
z Do not squeeze the side of ink tanks as this may cause the ink to leak out and stain your clothes
and hands.
z Do not reattach the protective cap once you have removed it.
z An error message will be displayed on the LCD if an ink tank is not installed properly. Open the
Scanning Unit (Printer Cover) and make sure that position of all the ink tanks match the label.
4 Preparing the Machine
Page 9

4 Load printing paper.
In the following process, you will be required to perform the Print Head Alignment, and you
will need a sheet of A4 or Letter-sized plain paper loaded in the Auto Sheet Feeder.
Important
z When loading paper in the Auto Sheet Feeder, make sure that the Auto Sheet Feeder lamp is
lit.
z Always load paper in portrait orientation. Loading paper in landscape orientation can cause the
paper to be jammed.
Notes on the Print Head Alignment
z Print Head Alignment will take about 6 minutes to complete. Do not open the Scanning Unit
(Printer Cover) while printing.
z If the pattern is not printed successfully, refer to “Error Message Is Displayed on the LCD” in the
User’s Guide on-screen manual.
Important
Printing on DVD/CDs is not available for the machines sold in USA, Canada, all countries in South
America, and some other countries and regions.
ENGLISH
5Preparing the Machine
Page 10
ENGLISH
Installing the MP Drivers
Information Common to Windows and Macintosh
Notes on the Installation Process
z If the Select Language screen appears, select a language, then click Next.
z If the Select Your Place of Residence screen appears, select your place of residence, then
click Next.
z There are two ways of installing the MP Drivers and other software:
Easy Install: the items included on the Setup CD-ROM are installed automatically
Custom Install: you can select particular items to install
z When the User Registration screen appears, if you click Register and your computer is
connected to the Internet, the on-screen instructions to register your product will appear.
z Registration can also be performed from the icon on the desktop after installation is
completed.
®
Information for Windows
Note
z When installing the MP Drivers in Windows XP or Windows 2000, log on to the system as a
member of the Administrators group.
z Before installing the drivers, disable all anti-virus
programs and automatically loading programs.
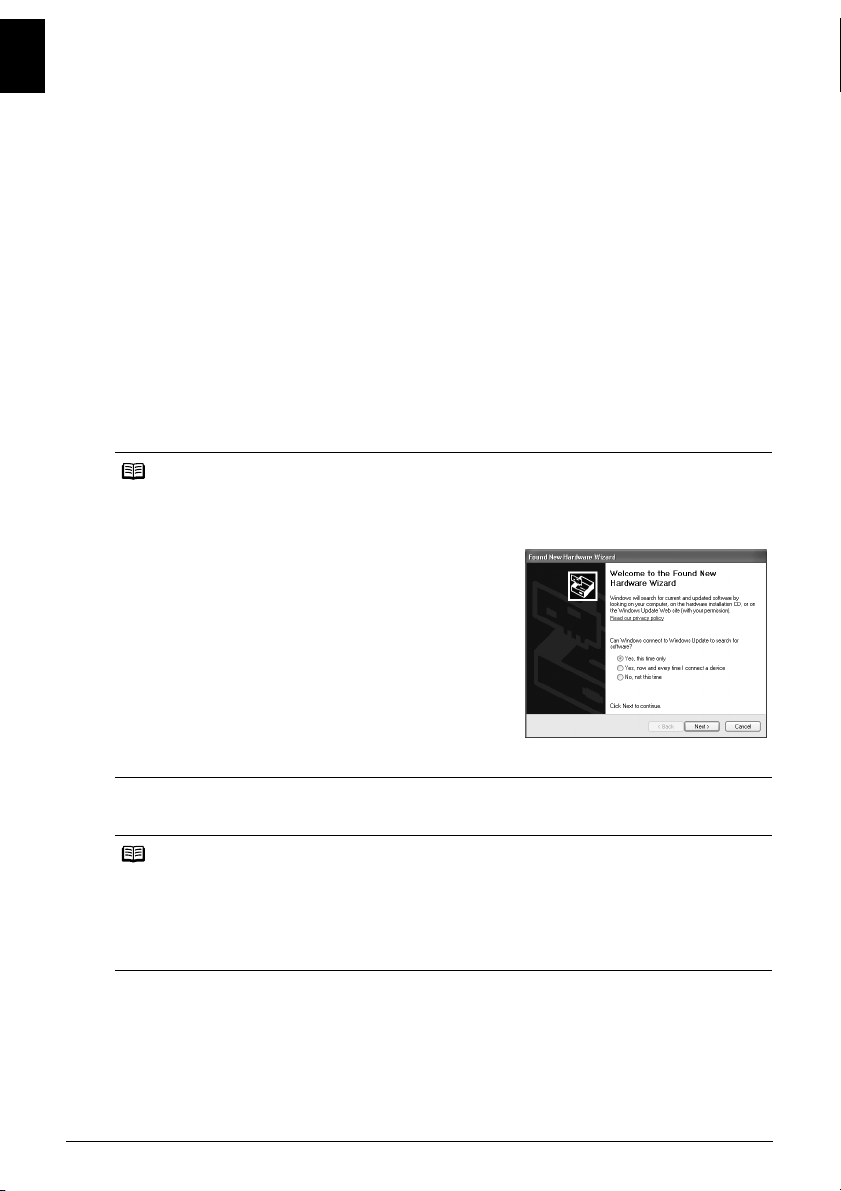
z If the following screen appears automatically, remove
the USB cable connected to your computer. Next, click
Cancel to quit the screen and turn off the machine. Then
start the installation process again. For details on the
installation process, refer to your setup sheet.
z To install Adobe® RGB (1998), click Custom Install and
follow the instruction on the screen.
z Adobe RGB (1998) cannot be installed in Windows Me
and Windows 98.
z When a message asking for your confirmation to restart
your computer appears during the installation process,
click OK. The system is restarted automatically.
z If the connection is not recognized, refer to “Cannot
Install the MP Drivers” in the User’s Guide on-screen
manual.
Information for Macintosh
Note
Before installing the MP Drivers, disable all anti-virus programs and automatically loading
programs or remove them from your system folder.
Users in Asia
To install the User’s Guide on-screen manual in a language other than the installed one, doubleclick the Manual folder in Setup CD-ROM, Canon folder, and then copy a language folder to your
hard disk.
6 Installing the MP Drivers
Page 11

Introduction
Thank you for purchasing the Canon MP600.
This Quick Start Guide uses the following symbols to indicate important information. Always observe
the instructions indicated by these symbols.
Warning
Instructions that, if ignored, could result in death or serious personal injury caused by incorrect
operation of the equipment. These must be observed for safe operation.
Caution
Instructions that, if ignored, could result in personal injury or material damage caused by incorrect
operation of the equipment. These must be observed for safe operation.
Important
Instructions that must be observed for safe operation.
Trademark Notices
z “Windows” and “Internet Explorer” are trademarks of Microsoft Corporation, registered in the
United States and other countries.
z “Macintosh” and “Mac” are trademarks of Apple Computer, Inc., registered in the U.S. and
other countries.
z “Adobe” and “Adobe RGB (1998)” are either registered trademarks or trademarks of Adobe
Systems Incorporated in the United States and/or other countries.
z “SmartMedia” is a trademark of Toshiba Corporation.
z “MEMORY STICK”, “Memory Stick PRO”, “MEMORY STICK Duo” and “Memory Stick Pro Duo”
are trademarks of Sony Corporation.
z “xD-Picture Card” is a trademark of Fuji Photo Film Co., Ltd.
z “MultiMediaCard” is a trademark of the MultiMediaCard Association.
z “SD card” and “miniSD Card” are trademarks of SD Association.
z Specifications are subject to change without notice.
Copyright ©2006 CANON INC.
All rights reserved. No part of this publication may be transmitted or copied in any form
whatsoever without the express written permission.
ENGLISH
7Introduction
Page 12

ENGLISH
Selecting the Language for the LCD
1 Press the HOME button. Wait for about 5 seconds, select , and then press the
OK button.
2 Press the ] button to select , then press the OK button.
3 Press the } button four times, then press the OK button.
If the Bluetooth unit is connected to the machine, press the } button five times, and then
press the OK button.
4 Press the { or } button to select the language you want to be displayed, then
press the OK button.
8 Selecting the Language for the LCD
Page 13
Loading Printing Paper
Some types and sizes of paper are not loadable in the Cassette and requires the use of the Auto
Sheet Feeder. If you intend to use only the Cassette, check for any usage restrictions in advance.
Important
z If you cut plain paper to 4" x 6" / 101.6 x 152.4 mm, 5" x 7" / 127.0 x 177.8 mm, or 2.13" x 3.39" / 54.0 x
86.0 mm (credit card-size) for a trial print, it can cause paper jams.
z Always load paper in portrait orientation. Loading paper in landscape orientation can cause the paper
to be jammed.
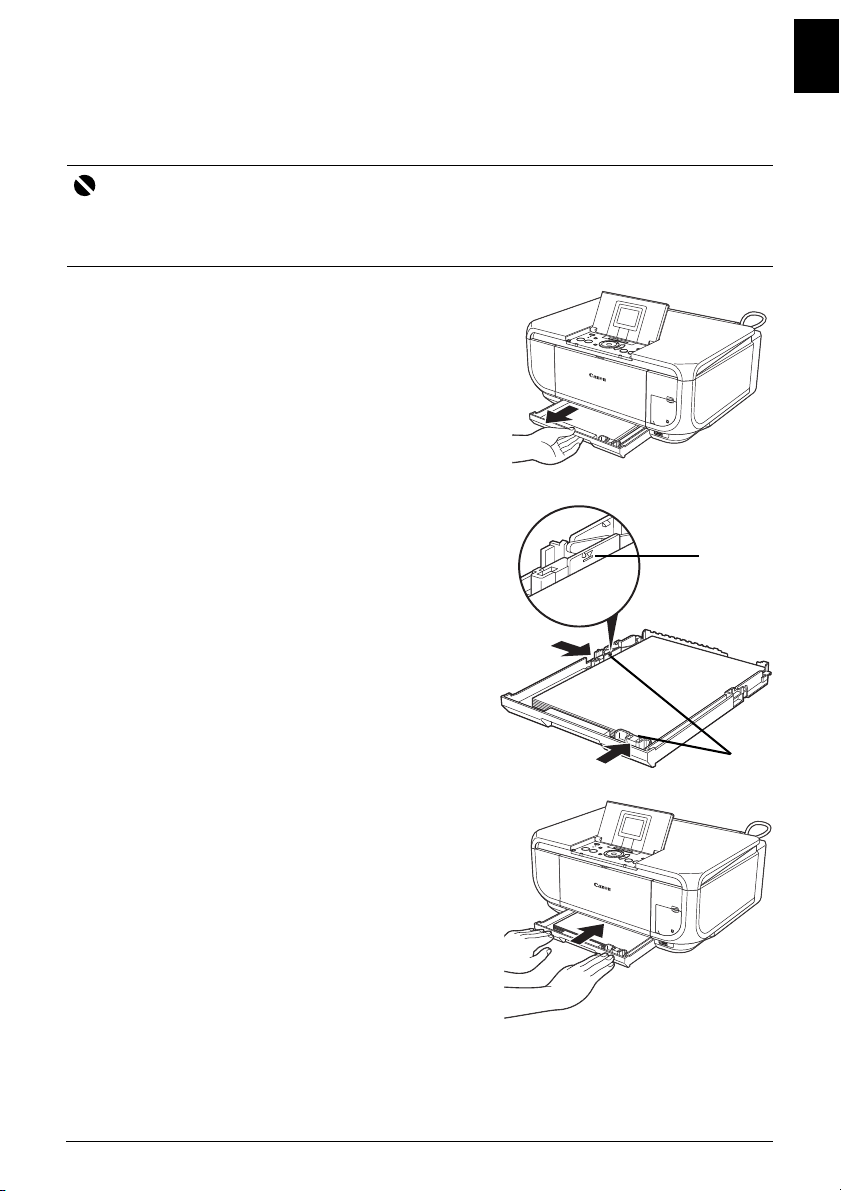
1 Pull out the Cassette from the machine.
2 Load the paper in the Cassette with the print
side facing DOWN, aligning the paper stack
against the right side of the Cassette.
Do not load higher than the Load Limit Mark (A).
3 Slide the paper guides (B) to fit to the loaded
paper stack.
(A)
ENGLISH
4 Insert the Cassette into the machine.
Push the Cassette all the way into the machine.
(B)
9Loading Printing Paper
Page 14
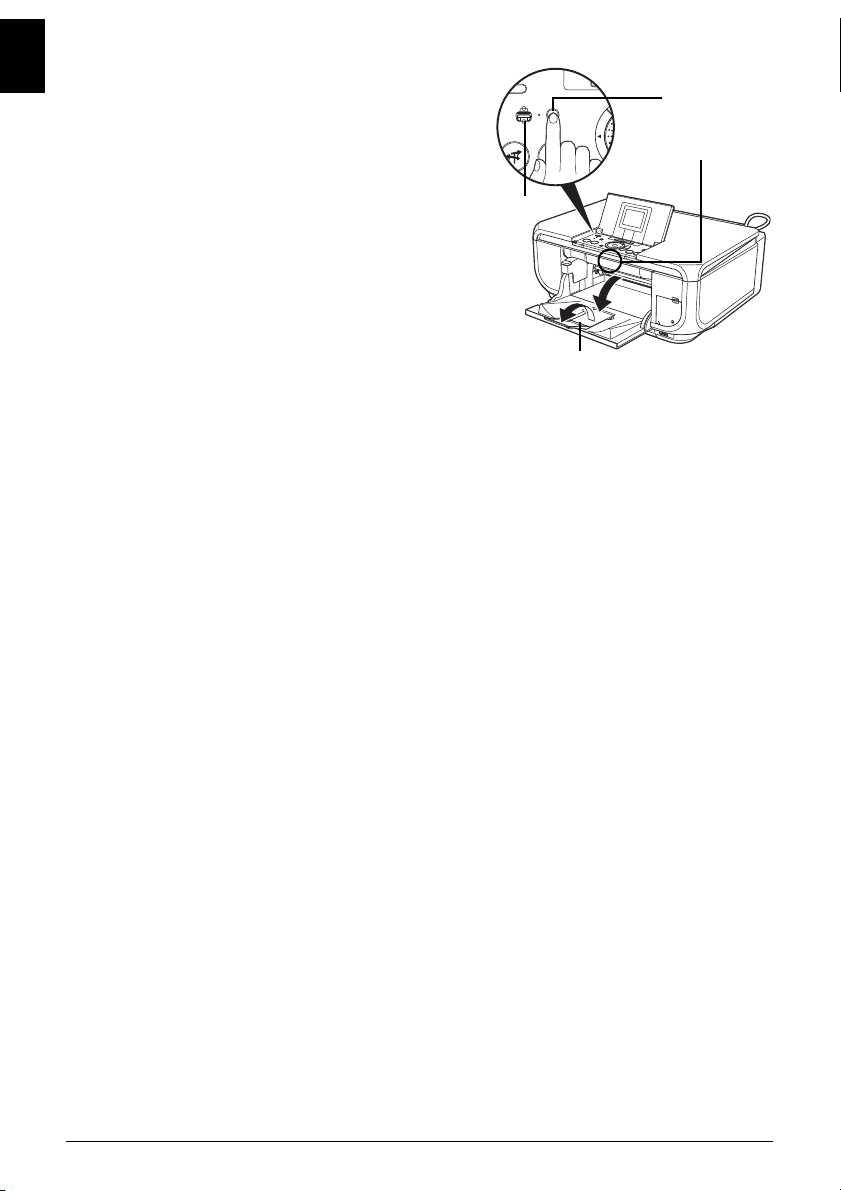
5 Put your finger in the rounded indent of the
ENGLISH
Paper Output Tray (A) and open it gently, and
open the Output Tray Extension (B).
6 Press the Paper Feed Switch (C) so that the
Cassette lamp (D) lights.
(C)
(A)
(D)
(B)
10 Loading Printing Paper
Page 15
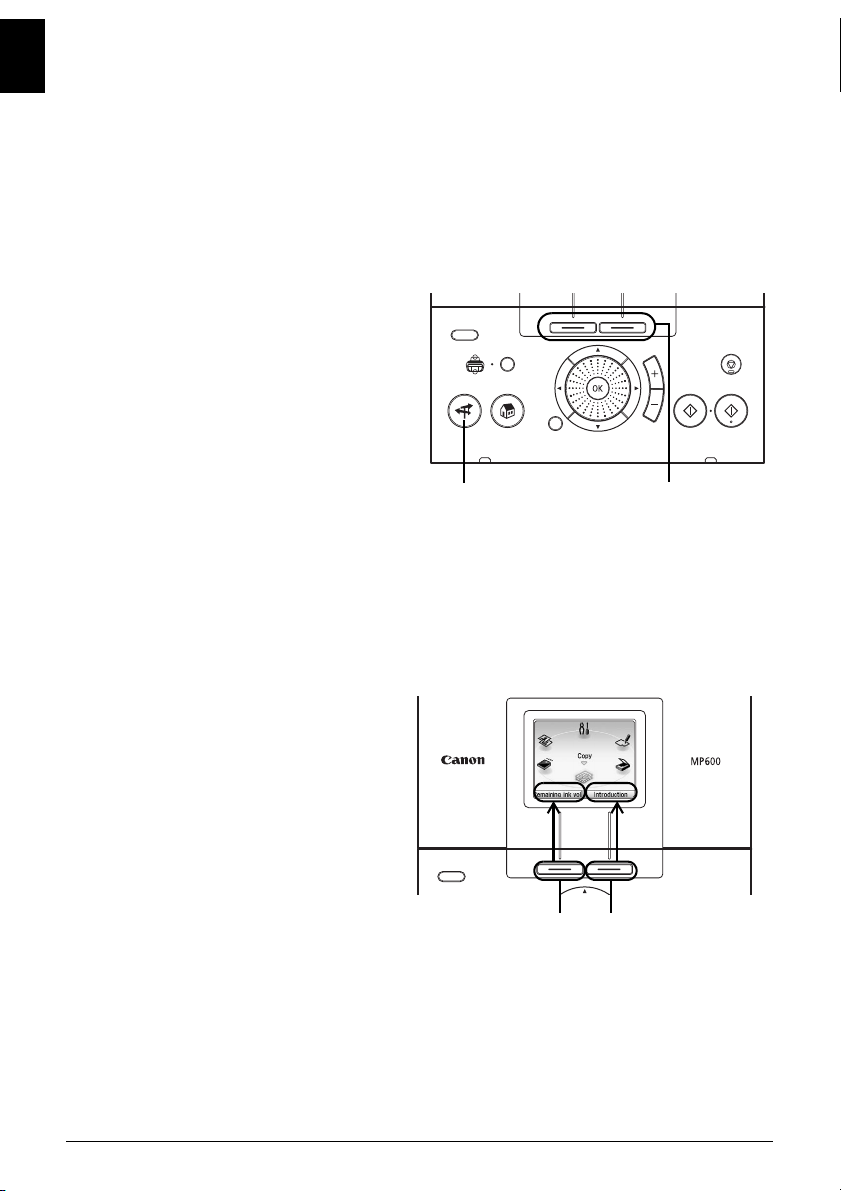
Basic Operation for the Operation Panel
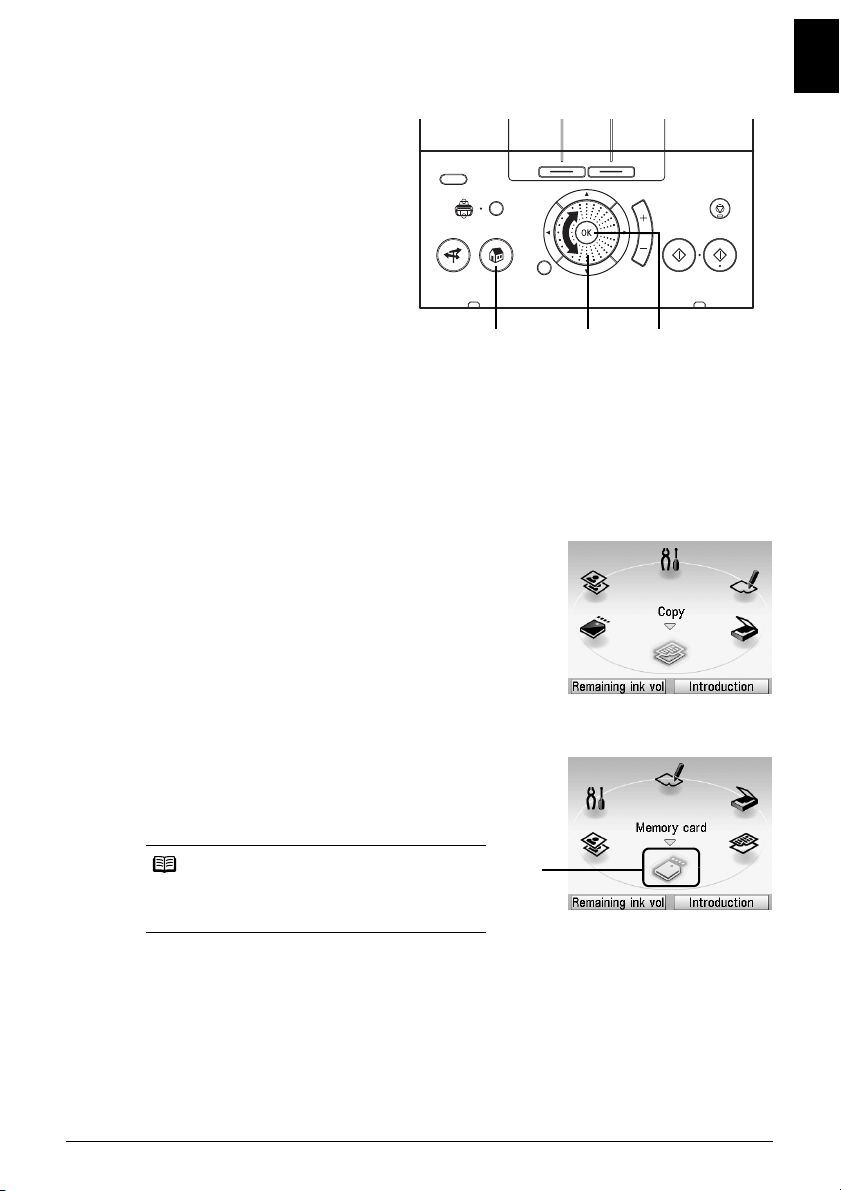
(A) HOME button
(B) Easy-Scroll Wheel
(C) OK button
(A) (B) (C)
Easy-Scroll Wheel
Turn the Easy-Scroll Wheel left or right to select the setting item. The selected item is
highlighted or surrounded by a frame. You can also use the {, }, [ or ] button to select the
setting items.
HOME button
This section describe the procedure to display each mode from the HOME screen.
1 Display the HOME screen.
(1) Press the HOME button.
The HOME screen will be displayed.
ENGLISH
2 Select the mode.
(1) Turn the Easy-Scroll Wheel to select the
mode, then press the OK button.
Example: Select Memory card.
The selected mode screen will be appeared.
Note
When you select a mode and press the Function
button (f2/Introduction), the instructions for the
selected mode are displayed.
You can select the following modes on the HOME screen:
Copy: You can copy in various layouts. See “Copying” on page 16.
Scan: You can save the scanned data to a connected computer using
Photo index sheet: You can easily print the photos from a memory card using the
the Operation Panel. See “Scanning Images” on page 15.
Photo Index Sheet. See “Printing Using the Photo Index Sheet”
on page 20.
(1)
11Basic Operation for the Operation Panel
Page 16
ENGLISH
Settings: You can perform the maintenance or change the various settings
Easy photo reprint: You can scan printed photos and then print them. See “Photo
Memory card: Print the photo data stored in a memory card of a digital camera.
Other Buttons
(A) NAVI button
(B) Function buttons
z NAVI Button
You can easily reach the function that you want to perform. Select what you want to do on the
navigation menu, then press the OK button.
z Function Buttons
Two Function buttons enable you to select menus displayed at the bottom of the LCD.
The screen that appears when you press a Function button depends on the screen that is
displayed and which Function button you press.
of the machine. For details, refer to “When Printing Becomes
Faint or Colors Are Incorrect”, “Cleaning Your Machine”, or
“Changing the Machine Settings” in the User’s Guide on-screen
manual.
Printing from Photo” on page 21.
See “Printing from a Memory Card” on page 17.
(A) (B)
(A) (B)
(A) Function button (f1): When you press the Function button (f1/Remaining ink vol) on the
(B) Function button (f2): When you press the Function button (f2/Introduction) on the
When you press them on screens other than the HOME screen, an operation procedure or
menus is displayed.
HOME screen, the remaining ink volume screen is displayed.
HOME screen, the introductions for the selected mode functions are
displayed.
12 Basic Operation for the Operation Panel
Page 17
Printing from Your Computer
This section describes procedure for basic printing.
Printing with Windows
1
Turn on the machine and load the paper in the machine.
2 Make sure that the proper paper source is selected.
3 Create a document or open a file to print using an appropriate application software.
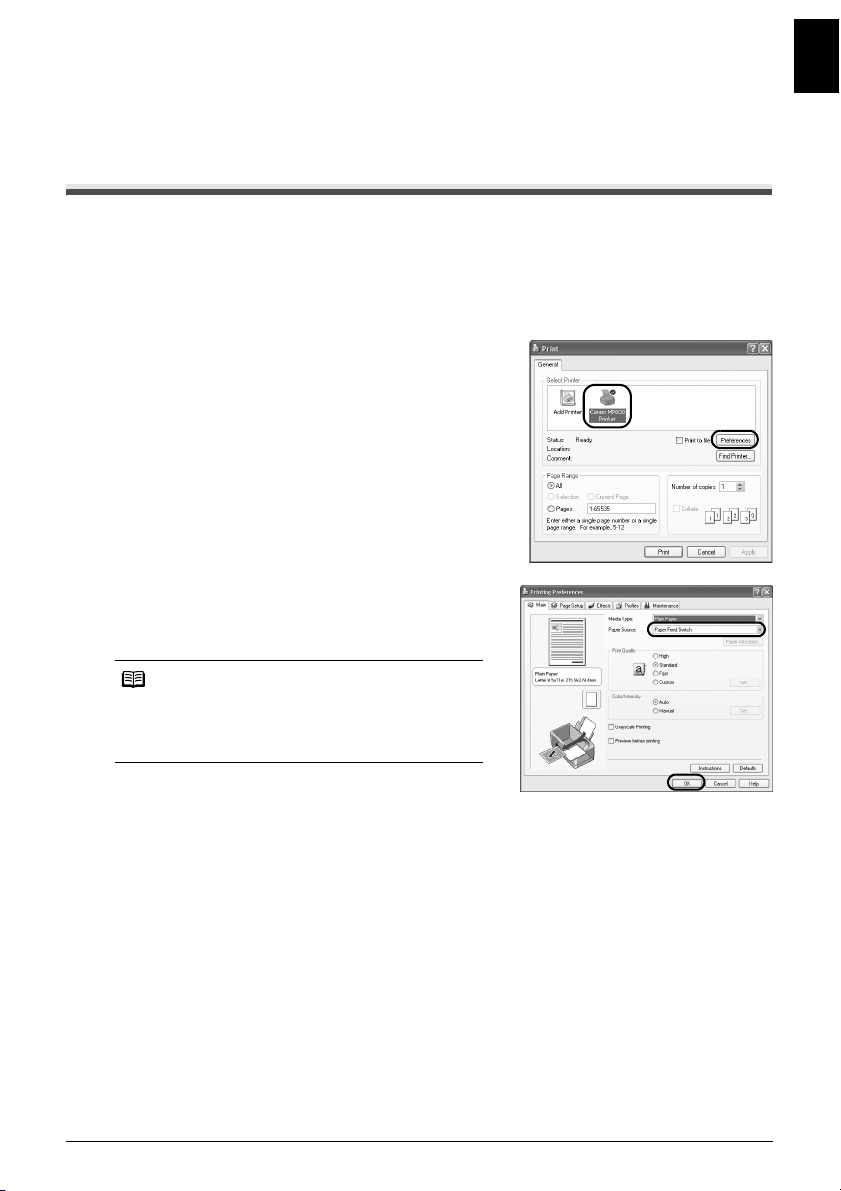
4 Select Print on the application software’s File
menu.
5 Make sure that Canon MP600 Printer is
selected, and click Preferences (or
Properties).
6 Specify the required settings and click OK.
Make sure that Paper Feed Switch is selected in
Paper Source.
ENGLISH
Note
For details on other printer driver functions, click Help
or Instructions to view the online help or the Printer
Driver Guide on-screen manual. Instructions is only
displayed when the on-screen manuals are installed.
7 Click Print (or OK).
13Printing from Your Computer
Page 18
Printing with Macintosh
ENGLISH
1
Turn on the machine and load the paper in the machine.
2 Make sure that the proper paper source is selected.
3 Create a document or open a file to print using an appropriate application software.
4 Select Page Setup on the application
software’s File menu.
5 Confirm that MP600 is selected in Format
for.
6 Select the desired paper size in Paper Size.
7 Click OK.
8 Select Print on the application software’s File
menu.
9 Select Quality & Media in the pop-up menu.
10 Specify the required settings.
Make sure that Paper Feed Switch is selected in
Paper Source.
Note
For details on other printer driver functions, click to
view the Printer Driver Guide on-screen manual. If the
on-screen manuals are not installed, the Printer Driver
Guide on-screen manual is not displayed even if is
clicked.
11 Click Print.
14 Printing from Your Computer
Page 19

Scanning Images
You can scan images from the machine to a computer without printing them and save them in
popular file formats, such as JPEG, TIFF, bitmaps, or PDF. If you are scanning printed text, you can
use the OCR (Optical Character Recognition) software to convert it to text data.
Scanning Methods
Scanning Using the MP Navigator
Using MP Navigator, you can scan originals loaded on the Platen Glass and view images saved
on your computer or on a memory card. Scanned documents can be previewed and be easily
printed and edited according to your needs.
You can use the bundled software applications to edit or print the document you have scanned.
For detailed operations of the MP Navigator, refer to the Scanning Guide on-screen manual.
Scanning Using the Operation Panel of the Machine
1 Turn on the machine.
2 Load the original document on the Platen Glass.
3 Select Scan on the HOME screen.
See “Basic Operation for the Operation Panel” on page 11.
4 Select the scan operation, then press the OK button.
5 Press the Color or Black button.
The operation to be performed after scanning the original depends on the scan operation
setting you have selected in step 4. For details on how to modify the operation settings, refer
to the Scanning Guide on-screen manual.
ENGLISH
Scanning from an Application Software
You can scan an image from a TWAIN- or WIA- (Windows XP only) compliant application
software and handle the scanned image in the application software. For detailed operations,
refer to the Scanning Guide on-screen manual.
15Scanning Images
Page 20
ENGLISH
Copying
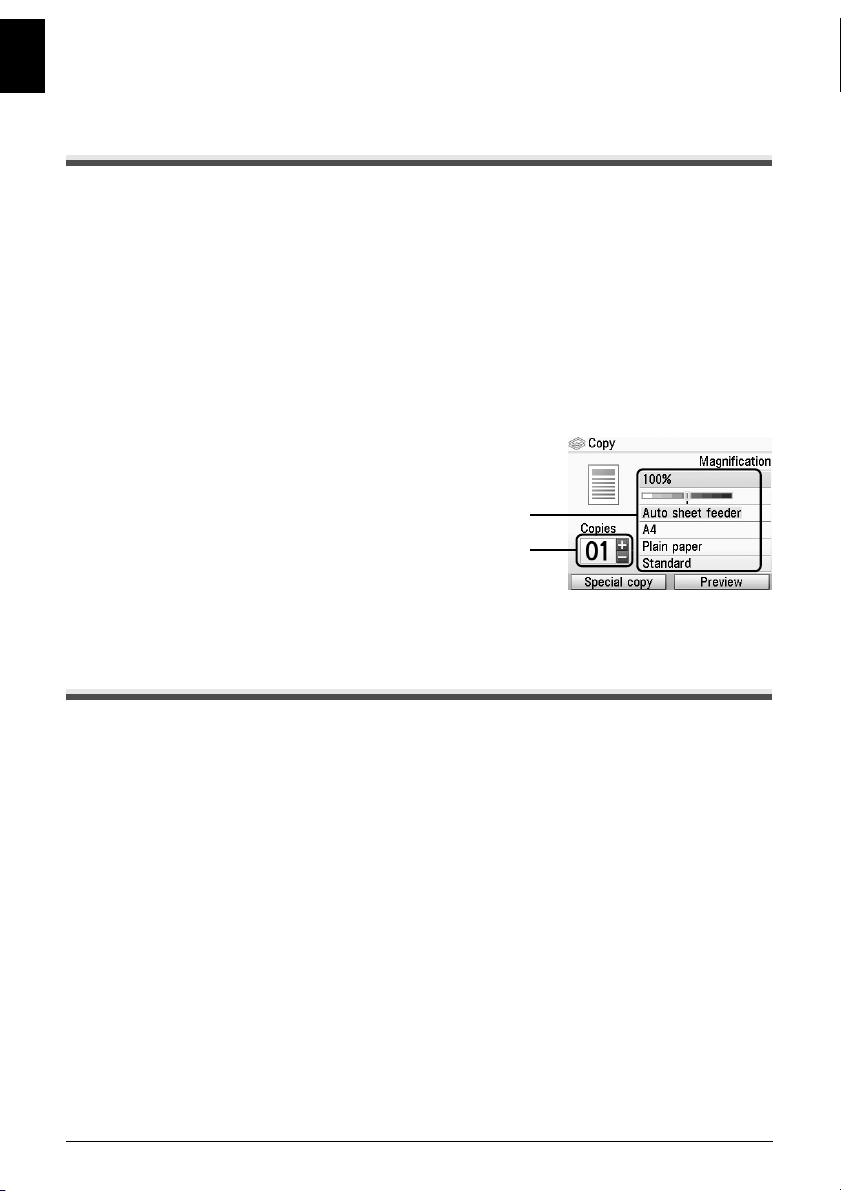
Making Copies
This section describes the basic procedure to make copies.
1 Turn on the machine.
2 Select Copy on the HOME screen.
See “Basic Operation for the Operation Panel” on page 11.
3 Load paper.
4 Make sure that the proper paper source is selected.
5 Specify copy settings.
(1) Confirm the page size, media type, or other
settings. To change the settings, select the
item and press the OK button.
(2) Use the + or - button to specify the number of
copies.
6 Load the original on the Platen Glass.
7 Press the Color button for color copying, or
the Black button for black & white copying.
(1)
(2)
Using Other Copy Functions
Reduced/Enlarged Copy
Reduces or enlarges copies.
Two-sided copy
Copies two original pages onto the sides of a single sheet of paper.
Borderless copy
Copies color images so that they fill the entire page without borders.
2-on-1 copy
Copies two original pages onto a single sheet of paper by reducing each image.
4-on-1 copy
Copies four original pages onto a single sheet of paper by reducing each image. Four different
layouts are available.
Image repeat
Copies an image multiple times onto a single page. For the number of times to repeat the image,
you can select from Auto layout or the machine’s pre-defined settings.
16 Copying
Page 21
Printing from a Memory Card
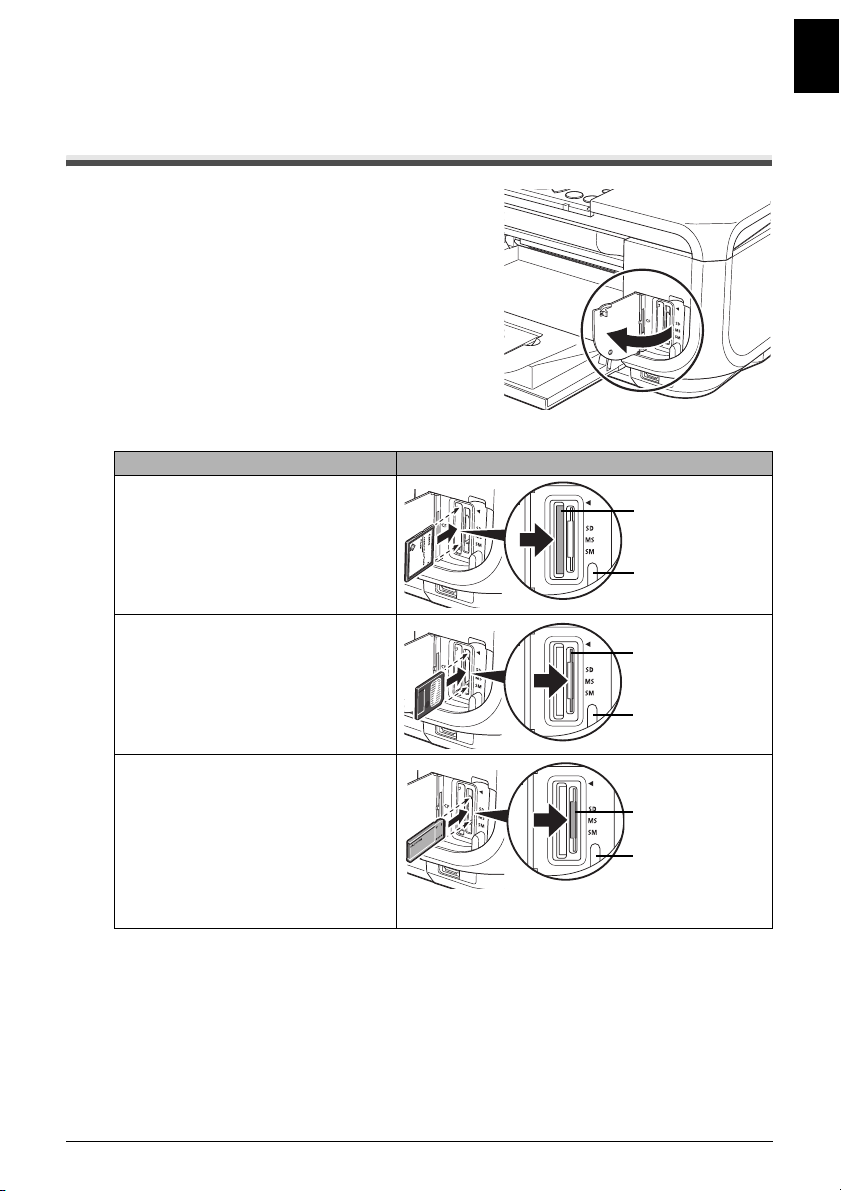
Inserting the Memory Card
1
Turn on the machine.
2 Open the Card Slot Cover.
3 Insert one and only one memory card into the Card Slot.
Card Type Inserting Card
z
Compact Flash (CF) card
z
Microdrive
z
xD-Picture card*
z
SmartMedia
ENGLISH
Insert into the left
Card Slot.
Lights up
Insert into the
right Card Slot.
Lights up
z
MEMORY STICK
z
MEMORY STICK PRO
z
MEMORY STICK Duo*
z
MEMORY STICK PRO Duo*
z
SD Secure Digital memory card
z
MiniSD Card*
z
MultiMediaCard (v.3.31)
* Be sure to attach the memory card to the special adapter before inserting it into the Card
Slot.
Insert into the
center part of the
right Card Slot.
Lights up
4 Confirm that the Access lamp has lit up.
5 Close the Card Slot Cover.
17Printing from a Memory Card
Page 22
Removing the Memory Card
ENGLISH
1
Open the Card Slot Cover.
2 Make sure that the Access lamp is not flashing, then remove the memory card.
3 Close the Card Slot Cover.
Printing Photographs Stored on a Memory Card
1
Prepare for printing.
(1) Turn on the machine.
(2) Load paper.
(3) Make sure that the proper paper source is selected.
2 Insert the memory card.
(1) Select Memory card on the HOME screen.
See “Basic Operation for the Operation Panel” on page 11.
(2) Insert the memory card into the Card Slot.
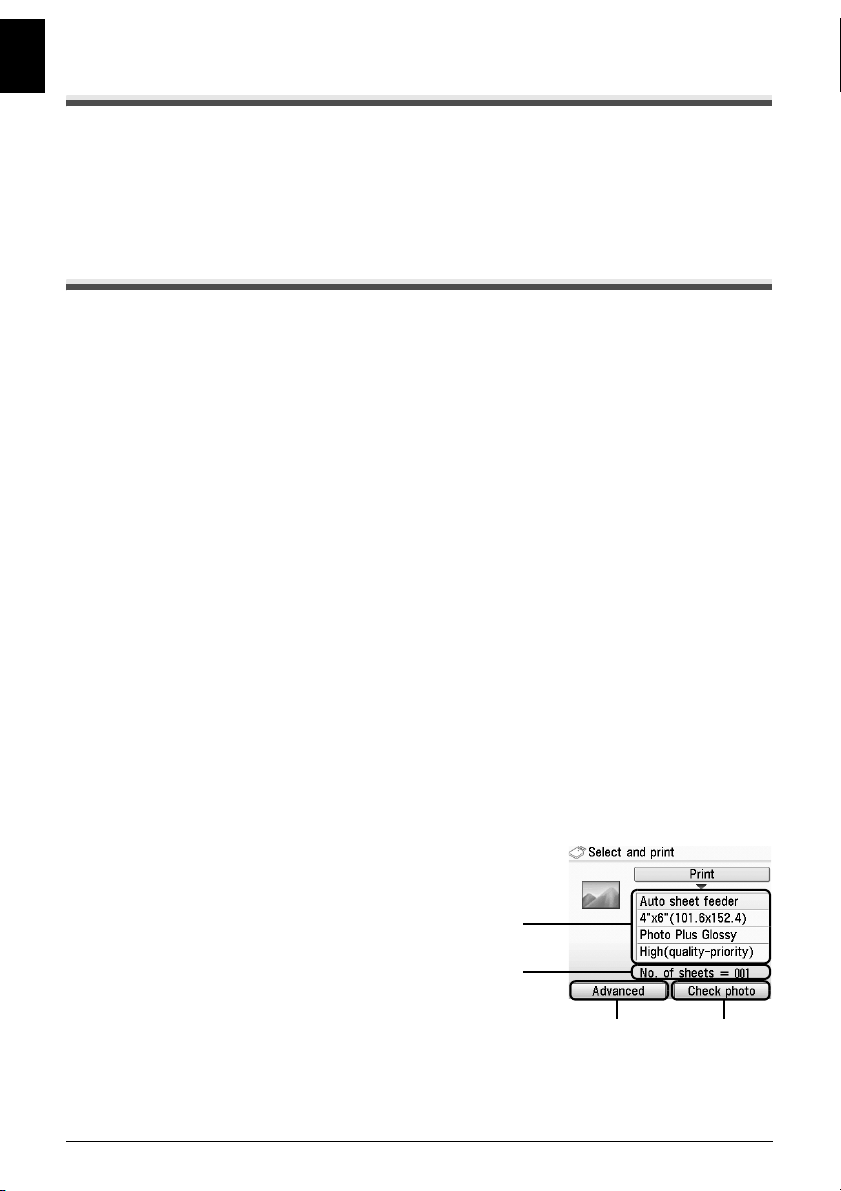
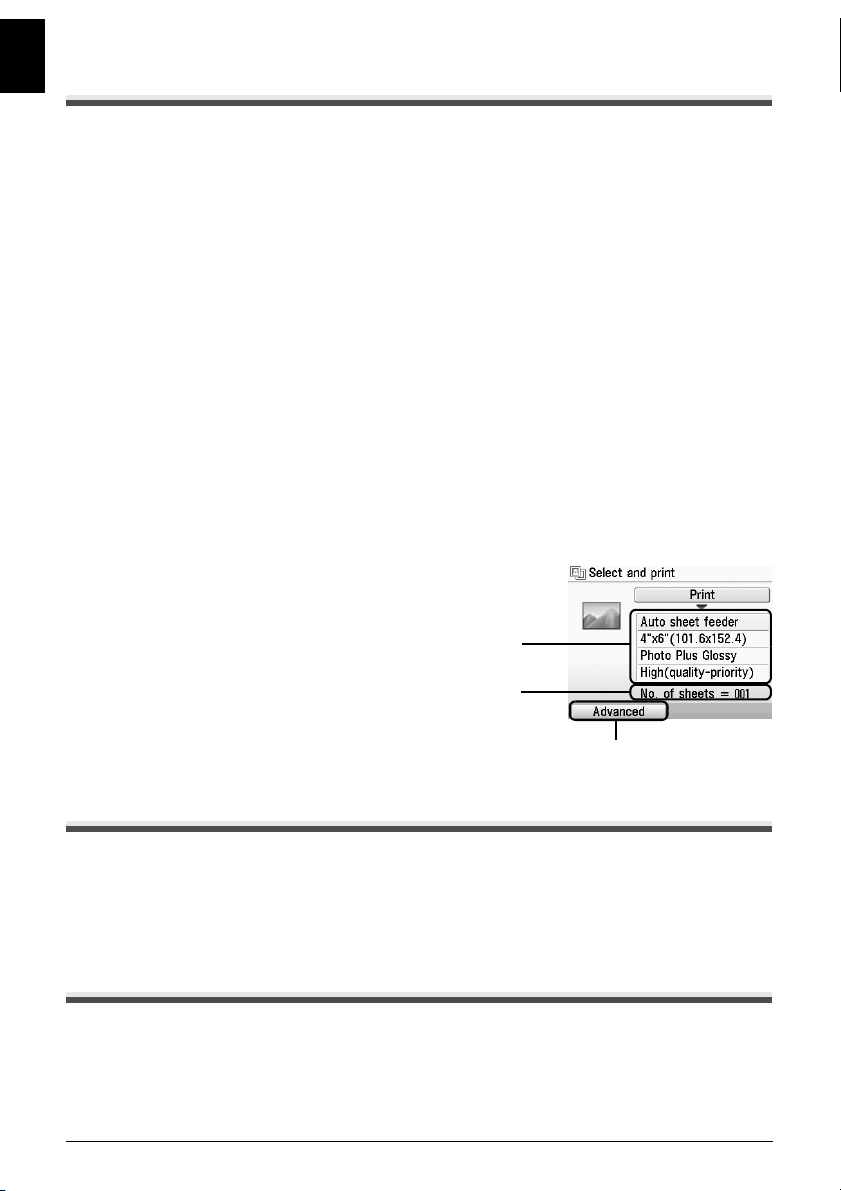
3 Select the print menu.
(1) Select Select and print, then press the OK button.
(2) Confirm the paper size, media type, and other settings, select Next, and then press the
OK button. To change the settings, select the item and press the OK button.
4 Select the photo to print and specify the number of copies for each photo.
(1) Use the Easy-Scroll Wheel or the [ or ] button to display a photo to print.
(2) Use the + or - button to specify the number of copies.
(3) Repeat steps (1) and (2) to specify the number of copies for each photo.
(4) Press the OK button.
5 Start printing.
(1) Confirm the print setting. To change the
settings, select the item and press the OK
button.
(2) Confirm the total number of copies for the
selected photos.
(3) Confirm the selected photos and number of
copies for each photo.
(4) Change the advanced print settings.
(5) Press the Color button.
The specified number of copies of each photo
will be printed.
18 Printing from a Memory Card
(1)
(2)
(4) (3)
Page 23

Using Other Printing Functions
Layout print
Prints photos your pasted in the specified layout.
Sticker print
Prints your favorite photo with a frame on Canon Photo Stickers.
DPOF print
Prints according to the Digital Print Order Format (DPOF) settings on your digital camera, if you
have specified them.
Captured info print
Prints information on photographs at the time of its shooting (Exif info) in the margin of Photo
index print or selected individual photos.
Photo index print
Prints an index of all the photos saved on a memory card.
Print all photos
Prints all photos saved on the memory card.
Using Useful Display Functions
Change display
The display method of a photograph can be changed.
Trimming
Edits images displayed on the LCD by cropping them.
Search
When there are a lot of photos saved on the memory card, displays and prints only photos shot
on the specified date or within the specified range of dates.
ENGLISH
19Printing from a Memory Card
Page 24
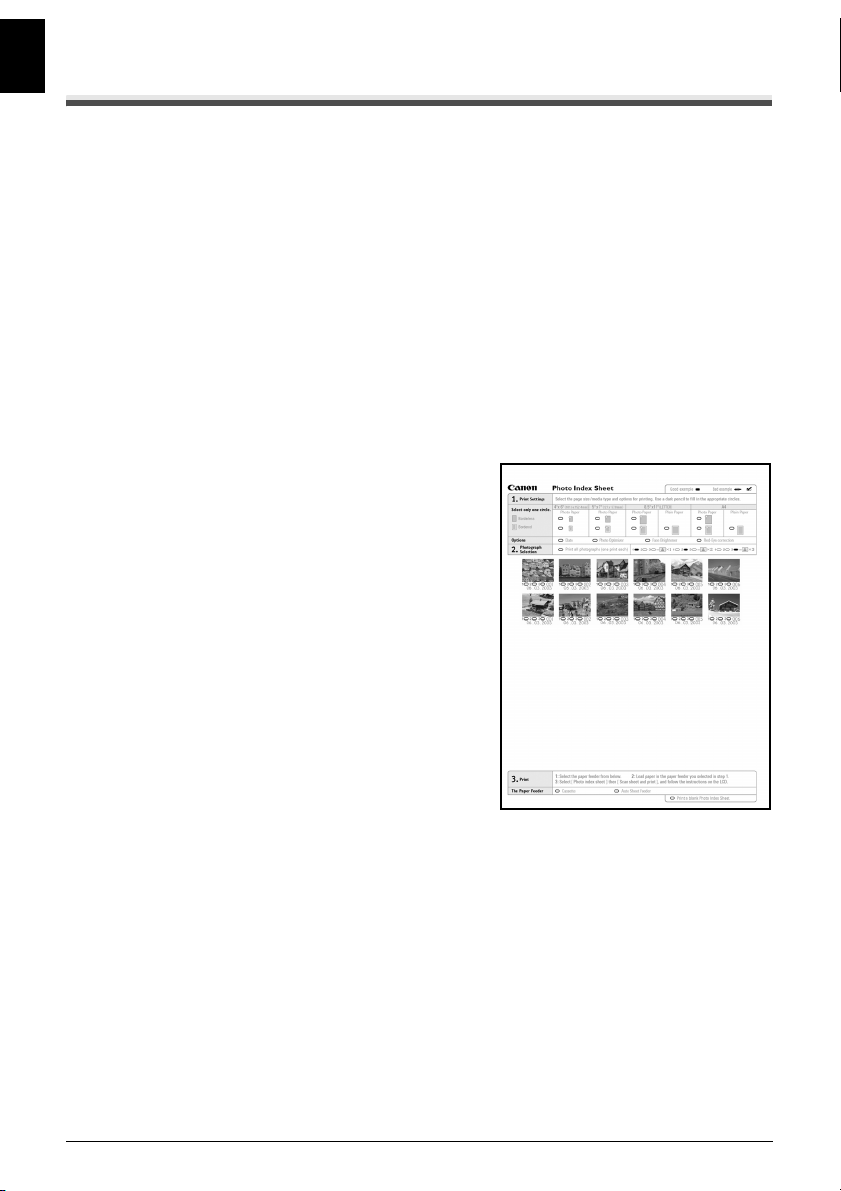
Printing Using the Photo Index Sheet
ENGLISH
1
Turn on the machine, and load A4 or Letter-sized paper.
2 Make sure that the proper paper source is selected.
3 Select Photo index sheet on the HOME screen.
See “Basic Operation for the Operation Panel” on page 11.
4 Select Index sheet print, then press the OK button.
5 Insert a memory card into the Card Slot.
6 Select a range of images to include in the Photo Index Sheet, then press the OK
button.
7 Press the Color button.
8 Fill in the appropriate circles in the Photo
Index Sheet.
9 Load the type of paper you selected in the
Photo Index Sheet.
10 Select Scan sheet and print, then press the
OK button.
11 Place the Photo Index Sheet face-down on
the Platen Glass, then press the OK button.
20 Printing from a Memory Card
Page 25
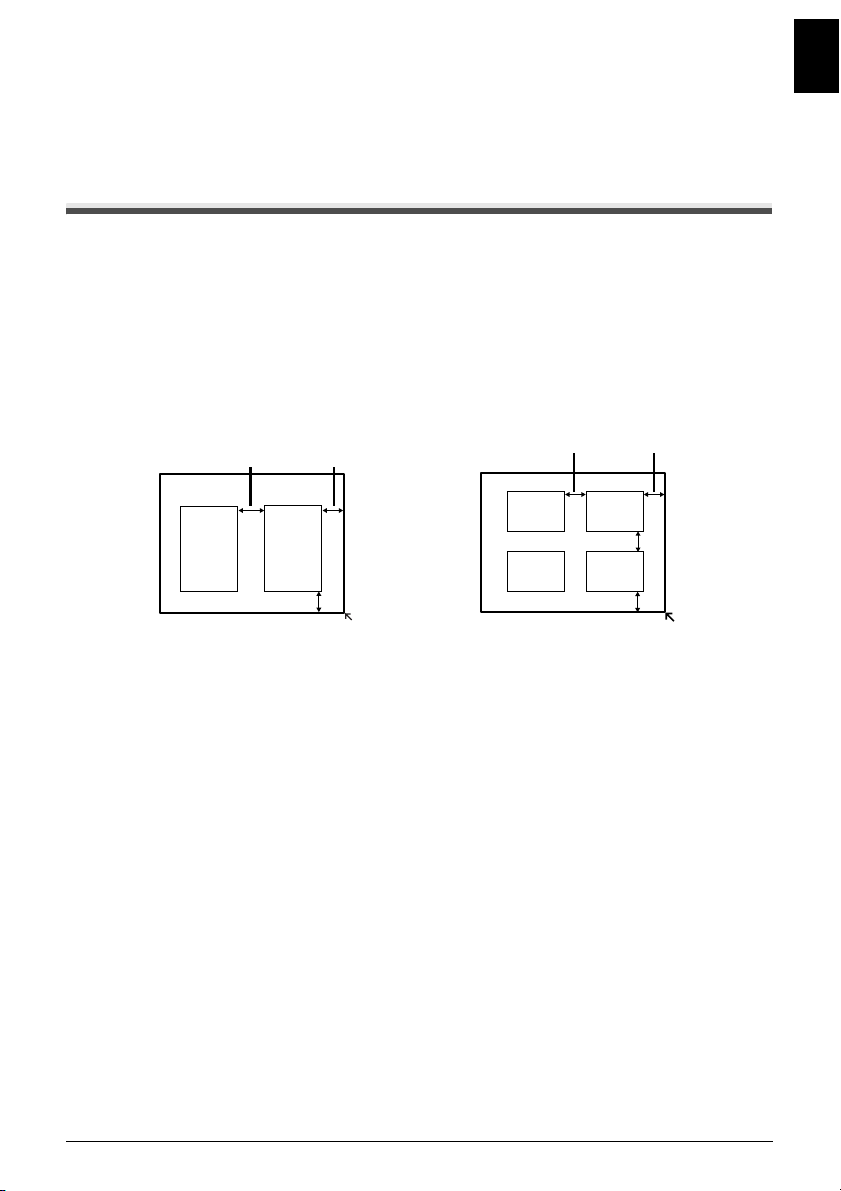
Photo Printing from Photo
You can scan photos into and then print them from the machine. Various effects can be applied to
the images before printing them.
Scanning a Photo
1
Turn on the machine.
2 Select Easy photo reprint on the HOME screen.
See “Basic Operation for the Operation Panel” on page 11.
3 Lift the Document Cover and load the photos on the Platen Glass.
Place the photos face down on the Platen Glass as follows.
4"x 6" / 101.6 x 152.4 mm or
5"x 7" / 127 x 177.8 mm originals
0.4" / 10 mm
0.4" / 10 mm
Credit card-sized originals
0.4" / 10 mm 0.4" / 10 mm
0.4" / 10 mm
ENGLISH
0.4" / 10 mm
0.4" / 10 mm
4 Gently close the Document Cover and press the OK button.
21Photo Printing from Photo
Page 26
Printing Scanned Photographs
ENGLISH
1
Prepare for printing.
(1) Load paper.
(2) Scan a photo.
See “Scanning a Photo” on page 21.
(3) Make sure that the proper paper source is selected.
2 Select the print menu.
(1) Select Select and print, then press the OK button.
(2) Confirm the paper size, media type, and other settings, then select Next, and then press
the OK button. To change the settings, select the item and press the OK button.
3 Select the photo to print and specify the number of copies for each photo.
(1) Use the Easy-Scroll Wheel or the [ or ] button to display a photo to print.
(2) Use the + or - button to specify the number of copies.
(3) Repeat steps (1) and (2) to specify the number of copies for each photo.
(4) Press the OK button.
4 Start printing.
(1) Confirm the print setting. To change the
settings, select the item and press the OK
button.
(2) Confirm the total number of copies for selected
photos.
(3) Change the advanced print settings.
(4) Press the Color button to print in color, or the
Black button to print in black & white.
The specified number of copies of each photo
will be printed.
(1)
(2)
(3)
Other Useful Functions
Sticker print
Prints your favorite photo on Canon Photo Stickers to create your own stickers.
Print all photos
Prints all scanned photos.
Using Useful Display Functions
Change display
The display method of a photograph can be changed.
Trimming
Edits images displayed on the LCD by cropping them.
22 Photo Printing from Photo
Page 27

Printing Photographs Directly from a
Compliant Device
Printing from a PictBridge Compliant Device
You can connect a PictBridge compliant device such as a digital camera, camcorder, or mobile
phone and print recorded images directly without using a computer.
Note
z PictBridge is an industry standard enabling a range of digital photo solutions, including the direct
printing of photos from a digital still camera, camcorder or mobile phone* without the need to use a
computer. A device can be connected to this machine for direct printing regardless of the manufacturer
or the model as long as it complies with the PictBridge standard.
z You can select the images to print and specify various print settings from your camera or mobile phone.
* PictBridge compatible digital still cameras, digital camcorders, and camera-equipped mobile phones
are hereafter collectively referred to as “PictBridge compliant device”.
A device with this mark is PictBridge-compatible.
Connecting a PictBridge Compliant Device
To connect a PictBridge compliant device to this machine, use a USB cable recommended by
the device’s manufacturer.
Caution
Do not connect any equipment other than PictBridge compliant devices or optional Bluetooth Units
BU-20 to the Direct Print Port of the machine. If you do so, electric shock, fire, or damage to the
device could result.
Note
When printing photos with the digital device connected to the machine, we recommend the use of
the AC adapter supplied with the device. If you are using the device battery, be sure to charge it
fully.
ENGLISH
1 Set up the machine.
Refer to the Easy Setup Instructions to set up the machine and make it ready for printing.
Note
The Print Head cannot be aligned using the controls of the PictBridge compliant device. If Print
Head alignment is not yet performed and the MP Drivers are not installed in the computer, be sure
to align the Print Head. For details, refer to “Aligning the Print Head” in the User’s Guide.
2 Turn on the machine and load the paper in the machine.
23Printing Photographs Directly from a Compliant Device
Page 28
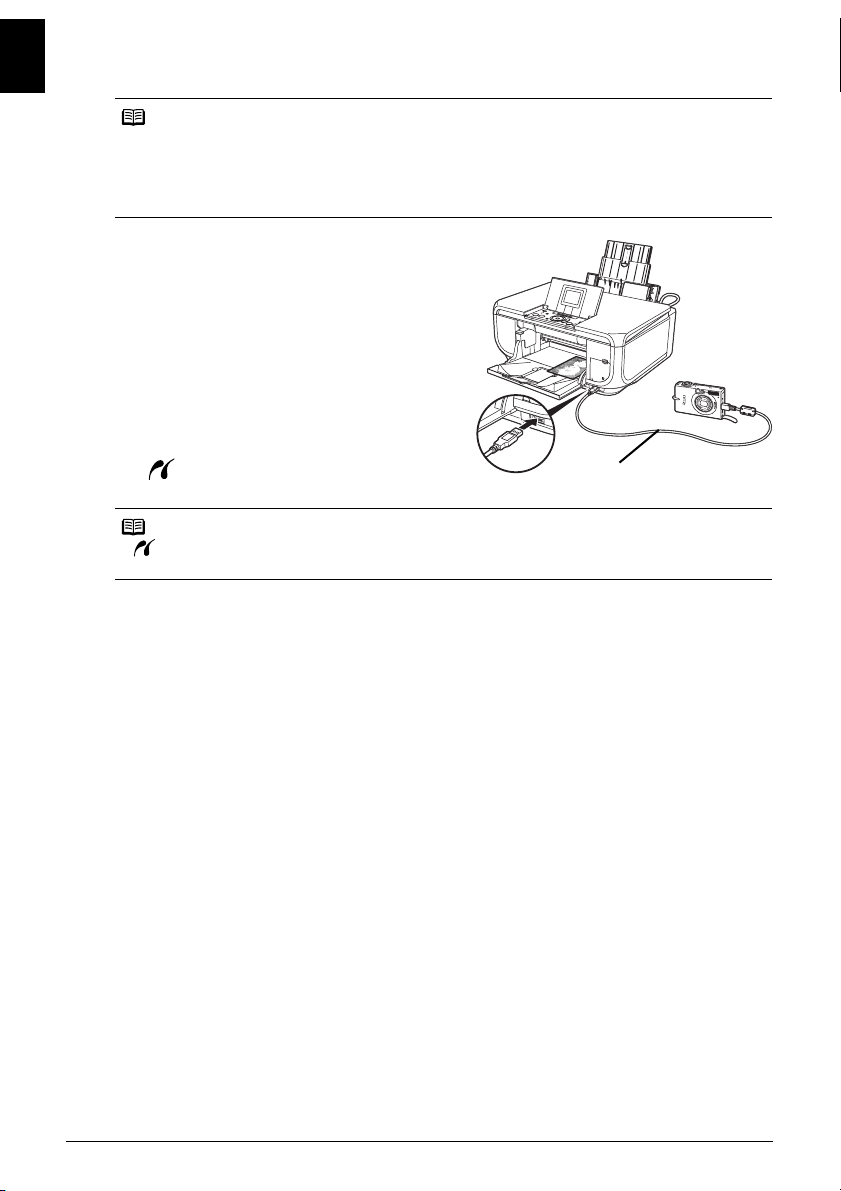
3 Connect the PictBridge compliant device to the machine.
ENGLISH
Note
Depending on the model or brand of your device, you may have to select a print mode compliant
with PictBridge before connecting the device. You may also have to turn on the device or select
Play mode manually after connecting the device to the machine.
Perform necessary operations on the PictBridge compliant device before connecting it to this
machine according to instructions given in the device’s instruction manual.
(1) Make sure that the PictBridge compliant
device is turned off.
(2) Connect the PictBridge compliant device to
the machine using a USB cable
recommended by the manufacturer of the
device.
The device turns on automatically.
If your device does not turn on
automatically, turn it on manually.
(3) Set up the PictBridge compliant device for
direct printing.
will appear on the LCD of the device
when the machine is correctly connected.
Note
If does not appear, refer to “Cannot Print Properly from a Digital Camera” in the User’s Guide
on-screen manual.
(2)
24 Printing Photographs Directly from a Compliant Device
Page 29
Printing Photographs Directly from a PictBridge Compliant Device
When operating the device, be sure to follow the instructions given in the instruction manual of
your PictBridge compliant device. This section describes the page size, media type, layout,
image optimization modes, and date printing mode that can be set on a PictBridge compliant
device connected to the machine.
z Confirming or Changing PictBridge Print Settings from Your Camera
To change the page size or media type, operate the device to select the PictBridge print setup
mode and confirm or change the settings.
About the Settings Explained Below
Some setting items explained below may not be available on some devices. In this case, the
Default setting explained below is applied for the setting item.
* In the following description, names of settings items are given according to those used in
Canon-brand PictBridge compliant devices. Setting item names may be different depending
on the brand or model of your device.
The settings below can be changed in the PictBridge settings screen on the machine when a
PictBridge compliant device is connected. However, changes can be made in the PictBridge
settings screen on the machine only when the corresponding items below are in the Default
setting items (the setting to follow that of the machine) on the PictBridge compliant device.
See “Confirming or Changing PictBridge Print Settings on the Machine” on page 28.
ENGLISH
PictBridge compliant
device setting items
Paper size: Default You can change the following settings on the PictBridge
Paper type: Default
Layout: Default
Image optimize: Default You can change the following settings on the PictBridge
Machine setting on the Print Setting screen
settings screen:
Page size, Media type, Bordered/Borderless
For the setting items, see “Setting items” on page 28.
settings screen:
Photo opt.pro, Vivid photo, Face brightener, Noise
reduction, Image optimizer, Red eye correc., Brightness,
Contrast, Color hue, Effects
For the setting items, see “Setting items” on page 28.
z Printable Image Data Format
This machine prints images taken with a DCF® (Design rule for Camera File system)compatible digital camera*, as well as PNG files.
* Exif2.21 compliant
25Printing Photographs Directly from a Compliant Device
Page 30
ENGLISH
z Paper Size and Paper Type Settings
If these settings are set to Default (the setting to follow that of the machine) on the PictBridge
compliant device, the Page size and the Media type settings specified in the PictBridge
settings of the machine are applied.
The following sizes and types of printing paper can be loaded according to the Paper size
and Paper type settings.
Paper Size Setting Paper Type Setting
Loadable Paper
*6
10 x 15 cm/4" x 6" Photo Photo Paper Plus Glossy
Fast Photo Photo Paper Pro
Photo Photo Paper Plus Semi-gloss
Photo Glossy Photo Paper
Glossy Photo Paper “Everyday
Use”
Photo Paper Glossy
*1, *5
13 x 18 cm/5" x 7"
*3, *4
A4
*2
Photo Photo Paper Plus Glossy
Photo Photo Paper Plus Glossy
Photo Stickers
Fast Photo Photo Paper Pro
Photo Photo Paper Plus Semi-gloss
Photo Glossy Photo Paper
Photo Glossy Photo Paper “Everyday
Use”
8.5" x 11" (Letter)
*3, *4
Photo Photo Paper Plus Glossy
Fast Photo Photo Paper Pro
Photo Photo Paper Plus Semi-gloss
Photo Glossy Photo Paper
Photo Photo Paper Glossy
5.4 x 8.6 cm/Credit card Photo Glossy Photo Paper
20 x 25 cm/8" x 10"
10.1 x 18 cm/4" x 7.1"
*1
Exclusively used to print photo stickers. When printing on sticker paper, select 10 x 15 cm/
*7
*2
Fast Photo Photo Paper Pro
Fast Photo Photo Paper Pro
4" x 6" in Paper size.
*2
Can be selected only on certain Canon-brand PictBridge compatible devices.
*3
Plain Paper can be selected for Paper type only when Paper size is set to A4 or 8.5" x
11" (Letter). When Paper type is set to Plain Paper, borderless printing will be disabled
even when Layout is set to Borderless.
*4
You can print in 4-up layout when Paper size is set to A4 or 8.5" x 11" (Letter).
*5
Feeding this paper from the Cassette can damage the machine. Load in the Auto Sheet
Feeder.
*6
You may not be able to purchase some Canon genuine papers depending on your country.
*7
When printing on Photo Paper Plus Semi-gloss 8" x 10" / 203.2 x 254.0 mm (SG-201),
select 20 x 25 cm/8" x 10" for Paper size and Default for Paper type.
*Select Photo Plus Glossy for Media type in the PictBridge settings screen on the
machine.
See “Confirming or Changing PictBridge Print Settings on the Machine” on page 28.
26 Printing Photographs Directly from a Compliant Device
Page 31

z Layout and Trimming Settings
If Layout is set to Default (the setting to follow that of the machine) on the PictBridge
compliant device, the print setting specified in the PictBridge settings of the machine is
applied. The setting on the PictBridge compliant device is applied for Trimming.
When printing onto Photo Stickers (PS-101), select N-up for Layout, then select 16-up.
* Some PictBridge compliant devices may display the Layout option 2-up, 4-up, 9-up, and
16-up. In this case always select 16-up.
* If there are no options on the PictBridge compliant device that correspond to 16-up,
printing on stickers is not possible.
* When printing on Photo Stickers (PS-101), do not set Layout to Borderless.
z Image Optimize Setting
If Image optimize is set to Default (the setting to follow that of the machine) on the
PictBridge compliant device, the print setting specified in the PictBridge settings of the
machine is applied. For details on the setting, see “Confirming or Changing PictBridge Print
Settings from Your Camera” on page 25.
If you are using a Canon-brand PictBridge compatible device, additional options of VIVID,
NR, Face, or Red eye may be available, depending on the model.
* VIVID prints green and blue portions of photos more vividly.
NR (Noise Reduction) reduces noise in blue portions, such as the sky, and dark portions.
Face corrects the contrast of backlit images.
Red eye corrects red eyes.
z Date/File No. Print Setting
You cannot change this setting on this machine. The setting on the PictBridge compliant
device is applied.
If the images already have dates superimposed when shot, set this PictBridge setting item to
Off. If you select Date, File No., or Both, the date and/or file number will be printed over the
date printed by the camera’s function.
z Other Settings
The following additional options are available for Canon-brand PictBridge-compliant devices,
depending on the model. For details, refer to your Canon-brand PictBridge compliant device’s
instruction manual.
Shooting Info (Exif Data)
You can print shooting Info (Exif Data) on photos in list format, or in the margins of specified
photos. In Layout select the item with the “i” icon.
35 mm Film Style Layout (Contact Printing Layout)
You can print selected photos or index-specified photos in 35 mm film style layout (contact
printing layout).
In Layout select the item with the film icon.
ENGLISH
Note
z Never disconnect the USB cable during printing unless when explicitly allowed to by the
PictBridge compliant device.
When disconnecting the USB cable between the PictBridge compliant device and machine,
follow the instructions given in the device’s instruction manual.
z You cannot set or do the following by operating on the PictBridge compatible device.
– Print quality setting
– Machine maintenance
27Printing Photographs Directly from a Compliant Device
Page 32

z Confirming or Changing PictBridge Print Settings on the Machine
ENGLISH
You can confirm and change the print settings such as media type and size that are preset to the
machine and applied to PictBridge printing.
z Displaying the PictBridge Settings Screen and Specifying the Settings
(1) Turn on the machine.
(2) Select Settings on the HOME screen.
See “Basic Operation for the Operation Panel” on page 11.
(3) Select Device settings, then press the OK button.
(4) Select PictBridge settings, then press the OK button.
(5) Select the item to set, then press the OK button.
(6) Select the item, then press the OK button.
(7) Confirm the print settings, select Next and then press the OK button.
(8) Repeat steps (5) and (6) to specify the item.
(9) After finishing all settings you need, select OK and then press the OK button.
z Setting items
Page size
Select the page size, when printing directly from a PictBridge compliant device.
Media type
Select the media type, when printing directly from a PictBridge compliant device.
Print quality
Select the print quality, when printing directly from a PictBridge compliant device.
Bordered/Borderless
Select bordered or borderless print.
Photo opt.pro
Activate/deactivate the Photo Optimizer pro function.
Automatically optimizes brightness and tone of a photo.
Vivid photo
Activate/deactivate Vivid photo function.
Makes green and blue more lively.
Face brightener
Activate/deactivate Face brightener function.
Brightens a darkened face on the photo taken against the light.
Noise reduction
Activate/deactivate the Noise reduction function.
Reduces the noise on blue areas like the sky as well as on black areas.
Image optimizer
Activate/deactivate Image optimizer function.
Corrects and smooths the jagged contours for printing.
Red eye correc.
Activate/deactivate Red eye correction.
Corrects red eyes in portraits caused by flash photography.
Brightness
Adjust brightness.
28 Printing Photographs Directly from a Compliant Device
Page 33

Contrast
Adjust contrast.
Color hue
Adjust color hue.
Effects
Applies special effects to the photo, such as printing in sepia tones or with a sketch
illustration like effect.
ENGLISH
29Printing Photographs Directly from a Compliant Device
Page 34

ENGLISH
Replacing an Ink Tank
When ink tanks run out of ink, replace them using the following steps.
1 Open the Paper Output Tray.
2 Make sure that the machine is turned on, and
raise the Scanning Unit (Printer Cover) until it
stops.
3 Open the Inner Cover.
4 Push the tab of the ink tank whose lamp is
flashing fast (A) and remove it.
Do not touch the Print Head Lock Lever (B).
30 Replacing an Ink Tank
(B)(A)
Page 35

5 Remove the new ink tank from its packaging,
then pull the orange tape in the direction of
the arrow (A) so that the protective film does
not remain on the air hole (B). Then remove
the film completely (C).
(C)
(B)
(A)
ENGLISH
6 Remove the orange protective cap (A) from
the bottom of the ink tank.
Carefully hold the protective cap when removing it
to prevent the ink from staining your fingers.
Discard the cap once it is removed.
Important
Do not touch the electrical contacts (B) on the ink tank.
Doing so can cause the machine to malfunction or
become unable to print.
7 Insert the front end of the ink tank into the
Print Head.
Make sure the position of the tank matches the
label (A).
8 Press on the mark on the ink tank until
the ink tank snaps firmly into place.
Confirm that the ink lamp (A) lights up red.
(A)
(B)
(A)
(A)
31Replacing an Ink Tank
Page 36

9 Close the Inner Cover.
ENGLISH
10 Gently close the Scanning Unit (Printer Cover).
32 Replacing an Ink Tank
Page 37

Guide de démarrage rapide
Sommaire
Comment utiliser la documentation fournie 2
Lecture des manuels en ligne 3
Préparation de l'appareil 4
Installation des MP Drivers 6
Introduction 7
Sélection de la langue de l'écran LCD 8
Chargement du papier d'impression 9
Fonctionnement de base du panneau de contrôle 11
Impression depuis votre ordinateur 13
Numérisation d'images 15
Copie 16
Impression depuis une carte mémoire 17
Impression à partir d'une photo 21
Impression directe de photographies à partir
d'un périphérique compatible 23
Remplacement d'un réservoir d'encre 30
FRANÇAIS
Page 38

FRANÇAIS
.
Exif Print
Cet appareil prend en charge ExifPrint.
La norme Exif Print optimise la communication entre les appareils photo numériques et les
imprimantes. Lors d'une connexion à un appareil photo numérique compatible avec Exif
Print, les données d'image de l'appareil photo sont exploitées et optimisées au cours de
la prise de vue, ce qui permet de réaliser des impressions d'excellente qualité.
Canadian Radio Interference Regulations/Réglementations
canadiennes relatives aux interférences radio
This digital apparatus does not exceed the Class B limits for radio noise emissions from
a digital apparatus as set out in the interference-causing equipment standard entitled
"Digital Apparatus," ICES-003 of the Industry Canada.
Cet appareil numérique respecte les limites de bruits radioélectriques applicables
aux appareils numériques de Classe B prescrites dans la norme sur le matériel brouilleur
NMB-003 d'Industrie Canada intitulée « Appareils numériques ».
Programme international ENERGY STAR
®
En tant que partenaire du programme ENERGY STAR®, Canon Inc. a fait en sorte que ce
produit réponde aux normes de ce programme en matière de consommation énergétique.
Le programme international d'équipement de bureau ENERGY STAR
®
est un programme global qui encourage les économies d'énergie lors de
l'utilisation d'ordinateurs et des autres équipements de bureau. Il soutient
le développement et la distribution de produits dotés de fonctions
permettant de réduire réellement la consommation d'énergie. Il s'agit
d'un système ouvert auquel les entreprises peuvent volontairement
prendre part. Les produits visés sont des équipements de bureau tels
que les ordinateurs, les écrans, les imprimantes, les télécopieurs et les
photocopieurs.
Les normes et les logos de ces produits sont identiques dans tous les pays
qui participent au programme.
Spécifications électriques
N'utilisez jamais une tension d'alimentation autre que celle fournie dans le pays d'achat.
L'utilisation d'une tension incorrecte risque de causer un incendie ou une décharge
électrique. La tension et les fréquences appropriées sont les suivantes :
100-240 V CA, 50/60 Hz
À propos des consommables
Les consommables (réservoirs d'encre / cartouches FINE (FINE Cartridges))
sont disponibles cinq ans après arrêt de la production.
Lisez également les précautions d'emploi qui figurent dans le Guide d'Utilisation en ligne. Lisez les
avertissements et les mises en garde afin d'éviter de vous blesser ou d'endommager la machine.
Nom du modèle : K10287 (MP600)
Page 39

Précautions de sécurité
Avertissement
z Ce produit émet un flux magnétique de faible intensité. Si vous utilisez un stimulateur cardiaque ou
pacemaker et éprouvez une sensation inhabituelle, éloignez-vous de l'appareil et consultez votre médecin.
z Si vos mains sont mouillées, ne tentez jamais de brancher ou de débrancher le cordon d'alimentation
de la prise de courant.
z Veillez à ne jamais endommager, modifier, étirer, plier ou tordre de façon excessive le cordon
d'alimentation. Évitez de placer des objets lourds sur le cordon d'alimentation.
z N'utilisez jamais de source d'alimentation autre que la source standard fournie dans le pays d'achat.
L'utilisation d'une tension et d'une fréquence incorrectes risque de causer un incendie ou une décharge
électrique.
z Insérez toujours à fond la fiche secteur du câble d'alimentation dans la prise murale.
Attention
z Pour des raisons de sécurité, stockez les réservoirs d'encre hors de portée des enfants en bas âge.
z Ne faites pas tomber et ne secouez pas les réservoirs : de l'encre pourrait couler et tacher vos
vêtements et vos mains.
Union européenne (et EEE) uniquement.
Ce symbole indique que, conformément à la directive DEEE (2002/96/CE) et à
la réglementation de votre pays, ce produit ne doit pas être jeté avec les ordures
ménagères. Vous devez le déposer dans un lieu de ramassage prévu à cet
effet, par exemple, un site de collecte officiel des équipements électriques et
électroniques (EEE) en vue de leur recyclage ou un point d'échange de produits
autorisé qui est accessible lorsque vous faites l'acquisition d'un nouveau produit
du même type que l'ancien. Toute déviation par rapport à ces recommandations
d'élimination de ce type de déchet peut avoir des effets négatifs sur
l'environnement et la santé publique car ces produits EEE contiennent
généralement des substances qui peuvent être dangereuses. Parallèlement,
votre entière coopération à la bonne mise au rebut de ce produit favorisera une
meilleure utilisation des ressources naturelles. Pour obtenir plus d'informations
sur les points de collecte des équipements à recycler, contactez votre mairie,
le service de collecte des déchets, le plan DEEE approuvé ou le service
d'enlèvement des ordures ménagères.
Pour plus d'informations sur le dépôt et le recyclage des produits DEEE,
consultez le site www.canon-europe.com/environment
(EEE : Norvège, Islande et Liechtenstein)
.
FRANÇAIS
Pour les clients d'Europe, du Moyen-Orient, d'Afrique
et de Russie uniquement
Pour connaître les points d'assistance client Canon, consultez la quatrième de couverture de la
Brochure sur le système de garantie européenne (EWS) ou visitez le site www.canon-europe.com.
Canon Europa N.V., Bovenkerkerweg 59-61, 1185 XB Amstelveen, Pays-Bas
ID Bluetooth : B02954
1
Page 40

Comment utiliser la documentation fournie
Instructions d'installation simplifiée (Documentation imprimée)
FRANÇAIS
Veillez d'abord à lire cette page.
Elle comprend des instructions relatives à la configuration de votre appareil
et à sa préparation avant l'emploi.
Guide de démarrage rapide (le présent guide)
Lisez ce guide quand vous commencez à utiliser l'appareil.
Après avoir suivi les instructions du document Instructions d'installation
simplifiée, nous vous recommandons de lire ce guide pour vous familiariser
avec le fonctionnement de base des principales fonctions disponibles sur
l'appareil.
Manuels en ligne
Guide d'Utilisation
Lisez ce guide quand vous commencez à utiliser l'appareil.
Si le Guide de démarrage rapide ne vous apporte pas toutes les informations
dont vous avez besoin, reportez-vous au Guide d'Utilisation, qui peut être
installé à partir du [Setup CD-ROM/CD-ROM d'installation]. Ce guide fournit
des instructions détaillées pour les opérations suivantes :
z Impression depuis votre ordinateur
z Impression directe de photographies au départ d'appareils photo numériques
sélectionnés
z Copie
z Numérisation
D'autres guides sont également disponibles pour les fonctionnalités avancées.
Guide de numérisation
Reportez-vous à ce guide pour obtenir des informations détaillées sur la
numérisation et la configuration des paramètres.
Guide du pilote d'imprimante
Reportez-vous à ce guide pour obtenir des informations détaillées sur le pilote
d'imprimante.
Guide des applications photographiques
Reportez-vous à ce guide pour obtenir des informations sur l'utilisation des
différents logiciels d'application inclus dans le [Setup CD-ROM/CD-ROM
d'installation].
Guide d'Utilisation de Bluetooth
Reportez-vous à ce guide pour obtenir des instructions complètes sur
l'impression à partir d'ordinateurs et de périphériques prenant en charge
les communications Bluetooth et sur le dépannage de ces dispositifs.
2
Comment utiliser la documentation fournie
Page 41

Lecture des manuels en ligne
Outre ce Guide de démarrage rapide, des manuels en ligne vous sont également fournis. Pour plus
de détails sur l'installation des manuels en ligne, référez-vous à votre fiche d'installation.
Important
Pour les utilisateurs résidant dans des pays hors États-Unis, Canada et Amérique du Sud :
Pour plus d'informations sur la manière d'imprimer sur DVD/CD, reportez-vous au Guide d'impression
sur CD et DVD en ligne.
Vous pouvez consulter les manuels en ligne de la manière suivante :
Pour visualiser le manuel en ligne, double-cliquez sur l'icône MP600 [On-screen Manual/Manuel en
ligne] de votre bureau, ou cliquez sur [Start/Démarrer] > [All Programs/Tous les programmes]
(ou [Programs/Programmes]) > [Canon MP600 Manual/Manuel Canon MP600] > MP600
[On-screen Manual/Manuel en ligne].
Configuration requise
Navigateur : Windows
Remarque
z Microsoft Internet Explorer® 5.0 ou version ultérieure doit être installé.
z Le manuel en ligne peut ne pas s'afficher correctement selon votre système d'exploitation ou
la version d'Internet Explorer. Nous vous recommandons de mettre à jour votre système avec
Windows Update.
Pour consulter le manuel en ligne, double-cliquez sur MP600 [On-screen Manual/Manuel en ligne]
dans le bureau.
®
HTML Help Viewer
FRANÇAIS
Remarque
Utilisateurs en Asie
Si vous avez installé le Guide d'Utilisation à partir du répertoire [Manual/Manuel] du [Setup CD-ROM/
CD-ROM d'installation], ouvrez le répertoire dans lequel vous avez copié le Guide d'Utilisation et double-
cliquez sur le fichier top.htm.
Configuration requise
Navigateur : Help Viewer
Remarque
z Le manuel en ligne peut ne pas s'afficher correctement selon votre système d'exploitation.
Nous vous recommandons de mettre à jour votre système.
z Nous vous recommandons d'utiliser Safari comme navigateur Web pour afficher les manuels en
ligne au format HTML. Si Safari n'est pas installé sur votre ordinateur, téléchargez-le sur le site
Web d'Apple Computer, Inc. pour l'installer.
Lecture des manuels en ligne
3
Page 42

Préparation de l'appareil
Veillez à bien commencer par lire la fiche d'installation avant de configurer votre appareil
et de l'utiliser.
FRANÇAIS
Sortez l'appareil de son emballage.
Comparez les éléments contenus dans le carton d'emballage avec l'illustration imprimée sur
le dessus du carton.
Important
z Ne connectez pas le câble USB avant que le logiciel soit installé.
z Un câble USB est nécessaire pour raccorder l'appareil à l'ordinateur.
1 Mettez l'appareil sous tension.
Attention
Veillez à enlever les rubans adhésifs avant de mettre l'appareil sous tension.
Remarque
z La position du ruban peut varier.
z Si la langue affichée sur l'écran LCD n'est pas celle que vous souhaitez, appuyez sur le bouton
[Back] (Précédent) pour retourner à l'écran <Language selection> (Sélection de langue).
2 Installez la tête d'impression.
Attention
Ne touchez à aucune partie interne à l'exception du levier de verrouillage de la tête d'impression.
Important
Si l'unité de numérisation (capot de l'imprimante) reste ouverte pendant plus de 10 minutes,
le support de la tête d'impression se déplace vers la droite. Dans ce cas, fermez l'unité de
numérisation (capot de l'imprimante) et ouvrez-la à nouveau.
Remarque
z De l'encre transparente ou bleu clair peut se trouver à l'intérieur de l'étui qui contient la tête
d'impression ou de la capsule de protection : cela n'affecte pas la qualité d'impression. Veillez
à ne pas vous salir en manipulant ces éléments.
z Ne remettez pas la capsule de protection en place après l'avoir retirée.
3 Installez les réservoirs d'encre.
Important
z Veillez à ce que tous les réservoirs d'encre soient installés dans la bonne position, en faisant
correspondre les étiquettes. L'appareil ne peut pas être utilisé tant que les réservoirs ne sont
pas tous installés.
z Attendez environ 2 minutes, jusqu'à ce que l'appareil ne fasse plus de bruit, avant
de poursuivre.
Remarque
z Veillez à retirer le film transparent du réservoir d'encre exactement comme indiqué
à l'étape 3 de votre fiche d'installation.
z N'appuyez pas sur le côté des réservoirs d'encre car l'encre risque de couler et de tacher
vos vêtements et vos mains.
z Ne remettez pas la capsule de protection une fois qu'elle a été enlevée.
z Un message d'erreur s'affiche sur l'écran LCD si un réservoir d'encre n'est pas installé
correctement. Ouvrez l'unité de numérisation (capot de l'imprimante) et assurez-vous que
la position de tous les réservoirs d'encre correspond à l'étiquette.
4
Préparation de l'appareil
Page 43

4 Chargez le papier.
L'appareil va vous demander d'aligner les têtes d'impression et vous devrez vous assurer
qu'une feuille de papier ordinaire au format A4 ou Lettre est placée dans le chargeur
automatique.
Important
z Lorsque vous placez du papier dans le chargeur automatique, assurez-vous que le témoin
Chargeur automatique est allumé.
z Chargez toujours le papier en orientation portrait. Si vous chargez le papier en orientation
paysage, vous risquez de provoquer un bourrage papier.
Remarques relatives à l'alignement des têtes d'impression
z L'alignement des têtes d'impression prend environ 6 minutes. N'ouvrez pas l'unité de
numérisation (capot de l'imprimante) tant que l'impression est en cours.
z Si le motif ne s'imprime pas correctement, reportez-vous à la section « Un message d'erreur
s'affiche sur l'écran LCD » du Guide d'Utilisation en ligne.
Important
L'impression sur DVD/CD n'est pas disponible sur les appareils vendus aux États-Unis, au Canada, dans
tous les pays d'Amérique du Sud ainsi que dans d'autres pays et régions.
FRANÇAIS
Préparation de l'appareil
5
Page 44

Installation des MP Drivers
Informations communes à Windows et Macintosh
Remarques sur la procédure d'installation
FRANÇAIS
z Si l'écran [Select Language/Sélectionner la langue] apparaît, sélectionnez une langue,
puis cliquez sur [Next/Suivant].
z Si [Select Your Place of Residence/Sélectionnez votre lieu de résidence] apparaît,
sélectionnez votre lieu de résidence, puis cliquez sur [Next/Suivant].
z Il existe deux façons d'installer les MP Drivers et les autres logiciels :
[Easy Install/Installation rapide] : les éléments du [Setup CD-ROM/CD-ROM d'installation]
sont installés automatiquement.
[Custom Install/Installation personnalisée] : vous pouvez choisir les éléments à installer.
z Lorsque l'écran [User Registration/Enregistrement de l'utilisateur] apparaît, si vous
cliquez sur [Register/Enregistrer] et si votre ordinateur est connecté à Internet,
des instructions en ligne apparaîtront pour enregistrer votre produit.
z Vous pouvez également enregistrer votre produit en cliquant sur l'icône présente sur
le bureau une fois l'installation terminée.
®
Informations pour Windows
Remarque
z Pour l'installation des MP Drivers sous Windows XP ou Windows 2000, connectez-vous
au système en tant que membre du groupe [Administrators/Administrateurs].
z Avant d'installer les pilotes, désactivez tous les programmes de détection de virus
et les programmes à chargement automatique.
z Si l'écran suivant apparaît automatiquement, retirez le
câble USB raccordé à votre ordinateur. Ensuite, cliquez
sur [Cancel/Annuler] pour quitter l'écran, puis mettez
l'appareil hors tension. Recommencez ensuite la
procédure d'installation. Pour plus de détails sur la
procédure d'installation, consultez la fiche d'installation.
z Pour installer Adobe® RGB (1998), cliquez sur
[Custom Install/Installation personnalisée],
puis suivez les instructions affichées à l'écran.
z Adobe RGB (1998) ne peut être installé avec
Windows Me et Windows 98.
z Lorsqu'un message vous demandant de confirmer le
redémarrage de l'ordinateur s'affiche lors de la
procédure d'installation, cliquez sur [OK]. Le système
redémarre automatiquement.
z Si la connexion n'est pas reconnue, reportez-vous à la section « Impossible d'installer les
MP Drivers » du Guide d'Utilisation en ligne.
Informations pour Macintosh
Remarque
Avant d'installer les MP Drivers, désactivez tous les programmes de détection de virus et les
programmes à chargement automatique, ou supprimez-les de votre dossier système.
Utilisateurs en Asie
Pour installer le Guide d'Utilisation en ligne dans une autre langue que celle de l'installation
actuelle, double-cliquez sur le dossier [Manual/Manuel] dans le [Setup CD-ROM/CD-ROM
d'installation], dans le dossier [Canon], puis copiez un dossier de langue sur votre disque dur.
6
Installation des MP Drivers
Page 45

Introduction
Nous vous remercions d'avoir acheté l'imprimante Canon MP600.
Ce Guide de démarrage rapide utilise les symboles suivants pour indiquer les informations
importantes. Veillez à toujours respecter les instructions indiquées par ces symboles.
Avertissement
Instructions dont le non-respect peut entraîner la mort ou des blessures graves provoquées par
un fonctionnement incorrect du matériel. Elles doivent être respectées afin de garantir un
fonctionnement en toute sécurité.
Attention
Instructions dont le non-respect peut entraîner des blessures graves ou des dommages matériels
dus à un fonctionnement incorrect du matériel. Elles doivent être respectées afin de garantir un
fonctionnement en toute sécurité.
Important
Instructions à respecter afin de garantir un fonctionnement en toute sécurité.
Avis sur les marques
z « Windows » et « Internet Explorer » sont des marques commerciales de Microsoft
Corporation, déposées aux États-Unis et dans d'autres pays.
z « Macintosh » et « Mac » sont des marques commerciales d'Apple Computer, Inc., déposées
aux États-Unis et dans d'autres pays.
z « Adobe » et « Adobe RGB (1998) » sont également des marques commerciales ou déposées
d'Adobe Systems Incorporated aux États-Unis et/ou dans d'autres pays.
z « SmartMedia » est une marque commerciale de Toshiba Corporation.
z « MEMORY STICK », « Memory Stick PRO », « MEMORY STICK Duo » et « Memory Stick
Pro Duo » sont des marques commerciales de Sony Corporation.
z « xD-Picture Card » est une marque commerciale de Fuji Photo Film Co., Ltd.
z « MultiMediaCard » est une marque commerciale de MultiMediaCard Association.
z « SD Card » et « miniSD Card » sont des marques commerciales de SD Association.
z Ces spécifications sont susceptibles d'être modifiées, sans notification préalable.
Copyright ©2006 CANON INC.
Tous droits réservés. Toute reproduction ou transmission, même partielle, sous quelque forme
que ce soit, est interdite sans autorisation expresse écrite.
FRANÇAIS
Introduction
7
Page 46

Sélection de la langue de l'écran LCD
1 Appuyez sur le bouton [HOME] (ACCUEIL). Patientez environ 5 secondes,
FRANÇAIS
sélectionnez et appuyez ensuite sur le bouton [OK].
2 Appuyez sur le bouton ] pour sélectionner , puis sur [OK].
3 Appuyez trois fois sur le bouton }, puis une fois sur le bouton [OK].
Si l'adaptateur Bluetooth est connecté à l'appareil, appuyez cinq fois sur le bouton }, puis
une fois sur le bouton [OK].
4 Appuyez sur le bouton { ou } pour sélectionner la langue à afficher,
puis sur [OK].
8
Sélection de la langue de l'écran LCD
Page 47

Chargement du papier d'impression
Certains types et formats de papier ne peuvent pas être chargés dans la cassette mais uniquement
dans le chargeur automatique. Si vous avez l'intention de n'utiliser que la cassette, vérifiez d'abord
les restrictions d'utilisation.
Important
z Si vous coupez du papier ordinaire au format 4" x 6" / 101,6 x 152,4 mm, 5" x 7" / 127 x 177,8 mm ou
2,13" x 3,39" / 54,0 x 86,0 mm (Carte de crédit) pour un essai d'impression, vous risquez de provoquer
un bourrage papier.
z Chargez toujours le papier en orientation portrait. Si vous chargez le papier en orientation paysage,
vous risquez de provoquer un bourrage papier.
1 Retirez la cassette de l'appareil.
2 Chargez le papier dans la cassette, face
à imprimer vers le BAS, en alignant la pile
de papier contre le bord droit de la cassette.
Ne chargez pas du papier au-delà du repère de
la limite de chargement (A).
(A)
FRANÇAIS
3 Faites glisser les guides papier (B) contre
la pile de papier chargée.
4 Insérez la cassette dans l'appareil.
Poussez-la bien à fond dans l'appareil.
Chargement du papier d'impression
(B)
9
Page 48

5 Insérez le doigt dans la rainure arrondie
du bac de sortie papier (A) et ouvrez-le
délicatement, puis déployez son
extension (B).
FRANÇAIS
6 Appuyez sur le bouton [Paper Feed Switch]
(Changement d'alimentation papier) (C)
de façon à ce que le témoin Cassette (D)
s'allume.
(C)
(A)
(D)
(B)
10
Chargement du papier d'impression
Page 49

Fonctionnement de base du panneau
de contrôle
(A) Bouton [HOME] (ACCUEIL)
(B) [Easy-Scroll Wheel]
(Molette de défilement facile)
(C) Bouton [OK]
(A) (B) (C)
[Easy-Scroll Wheel] (Molette de défilement facile)
Faites pivoter la [Easy-Scroll Wheel] (Molette de défilement facile) vers la gauche ou
vers la droite afin de sélectionner le paramètre de votre choix. Le paramètre sélectionné
s'affiche en surbrillance ou apparaît encadré. Vous pouvez également sélectionner les
paramètres à l'aide des boutons {, }, [ ou ].
Bouton [HOME] (ACCUEIL)
Cette section décrit la procédure à suivre pour afficher chaque mode au départ de l'écran ACCUEIL.
1 Ouvrez l'écran ACCUEIL.
(1) Appuyez sur le bouton [HOME] (ACCUEIL).
L'écran ACCUEIL s'affiche.
FRANÇAIS
2 Sélectionnez le mode.
(1) Faites pivoter la [Easy-Scroll Wheel]
(Molette de défilement facile) pour sélectionner
le mode, puis appuyez sur le bouton [OK].
Exemple : sélectionnez <Memory card>
(Carte mémoire).
L'écran du mode sélectionné s'affiche.
Remarque
Lorsque vous sélectionnez un mode et que
vous appuyez sur le bouton [Function] (Fonction)
(f2/<Introduction> (Introduction)), vous obtenez
les instructions relatives au mode sélectionné.
L'écran ACCUEIL vous permet de sélectionner les modes suivants :
<Copy> (Copie) : vous pouvez copier avec diverses mises en page. Consultez
<Scan> (Numériser) : vous pouvez enregistrer les données numérisées sur un
<Photo index sheet>
(Index photo) :
Fonctionnement de base du panneau de contrôle
(1)
« Copie », page 16.
ordinateur connecté via le panneau de contrôle. Consultez
« Numérisation d'images », page 15.
l'index photo vous permet d'imprimer facilement les photos
à partir d'une carte mémoire. Consultez « Impression à l'aide
de l'index photo », page 20.
11
Page 50

<Settings> (Paramètres) : vous pouvez effectuer l'entretien ou modifier les différents
FRANÇAIS
<Easy photo reprint>
(Retirage photo facile) :
<Memory card>
(Carte mémoire) :
Autres boutons
(A) Bouton [NAVI] (NAVIGATION)
(B) Boutons [Function] (Fonction)
paramètres de l'appareil. Pour plus de détails, reportez-vous
à la section « Lorsque l'impression devient pâle ou que les
couleurs ne s'impriment plus correctement », « Nettoyage de
l'appareil » ou « Modification des paramètres de l'appareil »
dans le Guide d'Utilisation en ligne.
vous pouvez numériser des photos imprimées en vue de les
imprimer. Consultez « Impression à partir d'une photo », page 21.
imprimez les données photo stockées sur la carte mémoire
d'un appareil photo numérique. Consultez « Impression
depuis une carte mémoire », page 17.
z Bouton [NAVI] (NAVIGATI ON)
Ce bouton de navigation vous permet d'accéder facilement à la fonction souhaitée.
Sélectionnez l'action que vous désirez effectuer dans le menu de navigation, puis appuyez
sur le bouton [OK].
(A) (B)
z Boutons [Function] (Fonction)
Deux boutons [Function] (Fonction) vous permettent de sélectionner les menus affichés
au bas de l'écran LCD.
L'écran qui s'affiche lorsque vous appuyez sur un bouton [Function] (Fonction) dépend d'une
part de l'écran dans lequel vous vous trouvez et d'autre part du bouton [Function] (Fonction)
sur lequel vous appuyez.
(A) (B)
(A) Bouton [Function] (Fonction) (f1) : lorsque vous appuyez sur le bouton [Function]
(B) Bouton [Function] (Fonction) (f2) : lorsque vous appuyez sur le bouton [Function]
Lorsque vous utilisez ces boutons dans d'autres écrans que l'écran ACCUEIL, une procédure
ou des menus s'affichent.
(Fonction) (f1/<Remaining ink vol> (Vol. encre
rest.)) dans l'écran ACCUEIL, l'écran indiquant le
volume d'encre restant s'affiche.
(Fonction) (f2/<Introduction> (Introduction)) dans
l'écran ACCUEIL, les explications relatives aux
fonctions du mode sélectionné s'affichent.
12
Fonctionnement de base du panneau de contrôle
Page 51

Impression depuis votre ordinateur
Cette section décrit la procédure d'impression de base.
Impression sous Windows
1
Mettez l'appareil sous tension et chargez le papier dans l'appareil.
2 Veillez à sélectionner la source d'alimentation papier adéquate.
3 Créez un document ou ouvrez un fichier à imprimer avec le logiciel d'application
approprié.
4 Sélectionnez [Print/Imprimer] dans le menu
[File/Fichier] du logiciel d'application.
5 Assurez-vous que [Canon MP600 Printer]
est bien sélectionné et cliquez sur
[Preferences/Préférences] (ou [Properties/
Propriétés]).
6 Indiquez les paramètres requis, puis cliquez
sur [OK].
Assurez-vous que [Paper Feed Switch/
Commutateur de papier] est sélectionné dans
[Paper Source/Alimentation papier].
FRANÇAIS
Remarque
Pour plus de détails sur les autres fonctions du
pilote d'imprimante, cliquez sur [Help/Aide] ou sur
[Instructions] afin de consulter l'aide en ligne ou le
Guide du pilote d'imprimante en ligne. [Instructions]
ne s'affiche que si les manuels en ligne sont installés.
7 Cliquez sur [Print/Imprimer] (ou sur [OK]).
Impression depuis votre ordinateur
13
Page 52

Impression sous Macintosh
1
Mettez l'appareil sous tension et chargez le papier dans l'appareil.
FRANÇAIS
2 Veillez à sélectionner la source d'alimentation papier adéquate.
3 Créez un document ou ouvrez un fichier à imprimer avec le logiciel d'application
approprié.
4 Sélectionnez [Page Setup/Mise en page]
dans le menu [File/Fichier] du logiciel
d'application.
5 Vérifiez que [MP600] est bien sélectionné
dans [Format for/Format pour].
6 Sélectionnez le format papier souhaité dans
[Paper Size/Taille du papier].
7 Cliquez sur [OK].
8 Sélectionnez [Print/Imprimer] dans le menu
[File/Fichier] du logiciel d'application.
9 Sélectionnez [Quality & Media/Qualité et
support] dans le menu déroulant.
10 Spécifiez les paramètres requis.
Assurez-vous que [Paper Feed Switch/
Commutateur d'alimentation papier] est
sélectionné dans [Paper Source/Alimentation
papier].
Remarque
Pour plus de détails sur les autres fonctions du pilote
d'imprimante, cliquez sur pour consulter le Guide
du pilote d'imprimante en ligne. Si les manuels
en ligne ne sont pas installés, le Guide du pilote
d'imprimante en ligne ne s'affiche pas, même si
vous cliquez sur .
11 Cliquez sur [Print/Imprimer].
14
Impression depuis votre ordinateur
Page 53

Numérisation d'images
Vous pouvez numériser des images de l'appareil vers un ordinateur sans les imprimer, puis les
enregistrer aux formats de fichier habituels (JPEG, TIFF, Bitmap ou PDF). Si vous numérisez du
texte imprimé, vous pouvez utiliser le logiciel de reconnaissance optique des caractères (OCR)
pour le convertir en données texte.
Méthodes de numérisation
Numérisation avec MP Navigator
Avec MP Navigator, vous pouvez numériser des originaux chargés sur la vitre d'exposition
et visualiser les images sauvegardées sur votre ordinateur ou sur une carte mémoire.
Les documents numérisés peuvent être prévisualisés et facilement imprimés et modifiés
en fonction de vos besoins.
Vous pouvez utiliser le logiciel d'application fourni pour modifier ou imprimer le document
numérisé.
Pour connaître le fonctionnement détaillé de MP Navigator, reportez-vous au Guide de
numérisation en ligne.
Numérisation à partir du panneau de contrôle de l'appareil
1 Mettez l'appareil sous tension.
2 Placez le document original sur la vitre d'exposition.
3 Sélectionnez <Scan> (Numériser) dans l'écran ACCUEIL.
Consultez « Fonctionnement de base du panneau de contrôle », page 11.
FRANÇAIS
4 Sélectionnez l'opération de numérisation, puis appuyez sur le bouton [OK].
5 Appuyez sur le bouton [Color] (Couleur) ou [Black] (Noir).
L'opération à effectuer après la numérisation de l'original dépend du paramètre que vous
avez sélectionné à l'étape 4. Pour savoir comment modifier ce paramètre, reportez-vous
au Guide de numérisation en ligne.
Numérisation depuis un logiciel d'application
Vous pouvez numériser une image depuis un logiciel d'application compatible TWAIN ou WIA
(Windows XP uniquement) et gérer l'image numérisée dans le logiciel d'application. Pour
connaître le fonctionnement détaillé, reportez-vous au Guide de numérisation en ligne.
Numérisation d'images
15
Page 54

Copie
Copie de documents
FRANÇAIS
Cette section décrit la procédure de base pour la copie de documents.
1 Mettez l'appareil sous tension.
2 Sélectionnez <Copy> (Copie) dans l'écran ACCUEIL.
Consultez « Fonctionnement de base du panneau de contrôle », page 11.
3 Chargez le papier.
4 Veillez à sélectionner la source d'alimentation papier adéquate.
5 Spécifiez les paramètres de copie.
(1) Vérifiez le format de page, le type de support
et tout autre paramètre. Pour modifier un
paramètre, sélectionnez-le et appuyez ensuite
sur le bouton [OK].
(2) Utilisez le bouton + ou - pour spécifier le
nombre de copies.
6 Placez le document original sur la vitre
d'exposition.
7 Appuyez sur le bouton [Color] (Couleur) pour une copie en couleur ou sur [Black]
(Noir) pour une copie en noir et blanc.
(1)
(2)
Utilisation des autres fonctions de copie
Copie réduite/agrandie
Réduit ou agrandit les copies.
<Two-sided copy> (Copie recto verso)
Copie deux pages de document sur les deux faces d'une même feuille.
<Borderless copy> (Copie sans bordure)
Effectue des copies d'images en couleur de façon à ce qu'elles occupent la totalité de la page
sans marge.
<2-on-1 copy> (Copie 2-sur-1)
Copie deux pages d'originaux sur une seule feuille en réduisant chaque image.
<4-on-1 copy> (Copie 4-sur-1)
Copie quatre pages d'originaux sur une seule feuille en réduisant chaque image. Quatre mises
en page différentes sont disponibles.
<Image repeat> (Image répétée)
Copie plusieurs fois une image sur une seule page. Pour le nombre de répétitions de l'image,
vous pouvez choisir <Auto layout> (M. en page auto) ou sélectionner les paramètres prédéfinis
de l'appareil.
16
Copie
Page 55

Impression depuis une carte mémoire
Insertion de la carte mémoire
1
Mettez l'appareil sous tension.
2 Ouvrez le couvercle de l'emplacement
de carte.
3 Insérez une et une seule carte mémoire dans l'emplacement de la carte.
Type de carte Insertion de la carte
z
Carte Compact Flash (CF)
z
Microdrive
z
Carte xD-Picture*
z
SmartMedia
Insérez dans
l'emplacement
de carte gauche.
S'allume
Insérez dans
l'emplacement
de carte droit.
S'allume
FRANÇAIS
z
MEMORY STICK
z
MEMORY STICK PRO
z
MEMORY STICK Duo*
z
MEMORY STICK PRO Duo*
z
Carte mémoire SD Secure Digital
z
Carte MiniSD*
z
MultiMediaCard (v.3.31)
* Veillez à relier la carte mémoire à l'adaptateur spécial avant de l'insérer dans
l'emplacement de carte.
4 Vérifiez que le témoin Accès est allumé.
5 Fermez le couvercle de l'emplacement de carte.
Impression depuis une carte mémoire
Insérez dans la
partie centrale de
l'emplacement de
carte de droite.
S'allume
17
Page 56

Retrait de la carte mémoire
1
Ouvrez le couvercle de l'emplacement de carte.
FRANÇAIS
2 Vérifiez que le témoin Accès ne clignote pas, puis retirez la carte mémoire.
3 Fermez le couvercle de l'emplacement de carte.
Impression de photos enregistrées sur une
carte mémoire
Préparez l'impression.
1
(1) Mettez l'appareil sous tension.
(2) Chargez le papier.
(3) Veillez à sélectionner la source d'alimentation papier adéquate.
2 Insérez la carte mémoire.
(1) Sélectionnez <Memory card> (Carte mémoire) dans l'écran ACCUEIL.
Consultez « Fonctionnement de base du panneau de contrôle », page 11.
(2) Insérez la carte mémoire dans l'emplacement de carte.
3 Sélectionnez le menu d'impression.
(1) Sélectionnez <Select and print> (Sélec. et impr.), puis appuyez sur le bouton [OK].
(2) Vérifiez le format de papier, le type de support et les autres paramètres, sélectionnez
<Next> (Suivant), puis appuyez sur le bouton [OK]. Pour modifier un paramètre,
sélectionnez-le et appuyez ensuite sur le bouton [OK].
4 Sélectionnez la photo à imprimer et définissez le nombre de copies pour
chaque photo.
(1) Utilisez la [Easy-Scroll Wheel] (Molette de défilement facile) ou le bouton [ ou ]
pour afficher une photo à imprimer.
(2) Utilisez le bouton + ou - pour spécifier le nombre de copies.
(3) Répétez les étapes (1) et (2) pour définir le nombre de copies pour chaque photo.
(4) Appuyez sur le bouton [OK].
5 Lancez l'impression.
(1) Validez les paramètres d'impression. Pour
modifier un paramètre, sélectionnez-le et
appuyez ensuite sur le bouton [OK].
(2) Vérifiez le nombre total de copies des photos
sélectionnées.
(3) Vérifiez les photos sélectionnez et le nombre
de copies pour chaque photo.
(4) Modifiez les paramètres d'impression avancés.
(5) Appuyez sur le bouton [Color] (Couleur).
Le nombre choisi de copies pour chaque
photo sera imprimé.
18
Impression depuis une carte mémoire
(1)
(2)
(4) (3)
Page 57

Utilisation des autres fonctions d'impression
<Layout print> (Impr. m. en page)
Imprime des photos que vous avez collées dans la mise en page spécifiée.
<Sticker print> (Impr. autocollant)
Imprime votre photo préférée avec un cadre sur des autocollants photo Canon.
<DPOF print> (Impression DPOF)
Imprime selon les paramètres DPOF (Digital Print Order Format) de votre appareil photo
numérique, si vous les avez spécifiés.
<Captured info print> (Infos capturées)
Imprime des informations sur les photos concernant le moment de la prise de vue (info Exif)
dans la marge de l'index photo ou sur certaines photos sélectionnées.
<Photo index print> (Impression index photo)
Imprime un index de toutes les photos contenues sur une carte mémoire.
<Print all photos> (Impr. ttes images)
Imprime toutes les photos contenues sur la carte mémoire.
Utilisation de fonctions d'affichage utiles
<Change display> (Modifier affich.)
La méthode d'affichage des photos peut être modifiée.
<Trimming> (Rognage)
Permet de modifier les images affichées sur l'écran LCD en les découpant.
<Search> (Rechercher)
Si vous avez enregistré un grand nombre de photos sur la carte mémoire, vous pouvez choisir
d'afficher et d'imprimer uniquement les photos prises à une certaine date ou au cours d'un
certain laps de temps.
FRANÇAIS
Impression depuis une carte mémoire
19
Page 58

Impression à l'aide de l'index photo
1
Mettez l'appareil sous tension et chargez du papier au format A4 ou Lettre.
FRANÇAIS
2 Veillez à sélectionner la source d'alimentation papier adéquate.
3 Sélectionnez <Photo index sheet> (Index photo) dans l'écran ACCUEIL.
Consultez « Fonctionnement de base du panneau de contrôle », page 11.
4 Sélectionnez <Index sheet print> (Impr. index photo), puis appuyez sur
le bouton [OK].
5 Insérez une carte mémoire dans l'emplacement de carte.
6 Sélectionnez une plage d'images à inclure dans l'index photo, puis appuyez sur
le bouton [OK].
7 Appuyez sur le bouton [Color] (Couleur).
8 Remplissez les cercles appropriés de l'index
photo.
9 Chargez le type de papier sélectionné pour
l'index photo.
10 Sélectionnez <Scan sheet and print>
(Num. feuille et impr.), puis appuyez
sur le bouton [OK].
11 Placez l'index photo face vers le bas sur la
vitre d'exposition, puis appuyez sur [OK].
20
Impression depuis une carte mémoire
Page 59

Impression à partir d'une photo
Vous pouvez numériser des photos en vue de les imprimer à partir de l'appareil. Il est possible
d'appliquer divers effets aux images avant de les imprimer.
Numérisation d'une photo
1
Mettez l'appareil sous tension.
2 Sélectionnez <Easy photo reprint> (Retirage photo facile) dans l'écran
ACCUEIL.
Consultez « Fonctionnement de base du panneau de contrôle », page 11.
3 Soulevez le couvercle de document et placez les photos sur la vitre d'exposition.
Orientez-les face vers le bas de la manière suivante.
Originaux de 4" x 6" / 101,6 x 152,4 mm ou
5" x 7" / 127 x 177,8 mm
0,4"/10 mm
0,4"/10 mm
Originaux au format Carte de crédit
0,4"/10 mm 0,4"/10 mm
0,4"/10 mm
FRANÇAIS
0,4"/10 mm
0,4"/10 mm
4 Fermez doucement le couvercle de document, puis appuyez sur le bouton [OK].
Impression à partir d'une photo
21
Page 60

Impression de photographies numérisées
Préparez l'impression.
1
FRANÇAIS
(1) Chargez le papier.
(2) Numérisez une photo.
Consultez « Numérisation d'une photo », page 21.
(3) Veillez à sélectionner la source d'alimentation papier adéquate.
2 Sélectionnez le menu d'impression.
(1) Sélectionnez <Select and print> (Sélec. et impr.), puis appuyez sur le bouton [OK].
(2) Vérifiez le format de papier, le type de support et les autres paramètres, sélectionnez
<Next> (Suivant), puis appuyez sur le bouton [OK]. Pour modifier un paramètre,
sélectionnez-le et appuyez ensuite sur le bouton [OK].
3 Sélectionnez la photo à imprimer et définissez le nombre de copies pour
chaque photo.
(1) Utilisez la [Easy-Scroll Wheel] (Molette de défilement facile) ou le bouton [ ou ]
pour afficher la photo à imprimer.
(2) Utilisez le bouton + ou - pour spécifier le nombre de copies.
(3) Répétez les étapes (1) et (2) pour définir le nombre de copies pour chaque photo.
(4) Appuyez sur le bouton [OK].
4 Lancez l'impression.
(1) Validez les paramètres d'impression. Pour
modifier un paramètre, sélectionnez-le
et appuyez ensuite sur le bouton [OK].
(2) Vérifiez le nombre total de copies des photos
sélectionnées.
(3) Modifiez les paramètres d'impression avancés.
(4) Appuyez sur le bouton [Color] (Couleur) pour
une impression en couleur ou sur [Black]
(Noir) pour une impression en noir et blanc.
Le nombre choisi de copies pour chaque
photo sera imprimé.
(1)
(2)
(3)
Autres fonctions utiles
<Sticker print> (Impr. autocollant)
Imprime votre photo préférée sur des autocollants photo Canon afin de créer vos propres
autocollants.
<Print all photos> (Impr. ttes images)
Imprime toutes les photos numérisées.
Utilisation de fonctions d'affichage utiles
<Change display> (Modifier affich.)
La méthode d'affichage des photos peut être modifiée.
<Trimming> (Rognage)
Permet de modifier les images affichées sur l'écran LCD en les découpant.
22
Impression à partir d'une photo
Page 61

Impression directe de photographies
à partir d'un périphérique compatible
Impression à partir d'un périphérique
compatible PictBridge
Vous pouvez connecter un périphérique compatible PictBridge tel qu'un appareil photo numérique,
un caméscope ou un téléphone portable et imprimer directement les images enregistrées sans
passer par l'ordinateur.
Remarque
z PictBridge est une norme mondiale présentant toute une gamme de solutions numériques qui vous
permet, entre autres, d'imprimer vos photos directement à partir d'un appareil photo numérique, d'un
caméscope ou d'un téléphone portable* sans avoir besoin d'un ordinateur. Il est possible de connecter
un périphérique à cet appareil pour une impression directe, indépendamment du fabricant ou du
modèle du périphérique, pour autant que celui-ci soit compatible avec la norme PictBridge.
z Vous pouvez sélectionner les images à imprimer et spécifier les différents paramètres d'impression
à partir de votre appareil photo ou de votre téléphone portable.
* Les appareils photo numériques, les caméscopes numériques et les téléphones portables équipés
d'un appareil photo compatible PictBridge sont tous dénommés ci-après « périphérique compatible
PictBridge ».
Un périphérique portant cette marque est compatible PictBridge.
Connexion d'un périphérique compatible PictBridge
Pour connecter un périphérique compatible PictBridge à cet appareil, utilisez un câble USB
recommandé par le fabricant du périphérique.
Attention
Ne connectez aucun équipement autre que les périphériques compatibles PictBridge ou les
adaptateurs Bluetooth BU-20 en option au port d'impression directe de l'imprimante. Si vous
ne respectez pas ces conditions, vous risquez de provoquer une électrocution ou un incendie,
ou d'endommager l'appareil.
Remarque
Pour imprimer des photos avec le périphérique numérique connecté à l'appareil, il est conseillé
d'utiliser l'adaptateur CA fourni avec le périphérique. Si vous utilisez la batterie de ce dernier,
prenez soin de la charger complètement.
FRANÇAIS
1 Configurez l'appareil.
Reportez-vous au manuel Instructions d'installation simplifiée pour configurer l'appareil
pour l'impression.
Remarque
La tête d'impression ne peut être alignée à l'aide des commandes du périphérique compatible
PictBridge. Si l'alignement de la tête d'impression n'a pas encore été effectué et que les MP Drivers
ne sont pas installés sur l'ordinateur, veillez à aligner la tête d'impression. Pour plus de détails,
reportez-vous à « Alignement de la tête d'impression » dans le manuel Guide d'Utilisation en ligne.
2 Mettez l'appareil sous tension et chargez le papier dans l'appareil.
Impression directe de photographies à partir d'un périphérique compatible
23
Page 62

3 Connectez le périphérique compatible PictBridge à l'appareil.
Remarque
Selon le modèle ou la marque de votre périphérique, il vous faudra peut-être, avant de le
FRANÇAIS
raccorder, sélectionner un mode d'impression compatible PictBridge. Vous devrez peut-être aussi
mettre votre périphérique sous tension ou sélectionner manuellement le mode Lecture après
l'avoir connecté à l'appareil.
Effectuez les opérations nécessaires sur le périphérique compatible PictBridge avant de le
connecter à l'appareil, en respectant les instructions du manuel du périphérique.
(1) Assurez-vous que le périphérique
compatible PictBridge est hors tension.
(2) Connectez le périphérique compatible
PictBridge à l'appareil à l'aide du câble
USB recommandé par le fabricant du
périphérique.
Le périphérique se met automatiquement
sous tension.
S'il ne s'allume pas automatiquement,
mettez-le sous tension manuellement.
(3) Configurez le périphérique compatible
PictBridge pour l'impression directe.
Lorsque l'appareil est correctement
connecté, l'icône apparaît sur l'écran
LCD du périphérique.
Remarque
Si l'icône n'apparaît pas, référez-vous à la section « Impossible d'imprimer correctement
à partir d'un appareil photo numérique » du Guide d'Utilisation en ligne.
(2)
24
Impression directe de photographies à partir d'un périphérique compatible
Page 63

Impression directe de photographies à partir d'un périphérique
compatible PictBridge
Pour faire fonctionner le périphérique, suivez les instructions contenues dans le manuel
d'instructions de votre périphérique compatible PictBridge. Cette section décrit les paramètres
de format de page, de type de support, de mise en page, les modes d'optimisation de l'image
ainsi que le mode d'impression de la date qui peuvent être configurés sur un périphérique
compatible PictBridge connecté à l'appareil.
z Confirmation ou modification des paramètres d'impression PictBridge
à partir de votre appareil photo
La modification du format de page ou du type de support s'effectue en sélectionnant le mode
de configuration d'impression de PictBridge et en confirmant ou modifiant les paramètres.
À propos des paramètres décrits ci-dessous
Il se peut que certains paramètres décrits ci-dessous ne soient pas disponibles sur certains
périphériques. Dans ce cas, c'est le paramètre [Default/Standard] expliqué ci-dessous
qui s'applique.
* Dans la description suivante, les noms des paramètres sont ceux utilisés pour les
périphériques compatibles PictBridge de marque Canon. Ces noms peuvent différer
en fonction de la marque ou du modèle de votre périphérique.
Les paramètres ci-dessous peuvent être modifiés dans l'écran <PictBridge settings>
(Param. PictBridge) de l'appareil lorsqu'un périphérique compatible PictBridge est connecté.
Cependant, des modifications ne peuvent être effectuées sur l'écran <PictBridge settings>
(Param. PictBridge) de l'appareil que lorsque les éléments correspondants ci-dessous sont
dans les paramètres « par défaut » (sélections en fonction de la configuration de l'appareil)
sur le périphérique compatible PictBridge.
Consultez « Confirmation ou modification des paramètres d'impression PictBridge sur
l'appareil », page 28.
Paramètres du périphérique
compatible PictBridge
Format de papier :
[Default/Standard]
Type de papier :
[Default/Standard]
Mise en page :
[Default/Standard]
Optimiseur d'image :
[Default/Standard]
Paramétrage sur l'écran de configuration de l'impression
L'écran <PictBridge settings> (Param. PictBridge) vous
permet de modifier les paramètres suivants :
<Page size> (Format page), <Media type> (Type de
support), <Bordered> (Avec bordure)/<Borderless>
(Sans bordure)
Pour les paramètres, voir « Configuration des éléments »,
page 28.
L'écran <PictBridge settings> (Param. PictBridge)
vous permet de modifier les paramètres suivants :
<Photo opt. Pro> (Photo opt Pro), <Vivid photo>
(Vivid Photo), <Face brightener> (Éclairc. visage),
<Noise reduction> (Réduct. bruit), <Image optimizer>
(Image opt.), <Red eye correc.> (Corr. yeux rges),
<Brightness> (Luminosité), <Contrast> (Contraste),
<Color hue> (Teinte), <Effects> (Effets)
Pour les paramètres, voir « Configuration des éléments »,
page 28.
FRANÇAIS
z Format des données image imprimables
Cet appareil imprime des images prises avec un appareil photo numérique* compatible
®
(Design rule for Camera File system) ainsi que les fichiers PNG.
DCF
* Compatible Exif2.21
Impression directe de photographies à partir d'un périphérique compatible
25
Page 64

FRANÇAIS
z Paramètres de format et type de papier
Si ces paramètres sont définis sur [Default/Standard] (afin de suivre le paramètre de
l'appareil) sur le périphérique compatible PictBridge, ce sont les <Page size> (Format page)
et <Media type> (Type de support) spécifiés dans les <PictBridge settings> (Param.
PictBridge) de l'appareil qui s'appliquent.
Selon les paramètres [Paper size/Format papier] et [Paper type/Type de papier],
vous pouvez chargez du papier à imprimer aux formats et de type suivants :
Réglage du format
de papier
Réglage du type
de papier
Papier à charger
10 x 15 cm/4" x 6" [Photo] [Photo Paper Plus Glossy/Papier Photo Glacé Extra]
[Fast Photo/Ph. Glacé] [Photo Paper Pro/Papier Photo Professionnel]
[Photo] [Photo Paper Plus Semi-gloss/Papier Photo Satiné]
[Photo] [Glossy Photo Paper/Papier Photo Glacé]
[Glossy Photo Paper “Everyday Use”/
Papier Photo Glacé Standard]
[Photo Paper Glossy/Papier photo glacé]
[Photo Stickers/Photos Autocollantes]
13 x 18 cm/5" x 7"
*3, *4
A4
*2
[Photo] [Photo Paper Plus Glossy/Papier Photo Glacé Extra]
[Photo] [Photo Paper Plus Glossy/Papier Photo Glacé Extra]
[Fast Photo/Ph. Glacé] [Photo Paper Pro/Papier Photo Professionnel]
[Photo] [Photo Paper Plus Semi-gloss/Papier Photo Satiné]
[Photo] [Glossy Photo Paper/Papier Photo Glacé]
[Photo] [Glossy Photo Paper “Everyday Use”/
Papier Photo Glacé Standard]
8,5" x 11" (Lettre)
*3, *4
[Photo] [Photo Paper Plus Glossy/Papier Photo Glacé Extra]
[Fast Photo/Ph. Glacé] [Photo Paper Pro/Papier Photo Professionnel]
[Photo] [Photo Paper Plus Semi-gloss/Papier Photo Satiné]
[Photo] [Glossy Photo Paper/Papier Photo Glacé]
[Photo] [Photo Paper Glossy/Papier photo glacé]
5,4 x 8,6 cm/
[Photo] [Glossy Photo Paper/Papier Photo Glacé]
Cartedecrédit
20 x 25 cm/8" x 10"*7[Fast Photo/Ph. Glacé] [Photo Paper Pro/Papier Photo Professionnel]
10,1 x 18 cm/4" x 7,1"*2[Fast Photo/Ph. Glacé] [Photo Paper Pro/Papier Photo Professionnel]
*1
Utilisé exclusivement pour imprimer des photos autocollantes. Pour imprimer sur du papier
autocollant, sélectionnez 10 x 15 cm/4" x 6" dans [Paper size/Format papier].
*2
Ne peut être sélectionné que sur certains périphériques compatibles PictBridge
de marque Canon.
*3
Vous ne pouvez sélectionner [Plain Paper/Ordinaire] comme [Paper type/Type de papier]
que si vous avez sélectionné A4 ou 8,5" x 11" (Lettre) sous [Paper size/Format papier].
Si [Plain Paper/Ordinaire] est sélectionné sous [Paper type/Type de papier], l'impression
sans bords sera désactivée même si vous avez sélectionné [Borderless/Sans bords] sous
[Layout/Mise en page].
*4
Lorsque A4 ou 8,5" x 11" (Lettre) est sélectionné pour [Paper size/Format papier],
vous pouvez imprimer dans une mise en page [4-up/4 plus].
*5
L'introduction de ce type de papier via la cassette risque d'endommager l'appareil. Placez-le
dans le chargeur automatique.
*6
Il est possible que certains papiers de marque Canon ne soient pas disponibles dans votre pays.
*7
Lorsque vous imprimez sur du papier photo satiné au format 8" x 10" / 203,2 x 254,0 mm
(SG-201), sélectionnez 20 x 25 cm/8" x 10" comme [Paper size/Format papier] et
[Default/Standard] comme [Paper type/Type de papier].
* Sélectionnez <Photo Plus Glossy> (Photo Plus glacé) comme <Media type>
(Type de support) dans l'écran <PictBridge settings> (Param. PictBridge) de l'appareil.
Reportez-vous à la section « Confirmation ou modification des paramètres d'impression PictBridge
sur l'appareil », page 28.
*6
*1, *5
26
Impression directe de photographies à partir d'un périphérique compatible
Page 65

z Paramètres de mise en page et de rognage
Si [Layout/Mise en page] est défini sur [Default/Standard] (afin de suivre le paramètre
de l'appareil) sur le périphérique compatible PictBridge, ce sont les paramètres spécifiés dans
les <PictBridge settings> (Param. PictBridge) de l'appareil qui sont appliqués. Le paramètre
du périphérique compatible PictBridge s'applique au paramètre [Trimming/Rogner].
Pour l'impression sur des photos autocollantes (PS-101), sélectionnez [N-up/N-plus] pour
[Layout/Mise en page], puis [16-up/16-Plus].
* Certains périphériques compatibles PictBridge affichent les options de mise en page
[2-up/2-Plus], [4-up/4-Plus], [9-up/9-Plus] et [16-up/16-Plus]. Dans ce cas, sélectionnez
toujours[16-up/16-Plus].
* Si aucune option du périphérique compatible PictBridge ne correspond à [16-up/16-Plus],
l'impression d'autocollants est impossible.
* Pour imprimer sur des photos autocollantes (PS-101), ne sélectionnez pas [Borderless/
Sans bords] dans [Layout/Mise en page].
z Paramètre d'optimisation des images
Si [Image optimize/Optimisation des images] a la valeur [Default/Standard] (afin de
suivre le paramètre de l'appareil) sur le périphérique compatible PictBridge, le paramètre
d'impression défini dans les <PictBridge settings> (Param. PictBridge) de l'appareil
s'applique. Pour plus de détails sur ce paramètre, consultez « Confirmation ou modification
des paramètres d'impression PictBridge à partir de votre appareil photo », page 25.
Si vous utilisez un périphérique compatible PictBridge de marque Canon, d'autres options
telles que [VIVID], [NR], [Face/Visage] ou [Red eye/Yeux rouges] peuvent être
disponibles, selon le modèle.
* [VIVID] imprime les zones bleues et vertes des photos en couleurs vives.
[NR] (Noise Reduction/Réduction du bruit) diminue le bruit dans les zones bleues,
telles que le ciel, et les zones sombres.
[Face/Visage] corrige le contraste des images rétroéclairées.
[Red eye/Yeux rouges] corrige les yeux rouges.
z Paramètre d'impression de date/de numéro de fichier
Vous ne pouvez pas modifier ce paramètre sur cet appareil. C'est le paramètre
du périphérique compatible PictBridge qui s'applique.
Si les dates sont déjà surimprimées lors de la prise de photos, sélectionnez [Off]
pour ce paramètre de PictBridge. Si vous sélectionnez [Date], [File No./N° fich.] ou [Both/
Les deux], la date et/ou le numéro de fichier sera imprimé au-dessus de la date déjà inscrite
par la fonction de l'appareil photo.
z Autres paramètres
Les autres options suivantes sont disponibles pour les périphériques compatibles PictBridge
de marque Canon, selon le modèle. Pour plus d'informations, reportez-vous au manuel
d'instructions de votre périphérique compatible PictBridge de marque Canon.
Informations de prise de vue (données Exif)
Vous pouvez imprimer des informations de prise de vue (données Exif) sur les photos au
format liste ou dans les marges des photos spécifiées. Sélectionnez [Layout/Mise en page],
puis choisissez l'élément auquel est associée l'icône « i ».
Présentation style film de 35 mm (impression par contact)
Vous pouvez imprimer des photos sélectionnées ou certaines photos de l'index en
présentation style film de 35 mm (impression par contact).
Sous [Layout/Mise en page], sélectionnez l'élément auquel est associée l'icône « film ».
FRANÇAIS
Remarque
z Ne déconnectez jamais le câble USB pendant une impression, sauf si cela est explicitement
autorisé par le périphérique compatible PictBridge.
Pour déconnecter le câble USB reliant le périphérique compatible PictBridge et l'appareil,
suivez les instructions fournies dans le manuel d'instructions du périphérique.
z Les opérations suivantes ne peuvent être réalisées ou configurées sur un périphérique
compatible PictBridge.
– Paramétrage de la qualité d'impression
– Entretien de l'appareil
Impression directe de photographies à partir d'un périphérique compatible
27
Page 66

z Confirmation ou modification des paramètres d'impression PictBridge
sur l'appareil
Vous pouvez valider ou modifier les paramètres d'impression tels que le type et le format du
support prédéfinis sur l'appareil et appliqués à l'impression PictBridge.
FRANÇAIS
z Affichage de l'écran des paramètres PictBridge et configuration
des paramètres
(1) Mettez l'appareil sous tension.
(2) Sélectionnez <Settings> (Paramètres) dans l'écran ACCUEIL.
Consultez « Fonctionnement de base du panneau de contrôle », page 11.
(3) Sélectionnez <Device settings> (Param. périphérique), puis appuyez sur le bouton [OK].
(4) Sélectionnez <PictBridge settings> (Param. PictBridge), puis appuyez sur le bouton [OK].
(5) Sélectionnez le paramètre à régler, puis appuyez sur le bouton [OK].
(6) Sélectionnez le paramètre, puis appuyez sur le bouton [OK].
(7) Validez les paramètres d'impression, sélectionnez <Next> (Suivant) et appuyez sur
le bouton [OK].
(8) Répétez les étapes (5) et (6) pour définir le paramètre.
(9) Après avoir défini tous les paramètres requis, sélectionnez <OK> (OK), puis appuyez sur
le bouton [OK].
z Configuration des éléments
<Page size> (Format page)
Sélectionnez le format de page lors de l'impression directe au départ d'un périphérique
compatible PictBridge.
<Media type> (Type de support)
Sélectionnez le type de support lors de l'impression directe au départ d'un périphérique
compatible PictBridge.
<Print quality> (Qualité d'impr.)
Sélectionnez la qualité d'impression lors de l'impression directe au départ d'un
périphérique compatible PictBridge.
<Bordered> (Avec bordure)/<Borderless> (Sans bordure)
Sélectionnez une impression avec ou sans bordure.
<Photo opt.pro> (Photo opt pro)
Activez/désactivez la fonction Photo Optimizer PRO.
Cette fonction optimise automatiquement la luminosité et la teinte d'une photo.
<Vivid photo> (Vivid Photo)
Activez/désactivez la fonction Vivid Photo.
Cette fonction rend le vert et le bleu plus vifs.
<Face brightener> (Éclairc. visage)
Activez/désactivez la fonction Éclaircisseur de visage.
Cette fonction illumine un visage sombre sur une photo prise à contre-jour.
<Noise reduction> (Réduct. bruit)
Activez/désactivez la fonction Réduction de bruit.
Cette fonction réduit le bruit dans les zones bleues comme le ciel, ainsi que dans
les zones sombres.
<Image optimizer> (Image Opt.)
Activez/désactivez la fonction Image optimizer.
Cette fonction corrige et adoucit les contours irréguliers pour l'impression.
<Red eye correc.> (Corr. yeux rges)
Activez/désactivez la correction des yeux rouges.
Corrige les yeux rouges, dans les portraits, dus à photographie au flash.
<Brightness> (Luminosité)
Réglez la luminosité.
28
Impression directe de photographies à partir d'un périphérique compatible
Page 67

<Contrast> (Contraste)
Réglez le contraste.
<Color hue> (Teinte)
Réglez la teinte.
<Effects> (Effets)
Applique des effets spéciaux à la photo, comme l'impression en sépia ou avec une
illustration.
FRANÇAIS
Impression directe de photographies à partir d'un périphérique compatible
29
Page 68

Remplacement d'un réservoir d'encre
Lorsque des réservoirs d'encre sont vides, suivez la procédure ci-dessous pour les remplacer.
1 Ouvrez le bac de sortie papier.
FRANÇAIS
2 Vérifiez que l'appareil est sous tension, puis
soulevez l'unité de numérisation (capot de
l'imprimante) jusqu'à ce qu'elle s'arrête.
3 Ouvrez le panneau interne.
4 Poussez la languette du réservoir d'encre
dont le témoin clignote rapidement (A)
et enlevez-le.
Ne touchez pas le levier de verrouillage de la tête
d'impression (B).
30
Remplacement d'un réservoir d'encre
(B)(A)
Page 69

5 Sortez le nouveau réservoir d'encre de son
emballage, puis tirez la languette orange
dans le sens de la flèche (A) afin que le film
protecteur ne bloque plus le trou d'aération
(B). Retirez complètement le film (C).
(A)
FRANÇAIS
(C)
(B)
6 Retirez la capsule de protection orange (A)
située sous le réservoir d'encre.
Lors du retrait de la capsule de protection, tenez-la
soigneusement pour éviter de vous tacher
les doigts, puis jetez-la.
Important
Ne touchez pas les contacts électriques (B) du
réservoir d'encre. Sinon l'appareil risque de mal
fonctionner ou de ne pas fonctionner du tout.
7 Insérez l'extrémité avant du réservoir d'encre
dans la tête d'impression.
Veillez à ce que la position du réservoir
corresponde à l'étiquette (A).
8 Appuyez sur le repère du réservoir
jusqu'à ce que vous entendiez un déclic.
Vérifiez que le témoin Encre (A) est bien allumé
et rouge.
(A)
(B)
(A)
(A)
Remplacement d'un réservoir d'encre
31
Page 70

9 Refermez le panneau interne.
FRANÇAIS
10 Refermez doucement l'unité de numérisation (capot de l'imprimante).
32
Remplacement d'un réservoir d'encre
Page 71

ČESKY
Stručná příručka
Obsah
Jak používat dodanou dokumentaci 2
Použití příruček online 3
Příprava přístroje 4
Instalace ovladačů MP 6
Úvod 7
Volba jazyka displeje 8
Vložení papíru 9
Základní operace na ovládacím panelu 11
Tisk z počítače13
Skenování obrázků 15
Kopírování 16
Tisk z pamět’ové karty 17
Tisk fotografií z fotoaparátu 21
Tisk fotografií přímo z kompatibilního zařízení 23
Výměna nádržky s inkoustem 30
Page 72

ČESKY
.
Exif Print
Tento přístroj podporuje tisk Exif Print.
Exif Print je standardní formát pro zlepšení komunikace mezi digitálními fotoaparáty a
tiskárnami. Po připojení k digitálnímu fotoaparátu kompatibilnímu se standardem Exif Print
budou k optimalizaci použita data fotoaparátu nastavená při zhotovení snímku, čímž je
možné dosáhnout velmi vysoké kvality výtisku.
Kanadské předpisy o rušení rádiového příjmu
Tento digitální přístroj nepřekračuje limity třídy B pro emise rádiového záření
produkovaného digitálními přístroji stanovené v normě pro zařízení způsobující rušení
„Digital Apparatus“ (Digitální přístroje), ICES-003 Industry Canada.
Cet appareil numérique respecte les limites de bruits radioélectriques applicables aux
appareils numériques de Classe B prescrites dans la norme sur le matériel brouilleur
NMB-003 d'Industrie Canada intitulée « Appareils numériques ».
Mezinárodní program ENERGY STAR
®
Společnost Canon Inc. jako partner programu ENERGY STAR® potvrzuje, že tento výrobek
vyhovuje směrnicím ENERGY STAR.
Mezinárodní program ENERGY STAR
®
pro kancelářská zařízení je
celosvětový program prosazující úspory energie při používání
počítačového a dalšího kancelářského zařízení. Program podporuje vývoj
a šíření výrobků vybavených funkcemi, které účinně snižují spotřebu
energie. Jedná se otevřený program, do kterého se mohou výrobci zapojit
dobrovolně. Program je zaměřen na kancelářskou techniku, jako jsou
počítače, monitory, tiskárny, faxová a kopírovací zařízení.
Účastníci používají sjednocené normy a označení.
Požadavky na napájení
Nepoužívejte jiné napájecí napětí, než které je určeno pro zemi, kde byla tiskárna
zakoupena. Při použití nesprávného napájecího napětí hrozí nebezpečí požáru nebo úrazu
elektrickým proudem. Správná napájecí napětí a frekvence:
100-240 V stř., 50/60 Hz
Spotřební materiál
Spotřební materiál (nádržky s inkoustem, kazety FINE) jsou dostupné po dobu 5 let po
ukončení výroby.
Přečtěte si také téma Bezpečnostní opatření v Uživatelské příručce online. Dbejte varování a výstrah,
předejdete tak zranění nebo poškození přístroje.
Číslo modelu: K10287 (MP600)
Page 73

Bezpečnostní opatření
Výstraha
z Tento produkt vyzařuje slabé magnetické pole. Pokud používáte kardiochirurgické stimulátory a v
blízkosti zařízení ucítíte nezvyklý pocit, odejděte od zařízení a obrat’te se na svého lékaře.
z Nikdy nezapojujte nebo neodpojujte napájecí kabel tiskárny, máte-li mokré ruce.
z Nikdy kabel nepoškozujte, neupravujte, nenapínejte, nadměrně neohýbejte nebo nepřekrucujte.
Nepokládejte na napájecí kabel těžké předměty.
z Nepoužívejte jiný než standardní napájecí kabel, který byl zakoupen s tiskárnou. Při použití
nesprávného napájecího napětí a frekvence hrozí nebezpečí požáru nebo úrazu elektrickým proudem.
z Zástrčku vždy zatlačte do elektrické zásuvky až nadoraz.
Upozornění
z Z bezpečnostních důvodů uschovejte nádržky s inkoustem mimo dosah dětí.
z Neupust’te nádržky s inkoustem na zem ani je neprotřepávejte, inkoust by mohl vytéci a potřísnit ruce
aoděv.
Pouze pro Evropskou unii (a EHP)
Tento symbol znamená, že podle směrnice o OEEZ (2002/96/ES) a podle
vnitrostátních právních předpisů nemá být tento výrobek likvidován s
odpadem z domácností. Tento výrobek má být vrácen do sběrného místa,
např. v rámci autorizovaného systému odběru jednoho výrobku za jeden nově
prodaný podobný výrobek nebo v autorizovaném sběrném místě pro recyklaci
odpadních elektrických a elektronických zařízení (OEEZ). Nevhodné
nakládání s tímto druhem odpadu by mohlo mít negativní dopad na životní
prostředí a lidské zdraví, protože elektrická a elektronická zařízení zpravidla
obsahují potenciálně nebezpečné látky. Vaše spolupráce na správné likvidaci
tohoto výrobku současně napomůže efektivnímu využívání přírodních zdrojů.
Další informace o místech sběru vašeho odpadního zařízení k recyklaci vám
sdělí místní úřad vaší obce, správní orgán vykonávající dozor nad likvidací
odpadu, sběrny OEEZ nebo služba pro odvoz komunálního odpadu.
Další informace týkající se vracení a recyklace OEEZ naleznete na adrese
www.canon-europe.com/environment
(EHP: Norsko, Island a Lichtenštejnsko)
.
ČESKY
Pouze pro zákazníky v Evropě, na Blízkém Východě,
v Africe a Rusku
Kontakt na službu technické podpory Canon Customer Support najdete na zadní straně záruční
brožury European Warranty Systems (EWS) nebo na adrese www.canon-europe.com.
Canon Europa N.V., Bovenkerkerweg 59-61, 1185 XB Amstelveen, The Netherlands
ID Bluetooth: B02954
1
Page 74

Jak používat dodanou dokumentaci
Instalační leták (tištěná dokumentace)
Tento list si přečtěte nejdříve.
Obsahuje pokyny k nastavení přístroje k používání.
ČESKY
Stručná příručka (tato příručka)
Tuto příručku si přečtěte při zahájení práce s přístrojem.
Po provedení postupů uvedených v příručce Instalační leták doporučujeme
přečíst si tuto příručku, abyste se seznámili s ovládáním některých základních
funkcí přístroje.
Příručky online
Uživatelská příručka
Tuto příručku si přečtěte při zahájení práce s přístrojem.
Pokud příručka Stručná příručka neposkytuje dostatek informací, další
informace naleznete v příručce Uživatelská příručka, kterou lze nainstalovat z
instalačního disku CD [Setup CD-ROM/CD Instalace]. Tato příručka poskytuje
podrobné informace pro:
z tisk z počítače,
z přímý tisk fotografií z vybraných digitálních fotoaparátů,
z kopírování,
z skenování.
K pokročilým vlastnostem jsou k dispozici doplňující příručky.
Průvodce skenováním
Tato příručka obsahuje úplné pokyny ke skenování a jeho nastavení.
Příručka ovladače tiskárny
Tato příručka obsahuje úplné pokyny k nastavení ovladače tiskárny.
Příručka pro fotoaplikace
Tato příručka obsahuje pokyny k práci s jednotlivými aplikacemi, které jsou k
dispozici na disku CD-ROM [Setup CD-ROM/CD Instalace].
[Bluetooth User's Guide/Uživatelská příručka Bluetooth]
Tato příručka obsahuje úplné pokyny k tisku z počítačů a zařízení podporujících
komunikaci Bluetooth a řešení problémů s nimi.
2 Jak používat dodanou dokumentaci
Page 75

Použití příruček online
S přístrojem se kromě této příručky Stručná příručka dodávají také příručky online. Podrobné
pokyny k instalaci příruček online naleznete na instalačním letáku.
Důležité
Pro uživatele v zemích mimo USA, Kanadu a jižní Ameriku:
Informace o tisku na disky DVD/CD naleznete v příručce online [DVD CD Print Guide/Příručka k tisku na
disky DVD a CD].
Příručky online je možné zobrazit následujícím způsobem:
Chcete-li zobrazit příručku online, poklepejte na ikonu MP600 [On-screen Manual/Příručka online]
na pracovní ploše nebo klepněte na položku [Start] > [All Programs/Všechny programy]
(nebo [Programs/Programy]) > [Canon MP600 Manual/Příručka pro tiskárnu Canon MP600] >
MP600 [On-screen Manual/Příručka online].
Požadavky na systém
Prohlížeč: Prohlížeč nápovědy ve formátu HTML pro systém Windows
Poznámka
z Musí být nainstalována aplikace Microsoft Internet Explorer® 5.0 nebo novější.
z V závislosti na operačním systému nebo verzi aplikace Internet Explorer se elektronické
příručky nemusejí zobrazovat správně. Doporučujeme aktualizovat systém prostřednictvím
služby Windows Update.
Chcete-li zobrazit příručku online, poklepejte na zástupce MP600 [On-screen Manual/
Příručka online] na ploše.
®
ČESKY
Poznámka
Uživatelé v Asii
Jestliže jste nainstalovali Uživatelskou příručku ze složky [Manual/Příručka] na disku [Setup CD-ROM/
CD Instalace], otevřete složku, do které jste zkopírovali Uživatelskou příručku, a poklepejte na soubor
top.htm.
Požadavky na systém
Prohlížeč: Prohlížeč nápovědy
Poznámka
z V závislosti na operačním systému se příručky online nemusejí zobrazovat správně.
Doporučujeme aktualizovat systém.
z K zobrazení příruček online ve formátu HTML doporučujeme jako webový prohlížeč používat
aplikaci Safari. Jestliže není v počítači aplikace Safari nainstalována, stáhněte ji z webu
společnosti Apple Computer, Inc. a nainstalujte ji.
3Použití příruček online
Page 76

Příprava přístroje
Nejprve si pročtěte instalační leták, kde naleznete informace o instalaci a přípravě přístroje k použití.
Rozbalení přístroje
Zkontrolujte dodané položky podle obrázků na víku krabice.
ČESKY
z Nepřipojujte kabel USB, dokud není nainstalován software.
z Pro připojení přístroje k počítači je třeba použít kabel USB.
1 Zapněte přístroj.
Důležité
Upozornění
Před zapnutím přístroje se ujistěte, že jste odstranili všechny pásky.
Poznámka
z Umístění pásky se může lišit.
z Pokud se na displeji LCD zobrazí jiný než požadovaný jazyk, stisknutím tlačítka [Back] (Zpět)
se vrátíte zpět na obrazovku <Language selection> (Výběr jazyka).
2 Nainstalujte tiskovou hlavu.
Upozornění
Kromě zajišt’ovací páčky tiskové hlavy se nedotýkejte žádné vnitřní části tiskárny.
Důležité
Pokud je skener (kryt tiskárny) otevřený déle než 10 minut, držák tiskové hlavy se přesune
doprava. V tomto případě zavřete skener (kryt tiskárny) a znovu jej otevřete.
Poznámka
z Uvnitř obalu, ve které byla tisková hlava dodána, nebo v ochranném krytu se mohou nacházet
zbytky průhledného nebo světle modrého inkoustu, který však nemá žádný vliv na kvalitu tisku.
Při manipulaci s tiskovou hlavou dejte pozor, abyste se nepotřísnili inkoustem.
z Po sejmutí nenasazujte ochranný kryt zpět na tiskovou hlavu.
3 Nainstalujte nádržky s inkoustem.
Důležité
z Ujistěte se, že všechny nádržky s inkoustem jsou nainstalovány ve správných pozicích (podle
štítků). Přístroj nesmí být používán, dokud nejsou nainstalovány všechny inkoustové nádržky.
z Před pokračováním počkejte 2 minuty, dokud přístroj nepřestane vydávat zvuky.
Poznámka
z Nezapomeňte odstranit z nádržky s inkoustem průhlednou fólii přesně v pořadí, jak je uvedeno
v kroku 3 na instalačním letáku.
z Dbejte, abyste nestiskli stěny nádržky s inkoustem; inkoust by mohl vytéci a potřísnit ruce
aoděv.
z Jakmile odstraníte ochranný kryt, již ho nevracejte zpět.
z Pokud nádržka s inkoustem není správně nainstalována, na displeji LCD se zobrazí chybová
zpráva. Otevřete skener (kryt tiskárny) a ujistěte se, že všechny nádržky s inkoustem
odpovídají štítkům v tiskárně.
4 Příprava přístroje
Page 77

4 Vložte papír.
V následujícím postupu budete vyzváni k nastavení tiskové hlavy; budete potřebovat list
běžného papíru o velikosti A4 nebo Letter, vložený do automatického podavače listů.
Důležité
z Pokud vkládáte papír do automatického podavače listů, rozsvítí se indikátor
Automatický podavač listů.
z Papír vkládejte vždy na výšku. Při vložení papíru na šířku může dojít k uvíznutí papíru.
Poznámky k nastavení tiskové hlavy
z Proces nastavení tiskové hlavy trvá přibližně 6 minut. Během tisku neotevírejte skener
(kryt tiskárny).
z Pokud se vzorek úspěšně nevytiskne, naleznete další informace v části ”Na displeji je
zobrazena chybová zpráva” v příručce online Uživatelská příručka.
Důležité
Tisk na disky DVD/CD není dostupný u přístrojů prodávaných v USA, v Kanadě, ve všech zemích jižní
Ameriky a v některých dalších zemích a oblastech.
ČESKY
5Příprava přístroje
Page 78

Instalace ovladačů MP
Společné informace pro systémy Windows a Macintosh
Poznámky k instalaci
z Pokud se objeví obrazovka [Select Language/Vybrat jazyk], zvolte požadovaný jazyk a
klepněte na tlačítko [Next/Další].
z Jestliže se objeví obrazovka [Select Your Place of Residence/Vyberte vaše bydliště],
ČESKY
zvolte příslušné umístění a klepněte na tlačítko [Next/Další].
z K dispozici jsou dva způsoby instalace ovladačů MP a dalšího softwaru:
[Easy Install/Jednoduchá instalace]: Položky obsažené na disku [Setup CD-ROM/
CD Instalace] jsou nainstalovány automaticky.
[Custom Install/Uživatelská instalace]: Uživatel může vybrat položky, které se mají
nainstalovat.
z Po zobrazení okna [User Registration/Registrace uživatele] klepněte na tlačítko [Register/
Registrovat]; pokud je počítač připojen k Internetu, zobrazí se online pokyny k registraci
produktu.
z Registraci lze také provést pomocí ikony na pracovní ploše po dokončení instalace.
®
Informace pro systém Windows
Poznámka
z Pokud instalujete ovladače řady MP v operačním systému Windows XP nebo Windows 2000,
přihlaste se do systému jako člen skupiny [Administrators/Správci].
z Před instalací ovladačů vypněte všechny antivirové programy a programy s automatickým
spouštěním.
z Pokud se automaticky zobrazí následující okno, odpojte
kabel USB připojený k počítači. Poté klepnutím na
tlačítko [Cancel/Storno] obrazovku zavřete a vypněte
počítač. Potom spust’te instalaci znovu. Podrobné
informace o instalaci naleznete v instalačním letáku.
z Chcete-li nainstalovat součást Adobe® RGB (1998),
klepněte na tlačítko [Custom Install/Uživatelská
instalace] a postupujte podle pokynů na obrazovce.
z Součást Adobe RGB (1998) nelze nainstalovat v
systému Windows Me a Windows 98.
z Po zobrazení výzvy k potvrzení restartování počítače
během instalace klepněte na tlačítko [OK]. Systém se
automaticky restartuje.
z Pokud připojení není rozpoznáno, přečtěte si část
„Nelze nainstalovat ovladače MP“ v příručce online Uživatelská příručka.
Informace pro systém Macintosh
Poznámka
Před instalací ovladačů MP vypněte všechny antivirové programy a automaticky spouštěné
programy nebo je odstraňte ze systémové složky.
Uživatelé v Asii
Chcete-li nainstalovat příručku online Uživatelská příručka online v jiném jazyce, než v jakém byla
nainstalována, poklepejte na složku [Manual/Příručka] na disku [Setup CD-ROM/CD Instalace],
dále na složku [Canon] a potom zkopírujte složku jazyka na pevný disk.
6 Instalace ovladačů MP
Page 79

Úvod
Děkujeme za zakoupení produktu Canon MP600.
Následující symboly v této Stručné příručce označují důležité informace. Pokynům označeným
těmito symboly věnujte vždy zvýšenou pozornost.
Výstraha
Při nedodržení pokynů hrozí nebezpečí smrti nebo vážného zranění způsobeným nesprávným
používáním zařízení. Tyto pokyny je třeba dodržovat pro zajištění bezpečného provozu.
Upozornění
Při nedodržení těchto pokynů hrozí nebezpečí zranění osob nebo poškození majetku způsobeným
nesprávným používáním zařízení. Tyto pokyny je třeba dodržovat pro zajištění bezpečného provozu.
Důležité
Tyto pokyny je třeba dodržovat pro zajištění bezpečného provozu.
Ochranné známky
z „Windows“ a „Internet Explorer“ jsou ochranné známky společnosti Microsoft Corporation
registrované v USA a v dalších zemích.
z „Macintosh“ a „Mac“ jsou ochranné známky společnosti Apple Computer, Inc. registrované v
USA a v dalších zemích.
z „Adobe“ a „Adobe RGB (1998)“ jsou registrované ochranné známky nebo ochranné známky
společnosti Adobe Systems Incorporated v USA anebo dalších zemích.
z „SmartMedia“ je ochranná známka společnosti Toshiba Corporation.
z „MEMORY STICK“, „Memory Stick PRO“, „MEMORY STICK Duo“ a „Memory Stick Pro Duo“
jsou ochranné známky společnosti Sony Corporation.
z „xD-Picture Card“ je ochranná známka společnosti Fuji Photo Film Co., Ltd.
z „MultiMediaCard“ je ochranná známka společnosti MultiMediaCard Association.
z „SD card“ a „miniSD Card“ jsou ochranné známky společnosti SD Association.
z Technické údaje se mohou měnit bez předchozího upozornění.
Copyright ©2006 CANON INC.
Všechna práva vyhrazena. Šíření nebo kopírování jakékoli části této publikace libovolným
způsobem bez předchozího výslovného písemného svolení je zakázáno.
ČESKY
7Úvod
Page 80

Volba jazyka displeje
1 Stiskněte tlačítko [HOME] (DOMŮ). Počkejte přibližně 5 sekund, vyberte položku
a potom stiskněte tlačítko [OK].
2 Stisknutím tlačítka ] vyberte a poté stiskněte tlačítko [OK].
3 Stiskněte čtyřikrát tlačítko } a poté stiskněte tlačítko [OK].
ČESKY
Pokud je připojena jednotka Bluetooth, stiskněte tlačítko } pětkrát a potom stiskněte
tlačítko [OK].
4 Stisknutím tlačítka { nebo } vyberte jazyk, který chcete zobrazit, a poté stiskněte
tlačítko [OK].
8 Volba jazyka displeje
Page 81

Vložení papíru
Některé typy a velikosti papíru nelze vkládat do kazety a je třeba použít automatický podavač listů.
Pokud chcete použít pouze kazetu, prostudujte si nejprve veškerá omezení.
Důležité
z Oříznete-li běžný papír na rozměry 4" x 6"/101,6 x 152,4 mm, 5" x 7"/127,0 x 177,8 mm nebo
2,13" x 3,39"/54,0 x 86,0 mm (formát kreditní karty) pro zkušební tisk, může dojít k uvíznutí papíru.
z Papír vkládejte vždy na výšku. Při vložení papíru na šířku může dojít k uvíznutí papíru.
1 Vytáhněte kazetu z přístroje.
2 Vložte papír do kazety tiskovou stranou
DOLŮ. Stoh papíru zarovnejte k její
pravé straně.
Stoh papíru nesmí přesahovat limitní značku výšky
stohu (A).
3 Posuňte vodítka papíru (B) k vloženému
stohu.
(A)
ČESKY
4 Vložte kazetu do přístroje.
Zasuňte kazetu do přístroje až nadoraz.
(B)
9Vložení papíru
Page 82

5 Zasuňte prst do kulatého výřezu výstupní
přihrádky na papír (A) a zlehka ji otevřete.
Poté otevřete nástavec výstupní přihrádky
(B).
6 Stiskněte tlačítko [Paper Feed Switch]
(Přepínač podávání) (C); rozsvítí se
ČESKY
indikátor Kazeta (D).
(C)
(A)
(D)
(B)
10 Vložení papíru
Page 83

Základní operace na ovládacím panelu
(A) Tlačítko [HOME] (DOMŮ)
(B) [Easy-Scroll Wheel] (Otočný ovladač)
(C) Tlačítko [OK]
(A) (B) (C)
[Easy-Scroll Wheel] (Otočný ovladač)
Otočením otočného ovladače [Easy-Scroll Wheel] (Otočný ovladač) doleva nebo doprava
vyberete položku nastavení. Vybraná položka je zvýrazněna nebo se okolo ní zobrazí rámeček.
K výběru položek nastavení slouží také tlačítka {, }, [ a ].
Tlačítko [HOME] (DOMŮ)
Ta to část popisuje postup zobrazení jednotlivých režimů z obrazovky DOMŮ.
1 Zobrazte obrazovku DOMŮ.
(1) Stiskněte tlačítko [HOME] (DOMŮ).
Zobrazí se obrazovka DOMŮ.
ČESKY
2 Vyberte režim.
(1) Otočením ovladače [Easy-Scroll Wheel]
(Otočný ovladač) vyberte režim a potom
stiskněte tlačítko [OK].
Příklad: Vyberte položku <Memory card>
(Pamět’ová karta).
Zobrazí se obrazovka vybraného režimu.
Poznámka
Jestliže vyberete režim a stisknete tlačítko [Function]
(Funkce) s označením
zobrazí se pokyny pro vybraný režim.
Na obrazovce DOMŮ můžete vybrat následující režimy:
<Copy> (Kopírovat): Kopírovat lze v různých rozvrženích. Viz část „Kopírování“ na
<Scan> (Skenovat): Prostřednictvím ovládacího panelu můžete uložit naskenovaná
<Photo index sheet>
(List s rejstř. fotogr.): Pomocí tohoto režimu můžete snadno vytisknout fotografie z
(f2/<Introduction> (Úvod))
straně 16.
data do připojeného počítače. Viz část „Skenování obrázků“ na
straně 15.
pamět’ové karty. Viz část „Tisk pomocí funkce <List s rejstř.
fotogr.>“ na straně 20.
(1)
,
11Základní operace na ovládacím panelu
Page 84

<Settings> (Nastavení): Můžete provádět údržbu nebo změnit různá nastavení zařízení.
<Easy photo reprint>
(Snadný dotisk fotog.): Vytištěné fotografie můžete naskenovat a potom vytisknout.
<Memory card>
ČESKY
(Pamět’ová karta): Slouží k tisku fotografických dat uložených na pamět’ové kartě
Další tlačítka
(A) Tlačítko [NAVI] (NAVIGACE)
(B) Tlačítka [Function] (Funkce)
z Tlačítko [NAVI] (NAVIGACE)
Usnadňuje přístup k funkcím, které chcete spustit. Vyberte požadovanou akci v nabídce
navigace a potom stiskněte tlačítko [OK].
z Tlačítka [Function] (Funkce)
Dvě tlačítka [Function] (Funkce) umožňují vybrat nabídky zobrazené v dolní části
displeje LCD.
To, která obrazovka se zobrazí po stisknutí tlačítka [Function] (Funkce), závisí na aktivní
obrazovce a na tom, které tlačítko [Function] (Funkce) stisknete.
Podrobnější informace naleznete v částech „Nejasný tisk nebo
tisk nesprávných barev“, „Čištění přístroje“ a „Změna nastavení
zařízení“ v příručce online Uživatelská příručka.
Viz část „Tisk fotografií z fotoaparátu“ na straně 21.
digitálního fotoaparátu. Viz část „Tisk z pamět’ové karty“ na
straně 17.
(A) (B)
(A) (B)
(A) Tlačítko [Function] (Funkce) (f1): Pokud stisknete tlačítko [Function] (Funkce)
(B) Tlačítko [Function] (Funkce) (f2): Po stisknutí tlačítka [Function] (Funkce) s označením
Jestliže tato tlačítka stisknete na jiných obrazovkách než je obrazovka DOMŮ, zobrazí se
postup nebo nabídky operace.
(f1/<Remaining ink vol> (Zbývající inkoust)) na
obrazovce DOMŮ, zobrazí se obrazovka
[Remaining ink vol] (Zbývající inkoust).
(f2/<Introduction> (Úvod)) na obrazovce DOMŮ se
zobrazí úvod pro vybrané funkce režimu.
12 Základní operace na ovládacím panelu
Page 85

Tisk z počítače
Ta to část obsahuje pokyny pro základní tisk.
Tisk v operačním systému Windows
1
Zapněte přístroj a vložte do něj papír.
2 Ověřte, že je vybrán správný zdroj papíru.
3 Vytvořte dokument nebo otevřete požadovaný soubor pomocí příslušné aplikace.
4 V aplikaci v nabídce [File/Soubor] klepněte
na příkaz [Print/Tisk].
5 Ujistěte se, že je vybrána [Canon MP600
Printer/Tiskárna Canon MP600] a klepněte
na tlačítko [Preferences/Předvolby] (nebo
[Properties/Vlastnosti]).
6 Zadejte požadované nastavení a klepněte na
tlačítko [OK].
Ujistěte se, že v nabídce [Paper Source/
Zdroj papíru] je vybrána možnost [Paper Feed
Switch/Přepínač podávání papíru].
ČESKY
Poznámka
Chcete-li zjistit podrobné informace o dalších funkcích
ovladače tiskárny, klepnutím na tlačítko [Help/
Nápověda] nebo [Instructions/Pokyny] zobrazte
nápovědu online nebo Příručku ovladače tiskárny
online. Položka [Instructions/Pokyny] se zobrazí,
jen pokud jste nainstalovali příručky online.
7 Klepněte na tlačítko [Print/Tisk] (nebo [OK]).
13Tisk z počítače
Page 86

Tisk v operačním systému Macintosh
1
Zapněte přístroj a vložte do něj papír.
2 Ověřte, že je vybrán správný zdroj papíru.
3 Vytvořte dokument nebo otevřete požadovaný soubor pomocí příslušné aplikace.
ČESKY
4 V aplikaci v nabídce [File/Soubor] klepněte
na příkaz [Page Setup/Vzhled stránky].
5 Ověřte, zda je pro nastavení [Format for/
Tiskárna] vybrána položka [MP600].
6 Vyberte požadovanou velikost papíru v
nastavení [Paper size/Velikost papíru].
7 Klepněte na tlačítko [OK].
8 V aplikaci v nabídce [File/Soubor] klepněte
na příkaz [Print/Tisk].
9 Z místní nabídky vyberte položku [Quality &
Media/Kvalita a média].
10 Zadejte požadované nastavení.
Ujistěte se, že je vybrána možnost [Paper Feed
Switch/Přepínač podávání] v nabídce
[Paper Source/Zdroj papíru].
Poznámka
Chcete-li zjistit podrobné informace o dalších funkcích
ovladače tiskárny, klepnutím na tlačítko zobrazte
Příručku ovladače tiskárny online. Pokud příručky
online nejsou nainstalovány, Příručka ovladače
tiskárny online se nezobrazí, ani když klepnete na
tlačítko .
11 Klepněte na tlačítko [Print/Tisk].
14 Tisk z počítače
Page 87

Skenování obrázků
Obrázky lze skenovat ze zařízení do počítače bez vytištění a ukládat je v oblíbených formátech
souborů, například jako soubory JPEG, TIFF, rastrové obrázky nebo ve formátu PDF. Při skenování
vytištěného textu je možné výtisk převést na textová data pomocí softwaru OCR (Optical Character
Recognition - optické rozpoznávání znaků).
Způsoby skenování
Skenování pomocí aplikace MP Navigator
Pomocí Aplikace MP Navigator můžete skenovat dokumenty vložené na skleněnou plochu a
zobrazovat obrázky uložené v počítači nebo na pamět’ové kartě. Můžete zobrazit náhled
naskenovaných dokumentů a snadno je vytisknout a upravit podle svých potřeb.
Dodané aplikace lze použít k úpravě nebo tisku naskenovaného dokumentu.
Podrobné informace o provozu aplikace MP Navigator naleznete v [Scanning Guide/
Průvodce skenováním] online.
Skenování pomocí ovládacího panelu přístroje
1 Zapněte přístroj.
2 Položte dokument na skleněnou plochu.
3 Vyberte položku <Scan> (Skenovat) na obrazovce DOMŮ.
Viz část „Základní operace na ovládacím panelu“ na straně 11.
4 Vyberte operaci skenování a potom stiskněte tlačítko [OK].
5 Stiskněte tlačítko [Color] (Barevný), nebo [Black] (Černá).
Operace provedená po naskenování předlohy závisí na nastavení operace skenování
zvoleném v kroku 4. Podrobné informace o úpravě nastavení operace naleznete v
[Scanning Guide/Průvodce skenováním] online.
Skenování z aplikace
Obraz lze skenovat v aplikaci podporující rozhraní TWAIN nebo WIA (pouze v systému
Windows XP) a zpracovat obraz přímo v aplikaci. Podrobné informace naleznete v
[Scanning Guide/Průvodce skenováním] online.
ČESKY
15Skenování obrázků
Page 88

Kopírování
Vytváření kopií
Tento oddíl popisuje základní postup kopírování.
1 Zapněte přístroj.
ČESKY
2 Vyberte položku <Copy> (Kopírovat) na obrazovce DOMŮ.
Viz část „Základní operace na ovládacím panelu“ na straně 11.
3 Vložte papír.
4 Ověřte, že je vybrán správný zdroj papíru.
5 Určete nastavení kopírování.
(1) Zkontrolujte nastavení velikosti stránky, typu
média a dalších položek. Chcete-li změnit
nastavení, vyberte položku a stiskněte
tlačítko [OK].
(2) Pomocí tlačítka + nebo - určete počet kopií.
6 Položte dokument na skleněnou plochu.
7 Stiskněte tlačítko [Color] (Barevný) pro
barevné kopírování, nebo tlačítko [Black]
(Černá) pro černobílé kopírování.
(1)
(2)
Použití ostatních funkcí při kopírování
Zmenšení/zvětšení kopie
Zmenšuje nebo zvětšuje kopie.
<Two-sided copy> (Oboustranné kopírování)
Slouží ke zkopírování dvou stran dokumentu na jeden list papíru.
<Borderless copy> (Kopírování bez ohraničení)
Kopíruje barevné obrázky tak, aby vyplnily celou stránku a nevznikaly okraje.
<2-on-1 copy> (Kopírování 2 na 1)
Zmenšíte-li velikost jednotlivých obrázků, můžete na jeden list papíru zkopírovat dvě strany
předlohy.
<4-on-1 copy> (Kopírování 4 na 1)
Zmenšíte-li velikost jednotlivých obrázků, můžete na jeden list papíru zkopírovat čtyři strany
předlohy. K dispozici jsou čtyři různá rozvržení.
<Image repeat> (Opakování obrázku)
Zkopíruje obrázek několikrát na jedinou stránku. Chcete-li nastavit počet opakování, můžete
vybrat některé <Auto layout> (Automatické rozvržení) nebo předdefinované nastavení zařízení.
16 Kopírování
Page 89

Tisk z pamět’ové karty
Vkládání pamět’ové karty
1
Zapněte přístroj.
2 Otevřete kryt patice pro kartu.
3 Do patice pro pamět’ovou kartu vložte pouze jednu kartu.
Typ karty Vložení karty
z
Karta Compact Flash (CF) card
z
Microdrive
z
Karta xD-Picture Card*
z
SmartMedia
z
MEMORY STICK
z
MEMORY STICK PRO
z
MEMORY STICK Duo*
z
MEMORY STICK PRO Duo*
z
Karta SD Secure Digital memory card
z
Karta MiniSD Card*
z
MultiMediaCard (v3.31)
*Pamět’ovou kartu musíte před vložením do patice připojit ke speciálnímu adaptéru.
ČESKY
Vložte do levé
patice pro kartu.
Rozsvítí se
Vložte ji do
pravého patice
pro kartu.
Rozsvítí se
Vložte ji do
střední části
patice na pravé
straně.
Rozsvítí se
4 Ujistěte se, že se indikátor Přístup rozsvítil.
5 Zavřete kryt patice pro kartu.
17Tisk z pamět’ové karty
Page 90

Vyjímání pamět’ové karty
1
Otevřete kryt patice pro kartu.
2 Ujistěte se, že indikátor Přístup nebliká, a vyjměte pamět’ovou kartu.
3 Zavřete kryt patice pro kartu.
ČESKY
Tisk fotografií uložených na pamět’ové kartě
1
Připravte se ke spuštění tisku.
(1) Zapněte přístroj.
(2) Vložte papír.
(3) Ověřte, že je vybrán správný zdroj papíru.
2 Vložte pamět’ovou kartu.
(1) Vyberte položku <Memory card> (Pamět’ová karta) na obrazovce DOMŮ.
Viz část „Základní operace na ovládacím panelu“ na straně 11.
(2) Vložte pamět’ovou kartu do patice.
3 Vyberte nabídku tisku.
(1) Vyberte položku <Select and print> (Vybrat a tisknout) a poté stiskněte tlačítko [OK].
(2) Potvrďte velikost papíru, typ média a další nastavení, a vyberte možnost <Next> (Další)
a poté stiskněte tlačítko [OK]. Chcete-li změnit nastavení, vyberte položku a stiskněte
tlačítko [OK].
4 Vyberte fotografii, kterou chcete vytisknout, a zadejte počet kopií jednotlivých
fotografií.
(1) Pomocí ovladače [Easy-Scroll Wheel] (Otočný ovladač) nebo tlačítka [ a ] zobrazte
fotografii, kterou chcete vytisknout.
(2) Použitím tlačítka + nebo - určete počet kopií.
(3) Opakováním kroků (1) a (2) určete počet kopií každé fotografie.
(4) Stiskněte tlačítko [OK].
5 Začněte tisknout.
(1) Zkontrolujte nastavení tisku. Chcete-li změnit
nastavení, vyberte položku a stiskněte tlačítko
[OK].
(2) Zkontrolujte celkový počet kopií u vybraných
fotografií.
(3) Zkontrolujte vybrané fotografie a počet kopií
jednotlivých fotografií.
(4) Změňte rozšířená nastavení tisku.
(5) Stiskněte tlačítko [Color] (Barevný).
Vytiskne se určený počet kopií každé z fotografií.
18 Tisk z pamět’ové karty
(1)
(2)
(4) (3)
Page 91

Další funkce tisku
<Layout print> (Tisk s rozvržením)
Tiskne fotografie, které jste vložili do určeného rozvržení.
<Sticker print> (Tisk nálepek)
Vytiskne vaši oblíbenou fotografii s rámečkem na fotografické nálepky [Canon Photo Stickers/
Fotografické nálepky Canon].
<DPOF print> (Tisk DPOF)
Tiskne podle formátu nastavení DPOF (Digital Print Order Format) v digitálním fotoaparátu,
pokud jste tato nastavení určili.
<Captured info print> (Tisk informací o snímku)
Vytiskne informace o způsobu pořízení snímku (data Exif) na okraj rejstříku fotografií nebo
jednotlivých vybraných fotografií.
<Photo index print> (Tisk rejstříku fotografií)
Vytiskne rejstřík všech fotografií uložených na pamět’ové kartě.
<Print all photos> (Tisk všech fotografií)
Vytiskne všechny fotografie uložené na pamět’ové kartě.
Použití užitečných funkcí zobrazení
<Change display> (Změnit zobrazení)
Metodu zobrazení fotografie lze změnit.
<Trimming> (Oříznutí)
Upraví snímky zobrazené na displeji oříznutím.
<Search> (Hledat)
Při velkém množství fotografií uložených na pamět’ové kartě zobrazí a vytiskne fotografie
pořízené v určené datum či v určeném rozmezí dat.
ČESKY
19Tisk z pamět’ové karty
Page 92

Tisk pomocí funkce <List s rejstř. fotogr.>
1
Zapněte přístroj a vložte papír o velikosti A4 nebo Letter.
2 Ověřte, že je vybrán správný zdroj papíru.
3 Vyberte položku <Photo index sheet> (List s rejstř. fotogr.) na obrazovce
ČESKY
DOMŮ.
Viz část „Základní operace na ovládacím panelu“ na straně 11.
4 Vyberte položku <Index sheet print> (Tisk listu rejstříku) a poté stiskněte
tlačítko [OK].
5 Vložte pamět’ovou kartu do patice.
6 Vyberte skupinu obrázků, které budou na listu s rejstříkem fotografií, a poté
stiskněte tlačítko [OK].
7 Stiskněte tlačítko [Color] (Barevný).
8 Vyplňte příslušné kroužky na indexu snímků.
9 Vložte typ papíru vybraný v listu s rejstříkem
fotografií.
10 Vyberte položku <Scan sheet and print>
(Skenovat list a tisknout) a poté stiskněte
tlačítko [OK].
11 Umístěte stránku s indexem snímků lícem
dolů na skleněnou plochu a stiskněte
tlačítko [OK].
20 Tisk z pamět’ové karty
Page 93

Tisk fotografií z fotoaparátu
Fotografie je možné naskenovat a potom je vytisknout ze zařízení. Před tiskem je možné u obrázků
použít různé efekty.
Skenování fotografií
1
Zapněte přístroj.
2 Vyberte možnost <Easy photo reprint> (Snadný dotisk fotog.) na
obrazovce DOMŮ.
Viz část „Základní operace na ovládacím panelu“ na straně 11.
3 Zvedněte kryt dokumentů a vložte fotografie na skleněnou plochu.
Fotografie umístěte na skleněnou plochu potištěnou stranou dolů následujícím způsobem:
Předlohy o velikosti 4" x 6"/101,6 x 152,4 mm
nebo 5"x 7" / 127 x 177,8 mm
10 mm / 0,4"
10 mm / 0,4"
10 mm / 0,4"
Předlohy o velikosti kreditní karty
10 mm / 0,4" 10 mm / 0,4"
10 mm / 0,4"
10 mm / 0,4"
4 Opatrně zavřete kryt dokumentů a stiskněte tlačítko [OK].
ČESKY
21Tisk fotografií z fotoaparátu
Page 94

Tisk naskenovaných fotografií
1
Připravte se ke spuštění tisku.
(1) Vložte papír.
(2) Naskenujte fotografii.
Viz část „Skenování fotografií“ na straně 21.
ČESKY
(3) Ověřte, že je vybrán správný zdroj papíru.
2 Vyberte nabídku tisku.
(1) Vyberte položku <Select and print> (Vybrat a tisknout) a poté stiskněte tlačítko [OK].
(2) Potvrďte velikost papíru, typ média a další nastavení a poté vyberte možnost <Next>
(Další). Poté stiskněte tlačítko [OK]. Chcete-li změnit nastavení, vyberte položku a
stiskněte tlačítko [OK].
3 Vyberte fotografii, kterou chcete vytisknout, a zadejte počet kopií jednotlivých
fotografií.
(1) Pomocí ovladače [Easy-Scroll Wheel] (Otočný ovladač) nebo tlačítek [ a ] zobrazte
fotografii, kterou chcete vytisknout.
(2) Použitím tlačítka + nebo - určete počet kopií.
(3) Opakováním kroků (1) a (2) určete počet kopií každé fotografie.
(4) Stiskněte tlačítko [OK].
4 Začněte tisknout.
(1) Zkontrolujte nastavení tisku. Chcete-li změnit
nastavení, vyberte položku a stiskněte
tlačítko [OK].
(2) Zkontrolujte celkový počet kopií u vybraných
fotografií.
(3) Změňte rozšířená nastavení tisku.
(4) Stiskněte tlačítko [Color] (Barevný) pro barevný
tisk nebo tlačítko [Black] (Černá) pro
černobílý tisk.
Vytiskne se určený počet kopií každé z fotografií.
(1)
(2)
(3)
Další užitečné funkce
<Sticker print> (Tisk nálepek)
Pokud si chcete vytvořit vlastní nálepky, vytiskne vaši oblíbenou fotografii na štítky [Canon Photo
Stickers/Fotografické štítky Canon].
<Print all photos> (Tisk všech fotografií)
Vytiskne všechny naskenované fotografie.
Použití užitečných funkcí zobrazení
<Change display> (Změnit zobrazení)
Metoda zobrazení fotografie může být změněna.
<Trimming> (Oříznutí)
Upraví snímky zobrazené na displeji LCD oříznutím.
22 Tisk fotografií z fotoaparátu
Page 95

Tisk fotografií přímo z kompatibilního
zařízení
Tisk ze zařízení kompatibilního se standardem
PictBridge
Můžete připojit zařízení kompatibilní se standardem PictBridge (například digitální fotoaparát,
videokameru nebo mobilní telefon s fotoaparátem) a vytisknout zaznamenané snímky přímo bez
použití počítače.
Poznámka
z PictBridge je průmyslový standard umožňující celou řadu řešení pro digitální fotografie, včetně přímého
tisku fotografií z digitálního fotoaparátu, videokamery nebo mobilního telefonu* bez nutnosti použití
počítače. K tomuto přístroji lze připojit jakékoli zařízení (bez ohledu na model či výrobce), pokud je v
souladu se standardem PictBridge.
z Pomocí fotoaparátu nebo mobilního telefonu můžete vybrat požadované snímky a zadat různá
nastavení.
* Digitální fotoaparáty, digitální videokamery a mobilní telefony s fotoaparátem kompatibilní se
standardem PictBridge budou dále v této příručce uváděny pod společným názvem „zařízení
kompatibilní se standardem PictBridge“.
Zařízení s touto značkou je kompatibilní se standardem PictBridge.
Připojení zařízení kompatibilního se standardem PictBridge
Chcete-li k tomuto přístroji připojit zařízení kompatibilní se standardem PictBridge, použijte
kabel USB doporučený výrobcem zařízení.
ČESKY
Upozornění
K portu tiskárny pro přímý tisk nepřipojujte žádné jiné zařízení než zařízení kompatibilní se
standardem PictBridge nebo volitelných jednotek Bluetooth BU-20. Jinak by mohlo dojít k úrazu
elektrickým proudem, požáru nebo poškození zařízení.
Poznámka
Tisknete-li fotografie pomocí digitálního zařízení připojeného k přístroji, doporučuje se použít
napájecí adaptér dodaný se zařízením. Pokud používáte baterie zařízení, měly by být plně nabité.
1 Nastavte přístroj.
Informace o nastavení přístroje a jeho přípravě k tisku naleznete v příručce Instalační leták.
Poznámka
Tiskovou hlavu nelze nastavit pomocí ovládacích prvků na zařízení kompatibilním se standardem
PictBridge. Pokud ještě nebylo provedeno vyrovnání tiskové hlavy a ovladače MP nebyly
nainstalovány do počítače, nezapomeňte nastavit tiskovou hlavu. Další podrobné informace
naleznete v části „Vyrovnání tiskové hlavy“ v příručce Uživatelská příručka.
2 Zapněte přístroj a vložte do něj papír.
23Tisk fotografií přímo z kompatibilního zařízení
Page 96

3 Připojte zařízení kompatibilní se standardem PictBridge k přístroji.
Poznámka
V závislosti na značce a modelu zařízení může být před připojením zařízení nutné zvolit režim
tisku kompatibilní se standardem PictBridge. Možná bude nutné po připojení zařízení k přístroji
zařízení zapnout nebo ručně vybrat režim přehrávání.
Než k přístroji připojíte zařízení kompatibilní se standardem PictBridge, nastavte je podle
příslušných pokynů v příručce k zařízení.
ČESKY
(1) Ověřte, zda je zařízení kompatibilní se
standardem PictBridge vypnuté.
(2) Připojte zařízení kompatibilní se
standardem PictBridge k přístroji pomocí
kabelu USB doporučeného výrobcem
zařízení.
Zařízení se automaticky zapne.
Pokud se automaticky nezapne, zapněte
jej ručně.
(3) Nastavte zařízení kompatibilní se
standardem PictBridge pro přímý tisk.
Při správném připojení k přístroji se na
displeji zařízení objeví ikona .
Poznámka
Pokud se ikona nezobrazí, postupujte podle pokynů v části „Z digitálního fotoaparátu nelze
správně tisknout“ v příručce online Uživatelská příručka.
(2)
24 Tisk fotografií přímo z kompatibilního zařízení
Page 97

Tisk fotografií přímo ze zařízení kompatibilního se standardem
PictBridge
Při použití zařízení postupujte podle pokynů v příručce dodané se zařízením kompatibilním se
standardem PictBridge. Tato část popisuje nastavení velikosti strany, typu média, optimalizace
obrazu a tisku data na zařízení kompatibilním se standardem PictBridge, které je připojeno
kpřístroji.
z Kontrola a změna nastavení tisku pomocí standardu PictBridge ve
fotoaparátu
Chcete-li změnit velikost strany nebo typ média, přepněte zařízení do režimu tisku PictBridge a
zkontrolujte nebo změňte nastavení.
Informace týkající se níže vysvětlených nastavení
Některé níže popsané položky nemusí být na některých nastaveních dostupné. V tom případě
bude pro nastavovanou položku použito níže popsané nastavení [Default/Výchozí].
* Následující popis obsahuje názvy nastavení podle názvů používaných v zařízeních Canon
kompatibilních se standardem PictBridge. V jiných zařízeních nebo modelech se názvy
položek nastavení mohou lišit.
Toto nastavení lze změnit na obrazovce <PictBridge settings> (Nastavení PictBridge) na
přístroji, pokud je připojeno zařízení kompatibilní se standardem PictBridge. Změny však lze na
obrazovce <PictBridge settings> (Nastavení PictBridge) provést pouze v případě, že
odpovídající položky uvedené níže jsou ve výchozím nastavení (možnosti založené na
nastavení přístroje) na zařízení kompatibilním se standardem PictBridge.
Viz část „Kontrola a změna nastavení tisku pomocí standardu PictBridge na přístroji“ na
straně 28.
Položky nastavení zařízení
standardu PictBridge
Velikost papíru:
[Default/Výchozí]
Typ papíru:
[Default/Výchozí]
Rozvržení:
[Default/Výchozí]
Optimalizace obrazu:
[Default/Výchozí]
Nastavení přístroje na obrazovce Nastavení tisku
Na obrazovce <PictBridge settings> (Nastavení
PictBridge) můžete změnit následující nastavení:
<Page size> (Velikost stránky), <Media type>
(Typ média), <Bordered> (S ohraničením)/<Borderless>
(Bez ohraničení)
Pokyny k položkám nastavení naleznete v části „Položky
nastavení“ na straně 28.
Na obrazovce <PictBridge settings> (Nastavení
PictBridge) můžete změnit následující nastavení:
<Photo opt.pro> (Photo opt.pro), <Vivid photo>
(Vivid photo), <Face brightener> (Zjasnění tváře),
<Noise reduction> (Snížení šumu), <Image optimizer>
(Image optimizer), <Red eye correc.> (Odstr. červ. očí),
<Brightness> (Jas), <Contrast> (Kontrast), <Color hue>
(Bar. odstín žluté), <Effects> (Efekty)
Položky nastavení: viz část „Položky nastavení“ na
straně 28.
ČESKY
z Formát obrazových dat pro tisk
Tento přístroj tiskne obrázky pořízené fotoaparátem, který je kompatibilní se systémem DCF®
a soubory PNG.
* Kompatibilní se standardem Exif 2.21
25Tisk fotografií přímo z kompatibilního zařízení
Page 98

ČESKY
z Nastavení velikosti a typu papíru
Pokud jsou tyto položky nastaveny na hodnotu [Default/Výchozí] (nastavení podle přístroje)
na zařízení kompatibilním se standardem PictBridge, budou použita nastavení <Page size>
(Velikost stránky) a <Media type> (Typ média) určená na obrazovce přístroje <PictBridge
settings> (Nastavení PictBridge).
V závislosti na nastavení [Paper size/Velikost stránky] a [Paper type/Typ papíru] lze do
tiskárny vložit papír následujících velikostí a typů.
Nastavení velikosti
papíru
Nastavení typu
papíru
Vhodný papír
10 x 15 cm/4" x 6" [Photo/Foto] [Photo Paper Plus Glossy/
Lesklý fotografický papír Plus]
[Fast Photo/Rychl.
[Photo Paper Pro/Fotografický papír Pro]
foto]
[Photo/Foto] [Photo Paper Plus Semi-gloss/
Pololesklý fotografický papír Plus]
[Photo/Foto] [Glossy Photo Paper/Lesklý fotografický
papír]
[Glossy Photo Paper „Everyday Use“/
Lesklý fotografický papír pro běžné použití]
[Photo Paper Glossy/Lesklý fotografický
papír]
[Photo Stickers/Fotografické štítky]
13 x 18 cm/5" x 7"
*2
[Photo/Foto] [Photo Paper Plus Glossy/
Lesklý fotografický papír Plus]
*3, *4
A4
[Photo/Foto] [Photo Paper Plus Glossy/
Lesklý fotografický papír Plus]
[Fast Photo/Rychl.
[Photo Paper Pro/Fotografický papír Pro]
foto]
[Photo/Foto] [Photo Paper Plus Semi-gloss/
Pololesklý fotografický papír Plus]
[Photo/Foto] [Glossy Photo Paper/Lesklý fotografický
papír]
[Photo/Foto] [Glossy Photo Paper „Everyday Use“/
Lesklý fotografický papír pro běžné použití]
8,5" x 11" (Letter)
*3, *4
[Photo/Foto] [Photo Paper Plus Glossy/
Lesklý fotografický papír Plus]
[Fast Photo/Rychl.
[Photo Paper Pro/Fotografický papír Pro]
foto]
[Photo/Foto] [Photo Paper Plus Semi-gloss/
Pololesklý fotografický papír Plus]
[Photo/Foto] [Glossy Photo Paper/Lesklý fotografický
papír]
[Photo/Foto] [Photo Paper Glossy/Lesklý fotografický
papír]
5,4 x 8,6 cm/Kreditní
karta
20 x 25 cm/8" x 10"
[Photo/Foto] [Glossy Photo Paper/Lesklý fotografický
papír]
*7
[Fast Photo/Rychl.
[Photo Paper Pro/Fotografický papír Pro]
foto]
10,1 x 18 cm/4" x 7,1"
*2
[Fast Photo/Rychl.
[Photo Paper Pro/Fotografický papír Pro]
foto]
*6
*1, *5
26 Tisk fotografií přímo z kompatibilního zařízení
Page 99

*1
Slouží výhradně pro tisk na fotografické štítky. Při tisku na štítky vyberte položku
4" x 6"
*2
*3
*4
*5
*6
*7
v nabídce
Lze vybrat jen v některých zařízeních kompatibilních se standardem PictBridge.
Možnost
papíru]
(Letter)
Běžný papír]
Rozvržení]
[Plain Paper/Běžný papír]
, jestliže je pro položku
. Pokud je pro položku
Pokud vyberete pro nastavení
můžete při tisku použít rozvržení [4-up/4 plus].
Podávání tohoto papíru z kazety může přístroj poškodit. Vložte jej proto do automatického
podavače listů.
Některé značkové papíry společnosti Canon nelze v některých zemích zakoupit.
Pokud tisknete na papír [Photo Paper Plus Semi-gloss/Pololesklý fotografický papír Plus]
8" x 10" / 203,2 x 254,0 mm (SG-201), vyberte pro nastavení
možnost
Výchozí]
* Vyberte možnost
20 x 25 cm/8" x 10"
.
(Typ média)
Viz část „Kontrola a změna nastavení tisku pomocí standardu PictBridge na přístroji“ na
straně 28.
[Paper size/Velikost papíru]
je možné vybrat jen pro položku
[Paper size/Velikost papíru]
, bezokrajový tisk bude deaktivován, i když bude pro položku
vybrána položka
[Paper type/Typ papíru]
[Borderless/Bez okrajů]
[Paper size/Velikost papíru]
.
vybrána možnost
vybráno nastavení
.
položku
[Paper size/Velikost papíru]
a pro nastavení
<Photo Plus Glossy> (Lesklý fotogr. Plus)
na obrazovce
<PictBridge settings> (Nastavení PictBridge)
[Paper type/Typ papíru]
v nastavení
[Paper type/Typ
A4/8,5" x 11" (Letter)
A4/8,5" x 11"
[Plain Paper/
[Layout/
možnost
<Media type>
na přístroji.
10x15cm /
[Default/
z Nastavení Rozvržení a Výřez
Pokud je položka [Layout/Rozvržení] nastavena na hodnotu [Default/Výchozí] (nastavení
podle přístroje) na zařízení kompatibilním se standardem PictBridge, bude použito nastavení
tisku určené na obrazovce přístroje <PictBridge settings> (Nastavení PictBridge).
Nastavení na zařízení kompatibilním se standardem PictBridge bude použito pro položku
[Trimming/Oříznutí].
Při tisku na média [Photo Stickers PS-101/Fotografické štítky PS-101] vyberte položku
[N-up/N plus] pro nastavení [Layout/Rozvržení] a potom vyberte položku [16-up/16 plus].
*V některých zařízení kompatibilních se standardem PictBridge se může pro položku
[Layout/Rozvržení] zobrazit možnost [2-up/2 plus], [4-up/4 plus], [9-up/9 plus] a [16-up/
16 plus]. V tomto případě vždy vyberte možnost [16-up/16 plus].
* Pokud není v zařízení kompatibilním se standardem PictBridge k dispozici žádná možnost,
která odpovídá možnosti [16-up/16 plus], není tisk na štítky možný.
*Při tisku na média [Photo Stickers PS-101/Fotografické štítky PS-101] nevybírejte pro
nastavení [Layout/Rozvržení] položku [Borderless/Bez okrajů].
z Nastavení Optimalizace obrazu
Pokud je položka [Image optimize/Optimalizace obrazu] nastavena na hodnotu [Default/
Výchozí] (nastavení podle přístroje) na zařízení kompatibilním se standardem PictBridge,
bude použito nastavení tisku určené na obrazovce přístroje <PictBridge settings>
(Nastavení PictBridge). Podrobnosti o nastavení naleznete v části „Kontrola a změna
nastavení tisku pomocí standardu PictBridge ve fotoaparátu“ na straně 25.
Pokud používáte zařízení Canon kompatibilní se standardem PictBridge, v závislosti na
modelu mohou být k dispozici i možnosti [VIVID], [NR], [Face/Tvář] nebo [Red eye/
Efekt červených očí].
* Pokud vyberete možnost [VIVID], budou zelené a modré části fotografie vytištěny živěji.
[NR] sníží šum v modrých (například obloha) a tmavých částech obrazu.
Možnost [Face/Tvář] opravuje kontrast snímků v protisvětle.
Možnost [Red eye/Efekt červených očí] potlačuje efekt červených očí.
z Nastavení Tisk data a čísla souboru
Toto nastavení nelze u tohoto přístroje měnit. Bude použito nastavení na zařízení
kompatibilním se standardem.
Pokud je zobrazení data na fotografiích nastaveno již při pořizování snímků, vyberte pro tuto
položku nastavení PictBridge hodnotu [Off/Vypnuto]. Vyberete-li možnost [Date/Datum],
[File No./Číslo souboru] nebo [Both/Obojí], vytiskne se datum nebo číslo souboru přes
datum vložené funkcí fotoaparátu.
,
ČESKY
27Tisk fotografií přímo z kompatibilního zařízení
Page 100

z Možnost Další nastavení
Následující další možnosti jsou dostupné, pokud používáte zařízení Canon kompatibilní se
standardem PictBridge, v závislosti na modelu. Podrobné informace naleznete v návodu k
obsluze zařízení Canon kompatibilního se standardem PictBridge.
Nastavení Informace o pořízení (Data Exif)
Můžete vytisknout informace o pořízení snímku (data Exif) na fotografiích ve formátu
seznamu nebo na okrajích zadaných fotografií. V možnosti [Layout/Rozvržení] vyberte
položku s ikonou „i“.
ČESKY
Nastavení Rozvržení stylu 35mm filmu (Rozvržení kontaktního tisku)
Vybrané fotografie nebo fotografie s nastaveným indexem můžete vytisknout v rozvržení
stylu 35mm filmu (v rozvržení kontaktního tisku).
V možnosti [Layout/Rozvržení] vyberte položku s ikonou filmu.
Poznámka
z
Během tisku kabel USB nikdy neodpojujte, pokud se nezobrazí jednoznačná výzva zařízení
kompatibilního se standardem PictBridge.
Při odpojování kabelu USB mezi zařízením kompatibilním se standardem PictBridge a přístrojem
postupujte podle pokynů uvedených v příručce k zařízení.
z
Na zařízení kompatibilním se standardem PictBridge nelze nastavit či provádět následující operace:
– nastavení kvality tisku,
– údržba přístroje
z Kontrola a změna nastavení tisku pomocí standardu PictBridge
na přístroji
Můžete zkontrolovat a změnit nastavení tisku (například typ a velikost média), která jsou v
zařízení přednastavena pro tisk se standardem PictBridge.
z Zobrazení obrazovky nastavení PictBridge a zadání nastavení
(1) Zapněte přístroj.
(2) Vyberte položku <Settings> (Nastavení) na obrazovce DOMŮ.
Viz část „Základní operace na ovládacím panelu“ na straně 11.
(3) Vyberte položku <Device settings> (Nastavení zařízení) a stiskněte tlačítko [OK].
(4) Vyberte položku < PictBridge settings> (Nastavení PictBridge) a stiskněte
tlačítko [OK].
(5) Vyberte položku, kterou chcete nastavit, a poté stiskněte tlačítko [OK].
(6) Vyberte položku a poté stiskněte tlačítko [OK].
(7) Potvrďte nastavení tisku výběrem tlačítka <Next> (Další) a stisknutím tlačítka [OK].
(8) Opakováním kroků (5) a (6) určete položku.
(9) Po dokončení všech požadovaných nastavení vyberte položku <OK> (OK) a stiskněte
tlačítko [OK].
z Položky nastavení
<Page size> (Velikost stránky)
Pokud tisknete přímo ze zařízení kompatibilního se standardem PictBridge, vyberte
velikost stránky.
<Media type> (Typ média)
Pokud tisknete přímo ze zařízení kompatibilního se standardem PictBridge, vyberte
typ média.
<Print quality> (Kvalita tisku)
Pokud tisknete přímo ze zařízení kompatibilního se standardem PictBridge, vyberte
kvalitu tisku.
28 Tisk fotografií přímo z kompatibilního zařízení
 Loading...