

Page 1

Quick Start Guide
Guía de iniciación rápida
Guide de démarrage rapide
ENGLISHESPAÑOL FRANÇAISPORT DO
BRASIL
Guia de consulta rápida
E4-1
QT5-0288-V01
Page 2

Page 3

Quick Start Guide
Table of Contents
Introduction 14
Document Handling 22
Paper Handling 25
Copying 31
Printing Photographs Directly from a Compliant Device 33
Preparing Your Machine for Fax 34
Sending Faxes 41
Receiving Faxes 42
Maintenance 44
ENGLISH
Page 4

For information about the machine setup on pages 2 to 3, also refer to the Easy Setup Instructions.
ENGLISH
Preparing the machine
Unpack the machine
Please confirm bundled items against the illustration printed on the lid of the packing box.
.
Also read the Safety Precautions in the User's Guide. Observe the warnings and cautions to avoid personal
injury or damage to the machine.
IMPORTANT
• Do not connect the USB cable until after the software is installed.
• A printer cable is not included. You must purchase a USB cable (less than 3 m / 10 ft.) to connect your
machine to a computer.
1 Connect the telephone line and the power cord.
• Be sure to use the bundled telephone line cable.
• If you connect the telephone line, see “Examples of Connecting the Machine” on page 34.
UK users only
If the connector of the external device cannot be connected to the jack on the machine, you will need to
purchase a B.T. adapter to connect as follows:
Connect the external device line to the B.T. adapter, then connect the B.T. adapter to the jack.
2 Turn on the machine.
• The country selection is only available for some countries.
• If you have an undesired language or country selection, refer to the User’s Guide.
3 Install the Print Head.
• If the Scanning Unit (Printer Cover) is left open for more than 10 minutes, the Print Head Holder moves
to the right. Close and reopen the Scanning Unit (Printer Cover) to return the Holder to the center.
• There might be some transparent or light blue ink on the inside of the bag the Print Head comes in - this
has no effect on print quality. Be careful not to get ink on yourself when handling these items.
• Do not reattach the protective cap once you have removed it.
4 Install the ink tanks.
• Ensure that all the ink tanks are installed in the order directed by the label. The machine cannot be used
unless all the ink tanks are installed.
• For safety reasons, store ink tanks out of the reach of small children.
• Do not drop or shake ink tanks as this may cause the ink to leak out and stain your clothes and hands.
• Be sure to remove the clear film from the ink tank in the exact order as shown in step 4.
• Do not reattach the protective cap once you have removed it.
• The Alarm Lamp still lights orange if an ink tank is not installed properly. Open the Scanning Unit
(Printer Cover) and make sure that all the ink tanks are installed in the correct order directed on the label.
2
Page 5

5 Align the Print Head from the Operation Panel.
Execute automatic Print Head alignment to keep high print quality.
• When executing automatic Print Head alignment, always load paper in the Auto Sheet Feeder. You can
load paper in both the Auto Sheet Feeder and Cassette when printing. For details, refer to the User's
Guide.
• If the automatic Print Head alignment screen is not displayed, see “Aligning the Print Head
Automatically” on page 47.
• When the Print Head position pattern is printed, Print Head alignment is complete.
For fax users
Select the receive mode according to your needs. See “Receive Modes” on page 42.
• If you want to receive only faxes automatically with your machine, or you have a dedicated telephone
line for fax use only:
<FAX ONLY MODE>
• If you receive mainly voice calls and sometimes faxes, or you want to receive faxes manually:
<MANUAL MODE>
• If you want to receive voice messages on your answering machine and receive faxes automatically:
<ANS.MACHINE MODE>
• If you want to receive faxes automatically as well as voice calls:
<FAX/TEL AUTO SW>
• If you have subscribed to a Distinctive Ring Pattern Detection (DRPD) service with your telephone
company (US and Canada only):
<DRPD>
• If you want your machine to automatically switch between fax and voice calls by the call ring patterns
(Network Switch) (This setting is not available in some countries and regions.):
<NETWORK SWITCH>
• To send a fax, you need to set the telephone line type setting properly on the machine. For details on
how to confirm and change this setting, refer to the User’s Guide.
If you are unsure of your telephone line type, contact your telephone company.
ENGLISH
3
Page 6
For information about the software installation on this page, also refer to the Easy Setup
ENGLISH
Instructions.
Install the software
Select [Easy Install] in order to install the application software, On-screen Manual and MP drivers. Select
[Custom Install] in order to choose the options you would like to install.
IMPORTANT
• Temporarily close any open applications, including anti-virus software. Computer security programs
can be restarted after software installation.
Installing the MP Driver - Windows
• If you have an earlier version of the MultiPASS Suite software installed on your computer, uninstall this
version before installing the new version. For instructions on uninstallation, refer to the guides for that
version of MultiPASS Suite.
• You must log on as an administrator or have administrative privileges in order to install the software in
Windows XP or Windows 2000.
• Do not switch users during the installation process.
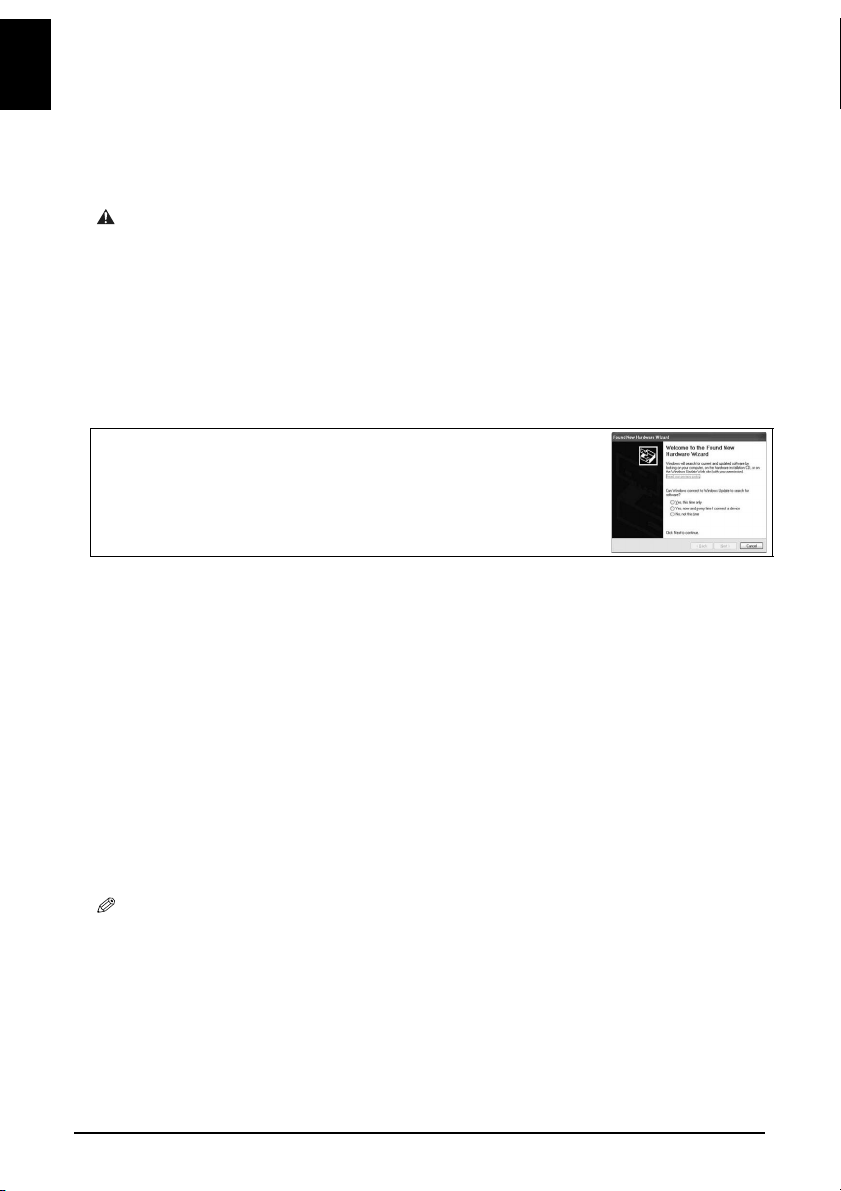
• If the following screen appears, the USB cable is connected.
Perform the following steps.
1. Press [ON/OFF] to turn off the machine.
2. Disconnect the USB cable.
3. Click [Cancel].
®
Installing the MP Driver - Macintosh
• Do not connect the machine to Mac® OS 9 or Mac OS X Classic environments since they are not
supported.
• Enter the name and password for an Administrator Account if required.
Perform the following to make sure the driver has been installed correctly
1. Select [Applications] from the [Go] menu.
2. Double-click the [Utilities] folder, then the [Printer Setup Utility] ([Print Center] when using Mac OS
X v.10.2.x) icon.
If the printer is displayed in the [Printer List], the printer driver is installed.
If the printer is not displayed in the [Printer List], click [Add] in the [Printer List], select [MP530] from
the [Printer Name] list, and click [Add].
When connecting from Mac OS X v.10.3.3 or earlier:
Restarting the computer while connected to the machine may cause the machine not to be detected. To
resolve this, either unplug the USB cable then plug it back in again, or turn the machine OFF then back
ON again.
• [MP530 FAX] is shown in the [Printer Name] list, but you cannot add [MP530 FAX]. You can fax the
document with the current print settings applied to it using the computer's internal modem. You cannot
send faxes from your computer via the machine.
®
4
Page 7

Canon MP530 Quick Start Guide
Copyright
This manual is copyrighted by Canon Inc. with all rights reserved.
Under the copyright laws, this manual may not be reproduced in any form, in whole or in
part, without the prior written consent of Canon Inc.
© 2006 Canon Inc.
Disclaimer
Canon Inc. has reviewed this manual thoroughly in order that it will be an easy-to-use
guide to your Canon MP530 Series. All statements, technical information and
recommendations in this manual and in any guides or related documents are believed
reliable, but the accuracy and completeness thereof are not guaranteed or warranted, and
they are not intended to be, nor should they be understood to be, representation or
warranties concerning the products described.
Specifications are subject to change without notice.
As an ENERGY STAR partner, Canon Inc., has determined that this
product meets the ENERGY STAR guidelines for energy efficiency.
All information regarding non-Canon products was compiled from
publicly available information. No representation is made regarding the
accuracy thereof.
Super G3 is a phrase used to describe the new generation of fax
machines that use ITU-T V.34 standard 33.6 Kbps* modems. Super
G3 High Speed Fax machines allow transmission time of
approximately 3 seconds* per page which results in reduced
telephone line charges.
* Approximately 3 seconds per page fax transmission time based on Canon FAX
Standard Chart (Standard Mode) at 33.6 Kbps modem speed.
The Public Switched Telephone Network (PSTN) currently supports 28.8 Kbps modem
speeds or lower, depending on telephone line conditions.
ENGLISH
5
Page 8
ENGLISH
ExifPrint is a standard for enhancing the communication
between digital cameras and printers.
By connecting to an ExifPrint-compliant digital camera, the
camera’s image data at the time of shooting is used and
optimized, yielding extremely high quality prints.
This equipment conforms with the essential requirements of EC
Directive 1999/5/EC. We declare that this product conforms with the
EMC requirements of EC Directive 1999/5/EC at nominal mains input
230V, 50 Hz although the rated input of the product is 110V–240V, 50/
60 Hz. If you move to another EU country and are experiencing trouble
please call the Canon Help Desk.
(For Europe Only)
IMPORTANT SAFETY INSTRUCTIONS
When using your telephone equipment, basic safety precautions should always be
followed to reduce the risk of fire, electric shock and injury to persons, including the
following:
1. Do not use this product near water, for example, near a bath tub, wash bowl, kitchen sink
or laundry tub, in a wet basement or near a swimming pool.
2. Avoid using this product during an electrical storm. There may be a remote risk of electric
shock from lightning.
3. Do not use this product to report a gas leak in the vicinity of the leak.
SAVE THESE INSTRUCTIONS
This machine supports Exif 2.2 (also called “ExifPrint”).
Model Name
K10269 (PIXMA MP530)
Trademarks
• “Windows” and “Internet Explorer” are trademarks of Microsoft Corporation,
registered in the United States and other countries.
• “Macintosh” and “Mac” are trademarks of Apple Computer, Inc., registered in the U.S.
and other countries.
• Specifications are subject to change without notice.
6
Page 9

X How to Use the Documentation Provided
Easy Setup Instructions (Printed documentation):
Be sure to read this sheet first.
This sheet includes instructions for setting up your machine and getting it ready for use.
Quick Start Guide (This guide)
Read this guide when starting to use the machine.
After following instructions in the Easy Setup Instructions, we recommend you read this
guide to familiarize yourself with the basic operation of some of the main functions that
can be performed on your machine.
On-screen Manuals
User’s Guide
Read this guide when starting to use the machine.
After following instructions in the Easy Setup Instructions, read this guide for instructions
on printing from your computer, direct photo printing from selected digital cameras,
copying, faxing, and scanning.
Printing on DVD/CDs is not available for the machines sold in USA, Canada, all countries
in South America, and some other countries and regions.
Refer to these guides as needed for full instructions on some of the more advanced
features.
Scan Guide
Refer to this guide for full instructions on scanning operation and settings.
Printer Driver Guide
Refer to this guide for full instructions on setting the printer driver.
FAX Driver Guide
Refer to this guide for instructions on faxing from your computer.
Photo Application Guide
Refer to this guide for instructions on using various application software included on the
Setup CD-ROM.
ENGLISH
7
Page 10

X How to Read the On-screen Manuals
ENGLISH
The On-screen Manuals are manuals to be viewed on your computer.
Read these manuals for detailed information on usage of the machine that is not
mentioned in this document, troubleshooting, or usage of the application softwares
supplied with the Setup CD-ROM, etc.
If you have not installed or have deleted the On-screen Manuals, you can install them
using the Setup CD-ROM by either of the following.
• Select [Easy Install] to install the On-screen Manuals along with the MP driver and
application softwares.
• Select [On-screen Manual] from [Custom Install] to install the On-screen Manuals.
For Windows:
• Browser: Windows HTML Help Viewer
• Microsoft Internet Explorer® 5.0 or later must be installed.
• The On-screen Manual may not be displayed properly depending on your operating system or
Internet Explorer version. We recommend that you keep your system up to date with Windows
Update.
For Macintosh:
• Browser: Help Viewer
• The On-screen Manual may not be displayed properly depending on your operating system. We
recommend that you keep your system up to date.
• We recommend using Safari as your Web browser to view the HTML format On-screen Manuals.
If Safari is not installed on your computer, download it from Apple Computer, Inc. website and
install it.
8
Page 11

X Reading the Document
Symbols Used in This Guide
ENGLISH
WARNING Indicates a warning concerning operations that may lead to death or
CAUTION Indicates a caution concerning operations that may lead to injury to
IMPORTANT Indicates operational warnings and restrictions. Be certain to read these
1. (Operation branch-step) Used to explain each operation of a branch procedure.
injury to persons if not performed correctly. In order to use the machine
safely, always pay attention to these warnings.
persons or damage to property if not performed correctly. In order to use
the machine safely, always pay attention to these cautions.
items to operate the machine correctly and to avoid damage to the
machine.
Indicates notes for operation or additional explanations. Reading these is
highly recommended.
Forms Used in This Guide
[button name] Text enclosed in these brackets indicates a button on the Operation Panel of the
machine or an item on the computer to be manipulated.
Example: [Color]
<message> Text enclosed in these brackets indicates a message or selectable menu item
which appears on the LCD (Liquid Crystal Display).
Example: <PHOTO PRO>, <OFF>
Terms Used in This Guide
machine General term used to represent MP530.
default A setting that remains in effect unless you change it.
documents The original sheets of paper, pages of a book, or photographs you copy, fax, or
scan with the machine.
paper Paper on which you can print with the machine.
menu A list of settings from which you select an item to set up or change. A menu has
a title which appears on the LCD.
X Selecting the Language for the LCD
1 Press [Menu] to select <DEVICE SETTINGS>.
2 Use [W] or [X] to select <OTHERS>, then press [OK].
3 Use [W] or [X] to select <LANGUAGE SETTING>, then press [OK].
4 Use [W] or [X] to select the language, then press [OK].
9
Page 12
X Legal Limitations on Use of Your Product and Use of
ENGLISH
Images
It may be unlawful to make copies of, scan, print or use reproductions of the following
documents. The list provided is non-exhaustive. When in doubt, check with a legal
representative in your jurisdiction.
.
• Paper money
• Money orders
• Certificates of deposit
• Postage stamps (canceled or uncanceled)
• Identifying badges or insignias
• Selective service or draft papers
• Checks or drafts issued by governmental
agencies
• Motor vehicle licenses and certificates of
title
• Traveler’s checks
• Food stamps
• Passports
• Immigration papers
• Internal revenue stamps (canceled or
uncanceled)
• Bonds or other certificates of
indebtedness
• Stock certificates
• Copyrighted works/works of art without
permission of copyright owner
X European Union (and EEA) only.
This symbol indicates that this product is not to be disposed of with your
household waste, according to the WEEE Directive (2002/96/EC) and
your national law. This product should be handed over to a designated
collection point, e.g., on an authorized one-for-one basis when you buy
a new similar product or to an authorized collection site for recycling
waste electrical and electronic equipment (EEE). Improper handling of
this type of waste could have a possible negative impact on the
environment and human health due to potentially hazardous substances
that are generally associated with EEE. At the same time, your
cooperation in the correct disposal of this product will contribute to the
effective usage of natural resources. For more information about where
you can drop off your waste equipment for recycling, please contact
your local city office, waste authority, approved WEEE scheme or your
household waste disposal service.
For more information regarding return and recycling of WEEE
products, please visit www.canon-europe.com/environment.
(EEA: Norway, Iceland and Liechtenstein)
10
Page 13

X Users in Canada
Pre-Installation Requirements for Canon Facsimile Equipment
A. Location
Supply a suitable table, cabinet, or desk for the machine. See the Appendix for the
machine’s specific dimensions and weight.
B. Order Information
1. Provide only a single line touch-tone or rotary telephone set terminated with a standard
6-pin modular telephone plug. (Touch-tone is recommended if available in your area.)
2. Order a CA11A modular wall jack, which should be installed by the telephone
company. If the CA11A modular wall jack is not present, installation cannot occur.
3. Order a normal business line from your telephone company’s business representative.
The line should be a regular voice grade line or an equivalent one. Use one line per
machine.
DDD (Direct Distance Dial) line
-orIDDD (International Direct Distance Dial) line if you communicate overseas
• Canon recommends an individual line following industry standards, such as the 2500 (touch-tone)
or 500 (rotary/pulse dial) telephones. A dedicated extension off a PBX (Private Branch Exchange)
unit without “Call Waiting” can be used with your facsimile unit. Button telephone systems are not
recommended because they send non-standard signals to individual telephones for ringing and
special codes, which may cause a fax error.
C. Power Requirements
The power outlet should be a two-prong grounded receptacle (Single or Duplex). It
should be independent from copiers, heaters, air conditioners or any electric equipment
that is thermostatically controlled. The rated value is 120 volts and 15 amperes. The
CA11A modular jack should be relatively close to the power outlet to facilitate
installation.
Notice
This equipment meets the applicable Industry Canada terminal Specifications.
ENGLISH
11
Page 14

Avis
ENGLISH
Le présent matériel est conforme aux spécifications techniques applicables d'Industrie
Canada.
Before installing this equipment, users should ensure that it is permitted to be connected
to the facilities of the local telecommunications company. The equipment must also be
installed using an acceptable method of connection. In some cases, the company's inside
wiring associated with a single-line individual service may be extended by means of a
certified connector assembly (telephone extension cord). The customer should be aware
that compliance with the above conditions may not prevent degradation of service in
some situations.
The Ringer Equivalence Number is an indication of the maximum number of devices
allowed to be connected to a telephone interface. The termination on an interface may
consist of any combination of devices subject only to the requirement that the sum of the
RENs of all the devices does not exceed five.
Even if the dual-line option is installed, the REN is applicable to each port.
Avis
L'indice d'équivalence de la sonnerie (IES) sert à indiquer le nombre maximal de
terminaux qui peuvent être raccordés à une interface téléphonique. La terminaison d'une
interface peut consister en une combinaison quelconque de dispositifs, à la seule
condition que la somme d'indices d'équivalence de la sonnerie de tous les dispositifs
n'excède pas 5.
Repairs to certified equipment should be made by an authorized Canadian maintenance
facility designated by the supplier. Any repairs or alterations made by the user to this
equipment, or equipment malfunctions, may give the telecommunications company cause
to request the user to disconnect the equipment.
Users should ensure for their own protection that the electrical ground connections of the
power utility, telephone lines and internal metallic water pipe system, if present, are
connected together. This precaution may be particularly important in rural areas.
CAUTION
• Users should not attempt to make such connections themselves, but should contact the
appropriate electric inspection authority, or electrician, as appropriate.
• This Class B digital apparatus meets all requirements of the Canadian Interference-Causing
Equipment Regulations.
• Cet appareil numérique de la classe B respecte toutes les exigences du Règlement sur le
matériel brouilleur du Canada.
12
Page 15

Customer Technical Supports
Canon Canada Inc., offers a full range of customer technical support* options:
• For interactive troubleshooting, e-mail technical support, the latest driver downloads
and answers to frequently asked questions (www.canon.ca)
• Free live technical support Mon - Fri 9am-8pm EST (excluding holidays) for products
still under warranty (1-800-OK-CANON)
• The location of the authorized service facility nearest you (1-800-OK-CANON)
If the problem cannot be corrected by using one of the above technical support options,
repair options are available at the time of your call to the Free live technical support
number above or via the website at www.canon.ca
* Support program specifics are subject to change without notice.
CANON CANADA INC.
1-800-OK-CANON (1-800-652-2666)
http://www.canon.ca
ENGLISH
13
Page 16
1Introduction
(1) (2) (5)
(3) (4)
ENGLISH
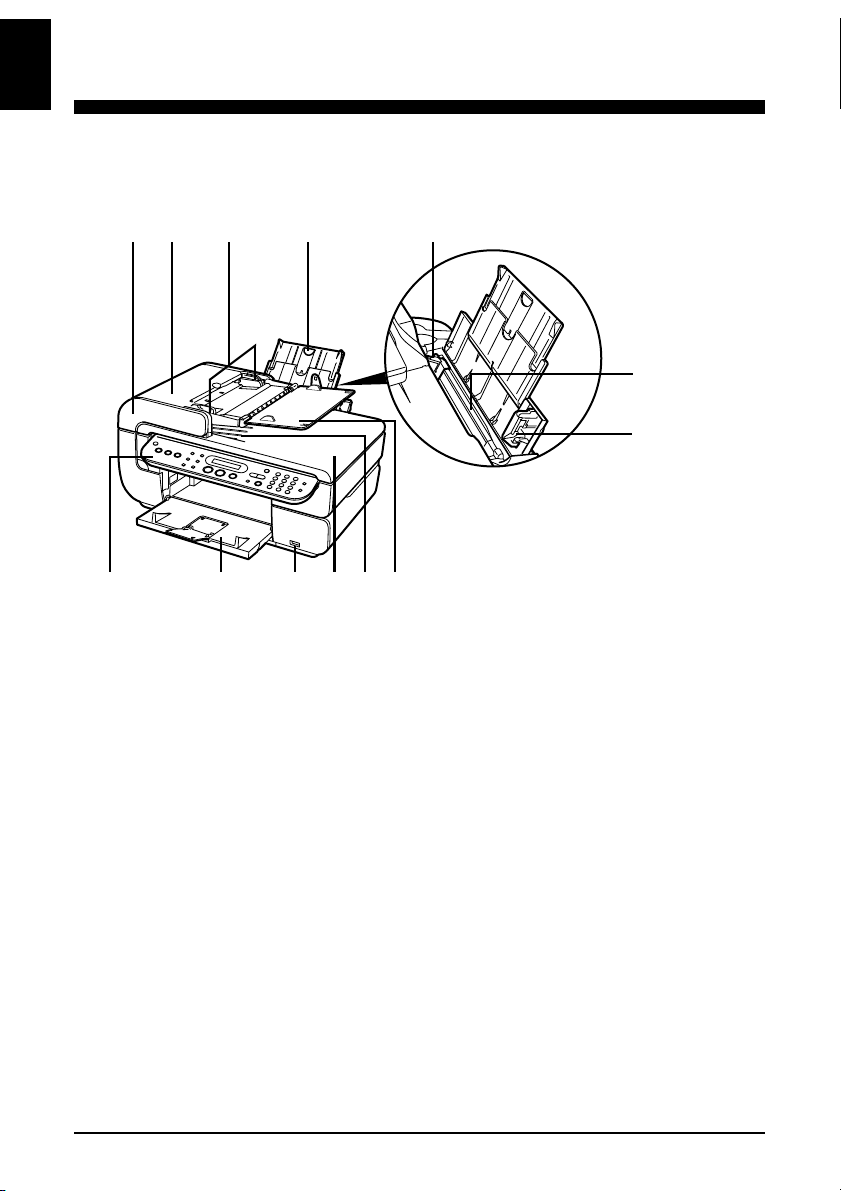
X Main Components and Their Functions
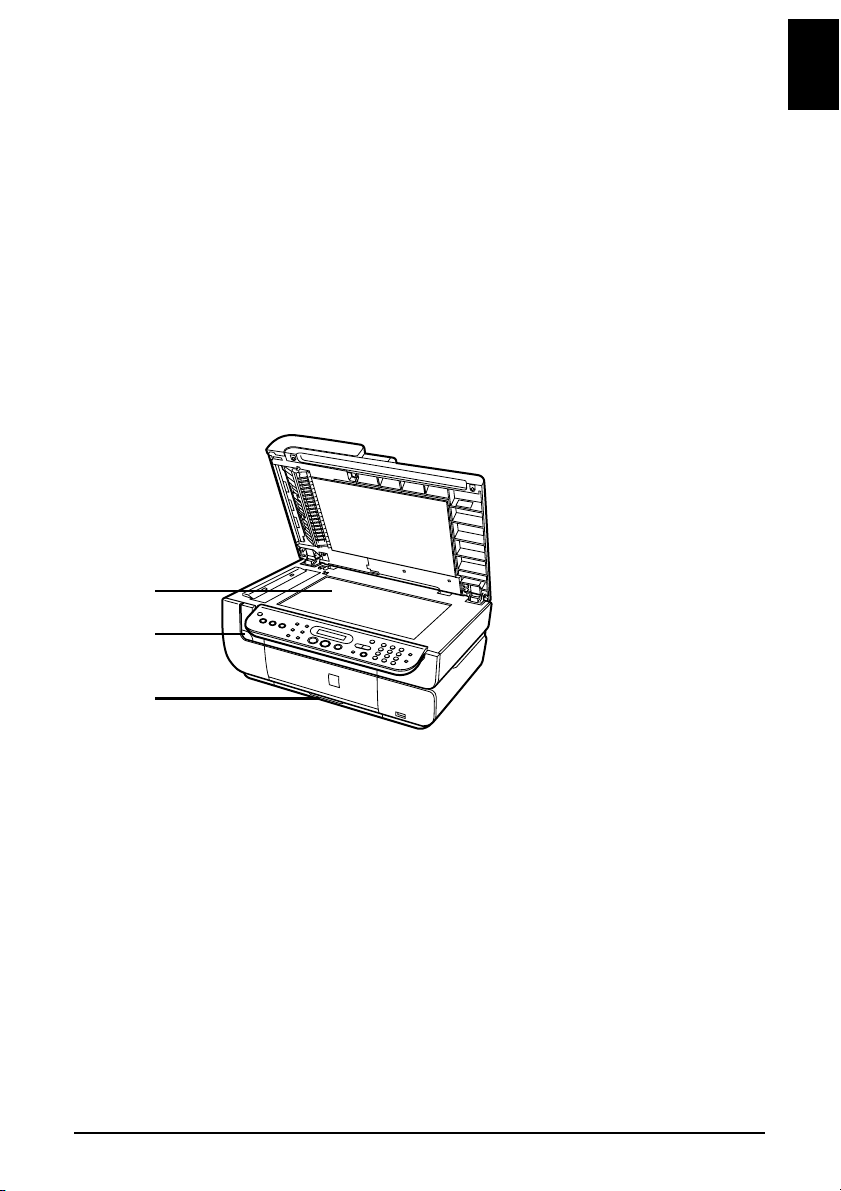
Front View
(13) (12) (11) (10) (8)(9)
(6)
(7)
ADF (Auto Document
(1)
Feeder)
Feeder Cover Open this cover when clearing jammed documents.
(2)
Document Guides Adjust these guides to match the document width.
(3)
Paper Support Supports paper loaded on the tray. Extend it before loading paper by
(4)
Paper Guide When loading paper, ensure that the left edge just touches this guide.
(5)
Automatically scans in documents loaded in the Document Tray.
putting your finger in the rounded hollow and pulling out the extension
until it stops.
To move the Paper Guide, pinch the knob and slide in the appropriate
direction.
14 Introduction Chapter 1
Page 17
Auto Sheet Feeder Load paper here before printing. Paper feeds automatically, one sheet at a
(6)
Cover Guide Align the right side of the paper to this guide.
(7)
Document Tray Open this tray to load a document. Once loaded, the document is fed one
(8)
Document Output
(9)
Slot
Document Cover Open this cover when loading a document on the Platen Glass.
(10)
Direct Print Port Connect the USB cable when printing directly from a digital camera or a
(11)
Paper Output Tray Printouts are output to this tray. It opens automatically when copying or
(12)
Operation Panel Used to change the settings or operate the machine. See “Operation Panel
(13)
(14)
(15)
time.
page at a time. Load the document with the side you want to scan face up.
Documents scanned from the Document Tray are delivered here.
digital video camcorder or a mobile phone equipped with a camera
compatible with PictBridge or Canon Bubble Jet Direct. See “Printing
Photographs Directly from a Compliant Device” in the User’s Guide.
printing is started. If it is closed, press the Open Button.
Name and Functions” on page 18.
ENGLISH
(16)
Platen Glass Used to load a document to be processed.
(14)
Open Button Press this button to open the Paper Output Tray.
(15)
Cassette Load paper to be used regularly here. Paper feeds automatically, one sheet
(16)
Chapter 1 Introduction 15
at a time.
Photo Stickers and 54.0 x 86.0 mm / 2.13" x 3.39" size paper are not
loadable in the Cassette.
Page 18
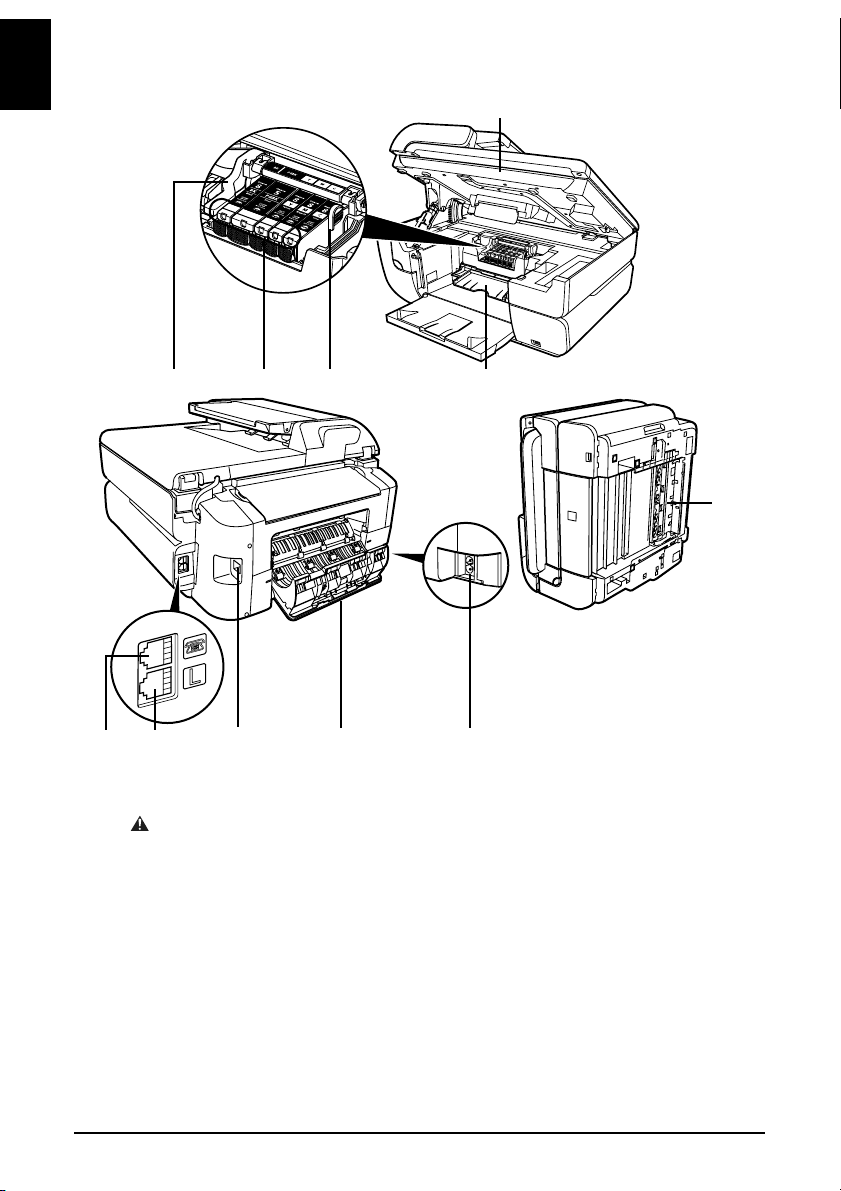
Rear View and Interior
ENGLISH
(17) (18) (19) (21)
(20)
(22)
(27) (24) (23)
(26) (25)
Print Head Lock
(17)
Lever
IMPORTANT
• Do not pull up this lever after installing the Print Head.
Ink Lamp Lights or flashes red to indicate the status of the ink tank. You can check
(18)
Print Head Holder Used to install a Print Head.
(19)
Scanning Unit
(20)
(Printer Cover)
Inner Cover Open this cover when replacing the ink tanks, or clearing jammed paper.
(21)
Duplexing Transport
(22)
Unit
Power Cord
(23)
Connection
Used to fix the Print Head.
the status of each ink tank according to the way its lamp flashes.
This is the unit used to scan documents. Open this unit when replacing the
ink tanks, or clearing jammed paper.
Also, open it and set the CD-R tray, when printing on a DVD/CD.*
Open this unit when clearing jammed paper after pulling out the Cassette.
This is the connector used to connect the provided power cord.
16 Introduction Chapter 1
Page 19

Rear Cover Open this cover when clearing jammed paper.
(24)
USB Port This is the connector used to connect the machine to a computer using a
(25)
IMPORTANT
• While the machine is printing from or scanning images to the computer, or the computer is
in the sleep mode or standby mode, do not disconnect and connect the USB cable.
Telephone Line Jack Connect the telephone line here.
(26)
External Device Jack Connect the external device here.
(27)
USB cable.
* Printing on DVD/CDs is not available for the machines sold in USA, Canada, all
countries in South America, and some other countries and regions.
ENGLISH
Chapter 1 Introduction 17
Page 20

Operation Panel Name and Functions
ENGLISH
(2)
(3)
(4)
(9) (11)(1) (5) (7) (8)
(6)
(10)
(12)
(20)
(24) (22)
[ON/OFF] Turns the machine ON and OFF. Before turning ON the machine, make
(1)
[COPY] Switches the machine to the Copy mode. Flashes when the machine is
(2)
[FAX] Switches the machine to the Fax mode.
(3)
In Use/Memory
(4)
Lamp
[SCAN] Switches the machine to the Scan mode. This button is used when the
(5)
Alarm Lamp Lights or flashes orange, when an error occurs, or when paper or ink has run
(6)
[Exposure] Sets the copy intensity and fax intensity.
(7)
[Enlarge/Reduce] Sets the reduction or enlargement ratio for copying.
(8)
LCD (Liquid Crystal
(9)
Display)
[Menu] Displays menus to configure copy, fax, or machine settings.
(10)
Numeric Buttons Enters numerical values such as the number of copies, as well as fax/
(11)
[Redial/Pause] Redials the last dialed number using numeric buttons. Also enters pauses
(12)
[Coded Dial] Press this button and a two-digit code to dial a pre-registered fax/telephone
(13)
[Tone] Switches temporarily to tone dialing. Also changes the mode when entering
(14)
sure the Document Cover is closed.
turned on.
Flashes when the telephone line is in use. Lights when there are documents
stored in the machine's memory.
machine is connected to a computer (Refer to the Scan Guide).
out.
Displays messages, menu selections, and the operation status.
telephone numbers and characters.
between or after numbers when dialing or registering numbers.
number.
characters.
(19)
(18) (17) (14)
(16)(23) (21)(26) (25)
(15)
(13)
18 Introduction Chapter 1
Page 21

[OK] Finalizes your selection for the menu or setting item.
(15)
[(-)W] and [X(+)] Scrolls through menu selections, and increases or decreases the number of
(16)
[Back] Returns to the previous screen.
(17)
[Stop/Reset] Cancels operations. If this button is pressed during printing, the machine
(18)
[Color] Starts color copying or faxing.
(19)
[Black] Starts black & white copying or faxing.
(20)
[Paper] Sets the page size and media type for copying, and for received faxes.
(21)
[Two-Sided] Selects two-sided copying.
(22)
[Image Quality] Sets the copy resolution and fax resolution.
(23)
[Feed Switch] Selects the paper source. Press this toggle switch to change the paper source
(24)
Cassette Lamp Lights when the Cassette is selected.
(25)
Auto Sheet Feeder
(26)
Lamp
Restores the machine to normal operation after a printing error was
resolved, or if paper jams are cleared. Ejects documents remaining in the
ADF.
copies. For the fax settings, [W] cancels the entered character, and [X]
enters a space between characters.
aborts printing. Resets the settings for the number of copies, for the ratio of
reduction/enlargement, for the intensity, and on <1.SPECIAL COPY>.
Also enables you to return to the standby screen after you set some menus.
between the Auto Sheet Feeder and Cassette.
Lights when the Auto Sheet Feeder is selected.
ENGLISH
Chapter 1 Introduction 19
Page 22

X Menu List
ENGLISH
In [COPY], [FAX], and [SCAN],
pressing [Menu] enables you to
display the items such as functions you
can use in each mode, settings
common to each mode, or
maintenance.
The display items in each mode are
listed as shown.
COPY
1.SPECIAL COPY
2-ON-1
4-ON-1
STICKER COPY
BORDERLESS COPY
IMAGE REPEAT
COLLATED COPY
2.FAX SETTINGS
See “1.FAX SETTINGS” in [FAX].
3.DEVICE SETTINGS
PRINT SETTINGS
QUIET MODE
PREVENT ABRASION
EXTENDED AMOUNT
AUTO FEED SWITCH
PICTBRIDGE SET
PAGE SIZE
MEDIA TYPE
PRINT QLTY
BORDERLESS PRINT
IMAGE ENHANCEMENT
OTHERS
AUDIBLE TONES
PWR SAVE SETTING
COUNTRY SELECT
LANGUAGE SETTING
RESTORE DEFAULT
SAVE CONFIG
LOAD CONFIG
4.MAINTENANCE
NOZZLE CHECK
CLEANING
DEEP CLEANING
AUTO HEAD ALIGN
ALIGN PRINT HEAD
HEAD ALIGN PRINT
ROLLER CLEANING
BOTTOM CLEANING
*1
20 Introduction Chapter 1
Page 23

FAX SCAN
1.FAX SETTINGS 1.FAX SETTINGS
RECEIVE MODE SET See “1.FAX SETTINGS” in [FAX].
FAX/TEL AUTO SW
FAX ONLY MODE
*2
DRPD
NETWORK SWITCH
MANUAL MODE
ANS.MACHINE MODE
*1
2.DEVICE SETTINGS
See “3.DEVICE SETTINGS” in [COPY].
3.MAINTENANCE
See “4.MAINTENANCE” in [COPY].
MEMORY REFERENCE
PRINT MEMORY LIST
PRINT DOCUMENT
DELETE DOCUMENT
PRNT REPORT/LIST
ACTIVITY REPORT
SPEED DIAL LIST
USER'S DATA LIST
MEMORY LIST
CODED DIAL REGIST
USER SETTINGS
DATE/TIME SETTING
DATE DISPLAY
SUMMER TIME SET
UNIT TEL NUMBER
*1
UNIT NAME
TX TERMINAL ID
OFFHOOK ALARM
VOLUME CONTROL
RX RING LEVEL
TEL LINE TYPE
ACTIVITY REPORT
TX SETTINGS
ECM TX
PAUSE TIME
AUTO REDIAL
TX START SPEED
COLOR TX
TX REPORT
DIAL TONE DETECT
RX SETTINGS
ECM RX
FAX/TEL AUTO SW
DRPD:FAX RNG PAT
INCOMING RING
*2
MAN/AUTO SWITCH
REMOTE RX
RX IMG REDUCTION
RX START SPEED
RX REPORT
2.DEVICE SETTINGS
See “3.DEVICE SETTINGS” in [COPY].
*1
3.MAINTENANCE
See “4.MAINTENACE” in [COPY].
This setting is not available in some countries and
regions.
*2
US and Canada only.
ENGLISH
Chapter 1 Introduction 21
Page 24
2 Document Handling
ENGLISH
X Document Requirements
Platen Glass ADF
Document
type
Size
(W x L)
Quantity
Thickness
Weight
z Special types of paper
z Photographs
z Book
z Documents that are not suitable for the
ADF
Max. 216 x 297 mm / 8.5" x 11.7" Max. 216 x 356 mm / 8.5" x 14.0"
1 sheet
Max. 10 mm / 0.39" 0.06 to 0.13 mm / 0.002" to 0.005"
— 50 to 90 gsm / 13 to 24 lb
Multipage documents of the same size,
thickness, and weight
Min. 148 x 148 mm / 5.8" x 5.8"
z Max. 30 pages of A4- or letter-size
sheets (75 gsm / 20 lb paper), up to
4mm in height
z Max. 10 pages of legal-size sheets (75
gsm / 20 lb paper), up to 2mm in height
z 1 sheet for sizes other than these
22 Document Handling Chapter 2
Page 25
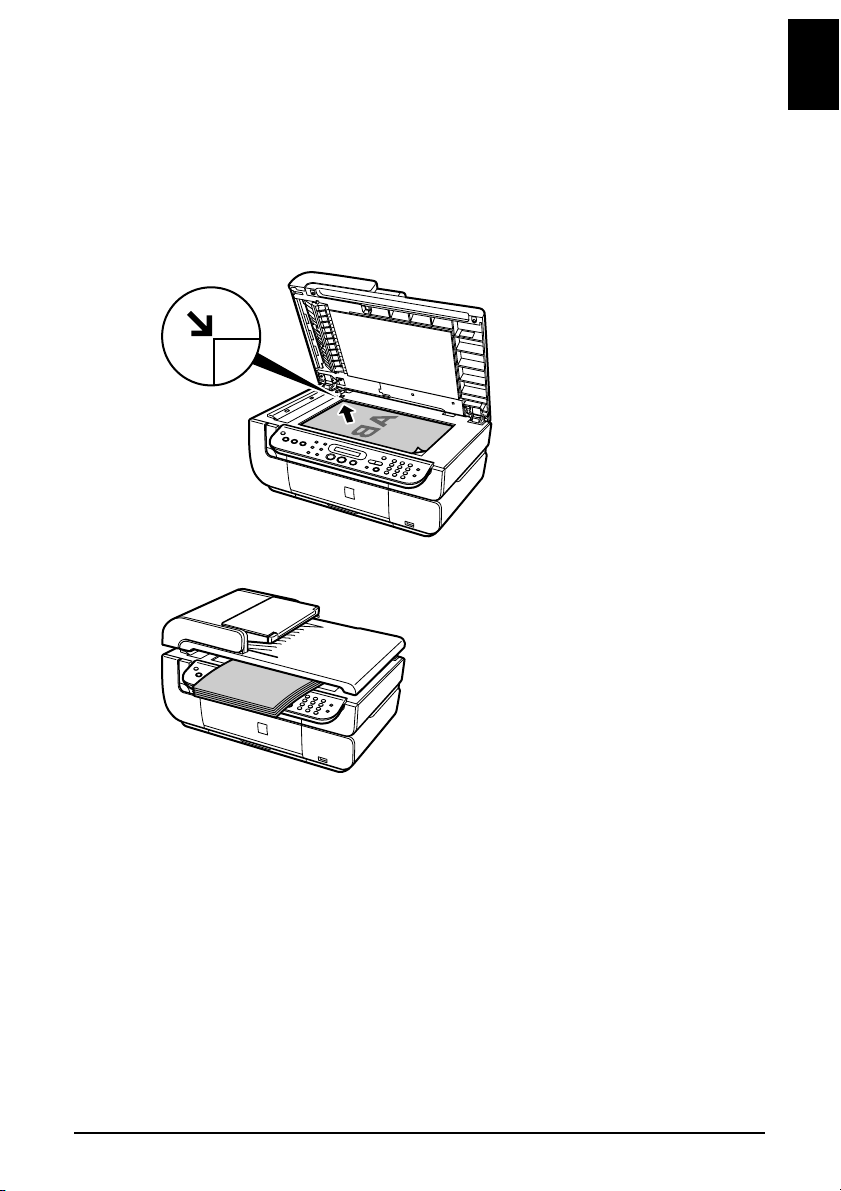
X Loading Documents
Using the Platen Glass
1 Open the Document Cover.
2 Load your document on the Platen Glass.
• Place your document face down on the Platen Glass.
• Align the upper left corner of your document with the alignment mark on the upper left corner
of the Platen Glass.
• You can also scan in originals that are up to 10 mm / 0.39" thick, such as books. Set them on
the Platen Glass in the same way as documents.
ENGLISH
3 Gently close the Document Cover.
Chapter 2 Document Handling 23
Page 26
Using the ADF
ENGLISH
1 Remove any documents from the Platen Glass.
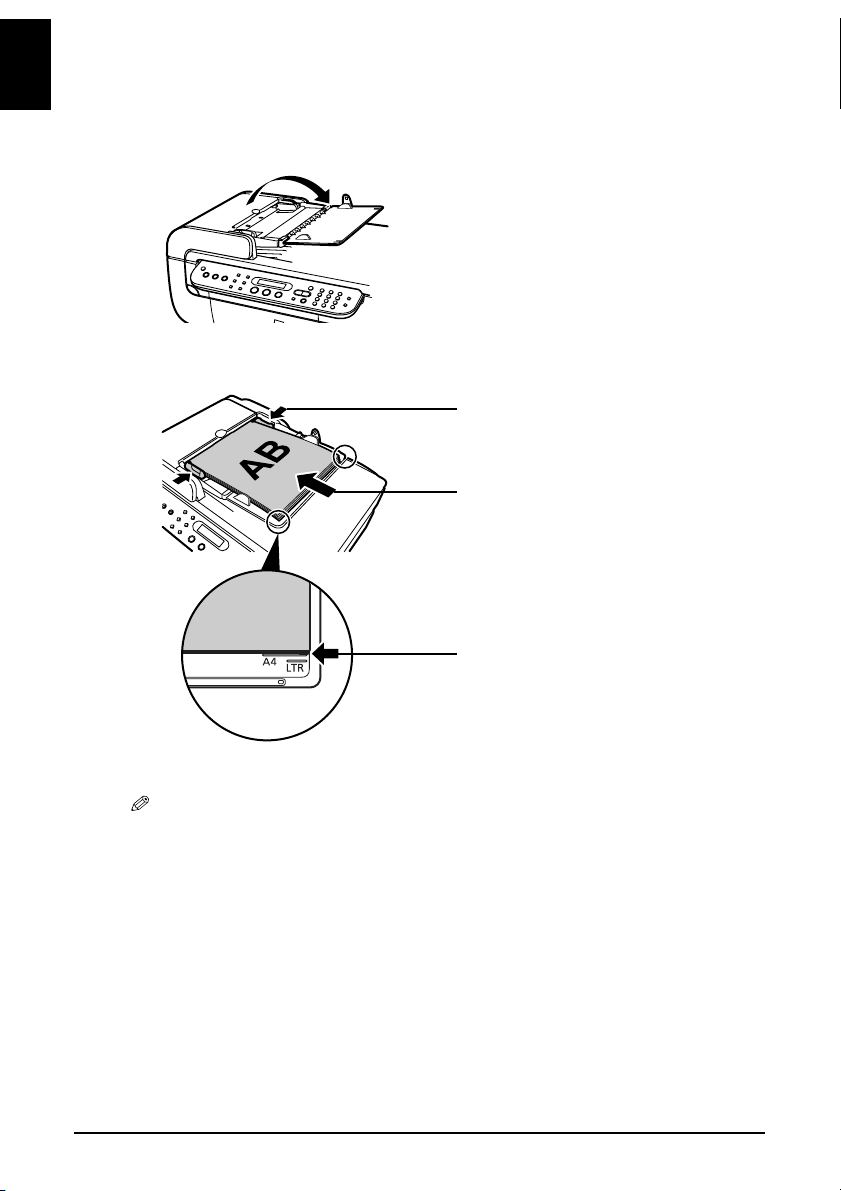
2 Open the Document Tray.
3 Load the document in the ADF (1).
Load the document with the side you want to copy, fax, or scan face up in the ADF.
(2)
(1)
(A)
4 Adjust the Document Guides to match the document width (2).
• Ensure that the edge of the document stack is in line with the Paper Size Mark imprinted on the
Document Tray (A).
24 Document Handling Chapter 2
Page 27
3 Paper Handling
X Recommended Paper and Requirements
ENGLISH
Media Type Model Paper Support Load Limit Printer Driver
Auto Sheet Feeder Cassette
Plain Paper — 13 mm / 0.51" 13 mm / 0.51" [Plain Paper]
High Resolution
Paper
Super White Paper SW-201 13 mm / 0.51"
Glossy Photo
Paper
Glossy Photo
Paper
“Everyday Use”
Matte Photo Paper MP-101 10 sheets (A4, Letter),
Photo Paper Plus
Double Sided
Photo Paper Plus
Glossy
Photo Paper Plus
Semi-gloss
Photo Paper Pro PR-101 10 sheets (A4, Letter),
Photo Stickers PS-101 1 sheet Not loadable [Photo Paper Plus
Transparencies CF-102 30 sheets 30 sheets [Transparencies]
T-Shirt Transfers TR-301 1 sheet 1 sheet [T-Shirt Transfers]
Envelopes — 10 envelopes 5 envelopes [Envelope]
HR-101N 80 sheets (A4, Letter) 80 sheets (A4, Letter) [High Resolution
13 mm / 0.51"
(A4, Letter)
GP-401 10 sheets (A4, Letter),
20 sheets (101.6 x
152.4 mm / 4" x 6",
Credit Card)
GP-501 10 sheets (A4),
20 sheets (101.6 x
152.4 mm / 4" x 6")
20 sheets (101.6 x
152.4 mm / 4" x 6")
PP-101D 10 sheets (A4, Letter,
127.0 x 177.8 mm / 5" x
7")
PP-101 10 sheets (A4, Letter,
127.0 x 177.8 mm / 5" x
7"), 20 sheets (101.6 x
152.4 mm / 4" x 6")
SG-101 10 sheets (A4, Letter),
20 sheets (101.6 x
152.4 mm / 4" x 6")
20 sheets (101.6 x
152.4 mm / 4" x 6")
(A4, Letter)
10 sheets (A4, Letter),
20 sheets (101.6 x
152.4 mm / 4" x 6"),
Not supported
(Credit Card)
10 sheets (A4),
20 sheets (101.6 x
152.4 mm / 4" x 6")
10 sheets (A4, Letter),
20 sheets (101.6 x
152.4 mm / 4" x 6")
10 sheets (A4, Letter,
127.0 x 177.8 mm / 5" x
7")
10 sheets (A4, Letter,
127.0 x 177.8 mm / 5" x
7"), 20 sheets (101.6 x
152.4 mm / 4" x 6")
10 sheets (A4, Letter),
20 sheets (101.6 x
152.4 mm / 4" x 6")
10 sheets (A4, Letter),
20 sheets (101.6 x
152.4 mm / 4" x 6")
Setting for
[Media Type]
Paper]
[Plain Paper]
[Glossy Photo Paper]
[Glossy Photo Paper]
[Matte Photo Paper]
[Photo Paper Plus
Double Sided]
[Photo Paper Plus
Glossy]
[Photo Paper Plus
Glossy]
[Photo Paper Pro]
Glossy]
Chapter 3 Paper Handling 25
Page 28
X Auto Sheet Feeder and Cassette
ENGLISH
Paper can be loaded into the machine at two locations: the Auto Sheet Feeder at the rear,
and the Cassette at the front. To switch the paper source, press [Feed Switch]. The
selected feeder is indicated on the Operation Panel.
Loading the Print Media in the Auto Sheet Feeder
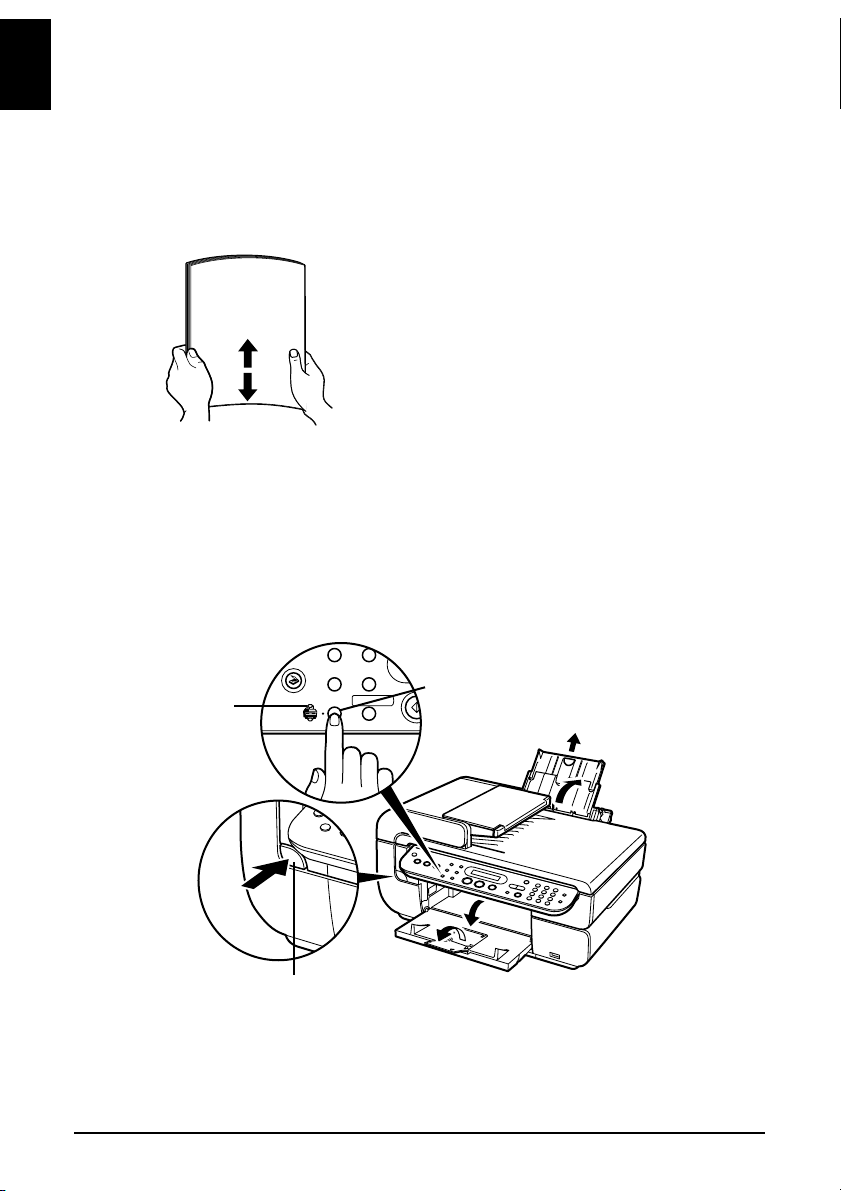
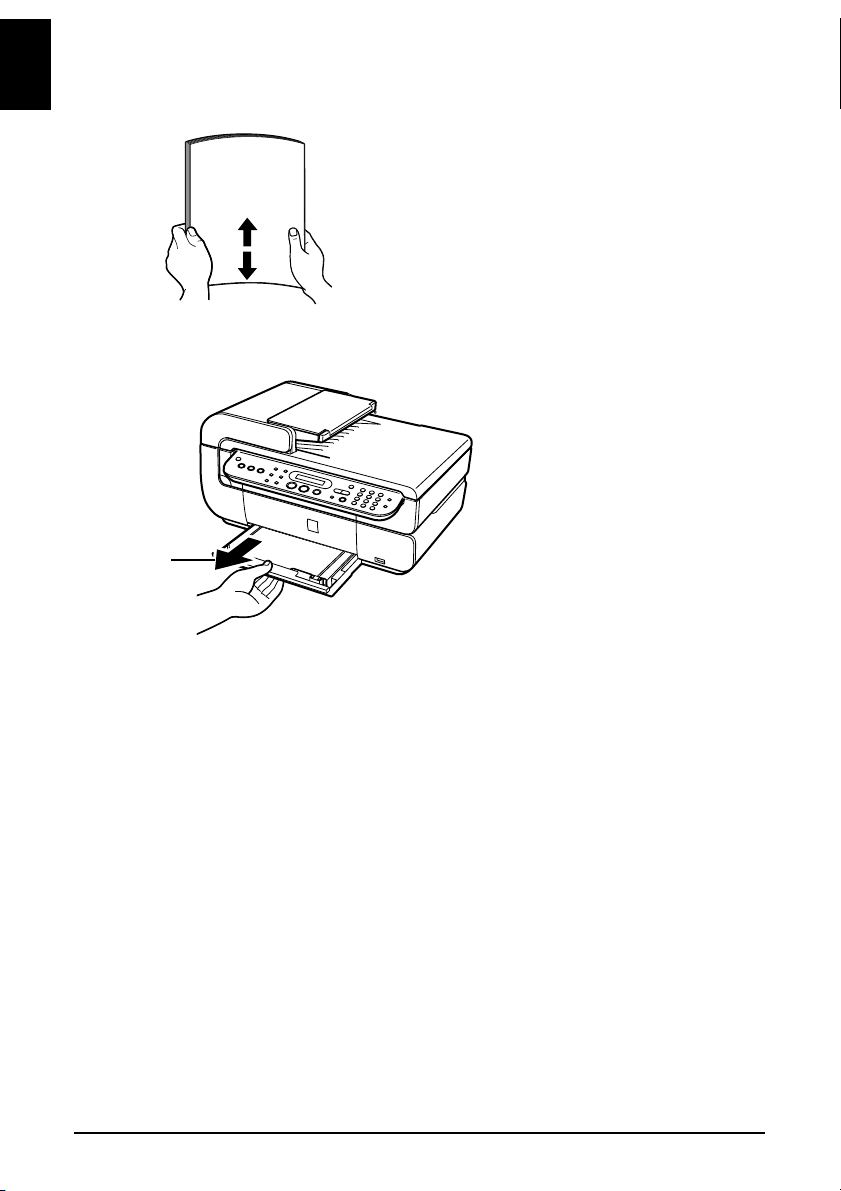
1 Flatten the four corners of the paper before loading it.
2 Prepare to load paper.
1. Open the Paper Support, then pull out the Paper Support Extension to support the
paper.
2. Press the Open Button to open the Paper Output Tray.
3. Open up and set the Paper Output Tray Extension completely by pressing down
the hollow on its front side.
4. Press [Feed Switch] so that the Auto Sheet Feeder Lamp (A) lights.
(A)
(2)
(4)
(1)
(3)
26 Paper Handling Chapter 3
Page 29
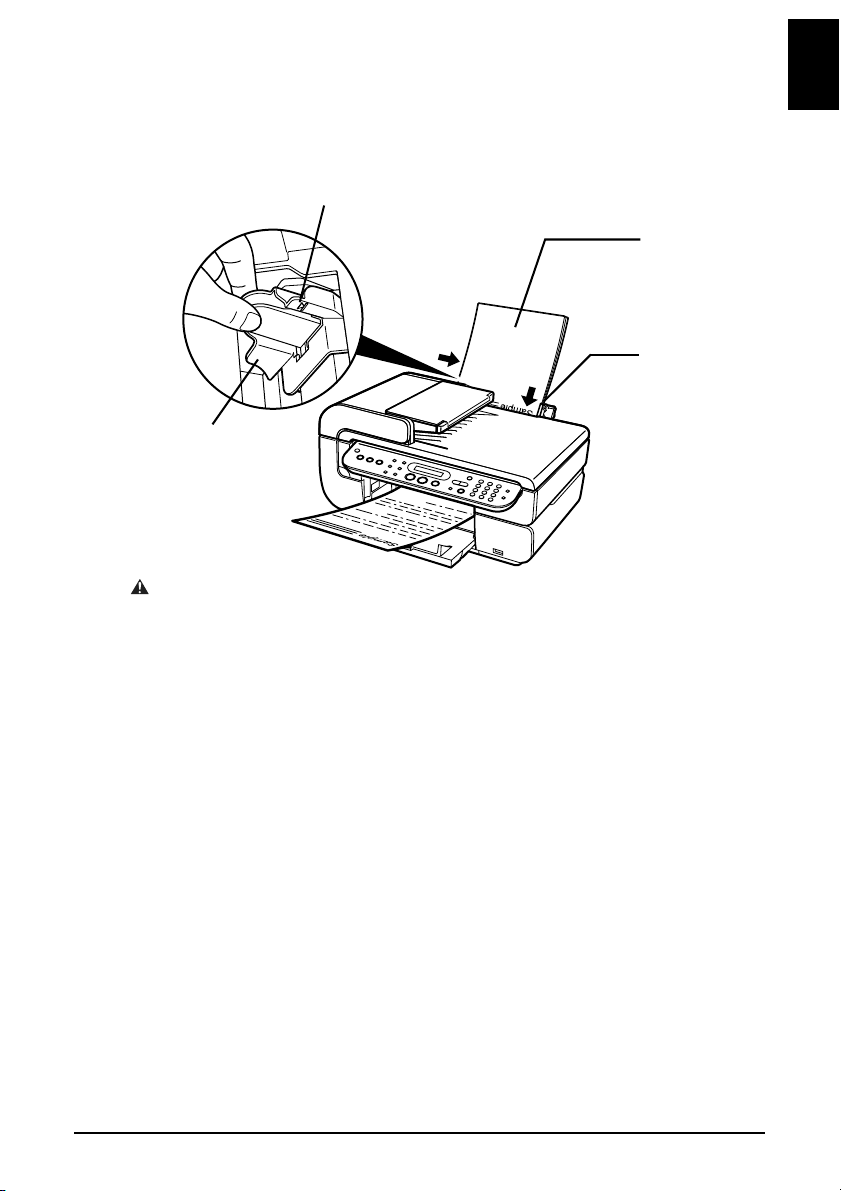
3 Load the paper.
1. Load the paper into the Auto Sheet Feeder with the print side face up.
2. Align the paper stack to the Cover Guide on the right side of the Paper Support.
3. Pinch the Paper Guide and slide it against the left side of the paper stack.
(A)
(1)
(2)
(3)
IMPORTANT
• Do not load the paper beyond this Load Limit Mark (A).
ENGLISH
Chapter 3 Paper Handling 27
Page 30
Loading the Print Media in the Cassette
ENGLISH
1 Flatten the four corners of the paper before loading it.
2 Prepare to lead paper.
1. Pull out the Cassette from the machine.
(1)
28 Paper Handling Chapter 3
Page 31

3 Load the paper (Print side face down).
1. Load the paper into the Cassette with the print side face down.
2. Align the paper stack to the right side of the Cassette.
3. Slide the Paper Guides to fit the loaded paper stack.
IMPORTANT
• Do not load the paper beyond this Load Limit Mark (A).
4 Insert the Cassette into the machine.
1. Push the cassette all the way into the machine.
ENGLISH
(A)
(1)
(2)
(3)
(1)
Chapter 3 Paper Handling 29
Page 32

ENGLISH
1. Press the Open Button to open the Paper Output Tray.
2. Open up and set the Paper Output Tray Extension completely by pressing down
the hollow on its front side.
3. Press [Feed Switch] so that the Cassette Lamp (A) lights.
(3)
(A)
5 Prepare the Paper Output Tray.
(1)
(2)
30 Paper Handling Chapter 3
Page 33

4 Copying
X Making Copies
When making color or black & white copies, you can adjust the print resolution and
density. You can also change reduction or enlargement settings. For more information,
refer to the User’s Guide.
1 Press [ON/OFF] to turn on the machine.
2 Press [COPY].
3 Load paper.
4 Ensure that the proper paper source is selected.
5 Adjust the settings for your document as necessary.
(1) (2) (3) (4)
(5)(6)
(1) Ratio of Reduction/Enlargement
The ratio of reduction or enlargement set by using [Enlarge/Reduce] is displayed.*
(2) Page Size
The page size set by using [Paper] is displayed.*
(3) Image Quality
The print quality set by using [Image Quality] is displayed.*
(4) Number of Copies
The number of copies (max. 99 copies) specified by using [W] button or [X] button is
displayed.
(5) Media Type
The media type set by using [Paper] is displayed.*
(6) Intensity
The intensity set by using [Exposure] is displayed.*
6 Load the document on the Platen Glass or in the ADF.
7 Press [Color] for color copying, or [Black] for black & white copying.
* For more information, refer to the User’s Guide.
ENGLISH
Chapter 4 Copying 31
Page 34

X Advanced Copy Features
ENGLISH
Two-sided copy Copies two document pages onto the both sides of a single sheet of paper.*
2-on-1 copy Copies two document pages to fit onto a single page.*
4-on-1 copy Copies four document pages to fit onto a single page.*
Creating stickers
(Sticker copy)
Borderless copy Copies color or black & white images so that they fill the entire page without
Repeating an
image on a page
(Image repeat)
Collated copy When making multiple copies of a document with more than one page you
* For more information, refer to the User’s Guide.
Easily makes stickers from 101.6 x 152.4 mm / 4" x 6" photos or graphics.*
borders.*
Copies an image multiple times onto a single page.*
have them delivered in sorted sets.*
32 Copying Chapter 4
Page 35

5 Printing Photographs Directly from a
Compliant Device
Connecting a PictBridge-compatible digital camera, camcorder or mobile phone to the
machine allows you to print recorded images directly without using a computer.
X Connecting to a PictBridge Compliant Device
1 Press [ON/OFF] to turn on the machine.
2 Load paper.
3 Ensure that the proper paper source is selected.
4 Ensure that the device is turned off.
5 Connect the device to the machine using the USB cable supplied with
the device.
Some types of the devices turn on automatically, when connected to the machine. If the device
not turns on automatically, turn it on manually.
6 Turn on and set up the device for direct printing.
ENGLISH
Chapter 5 Printing Photographs Directly from a Compliant Device 33
Page 36

6 Preparing Your Machine for Fax
ENGLISH
X Examples of Connecting the Machine
Connecting to the Telephone Line
Connecting to an Analog Line
Telephone line (analog)
Connecting to an ADSL
Asymmetric Digital
Subscriber Line
ADSL modem
(splitter may be
built-in to the
modem)
Splitter
Computer
For details on ADSL connection and settings, see the manual supplied with your ADSL
modem. The illustrated connection is an example and is not guaranteed to suit every
connecting condition.
34 Preparing Your Machine for Fax Chapter 6
Page 37

Connecting to an ISDN Line
ENGLISH
ISDN line
Terminal adapter,
etc.
Analog port
Computer
For details on ISDN connection and settings, see the manuals supplied with your terminal
adapter or dial-up router.
Connecting External Devices
Connecting a Telephone or Answering Machine via a Computer
Telephone or Answering
Computer
Connecting a Telephone or Answering Machine Directly
Telephone or Answering machine
machine
Chapter 6 Preparing Your Machine for Fax 35
Page 38

X Setting the Telephone Line Type
ENGLISH
1 Press [FAX], then press [Menu].
2 Use [W] or [X] to select <USER SETTINGS>, then press [OK].
3 Use [W] or [X] to select <TEL LINE TYPE>, then press [OK].
4 Use [W] or [X] to select the telephone line type, then press [OK].
– <TOUCH TONE>: Suitable for tone dialing.
– <ROTARY PULSE>: Suitable for pulse dialing.
5 Press [Stop/Reset].
X Registering Sender Information
Entering the Date and Time
1 Press [FAX], then press [Menu].
2 Use [W] or [X] to select <USER SETTINGS>, then press [OK] two times.
3 Use the numeric buttons to enter the date and time (in 24-hour format),
then press [OK].
4 Press [Stop/Reset].
Registering Your Fax/Telephone Number and Name (Sender
Information)
1 Press [FAX], then press [Menu].
2 Use [W] or [X] to select <USER SETTINGS>, then press [OK].
3 Use [W] or [X] to select <UNIT TEL NUMBER>, then press [OK].
4 Use the numeric buttons to enter your fax/telephone number (max. 20
digits, including spaces), then press [OK] two times.
5 Use the numeric buttons to enter your name (max. 24 characters,
including spaces), then press [OK].
6 Press [Stop/Reset].
36 Preparing Your Machine for Fax Chapter 6
Page 39

X Registering Coded Speed Dialing
1 Press [FAX], then press [Menu].
2 Use [W] or [X] to select <CODED DIAL REGIST>, then press [OK].
3 Use [W] or [X] to select a coded speed dialing code (00 to 39), then press
[OK] two times.
4 Use the numeric buttons to enter the fax/telephone number you want to
register (max. 60 digits (40 digits for Korea), including spaces), then
press [OK] two times.
5 Use the numeric buttons to enter a name (max. 16 characters, including
spaces), then press [OK].
6 Press [Stop/Reset].
Changing or Deleting a Coded Speed Dialing
1. Follow the procedures from steps 1 to 3 in “Registering Coded Speed Dialing”.
To change a registered number:
2. Press and hold [W] to delete the registered number.
3. Use the numeric buttons to enter the new number.
4. Press [OK], then press [Stop/Reset].
To change a registered name:
2. Press [OK] two times.
3. Press and hold [W] to delete the registered name.
4. Use the numeric buttons to enter the new name.
5. Press [OK], then press [Stop/Reset].
To delete an entire entry:
2. Press and hold [W] to delete the registered number.
3. Press [OK], then press [Stop/Reset].
The name will automatically be deleted when you delete the number.
ENGLISH
Chapter 6 Preparing Your Machine for Fax 37
Page 40

X Setting Daylight Saving Time (Summer Time)
ENGLISH
• This setting is not available in some countries and regions.
1 Press [FAX], then press [Menu].
2 Use [W] or [X] to select <USER SETTINGS>, then press [OK].
3 Use [W] or [X] to select <SUMMER TIME SET>, then press [OK].
4 Use [W] or [X] to select <ON> or <OFF>, then press [OK].
• If you select <OFF>, go to step 14
• If you select <ON>, go to step 5
5 Press [OK] two times.
6 Use [W] or [X] to select the month when summer time starts, then press
[OK] two times.
7 Use [W] or [X] to select the week when summer time starts, then press
[OK] two times.
8 Use [W] or [X] to select the day of the week when summer time starts,
then press [OK] two times.
9 Use the numeric buttons to enter the time (in 24-hour format) when
summer time starts, then press [OK] three times.
10Use [W] or [X] to select the month when summer time ends, then press
[OK] two times.
11Use [W] or [X] to select the week when summer time ends, then press
[OK] two times.
12Use [W] or [X] to select the day of the week when summer time ends,
then press [OK] two times.
13Use the numeric buttons to enter the time (in 24-hour format) when
summer time ends, then press [OK].
14Press [Stop/Reset].
38 Preparing Your Machine for Fax Chapter 6
Page 41

X Guidelines for Entering Numbers, Letters, and Symbols
1 Press [ ] to switch to uppercase letter mode (:A), lowercase letter mode
(:a), or number mode (:1).
2 Use the numeric buttons to enter a character. Press the button
repeatedly until the character you want appears.
To enter successive characters from the same numeric button:
– Press the numeric button, press [X], then press the same numeric button again.
To enter a space:
– Press [X] two times.
In number mode, press [X] once.
To delete a character:
– Press [W].
To delete an entire entry :
– Press and hold [W].
Models with lowercase letter mode:
Button Uppercase letter
[1] 1
[2] ABCЕДБАГВЖЗ abcедбагвжз 2
[3] DEFËÉÈÊ defëéèê 3
[4] GH I Ï Í Ì Î gh i ï í ì î 4
[5] JKL jkl 5
[6] MNOСШЦУТХФ mnoсшцутхф 6
[7] PQRSÞ pqrsþ 7
[8] TUVÜÚÙÛ tuvüúùû 8
[9] WXYZÝ wxyzý 9
[0] 0
[#]
[]
mode
-.SP #!",;:^`_=/|’?$@%&+()[]{}<>
Uppercase letter
mode (: A)
Lowercase letter
mode
Lowercase letter
mode (: a)
Number mode
Number mode (:1)
ENGLISH
SP indicates a space.
Chapter 6 Preparing Your Machine for Fax 39
Page 42

ENGLISH
Button Letter mode Number mode
[1] 1
[2] ABCabc 2
[3] DEFdef 3
[4] GHIghi 4
[5] JKLjkl 5
[6] MNOmno 6
[7] PQRSpqrs 7
[8] TUVtuv 8
[9] WXYZwxyz 9
[0] 0
[#]
SP indicates a space.
-.SP #!",;:^`_=/|’?$@%&+()[]{}<>
Models without lowercase letter mode:
40 Preparing Your Machine for Fax Chapter 6
Page 43

7 Sending Faxes
X Sending Methods
1 Load the document on the Platen Glass or in the ADF.
2 Press [FAX].
3 Adjust the settings for your document as necessary.
4 Dial the recipient’s number (DESTINATION NUMBER) using the numeric
buttons or coded speed dialing.
5 Press [Color] for color sending, or [Black] for black & white sending.
Coded Speed Dialing
1 Press [Coded Dial].
2 Use the numeric buttons to enter the two-digit code (00-39) assigned to
the number you want to dial, then press [OK].
ENGLISH
Chapter 7 Sending Faxes 41
Page 44

8 Receiving Faxes
ENGLISH
X Receive Modes
If You Want to Receive Only Faxes Automatically with Your
Machine, or You Have a Dedicated Telephone Line for Fax Use
Only:
Select <FAX ONLY MODE>.
• When you receive a fax call: The machine will receive the fax automatically.
• When you receive a voice call: You will not be able to answer the call.
If You Receive Mainly Voice Calls and Sometimes Faxes, or You
Want to Receive Faxes Manually:
Select <MANUAL MODE>.
• When you receive a fax call: The telephone will ring. Pick up the handset and if you
hear a high-pitched signal, press [Black] or [Color] on
• When you receive a voice call: The telephone will ring. Pick up the handset to answer
• For remote receiving: If you are far from your machine, dial 25 (the remote
If You Want to Receive Voice Messages on Your Answering
Machine and Receive Faxes Automatically:
Select <ANS.MACHINE MODE>.
• When you receive a fax call: First the answering machine connected to your machine
• When you receive a voice call: The answering machine connected to your machine will
the machine to receive the fax.
the call.
receiving ID) on your telephone to receive faxes.
will respond to an incoming call, and then the machine
will receive faxes automatically.
respond to an incoming call.
If You Want to Receive Faxes Automatically as well as Voice Calls:
Select <FAX/TEL AUTO SW>.
• When you receive a fax call: The machine will receive the fax automatically.
• When you receive a voice call: The machine will ring. Pick up the telephone or
42 Receiving Faxes Chapter 8
answering machine connected to your machine to
answer the call.
Page 45

If You Have Subscribed to a Distinctive Ring Pattern Detection
(DRPD) Service with Your Telephone Company (US and Canada
only) :
Select <DRPD>.
• When you receive a fax call: The machine will ring according to the ring pattern you
have chosen and receive the fax automatically.
• When you receive a voice call: The telephone will ring according to the ring pattern
you have chosen. Pick up the handset of your answering
machine to answer the call.
If you Want Your Machine to Automatically Switch between Fax and
Voice Calls by the Call Ring Patterns (Network Switch) (This setting
is not available in some countries and regions.):
Select <NETWORK SWITCH>.
• When you receive a fax call: The machine will ring and receive the fax
automatically.
• When you receive a voice call: The machine will ring. Pick up the handset to answer
the call.
• The name of this service varies depending upon a country. The typical example is as follows:
Australia: NET SWITCH
New Zealand: FAX ABILITY
Finland: Own Ringing
X Setting the Receive Mode
1 Press [FAX], then press [Menu].
2 Press [OK].
3 Use [W] or [X] to select the receive mode.
4 Press [OK].
ENGLISH
Chapter 8 Receiving Faxes 43
Page 46

9 Maintenance
ENGLISH
X Replacing an Ink Tank
1 Ensure that the machine is on.
2 Raise the Scanning Unit (Printer Cover) until it stops.
The Paper Output Tray will open automatically and the Print Head Holder moves to the center.
(A)
(A) Press the Open Button to open the Paper Output Tray if it does not open automatically.
3 Open the Inner Cover.
44 Maintenance Chapter 9
Page 47

4 Push the tab (A) and remove the ink tank whose lamp is flashing red
fast. Do not touch the Print Head Lock Lever (B). Remove only the ink
tank.
(B)
(A)
5 Prepare a replacement tank.
1. Remove the new ink tank from its packaging, then pull the orange tape (A) toward
the arrow so that the protective film does not remain on the air hole (C). Then
remove the film completely (B).
2. Remove the orange protective cap (D) from the bottom of the ink tank and discard
it. Carefully hold the protective cap when removing it to prevent the ink from
staining your fingers.
Discard the cap once it is removed.
ENGLISH
(A)
(B)
(C)
Chapter 9 Maintenance 45
(D)
Page 48

ENGLISH
1. Install the ink tank into the Print Head.
2. Press on the mark on the ink tank until the ink tank snaps firmly into place.
3. Ensure that the ink tank clicks into place and then its lamp lights red (A).
(A)
7 Close the Inner Cover.
6 Install the ink tank.
8 Slowly close the Scanning Unit (Printer Cover).
CAUTION
• Be sure to hold the Scanning Unit (Printer Cover) firmly using both hands, and be careful
not to get your fingers caught.
46 Maintenance Chapter 9
Page 49

X Maintaining the Print Head
Cleaning the Print Head
1 Press [ON/OFF] to turn on the machine.
2 Press [Menu] repeatedly to select <MAINTENANCE>.
3 Use [W] or [X] to select <CLEANING> or <DEEP CLEANING> as
necessary, then press [OK].
Aligning the Print Head Automatically
1 Press [ON/OFF] to turn on the machine.
2 Press the Open button to open the Paper Output Tray, and open up and
set the extension by pressing down the hollow on its front side.
3 Press [Menu] repeatedly to select <MAINTENANCE>.
4 Load a few sheets of A4 or Letter-size plain paper in the Auto Sheet
Feeder.
5 Use [W] or [X] to select <AUTO HEAD ALIGN>, then press [OK].
6 The pattern is printed.
ENGLISH
Chapter 9 Maintenance 47
Page 50

ENGLISH
48 Maintenance Chapter 9
Page 51

Guía de iniciación rápida
Tabla de contenido
Introducción 14
Manipulación de documentos 22
Manejo de papel 25
Copia 31
Impresión de fotografías directamente desde un dispositivo compatible
Preparación del equipo para enviar y recibir faxes 34
Envío de faxes 41
Recepción de faxes 42
Mantenimiento 44
33
ESPAÑOL
Page 52

Para obtener más información sobre la configuración del equipo de las páginas 2 y 3, consulte
también las [Easy Setup Instructions/Instrucciones de instalación].
Preparación del equipo
Desembale el equipo
ESPAÑOL
Compruebe los artículos embalados fijándose en el dibujo impreso en la cubierta de la caja de embalaje.
.
Consulte también Precauciones de seguridad en la Guía del Usuario. Observe las advertencias y notas
de aviso para evitar cualquier lesión personal y daños en el equipo.
IMPORTANTE
• No conecte el cable USB hasta que haya instalado el software.
• No se incluye cable de impresora. Debe adquirir un cable USB (menor de 10 pies / 3 m) para conectar
su equipo a un ordenador.
1 Conecte la línea de teléfono y el cable de alimentación.
• Asegúrese de utilizar el cable de línea telefónica suministrado.
• Si conecta la línea telefónica, consulte ”Ejemplos de conexión del equipo” en la página 34.
Sólo usuarios de RU
Si el conector del dispositivo externo no se puede conectar al conector del equipo, deberá comprar un
adaptador de B.T. para conectarlos de la siguiente manera:
Conecte la línea del dispositivo externo al adaptador de B.T. y, después, conecte el adaptador de B.T. al
conector .
2 Encienda el equipo.
• El ajuste de país sólo está disponible en determinados países.
• Si la selección de idioma o país no es la que desea, consulte la Guía del Usuario.
3 Instale el cabezal de impresión.
• Si la unidad de lectura (cubierta de la impresora) se deja abierta durante más de 10 minutos, el
contenedor del cabezal de impresión se desplaza a la derecha. Cierre y vuelva a abrir la unidad de lectura
(cubierta de la impresora) para devolver el contenedor al centro.
• Puede que haya algo de tinta transparente o azul clara en el interior de la bolsa en la que viene el cabezal
de impresión; esto no afecta a la calidad de impresión. Tenga cuidado de no mancharse de tinta cuando
manipule estos artículos.
• No vuelva a poner el tapón protector una vez lo haya extraído.
4 Instale los depósitos de tinta.
• Asegúrese de instalar todos los depósitos de tinta en el orden indicado en la etiqueta. El equipo no se
puede utilizar si no están instalados todos los depósitos de tinta.
• Por razones de seguridad, guarde los depósitos de tinta fuera del alcance de los niños.
• No tire ni sacuda los depósitos de tinta ya que podría salirse la tinta y mancharse las manos y la ropa.
• Asegúrese de retirar la película transparente del depósito de tinta en el orden de extracción mostrado en
el paso 4.
• No vuelva a poner el tapón protector una vez lo haya extraído.
• La luz de alarma seguirá encendida en naranja si no se ha instalado correctamente algún depósito de
tinta. Abra la unidad de lectura (cubierta de la impresora) y asegúrese de que los depósitos de tinta están
instalados en el orden correcto que aparece en etiqueta.
2
Page 53

5 Alinee el cabezal de impresión desde el panel de control.
Ejecute la alineación automática del cabezal de impresión para mantener una alta calidad de impresión.
• Cuando ejecute la alineación automática del cabezal de impresión, cargue siempre el papel en el
alimentador de hojas automático. Cuando imprima, puede cargar el papel tanto en el alimentador de
hojas automático como en el cassette. Para obtener una información detallada, consulte la Guía del
Usuario.
• Si no aparece la pantalla de alineación automática del cabezal de impresión, consulte ”Alineación
automática del cabezal de impresión” en la página 47.
• Cuando se imprima el patrón de posición del cabezal de impresión, la alineación habrá finalizado.
Para usuarios del fax
Seleccione el modo de recepción según sus necesidades. Consulte ”Modos de recepción” en la página 42.
• Si quiere recibir sólo faxes de forma automática o dispone de una línea telefónica exclusiva para el fax:
<FAX ONLY MODE/MODO SÓLO FAX>
• Si recibe principalmente llamadas de voz y algunos faxes o si quiere recibir los faxes de forma manual:
<MANUAL MODE/MODO MANUAL>
• Si quiere recibir mensajes de voz en su contestador automático y faxes automáticamente:
<ANS.MACHINE MODE/MODO CONTESTADOR>
• Si quiere recibir faxes automáticamente y llamadas de voz:
<FAX/TEL AUTO SW/CAMBIO T/F AUTO>
• Si está suscrito a un servicio de detección de un tipo de timbre característico o DRPD (por sus siglas en
inglés) con su empresa de telefonía (sólo EE.UU. y Canadá):
<DRPD>
• Si quiere que el equipo cambie automáticamente entre llamadas de voz y de fax mediante patrones de
timbre de llamada (Network Switch) (este ajuste no está disponible en algunos países o regiones):
<NETWORK SWITCH>
• Para enviar un fax, debe ajustar correctamente el tipo de línea de teléfono en el equipo. Para obtener más
información sobre cómo confirmar y cambiar la configuración, consulte la Guía del Usuario.
Si no sabe de qué tipo línea de teléfono dispone, contacte con su empresa de telefonía.
ESPAÑOL
3
Page 54

Para obtener información sobre la instalación del software de esta página consulte también las
[Easy Setup Instructions/Instrucciones de instalación].
Instalación del software
Seleccione [Easy Install/Instalación simple] para instalar el software de aplicaciones, el Manual en
pantalla y los controladores de MP. Seleccione [Custom Install/Instalación personalizada] para
ESPAÑOL
seleccionar las opciones que le gustaría instalar.
IMPORTANTE
• Cierre temporalmente todas las aplicaciones de software abiertas, incluidos los antivirus. Los programas
de seguridad del ordenador se podrán activar de nuevo tras la instalación del software.
Instalación del MP Driver - Windows
• Si dispone de una versión anterior del software MultiPASS Suite instalada en su ordenador, desinstálela
antes de instalar la nueva. Para obtener instrucciones sobre la desinstalación, consulte las guías de esa
versión de MultiPASS Suite.
• Deberá abrir una sesión como administrador o disponer de privilegios administrativos para poder
instalar el software en Windows XP o Windows 2000.
• No cambie de usuario durante el proceso de instalación.
• Si aparece la siguiente pantalla, el cable USB está conectado.
Ejecute los pasos siguientes.
1. Pulse [ON/OFF] para encender el equipo.
2. Desconecte el cable USB.
3. Haga clic en [Cancel/Cancelar].
®
Instalación del MP Driver - Macintosh
• No conecte el equipo a los entornos Mac® OS 9 o Mac OS X Classic ya que éstos no son compatibles.
• Introduzca el nombre y la contraseña de una cuenta de administrador si es necesario.
Lleve a cabo los pasos siguientes para asegurarse de que el controlador se ha instalado
correctamente.
1. Seleccione [Applications/Aplicaciones] en el menú [Go/Ir].
2. Haga doble clic en la carpeta [Utilities/Utilidades] y a continuación en el icono [Printer Setup Utility/
Utilidad Configuración Impresoras] ([Print Center/Centro de impresión] cuando utilice Mac OS X
v.10.2.x).
Si la impresora aparece en [Printer List/Lista de impresoras], el controlador de la impresora estará
instalado.
Si la impresora no aparece en [Printer List/Lista de impresoras], haga clic en [Add/Añadir] en la
[Printer List/Lista de impresoras], seleccione [MP530] en la lista [Printer Name/Nombre de
impresora] y haga clic en [Add/Añadir].
Conexión con Mac OS X v.10.3.3 o anterior:
Si se reinicia el ordenador mientras éste está conectado al equipo, puede que no se detecte el equipo. Para
resolver este problema, desconecte el cable USB y conéctelo de nuevo o bien apague y vuelva a encender
el equipo.
• Si aparece [MP530 FAX] en la lista [Printer Name/Nombre de impresora] pero no puede añadir [MP530
FAX]. Puede enviar el documento por fax aplicando la configuración de impresión actual utilizando el
módem interno. No puede enviar faxes desde el ordenador a través del equipo.
®
4
Page 55

Guía de iniciación rápida de Canon MP530
Copyright
Este manual es propiedad de Canon Inc. Reservados todos los derechos.
De acuerdo con las leyes de la propiedad intelectual, este manual no podrá reproducirse en
forma alguna, ni total ni parcialmente, sin el consentimiento previo por escrito de Canon Inc.
© 2006 Canon Inc.
Renuncia
Canon Inc. ha revisado este manual en su totalidad para que constituya una guía de fácil
uso para su equipo Canon de la serie MP530. Todas las afirmaciones, información técnica
y recomendaciones que aparecen en este manual y en cada una de las guías o documentos
relacionados se consideran fiables, aunque no podemos garantizar que sean precisas o
completas, y no pretenden ser ni deberán entenderse como representación o garantía de
los productos descritos.
Especificaciones sujetas a cambios sin previo aviso.
Como miembro de ENERGY STAR, Canon Inc. ha determinado que este
producto cumple las directrices ENERGY STAR de ahorro de energía.
Toda la información relativa a productos de otros fabricantes distintos a
Canon se ha compilado a partir de información disponible públicamente.
Por consiguiente, no podemos garantizar la precisión de la misma.
Super G3 es una frase que se utiliza para describir la nueva
generación de faxes que utiliza módems de 33,6 Kbps* con el
estándar ITU-T V.34. Los equipos Super G3 High Speed Fax
alcanzan un tiempo de transmisión de aproximadamente 3 segundos*
por página, lo que reduce los gastos telefónicos.
* Tiempo de transmisión aproximado de 3 segundos por hoja de fax según la hoja
estándar de Canon FAX (modo estándar) con un módem de 33,6 Kbps.
En estos momentos, la red pública de telefonía conmutada o PSTN (por sus siglas en
inglés) permite velocidades de módem de 28,8 Kbps o menos dependiendo de las
condiciones de la línea telefónica.
ESPAÑOL
5
Page 56

Este equipo es compatible con Exif 2.2 (también
denominado ”ExifPrint”).
ExifPrint es un estándar para mejorar la comunicación entre
cámaras digitales e impresoras.
Al conectar una cámara digital compatible con ExifPrint, se
ESPAÑOL
utilizan y optimizan los datos de imagen de la cámara en el
momento del disparo, permitiendo impresiones de muy alta
calidad.
Este equipo cumple los requisitos esenciales de la Directiva 1999/5/EC de
la UE. Declaramos que este producto cumple los requisitos EMC de la
Directiva 1999/5/EC de la UE con el valor nominal de tensión de 230 V,
50 Hz, aunque su especificación sea de 110–240 V, 50/60 Hz. Si se
traslada a otro país de la Unión Europea y tiene dificultades con el equipo,
póngase en contacto con la Línea de atención al cliente de Canon.
(Sólo para Europa)
INSTRUCCIONES DE SEGURIDAD IMPORTANTES
Cuando utilice el equipo telefónico, debe cumplir siempre las precaciones de
seguridad básicas para reducir el riesgo de incendio, descarga eléctrica y lesiones
personales, por ejemplo:
1. No utilice este producto cerca del agua, por ejemplo, cerca de una bañera, lavabo,
fregadero o lavadora, en un sótano húmedo o cerca de una piscina.
2. Evite utilizar este producto durante tormentas eléctricas. Existe un riesgo remoto de
descarga eléctrica producida por un rayo.
3. No utilice este producto para informar sobre una fuga de gas si está cerca de la fuga.
TENGA PRESENTE DICHAS INSTRUCCIONES
Nombre del modelo
K10269 (PIXMA MP530)
Marcas registradas
• ”Windows” e ”Internet Explorer” son marcas comerciales de Microsoft Corporation,
registradas en los Estados Unidos y en otros países.
• ”Macintosh” y ”Mac” son marcas registradas de Apple Computer, Inc. registradas en
los EE.UU. y en otros países.
• Especificaciones sujetas a cambios sin previo aviso.
6
Page 57

X Cómo utilizar la documentación suministrada
[Easy Setup Instructions/Instrucciones de instalación] (documentación impresa):
Asegúrese de leer esta hoja en primer lugar.
Esta hoja incluye instrucciones para la instalación del equipo y la puesta a punto para su
uso.
Guía de iniciación rápida (esta guía)
Lea esta guía al empezar a utilizar el equipo.
Después de seguir las indicaciones de [Easy Setup Instructions/Instrucciones de
instalación], recomendamos que lea esta guía para familiarizarse con el funcionamiento
básico de algunas de las funciones principales que puede realizar el equipo.
Manuales en pantalla
Guía del Usuario
Lea esta guía al empezar a utilizar el equipo.
Tras seguir las indicaciones de las [Easy Setup Instructions/Instrucciones de instalación],
lea esta guía para obtener información sobre la impresión desde el ordenador, la impresión
directa de fotos desde cámaras digitales seleccionadas, la copia, el envío y recepción de
faxes, y el escaneado.
La impresión en DVDs o CDs no está disponible para equipos vendidos en EE.UU.,
Canadá, todos los países de Sudamérica y otros países y regiones.
Consulte estas guías según sea necesario para obtener instrucciones completas sobre
algunas de las funciones más avanzadas.
Guía de exploración
Consulte esta guía para obtener instrucciones completas sobre el funcionamiento y la
configuración del escaneado.
Guía del controlador de la impresora
Consulte esta guía para obtener instrucciones completas sobre la configuración del
controlador de la impresora.
[FAX Driver Guide/Guía del controlador del FAX]
Consulte esta guía para obtener instrucciones sobre el uso del fax desde el ordenador.
Guía de las aplicaciones para fotografías
Consulte esta guía para obtener instrucciones sobre el uso de las diversas aplicaciones de
software incluidas en el [Setup CD-ROM/CD-ROM de configuración].
ESPAÑOL
7
Page 58

X Cómo leer los Manuales en pantalla
Los manuales en pantalla son manuales que puede ver en su ordenador.
Lea estos manuales para obtener otra información detallada sobre el uso del equipo no
mencionada en este documento, en la solución de problemas o sobre el uso del software de
ESPAÑOL
las aplicaciones proporcionadas con el [Setup CD-ROM/CD-ROM de configuración], etc.
Si no ha instalado o ha eliminado los manuales en pantalla, instálelos con el [Setup
CD-ROM/CD-ROM de configuración] siguiendo uno de estos procedimientos.
• Seleccione [Easy Install/Instalación simple] para instalar los manuales en pantalla
junto con el controlador MP y el software de las aplicaciones.
• Seleccione [On-screen Manual/Manual en pantalla] en [Custom Install/Instalación
personalizada] para instalar los manuales en pantalla.
Para Windows:
• Explorador: Windows HTML Help Viewer
• Se debe instalar Microsoft Internet Explorer® 5.0 o una versión posterior.
• Puede que no se muestre correctamente el manual en pantalla según su sistema operativo o la
versión de Internet Explorer. Le recomendamos que mantenga actualizado su sistema con
Windows Update.
Para Macintosh:
• Explorador: Help Viewer
• Puede que no se muestre correctamente el manual en pantalla según su sistema operativo.
Le recomendamos que mantenga actualizado su sistema.
• Le aconsejamos utilizar Safari como navegador de web para ver los manuales en pantalla en
formato HTML. Si no tiene Safari instalado, descárguelo del sitio web de Apple Computer, Inc.
e instálelo.
8
Page 59

X Lectura del documento
Símbolos utilizados en esta guía
ADVERTENCIA Indica una advertencia relativa a operaciones que pueden ocasionar
lesiones personales o incluso la muerte si no se ejecutan correctamente.
Con objeto de utilizar el equipo de forma segura, preste especial atención
a estas advertencias.
ATENCIÓN Indica una precaución relativa a operaciones que pueden ocasionar
IMPORTANTE
1. (Pasos en una operación) Utilizado para explicar los diversos pasos en un procedimiento.
Términos utilizados en esta guía
[nombre de botón] El texto entre corchetes indica un botón del panel de control del equipo o un
<mensaje> El texto entre estos corchetes indica un mensaje o un elemento de menú
Términos utilizados en esta guía
lesiones personales o daños materiales si no se efectúan correctamente.
Con objeto de utilizar el equipo de forma segura, preste especial atención
a estas precauciones.
Indica advertencias y limitaciones sobre el funcionamiento. Asegúrese de
leer estos puntos para utilizar correctamente el equipo y evitar deteriorarlo.
Indica notas para la utilización o explicaciones adicionales. Se recomienda
encarecidamente su lectura.
elemento del ordenador que se va a manipular.
Ejemplo: [Color]
seleccionable que aparece en la pantalla de LCD (pantalla de cristal líquido).
Ejemplo: <PHOTO PRO/FOTO PRO>, <OFF/APAGADO>
ESPAÑOL
equipo Término general para representar el equipo MP530.
predeterminado Es un ajuste que permanece en vigor a menos que se cambie.
documentos Las hojas de papel originales, páginas de un libro o fotografías que se copian,
envían por fax o escanean con el equipo.
papel Papel en el que puede imprimir con el equipo.
menú Lista de ajustes de entre los que se selecciona un elemento para configurar o
cambiar. Un menú tiene un título que aparece en la LCD (pantalla de cristal
líquido).
X Selección del idioma de la LCD (pantalla de cristal líquido)
1 Pulse [Menu] (Menú) para seleccionar <DEVICE SETTINGS/CONF.
DISPOSITIVO>.
2 Utilice [W] o [X] para seleccionar <OTHERS/OTROS> y, a continuación,
pulse [OK].
3 Utilice [W] o [X] para seleccionar <LANGUAGE SETTING/CONFIG.
IDIOMA> y, a continuación, pulse [OK].
4 Utilice [W] o [X] para seleccionar el idioma y pulse [OK].
9
Page 60

X Limitaciones legales sobre el uso del producto y
de imágenes
Puede ser ilegal realizar copias, escanear, imprimir o utilizar reproducciones de los
siguientes documentos. La lista proporcionada no es exhaustiva. En caso de duda,
consulte a un representante legal de su jurisdicción.
.
ESPAÑOL
• Papel moneda
• Giros postales
• Certificados de depósito
• Sellos postales (matasellados o no)
• Chapas o insignias de identificación
• Documentos de servicio selectivo u
órdenes de pago
• Cheques o letras de cambio emitidas
por organismos gubernamentales.
• Licencias de vehículos de motor y
certificados de titularidad
• Cheques de viaje
• Cupones de alimentos
• Pasaportes
• Papeles de inmigración
• Sellos de ingresos fiscales
(cancelados o no)
• Bonos u otros certificados
de endeudamiento
• Certificados bursátiles
• Obras protegidas por los derechos de la
propiedad intelectual/obras de arte sin
permiso del propietario del copyright
X Sólo para la Unión Europea (y la EEA).
Este símbolo indica que este producto no debe desecharse con los
desperdicios del hogar, de acuerdo con la directiva WEEE (2002/96/
EC) y con la legislación nacional. Este producto debería entregarse en
uno de los puntos de recogida designados, como por ejemplo,
intercambiando uno por otro al comprar un producto similar o
entregándolo en un lugar de recogida autorizado para el reciclado de
equipos electrónicos (EEE). La manipulación inapropiada de este tipo
de desechos podría tener un impacto negativo en el entorno y la salud
humana, debido a las sustancias potencialmente peligrosas que
normalmente están asociadas al EEE. Al mismo tiempo, su cooperación
a la hora de desechar correctamente este producto contribuirá a la
utilización efectiva de los recursos naturales. Para más información
acerca de dónde puede desechar el equipo para su reciclado, póngase en
contacto con las autoridades locales, con las autoridades encargadas de
los desechos, con un plan WEEE autorizado o con el servicio de
recogida de basuras para hogares.
Si desea más información acerca de la devolución y reciclado de
productos WEEE, visite la web www.canon-europe.com/environment.
(EEA: Noruega, Islandia y Liechtenstein)
10
Page 61

X Usuarios de Canadá
Requisitos previos a la instalación de un equipo facsímil de Canon
A. Ubicación
Prepare una mesa, librería o escritorio para colocar el equipo. Consulte los apéndices del
equipo para conocer el peso y dimensiones específicas.
B. Información de pedido
1. Disponga un aparato de teléfono por tonos o pulsos de línea única con un conector de
teléfono modular de 6 pines estándar. (Se recomienda la marcación por tonos si está
disponible en su zona.)
2. Pida un conector de pared modular CA11A que debe ser instalado por la empresa de
telefonía. Sin ese conector, no puede realizarse la instalación.
3. Pida una línea de negocios normal al representante empresarial de su empresa de
telefonía. La línea debe ser de grado de voz normal o equivalente. Utilice una línea por
cada equipo.
Línea de marcación directa a distancia o DDD
-oLínea de marcación directa a distancia internacional o IDDD si realiza llamadas al
extranjero
• Canon recomienda una línea individual que siga los estándares de la industria, como los teléfonos
de marcación por tonos 2500 o pulsos 500. Se puede utilizar una extensión dedicada de una
centralita sin llamada en espera con la unidad de facsímil. Los sistemas de teléfono de botones se
desaconsejan porque envían señales no estándar a teléfonos individuales para los tipos de sonido
y códigos especiales, lo que puede causar un error en el fax.
C. Requisitos de alimentación
La toma de corriente debe ser un receptáculo conectado a tierra de dos patillas (sencillo
o doble). Debe ser independiente de copiadoras, calefactores, equipos de aire
acondicionado o de cualquier equipo eléctrico que esté controlado por un termostato. El
valor nominal es de 120 voltios y 15 amperios. El conector modular CA11A debe estar
relativamente cerca de la toma de corriente para facilitar su instalación.
Aviso
Este equipo cumple las especificaciones de la industria en Canadá.
ESPAÑOL
11
Page 62

Avis
Le présent matériel est conforme aux spécifications techniques applicables d'Industrie
Canada.
Antes de instalar este equipo, los usuarios deben comprobar que está permitido conectarlo
a la red de la compañía de telecomunicaciones local. El equipo se debe instalar también
ESPAÑOL
utilizando un método de conexión aceptable. En algunos casos, el cableado interior de la
compañía asociado a un servicio individual de una sola línea puede prolongarse mediante
una conexión certificada (cable de extensión telefónica). Pese a cumplir con las
condiciones anteriores, el cliente debe saber que en algunas situaciones no es posible
evitar la pérdida de calidad del servicio.
El número de equivalencia de timbres es una indicación del número máximo de
dispositivos que se pueden conectar a una interfaz telefónica. A una interfaz se puede
conectar cualquier combinación de dispositivos, con la única limitación de que la suma
de los números de equivalencia de timbres de todos los dispositivos no sea superior a
cinco.
Aunque esté instalada una opción de línea dual, el número de equivalencia de equipos es
aplicable a cada puerto.
Avis
L'indice d'équivalence de la sonnerie (IES) sert à indiquer le nombre maximal de
terminaux qui peuvent être raccordés à une interface téléphonique. La terminaison d'une
interface peut consister en une combinaison quelconque de dispositifs, à la seule
condition que la somme d'indices d'équivalence de la sonnerie de tous les dispositifs
n'excède pas 5.
Las reparaciones del equipo certificado deberá realizarlas un servicio de mantenimiento
canadiense autorizado designado por el proveedor. Cualquier reparación o alteración
hecha por el usuario en este equipo, o los fallos de funcionamiento del equipo, pueden
motivar que la compañía de telecomunicaciones solicite al usuario que lo desconecte.
Por su propia seguridad, los usuarios deben asegurarse de que las conexiones de la toma
de tierra de la instalación de corriente, de las líneas telefónicas y de las cañerías interiores
metálicas, si las hubiera, están conectadas juntas. Esta precaución puede ser sobre todo
importante en las zonas rurales.
ATENCIÓN
• Los usuarios no deberán intentar hacer dichas conexiones por sí mismos, sino que tendrán
que ponerse en contacto con la autoridad de inspección eléctrica correspondiente o con un
electricista.
• Este aparato digital de clase B cumple con todos los requisitos de la normativa canadiense
sobre equipos causantes de interferencias.
• Cet appareil numérique de la classe B respecte toutes les exigences du Règlement sur le
matériel brouilleur du Canada.
12
Page 63

Asistencia técnica al cliente
Canon Canada Inc., ofrece una serie completa de opciones de asistencia técnica al
cliente*:
• Solución de problemas de forma interactiva, asistencia técnica por correo electrónico,
últimas descargas de controladores y las respuestas a las preguntas más frecuentes
(www.canon.ca)
• Asistencia técnica gratuita instantánea, de lunes a viernes de 9 am a 8 pm (hora de
Nueva York) (excluyendo días festivos) para productos aún en garantía
(1-800-OK-CANON)
• Información sobre el centro de servicio autorizado más cercano
(1-800-OK-CANON)Si no consigue corregir el problema mediante una de las opciones
de asistencia técnica anteriores, llame al número de asistencia técnica gratuita
instantánea antes indicado o acceda a la página Web www.canon.ca para informarse de
las opciones de reparación.
* Los detalles del programa de asistencia están sujetos a cambios sin previo aviso.
CANON CANADA INC.
1-800-OK-CANON (1-800-652-2666)
http://www.canon.ca
ESPAÑOL
13
Page 64

1 Introducción
(1) (2) (5)
(3) (4)
X Componentes principales y sus funciones
ESPAÑOL
Vista frontal
(13) (12) (11) (10) (8)(9)
(6)
(7)
ADF (Alimentador
(1)
automático de
documentos)
Tapa del alimentador Abra esta tapa si es necesario desatascar un documento.
(2)
Guías de documentos Ajuste estas guías al ancho del documento.
(3)
Soporte del papel Alberga el papel cargado en la bandeja. Extráigalo antes de cargar papel
(4)
Guía del papel
(5)
Explora automáticamente los documentos cargados en la bandeja de
documentos.
colocando el dedo en la hendidura redondeada y sacando el prolongador
hasta que haga tope.
Cuando cargue papel, asegúrese de que el borde izquierdo toque esta guía.
Para mover la guía del papel, agarre del tirador y deslícela en la dirección
apropiada.
14 Introducción Capítulo 1
Page 65

Alimentador
(6)
de hojas automático
Guía de la cubierta Alinee el lado derecho del papel con esta guía.
(7)
Bandeja de
(8)
documentos
Ranura de salida
(9)
de documentos
Cubierta de
(10)
documentos
Puerto de impresión
(11)
directa
Bandeja de salida
(12)
de papel
Panel de control Se utiliza para cambiar la configuración o manejar el equipo. Consulte
(13)
Cargue el papel aquí antes de imprimir. El papel se alimenta
automáticamente de hoja en hoja.
Abra esta bandeja para cargar un documento. Cuando lo haya cargado, el
documento se alimenta de hoja en hoja. Cargue el papel con el lado que
quiera escanear hacia arriba.
Los documentos escaneados desde la bandeja de documentos salen por
aquí.
Ábrala cuando cargue un documento en el cristal de la platina.
Conecte el cable USB cuando imprima directamente desde una cámara de
fotos o de vídeo digital o desde un teléfono móvil que disponga de una
cámara compatible con PictBridge o Canon Bubble Jet Direct. Consulte
”Impresión de fotografías directamente desde un dispositivo compatible”
en la Guía del Usuario.
Las copias impresas salen por esta bandeja. Se abre automáticamente
cuando se empieza a copiar o imprimir. Si está cerrada, pulse la tecla de
apertura.
”Nombre y funciones del panel de control” en la página 18.
ESPAÑOL
(14)
(15)
(16)
Cristal de la platina Se utiliza para cargar un documento para su procesamiento.
(14)
Tecla de apertura Pulse este botón para abrir la bandeja de salida de papel.
(15)
Cassette Cargue aquí el papel que vaya a utilizar regularmente. El papel se alimenta
(16)
Capítulo 1 Introducción 15
automáticamente de hoja en hoja.
Las Etiquetas Fotográficas Adhesivas y el papel de tamaño 54 x 86 mm /
2,13" x 3,39" no se puede cargar en el cassette.
Page 66

Vista posterior e interior
ESPAÑOL
(17) (18) (19) (21)
(20)
(22)
(27) (24) (23)
(26) (25)
Palanca de bloqueo
(17)
del cabezal de
impresión
IMPORTANTE
• No tire de esta palanca hacia arriba después de instalar el cabezal de impresión.
Lámpara de tinta Se enciende o parpadea en rojo para indicar el estado del depósito de tinta.
(18)
Contenedor del
(19)
cabezal de impresión
Unidad de lectura
(20)
(cubierta de la
impresora)
Se utiliza para fijar el cabezal de impresión.
Puede comprobar el estado de cada d epósito de tinta según la forma en que
parpadee la lámpara.
Se utiliza para instalar un cabezal de impresión.
Esta es la unidad utilizada para escanear documentos. Abra la unidad
cuando tenga que cambiar los depósitos de tinta o eliminar un atasco de
papel.
16 Introducción Capítulo 1
Page 67

Cubierta interior Abra esta cubierta cuando tenga que cambiar los depósitos de tinta o
(21)
Unidad
(22)
de transporte
de doble cara
Conexión del cable
(23)
de alimentación
Cubierta posterior Abra esta tapa si es necesario desatascar un papel.
(24)
Puerto USB Este es el conector usado para conectar el equipo a un ordenador usando
(25)
IMPORTANTE
• No desconecte ni conecte el cable USB mientras el equipo esté imprimiendo o escaneando
imágenes al ordenador o el ordenador esté en modo de reposo o en espera.
eliminar un atasco de papel.
Asimismo, ábrala y coloque la bandeja de CD, cuando imprima en un
DVD o CD.*
Ábrala cuando retire papel atascado después de sacar el cassette.
Este es el conector que se usa para conectar el cable de alimentación
proporcionado.
un cable USB.
ESPAÑOL
Conector de línea
(26)
telefónica
Conector de
(27)
dispositivo externo
Conecte la línea telefónica a esta entrada.
Conecte cualquier dispositivo externo aquí.
* La impresión en DVDs o CDs no está disponible para equipos vendidos en EE.UU.,
Canadá, todos los países de Sudamérica y otros países y regiones.
Capítulo 1 Introducción 17
Page 68

Nombre y funciones del panel de control
(2)
(3)
(4)
(6)
ESPAÑOL
(9) (11)(1) (5) (7) (8)
(10)
(12)
(20)
(24) (22)
[ON/OFF] Enciende y apaga el equipo. Antes de encenderlo, asegúrese de que la
(1)
[COPY] (COPIAR) Cambia el equipo al modo de copia. Parpadea cuando el equipo está
(2)
[FAX] Cambia el equipo al modo de fax.
(3)
Lámpara de
(4)
en uso/memoria
[SCAN]
(5)
(ESCANEAR)
Lámpara de alarma Se enciende o parpadea en naranja cuando se produce un error o cuando se
(6)
[Exposure]
(7)
(Exposición)
[Enlarge/Reduce]
(8)
(Ampliar/Reducir)
LCD (Pantalla de
(9)
cristal líquido)
[Menu] (Menú) Muestra menús para configurar la copia, el fax y los ajustes del equipo.
(10)
Botones numéricos Introduce valores numéricos, como número de copias, así como números
(11)
[Redial/Pause]
(12)
(Remarcación/Pausa)
[Coded Dial]
(13)
(Marcación
codificada)
[Tone] (Tono) Cambia temporalmente a la marcación por tonos. También cambia el
(14)
cubierta de documentos está cerrada.
encendido.
Parpadea cuando se está utilizando la línea de teléfono. Se enciende
cuando hay documentos almacenados en la memoria del equipo.
Cambia el equipo al modo de escaneado. Este botón se utiliza cuando el
equipo está conectado a un ordenador (consulte la Guía de exploración).
ha agotado el papel o la tinta.
Establece la intensidad de la copia y del fax.
Establece el nivel de ampliación o reducción de la copia.
Muestra mensajes, selecciones de menús y el estado de funcionamiento.
de fax o teléfono y caracteres.
Vuelve a marcar el último número introducido con los botones numéricos.
También introduce pausas entre o después de los números cuando se
marcan o registran números.
Pulse este botón y un código de dos dígitos para marcar un número de fax
o teléfono registrado con antelación.
modo de introducción de caracteres.
(19)
(18) (17) (14)
(16)(23) (21)(26) (25)
(15)
(13)
18 Introducción Capítulo 1
Page 69

[OK] Finaliza su selección del menú o del elemento de ajuste.
(15)
[(-)W] y [X(+)] Permiten desplazarse a través de las selecciones del menú e incrementar o
(16)
[Back] (Atrás) Vuelva a la pantalla anterior.
(17)
[Stop/Reset]
(18)
(Parar/Reiniciar)
[Color] Inicia la copia o envío de fax en color.
(19)
[Black] (Negro) Inicia la copia o envío de fax en blanco y negro.
(20)
[Paper] (Papel) Establece el tamaño de página y el tipo de soporte para copiar y recibir
(21)
[Two-Sided]
(22)
(Dos caras)
[Image Quality]
(23)
(Calidad de imagen)
[Feed Switch]
(24)
(Conmutador de
alimentación)
Luz del cassette Se enciende al seleccionar el cassete.
(25)
Luz del alimentador
(26)
de hojas automático
Restaura el equipo al funcionamiento normal después de solucionar un
error de impresión o de eliminar un atasco de papel. Expulsa los
documentos que quedan en el ADF.
reducir el número de copias. Al configurar el fax, [W] cancela el caracter
introducido y [X] introduce un espacio entre los caracteres.
Cancela las operaciones. Si se pulsa este botón durante la impresión, el
equipo cancela la impresión. Restablece la configuración sobre el número
de copias, la proporción de reducción o ampliación, la intensidad, etc. en
<1.SPECIAL COPY/1.COPIA ESPECIAL>.
También permite regresar a la pantalla en espera después de configurar
algunos menús.
faxes.
Selecciona la copia a doble cara.
Establece la resolución de la copia y el fax.
Selecciona la fuente de papel. Pulse este botón para cambiar la fuente de
papel entre el alimentador de hojas automático y el cassette.
Se enciende al seleccionar el alimentador de hojas automático.
ESPAÑOL
Capítulo 1 Introducción 19
Page 70

X Lista de menús
En [COPY] (COPIAR), [FAX] y [SCAN]
(ESCANEAR), al pulsar [ Menu] (Menú) se
muestran elementos como funciones que
ESPAÑOL
puede utilizar en cada modo, ajustes
comunes de cada modo o mantenimiento.
Los elementos mostrados en cada modo
son los siguientes.
[COPY] (COPIAR)
1.<SPECIAL COPY/COPIA ESPECIAL>
<2-ON-1/2 EN 1>
<4-ON-1/4 EN 1>
<STICKER COPY/COPIA ETIQUETA>
<BORDERLESS COPY/COPIA SIN MARGEN>
<IMAGE REPEAT/REPETIR IMAGEN>
<COLLATED COPY/COPIA INTERCALADA>
2.<FAX SETTINGS/AJUSTES DE FAX>
Consulte ”1.<FAX SETTINGS/AJUSTES DE FAX>”
en [FAX].
3.<DEVICE SETTINGS/CONF. DISPOSITIVO>
<PRINT SETTINGS/AJUSTES IMPRESIÓN>
<QUIET MODE/IMPR SILENCIOSA>
<PREVENT ABRASION/PREVENIR ROCES>
<EXTENDED AMOUNT/NIVEL EXPANSIÓN>
<AUTO FEED SWITCH/SEL AL AUTO>
<PICTBRIDGE SET/CONFIG PICTBRIDGE>
<PAGE SIZE/SELEC. TAM. PAPEL>
<MEDIA TYPE/SELEC. TIPO PAPEL>
<PRINT QLTY/CALIDAD IMP>
<BORDERLESS PRINT/IMPR. SIN MARGEN>
<IMAGE ENHANCEMENT/MEJORA DE IMAGEN>
<OTHERS/OTROS>
<AUDIBLE TONES/TONOS AUDIBLES>
<PWR SAVE SETTING/AJUSTE AHOR ENERG>
<COUNTRY SELECT/CONFIG. DESTINO
<LANGUAGE SETTING/CONFIG. IDIOMA>
<RESTORE DEFAULT/RESTAURAR PREDET.>
<SAVE CONFIG/GUARDE CONFIGUR.>
<LOAD CONFIG/CARGUE CONFIGUR.>
4.<MAINTENANCE/MANTENIMIENTO>
<NOZZLE CHECK/COMPR INYECTORES>
<CLEANING/LIMPIEZA>
<DEEP CLEANING/LIMPIEZA A FONDO>
<AUTO HEAD ALIGN/ALIN CAB AUTO>
<ALIGN PRINT HEAD/ALINEAR CAB IMPR>
<HEAD ALIGN PRINT/IMP ALIN CAB>
<ROLLER CLEANING/LIMPIEZA RODILLO>
<BOTTOM CLEANING/LIMPIE PLACA INF.>
>
*1
20 Introducción Capítulo 1
Page 71

FAX
1.<FAX SETTINGS/AJUSTES DE FAX>
<RECEIVE MODE SET/MODO RECEPCIÓN>
<FAX/TEL AUTO SW/CAMBIO T/F AUTO>
<FAX ONLY MODE/MODO SÓLO FAX>
*2
<DRPD>
<NETWORK SWITCH>
<MANUAL MODE/MODO MANUAL>
<ANS.MACHINE MODE/MODO CONTESTADOR>
<MEMORY REFERENCE/REFEREN. MEMORIA>
<PRINT MEMORY LIST/IMP LISTA MEMORIA>
<PRINT DOCUMENT/IMP DOCUMENTO>
<DELETE DOCUMENT/BORRAR DOCUMENTO>
<PRNT REPORT/LIST/ IMP INFOR/LISTA>
<ACTIVITY REPORT/INFORME ACTIVID.>
<SPEED DIAL LIST/LISTA MARC ABREV>
<USER'S DATA LIST/LISTA USUARIO>
<MEMORY LIST/LISTA DE MEMORIA>
<CODED DIAL REGIST/REGIST MARC ABREV>
<USER SETTINGS/AJUSTES USUARIO>
<DATE/TIME SETTING/ AJUSTES FECH/HORA>
<DATE DISPLAY/FORMATO DE FECHA>
<SUMMER TIME SET/HORARIO VERANO>
<UNIT TEL NUMBER/N° TEL UNIDAD>
<UNIT NAME/NOMBRE UNIDAD>
<TX TERMINAL ID/ADJUNTE ID TX>
<OFFHOOK ALARM/ALAR. DESCOLGADO>
<VOLUME CONTROL/CONTROL VOLUMEN>
<RX RING LEVEL/NIVEL LLAMADA RX>
<TEL LINE TYPE/TIPO LÍN. TEL>
<ACTIVITY REPORT/INFORME ACTIVID.>
<TX SETTINGS/CONFIGURACIÓN TX>
<ECM TX/TX DE ECM>
<PAUSE TIME/TIEMPO DE PAUSA>
<AUTO REDIAL/REMARCACIÓN>
<TX START SPEED/VELOCIDAD INI TX>
<COLOR TX/TX COLOR>
<TX REPORT/INFORME DE TX>
<DIAL TONE DETECT/DETECT. TONO MARC>
<RX SETTINGS/CONFIGURACIÓN RX>
<ECM RX/RX DE ECM>
<FAX/TEL AUTO SW/CAMBIO T/F AUTO>
<DRPD:FAX RNG PAT/DRPD:ELE TON FAX>
<INCOMING RING/LLAMADA ENTRANTE>
<MAN/AUTO SWITCH/ INTERRUP MAN/AUTO>
<REMOTE RX/ID RX REMOTA>
<RX IMG REDUCTION/REDUCCIÓN IMG RX>
<RX START SPEED/VELOCIDAD INI RX>
<RX REPORT/INFORME DE RX>
2.<DEVICE SETTINGS/CONF. DISPOSITIVO>
Consulte ”3.<DEVICE SETTINGS/CONFIG.
DISPOSITIVO>” en [COPY] (COPIAR).
3.<MAINTENANCE/MANTENIMIENTO>
Consulte ”4.<MAINTENANCE/MANTENIMIENTO>”
en [COPY] (COPIAR).
*1
[SCAN] (ESCANEAR)
1.<FAX SETTINGS/AJUSTES DE FAX>
Consulte ”1.<FAX SETTINGS/AJUSTES DE
FAX>” en [FAX].
2.<DEVICE SETTINGS/CONF. DISPOSITIVO>
Consulte ”3.<DEVICE SETTINGS/CONFIG.
DISPOSITIVO>” en [COPY] (COPIAR).
3.<MAINTENANCE/MANTENIMIENTO>
Consulte ”4.<MAINTENANCE/
MANTENIMIENTO>” en [COPY] (COPIAR).
*1
*2
*1
Este valor puede no estar disponible en algunos
países y regiones.
*2
Sólo en EE.UU. y Canadá.
ESPAÑOL
Capítulo 1 Introducción 21
Page 72

2 Manipulación de documentos
X Requisitos de documentos
ESPAÑOL
Tipo de
documentos
Tamaño
(A x L)
Cantidad
Grosor
Peso
Cristal de la platina ADF
z Tipos especiales de papel
z Fotografías
z Libro
z Documentos no adecuados para el ADF
Máx. 216 x 297 mm / 8,5" x 11,7" Máx. 216 x 356 mm / 8,5" x 14"
1 hoja
Máx. 10 mm / 0,39" 0,06 a 0,13 mm / 0,002 pda. a 0,005 pda.
— 50 a 90 gsm / 13 a 24 lb
Documentos de varias páginas del
mismo tamaño, grosor y peso
Mín. 148 x 148 mm / 5,8" x 5,8"
z Máx. 30 páginas de hojas de tamaño
A4 o carta (papel de 75 gsm / 20 lb),
hasta 4 mm de alto
z Máx. 10 páginas de hojas de tamaño
legal (papel de 75 gsm / 20 lb), hasta
2 mm de alto
z 1 hoja para otros tamaños
22 Manipulación de documentos Capítulo 2
Page 73

X Carga de documentos
Uso del cristal de la platina
1 Abra la cubierta de documentos.
2 Ponga el documento en el cristal de la platina.
• Ponga el documento boca abajo en el cristal de la platina.
• Alinee la esquina superior izquierda del documento con la marca de alineación de la esquina
superior izquierda del cristal de la platina.
• También puede escanear originales con un grosor máximo de 10 mm / 0,39" como, por
ejemplo, libros. Colóquelos en el cristal de la platina del mismo modo que los documentos.
ESPAÑOL
3 Cierre suavemente la cubierta de documentos.
Capítulo 2 Manipulación de documentos 23
Page 74

Uso del ADF
ESPAÑOL
1 Retire cualquier documento del cristal de la platina.
2 Abra la bandeja de documentos.
3 Cargue el documento en el ADF (1).
Cargue el documento con el lado por el que quiere copiar, enviar el fax o escanear hacia arriba
en el ADF.
(2)
(1)
(A)
4 Ajuste las guías de documentos al ancho del documento (2).
• Compruebe que la pila de documentos está alineada con la marca del tamaño de papel de la bandeja
de documentos (A).
24 Manipulación de documentos Capítulo 2
Page 75

3 Manejo de papel
X Papel recomendado y requisitos
Tipo de soporte Modelo Límite de carga del soporte del papel Configuración del
Alimentador de hojas
automático
Papel normal — 13 mm / 0,51" 13 mm / 0,51" [Plain Paper/Papel
Papel Alta
Resolución
Papel de gran
blancura
Papel Fotográfico
Con Brillo
Papel Fotográfico
Con Brillo
¡Uso diario!
Papel Fotográfico
Mate
Papel Fotográfico a
Doble Cara
Papel Fotográfico
Brillo
Papel Fotográfico
Plus Semi Brillante
Papel Fotográfico
Profesional
Etiquetas
Fotográficas
Adhesivas
Transparencias CF-102 30 hojas 30 hojas [Transparencies/
Transfers Para
Camisetas
Sobres — 10 sobres 5 sobres [Envelope/Sobre]
HR-101N 80 hojas (A4, Carta) 80 hojas (A4, Carta) [High Resolution Paper/
SW-201 13 mm / 0,51"
(A4, Carta)
GP-401 10 hojas (A4, Carta),
20 hojas (101,6 x
152,4 mm / 4" x 6", Tarjeta
de crédito)
GP-501 10 hojas (A4),
20 hojas (101,6 x
152,4 mm / 4" x 6")
MP-101 10 hojas (A4, Carta),
20 hojas (101,6 x
152,4 mm / 4" x 6")
PP-101D 10 hojas (A4, Carta, 127 x
177,8 mm / 5" x 7")
PP-101 10 hojas (A4, Carta,
127 x 177,8 mm / 5" x 7"),
20 hojas (101,6 x
152,4 mm / 4" x 6")
SG-101 10 hojas (A4, Carta),
20 hojas (101,6 x
152,4 mm / 4" x 6")
PR-101 10 hojas (A4, Carta),
20 hojas (101,6 x
152,4 mm / 4" x 6")
PS-101 1 hoja No se puede cargar [Photo Paper Plus
TR-301 1 hoja 1 hoja [T-Shirt Transfers/
Cassette
13 mm / 0,51"
(A4, Carta)
10 hojas (A4, Carta),
20 hojas (101,6 x
152,4 mm / 4" x 6"),
No admite
(Tarjeta de crédito)
10 hojas (A4),
20 hojas (101,6 x
152,4 mm / 4" x 6"),
10 hojas (A4, Carta),
20 hojas (101,6 x
152,4 mm / 4" x 6"),
10 hojas (A4, Carta, 127 x
177,8 mm / 5" x 7")
10 hojas (A4, Carta,
127 x 177,8 mm / 5" x 7"),
20 hojas (101,6 x
152,4 mm / 4" x 6")
10 hojas (A4, Carta),
20 hojas (101,6 x
152,4 mm / 4" x 6"),
10 hojas (A4, Carta),
20 hojas (101,6 x
152,4 mm / 4" x 6")
controlador de
impresora para
Tipo de soporte
normal]
Papel Alta Resolución]
[Plain Paper/Papel
normal]
[Glossy Photo Paper/
Papel Fotográfico Con
Brillo]
[Glossy Photo Paper/
Papel Fotográfico Con
Brillo]
[Matte Photo Paper/
Papel Fotográfico Mate]
[Photo Paper Plus
Double Sided/Papel
Fotográfico a Doble
Cara]
[Photo Paper Plus
Glossy/Papel
Fotográfico Brillo]
[Photo Paper Plus
Glossy/Papel
Fotográfico Brillo]
[Photo Paper Pro/Papel
Fotográfico Profesional]
Glossy/Papel
Fotográfico Brillo]
Transparencias]
Transfers Para
Camisetas]
ESPAÑOL
Capítulo 3 Manejo de papel 25
Page 76

X Alimentador de hojas automático y cassette
El papel puede cargarse en el equipo en dos sitios: el alimentador de hojas automático en
la parte trasera y el cassette en la parte delantera. Para cambiar la fuente de papel, pulse
[Feed Switch] (Conmutador de alimentación). El alimentador seleccionado se indicará en
el panel de control.
ESPAÑOL
Carga del papel de impresión en el alimentador de hojas automático
1 Alinee las cuatro esquinas del papel antes de cargarlo.
2 Prepare la carga del papel.
1. Abra el soporte del papel y tire del prolongador del soporte de papel para sujetar
el papel.
2. Pulse la tecla de apertura para abrir la bandeja de salida de papel.
3. Abra y coloque la prolongación de la bandeja de salida de papel pulsando la
hendidura de la parte frontal.
4. Pulse [Feed Switch] (Conmutador de alimentación) para que se encienda la luz
del alimentador de hojas automático (A).
(A)
(2)
(4)
(1)
(3)
26 Manejo de papel Capítulo 3
Page 77

3 Cargue el papel.
1. Cargue el papel en el alimentador de hojas automático con el lado de impresión
hacia arriba.
2. Alinee la pila de papel con la guía de la cubierta del lado derecho del soporte
de papel.
3. Sujete la guía de papel y deslícela contra el lado izquierdo de la pila de papel.
(A)
(1)
(2)
(3)
IMPORTANTE
• No cargue papel por encima de esta marca de límite de carga (A).
ESPAÑOL
Capítulo 3 Manejo de papel 27
Page 78

Carga del papel de impresión en el cassette
1 Alinee las cuatro esquinas del papel antes de cargarlo.
ESPAÑOL
2 Prepare la carga del papel.
1. Saque el cassette del equipo.
(1)
28 Manejo de papel Capítulo 3
Page 79

3 Cargue el papel con el lado de impresión hacia abajo.
1. Cargue el papel en el cassette con el lado de impresión hacia abajo.
2. Alinee la pila de papel contra el lado derecho del cassette.
3. Deslice las guías de papel para ajustar la pila del papel cargado.
(A)
(1)
(2)
(3)
IMPORTANTE
• No cargue papel por encima de esta marca de límite de carga (A).
4 Introduzca el cassette en el equipo.
1. Empuje el cassette hasta el fondo en el equipo.
ESPAÑOL
(1)
Capítulo 3 Manejo de papel 29
Page 80

5 Prepare la bandeja de salida de papel.
1. Pulse la tecla de apertura para abrir la bandeja de salida de papel.
2. Abra y coloque la prolongación de la bandeja de salida de papel pulsando el
hueco de la parte frontal.
ESPAÑOL
3. Pulse [Feed Switch] (Conmutador de alimentación) para que se encienda la luz
del cassette (A).
(3)
(A)
(1)
(2)
30 Manejo de papel Capítulo 3
Page 81

4Copia
X Realización de copias
Cuando realice copias en color o blanco y negro, podrá ajustar la resolución y la densidad
de impresión. También podrá cambiar los ajustes de reducción o ampliación. Para obtener
una información detallada, consulte la Guía del Usuario.
1 Pulse [ON/OFF] para encender el equipo.
2 Pulse [COPY] (COPIAR).
3 Cargue el papel.
4 Asegúrese de que se selecciona la fuente del papel correcta.
5 Defina los ajustes del documento según sea necesario.
(1) (2) (3) (4)
(5)(6)
(1) Proporción de reducción/ampliación
Muestra el valor ajustado con [Enlarge/Reduce] (Ampliar/reducir).*
(2) Tamaño de papel
Muestra el tamaño de página ajustado con [Paper] (Papel).*
(3) Calidad de imagen
Muestra la calidad de impresión ajustada con [Image Quality] (Calidad imagen).*
(4) Número de copias
Muestra el número de copias (máx. 99 copias) especificadas con el botón [W] o [X].
(5) Tipo de soporte
Muestra tamaño de página ajustado con [Paper] (Papel).*
(6) Intensidad
Muestra el valor ajustado con [Exposure] (Exposición).*
6 Cargue el documento en el cristal de la platina o en el ADF.
7 Pulse [Color] para realizar copias en color o [Black] (Negro) para copias
en blanco y negro.
* Para obtener una información detallada, consulte la Guía del Usuario.
ESPAÑOL
Capítulo 4 Copia 31
Page 82

X Funciones avanzadas de copia
<Two-sided copy/
Copia a dos caras>
<2-on-1 copy/
ESPAÑOL
Copia 2 en 1>
<4-on-1 copy/
Copia 4 en 1>
Creación de
adhesivos
(<Sticker copy/
COPIA ETIQUETA
<Borderless copy/
Copia sin margen>
Repetición de una
imagen en una página
(<Image repeat/
Repetir imagen>)
<Collated cop y/Copia
intercalada>
* Para obtener una información detallada, consulte la Guía del Usuario.
Copia dos páginas de documento por las dos caras de una misma hoja
de papel.*
Copia dos páginas de documento en una única página.*
Copia cuatro páginas de documento en una única página.*
Crea fácilmente adhesivos a partir de fotos o gráficos de
101,6 × 152,4 mm / 4" x 6".*
>)
Copia imágenes en color o blanco y negro de modo que llenen la página
entera sin márgenes.*
Copia una imagen múltiples veces en una sola página.*
Cuando se hacen varias copias de un documento con más de una página,
pueden ordenarse en grupos.*
32 Copia Capítulo 4
Page 83

5 Impresión de fotografías directamente
desde un dispositivo compatible
La conexión de un dispositivo compatible con PictBridge como una cámara digital de
fotos o vídeo o teléfono móvil al equipo le permitirá imprimir imágenes capturadas
directamente sin tener que utilizar un ordenador.
X Conexión a un dispositivo compatible con PictBridge
1 Pulse [ON/OFF] para encender el equipo.
2 Cargue el papel.
3 Asegúrese de que se selecciona la fuente del papel correcta.
4 Asegúrese de que el dispositivo está apagado.
5 Conecte el dispositivo al equipo usando el cable USB proporcionado
con el dispositivo.
Algunos tipos de dispositivos se encienden automáticamente al conectarlos a la máquina. Si el
dispositivo no se enciente automáticamente, enciéndalo de forma manual.
6 Encienda y configure el dispositivo para la impresión directa.
ESPAÑOL
Capítulo 5 Impresión de fotografías directamente desde un dispositivo compatible 33
Page 84

6 Preparación del equipo para enviar y
recibir faxes
X Ejemplos de conexión del equipo
ESPAÑOL
Conexión a la línea telefónica
Conexión a una línea analógica
Línea telefónica (analógica)
Conexión ADSL
Línea de abonado digital
asimétrica (ADSL)
Módem ADSL
(El splitter
puede estar
integrado en
el módem)
Para obtener más información sobre la conexión y configuración de una línea ADSL,
consulte el manual suministrado con el módem ADSL. La conexión mostrada es un
ejemplo y no se garantiza que sea adecuada en todos los casos.
Splitter
Ordenador
34 Preparación del equipo para enviar y recibir faxes Capítulo 6
Page 85

Conexión a una línea RDSI
Línea RDSI
Adaptador de
terminal, etc.
Puerto analógico
Ordenador
Para obtener más información sobre la conexión y configuración de una línea RDSI,
consulte los manuales suministrados con el adaptador de terminal o router de marcación.
Conexión de dispositivos externos
Conexión de un teléfono o contestador automático a través del ordenador
Teléfono o contestador
Ordenador
Conexión de un teléfono o contestador automático directamente
automático
ESPAÑOL
Teléfono o contestador automático
Capítulo 6 Preparación del equipo para enviar y recibir faxes 35
Page 86

X Configuración del tipo de línea telefónica
1 Pulse [FAX] y, a continuación, [Menu] (Menú).
2 Utilice [W] o [X] para seleccionar <USER SETTINGS/AJUSTES
USUARIO> y, a continuación, pulse [OK].
ESPAÑOL
3 Utilice [W] o [X] para seleccionar <TEL LINE TYPE/TIPO LÍN. TEL>
y, a continuación, pulse [OK].
4 Utilice [W] o [X] para seleccionar el tipo de línea telefónica y, a
continuación, pulse [OK].
– <TOUCH TONE/TONOS>: Adecuado para la marcación por tonos.
– <ROTARY PULSE/PULSO ROTATIVO>: Adecuado para la marcación por pulsos.
5 Pulse [Stop/Reset] (Parar/Reiniciar).
X Registro de la información de remitente
Introducción de la fecha y la hora
1 Pulse [FAX] y, a continuación, [Menu] (Menú).
2 Utilice [W] o [X] para seleccionar <USER SETTINGS/AJUSTES
USUARIO> y, a continuación, pulse [OK] dos veces.
3 Utilice los botones numéricos para introducir la fecha y la hora (formato
de 24 horas) y, a continuación, pulse [OK].
4 Pulse [Stop/Reset] (Parar/Reiniciar).
Registro del número de teléfono/fax y el nombre (información de
remitente)
1 Pulse [FAX] y, a continuación, [Menu] (Menú).
2 Utilice [W] o [X] para seleccionar <USER SETTINGS/AJUSTES
USUARIO> y, a continuación, pulse [OK].
3 Utilice [W] o [X] para seleccionar <UNIT TEL NUMBER/NINGÚN N° TEL
UNIDAD> y, a continuación, pulse [OK].
4 Utilice los botones numéricos para introducir su número de teléfono/fax
(máx. 20 dígitos, incluidos los espacios) y, a continuación, pulse [OK]
dos veces.
5 Utilice los botones numéricos para introducir su nombres (máx.
24 caracteres, incluidos los espacios) y, a continuación, pulse [OK].
6 Pulse [Stop/Reset] (Parar/Reiniciar).
36 Preparación del equipo para enviar y recibir faxes Capítulo 6
Page 87

X Registro de marcación rápida codificada
1 Pulse [FAX] y, a continuación, [Menu] (Menú).
2 Utilice [W] o [X] para seleccionar <CODED DIAL REGIST/REGIST MARC
ABREV> y, a continuación, pulse [OK].
3 Utilice [W] o [X] para seleccionar un código de marcación rápida
(de 00 a 39) y, a continuación, pulse [OK] dos veces.
4 Utilice los botones numéricos para introducir el número de teléfono/fax
que quiere registrar (máx. 60 dígitos, 40 en Corea, incluidos los
espacios) y, a continuación, pulse [OK] dos veces.
5 Utilice los botones numéricos para introducir un nombre (máx.
16 caracteres, incluidos los espacios) y, a continuación, pulse [OK].
6 Pulse [Stop/Reset] (Parar/Reiniciar).
Cambio o eliminación de una marcación rápida codificada
1. Sigua el procedimiento desde los pasos 1 al 3 de ”Registro de marcación rápida
codificada”.
Para cambiar un número registrado:
2. Mantenga pulsado [W] para eliminar el número registrado.
3. Utilice los botones numéricos para introducir el número nuevo.
4. Pulse [OK] y, a continuación, pulse [Stop/Reset] (Parar/Reiniciar).
Para cambiar un nombre registrado:
2. Pulse [OK] dos veces.
3. Mantenga pulsado [W] para eliminar el nombre registrado.
4. Utilice los botones numéricos para introducir el nuevo nombre.
5. Pulse [OK] y, a continuación, pulse [Stop/Reset] (Parar/Reiniciar).
Para eliminar una entrada completa:
2. Mantenga pulsado [W] para eliminar el número registrado.
3. Pulse [OK] y, a continuación, pulse [Stop/Reset] (Parar/Reiniciar).
El nombre se eliminará automáticamente cuando elimine el número.
ESPAÑOL
Capítulo 6 Preparación del equipo para enviar y recibir faxes 37
Page 88

X Ajuste del horario de verano
• Este ajuste puede no estar disponible en algunos países y regiones.
1 Pulse [FAX] y, a continuación, [Menu] (Menú).
ESPAÑOL
2 Utilice [W] o [X] para seleccionar <USER SETTINGS/AJUSTES
USUARIO> y, a continuación, pulse [OK].
3 Utilice [W] o [X] para seleccionar <SUMMER TIME SET/HORARIO
VERANO> y, a continuación, pulse [OK].
4 Utilice [W] o [X] para seleccionar <ON/ACT.> o <OFF/DES> y, a
continuación, pulse [OK].
• Si selecciona <OFF/DES>, vaya al paso 14
• Si selecciona <ON/ACT.>, vaya al paso 5
5 Pulse [OK] dos veces.
6 Utilice [W] o [X] para seleccionar el mes en el que empieza el horario de
verano y, a continuación, pulse [OK] dos veces.
7 Utilice [W] o [X] para seleccionar la semana en la que empieza el horario
de verano y, a continuación, pulse [OK] dos veces.
8 Utilice [W] o [X] para seleccionar el día de la semana en el que empieza
el horario de verano y, a continuación, pulse [OK] dos veces.
9 Utilice los botones numéricos para introducir la hora, en formato de
24 horas, a la que empieza el horario de verano y pulse [OK] tres veces.
10Utilice [W] o [X] para seleccionar el mes en el que acaba el horario de
verano y, a continuación, pulse [OK] dos veces.
11Utilice [W] o [X] para seleccionar la semana en la que acaba el horario
de verano y, a continuación, pulse [OK] dos veces.
12Utilice [W] o [X] para seleccionar el día de la semana en el que acaba el
horario de verano y, a continuación, pulse [OK] dos veces.
13Utilice los botones numéricos para introducir la hora, en formato de
24 horas, a la que acaba el horario de verano y pulse [OK].
14Pulse [Stop/Reset] (Parar/Reiniciar).
38 Preparación del equipo para enviar y recibir faxes Capítulo 6
Page 89

X Instrucciones para introducir números, letras y símbolos
)
1 Pulse [ ] para cambiar al modo de letras mayúsculas (:A), modo de
letras minúsculas (:a) o modo numérico (:1).
2 Utilice los botones numéricos para introducir un caracter. Pulse el
botón varias veces hasta que aparezca el caracter que necesita.
Para introducir caracteres sucesivos del mismo botón numérico:
– Pulse el botón numérico, a continuación [X] y después el mismo botón numérico de nuevo.
Para introducir un espacio:
– Pulse [X] dos veces.
En el modo numérico, pulse [X] una vez.
Para eliminar un caracter:
– Pulse [W].
Para eliminar una entrada completa:
– Mantenga pulsado [W].
Modelos con el modo de letra minúscula:
Botón Modo de letras
[1] 1
[2] ABCЕДБАГВЖЗ abcедбагвжз 2
[3] DEFËÉÈÊ defëéèê 3
[4] GH I Ï Í Ì Î gh i ï í ì î 4
[5] JKL jkl 5
[6] MNOСШЦУТХФ mnoсшцутхф 6
[7] PQRSÞ pqrsþ 7
[8] TUVÜÚÙÛ tuvüúùû 8
[9] WXYZÝ wxyzý 9
[0] 0
[#]
[]
mayúsculas
-.SP #!",;:^`_=/|’?$@%&+()[]{}<>
Modo de letras
mayúsculas (: A)
Modo de letras
minúsculas
Modo de letras
minúsculas (: a)
Modo numérico
Modo numérico (:1
ESPAÑOL
SP indica un espacio.
Capítulo 6 Preparación del equipo para enviar y recibir faxes 39
Page 90

Modelos sin el modo de letra minúscula:
Botón Modo de letra Modo numérico
[1] 1
[2] ABCabc 2
ESPAÑOL
[3] DEFdef 3
[4] GHIghi 4
[5] JKLjkl 5
[6] MNOmno 6
[7] PQRSpqrs 7
[8] TUVtuv 8
[9] WXYZwxyz 9
[0] 0
[#]
SP indica un espacio.
-.SP #!",;:^`_=/|’?$@%&+()[]{}<>
40 Preparación del equipo para enviar y recibir faxes Capítulo 6
Page 91

7 Envío de faxes
X Métodos de envío
1 Cargue el documento en el cristal de la platina o en el ADF.
2 Pulse [FAX].
3 Defina los ajustes del documento según sea necesario.
4 Marque el número del destinatario (DESTINATION NUMBER/NÚMERO
DESTINATARIO) con los botones numéricos o con la marcación rápida
codificada.
5 Pulse [Color] para enviar faxes en color o [Black] (Negro) para enviar
faxes en blanco y negro.
Marcación rápida codificada
1 Pulse [Coded Dial] (Marcación codificada).
2 Utilice los botones numéricos para introducir un código de dos dígitos
(00-39) asignado al número que quiera marca y, a continuación,
pulse [OK].
ESPAÑOL
Capítulo 7 Envío de faxes 41
Page 92

8 Recepción de faxes
X Modos de recepción
ESPAÑOL
Si quiere recibir sólo faxes de forma automática o dispone de una
línea telefónica exclusiva para el fax:
Seleccione <FAX ONLY MODE/MODO SÓLO FAX>.
• Cuando reciba una llamada de fax: El equipo recibirá el fax automáticamente.
• Cuando reciba una llamada de voz: No podrá contestar a la llamada.
Si recibe principalmente llamadas de voz y algunos faxes o si
quiere recibir los faxes de forma manual:
Seleccione <MANUAL MODE/MODO MANUAL>.
• Cuando reciba una llamada de fax: El teléfono sonará. Descuelgue el auricular y si oye un
• Cuando reciba una llamada de voz: El teléfono sonará. Descuelgue el auricular para
• Para la recepción remota: Si no está cerca del equipo, marque 25 (el identificador
Si quiere recibir mensajes de voz en su contestador automático y
faxes automáticamente:
Seleccione <ANS.MACHINE MODE/MODO CONTESTADOR>.
• Cuando reciba una llamada de fax: Primero el contestador conectado a su equipo
• Cuando reciba una llamada de voz: El contestador automático conectado a su equipo
pitido, pulse [Black] (Negro) or [Color] en el equipo
para recibir el fax.
contestar a la llamada.
de recepción remota) en el teléfono para recibir faxes.
responderá a una llamada entrante y después recibirá
faxes automáticamente.
responderá a un llamada entrante.
Si quiere recibir faxes automáticamente y llamadas de voz:
Seleccione <FAX/TEL AUTO SW/CAMBIO T/F AUTO>.
• Cuando reciba una llamada de fax: El equipo recibirá el fax automáticamente.
• Cuando reciba una llamada de voz: El equipo sonará. Descuelgue o deje que el contestador
automático conectado al equipo conteste a la llamada.
42 Recepción de faxes Capítulo 8
Page 93

Si está suscrito a un servicio de detección de un tipo de timbre
característico o DRPD (por sus siglas en inglés) con su empresa de
telefonía (sólo EE.UU. y Canadá):
Seleccione <DRPD>.
• Cuando reciba una llamada de fax: El equipo sonará de acuerdo con el patrón de timbre que
haya elegido y recibirá el fax automáticamente.
• Cuando reciba una llamada de voz: El teléfono sonará de acuerdo con el patrón de timbre
que haya elegido. Descuelgue el auricular para que el
contestador automático responda a la llamada.
Si quiere que el equipo cambie automáticamente entre llamadas de
voz y de fax mediante patrones de timbre de llamada (Network
Switch) (este ajuste no está disponible en algunos países o
regiones):
Seleccione <NETWORK SWITCH>.
• Cuando reciba una llamada de fax: El equipo sonará y recibirá el fax automáticamente.
• Cuando reciba una llamada de voz: El equipo sonará. Descuelgue el auricular para
contestar a la llamada.
• El nombre de este servicio varía según el país. Por ejemplo, algunos nombres de servicios serían:
Australia: NET SWITCH
Nueva Zelanda: FAX ABILITY
Finlandia: Own Ringing
X Ajuste del modo de recepción
1 Pulse [FAX] y, a continuación, [Menu] (Menú).
2 Pulse [OK].
3 Utilice [W] o [X] para seleccionar el modo de recepción.
4 Pulse [OK].
ESPAÑOL
Capítulo 8 Recepción de faxes 43
Page 94

9 Mantenimiento
X Sustitución de un depósito de tinta
ESPAÑOL
1 Compruebe que el equipo está encendido.
2 Levante la unidad de lectura (cubierta de la impresora) hasta que
haga tope.
La bandeja de salida de papel se abrirá automáticamente y el contenedor del cabezal de
impresión se desplazará hasta el centro.
(A)
(A) Si no se abre automáticamente, pulse la tecla de apertura para abrir la bandeja de salida
de papel.
3 Abra la cubierta interior.
44 Mantenimiento Capítulo 9
Page 95

4 Presione la palanca (A) y retire el depósito de tinta correspondiente a la
luz que parpardea en rojo. No toque la palanca de bloqueo del cabezal
de impresión (B). Retire todos los depósitos de tinta.
(B)
(A)
5 Prepare un depósito de sustitución.
1. Extraiga el depósito de tinta nuevo de su embalaje y, a continuación, tire de la
cinta naranja (A) en la dirección de la flecha para que la película de protección no
tape el respiradero (C). A continuación, retire toda la película (B).
2. Retire la tapas protectoras naranjas (D) de la parte inferior del depósito de tinta y
tírelas. Tire con cuidado de la tapa de protección para evitar que la tinta le
manche los dedos.
Puede tirar el tapón una vez extraído.
(A)
(D)
ESPAÑOL
(B)
(C)
Capítulo 9 Mantenimiento 45
Page 96

6 Instale el depósito de tinta.
1. Instale el depósito de tinta en el cabezal de impresión.
2. Pulse en la marca del depósito de tinta hasta que éste quede encajado
firmemente.
ESPAÑOL
3. Asegúrese de que el depósito de tinta haga clic al encajar en su lugar y después,
que su lámpara esté en rojo (A).
(A)
7 Cierre la cubierta interior.
8 Cierre despacio la unidad de lectura (cubierta de la impresora).
ATENCIÓN
• Sujete la unidad de lectura (cubierta de la impresora) firmemente con las dos manos y tenga
cuidado de no pillarse los dedos.
46 Mantenimiento Capítulo 9
Page 97

X Mantenimiento del cabezal de impresión
Limpieza del cabezal de impresión
1 Pulse [ON/OFF] para encender el equipo.
2 Pulse [Menu] (Menú) varias veces para seleccionar <MAINTENANCE/
MANTENIMIENTO>.
3 Utilice [W] o [X] para seleccionar <CLEANING/LIMPIEZA> o <DEEP
CLEANING/LIMPIEZA A FONDO> si lo necesita, y a continuación,
pulse [OK].
Alineación automática del cabezal de impresión
1 Pulse [ON/OFF] para encender el equipo.
2 Pulse la tecla de apertura de la bandeja de salida de papel, y abra y
ajuste la extensión presionando la hendidura de la parte frontal.
3 Pulse [Menu] (Menú) varias veces para seleccionar <MAINTENANCE/
MANTENIMIENTO>.
4 Cargue unas cuantas hojas de papel en blanco de tamaño A4 o Carta en
el alimentador de hojas automático.
5 Utilice [W] o [X] para seleccionar <AUTO HEAD ALIGN/ALIN CAB AUTO>
y, a continuación, pulse [OK].
6 Se imprime el patrón.
ESPAÑOL
Capítulo 9 Mantenimiento 47
Page 98

ESPAÑOL
48 Mantenimiento Capítulo 9
Page 99

Guide de démarrage rapide
Table des matières
Introduction 14
Gestion des documents 22
Gestion du papier 25
Copie 31
Impression directe de photos depuis un périphérique compatible 33
Préparation de votre machine pour les télécopies 34
Envoi de télécopies 41
Réception de télécopies 42
Entretien 44
FRANÇAIS
Page 100

Pour plus d'informations sur l'installation de la machine présentée aux pages 2 et 3, reportez-vous
également aux [Easy Setup Instructions/Instructions d'installation simplifiée].
Préparation de la machine
Sortez la machine de son emballage
Veuillez confronter les éléments contenus dans l'emballage avec l'illustration imprimée sur le couvercle
du carton d'emballage.
.
Lisez également les Précautions de sécurité dans le Guide d'Utilisation. Veillez à respecter les
avertissements et les précautions afin d'éviter de vous blesser ou d'endommager la machine.
FRANÇAIS
IMPORTANT
• Ne connectez pas le câble USB avant que le logiciel soit installé.
• Un câble d'imprimante n'est pas inclus. Vous devez vous procurer un câble USB (longueur inférieure à
3 mètres / 10 pieds) pour connecter la machine à un ordinateur.
1 Branchez la ligne téléphonique et le cordon d'alimentation.
• Veillez à utiliser le câble de téléphone fourni.
• Si vous branchez la ligne téléphonique, voir « Exemples de connexion à la machine » page 34.
Grande-Bretagne uniquement
Si le connecteur du périphérique externe ne peut pas être raccordé à la prise de la machine, vous devez
acheter un adaptateur B.T. pour établir la connexion de la manière suivante :
Raccordez la ligne du périphérique externe à l'adaptateur B.T., puis branchez ce dernier sur la prise .
2 Mettez la machine sous tension.
• La sélection du pays n'est disponible que pour certains pays.
• Si la sélection de la langue ou du pays ne vous convient pas, consultez le Guide d'Utilisation.
3 Installez la tête d'impression.
• Si l'Ensemble d'analyse (capot d'imprimante) reste ouvert pendant plus de 10 minutes, le support de la
tête d'impression se déplace vers la droite. Fermez et ouvrez à nouveau l'Ensemble d'analyse (capot
d'imprimante) pour que le support de tête d'impression revienne au centre.
• De l'encre transparente ou bleue peut se trouver à l'intérieur de l'étui contenant la tête d'impression ; cela
n'affecte pas la qualité d'impression. Veillez à ne pas vous salir d'encre en manipulant ces éléments.
• Ne remettez pas le capuchon protecteur une fois qu'il est enlevé.
4 Installez les réservoirs d'encre.
• Assurez-vous que les réservoirs d'encre sont installés conformément à l'ordre indiqué sur l'étiquette. La
machine ne peut pas être utilisée tant que les réservoirs ne sont pas tous installés.
• Pour des raisons de sécurité, stockez les têtes d'impression et les réservoirs d'encre hors de portée des
enfants en bas âge.
• Ne faites pas tomber et ne secouez pas les réservoirs ; de l'encre pourrait couler et tacher vos vêtements
et vos mains.
• Veillez à retirer le film transparent du réservoir d'encre exactement dans l'ordre indiqué à l'étape 4.
• Ne remettez pas le capuchon protecteur une fois qu'il est enlevé.
• Le voyant Alarme s'allume en orange si un réservoir d'encre n'est pas correctement installé. Ouvrez
l'Ensemble d'analyse (capot d'imprimante) et assurez-vous que tous les réservoirs sont installés dans
l'ordre indiqué sur l'étiquette.
2
 Loading...