

Page 1
HD Camcorder
COPY
Instruction Manual
PUB. DIE-0445-001
Page 2
Important Usage Instructions
COPY
COPYRIGHT WARNING:
Unauthorized recording of copyrighted materials may infringe on the rights of copyright owners and be contrary to copyright laws.
CAUTION
RISK OF EXPLOSION IF BATTERY IS REPLACED BY AN INCORRECT TYPE. DISPOSE OF
USED BATTERIES ACCORDING TO LOCAL REGULATION.
Complies with
IDA Standards
DB007671
This product is installed with the WLAN Module which is certified to
standards set by IDA Singapore.
Only for European Union and EEA (Norway, Iceland and Liechtenstein)
If a chemical symbol is printed beneath the symbol shown above, in accordance with
the Battery Directive, this indicates that a heavy metal (Hg = Mercury, Cd = Cadmium,
Pb = Lead) is present in this battery or accumulator at a concentration above an applicable threshold specified in the Battery Directive.
This product should be handed over to a designated collection point, e.g., on an
authorized one-for-one basis when you buy a new similar product or to an authorized
collection site for recycling waste electrical and electronic equipment (EEE) and batteries and accumulators. Improper handling of this type of waste could have a possible
impact on the environment and human health due to potentially hazardous substances that are generally associated with EEE. Your cooperation in the correct disposal of this product will contribute to the effective usage of natural resources.
For more information about the recycling of this product, please contact your local city
office, waste authority, approved scheme or your household waste disposal service or
visit www.canon-europe.com/weee
These symbols indicate that this product is not to be disposed of
with your household waste, according to the WEEE Directive (2012/
19/EU), the Battery Directive (2006/66/EC) and/or national legislation
implementing those Directives.
, or www.canon-europe.com/battery.
2
Page 3
REGIONS OF USE
COPY
The LEGRIA mini is in compliance (as of February 2014) with the radio signal regulations of the regions listed below. For details on other regions where it can be used,
make inquiries with the contacts listed at the end of this instruction manual (A 256).
REGIONS
Australia, Austria, Belgium, Bulgaria, China (PRC mainland), Cyprus, Czech Republic, Denmark, Estonia, Finland, France, Germany, Greece, Hong Kong S.A.R., Hungary, Iceland, Ireland, Italy, Latvia, Liechtenstein, Lithuania, Luxembourg, Malta,
Netherlands, New Zealand, Norway, Poland, Portugal, Romania, Russia, Singapore,
Slovakia, Slovenia, Spain, Sweden, Switzerland, United Kingdom
Statement on EC directive
Hereby, Canon Inc., declares that this RF401 is in compliance with the
essential requirements and other relevant provisions of Directive 1999/5/EC.
Please contact the following address for the original Declaration of Conformity:
CANON EUROPA N.V.
Bovenkerkerweg 59, 1185 XB Amstelveen, The Netherlands
CANON INC.
30-2, Shimomaruko 3-chome, Ohta-ku, Tokyo 146-8501, Japan
Model
ID0033: LEGRIA mini
3
Page 4
Trademark Acknowledgements
COPY
• microSD, microSDHC and microSDXC Logos are trademarks of SD-3C, LLC.
• Microsoft and Windows are trademarks or registered trademarks of Microsoft Corporation in the United
States and/or other countries.
• App Store, iPad, iPhone, iTunes and Mac OS are trademarks of Apple Inc., registered in the U.S. and
other countries.
• HDMI, the HDMI logo and High-Definition Multimedia Interface are trademarks or registered trademarks
of HDMI Licensing LLC in the United States and other countries.
• Google, Android, Google Play, YouTube are trademarks of Google Inc.
• Facebook is a registered trademark of Facebook, Inc.
• IOS is a trademark or registered trademark of Cisco in the U.S. and other countries and is used under
license.
• The Twitter name and marks are trademarks of Twitter, Inc.
• Wi-Fi is a registered trademark of the W i-Fi Alliance.
• Wi-Fi Certified, WPA, WPA2, and the Wi-Fi Certified logo are trademarks of the Wi-Fi Alliance.
• WPS as used on the camcorder’s settings, onscreen displays and in this manual signifies Wi-Fi Protected Setup.
• The Wi-Fi Protected Setup Identifier Mark is a mark of the W i-Fi Alliance.
• Other names and products not mentioned above may be trademarks or registered trademarks of their
respective companies.
• This device incorporates exFAT technology licensed from Microsoft.
• “Full HD 1080” refers to Canon camcorders compliant with high-definition video composed of 1,080 vertical pixels (scanning lines).
• This product is licensed under AT&T patents for the MPEG-4 standard and may be
used for encoding MPEG-4 compliant video and/or decoding MPEG-4 compliant
video that was encoded only (1) for a personal and non-commercial purpose or (2) by a video provider
licensed under the AT&T patents to provide MPEG-4 compliant video. No license is granted or implied
for any other use for MPEG-4 standard.
Copyright
• If you use copyrighted songs and music tracks in your video creations, remember that music under
copyright may not be used without permission from the copyright holder, except for cases permitted
under applicable laws, such as for personal use. Make sure to follow applicable laws when using music
files.
4
Page 5
About this Manual
COPY
Thank you for purchasing the Canon LEGRIA mini. Please read
this manual carefully before you use the camcorder and retain it
for future reference. Should your camcorder fail to operate correctly, refer to Troubleshooting (A 206).
Conventions Used in this Manual
Important precautions related to the camcorder’s operation.
Additional notes and topics that complement the basic
operating procedures.
Restrictions, requirements or preconditions regarding the
function described.
A
>
• “Scene” refers to one movie unit from the point you touch [Ü]
• Brackets [ ] are used to refer to onscreen controls you need to
Reference page number within this manual.
This arrow is used to abbreviate menu selections. For a
detailed explanation on how to use the menus, refer to
Using the Menus (A 43).
to start recording until you touch [Ñ] to stop recording.
touch (menus, buttons, etc.) and to messages as they are displayed on the screen.
5
Page 6
• The photos included in this manual are simulated pictures
COPY
taken with a still camera.
• Illustrations of the camcorder’s screen or a computer’s screen
included in this manual may show only relevant parts of the
screen.
• Navigation buttons: The navigation bar at the bottom of the
page offers up to four buttons to let you get quickly to the
information you want to find.
Jump to the general table of contents.
Go to a list of select functions grouped by their uses in
real-life situations. This alternative index can be very
useful for beginners who encounter a particular challenge but are not sure of what function to use.
Jump to the alphabetical index.
The button with a number in it will take you to the
beginning of the current chapter, where you will find an
overview of the information and related functions covered in that chapter. Note that the icon itself will
change depending on the chapter you are currently
reading.
6
Page 7

Table of Contents
COPY
Important Usage Instructions...................................... 2
About this Manual ...................................................... 5
The Camcorder’s Functions in Real-Life
Situations .................................................................. 12
Unique functions for special cases ........................... 12
Getting the look you want......................................... 13
Challenging subjects and shooting conditions .......... 14
Audio, playback, editing and others.......................... 14
Wireless functions .................................................... 16
Getting to Know the Camcorder ............................... 18
Supplied Accessories and CD-ROM......................... 18
Names of Parts ........................................................ 20
Preparations........................................................ 26
Charging and Inserting the Battery Pack .................. 28
Using a Memory Card ............................................... 32
Memory Cards Compatible for Use with the
Camcorder............................................................... 32
7
Page 8

Inserting and Removing a Memory Card................... 34
COPY
First Time Settings .................................................... 36
Basic Setup ............................................................. 36
Changing the Time Zone .......................................... 39
Initializing a Memory Card......................................... 40
Basic Operation of the Camcorder ........................... 42
Using the Touch Screen........................................... 42
Using the Menus ...................................................... 43
Operating Modes ..................................................... 49
Basic Recording and Playback .......................... 51
Basic Recording........................................................ 52
Recording Video....................................................... 52
Changing the Field of View ....................................... 55
Taking Photos .......................................................... 59
Basic Playback.......................................................... 63
Playing Back Video .................................................. 63
Viewing Photos ........................................................ 71
Deleting Scenes ....................................................... 75
Trimming Scenes ..................................................... 78
Deleting Photos........................................................ 80
Slideshow ................................................................ 83
8
Page 9

Advanced Functions ........................................... 84
COPY
Video Quality and Shooting Modes .......................... 86
Selecting the Video Quality....................................... 86
Selecting the Photo Size .......................................... 88
Selecting the Shooting Mode ................................... 89
Special Recording Modes ......................................... 93
Interval Recording .................................................... 93
Slow and Fast Motion............................................... 97
Video Snapshot........................................................ 99
Convenient Functions ............................................. 101
Self Timer ............................................................... 101
Decoration: Adding a Personal Touch .................... 102
Image Rotation and Image Flipping ........................ 107
Audio Scenes......................................................... 109
When You Want More Control................................ 111
White Balance ........................................................ 111
Exposure................................................................ 113
Face Detection ....................................................... 116
Capturing Video Snapshot Scenes and Photos
from a Movie .......................................................... 119
9
Page 10

External Connections........................................ 122
COPY
Terminals on the Camcorder .................................. 123
Connection Diagrams............................................. 124
Playback on a TV Screen ....................................... 126
Saving and Sharing Your Recordings..................... 127
Converting and Resizing Movies............................. 127
Saving Recordings on a Computer......................... 130
Uploading Recordings to the Web.......................... 136
Wi-Fi Functions ................................................. 137
The Camcorder’s Wi-Fi Functions .......................... 139
Wireless Connections Without an Access Point..... 144
Using an iOS or Android Device as a Remote
Control ................................................................... 144
Remote Browse: Viewing Recordings Using a Web
Browser on an iOS or Android Device .................... 156
Saving Recordings and Uploading Movies to the
Web Using an iOS Device ...................................... 158
Wireless Connections Using an Access Point ........ 162
Sharing Recordings with CANON iMAGE
GATEWAY ............................................................. 162
Wireless Playback on a Computer.......................... 169
Wi-Fi Connection Using an Access Point................ 171
Viewing and Changing Wi-Fi Settings ..................... 179
10
Page 11

Additional Information ...................................... 184
COPY
Appendix: Menu Options Lists................................ 186
[1 Other Settings] Menus ..................................... 188
Appendix: Onscreen Icons and Displays ................ 199
Trouble? .................................................................. 206
Troubleshooting ..................................................... 206
List of Messages .................................................... 217
Do’s and Don’ts ...................................................... 234
Handling Precautions ............................................. 234
Maintenance/Others................................................ 240
Cleaning................................................................. 240
Condensation......................................................... 241
Using the Camcorder Abroad................................. 242
General Information ................................................ 243
Optional Accessories.............................................. 243
Specifications......................................................... 246
Index ....................................................................... 252
11
Page 12
The Camcorder’s Functions in
COPY
Real-Life Situations
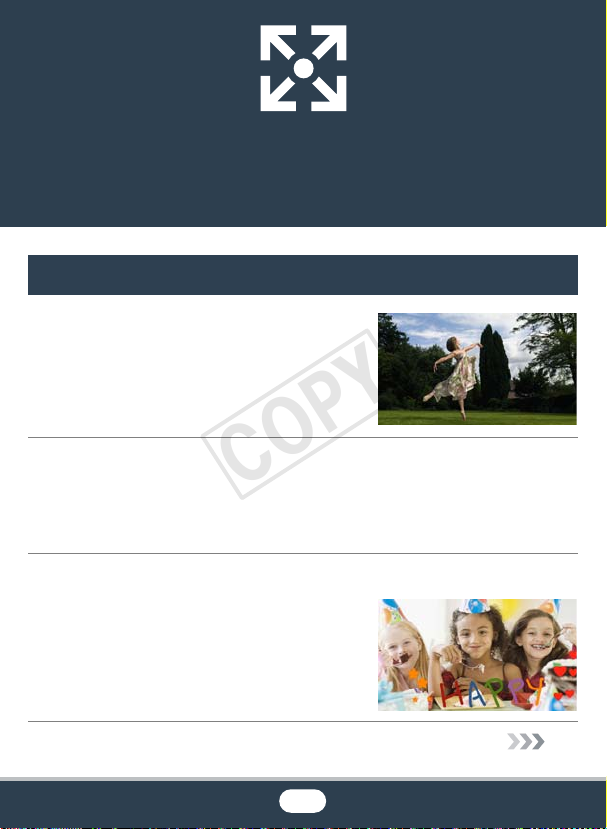
Unique functions for special cases
Record a mirror image of your
dance training so you can practice
along with the playback scene.
X Automatic Image Rotation and
Image Flipping (A 107)
Shoot a cool time-lapse video or use slow motion to check
your golf swing.
X Interval Recording (A 93)
X Slow and Fast Motion Recording (A 97)
Decorate movies with graphics and stamps.
X Decoration (A 102)
12
Page 13
Create a dynamic montage sequence with short cuts.
COPY
X Video Snapshot (A 99)
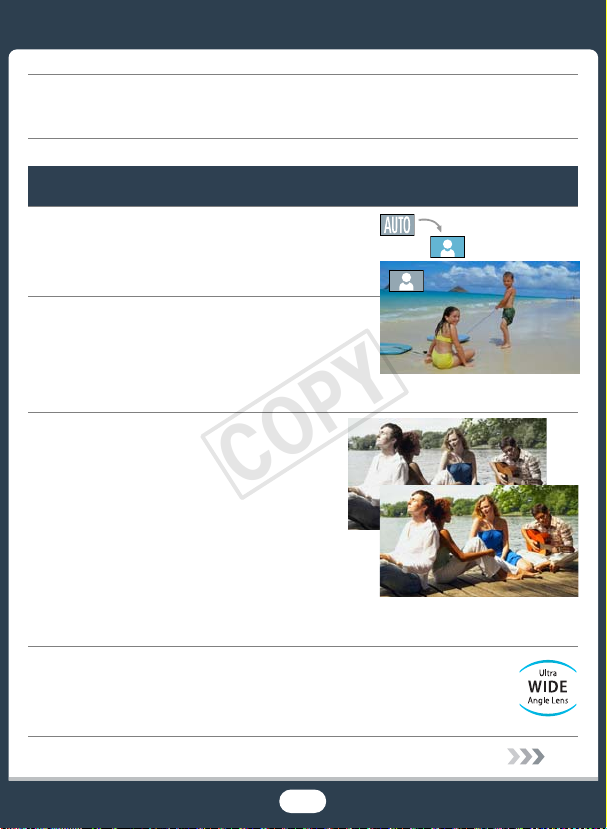
Getting the look you want
Get gorgeous video and photos
without bothering with settings.
X N mode (A 52)
Make the image brighter or darker
than the exposure set by the
camcorder.
X Exposure (A 113)
Create a copy of your movies
applying a unique cinematic filter.
X Converting and Resizing Movies
(A 127)
Change the field of view you record from a fisheyelike ultra wide angle to a close-up center view.
X Field of View (A 55)
Cinema filter
[FILTER 2] (Vivid)
13
Page 14
Challenging subjects and shooting conditions
COPY
Shoot great video of special scene situations with minimal
settings.
X Shooting Modes (A 89)
Obtain natural-looking colors even
under special lighting conditions.
X White Balance (A 111)
Optimize the exposure for the desired subject just by touching the screen.
X Touch AE (A 115)
Keep the exposure optimized while shooting a moving subject.
X Face Detection and Tracking (A 116)
Give yourself time to get in the picture.
X Self Timer (A 101)
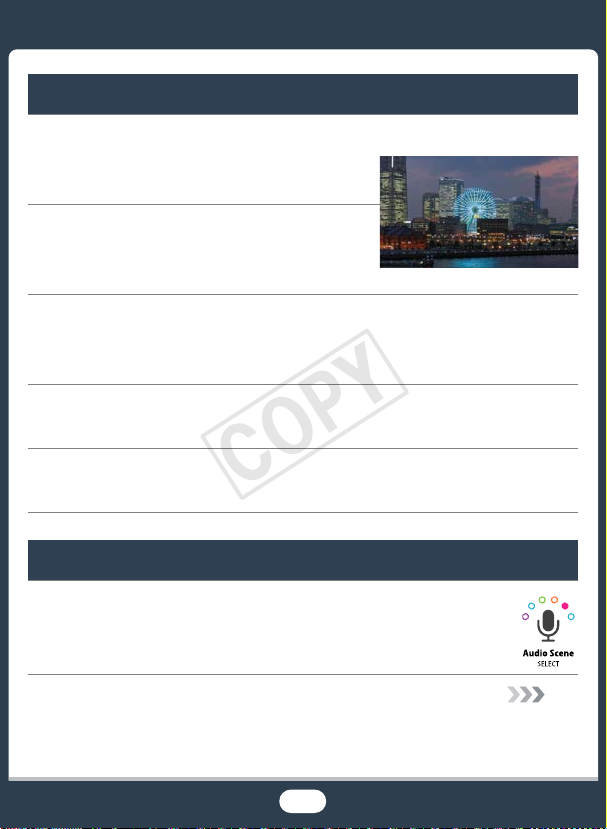
Audio, playback, editing and others
Record the best sound possible according to your
shooting situation.
X Audio Scenes (A 109)
14
Page 15
Save parts of your video as photos or short video snapshot
COPY
scenes.
X Capturing Photos/Video Snapshot Scenes (A 119)
Convert your scenes into a smaller file size to upload to the
Web.
X Converting and Resizing Movies (A 127)
Play a slideshow of your photos.
X Slideshow (A 83)
Enjoy your recordings on a TV.
X HDMI Connection (A 124)
X Playback (A 126)
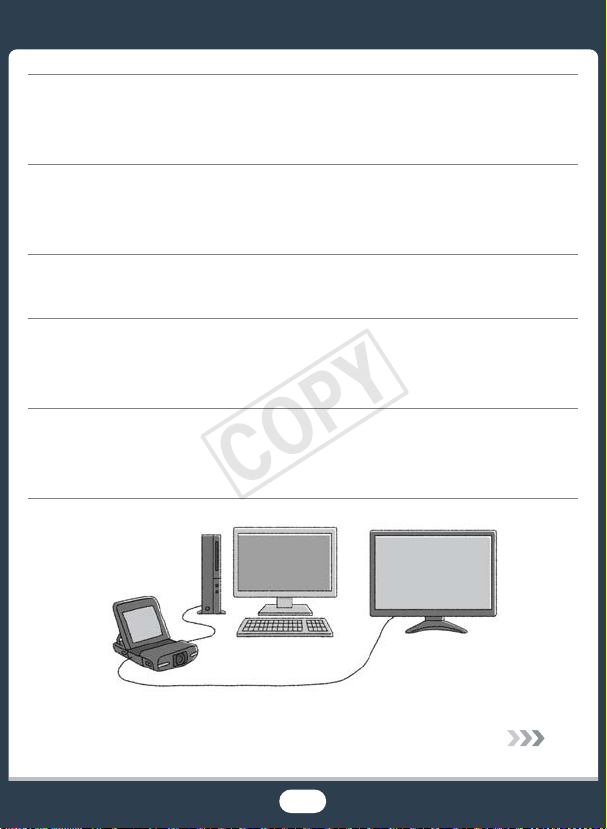
Save recordings on your computer and upload them to the
Web.
X Saving Recordings (ImageBrowser EX) (A 130)
15
Page 16
Wireless functions
COPY
Use your smartphone or tablet as a remote control while
recording.
X Wi-Fi Remote Control (CameraAccess plus) (A 144)
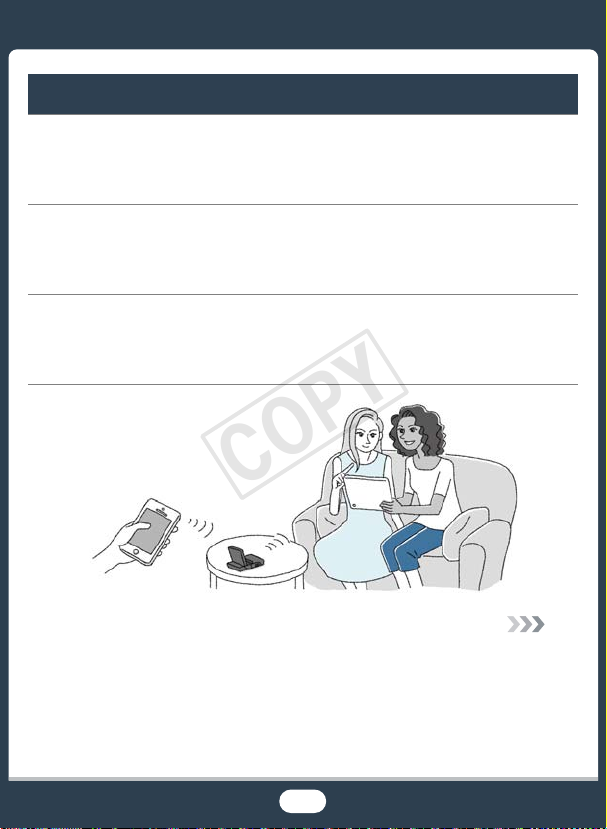
Use a Web browser on your smartphone or tablet to access
and play back the recordings in the camcorder.
X Remote Browse/Playback via Browser (A 156)
Use an iOS app to wirelessly transfer recordings to your
iPhone/iPad and upload them to the Web.
X Movie Uploader (A 158)
16
Page 17

Share your recordings with Web albums using CANON
COPY
iMAGE GATEWAY.
X CANON iMAGE GATEWAY (A 162)
Connect the camcorder to your home network and wirelessly stream your recordings.
X Media Server (A 169)
X Wi-Fi Connection to an Access Point (A 171)
Review and change Wi-Fi settings (for advanced users).
X Wi-Fi Settings (A 179)
17
Page 18
Getting to Know the Camcorder
COPY
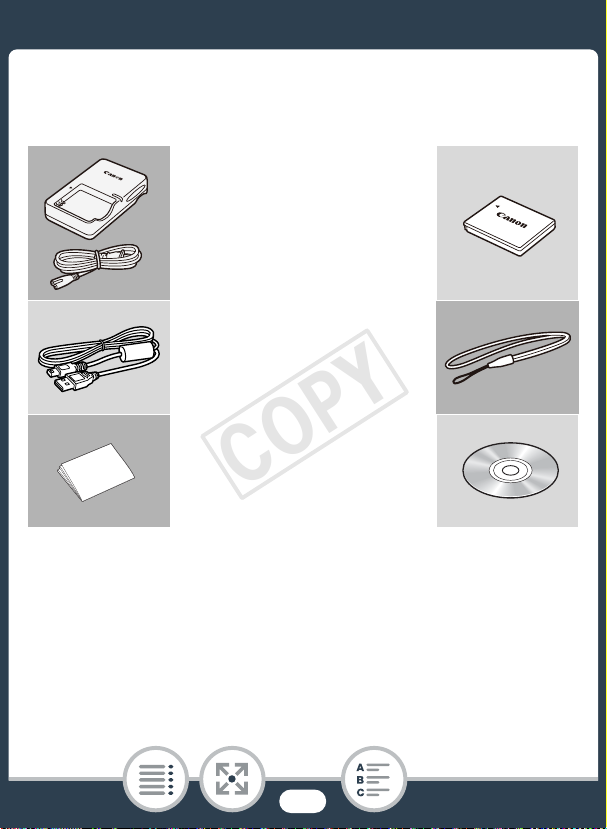
Supplied Accessories and CD-ROM
The following accessories are supplied with the camcorder:
XCB-2LVE Battery Charger
(incl. power cord)
NB-4L Battery PackW
XIFC-400PCU USB Cable
WS-DC11 Wrist StrapW
XGetting Started Leaflet
Canon LEGRIA mini CD-ROMW
18
Page 19

The Canon LEGRIA mini CD-ROM contains the following com-
COPY
ponents:
- Instruction Manual - The full-version instruction manual of
the camcorder (this PDF file).
- ImageBrowser EX - The CD-ROM contains an automatic
installer for the software ImageBrowser EX, which allows
you to save and manage movies and photos and upload
them to CANON iMAGE GATEWAY*, YouTube and Facebook. An Internet connection is required for full installation of
the software.
* CANON iMAGE GATEWAY is an online service that allows you to
share movies and photos, make photo albums, and more. This service may not be available in all countries/regions.
19
Page 20
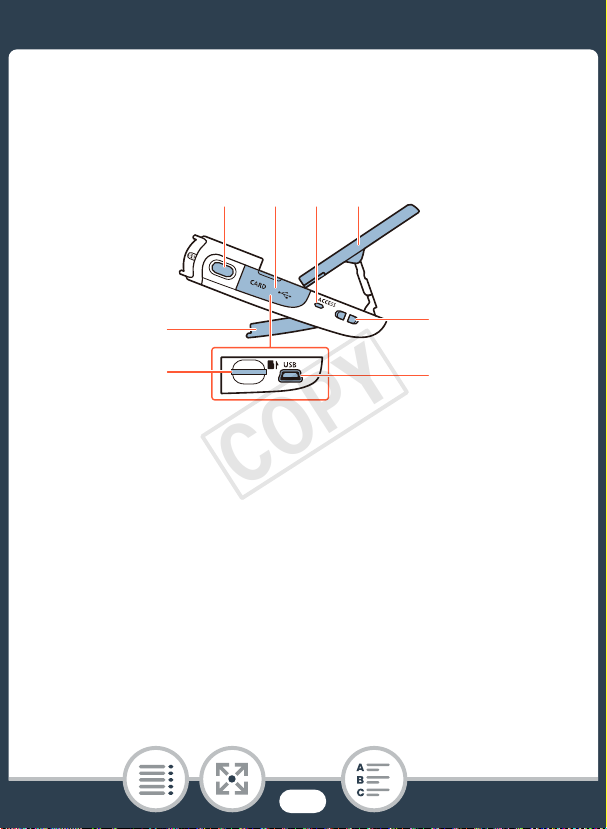
Names of Parts
COPY
Left side view
1234
5
6
1 Photo button (A 59)
2 Memory card slot cover (A 34)
3 ACCESS indicator (A 52, 59)
4 LCD panel (A 24)
5 Adjustable stand (A 24)
6 Memory card slot (A 34)
7 Strap mount (A 24)
8 USB terminal (A 123, 125)
20
7
8
Page 21

Right side view
COPY
9101112
13
14
9 (playback mode) button (A 63, 69)
10 Terminal cover
11 Power indicator
12 Power switch (ON/OFF) (A 52, 59)
13 Strap mount (A 24)
14 HDMI terminal (A 123, 124)
15 DC IN terminal
To use the optional CA-110E Compact Power Adapter.
21
15
Page 22
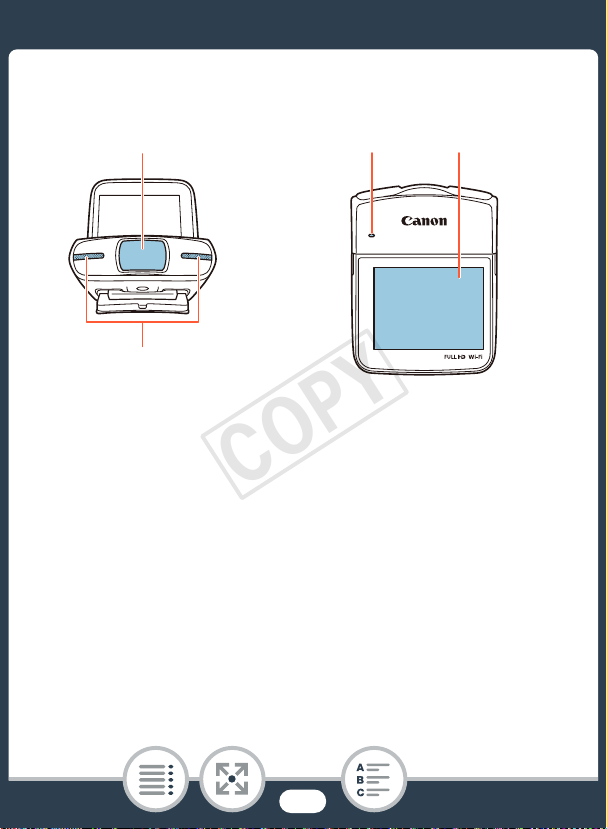
Front view Top view
COPY
16
17
16 Lens cover
17 Stereo microphone (A 109)
18 Speaker (A 65)
19 LCD touch screen (A 25, 42)
18 19
22
Page 23
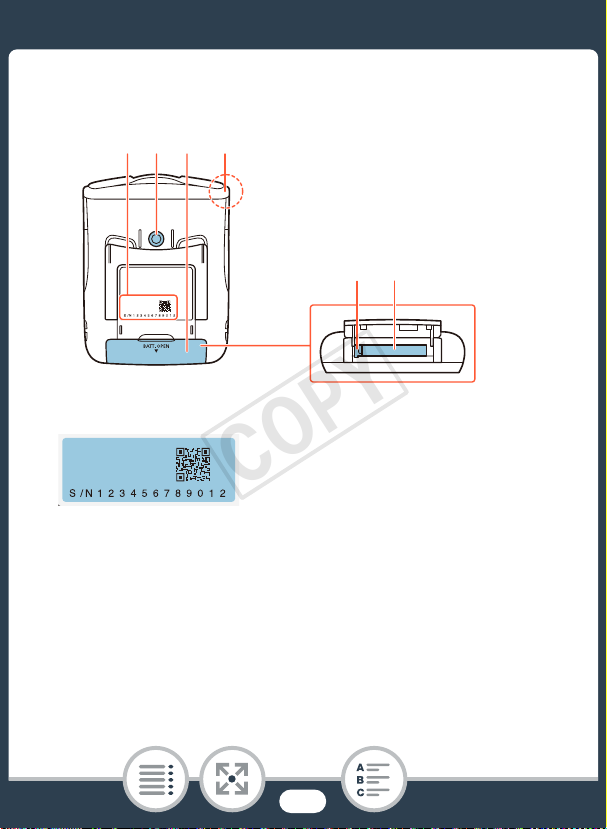
Bottom view Back view
COPY
21 2320 22
24 25
20 Serial number
21 Tripod socket (A 236)
22 Battery compartment cover (A 29)
23 Wi-Fi antenna (A 137)
24 Battery release latch (A 29)
25 Battery compartment (A 29)
23
Page 24
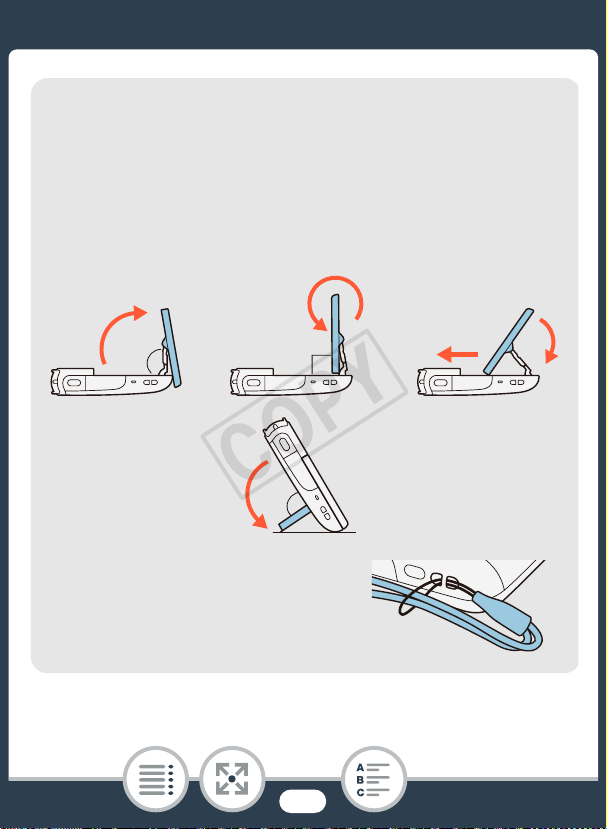
Adjusting the camcorder’s position
COPY
The camcorder has an adjustable stand (5) and an articulated LCD panel (4) that allow you to easily adjust its position
to match your recording conditions.
Here are typical shooting positions (all degree measurements are approximate):
12 3
80° 90°
95°
13 Strap mount
You can attach the supplied wrist
strap to one side of the camcorder.
24
Page 25

19 LCD touch screen
COPY
• The screen is produced using extremely high-precision
manufacturing techniques, with more than 99.99% of the
pixels operating to specification. Less than 0.01% of the
pixels may occasionally misfire or appear as black, red,
blue or green dots. This has no effect on the recorded
image and does not constitute a malfunction.
• For details about how to take care of the touch screen,
refer to Handling Precautions (A 234), Cleaning
(A 240).
• You can adjust the screen’s brightness using the 1 >
t > [LCD Brightness] and [LCD Backlight] settings.
25
Page 26
Preparations
COPY
Charging and Inserting the Battery Pack
The first step for using your camcorder is to prepare the
28
power supply. This section explains how to charge a battery pack and how to install it in the camcorder.
Using a Memory Card
Next, you need to prepare a memory card where your
movies and photos will be recorded. This section explains
32
the types of memory cards that can be used and how to
insert one into the camcorder.
First Time Settings
Now that your camcorder is powered up and has a memory card, you can turn it on and complete the basic setup.
36
These include selecting the camcorder’s language and
setting the date and time.
26
Page 27

Basic Operation of the Camcorder
COPY
In this section you can learn more about basic operations,
42
such as using the touch screen, changing operating
modes and using the menus.
27
Page 28
Charging and Inserting the Battery Pack
COPY
Charging and Inserting the Battery
Pack
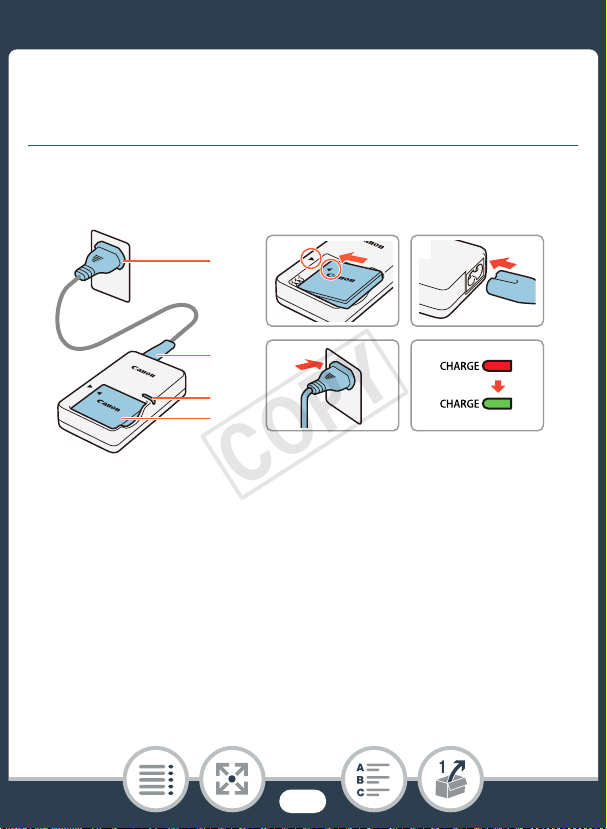
Charge the supplied battery pack in advance, using the supplied
battery charger.
1
2
2
2
3
1
2
3
■ Charging the Battery Pack
1 Attach the battery pack to the battery charger, aligning
the triangle marks.
2 Connect the power cord to the battery charger and
plug the other end into a power outlet.
• When the CHARGE indicator on the battery charger turns
green, the battery pack is fully charged.
28
Page 29
Charging and Inserting the Battery Pack
1
2
COPY
3 When the battery pack is fully charged, remove the bat-
tery pack from the battery charger and unplug the battery charger.
1
1
3
2
2
2
1
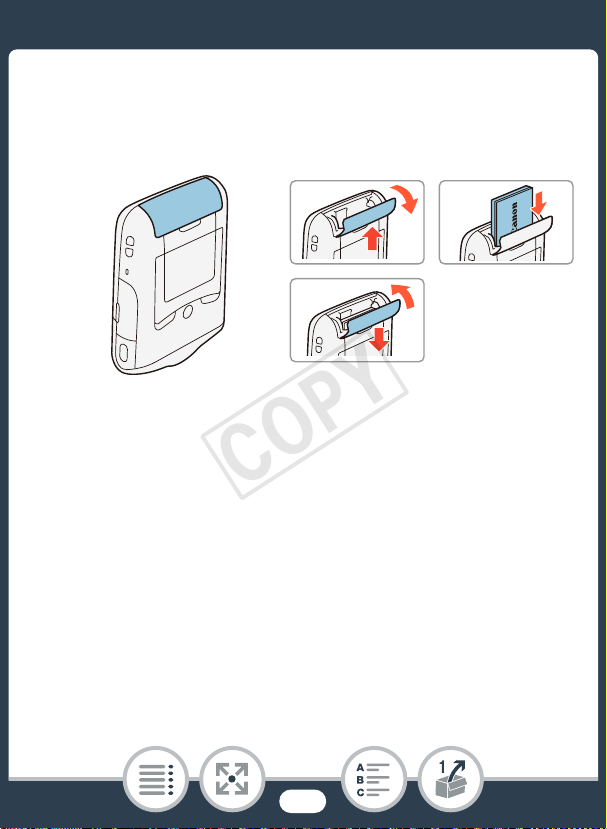
■ Inserting the Battery Pack
1 Push the battery compartment cover in the direction of
the arrow to open it.
2 Insert the battery pack with the Canon label facing the
bottom of the camcorder.
• Push the battery pack all the way in, until the battery
release latch secures it in place.
3 Close the battery compartment cover.
• Push the cover until you hear a click. Do not force the
cover closed if the battery pack is not correctly inserted.
29
Page 30
Charging and Inserting the Battery Pack
COPY
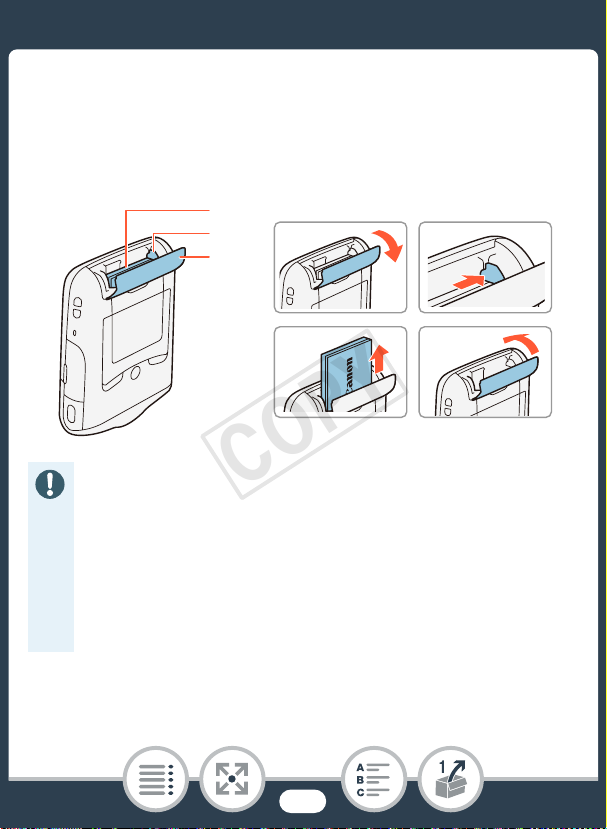
To remove the battery pack
Open the battery compartment cover and slide the battery
release latch in the direction of the arrow so the battery pack
springs out. Remove the battery pack and close the cover.
3
2
1, 4
1
2
3
• Turn off the camcorder before removing the battery
pack. After turning off the camcorder, important
data is updated on the memory card. Be sure to
wait until the green power indicator goes out.
• Do not connect to the camcorder’s DC IN terminal
any electrical equipment that is not expressly recommended for use with this camcorder.
30
4
Page 31

Charging and Inserting the Battery Pack
COPY
• To prevent equipment breakdowns and excessive
heating, do not connect the supplied battery
charger to voltage converters for overseas travels
or special power sources such as those on aircraft
and ships, DC-AC inverters, etc.
• Fully charging a battery pack will take approximately 1 hour 30 minutes. (The actual charging
time will vary depending on charging conditions
and the initial charge of the battery pack.)
• If remaining battery time is an issue, you can power
the camcorder using the optional CA-110E Compact Power Adapter. Battery packs cannot be
charged by the camcorder even when the optional
compact power adapter is used.
• For approximate recording/playback times with a
fully charged battery pack, refer to Approximate
Usage Times (A 245).
• Charged battery packs continue to discharge naturally. Therefore, charge them on the day of use, or
the day before, to ensure a full charge.
31
Page 32

Using a Memory Card
COPY
Using a Memory Card
Memory Cards Compatible for Use with the Camcorder
You can use the following types of commercially available
microSD cards with this camcorder. We recommend using
memory cards rated SD Speed Class 10.
As of June 2013, the movie recording function has been tested
using microSD/microSDHC/microSDXC cards made by Panasonic, Toshiba and SanDisk. For the latest information on memory cards that can be used, visit your local Canon Web site.
Memory card type: microSD card
microSDHC card
microSDXC card
SD Speed Class*: ** ** **
Capacity: 128 MB or larger***
* When using a microSD card without a speed class rating, you may
not be able to record movies, depending on the memory card used.
** When using microSD cards with this SD Speed Class rating, we rec-
ommend recording movies only at a video quality of 4 Mbps.
***microSD cards with a capacity of 64 MB or smaller cannot be used to
record movies.
32
Page 33

Using a Memory Card
COPY
• After repeatedly recording, deleting and editing scenes
(fragmented memory), it will take longer to write data on
the memory
recordings and initialize the memory card using the
[Complete Initialization] option.
• About the Speed Class: Speed Class is a standard
that indicates the minimum guaranteed data transfer
speed of memory cards. When you buy a new memory
card, look for the Speed Class logo on the package.
card and recording may stop. Save your
■ microSDXC Cards
You can use microSDXC cards with this camcorder. When using
microSDXC cards with other devices, such as digital recorders,
computers and card readers, make sure that the external
device is compatible with microSDXC cards. For more information on compatibility, contact the computer, operating system
or memory card manufacturer.
• If you use a microSDXC card with a computer OS that
is not SDXC-compatible, you may be prompted to format the memory card. In such case, cancel the opera-
tion to prevent data loss.
33
Page 34

Using a Memory Card
COPY
Inserting and Removing a Memory Card
Make sure to initialize all memory cards with the camcorder,
using the [Complete Initialization] option, before using them
for the first time. When you turn on the camcorder for the first
time, you will need to complete the basic setup first (A 36), and
then initialize the memory card (A 40).
1
1
2
3
3 2, 4
4
1 Turn off the camcorder.
• Set the power switch to OFF and check that the power
indicator is off.
2 Open the memory card slot cover.
3 Insert the memory card with the label facing up and
push it all the way into the memory card slot until it
clicks.
34
Page 35

Using a Memory Card
COPY
4 Close the memory card slot cover.
• Do not force the cover closed if the memory card is not
correctly inserted.
To remove the memory card
Push the memory card once to release it. When the memory
card springs out, pull it all the way out.
• Memory cards have front and back sides that are not
interchangeable. Inserting a memory card facing the
wrong direction can cause a malfunction of the camcorder. Be sure to insert the memory card as described
in step 3.
35
Page 36

First Time Settings
COPY
First Time Settings
Basic Setup
The first time you turn on the camcorder, you will be guided by
the camcorder’s basic setup screens to select the camcorder’s
language and set the date and time. For details on how to use
the touch screen, refer to Using the Touch Screen (A 42).
1 Set the power switch to ON to turn on the camcorder.
• The lens cover will open.
1
1
• The language selection screen will appear.
2 Touch the language that you want to be used for
onscreen displays and then touch [æ].
• You can select one of 27 languages. You may need to
scroll down to find your language.
• After you select a language, the [Date Format] screen will
appear.
36
Page 37

First Time Settings
COPY
Touch [æ] after selecting a
language
3 Touch [Y.M.D], [M.D,Y] or [D.M.Y] to select the date for-
mat you prefer and then touch [æ].
• After you select the date format, the [Date/Time] screen
will appear with the first field selected.
4 Touch a field you want to change (year, month, day,
hours or minutes).
5 Touch [Í] or [Î] to change the field as necessary.
37
Page 38

First Time Settings
COPY
6 Set the correct date and time by changing all the fields
in the same way.
• Touch [24H] to use 24-hour clock or leave it unselected to
use 12-hour clock (AM/PM).
7 Touch [OK] to complete the basic setup and close the
setup screen.
• Some buttons, such as [ON]/[OFF] in some screens, will
appear in English regardless of the language selected.
• You can change the language and adjust the date and
time later on, using the following menu settings.
- 1 > q > [Language H]
- 1 > q > [Date/Time]
• When you do not use the camcorder for about 3
weeks, the built-in rechargeable lithium battery may discharge completely and the date and time setting may
be lost. In such case, recharge the built-in lithium battery (A 239). The next time you turn on the camcorder, you will have to perform the basic setup again.
38
Page 39

First Time Settings
COPY
Changing the Time Zone
Change the time zone to match your location. The default setting is Paris. In addition, the camcorder is able to retain the date
and time of another location. This is convenient when you travel
so that you can set the camcorder to match the time of your
home location or that of your destination.
This section requires using the camcorder’s menus. For details
about how to use the menus, refer to Using the Menus
(A 43).
Shooting mode Playback
N
J L K ’ y }
I
1 Open the [Time Zone/DST] screen.
0 > [1 Other Settings] > q > [Time Zone/DST]
2 Touch ["] to set the home time zone, or [#] to set the
time zone of your destination when you are traveling.
3 Touch [Í] or [Î] to set the desired time zone. If nec-
essary, touch [$] to adjust for daylight saving time.
4 Touch [X] to close the menu.
39
Page 40

First Time Settings
COPY
Initializing a Memory Card
Initialize memory cards when you use them with this camcorder
for the first time. You can also initialize a memory card to permanently delete all the recordings it contains.
Shooting mode Playback
N
J L K ’ y }
I
1 Make sure the camcorder has sufficient power to com-
plete the operation.
• Insert a fully charged battery pack or use the optional
CA-110E Compact Power Adapter.
2 Set the power switch to ON to turn on the camcorder.
• The lens cover will open.
1
1
40
Page 41

First Time Settings
COPY
3 Initialize the memory card.
0 > [1 Other Settings] > q > [Initialize ] >
[Initialize] > [Complete Initialization]
> [X]
1
Touch this option if you want to physically erase all the data
rather than just clear the file allocation table of the memory card.
2
If you selected the [Complete Initialization] option, you can touch
[Cancel] to cancel the initialization while it is in progress. All
recordings will be erased and the memory card can be used
without any problem.
• Initializing a memory card will permanently erase all
recordings. Lost original recordings cannot be recovered. Make sure you save important recordings in
advance (A 130).
1
> [Yes]2 > [OK]
41
Page 42

Basic Operation of the Camcorder
COPY
Basic Operation of the Camcorder
Using the Touch Screen
The buttons and menu items that appear on the touch screen
change dynamically depending on the operating mode and the
task you are performing. With the intuitive touch screen interface
you have all the controls at your fingertips.
12
1 Touch
Touch on an element displayed on the touch screen.
Used to start playing back a scene in an index screen, to select
a setting from the menus, etc.
2 Drag
While touching the screen, swipe your finger up and down or left
and right across the screen.
Used to scroll menus, to browse through index screen pages or
to adjust slider controls like the volume.
42
Page 43

Basic Operation of the Camcorder
COPY
• In the following cases, you may not be able to perform
touch operations correctly.
- Using your fingernails or hard-tipped objects, such as
ballpoint pens.
- Operating the touch screen with wet or gloved hands.
- Applying excessive force with your finger.
Using the Menus
The 0 (Home) menu is the gateway to most of the camcorder’s
functions and settings. In recording mode, the 0 (Home) menu
offers immediate access to some frequently used functions. In
playback mode, it is from the 0 (Home) menu that you will
switch between the movies’ and photos’ index screens. In both
modes, from the 0 (Home) menu you can open the [1Other
Settings] menus for more detailed settings, and also access the
camcorder’s various Wi-Fi functions.
43
Page 44

Basic Operation of the Camcorder
COPY
■ 0 (Home) Menu
Recording mode Playback mode
1 Touch [0] on the bottom left corner (recording mode)
or top left corner (playback mode) of the screen to
open the 0 (Home) menu.
2 Drag your finger left/right to bring the desired menu to
the center.
• You can also touch [Ï] or [Ð] to move through the menu
icons.
3 Touch the icon of the desired menu to open it.
• See the following table for a description of each menu.
44
Page 45

Basic Operation of the Camcorder
COPY
Menu item
Description
[1 Other Settings] (A 48, 188)
Opens the [1 Other Settings] menus, which give you
access to various camcorder settings.
[Audio Scene]* (recording mode only) (A 109)
Optimize audio settings for your surroundings to get the
best possible sound.
[Special Rec Modes]* (recording mode only) (A 93)
Enjoy special recording modes, like slow and fast motion
and interval recording, to achieve unique effects.
[Shooting Mode]* (recording mode only) (A 89)
The camcorder features a number of shooting modes that
offer the most appropriate settings for a variety of special
scenes.
[ Flip/Rotate Image] (recording mode only) (A 107)
You can have the camcorder record a mirror image (flipped
horizontally) or automatically detect its position to rotate the
image during playback.
* For these menu items, the icon shown in the 0 (Home) menu indi-
cates, respectively, the shooting mode, special recording mode or
audio scene currently selected.
45
Page 46

Basic Operation of the Camcorder
COPY
Menu item
Description
[< Self Timer] (recording mode only) (A 101)
Convenient function to give you time to get in the picture
after setting up the camcorder.
[ Remote Control+Streaming] (recording mode only) (A 144)
Use your smartphone or tablet as a remote control to
record with the camcorder. You can also stream video from
the camcorder and record it on the smartphone or tablet.
[} Photo Playback] (playback mode only) (A 71)
Switches the camcorder to photo playback mode and
opens the [}] index screen.
[y Movie Playback] (playback mode only) (A 63)
Switches the camcorder to movie playback mode and
opens the [y] index screen.
[¦ Video Snapshot] (playback mode only) (A 63)
Switches the camcorder to movie playback mode and
opens the [¦] index screen, which displays only your
video snapshot scenes.
46
Page 47

Basic Operation of the Camcorder
COPY
Menu item
Description
[— Wi-Fi] (playback mode only) (A 137)
Allows you to access the various Wi-Fi functions, such as
uploading recordings to the Web or playing back recordings using a smartphone.
■ Using the Menus
Changing the camcorder’s various settings using the menus is
very easy. You make your selection simply by touching the button of the desired option. When they appear on the screen, you
can touch [K] to return to the previous screen or [X] to close
the menu.
In some screens, you will need to scroll to find the desired
option.
Some screens provide additional
information about the options. In
that case, simply drag your finger
up and down along the column of
icons.
47
Page 48

Basic Operation of the Camcorder
COPY
The [1 Other Settings] Menu
The [1 Other Settings] menus offer many options to control
various aspects of the camcorder’s operation. For details, refer
to the complete list of settings in the appendix [1 Other Set-
tings] Menus (A 188).
In the [1 Other Settings] menus, settings are organized under
submenus (tabs). For brevity’s sake, these settings are referenced throughout the manual like this: “1 > q >
[Language H]”. In this example (to change the language), you
will need to do the following:
1 Touch [0] to open the 0 (Home) menu.
2 Drag your finger left/right to bring [1 Other Settings]
to the center. Then, touch the icon to open the
[1 Other Settings] menus.
2
4
5
4
48
34
Page 49

Basic Operation of the Camcorder
COPY
3 Touch the tab of the desired menu.
4 Drag your finger up/down to bring the setting you want
to change into the orange selection bar.
• You can also use the [Í] and [Î] icons for scrolling.
• Menu items not available appear grayed out.
• You can touch any menu item or its corresponding icon to
bring it directly into the selection bar.
5 When the desired menu item is inside the selection bar,
touch [æ].
6 Touch the desired option and touch [X].
• You can touch [X] to close the menu at any time.
Operating Modes
In this manual, the camcorder’s operating modes are indicated
with a bar of icons. A full icon in blue (N) indicates that the
function described can be used in that particular operating
mode; a grayed-out icon (}) indicates the function is not available in that operating mode. Icons are divided into recording and
playback modes.
Shooting mode Playback
N
I
J L K ’ y }
49
Page 50

Basic Operation of the Camcorder
COPY
■ Recording
When you set the power switch to ON, the camcorder will turn
on in recording mode. In recording mode, the camcorder’s operating mode is determined by the selected shooting mode
(A 89). The shooting mode icons are the same icons used in
the shooting mode selection screen.
■ Playback
1
1
Press and hold the ^ button to switch the camcorder between
recording mode and playback mode.
In the bar of operating mode icons, the y icon refers to playing
back movies, whether from the [y] index screen (all scenes) or
from the [¦] index screen (only video snapshot scenes)
(A 63). The } icon refers to viewing photos from the [}]
index screen (A 71).
50
Page 51

Basic Recording and Playback
COPY
Basic Recording
This section covers how to easily record video and photos
in N mode. To record using other shooting modes, use
52
more advanced functions and enjoy full access to all menu
settings, refer to Advanced Functions (A 84).
Basic Playback
This section covers how to play back, trim and delete
63
movies and how to view photos (including in slideshow
mode) and delete them.
51
Page 52

Basic Recording
COPY
Basic Recording
Recording Video
With N mode, you can take great-looking videos by letting
the camcorder automatically adjust settings. N mode is
therefore used as an example in the following procedure. You
can select a different shooting mode according to the shooting
conditions (A 89).
Shooting mode Playback
N
• Before you begin recording, make a test recording
first to check that the camcorder is operating correctly.
J L K ’ y }
I
2
1
1
3
3
52
2
Shooting mode
button
Page 53

Basic Recording
COPY
1 Set the power switch to ON to turn on the camcorder.
• The lens cover will open.
• Place and adjust the camcorder as necessary. If shooting
with the camcorder hand-held, be careful not to obstruct
the lens.
2 Set the camcorder to N mode.
Touch the shooting mode button > [N Auto] > [OK]
• This step is not necessary the first time you use the camcorder.
3 If necessary, change the field of view (ultra wide or
close-up).
• Refer to Changing the Field of View (A 55). The default
field of view is ultra wide angle.
53
Page 54

Basic Recording
COPY
4
4
4
4 Touch [Ü] to begin recording.
• Movies have an aspect ratio of 16:9. When the recording
starts, the onscreen display will change to letterbox mode.
• The ACCESS indicator will flash from time to time while the
scene is being recorded.
5 Touch [Ñ] to stop recording.
When you have finished recording
Make sure the ACCESS indicator is off and set the power switch
to OFF.
54
Page 55

Basic Recording
COPY
■ Changing the Field of View
The camcorder features an ultra wide angle lens so you can
capture a vast field of view (about 160° for video, about 170° for
photos), for example to include a large group in a fisheye-like
image. Alternatively, you can enlarge the center of the screen for
a closer view.
Touch [ ] to enlarge the center of the screen (close-up).
Touch [ ] to return to the default field of view (ultra wide).
(ultra wide) (close up)
55
Page 56

Basic Recording
COPY
About AUTO mode
• Only the following functions are available in N mode.
- Video snapshot (A 99).
- Face detection and tracking (A 116) to get the best
exposure when a person’s face is detected.
- Decoration (A 102) to add a fun personal touch using
stamps and drawings.
About the Smart AUTO function
In N mode, the camcorder will automatically detect certain characteristics of the subject, background, lighting conditions, etc.* It will then adjust the exposure and color,
selecting the best settings for the scene you want to shoot.
The icon in the shooting mode button will automatically
change to one of the following Smart AUTO icons.**
* Under certain conditions, the Smart AUTO icon that appears on the
screen may not match the actual scene. Especially when shooting
against orange or blue backgrounds, the Sunset or one of the Blue
Skies icons may appear and the colors may not look natural. In such
case, we recommend recording in ’ mode (A 89).
** There are times when the Smart AUTO function cannot detect the
subject, such as during interval recording or when you touch a subject’s face for face detection. In such case, N will be displayed as
the Smart AUTO icon.
56
Page 57

Basic Recording
COPY
Smart AUTO icons
Background
( )
( )
Background
( )
( )
Dark +
Spotlight
Subject
People (stationary)
People (moving)
Subjects other than people, such as landscapes
* The icon in parentheses appears under backlight conditions.
Subject
People (stationary) — —
People (moving)
Subjects other than people, such as landscapes
• In order to protect the lens, turn off the camcorder after
you have finished recording to keep the lens cover
closed.
Bright* Blue skies* Vivid colors*
( )
( )
( ) ( ) ( )
Sunset Dark
—
—
57
Page 58

Basic Recording
COPY
• Observe the following precautions while the ACCESS
indicator is on or flashing. Failing to do so may result in
permanent data loss or damage to the memory card.
- Do not remove the memory card.
- Do not disconnect the power source or turn off the
camcorder.
- Do not press and hold the ^ button.
• Be sure to save your recordings regularly (A 130),
especially after making important recordings. Canon
shall not be liable for any loss or corruption of data.
• If a subject is too close to the camcorder, it may not be
able to focus correctly. You can set the shooting mode
to (A 89) to be able to focus a subject at a distance of only 20 cm from the camcorder.
•If 1 > q > [Auto Power Off] is set to [i On],
the camcorder will shut off automatically to save power
when it is powered by a battery pack and is left without
any operation for 3 minutes. Should this happen, set
the power switch to OFF and then ON again to turn the
camcorder back on.
58
Page 59

Basic Recording
COPY
• When recording in bright places, it may be difficult to
use the LCD screen. In such cases, you can adjust the
LCD backlight with the 1 > t > [LCD Back-
light] setting or adjust the brightness of the LCD screen
with the 1 > t > [LCD Brightness] setting.
• In order to save power, the image shown on the screen
in record standby mode is less detailed than the image
that will actually be recorded.
• Using the optional SP-V1 Splashproof Case is recommended to operate the camcorder with wet hands, for
example when recording in the kitchen. Available functions and operations are limited when the camcorder is
protected by the splashproof case.
Tak i n g Ph o t o s
You can easily take photos with the camcorder. In the following
procedure, N mode is used as an example but you can
select a different shooting mode according to the shooting conditions (A 89).
Shooting mode Playback
N
I
J L K ’ y }
59
Page 60

Basic Recording
COPY
1 Set the power switch to ON to turn on the camcorder.
• The lens cover will open.
• Place and adjust the camcorder as necessary. If shooting
with the camcorder hand-held, be careful not to obstruct
the lens.
1
2
3
3
1
2
Shooting mode
button
2 Set the camcorder to N mode.
Touch the shooting mode button > [N Auto] > [OK]
• This step is not necessary the first time you use the camcorder.
3 If necessary, change the field of view and photo size.
• Refer to Changing the Field of View (A 55) and Select-
ing the Photo Size (A 88).
60
Page 61

Basic Recording
COPY
4, 5 5
5
4, 5
4 Press the photo button halfway to lock the exposure.
• The camcorder will beep and automatically adjust the
exposure.
• and the aperture value and shutter speed will appear
on the screen.
5 Press the photo button fully to take a photo.
• You will hear the shutter release and another beep. The
ACCESS indicator will also flash as the photo is recorded.
• Photos have an aspect ratio of 4:3.
When you have finished taking photos
Make sure the ACCESS indicator is off and set the power switch
to OFF.
61
Page 62

Basic Recording
COPY
The information in the sidebars, (important precautions) and (additional notes) sections in the previous
pages (A 56-59) apply also to photo shooting.
• Photos can only be recorded in record standby mode.
62
Page 63

Basic Playback
COPY
Basic Playback
Playing Back Video
Shooting mode Playback
N
1
Press and hold the ^ button until an index screen
1
appears.
• The index screen that appears depends on the last
recording made. When turning on the camcorder directly
or if you were recording a movie, the [y] index screen will
appear; if you were recording a video snapshot scene, the
[¦] index screen will appear; if you just recorded a photo,
the [}] index screen will appear.
J L K ’ y }
I
1
63
Page 64

Basic Playback
COPY
• If you want to switch to a different index screen, use the
0 (Home) menu.
To play back all the movies:
Touch 0 > [y Movie Playback] to open the
[y] index screen.
To play back only video snapshot scenes:
Touch 0 > [¦ Video Snapshot] to open the
[¦] index screen.
Visual bar shows
the relative location of the current index screen.
2a
2a
2b
Folder name. The last four
digits represent the recording
date (1103 = 3 November).
2b
2 Look for the scene you want to play back.
• Drag your finger right/left (2a) or touch [Ï] or [Ð] (2b) to
display the previous/next index screen.
64
Page 65

Basic Playback
COPY
3 Touch the desired scene to play it back.
• The camcorder will play back the scene selected and continue until the end of the last scene in the index screen.
• Touch the screen to display the playback controls. During
playback, the playback controls will disappear automatically after a few seconds without operation.
To adjust the volume
1 During playback, touch the screen to display the play-
back controls.
2 Touch [ ], drag your finger along the [Speaker Volume]
bar, or repeatedly touch the speaker icon on either end
of it, to adjust the volume and touch [K].
Playback controls
Playback Playback pause
1
2
3
4
5
6
12
13
9871011
65
14
Page 66

Basic Playback
COPY
1 Mirror image playback.
2 Repeat playback.
3 Stop the playback.
4 Jump to the beginning of the scene. Double-tap to jump to
the previous scene.
5 Pause the playback.
6 Volume control.
7 Decoration (A 102).
8 Capture a video snapshot scene (A 119).
9 Fast playback* backward/forward.
10 Recording date.
11 Jump to the beginning of the next scene.
12 Resume the playback.
13 Capture the displayed frame as a photo (A 121).
14 Slow playback** backward/forward.
* Touch several times to increase the playback speed to 5x → 15x →
60x normal speed.
** Touch several times to increase the playback speed to 1/8x → 1/4x
normal speed.
66
Page 67

Basic Playback
COPY
■ The Scene Information Screen
On the scene information screen you can check various details,
including the scene’s length, date and time of recording and
video quality.
1 In the [y] or [¦] index screen, touch [I] and then
touch the desired scene.
• The [Scene Info] screen appears.
• Touch [Ï]/[Ð] to select the previous/next scene.
2 Touch [K] twice to return to the index screen.
■ Repeat Playback
During playback of the desired scene:
Touch the screen to display the playback controls > [Ý] >
[] > [Ð]
• The same scene will be played back in a loop. Repeat the procedure to return to normal playback. Stopping the playback
will also cancel the repeat playback setting.
67
Page 68

Basic Playback
COPY
■ Mirror Image Playback
During playback of the desired scene:
Touch the screen to display the playback controls > []
• The image will be flipped left to right. Repeat the procedure to end the mirror image playback.
68
Page 69

Basic Playback
COPY
The ^ button
When the camcorder is turned on, press and hold the ^
button to switch back and forth between playback and
recording mode.
• When the camcorder is off, you can press and hold the
^ button to turn it on directly in playback mode.
• When 1 > q > [SP-V1 Mode] is set to [i On],
playback mode is not available. Instead, you can press
the ^ button to review once the last scene or photo*
recorded with the camcorder.
* In the instruction manual supplied with the optional SP-V1
Splashproof Case, the review function is explained as applying
only to movies, but with this camcorder you can review the
last scene or photo recorded.
69
Page 70

Basic Playback
COPY
• Observe the following precautions while the ACCESS
indicator is on or flashing. Failing to do so may result in
permanent data loss.
- Do not remove the memory card.
- Do not disconnect the power source or turn off the
camcorder.
- Do not press and hold the ^ button.
• You may not be able to play back with this camcorder
movies recorded on or copied onto a memory card
using another device.
• You can use the 1 > t > [Display Date/Time]
setting to choose whether to display the recording date
when you play back scenes.
• Depending on the recording conditions, you may notice
brief stops in video or sound playback between scenes.
• During fast/slow playback, you may notice some anomalies (blocky video artifacts, banding, etc.) in the playback picture. Also, sound will not be output.
• The speed indicated on the screen is approximate.
• Slow reverse playback will look the same as continuous
frame reverse.
70
Page 71

Basic Playback
COPY
• Sound will not be output from the built-in speaker while
the optional HTC-100 High Speed HDMI cable is connected to the camcorder.
Viewing Photos
Shooting mode Playback
N
Press and hold the ^ button to turn on the camcorder
1
in playback mode.
•The [y] index screen will appear.
J L K ’ y }
I
1
1
2 Open the [}] index screen.
71
Page 72

Basic Playback
COPY
0 > [} Photo Playback]
Visual bar shows
the relative location of the current index screen.
3a
3a
3b
Folder name. The last four
digits represent the recording
date (1103 = 3 November).
3b
3 Look for the photo you want to view.
• Drag your finger right/left (3a) or touch [Ï] or [Ð] (3b) to
display the previous/next index screen.
4 Touch the photo you want to view.
• The photo is displayed in single photo view.
• Drag your finger left/right to browse through the photos
one by one.
• To return to the [}] index screen:
Touch the screen to display the playback controls > [f]
72
Page 73

Basic Playback
COPY
■ Photo Jump Function
When you have recorded a large number of photos, you can
jump easily through the photos using a scroll bar.
1 In single photo view, display the [Photo Jump] scroll
bar.
Touch the screen to display the playback controls > [h]
2 Touch [Ï] or [Ð], or drag your finger along the scroll
bar to find the desired photo.
3 Touch [K] to return to single photo view.
■ Magnifying Photos in Playback
1 In single photo view, select the photo you want to mag-
nify.
2 Magnify the photo.
Touch the screen to display the playback controls > []
• The center of the photo is magnified approximately 2
times.
73
Page 74

Basic Playback
COPY
• Touch [ ] to magnify the image further. Touch [ ] to
reduce the magnification.
• Drag your finger along the magnified area to check other
parts of the photo. The white square within the frame represents the approximate location of the portion of the
photo that is shown magnified.
3 Touch [K] to cancel the magnified view and return to
single photo view.
• You can also touch [ ] repeatedly until the magnified
view is canceled.
• Observe the following precautions while the ACCESS
indicator is on or flashing. Failing to do so may result in
permanent data loss.
- Do not remove the memory card.
- Do not disconnect the power source or turn off the
camcorder.
- Do not press and hold the ^ button.
• The following image files may not be displayed correctly
with this camcorder if they were recorded on or copied
onto a memory card using another device.
- Images not recorded with this camcorder.
- Images edited on a computer.
- Images whose file names have been changed.
74
Page 75

Basic Playback
COPY
Deleting Scenes
You can delete those scenes that you are not interested in keeping. Deleting scenes allows you also to free up space on the
memory card.
Shooting mode Playback
N
■ Deleting a Single Scene
1 Play back the scene you want to delete (A 63).
2 Pause the playback.
Touch the screen to display the playback controls > [Ý]
J L K ’ y }
I
3 Delete the scene.
[Edit] > [Delete] > [Yes] > [OK]
75
Page 76

Basic Playback
COPY
■ Deleting Scenes from the Index Screen
1 Open the [y] or [¦] index screen (A 63).
• To delete all the scenes saved in the same folder (recorded
on the same date), drag your finger left/right until a scene
you want to delete appears.
2 Delete the scenes.
[Edit] > [Delete] > Desired option* > [Yes]** > [OK]
* When you select [Select], perform the following procedure to
select the individual scenes you want to delete before touching
[Yes].
** Touch [Stop] to interrupt the operation while it is in progress.
Some scenes may be deleted nevertheless.
To select individual scenes
1 Touch on the individual scenes you want to delete.
• A checkmark ! will appear on the scenes you touch. The
total number of selected scenes will appear next to the "
icon.
• Touch a selected scene to remove the checkmark. To
remove all checkmarks at once, touch [Remove All] >
[Yes].
2 After selecting all the desired scenes, touch [OK].
76
Page 77

Basic Playback
COPY
Options
[<folder name>]:
Delete all the scenes recorded on a particular date that are
stored in the same folder. The last four digits of the folder name
that appears in the button indicate the date the folder was created (ex. 1103 = 3 November).
[Select]:
Select individual scenes to delete.
[All Scenes]:
Delete all the scenes.
• Be careful when deleting recordings. Once deleted,
scenes cannot be recovered.
• Save copies of important scenes before deleting them
(A 130).
• Observe the following precautions while the ACCESS
indicator is on or flashing (while scenes are being
deleted).
- Do not remove the memory card.
- Do not disconnect the power source or turn off the
camcorder.
- Do not press and hold the ^ button.
77
Page 78

Basic Playback
COPY
• To delete all movies and make all recordable space
available again you may prefer to initialize the memory
card (A 40).
Trimming Scenes
You can trim scenes by removing everything up to a certain
point or everything after a certain point. By doing so, you leave
only memorable moments to keep for posterity.
Shooting mode Playback
N
J L K ’ y }
I
1 Play back the scene you want to trim (A 63).
2 At the point where you want to trim the scene, open the
scene trimming screen.
Touch the screen to display the playback controls > [Ý]
> [Edit] > [Trim]
3 Bring the scene to a precise point, if necessary.
• The point at which the movie will be trimmed is indicated
by the ´ marker.
78
Page 79

Basic Playback
COPY
• Playback controls will appear on the screen (A 65). Use
any special playback modes (fast playback, frame reverse/
advance) as necessary to locate the desired point.
4 Trim the scene.
[Trim] > [Trim Before Marker] or [Trim After Marker] >
[Save as New] or [Overwrite]
• You can select whether to trim the part before or after the
´ marker and whether to save the remaining part of the
video as a new scene (keeping the original scene) or to
overwrite the original scene.
• Touch [Stop] to interrupt the operation while it is in
progress.
• You may not be able to correctly trim scenes that were
recorded on or copied onto a memory card using
another device.
• Interval scenes with the icon cannot be trimmed.
79
Page 80

Basic Playback
COPY
Deleting Photos
You can delete those photos that you are not interested in keeping.
Shooting mode Playback
N
■ Deleting a Single Photo
1 In single photo view, select the photo you want to
delete.
2 Touch the screen to display the playback controls.
3 Delete the photo.
J L K ’ y }
I
[Edit] > [Delete] > [¸ Proceed] > [Yes]
4 Drag your finger left/right to select another photo to
delete or touch [X].
80
Page 81

Basic Playback
COPY
■ Deleting Photos from the Index Screen
1 Open the [}] index screen (A 71).
• To delete all the photos saved in the same folder (recorded
on the same date), drag your finger left/right until a photo
you want to delete appears.
2 Delete the photos.
[Edit] > [Delete] > Desired option* > [Yes]** > [OK]
* When you select [Select], perform the following procedure to
select the individual photos you want to delete before touching
[Yes].
** Touch [Stop] to interrupt the operation while it is in progress.
Some photos will be deleted nevertheless.
To select individual photos
1 Touch the individual photos you want to delete.
• A checkmark ! will appear on the photos you touch. The
total number of selected photos will appear next to the "
icon.
• Touch a selected photo to remove the checkmark. To
remove all checkmarks at once, touch [Remove All] >
[Yes].
2 After selecting all the desired photos, touch [OK].
81
Page 82

Basic Playback
COPY
Options
[<folder name>]:
Delete all the photos taken on a particular date. The last four
digits of the folder name that appears in the button indicate the
date the folder was created (ex. 1103 = 3 November).
[Select]:
Select individual photos to delete.
[All Photos]:
Delete all the photos.
• Be careful when deleting photos. Deleted photos can-
not be recovered.
• Photos that were protected with other devices and then
transferred to the memory card when it was connected
to a computer cannot be deleted with this camcorder.
82
Page 83

Basic Playback
COPY
Slideshow
You can play a slideshow of all the photos.
Shooting mode Playback
N
J L K ’ y }
I
1 Open the [}] index screen (A 71).
2 Touch the photo that will open the slideshow to display
it in single photo view.
3 Start the slideshow.
Touch the screen to display the playback controls > [Ð]
• During the photo slideshow, touch the screen and touch
[Ý] to stop the slideshow.
To change the slideshow’s transition effects from the index
screen
0 > [1 Other Settings] > > [Slideshow Transi-
tion] > [j Off], [k Dissolve] or [l Slide Image] >
[X]
83
Page 84

86
COPY
93
101
Advanced Functions
Video Quality and Shooting Modes
This section explains how to change the video quality of
your recordings and how to use the camcorder’s various
shooting modes to get perfect recordings when you are
shooting fashion scenes, dance training sessions, night
scenes or many other special scenes.
Special Recording Modes
This section explains how you can use interval recording
to create time-lapse scenes, slow and fast motion for
unique recordings, or video snapshot scenes for a fastpaced, interesting video clip.
Convenient Functions
This section introduces some of the camcorder’s functions
that you may find convenient in special situations. For
example, self timer, fun decorations for your scenes, mirror
image recording and audio scene selection.
84
Page 85

111
COPY
When You Want More Control
This section explains functions you can use when you
want more control over how your recordings look. It is
more oriented for advanced users and covers functions
such as white balance and exposure compensation.
85
Page 86

Video Quality and Shooting Modes
COPY
Video Quality and Shooting Modes
Selecting the Video Quality
The camcorder offers three video quality options (bit rates*) for
recording movies. Select 24 Mbps for higher video quality; select
4 Mbps for longer recording times or smaller file sizes. The table following the procedure (A 87) gives approximate recording times.
* Bit rate (measured in Mbps) indicates how much information is
recorded in 1 second of video and therefore affects also the recording
time available on the memory card.
Shooting mode Playback
N
0 > [1 Other Settings] > p > [Video Quality] >
Desired video quality > [X]
J L K ’ y }
I
86
Page 87

Video Quality and Shooting Modes
COPY
Approximate recording times
Video quality (Resolution)
Memory card
8 GB 40 min. 1 hr. 4 hr. 20 min.
16 GB 1 hr. 25 min. 2 hr. 5 min. 8 hr. 40 min.
32 GB 2 hr. 55 min. 4 hr. 10 min. 17 hr. 20 min.*
64 GB 5 hr. 55 min. 8 hr. 20 min. 34 hr. 45 min.*
* Using the optional CA-110E Compact Power Adapter, a single scene
can be recorded continuously for 12 hours. After that, recording will
continue as a separate scene.
• Depending on the device used, you may not be able to
play back your recordings on other devices.
• The camcorder uses a variable bit rate (VBR) to encode
video so the actual recording times will vary depending
on the content of the scenes.
• Long scenes, whose video data exceeds 4 GB, will be
recognized as multiple files on other devices.
24 Mbps
(1920x1080)
17 Mbps
(1920x1080)
4 Mbps
(1280x720)
87
Page 88

Video Quality and Shooting Modes
COPY
Selecting the Photo Size
Photos are recorded as JPG files. The camcorder offers three
photo sizes but the photo quality cannot be changed. As a general rule, select a larger photo size for higher quality.
Shooting mode Playback
N
0 > [1 Other Settings] > p > [Photo Size] >
Desired option > [X]
J L K ’ y }
I
Approximate number of photos available on
a 4 GB memory card
Photo size Number of photos
[ 4000x3000]
[n 1920x1440] 3,200
[ 640x480] 23,500
• Even if the photo size was set to , it will change auto-
matically to n size when you set the field of view to
close-up.
88
750
Default value
Page 89

Video Quality and Shooting Modes
COPY
Selecting the Shooting Mode
In addition to N mode, the camcorder features a number of
shooting modes that offer the most appropriate settings for a
variety of special scenes. You can also use the ’ shooting
mode when you want the camcorder to set the exposure automatically but control manually some advanced settings.
Shooting mode Playback
N
Shooting mode button
J L K ’ y }
I
1 Touch the shooting mode button on the top left corner
of the screen.
• The button will show the icon of the shooting mode currently selected. If the camcorder is set to N mode, the
button will show one of the Smart AUTO icons (A 57).
• Alternatively, you can open the shooting mode selection
screen from the 0 (Home) menu: 0> [Shooting Mode].
89
Page 90

Video Quality and Shooting Modes
COPY
2 Drag your finger up/down to bring the desired shooting
mode to the center and then touch [OK].
Options ( Default value;
[ Macro] (ƒ)
The camcorder can focus at a shorter distance,
allowing you to get closer shots of flowers or
insects. Close subjects will also stand out more
because of the fisheye effect of the ultra wide
angle lens.
[N Auto]
Let the camcorder take care of most of the settings while you concentrate on recording (A 52).
Great for beginners or if you just prefer not to
bother with detailed camcorder settings.
[ Food and Fashion] (ƒ)
To record fashion or food related scenes with
vivid colors.
[I Sports] (ƒ)
To record scenes with lots of movement, such
as sport events and dance scenes.
ƒ
- special scene shooting mode)
90
Page 91

Video Quality and Shooting Modes
COPY
[J Night Scene] (ƒ)
To record nightscapes with lower noise.
[L Beach] (ƒ)
To record on a sunny beach without the subject
being underexposed.
[K Snow] (ƒ)
To record in bright ski resorts without the subject being underexposed.
[’ Programmed AE]
The camcorder automatically sets the shutter
speed and aperture but you have the option to
adjust the white balance (A 111) and exposure (A 113).
91
Page 92

Video Quality and Shooting Modes
COPY
•[I Sports]/[L Beach]/[K Snow]: The picture may
not appear smooth during playback.
•[L Beach]/[K Snow]: The subject may become over-
exposed on cloudy days or in shaded places. Check
the image on the screen.
• [ Macro]: The camcorder can focus on a subject as
close as 20 cm.
92
Page 93

Special Recording Modes
COPY
Special Recording Modes
Interval Recording
You can easily set the camcorder to record half a second of
video or a photo at fixed intervals from 5 seconds to 10 minutes.
When recording video using interval recording, you can join all
these short bits of video (interval scenes) into a single time-lapse
scene that captures the passage of time.
Sound is not recorded in this special recording mode.
Shooting mode Playback
N
1 Make sure the camcorder has sufficient power to com-
plete the operation.
• Insert a fully charged battery pack or use the optional
CA-110E Compact Power Adapter.
2 Activate interval recording.
0 > [Special Rec Modes] > [ Interval Recording]
> [OK]
J L K ’ y }
I
• The default recording interval is 5 seconds. Before touching [OK], you can change the recording interval with the
following procedure.
93
Page 94

Special Recording Modes
COPY
• and the selected interval length will appear on the
screen. Also, the remaining video recording time will automatically be reduced by about half.
3 Start recording with interval recording.
• Movies: Touch [Ü] to record the first video.
Photos: Press the photo button, first halfway, then fully.
• The camcorder will continue recording interval scenes or
photos at the set interval. The number of videos/photos
recorded so far, and a countdown until the next recording
is made will be displayed on the screen.
4 Press and hold the ^ button and then touch [Yes] to
end interval recording mode.
• Interval recording mode will end. If you were recording a
series of photos, the rest of the procedure is not necessary.
• If you were recording video, continue the procedure to join
all the interval scenes into a single time-lapse scene.
5 Touch [Yes] to join the interval scenes.
• If you prefer to join the interval scenes later on, touch [No]
instead. The rest of the procedure is not necessary.
• You can touch [Stop] > [OK] to interrupt the operation
while it is in progress. The index screen will appear, displaying the folder where the interval scenes are saved.
6 Touch [OK].
94
Page 95

Special Recording Modes
COPY
7 Touch [Yes] to delete the original interval scenes.
• If you prefer to keep the original interval scenes even after
they were successfully joined, touch [No] instead.
• You can touch [Stop] to interrupt the operation while it is in
progress.
8 Touch [OK].
• A new time-lapse scene, created from all the interval
scenes, will be added to the [y] index screen.
To change the recording interval
You can change the recording interval while activating interval
recording (from the [ Interval Recording] selection screen) or
from the record standby screen after interval recording is activated.
[w] > Desired interval > [K]
To join interval scenes later on
Even if you did not join videos recorded using interval recording
immediately after recording them, you can do so at a later date.
1 Open the [y] index screen (A 63).
2 Touch an interval scene marked with the icon.
95
Page 96

Special Recording Modes
COPY
3 Touch [Join] and continue from step 5 in the previous
procedure (A 94).
• Face detection and tracking, decoration, exposure
adjustment and Wi-Fi functions cannot be used during
interval recording.
• The maximum recording time from the point recording
begins to the point it ends is as follows. The maximum
recording time in interval recording mode depends on
the selected recording interval.
Recording interval Maximum recording time*
5 sec., 10 sec., 30 sec. 3 hours
1 min. 6 hours
10 min. 60 hours
* When the camcorder is being powered by a battery pack,
depending on the remaining battery charge, the actual
interval recording time may be shorter.
• Depending on the memory card used, writing on the
memory card may take longer, and the actual recording
interval may be longer than the recording interval that
was selected.
96
Page 97

Special Recording Modes
COPY
• When you select a recording interval of 30 seconds or
longer, the camcorder will enter standby mode when it
is not recording in order to save power. In standby
mode the screen will turn off and the power indicator
will light up in red.
Slow and Fast Motion
You can use slow motion or fast motion to record movies with a
unique look. Sound is not recorded in this special recording
mode.
Shooting mode Playback
N
J L K ’ y }
I
1 Activate slow/fast motion.
0 > [Special Rec Modes] > [ Slow Motion] or
[ Fast Motion] > [OK]
• Before touching [OK], you can change the playback speed
with the following procedure.
• or and the selected speed will appear on the
screen.
97
Page 98

Special Recording Modes
COPY
2 Touch [Ü]/[Ñ] to record scenes in slow/fast motion.
To change the playback speed
You can change the playback speed while activating slow/fast
motion (from the [ Slow Motion]/[ Fast Motion] selection
screen) or from the record standby screen after slow/fast motion
is activated.
[w] > Desired speed > [K]
• Using the optional CA-110E Compact Power Adapter,
the maximum continuous recording time using slow
motion is 6 hours ([x1/2] speed) or 3 hours ([x1/4]
speed). After that, recording will continue as a separate
scene.
• When recording using slow motion, the video quality will
change automatically to 4 Mbps/1280x720 ([x1/2]
speed) or 3 Mbps/640x360 ([x1/4] speed).
98
Page 99

Special Recording Modes
COPY
Video Snapshot
You can record a series of short scenes, each a few seconds
long. When you play the video snapshot scenes one after the
other, this will result in fast-paced, dynamic video. You can also
record a video snapshot scene every time you record a photo.
Shooting mode Playback
N
J L K ’ y }
I
1 Activate video snapshot.
0 > [Special Rec Modes] > [¦ Video Snapshot] >
[OK]
• ¦ and the video snapshot length currently selected, and
a blue border appear on the screen.
2 To record only a video snapshot scene: Touch [Ü].
• The camcorder records for about 4 seconds (the blue
frame serves as a visual progress bar) and then automatically returns to record standby mode.
99
Page 100

Special Recording Modes
COPY
3 To record a photo along with a video snapshot scene:
Press the photo button, first halfway, then fully.
• The camcorder records a photo and about 4 seconds of
video after that. Then, the camcorder returns to record
standby mode.
• You can change the length of the video snapshot
scenes recorded to 2 or 8 seconds with the 1 >
p > [Video Snapshot Length] setting.
• During video snapshot recording, the recording of the
video snapshot scene will start immediately after a
photo is recorded. The photo will not be displayed for
review, regardless of the 1 > p > [Photo
Review Time] setting.
100
 Loading...