

Page 1
Laser Beam Printer
User's Guide
User's Guide
Page 2

Contents
Tu r ning the Printer ON/OFF (For 5910/5910F) . . . . . . . . . . . . . . . . . . . . . . . . . . 3
Tu r ning the Printer ON . . . . . . . . . . . . . . . . . . . . . . . . . . . . . . . . . . . . . . . . . . . . . . . . . . 3
Tu r ning the Printer OFF . . . . . . . . . . . . . . . . . . . . . . . . . . . . . . . . . . . . . . . . . . . . . . . . . 4
When Not Using a Hard Disk . . . . . . . . . . . . . . . . . . . . . . . . . . . . . . . . . . . . . . . . . . . . . .5
When Using a Hard Disk (Only When a Hard Disk is Installed) . . . . . . . . . . . . . . . . . . . .6
Tu r ning the Printer ON/OFF (For LBP5610) . . . . . . . . . . . . . . . . . . . . . . . . . . . . 8
Tu r ning the Printer ON . . . . . . . . . . . . . . . . . . . . . . . . . . . . . . . . . . . . . . . . . . . . . . . . . . 8
Tu r ning the Printer OFF . . . . . . . . . . . . . . . . . . . . . . . . . . . . . . . . . . . . . . . . . . . . . . . . . 9
Online and Offline (Only for LBP5910/5910F) . . . . . . . . . . . . . . . . . . . . . . . . . . 10
Placing the Printer Online . . . . . . . . . . . . . . . . . . . . . . . . . . . . . . . . . . . . . . . . . . . . . . . 10
Placing the Printer Offline . . . . . . . . . . . . . . . . . . . . . . . . . . . . . . . . . . . . . . . . . . . . . . . 11
Paper Requirements . . . . . . . . . . . . . . . . . . . . . . . . . . . . . . . . . . . . . . . . . . . . . 12
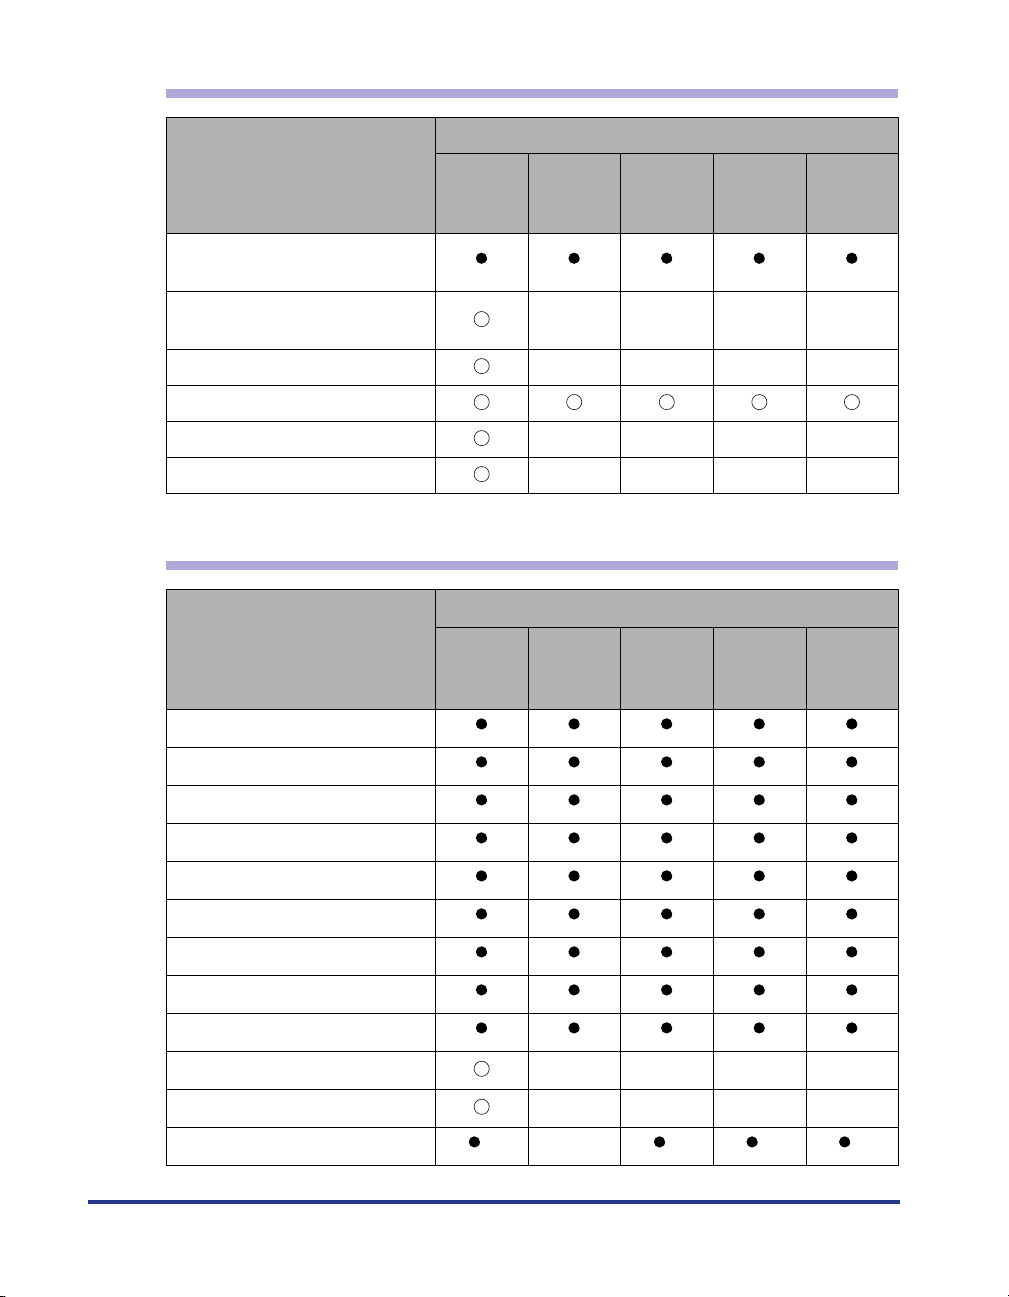
Usable Paper. . . . . . . . . . . . . . . . . . . . . . . . . . . . . . . . . . . . . . . . . . . . . . . . . . . . . . . . . 12
Paper Size for LBP5910/5910F . . . . . . . . . . . . . . . . . . . . . . . . . . . . . . . . . . . . . . . . . . .12
Paper Type for LBP5910/5910F . . . . . . . . . . . . . . . . . . . . . . . . . . . . . . . . . . . . . . . . . . .14
Paper Size for LBP5610 . . . . . . . . . . . . . . . . . . . . . . . . . . . . . . . . . . . . . . . . . . . . . . . . .14
Paper Type for LBP5610 . . . . . . . . . . . . . . . . . . . . . . . . . . . . . . . . . . . . . . . . . . . . . . . .15
Printable Area . . . . . . . . . . . . . . . . . . . . . . . . . . . . . . . . . . . . . . . . . . . . . . . . . . . . . . . . 21
Unusable Paper. . . . . . . . . . . . . . . . . . . . . . . . . . . . . . . . . . . . . . . . . . . . . . . . . . . . . . . 23
Paper Capacity of Paper Source. . . . . . . . . . . . . . . . . . . . . . . . . . . . . . . . . . . . . . . . . . 25
Paper Capacity of the Output Tray . . . . . . . . . . . . . . . . . . . . . . . . . . . . . . . . . . . . . . . . 25
Loading Paper in the Paper Cassette . . . . . . . . . . . . . . . . . . . . . . . . . . . . . . . . 27
When Loading Paper in Cassette 1 . . . . . . . . . . . . . . . . . . . . . . . . . . . . . . . . . . . . . . . 27
When Loading Standard Size Paper in Cassette 2, 3, or 4 . . . . . . . . . . . . . . . . . . . . . 36
When Loading Custom Size Paper (Non-Standard Size Paper) in Cassette 2, 3, or 4
. . . . 45
Loading Paper in the Multi-purpose Tray . . . . . . . . . . . . . . . . . . . . . . . . . . . . . . 54
When Loading Paper (Other than Postcards and Envelopes). . . . . . . . . . . . . . . . . . . . 55
When Loading Postcards (Only for LBP5910/5910F) . . . . . . . . . . . . . . . . . . . . . . . . . . 60
When Loading Envelopes . . . . . . . . . . . . . . . . . . . . . . . . . . . . . . . . . . . . . . . . . . . . . . . 64
Paper Loading Orientation . . . . . . . . . . . . . . . . . . . . . . . . . . . . . . . . . . . . . . . . . 70
Paper Jams . . . . . . . . . . . . . . . . . . . . . . . . . . . . . . . . . . . . . . . . . . . . . . . . . . . . 72
Precautions on Clearing Paper Jams . . . . . . . . . . . . . . . . . . . . . . . . . . . . . . . . . . . . . . 72
Paper Jam Area . . . . . . . . . . . . . . . . . . . . . . . . . . . . . . . . . . . . . . . . . . . . . . . . . . . . . . 74
Procedure for Clearing Paper Jams . . . . . . . . . . . . . . . . . . . . . . . . . . . . . . . . . . . . . . . 76
1
Page 3

2
Staple Jams (Only for LBP5910F) . . . . . . . . . . . . . . . . . . . . . . . . . . . . . . . . . . . 92
Precautions on Clearing Staple Jams . . . . . . . . . . . . . . . . . . . . . . . . . . . . . . . . . . . . . 92
Procedure for Clearing Staple Jams . . . . . . . . . . . . . . . . . . . . . . . . . . . . . . . . . . . . . . 93
Replacing the Toner Cartridges . . . . . . . . . . . . . . . . . . . . . . . . . . . . . . . . . . . . 100
When a Message Appears. . . . . . . . . . . . . . . . . . . . . . . . . . . . . . . . . . . . . . . . . . . . . 100
Precautions on Replacing the Toner Cartridges . . . . . . . . . . . . . . . . . . . . . . . . . . . . 102
Replacing the Toner Cartridges . . . . . . . . . . . . . . . . . . . . . . . . . . . . . . . . . . . . . . . . . 102
Resetting the Counter of Toner Cartridges . . . . . . . . . . . . . . . . . . . . . . . . . . . . . . . . 108
In Case of LBP5910/5910F . . . . . . . . . . . . . . . . . . . . . . . . . . . . . . . . . . . . . . . . . . . . . 109
In Case of LBP5610 . . . . . . . . . . . . . . . . . . . . . . . . . . . . . . . . . . . . . . . . . . . . . . . . . . 110
Replacing the Drum Cartridges . . . . . . . . . . . . . . . . . . . . . . . . . . . . . . . . . . . . 112
When a Message Appears. . . . . . . . . . . . . . . . . . . . . . . . . . . . . . . . . . . . . . . . . . . . . 112
Precautions on Replacing the Drum Cartridges . . . . . . . . . . . . . . . . . . . . . . . . . . . . 114
Replacing the Drum Cartridges . . . . . . . . . . . . . . . . . . . . . . . . . . . . . . . . . . . . . . . . . 118
Removing the Drum Cartridge to Be Replaced . . . . . . . . . . . . . . . . . . . . . . . . . . . . . . 118
Installing a New Drum Cartridge . . . . . . . . . . . . . . . . . . . . . . . . . . . . . . . . . . . . . . . . . 123
Replacing the Waste Toner Container . . . . . . . . . . . . . . . . . . . . . . . . . . . . . . . 138
When a Message Appears. . . . . . . . . . . . . . . . . . . . . . . . . . . . . . . . . . . . . . . . . . . . . 138
Precautions on Replacing the Waste Toner Container. . . . . . . . . . . . . . . . . . . . . . . . 139
Replacing the Waste Toner Container . . . . . . . . . . . . . . . . . . . . . . . . . . . . . . . . . . . . 141
Replacing the Staple Cartridge (Only for LBP5910F) . . . . . . . . . . . . . . . . . . . 146
When a Message Appears. . . . . . . . . . . . . . . . . . . . . . . . . . . . . . . . . . . . . . . . . . . . . 146
Precautions on Replacing the Staple Cartridge . . . . . . . . . . . . . . . . . . . . . . . . . . . . . 146
Replacing the Staple Cartridge . . . . . . . . . . . . . . . . . . . . . . . . . . . . . . . . . . . . . . . . . 148
Canceling a Job (Only for LBP5910/5910F) . . . . . . . . . . . . . . . . . . . . . . . . . . . 154
Deleting/Pausing/Resuming a Job (Only for LBP5610) . . . . . . . . . . . . . . . . . . 155
Confirming the Printer Features . . . . . . . . . . . . . . . . . . . . . . . . . . . . . . . . . . . . 157
In Case of LBP5910/5910F . . . . . . . . . . . . . . . . . . . . . . . . . . . . . . . . . . . . . . . . . . . . 157
In Case of LBP5610. . . . . . . . . . . . . . . . . . . . . . . . . . . . . . . . . . . . . . . . . . . . . . . . . . 158
Service Call Display . . . . . . . . . . . . . . . . . . . . . . . . . . . . . . . . . . . . . . . . . . . . . 161
In Case of LBP5910/5910F . . . . . . . . . . . . . . . . . . . . . . . . . . . . . . . . . . . . . . . . . . . . 161
In Case of LBP5610. . . . . . . . . . . . . . . . . . . . . . . . . . . . . . . . . . . . . . . . . . . . . . . . . . 163
Message List (Only for LBP5910/5910F) . . . . . . . . . . . . . . . . . . . . . . . . . . . . . 166
Page 4
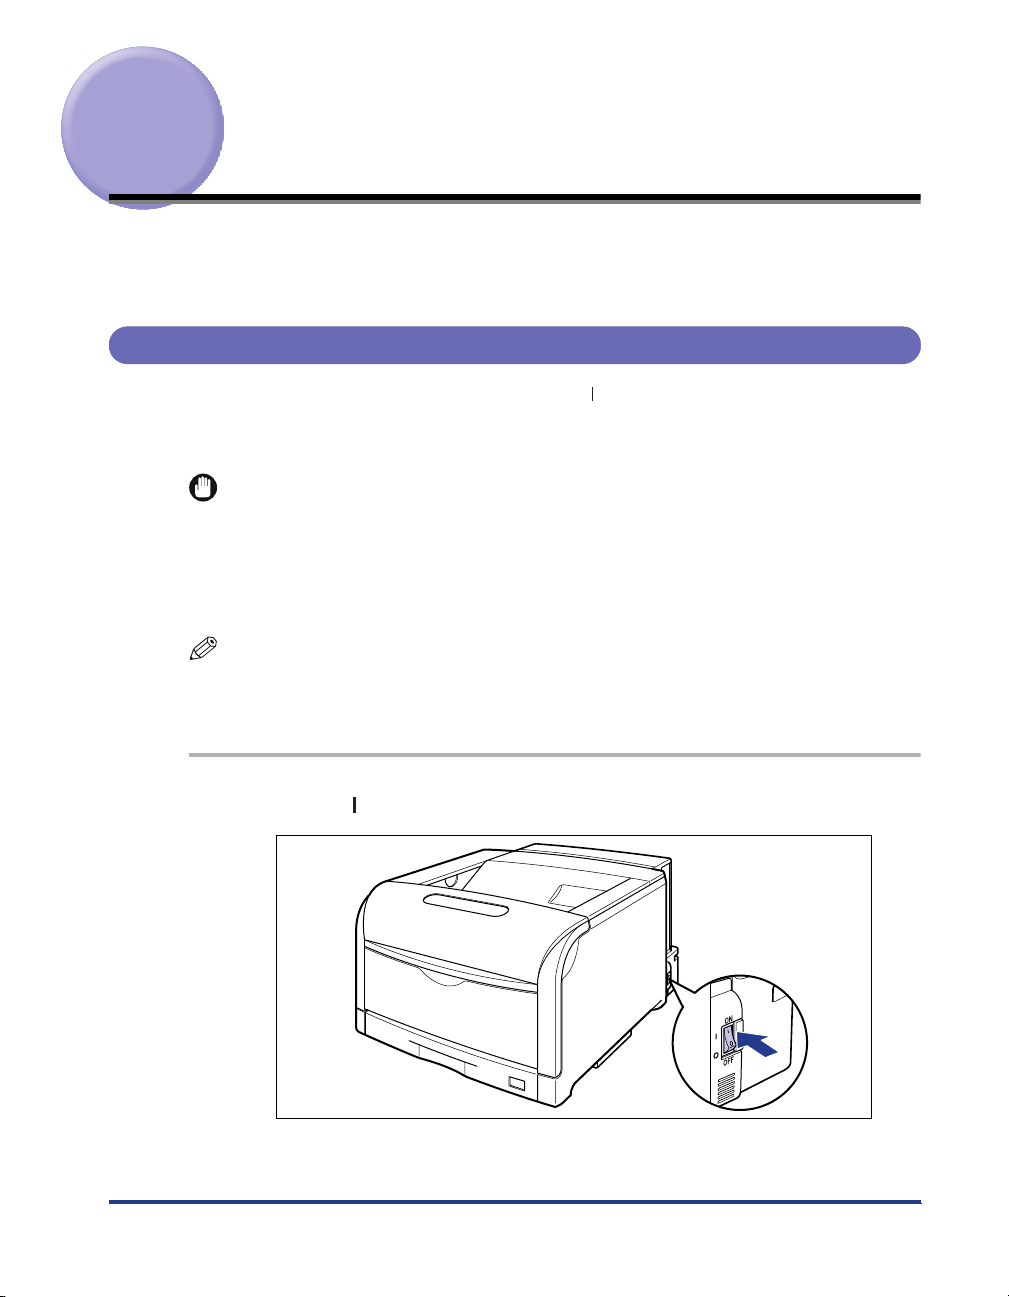
Turning the Printer ON/OFF (For 5910/5910F)
The power switch to turn the printer ON or OFF is located on the right side of the
printer. Be sure to observe the following instructions in order to prevent unexpected
problems.
Turning the Printer ON
In order to use this printer, you should press " " of the power switch to turn the
printer ON. After running a self-diagnostic test on the printer unit and optional
accessories, the printer will be ready to print.
IMPORTANT
•
Do not turn the power ON immediately after turning it OFF. If you want to turn the printer
ON again after turning it OFF, wait at least 10 seconds after turning the printer OFF
before turning it ON again.
•
Be sure to set the paper cassette in the printer before you turn the power ON for the first
time after you install the printer.
NOTE
When turning the printer ON for the first time after installing the hard disk, or when being
malfunction in the hard disk, it takes approx. 60 seconds to be ready to print because of
formatting after turning the printer ON.
1
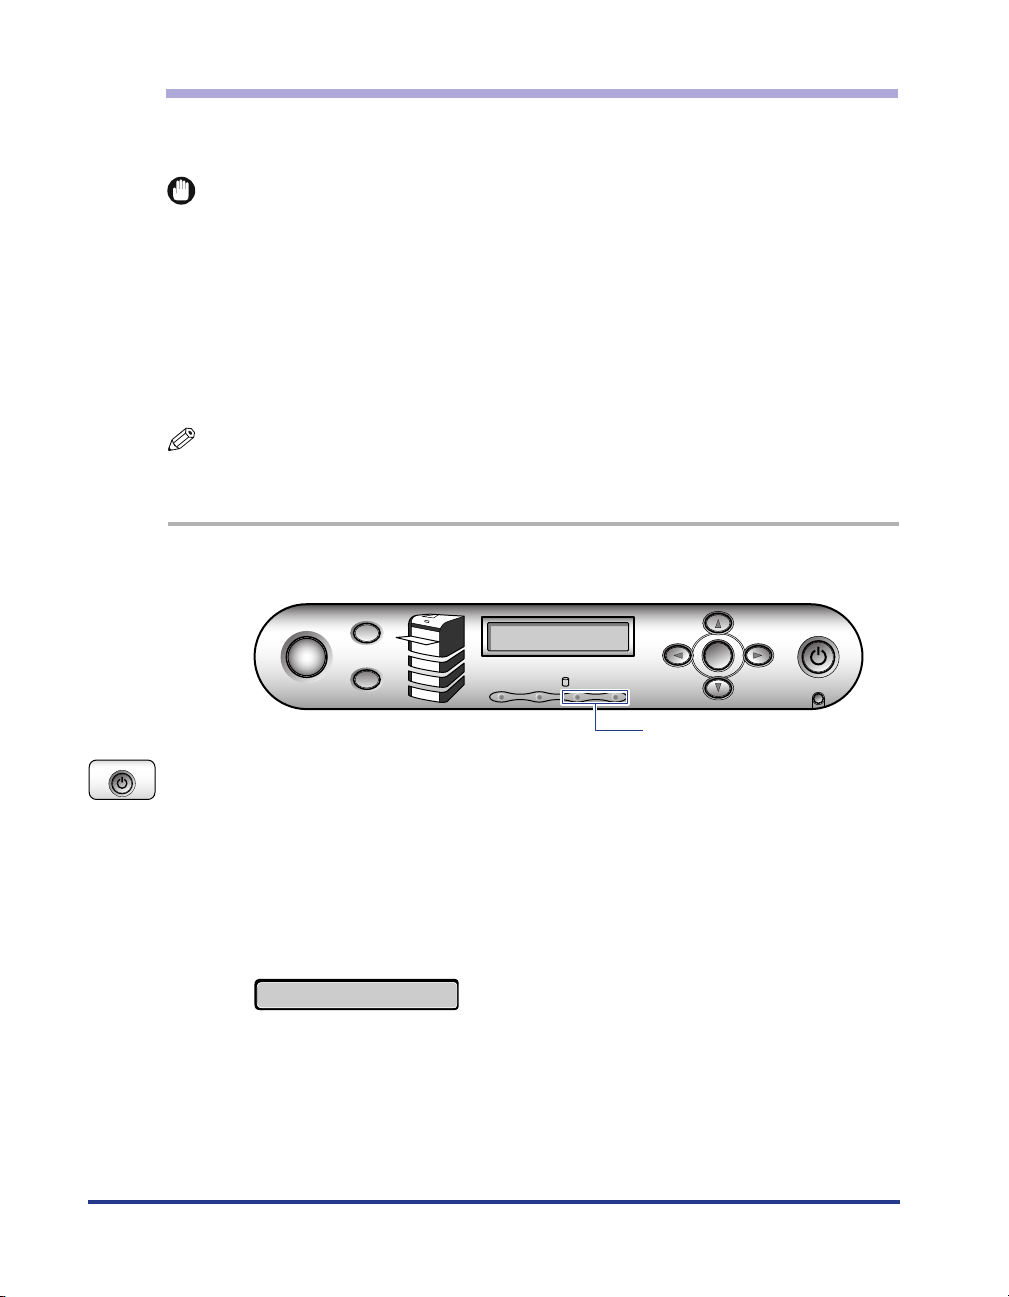
Press " " of the power switch on the printer.
3
Page 5
4
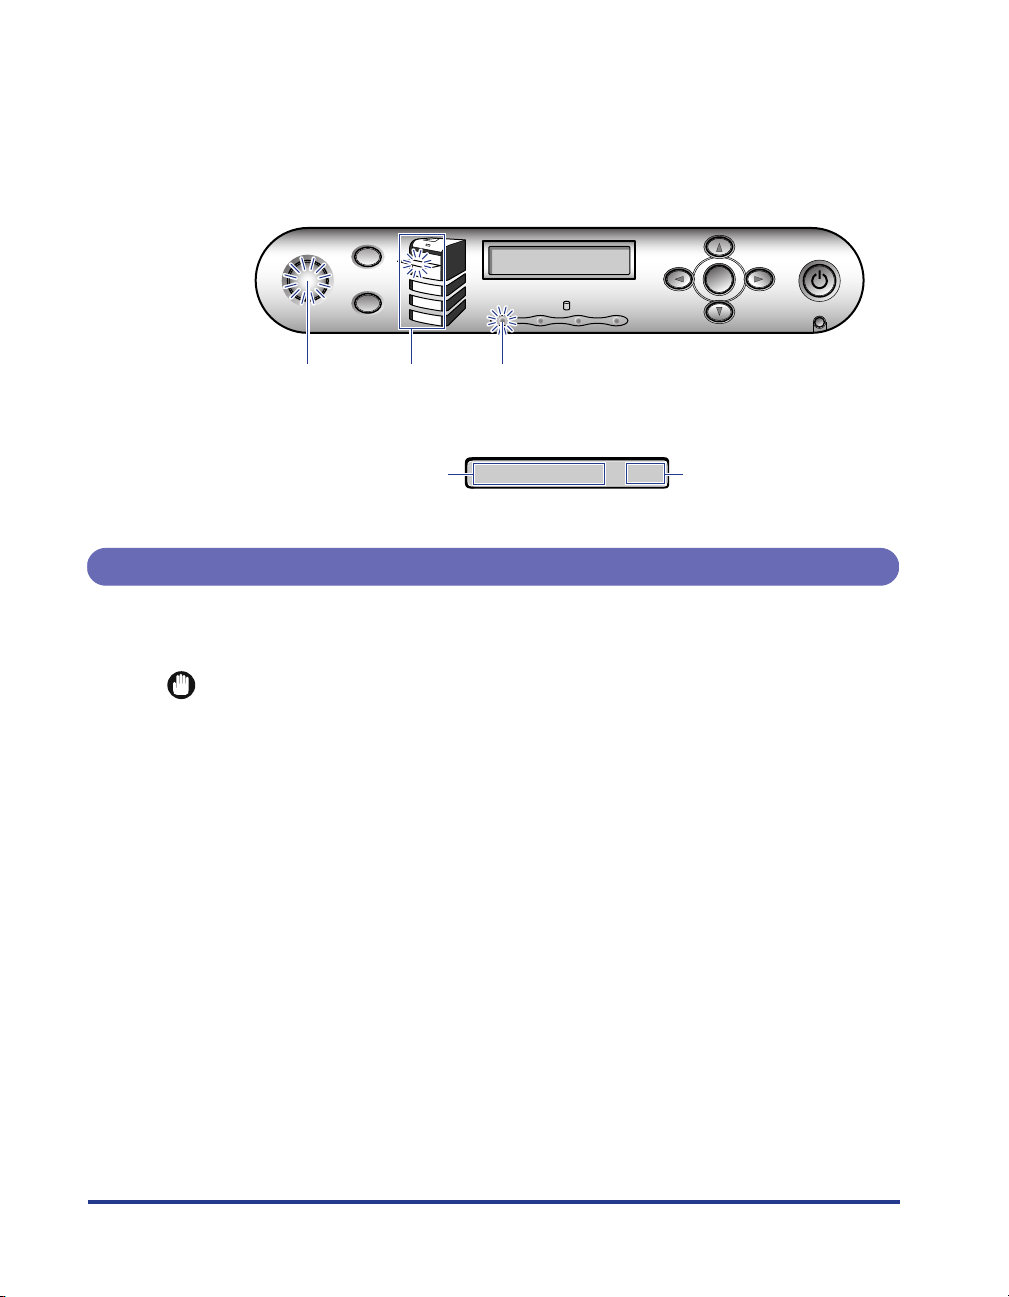
The indicators of the control panel and the display come on, and the printer
initiates a self-diagnostic test on the printer unit and optional accessories.
If no abnormality is found during the self-diagnostic test, the
and the
on, <
00 インサツ カノウ
indicator, and the selected paper source display indicator comes
印刷可
> , <00
LIPS>, or <00
ESC/P> comes on the display
オンライン
indicator
and the printer can be ready to print.
ジョブキャンセル
オンライン
給紙選択
オンライン
indicator
The following information is displayed on the display.
Ready to print and no
processing print data
Turning the Printer OFF
Tu rn the printer OFF using the following procedure. The operation to turn the printer
OFF is different in whether using the hard disk or not.
IMPORTANT
•
When using the hard disk, be sure to turn the printer OFF as the procedure for the
protection of the hard disk. (See p. 6)
•
If the printer is used on a network, make sure that it is not printing data from another
computer before turning the printer OFF.
•
If turning the printer OFF with the
deleted. Turn the printer OFF after necessary print data completing to be output or being
output by selecting <
Do not turn the printer OFF when the printer is in any of the following status:
•
- During printing.
-While the printer is running a self-diagnostic test immediately after turning the power
ON
-When the messages informing you that the NVRAM is being initialized or being written
is displayed.
-While <
When you are using a hard disk, make sure that HDD indicator is not on. If turn the
•
printer OFF while the HDD indicator is on (while data is being read from the hard disk or
being written to the hard disk), the hard disk may be damaged and disabled.
02 キドウチュウ
Paper source
display indicator
ハイシュツ
> or <
印刷可ジョブ
メッセージ
HDD
印刷可
indicator
00インサツカノウ
indicator being on, remaining print data will be
ジョブ
> with pressing [
02 キャリブレーションチュウ
A4
リセット
ジョブ
ユーティリティ
] offline.
セットアップ
OK
リセット
Paper size in the paper
source that is selected
currently
> is displayed.
電源
主電源
Page 6
When Not Using a Hard Disk
When you are not using a hard disk, turn the printer OFF using the following
procedure.
ブブ
ジジジジョョョョブブ
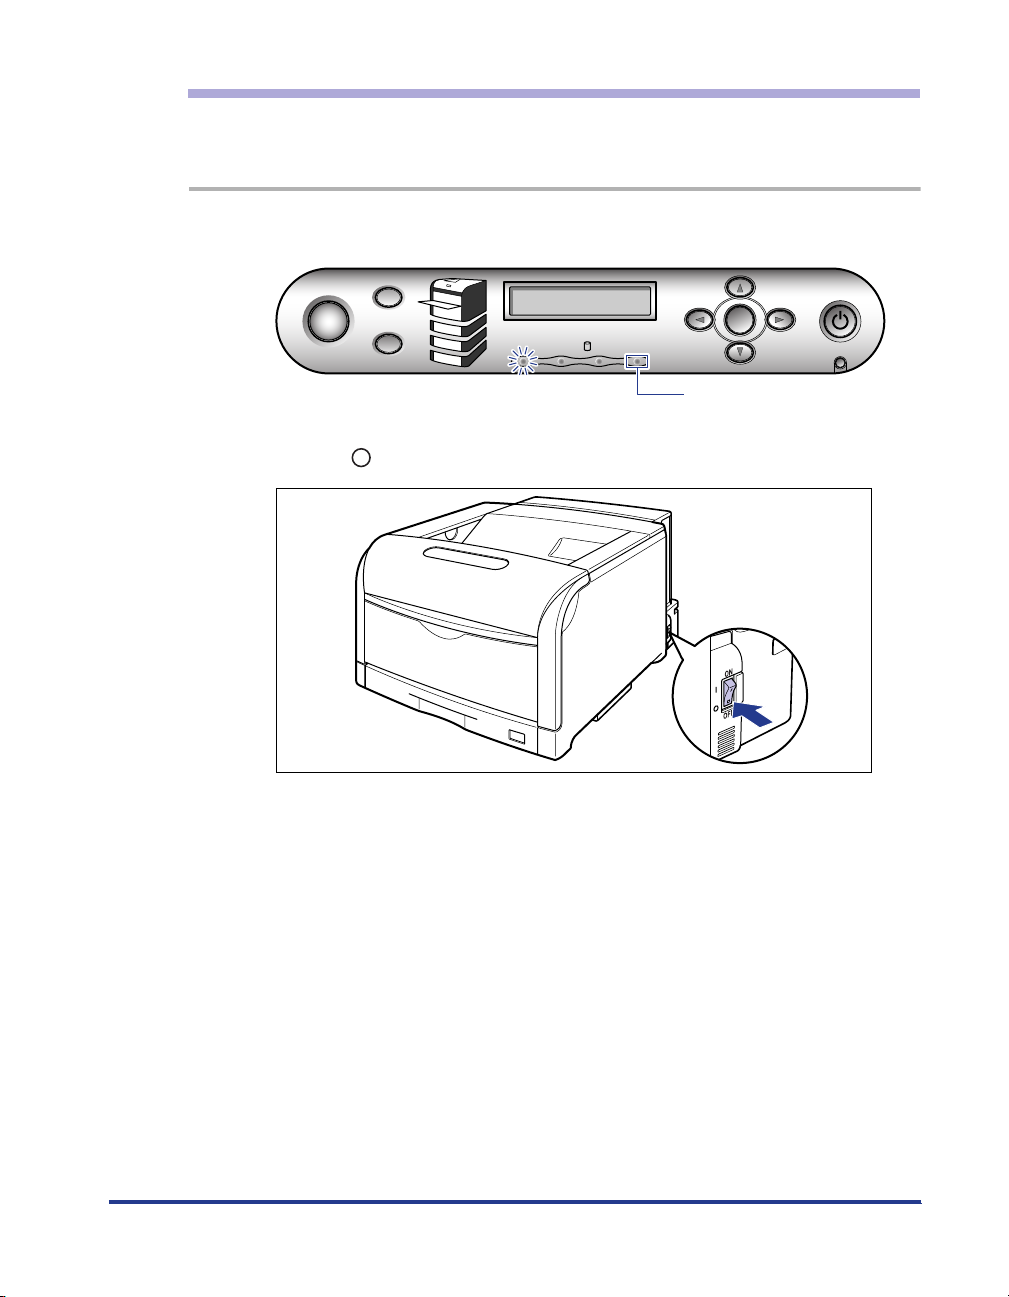
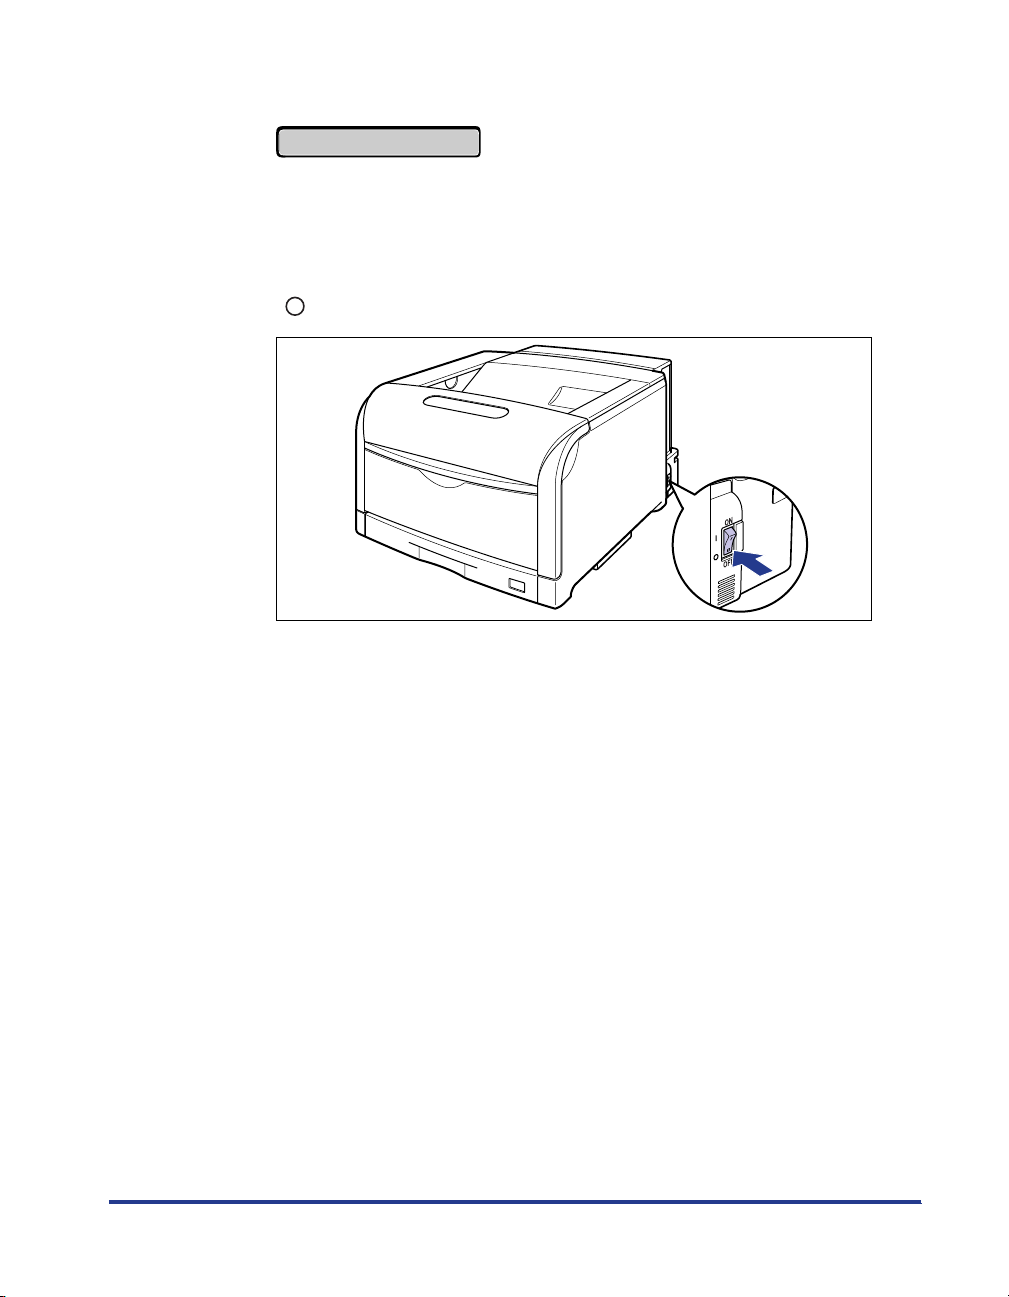
1
Make sure that
indicator is off.
ジョブキャンセル
オンライン
給紙選択
印刷可ジョブ
メッセージ
HDD
2
Press " " of the power switch on the printer.
ジョブ
ユーティリティ
OK
Off
セットアップ
リセット
電源
主電源
5
Page 7
電源
When Using a Hard Disk (Only When a Hard Disk is Installed)
When using the optional hard disk, turn the printer OFF using the following
procedure.
IMPORTANT
If you perform a shutdown when any job of which you stopped the operation or of
•
> in the
ジョブガ ノコッテイマス
].
オンライン
リセット
menu by pressing [
> or <
リセット
ジッコウ デ
secured print is in the hard disk, the message <
> is displayed.
キマセンデシタ
If you want to execute a shutdown, perform a soft reset to delete the job, and then
perform a shutdown again.
If you do not want to execute a shutdown, press [
Once you perform a shutdown, you cannot cancel the operation in midstream. When you
•
want to turn the printer ON again, turn the printer OFF once following the instruction of
the message, and then turn the printer ON.
NOTE
You can also perform <
シャットダウン
control panel.
] on the
1
Make sure that the
ジョブキャンセル
オンライン
給紙選択
2
Hold down the control panel power switch (sub power supply)
on the control panel until <
ブブ
indicator and HDD indicator are off.
ジジジジョョョョブブ
ユーティリティ
印刷可ジョブ
メッセージ
HDD
Off
00002222 シシシシャャャャッッッットトトトダダダダウウウウンンンンチチチチュュュュウウ
ジョブ
セットアップ
OK
リセット
ウウ
> is
displayed, then release the switch.
Hold down the switch (approximately 4 seconds) until <
is displayed. If the switch is released in less than 4 seconds, and <
is set to a setting value other than <
ツカワナイ
>, the printer enters Power Save
Mode.
02シャットダウンチュウ
02 シャットダウンチュウ
スリープモード
電源
主電源
>
>
6
Page 8
3
Confirm the message.
デンゲンヲオキリクダサイ
When the printer is ready to be turned OFF after the process for it is performed,
the message <
4
When the message <
"" of the power switch on the printer.
デンゲンヲ オキリクダサイ
デデデデンンンンゲゲゲゲンンンンヲヲヲヲ オオオオキキキキリリリリククククダダダダササササイイ
> appears.
イイ
> appears, press
7
Page 9
Turning the Printer ON/OFF (For LBP5610)
The power switch to turn the printer ON or OFF is located on the right side of the
printer. Be sure to observe the following instructions in order to prevent unexpected
problems.
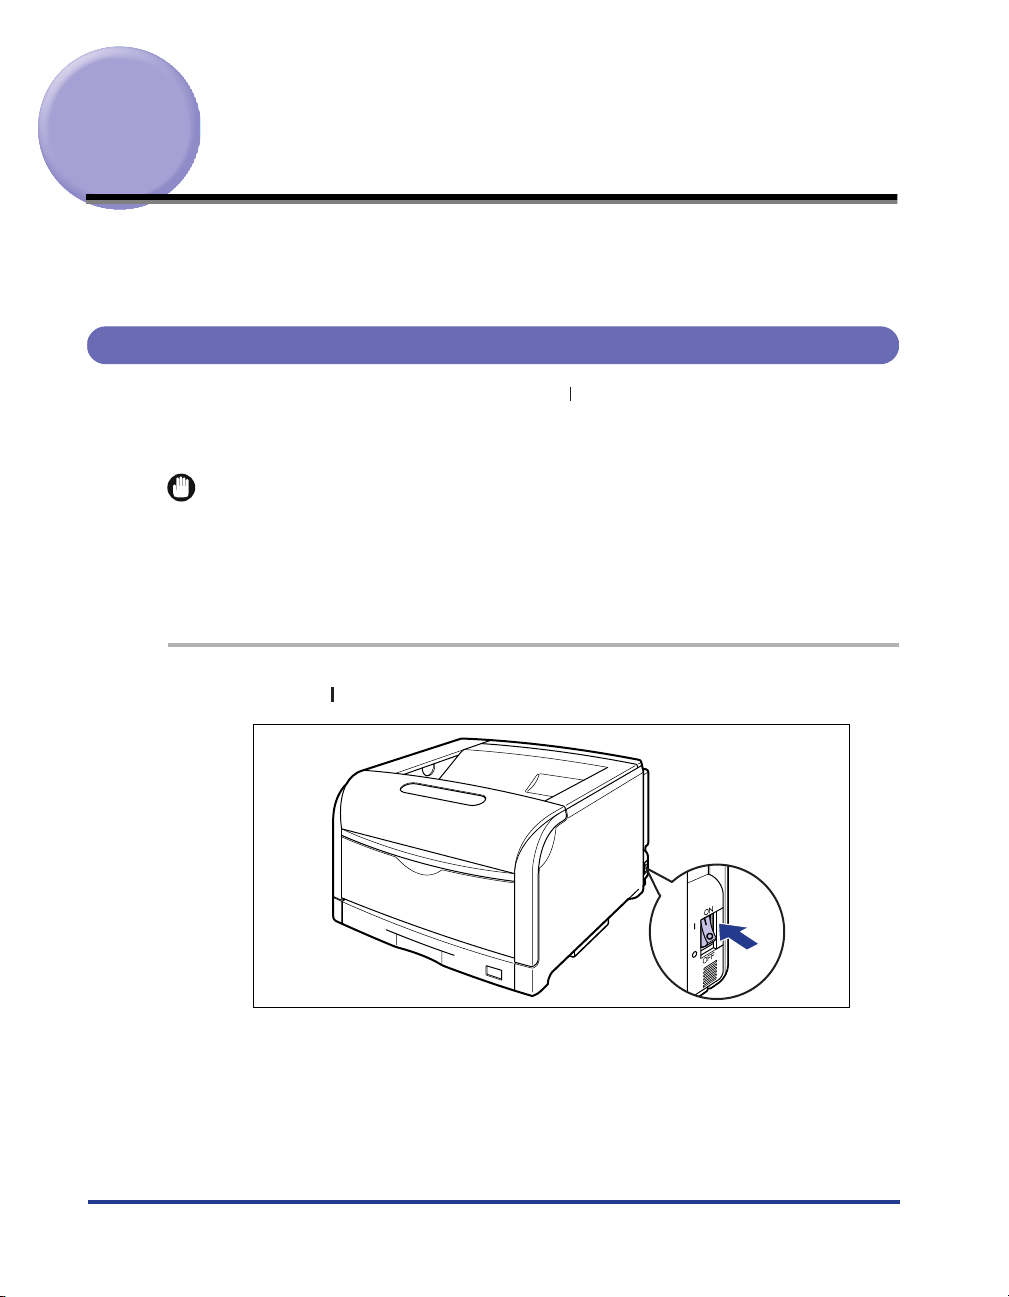
Turning the Printer ON
In order to use this printer, you should press " " of the power switch to turn the
printer ON. After running a self-diagnostic test on the printer unit and optional
accessories, the printer will be ready to print.
IMPORTANT
•
Do not turn the power ON immediately after turning it OFF. If you want to turn the printer
ON again after turning it OFF, wait at least 10 seconds after turning the printer OFF
before turning it ON again.
•
Be sure to set the paper cassette in the printer before you turn the power ON for the first
time after you install the printer.
1
Press " " of the power switch on the printer.
8
Page 10
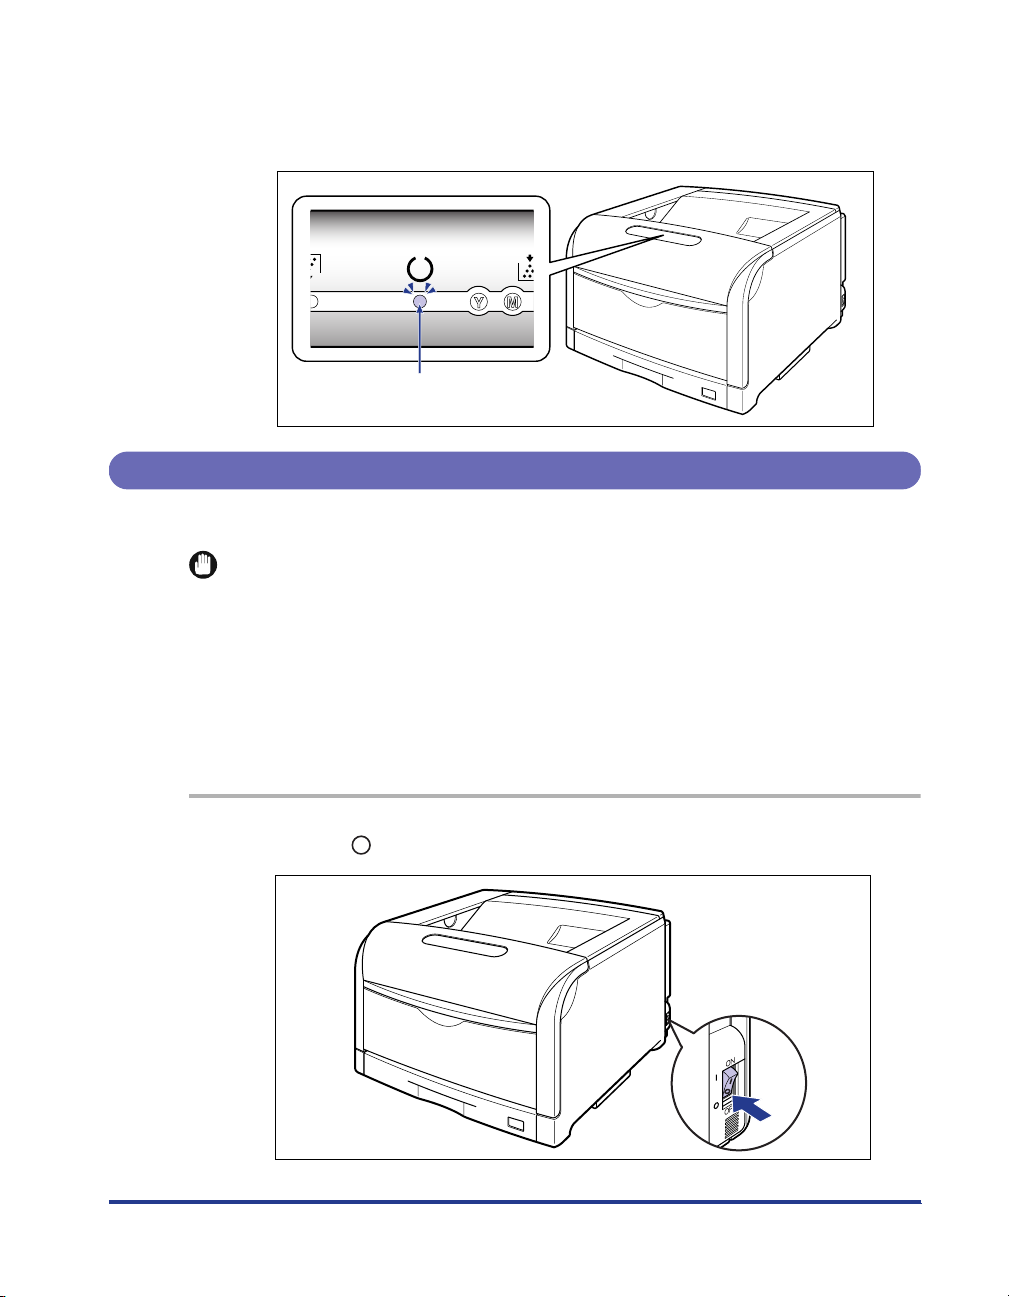
The indicators come on, and the printer initiates a self-diagnostic test on the
印刷可トナートナ
printer unit and optional accessories.
If no abnormality is found during the self-diagnostic test, the
comes on, and the printer is ready to print.
On
Turning the Printer OFF
Tu rn the printer OFF using the following procedure.
IMPORTANT
•
If the printer is used on a network, make sure that it is not printing data from another
computer before turning the printer OFF.
•
If you turn the printer OFF, all the print data remaining in the printer memory will be
deleted. So, wait for the necessary print data to be printed before turning the printer OFF.
•
Do not turn the printer OFF when the printer is in any of the following status:
- During printing
-While the printer is running a self-diagnostic test immediately after turning the power
ON
indicator (blue)
印刷可
9
1
Press " " of the power switch on the printer.
Page 11
オンライン
Online and Offline
(Only for LBP5910/5910F)
"Online" is the status that the printer receives data from the computer and is
possible to print, while "Offline" is the status that the connection with the computer
is cut off and be impossible to receive data.
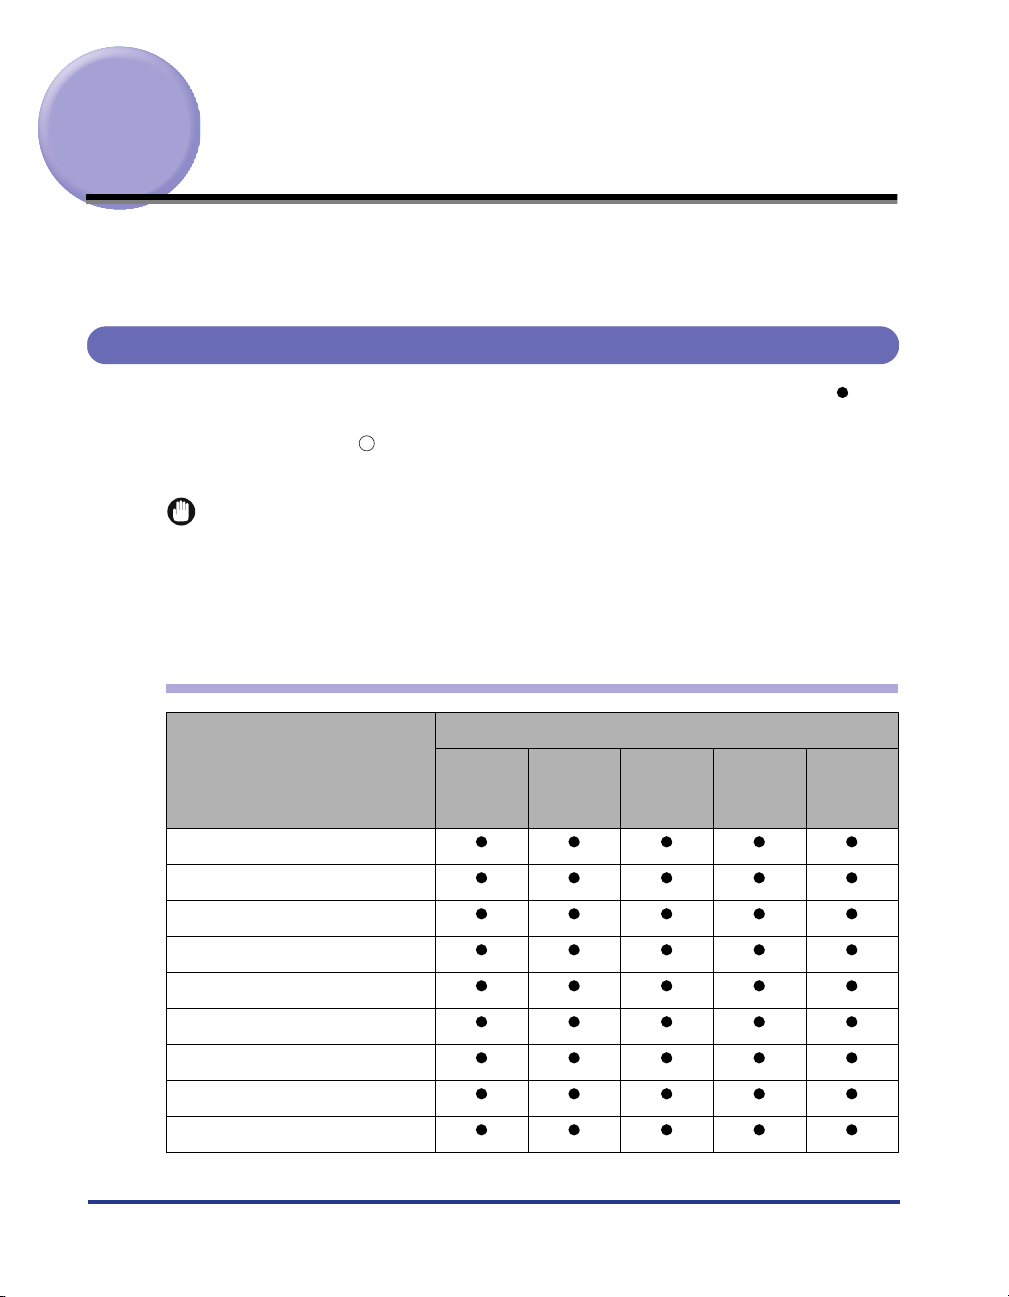
To perform the setting for each menu using the control panel, switch the printer
status as follows:
O
: The status that can go into a menu.
-
: The status that cannot go into a menu.
セットアップ
キュウシ センタク
リセット
ジョブ
ユーティリティ
* The setting in the
menu O* O
menu O O
menu O O
menu O -
menu O -
ユーザメンテナンス
Placing the Printer Online
When the printer is online When the printer is offline
options is not available in online status.
10
When printing from the computer, it is necessary that the printer is online. Before
printing, make sure that the printer is online. If not, place the printer online using the
following procedure. The printer comes online automatically after you turn it ON.
ンン
1
Press [
The
IMPORTANT
If an error is occurring in the printer (the
the message is blinking), it cannot come online. Eliminate the cause of the error
before you place the printer online.
オオオオンンンンラララライイイインン
オンライン
indicator comes on, and the printer is ready to print.
].
メッセージ
indicator is on, or numbers in
Page 12
NOTE
オンライン
When the printer is switching to the sleep mode, the
only the
data in the sleep mode, the sleep mode is released, the
on, and the printer is ready to print.
印刷可
indicator comes on even if the printer is online. If the printer receives
オンライン
indicator is off and
オンライン
Placing the Printer Offline
Set the printer to offline using the following procedure to prevent the printer from
receiving data from the computer and to set all options of the
セットアップ
indicator comes
menu.
1
Press [
The
control panel.
IMPORTANT
The printer comes online automatically if left in the offline state for five minutes or
longer. If an error is occurring in the printer (the
numbers in the message is blinking), or the menu function, paper selection and
setting of the paper size are being operated, the printer cannot set to online
automatically.
オオオオンンンンラララライイイインン
オンライン
ンン
].
indicator comes off, and the printer is available to be set by the
メッセージ
indicator is on, or
11
Page 13
Paper Requirements
To ensure optimum performance, use only paper that falls within the specifications
in the following lists. Using inappropriate paper may result in deterioration in print
quality or paper jams.
Usable Paper
The following shows the paper sizes that can be used with this printer. The " "
mark indicates that the paper is available for the 1-sided printing and automatic
2-sided printing; the " " mark indicates that the paper is available for only 1-sided
printing; and the "
IMPORTANT
When continuously printing the paper of 279.4 mm wide (Letter size) or less, the safety
•
function that prevents damages caused by heat may slow the print speed down in stages.
(In case of plain paper of A5, B5, or B4 size, the print speed may drop to approx. 10
pages/min., and in case of postcard, the print speed may drop to approx. 4 pages/min.)
When printing with a resolution of 1200dpi, the print speed drops to approximately half.
•
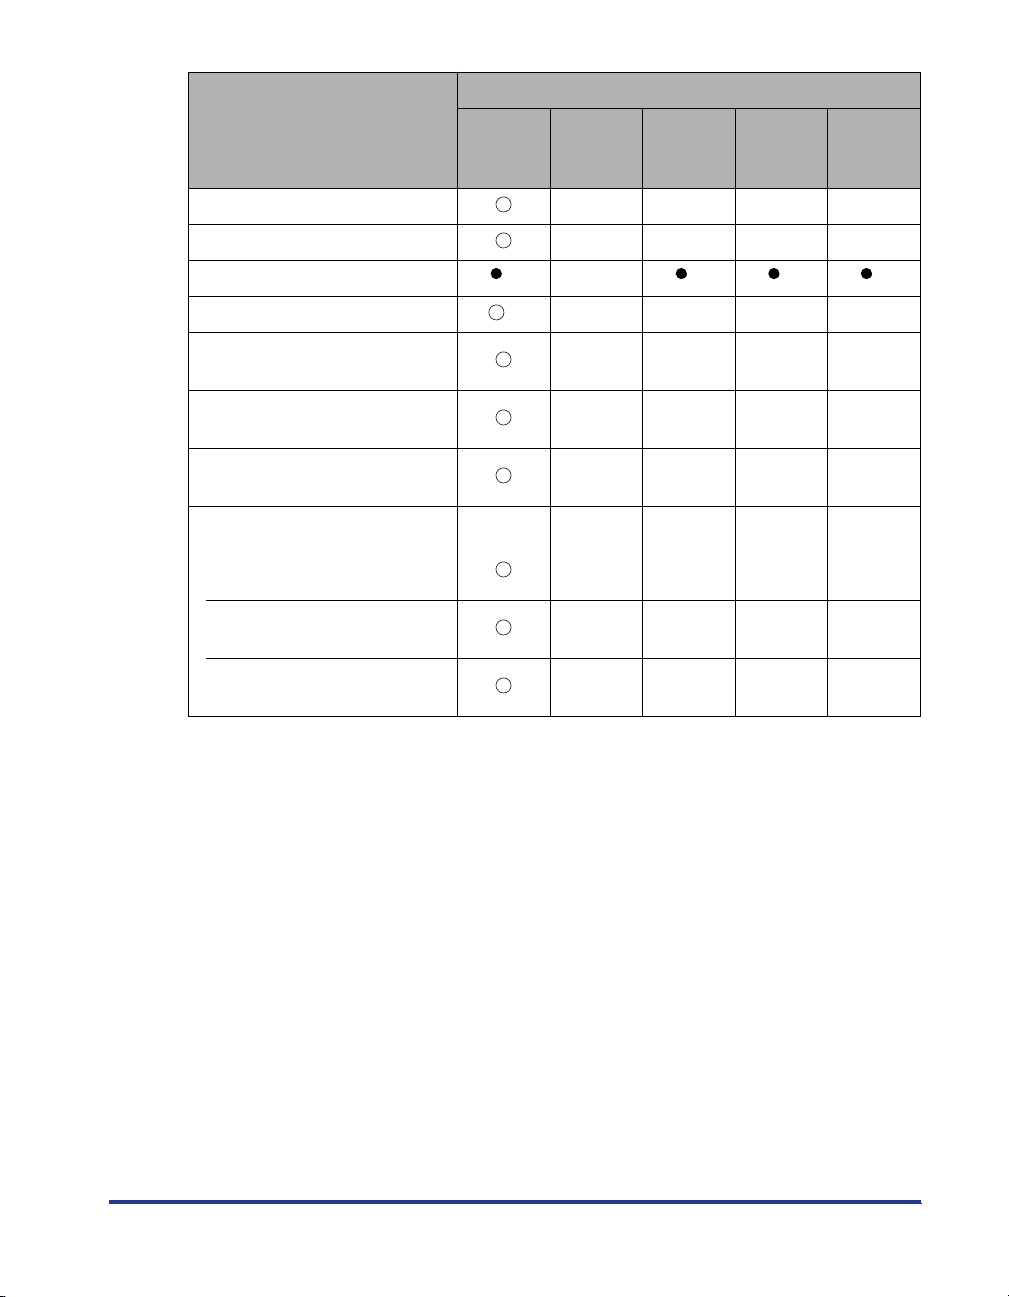
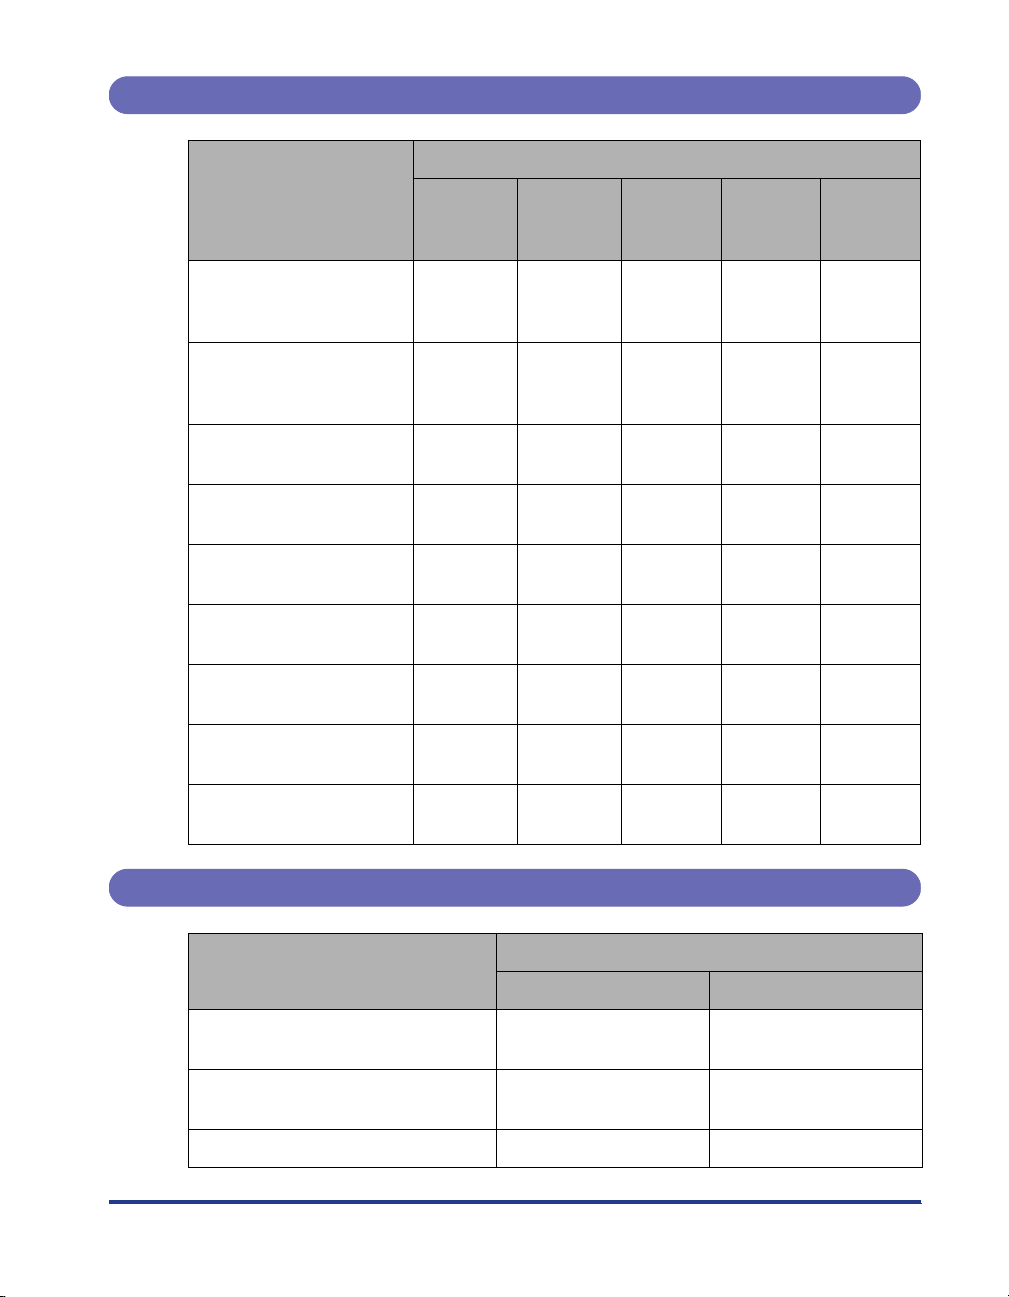
Paper Size for LBP5910/5910F
-
" mark indicates that the printing cannot be performed.
Paper Source
12
Paper Size
1
A5*
1
B5*
1
A4*
2
B4*
2
A3*
1
Letter*
Executive*
Legal*
1
2
Ledger (11 x 17)*
Multi-
purpose
Cassette 1
Tray
2
Cassette 2
(Optional)
Cassette 3
(Optional)
Cassette 4
(Optional)
Page 14
Paper Source
Paper Size
Multi-
purpose
Tray
12 x 18*
SRA3*
2
2
Custom Paper Size *
Long Size Paper*
Postcard*
2
2
100.0 mm x 148.0 mm
Reply Postcard*
1
148.0 mm x 200.0 mm
4 on 1 Postcard*
1
200.0 mm x 296.0 mm
Envelope*
2
YOUGATA No.4
105.0 mm x 235.0 mm
YOUGATA No.2
114.0 mm x 162.0 mm
KAKUGATA No.2
240.0 mm x 332.0 mm
3
5
*
Cassette 1
Cassette 2
(Optional)
Cassette 3
(Optional)
Cassette 4
(Optional)
----
----
-*
4
4
*
----
----
----
----
----
----
----
4
*
*1 Paper can be loaded only in landscape orientation.
*2 Paper can be loaded only in portrait orientation.
*3 The following sizes of custom paper can be loaded.
- In case of portrait orientation: Width 98.0 - 320.0 mm, Length 139.7 - 457.2 mm
-
In case of landscape orientation (Only when LIPS LX pr inter driver is used): Width 139.7 - 297.0 mm, Length 139.7 - 297.0 mm
Custom paper (plain paper) of the following sizes can be printed by automatic 2-sided printing.
- In case of portrait orientation: Width 210.0 - 312.0 mm, Length 210.0 - 431.8 mm
In case of landscape orientation (Only when LIPS LX pr inter driver is used): Width 210.0 - 297.0 mm, Length 148.0 - 297.0 mm
-
*4 The following sizes of custom paper can be loaded.
In case of portrait orientation: Width 210.0 - 297.0 mm, Length 210.0 - 431.8 mm
In case of landscape orientation (Only when LIPS LX printer driver is used): Width 210.0 - 297.0 mm, Length 148.0 -
297.0 mm
*5 The following sizes of long size paper can be loaded in portrait orientation. This can be printed by only LIPS LX
printer driver.
Width 210.0 - 297.0 mm, Length 457.3 - 1,200.0 mm
13
Page 15
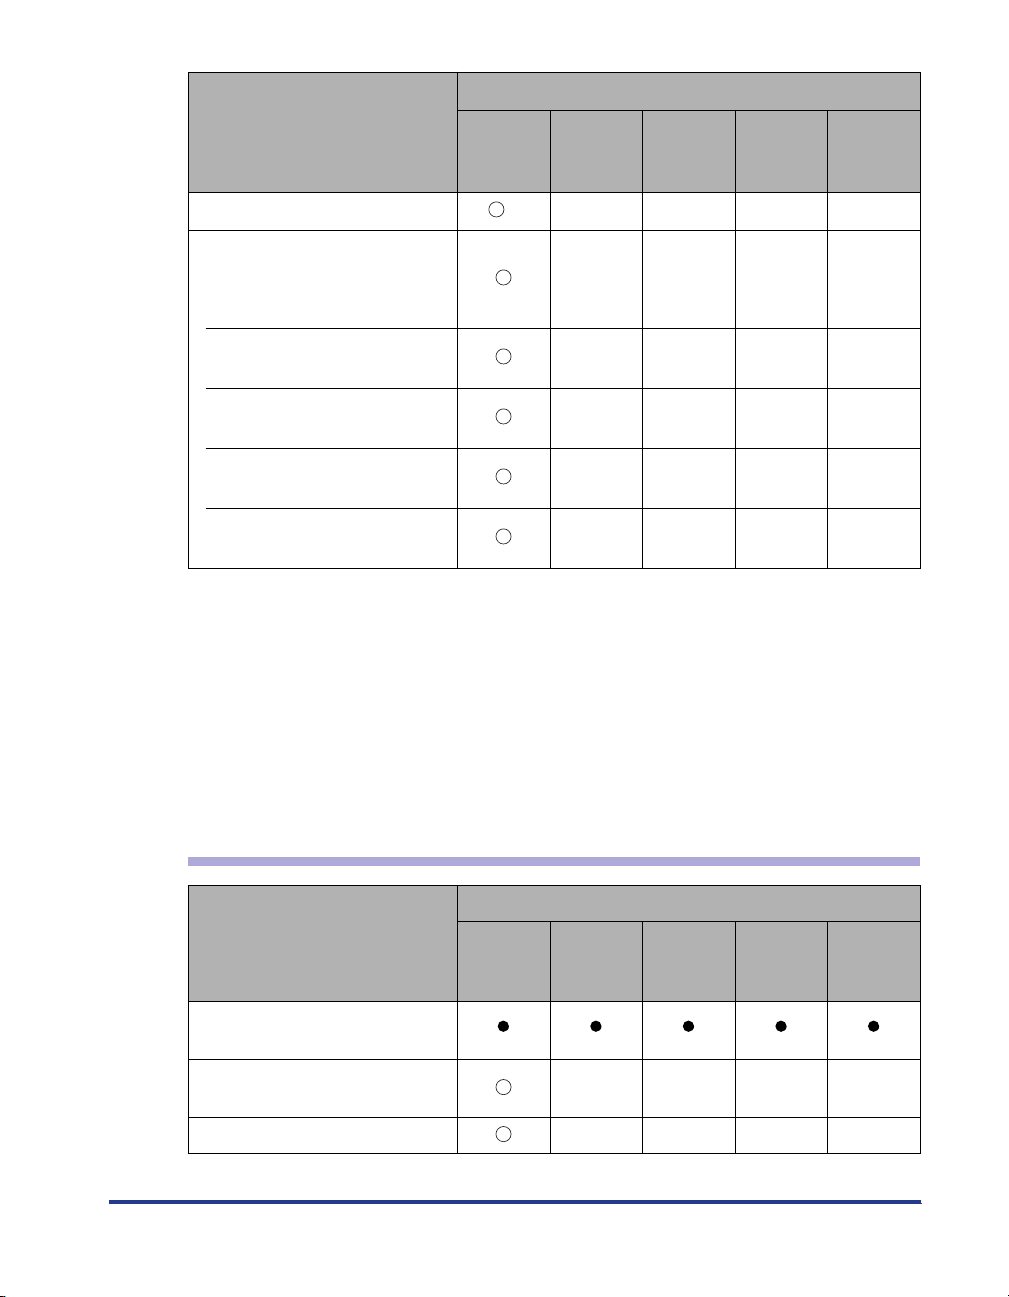
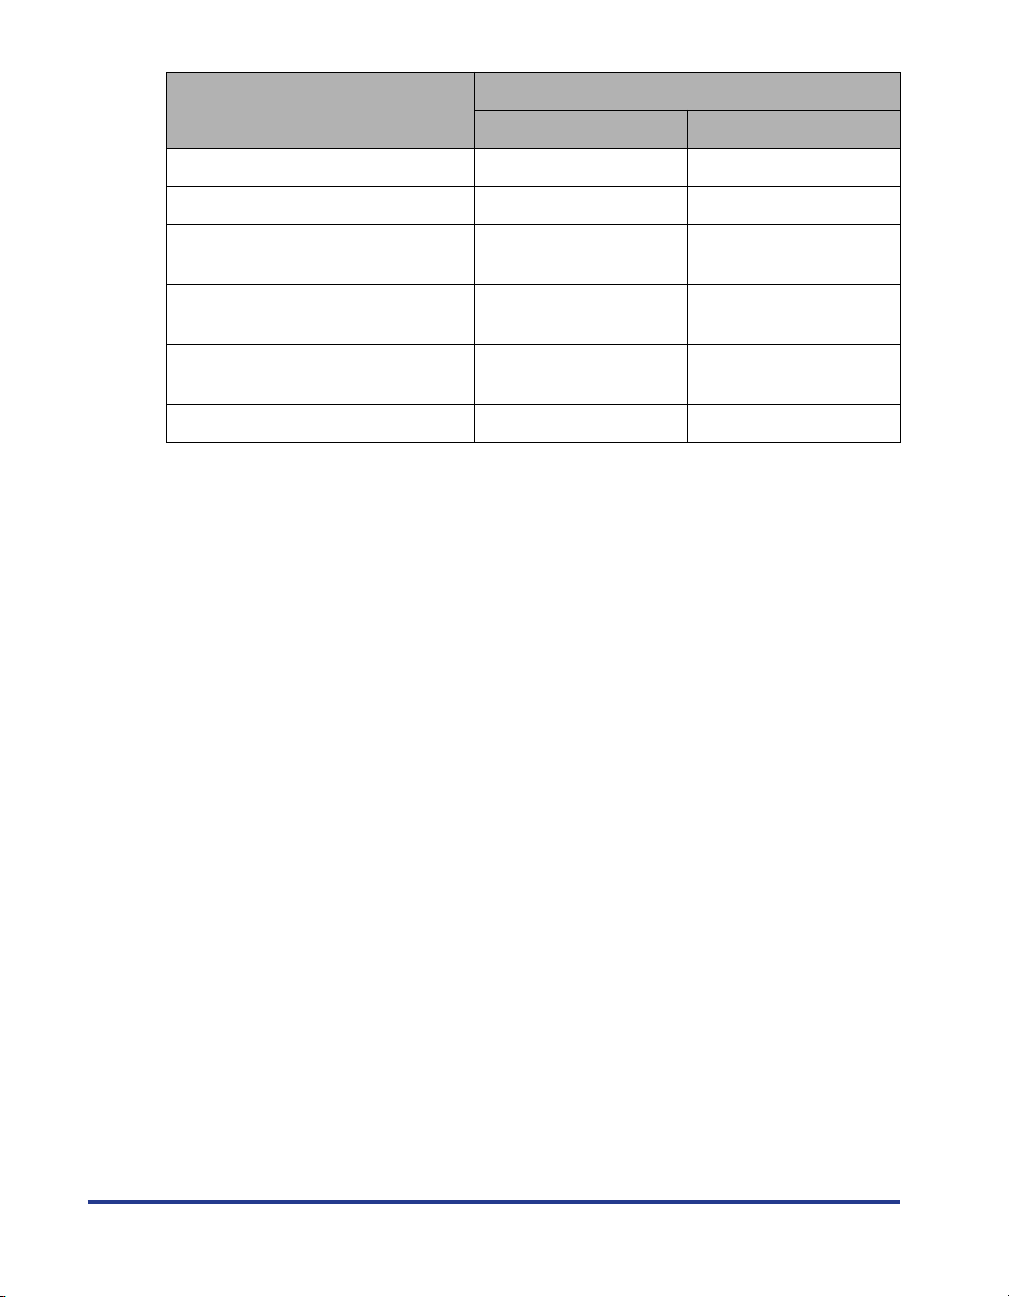
Paper Type for LBP5910/5910F
Paper Source
Paper Type
Plain paper*
(64 - 105 g/m
Heavy paper
(106 - 220 g/m
2
)
2
)
Multi-
purpose
Tray
Cassette 1
Cassette 2
(Optional)
Cassette 3
(Optional)
Cassette 4
(Optional)
----
Coated paper ----
Labels
Postcard ----
Envelopes ----
* 100% recycled paper (64 - 105 g/m
2
) can be used as plain paper.
Paper Size for LBP5610
Paper Source
Paper Size
1
A5*
1
B5*
1
A4*
2
B4*
2
A3*
1
Letter*
Executive*
Legal*
Ledger (11 x 17)*
12 x 18*
SAR3*
1
2
2
2
2
Custom Paper Size *
Multi-
purpose
Tray
3
Cassette 1
Cassette 2
(Optional)
Cassette 3
(Optional)
Cassette 4
(Optional)
----
----
-*
4
4
*
4
*
14
Page 16
Paper Source
Paper Size
Long Size Paper*
Envelope*
2
2
Envelope DL 110.0 mm x
Multi-
purpose
Tray
5
*
Cassette 1
Cassette 2
(Optional)
----
----
220.0 mm
Envelope COM10 104.9 mm x
241.3 mm
Envelope C5 162.0 mm x
229.0 mm
Envelope Monarch 98.5 mm x
190.5 mm
Envelope B5 176.0 mm x
250.0 mm
*1 Paper can be loaded only in landscape orientation.
*2 Paper can be loaded only in portrait orientation.
*3 The following sizes of custom paper can be loaded.
In case of portrait orientation: Width 98.0 - 320.0 mm, Length 148.0 - 457.2 mm
In case of landscape orientation: Width 210.0 - 297.0 mm, Length 148.0 - 297.0 mm
The following sizes of custom paper can be printed by automatic 2-sided printing.
In case of portrait orientation: Width 210.0 - 297.0 mm, Length 210.0 - 431.8 mm
In case of landscape orientation: Width 210.0 - 297.0 mm, Length 148.0 - 297.0 mm
*4 The following sizes of custom paper can be loaded.
In case of portrait orientation: Width 210.0 - 297.0 mm, Length 210.0 - 431.8 mm
In case of landscape orientation: Width 210.0 - 297.0 mm, Length 148.0 - 297.0 mm
*5 The following sizes of long size paper can be loaded in portrait orientation.
Width 210.0 - 297.0 mm, Length 457.3 - 1,200.0 mm
----
----
----
----
Cassette 3
(Optional)
Cassette 4
(Optional)
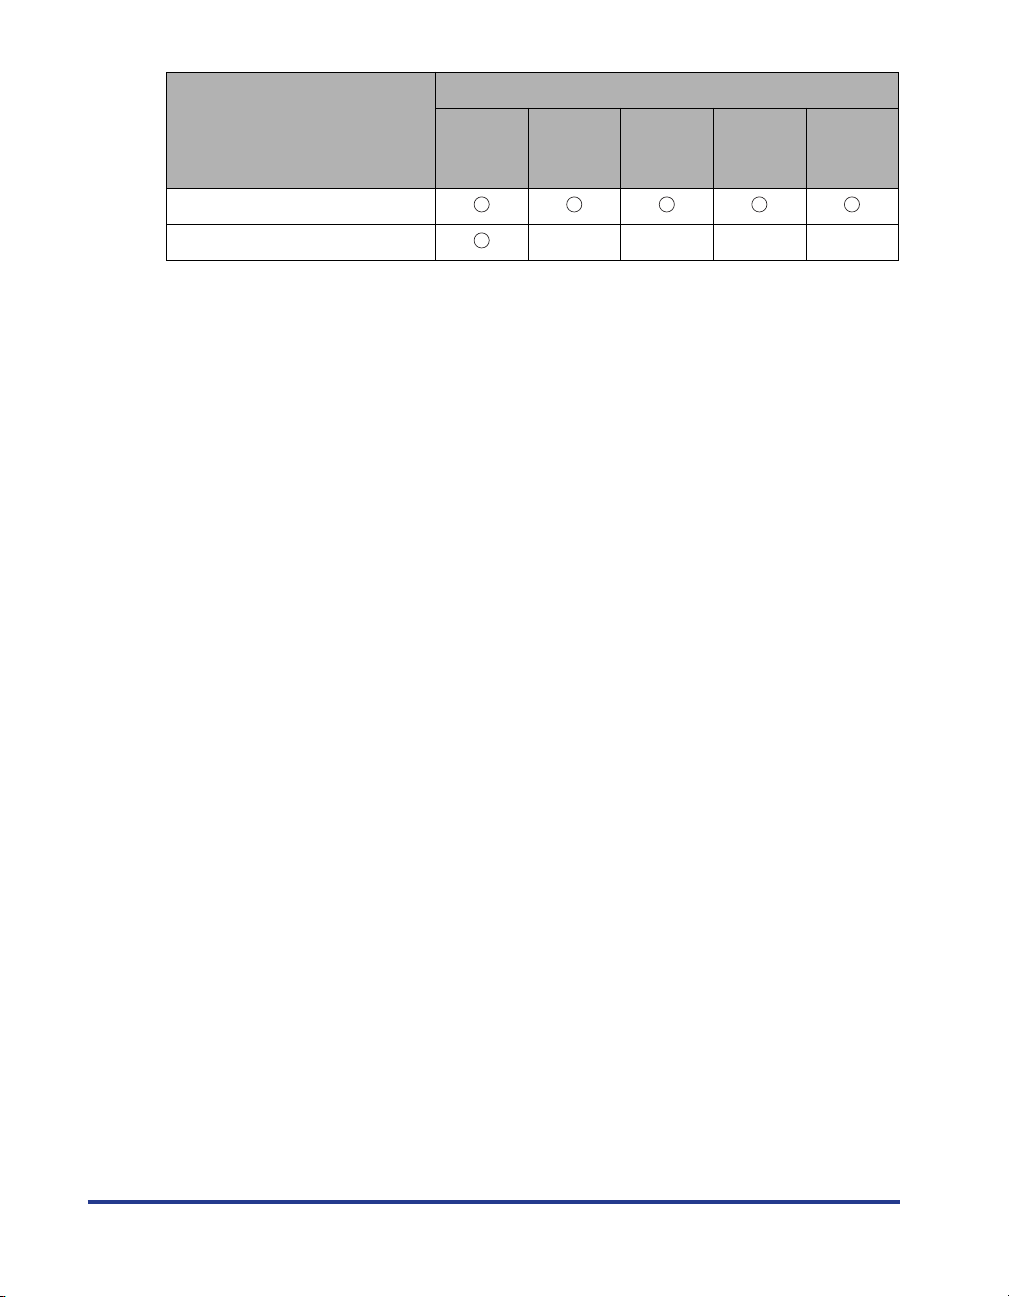
Paper Type for LBP5610
Paper Source
Paper Type
Plain paper*
(64 - 105 g/m
Heavy paper
(106 - 220 g/m
2
)
2
)
Coated paper ----
Multi-
purpose
Tray
Cassette 1
Cassette 2
(Optional)
Cassette 3
(Optional)
Cassette 4
(Optional)
----
15
Page 17
Paper Source
Paper Type
Multi-
purpose
Tray
Cassette 1
Cassette 2
(Optional)
Cassette 3
(Optional)
Cassette 4
(Optional)
Labels
Envelopes ----
* 100% recycled paper (64 - 105 g/m2) can be used as plain paper.
■ Plain Paper for LBP5910/5910F
This printer can print Plain paper of the standard paper sizes (A3, B4, A4, B5, A5, SRA3,
12 x 18, Ledger (11X17), Legal, Letter, Executive, Postcard, Reply postcard, 4 on 1
postcard), Custom paper size, and Long size paper. Plain paper that weighs between 64
and 105 g/m
Standard paper (other than Postcard, Reply postcard, 4 on 1 postcard) can be loaded in
the paper cassettes and multi-purpose tray. Plain paper of Postcard, Reply postcard, and
4 on 1 postcard can be loaded in the multi-purpose tray. Automatic 2-sided printing can be
performed on paper of A3, B4, A4, B5, A5, Ledger (11X17), Letter, Legal, and Executive
sizes.
Custom paper size and Long Size Paper can be loaded in the multi-purpose tray.
Automatic 2-sided printing can be performed on Custom paper size in the multi-purpose
tray. By installing the optional paper feeder, Custom paper size can be loaded in the
cassette 2, 3, 4, and automatic 2- sided printing can be performed.
* 100 % recycled paper (64 - 105 g/m2) can be used as plain paper.
2
can be printed.
16
■ Plain Paper for LBP5610
This printer can print Plain paper of the standard paper sizes (A3, B4, A4, B5, A5, SRA3,
12 x 18, Ledger (11X17), Legal, Letter, Executive), Custom paper size, and Long size
paper. Plain paper that weighs between 64 and 105 g/m
2
can be printed.
Standard paper can be loaded in the paper cassettes and multi-purpose tray. Automatic
2-sided printing can be performed on paper of A3, B4, A4, B5, A5, Ledger (11X17), Letter,
Legal, and Executive sizes.
Custom paper size and Long Size Paper can be loaded in the multi-purpose tray.
Automatic 2-sided printing can be performed on Custom paper size in the multi-purpose
tray. By installing the optional paper feeder, Custom paper size can be loaded in the
cassette 2, 3, 4, and automatic 2- sided printing can be performed.
* 100 % recycled paper (64 - 105 g/m2) can be used as plain paper.
■ Heavy Paper for LBP5910/5910F
This printer can print Heavy paper of the standard paper sizes (A3, B4, A4, B5, A5, SRA3,
12 x 18, Ledger (11X17), Legal, Letter, Executive, Postcard, Reply postcard, 4 on 1
postcard), Custom paper size, and Long size paper. And Heavy paper that weighs
between 106 and 220 g/m
Heavy paper can be loaded in the multi-purpose tray, and only 1-sided printing can be
performed.
2
can be printed.
Page 18

NOTE
Heavy paper at sizes of Postcard, Reply postcard, and 4 on 1 postcard that weighs 106 169 g/m2 can be used.
■ Heavy Paper for LBP5610
This printer can print Heavy paper of the standard paper sizes (A3, B4, A4, B5, A5, SRA3,
12 x 18, Ledger (11X17), Legal, Letter, Executive), Custom paper size, and Long size
paper. And Heavy paper that weighs between 106 and 220 g/m
2
can be printed.
Heavy paper can be loaded in the multi-purpose tray, and only 1-sided printing can be
performed.
■ Coated Paper
This printer can print A3 and A4 size coated paper. Load coated paper in the
multi-purpose tray.
IMPORTANT
Use "A3 size coated paper that Canon recommends", and "A4 size coated paper that
Canon recommends".
■ Label
This printer can print A4 size labels. Labels can be loaded in the paper cassettes and
multi-purpose tray.
IMPORTANT
•
Use "A4 size label that Canon recommends". "A4 size label that Canon recommends"
weighs 7.8 g per sheet.
•
Do not use the labels in the following conditions. Using inappropriate labels may result in
paper jams that are difficult to clear or may result in damage to the printer.
-Peeled labels or partly used labels
- Coated labels that are easily peeled off from the backing sheet
- Labels with uneven adhesive
■ Postcard / Reply postcard / 4 on 1 postcard (Only for LBP5910/5910F)
This printer can print Postcard, Reply postcard, 4 on 1 postcard and 4 on 1 postcard
recommended by Canon. Load Postcard, Reply postcard, and 4 on 1 postcard with the
printing side facing down in the multi-purpose tray.
IMPORTANT
•
Printing inappropriate size postcard (other than
postcard, and 4 on 1 postcard recommended by Canon) may cause deterioration in print
quality or paper jams.
•
Reply postcard that is not creased can be printed.
•
If the postcard is curled, flatten the curls by warping it in the opposite direction before
loading it.
•
Postcard and Reply postcard for ink jet printers cannot be printed.
Postcard
, Reply postcard, 4 on 1
17
Page 19
•
Postcard cannot be loaded in landscape orientation. Be sure to load postcard with the
printed side facing down in portrait orientation.
•
Reply postcard and 4 on 1 postcard cannot be loaded in portrait orientation. Be sure to
load Reply postcard or 4 on 1 postcard with the printed side facing down in landscape
orientation.
18
•
Printing speed drops when printing Postcard, Reply postcard, or 4 on 1 postcard.
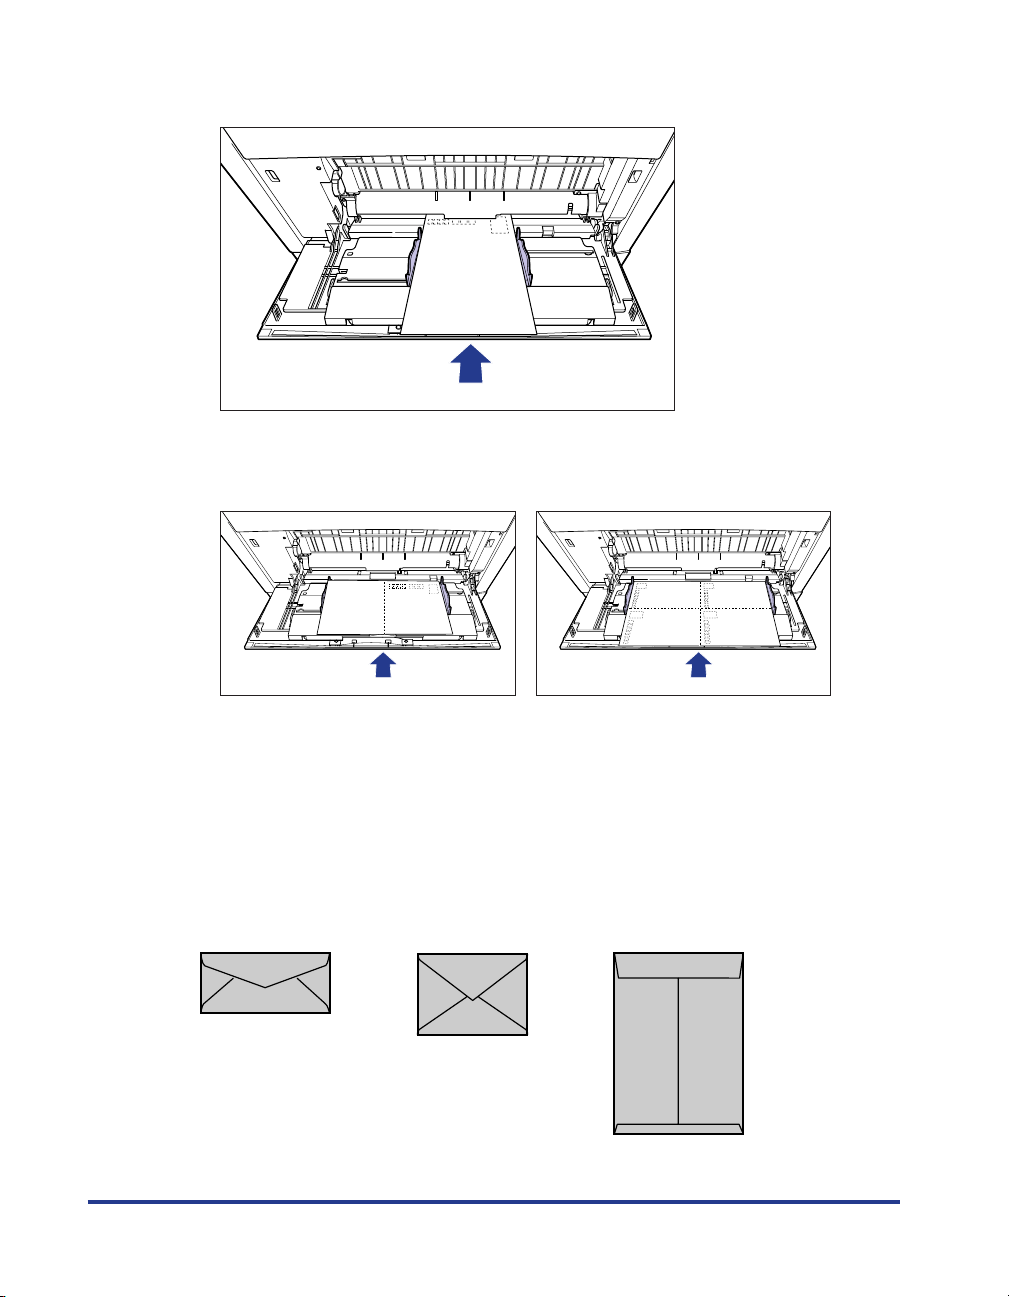
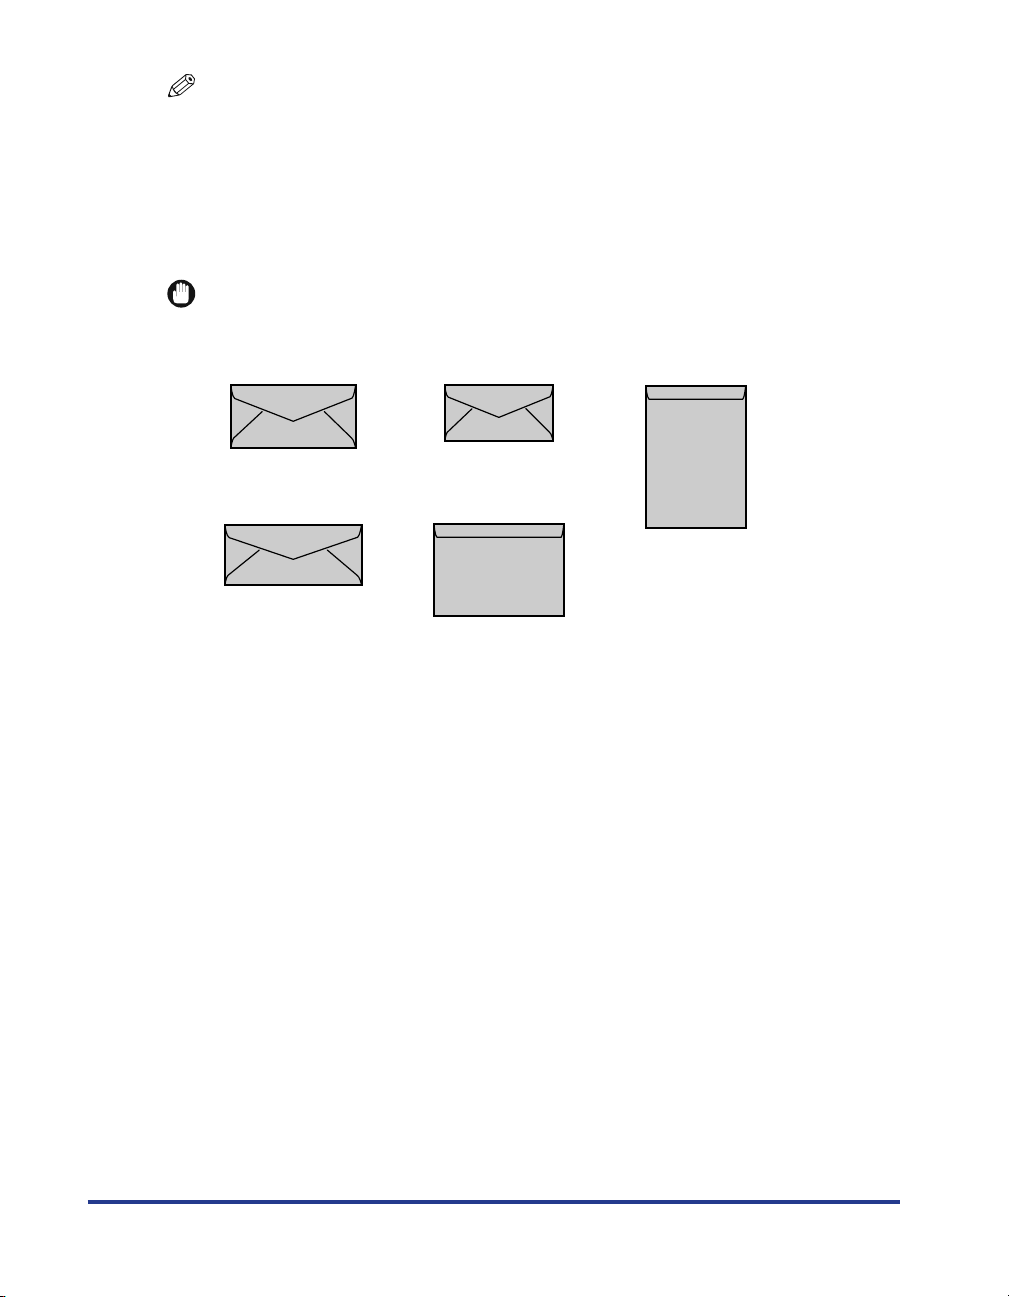
■ Envelope for LBP5910/5910F
The envelopes that can be used with this printer are YOUGATA No.4, YOUGATA No.2, and
KAKUGATA No.2, and the one that have the following structures only. Load the stack of
envelopes with the address side (non-glued side) facing down in the multi-purpose tray.
KAKUGATA No.2
YOUGATA No.4
(105 mm x 235 mm)
*You cannot use envelopes at sizes of YOUGATA No.4
and YOUGATA No.2 that have a flap on the short edge.
YOUGATA No.2
(114 mm x 162 mm)
(240 mm x 332 mm)
(Envelope K-201G for LBP that
Canon recommends)
Page 20
IMPORTANT
•
Do not use the following types of envelopes. Using inappropriate envelopes may result in
paper jams that are difficult to clear or may result in damage to the printer.
-Envelopes with fasteners or snaps
-Envelopes with address windows
-Envelopes with adhesive on the surface
-Wrinkled or creased envelopes
-Poorly manufactured envelopes in which the glued parts are uneven
- Irregularly-shaped envelopes
•
Before loading the envelopes, flatten the stack of envelopes to release any remaining air,
and press the fold lines along the edges tight.
•
Do not print on the reverse side (glued side) of envelopes.
•
When loading YOUGATA No.4 and YOUGATA No.2, load them so that the flap is toward
the left of the printer when viewed from the front.
•
When loading envelopes at size of KAKUGATA No.2, leave the flaps open and load them
so that the bottom of the envelopes is toward the back of the printer when viewed from
the front.
•
Printing speed drops when printing envelops.
19
Page 21
■
NOTE
When printing envelopes, they may be creased.
Envelope for LBP5610
The envelopes that can be used with this printer are Envelope DL, Envelope COM10,
Envelope C5, Envelope Monarch, and Envelope B5, and the one that have the following
structures only. Load the stack of envelopes with the address side (non-glued side) facing
down in the multi-purpose tray.
IMPORTANT
•
The printable envelope types are shown below:
Envelope DL
(110.0 mm x 220.0 mm)
Envelope COM10
(104.9 mm x 241.3 mm)
*You cannot use envelopes at sizes of DL, COM10, Monarch, and C5 that have a flap
on the short edge.
•
Do not use the following types of envelopes. Using inappropriate envelopes may result in
Envelope Monarch
(98.5 mm x 190.5 mm)
Envelope C5
(162.0 mm x 229.0 mm)
Envelope B5
(176.0 mm x 250.0 mm)
paper jams that are difficult to clear or may result in damage to the printer.
-Envelopes with fasteners or snaps
-Envelopes with address windows
-Envelopes with adhesive on the surface
-Wrinkled or creased envelopes
-Poorly manufactured envelopes in which the glued parts are uneven
- Irregularly-shaped envelopes
•
Before loading the envelopes, flatten the stack of envelopes to release any remaining air,
and press the fold lines along the edges tight.
•
Do not print on the reverse side (glued side) of envelopes.
20
Page 22

•
When loading DL, COM10, C5 or Monarch, load them so that the flap is toward the left of
the printer when viewed from the front.
•
When loading envelopes at size of Envelope B5, close the flaps and load them so that
the bottom of the envelopes is toward the front of the printer when viewed from the front.
•
Printing speed drops when printing envelops.
NOTE
When printing envelopes, they may be creased.
Printable Area
The following shows the printable area of this printer. If you have selected the [Print
with Upper Left of Sheet as Starting Point] check box in the [Finishing Details]
dialog box in the printer driver, however, you can extend the printable area to near
the edges of the paper. For more details, see Online Help in the printer driver.
21
Page 23
NOTE
If you are using LBP5610, and the paper is 315 mm wide or more, the right and left
margins are extended according to the width as follows.
Paper Width Margin
315 mm 5 mm
316 mm 5.5 mm
317 mm 6 mm
318 mm 6.5 mm
319 mm 7 mm
320 mm 7.5 mm
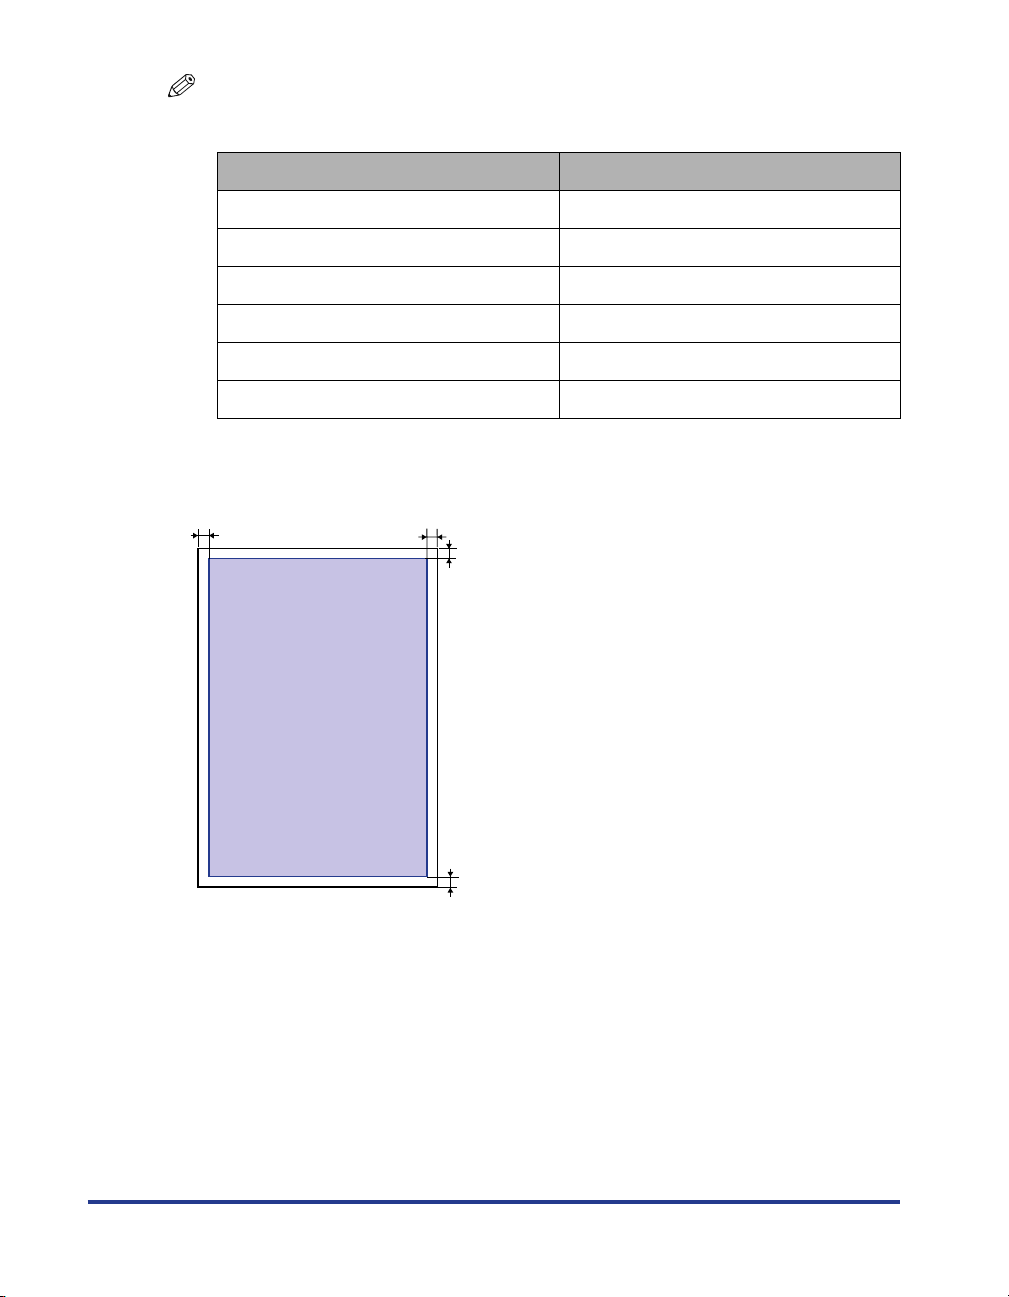
■ Plain Paper / Heavy Paper / Coated Paper / Label
You cannot print on any area within 5 mm of the edges of paper.
5 mm5 mm
5 mm
22
5 mm
■ Postcard / Reply postcard / 4 on 1 postcard (Only for LBP5910/5910F)
You cannot print on any area within 5 mm of the edges of postcard.
Page 24
2
■
100 mm
123-4567
東京都千代田区
○○○
148 mm
5 mm5 mm
5 mm
123-4567
東京都千代田区
○○○
5 mm
200 mm
5 mm
148 mm
5 mm
5 mm5 mm
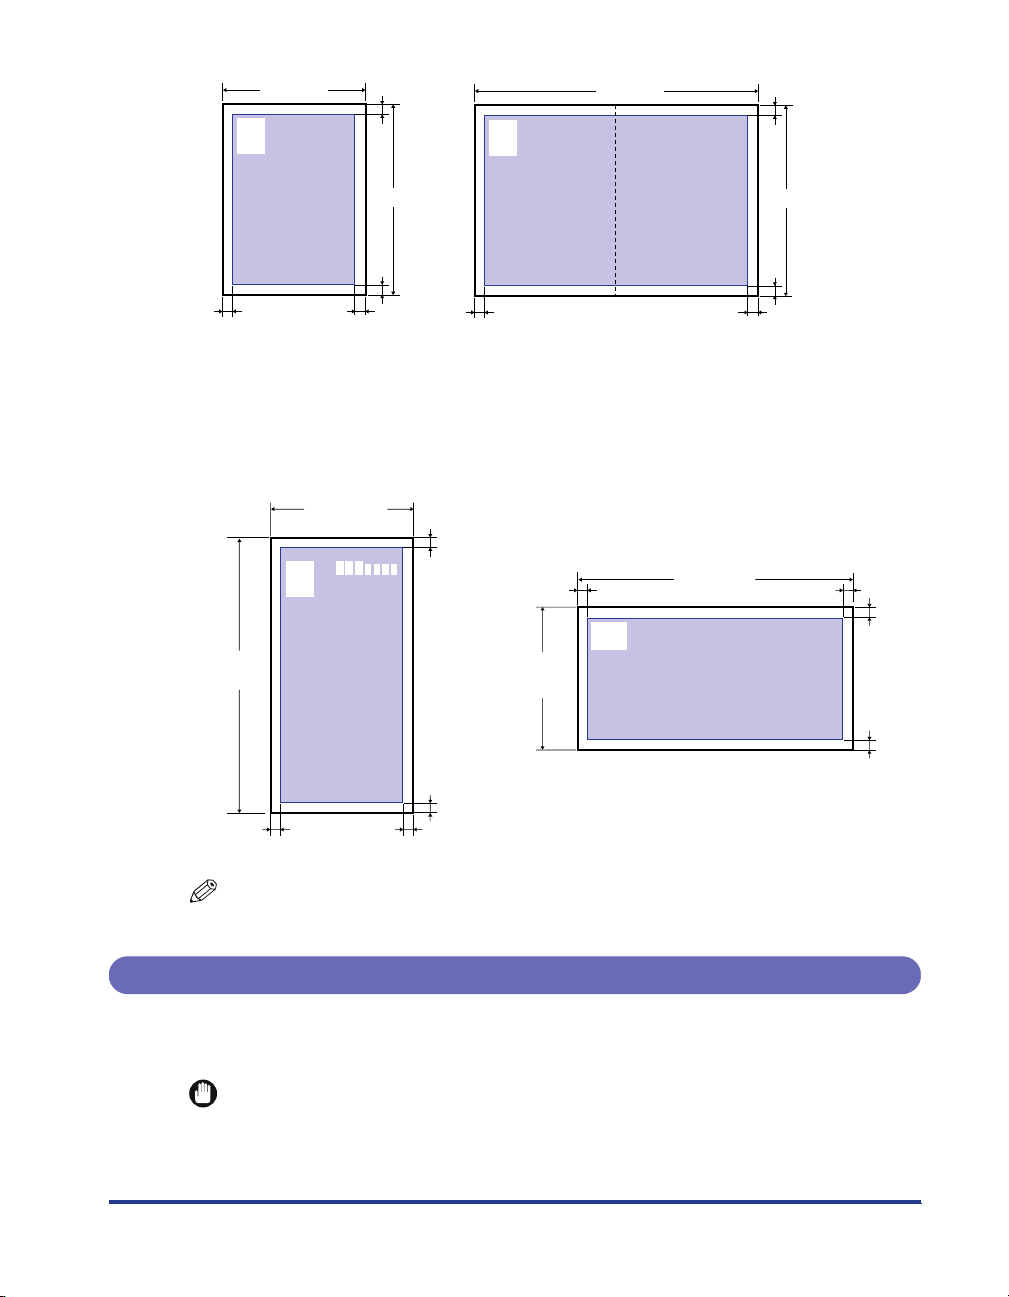
Envelopes
You cannot print on any area within 10 mm of the edges of an envelope.
You may have to change the printable area before printing, depending on the application
you use.
Sample: YOUGATA No.4 (LBP5910/5910F)
105 mm
10 mm
Sample: Envelope COM 10 (LBP5610)
10 mm
241.3 mm
10 mm
10 mm
35 mm
10 mm10 mm
104.9 mm
10 mm
10 mm
NOTE
If you are using LBP5610, the margins on all sides of custom envelopes are 5 mm.
Unusable Paper
To avoid problems such as paper jams and other malfunctions, the following types
of paper should never be used:
IMPORTANT
•
Paper that jams easily
-Paper that is too thick or too thin
23
Page 25

- Irregularly-shaped paper
-Wet or moist paper
-Torn or damaged paper
- Rough, extremely smooth, or glossy paper
-Paper with binding holes or perforations
- Curled or creased paper
- Specially coated paper (coated paper for ink jet printers, etc.)
- Labels with backing sheet that is easily peeled off
-Paper that has already been printed by a copy machine or another laser printer (The
reverse side of the paper is also unusable.). Using the multi-purpose tray, however, you
can perform 2-sided printing manually on the back of previously printed paper. You
cannot print on the printed side again.
-Paper with jagged edges
-Wrinkled paper
-Paper with the corners folded
•
Paper that changes its quality at a high temperature
-Paper that contains ink that melts, burns, evaporates or emits harmful gases at or lower
than the heating temperature (approx. 190 °C) of the fixing unit
- Heat-sensitive paper
-Treated color paper
- Specially coated paper (coated paper for ink jet printers, etc.)
-Paper with adhesive on the surface
•
Paper that causes printer malfunctions or damages the printer
- Carbon paper
-Paper with staples, clips, ribbons or tapes
-Paper that has already been printed by a copy machine or another laser printer (The
reverse side of the paper is also unusable.). Using the multi-purpose tray, however, you
can perform 2-sided printing manually on the back of previously printed paper. You
cannot print on the printed side again.
•
Paper that is difficult for the toner to fix onto
-Paper with rough surfaces
- Specially coated paper (coated paper for ink jet printers, etc.)
-Paper containing thick fibers
24
Page 26
Paper Capacity of Paper Source
Paper Source
Paper Type
Plain Paper
(When plain paper that
weighs 64g/m
2
is used)
Heavy Paper
(When heavy paper that
weighs 128g/m
2
is used)
Coated Paper
Labels
Postcard
(Only for LBP5910/5910F)
Reply Postcard
(Only for LBP5910/5910F)
4 on 1 Postcard
(Only for LBP5910/5910F)
4 on 1 Postcard
Recommended by Canon
Multi-
purpose
Tray
Approx.
100 sheets
Approx. 50
sheets
Approx. 50
sheets
Approx. 40
sheets
Approx. 40
sheets
Approx. 40
sheets
Approx. 40
sheets
Approx. 50
sheets
Cassette 1
Approx.
250 sheets
Cassette 2
(Optional)
Approx.
550 sheets
Cassette 3
(Optional)
Approx.
550 sheets
Cassette 4
(Optional)
Approx.
550 sheets
- ---
- ---
Approx. 50
sheets
Approx. 50
sheets
Approx. 50
sheets
Approx. 50
sheets
- ---
- ---
- ---
- ---
Envelopes
Approx. 10
sheets
Paper Capacity of the Output Tray
Paper Type
Plain Paper (When plain paper that
weighs 64 g/m 2 is used)
Heavy Paper (When heavy paper that
weighs 128g/m
Coated Paper Approx. 150 sheets Approx. 80 sheets
2
is used)
- ---
Output Tray*
1
LBP5910/5610 LBP5910F
Approx. 250 sheets Approx. 250 sheets*
Approx. 200 sheets Approx. 100 sheets
2
25
Page 27
Output Tray*
1
Paper Type
LBP5910/5610 LBP5910F
Labels Approx. 100 sheets Approx. 100 sheets
Postcard (Only for LBP5910/5910F) Approx. 50 sheets Approx. 50 sheets
Reply Postcard (Only for LBP5910/
5910F)
4 on 1 Postcard (Only for LBP5910/
5910F)
4 on 1 Postcard Recommended by
Canon
Envelopes Approx. 20 sheets Approx. 20 sheets*
*1Actual paper capacity varies depending on the installation environment or paper type.
*2Indicates the number for when A4, B5, A5, Letter, or Executive size paper is loaded. For the other sizes, the number
varies as follows.
- A3, B4, Ledger (11 x 17), or Legal: Approx. 150 sheets (64 g/m
- SRA3 or 12 x 18: Approx. 100 sheets (64 g/m2)
*3For KAKUGATA No.2 envelopes, the capacity is approximately 10 sheets.
Approx. 50 sheets Approx. 50 sheets
Approx. 50 sheets Approx. 50 sheets
Approx. 200 sheets Approx. 100 sheets
2
)
3
26
Page 28
Loading Paper in the Paper Cassette
The following kinds of paper can be loaded in the paper cassette.
Paper Type Paper Size Loading Procedure
A3, B4, A4, B5, A5,
Plain paper
Labels A4*
*1Only when the optional paper feeders are installed
2
*
A4 size label that Canon recommends
IMPORTANT
For more details on the usable paper, see "Usable Paper," on p. 12.
Ledger (11x17), Legal,
Letter, Executive
Custom paper sizes*1p. 45
2
When Loading Paper in Cassette 1: p. 27
When Loading Paper in Cassette 2, 3, or 4*
When Loading Paper in Cassette 1: p. 27
When Loading Paper in Cassette 2, 3, or 4*1: p. 36
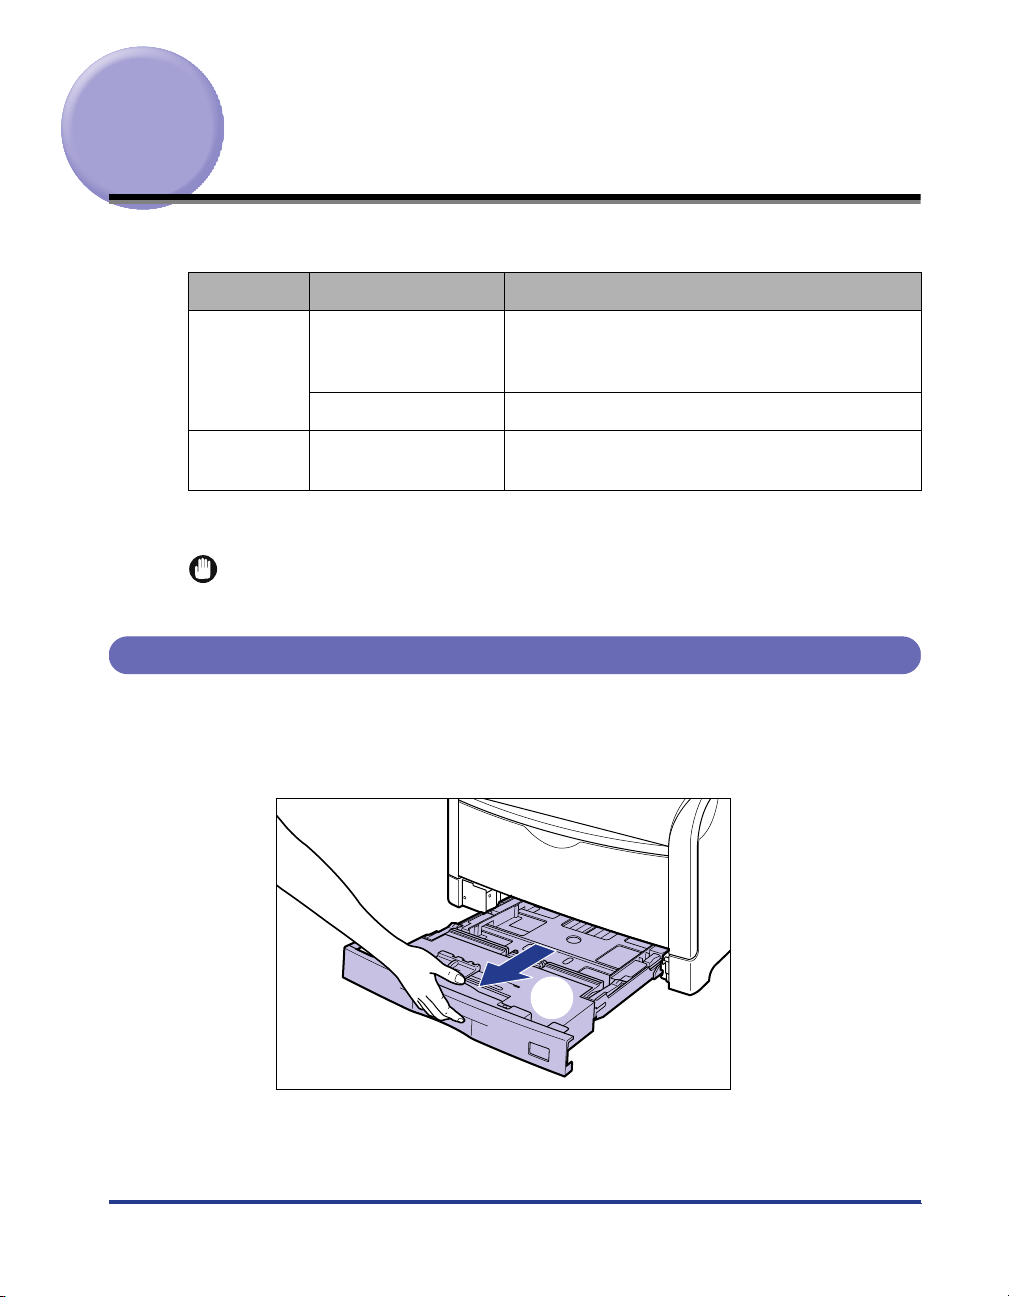
When Loading Paper in Cassette 1
1
Pull the paper cassette out.
Pull the paper cassette out until it stops a.
1
: p. 36
a
27
Page 29
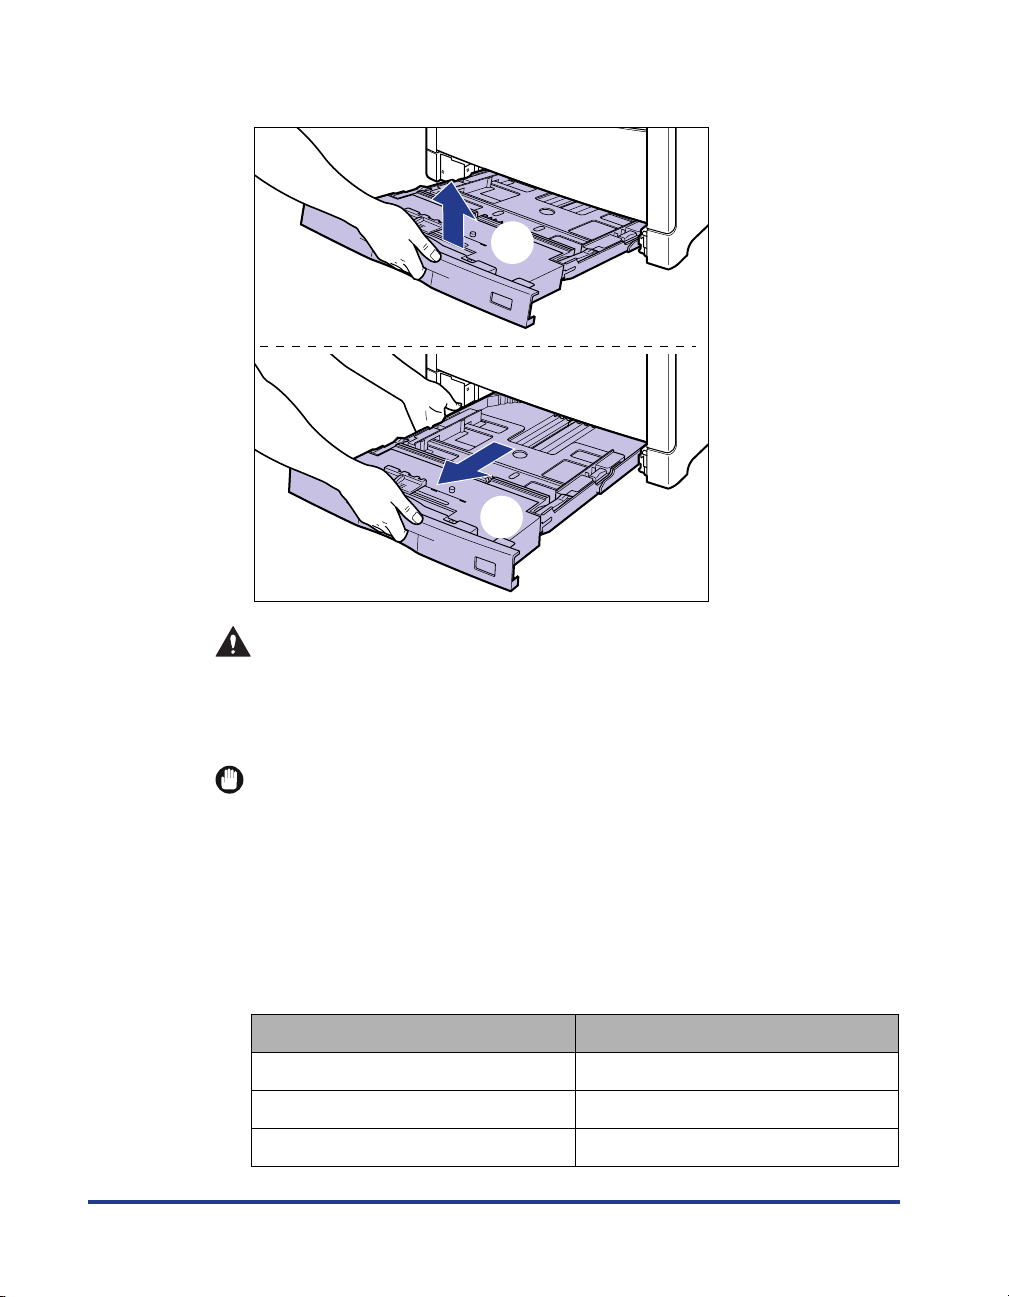
After lifting the paper cassette up a little b, pull it out while supporting it with
other hand as shown in the figure c.
b
c
CAUTION
Be sure to take the paper cassette out of the printer before loading paper.
If paper is loaded while the paper cassette is partially pulled out, the paper
cassette may drop or the printer may become damaged resulting in
personal injury.
28
IMPORTANT
The paper cassette cannot be pulled out horizontally. If you try to pull it out
forcefully, this may result in damage to the paper cassette.
2
When changing the size of the paper to be loaded, adjust the
length of the paper cassette and change the positions of the
paper guides.
The paper sizes indicated on the paper guides are abbreviated as follows.
Paper Size Paper Guides
Ledger 11 x 17
Legal LGL
Letter LTR
Page 30
Paper Size Paper Guides
Executive EXEC
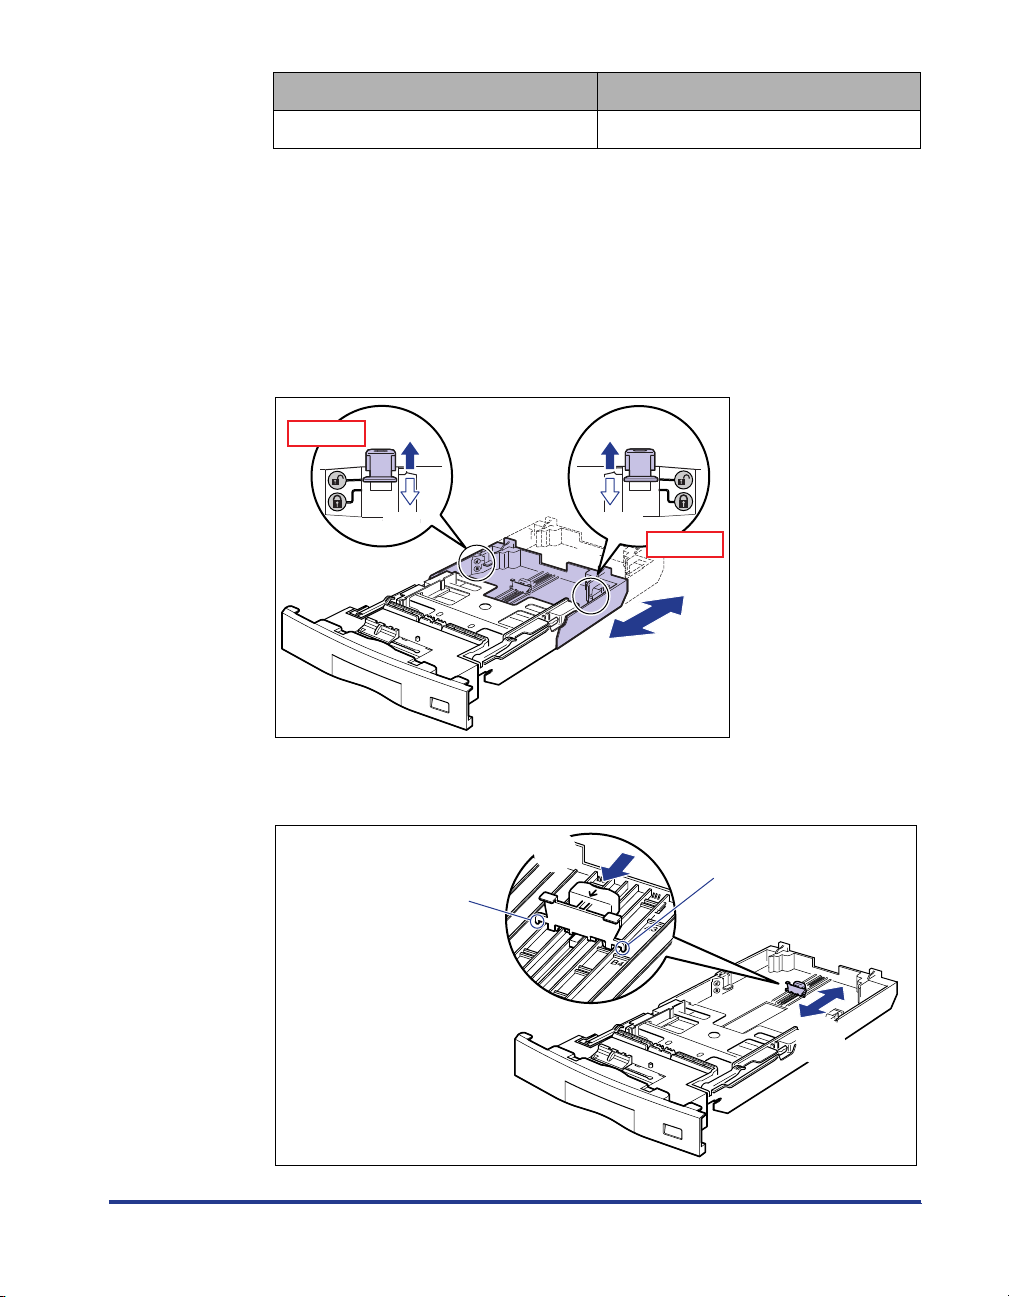
● Adjust the length of the paper cassette according to the size of the
paper to be loaded.
When loading paper in landscape orientation, such as when loading A4, B5, A5,
Letter, or Executive size paper, shorten the paper cassette.
When loading paper in portrait orientation, such as when loading A3, B4, Ledger
(11X17), or Legal size paper, extend the paper cassette.
To adjust the length of the paper cassette, push up the lock release levers gently
to release the lock, slide the paper cassette by holding the rear portion of the
paper cassette, and then push down the lock release levers to lock the cassette.
Side View
Release
Lock
Release
Lock
Side View
● While holding the lock release lever of the rear paper guide a, slide
the guide to the mark for the size of the paper to be loaded b.
a
Align the position of this
Align the position of this
part with the left side of
the paper size to be
loaded
part with the right side
of the paper size to be
loaded
b
29
Page 31

● While holding the lock release lever of the side paper guide a, slide
the guide to the mark for the size of the paper to be loaded b.
The side paper guides move together.
Top View
Align this part
with the paper
size to be
loaded
Top View
a
b
3
When loading labels, fan them in small batches and align the
edges.
Fan in small batches
Align the edges of the stack
on a hard and flat surface
30
CAUTION
When loading paper, take care not to cut your hands with the edges of the
paper.
IMPORTANT
Be sure to fan the labels thoroughly before loading them. If they are not fanned
enough, multiple sheets of paper may be fed at once, causing paper jams.
Page 32

4
Load the paper stack so that the rear edge is aligned with the
paper guide.
CAUTION
When loading paper, take care not to cut your hands with the edges of the
paper.
IMPORTANT
•
Be sure to check if the paper guide is at the position of the size of the loaded paper.
If the paper guide is set at a wrong position, this may result in misfeeds.
•
If you use paper that has been poorly cut, multiple sheets of paper may be fed at
once. In this case, align the edges of the stack on a hard, flat surface.
NOTE
To print letterhead paper or paper printed with a logo, see "Paper Loading
Orientation" (p. 70) and load the paper in the proper orientation.
31
Page 33

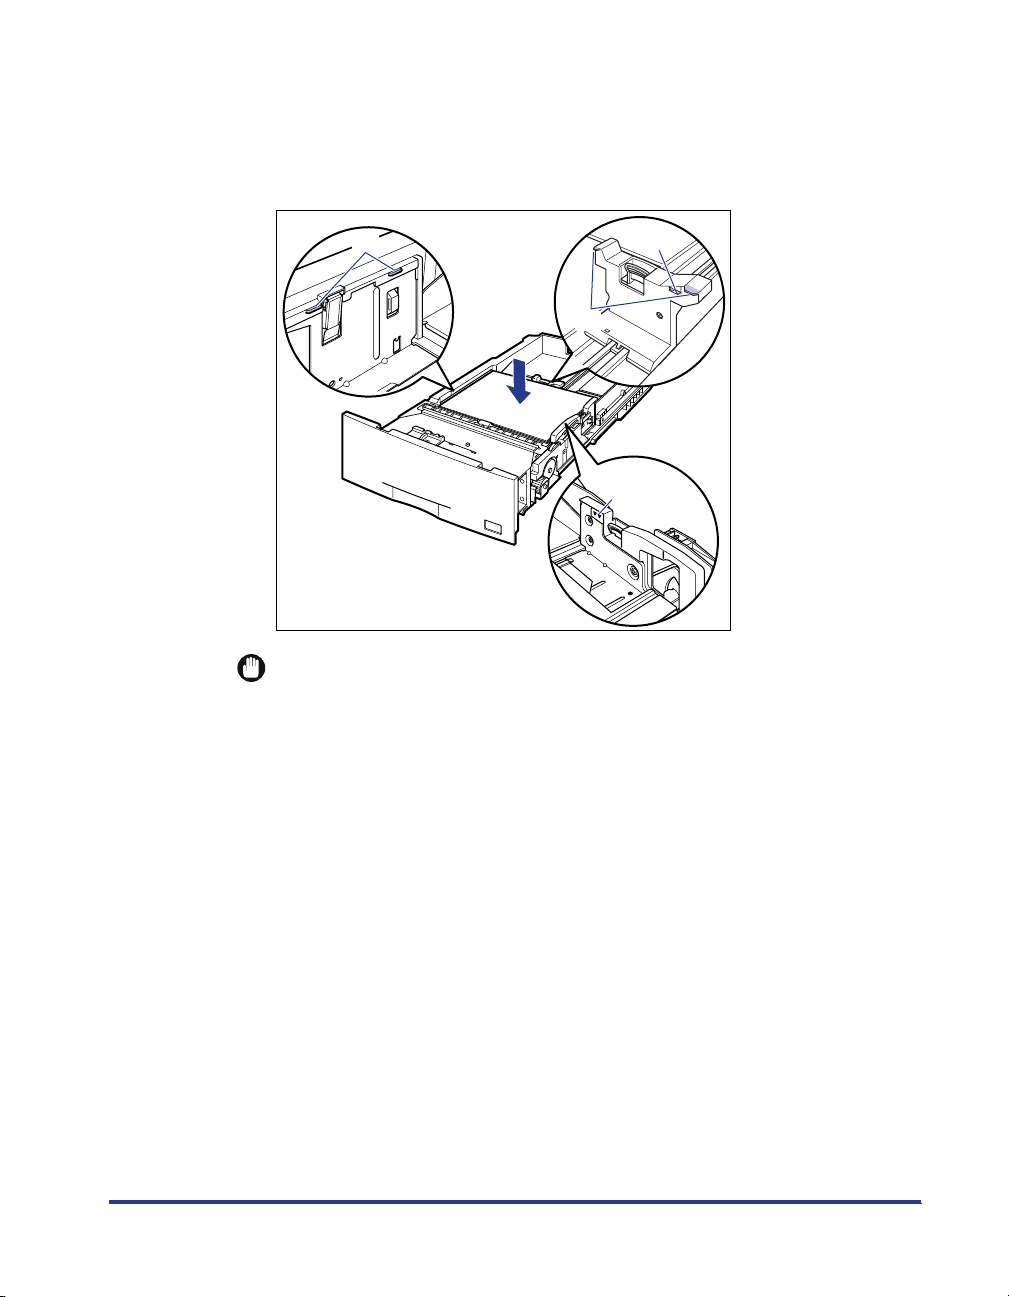
5
Press down the paper stack so that it is loaded under the
hooks on the side paper guides (A).
Make sure that there is sufficient space between the hooks and paper stack. If
there is no sufficient space, slightly reduce the amount of paper.
(A)
(B)
IMPORTANT
Up to approximately 250 sheets of plain paper (64 g/m 2) or approximately 50
sheets of labels can be loaded in the paper cassette. Be sure that the paper stack
does not exceed the load limit marks (B) on the paper guides. If the paper stack
exceeds the load limit marks, this may result in misfeeds.
(A)
(B)
32
Page 34

6
Attach the label for the size of the loaded paper to the paper
size indicator, and insert the guide into the paper size slot at
the front of the paper cassette.
7
Hold the tab (B) of the paper size setting switch (A) a, and
align the paper size with the triangular mark of the paper size
setting switch
The following shows the abbreviations of paper sizes that are marked on the
paper cassette.
b.
Paper Size Paper Size Setting Switch of a Paper Cassette
Ledger 11 x 17
Legal LGL
Letter LTR
Executive EXEC
33
Page 35

The default is "A4".
(B)
a
b
(A)
IMPORTANT
Make sure that the size of the loaded paper matches that of the paper size setting
switch before setting the paper cassette in the printer. If the size indicated by the
paper size setting switch does not match, this may result in printer malfunction.
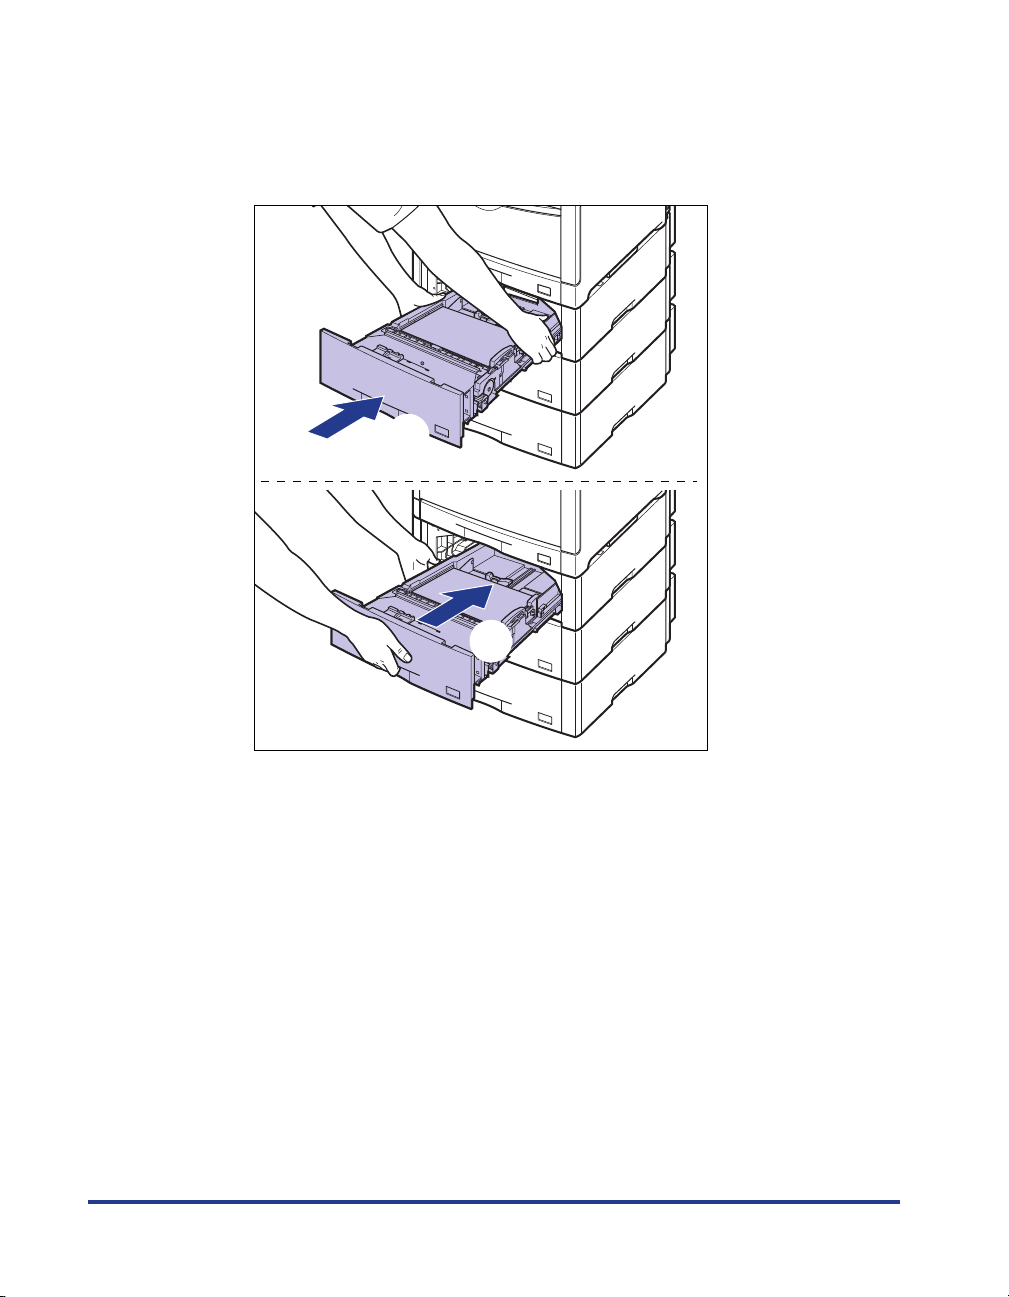
8
Set the paper cassette in the printer.
While holding the paper cassette with both hands and insert it until it stops a as
shown in the figure.
34
a
Page 36

After lifting the front of the paper cassette up a little b, push the paper cassette
into the printer firmly until the front side of the paper cassette is flush with the
front surface of the printer c.
b
c
CAUTION
When setting the paper cassette to the paper feeder, be careful not to
catch your fingers.
35
Page 37

When Loading Standard Size Paper in Cassette 2, 3, or 4
1
Pull the paper cassette out.
Pull the paper cassette out until it stops a.
a
36
Page 38

After lifting the paper cassette up a little b, pull it out while supporting the
(A)
cassette with your left hand until the handle (A) on the right side of the paper
cassette appears completely c.
b
c
While holding the paper cassette with both hands, pull it out completely d as
shown in the figure.
d
37
Page 39

CAUTION
Be sure to take the paper cassette out of the paper feeder before loading
paper. If paper is loaded while the paper cassette is partially pulled out, the
paper cassette may drop or the printer may become damaged resulting in
personal injury.
IMPORTANT
•
The paper cassette cannot be pulled out horizontally. If trying to pull it out forcefully,
this may result in damage to the paper cassette.
•
Because the paper cassette is heavy, hold it with your both hands securely.
•
Place the removed paper cassette on an even and stable surface.
2
When changing the size of the paper to be loaded, change the
positions of the paper guides.
The paper sizes indicated on the paper guides are abbreviated as follows.
Paper Size Paper Guides
Ledger 11 x 17
Legal LGL
Letter LTR
Executive EXEC
38
● While holding the lock release lever of the rear paper guide a, slide
the guide to the mark for the size of the paper to be loaded b.
a
b
Page 40

● While holding the lock release lever of the side paper guide a, slide
the guide to the mark for the size of the paper to be loaded b.
The side paper guides move together.
b
a
3
When loading labels, fan them in small batches and align the
edges.
Fan in small batches
CAUTION
When loading paper, take care not to cut your hands with the edges of the
paper.
NOTE
Be sure to fan the labels thoroughly before loading them. If they are not fanned
enough, multiple sheets of paper may be fed at once, causing paper jams.
Align the edges of the stack
on a hard and flat surface
39
Page 41

4
Load the paper stack so that the rear edge is aligned with the
paper guide.
CAUTION
When loading paper, take care not to cut your hands with the edges of the
paper.
IMPORTANT
•
Be sure to check if the paper guide is at the position of the size of the loaded paper.
If the paper guide is set at a wrong position, this may result in misfeeds.
•
If you use paper that has been poorly cut, multiple sheets of paper may be fed at
once. In this case, align the edges of the stack on a hard, flat surface.
40
NOTE
To print letterhead paper or paper printed with a logo, see "Paper Loading
Orientation" (p. 70) and load the paper in the proper orientation.
Page 42
5
Press down the paper stack so that it is loaded under the
hooks on the side paper guides (A).
Make sure that there is sufficient space between the hooks and paper stack. If
there is no sufficient space, slightly reduce the amount of paper.
(B)
(B)
IMPORTANT
Up to approximately 550 sheets of plain paper (64 g/m 2) or approximately 50
sheets of labels can be loaded in the paper cassette. Be sure that the paper stack
does not exceed the load limit marks (B) on the paper guides. If the paper stack
exceeds the load limit marks, this may result in misfeeds.
(A)
(A)
41
Page 43

6
Attach the label for the size of the loaded paper to the paper
size indicator, and insert the guide into the paper size slot at
the front of the paper cassette.
7
Hold the tab (B) of the paper size setting switch (A) a, and
align the paper size with the triangular mark of the paper size
setting switch
The following shows the abbreviations of paper sizes that are marked on the
paper cassette.
Paper Size Paper Size Setting Switch of a Paper Cassette
b.
42
Ledger 11 x 17
Legal LGL
Letter LTR
Executive EXEC
Page 44

The default is "A3".
(B)
a
CUSTOM
b
(A)
IMPORTANT
Make sure that the size of the loaded paper matches that of the paper size setting
switch before setting the paper cassette in the printer. If the size indicated by the
paper size setting switch does not match, this may result in printer malfunction.
43
Page 45
8
Set the paper cassette in the paper feeder.
While holding the paper cassette with both hands, push it to the position shown
in the figure a. Then, hold the front of the paper cassette with your right hand
and push it until it stops b.
a
b
44
Page 46

After lifting the front of the paper cassette up a little c, push the paper cassette
into the printer firmly until the front side of the paper cassette is flush with the
front surface of the paper feeder d.
c
d
CAUTION
When setting the paper cassette to the paper feeder, be careful not to
catch your fingers.
When Loading Custom Size Paper (Non-Standard Size Paper) in Cassette 2, 3, or 4
IMPORTANT
•
The following size of custom paper can be loaded.
- In case of portrait orientation: Width 210.0 - 297.0mm, Length 210.0 - 431.8mm
- In case of landscape orientation (Only when LIPS LX printer driver is used): Width
210.0 - 297.0mm, Length 148.0 - 297.0mm
•
When loading custom paper size in case of LBP5910/5910F, set <
> as follows.
ウシサイズ
- In case of landscape orientation: <
- In case of portrait orientation: <
>
ユーザセッテイサイズ
ユーザセッテイサイズR
>
カセットN(N=2,3,4)ヨ
45
Page 47

•
When changing orientation of custom paper size to be loaded frequently in case of
ツカウ
> to <
> message is
>, the printer
LBP5910/5910F, it is convenient to set <
is not necessary to change the setting for <
time to change orientation of the paper to be loaded. Observe the following guidelines
when setting to <
- Be sure to check if the size of loaded paper matches the settings of the paper size in
the printer driver before printing. If it differs, <
displayed and the printer may stop the operation or may cause paper jams. Be sure to
check if the size of loaded paper matches the settings of the paper size in the printer
driver before printing. However, if setting <
operates without detecting the paper size regardless of difference between the paper
size set in the printer driver and that of paper loaded in the paper cassette.
-When printing with LIPS LX printer driver, the paper can be loaded in portrait or
landscape orientation, but if printing custom paper of 297.0 mm long or less, load it in
landscape orientation. Also, when not using LIPS LX printer driver, load the paper in
portrait orientation.
•
When loading custom paper size in case of LBP5610, set the feeding direction of loaded
paper in [Feed Direction of Custom Paper Size] in [Cassettes Settings] dialog box in the
Printer Status Window.
1
Pull the paper cassette out.
Pull the paper cassette out until it stops a .
フリー
>.
カセットN(N=2,3,4)ヨウシサイズ
カセットN(N=2、3、4)ヨウシサイズ
41 ヨウシサイズ カクニン
> to <
トクシュモードJ
フリー
> each
>. It
46
a
Page 48

After lifting the paper cassette up a little b , pull it out while supporting the
(A)
cassette with your left hand until the handle (A) on the right side of the paper
cassette appears completely c .
47
b
c
While holding the paper cassette with both hands, pull it out completely d as
shown in the figure.
d
CAUTION
Be sure to take the paper cassette out of the paper feeder before loading
paper. If paper is loaded while the paper cassette is partially pulled out, the
paper cassette may drop or the printer may become damaged resulting in
personal injury.
Page 49

IMPORTANT
•
The paper cassette cannot be pulled out horizontally. If trying to pull it out forcefully,
this may result in damage to the paper cassette.
•
Because the paper cassette is heavy, hold it with your both hands securely.
•
Place the removed paper cassette on an even and stable surface.
2
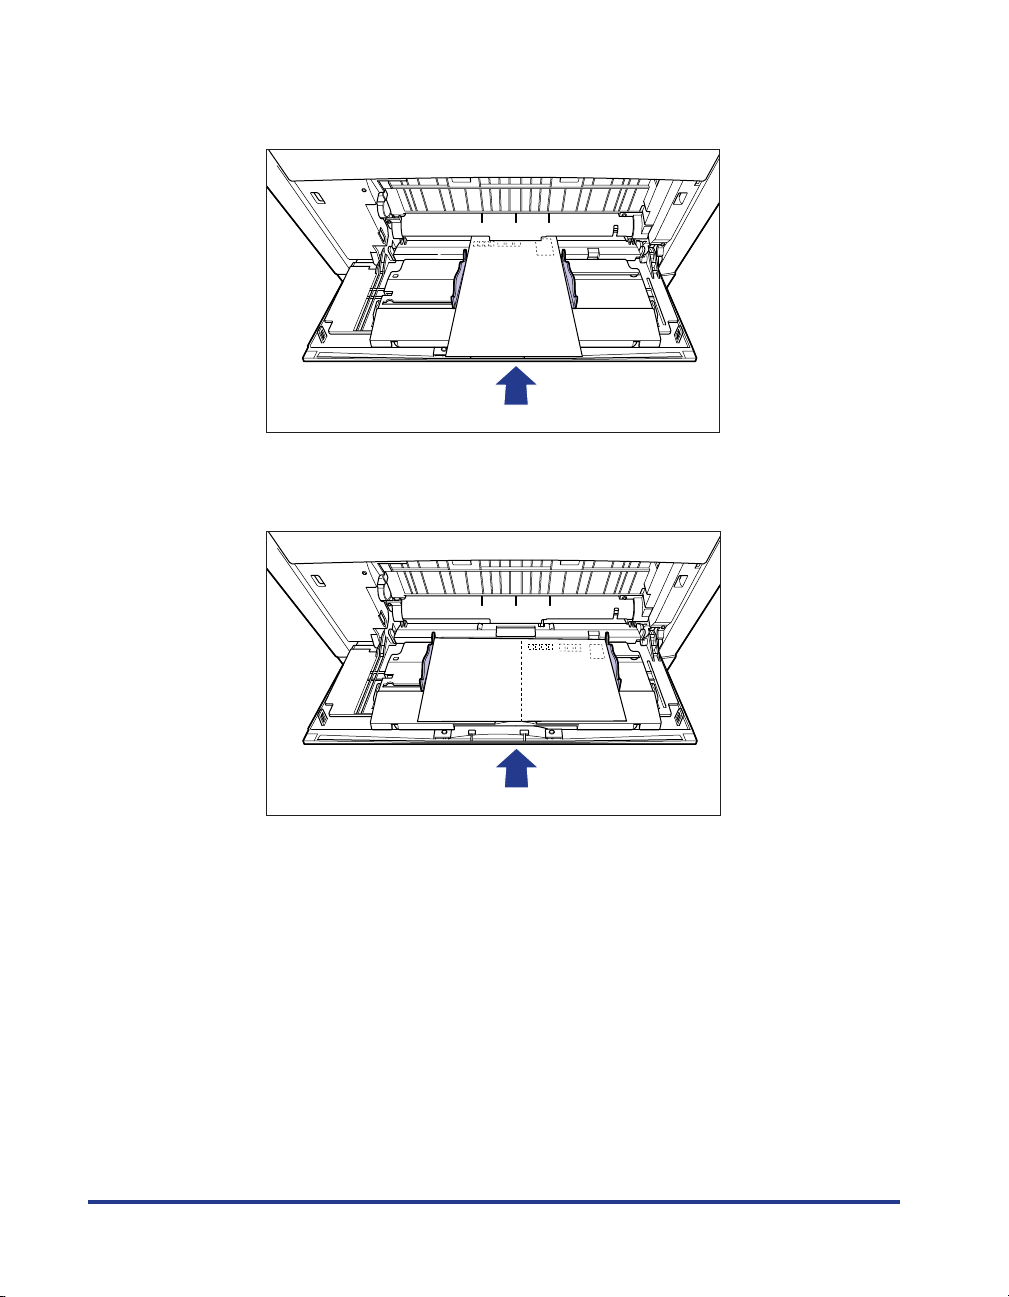
Load paper so that the edge of the paper is aligned with the
front side of the paper cassette.
CAUTION
When loading paper, take care not to cut your hands with the edges of the
paper.
48
IMPORTANT
If you use paper that has been poorly cut, multiple sheets of paper may be fed at
once. In this case, align the edges of the stack on a hard, flat surface.
NOTE
•
If <
カセットN(N=2、3、4)ヨウシサイズ
menu is set to <
less as follows according to your printer driver before printing.
When using LIPS LX printer driver: load the paper in landscape orientation
When not using LIPS LX printer driver: load the paper in portrait orientation
To print letterhead paper or paper printed with a logo, see "Paper Loading
•
Orientation" (p. 70) and load the paper in the proper orientation.
>, load custom paper of its long edges 297.0 mm long or
フリー
> in the
キュウシ
options of the
セットアップ
Page 50

3
Slide the paper guides.
While holding the lock release lever of the rear paper guide
the guide to the mark for the size of the paper to be loaded
a
b
While holding the lock release lever of the side paper guide
the guide to the mark for the size of the paper to be loaded
The side paper guides move together.
b
, slide
a
b
a
, slide
b
.
●
. ●
a
49
Page 51

IMPORTANT
Be sure to align the paper guides with the width of the paper. If the paper guides
are too loose or too tight, this may result in misfeeds or paper jams.
4
Press down the paper stack so that it is loaded under the
hooks on the side paper guides (A).
Make sure that there is sufficient space between the hooks and paper stack. If
there is no sufficient space, slightly reduce the amount of paper.
(B)
(B)
IMPORTANT
Up to approximately 550 sheets of plain paper (64 g/m
paper cassette. Be sure that the paper stack does not exceed the load limit marks
(B) on the paper guides. If the paper stack exceeds the load limit marks, this may
result in misfeeds.
(A)
(A)
2
) can be loaded in the
50
Page 52

5
Hold the tab (B) of the paper size setting switch (A)
a
align the triangular mark of the paper size setting switch with
"CUSTOM"
The default is "A3".
b
.
(B)
, and
CUSTOM
a
b
(A)
IMPORTANT
Make sure that paper size setting switch matches "CUSTOM" before setting the
paper cassette in the printer. If the size indicated by the paper size setting switch
does not match, this may result in printer malfunction.
51
Page 53

6
Set the paper cassette in the paper feeder.
While holding the paper cassette with both hands, push it to the position shown
in the figure a . Then, hold the front of the paper cassette with your right hand
and push it until it stops b .
a
b
52
Page 54

After lifting the front of the paper cassette up a little c , push the paper cassette
into the printer firmly until the front side of the paper cassette is flush with the
front surface of the paper feeder d .
c
d
CAUTION
When setting the paper cassette to the paper feeder, be careful not to
catch your fingers.
53
Page 55

Loading Paper in the Multi-purpose Tray
Paper Type Paper Size Loading Procedure
Plain paper - Standard sizes
A3, B4, A4, B5, A5, SRA3, 12x18, Ledger
(11 x 17), Legal, Letter, Executive,
Statement
Heavy paper
(106 - 169 g/m
Heavy paper
(170 - 220 g/m
2
)
2
)
Coated paper A3*
Labels A4*
-Postcard sizes (Only for LBP5910/5910F)
Postcard (100.0 mm x 148.0 mm), Reply
Postcard (148.0 mm x 200.0 mm), 4 on 1
Postcard (200.0 mm x 296.0 mm)
- Custom paper sizes, Long sizes
- Standard sizes
A3, B4, A4, B5, A5, SRA3, 12x18, Ledger
(11 x 17), Legal, Letter, Executive,
Statement
- Custom paper sizes, Long sizes
1
2
, A4*
3
p. 55
54
- Standard sizes (LBP5910/5910F)
YOUGATA No.4 (105.0 mm x 235.0 mm)
YOUGATA No.2 (114.0 mm x 162.0 mm)
KAKUGATA No.2 *
mm)
Envelopes
- Standard sizes (LBP5610)
Envelope DL (110.0 mm x 220.0 mm)
Envelope COM10 (104.9 mm x 241.3 mm)
Envelope C5 (162.0 mm x 229.0 mm)
Envelope Monarch (98.5 mm x 190.5 mm)
Envelope B5 (176.0 mm x 250.0 mm)
- Custom paper sizes
Postcard
(Only for LBP5910/
5910F)
1
*
A3 size coated paper that Canon recommends
2
*
A4 size coated paper that Canon recommends
3
*
A4 size label that Canon recommends
4
*
Envelope K-201G for LBP that Canon recommends
Postcard (100.0 mm x 148.0 mm)
Reply Postcard (148.0 mm x 200.0 mm)
4 on 1 Postcard (200.0 mm x 296.0 mm)
4
(240.0 mm x 332.0
p. 64
p. 60
Page 56
IMPORTANT
For more details on the usable paper, see "Usable Paper," on p. 12.
When Loading Paper (Other than Postcards and Envelopes)
Use the following procedure to load plain paper, heavy paper, coated paper or label
in the multi-purpose tray.
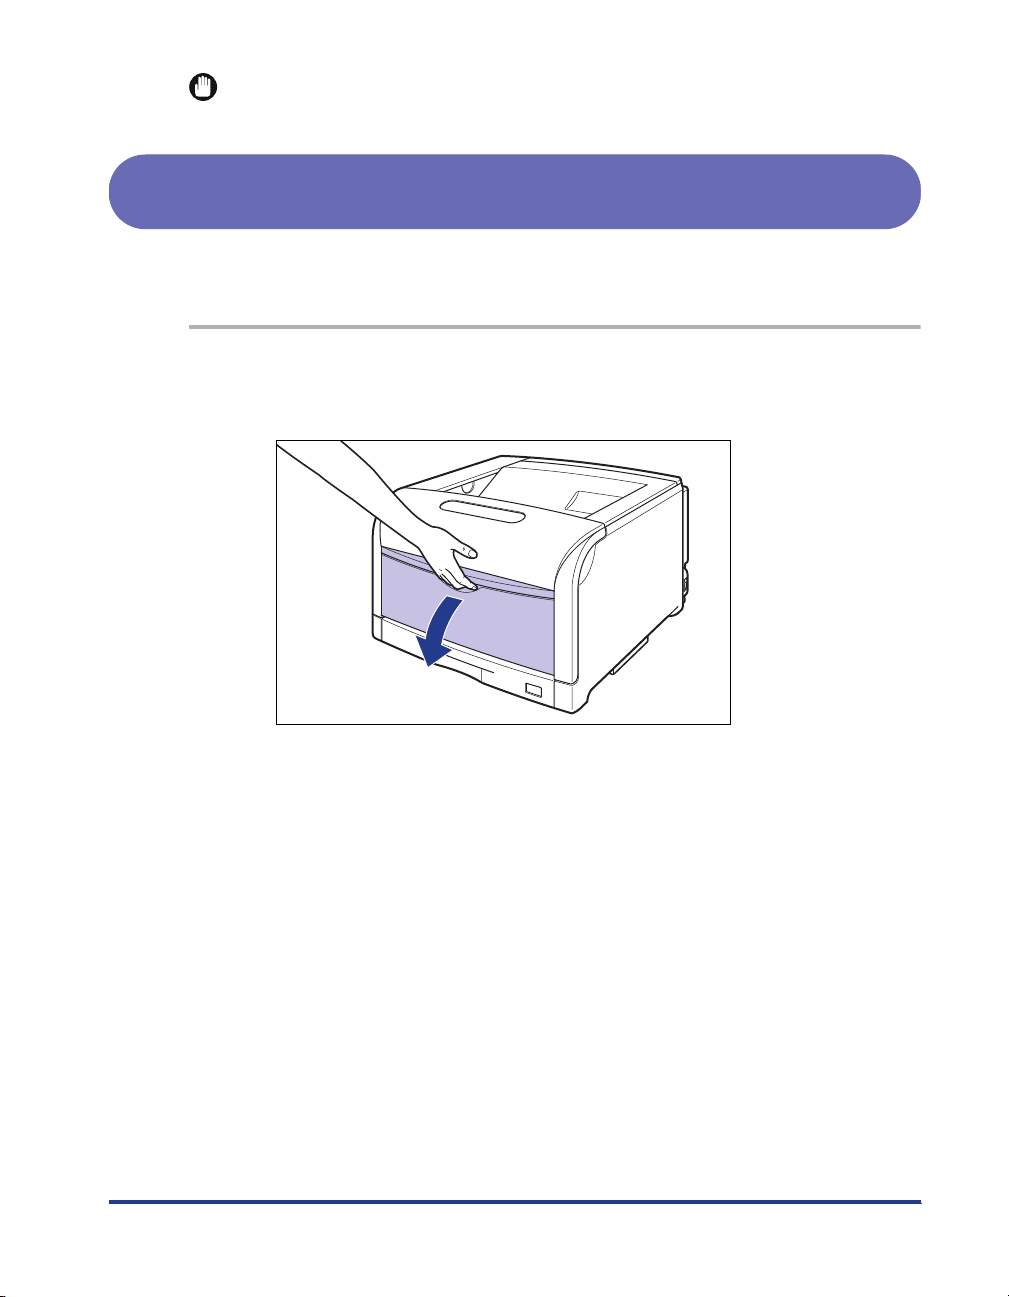
1
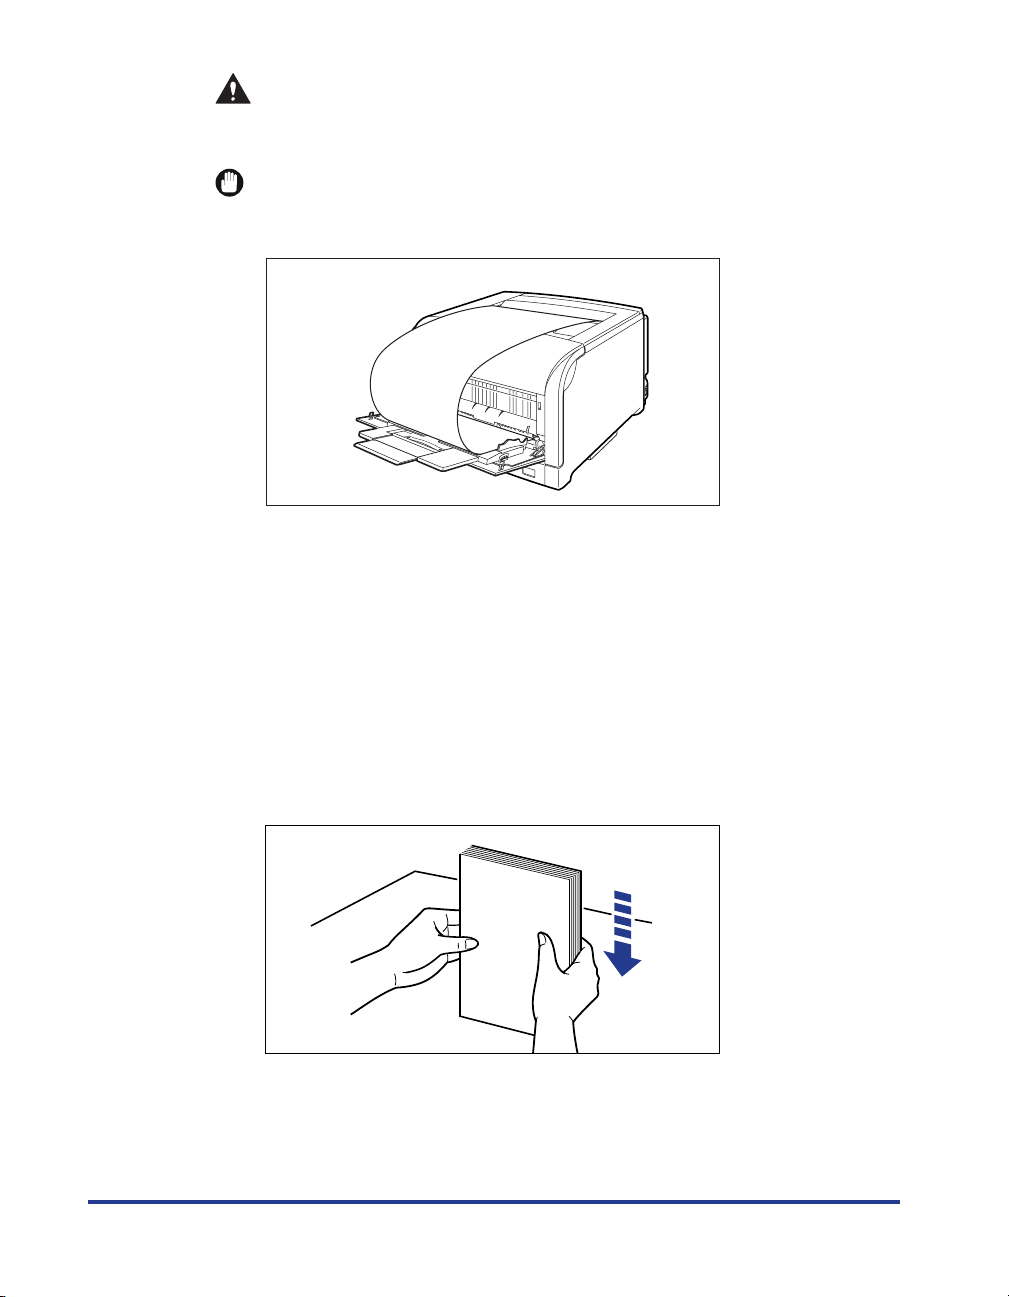
Open the multi-purpose tray.
Hold the tab at the center of the printer, and open the multi-purpose tray.
55
Page 57

When loading the long size paper such as A3, B4, or long size paper, pull the
auxiliary tray out a , and open the extension tray b .
a
b
2
Spread the paper guides a little wider than the actual paper
width.
56
Page 58

Before loading coated paper or labels, fan them in small
3
batches and align the edges.
Fan in small batches
Align the edges of the stack
on a hard and flat surface
CAUTION
When loading paper, take care not to cut your hands with the edges of the
paper.
IMPORTANT
•
Be sure to fan the coated paper or labels thoroughly before loading them. If they
are not fanned enough, multiple sheets of paper may be fed at once, causing paper
jams.
•
When fanning or aligning coated paper, try to hold the edges to avoid touching the
printing surface.
•
Ta ke care not to mark or stain the printing surface of coated paper with fingerprints,
dust, or oil. This may result in poor print quality.
4
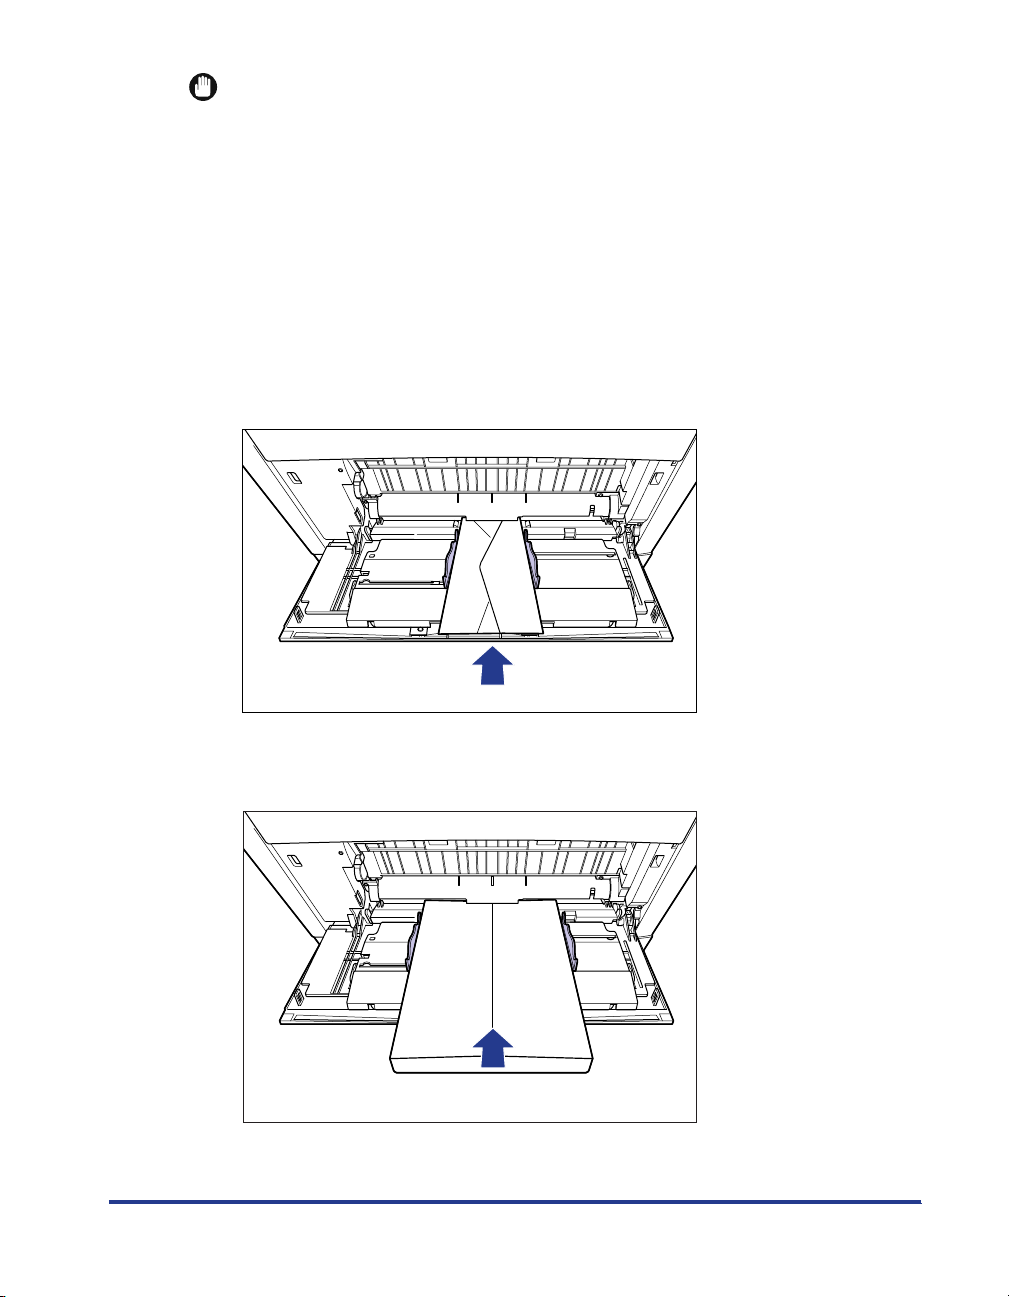
Gently load the stack of paper with the printing side facing
down until it touches the back of the tray.
Make sure that the paper stack does not exceed the load limit marks (A).
(A)
57
Page 59
CAUTION
When loading paper, take care not to cut your hands with the edges of the
paper.
IMPORTANT
•
When loading long size paper, set one piece at a time to the multi-purpose tray as
shown in the figure.
•
The multi-purpose tray can be loaded with up to the number of sheets listed below.
- Plain paper: Approx. 100 sheets (When plain paper that weighs 64 g/m
- Heavy paper: Approx. 50 sheets (When heavy paper that weighs 128 g/m
used)
- Coated Paper: Approx. 50 sheets
- Label: Approx. 40 sheets
•
Load the paper so that it is straight.
•
If the rear edge of the paper stack is not properly aligned, it may result in misfeeds
or paper jams.
•
If the paper is curled or folded at corners, flatten it before loading it in the printer.
•
If you use paper that has been poorly cut, multiple sheets of paper may be fed at
once. In this case, align the edges of the stack on a hard, flat surface.
2
is used)
2
is
58
Page 60

NOTE
•
If you are using LBP5910/LBP5910F and <
シ
options of the
long edges 297.0 mm long or less as follows according to your printer driver before
printing.
When using LIPS LX printer driver: load the paper in landscape orientation
When not using LIPS LX printer driver: load the paper in portrait orientation
•
To print letterhead paper or paper printed with a logo, see "Paper Loading
Orientation" (p. 70) and load the paper in the proper orientation.
5
Align the paper guides with both sides of the stack.
セットアップ
menu is set to <
テザシトレイ ヨウシサイズ
フリー
>, load custom paper of its
> in the
キュウ
IMPORTANT
Be sure to align the paper guides with the width of the paper. If the paper guides
are too loose or too tight, this may result in misfeeds or paper jams.
59
Page 61

When Loading Postcards (Only for LBP5910/5910F)
Postcard, Reply postcard, 4 on 1 postcard and 4 on 1 postcard recommended by
Canon can be loaded in the multi-purpose tray. Use the following procedure to load
postcard in the multi-purpose tray.
IMPORTANT
Be sure to use reply postcard that is not be creased.
•
Printing speed drops when printing Postcard, Reply postcard, or 4 on 1 postcard.
•
NOTE
This printer can print plain paper (64-105 g/m
postcard, Reply postcard, and 4 on 1 postcard. When printing plain paper or heavy paper
of postcard, Reply post card, or 4 on 1 postcard, see "When Loading Paper (Other than
Postcards and Envelopes)," on p. 55.
1
Open the multi-purpose tray.
Hold the tab at the center of the printer, and open the multi-purpose tray.
2
) and heavy paper (106-169 g/m
2
) of
60
Page 62

2
Spread the paper guides a little wider than the actual postcard
width.
Gently load the stack of Postcard with the printing side facing
3
down until it touches the back of the multi-purpose tray as
shown in the figure.
(A)
CAUTION
When loading paper, take care not to cut your hands with the edges of the
paper.
IMPORTANT
•
Up to approximately 40 sheets of Postcard, Reply postcard, or 4 on 1 postcard or
approximately 50 sheets of 4 on 1 postcard recommended by Canon can be
loaded in the multi-purpose tray. Make sure that the postcard stack does not
exceed the load limit marks (A).
61
Page 63
•
When loading postcard, be sure to load it in portrait orientation so that the printing
side is facing down and the top edge is toward the back of the printer when viewed
from the front.
•
When loading Reply postcard, be sure to load them in landscape orientation so
that the printing side is facing down and the top edge is toward the back of the
printer when viewed from the front.
62
•
When printing Reply postcard, match the paper settings and printing orientation
specified in the application with actual printing orientation. (Example: In case of
Windows NT 4.0 / 2000 / XP / Server 2003/Vista, Select [Double Japan Postcard
Rotated].)
Page 64

•
When loading 4 on 1 postcard, be sure to load them in landscape orientation so
that the printing side is facing down and the top edge is toward the left of the printer
when viewed from the front.
•
If the postcard is curled, flatten the curls by warping it in the opposite direction
before loading it.
•
If using postcard that has been poorly cut, multiple sheets of paper may be fed at
once. In this case, align the edges of the stack on a hard, flat surface.
4
Align the paper guides with both sides of the stack.
63
Page 65

IMPORTANT
Be sure to align the paper guides with the width of the postcards. If the paper
guides are too loose or too tight, this may result in misfeeds or paper jams.
When Loading Envelopes
Envelopes can be loaded in the multi-purpose tray. Use the following procedure to
load envelopes in the multi-purpose tray.
IMPORTANT
•
The printable envelope types are shown below:
- LBP5910/5910F
YOUGATA No.4
(105 mm x 235 mm)
YOUGATA No.2
(114 mm x 162 mm)
KAKUGATA No.2
(240 mm x 332 mm)
(Envelope K-201G for LBP that
Canon recommends)
64
*You cannot use envelopes at sizes of YOUGATA No.4
and YOUGATA No.2 that have a flap on the short edge.
Page 66

65
- LBP5610
Envelope DL
(110.0 mm x 220.0 mm)
Envelope COM10
(104.9 mm x 241.3 mm)
*You cannot use envelopes at sizes of DL, COM10, Monarch, and C5 that have a flap
on the short edge.
•
Do not use the envelopes with adhesive on the surface. This may result in poor print
Envelope Monarch
(98.5 mm x 190.5 mm)
Envelope C5
(162.0 mm x 229.0 mm)
Envelope B5
(176.0 mm x 250.0 mm)
quality or damage to the printer.
•
Printing speed drops when printing envelopes.
NOTE
When printing envelopes, they may be creased.
1
Open the multi-purpose tray.
Hold the tab at the center of the printer, and open the multi-purpose tray.
Page 67

2
Spread the paper guides a little wider than the actual envelope
width.
3
Place the stack of envelopes on a flat surface, flatten them to
release any remaining air, and be sure that the edges are
pressed tightly.
66
CAUTION
When loading paper, take care not to cut your hands with the edges of the
paper.
Page 68
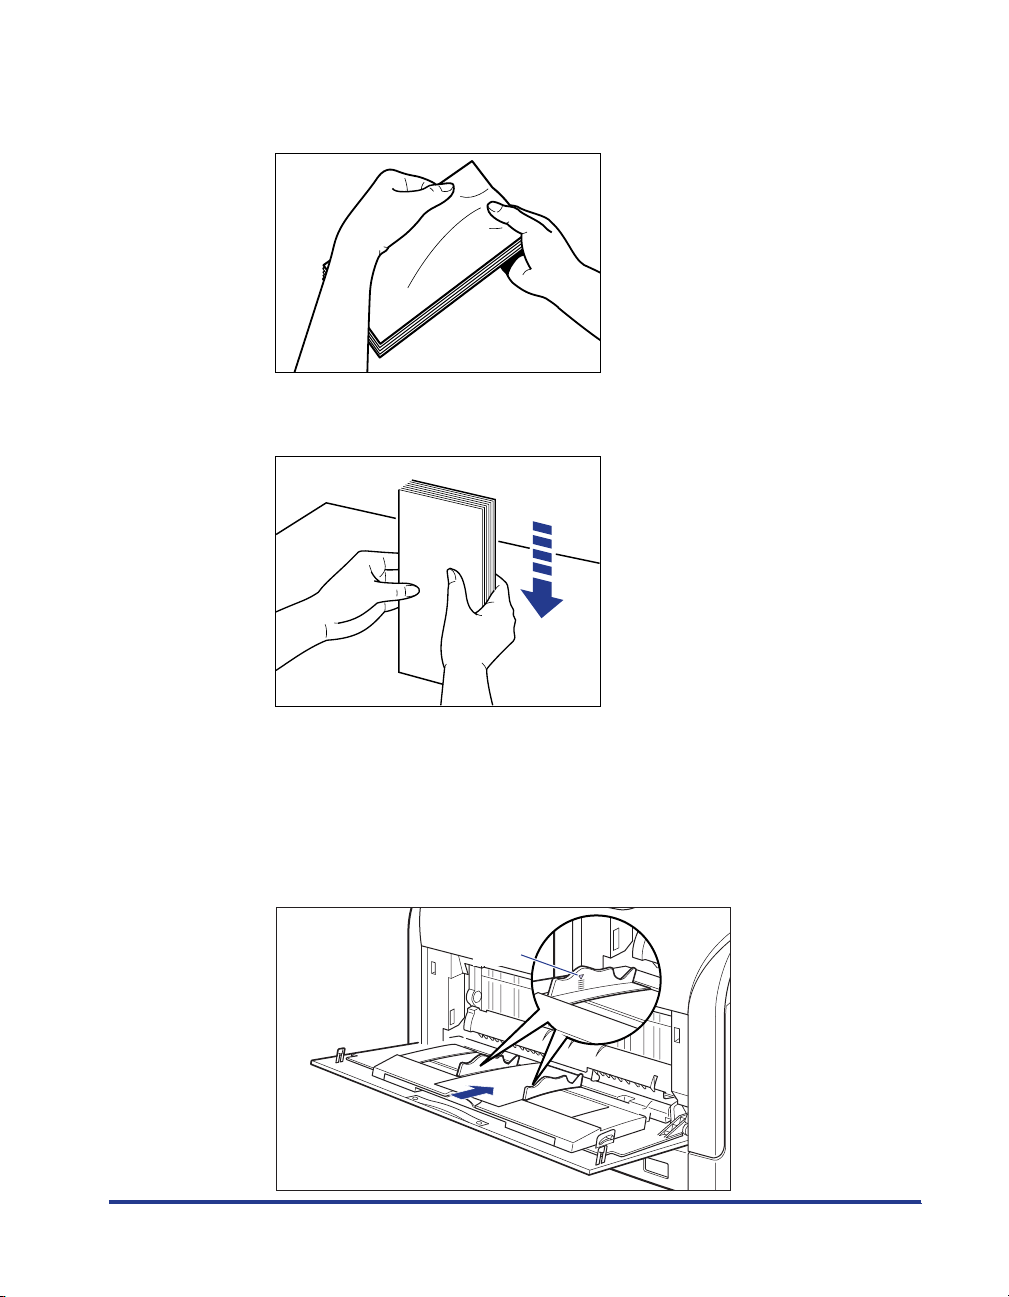
Loosen any stiff corners of the envelopes and flatten curls as
4
shown in the figure.
5
Align the edges of the envelopes on a flat surface.
Gently load the stack of envelopes with the address side
6
facing down and with the flaps closed and on the left side,
until it touches the back of the multi-purpose tray as shown in
the figure.
Make sure that the envelope stack does not exceed the load limit marks (A).
(A)
67
Page 69

IMPORTANT
•
Up to 10 envelopes can be loaded in the multi-purpose tray.
•
You cannot print on the reverse side (glued side) of envelopes.
•
When loading YOUGATA No.4, YOUGATA No.2 (in case of LBP5910/5910F), DL,
COM10, C5 or Monarch (in case of LBP5610), load them so that the flap is toward
the right of the printer when viewed from the front.
•
When loading envelopes at size of KAKUGATA No.2 (in case of LBP5910/5910F),
leave the flaps open and load them so that the bottom of the envelopes is toward
the back of the printer when viewed from the front.
68
Page 70

•
When loading envelopes at size of Envelope B5 (in case of LBP5610), close the
flaps and load them so that the bottom of the envelopes is toward the front of the
printer when viewed from the front.
7
Align the paper guides with both sides of the stack.
IMPORTANT
Be sure to align the paper guides with the width of the envelopes. If the paper
guides are too loose or too tight, this may result in misfeeds or paper jams.
69
Page 71
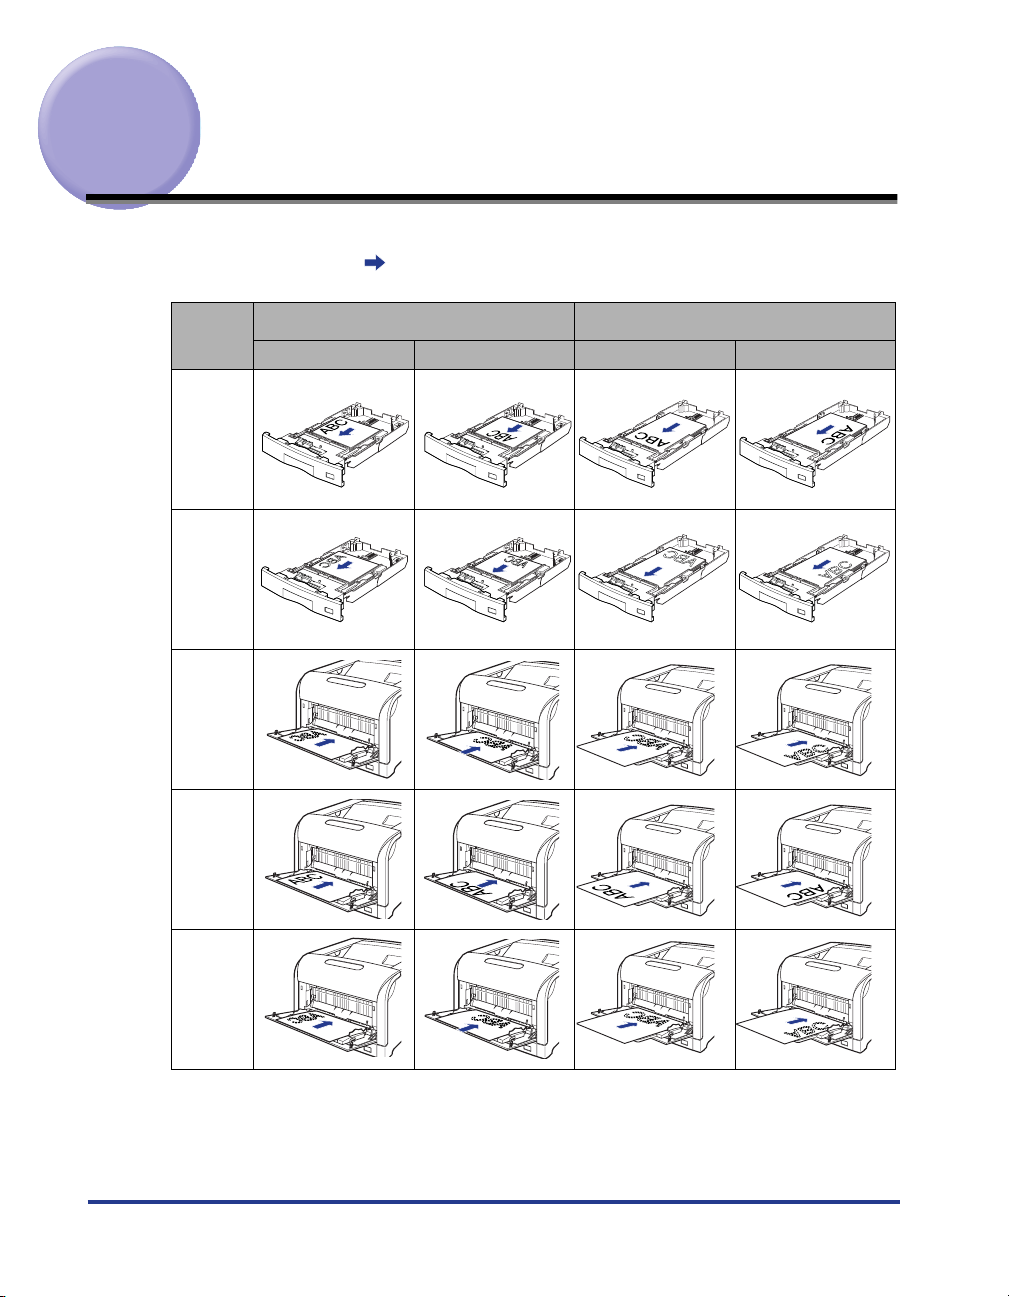
Paper Loading Orientation
To print letterhead paper or paper printed with a logo, load the paper in the proper
orientation as follows. in the table indicates the feeding directions.
Loading A4, B5, A5, Letter, or Executive size
paper in landscape orientation
Portrait Layout
(1-sided Printing)
Paper Cassette 1 to 4
Paper Cassette 1 to 4
(Automatic 2-sided Printing)
(1-sided Printing)
Multi-purpose Tray
Landscape Layout Portrait Layout Landscape Layout
Loading A3, B4, Ledger (11 x 17), or Legal size
paper in portrait orientation
70
Multi-purpose Tray
Multi-purpose Tray
(Automatic 2-sided Printing)
(Manual 2-sided Printing)
Page 72

NOTE
•
For details on the loading orientation of envelopes and postcards, see "When Loading
Postcards (Only for LBP5910/5910F)" (p. 60) and "When Loading Envelopes" (p. 64).
•
If you are using LBP5910/LBP5910F and <
トレイ ヨウシサイズ
> in the
キュウシ
options of the
カセットN(N=2,3,4) ヨウシサイズ
セットアップ
menu is set to <
> or <
フリー
load custom paper of its long edges 297.0 mm long or less as follows according to your
printer driver before printing.
-When using LIPS LX printer driver: load the paper in landscape orientation
-When not using LIPS LX printer driver: load the paper in portrait orientation
テザシ
>,
71
Page 73

Paper Jams
When a paper jam occurs during printing for some reason, in case of LBP5910/
5910F warning beep sounds and message <
display, while in case of LBP5610 the following message is displayed on printer
status window.
LBP5910/5910F
13ヨウシガツマリマシタ
マエカバーエリア
LBP5610
13 ヨウシガ ツマリマシタ
> appears on
■
■
Precautions on Clearing Paper Jams
WARNING
There are some areas inside the printer which are subject to high-voltages.
When removing jammed paper or when inspecting the inside of the printer, do
not allow necklaces, bracelets, or other metal objects to touch the inside of the
printer. This may result in burns or electrical shock.
72
Page 74

CAUTION
The fixing unit and its surroundings inside the printer are hot during use. Make
•
sure the fixing unit is completely cool before removing the jammed paper.
Touching the fixing unit when it is still hot may result in burns.
•
When removing jammed paper, take care not to allow the toner to come into
contact with your hands or clothing, as this will dirty your hands or clothing. If
they become dirty, wash them immediately with cold water. Washing with warm
water will set the toner and make it impossible to remove the toner stains.
•
When removing paper jammed inside the printer, remove the jammed paper
gently to prevent the toner on the paper from scattering. The toner may get into
your eyes or mouth. If the toner gets into your eyes or mouth, wash them
immediately with cold water and immediately consult a physician.
When removing jammed paper, take care not to cut your hands with the edges
•
of the paper.
•
Keep your hands or clothing away from the roller in the output area after
removing jammed paper completely. Even if the printer is not printing, sudden
rotation of the roller may catch your hands or clothing, resulting in personal
injury.
1.
IMPORTANT
•
Remove jammed paper while the power of the printer is ON. If the power is turned OFF,
the data being printed will be deleted.
•
Applying excess force may result in tearing paper or damaging the parts in the printer.
When removing jammed paper, pull the paper out in the most appropriate direction,
judging from the position of the paper.
•
If paper is torn, be sure to find and remove any remaining pieces of paper.
•
If you are using LBP5910F, and a staple jam occurs each time printed paper is stapled,
perform either one of the following methods.
Setting <
セットアップ
ステイプル
menu to <
> in <
キノウセイゲンモード
セイゲンスル
>*
> in the
ユーザメンテナンス
options of the
73
Page 75

2. Contacting your local authorized Canon dealer for servicing
* If <
セイゲンスル
even a job which is specified to be stapled.
Do not remove the staple cartridge (A) even if <
cartridge removed, this may result in paper jams.
> is specified, the normal printing process (stapling is not performed) is applied to
> is specified. If you print with the staple
セイゲンスル
(A)
Paper Jam Area
The message that appears in the display shows the location where the paper jam
occurred.
Output Tray
74
Duplex Print Transport Area
Multi-purpose Tray
Cassette 1
Cassette 2
Cassette 3
Cassette 4
A
C
B
D
E
Paper Feeder Unit
(Optional)
F
G
Paper flow for 1-sided printing
Paper flow for 2-sided printing
Page 76

Paper Jam Area
Paper Jam
Area Mark*
LBP5910/5910F LBP5610
Message
Output Area
A
Inside the front cover
B
Inside the front cover
(Duplex print transport
C
area)
Cassette 1
D
Cassette 2 (Only when
the paper feeder is
E
installed)
<ハイシ エリア>
<マエカバー エリア>
<リョウメンユニット
エリア>
<カセット1 エリア>
<カセット2 エリア>
No message is
displayed.
<Front Cover>
<Duplex Unit>
<Cassette 1>
<Cassette 2>
Cassette 3 (Only when
the paper feeder is
F
<カセット3 エリア>
<Cassette 3>
installed)
Cassette 4 (Only when
the paper feeder is
G
<カセット4 エリア>
<Cassette 4>
installed)
* In "Procedure for Clearing Paper Jams" (See p. 76), this mark is attached to the left of each step, indicating the
paper jam area where the operation described in the step is required.
75
Page 77
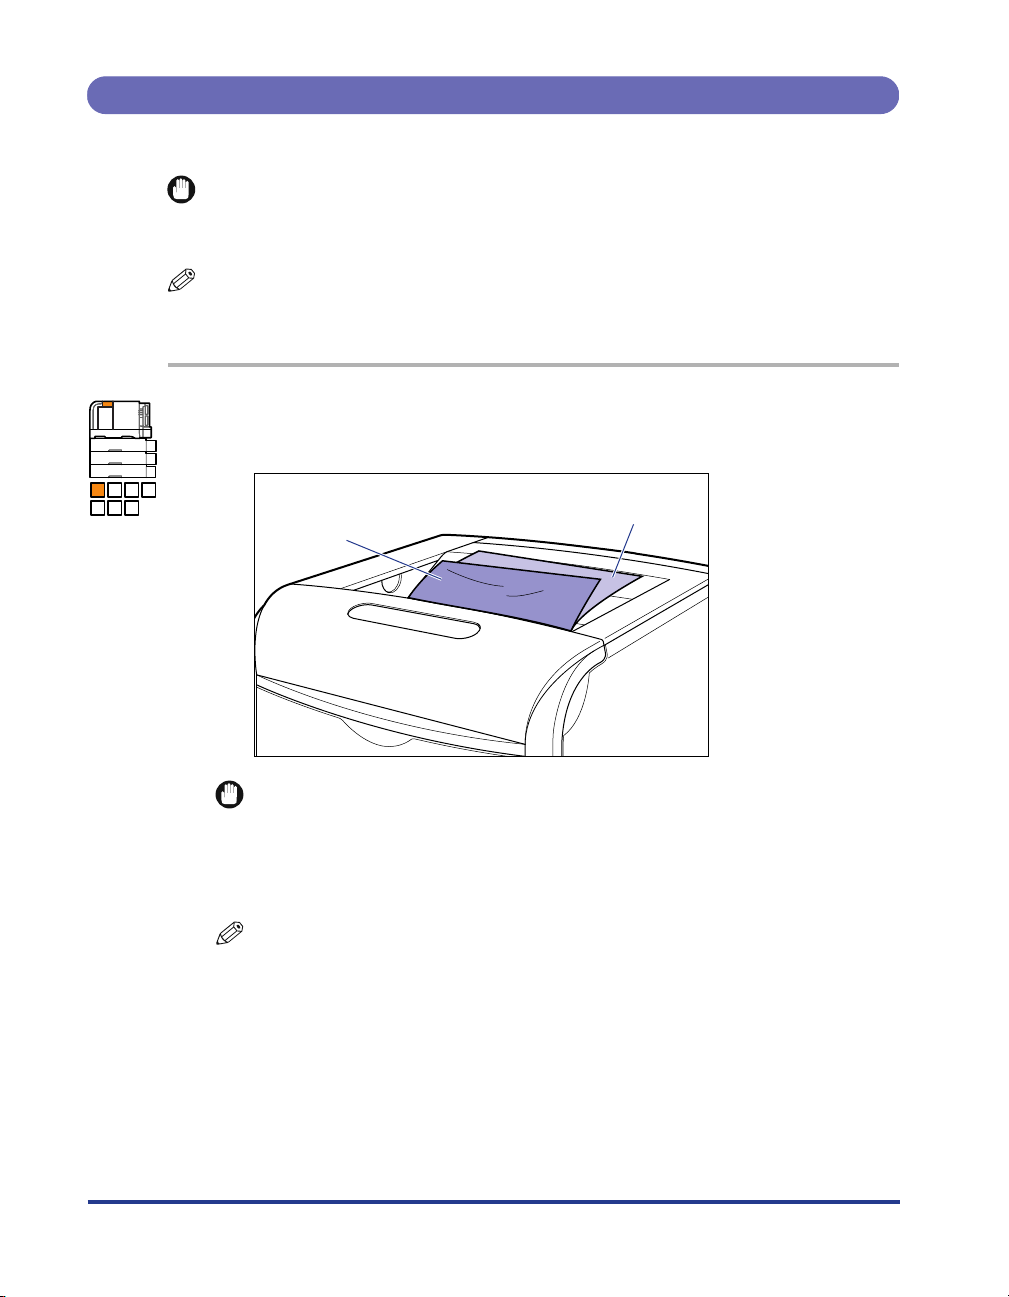
Procedure for Clearing Paper Jams
Remove the jammed paper using the following procedure.
IMPORTANT
The error message may remain if jammed paper is removed without opening the front
cover. In this case, open and close the front cover once.
NOTE
The illustrations of the printer on the left of each step indicate paper jam areas where the
operation described in the step is required.
A B C D
E F G
1
Check the output tray, then remove all the jammed paper
b
and output paper
.
b
a
IMPORTANT
•
If the jammed paper cannot be removed easily, do not try to remove it forcefully but
proceed to Step 2.
•
Do not place any paper or object on the output tray during printing, as this may
result in paper jams.
NOTE
If the toner is on the removed paper, the dirt of the toner may be on the paper to be
printed next.
a
76
Page 78

A B C D
E F G
A B C D
E F G
If using the multi-purpose tray, remove any paper jammed in
2
multi-purpose tray.
IMPORTANT
If the jammed paper cannot be removed easily, do not try to remove it forcefully but
proceed to Step 3.
3
If using the multi-purpose tray, close it.
77
Page 79

A B C D
E F G
Pull the paper cassette out.
4
Pull the paper cassette out until it stops a .
a
After lifting the paper cassette up a little b, pull it out while supporting it with
other hand as shown in the figure c.
b
78
c
IMPORTANT
The paper cassette cannot be pulled out horizontally. If trying to pull it out forcefully,
this may result in damage to the paper cassette.
Page 80

5
If the paper feeder is installed, pull all the paper cassettes out
from the top.
A B C D
E F G
Pull the paper cassette out until it stops a.
a
79
Page 81

After lifting the paper cassette up a little b, pull it out while supporting the
(A)
cassette with your left hand until the handle (A) on the right side of the paper
cassette appears completely c.
b
c
80
While holding the paper cassette with both hands, pull it out completely d as
shown in the figure.
d
IMPORTANT
•
Because the paper cassette is heavy, hold it with your both hands securely.
•
Place the removed paper cassette on an even and stable surface.
Page 82

6
Remove any jammed paper in the manner of pushing it
downward.
A B C D
E F G
In case of the printer
In case of the paper feeder
IMPORTANT
•
If jammed paper cannot be removed easily, do not try to remove it forcefully but
proceed to Step 8.
81
Page 83

A B C D
E F G
•
Do not touch the paper feed roller (A) and switch (B) on the lower portion of the
printer. This may result in damage to the printer or printer error.
(B)
(A)
7
Open the front cover.
While pressing the lever on the right side of the front cover, open the front cover
toward you.
82
IMPORTANT
Before opening the front cover, make sure that the multi-purpose tray is closed.
Page 84

A B C D
E F G
8
Pull the fixing unit down toward you.
While pressing the green lock release buttons (A) on the left and right side of the
fixing unit a, hold the tabs (B) and pull the fixing unit down toward you b as
shown in the figure.
(A)
A B C D
E F G
a
(B)
a
b
9
If you are using LBP5910F, remove any paper jammed in the
output area.
IMPORTANT
If paper jams frequently occur in the output area, make sure that the staple
cartridge is installed (See "Replacing the Staple Cartridge (Only for LBP5910F),"
on p. 146).
83
Page 85
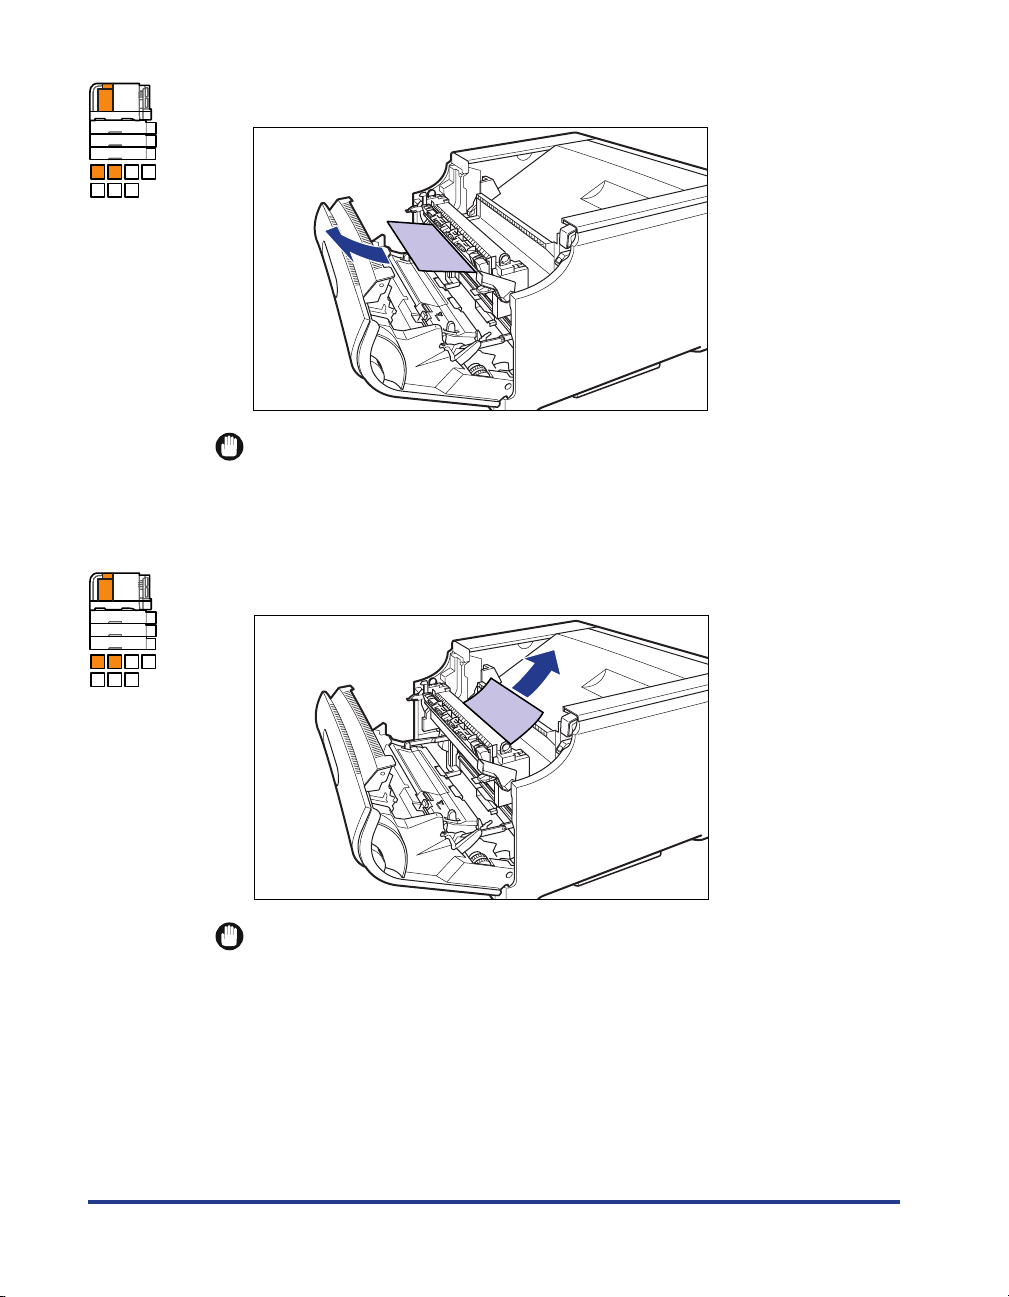
A B C D
E F G
A B C D
E F G
10
Remove jammed paper from the front of the fixing unit.
IMPORTANT
If jammed paper cannot be removed easily, pull jammed paper out gently and
strongly to remove it. If jammed paper still cannot be removed, do not try to remove
it forcefully but proceed Step 11.
11
Remove jammed paper from the back of the fixing unit.
84
IMPORTANT
Pull jammed paper out gently and strongly to prevent the toner that does not fix
onto jammed paper from scattering,
Page 86

A B C D
E F G
12
While holding the tabs (A), move the fixing unit back to its
original position a, and then press the tabs on the both sides
as shown in the figure b.
(A)
a
b b
A B C D
E F G
13
Remove jammed paper in the lower portion of the fixing unit.
Turn the dial on the left of the fixing unit in the direction of the arrow to send any
jammed paper a as shown in the figure.
a
85
Page 87

Remove any jammed paper as shown in the figure b.
b
IMPORTANT
As the paper may be jammed in the back of the printer, turn the dial sufficiently to
send the paper.
86
Page 88

A B C D
E F G
14
If a paper jam occurs when performing 2-sided printing, open
the cover of the duplex print transport guide holding the tab
(A) inside the front cover as shown in the figure a, and
remove jammed paper b.
(A)
a
b
87
Page 89

A B C D
E F G
15
Close the front cover.
While supporting the front cover a, push and close the front cover with both
hands as shown in the figure b.
a
b
88
CAUTION
Push the front portion of the front cover to close it as shown in the figure.
If closing the front cover by the levers on the both sides, you may catch
your fingers, resulting in personal injury.
Page 90
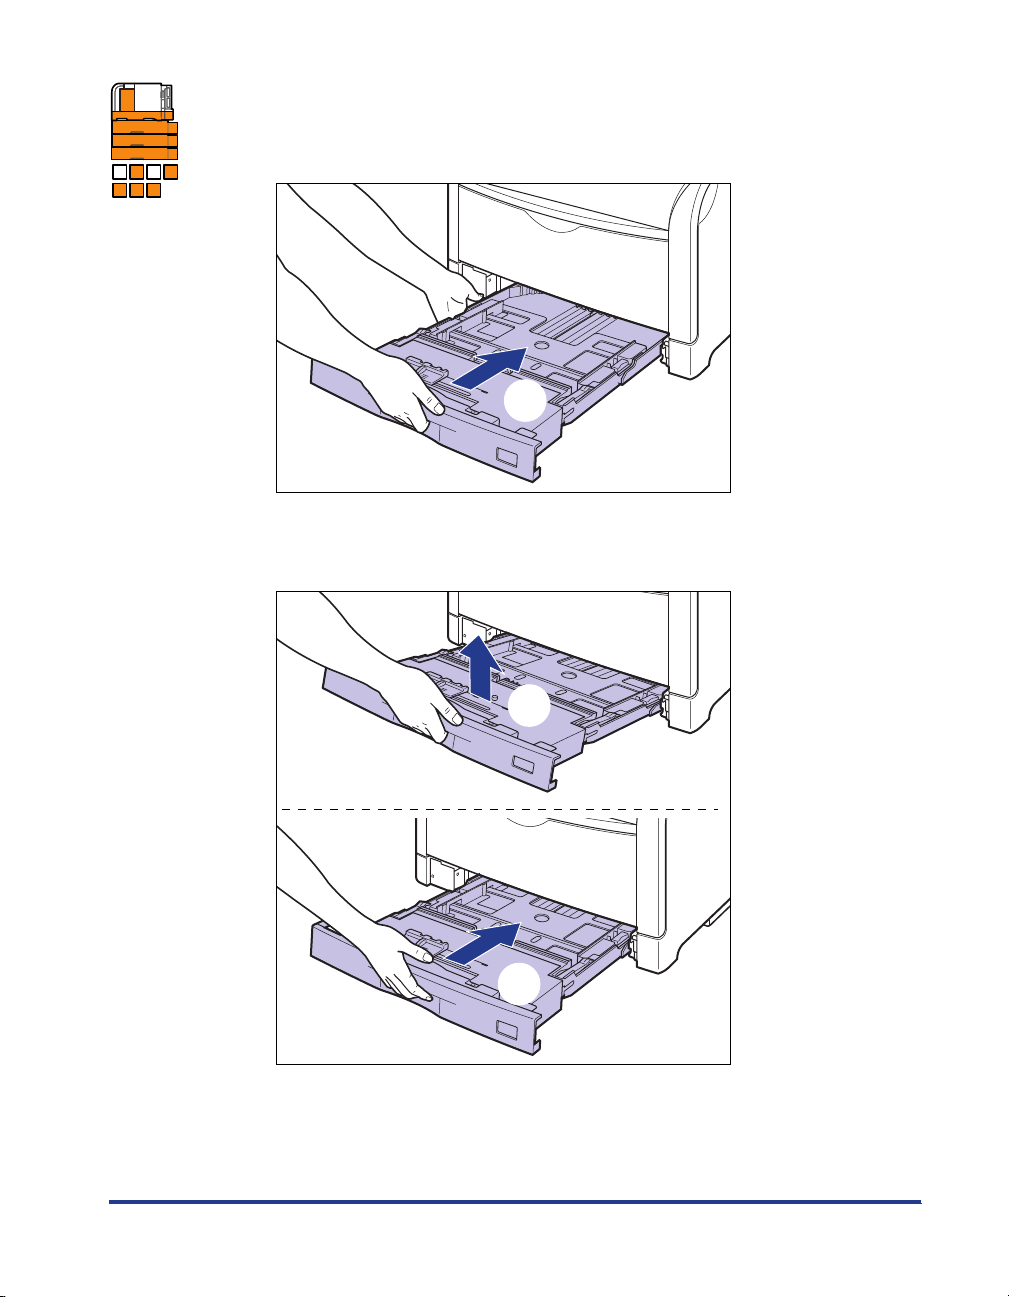
A B C D
E F G
16
Set the paper cassette to the printer.
While holding the paper cassette with both hands and insert it until it stops a as
shown in the figure.
a
After lifting the front of the paper cassette up a little b, push the paper cassette
into the printer firmly until the front side of the paper cassette is flush with the
front surface of the printer c.
b
c
89
Page 91
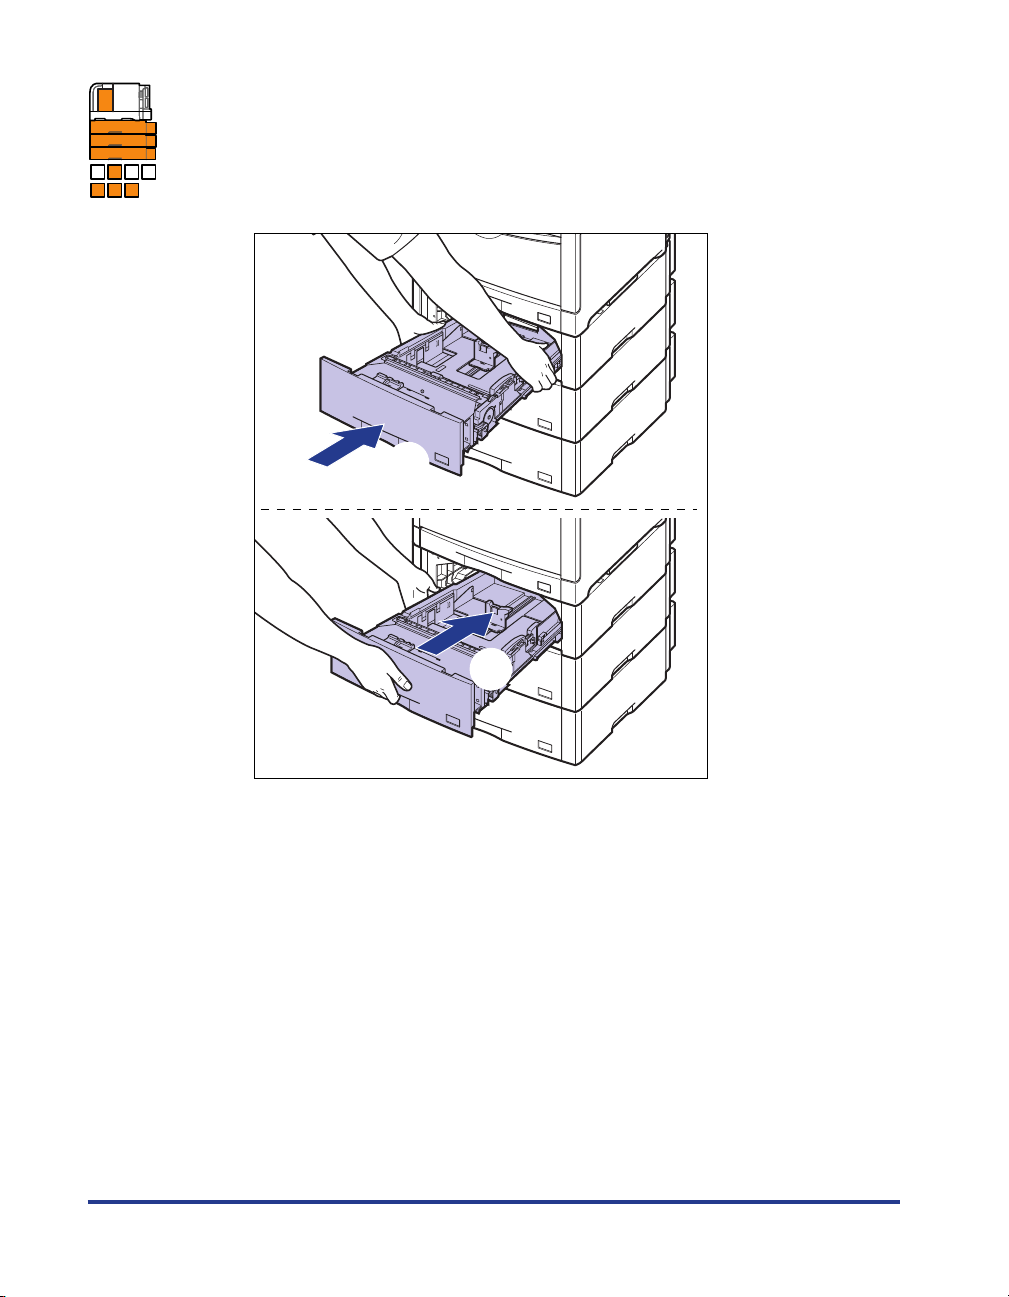
17
If the paper feeder is installed, set all the paper cassettes to
the paper feeder from the top.
A B C D
E F G
While holding the paper cassette with both hands, push it to the position shown
in the figure a. Then, hold the front of the paper cassette with your right hand
and push it until it stops b.
a
b
90
Page 92

After lifting the front of the paper cassette up a little c, push the paper cassette
into the printer firmly until the front side of the paper cassette is flush with the
front surface of the paper feeder d.
c
d
CAUTION
When setting the paper cassette to the paper feeder, be careful not to
catch your fingers.
If the message that indicates the paper jam does not disappear even after
removing the jammed paper following the procedure, there is a possibility that
some paper still remains under the fixing unit. Following Step 14, turn the dial
sufficiently to send the paper and remove it.
91
Page 93
Staple Jams (Only for LBP5910F)
When a staple jam occurs during stapling for some reason, the printer beeps,
displaying the message <
Precautions on Clearing Staple Jams
WARNING
There are some areas inside the printer which are subject to high-voltages.
When removing jammed staples or when inspecting the inside of the printer, do
not allow necklaces, bracelets, or other metal objects to touch the inside of the
printer. This may result in burns or electrical shock.
CAUTION
The fixing unit and its surroundings (also including the output area and the
staple cartridge) inside the printer are hot during use. Make sure the fixing unit
is completely cool before removing the jammed staples. Touching the fixing unit
when it is still hot may result in burns.
1E ハリガ ツマリマシタ
> in the display.
1.
92
IMPORTANT
•
A job in which a staple jam occurred is not stapled. Specify the settings for stapling and
print again.
•
If a staple jam occurs each time printed paper is stapled, perform either one of the
following methods.
Setting <
セットアップ
Contacting your local authorized Canon dealer for servicing
ステイプル
> in <
menu to <
キノウセイゲンモード
セイゲンスル
>* 2.
> in the
ユーザメンテナンス
options of the
Page 94

* If LIMIT is specified, the normal printing process (stapling is not performed) is applied to even a job which is
specified to be stapled.
Do not remove the staple cartridge (A) even if LIMIT is specified. If you print with the staple cartridge
removed, this may result in paper jams.
Procedure for Clearing Staple Jams
Remove the jammed staples using the following procedure.
1
If using the multi-purpose tray, close it.
(A)
93
Page 95

2
Open the front cover.
While pressing the lever on the right side of the front cover, open the front cover
toward you.
IMPORTANT
Before opening the front cover, make sure that the multi-purpose tray and the
paper cassette of the printer are closed.
94
Page 96

3
Pull the fixing unit down toward you.
While pressing the green lock release buttons (A) on the left and right side of the
fixing unit a , hold the tabs (B) and pull the fixing unit down toward you b as
shown in the figure.
(A)
a
(B)
b
b
4
The staple cartridge is located at the position shown in the
figure.
a
95
Page 97

5
Holding the tab (A) of the staple cartridge, remove it from the
printer.
(A)
CAUTION
The tab of the staple cartridge may be hot. Make sure the tab is completely
cool before removing the staple cartridge. Touching the tab when it is still
hot may result in burns.
IMPORTANT
Pull out the staple cartridge straight. If you pull out the staple cartridge upward, the
tab may come off. If the tab comes off, put it back to the original position. If the
staple cartridge is used without the tab, this may result in paper jams.
96
6
Open the cover of the staple cartridge as shown in the figure.
Page 98

7
Remove any jammed or bent staples.
Staples have a linear shape before use.
8
Close the cover of the staple cartridge as shown in the figure.
a
b
97
Page 99

9
Holding the tab of the staple cartridge, install it in the printer.
Insert the staple cartridge until it clicks.
IMPORTANT
Insert the staple cartridge straight. If you apply force upward while inserting the
staple cartridge, the tab may come off. If the tab comes off, put it back to the
original position. If the staple cartridge is used without the tab, this may result in
paper jams.
10
While holding the tabs (A), move the fixing unit back to its
original position
as shown in the figure
a
, and then press the tabs on the both sides
b
.
98
(A)
a
b b
Page 100

11
Close the front cover.
While supporting the front cover a , push and close the front cover with both
hands as shown in the figure b .
a
b
CAUTION
Push the front portion of the front cover to close it as shown in the figure.
If closing the front cover by the levers on the both sides, you may catch
your fingers, resulting in personal injury.
99
 Loading...