

Canon iX7000 Series Service Manual

iX7000
Service Manual
Revision 0
QY8-13CJ-000
COPYRIGHTc2009 CANON INC. CANON iX7000 083109 XX 0.00-0
Scope
This manual has been issued by Canon Inc., to provide the service technicians of this product with the information necessary
for qualified persons to learn technical theory, installation, maintenance, and repair of products. The manual covers
information applicable in all regions where the product is sold. For this reason, it may contain information that is not
applicable to your region.
This manual does not provide sufficient information for disassembly and reassembly procedures.
Refer to the graphics in the separate Parts Catalog.
Revision
This manual could include technical inaccuracies or typographical errors due to improvements or changes made to the
product. When changes are made to the contents of the manual, Canon will release technical information when necessary.
When substantial changes are made to the contents of the manual, Canon will issue a revised edition.
The following do not apply if they do not conform to the laws and regulations of the region where the manual or product is
used:
Trademarks
Product and brand names appearing in this manual are registered trademarks or trademarks of the respective holders.
Copyright
All rights reserved. No parts of this manual may be reproduced in any form or by any means or translated into another
language without the written permission of Canon Inc., except in the case of internal business use.
Copyright © 2009 by Canon Inc.
CANON INC.
Inkjet Device Market Support Management Div.
451, Tsukagoshi 3-chome, Saiwai-ku, Kawasaki-shi, Kanagawa 212-8530, Japan

TABLE OF CONTENTS
1. MAINTENANCE
1-1. Adjustment, Periodic Maintenance, Periodic Replacement Parts, and Replacement Consumables
by Service Engineer
1-2. Customer Maintenance
1-3. Special Tools
1-4. Sensors
1-5. Serial Number Location
2. LIST OF ERROR DISPLAY / TROUBLESHOOTING
2-1. Operator Call Errors
2-2. Service Call Errors
2-3. Troubleshooting by Symptom
3. REPAIR
3-1. Major Replacement Parts
3-2. Part Replacement Procedures
(1) External housing removal
(2) Carriage unlocking
(3) Printer unit removal
(4) Carriage unit removal
(5) ASF unit removal
(6) Purge unit removal
(7) Spur base unit and platen unit removal
4. ADJUSTMENT / SETTINGS
4-1. User Mode
4-2. Service Mode
(1) Service mode operation procedures
(2) Service Tool functions
(3) LF / Eject correction
(4) Ink absorber counter setting
(5) Wetting liquid counter setting
4-3. Grease Application
iX7000

4-4. Special Notes on Servicing
(1) Service test print
(2) For smeared printing, uneven printing, or non-ejection of ink
(3) Paper feed motor adjustment
(4) Ink absorber counter setting
4-5. Verification After Repair
(1) Standard inspection flow
(2) Service test print
(3) Ink absorber counter value print
5. PRINTER TRANSPORTATION
<TABLE OF CONTENTS>
1. MAINTENANCE
1-1. Adjustment, Periodic Maintenance, Periodic Replacement Parts, and
Replacement Consumables by Service Engineer
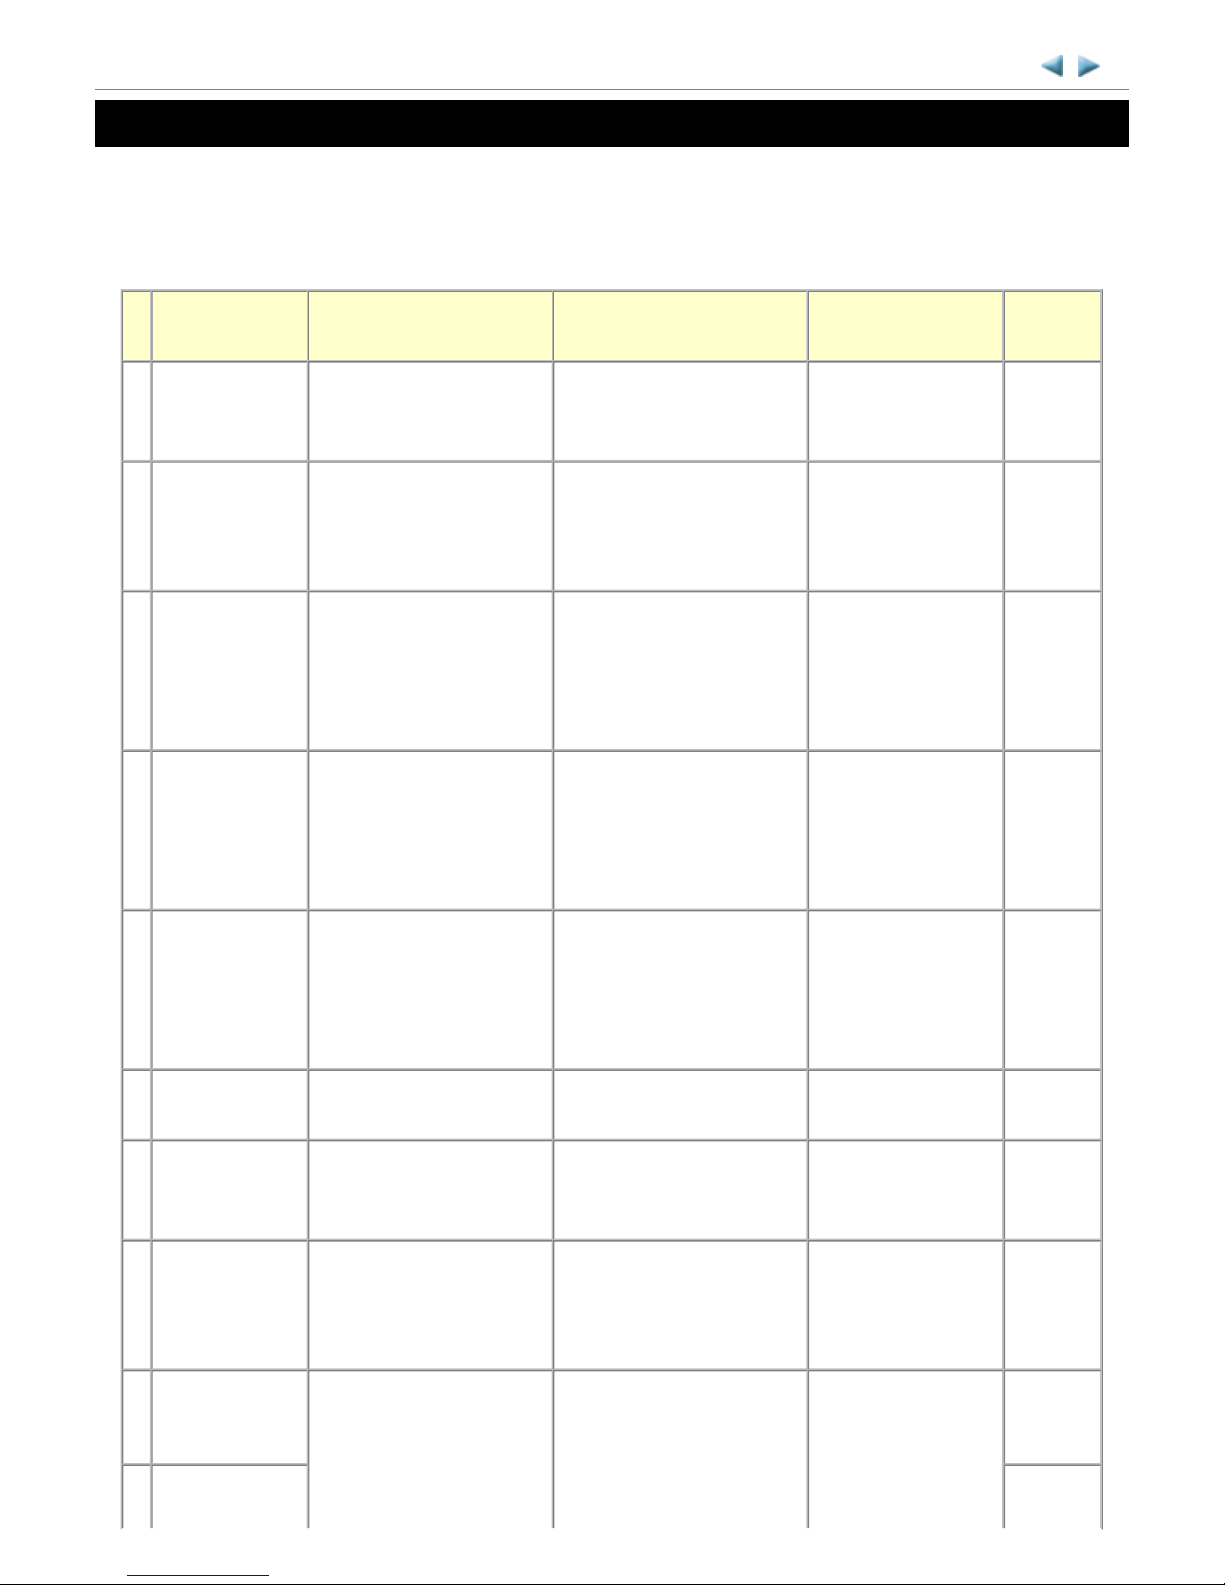
(1) Adjustment
iX7000 TABLE OF CONTENTS
Adjustment Timing Purpose Tool
Approx.
time
EEPROM
initialization
- At logic board
replacement
To initialize settings
Service Tool
*1
Perform in the
service mode.
1 min.
Destination
settings
(EEPROM
settings)
- At logic board
replacement
To set destination.
Service Tool
*1
Perform in the
service mode.
1 min.
Ink absorber
counter
resetting
(EEPROM
settings)
- At logic board
replacement
- At ink absorber
replacement
To reset the ink absorber
counter.
Service Tool
*1
Perform in the
service mode.
1 min.
Ink absorber
counter value
setting
(EEPROM
settings)
- At logic board
replacement
To set the ink amount data
in the ink absorber to the
ink absorber counter.
Service Tool
*1
Perform in the
service mode.
1 min.
Wetting liquid
counter value
setting
(EEPROM
settings)
- At logic board
replacement
- At blade cleaner unit
replacement
To set the wetting liquid
counter value.
Service Tool
*1
Perform in the
service mode.
1 min.
Ink absorber
replacement
- When the ink absorber
becomes full
To replace the ink
absorber with a new one.
Screwdriver, a pair
of tweezers, etc.
15 min.
Blade cleaner
unit
replacement
- When the wetting liquid
is used up
To replace the blade
cleaner unit with a new
one.
Screwdriver, etc. 10 min.
Paper feed
motor position
adjustment
- At paper feed motor
replacement
To adjust the belt tension.
(Position the paper feed
motor so that the belt is
stretched tight.)
None. 5 min.
Automatic print
head alignment
- At print head
replacement
- At logic board
replacement
To secure the dot
placement accuracy.
None. (Plain paper)
Perform in the user
mode.
6 min.
Manual print 10 min.
1 / 53
*1: Install the Service Tool to a pre-registered computer.
(2) Periodic maintenance
No periodic maintenance is necessary.
(3) Periodic replacement parts
There are no parts in this printer that require periodic replacement by a service engineer.
(4) Replacement consumables
There are no consumables that require replacement by a service engineer.
head alignment - When print quality is
not satisfying
Grease
application
- At carriage unit
replacement
- At other part
replacement
To maintain sliding
properties of the carriage
shaft, other sliding parts,
and gears.
FLOIL KG-107A 1 min.
Ink system
function check
- At logic board
replacement
- At spur unit
replacement
- At carriage unit
replacement
To maintain detection
functionality for presence
of the ink tanks and each
ink tank position.
Service Tool
*1
Perform in the
service mode.
1 min.
LF / Eject
correction
- At logic board
replacement
- At paper feed roller
replacement
- At platen unit
replacement
To correct the paper
feeding amount according
to each LF and eject roller.
Service Tool
*1
Perform in the
service mode.
5 min.
The screws securing the paper feed motor may be loosened only at replacement of the
paper feed motor unit. DO NOT loosen them in other cases.
2 / 53
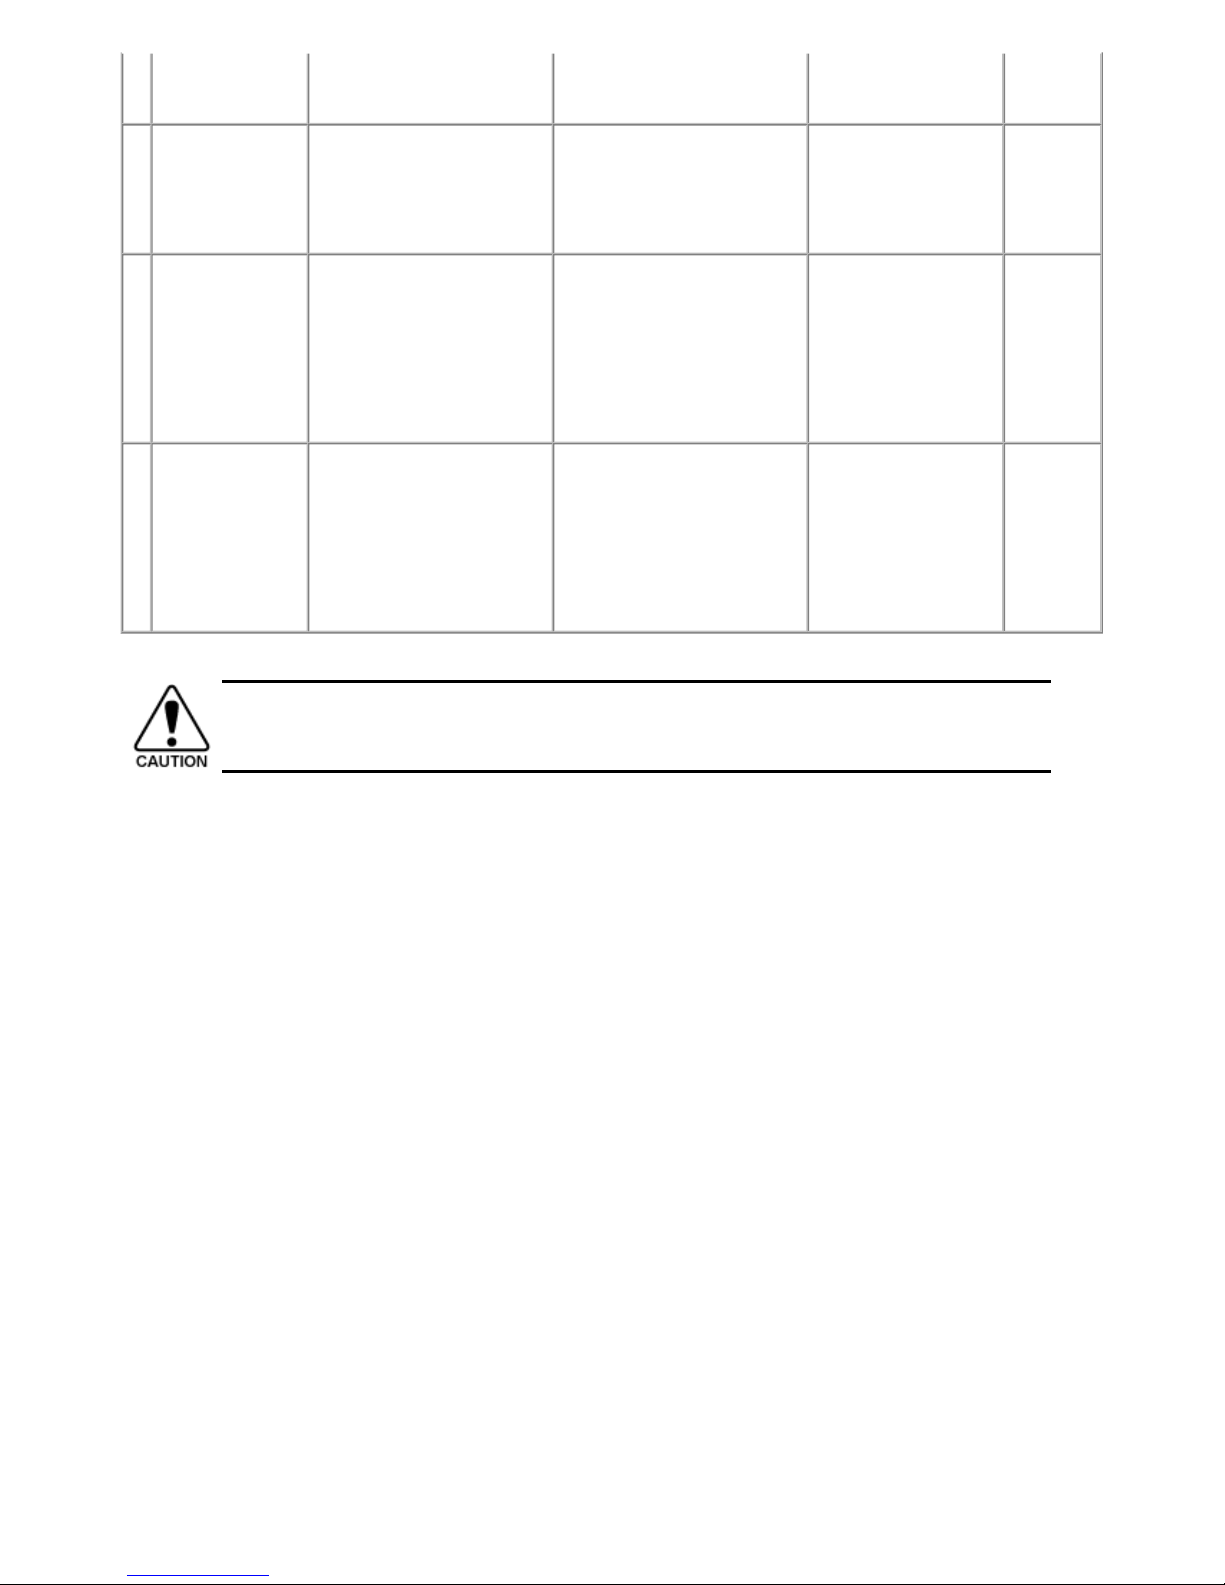
1-2. Customer Maintenance
Adjustment Timing Purpose Tool
Approx.
time
Automatic print
head alignment
- At print head replacement
- When print quality is not satisfying
(uneven printing, etc.)
To ensure accurate
dot placement.
- Printer
buttons
- Computer
(printer
driver)
6 min.
Manual print head
alignment
- Computer
(printer
driver)
10 min.
Print head
cleaning
When print quality is not satisfying. To improve nozzle
conditions.
- Printer
buttons
- Computer
(printer
driver)
1 min.
Print head deep
cleaning
When print quality is not satisfying, and
not improved by print head cleaning.
To improve nozzle
conditions.
- Computer
(printer
driver)
2 min.
Ink tank
replacement
When an ink tank becomes empty. ("No
ink error" displayed on the PC monitor,
or short flashing of an ink tank LED)
To replace the empty
ink tank.
--- 1 min.
Pick-up roller
cleaning
(Roller Cleaning)
- When paper does not feed properly.
- When the front side of the paper is
smeared.
To clean the pick-up
rollers of the rear
tray and the cassette.
- Computer
(printer
driver)
2 min.
Bottom plate
cleaning
When the back side of the paper is
smeared.
To clean the platen
ribs. (Feed the paper
from the rear tray.)
- Printer
buttons
- Computer
(printer
driver)
1 min.
Exterior cleaning When necessary. To clean the printer
exterior, or to wipe
off dusts.
Soft, dry, and
clean lint-free
cloth.
1 min.
Ink agitation When uneven printing occurs, or when
the automatic ink agitation ("Execute ink
quality maintenance automatically" in
the printer driver) is disabled for one or
more weeks.
To prevent
sedimentation of the
pigment.
- Computer
(printer
driver)
2 min.
Paper feed roller
cleaning
(Sheet Cleaning)
When "You need to execute sheet
cleaning because the predetermined print
count has been reached." is displayed on
the computer (at every 5,000 pages of
feeding from the cassette).
Use the Cleaning Sheet.
To clean the paper
feed rollers.
- Cleaning
sheet
- Computer
(printer
driver)
2 min.
3 / 53
1-3. Special Tools
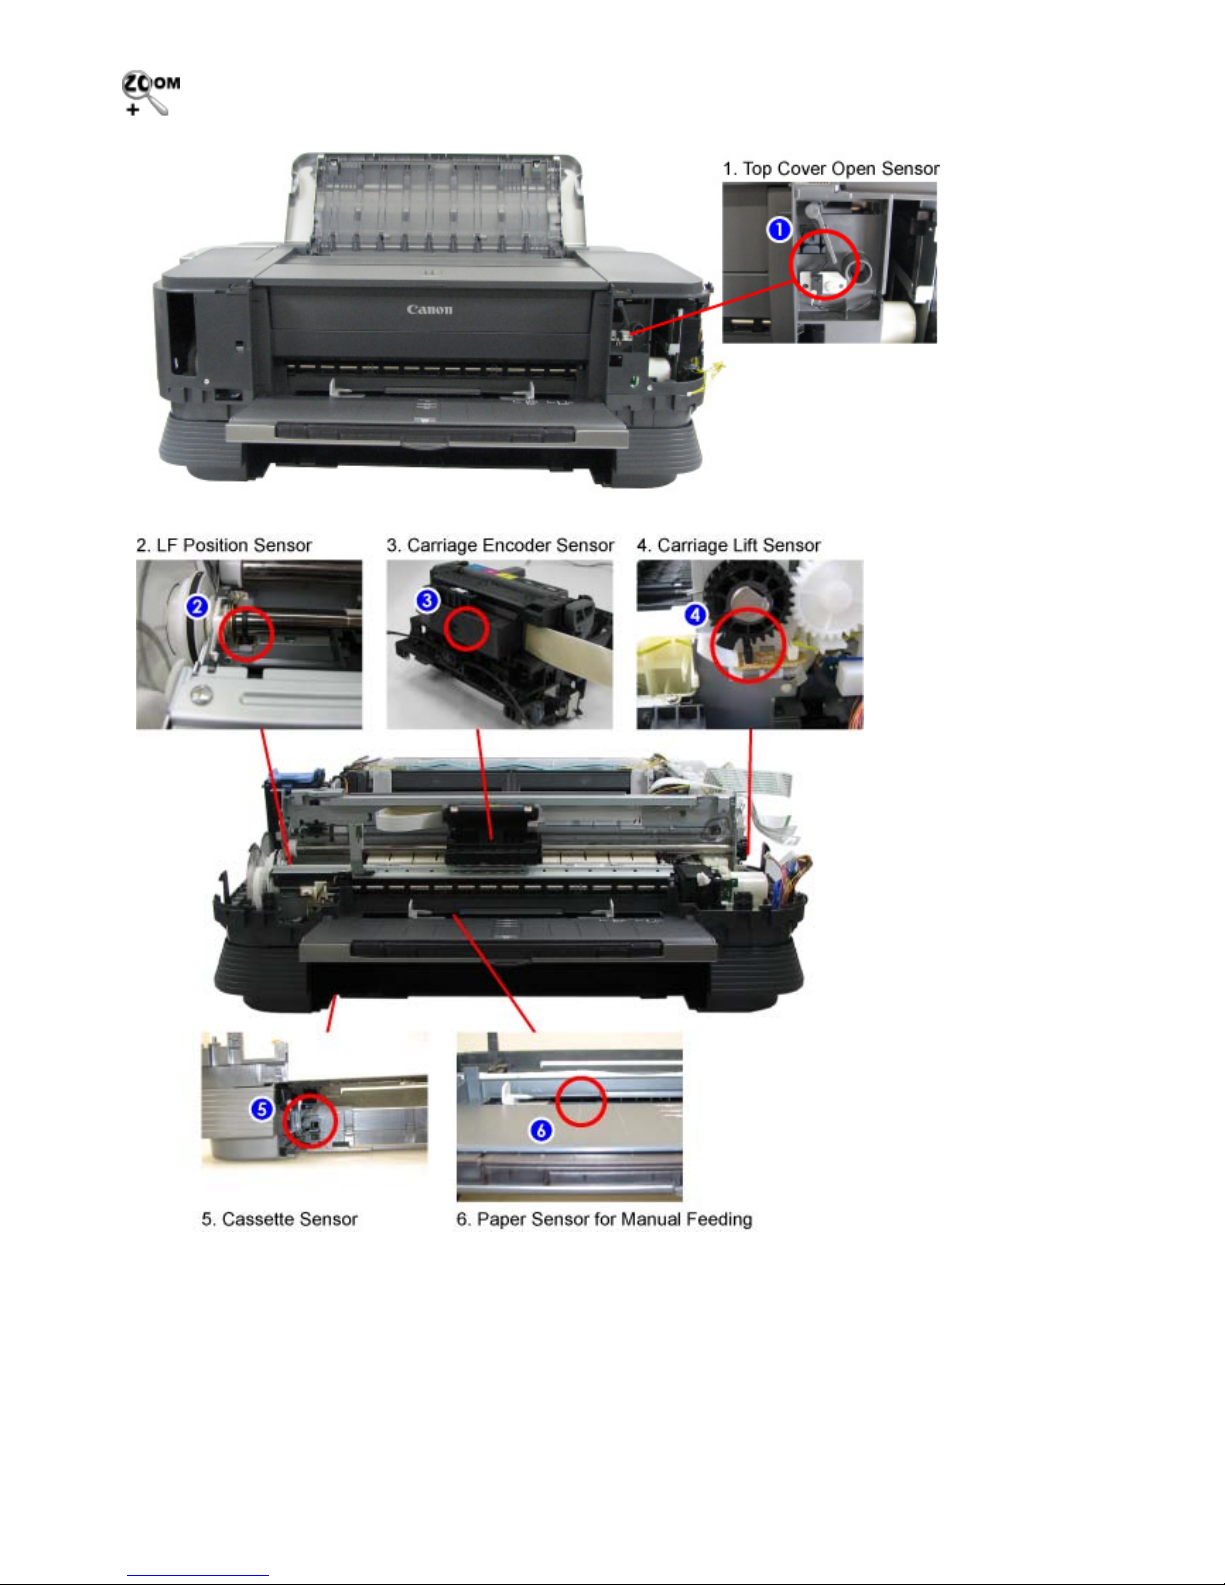
1-4. Sensors
Name Tool No. Application Remarks
FLOIL KG-107A QY9-0057-000 To the printer's sliding portions.
In common with other models
on the market.
No. Sensor Function Possible problems
1 Top cover open
sensor
Detects opening and closing of the
top cover.
- The carriage does not move to the center.
2 LF position sensor Detects the standard rotation
position of the feed roller.
- LF position error
3 Carriage encoder
sensor
Detects the position of the timing
slit film, and controls printing.
- Printing shifts from the correct position.
- Carriage position error
4 Carriage lift
sensor
Detects the position of the carriage
lift cam.
- Carriage lift mechanism error
5 Cassette sensor Detects the cassette. - No cassette
6 Paper sensor for
manual feeding
Detects paper in the front tray and
manual feed slot
- No paper in the front tray
- Paper in the manual feed slot
- Paper not properly set in the manual feed
slot
7 Valve cam sensor Controls valve unit operation. - Reactor error
8 PE sensor Detects paper feeding and ejection. - No paper
- Paper jam
9 Purge cam sensor Controls purging operation. - PG cam sensor error
10 Pump roller
sensor
Detects the position of the pump
roller
- Pump roller sensor error
11 Buffer tank sensor Detects Clear ink in the buffer
tank
- No Clear ink
- Reactor error
12 Clear ink tank
sensor
Detects the Clear ink tank. - No Clear ink tank
13 LF encoder sensor Detects rotation of the LF encoder,
and controls its drive.
- Uneven printing
- LF position error
14 Eject encoder
sensor
Detects rotation of the eject
encoder, and controls its drive.
- Uneven printing at the trailing edge of paper
- Eject encoder error
15 Ink sensor Detects the position of an ink tank. - No recognition of an ink tank
- Wrong position of an ink tank
16 Temperature
sensor
Detects the temperature of the
inside of the printer.
- Internal temperature error
17 Front tray open
sensor
Detects opening and closing of the
front tray.
- Front tray closed
4 / 53

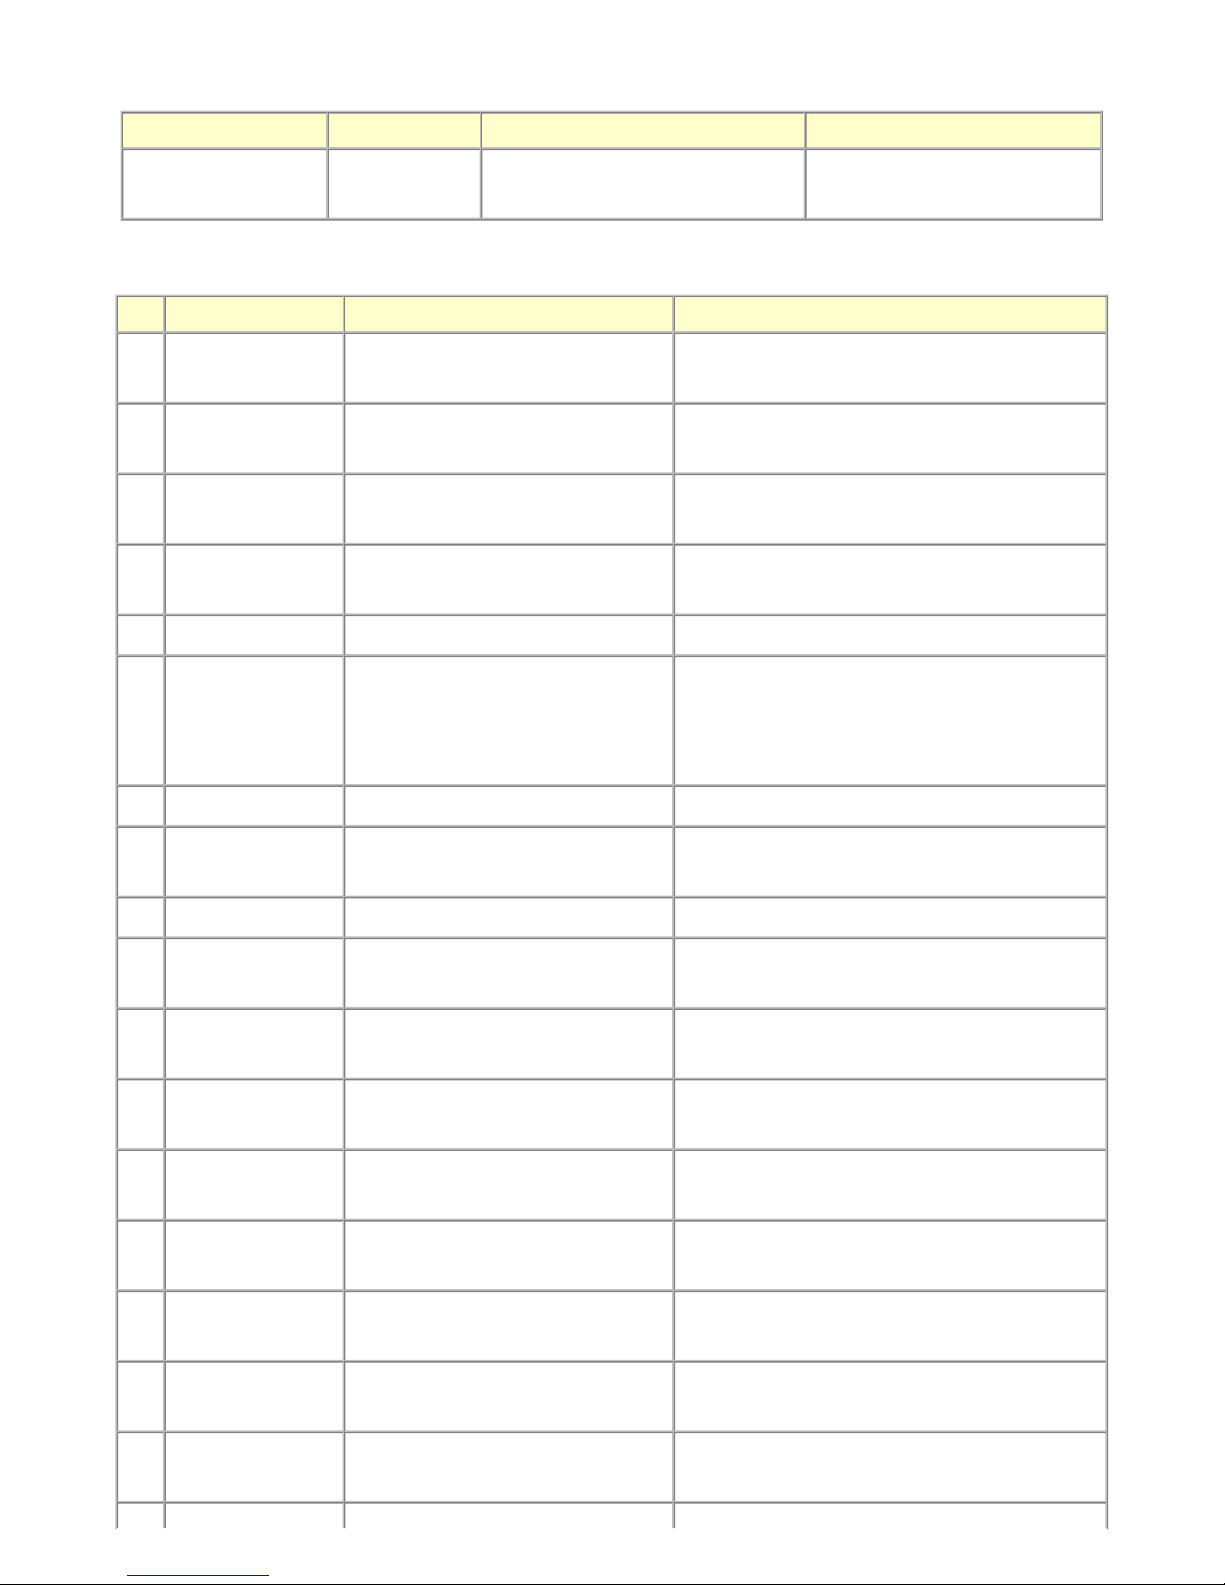
18 ASF cam sensor Detects the position of the ASF
cam (for paper feeding from the
rear tray).
- ASF cam sensor error
- Paper feeding problem
19 RR encoder
sensor
Detects rotation of the Clear ink
application roller encoder, and
controls its drive.
- RR position error
20 AP encoder
sensor
Controls paper feeding and
purging operation.
- AP position error
21 PF cam sensor Detects the position of the cassette
(and front tray) paper feeding cam
(for paper feeding from the
cassette).
- No paper feeding from the cassette (from the
front tray)
- PF cam sensor error
22 Rear cover PE
sensor
Detects paper feeding and ejection
at the rear cover.
- No paper
- Paper jam in the rear cover
23 Reactor roller
paper jam sensor
Detects if paper winds around the
reactor roller.
- Paper jam
24 PF encoder sensor Detects rotation of the encoder
during paper feeding from the
cassette, and controls its drive.
- PF position error
25 Liquid sensor Detects supply of the Clear ink to
the Clear ink application roller.
- Reactor error
26 PFPE sensor Detects paper feeding and ejection
from the cassette (or front tray).
- No paper in the cassette
- Paper jam in the cassette
- Paper not properly set in the manual feed
slot
5 / 53
Click on the image to enlarge it.
6 / 53
7 / 53
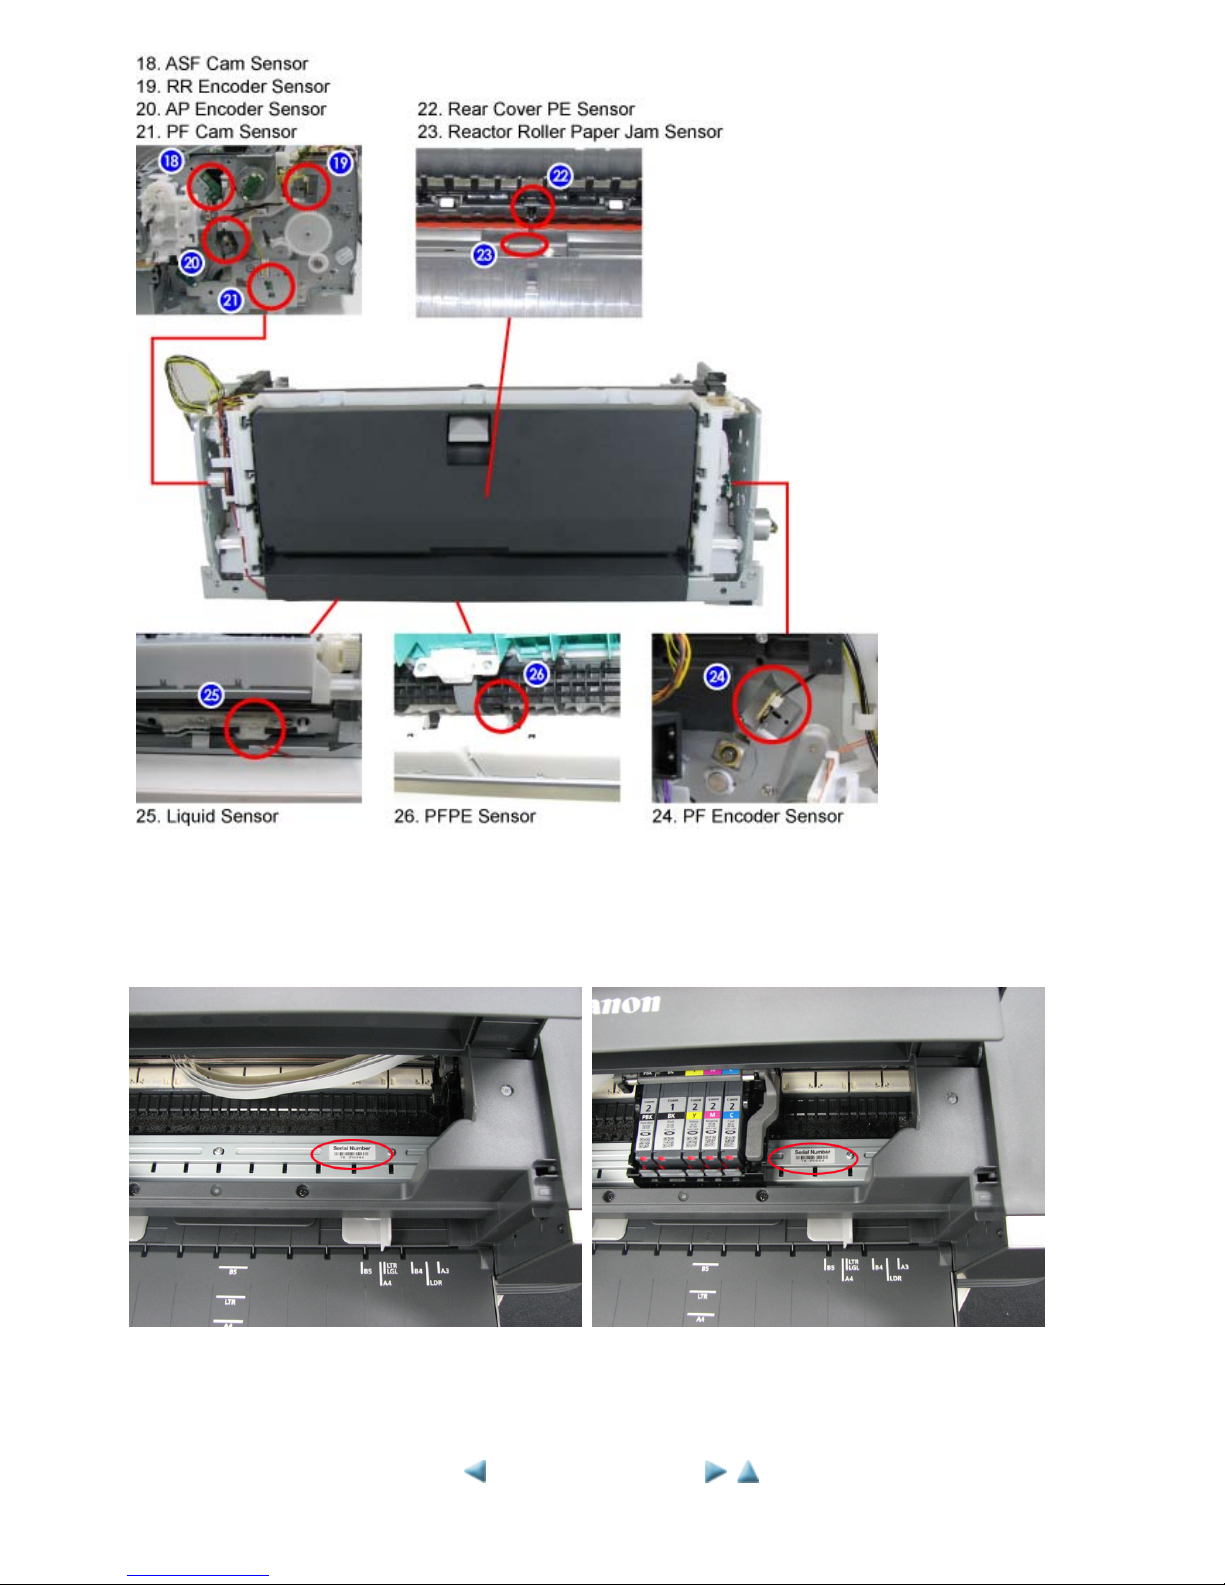
1-5. Serial Number Location
On the spur holder (visible when the top cover is opened).
When the printer power is OFF. When the printer power is ON.
<1. MAINTENANCE>
8 / 53

2. LIST OF ERROR DISPLAY / TROUBLESHOOTING
Errors and warnings are displayed by the following ways:
1. Operator call errors are indicated by the Alarm LED lit in orange, and the error messages are
displayed by the printer driver Status Monitor.
2. Error codes (the latest 10 error codes at the maximum) are printed in the "operator call/service call
error record" area in EEPROM information print
Buttons valid when an operator call error occurs:
1. Power button: To turn the printer off and on again.
2. Resume/Cancel button: To cancel the job at error occurrence, and to clear the error.
2-1. Operator Call Errors (by Alarm LED Lit in Orange)
iX7000 TABLE OF CONTENTS
Alarm
LED
blinking
in orange
Error
Error
code
U No.
Solution
Parts that are likely
to be faulty
2 times No paper in the
rear tray.
[1000] --- Confirm that the rear tray is
selected as the paper source.
(The rear tray is only for photo
papers and post cards.) Set the
paper in the rear tray, and press
the Resume/Cancel button.
- ASF unit
- Pressure roller unit
- PE sensor
- Paper feed motor
No paper in the
cassette.
[1003] --- Confirm that the cassette is
selected as the paper source.
(The cassette is only for plain
paper.) Set the paper in the
cassette, and press the
Resume/Cancel button.
- ASF unit
- Cassette
No paper in the
manual feed slot..
[1005] --- Confirm that the manual feed is
selected as the paper source.
(Manual feeding is available
only with plain paper.) Set the
paper in the manual feed slot,
and press the Resume/Cancel
button.
- Bottom case unit
3 times Front tray closed. [1250] --- Open the front tray. (The error
is indicated when the front tray
is not opened at start of
printing, or when the front tray
is closed during printing.)
- Bottom case unit
Paper jam in the
rear tray.
[1300] --- Remove the jammed paper or
foreign material causing a paper
- ASF unit
- Pressure roller unit
9 / 53

jam (paper remainings, clips,
pens, etc.), and press the
Resume/Cancel button.
- PE sensor
- Feed roller
- Platen unit
Paper jam in the
cassette.
[1303] --- Remove the jammed paper or
foreign material causing a paper
jam (paper remainings, clips,
pens, etc.), and press the
Resume/Cancel button.
- ASF unit
- Pressure roller unit
- PE sensor
- Feed roller
- Platen unit
- Cassette
Paper jam during
automatic duplex
printing.
[1304] --- Remove the jammed paper or
foreign material causing a paper
jam (paper remainings, clips,
pens, etc.), and press the
Resume/Cancel button.
- ASF unit
- Bottom case unit
- PE sensor
- Feed roller
- Platen unit
Paper in the
manual feed slot.
[1306] --- Remove the paper from the
manual feed slot, and press the
Resume/Cancel button. (The
error is indicated when paper is
left in the manual feed slot at
start of paper feeding from the
cassette.)
- Rear tray unit
- Rear tray holder R
unit
Paper jam in the
rear cover.
[1307] --- Open the rear cover, remove the
jammed paper or foreign
material causing a paper jam
(paper remainings, clips, pens,
etc.), then press the
Resume/Cancel button. (The
error is indicated at paper jam
in the rear cover during paper
feeding from the cassette or
during manual paper feeding
from the front tray.)
- ASF unit
4 times Ink may have run
out.
[1600] U044 Replace the applicable ink tank,
or press the Resume/Cancel
button to clear the error without
ink tank replacement. When the
error is cleared by pressing the
Resume/Cancel button, ink may
run out during printing.
- Ink tank
- Logic board
Ink tank not
installed.
[1660] U043 Install the applicable ink tank(s)
properly, and confirm that the
LED's of all the ink tanks light
red.
- Ink tank
- Carriage unit
- Logic board
Clear ink is low. [1692] U045 Replace the Clear ink tank, or
press the Resume/Cancel button
to clear the error without ink
- Clear ink tank
- Valve unit
- ASF unit
10 / 53
tank replacement. When the
error is cleared by pressing the
Resume/Cancel button, Clear
ink may run out during printing.
5 times Print head not
installed, or not
properly installed.
[1401] U051 Install the print head properly. - Print head
- Carriage unit
- Logic board
Faulty print head
ID.
U052 Re-set the print head. If the
error is not cleared, the print
head may be defective. Replace
the print head.
- Print head
- Logic board
Print head
temperature sensor
error.
[1403]
Faulty EEPROM
data of the print
head.
[1405]
6 times Paper not set
properly in the
manual feed slot.
[1330] --- Set the paper in the manual feed
slot properly, and press the
Resume/Cancel button. (The
error is indicated when paper
does not feed from the front
tray though paper is supposed
to be set in the manual feed
slot.)
- ASF unit
- Bottom case unit
- Cassette
7 times Multiple ink tanks
of the same color
installed.
[1487] U071 Replace the wrong ink tank(s)
with the correct one(s).
- Ink tank
- Logic board
Ink tank in a wrong
position.
[1680] U072 Install the ink tank(s) in the
correct position.
8 times Warning: The ink
absorber becomes
almost full.
[1700] --- Replace the ink absorber, and
reset its counter. [See 4-4.
Special Notes on Servicing, (4)
Ink absorber counter setting.]
Pressing the Resume/Cancel
button will exit the error, and
enable printing without
replacing the ink absorber.
However, when the ink
absorber becomes full, no
further printing can be
performed unless the applicable
ink absorber is replaced.
- Absorber kit
10 times Paper size not
supported for
automatic duplex
printing.
[1310] --- Set a supported size of paper,
and press the Resume/Cancel
button.
- ASF unit
11 / 53

No cassette. [1282] --- Set the cassette, and press the
Resume/Cancel button.
- Bottom case unit
11 times Failed in automatic
print head
alignment
[2500] --- Press the Resume/Cancel button
to clear the error, then perform
the automatic print head
alignment again.
- Print head
- Ink tank
- Carriage unit
- Logic board
Paper size smaller
than specified
[1062] --- Press the Resume/Cancel
button. (The paper will be
ejected, and the print job will be
cancelled automatically.)
The error is indicated when the
size of paper actually set is
smaller than the one selected in
the printer driver, to prevent
printing on the platen.
(e.g. When A4 paper is set in
the printer though A3 is
selected in the printer driver,
the error occurs. If A3 paper is
set in the printer and A4 is
selected in the printer driver,
then the error does not occur.)
- Carriage unit
- Logic board
Smearing on the
paper feed rollers
[1870]
*1
--- Perform Sheet cleaning, using
the Cleaning Sheet. (The error
is indicated at every 5,000
pages of paper feeding from the
cassette.)
12 times Ink tank replaced
during printing
[1350]
*1
--- If ink runs out and the empty
ink tank is replaced during
printing, ink agitation is
performed after the ink tank
replacement, then printing stops
with the message displayed on
the screen. To resume printing,
press the Resume/Cancel
button. Printing resumes after
cleaning is performed.
14 times Ink tank not
recognized.
[1684] U140 A non-supported ink tank (an
ink tank that is sold in a
different region from where the
printer was purchased) is
installed (the ink tank LED is
turned off). Install the
supported ink tanks.
- Ink tank
- Logic board
- Carriage unit
15 times Ink tank not
recognized.
[1682] U150 A hardware error occurred in an
ink tank (the ink tank LED is
turned off). Replace the ink
- Ink tank
- Logic board
- Carriage unit
12 / 53

tank(s).
16 times No Clear ink
(during printing).
[1693] U165 Replace the Clear ink tank, or
press the Resume/Cancel button
to clear the error without ink
tank replacement. When the
error is cleared by pressing the
Resume/Cancel button, the print
job is cancelled.
Printing on plain paper cannot
be performed until the Clear ink
tank is replaced with a new one.
If the error persists even after
replacement of the Clear ink
tank, press and hold the
Resume/Cancel button in the
user mode until the Alarm lamp
blinks 9 times, release the
button, then remove and reinstall the Clear ink tank.
- Clear ink tank
- ASF unit
- Valve unit
- Logic board
No Clear ink
(printing is not
performed).
[1694] U166 Replace the Clear ink tank, and
press the Resume/Cancel
button.
Unless the Clear ink tank is
replaced with a new one, the
error will not be cleared only by
pressing the Resume/Cancel
button.
If the error persists even after
replacement of the Clear ink
tank, press and hold the
Resume/Cancel button in the
user mode until the Alarm lamp
blinks 9 times, release the
button, then remove and reinstall the Clear ink tank.
- Clear ink tank
- ASF unit
- Valve unit
- Logic board
Clear ink tank not
installed.
[1696,
1697]
--- Install the Clear ink tank. - Clear ink tank holder
- Logic board
17 times No ink (no raw
ink).
[1688,
1698]
U172 Replace the empty ink tank(s).
This error is indicated when the
applicable ink tank has never
been removed until ink is used
up. (Printing cannot be
continued even when the
Resume/Cancel button is
pressed for 5 sec. or longer.)
If the ink tank is removed and
re-set again (without being
- Ink tank
- Logic board
- Carriage unit
13 / 53

*1: In the EEPROM information print in the service mode, the error is indicated as "FFFF" (the two
types of errors are not distinguished since neither of them are a trouble).
replaced with a new one), the
error of 18 blinks is indicated.
18 times Remaining ink
amount unknown.
[1683,
1699]
U182 Replace the ink tank with a new
one.
This error is indicated when the
applicable ink tank has been
removed before the error
occurrence.
Printing with an empty ink tank
can damage the printer.
To continue printing without
replacing the ink tank(s), press
the Resume/Cancel button for 5
sec. or longer to disable the
function to detect the remaining
ink amount. After the operation,
it is recorded in the printer that
the function to detect the
remaining ink amount was
disabled.
- Ink tank
- Logic board
- Carriage unit
14 / 53
 Loading...