

Canon HF S21, HF S20 User Manual


ImportantUsageInstructions
WARNING!
WARNING!
COPYRIGHTWARNING:
Unauthorized recording of copyrighted materials may infringe on the rights of copyright
owners and be contrary to copyright laws.
HD Camcorder, VIXIAHF $20 A/ VIXIAHF$21 A / VIXIAHF $200 A systems
Thisdevicecomplieswith Partt5 ofthe FCCRules.Operationissubjecttothefollowingtwoconditions:
(t) Thisdevicemaynotcauseharmfulinterferenceand(2)this devicemustacceptanyinterference
received includinginterferencethat maycauseundesiredoperation.
Note:Thisequipmenthasbeentestedandfoundto complywiththelimitsfor classBdigitaldevice,
_ursuantto Part15 oftheFOORules,Theselimitsaredesignedto providereasonableprotection
againstharmfulinterferenceina residentialinstallation.Thisequipmentgeneratesusesandcan
radiateradiofrequencyenergyand,if not installedanduseinaccordancewiththe instructions,may
causeharmfulinterferencetoradiocommunications,However,thereis noguaranteethat interference
will notoccurina particularinstallation.If thisequipmentdoescauseharmfulinterferencetoradioor
televisionreception,whichcan bedeterminedbyturningthe equipmentoffandon,theuseris
encouragedtotryto correctthe interferencebyoneor moreofthe followingmeasures:
• Reorientorrelocatethereceivingantenna,
• Increasetheseparationbetweentheequipmentandreceiver.
• Connecttheequipmentintoanoutletonacircuitdifferentfromthattowhichthereceiverisconnected.
• Consultthedealeroranexperiencedradio/TVtechnicianforhelp.
Useofshieldedcableisrequiredto complywith classBlimits inSubpartBofPart15of FOORules,
Donotmakeanychangesormodificationstothe equipmentunlessotherwisespecifiedinthemanual.
Ifsuch changesor modificationsshouldbemade,youcouldbe requiredtostopoperationofthe
equipment.
CanonU,S,A,,Inc,
OneCanonPlaza,LakeSuccess,NY11042,U.S.A.
TelNo,(516)328-5600
CAUTION:
TOPREVENTELECTRICSHOCK,MATCHWIDEBLADEOFPLUGTOWIDESLOT,FULLYINSERT.
WARNING:
Toreducethe risk of electric shock, do not exposethis product to dripping or splashing.
TOREDUCETHERISKOFFIREORELECTRICSHOCK,DONOTEXPOSETHIS
PRODUCTTORAIN ORMOISTURE.
TOREDUCETHERISKOFELECTRICSHOCKANDTOREDUCEANNOYING
INTERFERENCE,USETHERECOMMENDEDACCESSORIESONLY.

plug as plug readily operable
TheMainsisusedthedisconnectdevice. The Mains shall remain
to disconnectthe plug in case of anaccident.
CAUTION:
• Dangerof explosion if the wrong type of batteries are attached. Useonly the same type of
batteries.
• Donet exposebatteries or product to excessive heat such asthe inside of a car under
direct sunlight, fire, etc.
Important Warning
CAUTION:
TO REDUCE THE RISK OF ELECTRIC SHOCK, DO NOT REMOVE COVER
(OR BACK). NO USER-SERVICEABLE PARTS INSIDE. REFER SERVICING
TO QUAL FED SERV CE PERSONNEL.
Thelightningflashwitharrowheadsymbol,withinanequilateraltriangle,isintendedtoalertthe
usertothepresenceof uninsulated"dangerousvoltage"withintheproduct'senclosure,that may
beof sufficientmagnitudetoconstituteariskof electricshocktopersons,
The exclamation point, within an equilateral triangle, is intendedto alert the user to the presence
of important operating and maintenance (servicing) instructions inthe literature accompanying
the product.

Inthese safety instructions the word "product" refersto the CanonHDCamcorder
VIXIAHF$20 A/ ViXiAHF$21A / VIXIAHF$200 Aandall its accessories.
1 Readthese instructions,
2 Keepthese instructions.
3 Heedall warnings.
4 Follow allinstructions.
5 Do not usethis apparatusnear water.
6 Cleanonly with dry cloth.
7 Do not install near any heat sourcessuchas radiators, heat registers, stoves, or other
apparatus (includingamplifiers) that produce heat.
8 Do not defeatthe safety purposeof the polarizedorgrounding-type plug.Apolarizedplug
has two blades with onewider thanthe other.A groundingtype plug has two blades anda
third groundingprong.The wide blade orthe third prongare provided foryour safety.If the
providedplug doesnot fit into your outlet, consultan electricianfor replacement of the
obsolete outlet.
9 Protectthe power cord from beingwalked onor pinched particularly at plugs, convenience
receptacles,and the pointwhere they exit fromthe apparatus.
10 Onlyuse attachments/accessoriesspecified by the manufacturer.
11 Unplugthis apparatusduring lightningstorms or whenunused for longperiods of time.
12 Referall servicing to qualifiedservice personnel.Servicing is required when the apparatus
has beendamaged in any way, such as power-supplycord or plug is damaged,liquid has
beenspilled or objectshave fallen into the apparatus,the apparatushas been exposedto
rain or moisture,does notoperate normally,or has beendropped.
13 ReadInstructions-- All the safetyand operating instructionsshould be readbeforethe
productis operated.
14 RetainInstructions-- The safety andoperatinginstructions should be retainedfor future
reference.
15 HeedWarnings-- All warnings on the product and inthe operating instructions should be
adheredto.
16 Follow Instructions-- Alloperatingandmaintenanceinstructions should be followed.
17 Cleaning-- Unplugthis product from the wall outlet before cleaning.Donot use liquid or
aerosol cleaners.The productshould becleaned only as recommendedin this manual.
18 Accessories-- Donot use accessoriesnot recommendedinthis manual asthey may be
hazardous.
19 Avoidmagneticor electricfields -- Donot usethe cameraclose to TVtransmitters, portable
communication devicesor other sourcesof electric or magneticradiation. Theymay cause
picture interference,or permanentlydamagethe camera.
20 WaterandMoisture -- Hazardofelectric shock -- Donot use this productnear water orin
rainy/moist situations.

21
PlacingorMoving--Donotplaceonanunstablecart,stand,tripod,
bracketortable.Theproductmayfall,causingseriousinjurytoachildor
adult,andseriousdamagetotheproduct.
Aproductandcartcombinationshouldbemovedwithcare.Quickstops,
excessiveforce,andunevensurfacesmaycausetheproductandcart
combinationtooverturn.
22
PowerSources--TheCA-570CompactPowerAdaptershouldbe
operatedonlyfromthetypeofpowersourceindicatedonthemarkinglabel.Ifyouarenot
sureofthetypeofpowersupplytoyourhome,consultyourproductdealerorlocalpower
company.Regardingotherpowersourcessuchasbatterypower,refertoinstructionsinthis
manual.
23
Polarization--TheCA-570CompactPowerAdapterisequippedwithapolarized2-prong
plug(aplughavingonebladewiderthantheother).The2-prongpolarizedplugwillfitinto
thepoweroutletonlyoneway.Thisisasafetyfeature.Ifyouareunabletoinserttheplug
fullyintotheoutlet,tryreversingtheplug.Iftheplugstillfailstofit,contactyourelectrician
toreplaceyourobsoleteoutlet.Donotdefeatthesafetypurposeofthepolarizedplug.
24
PowerCordProtection--Powercordsshouldberoutedsothattheyarenotlikelytobe
walkedonorpinchedbyitemsplaceduponoragainstthem.Payparticularattentiontoplugs
andthepointfromwhichthecordsexittheproduct.
25
OutdoorAntennaGrounding--Ifan
outsideantennaisconnectedtothe
product,besuretheantennais
groundedsoastoprovidesome
protectionagainstvoltagesurges
andbuilt-upstaticcharges.Section
810oftheNationalElectricalCode,
ANSI/ NFPANo.70--1984,
provides informationwith respect to
proper groundingof the mast and
supportingstructure, groundingof
the lead-inwire to an antenna
dischargeunit, size of grounding
conductors,location of antenna
dischargeunit, connectionto
grounding electrodes,and
requirementsfor the groundingelectrode. Seefigure 1.
26 Lightning -- Foradded protectionof this productduring alightning storm,or when it is left
unattendedandunused forlong periods of time, disconnect it from the wall outlet and
disconnectthe antenna.This will preventdamageto the productdueto lightning and power-
line surges.
27 Overloading-- Donot overloadwall outlets andextensioncordsas this canresultin arisk of
fire or electric shock.
28 ObjectsandLiquid Entry-- Neverpush objects of any kind into this product through
openingsas they maytouch dangerousvoltagepoints or shortout partsthat could result in a
fire or electric shock. Becarefulnot tospill liquid of any kind ontothe product.
29 Servicing -- Donot attemptto service this product yourselfasopeningor removing covers
may exposeyouto dangerousvoltageor other hazards. Referall servicing to qualified
service personnel.
Fig. 1 EXAMPLE OF ANTENNA GROUNDING AS PER NATIONAL
ELECTRICAL CODE
......_u_ ....
t (NEC SECTION 810-20}
"I -E_ E-C_C_ ...... GROUNDING CONDUCTORSSERVICE "l )_." I (NEC SECTION ...... )
CLAMP ANTENNADISCHARGEUNit
NEC - NATIONAL
ELECTRICAL CODE (NEC Am 250. PART H)
_- IN WIRE
GROUND CLAMPS
SERV,CEGROUND,NO
ELECTRODESYSTEM

30DamageRequiringService--Disconnectthisproductfromthewailoutletandallpower
sourcesincludingbattery,andreferservicingtoqualifiedservicepersonnelunderthe
followingconditions:
a.Whenthepower-supplycordorplugisdamaged.
b.Ifanyliquidhasbeenspilledonto,orobjectshavefalleninto,theproduct.
c. Iftheproducthasbeenexposedtorainorwater.
d.Iftheproductdoesnotoperatenormallyevenifyoufollowtheoperatinginstructions.
Adjustonlythosecontrolsthatarecoveredbytheoperationinstructions.Improper
adjustmentofothercontrolsmayresultindamageandwilloftenrequireextensivework
byaqualifiedtechniciantorestoretheproducttoitsnormaloperation.
e.Iftheproducthasbeendroppedorthecabinethasbeendamaged.
f. Whentheproductexhibitsadistinctchangeinperformance.Thisindicatesaneedfor
service.
31ReplacementParts--Whenreplacementpartsarerequired,besuretheservicetechnician
hasusedreplacementpartsthatarespecifiedbyCanonorthathavethesame
characteristicsastheoriginalpart.Unauthorizedsubstitutionsmayresultinfire,electric
shockorotherhazards.
32SafetyCheck--Uponcompletionofanyserviceorrepairstothisproduct,asktheservice
techniciantoperformsafetycheckstodeterminethattheproductisinsafeoperatingorder.
33Heat--Theproductshouldbesituatedawayfromheatsourcessuchasradiators,heat
registers,stoves,orotherproducts(includingamplifiers)thatproduceheat.
Whenreplacementofthepowersupplyisrequired,pleasereturnittotheresponsible
nearest Canon Service Center and please replace it with the same type number CA-570.
The Adapter can be used with a power supply between 1O0and 240 VAC. For areas
where 120 V AC power is not used, you will need a special plug adapter. Contact your
nearest Canon Service Center for further information.
This Class B digital apparatus complies with Canadian ICES-O03. I
The serial number of this product can be found at the battery attach-
ment unit of the camcorder. Write down the number and other informa-
tion here and retain this book as a permanent record of your purchase
to aid identification in case of theft.
Model Name: VIXIA HF $20 A / VIXIA HF $21 A / VIXIA HF $200 A
Date of Purchase: Serial No.:
Purchased From:
Dealer Address:
Dealer Phone No.:

Trademark Acknowledgements
• The SO logo is atrademark.TheSDHClogois a trademark.
• Microsoft and Windows are trademarks or registered trademarks of Microsoft Corporationin the UnitedStates
and/or other countries.
• Macintoshand Mac OSare trademarks of Apple Inc., registered in the U.S. and other countries.
• "x.v.Color" and the "x.v, Color" logo are trademarks.
• HDMI,theHDMIlogo and High-DefinitionMultimedia Interfaceare DOLBY
trademarks or registered trademarks of HDMILicensing LLC.
• "AVCHD"and the "AVCHD"logo are trademarksof PanasonicCorporation DIGITAL I
and Sooy Corporation. STEREO EREATOR
• Manufacturedunder license from Dolby Laboratories.
"Dolby" and thedouble-D symbol are trademarks ofDolby Laboratories.
• YouTubeisa trademark of GoogleInc.
• Othernames and products not mentionedabove may betrademarks or registered trademarks of their
respective companies,
• This device incorporates exFATtechnology licensed from Microsoft.
• ANYUSEOF THISPRODUCTOTHERTHANCONSUMERPERSONALUSEINANY MANNERTHATCOMPLIESWITH
THEMPEG-2STANDARDFORENCODINGVIDEOINFORMATIONFORPACKAGEDMEDIAISEXPRESSLY
PROHIBITEDWITHOUTA LICENSEUNDERAPPLICABLEPATENTSIN THE MPEG-2PATENTPORTFOLIO,WHICH
LICENSEISAVAILABLEFROMMPEGLA, LLC., 250STEELESTREET,SUITE300, DENVER,COLORADO80206.
• This product is licensedunder AT&T patents for the MPEG-4 standard and maybe used for encoding MPEG-4
compliant video and/or decoding MPEG-4compliant video that was encodedonly (1)for a personal and non-
commercial purposeor (2)by a video provider licensed under the AT&Tpatents to provide MPEG-4compliant
video. No license is granted or implied for any other use for MPEG-4standard.
I

ExcitingFeaturesandNewFunctions
_1 _ High-Definiti0nVideo
Your camcorder's full high-definition
T image sensor (Full HD CMOS) captures
/
1,080 pixels 2. Videos are then recorded in the
lines
the special moments in your life with amazing image quality and in lifelike
vibrant colors is easy and fun!
video at a resolution of 1,920 x 1,080
memory in high definition, using AVCHD
specifications 3.
With your new HD camcorder, capturing
b_i_ _ DualFlash
Memory
You can record in the built-in
memory or on commercially
available memory cards ([_] 36).
1 "Full HD 1080" refers to Canon camcorders compliant with high-definition video
composed of 1,080 vertical pixels (scanning lines).
2 Video is recorded at this resolution only when the recording mode is set to MXP or
FXP mode, in other recording modes, the picture is recorded at 1,440 x 1,080
pixels.
3 AVCHD isa standard for recording high-definition video. With AVCHD specifica-
tions, the video signal is recorded using MPEG--4 AVC/H.264 compression and
the audio signal is recorded in Dolby Digital,
RelayRecording _
The memory almost full? Use the
double memory card slot to keep
on recording video without
interruption ([_ 39).
9®

SmartSmartAUTO(_ 43)
Smart AUTO automatically selects the best
scene mode for the scene you want to
shoot. You get spectacular recordings
every time without worrying about settings.
VideoSnapshot
|J ([_] 69)
Shoot or capture short scenes
and arrange them into a video
clip set to your favorite
background music.
Just point the camcorder
and it will automatically
select the best settings for
your subject
"_" FaceDetection(q3 67)
The camcorder automatically
detects people's faces and
adjusts the focus and other
settings accordingly for beautiful
results.
ImageStabilization
DYNAMIC
Dynamic IS (C_ 64)
compensates for camcorder
shake when you shoot video
while walking. Powered IS
([_[3 65) will produce stable shots
when you zoom in on distant
subjects (full telephoto).

Enjoyingyour Recordingson OtherDevices
Connect the camcorder to
Connectthe camcorder
toan HDTV([_ 128)
computeror a videosharingWebsite.
®
High Definition
the optional DW-100 DVD
Burner (_ 135, 140)
ImageMixer 3 SE (_ 133, 146).
Standard Definition
AVCHDdiscs4
PhotoDVDs
AVCHE}
Use the supplied software
ConvertyourHDmovies,inthe
Standard OVDs
camcorderitself,tostandarddefinition
files (_ 140, 146).
4 AVCHD discs containing scenes recorded in MXP mode cannot be created with
the optional DW--100 DVD burner, Use the supplied software IrnageMixer 3 SE to
back up such scenes.
5 Refer to the instruction manual of the device. Depending on the device used, cor-
rect playback may not be possible even if the device is AVCHD--compatible. In
such case, play back the recordings on the memory card using the camcorder,
10

11

Tableof contents
• Introduction
8 Exciting Features and New Functions
16 About this Manual
18 Getting to Know the Camcorder
18 Supplied Accessories and CD-ROMs
19 Names of Parts
• Preparations
22 Getting Started
22 Charging the Battery Pack
24 Preparing the Accessories
26 Adjusting the LCD Screen and (lll"_]IR only) Using the
Viewfinder
29 Basic Operation of the Camcorder
29 Using the Touch Screen
30 Operating Modes
32 Using the Menus
34 First Time Settings
34 Setting the Date and Time
35 Changing the Language
35 Changing the Time Zone
36 Using a Memory Card
36 Memory Cards Compatible for Use with the Camcorder
37 Inserting and Removing a Memory Card
38 Selecting the Memory for the Recordings
39 Relay Recording of Movies
40 Initializing the Built-in Memory (_ only) or
Memory Card
12 * Tableofcontents

• Dual Shot Mode
42 Basic Recording
42 Shooting Video and Taking Photos in Dual Shot Mode
43 About the Smart AUTO mode
46 Zooming
47 Quick Start Function
• Video
49 Basic Playback
49 Playing Back the Video
53 The Index Selection Screen: Selecting the Content to Play
55 3D Flip View
56 Narrowing Down the Scenes Shown in the Index Screen
57 Deleting Scenes
59 Advanced Functions
59 Shooting Video in M Manual Mode
60 Selecting the Video Quality _Recording Mode_
61 Special Scene Recording Programs
63 Cinema Mode: Giving a Cinematic Look to your
64 Advanced Image Stabilization
66 Pre-Recording
67 Face Detection
68 Touch & Track
69 Video Snapshot
70 Digital Effects
71 Manually Setting the Shutter Speed or Aperture
74 Manual Exposure Adjustment
76 Automatic Gain Control (AGC) Limit
76 Manual Focus Adjustment
79 White Balance
80 Digital Tele-Converter
81 Image Effects
82 Mini Video Light
83 Self Timer
83 Audio Recording Level
Back
Recordings
Table of contents * 13

85 Using Headphones
86 Using the Mini Advanced Shoe
87 Using an External Microphone
89 Using the Custom Key and Dial
90 Using a Zoom Remote Controller
91 Selecting the Playback Starting Point
93 Playing Back Scenes Set to Background Music
97 Onscreen Displays and Data Code
98 Playlist and Scene Operations
98 Editing the Playlist: Adding, Deleting, Moving and Playing
100 Capturing Photos and Video Snapshot Scenes from a
102 Dividing Scenes
Back
Movie
• Photos
104 Basic Playback
104 Viewing Photos
106 Deleting Photos
108 Additional Functions
108 Taking Photos in i Manual Mode
109 Selecting Photo Size and Quality
111 Flash
113 Drive Mode: Continuous Shooting and Exposure
114 Taking Photos while Recording Movies (Simultaneous
115 Light Metering Mode
116 Slideshow
117 Magnifying Photos during Playback
117 Rotating Photos
118 Histogram Display
118 Protecting Photos
121 Printing Photos
121 Printing Photos (Direct Print
123 Print Orders
Bracketing
Recording)
14 ° Table of contents

• ExternalConnections
125 Terminals on the Camcorder
126 Connection Diagrams
128 Playback on a TV Screen
130 Saving and Sharing Your Recordings
130 Copying Recordings to a Memory Card
133 Saving Recordings on a Computer
135 Saving Movies onto High-Definition Discs
140 Saving Movies onto Standard-Definition Discs (DVD)
144 Saving Photos on Photo DVDs
145 Copying Recordings to an External Video Recorder
146 Uploading Movies to Video Sharing Web Sites
(AVCHD/Blu-ray Discs)
• Additional Information
152 Appendix: Menu Options Lists
152 FUNC. Panel
156 Setup Menus
170 Appendix: Onscreen Icons and Displays
175 Trouble?
175 Troubleshooting
183 List of Messages
194 Do's and Don'ts
194 Handling Precautions
199 Maintenance/Others
200 Using the Camcorder Abroad
201 General Information
201 Accessories
202 Optional Accessories
208 Product Codes
209 Specifications
213 Index
Tabte of contents * 15

About this Manual
Thank you for purchasing the Canon VIXIA HF S21 /VIXIA HF S20 /
VlXlA HF S200. Please read this manual carefully before you use the
camcorder and retain it for future reference. Should your camcorder fail
to operate correctly, refer to Troubleshooting ([_ 175).
ConventionsUsedinthisManual
° O IMPORTANT: Precautions related to the camcorder's operation.
• (_ NOTES: Additional topics that complement the basic operating
procedures.
° O POINTS TO CHECK: Restrictions or requirements regarding the
function described.
• CJ_]:Reference page number within this manual.
To complete some operations you will need to refer also to other
instruction manuals. This will be indicated with the following icons:
[PHOTOI:Refer to the 'Photo Applications' Instruction Manual,
included as a PDF file in the supplied Camcorder Supple-
mental Disc.
[DW-100i;; Refer to the instruction manual of the optional DW-100 DVD
• _ : Text that applies only to the model(s) shown in the icon.
• The following terms are used in this manual:
• The photos included in this manual are simulated pictures taken with
Burner.
When not specified as "memory card" or "built-in memory", the term
"memory" by itself refers to both.
"Screen" refers to the LCD and the viewfinder screen (1_ only).
"Scene" refers to one movie unit from the point you press the
[START/S_r6#"button to start recording until you press again to pause
the recording.
a still camera. Unless indicated otherwise, illustrations and menu
icons refer to the I_.
16 • Introduction

indicates that a function is available in the
operating mode indicated and + indicates
that the function is not available. For a detailed
explanation refer to Operating Modes (_ 30).
* @ appears
+ Repeat, selecting I_ Oft], to turn o/1the self time1:
ii_ _] mode: In record pause mode, press sl//Ri sropi.
Brackets [] are used to refer to control
buttons and menu options you will
touch on the screen and to other
onscreen messages and displays.
The names of physical buttons
and switches on the
camcorder are indicated within
a "button" frame.
For example CuNc.
The _} arrow is used to abbreviate menu selections.
For a detailed explanation on how to use the menus,
refer to Using the Menus (_ 32). For a concise
summary of all available menu options and settings,
refer to the appendix Menu Options Lists (_ 152).
htroduction * 17

Supplied Accessoriesand CD-ROMs
The following accessories are supplied with the camcorder:
CompactPowerAdapter
(incl. power cord)
BP-808Battery
_WL-D89 WirelessController
) (incl.CR2025lithium button battery)
STV-250NStereoVideoCable<
Yellow • Red• White plugs
>CTC-IOO/SComponentCable
Red• Green• Blue plugs
IFC-3OOPCUUSBCable< _J
The following CD-ROMs and software are supplied with the camcorder:
• PIXELA Application - Disc 1 CD-ROM* and 'PIXELA Applications'
Installation Guide
- ImageMixer 3 SE Transfer Utilities - Software for saving and
transferring movies and music files you can use as background music.
• PIXELA Application - Disc 2 CD-ROM*
- ImageMixer 3 SE Video Tools - Software for managing, editing, and
playing back movies.
• Photo Applications Ver.34.0*/Music Data Disc CD-ROM (referred in
the manual as the Camcorder Supplemental Disc). Contains the follow-
ing components.
- Photo Application - Software for saving, managing, and printing
photos*.
- Music files that can be used as background music during playback**.
* The CD-ROM includes the instruction manual of the software (on PDF file).
**These music files are for exclusive use with the supplied software ImageMixer 3
SE, The disc cannot be played back on CD players. For more details, refer to
'lmageMixer 3 SE SoFtware Guide' (PDF file).
18 • htroduction

Names of Parts
Left side view
Right side view
@
_@
Front view
®
(il) Stereo microphone (L) (_ 83)
,'2_Speaker (_ 51)
_) "J,-%13E](camera/play) button ([._ 31)
r4_ VIDEO SNAP (video snapshot) button
(_ 69)
_5_DISR (onscreen display) button
(_ 97)/
BATT. INFO button (_ 174)
r6; Double memory card slot cover
f_ CUSTOM dial (l_[_l89)
%" Terminal cover
Jg] COMPONENT OUT terminal
([.Z_1125,127)
:t0_AV OUT terminal (_ 125,127)/
(headphones) terminal (_ 85)
31) REMOTE (zoom remote controller)
terminal ([.Z_I90)
,t_ Memory card slot Q (C[_137)
_' Memory card slot 171([.Z_I37)
J4_Mode switch (l_[_l30)
:t_ Stereo microphone (R) ([.Z_I83)
:t¢ Strap mount (_ 25)
:% USB terminal (C[_ 125,128)
:t8; HDMI OUT terminal (_ 125, 126)
:% Grip belt ([.Z_I25)
'20)MIC terminal ([_[_188)
'2_; Mini video _ight (_ 82)
'2_ Flash (_ 111)
'_h Instant AF sensor (_ 157)
'2# CUSTOM button (_ 89)
_ntroduction " 19

Topview
@
LCD panel
Back view
@
®@@
@ Mini advanced shoe ([_ 86)
@ Zoom lever (1_[_146)
'27_PHOTO button (_ 42, 108)
@ ACCESS indicator (_ 42, 59, 108)
@ Pop-up flash (1_ 111) and mini video
light ([.Z_I82)
@ POWER button
@ ON/OFF (CHG} (charge) indicator:
Green - ON
Orange - Standby (_ 47)
Red - Charging (_ 22)
132;Remote sensor (_ 25)
I_ LCD touch screen (_ 26, 29)
@ POWERED IS button (ILI_I65)/
WEB button (_ 146)
@ DC IN terminal (_ 22)
@ Viewfinder* (_ 28)
@ START/STOP button (1_[_142,59)
@ Serial number
The serial number label is located
inside the battery attachment unit.
Remove the battery pack to find it.
@ Battery attachment unit ([.Z:I 22)
* _ only,
@@
20 * Introduction

Bottomview
WirelessControllerWL-D89
@ Tripod socket (_ 195)
@ BATTERY RELEASE switch (_ 23)
@ Dioptric adjustment lever* (_ 28)
* _ only.
J0 START/STOP button (_142, 59)
:2) {,FE:]5(index selection) button (_ 53)
Press and hold for more than 2
seconds to switch between shooting
and playback mode.
_) MENU button (l_[_133, 156)
r4) DISR (onscreen display} button
(_ 97)
_sbSET button
@ • (stop) button ([._ 49)
:_) PHOTO button (_ 42,108)
8_ Zoom buttons ([_ 46)
Jq_,Navigation buttons ( I/V/4/ll_ )
_t¢ I_/11 (play/pause) button ([._ 49)
Introduction * 21

Preparations
This chapter describes basic operations, such as using the
touch panel, navigating the menus, and first time settings to
help you learn more about your camcorder.
6etting Started
Chargingthe Battery Pack
The camcorder can be powered with a battery pack or directly using
the compact power adapter. The first time you use a battery pack, fully
charge it and then use the camcorder until the battery pack iscom-
pletely exhausted. Doing so will ensure that the remaining recording
time will be displayed accurately.
For approximate charging times and recording/playback times with a
fully charged battery pack, refer to Charging, Recording and Playback
Times ([_ 203).
1 Connect the power cord to the
compact power adapter.
2 Plug the power cord into a power
outlet.
3 Connect the compact power
adapter to the camcorder's DO IN
terminal.
4 Attach the battery pack to the
camcorder.
Press the battery pack softly into the
battery attachment unit and slide it up
until it clicks in place.
22 * Preparations

5 Charging will start when the
camcorder is turned off.
ON/OFF (CHG)(charge) indicator
• If the camcorder was on, the green
ON/OFF (CHG) indicator will go out
when you turn off the camcorder.
After a moment, the ON/OFF (CHG)
indicator will start flashing in red
(battery pack charging). The red ON/
OFF (CHG) indicator will go out when
the battery pack is fully charged.
• Ifthe indicator flashes quickly, refer to
Troubleshooting ([_ 175).
To remove the battery pack
1 Slide [BAT%R_RE_E_SE/in the
direction of the arrow and hold it
pressed down.
2 Slide the battery pack in the direction
of the arrow and then pull it out.
iMPORTANT
• Turn off the camcorder before connecting or disconnecting the com-
pact power adapter. After pressing iPOWERto turn off the camcorder,
important data is updated in the memory. Be sure to wait until the green
ON/OFF (CHG) indicator goes out.
• We recommend charging the battery pack intemperatures between
10 °C and 30 _'C(50 _'Fand 86 _'F).Outside the temperature range of
0 _'Cto 40 _'C(32 _'Fto 104 _'F),charging will not start.
• Do not connect to the camcorder's DC IN terminal or to the compact
power adapter any electrical equipment that is not expressly recom-
mended for use with this camcorder.
Preparations * 23

• To prevent equipment breakdowns and excessive heating, do not con-
nect the supplied compact power adapter to voltage converters for
overseas travels or special power sources such as those on aircraft and
ships, DC-AC inverters, etc.
(_) NOTES
• The battery pack will be charged only when the camcorder is off.
• If remaining battery time is an issue, you can power the camcorder
using the compact power adapter so the battery pack will not be con-
sumed.
• Charged battery packs continue to discharge naturally. Therefore,
charge them on the day of use, or the day before, to ensure a full
charge.
• We recommend that you prepare battery packs to last 2 to 3 times
longer than you think you might need.
• USAandCanadaonly:The Lithium ion/polymer battery that
powers the product is recyclable. Please call
1-800-8-BATTERY for information on how to recycle this
battery.
0
Preparingthe Accessories
Wireless Controller
First, insert the supplied CR2025 lithium button battery into the wire-
less controller.
1 Press the tab in the direction of the
arrow and pull out the battery
holder.
2 Place the lithium button battery with
the + side facing up.
3 Insert the battery holder.
Tab
d)
24 • Preparations

To use the wireless controller
Point the wireless controller at the camcorder's remote sensor when
you press the buttons.
You can rotate the LCD panel 180 degrees to use the wireless controller
from the front of the camcorder.
(_ NOTES
• The wireless controller may not work properly when the remote sensor
is situated under strong light sources or direct sunlight.
Grip Belt and Straps
Fasten the grip belt.
Adjust the grip belt so that you can reach
the zoom lever with your index finger, and
the [STAi_i_/sTOPbutton with your thumb.
Preparations * 25

To attach an optional shoulder strap
Pass the ends of the shoulder strap through the strap mount on the grip
belt and adjust the length of the strap.
Adjustingthe LCDScreenand (I]1-'_I_only)Usingthe Viewfinder
Rotating the LCD Panel
Open the LCD panel 90 degrees.
• You can rotate the panel 90 degrees downward.
• You can rotate the panel 180 degrees toward the lens. Rotating the
LCD panel 180 degrees can be useful in the following cases:
- _ To allow the subject to monitor the LCD screen while you use
the viewfinder.
- To include yourself in the picture when recording with the self timer.
- To allow the camcorder to be operated with the wireless controller
from the front.
26 * Preparations
Subject can monitor the LCD screen
(l Youcan use the viewfinder
at the same time)

(_ NOTES
• Aboutthe LCDand viewfinder*screens:The screens are produced using
extremely high-precision manufacturing techniques, with more than
99.99% of the pixels operating to specification. Less than 0.01% of the
pixels may occasionally misfire or appear as black, red, blue or green
dots. This has no effect on the recorded image and does not constitute
a malfunction.
* _ only.
LCD Backlight
When recording in bright places it may be difficult to use the LCD
screen. Turn on the LCD backlight to make it brighter.
With the camcorder on, hold [blSR} pressed down for more than 2
seconds.
Repeat this action to switch the LCD backlight between off (normal) and
on (bright). _ This changes the brightness of both the LCD and view-
finder screen.
(_ NOTES
• The LCD backlight does not affect the brightness of the recordings.
• Using the bright setting will shorten the effective usage time of the bat-
tery pack.
• You can further adjust the brightness of the LCD screen with the
_ [LCD Brightness] setting, or dim it with the _ _ [LCD
Screen Dimmer] setting to use in places where the light from the LCD
screen can be a nuisance.
Preparations ,, 27
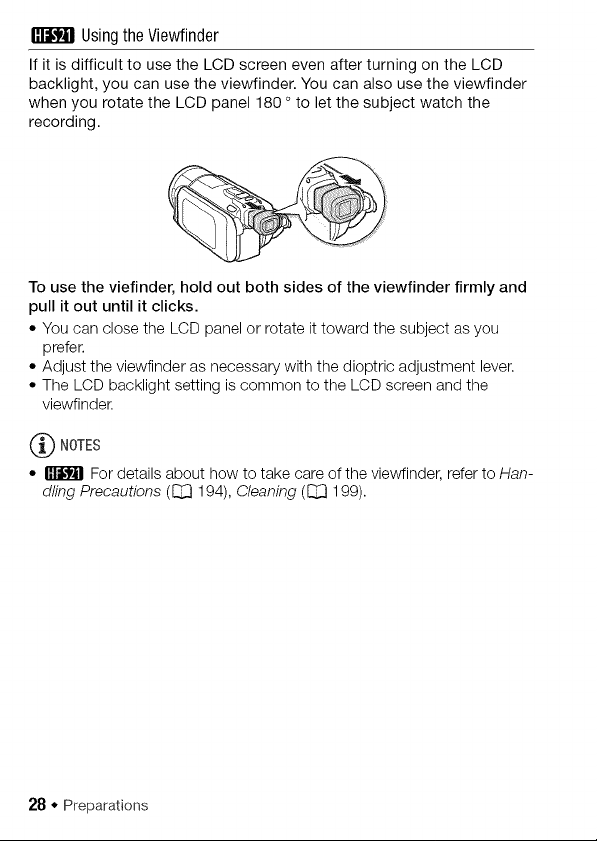
Using the Viewfinder
If it is difficult to use the LCD screen even after turning on the LCD
backlight, you can use the viewfinder. You can also use the viewfinder
when you rotate the LCD panel 180 ° to let the subject watch the
recording.
To use the viefinder, hold out both sides of the viewfinder firmly and
pull it out until it clicks.
• You can close the LCD panel or rotate it toward the subject as you
prefer.
• Adjust the viewfinder as necessary with the dioptric adjustment lever.
• The LCD backlight setting is common to the LCD screen and the
viewfinder.
(_ NOTES
• _ For details about how to take care of the viewfinder, refer to Han-
d/ing Precautions (CJ_]194), Cleaning (CJ_]199).
28 • Preparations

Basic Operation of the Camc0rder
Usingthe TouchScreen
The control buttons and menu items that appear on the touch screen
change dynamically depending on the operating mode and the task
you are performing. With the intuitive touch screen interface you have
all the controls at your fingertips.
Touch
Touch a menu item to select it, or a
control button to perform the corre-
sponding action. For some functions,
such as Touch & Track ([_ 68) and face
detection ([_ 67), you can touch a sub-
ject that appears on the touch screen to
select it and have the camcorder
choose the optimal settings.
Drag
Swipe your finger up and down or left
and right across the screen to scroll
menus, to browse through index screen
pages or to adjust slider controls (for
example, to adjust the volume).
IMPORTANT
• The camcorder uses a pressure-sensitive touch screen. Press firmly
when using touch operations.
• In the following cases, you may not be able to perform touch operations
correctly.
- Operating the touch screen with wet or gloved hands or using your
fingernails or other hard-tipped objects such as ballpoint pens.
- Applying excessive force or forcefully scratching the touch screen.
- Attaching commercially available screen protectors or adhesive film
onto the touch screen's surface.
Preparations * 29

• For details about how to take care of the touch screen, refer to Handling
Precautions (_ 194), Cleaning (_ 199).
OperatingModes
Recording
When recording video or photos, the camcorder's operating mode is
determined by the position of the mode switch and the onscreen con-
trol buttons.
Dual Shet Record video and take photos easily, letting the camcorder take careof all the
settings - Greatfor beginners or if you just prefer not to bother with detailed camcorder
settings.
,_'_. or_4 Easyrecording of movies and
_ [_* _ photos ([_[3 42).
Flexible recording Useone of the dedicated recording modes to enjoy full access to the
menus and advanced functions and change the camcorder's settings to your preference.
,_o.M (_ 59).
/__1 Touch ['_] to record movies
Touch [1_] to record photos
(_ 108)1
* The mode icon displayed will change according to the optirnai mode selected by the
Smart AUTO function (_ 43).
30 • Preparations
 Loading...