

Canon FAX-L200? FAX-L280 User Manual

User’s Guide
ii Preface
Copyright
Copyright © 2001 by Canon, Inc. All rights reserved. No part of this publication may be
reproduced, transmitted, transcribed, stored in a retrieval system, or translated into any
language or computer language in any form or by any means, electronic, mechanical,
magnetic, optical, chemical, manual, or otherwise, without the prior written permission
of Canon, Inc.
Trademarks
Canon is a registered trademark, and UHQ is a trademark of Canon Inc.
All other product and brand names are registered trademarks, trademarks or service
marks of their respective owners.
As an
ENERGY STAR
®
Partner, Canon has determined that the
FAX-L280/L200 meets the
ENERGY STAR
®
guidelines for energy
efficiency.
This equipment conforms with the essential requirements of
EC Directive 1999/5/EC.
We declare that this product conforms with the EMC requirements
of EC Directive 1999/5/EC at nominal mains input 230V, 50Hz
although the rated input of the product is 200V–240V, 50/60Hz.
(For Europe Only)
IMPORTANT!
If you have purchased the FAX-L280 model, be sure to read
Appendix C before reading the rest of this guide.
• H12203 (FAX-L200)
• H12204 (FAX-L280)
Model Name

Preface iii
For Your Safety (Australia Only)
To ensure safe operation the three-pin plug supplied must be inserted only into a
standard three-pin power point which is effectively earthed through the normal
household wiring.
Extension cords used with the equipment must be three-core and be correctly wired to
provide connection to earth. Wrongly wired extension cords are a major cause of
fatalities.
The power point shall be located near the equipment and shall be easily accessible.
The fact that the equipment operates satisfactorily does not imply that the power point
is earthed and the installation is completely safe. For your safety, if in any doubt about
the effective earthing of the power point, consult a qualified electrician.
Caution (New Zealand Only)
1. This equipment may not necessarily provide for the effective hand-over of a call to or
from a telephone connected to the same line.
2. The operation of this equipment on the same line as telephone or other equipment
with audible warning devices or automatic ring detectors will give rise to bell tinkle or
noise and may cause false tripping of the ring detector. Should such problems occur,
the user is not to contact Telecom faults service.
3. Should this equipment become physically damaged, disconnect immediately from
the Telecom connection and power source and contact your nearest service agent.
4. To relocate this equipment please.
1) Disconnect the equipment from the Telecom connection.
2) Disconnect the equipment from the power source.
3) Reconnect the equipment to the power source.
4) Reconnect the equipment to the Telecom connection.
5. If the supply cord of this equipment is damaged, it must be replaced by the special
cord (Parts No.: HH2-1910).
6. Not all standard telephones will respond to incoming ringing when connected to the
extension socket.
7. This device may be subject to bell tinkle, or mistakenly enter receive mode when
calls are made from another device on the same line. If this occurs, the problem
should not be referred to the Telecom Faults service.
8. Please note when you connect an extension phone to this device, if you use an
extension phone which has features such as “last number redial”, redial memory
numbers may be lost.
iv Preface
Laser Safety Information
Laser radiation could be hazardous to the human body. For this reason, laser radiation
emitted inside this unit is hermetically sealed within the protective housing and external
cover. No radiation can leak from the machine in the normal operation of the product by
the user.
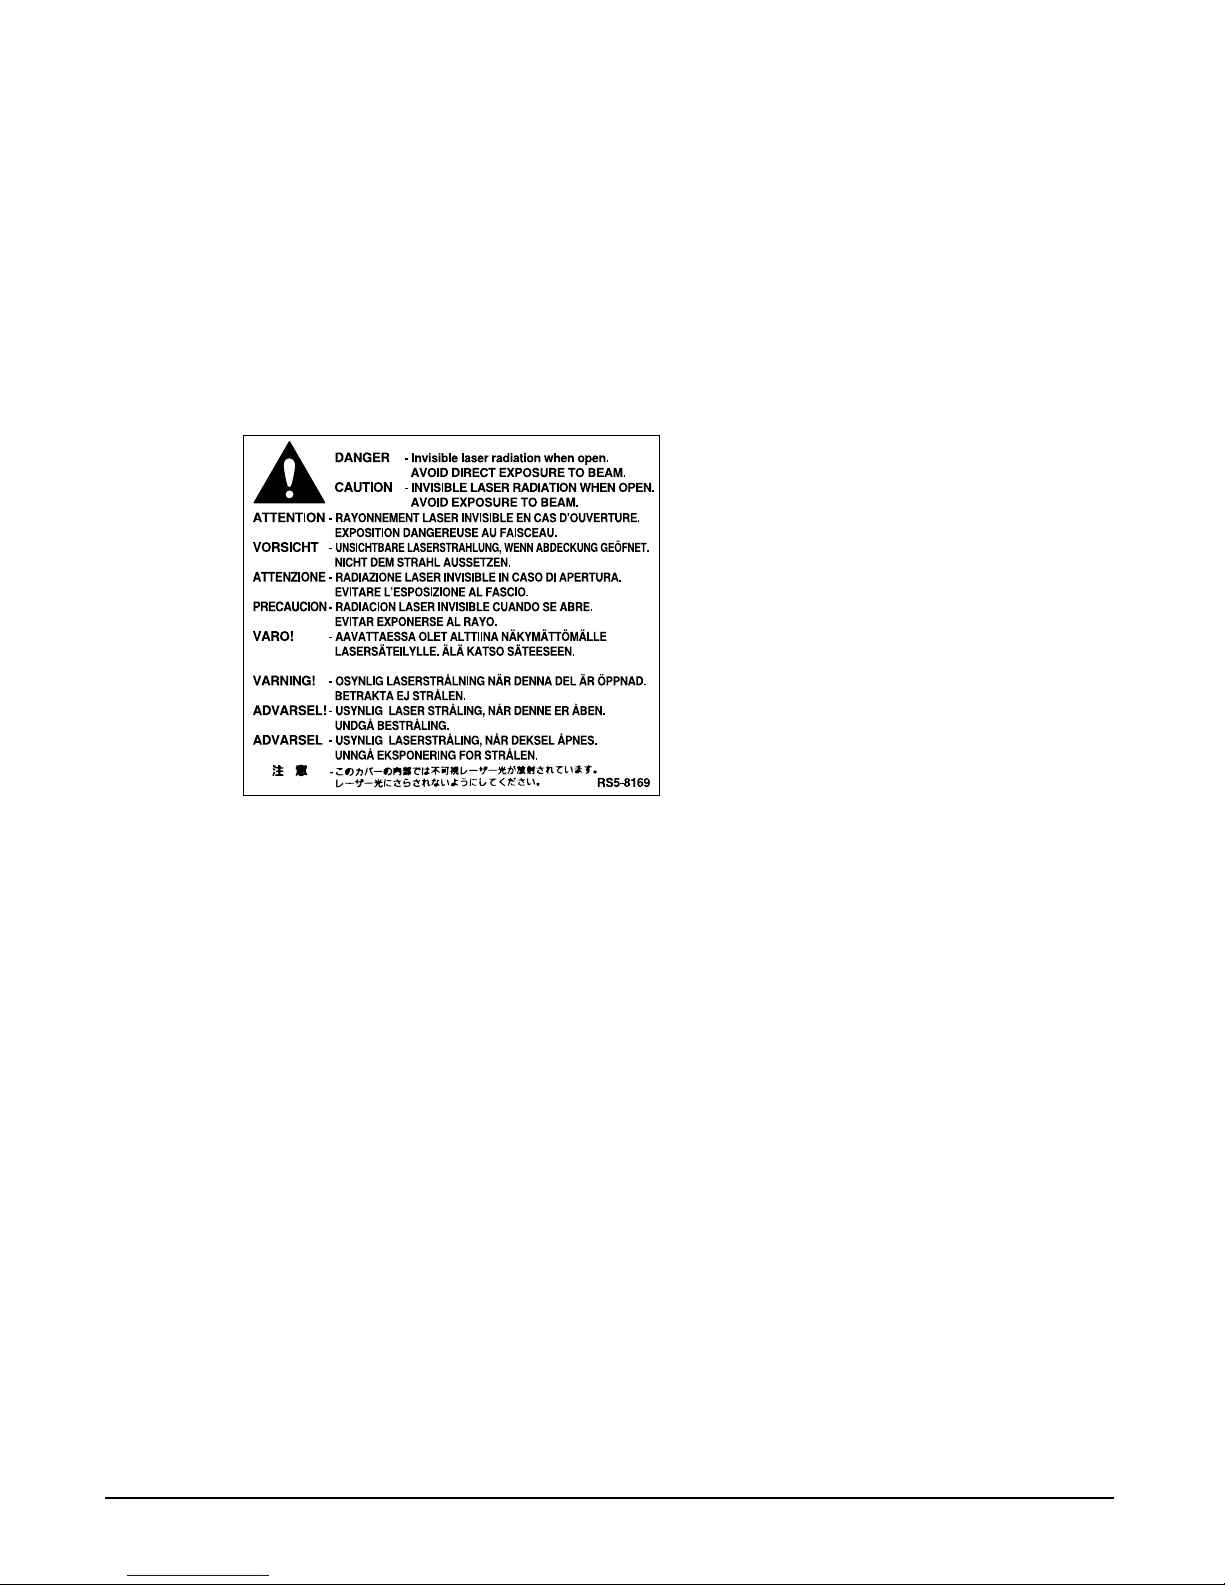
This fax is classified as a Class 1 Laser Product under EN 60825-1: 1994.
■ 200–240 V model
The label shown below is attached to the laser scan unit on the fax.
This fax has been classified under EN60825-1: 1994 and conforms to the following
classes:
CLASS 1 LASER PRODUCT
LASER KLASSE 1
APPAREIL A RAYONNEMENT LASER DE CLASSE 1
APPARECCHIO LASER DI CLASSE 1
PRODUCTO LASER DE CLASE 1
APARELHO A LASER DE CLASSE 1
c
Performance of procedures other than those specified in this guide may result in
hazardous radiation exposure.

Preface v
Contents
Chapter 1: Introduction
Type Conventions Used in This Guide ..................................................................1-2
Customer Support..................................................................................................1-3
Important Safety Instructions .................................................................................1-4
Chapter 2: Setting Up
Unpacking the FAX ................................................................................................2-2
Removing Shipping Materials............................................................................2-4
Assembling the FAX ..............................................................................................2-5
Making Connections ..............................................................................................2-6
Connecting the Telephone Line Cord and External Devices.............................2-6
Connecting the Power Cord ..............................................................................2-8
Main Components of the FAX................................................................................2-9
Operation Panel...............................................................................................2-10
Special Function Buttons.............................................................................2-10
Installing the Toner Cartridge ...............................................................................2-11
Loading Paper .....................................................................................................2-14
Testing the FAX....................................................................................................2-16
Chapter 3: Registering Information
Guidelines for Entering Numbers, Letters, and Symbols ......................................3-2
Correcting a Mistake..........................................................................................3-4
Registering Sender Information .............................................................................3-5
What is Sender Information? .............................................................................3-5
Entering the Date and Time...............................................................................3-6
Registering Your FAX Number and Name.........................................................3-6
Setting the Telephone Line Type ...........................................................................3-8
Dialling Through a Switchboard.............................................................................3-9
Registering the R Button ...................................................................................3-9
Chapter 4: Document Handling
Document Requirements .......................................................................................4-2
Scanned Area of a Document ...........................................................................4-2
Loading Documents...............................................................................................4-3
Adding Pages to the Document in the ADF.......................................................4-4
Chapter 5: Paper Handling
Paper Requirements..............................................................................................5-2
Printable Area ....................................................................................................5-3
Selecting Paper for Your FAX................................................................................5-3
Loading Paper .......................................................................................................5-3
Selecting Face-Up or Face-Down Paper Delivery.................................................5-4

vi Preface
Changing the Paper Size Setting ..........................................................................5-7
Adjusting the Toner Saver Setting .........................................................................5-9
Chapter 6: Speed Dialling
What is Speed Dialling? ........................................................................................6-2
Speed Dialling Methods.....................................................................................6-2
Registering One-Touch Speed Dialling..................................................................6-3
Registering Coded Speed Dialling.........................................................................6-8
Registering Group Dialling...................................................................................6-13
Using Speed Dialling ...........................................................................................6-16
Sending a Document With Speed Dialling ......................................................6-16
Making a Telephone Call With Speed Dialling.................................................6-17
Printing Speed Dialling Lists................................................................................6-18
Chapter 7: Sending Faxes
Preparing to Send a Fax........................................................................................7-2
Documents You Can Fax...................................................................................7-2
Setting the Scanning Resolution .......................................................................7-2
Setting the Scanning Contrast...........................................................................7-3
Dialling Methods ................................................................................................7-4
Sending Methods...................................................................................................7-5
Memory Sending................................................................................................7-5
Manual Sending Via the Handset......................................................................7-6
Cancelling Sending................................................................................................7-8
Redialling When the Line is Busy..........................................................................7-9
Manual Redialling ..............................................................................................7-9
Cancelling Manual Redialling ........................................................................7-9
Automatic Redialling ..........................................................................................7-9
What is Automatic Redialling?.......................................................................7-9
Cancelling Automatic Redialling ....................................................................7-9
Setting the Options for Automatic Redialling...............................................7-10
Sending the Same Document to Several Fax Numbers (Sequential
Broadcasting) ...................................................................................................7-12
Delayed Sending .................................................................................................7-14
Scanning a Document into Memory for Delayed Sending ..............................7-14
Printing a Document Set for Delayed Sending................................................7-16
Deleting a Document Set for Delayed Sending...............................................7-17
Using Alternative Telephone Networks (UK Only) ...............................................7-18
Attaching the M Label......................................................................................7-18
Registering an Alternative Telephone Network................................................7-19
Sending With an Alternative Telephone Network ............................................7-20
Registering Speed Dialling With the M Button ................................................7-21

Preface vii
Chapter 8: Receiving Faxes
Receiving Methods ................................................................................................8-2
Receiving Faxes Automatically: FAX ONLY MODE...........................................8-3
Setting FAX ONLY MODE .............................................................................8-3
Receiving Both Faxes and Telephone Calls Automatically: Fax/Tel Mode........8-5
Setting Fax/Tel Mode.....................................................................................8-5
Setting the Options for Fax/Tel Mode ............................................................8-6
Receiving Faxes Manually: MANUAL MODE....................................................8-8
Setting MANUAL MODE................................................................................8-8
Receiving a Fax Manually .............................................................................8-8
Receiving With an Answering Machine: ANS.MACHINE MODE.....................8-10
Setting ANS.MACHINE MODE ....................................................................8-10
Using the FAX With an Answering Machine................................................8-10
Receiving While Performing Other Tasks ............................................................8-11
Receiving Faxes in Memory When a Problem Occurs........................................8-11
Cancelling Receiving............................................................................................8-11
Telstra FaxStream™Duet (Australia Only) ...........................................................8-12
Setting the FAX for Network Switch ................................................................8-12
Network Switch System Operation ..................................................................8-13
Telecom FaxAbility (New Zealand Only)..............................................................8-14
Setting the FAX for Network Switch ................................................................8-14
Network Switch System Operation ..................................................................8-15
Chapter 9: Special Features
Special Dialling ......................................................................................................9-2
Entering Pauses in a Fax/Telephone Number...................................................9-2
Switching Temporarily to Tone Dialling ..............................................................9-3
Confirming a Dial Tone ......................................................................................9-4
Dialling Through a Switchboard.........................................................................9-4
Documents Stored in Memory ...............................................................................9-5
Printing a List of Documents Stored in Memory................................................9-5
Printing a Document Stored in Memory ............................................................9-6
Sending a Document Stored in Memory ...........................................................9-7
Deleting a Document Stored in Memory ...........................................................9-9
Polling ..................................................................................................................9-10
What is Polling?...............................................................................................9-10
Polling Receiving .............................................................................................9-10
Polling Another Fax Machine.......................................................................9-10
Cancelling Polling Receiving .......................................................................9-12
Polling Sending................................................................................................9-12
Setting Up the Polling Box...........................................................................9-12
Scanning a Document into the Polling Box .................................................9-15
Changing or Deleting the Polling Box Settings ...........................................9-15

viii Preface
Restricting Use of Your FAX ................................................................................9-17
Enabling Restriction of Your FAX ....................................................................9-17
Cancelling Restriction of Your FAX..................................................................9-18
Restricting Reception...........................................................................................9-20
Chapter 10: Copying
Documents You Can Copy ..................................................................................10-2
Making Copies .....................................................................................................10-2
Making a Quick Single Copy ...............................................................................10-3
Chapter 11: Reports and Lists
Summary of Reports and Lists ............................................................................11-2
ACTIVITY REPORT .............................................................................................11-3
TX (Transmission) REPORT................................................................................11-4
MULTI TX/RX (Transaction) REPORT.............................................................11-5
RX (Reception) REPORT ....................................................................................11-5
Chapter 12: Maintenance
Periodic Cleaning.................................................................................................12-2
Cleaning the FAX’s Exterior.............................................................................12-2
Cleaning the FAX’s Interior..............................................................................12-3
Cleaning the Scanner Components.................................................................12-5
Replacing the Toner Cartridge .............................................................................12-7
Chapter 13: Troubleshooting
Clearing Jams......................................................................................................13-2
Jams in the ADF ..............................................................................................13-2
Paper Jams......................................................................................................13-3
Jams in the Paper Delivery Slots ................................................................13-3
Jams Inside the Unit....................................................................................13-3
LCD Messages ....................................................................................................13-8
Paper Feeding Problems ...................................................................................13-13
Faxing Problems................................................................................................13-13
Sending Problems .........................................................................................13-13
Receiving Problems.......................................................................................13-15
Copying Problems .............................................................................................13-17
Telephone Problems ..........................................................................................13-18
Printing Problems ..............................................................................................13-18
General Problems..............................................................................................13-20
If You Cannot Solve a Problem .........................................................................13-21
If a Power Cut Occurs .......................................................................................13-22

Preface ix
Chapter 14: Summary of Settings
Understanding the Menu System ........................................................................14-2
Printing a List to Check the Current Settings ..................................................14-2
Accessing the Menus ......................................................................................14-3
USER SETTINGS Menu ......................................................................................14-4
REPORT SETTINGS Menu.................................................................................14-5
TX (Transmission) SETTINGS Menu ..................................................................14-6
RX (Reception) SETTINGS Menu .......................................................................14-7
PRINTER SETTINGS Menu ................................................................................14-8
POLLING BOX Menu...........................................................................................14-9
SYSTEM SETTINGS Menu ...............................................................................14-10
Appendix A: Specifications
General Specifications ..........................................................................................A-2
Facsimile ...............................................................................................................A-2
Copier ....................................................................................................................A-3
Telephone ..............................................................................................................A-3
Printer ....................................................................................................................A-3
Appendix B: Options
Optional Handset...................................................................................................B-2
Package Contents .............................................................................................B-2
Attaching the Handset to Your FAX...................................................................B-3
Maintaining Your Handset .................................................................................B-4
Appendix C: FAX-L280 Instructions
Introduction............................................................................................................C-3
Differences Between the FAX-L280 and FAX-L200..............................................C-3
Using Your Documentation....................................................................................C-3
Unpacking the FAX-L280 ......................................................................................C-3
Connecting the FAX-L280 to Your PC ..................................................................C-4
Print Media Requirements.....................................................................................C-5
Printable Area....................................................................................................C-5
Selecting Print Media ............................................................................................C-6
Loading Envelopes................................................................................................C-7
Loading Transparencies........................................................................................C-8
Specifications ........................................................................................................C-8
Index .....................................................................................................................I-1

x Preface

Chapter 1 Introduction 1-1
Introduction
Chapter 1
Introduction
Type Conventions Used in This Guide...................................................1-2
Customer Support ....................................................................................1-3
Important Safety Instructions..................................................................1-4

1-2 Introduction Chapter 1
Type Conventions Used in This Guide
Please read the list below of symbols, terms, and abbreviations used in this guide.
c
Cautions tell you how to avoid actions that could injure you or damage your FAX. In
order to use your unit safely, always observe these cautions.
n
Notes provide advice on using your FAX more effectively, describe operating restrictions,
and tell you how to avoid minor difficulties. Reading these is recommended to make the
most of your unit and its functions.
(1 p. n-nn) A number preceded by an arrow and enclosed in parenthesis
references a page number (p.) or page numbers (pp.) that
contain more information on the topic of the previous sentence.
default A setting that remains in effect unless you change it.
document or fax The original sheet(s) of paper you send or receive with your FAX.
menu A list of settings from which you select an item to set up or
change. A menu has a title which appears in the LCD.
TX/RX NO. Transaction number. When you send or receive a document,
your FAX automatically assigns the document a unique
transaction number. A transaction number is a four-digit number
that will help you keep track of documents you send and receive.
TX Denotes Sending.
RX Denotes Receiving.
Ex: Example of a message or setting displayed in the LCD.
ADF Automatic Document Feeder. The device on your FAX that
automatically feeds a document into the unit for faxing and
copying.
LCD Liquid Crystal Display. The display on the operation panel that
displays messages and settings.
ECM Error Correction Mode. The ability of your FAX to reduce system
and line errors when sending to or receiving from a fax machine
with ECM capability.
G3 Group 3. A system that uses encoding schemes to transmit
image data while reducing the amount of data that needs to be
transmitted, thus reducing transmission time.
ITU-TS International Telecommunications Union-Telecommunications
Sector. A committee created to set international standards for
telecommunications.

Chapter 1 Introduction 1-3
Introduction
In addition, this guide uses distinctive typefaces to identify buttons and information in
the LCD:
• The buttons you press appear in this typeface: Stop.
• Information in the LCD appears in this typeface: USER SETTINGS.
Customer Support
Your FAX is designed with the latest technology to provide trouble-free operation. If you
encounter a problem with the unit’s operation, try to solve it by using the information in
Chapter 13. If you cannot solve the problem or if you think your FAX needs servicing,
contact your local authorised Canon dealer or the Canon help line.
1-4 Introduction Chapter 1
Important Safety Instructions
Read these safety instructions thoroughly before using your FAX.
c
Except as specifically described in this guide, do not attempt to service the FAX
yourself. Never attempt to disassemble the unit: opening and removing its interior
covers will expose you to dangerous voltages and other risks. For all service,
contact your local authorised Canon dealer or the Canon help line.
■ Handling and Maintenance
• Follow all warnings and instructions marked on the FAX.
• Do not subject the FAX to strong physical shocks or vibrations.
• Always unplug the FAX before moving or cleaning it.
• To avoid paper jams, never unplug the power cord, open the front cover, or add or
remove paper in the multi-purpose tray while printing.
• When transporting the FAX, be sure to remove the toner cartridge from the unit. Place
the toner cartridge in its original protective bag or wrap it in a thick cloth to prevent
exposure to light.
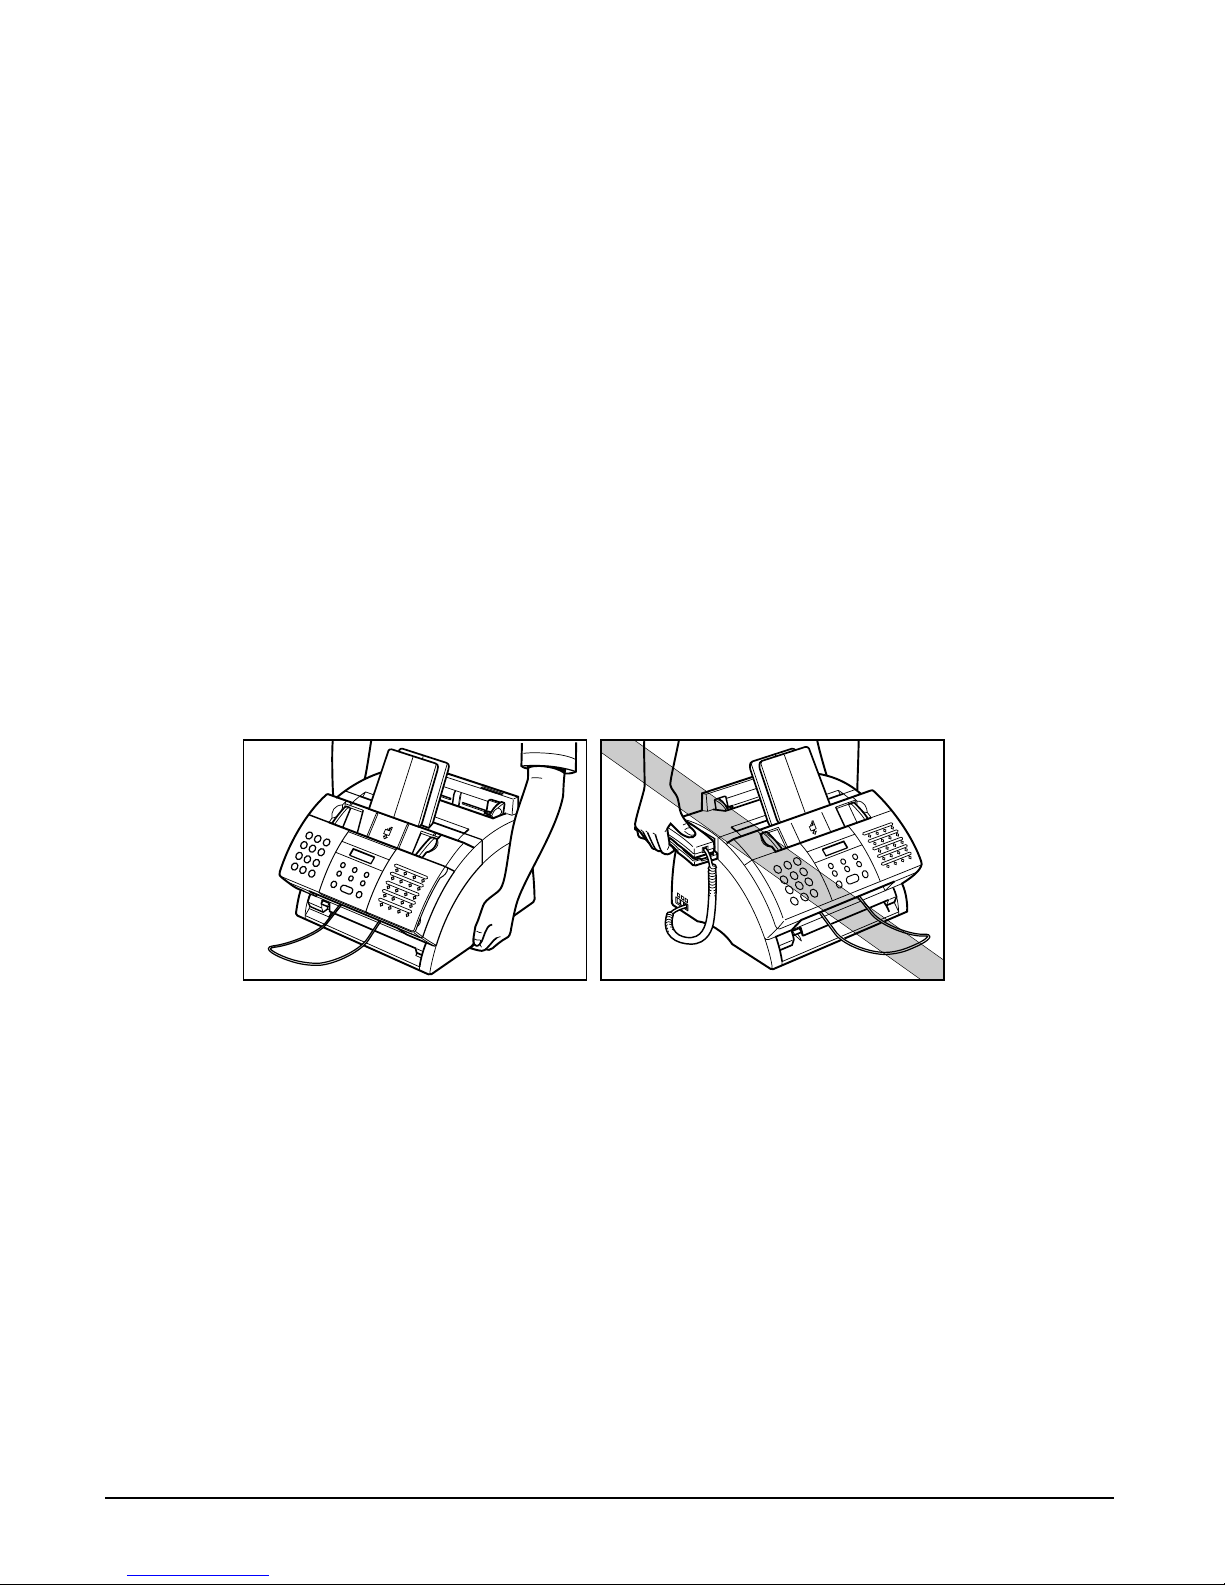
• Always lift the FAX as shown below. Never lift it by any of its attachments.
• Do not insert any objects into the slots or openings on the FAX since they may touch
dangerous voltage points or short out parts. This could result in fire or electric shock.
• Do not allow small objects (such as pins, paper clips, or staples) to fall into the FAX. If
something does fall into it, unplug the unit immediately and contact your local
authorised Canon dealer or the Canon help line.
• To avoid spillage in or around the unit, do not eat or drink near it. If you spill liquid or if
any substance falls into it, unplug the unit immediately and contact your local
authorised Canon dealer or the Canon help line.
• Keep the FAX clean. Dust accumulation can prevent the unit from operating properly.

Chapter 1 Introduction 1-5
Introduction
• Unplug the FAX from the wall outlet and contact your local authorised Canon dealer
or the Canon help line in any of the following cases:
– When the power cord or plug is damaged or frayed.
– If liquid has spilled into the unit.
– If the unit has been exposed to rain or water.
– If the unit does not operate normally when you have followed the instructions in this
guide. Adjust only those controls that are covered by the instructions in this guide.
Improper adjustment of other controls may result in damage and may require
extensive work by a qualified technician to restore the product to normal operation.
– If the unit has been dropped or the cabinet has been damaged.
– If the unit exhibits a distinct change in performance, indicating a need for servicing.
■ Location
• Place the FAX on a flat, stable, vibration-free surface that is strong enough to support
its weight (approx. 10 kg).
• Place the FAX in a cool, dry, clean, well ventilated place.
– Make sure the area is free from dust.
– Make sure the location is not affected by extreme temperature changes, and always
stays between 10° and 32.5°C.
– Make sure the area’s relative humidity is always between 20% and 80%.
• Keep the FAX away from direct sunlight as this can damage it. If you have to place it
near a window, install heavy curtains or blinds.
• Do not use the FAX near water. Make sure that no wet or humid objects come into
contact with the unit.
• Do not use or store the FAX outdoors.
• Do not install the FAX near devices that contain magnets or generate magnetic fields,
such as speakers.
• If possible, place the FAX near an existing telephone line outlet for easy connection of
the telephone line cord, and to avoid the expense of installing a new outlet.
• Place the FAX near a standard 200–240 V AC (50–60 Hz) power outlet.
• To ensure reliable operation of the FAX and to protect it from overheating (which can
cause it to operate abnormally and create a fire risk), do not block the exhaust vent.
Never block or cover any openings on the unit by placing it on a bed, sofa, rug, or
other similar surface. Do not place the unit in a cupboard or built-in installation, or
near a radiator or other heat source unless proper ventilation is provided. Leave
approximately 10 cm space around all sides of the unit. For the dimensions of the
FAX, see p. A-2.

1-6 Introduction Chapter 1
• Do not stack boxes or furniture around the power outlet. Keep the area free so you
can reach the outlet quickly. If you notice anything unusual (smoke, strange odours,
noises) around the FAX, unplug the unit immediately. Contact your local authorised
Canon dealer or the Canon help line.
• Do not allow anything to rest on the power cord, and do not place the unit where the
cord will be walked on. Make sure the cord is not knotted or kinked.
■ Power Supply
• During electrical storms, disconnect the power cord from the power outlet. (Please
note that any documents stored in the FAX’s memory will be deleted when you unplug
the unit.)
• Whenever you unplug the FAX, wait at least five seconds before you plug it in again.
• Do not plug the FAX into an uninterruptible power supply (UPS).
c
This product emits low level magnetic flux.
If you use a cardiac pacemaker and feel abnormalities, please move away from this
product and consult your doctor.

Chapter 2 Setting Up 2-1
Setting Up
Chapter 2
Setting Up
Unpacking the FAX...................................................................................2-2
Removing Shipping Materials.................................................................2-4
Assembling the FAX.................................................................................2-5
Making Connections ................................................................................2-6
Connecting the Telephone Line Cord and External Devices..................2-6
Connecting the Power Cord ...................................................................2-8
Main Components of the FAX .................................................................2-9
Operation Panel....................................................................................2-10
Special Function Buttons..................................................................2-10
Installing the Toner Cartridge................................................................2-11
Loading Paper.........................................................................................2-14
Testing the FAX.......................................................................................2-16
2-2 Setting Up Chapter 2
Unpacking the FAX
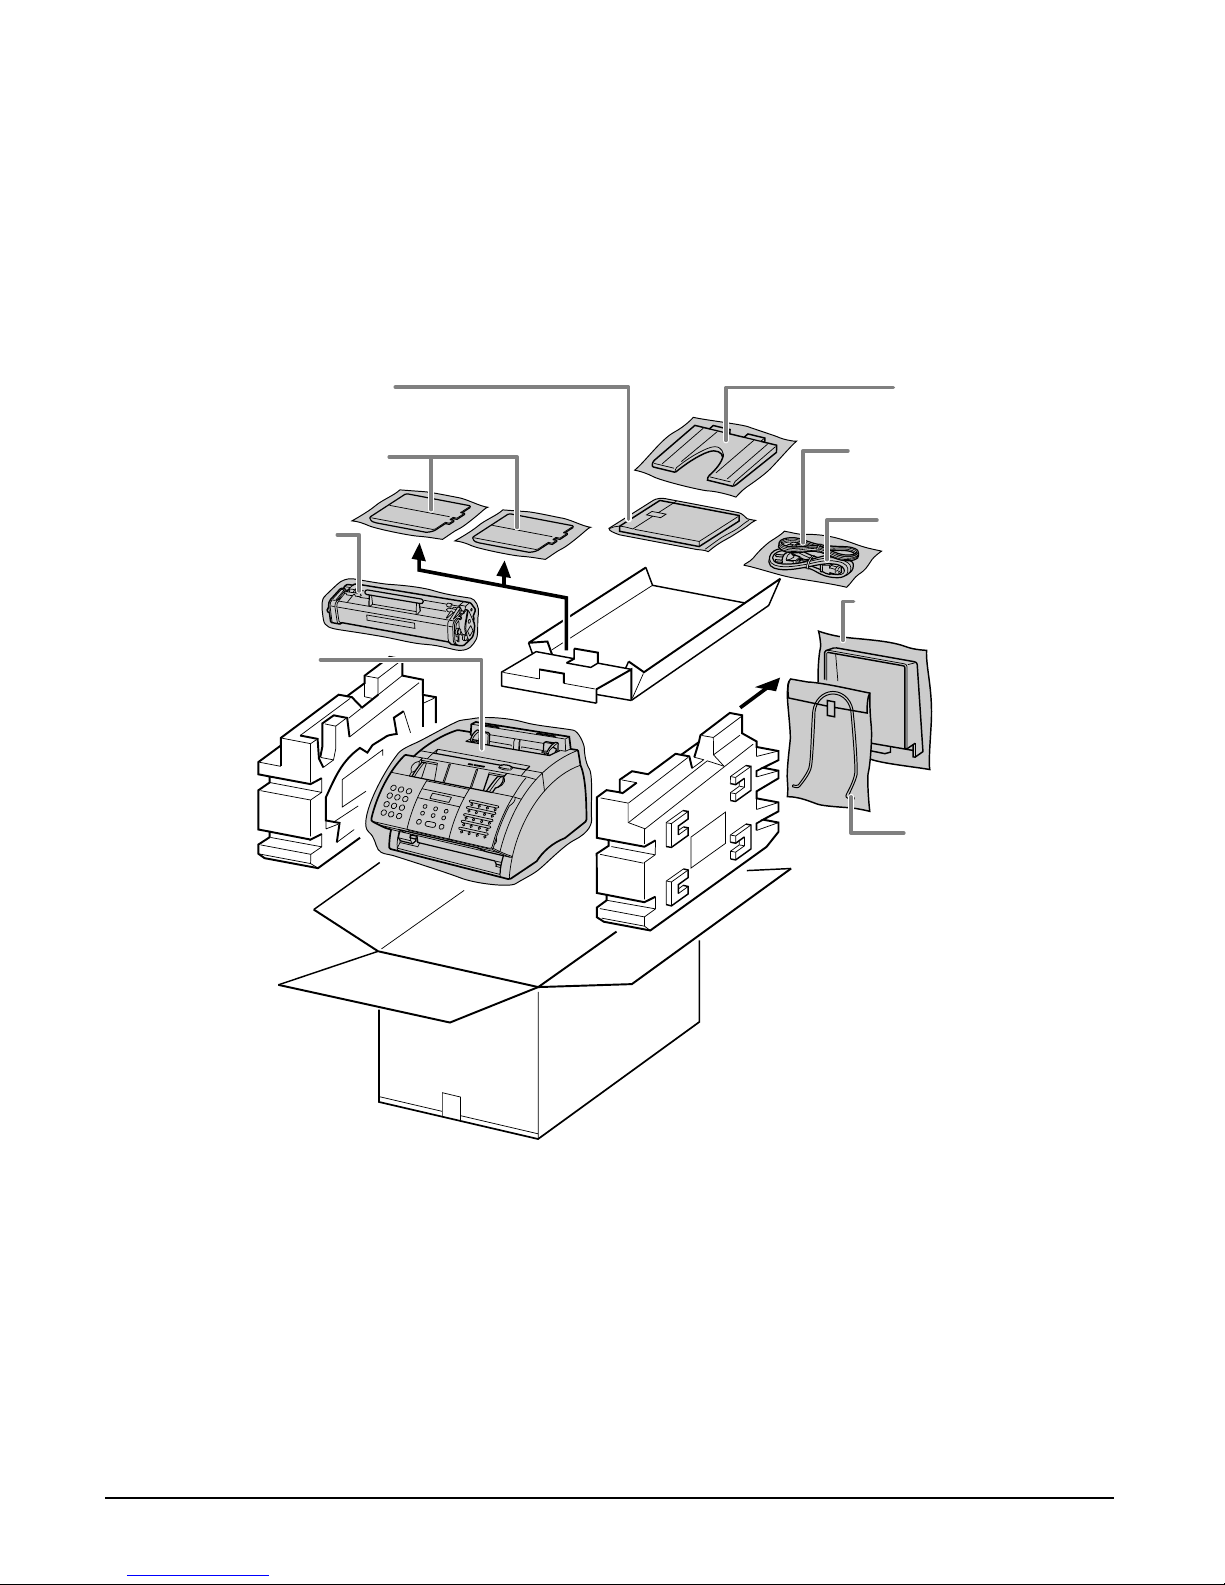
Before unpacking your FAX, be sure to choose a suitable location for it (1 p. 1-5).
Carefully remove all items from the box. You should have someone help you hold the
box while you lift out the FAX and its protective packaging. Save the carton and
packaging in case you need to transport the FAX in the future.
Make sure you have the following items:
n
• The actual packaging may differ in shape, quantity, and position from the one shown
above.
• Please note that the items included with your FAX may vary depending on the country of
purchase.
q MAIN UNIT
w FX-3 TONER
CARTRIDGE
e SUPPORT TRAYS
r DOCUMENTATION
y TELEPHONE LINE
CORD
u POWER CORD
i MULTI-PURPOSE
TRAY COVER
o DOCUMENT
SUPPORT
t PAPER REST

Chapter 2 Setting Up 2-3
Setting Up
You should also have the following:
• Paper loading warning label
• Destination labels
• M label*
If any items are damaged or missing, notify your local authorised Canon dealer or the
Canon help line immediately.
n
• Important! Save your sales receipt for proof of purchase in case your unit requires
warranty service.
• If you have purchased the optional handset, see Appendix B for the items included.
* This item is only available for the UK.
2-4 Setting Up Chapter 2
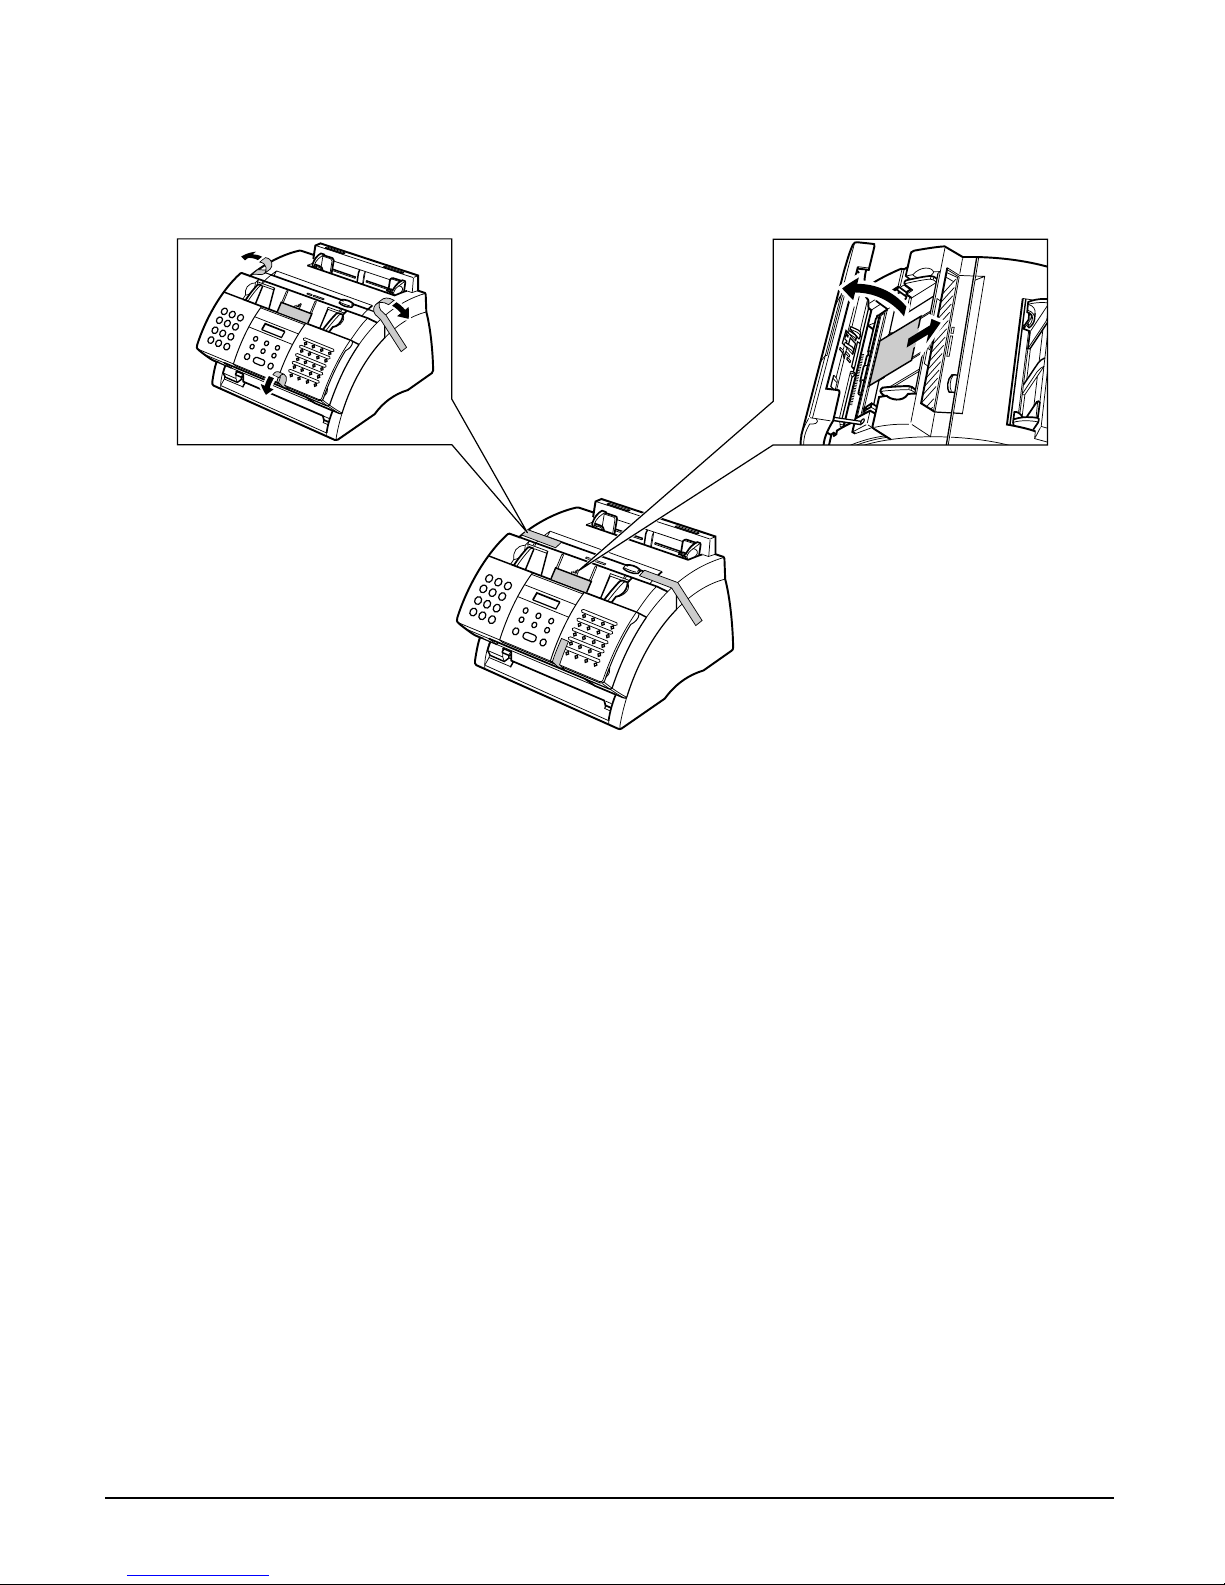
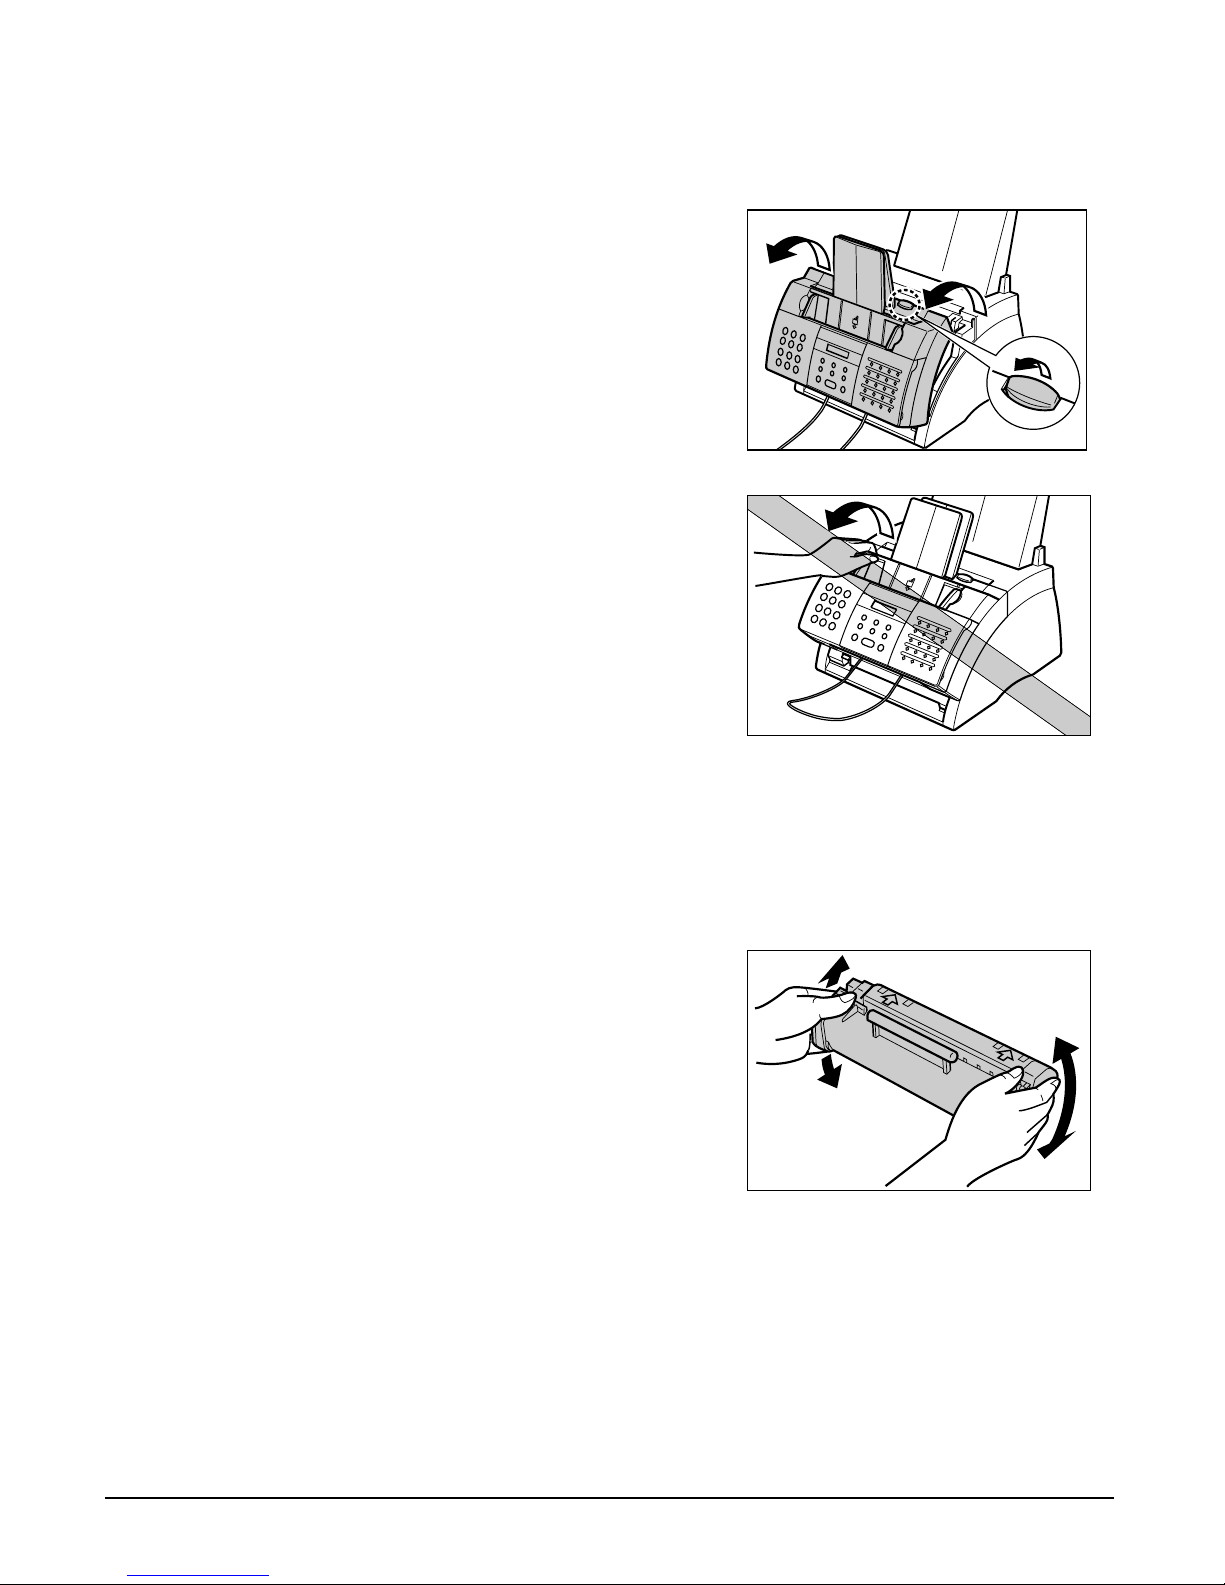
Removing Shipping Materials
Follow this procedure to remove the shipping materials. Keep them in case you need to
transport the unit in the future.
n
The actual shipping materials may differ in shape, quantity, and position from the ones
shown above.
1
Remove all shipping
tapes from the FAX.
2
Use both hands to
gently open the
operation panel (it
only opens partially).
Then remove the
protective sheet from
the ADF.
Close the operation
panel by pressing it
down from the
centre until it locks
into place.
Chapter 2 Setting Up 2-5
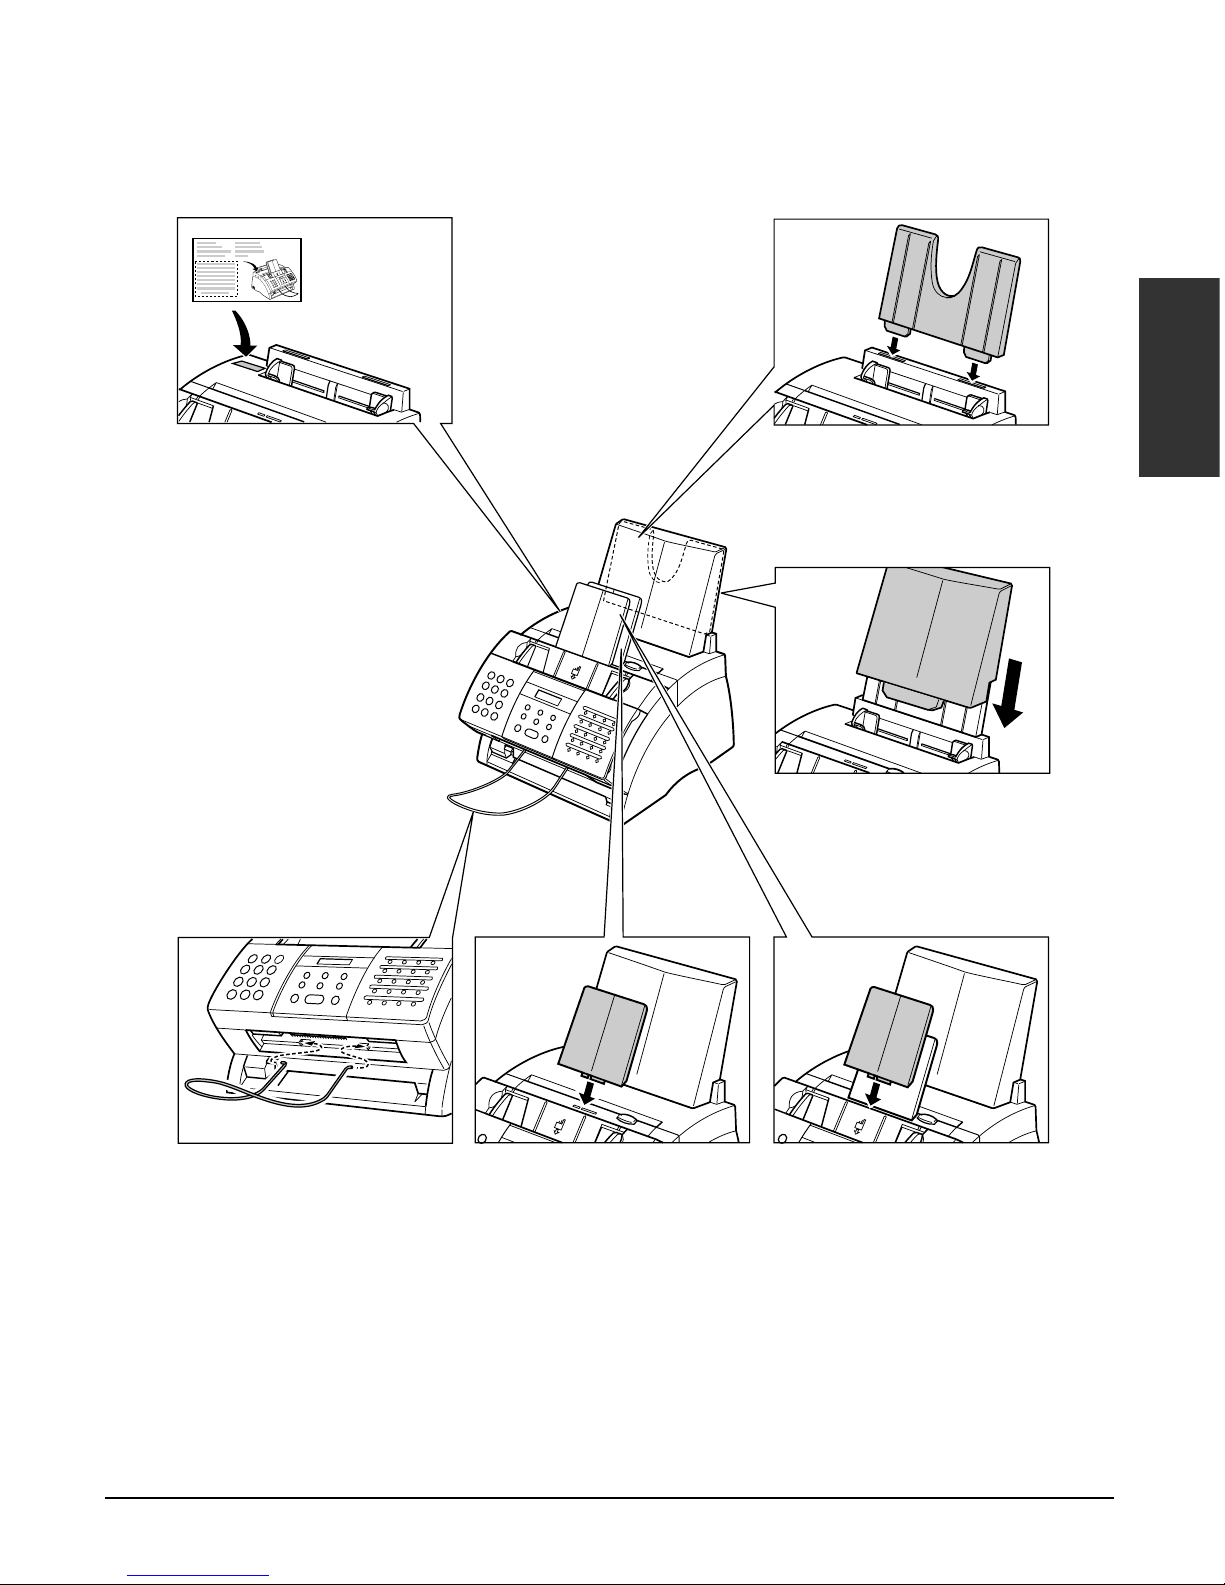
Setting Up
Assembling the FAX
Follow this procedure to assemble your FAX:
n
• To see how the FAX looks fully assembled, see p. 2-9.
• For details on attaching the optional handset to your FAX, see Appendix B.
1
Attach the paper
loading warning
label to the left of the
multi-purpose tray.
2
Insert the tabs on the
paper rest into the
slots on the unit.
3
Slide the multipurpose tray cover
over the paper rest.
4
Insert the ends of the
document support
into the slots on the
unit.
5
Insert the tabs on one
of the support trays
into the corresponding
slots above the facedown delivery slot.
6
Insert the tabs on the
other support tray into
the corresponding
slots above the ADF.
2-6 Setting Up Chapter 2
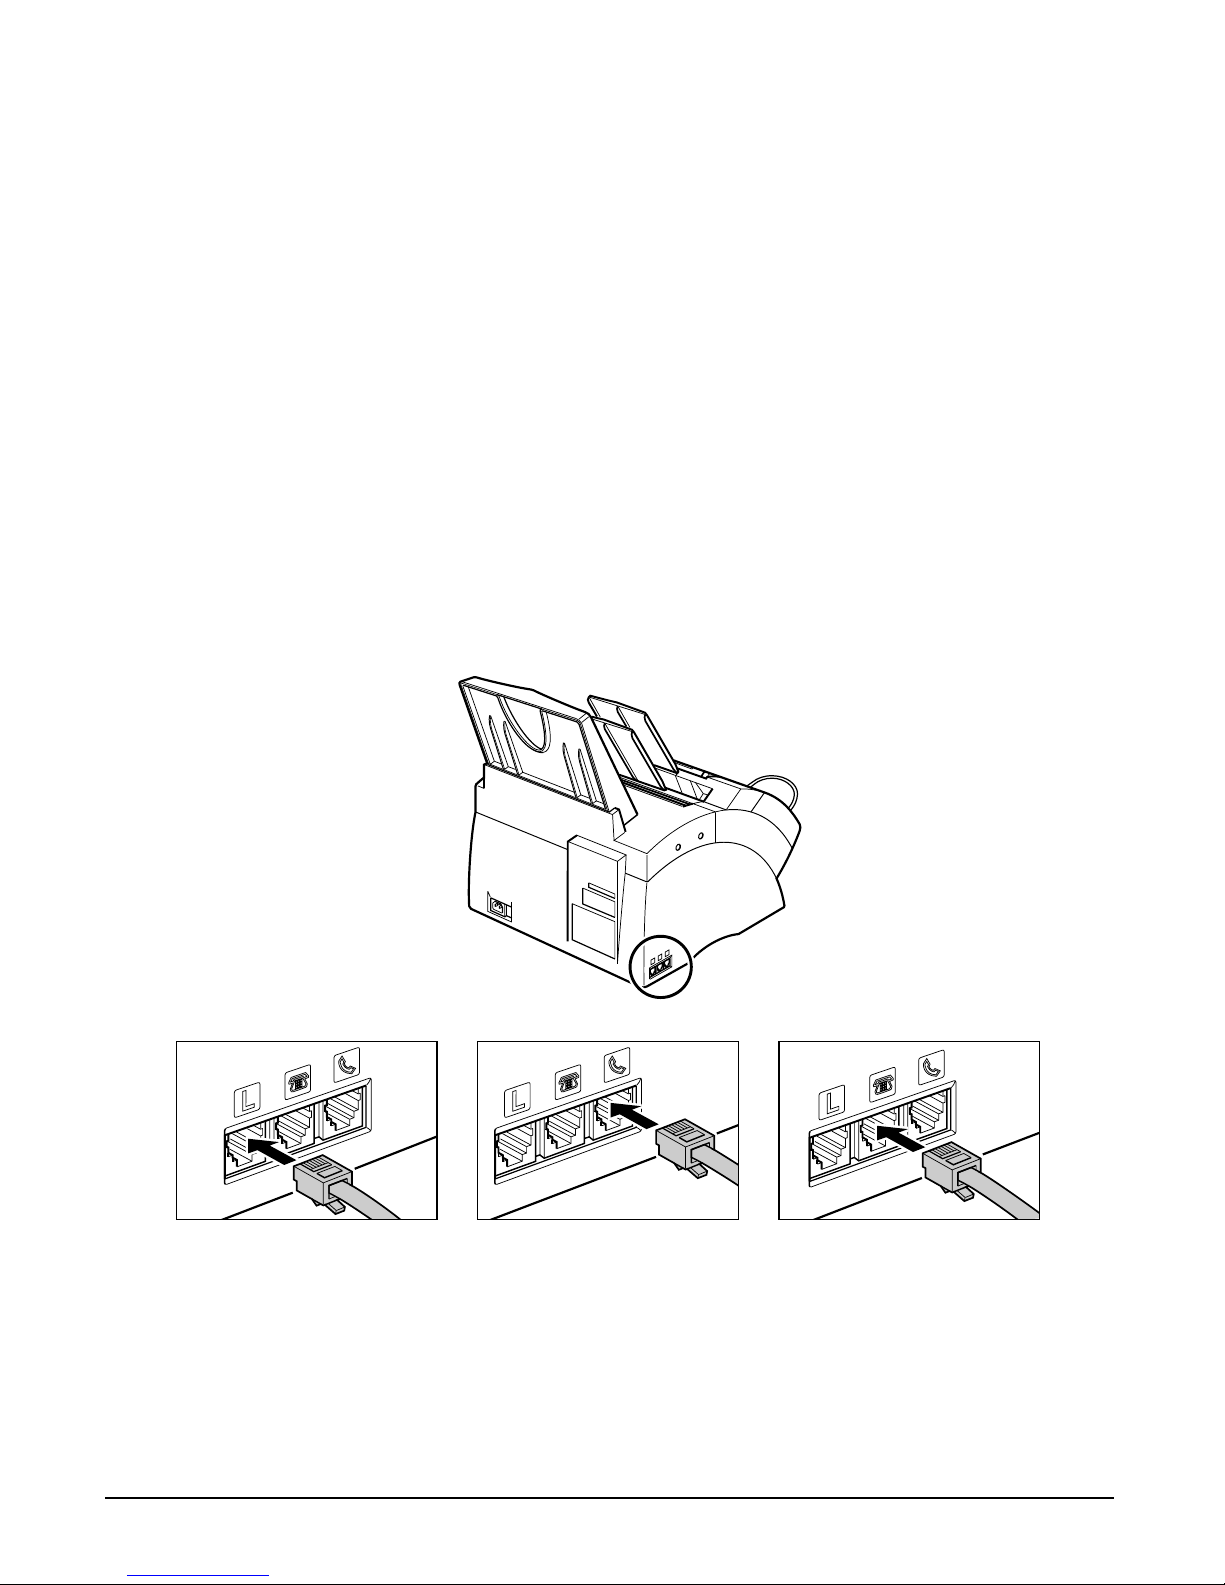
Making Connections
Connecting the Telephone Line Cord and
External Devices
Your FAX has three jacks on the side for connection of the following:
• Telephone line cord
• Optional handset or telephone
• Additional telephone, answering machine, or data modem
If you only have one telephone line and plan to use your FAX for receiving both faxes
and voice calls, you will need to connect the optional handset, a telephone, or an
answering machine to your unit.
n
Be sure to connect any external device before using your FAX.
Follow this procedure to connect the telephone line cord and external device(s):
1
Connect the supplied
telephone line cord
to the L jack, then
the other end to the
telephone line jack
on your wall.
2
Connect the optional
handset or telephone
cord to the h jack.
(UK users, see the
following page.)
3
Connect the
additional telephone,
answering machine,
or data modem cord
to the t jack.
(UK users, see the
following page.)
Chapter 2 Setting Up 2-7
Setting Up
n
• Canon cannot guarantee that all answering machines will be compatible with your unit,
due to varying specifications.
• If you have connected an external device to your FAX, be sure to set the correct receive
mode (1 Chapter 8).
• To connect an additional telephone as well as an answering machine, connect the
additional telephone to the answering machine, and then the answering machine to your
FAX.
• If you connect a data modem to your FAX and you use it extensively, or others access
your PC frequently through the data modem, you may want a dedicated telephone line
for your data modem.
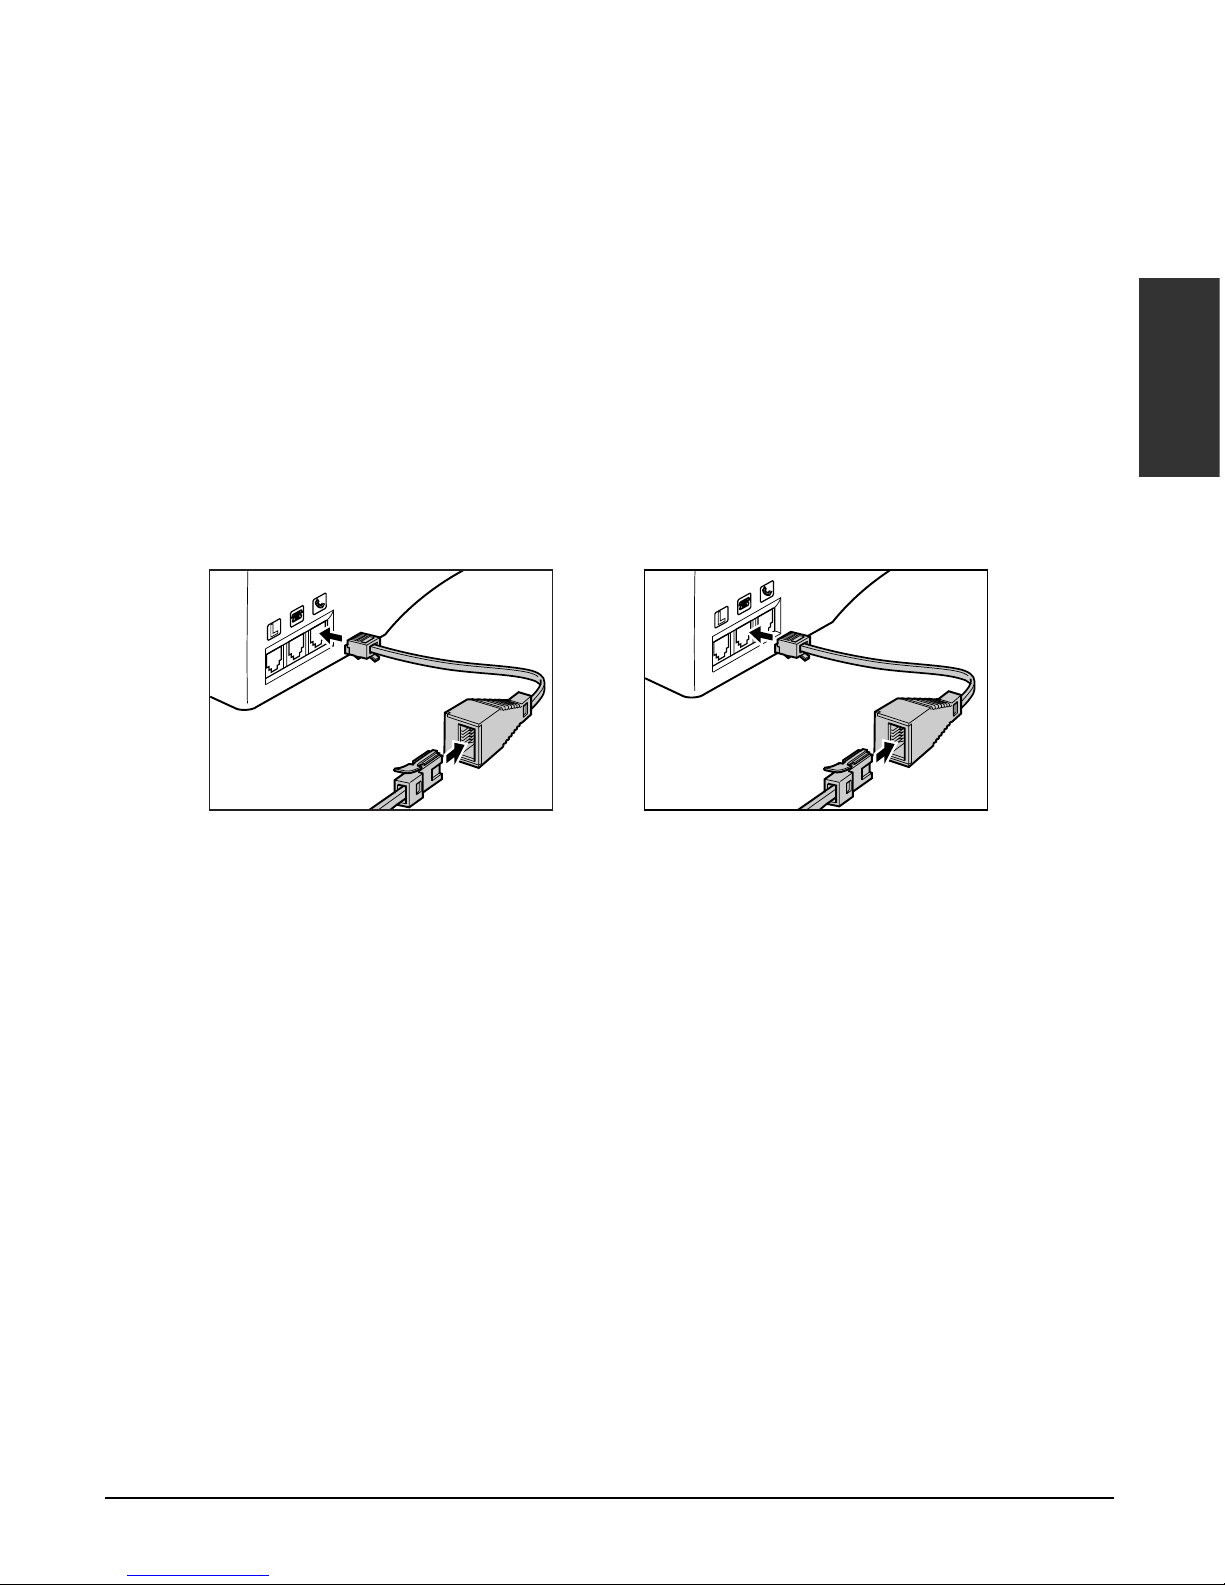
■ Users in the UK Only
If the connectors of the external devices cannot be connected to the jacks on the FAX,
you will need to purchase one or more B.T. adaptors to connect them as follows:
Connect the telephone cord to
the B.T. adaptor. Then connect
the B.T. adaptor to the h jack.
Connect the additional
telephone, answering machine,
or data modem cord to the B.T.
adaptor. Then connect the B.T.
adaptor to the
t jack.
-or-
2-8 Setting Up Chapter 2
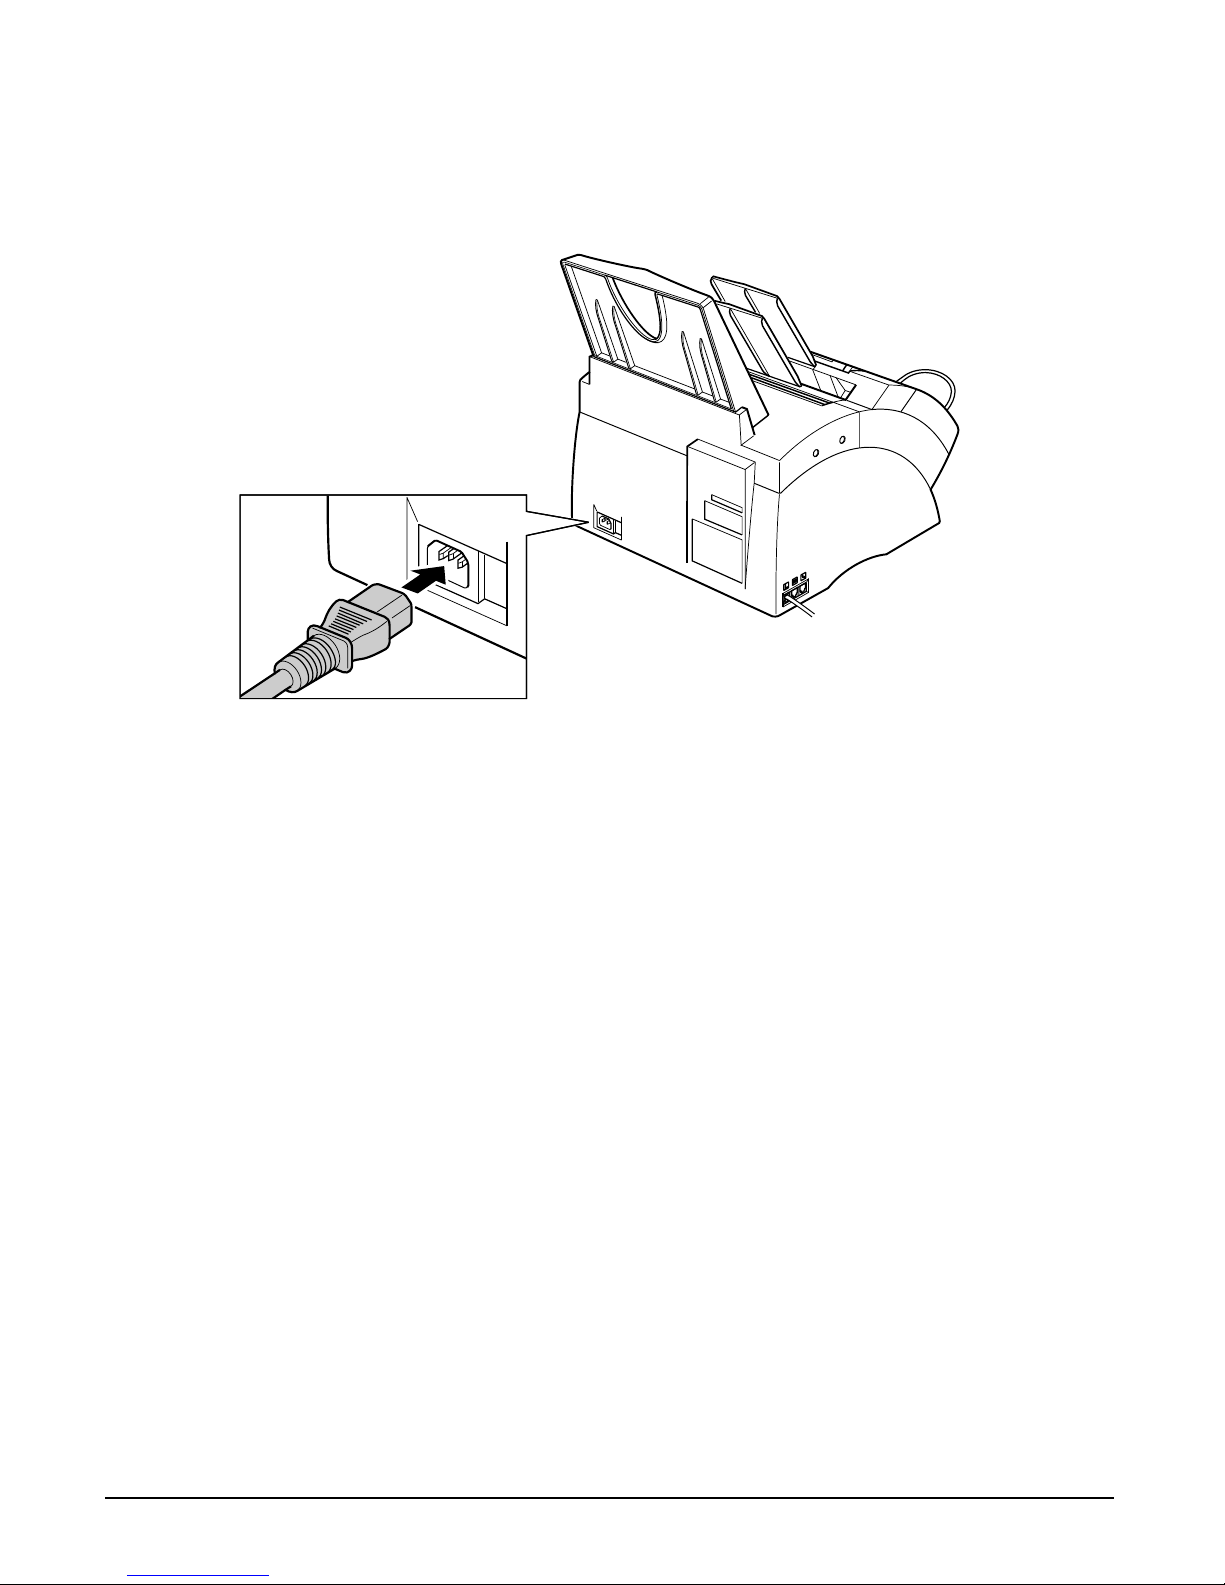
Connecting the Power Cord
Before connecting the power cord, see Power Supply, p. 1-6.
Follow this procedure to connect the power cord:
The FAX has no power switch, so its power is on as long as it is plugged in. Once
connected, though, the unit still needs time to warm up before you can use it. Wait until
the LCD no longer displays PLEASE WAIT.
n
• The FAX is equipped with a three-prong, grounding-type plug provided with a third
(grounding) pin. This plug will only fit into a grounding-type outlet. This is a safety
feature. If you are unable to insert the plug into your outlet, contact an electrician to
replace the outlet. Do not defeat the safety purpose of the grounding-type plug by
breaking off the third prong or using a 3-to-2 adaptor.*
• Do not plug the FAX into the same circuit as an appliance such as an air conditioner,
electric typewriter, television, or copier. Such devices generate electrical noise that can
interfere with your FAX’s ability to send and receive faxes.
Connect the supplied
power cord to the power
cord connector. Then
connect the other end into
a properly grounded
200–240 V AC threeprong outlet.*
* The shape of the plug and outlet vary depending on the country of purchase.
Chapter 2 Setting Up 2-9
Setting Up
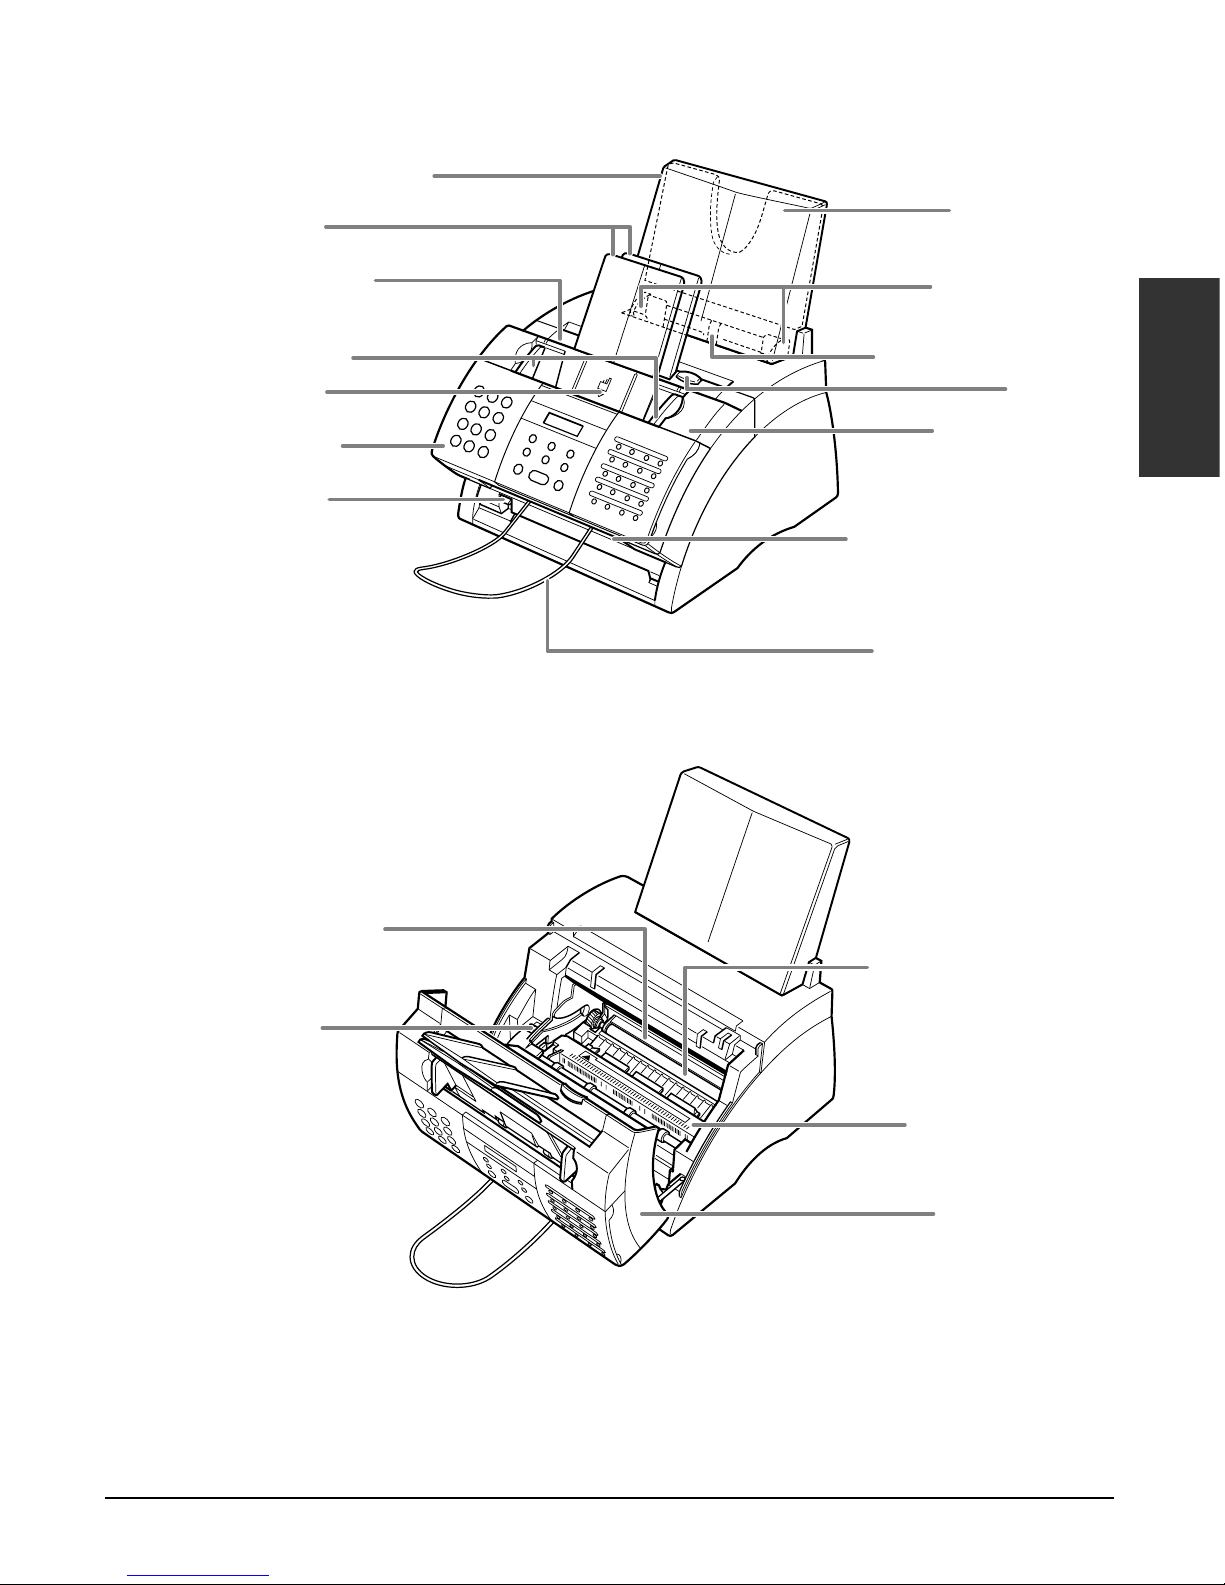
Main Components of the FAX
SUPPORT TRAYS
MULTI-PURPOSE TRAY COVER
ADF (AUTOMATIC
DOCUMENT FEEDER)
DOCUMENT GUIDES
OPERATION PANEL
PAPER DELIVERY
SELECTOR
DOCUMENT SUPPORT
FACE-UP DELIVERY SLOT
FRONT COVER
FACE-DOWN DELIVERY
SLOT
LATCH
PAPER GUIDES
MULTI-PURPOSE TRAY
PAPER REST
FX-3 TONER CARTRIDGE
COMPARTMENT
TRANSFER CHARGING
ROLLER
(DO NOT TOUCH)
PAPER RELEASE
LEVER
FIXING ASSEMBLY
FRONT COVER
2-10 Setting Up Chapter 2
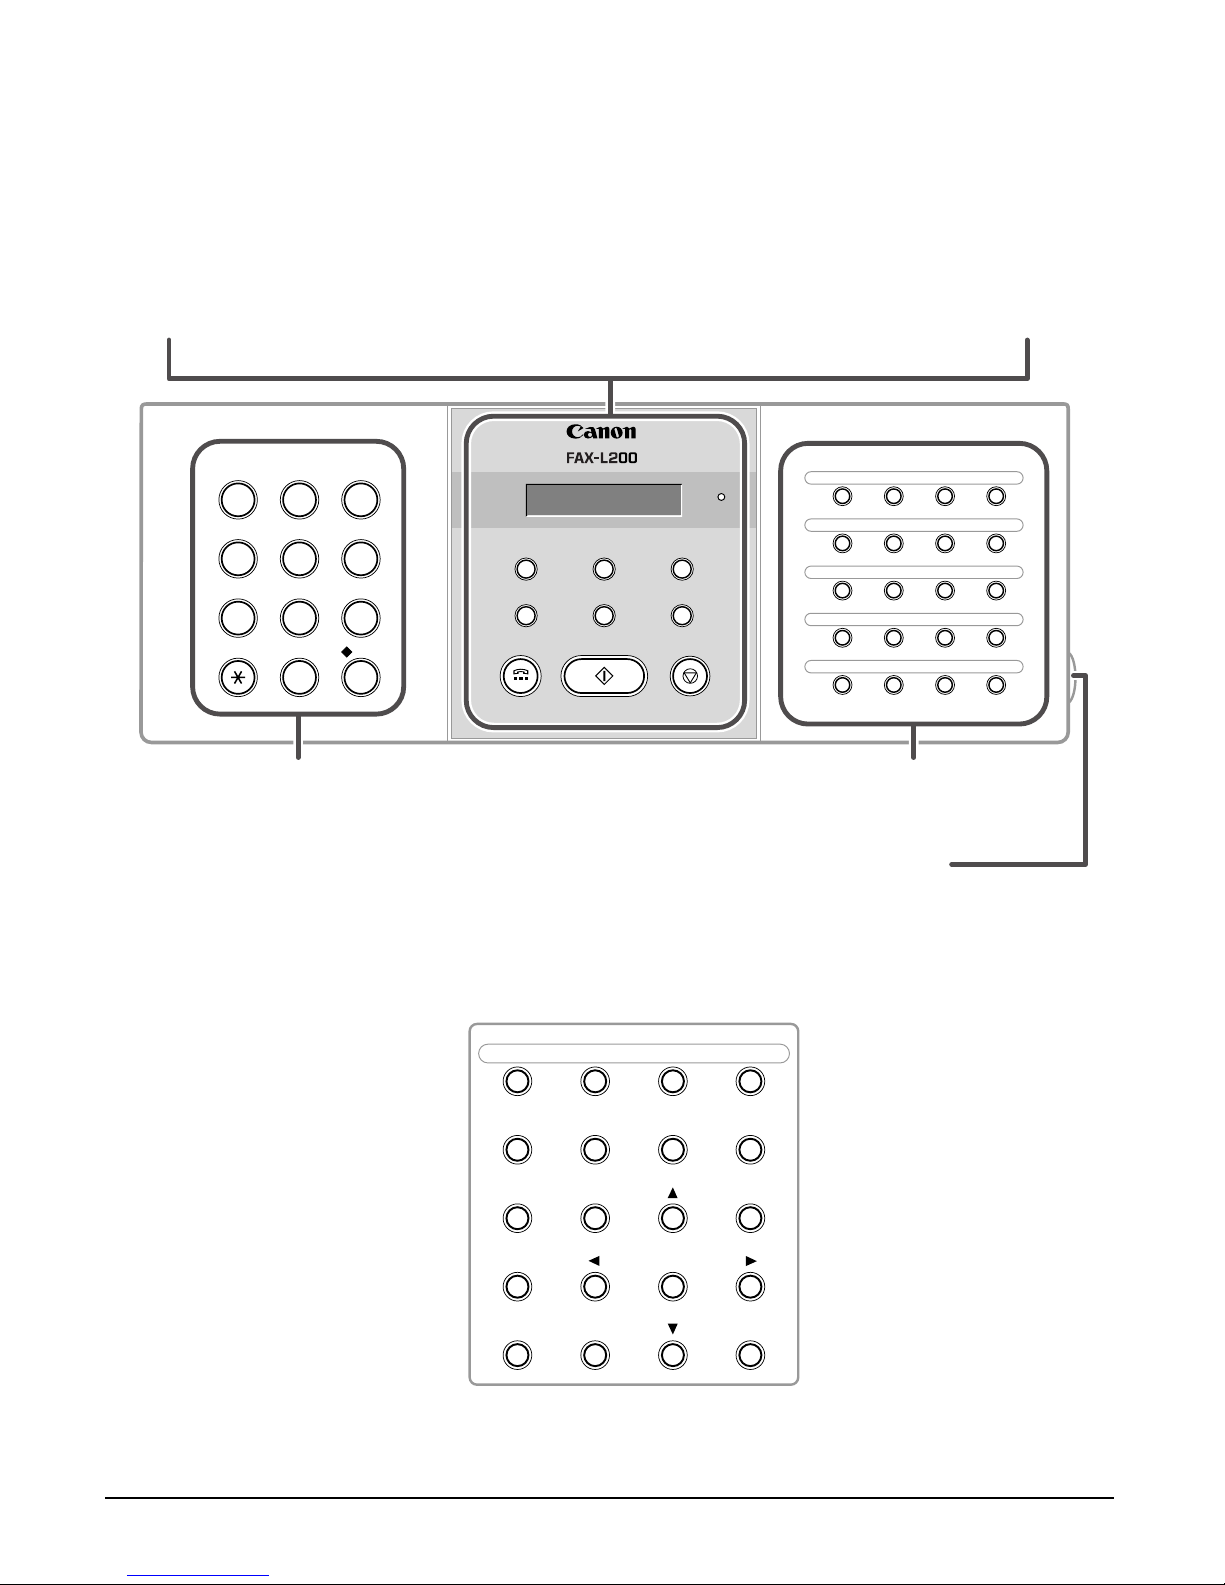
Operation Panel
Alarm
GHI JKL MNO
ABC DEF
TUV WXYZPQRS
Stop
Hook
Coded DialR
Receive Mode
Redial/Pause
Start/Copy
Resolution
Set
01 02 03
04
05 06 07
08
09 10 11
12
13 14 15
16
17 18 19
20
1
0#
7
8
9
45
6
2
3
21 22 23
24
Registration
Transmission
Data
Delayed
Reference
Memory
Polling
Report D.T.
Tone/+ Space
Clear
• Numeric Buttons
(1 p. 3-2)
• One-Touch Speed Dialling
Buttons (1 pp. 6-2, 6-16, 6-17)
• Receive Mode Button
(1 Chapter 8)
• R Button
(1 p. 3-9)
• Hook Button
(1 pp. 6-17, 7-6, 9-3)
• LCD
• Resolution Button
(1 pp. 7-2, 10-2)
• Coded Dial Button
(1 pp. 6-2, 6-16, 6-17)
• Start/Copy Button
(1 pp. 10-2, 10-3)
• Alarm Light
• Set Button
(1 p. 14-3)
• Redial/Pause Button
(1 pp. 7-9, 9-2)
• Stop Button
(1 p. 14-3)
• One-Touch Speed Dial Panel
Open the one-touch speed dial panel to
expose the special function buttons below.
• Data Registration
Button (1 p. 14-3)
• Delayed Transmission
Button (1 pp. 7-14,
7-16, 7-17)
• Report Button
(1 pp. 6-18, 11-3, 14-2)
• Tone/+ Button
(1 pp. 3-7, 9-3)
• ¬, ® Buttons
(1 pp. 3-3, 3-4)
• Clear Button (1 p. 3-4)
• Polling Button
(1 pp. 9-11, 9-15)
• Memory Reference
Button (1 pp. 9-5, 9-6,
9-7, 9-9)
• ¨, ∂ Buttons
(1 p. 14-3)
• D.T. Button*
(1 p. 9-4)
• Space Button
(1 pp. 3-3, 3-4)
Special Function Buttons
* This feature is not available for the UK, Ireland, Australia, New Zealand, Hong Kong, Singapore, or
Malaysia.
Chapter 2 Setting Up 2-11
Setting Up
Installing the Toner Cartridge
This section describes how to install the toner cartridge in the FAX for the very first
time. If you are replacing a used toner cartridge, see p. 12-7.
Before installing the toner cartridge, be sure to read the following:
• Use only FX-3 toner cartridges in your FAX.
• Keep the toner cartridge away from computer screens, disk drives, and floppy disks.
The magnet inside the toner cartridge may harm these items.
• Do not store the toner cartridge in direct sunlight.
• Avoid locations subject to high temperature, high humidity, or rapid changes in
temperature. Store the toner cartridge between 0° and 35°C.
• Do not expose the toner cartridge to direct sunlight or bright light for longer than five
minutes.
• Store the toner cartridge in its protective bag. Do not open the bag until you are ready
to install the toner cartridge in the unit.
• Save the toner cartridge’s protective bag in case you need to repack and transport
the toner cartridge at a later date.
• Do not store the toner cartridge in a salty atmosphere or where there are corrosive
gases such as from aerosol sprays.
• Do not remove the toner cartridge from the FAX unnecessarily.
• Do not open the drum protective shutter on the toner cartridge.
Print quality may deteriorate if the drum surface is exposed to
light or is damaged.
• Hold the toner cartridge as shown so that your hand is not
touching the drum protective shutter.
• Never touch the drum protective shutter. When holding the
toner cartridge, avoid touching the drum protective shutter
with your hands.
• Do not stand the toner cartridge on end, and do not turn it
upside down. If toner becomes caked in the toner cartridge,
it may prove impossible to free it even by shaking the toner
cartridge.
c
Do not place the toner cartridge in fire. Toner powder is flammable.
2-12 Setting Up Chapter 2
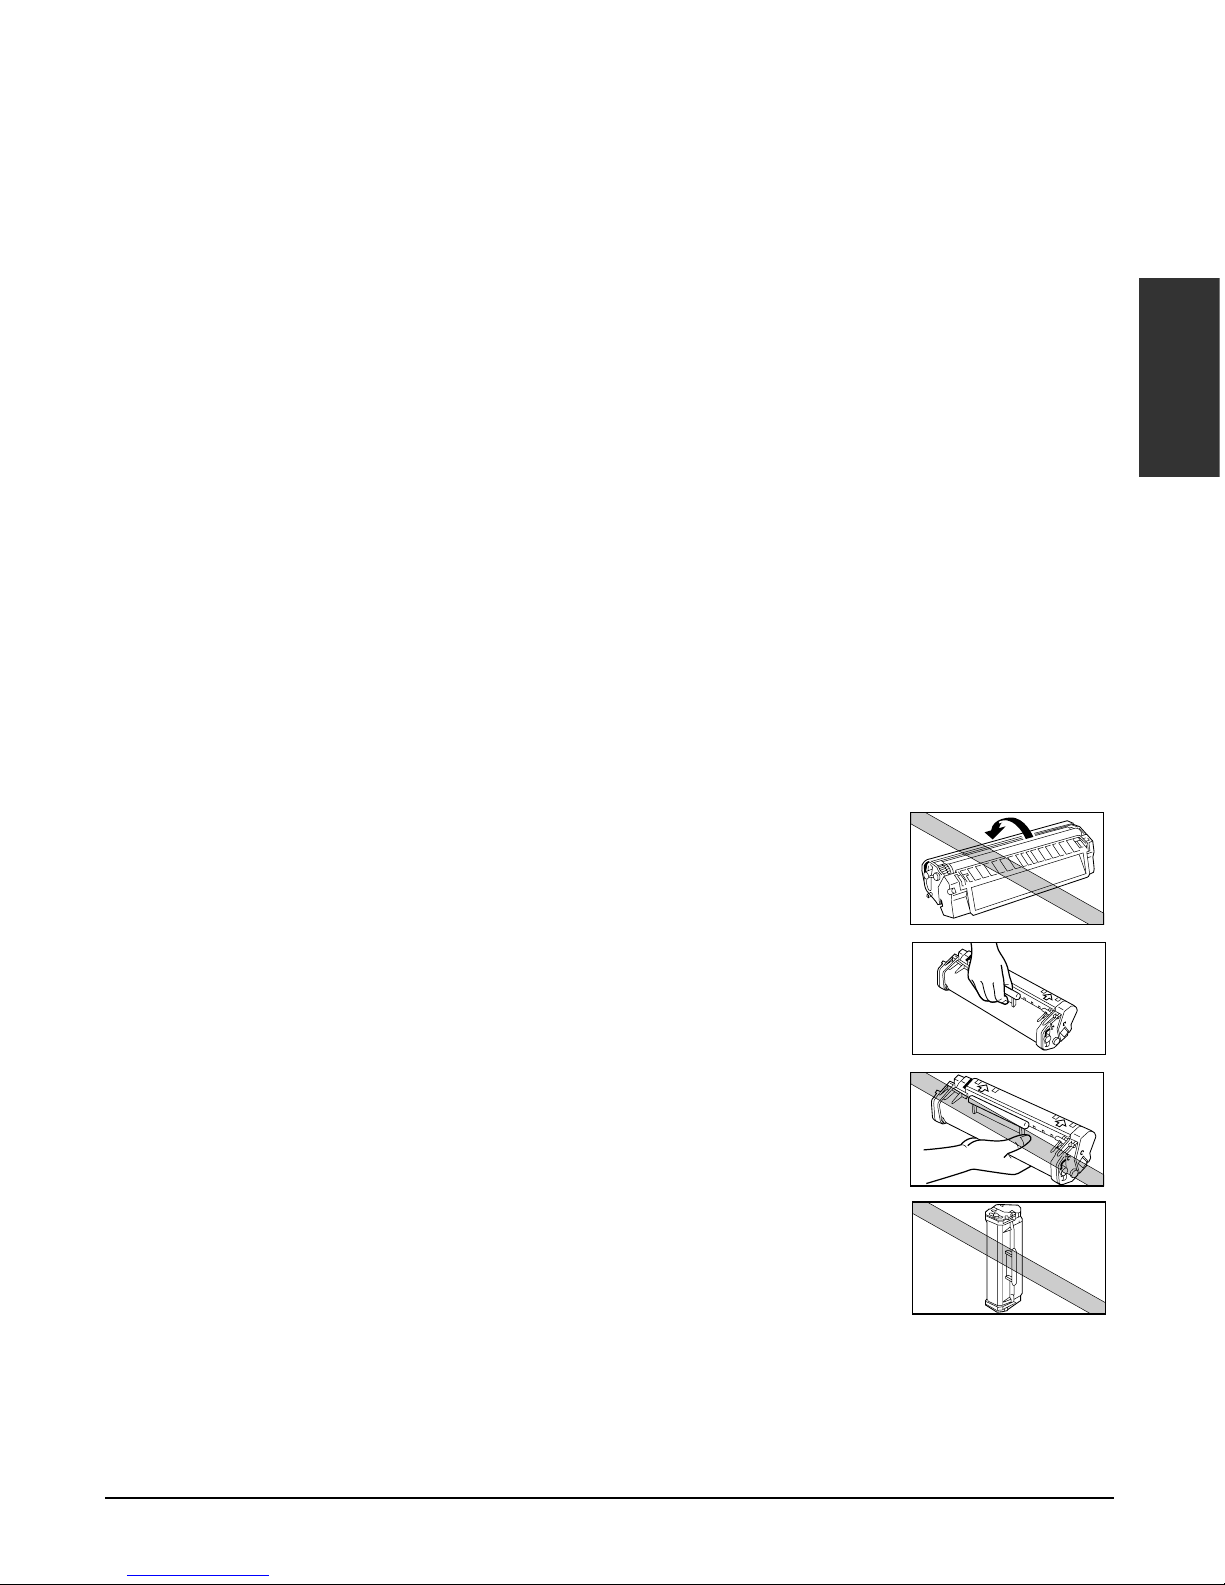
Follow this procedure to install the toner cartridge in the FAX:
1 Make sure the FAX is plugged in.
2 Lift the latch and open the front cover.
c
Do not open the front cover
without lifting the latch since this
may damage your unit.
3 Remove the new FX-3 toner cartridge
from its protective bag.
• Save the protective bag in case you
need to repack the toner cartridge at a
later date.
4 Gently rock the toner cartridge from
side to side a few times to distribute
the toner evenly inside it.
• Poor print quality may result if the toner
is unequally distributed.
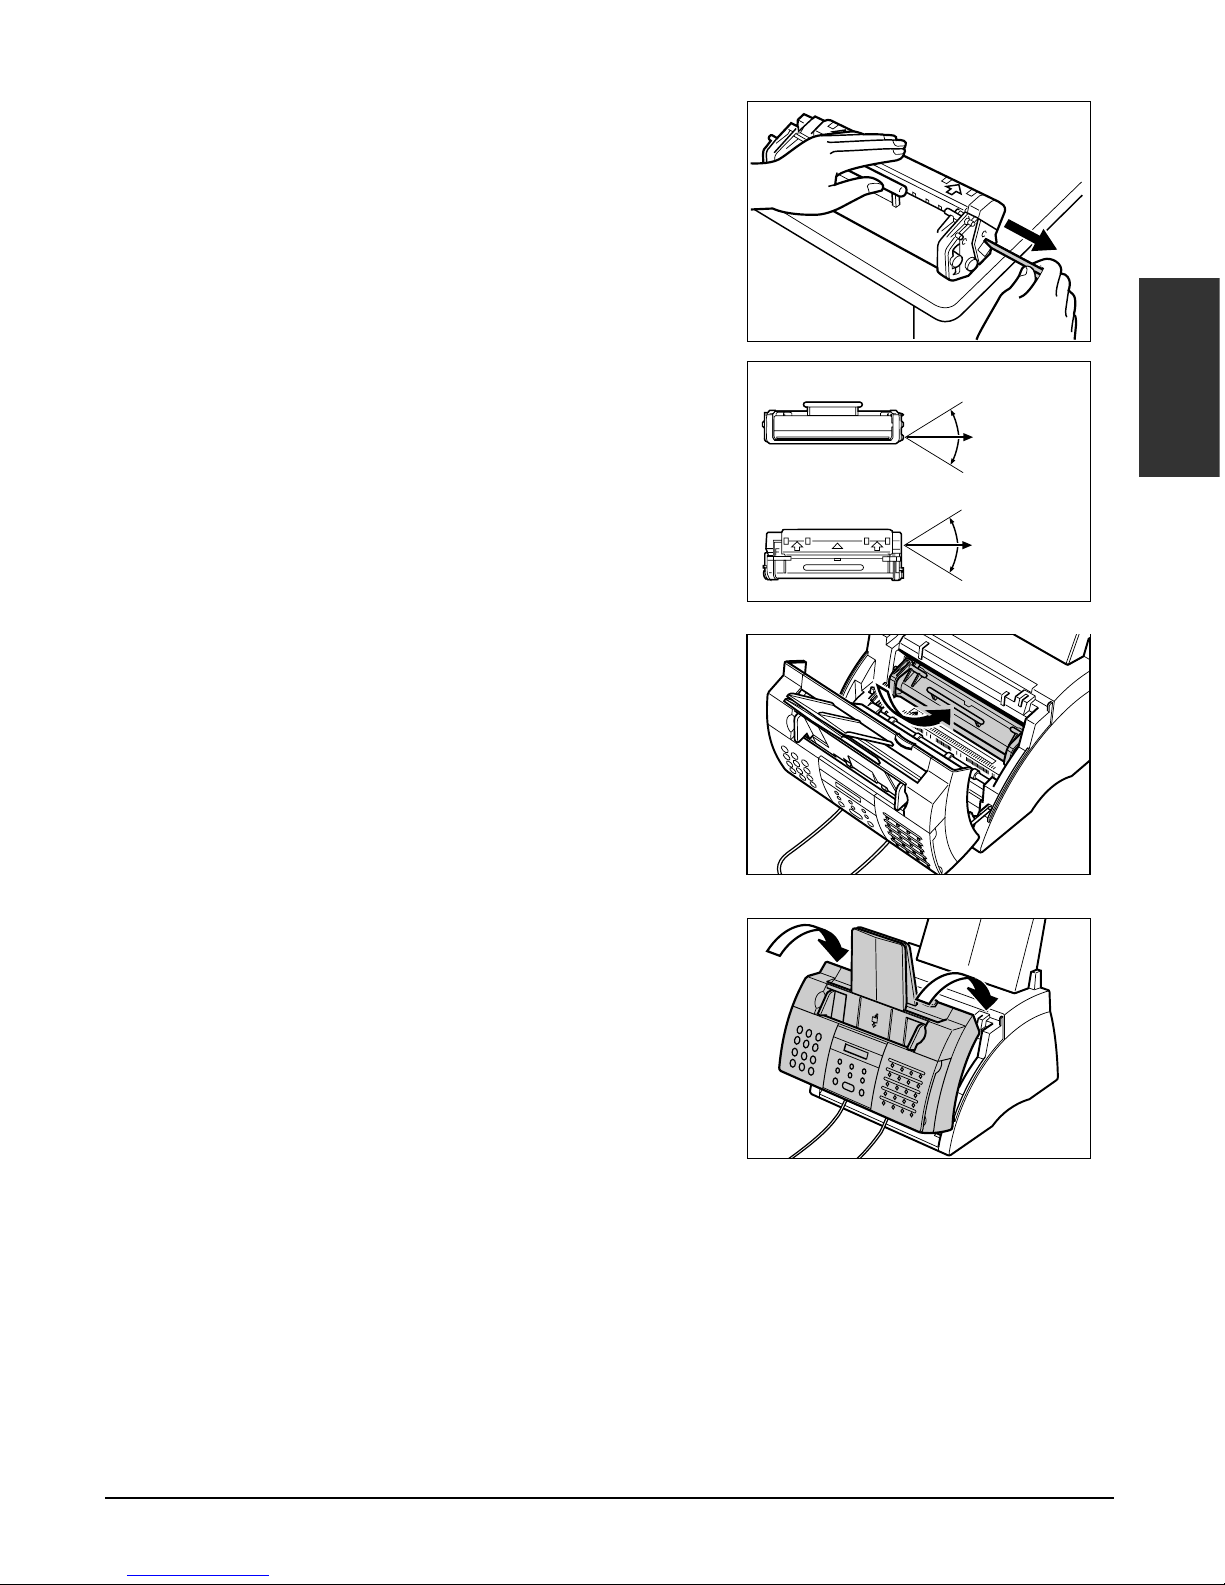
Chapter 2 Setting Up 2-13
Setting Up
5 Place and support the toner cartridge
on a flat, clean surface, then gently
pull on the plastic tab to remove the
plastic seal.
• Use a firm, even pull to avoid breaking
the seal.
6 Hold the toner cartridge by its handle
and insert it into the FAX as far as it
will go, making sure that its tabs are
aligned with the rails inside the unit.
• Always hold the toner cartridge by its
handle.
7 Use both hands to close the front
cover.
TOP VIEW
SIDE VIEW
PULL WITHIN
THIS RANGE
PULL WITHIN
THIS RANGE
2-14 Setting Up Chapter 2
Loading Paper
This section explains how to load plain paper in the multi-purpose tray.
For complete details on paper requirements and selecting paper for your FAX, see
Chapter 5.
Before loading paper, be sure to read the following:
c
The laser printing process uses high temperatures to fuse toner to the paper. Use
paper that will not melt, vaporise, discolour, or emit dangerous fumes at
temperatures near 170°C. For example, do not use vellum paper in a laser printer.
Make sure any letterhead or coloured paper you use can withstand high
temperatures.
• Your FAX supports regular copier paper, cotton bond paper, and typical letterhead
paper. It does not require special paper. Use cut-sheet paper only, not paper that
comes on a roll.
• Be sure to load paper of the correct size, weight, and quantity recommended for your
FAX (1 Chapter 5).
• The multi-purpose tray is factory-set for loading A4-size paper, but you can change
this setting to other paper sizes (1 p. 5-7).
• You can choose whether paper is delivered through the face-up or face-down delivery
slot (1 p. 5-4). Choose according to the task you are performing.
• The face-down delivery slot can hold up to approximately 50 sheets of paper. To
prevent paper jams, remove paper from this slot before the count reaches 50.
• Do not load paper while the FAX is printing.
• Do not leave paper stacked in the multi-purpose tray for long periods of time since it
may bend or curl and cause problems.
• Certain environmental conditions, such as extreme temperatures or humidity, can
cause some paper to misfeed in the multi-purpose tray. If you have trouble, feed one
sheet at a time.
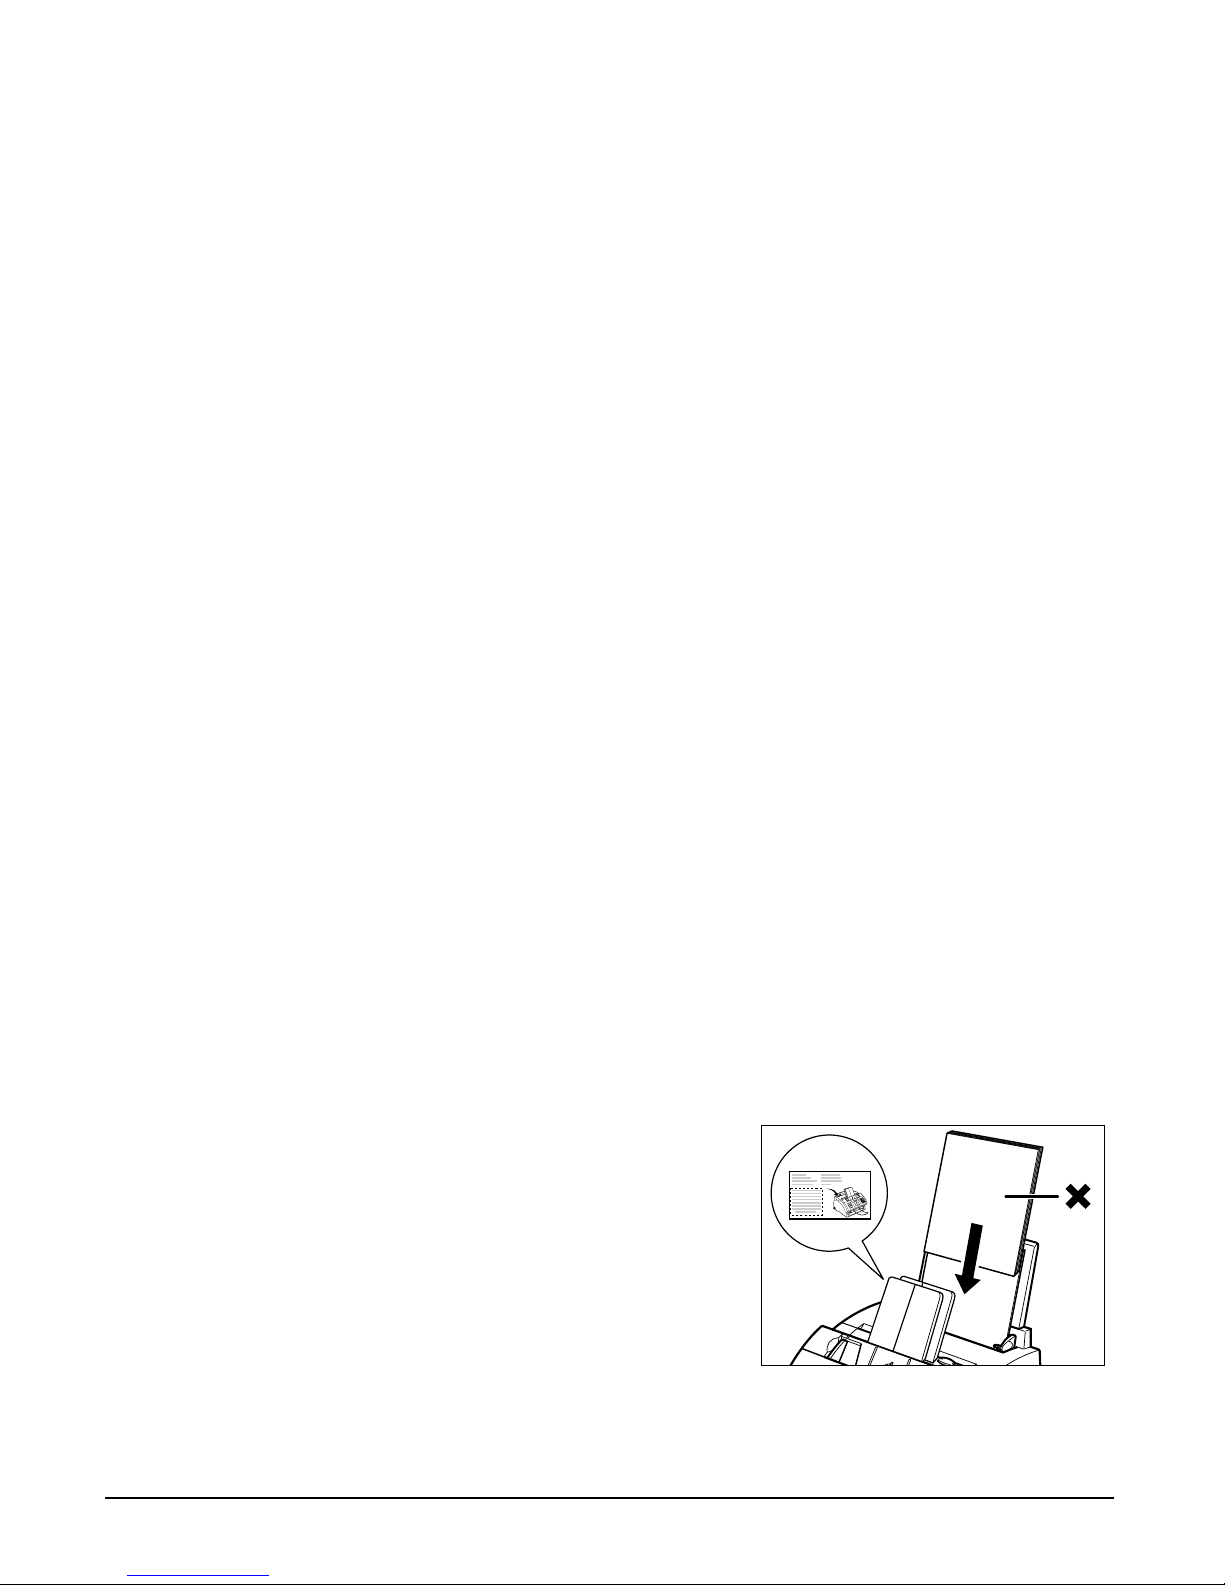
• Take care not to drop any foreign objects into the multi-purpose tray.
• Avoid mixing new stock with paper
already loaded in the multi-purpose tray.
Adding new stock without removing the
paper already loaded will cause paper
jams. If you must add new stock, remove
the loaded paper and reload it together
with the new stock.
 Loading...