

Page 1

INSTRUCTION
MANUAL
E
Wi-Fi (Wireless Communication) Function
Instruction Manual
Page 2
Introduction
(CANON iMAGE
GATEWAY)
(6) Send images to a
Web service
(1) Communicate with a smartphone
(5) Print images using
a Wi-Fi printer
(3) Save images to
Canon Connect
Station
(4) Operate remotely
using EOS Utility
(2) Send images
between cameras
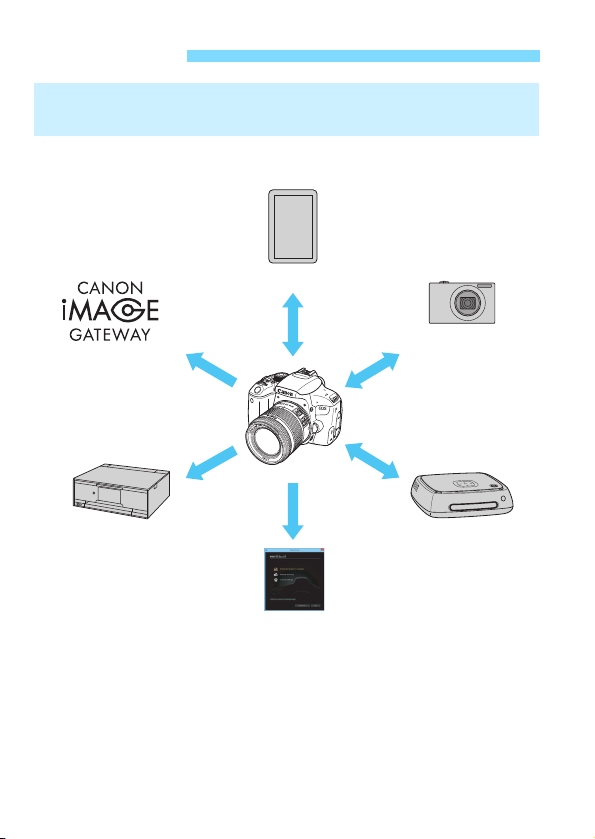
What You Can Do Using the Wi-Fi (Wireless Communication)
Functions
2
Page 3

Introduction
Update the Connect Station firmware to the latest version.
CANON iMAGE GATEWAY Web services are not supported in certain
countries and areas. For information on supported countries and areas,
refer to the Canon Web site (www.canon.com/cig).
(1)q Communicate with a smartphone (p.19, 47, 55)
Connect the camera to a smartphone or tablet via Wi-Fi and use the
dedicated application “Camera Connect” to operate the camera
remotely or view images stored in the camera.
In this manual and on the camera’s LCD monitor, “smartphone”
refers to smartphones and tablets.
(2)z Send images between cameras (p.61)
Connect this camera and other Canon cameras with built-in wireless
communication functions via Wi-Fi and send images between them.
(3)Save images to Connect Station (p.73)
Hold the camera close to Connect Station (sold separately) to
connect to it via Wi-Fi and save images to it.
(4)D Operate remotely using EOS Utility (p.77)
Connect the camera to a computer via Wi-Fi and operate the
camera remotely using EOS Utility (EOS software).
(5)l Print images using a Wi-Fi printer (p.83)
Connect the camera to a printer supporting PictBridge (Wireless
LAN) via Wi-Fi to print images.
(6)w Send images to a Web service (p.95)
Share images with your family and friends or share images using
various Web services via CANON iMAGE GATEWAY, an online
photo service for Canon users (free registration required).
3
Page 4

Introduction
Note that Canon cannot be held liable for any loss or damage from
erroneous wireless communication settings when using the camera. In
addition, Canon cannot be held liable for any other loss or damage caused
by use of the camera.
When using wireless communication functions, establish appropriate
security at your own risk and discretion. Canon cannot be held liable for
any loss or damage caused by unauthorized access or other security
breaches.
Wi-Fi Connection Using the Bluetooth Function
This camera can be connected easily to a smartphone compatible with
Bluetooth low energy technology* via Wi-Fi. For details, see page 19.
* Hereafter referred to as “Bluetooth”.
Wi-Fi Connection Using the NFC Function
This camera is compatible with NFC (Near Field Communication) that
enables you to easily establish a Wi-Fi connection between the camera
and a smartphone or Connect Station (sold separately). For details, see
page 47 or 73.
Wi-Fi Connection Using the <k> Button
This camera enables you to establish a Wi-Fi connection by displaying
the Wi-Fi function menu with the <k> button. For details, see the
pages describing how to connect the camera to each device or a Web
service via Wi-Fi.
4
Page 5

Conventions Used in this Manual
In this manual, the term “access point” indicates wireless LAN
routers, etc. that relay Wi-Fi connections.
The camera does not come with an interface cable.
Icons in this Manual
<6> : Indicates the Main Dial.
<W><X><Y><Z> : Indicate up, down, left, and right on the <V>
cross keys respectively.
<0> : Indicates the Setting button.
* In addition to the above, the icons and symbols used on the camera’s buttons
and displayed on the LCD monitor are also used in this manual when discussing
relevant operations and functionality.
(p.**) : Reference page numbers for more information.
: Warnings to prevent potential problems during operation.
: Supplemental information.
5
Page 6
Structure of This Manual
This manual is structured as follows. After finishing preparation for a
Wi-Fi connection in “Getting Started”, see the corresponding pages to
set up a Wi-Fi connection according to your needs.
1 Getting Started (p.11)
2 Connecting to a Bluetooth-
compatible Smartphone via
Wi-Fi (p.19)
3 Connecting to an NFC-
compatible Smartphone via
Wi-Fi (p.47)
4 Connecting to a Smartphone
via Wi-Fi with the <k> Button
(p.55)
10
Advanced Wi-Fi
Connection (p.107)
Mainly describes how to
establish a Wi-Fi connection,
using an access point.
A smartphone or computer can
be connected to the camera via
Wi-Fi while maintaining a Wi-Fi
connection to an access point.
5 Connecting to Another Camera
via Wi-Fi (p.61)
6 Connecting to Connect Station
via Wi-Fi (p.73)
7 Connecting to EOS Utility via
Wi-Fi (p.77)
8 Connecting to a Printer via
Wi-Fi (p.83)
9 Sending Images to a Web
Service (p.95)
11
Reconnecting via Wi-Fi (p.125)
12
Checking and Operating Connection Settings (p.131)
13
Troubleshooting Guide (p.137)
14
Reference (p.157)
6
Page 7

Contents
Introduction 2
What You Can Do Using the Wi-Fi (Wireless Communication)
Functions .......................................................................................... 2
Conventions Used in this Manual .....................................................5
Structure of This Manual ................................................................... 6
Getting Started 11
1
Setting Wi-Fi Settings ..................................................................... 12
Preparation for Smartphones .......................................................... 15
Preparation for Web Services .........................................................16
Connecting to a Bluetooth-compatible Smartphone
2
via Wi-Fi 19
Bluetooth Connection......................................................................20
Establishing a Bluetooth Connection .............................................. 21
Establishing a Wi-Fi Connection.....................................................25
Operating the Camera Using a Smartphone................................... 28
[Bluetooth function] Screen..........................................................31
Removing a Paired Device’s Registration.......................................32
Sending Images to a Smartphone from the Camera ......................33
Specifying Viewable Images ...........................................................43
Connecting to an NFC-compatible Smartphone
3
via Wi-Fi 47
Wi-Fi Connection to an NFC-compatible Smartphone ....................48
Establishing a Wi-Fi Connection.....................................................50
Sending Images from the Camera to a Smartphone ......................53
7
Page 8

Contents
4
Connecting to a Smartphone via Wi-Fi
with the <k> Button 55
Establishing a Wi-Fi Connection..................................................... 56
Connecting to Another Camera via Wi-Fi 61
5
Establishing a Wi-Fi Connection..................................................... 62
Sending Images to the Other Camera............................................ 64
Connecting to Connect Station via Wi-Fi 73
6
Saving Images................................................................................ 74
Connecting to EOS Utility via Wi-Fi 77
7
Establishing a Wi-Fi Connection..................................................... 78
Operating the Camera Using EOS Utility ....................................... 82
Connecting to a Printer via Wi-Fi 83
8
Establishing a Wi-Fi Connection..................................................... 84
Printing Images .............................................................................. 86
Print Settings.................................................................................. 89
Sending Images to a Web Service 95
9
Establishing a Wi-Fi Connection..................................................... 96
Sending Images to a Web Service................................................. 97
8
Page 9

Advanced Wi-Fi Connection 107
10
Checking the Type of Access Point .............................................. 109
Establishing a Wi-Fi Connection with WPS (PBC Mode)..............110
Establishing a Wi-Fi Connection with WPS (PIN Mode)............... 114
Connecting to a Detected Network Manually via Wi-Fi ................. 118
Reconnecting via Wi-Fi 125
11
Reconnecting via Wi-Fi.................................................................126
Connecting to a Bluetooth-connected Smartphone via Wi-Fi ....... 128
Registering Multiple Connection Settings .....................................130
Checking and Operating Connection Settings 131
12
Changing or Deleting Connection Settings ...................................132
Clearing Wireless Communication Settings to Default .................134
View Info Screen........................................................................... 135
Troubleshooting Guide 137
13
Responding to Error Messages ....................................................138
Troubleshooting Guide..................................................................151
Wireless Communication Function Notes.....................................153
Security.........................................................................................155
Checking Network Settings...........................................................156
Contents
9
Page 10

Contents
Reference 157
14
[Wireless communication settings] Screen .............................. 158
[Wi-Fi settings] Screen................................................................ 159
Virtual Keyboard Operation .......................................................... 160
Setting up the IP Address Manually ............................................. 161
Wireless Communication Status................................................... 163
Specifications ............................................................................... 165
Wireless Communication Function Precautions ........................... 166
Index............................................................................................. 168
10
Page 11

1
Getting Started
11
Page 12
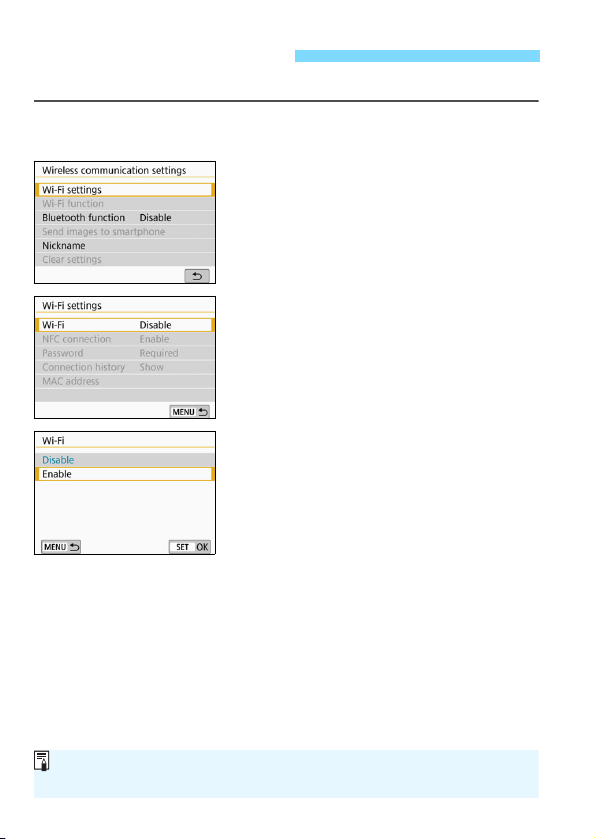
Setting Wi-Fi Settings
You can also set the Wi-Fi settings with [Wi-Fi settings] under
[51: Wireless communication settings].
First, follow the steps below to set the Wi-Fi settings.
Press the <k> button.
1
Select [Wi-Fi settings].
2
Select [Wi-Fi].
3
Select [Enable].
4
12
Page 13
Setting Wi-Fi Settings
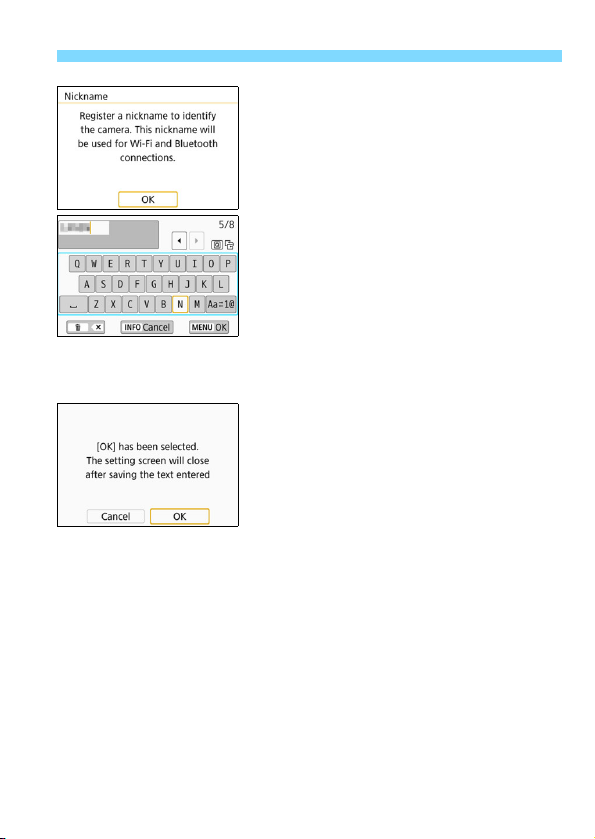
Register [Nickname].
5
When the screen on the left appears,
press <0>.
The screen on the left will appear.
When using the displayed nickname,
press the <M> button.
Otherwise, enter any characters
between 1 to 8 characters in length.
For instructions on entering
characters, see page 160. When you
finish entering, press the <M>
button.
Exit the setting.
6
When the screen on the left appears,
select [OK], then press <0>.
To return to the screen that appears
when the <k> button is pressed,
press the <M> button.
For information on each item on the
[Wi-Fi settings] screen, see page
159.
13
Page 14

Setting Wi-Fi Settings
When video snapshot or time-lapse movie is set, you cannot select
[51: Wireless communication settings].
Interface Cable Connection Cautions
With a Wi-Fi connection established, you cannot use the camera by
connecting it to Connect Station, a computer, a GPS receiver, or another
device with an interface cable. Terminate the connection before
connecting the interface cable.
When the camera is connected to Connect Station, a computer, a GPS
receiver, or another device with an interface cable, you cannot select
[51: Wireless communication settings]. Disconnect the interface
cable before changing any settings.
Cards
The camera cannot be connected via Wi-Fi if there is no card in the
camera (except for [D]). Also, for [l] and Web services, the camera
cannot be connected via Wi-Fi if there are no images saved on the card.
Using the Camera with a Wi-Fi Connection Established
When you want to prioritize the Wi-Fi connection, do not operate the
power switch, card slot cover, battery compartment cover, or other parts.
Otherwise, the Wi-Fi connection will be terminated.
Using an Eye-Fi Card
When [Wi-Fi] is set to [Enable], image transfer using an Eye-Fi card is
disabled.
14
Page 15
Preparation for Smartphones
To connect the camera to a smartphone, a smartphone on which
Android or iOS is installed is necessary. In addition, the dedicated
application Camera Connect (free of charge) must be installed on the
smartphone.
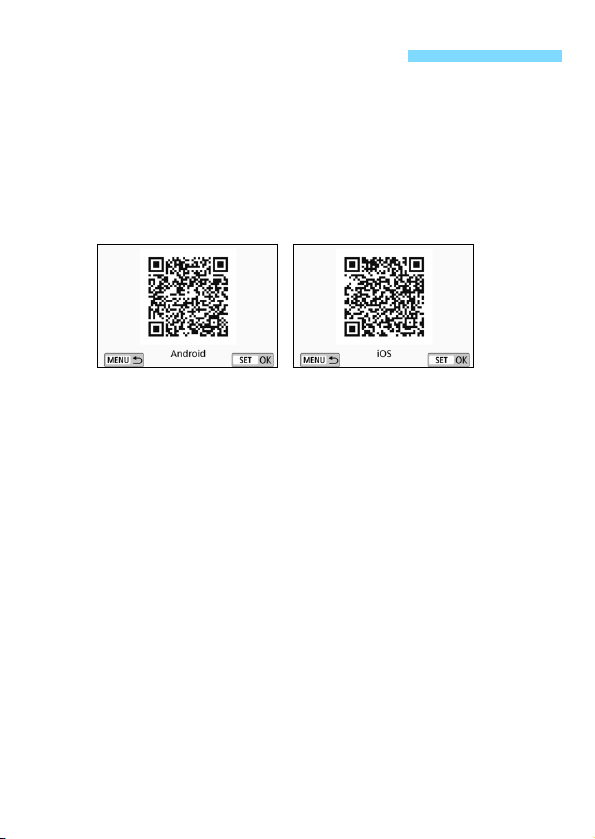
Camera Connect can be installed from the Google Play or App
Store. The Google Play or App Store can also be accessed using the
QR codes that appear when connecting the camera to a smartphone
(p.22, 57).
For the operating system versions supported by Camera Connect,
refer to the download site of Camera Connect.
When an NFC-compatible smartphone is touched to the camera
before installing Camera Connect, the download screen of Camera
Connect will be displayed on the smartphone.
Interface or functions of the camera and Camera Connect are
subject to change for firmware update of the camera or application
update of Camera Connect, Android, iOS, etc. In such a case,
features of the camera or Camera Connect may differ from sample
screens or operation instructions in this manual.
15
Page 16

Preparation for Web Services
CANON iMAGE GATEWAY Web services are not supported in certain
countries and areas. For information on supported countries and areas,
refer to the Canon Web site (www.canon.com/cig).
To use CANON iMAGE GATEWAY, you must be able to connect to the
Internet. (An account with an internet service provider is necessary,
browser software needs to be installed, and a line connection must be
completed.)
For information on web browser versions and settings required to access
CANON iMAGE GATEWAY, refer to the CANON iMAGE GATEWAY site.
Fees to connect to your provider and communication fees to access your
provider’s access point are charged separately.
If there has been a change in the service features of registered Web
services, operation may be different from the description in this manual,
or operation may not be possible.
For member registration, refer to Help on the CANON iMAGE GATEWAY
site.
For Web services that can be used with this camera’s Wi-Fi functions, refer
to the CANON iMAGE GATEWAY site.
Signing Up as a CANON iMAGE GATEWAY Member
To send images to Web services, you need to sign up as a CANON
iMAGE GATEWAY member (free of charge).
Once you are a CANON iMAGE GATEWAY member, you can publish
photos you took in online albums and use a range of services. This Web
site also serves as a platform for sharing images on registered Web
services. Connect to the Internet from a computer or other device,
access the Canon Web site (www.canon.com/cig) to check countries
and areas supporting the services, then register as a member by
following the instructions.
If you also intend to use Web services other than CANON iMAGE
GATEWAY, you must have an account with the services you intend to
use. For details, consult each individual Web service’s site.
16
Page 17

Preparation for Web Services
Specifying Settings to Use Web Services
Start EOS Utility on the computer, log in to CANON iMAGE GATEWAY,
then specify the camera’s settings to enable access to Web services.
For details, refer to the EOS Utility Instruction Manual. For how to
obtain the EOS Utility Instruction Manual, refer to the Camera
Instruction Manual.
The general procedure for sending images to a Web service is as
follows.
1 Install EOS Utility on a computer.
If you have already installed it, proceed to step 2.
2 Access Canon Web site from the computer and sign up
as a CANON iMAGE GATEWAY member (free of charge).
If you are already a member, proceed to step 3.
3 Connect the camera and computer via Wi-Fi (p.77).
You can also configure the settings by connecting the camera and
computer with an interface cable (sold separately) instead of via
Wi-Fi.
4 Start EOS Utility on the computer, log in to CANON
iMAGE GATEWAY, then specify the camera’s settings to
enable access to Web services.
For details, refer to the EOS Utility Instruction Manual.
17
Page 18

18
Page 19

2
Connecting to a Bluetooth-compatible
Smartphone via Wi-Fi
This section describes how to connect the camera to a
Bluetooth-compatible smartphone via Wi-Fi.
Connecting to a smartphone via Wi-Fi enables you to perform
the following:
• View images stored in the camera on a smartphone or save
viewed images to a smartphone.
• Operate the camera to take a picture or change camera
settings using a smartphone.
• Send images to a smartphone from the camera.
Install Camera Connect on the smartphone before setting
up a connection (p.15).
For procedures to connect to an NFC-compatible
smartphone via Wi-Fi, see “Connecting to an NFCcompatible Smartphone via Wi-Fi” (p.47).
If the smartphone you want to connect to via Wi-Fi is not
Bluetooth-compatible or NFC-compatible, see “Connecting
to a Smartphone via Wi-Fi with the <k> Button” (p.55).
To connect via Wi-Fi using a Wi-Fi access point, see
“Advanced Wi-Fi Connection” (p.107).
19
Page 20

Bluetooth Connection
Pairing and Bluetooth connection are not possible if the camera is
connected to Connect Station, a computer, a GPS receiver, or another
device with an interface cable.
Pairing is not possible while shooting with the camera.
The camera cannot be connected to two or more devices at the same
time via Bluetooth.
If you connect the camera to a smartphone via Wi-Fi while the camera is
connected to Wireless Remote Control BR-E1 (sold separately) via
Bluetooth, the Bluetooth connection with the wireless remote controller
will be terminated.
Bluetooth connection consumes battery power even after the camera’s
auto power off has activated. Therefore, the battery level may be low
when you use the camera.
The Bluetooth connection will be terminated if you turn off the camera or
smartphone, but when you turn on the power, the Bluetooth connection
will resume for the same combination of camera and smartphone.
This camera can be connected to Wireless Remote Control BR-E1 via
Bluetooth for remote shooting. For details, refer to Wireless Remote
Control BR-E1 Instruction Manual.
When you connect the camera to a Bluetooth-compatible smartphone
via Bluetooth, you can establish a Wi-Fi connection by operating only
the camera or the smartphone.
Note that pairing between the camera and smartphone is required to
connect the camera to a smartphone via Bluetooth. Pairing will be done
as part of the Bluetooth connection procedure.
20
Page 21
Establishing a Bluetooth Connection
To connect the camera to a smartphone via Bluetooth, refer to the
Camera Connect’s “Easy Connection Guide” or follow the steps below.
Set [Wi-Fi] to [Enable] on the [Wi-Fi settings] screen in advance
(p.12).
Operation on the Camera-1
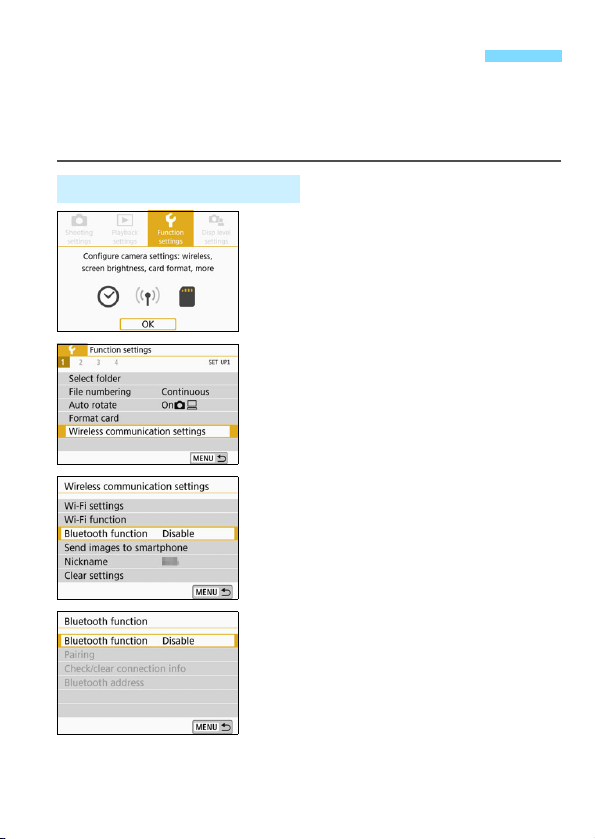
Select the [Function settings] tab.
1
Press the <M> button to display
the main tabs.
Select the [Function settings] tab,
then press <0>.
Select [Wireless communication
2
settings].
Under the [51] tab, select [Wireless
communication settings], then
press <0>.
Select [Bluetooth function].
3
Select [Bluetooth function].
4
21
Page 22
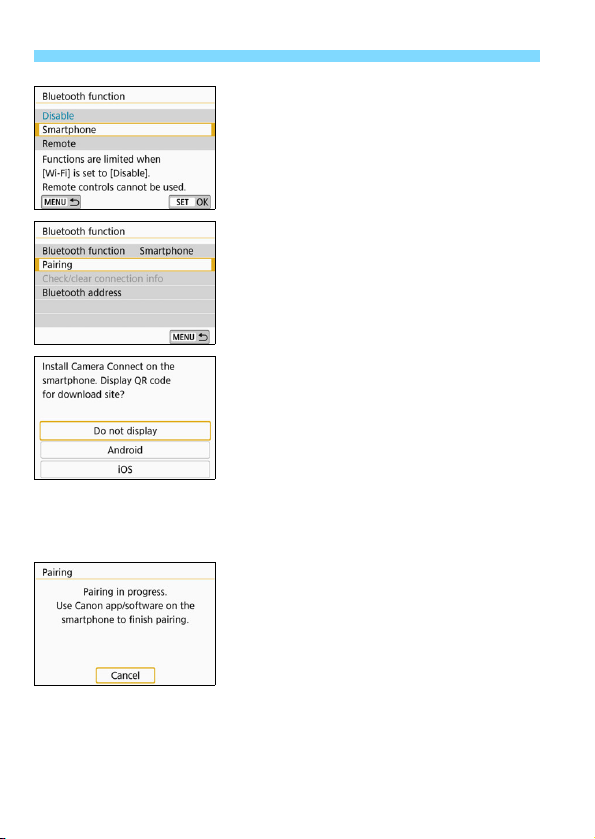
Establishing a Bluetooth Connection
5
6
7
Select [Smartphone].
Select [Pairing].
Select [Do not display].
If Camera Connect is already
installed, select [Do not display] and
press <0>.
If Camera Connect is not installed,
select [Android] or [iOS] on the
screen on the left, scan the displayed
QR code with the smartphone, then
access Google Play or the App Store
and install Camera Connect.
The screen on the left will appear and
pairing will start.
22
Page 23
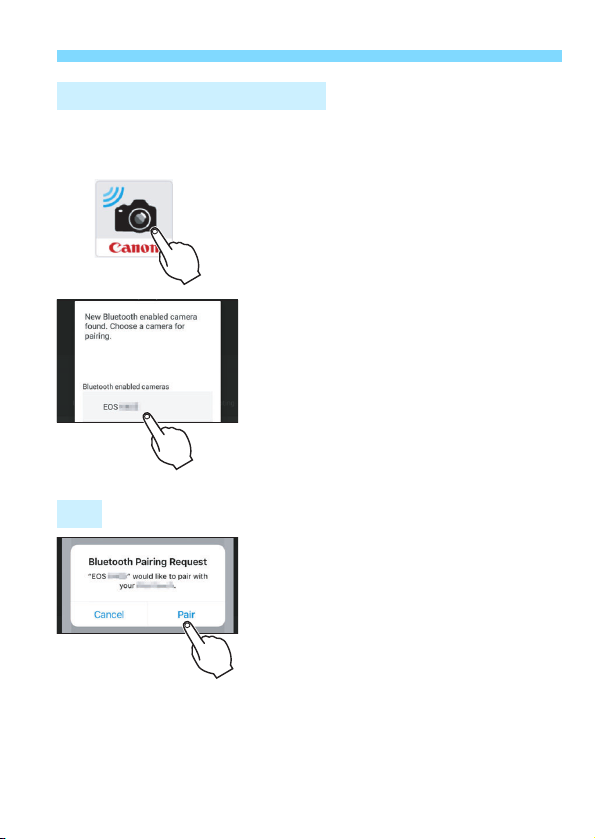
Operation on the Smartphone
Activate the smartphone’s
8
Bluetooth function.
Start Camera Connect.
9
Select the camera to pair with.
10
Tap on the nickname of the camera to
be paired.
iOS
When the screen on the left appears,
tap on [Pair].
Establishing a Bluetooth Connection
23
Page 24
Establishing a Bluetooth Connection
Operation on the Camera-2
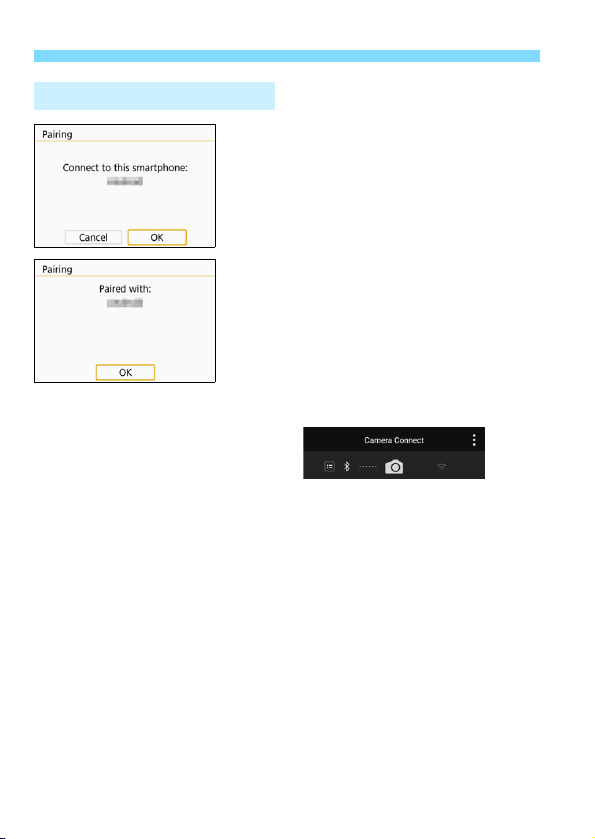
Select [OK].
11
Press <0>.
12
Pairing will complete and the camera
will be connected to the smartphone
via Bluetooth.
An illustration indicating that a
Bluetooth connection has been
established will appear on Camera
Connect.
With a Bluetooth connection established, you can operate the camera
to send images to the smartphone. For details, see page 33.
24
Page 25
Establishing a Wi-Fi Connection
When a Bluetooth connection is established, follow the steps below to
establish a Wi-Fi connection.
Set [Wi-Fi] to [Enable] on the [Wi-Fi settings] screen in advance
(p.12).
Select a Camera Connect
1
function.
Select the Camera Connect function
you want to use.
For the Camera Connect functions,
see page 28.
Android
A Wi-Fi connection will be established automatically.
When a Wi-Fi connection is established, the screen for the selected
function will appear.
25
Page 26
Establishing a Wi-Fi Connection
Password
SSID (network name)
“_Canon0A” is displayed at the end of the SSID.
iOS
Check the SSID and password.
2
Check the SSID (network name) and
password displayed on the camera.
Operate the smartphone to
3
establish a Wi-Fi connection.
On the smartphone’s Wi-Fi function
screen, select the SSID checked in
step 2.
For the password, enter the password
checked in step 2. The password will
not be required from the next time
you connect the camera to the
smartphone via Wi-Fi.
Camera Connect will appear.
When a Wi-Fi connection is
established, the screen for the
selected function will appear.
26
Page 27
Establishing a Wi-Fi Connection
Android and iOS
The [qWi-Fi on] screen will appear
on the camera’s LCD monitor.
An illustration indicating that a Wi-Fi
connection has been established will
appear on Camera Connect.
The Wi-Fi connection to a Bluetoothcompatible smartphone is now
complete.
For how to terminate the Wi-Fi
connection, see “Terminating the
Wi-Fi Connection” (p.29).
Terminating the Wi-Fi connection will
switch the camera to the Bluetooth
connection.
To reconnect via Wi-Fi, see
“Reconnecting via Wi-Fi” (p.125).
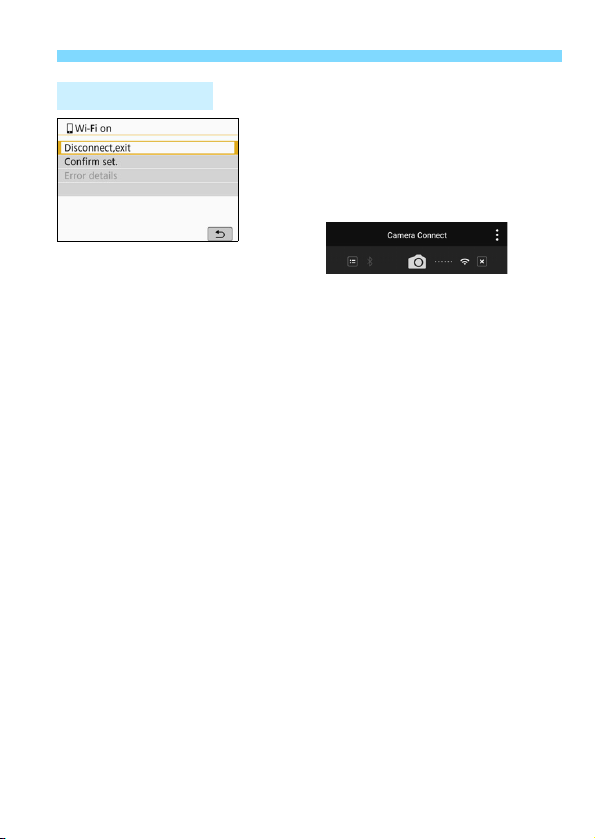
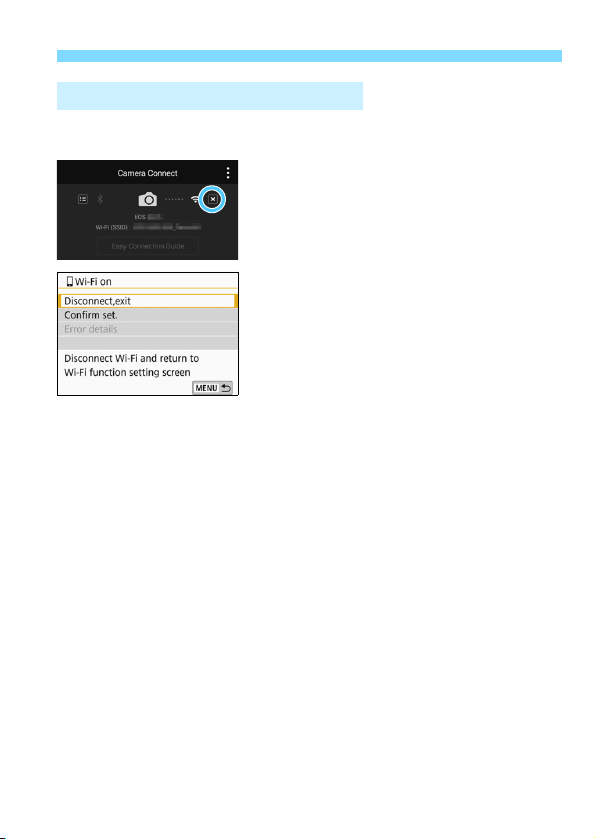
[qWi-Fi on] Screen
[Disconnect,exit]
Terminates the Wi-Fi connection.
[Confirm set.]
You can check the settings.
[Error details]
When a Wi-Fi connection error occurs, you can check the details of
the error.
To switch to the menu, press the <M> button.
27
Page 28
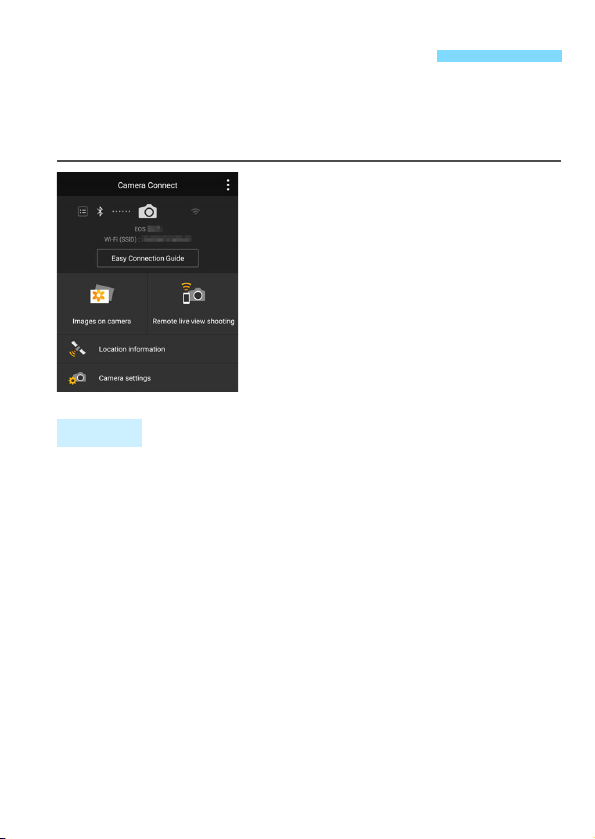
Operating the Camera Using a Smartphone
You can use a smartphone with Camera Connect installed to view
images stored in the camera or perform remote shooting, etc.
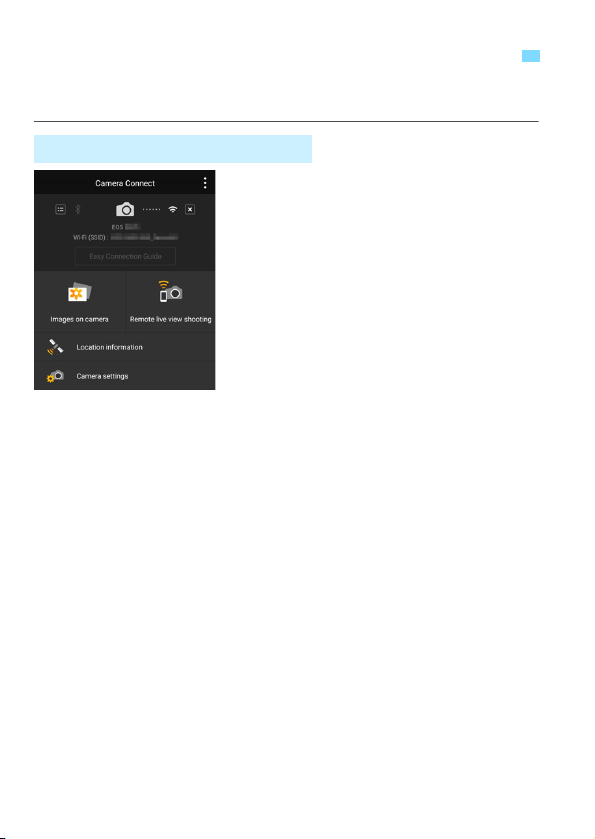
Camera Connect Main Window
The main functions of Camera Connect
are described below.
[Images on camera]
Images stored in the camera can be
viewed.
Images stored in the camera can be
saved on a smartphone.
Operations such as deletion can be
performed on images stored in the
camera.
[Remote live view shooting]
The camera’s Live View image can be viewed on a smartphone.
You can shoot with remote operation.
[Location information]
Not supported on this camera.
[Camera settings]
Camera settings can be changed.
28
Page 29
Operating the Camera Using a Smartphone
Terminating the Wi-Fi Connection
To terminate the Wi-Fi connection, perform either of the following
operations.
On the smartphone’s Camera
Connect screen, tap on [T].
On the camera’s [qWi-Fi on]
screen, select [Disconnect,exit].
If the [qWi-Fi on] screen is not
displayed, press the <k> button.
Select [Disconnect,exit], then select
[OK] on the confirmation dialog to
terminate the Wi-Fi connection.
29
Page 30

Operating the Camera Using a Smartphone
When the Wi-Fi connection is terminated while recording a movie with
remote shooting, the camera responds as follows:
• When the power switch is set to <k>, movie shooting continues.
• When the power switch is set to <1>, movie shooting stops.
When the power switch is set to <1> and the movie mode is set using
Camera Connect, you cannot shoot by operating the camera.
With a Wi-Fi connection to a smartphone established, certain functions
are unavailable.
In remote shooting, the AF speed may become slower.
Depending on the communication status, image display or shutter
release may be delayed.
When saving images to a smartphone, you cannot take a picture even if
you press the camera’s shutter button. Also, the camera’s LCD monitor
may turn off.
Even if MOV-format movies are displayed in the list, they cannot be
saved to a smartphone.
The Wi-Fi connection will be terminated if you set the camera’s power to
<2> or open the card slot cover or battery compartment cover.
RAW images cannot be saved to a smartphone. When a RAW image is
selected, it will be saved as a JPEG image.
With a Wi-Fi connection established, the camera’s auto power off does
not function.
With a Wi-Fi connection established, disabling the smartphone’s power
saving function is recommended.
30
Page 31

[Bluetooth function] Screen
On the [Bluetooth function] screen (step 3 on page 21), you can
change or check the Bluetooth function settings.
[Bluetooth function]
Select the device to pair with the
camera.
If you will not use the Bluetooth
function, select [Disable].
[Pairing]
Pair the camera with the device
selected in [Bluetooth function].
[Check/clear connection info]
You can check the name and
communication status of the paired
device.
To remove the paired device, press
the <B> button. For details, see
“Removing a Paired Device’s
Registration” (p.32).
[Bluetooth address]
You can check the camera’s
Bluetooth address.
31
Page 32

Removing a Paired Device’s Registration
To pair the camera with another smartphone, remove the currently
paired device’s registration.
Operation on the Camera
Select [Check/clear connection
1
info].
On the [Bluetooth function] screen
(p.21), select [Check/clear
connection info], then press <0>.
Press the <B> button.
2
Remove the device registration.
3
When the screen on the left appears,
select [OK], then press <0>.
Operation on the Smartphone
32
Remove the camera registration.
4
Remove the camera registration in
the Bluetooth settings.
Page 33

Sending Images to a Smartphone from the Camera
While a Bluetooth connection (Android only) or Wi-Fi connection is
established, you can operate the camera to send images to a
smartphone. There are two send methods.
(1) Select [Send images to smartphone] from the camera menu.
(2) Send images from the Quick Control screen during playback (p.34).
(1) Selecting [Send images to smartphone]
Select [Send images to smartphone] from the camera menu and send
images.
Connect the camera to a
1
smartphone via Bluetooth
(Android only) or Wi-Fi (p.25).
Select [Wireless communication
2
settings].
Under the [51] tab, select [Wireless
communication settings], then
press <0>.
Select [Send images to
3
smartphone].
If you perform this step with a
Bluetooth connection established, a
message will appear and a Wi-Fi
connection will start.
Select the images to send.
4
Select and send image(s). For
information on how to send images,
see page 35.
33
Page 34

Sending Images to a Smartphone from the Camera
(2) Quick Control During Playback
Send images from the Quick Control screen during playback.
Connect the camera to a
1
smartphone via Bluetooth
(Android only) or Wi-Fi
Play back the image.
2
Press the <3> button to play back
images.
Press the <Q> button.
3
The Quick Control screen will appear.
Select [q].
4
If you perform this step with a
Bluetooth connection established, a
message will appear and a Wi-Fi
connection will start.
Select the images to send.
5
Select and send image(s). For
information on how to send images,
see page 35.
(p.25).
34
Page 35

Sending Images to a Smartphone from the Camera
Sending Images Individually
Select and send images individually.
Select an image to send.
1
Press the <Y> <Z> keys of the
cross keys to select an image to
send, then press <0>.
By pressing the <I> button, you
can switch to the index display and
select an image.
Select [Send img shown].
2
To select a size at which to send the
image, select [Resize image] and
press <0>.
Select [Send img shown] and press
<0> to send the image displayed.
When the transfer is complete, the
screen for step 1 will reappear.
To send another image, repeat steps
1 and 2.
35
Page 36

Sending Images to a Smartphone from the Camera
Sending Multiple Selected Images
Select multiple images and send them at once.
If the multiple image selection screen is already displayed, start the
operation from step 3.
Press <0>.
1
Select [Send selected].
2
Select the images to send.
3
Press the <Y> <Z> keys of the
cross keys to select an image to
send, then press <0>.
A checkmark [X] will be displayed on
the upper left of the screen.
By pressing the <I> button, you
can select images from a three-image
display. To return to the single-image
display, press the <u> button.
To select another image to send,
repeat step 3.
After selecting the images to send,
press the <Q> button.
36
Page 37

Sending Images to a Smartphone from the Camera
Select [Resize image].
4
Set it as necessary.
On the displayed screen, select an
image size, then press <0>.
Select [Send].
5
The images will be sent. When the
transfer is complete, the screen for
step 1 will reappear.
To send other images, repeat steps 1
to 5.
37
Page 38

Sending Images to a Smartphone from the Camera
Sending a Specified Range of Images
Specify the range of images to send all the images in the range at once.
Press <0>.
1
Select [Send range].
2
Specify the range of images.
3
Select the first image, then press
<0>.
Select the last image, then press
<0>.
The [X] icon will appear on the
selected images.
To cancel the selection, repeat this
step.
38
Page 39

Sending Images to a Smartphone from the Camera
Confirm the range.
4
Press the <Q> button.
Select [Resize image].
5
Set it as necessary.
On the displayed screen, select an
image size, then press <0>.
Select [Send].
6
The images will be sent. When the
transfer is complete, the screen for
step 1 will reappear.
39
Page 40

Sending Images to a Smartphone from the Camera
Sending All Images on the Card
Send all images on the card at once.
Press <0>.
1
Select [Send all card].
2
Select [Resize image].
3
Set it as necessary.
On the displayed screen, select an
image size, then press <0>.
Select [Send].
4
The images will be sent. When the
transfer is complete, the screen for
step 1 will reappear.
40
Page 41

Sending Images to a Smartphone from the Camera
Sending Images that Match the Search Conditions
Send all the images that match the search conditions set in [Set image
search conditions] at once.
For [Set image search conditions], refer to “Setting Image Search
Conditions” in the Camera Instruction Manual.
Press <0>.
1
Select [Send all found].
2
Select [Resize image].
3
Set it as necessary.
On the displayed screen, select an
image size, then press <0>.
Select [Send].
4
The images will be sent. When the
transfer is complete, the screen for
step 1 will reappear.
41
Page 42

Sending Images to a Smartphone from the Camera
During the image transfer operation, a picture cannot be taken even if
the camera’s shutter button is pressed.
Even if MOV-format movies are displayed in the list, they cannot be
saved to a smartphone.
You can cancel the image transfer by selecting [Cancel] during the
transfer.
You can select up to 999 files at a time.
With a Wi-Fi connection established, disabling the smartphone’s power
saving function is recommended.
When you reduce the image size, all images to be sent at the same time
are resized. Note that movies and b size still photos are not reduced.
When you use a battery to power the camera, make sure it is fully
charged.
With a Wi-Fi connection established, the camera’s auto power off does
not function.
Ending Image Transfer
Press the <M> button.
1
If you send images by operating the
camera with a Wi-Fi connection
established, the previous screen will
reappear. The Wi-Fi connection will
not be terminated.
If you send images by operating the
camera with a Bluetooth connection
established, the screen on the left will
appear.
Select [OK], then press <0> to
terminate the Wi-Fi connection.
42
Page 43

Specifying Viewable Images
When reconnecting to a smartphone, check the settings of viewable images
before establishing a connection.
You can specify images viewable on a smartphone by operating the
camera. Images can be specified after the Wi-Fi connection is
terminated.
Press the <k> button.
1
Select [q].
2
If the history (p.126) is displayed,
switch the screen with the <Y> <Z>
keys.
If the [Wireless communication
settings] screen is displayed, set the
Wi-Fi settings (p.12).
Select [Edit device information].
3
Select a smartphone.
4
Select the smartphone on which you
want to make the images viewable.
43
Page 44

Specifying Viewable Images
If [Viewable imgs] is set to any setting other than [All images], remote
shooting is not possible.
Select [Viewable imgs].
5
Select an item.
6
Select [OK] and press <0> to
display the setting screen.
[All images]
All images stored on the card become viewable.
[Images from past days]
Specify viewable images on the
shooting-date basis. Images shot up to
nine days ago can be specified.
Select an item, then press <0>.
When [Images shot in past days] is
selected, images shot up to the
specified number of days before the
current date become viewable. When
<r> is shown for the number of
days, press the <W> <X> keys to
specify the number of days, then
press <0> to confirm the selection.
Select [OK] and press <0> to
specify the viewable images.
44
Page 45

[Select by rating]
First image Last image
Specify viewable images depending on
whether a rating is appended (or not
appended) or by the type of rating.
Select a rating, then press <0> to
specify the viewable images.
[File number range] (Select range)
Select the first and last images from
images arranged by the file number to
specify the viewable images.
1 Press the <Y> <Z> keys to select
the first image to be set as viewable.
2Press <0> to display the image
selection screen.
Select an image using the <Y> <Z>
keys.
By pressing the <I> button, you
can switch to the index display and
select an image.
3 Select an image and press <0> to
set it.
4 Use the same operation to specify the
last image file to be set as viewable.
Select an image shot later than the
image selected as the first image.
5 When the first and last images are
specified, select [OK], then press
<0>.
Specifying Viewable Images
45
Page 46

46
Page 47

3
Connecting to an NFC-compatible
Smartphone via Wi-Fi
This section describes how to connect the camera to an
NFC-compatible smartphone via Wi-Fi.
Connecting to a smartphone via Wi-Fi enables you to perform
the following:
• View images stored in the camera on a smartphone or save
viewed images to a smartphone.
• Operate the camera to take a picture or change camera
settings using a smartphone.
• Send images to a smartphone from the camera.
Install Camera Connect on the smartphone before setting
up a connection (p.15).
For procedures to connect to a Bluetooth-compatible
smartphone via Wi-Fi, see “Connecting to a Bluetoothcompatible Smartphone via Wi-Fi” (p.19).
If the smartphone you want to connect to via Wi-Fi is not
Bluetooth-compatible or NFC-compatible, see “Connecting
to a Smartphone via Wi-Fi with the <k> Button” (p.55).
To connect via Wi-Fi using a Wi-Fi access point, see
“Advanced Wi-Fi Connection” (p.107).
47
Page 48

Wi-Fi Connection to an NFC-compatible
A Wi-Fi connection may not be established with the NFC function even if the
smartphone is NFC-compatible. In such a case, establish a Wi-Fi
connection using the procedure in “Connecting to a Smartphone via Wi-Fi
with the <k> Button” (p.55) or “Advanced Wi-Fi Connection” (p.107).
Smartphone
NFC-compatible smartphones can be connected via Wi-Fi by
touching them to the camera.
Smartphones labeled with the p mark are NFC-compatible.
Some smartphones are NFC-compatible even if they are not labeled
with the p mark. In such a case, check the NFC antenna position by
referring to the smartphone’s instruction manual.
For the smartphone’s NFC setting, refer to the smartphone’s
instruction manual.
If you do not know whether your smartphone is NFC-compatible,
contact the manufacturer of the smartphone.
48
Page 49

Wi-Fi Connection to an NFC-compatible Smartphone
The camera cannot be connected to two or more smartphones at the
same time.
When touching the smartphone to the camera, be careful not to drop the
camera or smartphone.
Do not touch the smartphone to the camera with too much force. Doing
so can scratch the camera or smartphone.
Just holding the smartphone close to the camera may not establish a
connection. Be sure to touch the camera with the smartphone so that
they come into contact with each other.
Recognition may be difficult depending on the smartphone. Touch slowly
while changing the position or rotating horizontally. If connection is not
established, keep the camera and smartphone together until the camera
screen is updated.
Another application on the smartphone may start depending on how you
touch. Check the position of the p mark, then touch again.
When touching the smartphone to the camera, do not leave anything
between the camera and smartphone. In addition, when a case is
attached to the camera or smartphone, Wi-Fi connection with the NFC
function may not be possible.
A Wi-Fi connection cannot be established with the NFC function between
this camera and a smartphone while they are connected via Bluetooth.
To connect this camera to an NFC-compatible smartphone via Wi-Fi, the
smartphone’s Wi-Fi and NFC functions must be enabled.
NFC Function Cautions
A Wi-Fi connection cannot be established with the NFC function between
this camera and another NFC-compatible device such as a camera or
printer.
A Wi-Fi connection cannot be established with the NFC function while
shooting with this camera, when there is no card, when the LCD monitor
is closed with the screen facing inward, or while the camera is connected
to another device with an interface cable.
49
Page 50

Establishing a Wi-Fi Connection
To connect the camera to an NFC-compatible smartphone via Wi-Fi,
refer to the Camera Connect’s “Easy Connection Guide” or follow the
steps below.
(1) Turn on the camera and smartphone.
(2) Enable the NFC function on the camera and smartphone.
(3) Touch the smartphone to the camera so that they come into
contact with each other.
For the camera’s NFC setting, see page 12.
For the smartphone’s Wi-Fi setting, NFC setting, and NFC antenna
position, refer to the smartphone’s instruction manual.
Enable the NFC function on the
1
camera and smartphone
(p.12, 159).
Touch a smartphone to the
2
camera.
If the download site of Camera
Connect appears on the smartphone,
install Camera Connect (p.15).
If an image is being played back on
the camera, press the <3> button to
end the playback.
Touch the p mark on the smartphone
to that on the camera so that they
come into contact with each other.
When a message indicating the
connection is being established is
displayed on the camera’s LCD
monitor, move the smartphone away
from the camera.
Camera Connect starts on the
smartphone and establishes a
connection.
50
Page 51

Establishing a Wi-Fi Connection
Establish a Wi-Fi connection.
3
When a connection is established,
the screen on the left will appear on
the camera’s LCD monitor. When
connecting to the same smartphone
via NFC, this screen will not appear
again.
To specify viewable images, press the
<B> button. See step 6 on page
44 to set them.
Select [OK] and press <0>. After a
message is displayed, the [qWi-Fi
on] screen will appear.
[qWi-Fi on] Screen
[Disconnect,exit]
Terminates the Wi-Fi connection.
[Confirm set.]
You can check the settings.
[Error details]
When a Wi-Fi connection error occurs, you can check the details of
the error.
To switch to the menu, press the <M> button.
51
Page 52

Establishing a Wi-Fi Connection
The main window of Camera Connect
will be displayed on the smartphone.
The Wi-Fi connection to a smartphone
is now complete.
Operate the camera using Camera
Connect. See page 28.
For how to terminate the Wi-Fi
connection, see “Terminating the
Wi-Fi Connection” (p.29).
To reconnect via Wi-Fi, see
“Reconnecting via Wi-Fi” (p.125).
52
Page 53

Sending Images from the Camera to a Smartphone
By touching an NFC-compatible smartphone to the camera while
playing back an image on the camera, you can establish a Wi-Fi
connection automatically and send the image to the smartphone even if
a Bluetooth or Wi-Fi connection has not been established beforehand.
On the [Wi-Fi settings] screen, set [Wi-Fi] to [Enable] and set [NFC
connection] to [Enable] in advance (p.12).
For the smartphone’s Wi-Fi setting, NFC setting, and NFC antenna
position, refer to the smartphone’s instruction manual.
Play back the image.
1
Press the <3> button to play back
images.
Touch a smartphone to the
2
camera.
Touch the p mark on the smartphone
to that on the camera so that they
come into contact with each other.
When a message indicating the
established connection is displayed
on the camera’s LCD monitor, move
the smartphone away.
Select the images to send.
3
Select and send image(s). For
information on how to send images,
see page 35.
When the index display is selected in
step 1, the multiple image selection
screen will appear. See step 3 on
page 36.
When the transfer is complete, the
screen for step 3 will reappear.
53
Page 54

Sending Images from the Camera to a Smartphone
If necessary, also read “NFC Function Cautions” (p.49).
During the image transfer operation, a picture cannot be taken even if
the camera’s shutter button is pressed.
Images cannot be sent using the NFC function while the camera is
connected to another device via Wi-Fi. In addition, the camera cannot be
connected to multiple smartphones via Wi-Fi at the same time.
Even if MOV-format movies are displayed in the list, they cannot be
saved to a smartphone.
You can cancel the image transfer by selecting [Cancel] during the
transfer.
You can select up to 999 files at a time.
With a Wi-Fi connection established, disabling the smartphone’s power
saving function is recommended.
When using the NFC function while playing back an image, device
registration will not be performed.
When you reduce the image size, all images to be sent at the same time
are resized. Note that movies and b size still photos are not reduced.
When you use a battery to power the camera, make sure it is fully
charged.
With a Wi-Fi connection established, the camera’s auto power off does
not function.
End the image transfer.
4
Press the <M> button on the
image transfer screen.
Select [OK] on the screen on the left,
then press <0> to end the image
transfer and terminate the Wi-Fi
connection.
54
Page 55

4
Connecting to a Smartphone
via Wi-Fi with the <
This section describes how to connect the camera to a
smartphone via Wi-Fi using the <k> button.
Connecting to a smartphone via Wi-Fi enables you to perform
the following:
• View images stored in the camera on a smartphone or save
viewed images to a smartphone.
• Operate the camera to take a picture or change camera
settings using a smartphone.
• Send images to a smartphone from the camera.
Install Camera Connect on the smartphone before setting
up a connection (p.15).
For procedures to connect to a Bluetooth-compatible
smartphone via Wi-Fi, see “Connecting to a Bluetoothcompatible Smartphone via Wi-Fi” (p.19).
For procedures to connect to an NFC-compatible
smartphone via Wi-Fi, see “Connecting to an NFCcompatible Smartphone via Wi-Fi” (p.47).
To connect using a Wi-Fi access point, see “Advanced
Wi-Fi Connection” (p.107).
k
> Button
55
Page 56

Establishing a Wi-Fi Connection
To connect the camera to a smartphone via Wi-Fi, refer to the Camera
Connect’s “Easy Connection Guide” or follow the steps below.
Set [Wi-Fi] to [Enable] on the [Wi-Fi settings] screen in advance
(p.12).
Operation on the Camera-1
Press the <k> button.
1
Select [q] (Connect to
2
smartphone).
If the history (p.126) is displayed,
switch the screen with the <Y> <Z>
keys.
If the [Wireless communication
settings] screen is displayed, set the
Wi-Fi settings (p.12).
Select [Register a device for
3
connection].
56
Page 57

Establishing a Wi-Fi Connection
Password
SSID (network name)
“_Canon0A” is displayed at the end of the SSID.
By selecting [Switch network] in step 5, you can establish a Wi-Fi
connection via an access point (p.109).
Select [Do not display].
4
If Camera Connect is already
installed, select [Do not display] and
press <0>.
If Camera Connect is not installed,
select [Android] or [iOS] on the
screen on the left, scan the displayed
QR code with the smartphone, then
access Google Play or the App Store
and install Camera Connect.
Check the SSID and password.
5
Check the SSID (network name) and
password displayed on the camera’s
LCD monitor.
In [Wi-Fi settings], if you set
[Password] to [None], the password
will not be displayed or required. For
details, see page 159.
57
Page 58

Establishing a Wi-Fi Connection
Smartphone’s screen
(sample)
Operation on the Smartphone
Operate the smartphone to
6
establish a Wi-Fi connection.
Activate the smartphone’s Wi-Fi
For the password, enter the password
Start Camera Connect.
7
When the [Waiting to connect]
Select the camera to connect to
8
via Wi-Fi.
Select and tap on the camera to
function, then select the SSID
(network name) checked in step 5.
checked in step 5.
screen is displayed on the camera’s
LCD monitor, start Camera Connect
on the smartphone.
connect to via Wi-Fi from [Cameras]
on Camera Connect.
58
Page 59

Establishing a Wi-Fi Connection
Operation on the Camera-2
Establish a Wi-Fi connection.
9
When a connection is established,
the screen on the left will appear on
the camera’s LCD monitor. When
connecting to the same smartphone
via NFC, this screen will not appear
again.
To specify viewable images, press the
<B> button. See step 6 on page
44 to set them.
Select [OK] and press <0>. After a
message is displayed, the [qWi-Fi
on] screen will appear.
[qWi-Fi on] Screen
[Disconnect,exit]
Terminates the Wi-Fi connection.
[Confirm set.]
You can check the settings.
[Error details]
When a Wi-Fi connection error occurs, you can check the details of
the error.
To switch to the menu, press the <M> button.
59
Page 60

Establishing a Wi-Fi Connection
The main window of Camera Connect
will be displayed on the smartphone.
The Wi-Fi connection to a smartphone
is now complete.
Operate the camera using Camera
Connect. See page 28.
For how to terminate the Wi-Fi
connection, see “Terminating the
Wi-Fi Connection” (p.29).
To reconnect via Wi-Fi, see
“Reconnecting via Wi-Fi” (p.125).
With a Wi-Fi connection established, you can send images to a
smartphone from the camera menu ([Send images to smartphone]) or
from the Quick Control screen during playback. For details, see page
33.
60
Page 61

5
Wi-Fi connection is possible with Canon cameras with built-in
Wi-Fi functions released in and after 2012 supporting image
transfer between cameras. Note that the camera cannot be
connected to Canon camcorders via Wi-Fi, even if they have
built-in Wi-Fi functions.
Still photos can be transferred only if their file format is JPEG.
For movies, a send error may occur or the sent movies may not
be played back depending on the target camera’s functionality
and file format of the movies. (MP4-format movies cannot be
sent to cameras that are not compatible with playback of MP4format movies.)
Connecting to Another
Camera via Wi-Fi
This section describes how to easily connect this
camera and other Canon cameras via Wi-Fi with built-in
Wi-Fi functions.
61
Page 62

Establishing a Wi-Fi Connection
Connect the camera to another camera via Wi-Fi. The camera can be
connected to only one camera at a time.
Press the <k> button.
1
Select [z] (Transfer imgs
2
between cameras).
If the history (p.126) is displayed,
switch the screen with the <Y> <Z>
keys.
If the [Wireless communication
settings] screen is displayed, set the
Wi-Fi settings (p.12).
Select [Register a device for
3
connection].
Set up the target camera.
4
When the screen on the left is
displayed on the camera, set up the
Wi-Fi connection on the target
camera as well. For the operation
procedure, refer to the instruction
manual of the target camera.
When a Wi-Fi connection is
established, an image on the card will
appear.
62
Page 63

Establishing a Wi-Fi Connection
Note that GPS information is not displayed on the camera’s playback screen
even if GPS information is appended to the received image. Shooting
locations can be viewed on a virtual map, using Map Utility (EOS software).
The connection settings are saved/registered with the nickname of the
camera to which a Wi-Fi connection was established.
With a Wi-Fi connection established, the camera’s auto power off does
not function.
Select the images to send.
5
Select images on the camera sending
the images (p.64).
Do not operate the camera receiving
the images.
63
Page 64

Sending Images to the Other Camera
Sending Images Individually
Select and send images individually.
Select an image to send.
1
Press the <Y> <Z> keys of the
cross keys to select an image to
send, then press <0>.
By pressing the <I> button, you
can switch to the index display and
select an image.
Select [Send img shown].
2
To select a size at which to send the
image, select [Resize image] and
press <0>.
Select [Send img shown] and press
<0> to send the image displayed.
When the transfer is complete, the
screen for step 1 will reappear.
To send another image, repeat steps
1 and 2.
Terminate the Wi-Fi connection.
3
Press the <k> button to display the
confirmation dialog. Select [OK], then
press <0> to terminate the
connection.
64
Page 65

Sending Images to the Other Camera
Sending Multiple Selected Images
Select multiple images to send them at once.
Press <0>.
1
Select [Send selected].
2
Select the images to send.
3
Press the <Y> <Z> keys of the
cross keys to select an image to
send, then press <0>.
A checkmark [X] will be displayed on
the upper left of the screen.
By pressing the <I> button, you
can select images from a three-image
display. To return to the single-image
display, press the <u> button.
To select another image to send,
repeat step 3.
After selecting the images to send,
press the <Q> button.
65
Page 66

Sending Images to the Other Camera
4
5
6
Select [Resize image].
Set it as necessary.
On the displayed screen, select an
image size, then press <0>.
Select [Send].
The images will be sent. When the
transfer is complete, the screen for
step 1 will reappear.
To send other images, repeat steps 1
to 5.
Terminate the Wi-Fi connection.
Press the <k> button to display the
confirmation dialog. Select [OK], then
press <0> to terminate the
connection.
66
Page 67

Sending Images to the Other Camera
Sending a Specified Range of Images
Specify the range of images to send all the images in the range at once.
Press <0>.
1
Select [Send range].
2
Specify the range of images.
3
Select the first image, then press
<0>.
Select the last image, then press
<0>.
Images will be selected and [X] will
appear.
To cancel the selection, repeat this
step.
To return to the previous screen,
press the <M> button.
Confirm the range.
4
Press the <Q> button.
67
Page 68

Sending Images to the Other Camera
5
6
7
Select [Resize image].
Set it as necessary.
On the displayed screen, select an
image size, then press <0>.
Select [Send].
The images will be sent. When the
transfer is complete, the screen for
step 1 will reappear.
Terminate the Wi-Fi connection.
Press the <k> button to display the
confirmation dialog. Select [OK], then
press <0> to terminate the Wi-Fi
connection.
68
Page 69

Sending All Images on the Card
Send all images on the card at once.
Press <0>.
1
Select [Send all card].
2
Select [Resize image].
3
Set it as necessary.
On the displayed screen, select an
image size, then press <0>.
Select [Send].
4
The images will be sent. When the
transfer is complete, the screen for
step 1 will reappear.
Sending Images to the Other Camera
69
Page 70

Sending Images to the Other Camera
Terminate the Wi-Fi connection.
5
Press the <k> button to display the
confirmation dialog. Select [OK], then
press <0> to terminate the Wi-Fi
connection.
Sending Images that Match the Search Conditions
Send images that match the search conditions set in [Set image
search conditions] at once.
For [Set image search conditions], refer to “Setting Image Search
Conditions” in the Camera Instruction Manual.
Press <0>.
1
Select [Send all found].
2
70
Page 71

Sending Images to the Other Camera
Select [Resize image].
3
Set it as necessary.
On the displayed screen, select an
image size, then press <0>.
Select [Send].
4
The images will be sent. When the
transfer is complete, the screen for
step 1 will reappear.
Terminate the Wi-Fi connection.
5
Press the <k> button to display the
confirmation dialog. Select [OK], then
press <0> to terminate the Wi-Fi
connection.
71
Page 72

Sending Images to the Other Camera
With a Wi-Fi connection established, a picture cannot be taken even if
the camera’s shutter button is pressed.
To terminate the Wi-Fi connection during image transfer, select [Cancel]
on the camera, then terminate the Wi-Fi connection.
RAW images cannot be sent.
When sending a large number of images or large files (total size), make
sure to check the remaining battery level.
Depending on the functionality of the target camera, the movie files will
be converted when they are sent. Therefore, transfer may take longer
than usual.
You can select up to 999 files at a time.
When you reduce the image size, all images to be sent at the same time
are resized. Note that movies and b size still photos are not reduced.
[Resize:S2] is enabled only for still photos shot with cameras of the
same model as this camera. Still photos shot with other models are sent
without resizing.
You can cancel the image transfer by selecting [Cancel] during the
transfer. When [Cancel] is selected on the camera sending the images,
the image selection screen will reappear. When [Cancel] is selected on
the camera receiving the images, the connection will be terminated.
With a Wi-Fi connection established, the camera’s auto power off does
not function.
72
Page 73

6
Connecting to
Connect Station via Wi-Fi
Connect Station (sold separately) is a device that allows
you to import captured still photos and movies for
viewing on your TV set, smartphone, etc., or sharing
over a network.
You can easily save still photos and movies to Connect
Station by holding this camera close to Connect Station.
73
Page 74

Saving Images
NFC connect point
This section describes how to connect the camera and Connect Station
(sold separately) via Wi-Fi using the NFC function. To save images in
other ways, refer to the Connect Station Instruction Manual.
On the [Wi-Fi settings] screen, set [Wi-Fi] to [Enable] and set [NFC
connection] to [Enable] in advance (p.12, 159).
Hold the camera close to Connect
1
Station.
Turn on the camera and Connect
Station, then hold the camera’s p
mark close to the Connect Station’s
NFC connect point.
When a message indicating the Wi-Fi
connection is being established is
displayed on the camera’s LCD
monitor and Connect Station
responds, move the camera away
from Connect Station.
When a Wi-Fi connection is
established, Connect Station checks
the images on the memory card, then
saves only the unsaved images.
Terminate the Wi-Fi connection.
2
After images are saved, the screen
on the left will appear on the camera’s
LCD monitor. Press <0> to
terminate the Wi-Fi connection.
74
Page 75

Saving Images
If necessary, also read “NFC Function Cautions” (p.49).
While saving images, a picture cannot be taken even if the camera’s
shutter button is pressed.
Do not drop the camera on Connect Station or touch the camera to it with
too much force. Doing so may damage Connect Station’s internal hard
disk.
If the camera is not recognized right away, try holding it close to Connect
Station and slowly moving it or rotating it horizontally.
Just holding the camera close to Connect Station may not establish a
connection. In such a case, gently touch Connect Station with the
camera.
When holding the camera close to Connect Station, do not leave
anything between the camera and Connect Station. In addition, when a
case is attached to the camera, a Wi-Fi connection may not be
established with the NFC function.
If the camera and Connect Station are moved too far away from each
other while saving images, saving may take time or the Wi-Fi connection
may be terminated.
If the camera’s battery runs out while saving images, saving will stop.
Charge the battery, then try again.
When all images are already saved, saving will not be performed. In
such a case, select [OK] to terminate the Wi-Fi connection.
When there are a large number of images on the memory card, it may
take time to check and save the images.
While saving images, the camera’s auto power off does not function.
75
Page 76

76
Page 77

7
Settings may be disabled when an older version of software is
used. Install a version of EOS Utility that is compatible with this
camera.
Connecting to
EOS Utility via Wi-Fi
This section describes how to connect the camera
directly to a computer via Wi-Fi.
Install EOS Utility on the computer before setting up a Wi-Fi
connection.
To connect via Wi-Fi using an access point, see “Advanced
Wi-Fi Connection” (p.107).
77
Page 78

Establishing a Wi-Fi Connection
Password
SSID (network name)
“_Canon0A” is displayed at the end of the SSID.
To establish a Wi-Fi connection, operations on the computer are
required. For details, refer to the computer’s instruction manual.
The configuration procedure is as follows, using Windows 8.1 as an
example.
Operation on the Camera-1
Press the <k> button.
1
Select [D] (Remote control (EOS
2
Utility)).
If the history (p.126) is displayed,
switch the screen with the <Y> <Z>
keys.
If the [Wireless communication
settings] screen is displayed, set the
Wi-Fi settings (p.12).
Select [Register a device for
3
connection].
Check the SSID and password.
4
Check the SSID (network name) and
password displayed on the camera’s
LCD monitor.
In [Wi-Fi settings], if you set
[Password] to [None], the password
will not be displayed or required. For
details, see page 159.
78
Page 79

Operation on the Computer-1
Computer’s screen
(sample)
Select the SSID, then enter the
5
password.
On the computer’s network setting
screen, select the SSID checked in
step 4.
For the password, enter the password
checked in step 4.
Operation on the Camera-2
Select [OK].
6
Select [OK] and press <0>. The
following message is displayed.
“******” represents the last six digits of
the MAC address of the camera to be
connected.
Establishing a Wi-Fi Connection
79
Page 80

Establishing a Wi-Fi Connection
Operation on the Computer-2
Start EOS Utility.
7
In EOS Utility, click [Pairing over
8
Wi-Fi/LAN].
If a firewall-related message is
Click [Connect].
9
Select the camera to connect to, then
Operation on the Camera-3
Establish a Wi-Fi connection.
10
When the camera detects the
Select [OK] and press <0>. The
displayed, select [Yes ].
click [Connect].
computer on which you clicked
[Connect] in step 9, the screen on
the left is displayed.
[DWi-Fi on] screen will appear.
80
Page 81

Establishing a Wi-Fi Connection
[DWi-Fi on] Screen
[Disconnect,exit]
Terminates the Wi-Fi connection.
[Confirm set.]
You can check the settings.
[Error details]
When a Wi-Fi connection error occurs, you can check the details of
the error.
The Wi-Fi connection to a computer is now complete.
Operate the camera using EOS Utility on the computer. See page
82.
To reconnect via Wi-Fi, see “Reconnecting via Wi-Fi” (p.125).
81
Page 82

Operating the Camera Using EOS Utility
When the Wi-Fi connection is terminated while recording a movie with
remote shooting, the camera responds as follows:
• When the power switch is set to <k>, movie shooting continues.
• When the power switch is set to <1>, movie shooting stops.
When the power switch is set to <1> and the movie mode is set using
EOS Utility, you cannot shoot by operating the camera.
With a Wi-Fi connection to EOS Utility established, certain functions are
unavailable.
In remote shooting, the AF speed may become slower.
Depending on the communication status, image display or shutter
release may be delayed.
In Remote Live View shooting, the rate of image transmission is slower
compared to a connection via an interface cable. Therefore, moving
subjects cannot be displayed smoothly.
The Wi-Fi connection will be terminated if you set the camera’s power to
<2>, or open the card slot cover or battery compartment cover.
For EOS Utility operation procedures, refer to the EOS Utility Instruction
Manual. In addition to remote shooting, various camera operations are
available.
For how to obtain the EOS Utility Instruction Manual, refer to the
Camera Instruction Manual.
82
Page 83

8
When in the <8: FG> or <v: ABCD> modes or
when Multi Shot Noise Reduction is set, the camera cannot be
connected to a printer via Wi-Fi.
Connecting to a
Printer via Wi-Fi
This section describes how to connect the camera
directly to a printer via Wi-Fi.
Wi-Fi connection is possible with Wi-Fi printers supporting
PictBridge (Wireless LAN).
To connect via Wi-Fi using an access point, see “Advanced
Wi-Fi Connection” (p.107).
83
Page 84

Establishing a Wi-Fi Connection
Password
SSID (network name)
“_Canon0A” is displayed at the end of the SSID.
Follow the procedure in “Getting Started” (p.11) to enable a Wi-Fi
connection between a printer and the camera.
To establish a Wi-Fi connection, operations on the printer are required.
For details, refer to the printer’s instruction manual.
Press the <k> button.
1
Select [l] (Print from Wi-Fi
2
printer).
If the history (p.126) is displayed,
switch the screen with the <Y> <Z>
keys.
If the [Wireless communication
settings] screen is displayed, set the
Wi-Fi settings (p.12).
Select [Register a device for
3
connection].
Check the SSID and password.
4
Check the SSID (network name) and
password displayed on the camera’s
LCD monitor.
In [Wi-Fi settings], if you set
[Password] to [None], the password
will not be displayed or required. For
details, see page 159.
84
Page 85

Establishing a Wi-Fi Connection
Operate the printer to connect it
5
to the camera via Wi-Fi.
On the Wi-Fi settings menu of the
printer to be used, select the SSID
you have checked.
For the password, enter the password
checked in step 4.
Select the printer to connect to
6
via Wi-Fi.
When a list of detected printers
appears, select the printer to connect
to via Wi-Fi, then press <0>.
Some printers may make a beeping
sound.
When 16 or more printers are
detected or the search takes over 3
minutes, you can select [Search
again].
When a Wi-Fi connection is
established, an image on the card will
appear.
Select the images to be printed.
7
Select images on the camera for
printing (p.86).
85
Page 86

Printing Images
Printing Images Individually
Select and print images individually.
Select an image to print.
1
Press the <Y> <Z> keys of the
By pressing the <I> button, you
Select [Print image].
2
The print setting screen will appear.
Print the image.
3
For the print setting procedures, see
When [Print] is selected, printing
When printing is complete, the screen
Terminate the Wi-Fi connection.
4
Press the <k> button to display the
cross keys to select an image to print,
then press <0>.
can switch to the index display and
select an image.
page 89.
starts.
for step 1 will reappear. To print
another image, repeat steps 1 to 3.
confirmation dialog. Select [OK], then
press <0> to terminate the Wi-Fi
connection.
86
Page 87

Printing by Specifying the Options
Print by specifying the printing options.
Press <0>.
1
Select [Print order].
2
The [Print order] screen will appear.
Set the printing options.
3
For the setting procedures, refer to
“Digital Print Order Format (DPOF)”
in the Camera Instruction Manual.
If the print order is complete before
establishing a Wi-Fi connection,
proceed to step 4.
Select [Print].
4
[Print] can be selected only when an
image is selected and printer is ready
to print.
Printing Images
Set the [Paper settings] (p.89).
5
Set the printing effects (p.91) as
necessary.
87
Page 88

Printing Images
With a Wi-Fi connection to a printer established, a picture cannot be
taken even if the camera’s shutter button is pressed.
Movies cannot be printed.
Before printing, be sure to set the paper size.
Certain printers may not imprint the file number.
If [Bordered] is set, certain printers may imprint the date on the border.
Depending on the printer, the date may appear faint if it is imprinted on a
bright background or on the border.
RAW images cannot be printed by selecting [Print order]. When printing,
select [Print image] and print.
When you use a battery to power the camera, make sure it is fully
charged.
Depending on the image’s file size and image-recording quality, it may
take some time to start printing after you select [Print].
To stop printing, press <0> while [Stop] is displayed, then select [OK].
When printing with [Print order], if you stopped printing and want to
resume printing of the remaining images, select [Resume]. Note that
printing will not resume if any of the following occurs.
• You changed the print order or deleted any of the print ordered images
before resuming printing.
• When index is set, you changed the paper setting before resuming
printing.
• The card’s remaining capacity was low when you paused printing.
If a problem occurs during printing, see page 94.
Select [OK].
6
When printing is complete, the screen
for step 3 will reappear.
Terminate the Wi-Fi connection.
7
Press the <k> button to display the
confirmation dialog. Select [OK], then
press <0> to terminate the Wi-Fi
connection.
88
Page 89

Print Settings
Print setting screen
* Depending on the printer, certain settings such as the date and file
number imprinting and cropping may not be selectable.
Sets the printing effects (p.91).
Sets the date or file number imprinting to on or
off (p.92).
Sets the quantity to be printed (p.92).
Sets the print area (p.93).
Sets the paper size, type, and layout (p.90).
Returns to the image selection screen.
Starts the printing.
The paper size, type, and layout you have set are displayed.
Specify settings for printing as necessary.
The screen display and setting options vary depending on the
printer. Some settings may not be available. For details, refer to the
printer’s instruction manual.
Paper Settings
Select [Paper settings], then press
<0>.
The paper settings screen will
appear.
89
Page 90

Print Settings
If the image’s aspect ratio is different from the printing paper’s aspect ratio,
the image may be cropped significantly when you print it as a borderless
print. If the image is cropped, the print may look grainier due to the fewer
number of pixels.
Q Setting the Paper Size
Y Setting the Paper Type
U Setting the Page Layout
Select the size of the paper loaded in
the printer, then press <0>.
The paper type screen will appear.
Select the type of the paper loaded in
the printer, then press <0>.
The page layout screen will appear.
Select the page layout, then press
<0>.
The print setting screen will reappear.
Borderless
Bordered Prints with white borders along the edges.
xx-up Option to print 2, 4, 8, 9, 16, 20, or 35 images on one sheet.
Default
90
Prints with no borders. If your printer cannot print borderless
prints, the print will have borders.
The page layout varies depending on the printer model or its
settings.
Page 91

Setting the Printing Effects (Image Optimization)
If you imprint shooting information on an image shot at an expanded ISO
speed (H), the correct ISO speed may not be imprinted.
Contents displayed on the screen
vary depending on the printer.
Select the option, then press <0>.
Select the desired printing effect, then
press <0>.
Printing Effect Description
EDefault
EOn
EOff No automatic correction is applied.
ERed-Eye1
Printing differs depending on the printer. For details, refer to the
printer’s instruction manual.
Prints with the printer’s standard colors. The image’s Exif
information is used to make automatic corrections.
Effective in flash images where the subject has red eye. The
red eye is reduced for printing.
Print Settings
91
Page 92

Print Settings
The [Default] setting for printing effects and other options are the printer’s
own default settings as set by the printer’s manufacturer. Refer to the
printer’s instruction manual to find out what the [Default] settings are.
Setting the Date/File Number Imprinting
Select [I], then press <0>.
Set the print settings as desired, then
press <0>.
Setting the Number of Copies
Select [
Set the number of copies, then press
R], then press <0>.
<0>.
92
Page 93

Print Settings
Cropping the Image
You can crop the image and print only an
enlarged version of the cropped portion,
as if the image is recomposed.
Set the cropping right before printing.
If you change the print settings after
setting the cropping, you may have to set
the cropping again before printing.
1 On the print setting screen, select [Cropping].
2 Set the cropping frame size, position, and aspect ratio.
The image area within the cropping frame will be printed. The
cropping frame’s aspect ratio can be changed with [Paper
settings].
Changing the Cropping Frame Size
Press the <u> or <I> button to change the cropping frame
size. The smaller the cropping frame, the larger the image
magnification will be for printing.
Moving the Cropping Frame
Press the <W> <X> or <Y> <Z> keys to move the frame over
the image vertically or horizontally. Move the cropping frame until
it covers the desired image area.
Switching the Orientation of the Cropping Frame
Pressing the <B> button will toggle the cropping frame
between the vertical and horizontal orientations. This enables
you to create a vertically oriented print from a horizontal image.
3 Press <0> to exit the cropping.
The print setting screen will reappear.
You can check the cropped image area on the upper left of the
print setting screen.
93
Page 94

Print Settings
Depending on the printer, the cropped image area may not be printed as
you specified.
The smaller you make the cropping frame, the grainier the picture will
look in the print.
Handling Printer Errors
If printing does not resume after you resolve a printer error (no ink, no paper,
etc.) and select [Continue], operate the buttons on the printer to resume
printing. For details on resuming printing, refer to the printer’s instruction
manual.
Error Messages
If a problem occurs during printing, an error message will appear on the
camera’s LCD monitor. Press <0> to stop printing. After fixing the
problem, resume printing. For details on how to fix a printing problem, refer
to the printer’s instruction manual.
Paper Error
Check whether the paper is properly loaded in the printer.
Ink Error
Check the printer’s ink level and the waste ink tank.
Hardware Error
Check for any printer problems other than paper and ink problems.
File Error
The selected image cannot be printed. Images taken with a different
camera or images edited with a computer may not be printable.
94
Page 95

9
Sending Images to
a Web Service
You can register various Web services on the camera
and send images stored in the camera to them.
95
Page 96

Establishing a Wi-Fi Connection
Follow the procedures in “Preparation for Web Services” (p.16) to
enable a Wi-Fi connection between the Web service and the camera.
Press the <k> button.
1
Select the Web service you have
2
registered on page 17.
If the history (p.126) is displayed,
switch the screen with the <Y> <Z>
keys.
A screen to select a destination may
appear depending on the type and
settings of the Web service you
select. For details, see page 123.
Connect to an access point via
3
Wi-Fi.
See from page 107 to connect the
camera to an access point via Wi-Fi.
96
Page 97

Sending Images to a Web Service
You can share images with your family and friends by sending images
from the camera to a Web service registered on the camera or by
sending Web links of the online albums.
Sending Images Individually
Select and send images individually.
Select an image to send.
1
Press the <Y> <Z> keys of the
cross keys to select an image to
send, then press <0>.
By pressing the <I> button, you
can switch to the index display and
select an image.
Select [Send img shown].
2
To select a size at which to send the
image, select [Resize image] and
press <0>.
Select [Send img shown] and press
<0> to send the image displayed.
On the screen to complete the
process for sending the image, select
[OK] to terminate the Wi-Fi
connection and return to the screen
to select a Web service.
When the [Te rm s of us e] screen is
displayed, thoroughly read the
message, then select [I Agree].
The screen can be scrolled up and
down by pressing the <W> <X>
keys.
97
Page 98

Sending Images to a Web Service
Sending Multiple Selected Images
Select multiple images to send them at once.
Press <0>.
1
Select [Send selected].
2
Select the images to send.
3
Press the <Y> <Z> keys of the
cross keys to select an image to
send, then press <0>.
A checkmark [X] will be displayed on
the upper left of the screen.
By pressing the <I> button, you
can select images from a three-image
display. To return to the single-image
display, press the <u> button.
To select another image to send,
repeat step 3.
After selecting the images to send,
press the <Q> button.
98
Page 99

Sending Images to a Web Service
Select [Resize image].
4
Set it as necessary.
When YouTube is selected as the
destination, [Resize image] is not
displayed.
On the displayed screen, select an
image size, then press <0>.
Select [Send].
5
The images will be sent.
On the screen to complete the
process for sending the image, select
[OK] to terminate the Wi-Fi
connection and return to the screen
to select a Web service.
When the [Te rm s of us e] screen is
displayed, thoroughly read the
message, then select [I Agree].
The screen can be scrolled up and
down by pressing the <W> <X>
keys.
99
Page 100

Sending Images to a Web Service
Sending a Specified Range of Images
Specify the range of images to send all the images in the range at once.
Press <0>.
1
Select [Send range].
2
Specify the range of images.
3
Select the first image, then press
<0>.
Select the last image, then press
<0>.
Images will be selected and [X] will
appear.
To cancel the selection, repeat this
step.
To return to the previous screen,
press the <M> button.
Confirm the range.
4
Press the <Q> button.
100
 Loading...