

Page 1

Canon
English Edition
INSTRUCTIONS
Page 2

Infroduction
Thank you for selecting a Canon EOS camera.
This camera is an autofocus SLR camera de
veloped specifically to provide the high perfor
mance and flexible functionality required by pro
fessional and advanced photographers.
Features
1. World’s first Eye Controlled Focus SLR. Select
any of five focusing points in the viewfinder by
simply looking at the desired AF frame.
2. Advanced AF sensor provides five focusing
points plus high-speed autofocusing on a par
with the world’s fastest AF SLRs.
3. Fligh-performance shutter offers speeds all
the way up to an action-freezing 1/8000 sec
and flash synchronization up to 1/200 sec.
4. Fligh-speed built-in motor drive with silent
drive mechanism provides quiet film winding
and rewinding while achieving a maximum
continuous shooting speed of 5 frames/sec.
5. Multi-function built-in zoom flash covers wideangle focal lengths to 28mm.
Please read these instructions carefully for a
thorough understanding before taking pic
tures.
Page 3

Attention
IMPORTANT INFORMATION
This camera will give optimum performance
together with specially designed Canon EF
ienses, flash units and other Canon brand ac
cessories. It is possible that the use of incom
patible lenses or other accessories may result
in unsatisfactory performance or damage to
your camera. We therefore suggest the use of
Canon EF ienses and accessories. Damage to
your Canon camera as a result of malfunction
or improper connections caused by the use of
incompatible products may void its warranty.
While reading this booklet, unfold the front and
back flaps for easy reference to the camera’s
parts.
Page 4

Nomenclature
Accessory Shoe
Flash
LCD PanelSelf-timer Button
Main Dial
Shutter Button-
Grip/Battery
Compartment-
Battery Cover Late
AF Auxiliary Light
Emitter/Self-timer
Indicator-----------
Creative Zone
P: Program AE
Tv: Shutter-priority AE
Av: Aperture-priority AE
M: Manual Exposure
DEP; Depth-of-Field AE
X : Flash Sync Mode
: Custom Function Setting
ajj: Calibration Mode
H: Lock
Creative Zone^
Command Dial
X Contact, Directly-coupled
Contacts
Red-eye Reduction Lamp
Command Dial
Lock Release Button
Strap Fixture
Flash Button
Back Cover Latch
PC Terminal
Lens Release Button
Image Zone
a : Full Auto
: Portrait
U:Landscape
; Close-up
Sports
Image Zone
Page 5
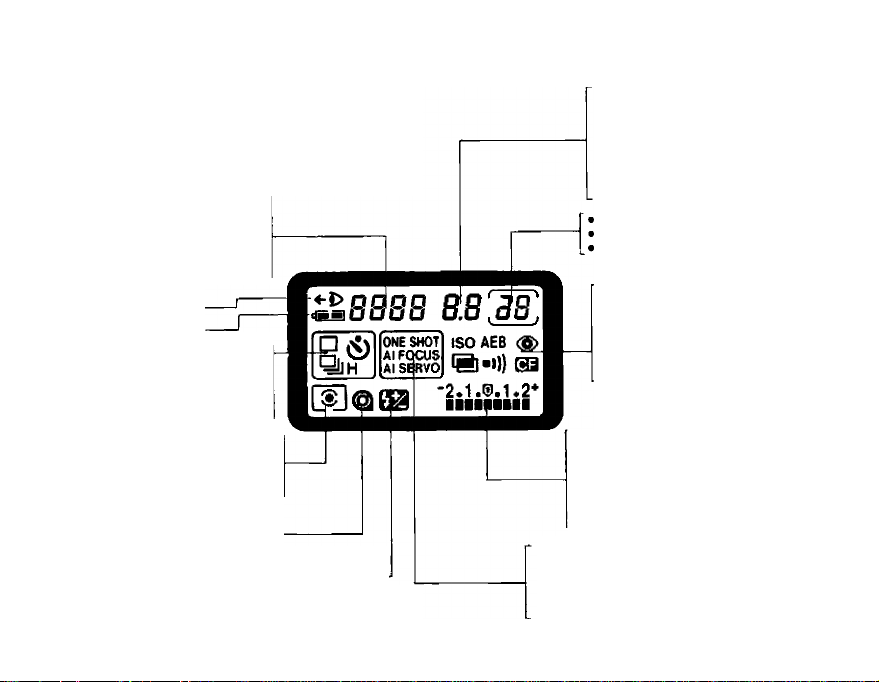
Display Panel
This camera uses a large liquid crystal display
panel to display shooting information. The diag
ram below shows all the information displayed
simultaneously for explanation only. The LCD
panel never actually appears like this.
• Shutter speed
• ISO film speed value
• dEP (Depth-of-field AE) indicator
• Custom Function No.
• CAL (Calibration) indicator
• Film rewind indicator
• Eye Controlled Focus
mode indicator-
• Battery check indicator
Film winding mode indicator
• Single exposure
• Continuous exposure
• High-speed continuous exposure
• Self-timer operation
Metering mode indicator
• Evaluative metering
• Spot metering
• Center-weighted average metering
Film condition indicator
Film-load check
Film rewind completion
Flash exposure compensation mode indicator
A minute amount of battery power is used for the display
even when the command dial is set to L
Aperture value
AEB bracketing amount
dEP point number
Custom function setting
Red-eye reduction function setting
Beeper mode setting
Calibration number
Film rewind indicator
Frame counter
No of preset multiple exposures
No of completed multiple exposures
ISO indicator
Auto exposure bracketing mode
indicator
Red-eye reduction mode indicator
Multiple exposure mode indicator
Beeper mode indicator
Custom function mode indicator
Exposure display
• Exposure compensation amount
• Metered manual exposure indicator
• AEB bracketing amount
• Flash exposure compensation amount
• Red-eye reduction lamp operation
• Film rewind indicator
Focus mode indicator
• One-shot AF
• Al Focus AF
• Al Servo AF
• Manual focus (all AF indicators extinguished)
Page 6
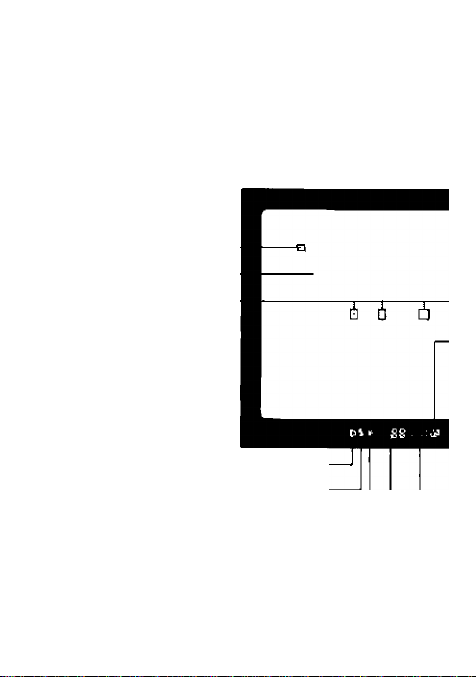
Viewfinder Information
The diagram below shows all the information
displayed simultaneously for explanation
only. The viewfinder never actually appears
like this.
Depth-of-Field
Check mark
Matte screen
AF frame indicators
Eye controlled focus mode Indicator-
Flash charge completion indicatorAE lock indicator--------------------------------
Shutter speed
Depth-of-field AE display: dEP 1, dEP 2-
Calibration display: CAL -1 —5
End -1 ~ -5
-----------------------------------
Page 7
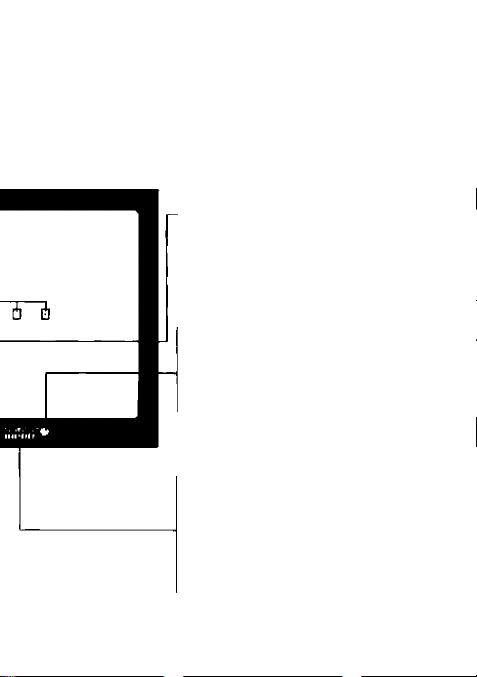
■ Flash exposure compensation
mode indicator
In-focus indicator (During autofocusing: Lights when subject is fo
cused, blinks at 8 Hz when focus
is impossible. During manual fo
cusing: Lights when subject is fo-
_cused, extinguished otherwise.)
Exposure display
• Exposure compensation
amount
• Manual exposure level
• AEB bracketing amount
• Red-eye reduction lamp oper
ation indicator
-Aperture value
Page 8

Table of Contents
Precautions
I Button & Dial Operation
II Camera Preparations................................10
..............................................
.............................
1. Loading and Checking the Battery.10
2. Lens Attachment
..........................
12
• Attaching the Strap....................12
3. Film Loading and Rewind..............13
4. Film Speed Setting
........................
15
5. Eye Controlled Focus Calibration.16
III Shooting Preparations
............................
20
1. Using the Eye Controlled Focus
Feature
.........................................
20
2. Other Methods of Selecting the
AF Focusing Point
.........................
25
3. Selecting the Film Winding Mode.27
4. Selecting the AF Mode
5. Selecting the Metering Mode
.................
.......
28
32
6. Exposure Compensation...............33
7. Turning Off the Beeper
8. Using the Built-in Flash
9. Flash Exposure Compensation
IV Shooting Modes & Functions
1. P (Program AE)
.............................
.................
.................
.....
................
34
35
39
41
41
2. Tv (Shutter-priority AE).................42
7
8
Page 9

3. Av (Aperture-priority AE)
4. M (Manual exposure)
5. DEP (Depth-of-Field AE)
6. X (Flash sync mode)
7. Image Zone Shooting Modes
8. AE Lock
.........................................
9. AEB (Auto Exposure Bracketing)
10. Multiple Exposure
..............
...................
...............
......................
........
........................
43
44
45
48
49
52
...
53
55
11. Bulb (Long Exposure) Operation..56
12. Self-timer Function
.......................
57
V Date Imprinting (QD model only)
VI Custom Function Control
VII Reference
...........................................
............
......................
58
60
63
1. Exposure Warnings.......................63
2. Program Line Characteristics
........
65
3. Function Combination Charts.......67
VIII Accessories
CAMERA CARE..........................................74
...........................................
• Cleaning........................................74
• Liquid Crystal DIsplay/Battery Notes....74
Specifications
.............................................
68
76
Page 10

Precautions
1) This camera is not resistant to water
and should not be used outdoors in snow
or rain. If accidentally dropped in water,
contact an authorized Canon service fa
cility. Keep the camera out of salt spray
and protect it from excessive humidity. If
used at the beach, clean it thoroughly
aftenward with a dry cloth.
2) Do not attempt to disassemble the camera
yourself. Always take it to an authorized
Canon service facility for repair.
3) Remove the battery if you do not expect to
use the camera for about three weeks or
longer.
4) When storing the camera, wrap it in a
clean, soft cloth and place it in a cool, dry,
dust-free place. Be sure to keep the
camera out of direct sunlight, and away
from “hot spots” such as the trunk or rear
window shelf of a car. Avoid places where
moth balls are used, and in extreme hu
midity, use a desiccant.
5) Carefully check the camera’s operation
after lengthy storage.
Page 11

6) The battery may explode or cause burns if
disassembled, recharged, shorted, ex
posed to high temperatures, or disposed
of in fire.
7) Film passing through X-ray examinations
at airports may be exposed and ruined
even if loaded in the camera. Request a
hand-checked inspection to avoid dam
age.
8) Aerosol spray dust removers are not rec
ommended for the shutter curtain.
9) Condensation is a problem when bringing
cold equipment into a warm room. If the
autofocus optics cloud over, accuracy
may be seriously affected. Before entering
a warm room, put equipment in a plastic
bag so that condensation forms on the
outside of the bag.
10) Color reproduction may be adversely af
fected if film is left in the camera for a long
time. Always develop exposed film
promptly.
* Please see page 74 for camera care in
formation.
Page 12

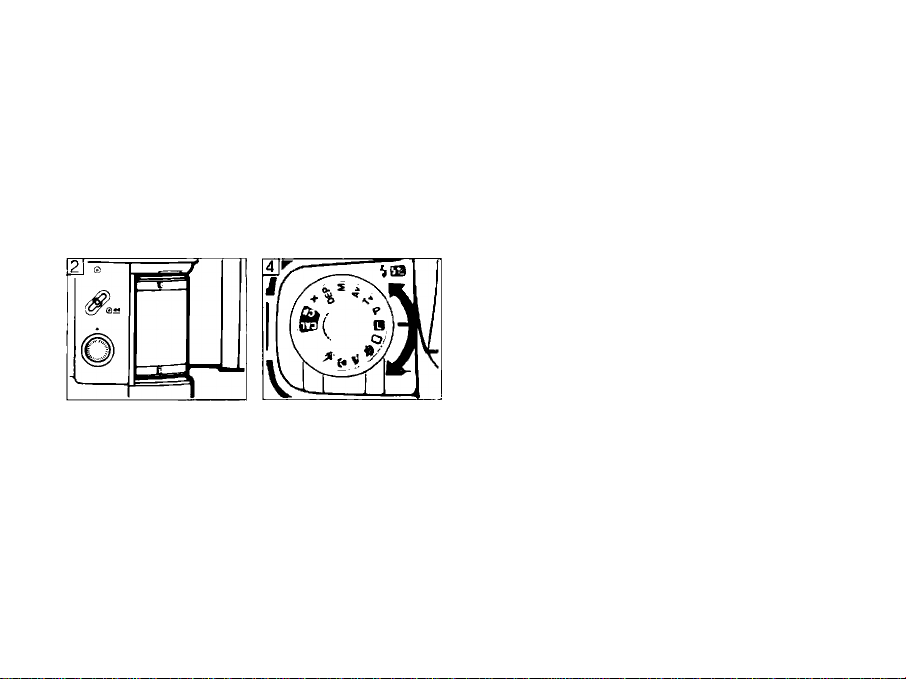
I Button & Dial Operation
Command Dial
Turn to select
the shooting
mode. Setting
the dial to the
“L” position
locks the dial
and turns off
unlock, turn the dial while press
ing the lock release button. Un
locking the dial turns on the
camera
Shutter Button
ing, and press completely (to the
second step) to release the shut
ter and make the exposure.
the power. To
The shutter
button has a
two step con
struction. Press
halfway (to the
first step) to
activate focus
ing and meter
Main Dial
Use in con
junction with
other buttons
for operations
such as select
ing the focus
ing mode, film
winding mode,
metering mode, or AF frame. Use
alone for operations such as set
ting the shutter speed or shifting
the program curve.
Quick Control Dial
Use for oper
ations such as
selecting the
aperture value
in manual ex
posure mode
and setting ex
posure com
pensation in AE or flash modes.
Quick control dial operation can
be prohibited or enabled using
the quick control dial switch
Flash Button
Press once to
pop up the
flash for flash
shooting. In
creative zone
modes, press
again to acti
posure compensation mode and
operate the main dial or quick
control dial to set the compensa
tion amount When finished using
the flash, press it down manually
to the retracted position.
vate flash ex
Self-timer Button
Press to dis;
play the “ 0 ”
symbol in the
O s
again.
LCD panel and
activate the
self-timer. To
cancel the selftimer, press
Page 13

Film Winding Mode Button
Press this but
ton and oper
ate the main
dial to select
the desired
film winding
mode
( □ : Single
exposure, Qs : Continuous ex
posure, : High-speed con
tinuous exposure). The selected
mode is displayed in the LCD
panel.
AF Mode Button
Press this but
ton and oper
ate the main
dial to select
the desired
focus mode
(One-shot AF,
Al Servo AF).
The selected mode is displayed
in the LCD panel.
Metering Mode Button
Press this but
ton and oper
ate the main
dial to select
the desired
metering mode
( : Evalu
ative metering,
H : Spot metering, CD :
Center-weighted average meter
ing). The selected mode is dis
played in the LCD panel.
Function Button
Each press
switches be
tween AEB
setting mode,
red-eye reduc
tion mode,
multiple expo
sure mode and
ISO film speed setting mode.
After selecting the desired mode,
operate the main dial to select
the desired setting. The selected
mode and setting are displayed in
the LCD panel.
AE Lock/Custom Function
Setting Button
Pressing this
button locks in
the current ex
posure reading
and allows re
composition
without chang
sure setting. When the command
dial is set to the custom function
mode, use this button to set or
cancel the selected custom func
tion.
ing the expo
AF Focusing Point Seiection
Button
Press to enter
AF focusing
point selection
mode. After
pressing, oper
ate the main
dial to select
cusing point.
the desired fo
Page 14
II Camera Preparations 1 Loading and Checking the Battery
JJ ©
/€
All buttons used for changing camera func
tions are equipped with a six-second timer.
After pressing and releasing the button, the
operation mode activated by the button re
mains active for six seconds. During this time
period, necessary information for the selected
mode is displayed in the viewfinder and LCD
panel.
©
10
This camera uses a single 6V lithium battery
(2CR5). Load the battery as follows.
1) Turn the battery cover latch counterclock
wise to open the battery compartment.
2) Insert the battery so that its terminals
enter the camera first.
3) Replace the battery cover and turn the
latch clockwise to firmly lock it in place.
4) Press the lock release button and turn the
command dial to a position other than “L”.
Check the battery indicator displayed in
the LCD panel.
If the entire battery indicator ( «si ) is dis
played, the battery is in good condition.
Page 15

If nothing at all is displayed in the LCD
panel, the battery may be inserted back
wards. Remove the battery and reinsert it
correctly.
When not using the camera, set the com
mand dial to a to prevent unnecessary
battery depletion or accidental shutter re
lease.
cs : When the battery indicator is only half
full, have a new battery handy,
en : When the battery indicator is empty,
replace the battery with a new one.
If the empty battery indicator is blink
ing, refer to page 74.
Page 16

Battery Life (Number of film rolls)
Temperature
Normal
(+20*C/68“F)
Low
(-20°C/-4°F)
Flash
not used
40 rolls 20 rolls 12 rolls
15 rolls 9 rolls
50%
flash use
100%
flash use
-
Data based on Canon’s Standard Test
Method (Using a new battery and 24 expo
sure film; Lens: EF 28~105mm f/3.5-4.5
USM; Shutter speed: 1/1000 sec; Lens
focus driven from infinity to closest shoot
ing distance and back, then shutter button
held at halfway position for six seconds
before each frame; Film winding mode:
Single exposure; AF mode: One-shot AF;
Eye controlled focus: ON).
Stated values include camera operation
when no film is loaded.
11
Page 17

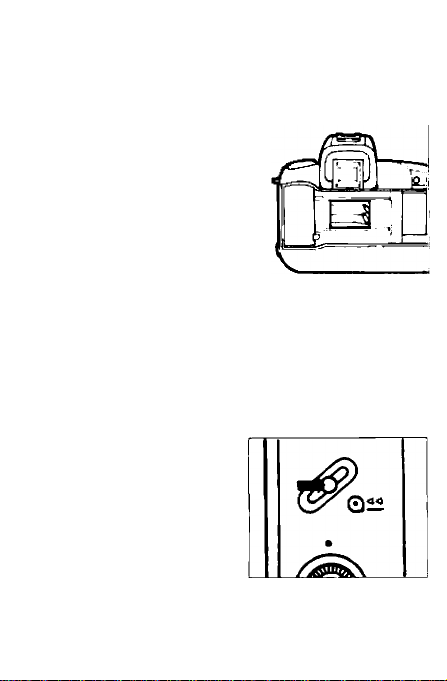
2. Lens Attachment
Attaching the Strap
Thread the strap
through the fixtures as
shown in the illustra
tion.
12
Page 18

1) Remove the camera body cap.
2) Align the red dots on the lens and camera
body, then rotate the lens clockwise until it
locks in place with a click.
• To remove the lens, press the lens release
button while turning the lens counter
clockwise.
When the lens is removed from the camera,
place it face down on a stable surface to pre
vent damage to the lens surface and elec
tronic contacts.
Page 19
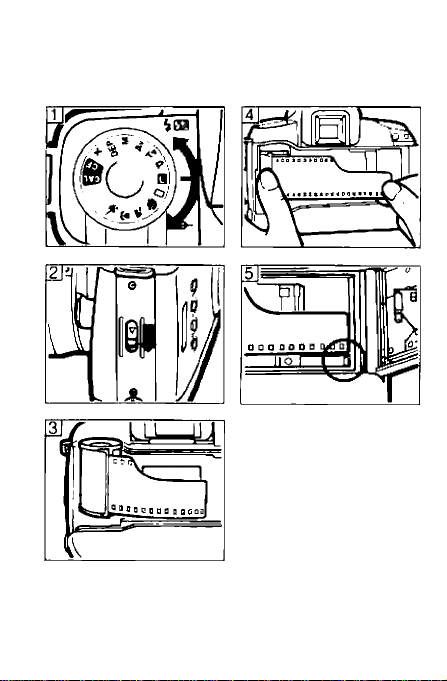
3 Film Loading and Rewind
•»)
-2.1.®.1.2-
Page 20

1) Move the command dial to a position other
than “ H ”,
2) Open the back cover by sliding the back
cover latch down.
3) Insert the film cartridge with the flat end
facing up and the bottom end entering the
camera first.
4) While holding down the film cartridge,
carefully pull the film tip across until it
reaches the orange mark.
5) After checking that the film lies flat and that
the tip is aligned with the orange mark,
close the back cover.
• The film automatically advances to the
first frame, the frame counter shows “1 ”
and the film cartridge symbol ( @ ) is
displayed in the LCD panel.
• If the film cartridge symbol blinks, the film
is not loaded correctly. Reload the film. If
the film is not loaded correctly, the shutter
will not release when the shutter button is
pressed.
13
Page 21
The shutter curtain oper
ates with extremely high
precision and can be easily
damaged if touched. When
loading or unloading film,
be careful not to touch the
shutter curtain acciden
tally with your finger or the
tip of the film.
Due to the emission of infrared light by the
camera's optical film perforation detector, in
frared film cannot be used in this camera.
14
Page 22

Film rewind
The film automatically rewinds after the last
frame is shot. During rewinding, the LCD
panel’s frame counter counts down, and the
focusing point display and exposure com
pensation amount bars flash to indicate that
thefilm is rewinding. When rewinding is com
pleted, © blinks in the LCD panel. After
confirming that © is blinking, open the
back cover and remove the film.
Rewinding film in mid-roll
Press the mid-roll rewind button to rewind
the film. After the film is wound completely
into the film cartridge, © blinks in the LCD
panel.
Page 23

4. Film Speed Setting
Film speed display
The manual film speed setting range is ISO
6-6400.
6, 8,10,12,16, 20, 25, 32, 40, 50, 64, 80, 100,
125, 160, 200, 250, 320, 400, 500, 640, 800,
1000, 1250, 1600, 2000, 2500, 3200, 4000,
5000, 6400
Page 24

Automatic film speed setting
When DX film is loaded, the film speed is set
automatically according to the DX code on the
film cartridge.
• The automatic film speed setting range is
ISO 25-5000.
• If non-DX film is loaded, the ISO indicator
blinks in the LCD panel.
• The currently set film speed can be checked
by pressing the function button so that ISO is
displayed in the LCD panel.
Manual film speed setting
The film speed can be set manually when using
non-DX film or when you wish to set a film
speed other than the DX-coded film speed.
1) Set the command dial to a creative zone po
sition.
2) Press the function button until ISO is dis
played in the LCD panel.
3) Turn the main dial to the desired film speed.
* The setting is completed when the shut
ter button is pressed halfway or after six
seconds elapse.
15
Page 25

5. Eye Controlled Focus Calibration
What is Eye Controlled Focus?
Eye Controlled Focus is a new feature which
enables the camera to automatically detect
which part of the viewfinder screen you are
looking at and focus the subject at that point.
The ability to focus where you look makes
the camera virtually an extension of your eye.
16
Calibration
Before using Eye Controlled Focus (refer to
page 20), it is necessary to calibrate the
camera for your individual eye characteris
tics (pupil size, use of contact lenses or
eyeglasses, etc.). Calibration numbers 1 ~5
are provided, allowing up to five different cali
bration settings to be stored in the camera for
different usage conditions, which can be
classified by photographer or shooting loca
tion, for example.
• Hold the camera in the normal (horizontal)
picture-taking position during the calibra
tion procedure.
• If performing the calibration procedure
outdoors, keep the sun behind you.
Page 26
Page 27

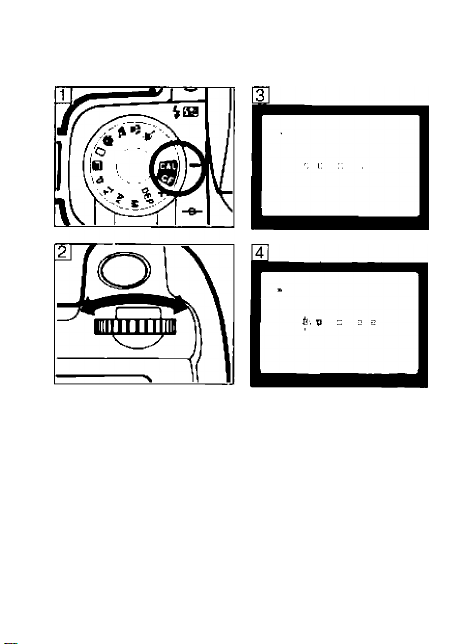
1) Turn the comnnand dial to the “ SB ” posi
tion.
• “OFF” is displayed in the LCD panel.
2) Turn the main dial to the desired calibra
tion number.
• Numbers which do not yet contain cali
bration settings blink in the display.
3) While holding the camera to your eye, look
at the blinking far right AF frame in the
viewfinder and press the shutter button.
• A double beep tone is heard.*
4) Next, look at the blinking far left AF frame
in the viewfinder and press the shutter
button again.
• A double beep tone is heard, and “End”
and the calibration number are dis
played in the viewfinder and LCD panel
to indicate that the calibration proce
dure is completed.
• If the calibration procedure is inter
rupted for a short period and the red AF
frame in the viewfinder goes out, press
the shutter button halfway and start
again from step 3.
17
Page 28
18
Page 29

* If an intermittent beep tone is heard and
the calibration number blinks, temporarily
move the command dial to a position other
than gJS , repeat the calibration proce
dure from step 1.
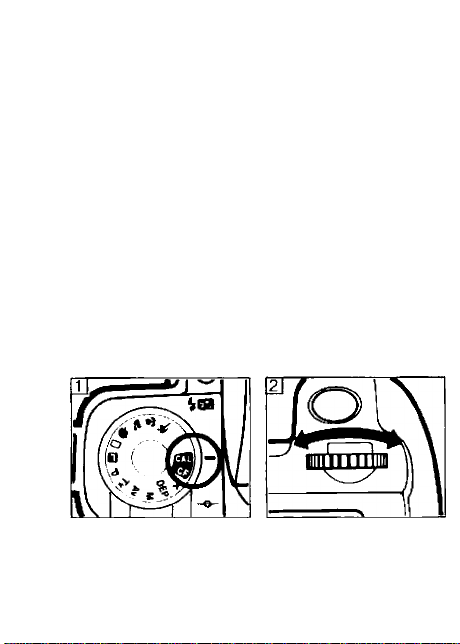
Deleting a Calibration Setting
If calibration is repeated at the same calibra
tion number but with a different eye, or if suc
cessive calibrations are performed by differ
ent people. Eye Controlled Focus operation
may become unstable or misoperation may
occur. If this happens, delete the setting at
the problematic calibration number as de
scribed below and repeat the calibration
procedure.
1) Turn the command dial to the“ Q33 "posi
tion.
2) Turn the main dial to the number of the
calibration setting you want to delete.
Page 30
Page 31

3) Simultaneously press the AE lock button
and AF focusing point selection button.
• The calibration number blinks in the
LCD panel to indicate that the calibra
tion setting is deleted.
If you have problems with the calibration
operation, or if you find it difficult to select the
desired AF frame in Eye Controlled Focus
mode, refer to the supplement supplied with
this instruction book.
19
Page 32

Ill Shooting Preparations Using the Eye Controlled Focus Feature
The preparations described in this section are
available only when the command dial is used
in the creative zone.
Creative Zone
20
Autofocusing with Eye Controlled Focus
This feature allows you to select any desired
focusing point by simply looking at the corre
sponding AF frame in the viewfinder. Eye
Controlled Focus can be used in all shooting
modes except a (Full Auto) and DEP
(Depth-of-Eield AE).
Before using Eye Controlled Focus, it is
necessary to calibrate the camera for your in
dividual eye characteristics and set the
camera to the corresponding calibration set
ting (refer to page 16).
• Eye Controlled Focus operation must be
carried out under the same conditions
used when the performing the calibration
(wearing contact lenses, eyeglasses, etc.).
• Manual focusing point selection is
possible even while Eye Controlled Eocus
is on (refer to page 25).
Page 33

Page 34

1) Turn the command dial to a creative zone
position.
2) Press the AF focusing point selection but
ton.
• The currently selected AF frame lights
red in the viewfinder and the AF focus
ing point indicator blinks in the LCD
panel.
3) Turn the main dial to select all five AF fo
cusing points.
• All AF frames light red in the viewfinder
and all AF focusing point indicators
blink in the LCD panel.
4) Set the command dial to the “ QD ” posi
tion.
• “CAL” or “OFF” appears in the LCD
panel.
5) Turn the main dial to the appropriate cali
bration number.
• Numbers which have been calibrated
light steadily in the display. Numbers
which do not yet contain calibration set
tings blink in the display.
21
Page 35

22
Page 36

6) Turn the command dial to the desired
shooting mode.
• “ i> ’’appearsintheviewfinderand“ ”
appears in the LCD panel.
7) Look through the viewfinder and press the
shutter button halfway while looking at the
desired AF frame.
• The selected AF frame lights red in the
viewfinder and focusing is carried out
for that focusing point.
8) To cancel Eye Controlled Focus mode, set
the calibration display to “OFF" in step 5.
• The camera enters automatic focusing
point selection mode.
When the camera is held vertically in Eye
Controlled Focus mode, the focus mode tem
porarily switches to automatic focusing point
selection mode and “ E> ” disappears from
the viewfinder.
Page 37

If the camera cannot determine which AF
frame you are looking at:
1) “ 1> ” blinks in the viewfinder and the
camera automatically switches to auto
matic focusing point selection mode (refer
to page 26) to select the focusing point.
After focusing is completed, “ i> ” will
continue to blink in the viewfinder but it is
still possible to use the eye-controlled
depth-of-field check function. To return to
Eye Controlled Focus mode, remove your
finger from the shutter button and then
press it again halfway.
2) Different shooting locations can conceiv
ably change the state of your eye and af
fect Eye Controlled Focus operation.
When shooting in a location with a differ
ent light source, perform the calibration
procedure again at the calibration number
you are currently using (refer to page 16).
Each time a calibration is performed the
camera “learns” the different states of your
eye, improving the Eye Controlled Focus
operation.
Page 38

• If calibration is repeated at the same
calibration number but with a different
eye, or if successive calibrations are
performed by different people, Eye
Controlled Focus operation may
become unstable or misoperation may
occur. If this happens, delete the setting
at the problematic calibration number
(refer to page 18) and repeat the cali
bration procedure.
23
Page 39

Eye controlled depth*of-field check
When using the Eye Controlled Focus fea
ture in a creative zone shooting mode, you
can check the depth of field (close down the
aperture) by looking at the depth-of-field
check mark in the upper left corner of the
viewfinder within 5 seconds after the subject
is focused in One-shot AF mode. The aper
ture opens back up when you remove your
finger from the shutter button.
24
Page 40

As long as Eye Controlled Focus mode is on,
eye controlled depth-of-field check is
possible even when the focusing point is se
lected manually (refer to page 25).
• Eye controlled depth-of-field check must
be carried out within 5 seconds after fo
cusing is completed. If more than 5 sec
onds elapse, refocus the subject and then
look at the depth-of-field check mark
within 5 seconds.
Page 41

2. Other Methods of Selecting the AF Focusing Point
Manual focusing point selection
At any time in creative zone, you can ma
nually select the desired AF frame in the
viewfinder using the main dial.
1) Press the AF focusing point selection but
ton.
• The currently selected AF frame lights
red in the viewfinder and the AF focus
ing point indicator blinks in the LCD
panel.
2) Turn the main dial to select the desired fo
cusing point.
• The selected AF frame lights red in the
viewfinder and the AF focusing point in
dicator blinks in the LCD panel.
• The setting is completed when the
shutter button is pressed halfway or
after six seconds elapse.
3) Turn the command dial to the desired
shooting mode and take a picture.
• The camera focuses using the ma
nually selected AF focusing point.
25
Page 42

Automatic focusing point seiection
The camera automatically selects the AF
frame according to the shooting conditions.
Page 43

1) Turn the command dial to the “ QB ” posi
tion.
2) Turn the main dial until the LCD panel dis
plays “OFF.”
3) Turn the command dial to a creative zone
setting.
4) Press the AF focusing point selection but
ton.
• The currently selected AF frame lights
red in the viewfinder and the AF focus
ing point indicator blinks in the LCD
panel.
5) Turn the main dial to select all five focus
ing points.
• All five AF frames light red in the view
finder and the AF focusing point indica
tors blink in the LCD panel.
• The setting is completed when the
shutter button is pressed halfway or
after six seconds elapse.
6) Turn the command dial to the desired
shooting mode and take a picture.
• The camera automatically selects a fo
cusing point and focuses the subject.
Page 44

3. Selecting the Film Winding Mode
Three film winding modes are available:
single exposure mode, continuous exposure
mode and high-speed continuous exposure
mode.
• Refer to page 67 for details concerning re
lationships between AF and film winding
modes.
Page 45

□ (Single exposure)
The film advances one frame after each pic
ture is taken. After taking a picture, let up on
the shutter button slightly to prepare for the
next exposure. This mode is usually com
bined with One-shot AF mode.
Qji (Continuous exposure)
Pictures are taken continuously as long as
the shutter button is held pressed.
QiH (High-speed continuous exposure)
Pictures are taken continuously at high
speed as long as the shutter button is held
pressed.
1) Press the film winding mode button.
2) Turn the main dial so the desired film
winding mode indicator appears in the
LCD panel.
* The setting is completed when the
shutter button is pressed halfway or
after six seconds elapse.
27
Page 46

4. Selecting the AF Mode
When the subject is focused in One-shot AF
mode, the corresponding AF frame lights red in
the viewfinder, the in-focus indicator lights up
and a double beep is heard. At the same time,
the shutter speed and aperture value are dis
played in the viewfinder and LCD panel.
If you remove your finger after pressing the
shutter button to the halfway position, the in
focus indicator will disappear, but the camera
timer will keep the viewfinder and LCD panel
displays lit for six seconds.
28
Page 47

Three types of autofocusing are available:
One-shot AF, Al Servo AF and Al Focus AF. Al
Focus AF is active only in Full Auto ( a )
mode. Manual focusing is also available.
1) Press the AF mode button. If you release
the button, the timer will allow AF mode se
lection for six seconds.
2) Operate the main dial so the desired AF
mode indicator appears in the LCD panel.
* Make sure the lens’ focus mode switch
is set to AF for autofocus shooting.
Page 48

* Predictive focus function
Predictive focus detects the distance and
speed ofthe subject and then predicts the sub
ject position so that the subject will be sharply
focused the instant the exposure occurs. Shut
ter release has priority over AF operation in
creative zone modes, and AF has priority in
image zone modes.
Page 49

One-shot AF
Use this mode with stationary subjects. The
shutter will not release until the subject is fo
cused. Exposure is determined when the
subject is focused. By keeping the shutter
button pressed to the halfway position, the
focus and exposure settings remain locked,
allowing you to recompose the picture as
desired.
• The shutter will not release if the in-focus
indicator is still blinking. Try refocusing the
subject at a different position or use ma
nual focusing (refer to page 31).
Al Servo AF
Use this mode when taking pictures of mov
ing .subjects. The lens focuses the subject
continuously with the selected focusing
point while the shutter button is pressed half
way. Al Servo’s predictive focus function*
can track subjects moving toward or away
from the camera. When the camera is set for
automatic focusing point selection, Al Servo
AF operation is as follows —
29
Page 50

When Eye Controlled Focus is ON The
camera continuously focuses and tracks the
subject using only the selected focusing
point.
• The selected focusing point lights red in
the viewfinder when the camera detects
your line of sight.
When Eye Controlled Focus is OFF: First
cover the subject with the center focusing
point and press the shutter button halfway to
focus the subject. After that, if the subject
moves away from the center focusing point
while the shutter button is still pressed half
way, the camera automatically shifts to one of
the other focusing points and continues
tracking the subject.
• Exposure is determined immediately be
fore the shutter is released.
• In Al Servo AF mode, the in-focus beeper
and indicator do not function.
• Focus lock cannot be used in this mode.
30
Page 51

Al Focus AF
This mode is active only when the command
dial is set to Full Auto ( □ ) mode. The
camera automatically selects One-shot AF
or Al Servo AF depending on the subject.
Page 52

Page 53

Manual Focusing
1) Set the lens’ focus mode switch to M.
* All AF mode indicators in the LCD panel
go out.
2) Turn the lens’ manual focusing ring until
the subject appears sharp.
* The in-focus indicator lights and the
beeper sounds to indicate that the sub
ject is in focus.
• If manual focusing is set when the camera
is in Eye Controlled Focus mode, i>
disappears from the viewfinder.
• After autofocusing is completed in Oneshot AF mode when using a USM lens
equipped with a distance scale window,
the lens can be manually focused directly
without switching the lens’ focus mode
switch.
31
Page 54

5. Selecting the Metering Mode
Three metering modes are available; evalua
tive metering, spot metering and centerweighted average metering.
Page 55

(Evaluative metering)
Use this mode for general subjects. The ex
posure setting is based on the focusing point
in use, taking into account such factors as
subject size, position, overall lighting level,
front lighting and back lighting.
ra (Spot metering)
This mode limits the metering area to the
centrai part of the viewfinder (approx. 3.5% of
the image area). Use this mode when there is
a big difference in brightness between the
main subject and the background, or for sub
jects that require precise measurement,
such as close-up photography.
n (Center-weighted average metering)
Metering is averaged over the entire scene
with emphasis piaced on the center area.
1) Press the metering mode button.
2) Operate the main dial so the desired
metering mode indicator appears in the
LCD panel.
Page 56

6. Exposure Compensation
When taking pictures in an AE shooting
mode, you can use the quick control dial to
vary the exposure according to the subject
conditions. Exposure can be compensated
up to ±2 stops in 1/2-stop increments.
Page 57

1) Set the quick control dial switch to I
2) Focus the subject and confirm the expo
sure.
3) Turn the quick control dial to set the
desired exposure compensation amount.
* The compensation amount is displayed
in the LCD panel and viewfinder. “+”
compensation overexposes the sub
ject and compensation underex
poses it.
* After setting the desired compensation
amount, itisagood idea tosetthequick
control dial switch to
cidental alteration of the setting.
4) Take the picture.
* To cancel exposure compensation, re
peat step 3 to return the compensation
amount to 0, then set the quick control
dial switch to O.
o to prevent ac
33
Page 58

7. Turning Off the Beeper
-.'I
34
Page 59

The beeper tone used to indicate self-timer
operation and focus completion in creative
zone modes can be turned off and on as fol
lows.
1) Set the command dial to a creative zone
mode.
2) Press the function button so that ■ !)) ap
pears in the LCD panel.
3) Turn the main dial to select “1 ” or “0” in the
LCD panel.
1: Beeper tone on. ■ !)) is displayed in the
LCD panel.
0: Beeper tone off. ■ !)) is not displayed in
the LCD panel.
Page 60

8. Using the Built-in Flash
The built-in flash zooms automatically to ad
just the flash illumination angle according to
the lens focal length (28mm, 50mm or
80mm).
Page 61

Automatic Firing
In Full Auto ( D ), Portrait ( ) and
Close-up ( ) modes when the subject is
in low light or backed by strong light, “ 4 ”
lights in the viewfinder and the flash auto
matically pops up and fires to illuminate the
subject. The flash automatically retracts after
use.
Manuai Firing
In creative zone modes you can use the flash
any time you need to.
1) Press the flash button to pop up the flash.
2) Press the shutter button halfway to con
firm that “ V ” lights in the viewfinder.
3) Take the picture.
* To retract the flash, push it down gently
by hand.
35
Page 62

When the red-eye reduction function is set and
the shutter button is pressed halfway, the bar
indicators in the LCD panel and viewfinder light
up for about 1.5 seconds. When these indica
tors go out, press the shutter button com
pletely to take the picture.
Light from the built-in flash may be blocked
when using the following lenses. When using
such a lens we recommend using a dedicated
external flash unit.
• Large aperture lenses such as the EF
20-35mm f/2.8L and EF 28~80mm f/2.84L.
• Super-telephoto lenses such as the EF
300mm f/2.8L and EF 600mm f/4L.
36
Page 63

Red-eye Reduction Function
The subject’s eyes may appear red in flash
photos due to a phenomenon called “red
eye,” caused by light reflecting from the re
tina.
When the red-eye reduction function is set
and the shutter button is pressed halfway,
the red-eye reduction lamp lights to illumi
nate the subject before the flash fires to re
duce the size of the subject’s pupils and mi
nimize the chance of red eye. Red-eye re
duction can be set in creative zone modes
and in Full Auto ( D ), Portrait ( 9 ) and
Close-up ( ) image zone modes.
• Although setting is possible, red-eye re
duction will not function in Sports ( )
and Landscape ( U ) modes.
Page 64

Page 65

1) Press the function button so that “ <g> ”
appears in the LCD panel.
2) Turn the main dial to select “1 ” or “0” in the
LCD panel.
1: Red-eye reduction on. <s> is displayed
in the LCD panel.
0: Red-eye reduction off. <S> is not dis
played in the LCD panel.
• A lens hood attached to the lens will block
light from the built-in flash. Always remove
the lens hood when using the built-in flash.
• The bullt-ln flash and an external flash
cannot be used together.
• The bullt-ln flash will not operate when an
external flash unit or cover is attached to
the accessory shoe.
• If the built-in flash is held down while the
flash button is pressed, >03 will blink in
the LCD panel and the camera will stop
operating. This is not a malfunction. Press
the shutter button halfway to resume nor
mal operation.
37
Page 66

Flash Shooting Distance Range (using the EF 28~ 105mm f/3.5-4.5 USM)
ISO
Negative film
100
400 1.2-10.5 m
1-5.3 m
28mm
Slide film Negative film Slide film
1 -3.7 m 1-5.3m
1.6-7.4 m
1-107 m 1.2-7 6 m
80mm
1 -3.8 m
X-sync Shutter Speed and Aperture Settings
Shooting mode
P (Program AE)
Tv (Shutter-priority AE)
M (Manual exposure)
Av (Aperture-priority AE)
X (Flash sync mode)
X-sync shutter speed
Automatically set to 1/60-1/200 sec
according to ambient light level.
Manually set to any shutter speed of
1/200 sec or slower.*
Automatically set between 30 sec and
1/200 sec according to ambient light
level and set aperture value.
Manually set to 1 /200,1 /125,1 /90 or
1/60 sec.
Flash aperture automatically set ac
cording to TTL program (for built-in
flash)
Automatically set according to am
bient light level and shutter speed
Manually set to desired aperture.
Manually set to desired aperture.
Aperture value
If a shutter speed faster than 1/200 sec is set, the camera automatically sets the shutter
speed to 1/200 sec.
38
Page 67

9 Flash Exposure Compensation
Page 68

This function iets you vary the automatic
fiash exposure ievei of the buiit-in fiash and
EOS externai fiash units. The fiash exposure
can be compensated up to ±2 stops in 172stop increments.
1) Press the fiash button to pop up the builtin flash.
2) Press the flash button again and turn the
main dial or quick control dial to set the
desired compensation amount.
* To use the quick control dial, set the
quick control dial switch to I .
* ® lights in the LCD panel.
* The flash exposure compensation
amount is displayed in the LCD panel.
“+" indicates overexposure compensa
tion and indicates underexposure
compensation.
3) Press the flash button again to complete
the flash exposure compensation setting.
The flash exposure compensation
amount disappears from the LCD panel
and viewfinder and the AE exposure com
pensation display appears.
39
Page 69

40
After setting the desired compensation
amount, it is a good idea to set the quick
control dial switch to o to prevent ac
cidental alteration of the setting.
To check the flash exposure compen
sation amount, pop up the flash and
press the flash button.
Flash exposure compensation remains
set until manually canceled. To cancel,
repeat steps 2 and 3 to reset the flash
exposure compensation amount to 0,
then set the quick control dial switch to
o.
Flash exposure compensation and AE
exposure compensation can be set in
dependently and used together.
Page 70

Flash Exposure Compensation Priority
Chart
When flash exposure compensation (FEC) is
set on the camera and/or an EOS external
flash unit, the setting priority ranking is as fol
lows.
FEC set on the
camera only
Macro Ring
Lite ML-3
160E Camera settingNot possible
200E Camera settingNot possible
300EZ Camera settingNot possible
420EZ Camera settingNot possible
430EZ Camera settingFlash setting
Camera settingNot possible
FEC set on the
flash only
FEC set on
both the
camera & flash
-
-
-
-
-
Flash setting
Page 71

IV Shooting Modes & Functions
Page 72

1. P (Program AE)
In this mode, the camera automatically sets
both the shutter speed and aperture accord
ing to the subject brightness.
1) Set the command dial to P.
2) Press the shutter button halfway to focus
the subject and confirm the exposure.
3) Press the shutter button completely to
take the picture.
Program shift function
When taking pictures in Program AE or
Depth-of-Field AE mode, you can “shift the
program” to the change the set shutter speed
and aperture value combination while main
taining the same exposure.
After pressing the shutter button halfway,
turn the main dial until the desired shutter
speed/aperture combination is displayed.
• The adjustment clears after one exposure
or continuous exposure sequence.
• Program shift cannot be used with the
built-in flash.
41
Page 73

2. Tv (Shutter-priority AE)
42
Page 74

In this mode, you set the shutter speed and
the camera automatically sets the aperture
according to the lighting conditions.
1) Set the command dial to Tv.
2) Turn the main dial to the desired shutter
speed.
3) Press the shutter button halfway to focus
the subject and confirm the exposure.
4) Press the shutter button completely to
take the picture.
Shutter speed display
The following shutter speeds are available.
8000 6000 4000 3000 2000 1500 1000 750
500 350 250 200 180125 90 60 45 30 2015
10 8 6 4 3 2 0”7 1 ” 1 ”5 2” 3” 4” 6” 8” 10” 15”
20” 30”
• 200 is available only when using flash.
Page 75

3. Av (Aperture-priority AE)
Page 76

In this mode, you set the aperture and the
camera automatically sets the shutter speed
according to the lighting conditions.
1) Set the command dial to Av.
2) Turn the main dial to the desired aperture.
3) Press the shutter button halfway to focus
the subject and confirm the exposure.
4) Press the shutter button completely to
take the picture.
Aperture value display
The following aperture settings are available.
1.01.2 1.4 1.8 2.0 2.5 2.8 3.5 4.0 4.5 5.6 6.7 8.0
9.5 11 13 16 19 22 27 32 38 45 54 64 76 91
• The actual aperture range available differs
depending on the lens.
43
Page 77

4. M (Manual exposure)
Correct exposure
Use this position as the reference point when determin
ing exposure.
Overexposure
Underexposure
44
Page 78

This mode lets you set both the shutter
speed and aperture. Use this mode when you
need complete control of exposure for crea
tive effects or when using a hand-held expo
sure meter. The main dial sets the shutter
speed and the quick control dial sets the
aperture.
1) Set the command dial to M.
2) Set the quick control dial switch to l .
3) Turn the main dial to the desired shutter
speed and the quick control dial to the
desired aperture.
4) Press the shutter button halfway to focus
the subject and determine the correct ex
posure using the exposure display.
5) Press the shutter button completely to
take the picture.
Adjust the exposure according to the expo
sure level indicator in the viewfinder and LCD
panel.
Page 79

5. DEP (Depth-of-Field AE)
Page 80

This mode places everything between two
freely set points in the foreground and back
ground within the zone of focus.
1) Set the command dial to DEP.
2) Select the desired AF frame using the ma
nual focusing point selection procedure
(refer to page 25).
3) Place the AF frame on the nearest point
you want in focus (point A), then press the
shutter button.
* When the in-focus indicator and “dEP 1 ”
light up in the viewfinder, remove your
finger from the shutter button.
4) Place the AF frame on the farthest point
you want in focus (point B), then press the
shutter button again.
* When the in-focus indicator and “dEP 2”
light up in the viewfinder, remove your
finger from the shutter button.
* Points A and B can be reversed if
desired.
45
Page 81

- -ll
If the aperture value blinks, the desired depth
of field cannot be obtained. Use a wide-angle
lens or move farther from the subject and re
peat steps 3 through 5.
46
Page 82

' ^ -•—■ 'l I
5) Compose the picture and press the shut
ter button halfway to confirm the expo
sure.
* The correct exposure value for the des
ignated depth of field and the corre
sponding shutter speed are displayed
in both the viewfinder and LCD panel.
* If you remove your finger from the shut
ter button the display changes to “dEP”
and the aperture value.
* If desired you can change the aperture/
shutter speed combination by turning
the main dial (refer to page 41).
6) Press the shutter button completely to
take the picture.
Page 83

To cancel depth-of-field AE in mid-oper
ation, turn the command dial to another
position.
When using a zoom lens, do not zoom the
lens after setting the first point.
For greater depth of field, we recommend
using a wide-angle lens.
For shallow depth of field, place both
points A and B on the same subject. This
method is effective for blurring the fore
ground and background when shooting
portraits. Use a telephoto lens for best ef
fect.
Page 84

Flash cannot be used effectively in depthof-field AE mode. Use of flash will provide
the same result as using flash in Program
AE mode.
If Eye Controlled Focus or automatic fo
cusing point selection mode is set, the
center AF frame is used for focusing.
If Eye Controlled Focus is on when depthof-field AE is set, !> temporarily disap
pears from the viewfinder display.
47
Page 85

6. X (Flash sync mode)
48
Page 86

Use this mode for flash photography using a
non-dedicated external flash unit (such as a
studio strobe) connected to the camera’s PC
terminal or accessory shoe. Shutter speed
and aperture settings are the reverse of ma
nual exposure operation, with the X-sync
shutter speed (1/200, 1/125, 1/90 or 1/60
sec) set with the quick control dial and the
aperture value set with the main dial.
• Before use, be sure to check the syn
chronous shutter speed range of the ex
ternal flash unit.
1) Set the command dial to X.
2) Set the quick control dial switch to I, then
turn the quick control dial to the desired
X-sync shutter speed.
3) Turn the main dial to set the desired aper
ture.
4) Take the picture.
Page 87

7. Image Zone Shooting Modes
Image zone shooting modes automatically
set all camera functions such as metering,
film winding and AF mode to the optimum
settings appropriate for the selected mode.
• When using an external flash unit in an
image zone mode, the picture may not
turn out as expected. Do not use an exter
nal flash unit with image zone modes.
• If the shutter speed set by the image zone
mode falls below ”1/focal length of the
lens in use,” the beeper sounds (2 beeps
per second) to warn of possible blurring
due to camera shake.
• Refer to page 67 for the function settings
in each mode.
a (Full Auto)
This setting allows you to take pictures in any
situation with point and shoot simplicity. Fo
cusing, exposure and film winding are all set
automatically.
Page 88

The flash automatically fires in low light or
when the subject is backed by a strong
light.
Red-eye reduction operation is possible
with the built-in flash (refer to page 36).
Eye Controlled Focus cannot be used.
AF mode automatic switching function
In Full Auto mode, the camera senses the sub
ject movement and automatically sets One-
shot AF if the subject is stationary or Al Servo
AF if the subject is moving (refer to page 29).
• When the camera switches to Al Servo AF
mode, the in-focus beeper and indicator do
not function.
• Once the camera switches to Al Servo AF
mode, it will not switch back to One-shot AF
mode.
49
Page 89

^ (Portrait)
Set this mode to create a sharply focused
subject against a blurred background for flat
tering portraits.
• Hold the shutter button down to take pic
tures continuously.
• The flash automatically fires in low light or
when the subject is backed by a strong
light.
• Red-eye reduction operation is possible
with the built-in flash (refer to page 36).
50
Page 90

U (Landscape)
Set this mode for vivid iandscape pictures
with everything sharpiy focused from near to
far. When using a zoom iens, set the iens to a
wide-angie position for best effect.
Page 91

A (Close-up)
Set this mode to use the lens’ built-in macro
function and take striking close-ups of small
objects such as flowers and insects. When
using a zoom lens, set the lens to telephoto for
greatest magnification.
• The flash automatically fires in low light or
when the subject is backed by a strong light.
• The light from the flash may be partially
blocked by the lens at distances closer than
1 m/3.3 ft.
• For high-magnification close-ups, we rec
ommend using a macro lens.
tikW
Page 92

(Sports)
Use this setting for taking pictures of sporting
events or other situations with fast-moving
subjects. The camera continuousiy focuses
as you foiiow the subject with the shutter but
ton pressed haifway.
• Pictures can be taken continuousiy by
hoiding the shutter button pressed.
51
Page 93

0 AE Lock
When you press the AE lock button,*lights in
the viewfinder to indicate that AE lock is set.
Once * appears the exposure remains
locked even if you release the AE lock button.
AE lock is available in P, Tv, Av and DEP
shooting modes.
• Whenthefilmwindingmodeis sii or 1!ih,
the same exposure setting is used for all
continuous exposures.
AE lock operation for different AF focusing point selection and metering mode combinations
Eye Controlled Focus/Automatic
focusing point selection
Locks metered value based on
selected AF focusing point after
focusing is completed with the
shutter button pressed halfway
Evaluative metering
Spot metering
Center-weighted average
metering
Manual focusing point selection
Locks metered value based on
selected AF focusing point
Locks metered value based on center AF focusing point
Locks metered value based on center AF focusing point
52
Page 94

9. AEB (Auto Exposure Bracketing)
Use auto exposure bracketing in AE and ma
nual exposure modes to take a sequence of
pictures at different exposures. When this
function is set, the exposure is shifted (brac
keted) for three successive pictures in the
sequence: correct exposure ->■ underexpo
sure ->• overexposure. The bracketing
amount can be set in 1 /2-stop increments up
to +2 stops from the metered exposure
value.
Page 95

Auto exposure bracketing is particularly ef
fective when using slide film, which produces
noticeably different results with even small
exposure variations.
• When this function is combined with con
tinuous exposure ( Qi ) or high-speed
continuous exposure ( Osh ), holding the
shutter button pressed automatically
takes three exposures in sequence while
shifting the exposure for each picture.
1) Press the function button so that AEB ap
pears in the LCD panel.
2) Turn the main dial to set the desired brac
keting amount.
* The bracketing amount is shown in the
LCD panel as both a graphic level dis
play and a numerical value. If “0.5” is set,
for example, three pictures are taken in
the following sequence: correct expo
sure (±0 stop), underexposure (-0,5
stop) and overexposure (-t-0.5 stop).
53
Page 96

Auto exposure bracketing is carried out in
each mode as follows:
P: Both the shutter speed and aperture value
are shifted.
Av, DEP, M: Only the shutter speed is shifted.
Tv, X: Only the aperture value Is shifted.
54
Page 97

* The bracketing amount is aiso dis
played in the viewfinder.
3) Set the command dial to the desired
shooting mode and take pictures.
• To cancel auto exposure bracketing, re
peat steps 1 and 2 to reset the bracketing
amount to 0.
• Auto exposure bracketing is automatically
canceled when the battery is replaced.
• Auto exposure bracketing cannot be used
in bulb mode or when using flash.
• Auto exposure bracketing can be used in
X mode or manual mode with flash units
connected through the PC terminal.
• The exposure level blinks in the LCD
panel and viewfinder display during auto
exposure bracketing operation.
If you wish to shift the bracketed exposure
values toward over- or underexposure, you
can add exposure compensation using the
quick control dial. In this case the LCD panel
may not display the correct values, but expo
sures will be made correctly.
Page 98

10. Multiple Exposure
When taking multiple exposures on a single
frame, you should decrease the exposure
value for each exposure using exposure com
pensation (refer to page 33).
Number of multiple
exposures amount
2 exposures -1.0
3 exposures
4 exposures
The above values should be used only as a
guide. The actual compensation amount re
quired depends on the shooting conditions
and should be determined by prior testing.
Compensation
-1.5
-2.0
Page 99

Up to nine exposures can be made on one
frame by presetting the number of multiple
exposures with the main dial,
1) Press the function button so that B ap
pears in the LCD panel.
2) Turn the main dial to set the desired num
ber of exposures in the frame counter dis
play area.
3) Take pictures.
• m blinks in the LCD panel while
multiple exposures are being taken.
• To cancel multiple exposure mode in mid
operation, repeat steps 1 and 2 to set the
frame counter to a blank display.
• When the preset number of multiple expo
sures is completed, the film automatically
advances to the next frame and multiple
exposure mode is canceled.
55
Page 100

11. Bulb (Long ixposure) Ope ation
Use this mode when long exposures are re
quired, such as for pictures of night scenes
and fireworks displays. The shutter stays
open for as long as you press the shutter but
ton.
Mount the camera on a tripod to prevent
camera movement during exposure.
56
The remote switch 60T3 (sold separately)
can be connected to the camera’s remote
control socket for use in starting and stop
ping the bulb exposure. For details, read
the instructions supplied with the 60T3.
Battery life during bulb exposure is ap
proximately 6 hours with a new battery.
1) Set the command dial to M.
2) Turn the main dial to change the shutter
speed until “bulb” appears in the LCD
panel. “buLb” is the next position after 30”.
3) Set the quick control dial switch tol,then
turn the quick control dial to the desired
aperture.
4) Press the shutter button for the desired
length of time.
* The viewfinder display extinguishes
during the exposure.
* The word “buLb” blinks in the LCD
panel during the exposure.
 Loading...