

Page 1

Canon
400D
DIGITA.L
This guide explains how to set digital functions,
shoot images, and playback images. You can take
this guide with you for shooting. For detailed
instructions, refer to the EOS 400D DIGITAL
Instruction Manual.
CEL-SF8JA210 PRINTED IN THE EU
S CANON INC. 2006
Page 2
Quick Start Guide
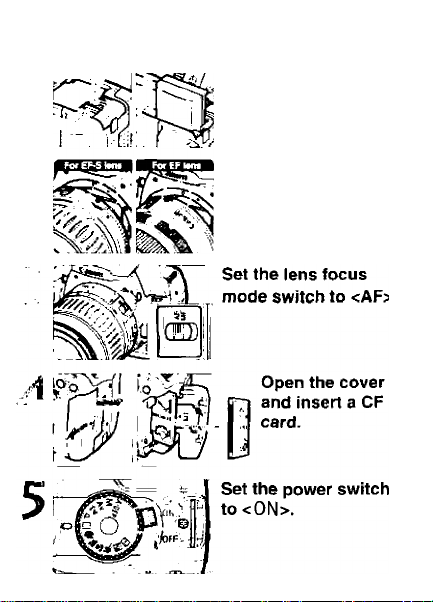
. Insert the battery.
Attach the lens.
When attaching an EF-S lens,
align it with the white dot on
the camera. For other lenses,
align It with the red dot.
Page 3

Set the Mode Dial to <0>
(Full Auto).
All the necessary camera settings
will be set automatically.
Focus the subject.
Aim the AF point over the subject
and press the shutter button
halfway to autofocus.
Take the picture.
Press the shutter button
completely to take the
picture.
Review the image.
The captured image will be
displayed for about 2 sec.
on the LCD monitor.
In this pocket guide, the asterisk ★ on the hght ol the feature name indicates that the
respective feature is available only in Creative Zone modes (
Battery Life ___
Wo FlashTemperature |
I At 23'C 173'F I Approii. 500 shots
P, Tv, Av, M, A-DEP)
50% Fla^
Approti. 360 shots
Page 4
Setting Digital Functions
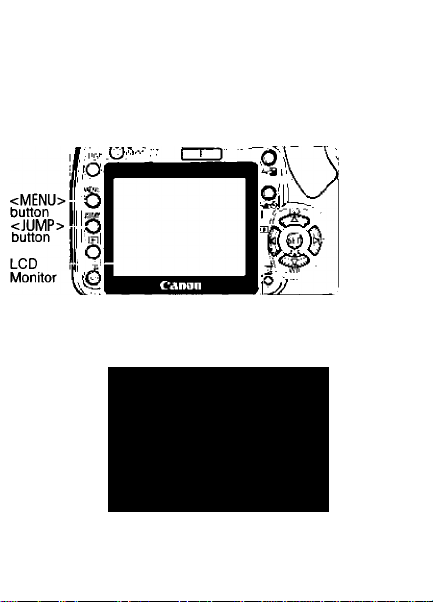
Basically, you look at the LCD monitor and press the <MENU>
button on the camera back and press the cross keys and
<©> button.
< yi >
button
<v>
Cross
keys
'ID1' 1
Playback menu
Set-up 1 menu
Set-up 2 menu
1 ill
Shooting 2 menu*
Shooting 1 menu
Tabs
IQuality
Red-eye Or/Off
Beep
Off
On 1
:Shoot vr/o card1On
Menu items
■ The [02] tab is not displayed in Basic Zone shooting modes
such as Full Auto
Menu settings
Page 5
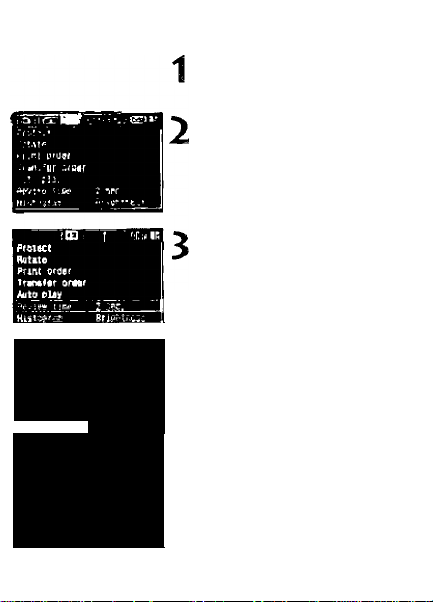
Display the menu.
Press the <MENU> button to
display the menu.
Select a tab.
Press the <JUMP> button to
select a menu tab.
If the tabs are highlighted, you
can also press the key
to select a tab.
Select a menu item.
Press the > key to select
the menu item, then press
r ; i.tBi
Prtnt ctrdtr
Trjnsfir ordvr 2 CSC.
AutQ pity 4 MC.
№19 tUM
Rottlv
Prini orflpr
Tf»n»itf prOTf
iWt
__
1 e:-
SEC.
Select the menu setting,
press the<i^> or key
to select the setting. (Some
settings require you to press
either the <i^> or <■<►> key
to select It.)
Set the desired setting.
5
Press <©> to set it.
Exit the menu.
Press the <MENU> button to
6
return to the camera setting
display.
Page 6

[01] Shooting 1 menu
[й2 ] Shooting Z menu
AEB
Fiesn exp cmp
WB SHIFTiWT
Cuftoni Ш
color space
Picture Style
Dust Delete Dsta 1
D. Cl/iO
Stari4ard
El
[H] Playback menu
Rotate
Print order
Transfer ordar
Auto piav
Review time
Kistogram Briotiirtesi
г sec.
[TT2] Set-ирЯ menu
Video sirStein pm
custoa FunctionstC. Rnl
blear settins:
Senear cleanitio
Sensor cleaning
Fimwarc Ver. i. Ù.Q
: Rutti
; AfoAijal
[tT1] Set-up 1 menu
Ш
.. «w>i-a
These screens apply
when a Creative Zone
mode is set
[A2] menu screen or
the items indicated by
the symbol are not
displayed when a Basic
Zone mode is set.
Page 7

Image-Recording Quality
Select [^1 Quality].
Press the < v> key to select the
recording quality.
Quality
JL
JL
JM
JM
dS
dS
CE53
GD+JL
• In the Basic Zone modes, RAW and RAW+JL cannot be selected
• The number of possible shots applies to a 512MB CF card
• The actual maximum burst during continuous shooting will depend on the shooting conditions
(see page 61 of the EOS 400D DIGITAL Instruction Manual)
Megapixels
(Approx.)
10,1
5.3
2.5
10 1
—
File Size
(Approx.)
3.8MB
2.0MB 249
2.3MB 216
1 2MB 410
1 3MB 376
0 7MB 709
9 8MB 50
Possible
Shots
130
36 8
Max.
Burst
27
58
47
112
98
326
10
Print Size
17 8x12 7cm/7.0x5 Oin
14 8x10cm/5 8x3.9in
A3
A4
A3
ISO: ISO Speed *
Press the < A IS0> button
Press the < v > key to set the ISO speed,
mm
200
400
Im
Low ISO
IS0100
1600
High ISO
200
400
BOO
“ I
D I
0 ▼
For bright scenes and still
subjects (less noise and
finer grain).
For low light and moving
subjects (more grain).
Page 8

Picture Style*
Selecting a Picture Style.
Press < 5ETi>
i Picture Style Ì
Portrait User Def. 1
Landscape User Def. 2
NoJtral
Faithful
Uonochrone
User Def. 3
Press the <%► > key to select the
desired style.
Style Description
Standard Vivid colors and sharp images
Portrait
Nice skin (ones and slightly sharp images
Landscape Vivid blue skies and greenery and very sharp images
Neutral
Faithful
Natural colors and dull tones
Accurate subject colors as obtained under a color
temperature of 5200K
A/lonochromeBlack-and-white images
User Def. 1/2/3
Custom style modified and saved by the user
Customizing the Picture Style.
4 '"n.ii oie&s
f'Contrast
MtSBturfltior
I'Color tone
Select [Q2 Picture Style]
If you press the <JUMP> button
while the Style selection screen is
displayed, you can adjust the
sharpness, etc
Page 9

Setting Digital Functions
WB: White Balance*
I Custom White Balance*
Press the <T WB> button
Press the <-^^> key to select
the white balance.
Aulo
Daylight
Shade
Cloudy, twilight, sunset
Tungsten light
White (luorescent light
Flash
Custom
Aim the center part of the
viewfinder over a plain, white
surface and photograph it at the
standard exposure.
Select [ A2 Custom WB]
Select the white image you just shot
Exit the menu and press the
<T WB> button.
Press the key to select
<rAi>.
White balance
<8>
Page 10

Shooting Operation
Nomenclature
Power switch
Main Dial
Shutter button
Remote control
sensor
Red-eye
reduction/
Self-timer lamp
Dioptric adjustment knob - ^
Viewfinder eyepiece
Display-off
sensor
LCD monitor
Mode Dial
Access lamp
Built-in flash/
AF-assist beam
Depth-of-field
preview button
<Av0> Aperture/Exposure
compensation button
--------
<-^>AElock/
FE lock button
<EE> AF point
selection button
<v>
Cross keys
Page 11

Camera Setting Display
Exposure level indicator Aperture
Shutter speed AEB
Shooting mode
White balance
White balance
correction
Custom Function
White balance
bracketing
Image-recording quality
Battery check
amrai d Ml D m\ g i
1/125 F5.6|ffil100
M f¥1 ONE SHOT □
^LEEB [ 153]
Metering mode
OKl^^ NG
Viewfinder Information
AF points
ISO speed
Flash exposure
compensation
Drive mode
Red-eye
reduction
Beeper
Shots remaining
Monochrome shooting
AF mode
AF point selection
AF point display indicator < >
AE lock
Flash-ready/FE lock
Flash exposure
compensation
Shutter speed
Focus
confirmation light
Max. burst
Exposure level indicator
Aperture
Page 12

All the settings necessary for
shooting are set automatically.
^ You just press the shutter button,
and the camera does the rest.
Select the shooting mode to suit your
D Full Auto
ijl Portrait
ik Landscape
A Close-up
Sports
H Night Portrait
CD Flash Off
subject
Aim an AF point on the subject.
Press the shutter button halfway to
focus.
Check the display.
Compose the shot and press the
shutter button fully.
Creative Zone Modes
You can set the shutter speed
and/or aperture and change the
exposure as desired. By
changing the camera settings,
you can obtain various effects.
P: Program AE
The camera automatically sets the shutter speed and aperture
In the same way as the <0> mode. The shooting procedure is
the same as with Basic Zone modes.
Set the Mode Diai to <P>
Page 13

Tv: Shutter-priority AE
Set the Mode Dial to <Tv>.
Turn the <^> dial to set the desired
shutter speed, then focus the subject
(1/500 F4.0lffi)l00
The aperture will be set automatically
If the aperture display blinks, turn
the <if^> dial until it stops blinking,
Av: Aperture-priority AE
Sbi the Mode Dial to<Av>
Turn the dial to sat the desired
aperture, then focus the subject
1/30 (F16) E noo
Av
The shutter speed will be set
automatically.
If the shutter speed display blinks, turn
the dial until it stops blinking
Using the Built-in Flash
In Basic Zone Modes
If necessary, the built-in flash will pop-up automatically in low-light
or backlit conditions (except in the <tk> <^> <CS> modes)
Creative Zone
Modes
Press the <i>
button to pop up
the built-in flash,
then shoot
______________
ISO Speed Wide-angle: 18 mm Telephoto; 55 mm
100 Approx. 1-3 7m (3 3-121ft)Approx 1-2 3m (3.3-7 5ft)
400 Approx 1-7 4m (3 3-24 3 ft)Approx 1-46m(33-151f1)
1600
Built-in Flash Range
Anprax. l-i.4.9m (3Ji-4fl9fi,)
(using EF-S18-55mm f/3 5-5 6 II lens)
Acorox 1-9 3m (3.3-30 5tl)
Page 14

Set the lens focus mode switch to
<AF>
Press the <► AF> button.
Press the key to select the
AF mode.
ONE SHOT
For still subjects
Al FOCUS
Switches the AF mode automatically.
Al SERVO
For moving subjects
Press the <EE> button
Press the < v> key to select the
desired AF point
By pressing < set >, you can toggle
between the center AF point and
automatic AF point selection.
You can also select the AF point
with the dial
u
Page 15

[D Metering Mode'
Press the <-^ [$]> button
Press the <-^^> key to select the
metering mode
r®l Evaluative metering;
fol Partial metering:
n Center-weighted average metering:
Qi Drive Mode*
Press the <Qj <^\> button
I
I pii>* moo«
C{?ntinuDue shoo ting
Press the key to select the
drive mode.
J
□ Single shooting
Oil Continuous shooting
(Max. approx. 3 shots/sec.)
Ci)! Self-timer (10 sec.)/
Remote control
Exposure Compensation*
Standard
exposure index
Turn the Mode Dial to select any
Creative Zone mode except <M>.
Focus the subject and check the display
Hold down the <av(2> button and
turn the dial (up to ±2
stops in 1/3-stop increments)
Standard metering mode
Metering at the center covering
about 9% of the viewfinder area
Metering weighted at the center
and averaged for the entire scene
Page 16

Playback Operation
Protect <
Shooting information
Image
Flash exposure
compensation amount
Shooting time
Shooting date
Shutter speed
Playback image
number/Total
images recorded
Exposure compensation amount
ii/o9/'oe 13MB aa« 03
1/1Ì5 6. D a-1 ai-lBJWE) p
32/32 55ffl H100
Aperture
image proteci
-—-►Magnify
Index inspiay
File number
Histogram
Color space
SRGB
File size
Image-recording quality
White balance
WB correction
Shooting mode
ISO speed
Metering mode
Monochrome
Select image
ScfOH nriag?
Reduce
 Loading...