

Page 1
Document Scanner
INSTRUCTIONS
ENGLISH
Please read this manual before operating this unit. After you finish
Please read this manual before operating this unit. After you finish
reading this manual, store it in a safe place for future reference.
reading this manual, store it in a safe place for future reference.
Page 2

International ENERGY STAR® Office Equipment Program
As an ENERGY STAR partner, Canon Electronics Inc. has determined that this product meets the
ENERGY STAR guidelines for energy efficiency.
The International ENERGY STAR Office Equipment Program is an international program that promotes
energy saving through the use of computers and other office equipment. The program backs the
development and dissemination of products with functions that effectively reduce energy consumption. It is an open system in which business proprietors can participate voluntarily. The targeted
products are office equipment such as computers, monitors, printers, fax machines, copiers and
scanners. Their standards and logos are uniform among the participating nations.
FCC REGULATIONS (For 120V models)
This equipment has been tested and found to comply with the limits for a Class A digital device, pursuant to Part 15 of the FCC
Rules. These limits are designed to provide reasonable protection against harmful interference when the equipment is
operated in a commercial environment. This equipment generates, uses, and can radiate radio frequency energy and, if not
installed and used in accordance with the instruction manual, may cause harmful interference to radio communications.
Operation of this equipment in a residential area is likely to cause harmful interference in which case the user will be required
to correct the interference at his own expense.
Do not make any changes or modifications to the equipment unless otherwise specified in the manual. If such changes or
modifications should be made, you could be required to stop operation of the equipment.
RADIO INTERFERENCE REGULATIONS (For 120V models)
This digital apparatus does not exceed the Class A limits for radio noise emissions from digital apparatus as set out in the
interference-causing equipment standard entitled “Digital Apparatus”, ICES-003 of the Industry Canada.
RÈGLEMENT SUR LE BROUILLAGE RADIOÉLECTRIQUE (For 120V models)
Cet appareil numérique respecte les limites de bruits radioélectriques applicables aux appareils numériques de Classe A
prescrites dans la norme sur le matériel brouilleur: “Appareils Numériques”, NMB-003 édictée par l’Industrie Canada.
NOTICE
q Copyright 2004 by CANON ELECTRONICS INC. All rights reserved. No part of this publication may be reproduced,
transmitted, transcribed, stored in a retrieval system, or translated into any language or computer language in any form or by
any means, electronic, mechanical, magnetic, optical, chemical, manual, or otherwise, without the prior permission of CANON
ELECTRONICS INC.
w The contents of this manual are subject to change without notice.
e Every effort has been made to ensure the accuracy of information presented in this manual. However, Canon Electronics Inc.
and the subsidiaries on the back cover assume no responsibility for any errors or their consequences.
r We do not assume any responsibility for damage resulting from operations regardless of item e.
Trademarks and Registered Trademarks
● ENERGY STAR is a United States registered mark.
● Microsoft Windows
and in other countries.
● ISIS
is a trademark of Pixel Translation A Division of Captiva Software Corporation in the United States.
● Product names mentioned herein are for identification purposes only and may be trademarks and/or registered trademarks of
their respective companies.
R
and Microsoft Windows NTR are registered trademarks of Microsoft Corporation in the United States
Page 3

READ CAREFULLY BEFORE OPENING THE SEALED DISK PACKAGE
CANON SOFTWARE LICENSE AGREEMENT
IMPORTANT-READ THIS AGREEMENT BEFORE OPENING THE SEALED DISK PACKAGE! BY OPENING THE
SEALED DISK PACKAGE, YOU ARE DEEMED TO AGREE TO BE BOUND BY THIS AGREEMENT.
This legal document is a license agreement between you and Canon Electronics Inc. ("Canon"). BY OPENING THE SEALED DISK
PACKAGE, YOU ARE DEEMED TO AGREE TO BE BOUND BY THE TERMS OF THIS AGREEMENT.
TERMS OF THIS AGREEMENT, DO NOT OPEN THE SEALED DISK PACKAGE AND PROMPTLY RETURN THE CANON SCANNER, THE
DISK PACKAGE CONTAINING SCANNER DRIVER SOFTWARE PROGRAMS AND/OR SCANNER UTILITY SOFTWARE PROGRAM
PROPRIETARY TO CANON OR ITS LICENSOR (THE "SOFTWARE") AND THE ACCOMPANYING DOCUMENTATION AND OTHER ITEMS
TO THE PLACE WHERE YOU OBTAINED THEM FOR A REFUND BEFORE THEY ARE USED OR OPENED OR UNPACKED.
In consideration of the right to use the SOFTWARE, you agree to abide by the terms and conditions of this Agreement.
1. GRANT OF LICENSE: Canon grants you the personal, non-exclusive right to use the SOFTWARE only on a single computer. You may
physically transfer the SOFTWARE from one computer to another provided that the SOFTWARE is used on only one computer at any time.
You shall not assign, sublicense, sell, rent, lease, loan, convey or transfer to any third party, or send or bring the SOFTWARE out of the country
where you originally obtain it to other countries without required authorization of applicable governments, or copy, duplicate, translate or convert to
another programming language the SOFTWARE or accompanying documentation, except as expressly provided herein.
Except as expressly permitted under the applicable law, you shall not alter, modify, disassemble, decompile or otherwise reverse engineer the
SOFTWARE or accompanying documentation and you also shall not have any third party do so.
2. BACK-UP COPY: You may make one copy of the SOFTWARE solely for a back-up purpose or copy the SOFTWARE onto the permanent
storage device (e.g. a hard disk) of your computer and retain the original for a back-up purpose. Except as expressly permitted under the applicable law,
any other copying of the SOFTWARE is a violation of this Agreement. You must reproduce and include the copyright notice on the back-up copy.
3. SUPPORT AND UPDATE: Canon, Canon's affiliate, their distributor or dealer is not responsible for maintaining or helping you to use the
SOFTWARE. No updates, fixes or support will be made available for the SOFTWARE.
4. LIMITED WARRANTY AND DISCLAIMER OF INDEMNITY: Canon, Canon's affiliate, their distributor or dealer will not guarantee
uninterrupted service, or absence or correction of errors. Therefore, the SOFTWARE is licensed on an "AS IS" basis without warranty of any kind. The
diskette on which the SOFTWARE is recorded is warranted against defective material or workmanship under normal use for a period of ninety (90) days
from the date you purchased the same as evidenced by a receipt or otherwise. The limited warranty does not apply if the failure of the diskette resulted
from accident, abuse or misapplication of the SOFTWARE and shall not extend to anyone other than the original user of the SOFTWARE.
CANON, CANON'S AFFILIATE, THEIR DISTRIBUTOR OR DEALER DISCLAIMS ALL IMPLIED WARRANTIES, INCLUDING ANY
WARRANTY OF MERCHANTABILITY OR FITNESS FOR A PARTICULAR PURPOSE, WITH RESPECT TO THE SOFTWARE OR
ACCOMPANYING DOCUMENTATION.
NEITHER CANON, CANON'S AFFILIATE, THEIR DISTRIBUTOR NOR DEALER IS LIABLE FOR ANY LOSS OR DAMAGE
INCLUDING CONSEQUENTIAL OR INCIDENTAL LOSS OR DAMAGE SUCH AS LOSS OF PROFITS, EXPENSE OR INCONVENIENCE,
WHATSOEVER CAUSED BY OR ARISING OUT OF THE SOFTWARE, ACCOMPANYING DOCUMENTATION OR THE USE THEREOF.
CANON, CANON'S AFFILIATE, THEIR DISTRIBUTOR OR DEALER SHALL HAVE NO OBLIGATION TO INDEMNIFY YOU
AGAINST ANY CLAIM OR SUIT BROUGHT BY A THIRD PARTY ALLEGING THAT THE SOFTWARE, ACCOMPANYING
DOCUMENTATION OR THE USE THEREOF INFRINGES ANY INTELLECTUAL PROPERTY OF SUCH THIRD PARTY.
THE ABOVE IS CANON'S ENTIRE LIABILITY AND YOUR EXCLUSIVE REMEDY IN CONNECTION WITH THE SOFTWARE AND
ACCOMPANYING DOCUMENTATION.
5. TERM: This Agreement is effective upon opening the sealed disk package and remains in effect until terminated. You may terminate this
Agreement by destroying the SOFTWARE and any copy thereof. This Agreement will also terminate if you fail to comply with any of the terms of this
Agreement. In addition to Canon enforcing its respective legal rights, you must then promptly destroy the SOFTWARE and any copy thereof.
6. U.S. GOVERNMENT RESTRICTED RIGHTS NOTICE: The SOFTWARE is provided with RESTRICTED RIGHTS. Use, duplication or
disclosure is subject to restrictions as set forth in either subparagraph (c) (1) (ii) of the Rights in Technical Data and Computer Software clause at DFARs
252.227-7013 or subparagraph (c) (1) and (2) of the Commercial Computer Software Restricted Rights Clause at FAR 52.227-19, as applicable.
7. SEVERABILITY: In the event that provision of this Agreement is declared or found to be illegal by any court or tribunal of competent
jurisdiction, such provision shall be null and void with respect to the jurisdiction of that court or tribunal and all the remaining provisions of this
Agreement shall remain in full force and effect.
8. ACKNOWLEDGEMENT: BY OPENING THE SEALED DISK PACKAGE, YOU ACKNOWLEDGE THAT YOU HAVE READ THIS
AGREEMENT, UNDERSTOOD IT, AND AGREE TO BE BOUND BY ITS TERMS AND CONDITIONS. YOU ALSO AGREE THAT THIS
AGREEMENT IS THE COMPLETE AND EXCLUSIVE STATEMENT OF AGREEMENT BETWEEN YOU AND CANON CONCERNING THE
SUBJECT MATTER HEREOF AND SUPERSEDES ALL PROPOSALS OR PRIOR AGREEMENTS, VERBAL OR WRITTEN, AND ANY OTHER
COMMUNICATIONS BETWEEN YOU AND CANON RELATING TO THE SUBJECT MATTER HEREOF. NO AMENDMENT TO THIS
AGREEMENT SHALL BE EFFECTIVE UNLESS SIGNED BY A DULY AUTHORIZED REPRESENTATIVE OF CANON.
Should you have any questions concerning this Agreement, or if you desire to contact Canon for any reason, please write to Canon's local affiliate.
IF YOU DO NOT AGREE TO THE
Page 4

Page 5
INTRODUCTION
Thank you for purchasing the Canon Document Scanner DR-7080C.
Please read this manual thoroughly before operating the machine in order to
familiarize yourself with its capabilities, and to make the most of its many
functions. After reading this manual, store it in a safe place for future reference.
Conventions
This manual uses the following symbols and indications.
Before you start reading this manual, read the following and familiarize yourself
with their meanings.
Warnings are provided for your safety and contain extremely important information.
WARNING
CAUTION
Failure to observe the instructions provided in a warning could result in death or serious
injury to yourself or your coworkers.
Caution notices are also provided for your safety and contain important information.
Failure to observe the instructions provided in a caution notice could result in serious
injury to yourself or your coworkers or damage to the equipment.
Important
Note
These important notes contain important information on procedures that must be
followed or actions that must be avoided. Failure to observe a request could result in
damage to the equipment or a malfunction.
Notes provide additional tips or advice that can save you time and effort in using the
scanner.
1
Page 6

CONTENTS
INTRODUCTION..........................................................................................1
Conventions ................................................................................................ 1
Safety Precautions ..................................................................................... 5
Safe Operation ............................................................................................ 5
Installation Location .................................................................................... 7
Power Supply .............................................................................................. 8
Operating and Closing the Feeder .............................................................. 8
Carrying ...................................................................................................... 9
Chapter 1 Getting Ready
1.1 Features of the DR-7080C ...............................................................12
1.2 Before Getting Started ................................................................... 14
Unpacking ................................................................................................. 14
Removing the Transportation Screw ......................................................... 15
1.3 Part Names ...................................................................................... 16
Feeder....................................................................................................... 16
Flatbed ...................................................................................................... 17
Rear .......................................................................................................... 18
Operation Panel ........................................................................................ 19
1.4 Job Function ................................................................................... 20
1.5 Optional Products............................................................................21
Stamp Unit ................................................................................................ 21
Chapter 2 Connecting to a Computer
2.1 Checking Your Operating Environment.........................................24
2.2 Connecting to a Computer............................................................. 25
SCSI Connections .................................................................................... 25
◆ SCSI Cards ........................................................................................... 25
◆ Connecting the SCSI Cable .................................................................. 26
◆ Setting the SCSI ID and Terminator...................................................... 26
◆ Setting the SCSI Transfer Speed .......................................................... 28
USB Connections ..................................................................................... 28
◆ USB 2.0 Interface Cards ....................................................................... 28
◆ Connecting a USB Interface Cable ....................................................... 29
Connecting the Power Cord...................................................................... 29
2
Page 7

2.3 Turning ON or OFF the Power ....................................................... 30
Turning ON the Power .............................................................................. 30
Recognizing the Scanner.......................................................................... 31
Turning OFF the Power ............................................................................ 33
Chapter 3 Using the Software
3.1 About the Software ......................................................................... 36
3.2 Installing the Software ................................................................... 37
3.3 How to Use the Software................................................................ 39
How to Display the ISIS/TWAIN Driver Help File ...................................... 39
How to Start CapturePerfect ..................................................................... 40
How to Start the Job Registration Tool ..................................................... 41
3.4 Uninstalling the Software................................................................43
Chapter 4 Using the Scanner
4.1 Documents ...................................................................................... 46
Types of Documents ................................................................................. 46
Feeder Capacity ........................................................................................ 47
4.2 Placing Documents onto the Scanner .......................................... 48
Loading a Document into the Feeder ....................................................... 48
Positioning a Document on the Flatbed (Platen Glass) ............................ 51
4.3 Document Feeding and Scanning ..................................................54
Scan Procedure ........................................................................................ 54
◆ Standard Feeding.................................................................................. 55
◆ Panel Feeding ....................................................................................... 56
◆ Automatic Feeding ................................................................................ 57
4.4 Other Scanning Techniques............................................................59
Using the Job Mode for Scanning ............................................................. 59
◆ Setting the Event Function .................................................................... 60
Using the Count Only Mode...................................................................... 63
Using Patch Code Sheets ......................................................................... 64
◆ Patch Code Sheets ............................................................................... 64
◆ Types of Patch Code Patterns ............................................................... 65
◆ How to Use Patch Code Sheets............................................................ 66
Chapter 5 User Modes
5.1 About the User Modes.....................................................................70
User Mode Functions ................................................................................ 70
How to Set the User Modes ...................................................................... 72
3
Page 8

Chapter 6 Troubleshooting
6.1 When the Scanner Is Not Recognized .......................................... 74
SCSI Connections .................................................................................... 74
USB Connections ..................................................................................... 76
6.2 Clearing Paper Jams ...................................................................... 77
Clearing a Paper Jam ............................................................................... 77
Paper Jam Causes.................................................................................... 81
6.3 When the Scanned Image Is Not Normal .......................................82
6.4 Display Messages ............................................................................83
Error Messages......................................................................................... 83
Scanner Status Messages ........................................................................ 85
6.5 Troubleshooting...............................................................................86
Chapter 7 User Maintenance
7.1 Changing the Stamp Cartridge .......................................................90
7.2 Daily Cleaning ..................................................................................92
Cleaning the Main Unit ............................................................................. 92
Cleaning the Flatbed (Platen Glass) and Pressure Board ....................... 93
Cleaning the Feeder ................................................................................. 94
Cleaning the Power Plug .......................................................................... 98
Appendix
Specifications ......................................................................................... 100
Specification for the Scanner .................................................................. 100
Options.................................................................................................... 101
Consumables .......................................................................................... 101
Exterior Dimensions ................................................................................ 102
Index ........................................................................................................103
4
Page 9

Safety Precautions
Safe Operation
When you are working around the scanner, follow these precautions to avoid the
hazards of fire and electrical shock:
■ Never install and operate the scanner near flammable substances such as alcohol,
WARNING
paint thinner, benzene, or any other type of volatile solution.
■ Never damage or modify the power cord, and never place heavy objects on the power
cord.
■ Always make sure that your hands are dry when you are handling the power cord or
plug. Never grasp the plug when your hands are wet.
■ Never plug the scanner into a multiplug power strip.
■ Never bundle, wrap, or tie the power cord around itself or another object. Connect the
plug securely to the power source.
■ Use only the power cord and plug provided with the scanner.
■ Never attempt to disassemble or modify the scanner.
■ Never use flammable aerosol products near the scanner.
■ Before you clean the scanner, turn OFF the power and disconnect the power cord
from the power outlet.
■ To clean the scanner exterior, use a firmly wrung cloth moistened slightly with water
or mild detergent. Never use any type of volatile solution such as alcohol, benzene,
or paint thinner.
■ If you hear a strange sound, detect smoke or abnormal heat, sense vibration, or
smell odd odors around the scanner, turn OFF the power immediately and disconnect
the power cord from the power outlet. Call for service immediately.
■ Handle the scanner with care. Avoid shocks and vibrations to the scanner caused by
reckless handling. If you suspect the scanner has been accidentally damaged, turn
OFF the power immediately and disconnect the power cord from the power outlet.
Call for service immediately.
■ Before you move the scanner, always turn OFF the power and disconnect the power
cord from the power outlet.
■ The scanner weighs 74.0 lb (33.6 kg). Two people must carry the scanner. You may
drop the scanner, or pinch your fingers if you attempt to carry it by yourself.
■ Notice to Cardiac Pacemaker Users
This product generates a weak magnetic field. If you use a cardiac pacemaker, move
away from product in the event that you notice any unusual symptoms. Also, please
consult a cardiologist.
5
Page 10

CAUTION
■ To avoid damage to the scanner, never place the scanner on an unstable or vibrating
surface. The scanner may tip or fall over, and cause an injury.
■ To avoid overheating and causing a fire, never block the air vents on the rear and
side of the scanner.
■ Keep all liquids, beverages, or any type of liquid, and clips, staples, necklaces, or
other metal objects away from the scanner. If you accidentally spill liquid or drop a
metal object into the scanner, turn OFF the power immediately and disconnect the
power cord from the power outlet. Call for service immediately.
■ Never install the scanner in humid or dusty locations. Doing so might cause a fire or
electrical shock.
■ Never place heavy objects on top of the scanner. Such objects may tip or fall over,
and cause an injury.
■ When you remove the power cord, grip it by the plug head. Never attempt to
disconnect the power cord from the power outlet by pulling on the power cord. Doing
so might expose or break the core leads, damage the power cord, and cause a fire or
electrical shock.
■ Keep the area around the power outlet clear of all obstacles so you can disconnect
the power cord easily at all times.
■ Never spill water or any type of volatile solution (alcohol, benzene, paint thinner) into
the scanner. Doing so might cause a fire or electrical shock.
■ When the scanner is not being used for a long time, disconnect the power cord from
the power outlet.
■ Avoid wearing loose fitting clothing, dangling jewelry, long ties, or even long hair that
could become entangled with moving parts, especially the rollers that feed the
scanner. If such objects become entangled, immediately disconnect the power plug
from the power outlet to stop the scanner.
■ Be very careful when you are loading a document or removing a paper jam. You may
be injured unexpectedly. For example, the paper edges may cut your fingers.
■ Do not open the feeder cover while the scanner is operating. Doing so might result in
a malfunction or injury.
■ Do not directly touch the pins and contacts on the scanner connector with your
hands. Doing so might result in a malfunction.
■ Open the feeder carefully and slowly, taking care to avoid letting it fall over
backwards. Failure to do so might result in a malfunction or personal injury.
■ Close the feeder carefully and slowly, taking care to avoid pinching your hands.
Failure to do so might result in a malfunction or personal injury.
■ When scanning a thick book or similar item from the flatbed (platen glass), avoid
pressing down hard on the feeder. Doing so might damage the glass and create the
risk of a malfunction or personal injury.
■ Never place any object other than documents to be scanned onto the scanner’s
flatbed (platen glass). Doing so might result in a malfunction or personal injury.
6
Page 11

Installation Location
More than 3.9" (100 mm)
More than
More than
5.9"
(150 mm)
More than
27.6"
(700 mm)
More than 33.5" (850 mm)
For operation, maintenance and ventilation, make sure that there is enough space
around the scanner, as shown in the illustration above.
5.9"
(150 mm)
Avoid placing the scanner in the following places. Doing so may cause a
malfunction and adversely affect the scanner or your computer.
•Places exposed to direct sunlight
If installation in such places is unavoidable, provide a curtain or similar object to
shade the scanner.
•Places subject to dust and fumes
Dust and cigarette fumes adversely affect the components inside the scanner.
• Near running water, a heat source, water vapor, or in an area such as a
laboratory exposed to ammonia gas, paint thinner, or other volatile chemicals.
•Places subject to vibration and strong shock
•Places subject to rapid changes in temperature or humidity
Condensation occurring inside the scanner may impair scan image quality. Place
the scanner in a room that is well within the following range:
Room temperature 59°F to 86°F (15°C to 30°C)
Relative humidity 25% to 80% RH
• Near electronic equipment or heavy equipment that generates a strong
magnetic field, such as a speaker, TV, or radio.
7
Page 12
Power Supply
• Be sure to connect to an AC 220-240 V (50/60 Hz) or AC 120 V (60 Hz) power
supply, according to your region’s requirement.
• Ensure that the scanner is connected to an independent power outlet. Do not
plug the scanner into an outlet shared with another device. If you use an
extension cord, pay attention to the total amperage of the cord.
• If you are unsure of anything relating to the power supply, contact your service
representative or the power company.
• Never place an object on top of the power cord or step on the power cord.
• Never bundle the power cord or wrap the cord around an object, such as a table
leg.
• Do not tug the power cord. When you remove the power cord, grip it by the plug
head.
• Keep the area around the power outlet free of obstacles.
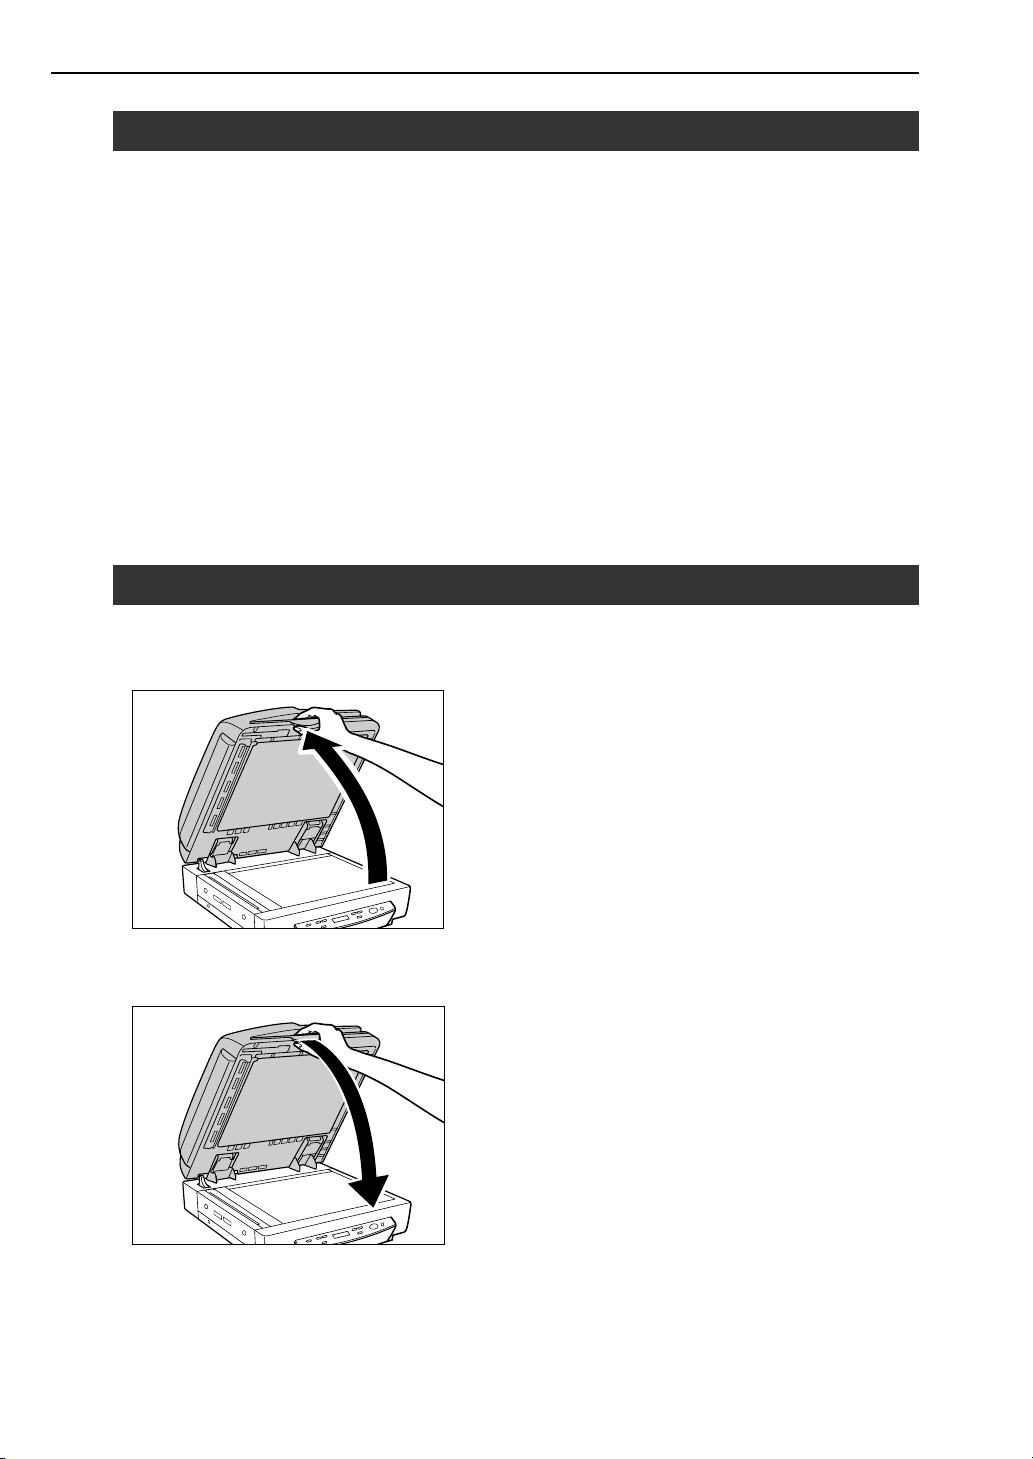
Opening and Closing the Feeder
■ Open the feeder carefully and slowly, taking care to avoid letting the feeder fall
over backwards.
■ Close the feeder carefully and slowly, taking care to avoid pinching your
fingers.
8
Page 13
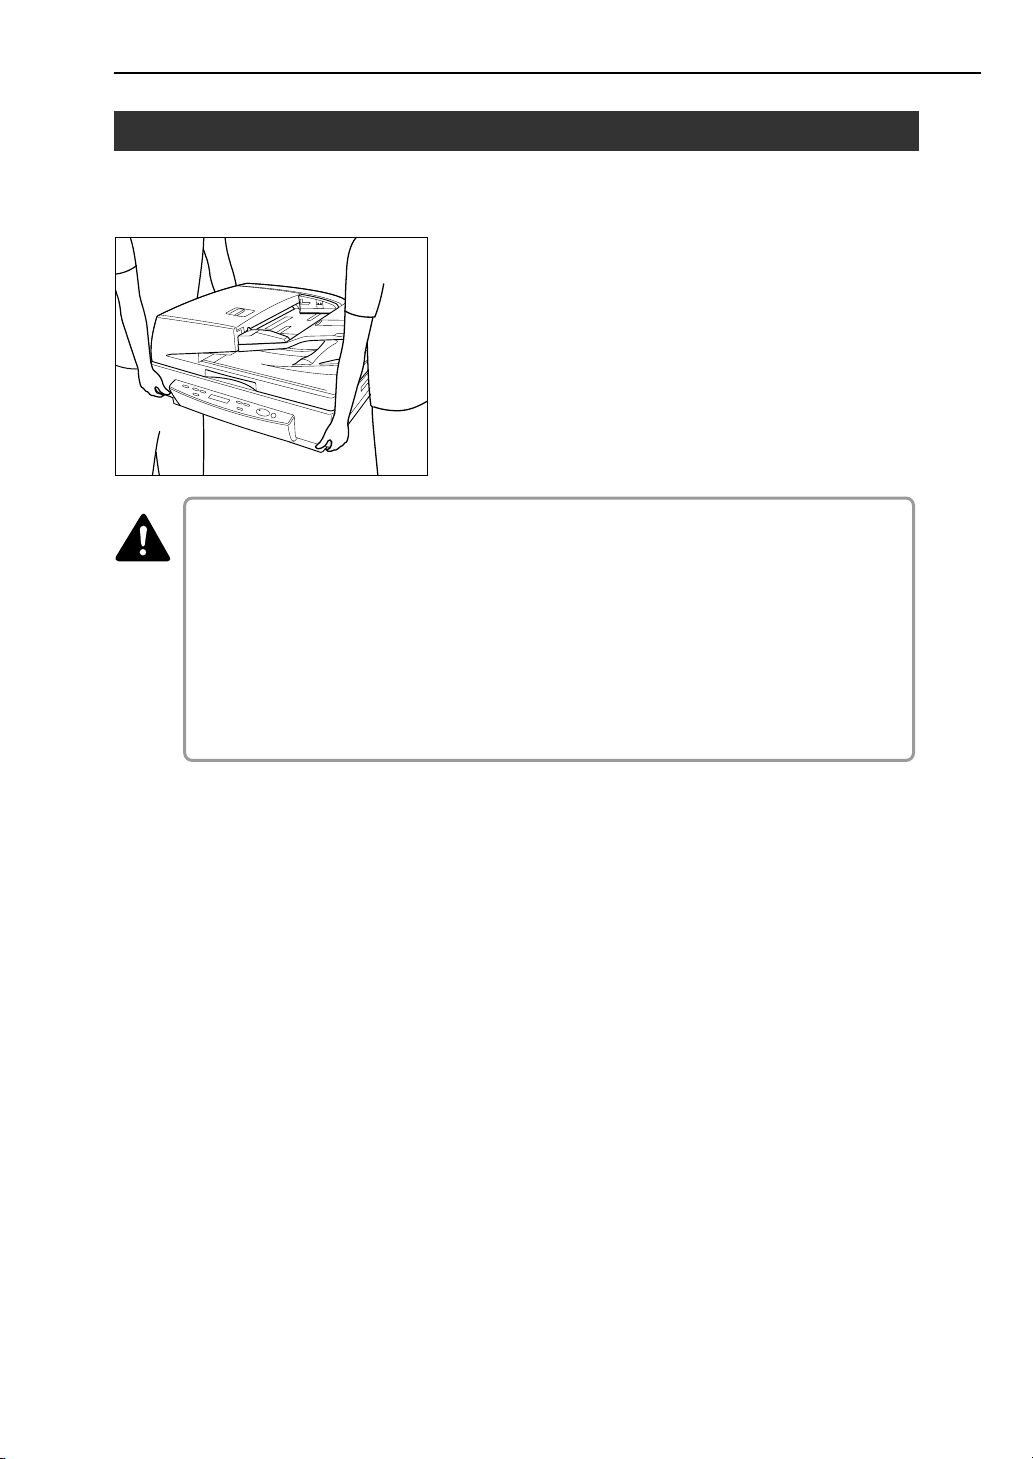
Carrying
Take care when moving the scanner. Two people should hold the scanner firmly
on opposite sides when lifting it.
■ The scanner weighs 74.0 lb (33.6 kg). Two people must carry the scanner. You may
WARNING
drop the scanner, or pinch your fingers if you attempt to carry it by yourself.
■ When moving the scanner, be sure to turn OFF the power and remove any cables. If
the cables are not removed before moving the scanner, you may damage the plugs
or connectors by forcibly pulling them out.
■ Notice to Cardiac Pacemaker Users
This product generates a weak magnetic field. If you use a cardiac pacemaker, move
away from product in the event that you notice any unusual symptoms. Also, please
consult a cardiologist.
9
Page 14

Page 15

Chapter 1
Getting Ready
This chapter describes the features of the
scanner, what’s in the box, and the names and
functions of parts on the scanner.
1.1 Features of the DR-7080C .................. 12
1.2 Before Getting Started ....................... 14
Unpacking ................................................ 14
Removing the Transportation Screw ....... 15
1.3 Part Names .......................................... 16
Feeder ..................................................... 16
Flatbed ..................................................... 17
Rear ......................................................... 18
Operation Panel ................................................. 19
1.4 Job Function ....................................... 20
1.5 Optional Products .............................. 21
Stamp Unit ............................................... 21
Page 16

Chapter 1 Getting Ready
Features of the DR-7080C
The DR-7080C is a desktop ADF/flatbed scanner for high-speed scanning of large
volume documents. The following are the main features of the DR-7080C.
● Black and white, grayscale, and 24-bit color output
Support for black and white, grayscale, and 24-bit color output.
● High-speed scanning
The feeder supports scanning of LTR/A4-size documents at speeds up to 70
pages per minute.
● Duplex (two-side) scanning
When scanning both sides of document pages with the feeder, the front is
scanned first. After that the page is turned over automatically and the back is
scanned.
● Flatbed scanning
Flatbed scanning is also supported for thin paper, paper that does not feed
properly, magazines, bound documents, and other documents that cannot be
scanned using the feeder.
● Large capacity, reliable feeding
-A large capacity paper feed tray allows loading of up to 100 LTR/A4-size
document pages.
- The document size is detected and adjusted automatically, which eliminates
the need for troublesome manual settings. Document pages of different sizes
can be mixed together and loaded for a single scan operation.
● Job Function
To begin scanning, you need only to select a job with the [Job] keys of the
scanner, and then press the [Start] key. Scanned images can be sent directly to
a specific folder, printer, or e-mail address. (See “Job Function,” on p. 20.)
● Skew correction
This feature automatically detects when a document page is fed unevenly, and
automatically straightens it.
● Text Orientation Recognition
The DR-7080C can detect the text orientation in scanned images and rotate
the images in 90° increments to normalize text orientation.
*1
● High durability
A highly durable design provides scanning for up to 4 million scans.
● Advanced Text Enhancement
12
Page 17

1.1 Features of the DR-7080C
This feature eliminates the background surrounding the text. This makes it
easier to read the text on documents that are printed on a light colored
background, or are written in pencil, or if the text is a color other than black.
● Dropout color
This feature lets you skip ("drop out") a specific color when scanning.
● Stamping (option)
This feature automatically marks the trailing edge of a scanned document page
with a stamp to indicate that is has been scanned. (See “Optional Products,” on
p. 21.)
*1
This function is not supported on a computer that is running Windows NT.
1
13
Page 18
Chapter 1 Getting Ready
Before Getting Started
Make sure you perform the following procedures before using the DR-7080C for
the first time.
• Unpacking
• Removing the Transportation Screw
Unpacking
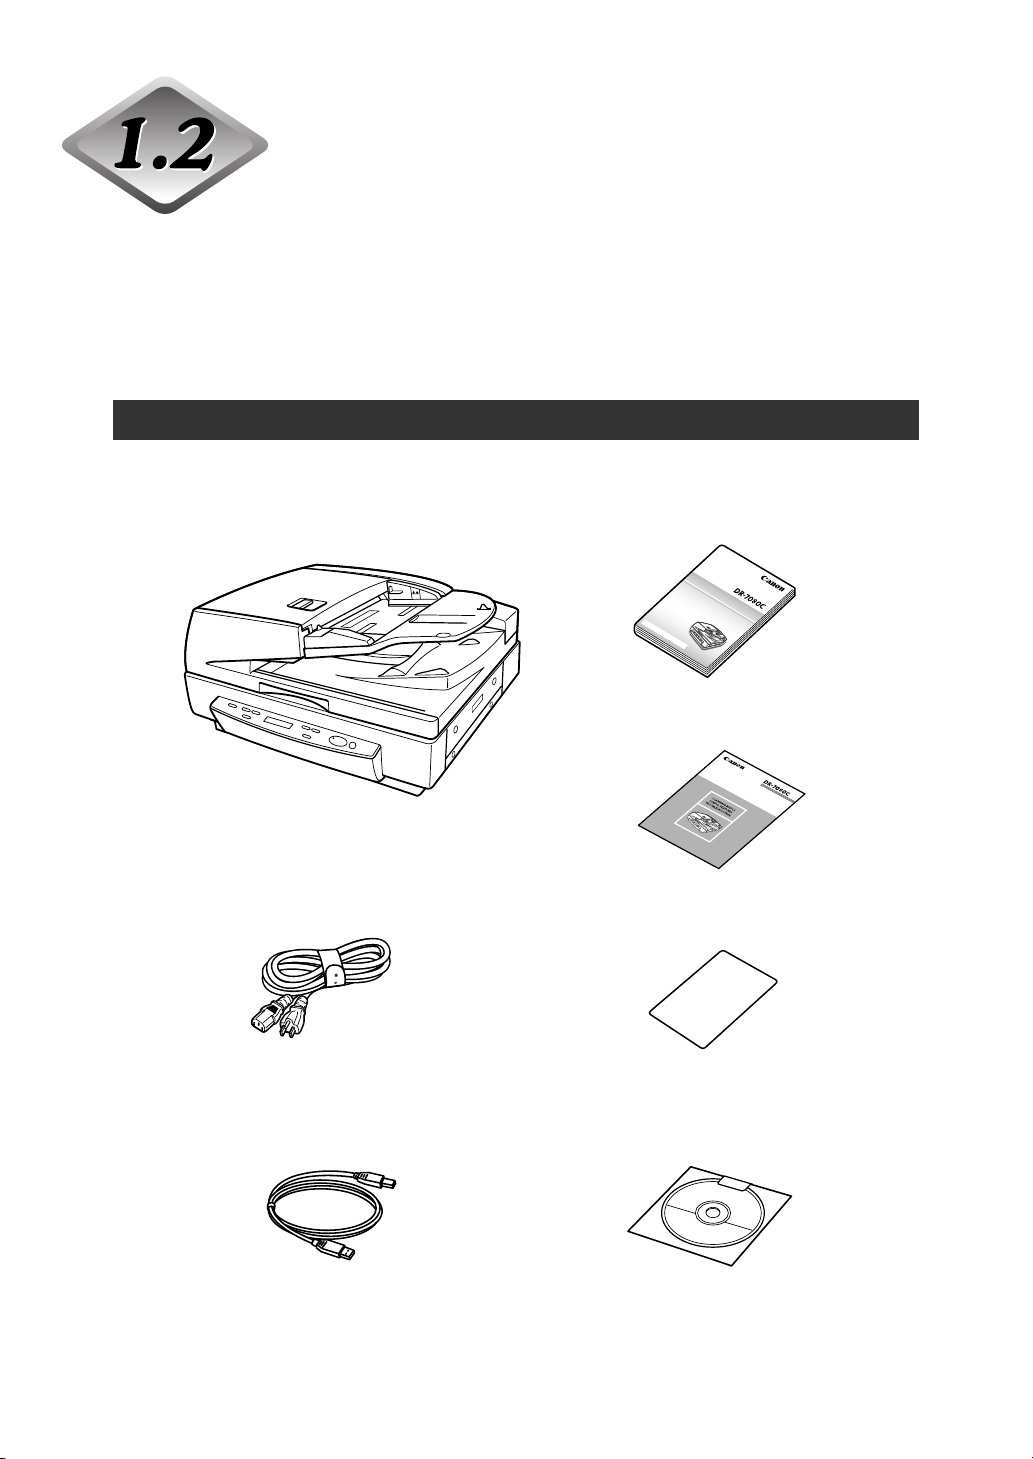
Make sure that you have everything. Check every item you have removed from the
box. If any items are missing, contact your sales representative.
D
o
c
u
m
e
n
t
S
c
a
n
n
e
r
IN
S
T
R
U
C
T
IO
N
P
l
e
a
r
e
s
a
e
d
r
i
e
n
a
g
d
t
h
t
h
i
s
i
s
m
m
a
a
n
n
u
u
a
a
l
,
l
s
b
t
e
o
f
r
o
e
r
e
i
t
o
i
n
p
a
e
r
s
a
a
t
i
f
n
e
g
p
t
l
h
a
i
c
s
e
u
f
n
o
i
r
t
.
f
A
u
t
f
u
t
e
r
r
e
y
r
o
e
u
f
e
f
r
i
e
n
n
i
s
c
h
e
.
S
DR-7080C
Power Cord*
Instructions (this manual)
Q
D
O
C
U
U
M
IC
E
N
T
S
K
C
A
N
R
N
E
R
E
F
E
R
E
N
C
E
Quick Reference
Warranty Card
*1
14
USB Cable
Setup Disc
*1 For U.S.A. and Canada only.
*2 The power cord varies according to country of purchase.
Page 19
1.2 Before Getting Started
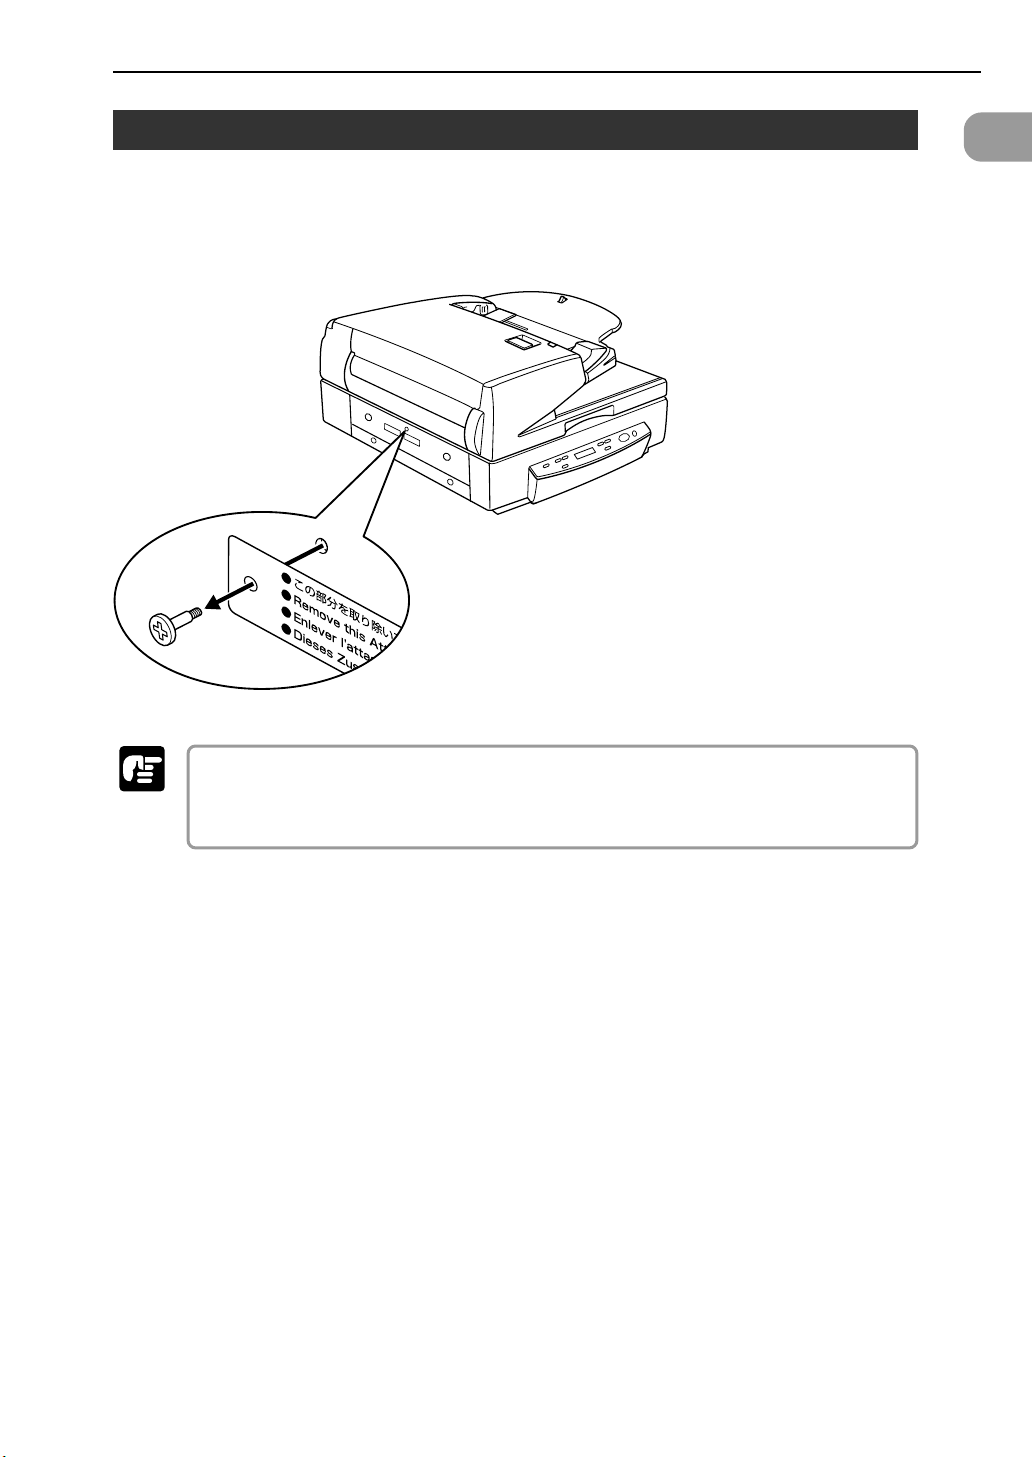
Removing the Transportation Screw
A transportation screw is installed at the factory to lock the scanner’s optical unit
in place and protect it against damage caused by vibration and other forces during
shipment. You must remove the transportation screw before trying to use the
scanner.
1
Important
● Tu rning the scanner ON without removing the transportation screw may damage the
scanner. If installed, always remove the transportation screw and tag before turning
the power ON.
15
Page 20
Chapter 1 Getting Ready
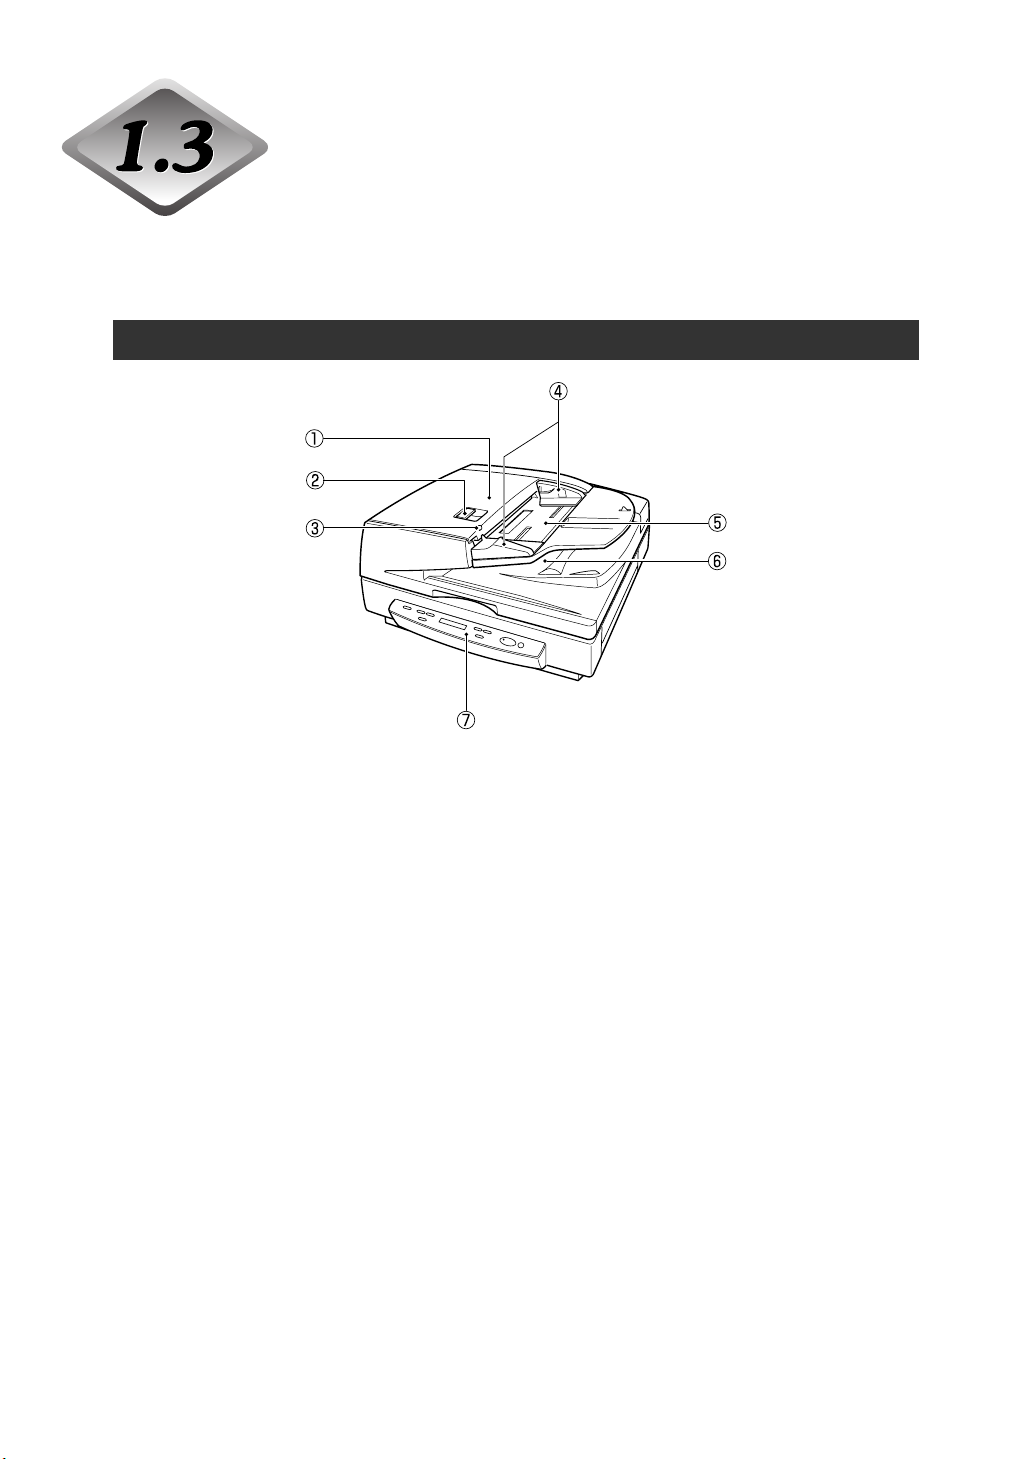
Part Names
This section describes the names and functions of each part. Before you connect
the DR-7080C, take a few minutes to familiarize yourself with the main parts.
Feeder
q Feeder Cover
Open this cover to clear document jams and clean the rollers. (See pp. 77, 90.)
w Opening Lever
Operate this release lever when opening or closing the feeder cover.
e Document Set Indicator
This indicator lights when there is a document in the document feeder tray.
(See p. 49.)
r Slide Guide
Adjust this guide to the marking on the document size label that indicates the
applicable document size. (See p. 48.)
t Document Feeder Tray
Load documents to be scanned here. (See p. 49.)
y Document Eject Tray
Scanned documents are ejected here. Raise the document feeder tray to
remove ejected documents. (See p. 50.)
u Operation Panel
(See p. 19.)
16
Page 21
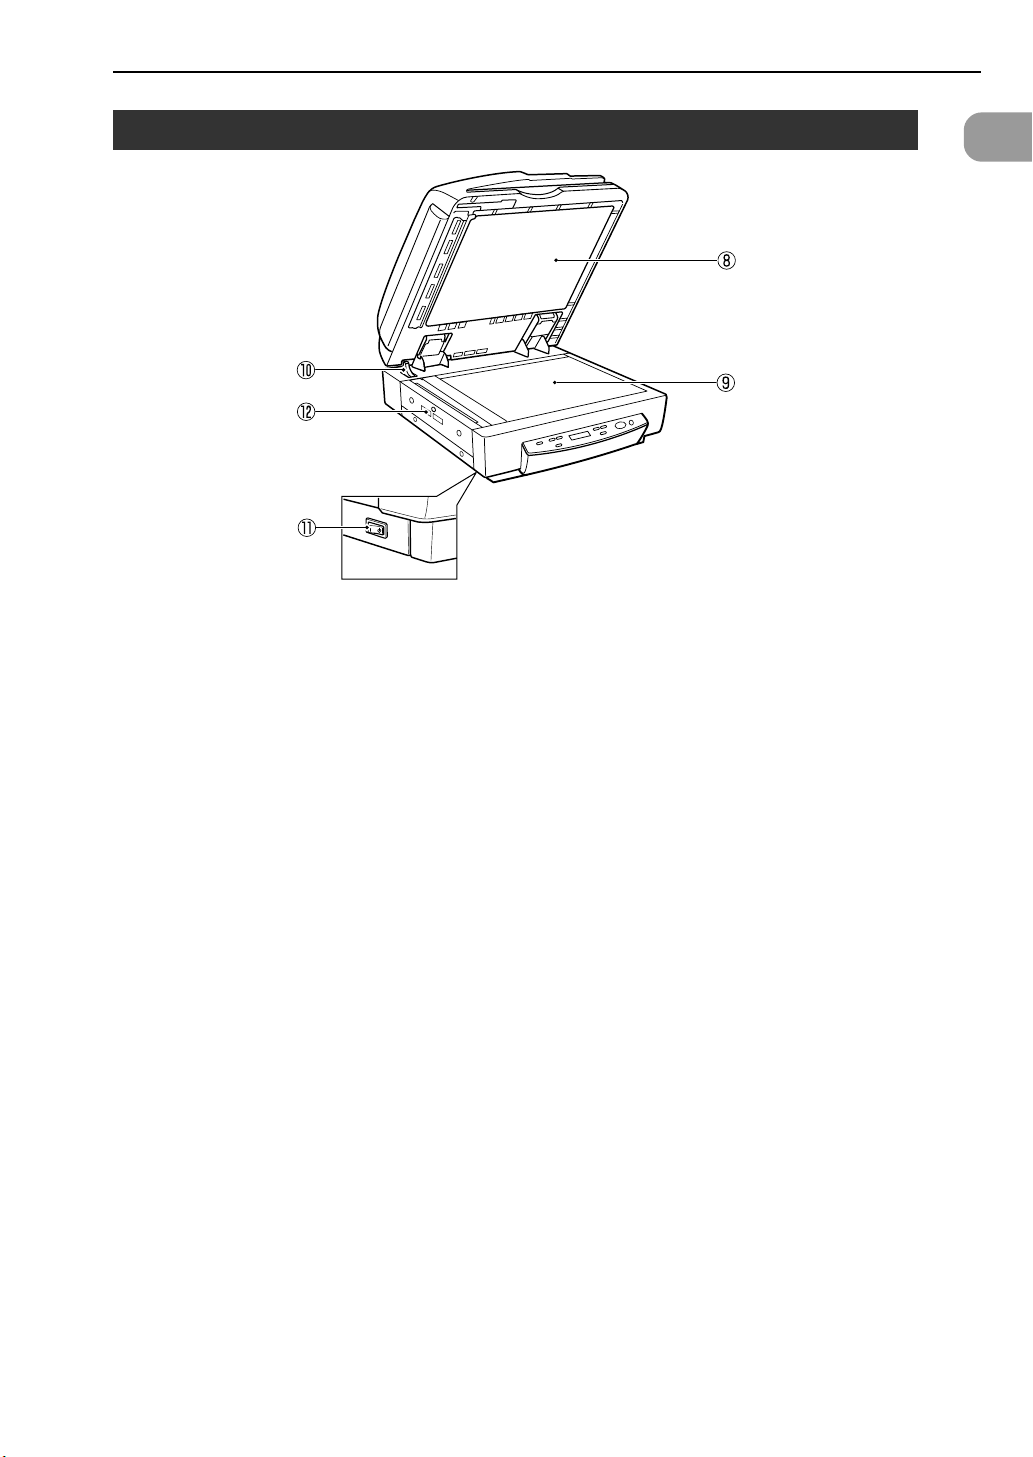
1.3 Part Names
Flatbed
i Pressure Board
This board presses the document page against the glass during scanning.
(See p. 89.)
o Flatbed (Platen Glass)
When placing the document onto the platen glass, align it with the arrow in the
upper left corner of the glass. (See p. 51.)
1
!0 Opening Sensor
This sensor detects whether the feeder is open or closed. (See p. 51.)
!1 Power Switch
(See p. 30.)
!2 Air Vents
17
Page 22
Chapter 1 Getting Ready
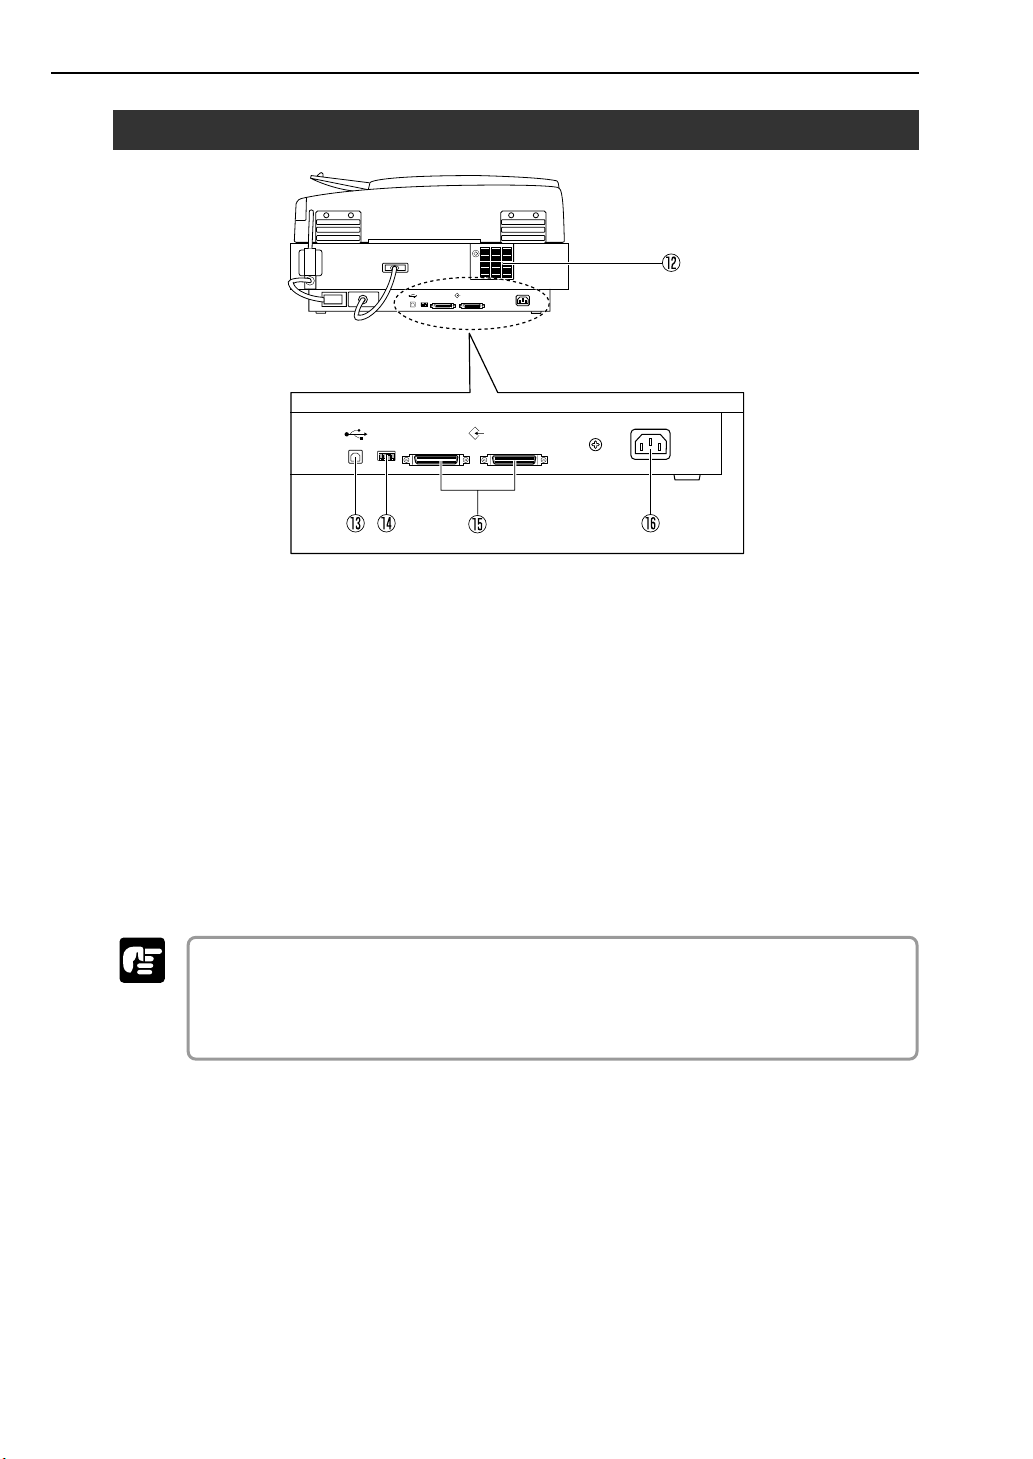
Rear
!22 Air Vents
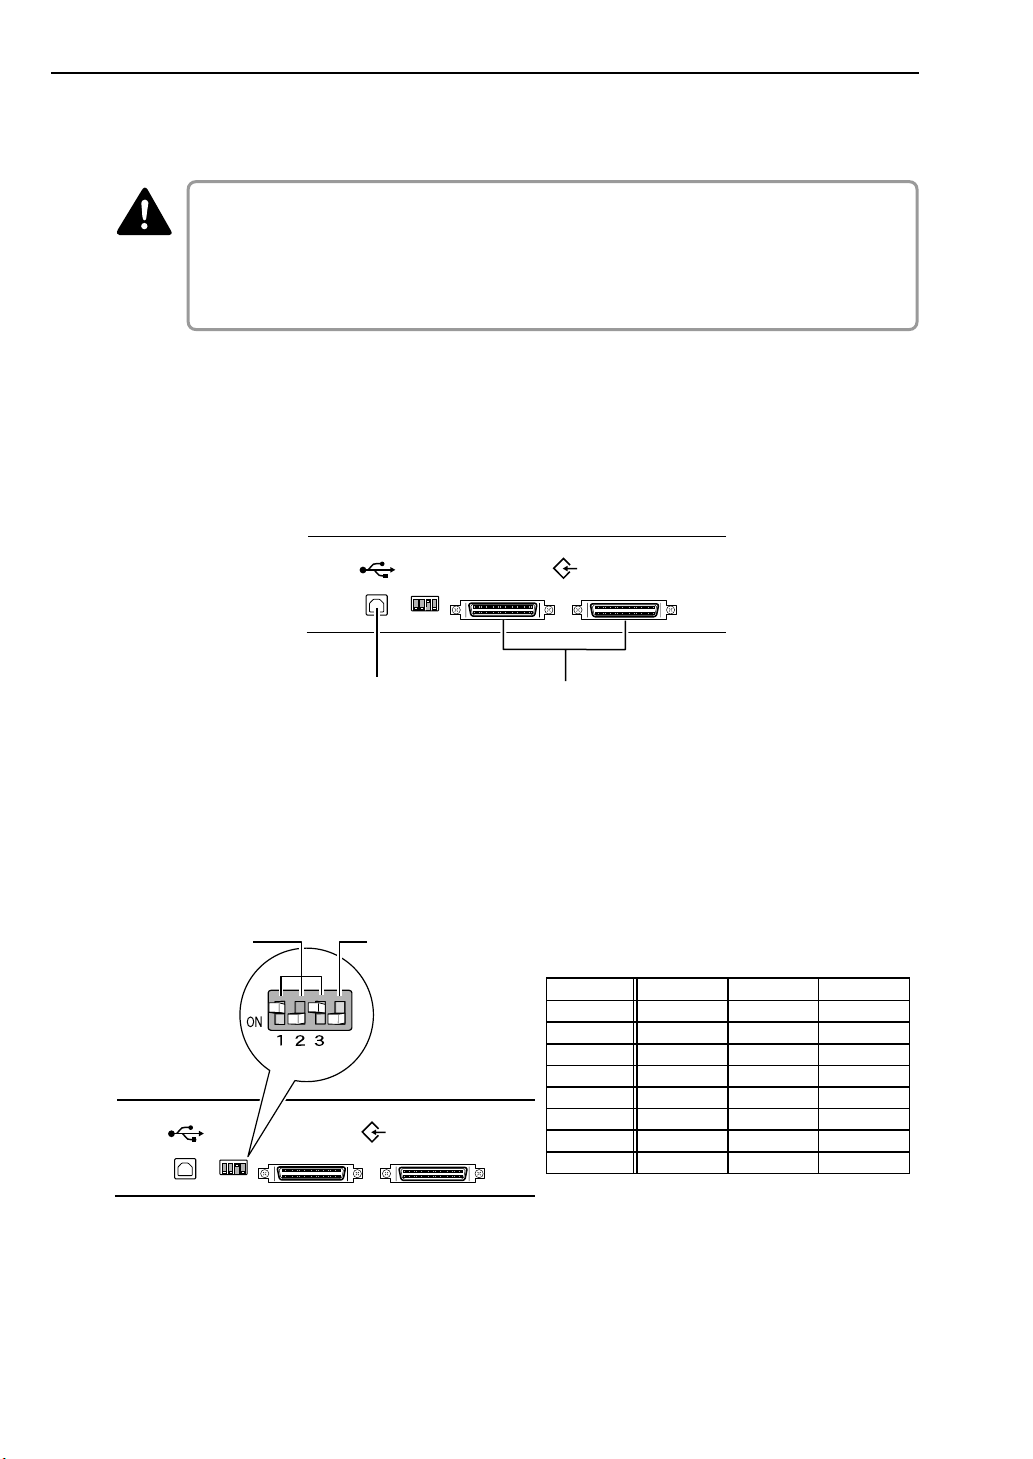
!3 USB Connector
Connect a Hi-Speed USB 2.0 compatible USB cable here. (See p. 28.)
!4 DIP Switches
Configure these switches to specify the SCSI ID or terminator ON or OFF.
(See p. 26.)
!5 SCSI Connectors
Connect a SCSI cable (50-pin half pitch, pin type) here. (See p. 25.)
!6 Power Cord Connector
Connect the provided power cord here.
● Never touch the cables on the left side of the back panel. Disconnection of cables
Important
can cause a malfunction of the scanner.
● Take care to ensure that the vents never become blocked. Blocked vents can lead to
heat build-up inside the scanner and create the risk of fire.
18
Page 23
1.3 Part Names
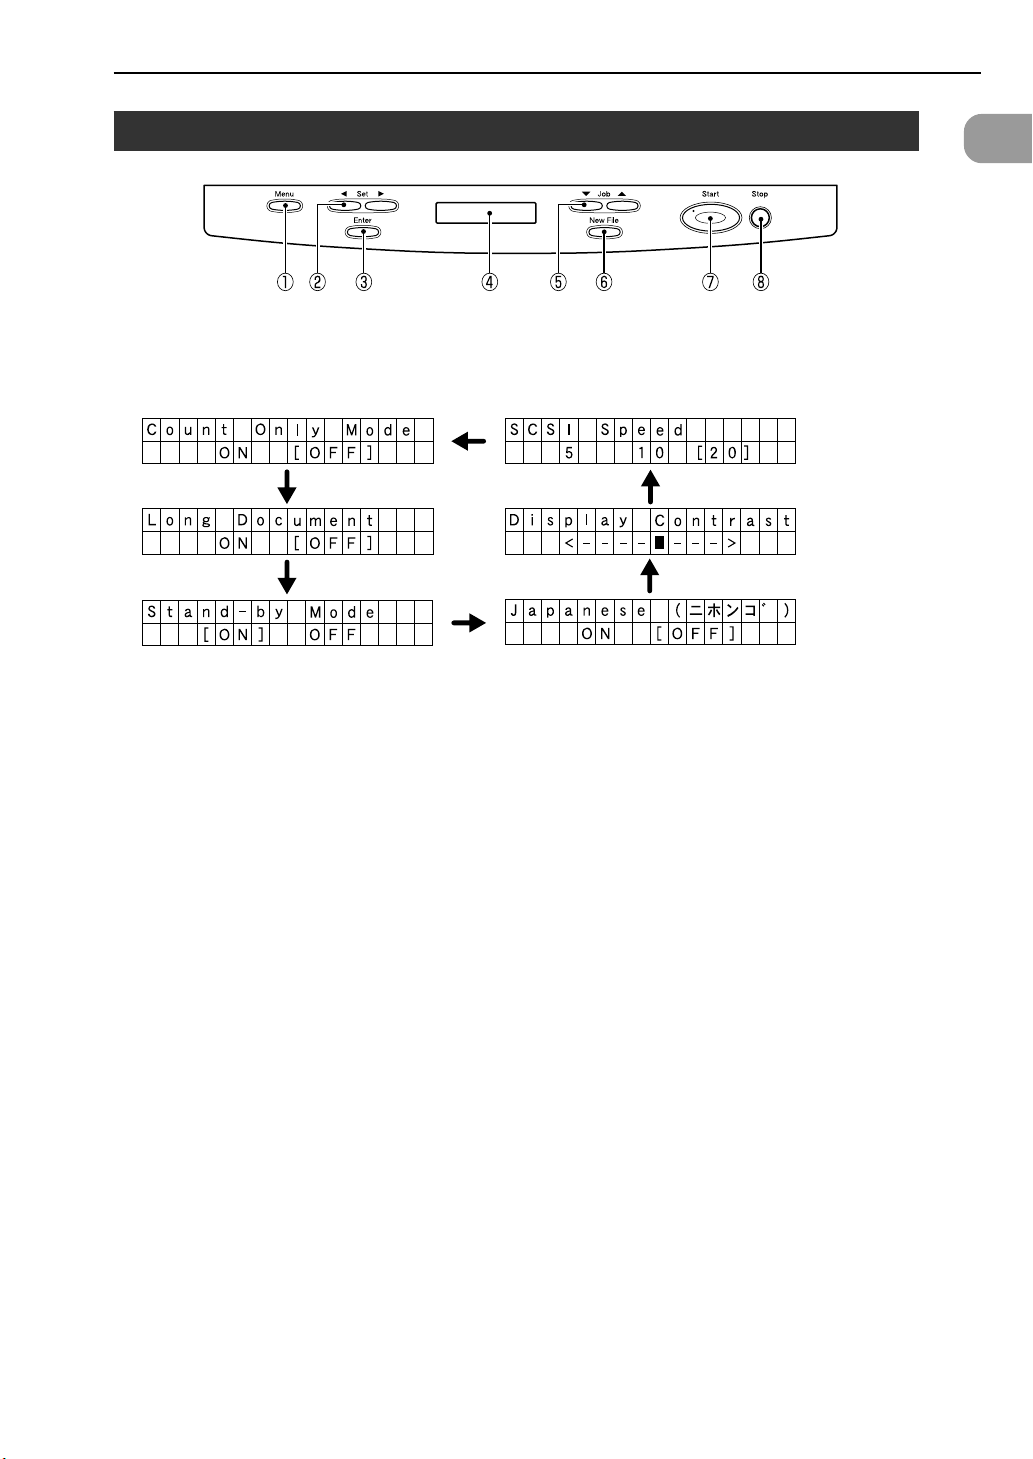
Operation Panel
q Menu Key
Press this key to cycle the display through the various user modes, as shown
below. (See “About the User Modes,” on p. 68.)
w Set Keys
Use these keys to change the setting of the currently displayed user mode.
(See p. 72.)
1
e Enter Key
Press this key to register the currently displayed user mode setting. (See p. 72.)
r Display Panel
Displays the number of scanned pages, error codes, etc.
t Job Keys
Use these keys to scroll through registered job numbers (01 through 99) on the
display panel. (See “Job Function,” on p. 20.) Pressing the [Start] key while a
job number is displayed starts scanning of the document and forwards the
scanned image to the registered job.
y New File Key
This key is active for applications that support batch separation. This key lights
when pressed or in accordance with the application's batch separation settings.
Scanning the next document while this key is lit causes the scanned image to
be stored in a different file or folder than the previously scanned document.
u Start Key
The Start key lamp lights when the key is enabled by the Count Only Mode or
the application's settings. Pressing the [Start] key while its lamp is lit causes
scanning to start.
i Stop Key
Pressing this key stops an ongoing scanning operation. This key is also used to
cancel a mode setting and clear an error indicator from the counter display
area.
19
Page 24
Chapter 1 Getting Ready
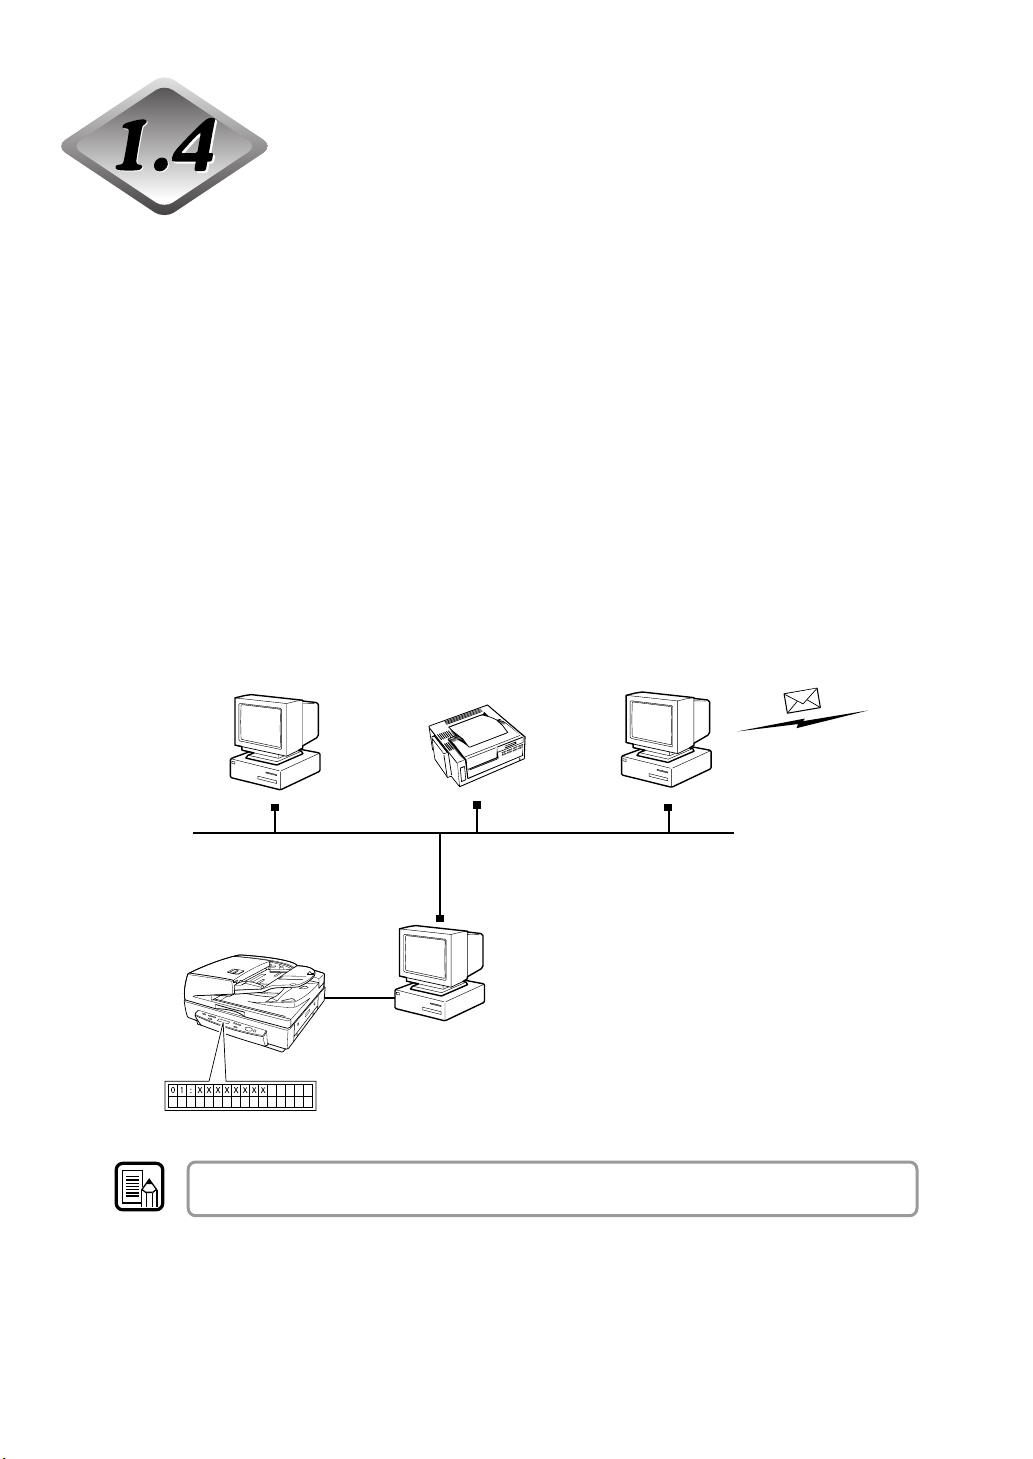
Job Function
The DR-7080C comes with a “Job function” that makes it possible to perform
scanning without starting a scanning application. The Job function lets you use the
operation panel to perform scanning and forward image files to destinations in
accordance with the currently selected job.
The Job function has the capabilities listed below, and jobs can be registered using
Job Registration Tool. (See “How to Start the Job Registration Tool,” on p. 41.)
• Images can be saved to a shared folder or other specified folder (Scan to PC).
• Images can be sent as e-mail attachments (Scan to Mail).
• Images can be output to a specified printer (Scan to Printer).
For details about using the Job function, see “Using the Job Mode for Scanning,”
on page 59.
Scan to PC Scan to MailScan to Printer
Save image to specified folder. Send image as
Output to printer (Mail Server)
mail attachment.
Note
(Internet)
(Network)
DR-7080C
The Job function is not supported on a computer that is running Windows NT.
20
Page 25
1.5 Optional Products
Optional Products
The following options can be purchased and used on the DR-7080C, if they are
necessary. Contact your sales representative.
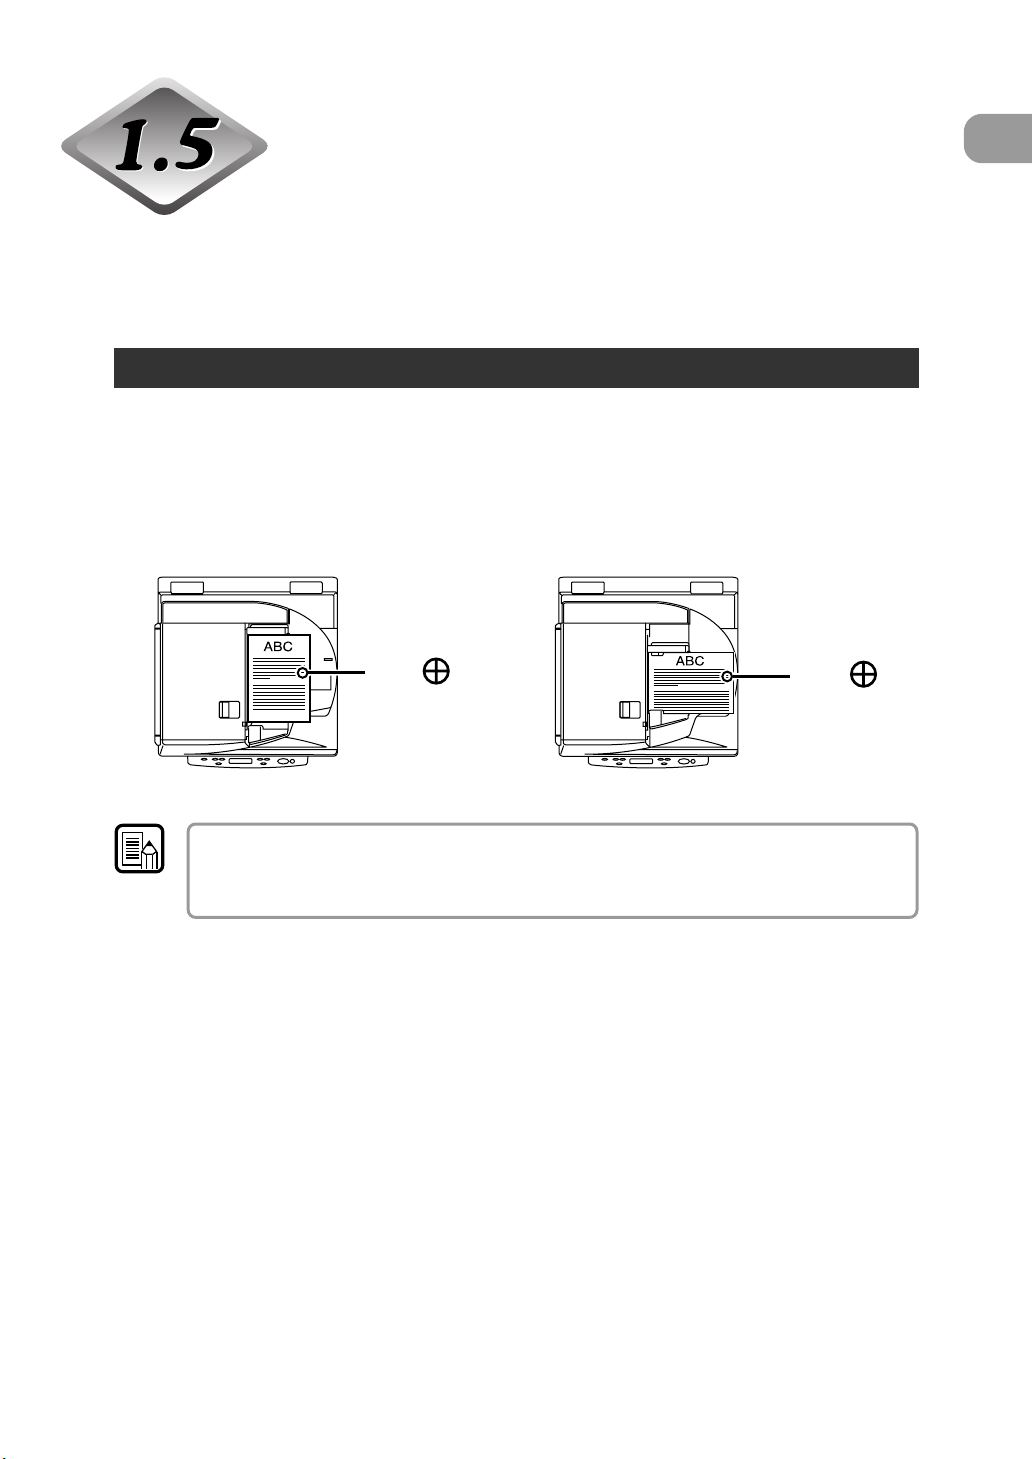
Stamp Unit
The stamp unit affixes a “scanned” stamp on document pages that are scanned
using the feeder. The application can be used to turn stamping on or off.
The stamp is a circle that has a diameter of about 0.11" (3 mm), with a cross in
the center. It is stamped on the scanned side of the document page, about
0.27" (7 mm) from the trailing edge of the document page.
Stamp
Position
Stamp
Position
1
Note
● The stamp pattern is fixed and cannot be changed.
● In the case of duplex scanning, both sides of the document page are stamped.
● The cross in the center of the stamp rotates during stamping.
21
Page 26

Page 27

Chapter 2
Connecting to a Computer
This chapter describes how to connect the
scanner to a computer, and includes
information about what you need to do to get
Windows to recognize the scanner.
2.1 Checking Your Operating
Environment ........................................ 24
2.2 Connecting to a Computer ................ 25
SCSI Connections ................................... 25
USB Connections .................................... 28
Connecting the Power Cord ..................... 29
2.3 Turning ON or OFF the Power ........... 30
Turning ON the Power ............................. 30
Recognizing the Scanner ........................ 31
Turning OFF the Power ............................ 33
Page 28

Chapter 2 Connecting to a Computer
Checking Your Operating
Environment
Your computer system must meet the following conditions to use the
DR-7080C.
● IBM PC/AT or compatible machines that meet the following
specifications:
• Intel Celeron 733 MHz or faster
• 256 MB main memory or more (recommended)
• 100 MB or more of free space on the hard disk
● SCSI card that is compatible with this scanner or Hi-Speed USB 2.0
interface card (See “Connecting to a Computer,” on p. 25.)
● Monitor that can display at a resolution of 1024 x 768 (XGA) or greater is
recommended.
● One of the following operating systems:
For SCSI
• Microsoft Windows 98SE
• Microsoft Windows Me
• Microsoft Windows NT 4.0 Workstation SP6
• Microsoft Windows 2000 Professional SP4
• Microsoft Windows XP SP1
For USB
• Microsoft Windows 98SE
• Microsoft Windows Me
• Microsoft Windows 2000 Professional SP4
• Microsoft Windows XP SP1
● Either an ISIS (compatible) or a TWAIN (compatible) application that
operates on one of the operating systems noted above.
24
Important
● The DR-7080C does not support operation under Windows 95.
● The Job function is not supported on a computer that is running Windows NT. If you
want to use the Job function, run the scanner with a computer running a supported
operating system other than Windows NT.
● Use the latest USB 2.0 driver when using USB connections. Contact your sales
representative.
● If the CPU, memory, SCSI card, or USB interface card does not meet the
recommended specifications, the scanning speed may slow down or the time
required to transfer data may increase.
Page 29

2.2 Connecting to a Computer
Connecting to a Computer
There are two ways to connect the scanner to your computer, SCSI or USB. Use
the method that is compatible with your computer system.
■ Do not turn OFF the scanner or remove any interface cables when an application is
CAUTION
running.
■ Do not connect both SCSI and USB interface cables at the same time.
■ Turn OFF the computer and the scanner before changing the cable format.
SCSI Connections
Connect the scanner to the computer.
To connect the scanner with a SCSI cable, you will need the following items that are not
Note
included in the package:
● SCSI card
Check that the SCSI card is installed on your computer.
Use one of the recommended SCSI cards.
● SCSI cable
The scanner’s SCSI connector is a half-pitch 50-pin (pin type) connector. Check the
shape of the connector on your computer’s SCSI card or on the SCSI device
connected to your computer, and prepare a SCSI cable that is compatible with the
connector that can be connected to the scanner.
2
◆ SCSI Cards
Be sure to use one of the recommended SCSI cards when connecting the
scanner with a SCSI cable. The recommended SCSI cards are listed below.
Recommended SCSI cards
Manufacturer: Adaptec
Product names: AHA-2930U, AHA-2940AU, ASC-19160, ASC-29160, APA-1480
Be sure to follow the installation procedure in your computer’s operation manual when
Important
installing the SCSI card on your computer.
25
Page 30
Chapter 2 Connecting to a Computer
◆ Connecting the SCSI Cable
■ The SCSI cable should only be as long as the rating for the SCSI card being used. If
CAUTION
Connect your computer to the scanner using the SCSI cable.
Two SCSI connectors are located on the rear of the scanner. Insert the SCSI
cable from the computer into one of the connectors on the bottom of the scanner.
To connect another SCSI device to the computer, insert the other SCSI cable into
the vacant SCSI connector on the rear of the scanner, and connect the other end
of the SCSI cable into the SCSI device in a daisy chain.
the SCSI cable is longer than the rated length, the scanner may not operate correctly.
■ Before you connect the SCSI cable, make sure that the scanner and the computer
are turned OFF.
■ Do not connect both SCSI and USB interface cables at the same time.
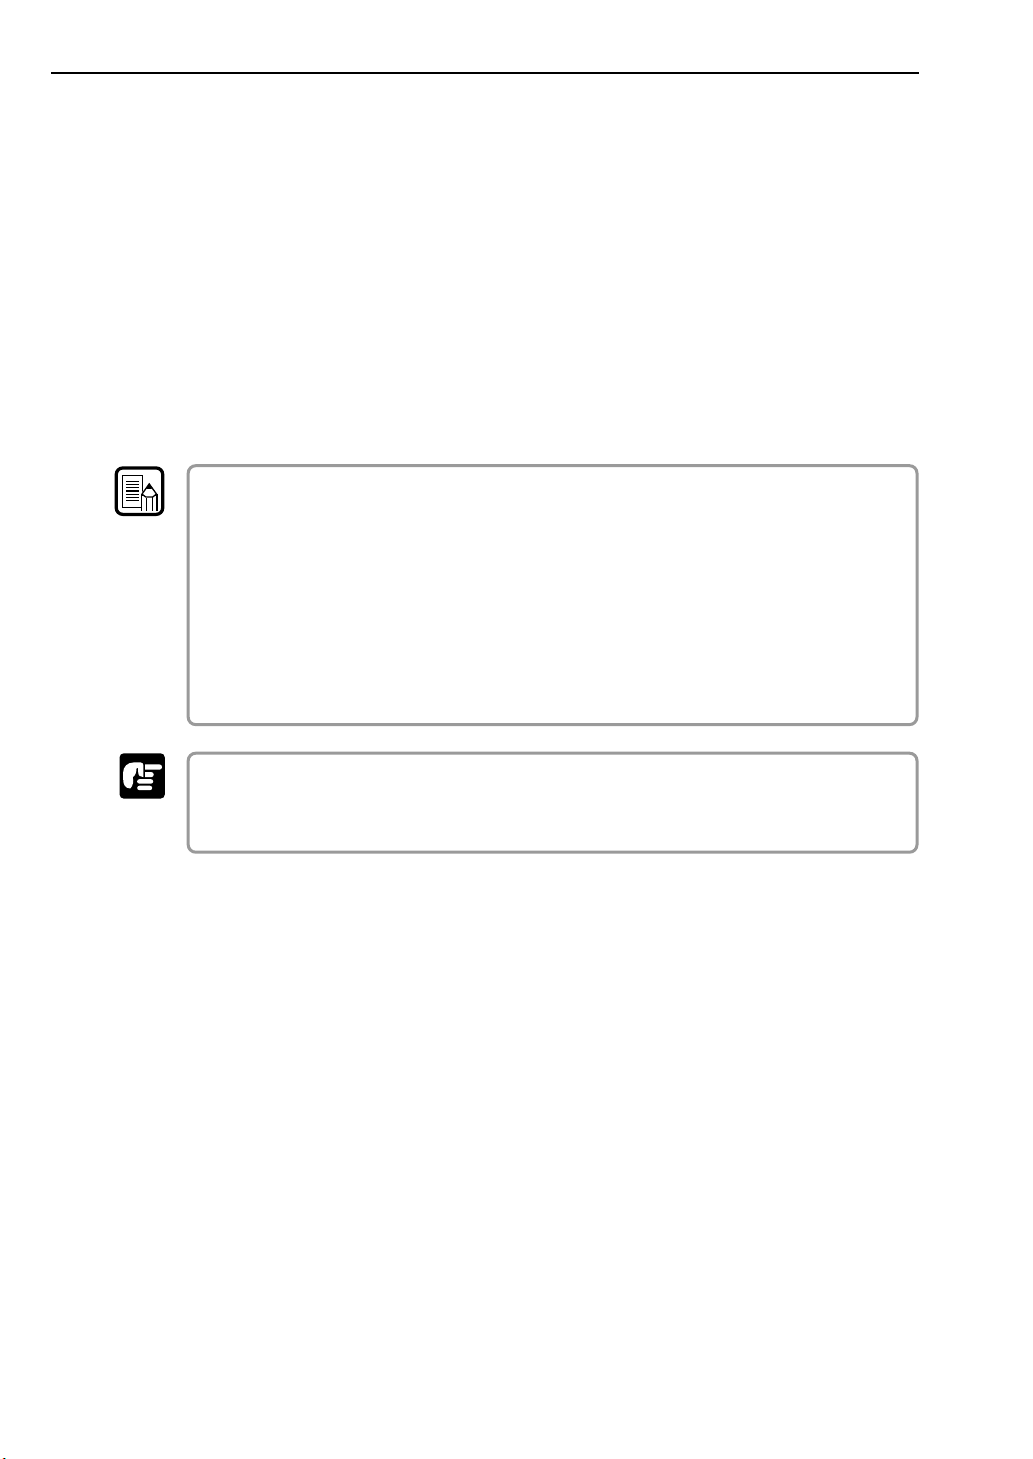
USB Connector
SCSI Connectors
(Cannot be used at the
same time a USB
connector is in use.)
◆ Setting the SCSI ID and Terminator
Set the SCSI ID and the terminator on the DIP switches located between the
SCSI connectors and the USB connector.
Move the DIP switch up to turn it OFF and move it down to turn it ON.
SCSI ID
Set the SCSI ID referring to the table above.
Set unique SCSI IDs to any other built-in SCSI devices or SCSI devices
connected to the computer.
Te r mi nator
SCSI ID
0
1
2
3
4
5
6
7
SW1
OFF
ON
OFF
ON
OFF
ON
OFF
ON
SW2
OFF
OFF
ON
ON
OFF
OFF
ON
ON
SW3
OFF
OFF
OFF
OFF
ON
ON
ON
ON
26
Page 31

● The SCSI ID default is set to 2.
Important
● Assign SCSI ID numbers ranging from 0 to 7 for each SCSI device. Do not select 7
as this is normally assigned to the SCSI controller. If a SCSI hard disk is mounted, do
not use 0 and 1. Normally 0 and 1 are assigned for hard disks.
Set the terminator on the last SCSI device on a daisy chain to ON.
<When only the scanner is connected to your computer, or when another
SCSI device is connected on a daisy chain and the scanner is the last SCSI
device on the end of the daisy chain>
Set the terminator switch on the scanner to ON.
In such a connection, be sure to set the terminator on all other SCSI devices to
OFF.
Te rminator ON
Te rminator OFF
<When another SCSI device is connected as the last device of the daisy
chain>
Set the terminator switch on the scanner to OFF.
In such a connection, set the terminator on the SCSI device connected as the end
device to ON.
Te rminator ON, or
attach terminator.
2
CAUTION
Te rminator OFF
Be sure to set the DIP switch or use a terminator plug if this scanner is installed as the
last piece of equipment in a daisy chain. Note that if you use a terminator plug and the
DIP switch is set to ON, the scanner may malfunction.
27
Page 32

Chapter 2 Connecting to a Computer 2.2 Connecting to a Computer
◆ Setting the SCSI Transfer Speed
When the scanner is hooked up with a SCSI cable, the scanner may not operate
correctly depending on the length of the cable and the SCSI card being used. In
this case, change the scanner's transfer speed in the user modes.
(See "About the User Modes," on p. 70.)
USB Connections
Connect the scanner to the computer.
● To connect the scanner with a USB interface cable, you will need the following items
Important
that are not included in the package.
• USB interface card
Use an extended USB interface card that is compatible with Hi-Speed USB 2.0 and
operationally tested by Canon.
● Tu rn the SCSI terminator on, even if you are using USB cables. If you use the
scanner with the SCSI terminator turned OFF, the scanner might not operate
correctly. (See "Setting the SCSI ID and Terminator," on p. 26.)
◆ USB 2.0 Interface Cards
Be sure to use one of the recommended USB 2.0 interface cards when
connecting the scanner with a USB interface cable. The recommended USB 2.0
interface cards are listed below.
Recommended USB 2.0 interface cards
Manufacturer: Adaptec
Product: USB 2 Connect 2000LP (AUA-2000)
USB 2 Connect 3100 (AUA-3100LP)
USB 2 Connect 5100 (AUA-5100)
USB 2 Connect for Notebooks (AUA-1420)
● Be sure to follow the installation procedure in your computer’s operation manual
Important
when installing the USB 2.0 interface card on your computer.
● Use the most recent USB 2.0 driver provided by Adaptec or Microsoft.
● Windows NT operating system does not support USB. Use a SCSI cable to connect
the scanner to computers with the Windows NT operating system.
● Use a USB hub that supports USB 2.0 if you need to use a USB hub.
● This scanner has passed the Hi-Speed USB 2.0 verification test. However, it may not
function properly even when Hi-Speed USB 2.0 is built-in to a computer as standard.
● Scan speed may slow down when Hi-Speed USB 2.0 is not supported.
28
Page 33

◆ Connecting a USB Interface Cable
Do not connect both a SCSI cable and USB interface cable at the same time.
CAUTION
2
USB Connector
SCSI Connectors
(Cannot be used at the
same time a USB
connector is in use.)
Connecting the Power Cord
Connect the power cord.
Be sure to use only the power cord provided with the scanner.
WARNING
When connecting the power cord, follow these precautions. Failure to do so might
cause a fire or electrical shock.
■ Never grasp the plug when your hands are wet.
■ Never plug the scanner into a multiplug power strip.
■ Never bundle or tie the power cord around itself or another object. Connect the plug
securely to the power source.
■ Use only the power cord and plug provided with the scanner.
■ Before you connect the power cord, be sure to turn OFF the power.
■ Be sure to connect to an AC 220-240 V (50/60 Hz) or AC 120 V (60 Hz) power supply,
according to your region’s requirement.
■ Do not plug the scanner into an outlet shared with another device. If you use an
extension cord, pay attention to the total amperage of the cord.
29
Page 34

Chapter 2 Connecting to a Computer
2.3 Turning ON or OFF the Power
Turning ON or OFF the Power
Follow the procedures below to turn ON or OFF the scanner power.
Turning ON the Power
Be sure to turn ON the power of all connected SCSI devices before you turn ON the
Important
1
computer.
Turn ON the scanner.
The illustration below shows the location of the power switch.
30
OFF
ON
Turning ON the scanner causes the display panel to appear as shown below.
If you hear a strange sound, detect smoke or abnormal heat, sense vibration, or smell
WARNING
2
Note
odd odors around the scanner, turn OFF the power immediately and disconnect the
power cord from the power outlet. Contact your service representative immediately.
Failure to do so might cause a fire.
Turn ON the computer.
You will need to install the scanner device driver when you start Windows the first time
after you connect the scanner to your computer. (See “Recognizing the Scanner,” on
p. 31.)
Page 35

Recognizing the Scanner
If you are using Windows 98/Me or Windows 2000/XP, then the first time that you
turn ON your computer after connecting this scanner to your computer, Windows
Plug and Play function automatically displays a screen prompting you to install the
scanner driver. Follow the instructions on the screen to proceed with the
installation. (The name of the installation dialog varies depending on the Windows
operating system.)
● If you are using Windows 98SE, the [Add New Hardware Wizard] dialog
box appears.
1. Click the [Next] button.
2. Select [Search for the best driver for your device. (Recommended).], and
then click the [Next] button.
3. Insert the setup disc into the computer’s CD-ROM drive.
4. Select [Specify a location], enter “D:\INF” (assuming that “D” is assigned to
your CD-ROM drive), and then click the [Next] button.
5. Click the [Next] button.
6. Click the [Finish] button.
● If you are using Windows Me, the [Add New Hardware Wizard] dialog box
appears.
1. Select [Specify the location of the driver (Advanced)], and then click the
[Next] button.
2. Insert the setup disc into the computer’s CD-ROM drive.
3. Select [Search for the best driver for your device. (Recommended).], and
then select [Specify a location]. Enter “D:\INF” (assuming that “D” is
assigned to your CD-ROM drive), and then click the [Next] button.
4. Click the [Next] button.
5. Click the [Finish] button.
2
● If you are using Windows 2000 Professional, the [Found New Hardware
Wizard] dialog box appears.
1. Click the [Next] button to proceed to the [Install Hardware Device Drivers]
screen.
2. Select [Search for a suitable driver for my device (recommended)], and then
click the [Next] button to proceed to the [Locate Driver Files] screen.
3. Select [Specify a location], and then click the [Next] button.
4. Insert the setup disc into the computer’s CD-ROM drive.
5. Enter “D:\INF” (assuming that “D” is assigned to your CD-ROM drive), and
then click the [OK] button.
6. In the [Driver Files Search Results] screen, click the [Next] button.
7. If the message “Digital Signature Not Found” appears, click [Yes] to continue
installation.
8. On the [Completing the Found New Hardware Wizard] screen, click the
[Finish] button.
31
Page 36
Chapter 2 Connecting to a Computer
2.3 Turning ON or OFF the Power
● If you are using Windows XP, the [Found New Hardware Wizard] dialog
box appears.
1. Insert the setup disc into the computer’s CD-ROM drive.
2. In the [Welcome to the Found New Hardware Wizard] screen, select [Install
from a list or specific location (Advanced)], and then click the [Next] button.
3. Select [Search for the best driver in these locations], and then clear the
[Search removable media (floppy, CD-ROM...)] check box. Select [Include
this location in the search], enter “D:\INF” (assuming that “D” is assigned to
your CD-ROM drive), and then click the [Next] button.
4. Click the [Continue Anyway] button in the [Hardware Installation] dialog box.
5. Click the [Finish] button in the [Completing the Found New Hardware
Wizard] screen.
● Although a message appears in the [Hardware Installation] dialog box indicating that
Note
the driver “has not passed Windows logo testing,” this is not a problem.
● The DR-7080C will be registered as “CANON DR-7080C SCSI” or “CANON
DR-7080C USB” in the “Imaging Device” directory.
● Note that the SCSI connection device name is different from the USB connection
device name. If you change from one type of connection to another, Windows will
have to recognize the scanner again. The first time you turn ON the computer after
changing the connection method, perform the device driver installation procedure
from the beginning again.
Important
If you cancel device driver installation part way through, you will not be able to use the
Job function. (See “Job Function,” on p. 20.) Always perform the entire device driver
installation procedure all the way to the end.
32
Page 37

Turning OFF the Power
If you are using a SCSI connection, turn OFF the computer first, before turning OFF the
Important
scanner.
1
Turn OFF the computer.
2
Turn OFF the scanner.
OFF
ON
■ Wait at least 10 seconds before turning ON the scanner again.
CAUTION
■ For your safety, disconnect the power plug from the power outlet if you are not using
the scanner for a long time.
2
33
Page 38

Page 39

Chapter 3
Using the Software
This chapter describes how to install and use
the ISIS/TWAIN driver, CapturePerfect, and
Job Registration Tool that come packaged
with the scanner.
3.1 About the Software .............................36
3.2 Installing the Software .......................37
3.3 How to Use the Software ...................39
How to Display the ISIS/TWAIN Driver Help File ...
How to Start CapturePerfect.................... 40
How to Start the Job Registration Tool .... 41
3.4 Uninstalling the Software ................. 43
39
Page 40

Chapter 3 Using the Software
About the Software
The following software applications are provided on the setup disc that is
packaged with the scanner. Be sure to open and read the Readme.txt file on the
setup disc before installing the software.
● ISIS/TWAIN driver
This driver allows the scanner to use ISIS (Image and Scanner Interface
Specification) compatible applications or TWAIN (Tool Without An Interesting
Name) compatible applications to scan documents. Be sure to install the ISIS/
TWAIN driver to use this scanner.
● CapturePerfect
This is a TWAIN compatible application for scanning images. Install it if
necessary.
● Job Registration Tool
Job Registration Tool is a TWAIN-compliant application for registering the jobs
used by the Job function. Note, however, that the Job function is not supported
on a computer that is running Windows NT. If you want to use the Job function,
run the scanner with a computer running a supported operating system other
than Windows NT. (See “Job Function,” on p. 20.)
Important
● CapturePerfect and the Job Registration Tool use the TWAIN Driver. Be sure to install
the ISIS/TWAIN Driver before you install CapturePerfect or the Job Registration Tool.
● The ISIS/TWAIN driver provided with the scanner does not necessarily operate all
ISIS compatible applications or all TWAIN compatible applications. Contact your
sales representative for further information.
● Some functions mentioned in this manual may not operate in some applications.
36
Page 41

3.2 Installing the Software
Installing the Software
This section describes how to install the ISIS/TWAIN driver, CapturePerfect, and
Job Registration Tool that are used when operating the scanner.
CapturePerfect and the Job Registration Tool use the TWAIN Driver. Install the
software in the order of the ISIS/TWAIN Driver, CapturePerfect, and then the Job
Registration Tool.
● The Job function is not supported on a computer that is running Windows NT. If you
Important
want to use the Job function, run the scanner with a computer running a supported
operating system other than Windows NT.
● If another ISIS compatible driver is already installed on the computer, be sure to
make a backup of the following file. The content of this file may be overwritten when
the ISIS/TWAIN driver is installed.
C:\Windows\PixTran\*.*
C:\Windows\System\pix*.dll
● The names of the “\Windows” and “\Windows\System” folders are different, depending
on which Windows operating system you are using. The names of the above folders
are representative and should be replaced by the name of the folder used in your
operating system.
3
1
Turn ON your computer and start Windows.
Be sure to log on as an administrator if your system is Windows NT 4.0 Workstation,
Important
2
Windows 2000 Professional, or Windows XP.
Insert the setup disc into the CD-ROM drive.
This manual assumes that “D” is assigned to your CD-ROM drive.
37
Page 42

Chapter 3 Using the Software
3
Click the [Start] button, and then select [Run].
The screen depends on which Windows operating system you are using.
4
Enter “D:\*****\setup.exe” in the [Open] field, and then click [OK].
● In this example, the CD-ROM drive name is D:.
Note
5
● ***** stands for the name of the folder where you will install the applicable software.
ISIS/TWAIN Driver: D:\Driver\setup.exe
CapturePerfect: D:\CapturePerfect\setup.exe
Job Registration Tool: D:\JobTool\setup.exe
This starts the installer. Follow the instructions that appear on your
computer screen to complete the installation.
When the installation completes, restart your computer.
38
Page 43

3.3 How to Use the Software
How to Use the Software
This section describes how to use CapturePerfect and Job Registration Tool for
scanning.
Read the “ISIS/TWAIN Driver HELP” for information on using the ISIS/TWAIN
driver.
How to Display the ISIS/TWAIN Driver Help File
The explanation on how to use the ISIS/TWAIN driver is in the ISIS/TWAIN driver
help file. To view the help file, click the [Start] button, and then click [Programs] [Canon DR-7080C] - [Canon DR-7080C Help].
3
39
Page 44

Chapter 3 Using the Software
How to Start CapturePerfect
This section describes the procedure to start and exit CapturePerfect. See [Help]
in CapturePerfect for information on how to use CapturePerfect.
1
Click the [Start] button, and then click [Programs] - [CapturePerfect
2.0].
Click [All Programs] - [CapturePerfect 2.0] if your OS is Windows XP.
2
This starts CapturePerfect.
The basic operation of CapturePerfect is noted in the CapturePerfect help file.
Note
To view the explanation, select [Help] from the [Help] menu on the menu bar in
CapturePerfect.
40
Page 45

3.3 How to Use the Software
3
Select [Exit] from the [File] menu.
How to Start the Job Registration Tool
This section describes the procedure to start and end the Job Registration Tool.
See [Help] in the Job Registration Tool for information on how to use the Job
Registration Tool. Alternatively, for information on scanning procedures using the
Job function, see "Using the Job Mode for Scanning," on p. 59.
3
● If you are using Windows 2000 or Windows XP, be sure to log on as an Administrator.
Important
1
Click the [Start] button, and then click [Programs] - [Canon DR-
● The Job function is not supported on a computer that is running Windows NT. If you
want to use the Job function, run the scanner with a computer running a supported
operating system other than Windows NT.
7080C] - [Job Registration Tool].
In the case of Windows XP, click [All Programs] - [DR-7080C] -[Job
Registration Tool].
41
Page 46

Chapter 3 Using the Software
2
This starts Job Registration Tool.
● See the Job Registration Tool help file for information about how to use the Job
Note
Registration Tool. To view the help file, click the [Help] button.
● The last page of this manual is “Job Title Record.” Use it to record the titles of jobs
that you register with the Job Registration Tool.
42
Page 47

3.4 Uninstalling the Software
Uninstalling the Software
This section explains how to uninstall the software.
● Be sure to log on as an administrator if your system is Windows NT 4.0 Workstation,
Important
1
Click the [Start] button, and then click [Settings] - [Control Panel].
Windows 2000 Professional, or Windows XP.
● The dialogs and button names in Windows XP are different from those used in the
explanations in this manual. Refer to the Windows XP “Help and Support Center” to
uninstall the software.
3
2
Double click on the [Add/Remove Programs] icon.
The [Add/Remove Programs Properties] dialog box appears.
43
Page 48

Chapter 3 Using the Software
3
From the list in the dialog box, select the name of the application
you want to remove, and then click the [Add/Remove] button.
4
This displays a [Confirm File Deletion] dialog box for the
application you are removing.
If you selected “Canon DR-7080C Driver,” the above dialog box appears.
5
Click the [Yes] button, and the uninstaller starts.
Follow the instructions on the screen to finish uninstalling the software.
44
Page 49

Chapter 4
Using the Scanner
This chapter describes precautions regarding
documents that can be handled on this
scanner and scanning operations.
4.1 Documents .......................................... 46
Types of Documents ................................ 46
Feeder Capacity ...................................... 47
4.2 Placing Documents onto the
Scanner ............................................... 48
Loading a Document into the Feeder ...... 48
Positioning a Document on the Flatbed
(Platen Glass) .......................................... 51
4.3 Document Feeding and Scanning..... 54
Scan Procedure ....................................... 54
4.4 Other Scanning Techniques .............. 59
Using the Job Mode for Scanning ........... 59
Using the Count Only Mode .................... 63
Using Patch Code Sheets ....................... 64
Page 50

Chapter 4 Using the Scanner
Documents
This section describes the various types of documents that can be scanned with
the feeder.
Handle documents with care. Improper handling of paper can cause paper cuts or other
CAUTION
Types of Documents
The following are the dimensions of the documents that can be fed by the feeder:
personal injury.
Width: 55" to 12" (139.7 mm to 304.8 mm)
Length: 5" to 17" (128 mm to 432 mm) (Normal Mode)
5" to 24" (128 mm to 630 mm) (Long Document Mode)
5" to 21" (128 mm to 540 mm) (Long Document Mode/Color 600 dpi Mode)
Document Thickness
Black-and-white Documents
Simplex: 0.002" to 0.006"/0.06 mm to 0.15 mm
Duplex: 0.002" to 0.006"/0.07 mm to 0.15 mm
Black-and-white/Color Documents Mixed:
0.002" to 0.006"/0.07 mm to 0.15 mm
Color Documents
0.003" to 0.006"/0.08 mm to 0.15 mm
Document Weight
Black-and-white Documents
Simplex: 11 to 32 lb bond/42 to 128 g/m
Duplex: 13 to 32 lb bond/50 to 128 g/m
2
2
Black-and-white/Color Documents Mixed
13 to 32 lb bond/50 to 128 g/m
2
Color Documents
17 to 32 lb bond/64 to 128 g/m
2
Follow these guidelines when you prepare a document for scanning:
• When scanning long documents, turn the Long Document Mode "ON" in the
user mode. (See "About the User Modes," on p. 70)
• Before scanning documents that contain pasted artwork, make sure that the ink
or paste on the pages is thoroughly dry. If the documents are scanned with the
ink or paste still wet, the scanner may malfunction.
• If you scan a document written in pencil, the letters may not scan properly or the
pencil may rub off onto the rollers and stain subsequent documents. Before you
scan this kind of document, make a copy and then scan the copy. After scanning
a document written in pencil or some other soft writing material, be sure to clean
the scanning rollers. (See "Cleaning the Feeder," on p. 94.)
• If you scan thin paper in the Duplex mode, the ink printed on the back side may
be scanned. In this case, adjust the scanning density.
46
Page 51
4.1 Documents
• If you scan documents with a rough surface, friction between the documents
may cause a paper jam. In this case, select [Flatbed], and then scan the
documents one page at a time.
• When you scan a batch of NCR documents, make sure that they are not stuck
together. If a jam occurs, change the scanning side setting to "Flatbed," and
then scan the document one page at a time.
•To avoid paper jams, damage to documents, and a scanner malfunction, do not
feed the following types of paper. For such documents, scan one page at a time
from the flatbed (platen glass).
Carbon-backed paper
Coated paper
Extremely thin paper
Paper with binding holes
Note
Wrinkled or creased paper
Curled paper
Torn paper
Paper with clips or staples
● Note that mixing documents of different thicknesses and sizes may cause a
malfunction during feeding.
● Documents containing text or pictures within 0.2" (5 mm) of its edges or documents
with a color background may cause erroneous skew detection or automatic size
detection.
Feeder Capacity
Note the following rules when loading a document into the feeder.
● Make sure the top of the document stack is not higher than the load limitation
mark. Overloading the feeder can cause jamming.
● The feeder is designed to hold approximately 100 sheets of LTR/A4-size
standard copy paper (20 lb bond or 80 g/m
2
).
4
Load Limitation Mark
47
Page 52

Chapter 4 Using the Scanner
Placing Documents onto the Scanner
This section describes how to load documents into the feeder and how to position
a document page on the flatbed (platen glass) for scanning.
Handle documents with care. Improper handling of paper can cause paper cuts or other
CAUTION
Loading a Document into the Feeder
Perform the following steps to load the pages of a document into the feeder for
scanning.
1
personal injury.
Adjust each slide guide so its pointer is aligned with the
corresponding paper size on the document size label.
Important
Slide Guide
Use both hands to adjust both the left and right slide guides. Adjusting only one slide
guide can lead to a malfunction.
48
Page 53

4.2 Placing Documents onto the Scanner
2
Align the edges of the document stack on a flat surface, and then
load the stack into the feeder with the scanning side facing
upwards.
Insert the stack into the feeder as far as it will go, until the document set
indicator lights.
Document Set Indicator
Important
● Make sure the top of the document stack is not higher than the load limitation mark.
Overloading the feeder can cause jamming.
● The feeder is designed to hold approximately 100 sheets of LTR/A4-size standard
copy paper (20 lb bond or 80g/m
● When scanning NCR paper that is 11" x 17"/A3 or other large sizes, as well as paper
that is very thin, the document may occasionally get caught in the paper eject
mechanism. In this case, place some paper (auxiliary paper) in the document eject
tray before scanning the document.
2
).
Load Limitation Mark
4
Auxiliary Paper
49
Page 54
Chapter 4 Using the Scanner
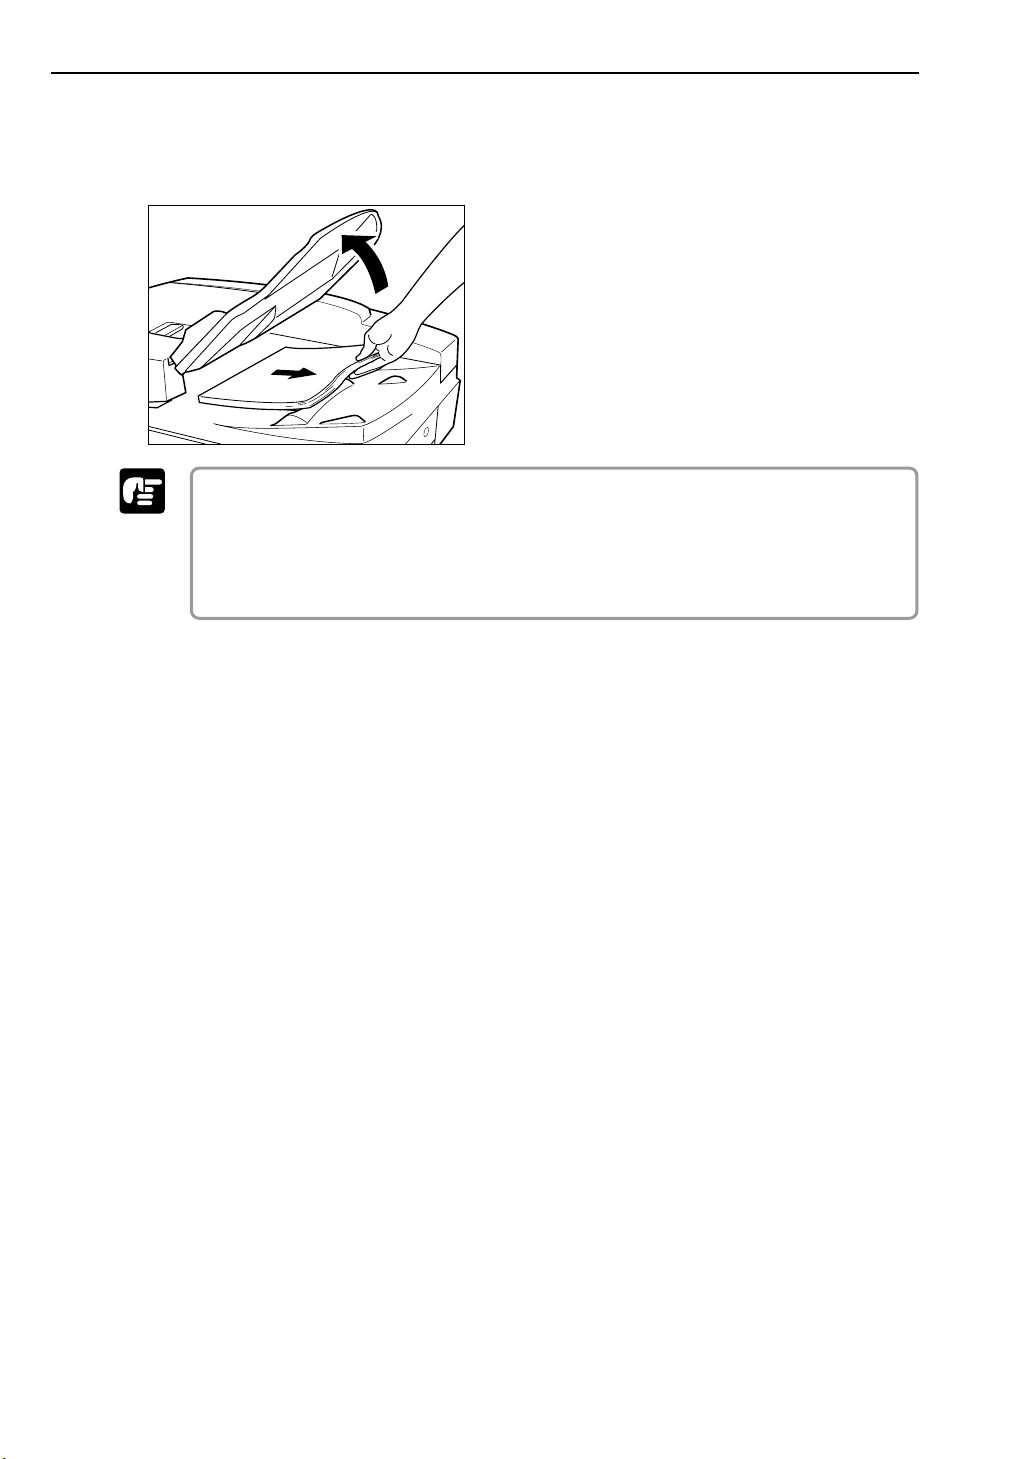
4
After scanning is complete, lift the document feeder tray, and then
remove the document from the document eject tray.
● Leaving a document in the document eject tray and scanning another document can
Important
cause jamming.
● Raise the document feeder tray only as much as you need to remove the ejected
document pages. Trying to forcibly raise the document feeder tray can cause a
malfunction.
50
Page 55

4.2 Placing Documents onto the Scanner
Positioning a Document on the Flatbed (Platen Glass)
Use the following procedure to scan on the
book, thick document, very thin document, an OHP (Overhead Transparency)
transparency, or any other document that cannot be scanned using the feeder.
1
Raise the feeder.
● Lower the feeder slowly, taking care to avoid pinching your fingers. Failure to do so
Important
might result in personal injury.
● When scanning on the
until the opening sensor unit is disengaged.
flatbed
(platen glass), raise the feeder at least 11.8" (300 mm)
flatbed
Opening Sensor
(platen glass) when scanning a
4
11.8" (300 mm)
or more
51
Page 56

Chapter 4 Using the Scanner
2
Place the document onto the
scanning side facing downwards.
With the scanning side of the document facing downwards, align its corner
with the arrow mark in the upper left corner of the
3
Slowly and carefully lower the feeder back down.
flatbed
(platen glass) with the
flatbed
(platen glass).
52
CAUTION
■ Lower the feeder slowly, taking care to avoid pinching your fingers. Failure to do so
might result in personal injury.
■ When scanning a thick book or similar item on the
pressing down hard on the feeder. Doing so might damage the glass and create the
risk of malfunction or personal injury.
flatbed
(platen glass), avoid
Page 57

4.2 Placing Documents onto the Scanner
4
Raise the feeder and remove the document from the
glass).
● Raise the feeder carefully and slowly, taking care to avoid letting the feeder fall over
Important
backwards.
● Leave the feeder raised when scanning thick documents like books, or operate the
feeder as shown in the procedure below.
1. Raise the feeder.
2. While pressing on the bottom of the feeder q, pull the feeder down and forward w.
flatbed
(platen
4
3. Set the thick document or book on the
lightly while scanning.
1.96" (50 mm)
Book or Thick Document
4. To return the feeder to its original position, raise it all the way q, then close it
carefully and slowly. w
flatbed
(platen glass) and hold the feeder
53
Page 58

Chapter 4 Using the Scanner
Document Feeding and Scanning
This section describes the various different document feeding modes that are
available, and the basic steps to use each mode for scanning.
■ Avoid wearing loose fitting clothing, dangling jewelry, long ties, or even long hair that
CAUTION
could become entangled with moving parts, especially the rollers that feed the paper.
If such objects become entangled, immediately disconnect the power plug from the
power outlet to stop the scanner.
■ Check the stack and remove all clips, staples, pins, or any other type of metal or
plastic fastener. They may damage the document, cause a paper jam, or scanner
malfunction.
■ Do not open the feeder cover during scanning. This could damage the document,
cause document jams, or damage the scanner.
Scan Procedure
The ISIS/TWAIN driver “Feeding Option” setting allows you to select from among
the three feeding modes described below. The procedure you should use depends
on the currently selected feeding mode.
● Standard Feeding (See p. 55.)
With this mode, you start and stop scanning from an application on your
computer. After placing the document onto the scanner, instruct the scanner
from your computer to start scanning.
● Panel Feeding (See p. 56.)
Panel feeding comes in handy when using the feeder for continuous scanning,
for scanning page-by-page from a book, etc. After placing the document page
onto the scanner, press the scanner’s [Start] key to start scanning.
When scanning is complete, place the next document page onto the scanner,
and then press the [Start] key again.
● Automatic Feeding (See p. 57.)
Use this mode for scanning a stack of document pages with the feeder. The
scanner will start scanning automatically when it detects a document in the
document feeder tray. Scanning stops when the document feeder tray is empty.
Loading the next document into the document feeder tray restarts scanning.
54
Page 59

4.3 Document Feeding and Scanning
◆ Standard Feeding
To use the standard feeding mode, instruct the scanner to start from the
application.
1
Select [Standard Feeding] in [Feeding Option] on the ISIS/TWAIN
driver’s settings screen.
2
Place the document onto the scanner.
See “Placing Documents onto the Scanner,” on page 48 for information about placing
Important
3
4
Note
documents onto the scanner.
From the application you are using, execute the required command
to start scanning.
This starts scanning.
When scanning of the document is complete, the application goes
into the Ready Mode.
If paper feeding stops during scanning due to a system error or paper jam, make sure
that the last page of the document was recorded properly before continuing to scan.
4
55
Page 60

Chapter 4 Using the Scanner
5
If you want to scan another document, place it onto the scanner,
and then execute the required command from the application to
resume scanning. To finish scanning, execute the required
command from the application.
If you are using the feeder for scanning, be sure to remove ejected document pages
Important
from the document eject tray before scanning another document. Leaving a document
in the document eject tray and scanning another document can cause a paper jam.
◆ Panel Feeding
With panel feeding, you execute the scan command from your application, and
then use the scanner's [Start] and [Stop] keys to control the scanning operation.
1
Select [Panel-Feeding] in [Feeding Option] on the ISIS/TWAIN
driver’s settings screen.
2
From the application you are using, execute the required command
to start scanning.
This causes the [Start] key lamp to light green.
3
Place the document onto the scanner.
See “Placing Documents onto the Scanner,” on page 48 for information about placing
Important
4
documents onto the scanner.
Press the [Start] key.
56
Page 61

4.3 Document Feeding and Scanning
5
When scanning of the document is complete, the scanner goes into
the Ready Mode.
If paper feeding stops during scanning due to a system error or paper jam, make sure
Note
6
Important
that the last page of the document was recorded properly before continuing to scan.
If you want to scan another document, place it onto the scanner,
and then press the [Start] key again to resume scanning. To finish
scanning, press the [Stop] key.
If you are using the feeder for scanning, be sure to remove ejected document pages
from the document eject tray before scanning another document. Leaving a document
in the document eject tray and scanning another document can cause a paper jam.
◆ Automatic Feeding
Automatic feeding can be used when feeding a document from the feeder. After
you execute the scan start command from the application, the scanner starts
scanning automatically whenever it detects a document loaded into the feeder.
1
Select [Automatic Feeding] in [Feeding Option] on the ISIS/TWAIN
driver’s settings screen.
2
From your application, execute the command to start scanning.
This causes the [Start] key lamp to light green.
4
57
Page 62

Chapter 4 Using the Scanner
3
Load the document into the document feeder tray.
The scanner detects the documents, and scanning starts.
See “Placing Documents onto the Scanner,” on page 48 for information about placing
Important
4
documents onto the scanner.
When scanning of the document is complete, the scanner goes into
the Ready Mode.
5
Raise the document feeder tray to remove the ejected document
pages.
Be sure to remove ejected document pages from the document eject tray before
Important
6
scanning another document. Leaving a document in the document eject tray and
scanning another document can cause a paper jam.
Loading another document into the document feeder tray causes
scanning to start automatically. After you finish scanning, press
the [Stop] key.
58
Page 63

4.4 Other Scanning Techniques
Other Scanning Techniques
This section describes how to scan using the Job Mode and how to use the Count
Only Mode to count the number of document pages. It also includes information
about how to use the patch code sheet to perform automatic batch separation.
Using the Job Mode for Scanning
The Job function is not supported on a computer that is running Windows NT. If you
Important
1
want to use the Job function, run the scanner with a computer running a supported
operating system other than Windows NT.
Set the Event function.
(See "Setting the Event Function," on p. 60.)
2
Use Job Registration Tool to register a job.
(See “How to Start the Job Registration Tool,” on p. 41.)
See [Help] in the Job Registration Tool for information on how to register jobs with the
Note
3
4
Job Registration Tool.
Press the Job [▲] key to enter the Job Mode.
This causes the job number screen to appear on the display panel.
Use the Job [▲] and [▼] keys to select the number of the job (01
through 99) you want.
4
59
Page 64

Chapter 4 Using the Scanner
5
Place the document onto the scanner.
See “Placing Documents onto the Scanner,” on page 48 for information about placing
Important
6
documents onto the scanner.
Press the [Start] key.
The image file is forwarded in accordance with the selected job.
7
When scanning of the document is complete, press the [Stop] key
to exit the Job Mode.
If you cannot get the Job Mode to operate correctly, see “Troubleshooting,” on page 86.
Note
◆ Setting the Event Function
The Job function does not function when [DR7080C Job Tool] has not been
specified in the scanner's Event function. Before using the Job function, set the
scanner's event according to the following procedure.
1
Click the [Start] button, then click [Settings] - [Control Panel].
60
Page 65

2
Double click [Scanners and Cameras].
This displays the [Scanners and Cameras] dialog box.
The dialog box that appears differs according to what version of Windows is running on
Note
the computer.
4.4 Other Scanning Techniques
4
3
Select [Canon DR-7080C SCSI], and then click [Properties].
4
Click the [Events] tab.
61
Page 66

Chapter 4 Using the Scanner
5
Specify [Job Start Button] in the [Scanner events] field.
6
Uncheck all the items in the [Send to this application] field except
for [DR7080C Job Tool].
7
Click the [Apply] button.
You cannot use the Job function if the [Disable device events] check box is checked.
Important
8
Click the [OK] button.
9
Restart Windows.
62
Page 67

4.4 Other Scanning Techniques
Using the Count Only Mode
In the Count Only Mode, document pages are sent through the feeder in order to
count them. The document is not scanned. You can perform Count Only Mode
operations on the scanner, without using your computer.
1
Use the user modes to enter the scanner's Count Only Mode.
(See “How to Set the User Modes,” on p. 72.)
This causes the Start key lamp to light green.
2
Load the document into the feeder, and then press the [Start] key.
This sends the pages of the document through the feeder and counts them.
3After all of the document pages are fed, exit the Count Only Mode.
(See “How to Set the User Modes,” on p. 72.)
To clear the page count from the display panel, hold down the [Stop] key
for approximately two seconds.
4
63
Page 68

Chapter 4 Using the Scanner
Using Patch Code Sheets
Patch code sheets are sheets of paper on which a special pattern is printed so
that files can be separated without stopping the scanning operation. The scanner
can recognize the pattern on these sheets, which allows files to be separated.
● Refer to “ISIS/TWAIN Driver HELP” when using patch code sheets.
Note
● Patch code sheets are enabled only when the application being used for scanning
supports file separation.
◆ Patch Code Sheets
Patch code sheets are PDF (portable document format) data of which there are
four types: [PATCH II (A4)], [PATCH II (LTR)], [PATCH T (A4)], and [PATCH T
(LTR)]. Click the [Start] button in Windows, and then click [Programs] – [Canon
DR-7080C] – [PATCH X(XX)], and use the document that is printed.
64
Note
You need CapturePerfect or an application that can open PDF (portable document
format) files.
Page 69

4.4 Other Scanning Techniques
◆ Types of Patch Code Patterns
There are two patch code patterns as shown below. The result varies depending
on the pattern.
● PATCH T (FILE A)
When this sheet is recognized, the document following the sheet is saved to a
separate file.
●
PATCH II (FILE B)
When this sheet is recognized, the file is separated after this sheet. This sheet
is saved as an image, even if the patch code recognition setting is set not to
save this sheet as an image.
4
65
Page 70

Chapter 4 Using the Scanner
◆ How to Use Patch Code Sheets
1
Print the patch code sheet on the following paper size:
● Print [PATCH II (A4)] and [PATCH T (A4)] on A4-size paper.
● Print [PATCH II (LTR)] and [PATCH T (LTR)] on letter size paper.
● Patch code patterns are detected within the enabled range shown below. When
Note
you make a copy of the patch code sheet, adjust the position of the image so that
it appears in the range in which detection is enabled.
0.2" (5 mm)
● When copying the patch code sheets, use the same size paper and the same
density as the original patch code sheet. If the copied sheet is not dense enough,
or if it is too dense, the scanner may not be able to recognize it correctly.
● Be careful not to let the patch code sheet get dirty, particularly for the range in
which patch code detection is enabled. Do not bend or wrinkle the patch code
sheet. This could prevent the scanner from recognizing the sheet.
● When the patch code sheet is being scanned, if it is not dense enough, or if it is
too dense, the scanner may not be able to recognize it correctly.
Patch code
(Range in which patch code
detection is enabled.)
Units: inches (units in parentheses are millimeters)
0.2" (5 mm)
0.2"
(5 mm)
3.7" (94 mm)
66
Page 71

4.4 Other Scanning Techniques
2
Place the patch code sheet on top of the documents that are to be
saved to a separate file, and then scan the documents.
Place the patch code sheet
on top of the documents that
are to be saved to a separate
file.
4
3
Set the scanning conditions, and then start scanning.
67
Page 72

Page 73

Chapter 5
User Modes
This chapter describes the user modes, which
you can use to configure the scanner settings.
5.1 About the User Modes .......................70
User Mode Functions .............................. 70
How to Set the User Modes ..................... 72
Page 74
Chapter 5 User Modes
About the User Modes
You can configure the scanner settings with the user modes described below.
User Mode Functions
User mode functions are as follows:
● Count Only Mode
ON: Count Only Mode (See “Using the Count Only Mode,” on p. 63.)
OFF: Normal Mode (default)
● Long Document Mode
ON: Enables detection of documents up to 24.8" (630 mm) long for auto
document size detection. (See “Documents,” on p. 46.)
OFF: Enables detection of documents up to 17.0" (432 mm) long for auto
document size detection (default).
● If you scan using Long Document Mode, the scanning speed may slow down.
Note
● Stand-by Mode
● Display Language Mode
● If a document page is not aligned correctly when using the Long Document Mode, it
might come into contact with the two sides of the feeder, which can damage the
page. Take care to make sure that document pages are aligned correctly.
ON: Scanner enters Stand-by Mode after 10 minutes of non-use (default).
OFF: Scanner does not enter Stand-by Mode.
ON: Japanese
OFF: English (default)
70
Page 75

● Display Contrast Mode
5.1 About the User Modes
Use the Set [ ] and [ ] keys to move the pointer (■) to the left for lighter
contrast or to the right for darker contrast.
● Setting SCSI Transfer Speed
Set the maximum value for synchronous transfer speed for the SCSI interface.
[5]: 5 Mbyte/sec
[10]: 10 Mbyte/sec (First SCSI)
[20]: 20 Mbyte/sec (Ultra SCSI) (default)
If the scanner does not operate correctly when the output speed is set to [20
Mbyte/sec], reduce the transfer speed to [10 Mbyte/sec] or [5 Mbyte/sec].
If you change the setting for the SCSI transfer speed, turn OFF the scanner, and then
Important
turn it ON.
▼
▼
5
71
Page 76

Chapter 5 User Modes
How to Set the User Modes
Use the following procedure to configure user mode settings.
1
Press the [Menu] key to display the user mode screens.
Use the [Menu] key to cycle through the user modes in the sequence shown
below.
72
2
Use the Set [ ] and [ ] keys to change the currently displayed
setting.
3
Press the [Enter] key to register the displayed setting.
4
To exit the user mode screens, press the [Stop] key.
▼
▼
Page 77

Chapter 6
Troubleshooting
This chapter describes the trouble that may
occur on the DR-7080C and how to correct it.
6.1 When the Scanner Is Not
Recognized ......................................... 74
SCSI Connections ................................... 74
USB Connections .................................... 76
6.2 Clearing Paper Jams .......................... 77
Clearing a Paper Jam .............................. 77
Paper Jam Causes .................................. 81
6.3 When the Scanned Image Is Not
Normal ................................................. 82
6.4 Display Messages ............................... 83
Error Messages ....................................... 83
Scanner Status Messages ....................... 85
6.5 Troubleshooting ................................. 86
Page 78

Chapter 6 Troubleshooting
When the Scanner Is Not
Recognized
The following describes possible causes of your computer not recognizing the
scanner. Remedy the problem by following the procedure for the respective cause.
SCSI Connections
Cause The scanner is not correctly connected.
Remedy Connect the SCSI cables to the scanner in the correct way.
Cause The SCSI card is not correctly recognized.
Remedy Correctly connect the SCSI card referring to the SCSI card manual.
Also, check the following according to the OS that your computer is
running on.
<Windows 98 and Windows Me>
Click [Start]-[Settings]-[Control Panel]-[System], and then open
[Device Manager] and check if “SCSI Controller” has an “x” or “!” on it.
If you can see one of these, then refer to the SCSI card’s operator’s
manual to reset the SCSI card.
<Windows NT 4.0 Workstation>
Click [Start]-[Settings]-[Control Panel], and then open [SCSI adapter]
and check if the “SCSI card” is being recognized correctly. If it is not
correctly recognized, then refer to the SCSI card’s operator’s manual
to reset the SCSI card.
<Windows 2000 Professional>
Click [Start]-[Settings]-[Control Panel]-[System]-[Hardware], and then
open [Device Manager] and check if “SCSI controller” has an “x” or “!”
on it. If you can see one of these, then refer to the SCSI card’s
operator’s manual to reset the SCSI card.
<Windows XP>
Click [Start]-[Control Panel]-[Performance and Maintenance]-[System][Hardware], and then open [Device Manager] and check if “SCSI
controller” has an “x” or “!” on it. If you can see one of these, then refer
to the SCSI card’s operator’s manual to reset the SCSI card.
74
Page 79

6.1 When the Scanner Is Not Recognized
Cause Same SCSI ID is used for other SCSI devices.
Remedy Check the SCSI ID of all connected SCSI devices, and make sure that
the same SCSI ID is not set to two or more devices. Reset the SCSI
IDs if the same SCSI ID is set. (See p. 26.)
Cause The terminator is not correctly connected.
Remedy Connect the terminator to the last SCSI device on the end of the daisy
chain. Enable the terminator function if the SCSI device has a built-in
terminator function. (See p. 26.)
Cause The scanner was turned ON after the computer.
Remedy Turn OFF the computer and scanner. Then, turn ON the scanner, and
then turn ON the computer. (See p. 30.)
Cause The scanner is OFF.
Remedy Turn OFF the computer. Then, turn ON the scanner, and then turn ON
the computer. (See p. 30.)
Cause The scanner’s power cord is disconnected from the scanner or
the AC power outlet.
Remedy Turn OFF the computer, and correctly connect the scanner’s power
cord. Then, turn ON the scanner, and then turn ON the computer.
(See p. 29.)
Cause The scanner does not support the SCSI card.
Remedy Replace with a SCSI card compatible with the driver application.
(See p. 25.)
6
75
Page 80

Chapter 6 Troubleshooting
USB Connections
Cause Scanner is not correctly connected.
Remedy Connect the scanner correctly with a cable that supports USB 2.0.
(See p. 28.)
Cause The USB 2.0 interface card is not correctly installed on the
computer.
Remedy Refer to the USB 2.0 interface card operation manual and install it
correctly. Also, check if the USB 2.0 interface card is being recognized
by Windows in the operating system you are using.
Cause The scanner is OFF.
Remedy Check the connections with the computer, and then turn ON the
scanner. (See p. 30.)
Cause The USB 2.0 interface card does not support the scanner.
Remedy Use one of the recommended USB 2.0 interface cards. (See p. 28.)
76
Page 81

6.2 Clearing Paper Jams
Clearing Paper Jams
A paper jam is indicated when scanning stops unexpectedly and the message
shown below appears on the display panel. Use the procedure below to clear a
paper jam.
Clearing a Paper Jam
■ Be careful when you clear a paper jam. You may be injured unexpectedly. For
CAUTION
example, the paper edges may cut your fingers, or the document may be damaged.
■ Remove all jammed sheets of paper. Paper scraps left inside the scanner may be
drawn into the scanner again, causing another paper jam or malfunction.
■ When opening or closing the feeder, take care not to get your fingers caught.
1
Remove all document pages from the document feeder tray and the
document eject tray.
2
Open the feeder cover.
Operate the opening lever, and then slowly raise the cover until it stops.
6
77
Page 82

Chapter 6 Troubleshooting
3
Remove the jammed paper.
4
If the document is jammed under the feeder guide, grasp the tab
inside the scanner to open the feeder guide.
78
If you are duplex scanning, the document may be jammed under the feeder guide.
Note
Page 83

6.2 Clearing Paper Jams
5
Rotate the dial on your side of the scanner to remove any paper
jammed inside the feeder.
● Rotating the dial to the right reverse feeds any paper jammed inside the feeder.
Note
Gently pull the paper from the feeder as you rotate the dial.
● Rotating the dial to the left forward feeds jammed paper into the document eject tray.
After feeding the paper, raise the document feeder tray and remove the paper.
6
Close the feeder guide.
Take care to avoid pinching your fingers when closing the feeder guide.
CAUTION
7
Close the feeder cover.
6
CAUTION
Take care to avoid pinching your fingers when closing the feeder cover.
79
Page 84
Chapter 6 Troubleshooting
8
Raise the feeder.
Open the feeder carefully and slowly, taking care to avoid letting the feeder fall over
CAUTION
9
backwards.
Remove any paper jammed inside the feeder.
80
10
Slowly and carefully lower the feeder back down.
Lower the feeder slowly, taking care to avoid pinching your fingers. Failure to do so
CAUTION
might result in personal injury.
Page 85

6.2 Clearing Paper Jams
Paper Jam Causes
Any of the following factors can cause paper to jam. If you experience paper jams,
check the following points and take the required action:
● What to check: Is the document size or thickness outside the range supported
by the feeder, or is the document paper of substandard quality?
What to do: See “Documents,” on p. 46 for information about required
document properties.
● What to check: Is a jam being caused by document paper that is not sliding
properly?
What to do: Scan such paper from the flatbed (platen glass), one page at a
time. (See p. 51.)
● What to check: Are the rollers inside the feeder dirty or worn?
What to do: If the rollers are dirty, clean them. (See p. 93.) If the rollers are
worn, contact your service representative to have them replaced.
81
6
Page 86

Chapter 6 Troubleshooting
When the Scanned Image
Is Not Normal
If there is a problem on the scanned image (image is not sharp or stripes appear
on the image), one of the following may be a probable cause. Check the following
points and take the appropriate action.
● The scanning glass or rollers in the scanner are dirty.
If the scanning glass or rollers in the scanner are dirty, that dirt will appear on
the scanned image.
➝ Clean the scanning glass and rollers. For details, see “Daily Cleaning,”
on p. 92.
● The scan conditions are inappropriate.
When the scan condition setup is inappropriate, the scanned image will not be
sharp or will appear darkish.
➝ Check the brightness and other scanner settings.
If the scanned image is foggy or the document is not scanned at all, a
probable cause is that the brightness is set too high.
If the scanned image appears darkish, a probable cause is that the
brightness is set too low.
Also, check the settings on the driver and the application.
● The driver or application does not run correctly.
If the document cannot be scanned correctly even if the scan conditions are
adjusted, a probable cause is that the driver or the application is not
functioning correctly.
➝ Uninstall and then reinstall the driver or application.
For details on how to install the driver, see “Installing the Software,” on p. 37.
For details on how to install the application, see the instruction manual for
the application in use.
● Other Causes
Even if the computer is correctly recognizing the scanner, and the driver and
the application are installed correctly, scanning may not be performed
correctly. A probable cause is that the interface card is not compatible. Use the
recommended interface card.
If the above remedies do not rectify the problem, contact your service
representative.
82
Page 87

6.4 Display Messages
Display Messages
This section explains the error messages and scanner status messages that
appear on the display panel.
Error Messages
The following are the messages that appear to indicate errors.
Display
Cause The feeder is raised.
Remedy Lower the feeder back down.
Display
Cause The feeder cover is open.
Remedy Close the feeder cover.
Display
Cause Jam
Remedy Check the document and try again. If this error continues to appear,
scan the document from the flatbed (platen glass).
Display
Cause Paper is jammed in the feeder.
Remedy Use the procedure under “Clearing a Paper Jam,” on p. 77 to clear
the jammed paper.
Display
Cause Scan to Mail send error occurs when sending images using
the Job Registration Tool.
6
Remedy Check the configuration of the Job Registration Tool settings and try
again.
83
Page 88

Chapter 6 Troubleshooting
Display
Cause You are attempting to scan a document that contains mixed
page sizes while the Different Size Originals Mode is off.
Remedy Confirm the front/rear sides of the ejected document, then turn on
the Different Size Originals Mode and scan the document again.
Display
Cause This is a “service call error,” which indicates that the scanner
has an internal problem.
Remedy This error requires servicing from your service representative. Turn
off the scanner. With the displayed error code on hand, contact
your sales reprentative or your service representative.
84
Page 89

6.4 Display Messages
Scanner Status Messages
The following messages indicate the current status of the scanner:
Display
Status The scanner is performing some process. Please wait.
Display
Status The scanner is in the Ready Mode. The scanner will go into the
Stand-by Mode if you do not perform any operation for
approximately 10 minutes.
Display
Status The scanner is in the Stand-by Mode. A signal from the computer or
an operation panel key operation will recover the scanner to Ready
Mode.
Display
Status The scanner is in the Count Only Mode. (See “Using the Count
Only Mode,” on p. 63.)
Display
Status The scanner is in the Job Mode. Press the [Start] key to start
scanning or the [Stop] key to exit the Job Mode. (See “Using the
Job Mode for Scanning,” on p.59.)
6
85
Page 90

Chapter 6 Troubleshooting
Troubleshooting
Check the following points when you have problems with the scanner operation:
● Display panel messages are in a different language.
Cause: The user mode language setting is not configured correctly.
Remedy: Display the user mode language setting and select the correct
language. (See “About the User Modes,” on p. 70.)
● Display panel is too dark or too bright.
Cause: The display panel brightness is not adjusted correctly.
Remedy: Adjust the display panel brightness in the user modes. (See "About
the User Modes," on p. 70.)
● Cannot scan with the feeder.
Cause: The ISIS/TWAIN driver “Scanning Side” setting is “Flatbed.”
Remedy: Change the “Scanning Side” setting to something other than
“Flatbed.”
● Job titles do not appear when the [Job] keys are pressed.
Cause 1: There are no jobs registered with the Job Registration Tool.
Remedy 1: Use the Job Registration Tool to register a job. (See “How to Start
the Job Registration Tool,” on p. 41.)
Cause 2: The computer is turned OFF or it is not connected to the
scanner.
Remedy 2: Job data is stored on the computer. Make sure the computer is
connected properly and turned ON. (See “Connecting to a
Computer,” on p. 25.)
● The Job function does not work when the [Start] key is pressed after
selecting a job.
Cause 1: The computer is running an operating system that does not
support the Job function.
Remedy 1: The Job function is not supported under Windows 95 or NT. Use a
computer running another operating system when you want to use
the Job function. (See “Checking Your Operating Environment,” on
p. 24.)
Cause 2: The Windows Event function is not configured to start
DR-7080C Job Tool.
Remedy 2: On the Windows Control Panel, double-click [Scanners and
Cameras] to open DR-7080C SCSI properties. Specify “DR-7080C
Job Tool” as the “Event” startup application. (See “Setting the
Event Function,” on p. 60.)
86
Page 91

6.5 Troubleshooting
● The Job function does not work when the [Start] key is pressed after
selecting a job, and [Scan Error] is displayed.
Cause 1: Another application is using the DR-7080C ISIS/TWAIN Driver.
Remedy 1: Close the other application that is using the DR-7080C ISIS/TWAIN
Driver.
Cause 2: Feeding is specified from the feeder, and a document is not
loaded in the feeder.
Remedy 2: Reload a document into the feeder.
● Cannot scan with USB cable connections.
Cause: The SCSI terminator has not been turned ON.
Remedy: For this scanner to operate normally, the SCSI terminator needs to
be turned ON even when using USB connections. Be sure to turn
ON the SCSI terminator. (See "Checking Your Operating
Environment," on p. 24.)
● The feeder does not close completely.
Cause: The feeder is in the book scanning position.
Remedy: Raise the feeder all the way, and then close it carefully and slowly.
(See "Positioning a Document on the flatbed (platen glass)," on
p. 51.)
87
6
Page 92

Page 93

Chapter 7
User Maintenance
This chapter describes daily cleaning of the
scanner.
7.1 Changing the Stamp Cartridge .......... 90
7.2 Daily Cleaning ..................................... 92
Cleaning the Main Unit ............................ 92
Cleaning the Flatbed (Platen Glass) and
Pressure Board ........................................ 93
Cleaning the Feeder ................................ 94
Cleaning the Power Plug ......................... 98
Page 94

Chapter 7 User Maintenance
Changing the Stamp
Cartridge
When using the optional stamp unit (see p. 21) to stamp scanned documents, you
should use the following procedure to replace the stamp cartridge whenever the
stamp mark becomes smudged or faint. Contact your sales reprentative or service
representative to purchase a new stamp cartridge.
1
Open the feeder cover.
Operate the opening lever, and then slowly raise the cover until it stops.
2
Grasping the tab inside the scanner, open the feeder guide.
Stamp cartridge
3
Use a pair of tweezers or some similar tool to remove the old stamp
cartridge.
90
Page 95

4
Insert a new stamp cartridge.
● When installing the stamp cartridge, make sure that the stamp does not protrude
Important
5
Close the feeder guide.
outside the hole.
● Improperly installing the stamp cartridge can cause paper jams.
7.1 Changing the Stamp Cartridge
Stamp cartridge
Take care to avoid pinching your fingers when closing the feeder guide.
CAUTION
6
Close the feeder cover.
Take care to avoid pinching your fingers when closing the feeder cover.
CAUTION
7
91
Page 96
Chapter 7 User Maintenance
Daily Cleaning
To maintain high-quality scanning, you should periodically clean the following:
• Main unit
• Flatbed (Platen glass)
• Pressure Board
• Feeder
■ Before you clean the scanner, turn OFF the scanner and computer and disconnect
CAUTION
the power cord from the power outlet. Otherwise, an electrical shock may result.
■ Never clean the scanner with any kind of organic solvent, such as alcohol, benzene,
or paint thinner. It might cause a fire and electrical shock, or cause the exterior of the
scanner to disfigure or discolor.
■ Never spray detergent or water directly onto the flatbed (platen glass). Sprayed liquid
can get inside the scanner and soil the light source and lens.
■ Overuse of water and allowing the scanner to become too wet during cleaning can
damage scanned documents and cause malfunction of the scanner.
Cleaning the Main Unit
Wipe the scanner with a firmly wrung cloth moistened slightly with water or mild
detergent. Then wipe off with a clean, dry cloth.
92
Page 97
7.2 Daily Cleaning
Cleaning the Flatbed (Platen Glass) and Pressure Board
A dirty flatbed (platen glass) or pressure board can cause soiling of scanned
images, or document size detection errors. Clean the flatbed (platen glass) and
pressure board periodically.
1
Raise the feeder.
Open the feeder carefully and slowly, taking care to avoid letting the feeder fall
CAUTION
2
Wipe the flatbed (platen glass) and pressure board with a cloth
moistened with plain water and thoroughly wrung out. Next, wipe
the flatbed (platen glass) and pressure board with a soft, dry cloth.
over backwards.
7
93
Page 98

Chapter 7 User Maintenance
3
Slowly and carefully lower the feeder back down.
Lower the feeder slowly, taking care to avoid pinching your fingers. Failure to do so
CAUTION
might result in personal injury.
Cleaning the Feeder
Without periodical cleaning, a problem may be caused on the scanned image or
the document may become soiled. Clean the feeder periodically.
1
Open the feeder cover.
Operate the opening lever, and then slowly raise the cover until it stops.
94
Page 99
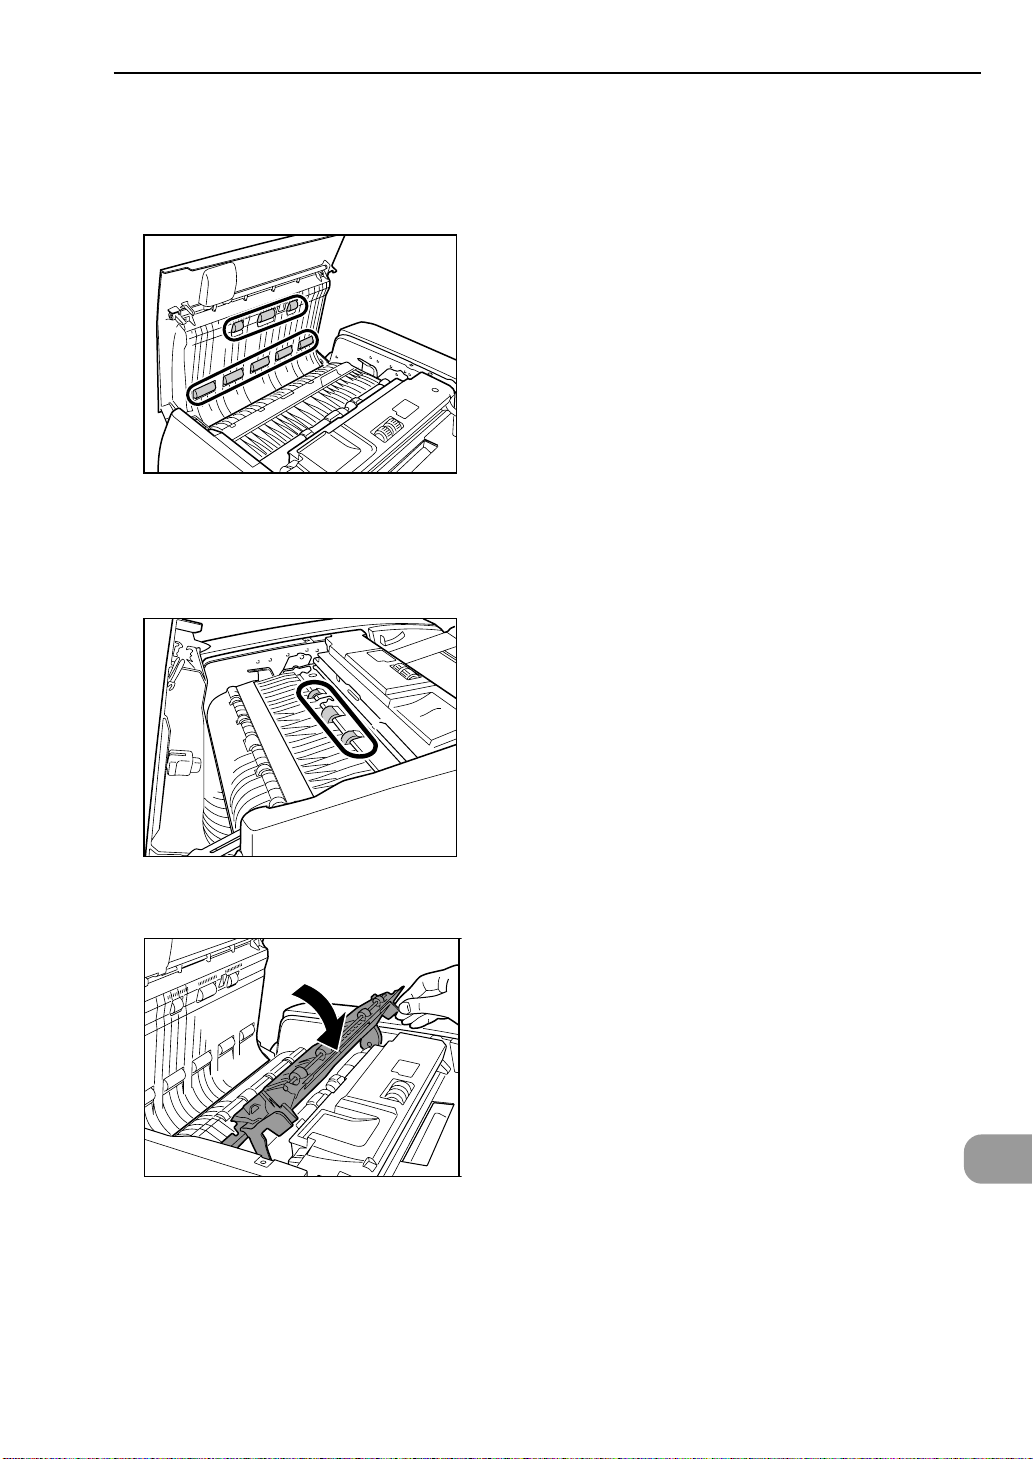
7.2 Daily Cleaning
2
Wipe the eight rollers inside the feeder cover with a cloth
moistened with plain water and thoroughly wrung out. Next, wipe
the rollers dry with a soft, dry cloth.
3
Wipe the three rollers on the feeder guide with a cloth moistened
with plain water and thoroughly wrung out. Next, wipe the rollers
dry with a soft, dry cloth.
4
Grasping the tab inside the scanner, open the feeder guide.
7
95
Page 100

Chapter 7 User Maintenance
5
Wipe the nine rollers with a cloth moistened with plain water and
thoroughly wrung out. Next, wipe the rollers dry with a soft, dry
cloth.
6
Wipe the four rollers inside the feeder guide with a cloth moistened
with plain water and thoroughly wrung out. Next, wipe the rollers
dry with a soft, dry cloth.
96
7
Close the feeder guide.
Take care to avoid pinching your fingers when closing the feeder guide.
CAUTION
 Loading...