

Page 1
NETWORKCAMERA
OperationGuide
Beforeusingtheproduct,besuretoreadtheStartGuideandthisOperationGuide.
Page 2
Introduction
Thank you for purchasing the Canon Network Camera VB-C300 (hereafter referred to as the
VB-C300).
This User’s Manual describes how to set up and use the VB-C300. Read this manual carefully
before using the VB-C300 to ensure effective operation. Make sure that you read the ReadMe file
on the Setup CD-ROM.
For the latest information, please refer to Canon Web site.
On Copyrights
Videos, images or sounds taken or recorded with your VB-C300 may not be utilized or
published, without consent of copyright holders, under relevant copyright law.
Notes
1. The unauthorized transfer of all or any part of the contents of this Manual is forbidden.
2. The contents of this Manual are subject to change without notice.
3. Every effort has been made to ensure that this Manual is flawless. However, if you find
any oversights, please let us know.
4. Notwithstanding the above, Canon accepts no responsibility for any effects resulting
from the use of this Manual.
Trademark Notice
● Canon and Canon logo are registered trademarks of Canon Inc.
● Microsoft and Windows are registered trademarks of Microsoft Corporation in the United
States and other countries.
● Windows is legally recognized as Microsoft Windows Operating System.
● Other brand or product names in this Manual may be trademarks or registered trademarks
of their respective companies.
Request concerning disclosure of videos and audio
With respect to the disclosure of videos and audio, we request that sufficient consideration
be given to matters of privacy and rights not to be photographed.
<Reference>
● We locate camera so that people cannot make special specifications.
● When videos are taken of specific buildings, interiors and the like, we install the camera
only after receiving approval from the administrator.
Please note that the operator of the camera site and not Canon has full responsibility
regarding the disclosure of videos and audio.
Legal Notice
In some countries or regions, monitoring via a camera is banned by the law or regulation,
and the law or regulation depends on the country or region.
Before using the VB-C300, check the law or regulation of the country or region where the
camera is used.
Usage Notice of Audio
● The audio and video may be out of sync.
● The audio stream may be interrupted according to the performance of your PC and the
network environment.
● You can send audio and video to up to 15 clients. However, if there are a large number
of clients, the audio stream may be interrupted.
● The audio stream may be interrupted if you use anti-virus software.
● Disconnecting the LAN cable also disconnects audio. Reconnect to the camera from
the NC Viewer.
ii
Page 3

Contents
Introduction ...................................................................................................... ii
Contents .......................................................................................................... iii
How to Read Manuals ...................................................................................... v
About User’s Manuals .................................................................................................. v
Icons Used in this Manual ............................................................................................ v
Chapter 1 Detailed Settings
What Can I Do on Each of the Settings Pages? ......................................... 1-2
Accessing the Settings Title Page............................................................... 1-3
Settings Title Page ................................................................................................... 1-5
Setting Up the Administrator Password and Network
(System and Network) .................................................................................. 1-6
Setting Image Size, Quality and Camera Control
(Video and Camera) ...................................................................................... 1-8
Setting HTTP Server, Video Server, and Audio Server
(Server) ........................................................................................................ 1-12
Setting User Access Privileges (Access Control) ................................... 1-15
Setting the Date and Time (Date and Time) .............................................. 1-16
Setting Up DNS and LED, etc. (Miscellaneous) ........................................ 1-18
Using the Administration Tools (Administration Tools) .......................... 1-20
Chapter 2 VBAdminTools
Starting the VBAdmin Tools ......................................................................... 2-2
Panorama Creation Tool ............................................................................... 2-4
Panorama Creation Tool Display Screen ................................................................. 2-5
Capturing Panorama Image ..................................................................................... 2-6
Registering/Deleting Panorama Image .................................................................... 2-7
Reconnecting ........................................................................................................... 2-8
Opening/Saving Panorama Image from/to Image File ............................................. 2-8
Preset Setting Tool ........................................................................................ 2-9
Preset Setting Tool Display Screen ........................................................................ 2-10
Setting Presets ....................................................................................................... 2-12
Log Viewer ................................................................................................... 2-15
Downloading Log Files ........................................................................................... 2-15
Viewing Logs .......................................................................................................... 2-16
NC Viewer .................................................................................................... 2-18
iii
Page 4
Contents
Chapter 3 NC Viewer and Viewer Switcher
Overview of the NC Viewer........................................................................... 3-2
Administrator and Authorized User .......................................................................... 3-3
Starting NC Viewer ........................................................................................ 3-4
Starting the NC Viewer ............................................................................................ 3-4
Terminating the NC Viewer ...................................................................................... 3-4
Connecting to Camera ................................................................................. 3-5
Connecting to a Specified Camera .......................................................................... 3-5
Connecting to Registered Camera ........................................................................... 3-6
Disconnecting .......................................................................................................... 3-6
NC Viewer Operation .................................................................................... 3-7
NC Viewer’s Display Screen ..................................................................................... 3-7
Starting Camera Control .......................................................................................... 3-9
Controlling Camera ................................................................................................ 3-10
Saving, Printing, and Copying still image ............................................................... 3-17
Displaying Information and Video .......................................................................... 3-18
Adding and Changing Camera List ........................................................................ 3-22
Operating and Setting Camera as Administrator .................................... 3-25
Setting White Balance ............................................................................................ 3-25
Displaying External Device Input ........................................................................... 3-27
Operating External Device Output ......................................................................... 3-27
Setting Administrator Control ................................................................................. 3-28
Shade Correction ................................................................................................... 3-29
Transmitting Audio.................................................................................................. 3-29
Setup Properties .................................................................................................... 3-31
Using Viewer Switcher ................................................................................ 3-34
Chapter 4 Appendix
Troubleshooting ............................................................................................ 4-2
Log Messages ............................................................................................... 4-4
The VB-C300 Log Messages ................................................................................... 4-4
Restoring the Factory Default Settings ...................................................... 4-8
Restoring the Factory Default Settings via the Administration Tools Page using
Web Browser ........................................................................................................... 4-8
Initializing the Camera from the Reset Switch ......................................................... 4-9
Initializing the Camera Head Position ....................................................... 4-10
Factory Default Settings ............................................................................ 4-12
Index ............................................................................................................ 4-13
iv
Page 5
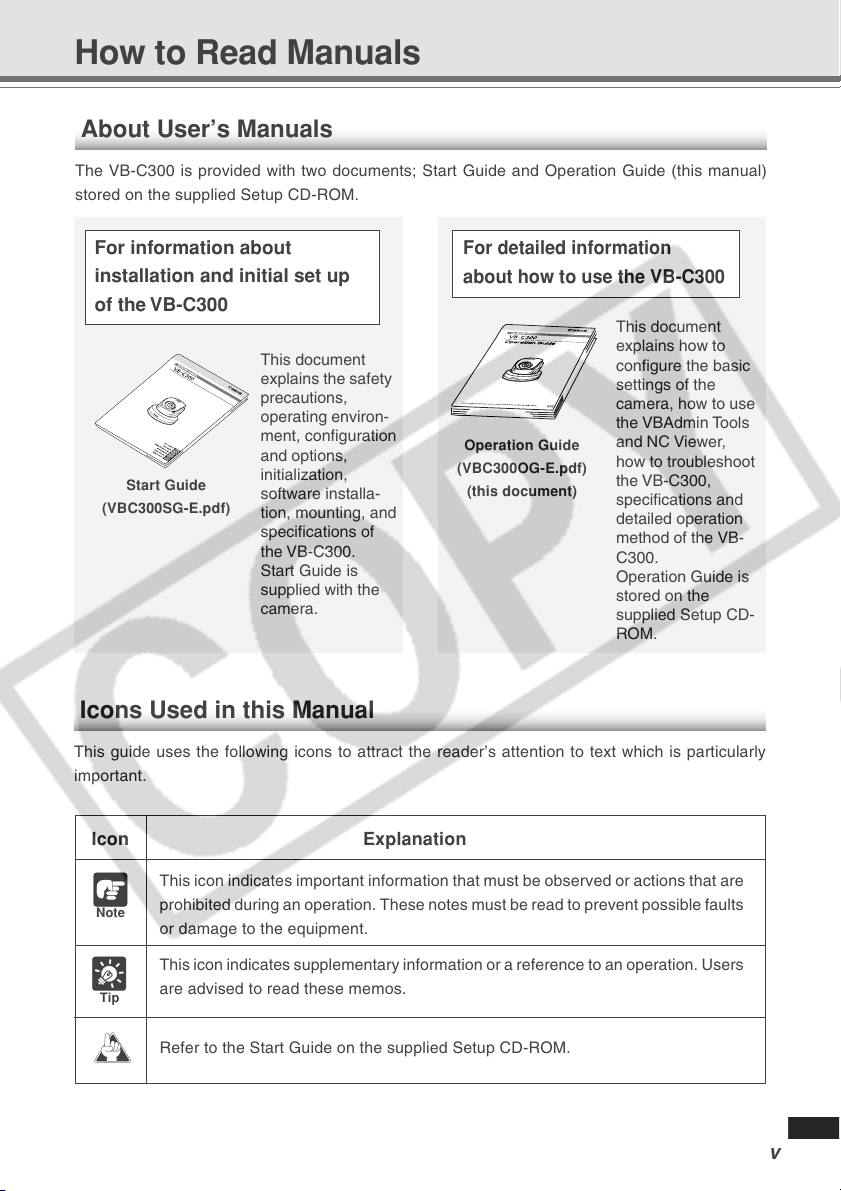
How to Read Manuals
About User’s Manuals
The VB-C300 is provided with two documents; Start Guide and Operation Guide (this manual)
stored on the supplied Setup CD-ROM.
For information about
installation and initial set up
For detailed information
about how to use the VB-C300
of the VB-C300
This document
explains how to
configure the basic
settings of the
camera, how to use
the VBAdmin Tools
and NC Viewer,
how to troubleshoot
the VB-C300,
specifications and
detailed operation
method of the VB-
C300.
Operation Guide is
stored on the
supplied Setup CD-
ROM.
Start Guide
(VBC300SG-E.pdf)
This document
explains the safety
precautions,
operating environ-
ment, configuration
and options,
initialization,
software installa-
tion, mounting, and
specifications of
the VB-C300.
Start Guide is
supplied with the
camera.
Operation Guide
(VBC300OG-E.pdf)
(this document)
Icons Used in this Manual
This guide uses the following icons to attract the reader’s attention to text which is particularly
important.
Icon Explanation
This icon indicates important information that must be observed or actions that are
Note
d
prohibited during an operation. These notes must be read to prevent possible faults
or damage to the equipment.
This icon indicates supplementary information or a reference to an operation. Users
are advised to read these memos.
Tip
Refer to the Start Guide on the supplied Setup CD-ROM.
v
Page 6

vi
Page 7
Chapter
Detailed Settings
This chapter describes the detailed settings for the VB-C300
such as network connection, camera control, date, time,
access control, etc.
Page 8
What Can I Do on Each of the Settings Pages?
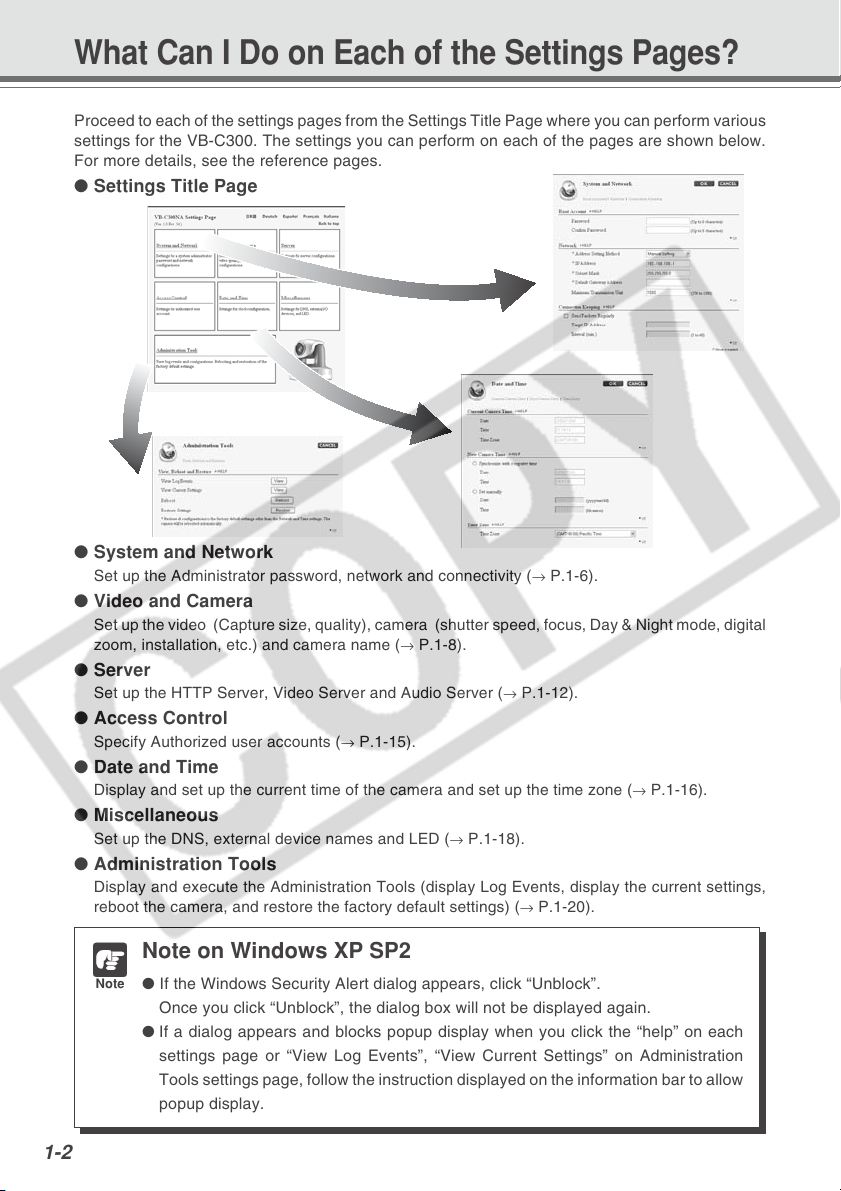
Proceed to each of the settings pages from the Settings Title Page where you can perform various
settings for the VB-C300. The settings you can perform on each of the pages are shown below.
For more details, see the reference pages.
● Settings Title Page
● System and Network
Set up the Administrator password, network and connectivity (→ P.1-6).
● Video and Camera
Set up the video (Capture size, quality), camera (shutter speed, focus, Day & Night mode, digital
zoom, installation, etc.) and camera name (
● Server
Set up the HTTP Server, Video Server and Audio Server (→ P.1-12).
● Access Control
Specify Authorized user accounts (→ P.1-15).
● Date and Time
Display and set up the current time of the camera and set up the time zone (→ P.1-16).
● Miscellaneous
Set up the DNS, external device names and LED (→ P.1-18).
● Administration Tools
Display and execute the Administration Tools (display Log Events, display the current settings,
reboot the camera, and restore the factory default settings) (
→ P.1-8).
→ P.1-20).
1-2
Note on Windows XP SP2
Note
● If the Windows Security Alert dialog appears, click “Unblock”.
Once you click “Unblock”, the dialog box will not be displayed again.
● If a dialog appears and blocks popup display when you click the “help” on each
settings page or “View Log Events”, “View Current Settings” on Administration
Tools settings page, follow the instruction displayed on the information bar to allow
popup display.
Page 9
Accessing the Settings Title Page
Configure various settings of the VB-C300 by accessing the Settings Pages of the camera from a
Web browser.
In this manual, the IP address “192.168.100.1” (factory default setting) is used to
explain how to set up the camera. Please use the actual IP address that is set in your
Note
VB-C300.
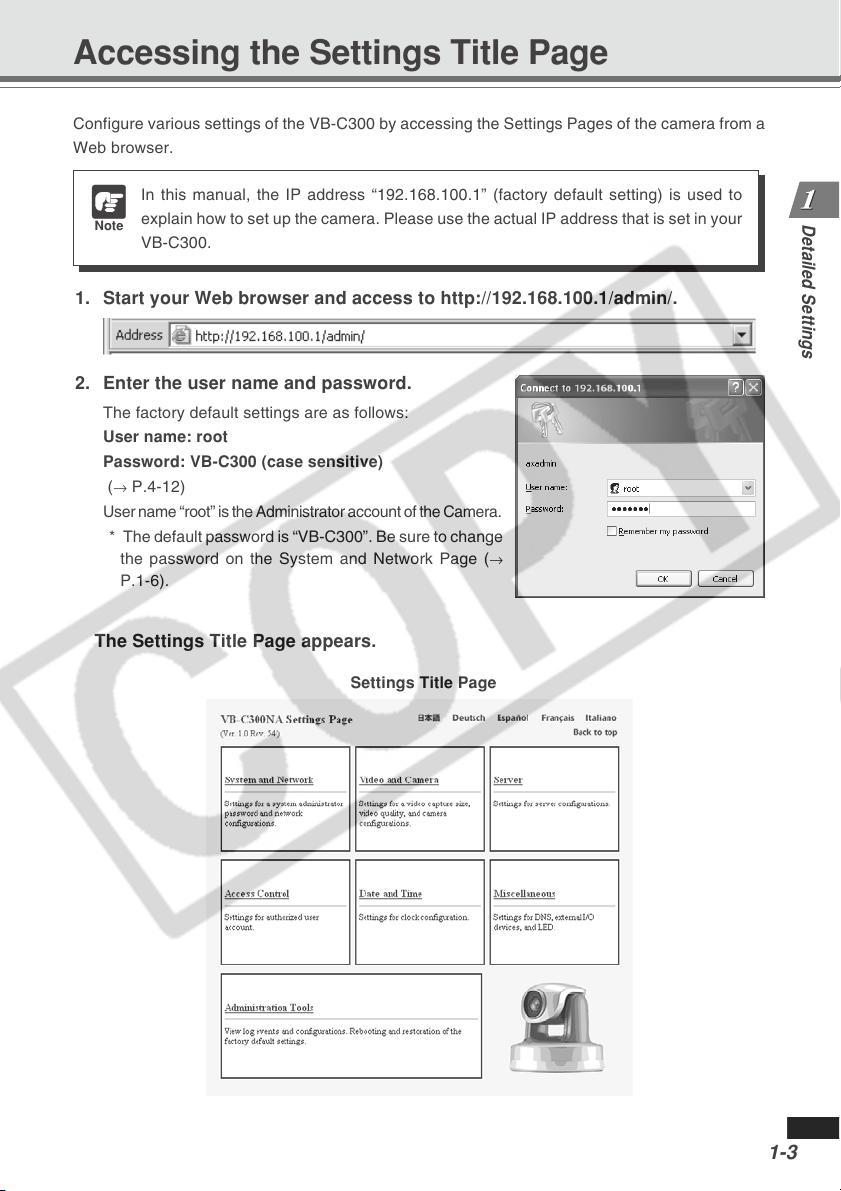
1. Start your Web browser and access to http://192.168.100.1/admin/.
2. Enter the user name and password.
The factory default settings are as follows:
User name: root
Password: VB-C300 (case sensitive)
→ P.4-12)
(
User name “root” is the Administrator account of the Camera.
* The default password is “VB-C300”. Be sure to change
the password on the System and Network Page (
P.1-6).
→
Detailed Settings
The Settings Title Page appears.
Settings Title Page
1-3
Page 10
Accessing the Settings Title Page
● For security reasons, be sure to close the browser after you finish settings on the
Note
settings page.
● The Settings Title Page cannot login with an authorized user account. Please enter
with root account.
You can also click “Settings” from the VB Initial Setup Tool to display the top page of
the camera, and then click “Settings“ to move to the Setting Title Page (→dStart
Tip
Guide P.2-10).
1-4
Page 11
Accessing the Settings Title Page
Settings Title Page
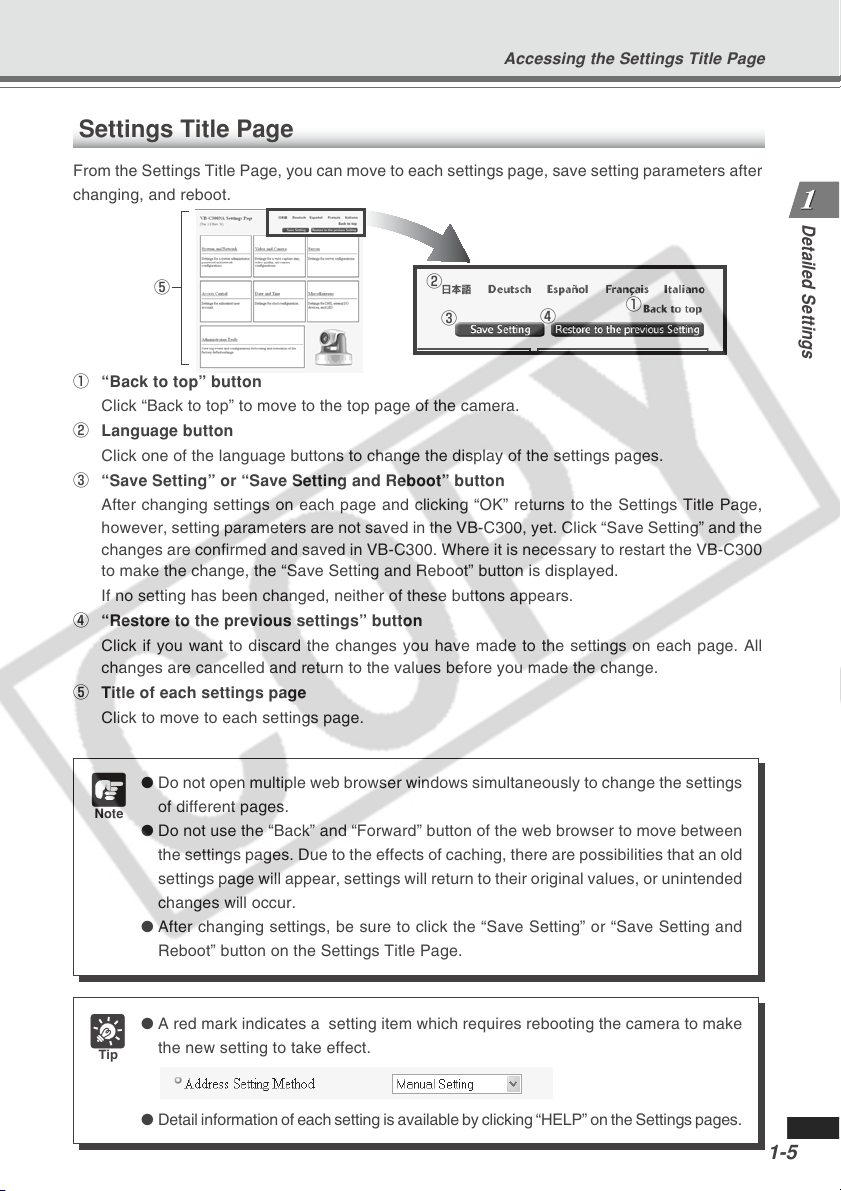
From the Settings Title Page, you can move to each settings page, save setting parameters after
changing, and reboot.
Detailed Settings
5
1 “Back to top” button
Click “Back to top” to move to the top page of the camera.
2 Language button
Click one of the language buttons to change the display of the settings pages.
3 “Save Setting” or “Save Setting and Reboot” button
After changing settings on each page and clicking “OK” returns to the Settings Title Page,
however, setting parameters are not saved in the VB-C300, yet. Click “Save Setting” and the
changes are confirmed and saved in VB-C300. Where it is necessary to restart the VB-C300
to make the change, the “Save Setting and Reboot” button is displayed.
If no setting has been changed, neither of these buttons appears.
4 “Restore to the previous settings” button
Click if you want to discard the changes you have made to the settings on each page. All
changes are cancelled and return to the values before you made the change.
5 Title of each settings page
Click to move to each settings page.
● Do not open multiple web browser windows simultaneously to change the settings
Note
of different pages.
● Do not use the “Back” and “Forward” button of the web browser to move between
the settings pages. Due to the effects of caching, there are possibilities that an old
settings page will appear, settings will return to their original values, or unintended
changes will occur.
● After changing settings, be sure to click the “Save Setting” or “Save Setting and
Reboot” button on the Settings Title Page.
2
3
4
1
● A red mark indicates a setting item which requires rebooting the camera to make
Tip
the new setting to take effect.
● Detail information of each setting is available by clicking “HELP” on the Settings pages.
1-5
Page 12
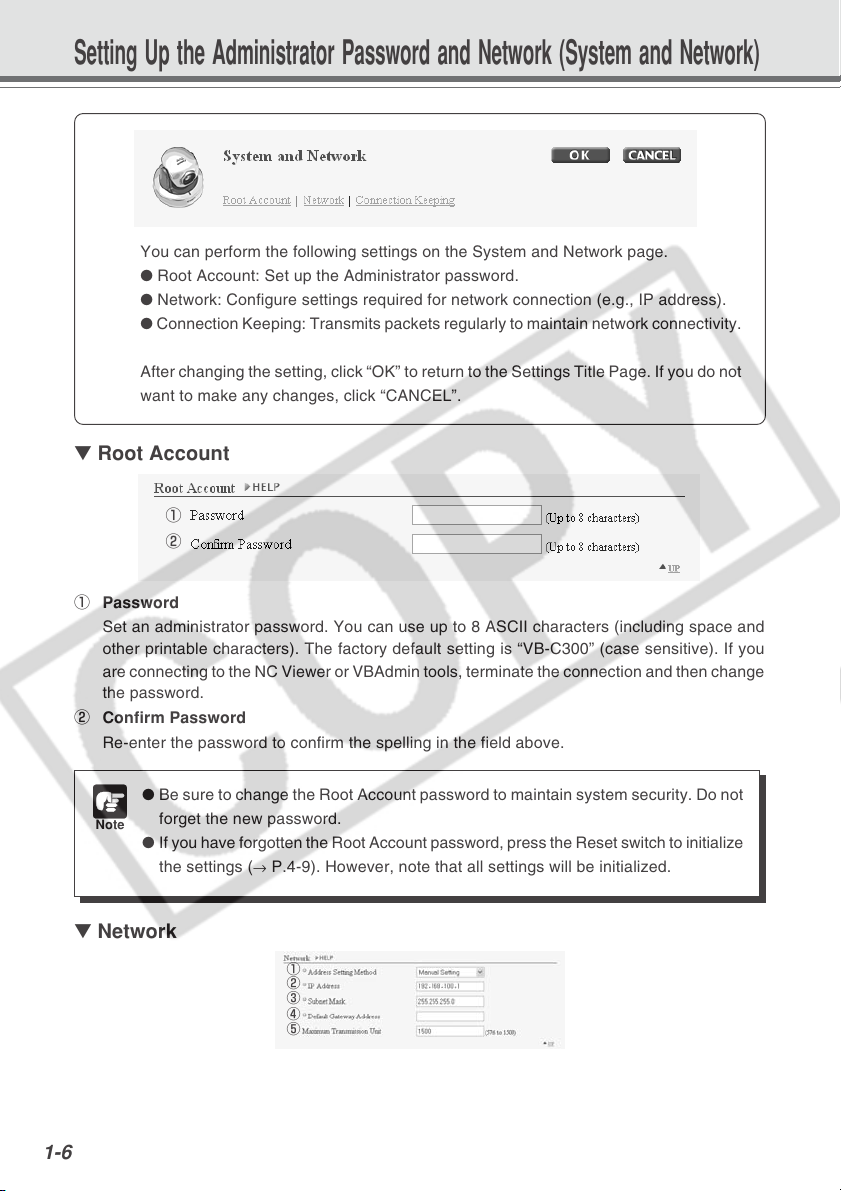
Setting Up the Administrator Password and Network (System and Network)
You can perform the following settings on the System and Network page.
● Root Account: Set up the Administrator password.
● Network: Configure settings required for network connection (e.g., IP address).
● Connection Keeping: Transmits packets regularly to maintain network connectivity.
After changing the setting, click “OK” to return to the Settings Title Page. If you do not
want to make any changes, click “CANCEL”.
▼ Root Account
1
2
1 Password
Set an administrator password. You can use up to 8 ASCII characters (including space and
other printable characters). The factory default setting is “VB-C300” (case sensitive). If you
are connecting to the NC Viewer or VBAdmin tools, terminate the connection and then change
the password.
2 Confirm Password
Re-enter the password to confirm the spelling in the field above.
Note
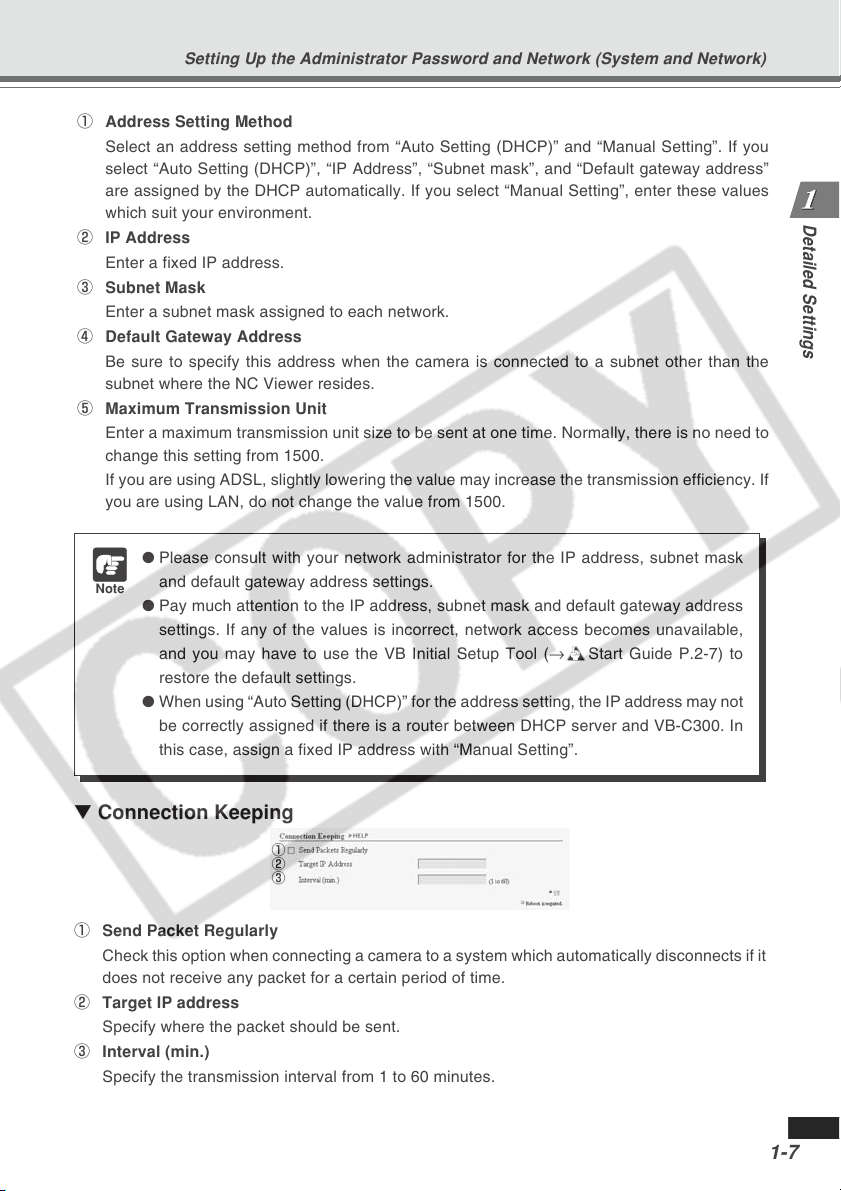
▼ Network
1-6
● Be sure to change the Root Account password to maintain system security. Do not
forget the new password.
● If you have forgotten the Root Account password, press the Reset switch to initialize
the settings (→ P.4-9). However, note that all settings will be initialized.
1
2
3
4
5
Page 13
Setting Up the Administrator Password and Network (System and Network)
1 Address Setting Method
Select an address setting method from “Auto Setting (DHCP)” and “Manual Setting”. If you
select “Auto Setting (DHCP)”, “IP Address”, “Subnet mask”, and “Default gateway address”
are assigned by the DHCP automatically. If you select “Manual Setting”, enter these values
which suit your environment.
2 IP Address
Enter a fixed IP address.
3 Subnet Mask
Enter a subnet mask assigned to each network.
4 Default Gateway Address
Be sure to specify this address when the camera is connected to a subnet other than the
subnet where the NC Viewer resides.
5 Maximum Transmission Unit
Enter a maximum transmission unit size to be sent at one time. Normally, there is no need to
change this setting from 1500.
If you are using ADSL, slightly lowering the value may increase the transmission efficiency. If
you are using LAN, do not change the value from 1500.
● Please consult with your network administrator for the IP address, subnet mask
Note
and default gateway address settings.
● Pay much attention to the IP address, subnet mask and default gateway address
settings. If any of the values is incorrect, network access becomes unavailable,
and you may have to use the VB Initial Setup Tool (→dStart Guide P.2-7) to
restore the default settings.
● When using “Auto Setting (DHCP)” for the address setting, the IP address may not
be correctly assigned if there is a router between DHCP server and VB-C300. In
this case, assign a fixed IP address with “Manual Setting”.
Detailed Settings
▼ Connection Keeping
1
2
3
1 Send Packet Regularly
Check this option when connecting a camera to a system which automatically disconnects if it
does not receive any packet for a certain period of time.
2 Target IP address
Specify where the packet should be sent.
3 Interval (min.)
Specify the transmission interval from 1 to 60 minutes.
1-7
Page 14
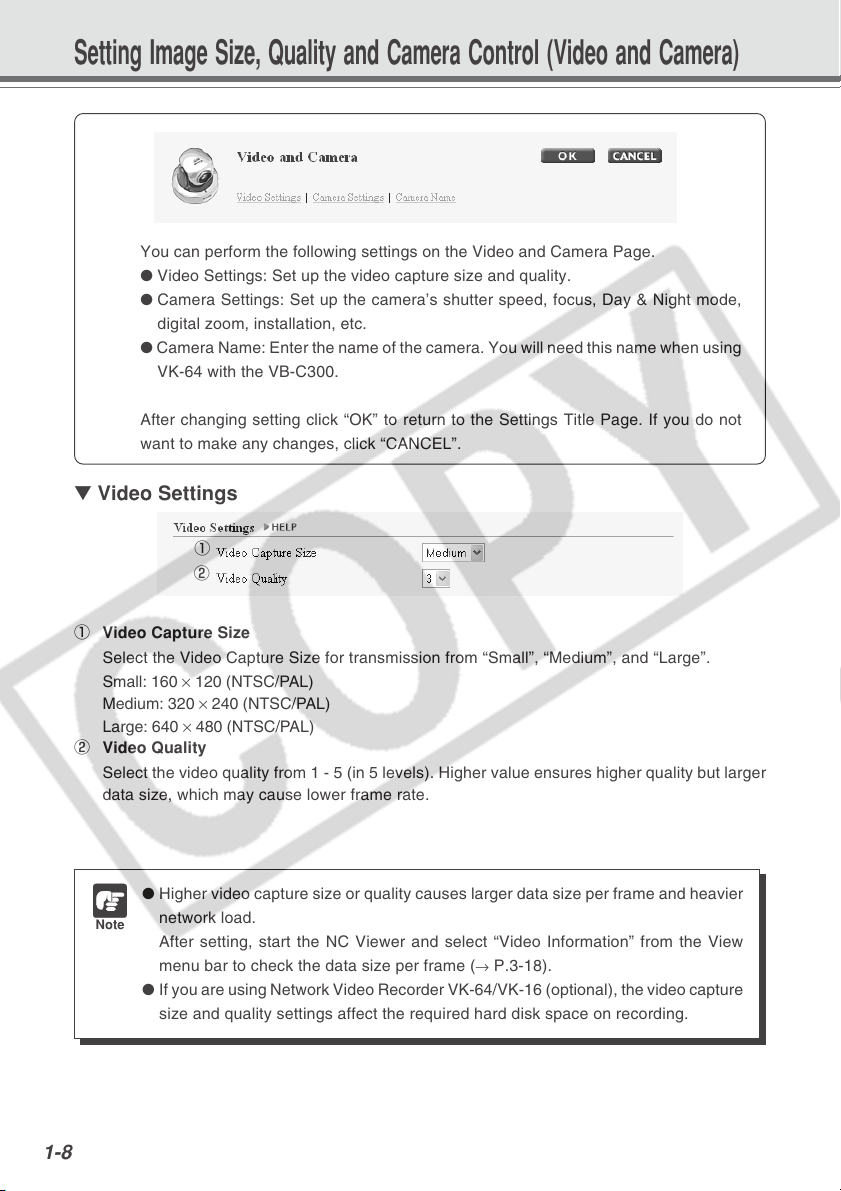
Setting Image Size, Quality and Camera Control (Video and Camera)
You can perform the following settings on the Video and Camera Page.
● Video Settings: Set up the video capture size and quality.
● Camera Settings: Set up the camera’s shutter speed, focus, Day & Night mode,
digital zoom, installation, etc.
● Camera Name: Enter the name of the camera. You will need this name when using
VK-64 with the VB-C300.
After changing setting click “OK” to return to the Settings Title Page. If you do not
want to make any changes, click “CANCEL”.
▼ Video Settings
1
2
1 Video Capture Size
Select the Video Capture Size for transmission from “Small”, “Medium”, and “Large”.
Small: 160 × 120 (NTSC/PAL)
Medium: 320 × 240 (NTSC/PAL)
Large: 640 × 480 (NTSC/PAL)
2 Video Quality
Select the video quality from 1 - 5 (in 5 levels). Higher value ensures higher quality but larger
data size, which may cause lower frame rate.
1-8
● Higher video capture size or quality causes larger data size per frame and heavier
Note
network load.
After setting, start the NC Viewer and select “Video Information” from the View
menu bar to check the data size per frame (→ P.3-18).
● If you are using Network Video Recorder VK-64/VK-16 (optional), the video capture
size and quality settings affect the required hard disk space on recording.
Page 15
Setting Image Size, Quality and Camera Control (Video and Camera)
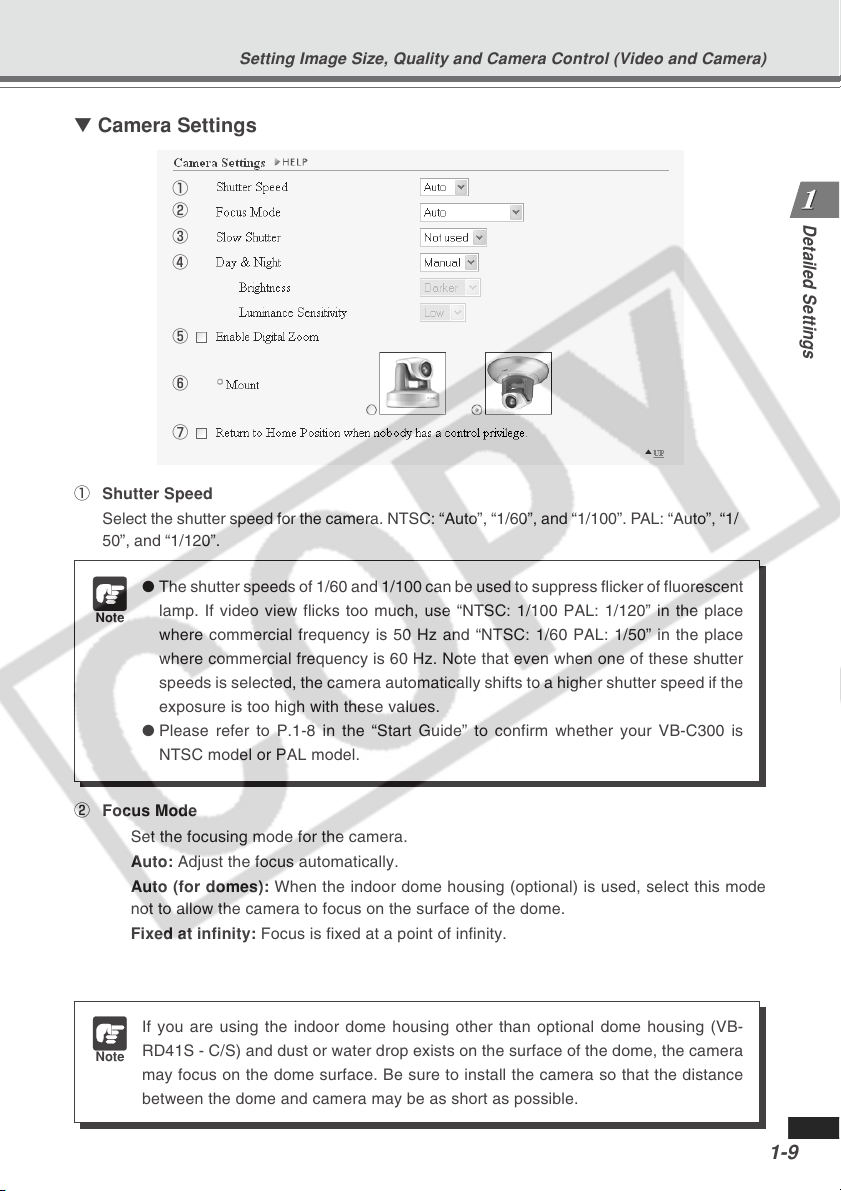
▼ Camera Settings
1
2
3
4
5
6
7
1 Shutter Speed
Select the shutter speed for the camera. NTSC: “Auto”, “1/60”, and “1/100”. PAL: “Auto”, “1/
50”, and “1/120”.
● The shutter speeds of 1/60 and 1/100 can be used to suppress flicker of fluorescent
Note
lamp. If video view flicks too much, use “NTSC: 1/100 PAL: 1/120” in the place
where commercial frequency is 50 Hz and “NTSC: 1/60 PAL: 1/50” in the place
where commercial frequency is 60 Hz. Note that even when one of these shutter
speeds is selected, the camera automatically shifts to a higher shutter speed if the
exposure is too high with these values.
● Please refer to P.1-8 in the “Start Guide” to confirm whether your VB-C300 is
NTSC model or PAL model.
Detailed Settings
2 Focus Mode
Set the focusing mode for the camera.
Auto: Adjust the focus automatically.
Auto (for domes): When the indoor dome housing (optional) is used, select this mode
not to allow the camera to focus on the surface of the dome.
Fixed at infinity: Focus is fixed at a point of infinity.
If you are using the indoor dome housing other than optional dome housing (VB-
RD41S - C/S) and dust or water drop exists on the surface of the dome, the camera
Note
may focus on the dome surface. Be sure to install the camera so that the distance
between the dome and camera may be as short as possible.
1-9
Page 16
Setting Image Size, Quality and Camera Control (Video and Camera)
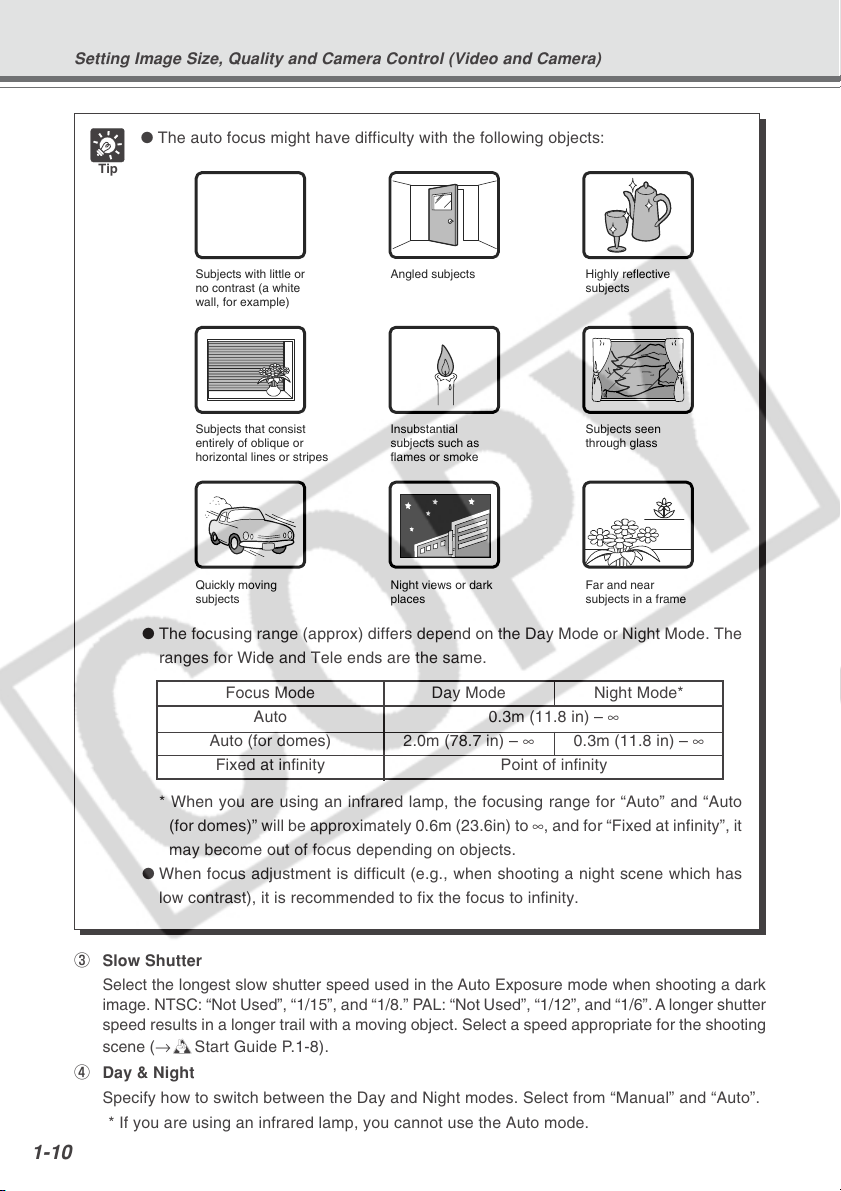
Subjects with little or
no contrast (a white
wall, for example)
Angled subjects Highly reflective
subjects
Subjects that consist
entirely of oblique or
horizontal lines or stripes
Insubstantial
subjects such as
flames or smoke
Subjects seen
through glass
Quickly moving
subjects
Night views or dark
places
Far and near
subjects in a frame
● The auto focus might have difficulty with the following objects:
Tip
● The focusing range (approx) differs depend on the Day Mode or Night Mode. The
ranges for Wide and Tele ends are the same.
3 Slow Shutter
Select the longest slow shutter speed used in the Auto Exposure mode when shooting a dark
image. NTSC: “Not Used”, “1/15”, and “1/8.” PAL: “Not Used”, “1/12”, and “1/6”. A longer shutter
speed results in a longer trail with a moving object. Select a speed appropriate for the shooting
scene (→dStart Guide P.1-8).
4 Day & Night
Specify how to switch between the Day and Night modes. Select from “Manual” and “Auto”.
* If you are using an infrared lamp, you cannot use the Auto mode.
1-10
Focus Mode Day Mode Night Mode*
Auto 0.3m (11.8 in) – ∞
Auto (for domes) 2.0m (78.7 in) – ∞ 0.3m (11.8 in) – ∞
Fixed at infinity Point of infinity
* When you are using an infrared lamp, the focusing range for “Auto” and “Auto
(for domes)” will be approximately 0.6m (23.6in) to ∞, and for “Fixed at infinity”, it
may become out of focus depending on objects.
● When focus adjustment is difficult (e.g., when shooting a night scene which has
low contrast), it is recommended to fix the focus to infinity.
Page 17
Setting Image Size, Quality and Camera Control (Video and Camera)
Brightness
Specify how the camera changes from the Day Mode to Night Mode. If you want to shoot
video in color as long as possible, select “Darker”. If you want to rather suppress noises in
video by capturing in black and white, select “Brighter”.
Luminance Sensitivity
Luminance Sensitivity refers to the time required for determining to switch between Day
and Night modes.
“Low” : approx. 30 sec. “High” : approx. 10 sec.
Day Mode or Night Mode switches when bright conditions remain above or below the
threshold value for either of the above period of time.
If the brightness changes frequently, due to a light source passing in front of the camera
for example, select “Low”. If the brightness does not change frequently, select “High”.
5 Enable Digital Zoom
Check to enable Digital zoom.
* With the digital zoom, higher magnification causes lower image quality.
6 Mount
Select a camera mount type. The factory default setting is Inverted.
7 Return to Home Position when nobody has a control privilege.
When this option is checked and the home position is specified, the camera is moved to its
home position if there is no request for a control privilege. You can set Home Position from
VBAdmin Tools (→ P. 2-10).
Detailed Settings
● When setting “Day & Night Mode” to “Auto”, be sure to test the camera operation in
Note
advance to check effectiveness of this option.
● When setting “Day & Night Mode” to “Auto”, use “Auto Exposure” (→ P. 3-28).
● If you are using an infrared lamp, set the “Day & Night Mode” to “Manual”. You
cannot use the Auto mode.
● If you set the “Day & Night Mode” to “Auto”, the infrared cut filter may make several
round trips when the camera switches the Day & Night modes.
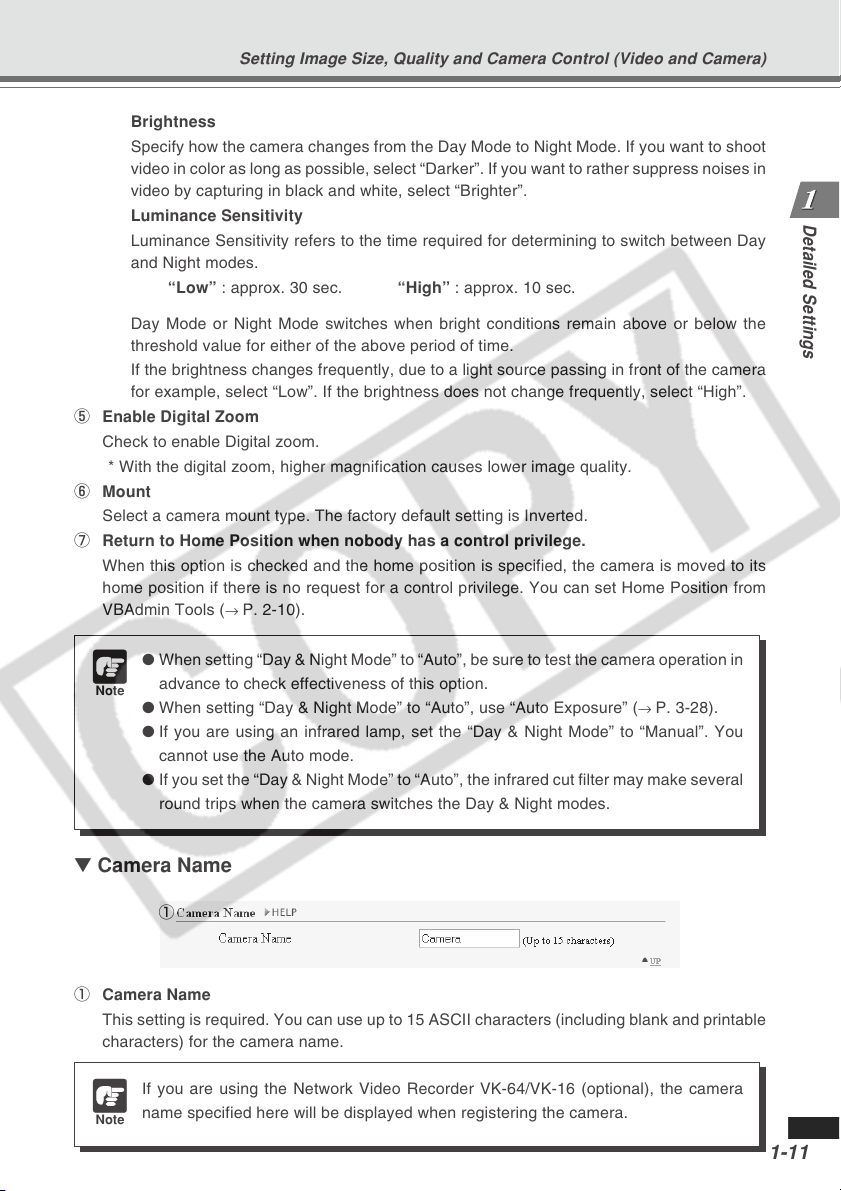
▼ Camera Name
1
1 Camera Name
This setting is required. You can use up to 15 ASCII characters (including blank and printable
characters) for the camera name.
If you are using the Network Video Recorder VK-64/VK-16 (optional), the camera
name specified here will be displayed when registering the camera.
Note
1-11
Page 18
Setting HTTP Server, Video Server, and Audio Server (Server)
You can perform the following settings on the Server Page.
● HTTP Server: Set the HTTP port.
● Video Server: Configure settings to transmit the video from the VB-C300.
● Audio Server: Configure settings related to audio transmission.
After changing setting click “OK” to return to the Settings Title Page. If you do not
want to make any changes, click “CANCEL”.
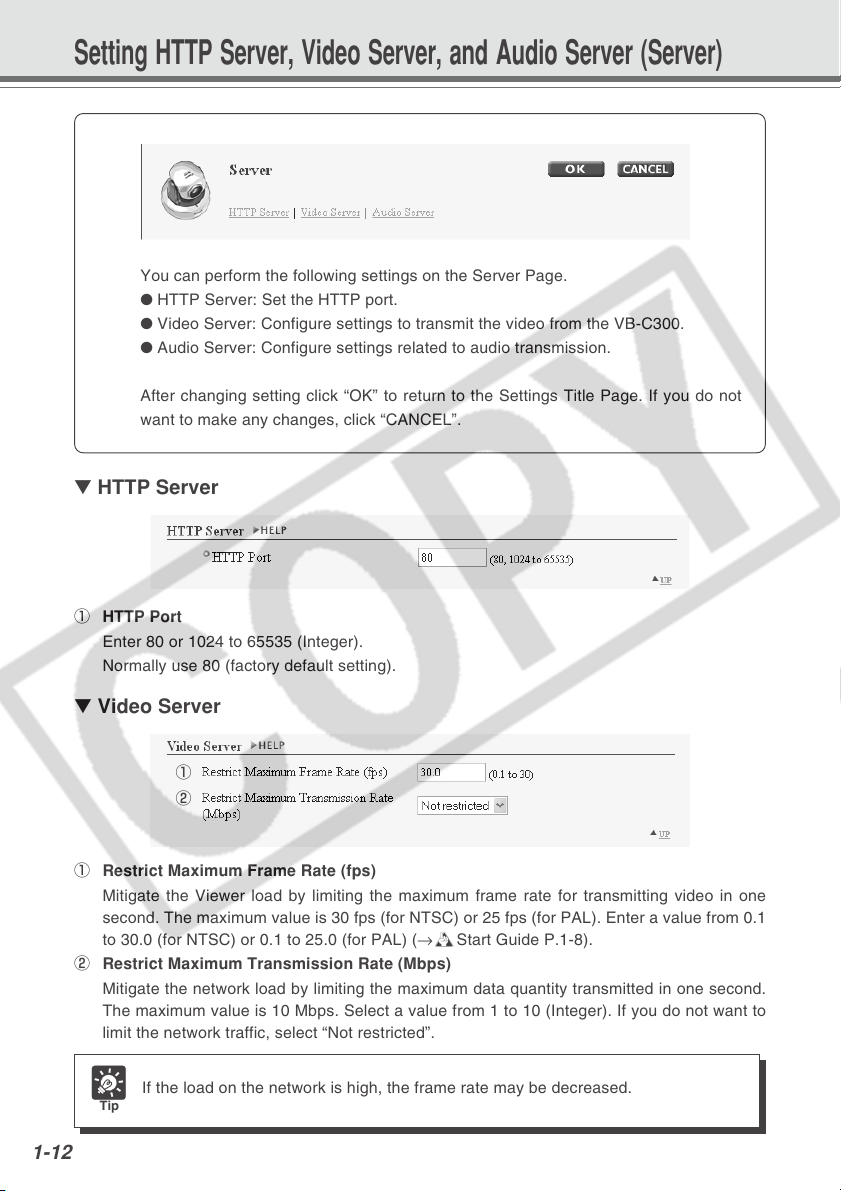
▼ HTTP Server
1 HTTP Port
Enter 80 or 1024 to 65535 (Integer).
Normally use 80 (factory default setting).
▼ Video Server
1
2
1 Restrict Maximum Frame Rate (fps)
Mitigate the Viewer load by limiting the maximum frame rate for transmitting video in one
second. The maximum value is 30 fps (for NTSC) or 25 fps (for PAL). Enter a value from 0.1
to 30.0 (for NTSC) or 0.1 to 25.0 (for PAL) (→dStart Guide P.1-8).
2 Restrict Maximum Transmission Rate (Mbps)
Mitigate the network load by limiting the maximum data quantity transmitted in one second.
The maximum value is 10 Mbps. Select a value from 1 to 10 (Integer). If you do not want to
limit the network traffic, select “Not restricted”.
If the load on the network is high, the frame rate may be decreased.
Tip
1-12
Page 19
Setting HTTP Server, Video Server, and Audio Server (Server)
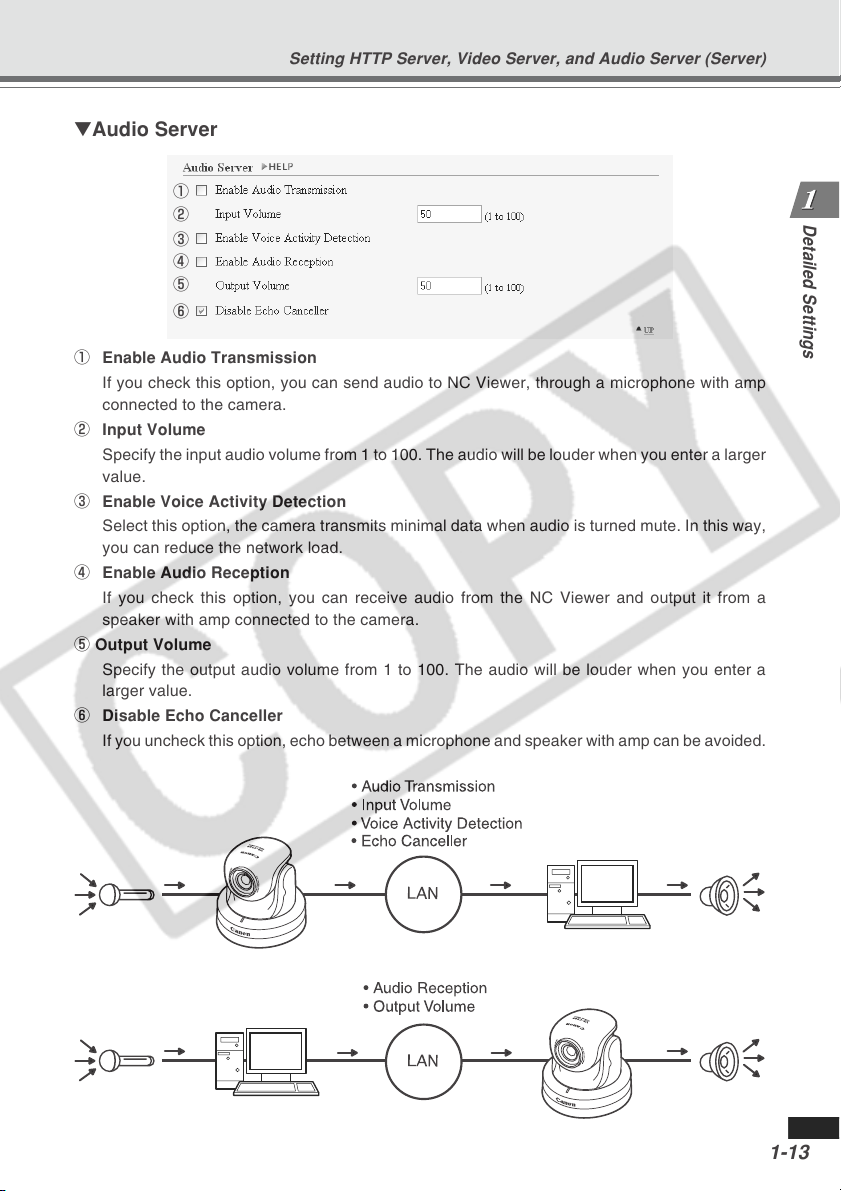
▼Audio Server
1
2
3
4
5
6
1 Enable Audio Transmission
If you check this option, you can send audio to NC Viewer, through a microphone with amp
connected to the camera.
2 Input Volume
Specify the input audio volume from 1 to 100. The audio will be louder when you enter a larger
value.
3 Enable Voice Activity Detection
Select this option, the camera transmits minimal data when audio is turned mute. In this way,
you can reduce the network load.
4 Enable Audio Reception
If you check this option, you can receive audio from the NC Viewer and output it from a
speaker with amp connected to the camera.
5 Output Volume
Specify the output audio volume from 1 to 100. The audio will be louder when you enter a
larger value.
6 Disable Echo Canceller
If you uncheck this option, echo between a microphone and speaker with amp can be avoided.
Detailed Settings
1-13
Page 20
Setting HTTP Server, Video Server, and Audio Server (Server)
● Be sure to use a microphone and speaker with amp (→dStart Guide P.3-6).
● If you uncheck the Disable Echo Canceller box, audio quality or volume may be
Note
affected. Check or uncheck this option according to the environment and usage of
the camera, as required.
● When transmitting audio, read the “Usage Notice of Audio” carefully (→ P.ii).
You must set the following settings in advance to transmit and receive audio.
● Check the Enable Audio Transmission box and Enable Audio Reception box on
the Audio Server section of the Server settings page (→ P.1-13).
● Check the Send and receive audio box in the Connection Setting dialog when
starting the NC Viewer (→ P.3-5, 3-23).
● When starting the NC Viewer from the VBAdmin Tools, check the Send and receive
audio option on the Connection Settings tab in the Setup properties dialog (→ P.3-
31).
1-14
Page 21
Setting User Access Privileges (Access Control)
Detailed Settings
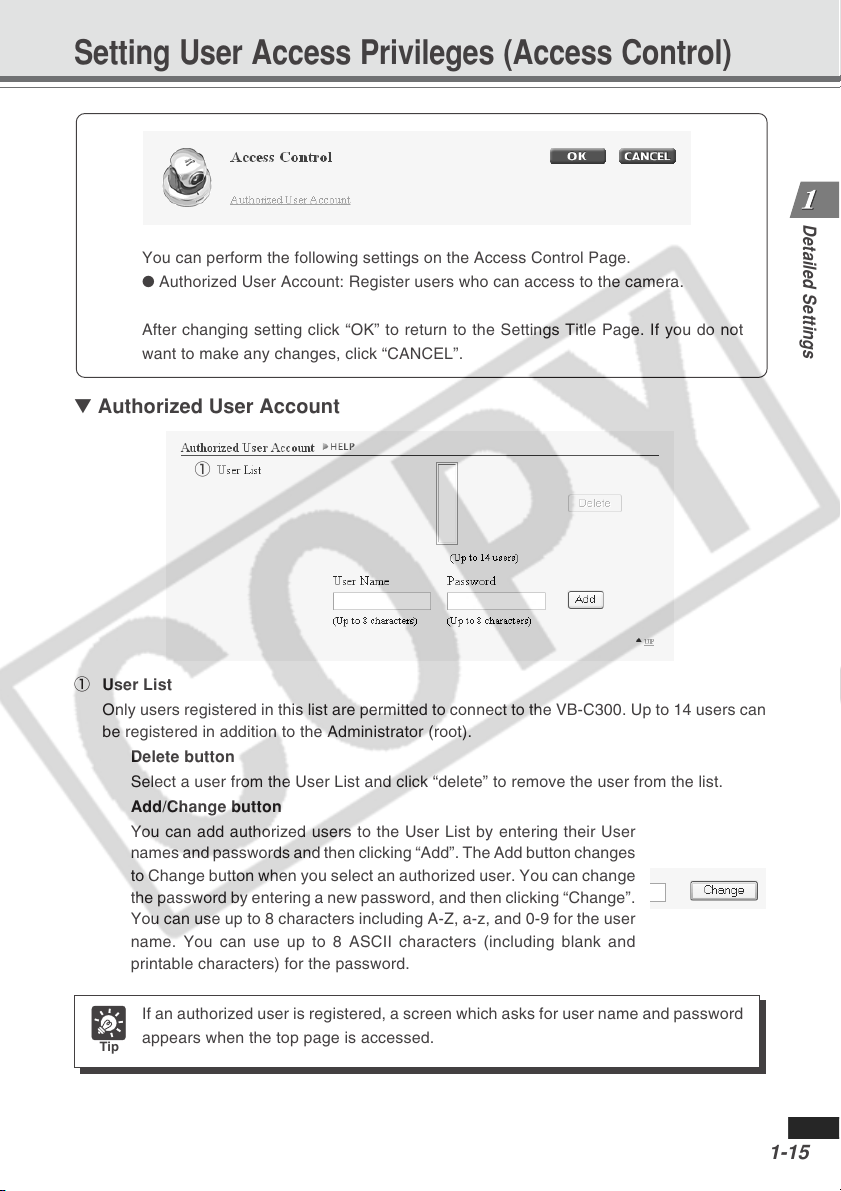
You can perform the following settings on the Access Control Page.
● Authorized User Account: Register users who can access to the camera.
After changing setting click “OK” to return to the Settings Title Page. If you do not
want to make any changes, click “CANCEL”.
▼ Authorized User Account
1
1 User List
Only users registered in this list are permitted to connect to the VB-C300. Up to 14 users can
be registered in addition to the Administrator (root).
Delete button
Select a user from the User List and click “delete” to remove the user from the list.
Add/Change button
You can add authorized users to the User List by entering their User
names and passwords and then clicking “Add”. The Add button changes
to Change button when you select an authorized user. You can change
the password by entering a new password, and then clicking “Change”.
You can use up to 8 characters including A-Z, a-z, and 0-9 for the user
name. You can use up to 8 ASCII characters (including blank and
printable characters) for the password.
If an authorized user is registered, a screen which asks for user name and password
appears when the top page is accessed.
Tip
1-15
Page 22
Setting the Date and Time (Date and Time)
You can perform the following settings on the Date and Time Page.
● Current Camera Time: Display the date and time currently set on the VB-C300.
● New Camera Time: Set the date and time for the VB-C300.
● Time Zone: Select a time zone from the drop-down list.
After changing setting click “OK” to return to the Settings Title Page. If you do not
want to make any changes, click “CANCEL”.
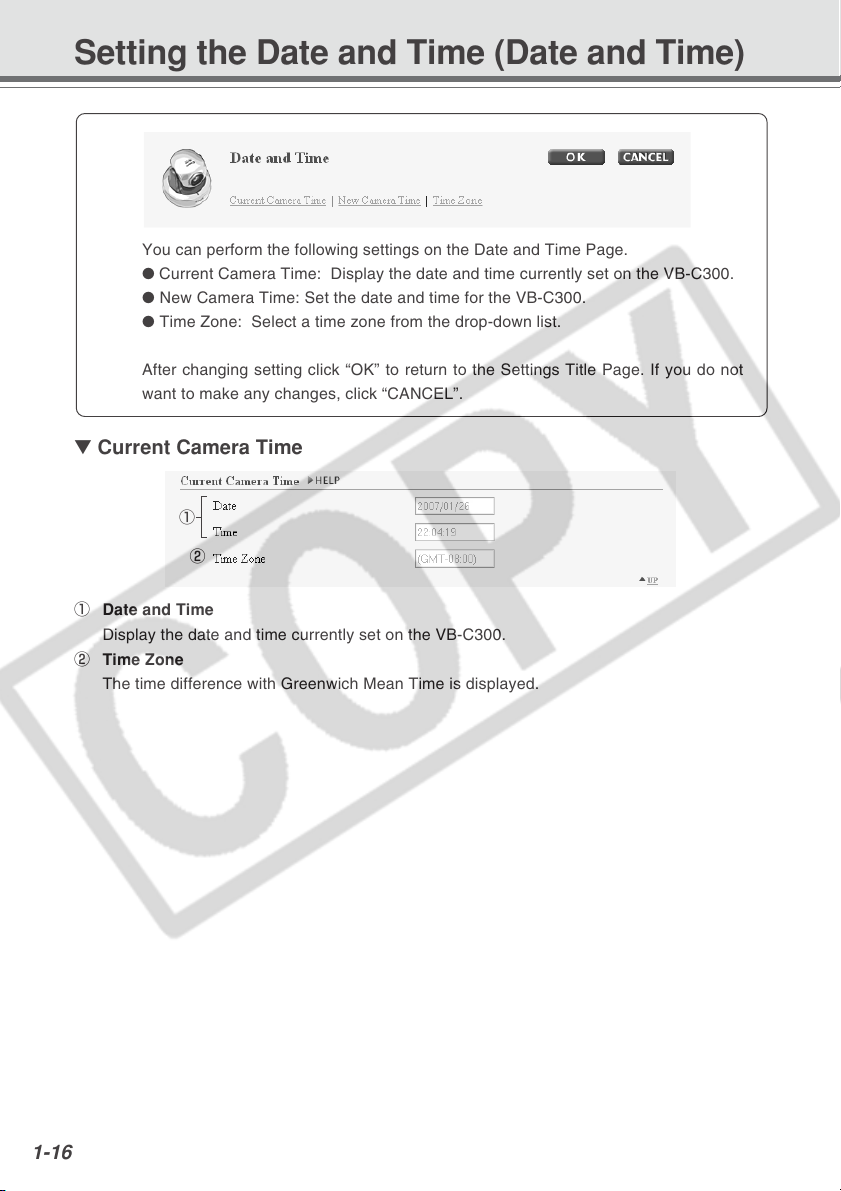
▼ Current Camera Time
1
2
1 Date and Time
Display the date and time currently set on the VB-C300.
2 Time Zone
The time difference with Greenwich Mean Time is displayed.
1-16
Page 23
Setting the Date and Time (Date and Time)
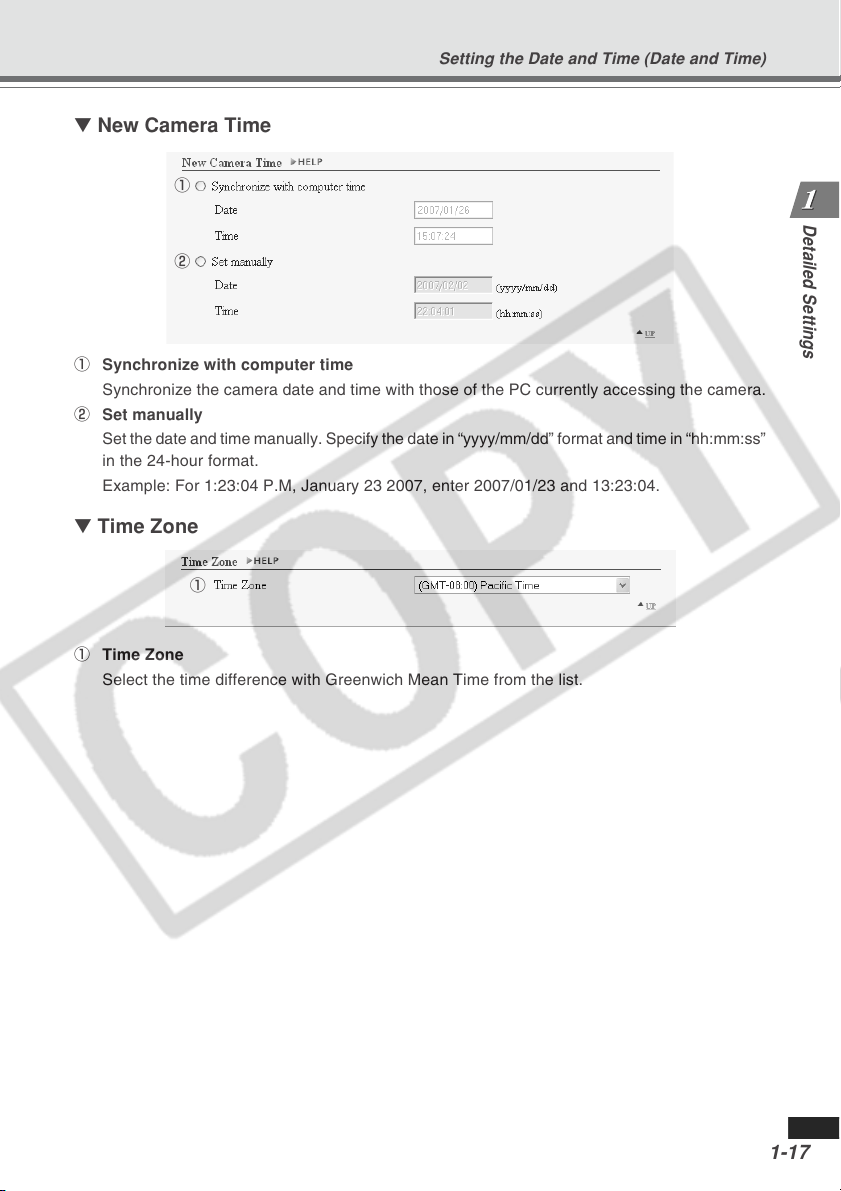
▼ New Camera Time
1
2
1 Synchronize with computer time
Synchronize the camera date and time with those of the PC currently accessing the camera.
2 Set manually
Set the date and time manually. Specify the date in “yyyy/mm/dd” format and time in “hh:mm:ss”
in the 24-hour format.
Example: For 1:23:04 P.M, January 23 2007, enter 2007/01/23 and 13:23:04.
▼ Time Zone
1
Detailed Settings
1 Time Zone
Select the time difference with Greenwich Mean Time from the list.
1-17
Page 24
Setting Up DNS and LED, etc. (Miscellaneous)
You can perform the following settings on the Miscellaneous Page.
● DNS: Enter the name server address and host name to register a DNS host.
● External Device Names: Specify the name of the external device.
● LED Setting: Set the LED of the camera to turn On or Off.
After changing setting click “OK” to return to the Settings Title Page. If you do not
want to make any changes, click “CANCEL”.
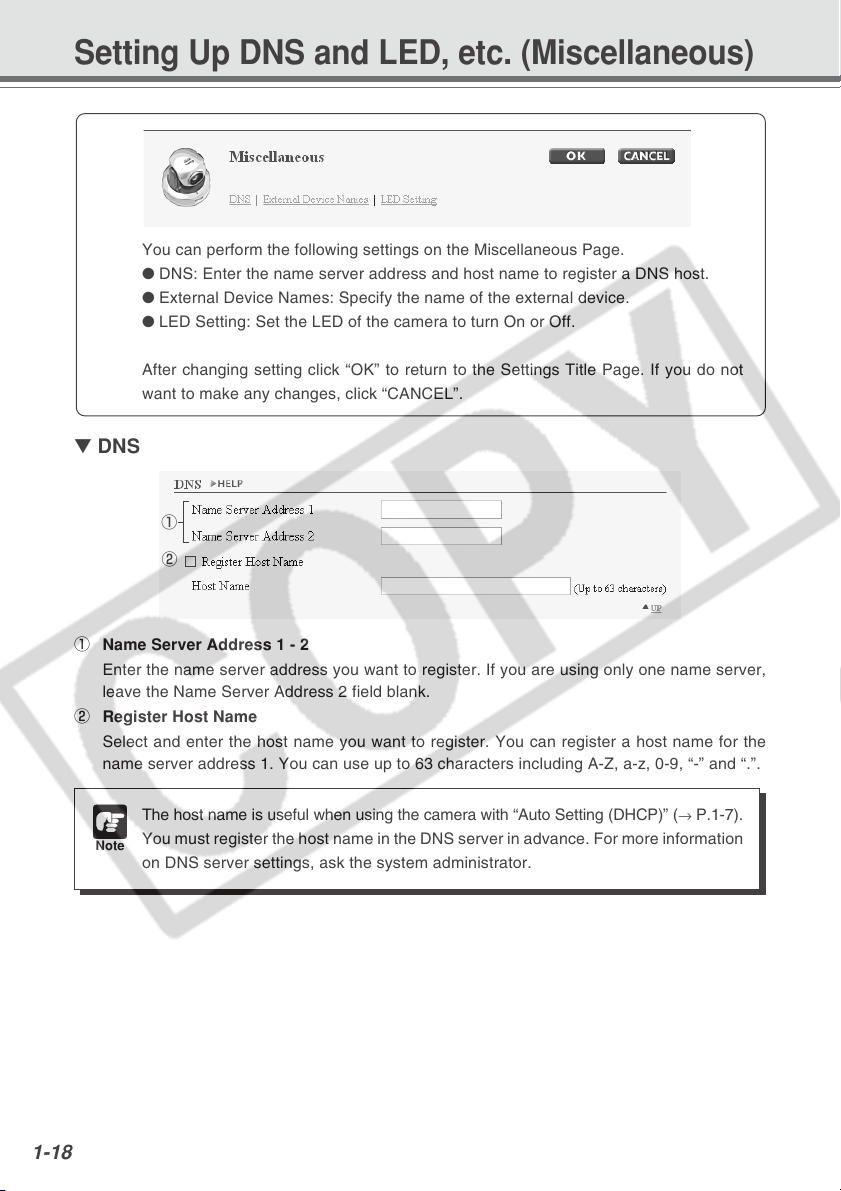
▼ DNS
1
2
1 Name Server Address 1 - 2
Enter the name server address you want to register. If you are using only one name server,
leave the Name Server Address 2 field blank.
2 Register Host Name
Select and enter the host name you want to register. You can register a host name for the
name server address 1. You can use up to 63 characters including A-Z, a-z, 0-9, “-” and “.”.
The host name is useful when using the camera with “Auto Setting (DHCP)” (→ P.1-7).
You must register the host name in the DNS server in advance. For more information
Note
on DNS server settings, ask the system administrator.
1-18
Page 25
▼ External Device Names
Setting Up DNS and LED, etc. (Miscellaneous)
1
2
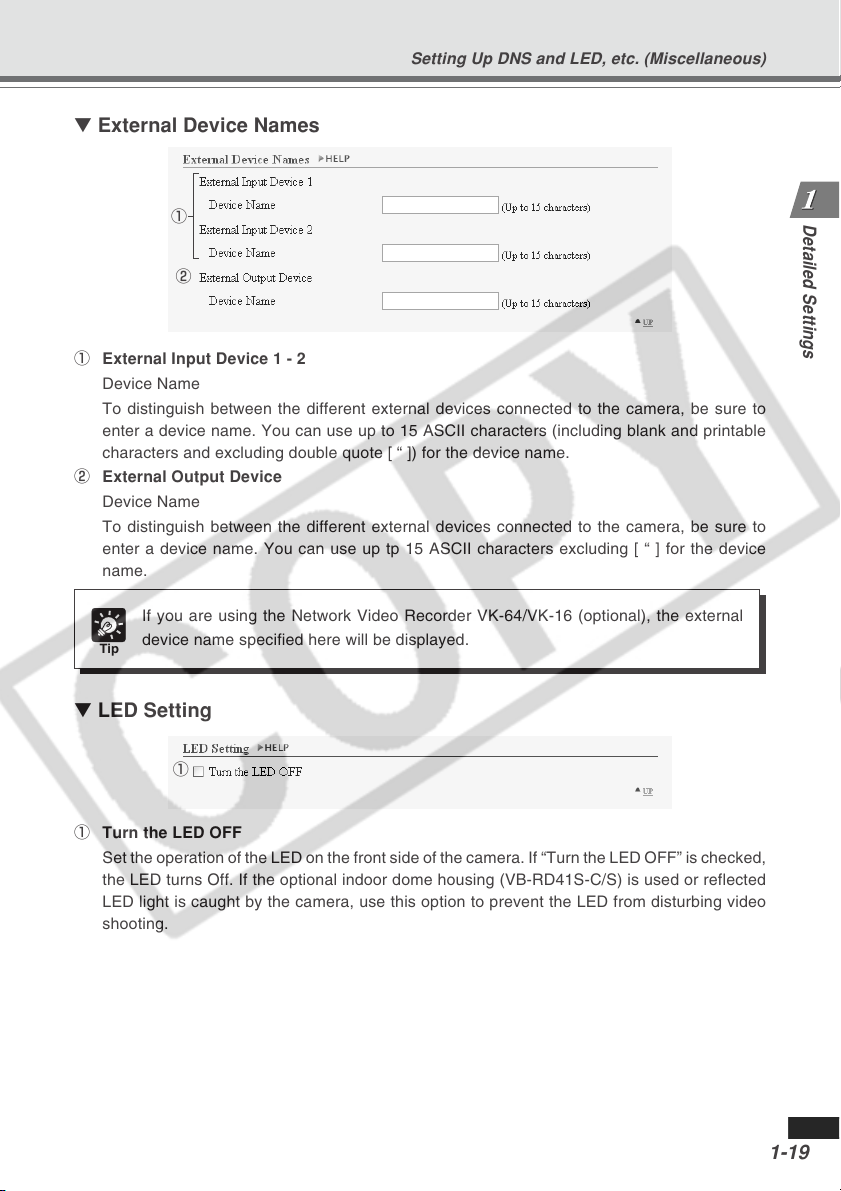
1 External Input Device 1 - 2
Device Name
To distinguish between the different external devices connected to the camera, be sure to
enter a device name. You can use up to 15 ASCII characters (including blank and printable
characters and excluding double quote [ “ ]) for the device name.
2 External Output Device
Device Name
To distinguish between the different external devices connected to the camera, be sure to
enter a device name. You can use up tp 15 ASCII characters excluding [ “ ] for the device
name.
If you are using the Network Video Recorder VK-64/VK-16 (optional), the external
device name specified here will be displayed.
Tip
▼ LED Setting
1
Detailed Settings
1 Turn the LED OFF
Set the operation of the LED on the front side of the camera. If “Turn the LED OFF” is checked,
the LED turns Off. If the optional indoor dome housing (VB-RD41S-C/S) is used or reflected
LED light is caught by the camera, use this option to prevent the LED from disturbing video
shooting.
1-19
Page 26
Using the Administration Tools (Administration Tools)
You can perform the following settings on the Administration Tools Page.
● View, Reboot and Restore: Display and initialize the setting for the VB-C300.
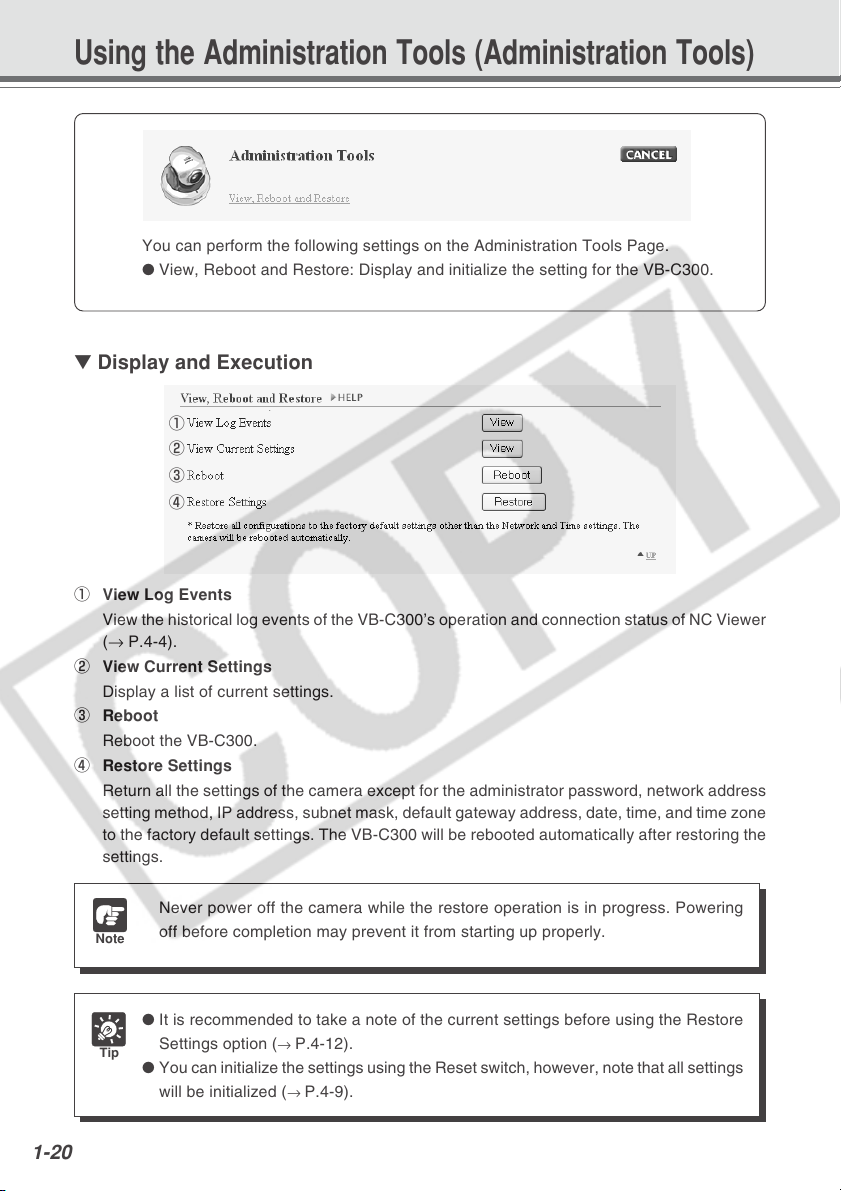
▼ Display and Execution
1
2
3
4
1 View Log Events
View the historical log events of the VB-C300’s operation and connection status of NC Viewer
(→ P.4-4).
2 View Current Settings
Display a list of current settings.
3 Reboot
Reboot the VB-C300.
4 Restore Settings
Return all the settings of the camera except for the administrator password, network address
setting method, IP address, subnet mask, default gateway address, date, time, and time zone
to the factory default settings. The VB-C300 will be rebooted automatically after restoring the
settings.
1-20
Never power off the camera while the restore operation is in progress. Powering
Note
Tip
off before completion may prevent it from starting up properly.
● It is recommended to take a note of the current settings before using the Restore
Settings option (→ P.4-12).
● You can initialize the settings using the Reset switch, however, note that all settings
will be initialized (→ P.4-9).
Page 27
Chapter
VBAdmin Tools
This chapter describes how to use the VBAdmin Tools. You
can create panoramas, set presets, view logs and use the NC
Viewer from the VBAdmin Tools. You must configure the
detail settings as directed in Chapter 1 in advance.
Page 28
Starting the VBAdmin Tools
To Launch the VBAdmin Tools
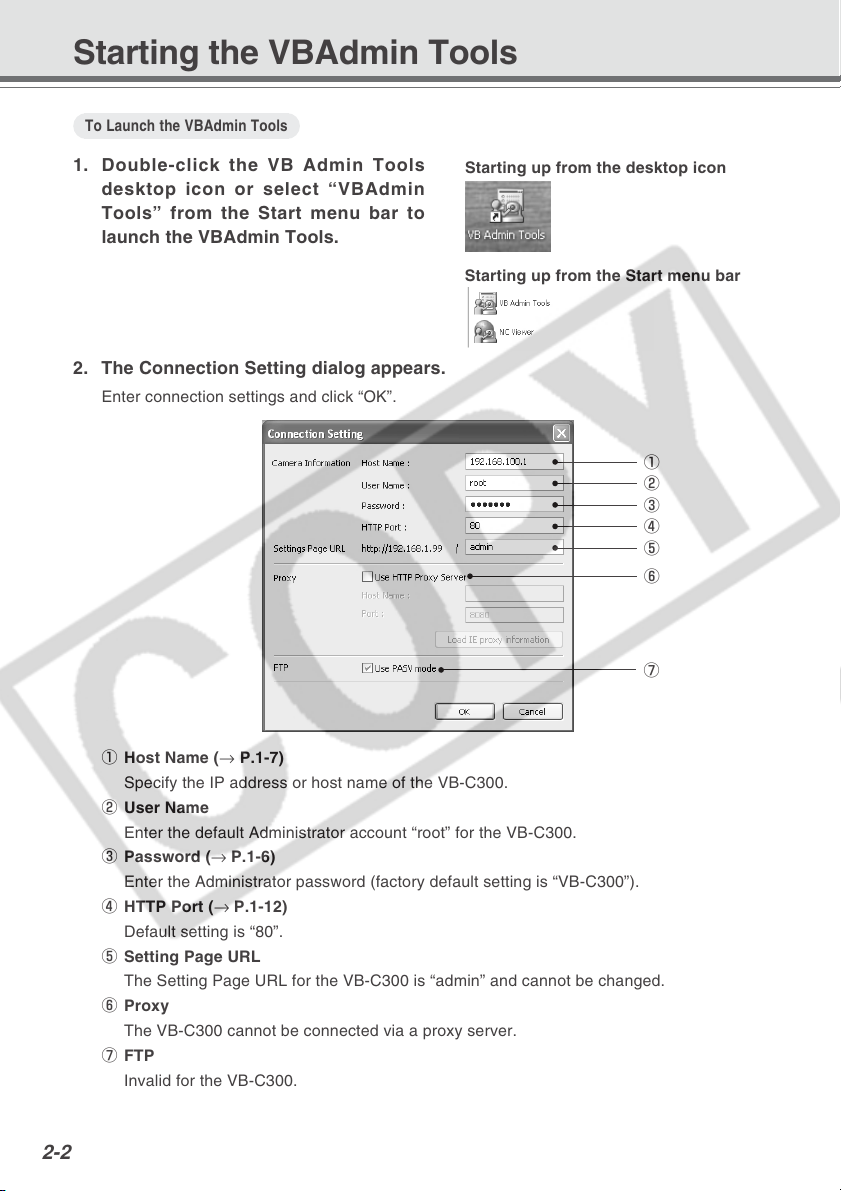
1. Double-click the VB Admin Tools
desktop icon or select “VBAdmin
Tools” from the Start menu bar to
launch the VBAdmin Tools.
2. The Connection Setting dialog appears.
Enter connection settings and click “OK”.
Starting up from the desktop icon
Starting up from the Start menu bar
1
2
3
4
5
6
7
1 Host Name (→ P.1-7)
Specify the IP address or host name of the VB-C300.
2 User Name
Enter the default Administrator account “root” for the VB-C300.
3 Password (→ P.1-6)
Enter the Administrator password (factory default setting is “VB-C300”).
4 HTTP Port (→ P.1-12)
Default setting is “80”.
5 Setting Page URL
The Setting Page URL for the VB-C300 is “admin” and cannot be changed.
6 Proxy
The VB-C300 cannot be connected via a proxy server.
7 FTP
Invalid for the VB-C300.
2-2
Page 29
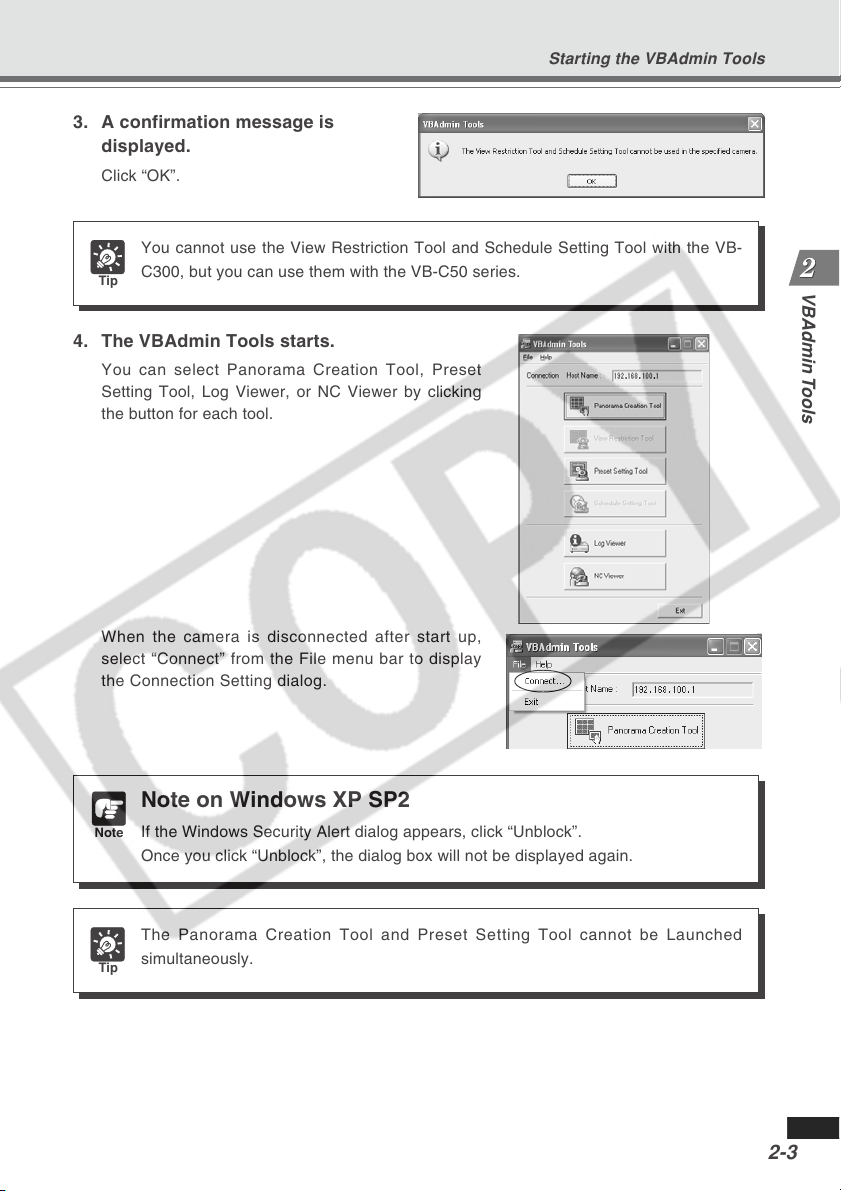
3. A confirmation message is
displayed.
Click “OK”.
You cannot use the View Restriction Tool and Schedule Setting Tool with the VB-
C300, but you can use them with the VB-C50 series.
Tip
4. The VBAdmin Tools starts.
You can select Panorama Creation Tool, Preset
Setting Tool, Log Viewer, or NC Viewer by clicking
the button for each tool.
When the camera is disconnected after start up,
select “Connect” from the File menu bar to display
the Connection Setting dialog.
Starting the VBAdmin Tools
VBAdmin Tools
Note on Windows XP SP2
Note
If the Windows Security Alert dialog appears, click “Unblock”.
Once you click “Unblock”, the dialog box will not be displayed again.
The Panorama Creation Tool and Preset Setting Tool cannot be Launched
simultaneously.
Tip
2-3
Page 30

Panorama Creation Tool
This tool is used to create a panorama image displaying the full view of the area covered by the VB-
C300. When using the NC Viewer to perform pan, tilt, or zoom as well as define presets, you can see,
at a glance, which part of the entire viewing area is currently covered.
The Panorama Creation Tool is used to take
and create panorama image and register
them in the VB-C300.
2-4
NC Viewer Preset Setting Tool
You can see, at a glance, where the
region currently being set is located
within the entire area.
Page 31

Panorama Creation Tool
Panorama Creation Tool Display Screen
2
1
3
4
8
567
1 Show Registered Panorama Image button
Displays panorama image registered in the VB-C300.
2 Register Panorama Image button
Register panorama image currently displayed in the panorama creation tool.
3 Display Camera model and Capture Date
Displays the model of camera currently connected and the date the panorama image was
taken, if it has been captured.
4 Panorama image
Shows the panorama image that was captured.
5 Capture button
Captures panorama image.
6 Remove Image button
Deletes panorama image.
7 Position of AE Lock
Switch the AE lock position between the center of the panorama image and current camera
position. The AE lock function sets the exposure level based on the specified position.
8 Indoor Dome Housing(VB-RD41S)
Check this option to prevent the VB-C300 from capturing areas obstructed by the optional
indoor dome housing (VB-RD41S-C/S).
VBAdmin Tools
2-5
Page 32

Panorama Creation Tool
Capturing Panorama Image
To Capture...
1. Click “Capture” to start capturing.
Change the AE lock position as required.
Check the Indoor Dome Housing (VB-RD41S)
option if you are using the optional indoor dome
housing.
To stop capturing while it is in progress, click the
Stop button.
2. After capturing is completed, click “OK”
to accept the image.
To capture the picture again, click “Recapture”.
Or, a square section in the displayed grid can be
captured again by double-clicking on that section.
To change the AE lock position, click “Cancel” to
discard the captured image and return to the initial
screen.
2-6
If you are using the optional indoor dome housing, select Indoor Dome Housing (VB-
RD41S) option so that the area obstructed by the dome housing is not recorded
Note
(→dStart Guide P.1-9).
Page 33

Registering/Deleting Panorama Image
To “Resister” the Panorama Image ...
Click “Resister Panorama Image”.
The panorama image is registered.
To Delete...
Click “Remove Image” and then click
“Resister Panorama Image”.
The panorama image registered in the VB-C300
is deleted.
Panorama Creation Tool
VBAdmin Tools
After registering the panorama image, the VB-C300 automatically reboots and
disconnects from the VBAdmin Tools. A dialog box asking whether or not to reconnect
Tip
to the VB-C300 appears after the VB-C300 restarts. Click “OK” to reconnect to the
camera.
2-7
Page 34

Panorama Creation Tool
Reconnecting
Reconnections are made when a connection with the VB-C300 has been cut.
To Reconnect...
Choose “Reconnect” from the File menu bar.
Opening/Saving Panorama Image from/to Image File
You can open an image file as a panorama image, or save a panorama image as an image file.
Only JPEG format images created by the Panorama Creation Tool can be used.
To Open...
Select “Open” from the File menu bar and
select the desired image file in the displayed
dialog.
To Save...
Select “Save” from the File menu bar and
select a folder to save the image, then enter
its file name.
2-8
Page 35

Preset Setting Tool
This tool enables easy visual setting of camera Preset and a home position. Presets are set by
operating the mouse while referring to a panoramic preview.
Preset Setting Tool
Setting Presets
VBAdmin Tools
Reflecting preset settings in the NC Viewer
2-9
Page 36

Preset Setting Tool
Preset Setting Tool Display Screen
You can set up to 20 presets and home position while referring to a panorama preview in the
Preset Setting Area on the Preset Setting Tool screen.
■ Preset Setting Tool Display Screen
12 3 4 5
6
7
Preset Setting Area
0!1!2!3
1 Load Preset Settings button
Loads the preset settings currently set in the VB-C300.
2 Save Preset Settings button
The preset settings set and applied with this tool is saved to the VB-C300.
After setting the presets, be sure to click “Save Preset Settings” to save the settings.
3 Panorama Preview
Panorama image registered in the VB-C300 is displayed. A yellow Preset Preview frame
shows the location of the Preset Setting. By dragging it with the mouse, you can change the
shape or move the frame which will then be reflected in the Preset settings.
4 Preset Selection box
Select the preset to set or “Home”. “Home” is the setting for home position.
5 Not shown in Viewers
Uncheck this option if you are using presets with the NC Viewer. Check this option if you want
to prevent presets from being shown in NC Viewer. If you selected “Home” in the Preset
Selection box, this setting will be grayed out (setting not possible).
6 Preset Name
A preset name can be assigned. If you select “Home” in the Preset Selection box, this setting
will be grayed out (setting not possible).
You can use up to 15 ASCII characters (including blank and printable characters) for the
preset name.
8
9
2-10
Page 37

Preset Setting Tool
7 Model
The model of the camera connected is displayed.
8 Camera Parameters
Use “Pan” and “Tilt” to specify the central angle for the pan and tilt ranges you want to set.
Use “Zoom” to enter the angle for the field of view.
● Camera Angles
Pan Set the pan position of the camera.
Tilt Set the tilt position of the camera.
Zoom Set the angle of view of the camera.
● BLC
Set the backlight compensation for the camera. Select “Off” or “On”.
● Focus
Set the focusing mode for the camera. Select from “Auto”, “Auto (for domes)”, “Fixed at
infinity”, and “Manual” (→P.3-14).
9 Get Value button
When the “Get Value” button is clicked, the current angle and focus position (for Manual
mode) of the camera selected at the VB-C300 is retrieved as camera parameters.
!0 Apply button
Settings for current Presets are applied to the VB-C300, and you can proceed to the next
Preset setting. At this stage, the edited settings are not yet saved to the VB-C300. Be sure to
click “Save Preset Settings” to save the settings to the VB-C300.
!1 Preview button
The settings for camera parameters are reflected in the Preset Preview frame. The camera
angle for the VB-C300 also switches to this Preset and you can confirm from the NC Viewer.
!2 NC Viewer button
Start the NC Viewer.
Use this button if you want to set presets while watching actual video image via the NC Viewer.
Orient the camera toward the position for setting the preset using the NC Viewer, then click
“Get Value”, and click “Apply” to set the preset.
!3 Status list
Displays the results of communication between this tool and the VB-C300.
Warning messages are displayed in blue and error messages are displayed in red.
VBAdmin Tools
Edited contents will not be stored in VB-C300 at the stage when “Apply” is clicked.
After confirming the edited content, be sure to click “Save Preset Settings” to save
Note
the settings to the VB-C300.
2-11
Page 38

Preset Setting Tool
Setting Presets
To set presets, enter the camera parameter values or use one of the following methods. Select
the way which suits your environment or according to your preference.
To use presets with the NC Viewer, uncheck the Not shown in Viewers option.
Note
■ Changing Settings from Preset Preview Frame
The Preset Preview frame on the panorama image can be used to set presets.
To Make Settings...
1. Select a preset to set from the Preset
Selection box and enter the preset name.
2. Set the preset by dragging and reshaping
the Preset Preview frame displayed on the
Panorama image.
Alternatively, you can click at a spot on the image
to make the center of the frame move to that point.
At this point, you can also enter and set values in
the camera parameters.
3. Click “Apply”.
Check the Status List to be sure the values were
applied correctly. Then when “Save Preset
Settings” button is clicked, the values will be saved
to the VB-C300.
2-12
Page 39

■ Changing Settings from NC Viewer’s Camera Angle
Start up the NC Viewer and set the camera angle as a preset.
To Make Settings...
1. Select a preset to set from the Preset
Selection box and enter the preset name.
2. Click “NC Viewer” to start the NC Viewer.
3. Click “Start Control” to get the camera
control.
Preset Setting Tool
VBAdmin Tools
4. Operate the camera and click “Get Value”
at the desired position.
The values retrieved using “Get Value” can be
checked in the Preset settings input boxes, or with
the Preset Preview frame.
At this point, you can also enter and set values in
the camera parameters.
5. Click “Apply”.
Check the Status List to be sure the values were
applied correctly. Then when “Save Preset
Settings” is clicked, the values will be saved to
the VB-C300.
2-13
Page 40

Preset Setting Tool
● The Panorama Preview may be slightly different from the actual image. After the
Note
presets have been set, be sure to check in the NC Viewer that the presets are
correctly reflected.
● When using the manual focus, adjust the focus manually while watching the video
via the NC Viewer. After manual focusing completes, click “Get Value” to set the
preset.
● Up to 20 presets can be set.
● Changes in the preset settings are not applied to the viewer while it is connected.
Tip
● To delete the set presets, use the Restore Settings option (→ P.4-8). However,
note that settings are restored to the factory default settings.
● You can check Not shown in Viewers option (→ P.2-10) to prevent presets from
being shown in the NC Viewer.
● Setting the preset position using the digital zoom may cause the viewing angle to
be misaligned.
● It is possible to apply multiple presets and save them by clicking “Save Preset
Settings” at the end.
2-14
Page 41

Log Viewer
This tool enables viewing of operation status logs of the VB-C300.
● The Log Viewer only displays logs and cannot delete them.
● To save logs, select “Save” from the File menu bar. Logs can be saved as text
Tip
files.
Downloading Log Files
To Download...
Starting the Log Viewer from the VBAdmin Tools,
automatically obtains and displays the latest log file.
To retrieve a list of log files, choose Download
from the File menu bar.
VBAdmin Tools
When the list is retrieved, a list of log files appears
in the dialog box. Select the log file you want to
view by clicking on it, then click “Download” and
the selected file will be downloaded.
2-15
Page 42

Log Viewer
Viewing Logs
The following information about logs is displayed:
● Code
The log codes are displayed here. See “Log Messages” (→ P.4-4) for the log codes.
One of the following four icons displayed with each log code, depending on the log level.
Information level Error level
Warning level Unknown
● Date & Time
The date and time when the log was generated is displayed here.
● Message
The log messages are displayed here.
■ Save Logs to File/Open Saved File
You can save a displayed log to a file as well as view a previously saved log file.
To Save...
Choose “Save” from the File menu bar.
Viewing the Pages
Choose “Open” from the File menu bar
and select the log file you want to view.
■ Copying and Searching Logs
You can copy or search a displayed log.
To Copy...
Select the log you want to copy by
clicking on it, then choose “Copy” from
the Edit menu bar.
To Search Data...
1. Choose “Search” from the Edit menu bar.
The Search Log dialog is displayed.
2. Enter a character string to search for and
click “Search”.
2-16
Page 43

Log Viewer
■ Conditionally Selecting and Viewing Logs
Logs can be filtered according to log type, code, or date and time so that only the required information
is displayed.
To Make Settings...
1. Choose “Filter” from the View menu bar.
2. The Filter dialog appears.
Set the search criteria and click “OK”. The
search results then appear showing a list of
logs that match the selected criteria.
If filtering is not required, click “Cancel”.
[Log Type]
To filter by log type, check “Specify Type” or “Specify Code”. Otherwise choose “Not Specified”.
● Specify Type
Specify the levels of the logs
From Error, Warning, and Information, select the log levels to be displayed.
Specify the modules that output the logs
Check the source module to output the logs from “Application”, “HTTP Server”, and “System”.
● Specify Code
Specify the code of the logs. The codes are compared to the characters that are entered
and only logs with matching log codes will be displayed. For example, if you enter “A0”, logs
with a code starting with “A0” will be displayed.
[Date & Time]
● Specify Start Date & Time
When this item is selected and a date and time is entered, logs generated after the specified
start date and time are displayed.
● Specify End Date & Time
When this item is selected and a date and time is entered, logs generated before the specified
end date and time are displayed.
VBAdmin Tools
“Application” and “System” correspond to the list of log messages (→ P.4-4).
“Application” represents logs related to video and audio.
Tip
“HTTP Server” represents logs related to the HTTP module of the VB-C300.
“System” represents logs related to the VB-C300 system.
2-17
Page 44

NC Viewer
The NC Viewer is the viewer for the network camera VB-C300. The NC Viewer started from the
VBAdmin Tools becomes the NC Viewer connected as the Administrator.
For the details of the NC Viewer, refer to “Chapter 3 NC Viewer and Viewer Switcher” (→ P.3-34).
2-18
Page 45

Chapter
NC Viewer and Viewer
Switcher
This chapter explains how to use the NC Viewer as well as the
Viewer Switcher used to switch among Viewers.
Page 46

Overview of NC Viewer
The NC Viewer is the viewer for the network camera VB-C300. The NC Viewer displays video
from the VB-C300 and controls camera angle and zoom.
NC Viewer
Click
3-2
Panorama image
Panorama image needs to be registered on the Camera in advance (→ P.2-4).
Note
Page 47

Overview of NC Viewer
Administrator and Authorized User
Two types of users, Administrator and Authorized User can use the NC Viewer.
Administrator is the root user who can use all the functions including the administration functions
(e.g., White Balance and Night mode) of the VB-C300.
Authorized User is a normal user who can use a limited set of functions. Register Authorized
User as directed in “Setting User Access Privileges (Access Control)” (→ P.1-15).
Administrator can use the functions listed below.
Functions only available to Administrator
Corresponding button or menu Function
External Device Input button
Administrator - External Device Input
External Device Output button
Administrator - External Device Output
Control for Administrators button
Administrator -
Shade Correction button
Administrator - Shade Correction
Microphone Setting button
View - Microphone
Administrator - White Balance Setting White Balance
Administrator - Setup Properties Connection Settings/Camera Control/Display Option
Control for Administrators
Display the external device input status
Operate External Device Output
Exposure/Night Mode Setting
Setting Shade Correction
Setting Sending Audio
When you connect to the VB-C300
as Administrator, “Administrator”
is displayed in red.
NC Viewer and Viewer Switcher
Start/Stop Control button
If you connect to the camera as Administrator, you can continue to have it forcibly
and Authorized User cannot get the camera control. After viewing, be sure to exit the
Note
viewer or click “Start/Stop Control” again to release the privilege.
3-3
Page 48

Starting the NC Viewer
Starting the NC Viewer
To Launch the NC Viewer
Double-click
Terminating the NC Viewer
Double-click the NC Viewer icon on
the desktop or select “NC Viewer”
from the Start menu bar.
To terminate the NC Viewer ...
Select “Exit” from the File menu bar, or close the
Viewer window.
3-4
Page 49

Connecting to Camera
Specify a camera or select a camera from the Camera List when you start the NC Viewer.
You can switch from a connected camera to another camera, or open multiple NC Viewer windows
and display separate cameras in them.
You can launch another NC Viewer window or switch to a viewer other than the VB-C300 by using
the Viewer Switcher (→ P. 3-34).
Connecting to a Specified Camera
To connect to the camera ...
1. Choose “Connect” from the File
menu bar.
2.
A dialog box to select a camera appears.
Enter connection settings and click “OK”.
1 Host Name
1
2
3
4
5
6
7
Enter the IP address or host name set on
the camera (→ P.1-17).
2 User Name
Enter the user name to connect to the
camera. Users can be authorized users
registered on the camera (→ P.1-15) or
administrator “root”.
NC Viewer and Viewer Switcher
3 Password
Enter the password for the specified user name.
4 HTTP Port
Enter the HTTP port number set on the camera (→ P.1-12). Use default setting (80) if you do
not need to change.
5 Send and receive audio
Check this box and connect a microphone and speaker with amp to the camera if you want to
send and receive audio via the NC Viewer (→ P.3-23). Authorized User can only receive
audio. You need other settings to transmit or receive audio (→P.1-14).
6 Remember password
Check this option to save the password.
7 Option button
Click “Option” to open the Connection Setting Option dialog to register a camera. If you register
a camera in this dialog, you can select the camera from the camera list box in the next sessions.
Check the Add to camera list option to enter the name of
the camera in the Nickname text box. Click “OK” after
entering information to register the camera. You can use
up to 32 characters.
3-5
Page 50

Connecting to Camera
● If Administrator and Authorized User use the NC Viewer from the same PC, it is
Note
strongly recommended not to check the Remember password option.
● If you enter a wrong user name or password, the Password dialog appears. Enter the
correct user name and password to connect to the camera.
Connecting to Registered Camera
To connect to the camera ...
Select a camera from the camera list box.
In this box, cameras which were registered by
checking the Add to camera list option when
connecting to the camera, or by setting the Register
Current camera option (→ P.3-22) during a session.
Refer to “Adding and Changing Camera List”.
Disconnecting
To disconnect the camera ...
3-6
Select “Disconnect” from the File menu
bar.
Page 51

NC Viewer Operation
NC Viewer’s Display Screen
The NC Viewer’s display screen has the following buttons, boxes, etc.
12345678
9
10
11
12
13
14
15161718
1 Pause/Resume button
Pauses video. Click this button again resumes video.
2 External Device Input button
Display the external device input status. Only the administrator can use this button.
3 External Device Output button
Operate the external device output. Only the administrator can use this button.
4 Cameral Control button
Sets camera properties (e.g., camera angle).
5 Control for Administrators button
Sets the exposure and Night Mode of the camera. Only the administrator can use this
button.
6 Shade Correction button
Sets the shade correction. Only the administrator can use this button.
7 Audio button
Sets audio reception. You need to set audio settings in advance to display this button (
P.3-16
).
8 Microphone button (For the administrator)
Sets audio transmission. Only the administrator can use this button. You need to set audio
settings in advance to display this button (
9 Camera List box
Allows selecting from multiple cameras installed.
0 Administrator display
When you connect to the VB-C300 as Administrator, “Administrator” is displayed in red.
→ P.3-16
).
NC Viewer and Viewer Switcher
→
3-7
Page 52

Overview of NC Viewer Operation
!1 Scroll bar for tilt
Use this scroll bar to change the tilt angle (up/down) of the camera.
!2 Scroll bar for zoom
Use this scroll bar to change zoom magnification.
Slide the knob upward to zoom in (toward the telephoto end) and downward to zoom out
(to wide end).
!3 Panorama Window button
Displays the Panorama window. Panorama image needs to be registered on the camera in
advance. If no panorama image is registered, no image is displayed (→ P.2-4).
!4 Camera Control Status window
Displays camera control status (“Camera control available”, “Camera control unavailable”
or “Pause”).
!5 Start/Stop Control button
Use this button to obtain/release camera control.
!6 Backlight Compensation button
When switched on, it is effective on images that are dark due to backlight. Click this button
again turns off the function.
!7 Preset Selection box
You can control the camera using a preset which is added and saved in advance (→ P.2-9).
!8 Scroll bar for pan
Use this scroll bar to change the pan angle (right/left) of the camera.
Items selected with buttons can also be selected from menu bar.
Tip
Panorama Window
The Panorama window appears when you click “Panorama Window”. You can click on the
Panorama window or drag a yellow frame over the window to control the camera.
The black frame indicates the area where the
center of the camera can move around. You
cannot move the center of the camera out of
this area.
The blue frame indicates the area currently
captured when you do not have camera control.
The blue frame changes to yellow when you get camera control and indicates the area currently
captured by the camera. You can drag the mouse pointer inside the yellow frame to pan or tilt the
camera, or drag over the frame to zoom in or out.
3-8
Page 53

Overview of NC Viewer Operation
Starting Camera Control
The camera cannot be controlled simultaneously by multiple users. Only the user who currently
has camera control can control the camera. You can use the backlight compensation or presets if
you have camera control.
To control the camera ...
Click “Start Control” to obtain camera control.
Camera Control Status window
Displays camera control status.
Start/Stop Control button
Obtain/release Camera Control.
NC Viewer and Viewer Switcher
Camera control status window
Camera Control Status window changes as follows depending on the camera control status.
z
x
You can select “Copy Still Image” from the File
menu bar.
When you do not have camera
control
When video image refreshing is
temporarily paused by clicking
“Pause/Resume”. Camera Control
Status window is shown in yellow.
c
v
not allowed to connect to the camera.
Camera Control Status window is shown in
red.
When you have camera control.
Camera Control Status window
is shown in green.
When you are disconnected
from the camera for some
reason, cannot connect to the
camera at start up, or you are
Camera Control Privilege
If the Administrator gets the camera control, Authorized user cannot control the camera. Terminate
the NC Viewer or click Start/Stop Control button again to release the camera control privilege.
When the multiple Authorized user are accessing the camera, the last Authorized user who tries
to get the control gets the camera control.
3-9
Page 54

Overview of NC Viewer Operation
Controlling Camera
When you have camera control, you can operate camera’s properties including angle, zoom
magnification, backlight compensation.
Changing Camera Angle
To change the camera angle ...
You can operate one of the following ways.
Move the knob of the scroll bar for pan or tilt.
The camera angle changes according to the knob position of the scroll bar.
Click the arrows at the both ends of the scroll bar.
Click on the image to move the center of the camera to the clicked position.
Click on the image to move the center
of the camera to the clicked position.
Scroll bar for tilt
Use this scroll bar to change the tilt angle
(up/down) of the camera.
3-10
Scroll bar for pan
Use this scroll bar to change the pan angle
(right/left) of the camera.
Changing Camera Angle in Panorama Window
Move by clicking
Click inside the Panorama window to change the pan and tilt angles so that the clicked
position becomes the center of the image.
Move by dragging
Drag the yellow frame inside the Panorama window to another location to change the pan
and tilt angles so that the area inside the yellow frame at the new location is captured.
Page 55

Overview of NC Viewer Operation
Specifying the zoom magnification of the camera
To change the zoom magnification ...
You can operate one of the following ways.
Move up or down the knob of the scroll bar for zoom.
The camera zoom magnification changes according to the knob position of the scroll bar.
Click the arrows at the both ends of the scroll bar.
Place the wheel mouse on the image and rotate the wheel.
Digital Zoom area
Scroll bar for zoom
Slide the knob upward to zoom in (toward
the telephoto end).
Slide the knob downward to zoom out (to
wide end).
NC Viewer and Viewer Switcher
If the Enable Digital Zoom option on the Video and Camera page in the settings page
is checked, the scroll bar for zoom is extended to allow for digital zoom (→ P.1-11).
Tip
Specifying Zoom Magnification Using Panorama Window
Change by dragging
If you drag a side of the yellow frame in the Panorama window to change the frame size,
the zoom magnification changes so that the area inside the yellow frame is captured.
Change by wheel operation
If you are using a wheel mouse, you can rotate the wheel to change the zoom magnification.
If you click outside the yellow frame and drag the mouse, a blue frame is drawn.
When you release the mouse button, the blue frame changes to yellow and the camera’s
Tip
pan, tilt, and zoom change so that the area inside the new yellow frame is captured.
3-11
Page 56

Overview of NC Viewer Operation
Controlling Camera by Clicking Screen
You can click on the Viewer screen to change the camera’s pan, tilt, and zoom settings.
When you click the NC Viewer screen to control the camera, you cannot control it
precisely.
Tip
Using a Preset
You can control the camera using a preset which is added and saved in advance (→ P.2-9).
To control the camera using a preset ...
1. Display the preset list by clicking the preset selection box.
2. Select a preset position from the list to change the video display.
Preset Selection box
Presets set by the camera are shown as candidates. Set the presets using the
VBAdmin Tools in advance (→ P.2-9).
Tip
Compensating Backlight
When switched on, it is effective on images that are dark due to backlight.
To compensate backlight ...
Click “Backlight Compensation” to make dark image brighter.
Click this button again turns off the function.
Backlight Compensation button
3-12
Page 57

Overview of NC Viewer Operation
Pausing and Resuming Video
You can pause and resume video playback.
To pause/resume video ...
1. To pause video, click “Pause/Resume”.
Alternatively, you can right-click the video screen to display the context menu and select
“Pause Picture Display” to pause the playback.
2. Click “Pause/Resume” to resume the playback.
NC Viewer and Viewer Switcher
Displaying External Device Input status (Administrator Only)
Click “External Device Input” to display the external device input status and save any changes as
logs. Only the administrator can use this function (→ P.3-3, 3-27).
Operating External Device Output (Administrator Only)
Click “External Device Output” to turn On or Off the external device output. Only the administrator
can use this function (→ P.3-3, 3-27).
3-13
Page 58

Overview of NC Viewer Operation
Setting Camera Control
You can click on the button from the dialog to change the camera’s pan, tilt, and zoom settings.
You can also set focus.
To Make Settings...
1. Click “Start Control” to obtain camera
control.
2. Click “Camera Control” on the toolbar.
3. The Camera Control dialog appears.
1 Pan/Tilt button
Pan and Tilt movements occur in the direction
of the arrows on the buttons. Operation
occurs when the button is held down and
stops when it is released. When the “center”
button is clicked, the camera faces front.
2 Focus
Switch the focus to “Auto”, “Auto (for
domes)”, “Fixed at infinity”, or “Manual”.
● The NC Viewer’s focus setting takes precedence over the focus mode set on the
Note
setting page.
● The NC Viewer’s focus setting is not reflected on the settings page therefore, it
can only continued with the NC Viewer.
● Note that focus will be fixed if you choose the manual focus mode.
● The NC Viewer’s focus setting is reflected on other Users’ focus setting.
● If you specify the shutter speed within the range from NTSC: 1/1 to 1/4, PAL: 1/1 to
1/3 with Manual Exposure (→ P.3-28), Auto, Auto (for domes), and One-Shot AF
for camera control will be invalidated. Change the focus mode to Manual and adjust
the focus.
● For the focusing range when the camera is set to Night Mode (→ P.1-10, 3-29)
refer to the Tip on P.1-10.
1
2
4
3
3-14
Auto: Focus is adjusted automatically.
Auto (for domes): When the optional dome housing is used, select this option to
automatically adjust the focus without focusing on the dome surface.
Fixed at Infinity: Focus is fixed at a point of infinity.
Manual: Hold Down the Far or Near buttons to adjust the focus. Clicking “One-shot AF”
adjusts the focus automatically and fixes the focus with Manual Focus mode.
Page 59

Overview of NC Viewer Operation
3 Zoom button
Lets you zoom in or zoom out. Zooms in or out when the button is held down and stops
when it is released.
4 Speed
Clicking “Speed” displays the Speed dialog.
Select the operation speed.
● Pan/Tilt
Select from Fast and Slow for Pan and Tilt.
● Zoom
Select from Fast, and Slow for zoom.
To apply the setting, click “Apply”.
Setting Administrator Control (Administrator Only)
Click “Control for Administrator” to set the Exposure and Night Mode functions. Only the
administrator can use this function (→ P.3-28).
NC Viewer and Viewer Switcher
Shade Correction (Administrator Only)
If the background of an image is bright, making the subject difficult to see, you can adjust the
contrast of the darker areas to make it easier to see by clicking Shade Correction. Unlike backlight
compensation, the shade correction feature allows image processing without adversely affecting
the existing lighter regions. Only the administrator can use this function (→ P.3-29).
3-15
Page 60

Overview of NC Viewer Operation
Receiving Audio
You can connect a microphone with amp to the camera and then receive audio from the camera.
To Make Settings...
1. Click “Audio” on the toolbar.
2. The Audio dialog is displayed.
1 Receive audio data
You can receive audio from the microphone
with amp connected to the VB-C300 by
selecting “Receive audio data”.
2 Volume Slider
Adjust the PC’s speaker volume
3 Mute
Selecting “Mute” turns the sound off.
1
2
3
Transmitting Audio (Administrator Only)
You can connect a microphone to the PC and speaker with amp to the camera and then transmit
audio from the VB-C300 to the NC Viewer. Perform settings for an administrator to send audio to
the VB-C300. Only the administrator can use this function (→ P.3-29).
3-16
You must set the following settings in advance to transmit and recieve audio.
● Check the Enable Audio Transmission box and Enable Audio Reception box on
Tip
the Audio Server section of on the Server settings page (→ P.1-13).
● Check the Send and receive audio box in the Connection Setting dialog when
starting the NC Viewer (→ P.3-5, 3-23).
● When starting the NC Viewer from the VBAdmin Tools, check the Send and receive
audio option on the Connection Settings tab in the Setup properties dialog (→ P.3-
31).
Page 61

Overview of NC Viewer Operation
Saving, Printing, and Copying Still image
Saving Still Image to File
To save still image ...
1.
Click “Pause/Resume” when the desired
video displayed.
The video is displayed as a still image.
2. Choose “Save” from the File menu
bar.
After saving the image, click “Pause/Resume”
to restart video display.
Please note that copyright laws prohibit the customer from using recorded videos
and images for any purpose other than personal requirements, without permission
Note
from the copyright holder.
NC Viewer and Viewer Switcher
File format for the images are saved in the BMP format.
Tip
Printing Still Image
To print still image ...
1. Click “Pause/Resume” when the
desired video displayed.
The video is displayed as a still image.
2. Choose “Print” from the File menu bar.
3-17
Page 62

Overview of NC Viewer Operation
3. Configure printing settings.
Click “Setup” to change the printing settings.
After printing the image, click “Pause/Resume”
to display video.
1 Print position
You can specify where the image should
be printed.
2 Print camera information
Check this option to print camera parameters including pan and tilt with the image.
Copying Still Image
To copy still image ...
1.
Click “Pause/Resume” when the desired
video displayed.
The video is displayed as a still image.
2. Choose “Copy Still Image” from the
File menu bar.
The image is copied to the Clipboard.
1
2
Displaying Information and Video
You can display information related to video, camera, and network in the dialog.
To view information...
1. Select “Video Information”, “Camera Information”, and “Network” from the
View menu bar.
Video Information
● Frame rate
Number of frames per second
● Data size per frame
Number of bytes per frame
● Image size
The numbers of vertical and horizontal pixels
of video data being received
3-18
Page 63

Camera Information
Zoom (viewing angle) may be misaligned in the digital zoom region.
Note
Network
Overview of NC Viewer Operation
● Pan
Pan angle of the camera
● Tilt
Tilt angle of the camera
● Zoom (viewing angle)
Zoom (viewing angle) angle of the camera
● Backlight compensation
On/Off status of backlight compensation
● Focus
Focus setting of the camera
● White balance
White balance setting of the camera
● Camera Model
Model name of the camera
● Indicator (camera icon)
Network bandwidth of video data
● Indicator (speaker icon)
Network bandwidth of audio data reception
● Indicator (microphone icon) (Administrator only)
Network bandwidth of audio data transmission
● Restrict transmission rate
Check this option to limit the bandwidth of
video data.
NC Viewer and Viewer Switcher
Change display screen size
You can change the display screen size for video display. Select from “Large”, “Middle”, “Small”,
and “Minimum”.
To change screen size ...
Select “Display Size” from the View
menu bar, and select the desired size
from the menu bar that appears.
The display screen size is changed.
3-19
Page 64

Overview of NC Viewer Operation
Changing to Full-Screen Mode
You can display video at full-screen size.
To change to full-screen ...
1. Choose “Full Screen Mode” from the
View menu bar.
2. A confirmation dialog appears. Click
“OK”.
The display changes to the full-screen mode.
Press the Esc key to return to the previous
screen.
3-20
If you uncheck the Display this message next time option in the confirmation dialog,
the confirmation dialog will not appear next time.
Tip
In the full-screen mode, right-click on the display opens the menu and you can perform the
following operations:
• Stop/start camera control (to stop or start controlling the camera)
• Panorama window (to display panorama window overlapped on the video screen)
• Return to normal mode (to return to the previous display mode)
• Presets list (to display or select presets currently registered)
Page 65

Overview of NC Viewer Operation
Toggling Toolbar Display
To toggle toolbar display ...
Select “Toolbar Display” from the
View menu bar to display or hide the
toolbar.
The toolbar is displayed if there is a check
mark before “Toolbar Display”.
Setting Video Display
You can set the video display size at start up. You can also select whether or not the confirmation
message is displayed when you select the full-screen mode.
To make settings ...
1. Choose “Display Settings” from the
View menu bar.
NC Viewer and Viewer Switcher
2. The Display Settings dialog is displayed.
1 Video display size at start up
You can set the video display size at start
up.
● Use a received image size
The display size is adjusted to the size
of the first video received when the NC
Viewer is connected to the Camera.
● Use a display size below
Select from “Large”, “Middle”, “Small”,
and “Minimum”.
1
2
3-21
Page 66

Overview of NC Viewer Operation
2 Confirm when changing to full screen mode
Check this option to display the confirmation message before changing to the full screen
mode.
Adding and Changing Camera List
If you register a camera, you can easily select the camera from the list and connect to it.
This section explains how to register a camera and change a registered camera. Up to 100 cameras
can be registered.
Registering Camera in Connection
To make settings ...
Select “Register Current Camera”
from the File menu bar to register the
camera currently connected.
The registered camera is listed in the Camera
list box and can be selected for connection.
You can change or delete a camera in the list
(→ P.3-6, 3-23).
Adding, Changing, or Deleting Camera
▼Adding a camera to the list
To register a camera currently not connected:
To make settings ...
1. Choose “Camera List” from the View
menu bar.
3-22
Page 67

Overview of NC Viewer Operation
2. Click “Add” from the Camera List
dialog.
3. A Register Camera (Add) dialog box
to select a camera appears.
Enter connection settings and click “OK” to add
the camera to the list.
1 Nickname
Enter a name for register a camera (You
can use up to 32 alphanumeric characters).
2 Host Name
Enter the IP address or host name set on
the camera (→ P.1-17).
3 User Name
E
nter the user name to connect to the
camera. Users can authorized users
registered on the camera (→ P.1-15) or
administrator “root”.
4 Password
Enter the password for the specified user name.
5 HTTP Port
Enter the HTTP port number set on the camera (→ P.1-12). Use default setting (80) if you
do not need to change.
6 Send and Receive audio
Check this box and connect a microphone and speaker with amp to the camera if you want
to send and receive audio via the NC Viewer (→ P.3-23). Authorized User can only receive
audio. You need other settings to transmit or receive audio (→P.1-14).
7 Remember Password
Check this option to save the password.
NC Viewer and Viewer Switcher
1
2
3
4
5
6
7
If Administrator and Authorized User use the NC Viewer from the same PC, it is
strongly recommended not to check the Remember Password option.
Note
3-23
Page 68

Overview of NC Viewer Operation
▼ To change or delete list contents:
To make settings ...
Choose “Camera List” from the View
menu bar.
The Camera List dialog appears.
Select a camera to change or delete from the
list.
Click “Edit” to change the settings or “Delete”
to delete the camera.
1
Clicking “Edit” opens the Register Camera
(Edit) dialog.
Change the settings. Click “OK” to reflect
the new settings to the camera.
2 Clicking “Delete” deletes the Camera.
A confirmation message appears.
Clicking “OK” deletes the camera.
1
2
▼ To change the order of cameras in
the list:
You can change the register order of cameras
by selecting a camera and clicking “Up” or
“Down”.
The new order is reflected to the list display
order in the Camera List box.
3-24
Page 69

Operating and Setting Camera as Administrator
The following operation and setting are available only to Administrator.
Setting White Balance
Select from “Auto”, “Light Source”, and “Lock” for the white balance.
The white balance setting remains after closing the NC Viewer. Also, it is reflected
Note
1. Choose “White Balance” from the
on the Authorized User’s video.
NC Viewer and Viewer Switcher
To make settings ...
Administrator menu bar.
2. The White Balance dialog appears.
1 Auto
Automatically adjusts the white balance.
2 Light Source
Select the light source from “Fluorescent”,
“Fluorescent H”, “Mercury Light”, “Sodium
Light”, “Halogen Light” according to your
environment.
Fluorescent : Select this option when using the camera under neutral white or cool
white fluorescent lighting.
Fluorescent H : Select this option when using the camera under a daylight fluorescent
lighting.
Mercury Light : Select this option when using the camera under a mercury lighting.
Sodium Light : Select this option when using the camera under orange light of a sodium
lighting.
Halogen Light : Select this option when using the camera under a halogen or
incandescent lighting.
1
2
3
3-25
Page 70

Operating and Setting Camera as Administrator
3 Lock
Fix adjusts the white balance using the video currently received. To forcibly adjust the
white balance, capture a white object (e.g., a piece of white paper) and click “One-Shot
WB”.
● Since the light source setting is based on representative characteristics of each
Note
type of lamp, correct color may not be reproduced depending on the actual lamp
used. In this case, use the One-Shot WB function.
● If the image is greenish when shooting an object under a mercury lamp while the
White Balance option is set to “Auto”, select “Mercury Light” with the Light Source
option. If the image color is not yet correct after changing the light source to the
mercury lamp, return the setting to “Auto”.
● When shooting images in day and night continuously.
If you shoot an object which shows little change in appearance in an environment
where the light source gradually changes (e.g., continuous outdoor shooting for
day and night), the video may show an incorrect color. In this case, use the pan,
tilt, or zoom function to give change to the image and the video will return to the
correct color.
● If you shoot a single color object or shoot images under a sodium-vapor lighting or
mercury lighting, it may be difficult to adjust the color automatically.
3-26
Page 71

Operating and Setting Camera as Administrator
Displaying External Device Input
You can display the external device input and save the logs.
To Operate...
1. Click “External Device Input” on the
toolbar.
2. The External Device Input dialog
opens.
The external device input status and logs are
displayed.
To save this content as a log, click “Save”,
and then specify a file name and where it
should be saved.
To clear the content in the display, click “Clear”.
Operating External Device Output
You can operate the external device output.
To Operate...
1. Click “Start Control” to get camera
control, and click “External Device
Output” on the toolbar.
NC Viewer and Viewer Switcher
2. The External Device Output dialog
opens.
The external device output status is displayed.
The external device output status can be
changed between ON and OFF by clicking the
icon.
3-27
Page 72

Operating and Setting Camera as Administrator
Setting Administrator Control
You can configure the exposure and Night mode settings.
To Make Settings...
1. Click “Control for Administrators” on
the toolbar.
2. The Control for Administrators dialog
opens.
1 Exposure
Select from Auto Exposure and Manual
Exposure.
2 Auto Exposure
Four buttons on the right are available. The
four buttons represent, from the left to the
right, “Backlight Compensation, Off”,
“Backlight Compensation, Low”, “Backlight
Compensation, Medium”, and “Backlight
Compensation, High”. Higher backlight
compensation produces brighter images.
3 Manual Exposure
You can set “Aperture”, “Shutter Speed”,
and “Gain”.
To apply the setting, click “Apply”.
Aperture
The further to the left you move the slide bar,
the more closed the aperture and the darker
the image. Conversely, the further to the right
you move the slide bar, the more open the
aperture and the brighter the image.
Shutter Speed
Fixes shutter speed. Higher shutter speed (e.g., 1/8000) produces darker images. Conversely,
slower shutter speed (e.g., 1/1, 1/2) produces brighter images. For the NTSC model, if you specify
the shutter speed within the range from 1/1 to 1/4, the auto focus and One-shot AF for camera
control (→ P.3-14) will be invalidated. For the PAL model, if you specify the shutter speed within the
range from 1/1 to 1/3, Auto, Auto (for domes), and One-Shot AF for camera control will be invalidated.
Gain
The further to the left you move the slide bar, the lower the gain (sensitivity for brightness)
and the darker the image. Conversely, the further to the right you move the slide bar, the
higher the gain and the brighter the image.
When setting “Day & Night Mode” to “Auto”, use “Auto Exposure” (→ P.1-11).
4 Night Mode
Set up Night Mode with night vision.
1
2
3
4
3-28
If Day & Night is set to Auto on Camera Settings Section of Video and Camera page,
Night Mode setting is not available here (→ P.1-10).
Tip
Page 73

Operating and Setting Camera as Administrator
Day Mode
Color images are displayed in the normal mode.
Night mode
The infrared cut filter of the VB-C300 is disabled and the images are displayed in monochrome.
For the focusing range when the camera is set to Night Mode (→ P. 1-10, 3-14) refer
to the Tip on P.1-10.
Tip
Shade Correction
If the background of an image is bright, making the subject difficult to see, you can adjust the
contrast of the darker areas to make it easier to see. Unlike backlight compensation, the shade
correction feature allows image processing without adversely affecting the existing lighter regions.
To Make Settings...
1. Click the “Shade Correction” on the
toolbar.
2. The Shade Correction dialog opens.
1 Shade Correction
Check this option for shade correction.
2 Shade Correction Slider
Adjust the level of shade correction.
1
2
NC Viewer and Viewer Switcher
Transmitting Audio
You can connect a microphone and speaker with amp to the camera and then transmit audio from
the VB-C300 to the NC Viewer.
Disconnecting the LAN cable also disconnects audio. Reconnect to the camera from
the NC Viewer.
Note
You must set the following settings in advance to transmit audio.
● Check the Enable Audio Transmission box on the Audio Server section of on the
Tip
Server settings page (→ P.1-13).
● Check the Send and receive audio box in the Connection Setting dialog when
starting the NC Viewer (→ P.3-5, 3-23).
● When starting the NC Viewer from the VBAdmin Tools, check the Send and receive
audio option on the Connection Settings tab in the Setup properties dialog
(→ P.3-31).
3-29
Page 74

Operating and Setting Camera as Administrator
To Make Settings...
1. Click “Microphone” on the toolbar.
2. The Microphone dialog appears.
1 Microphone button
Click this button to turn on the microphone
for Administrator and audio transmission
becomes available. Click it again to turn
off the microphone and stop audio
transmission.
Receive audio also when using the microphone
Check this option to receive audio even when the Microphone button is activated. It is
recommended to uncheck this option if the audio from the microphone played on the speaker
is hard to hear.
2 Volume Slider
Adjust the volume of the input in the microphone.
3 Use Voice Activity Detection to reduce network traffic
Select to temporarily reduce audio data quantity to transmit when the audio is turned to
mute. In this way, you can reduce traffic on the network you are using.
Use the default detection sensitivity setting: Operates at default sensitivity.
Set the detection sensitivity manually: Adjust the slider to set the detection sensitivity.
The detection sensitivity gets lower if you move the slider bar to the left. The sound has
to be softer so that to be detected as mute.
The detection sensitivity gets higher if you move the slider bar to the right. It will detect
as mute even if the sound is louder.
1
2
3
3-30
● When the Viewer window is minimized, audio transmission pauses even if the
Microphone button is active.
Tip
● If you activate another application while the Microphone button is active, the task
bar icon will flash.
● If you pause the video by clicking “Pause”, audio transmission also pauses.
● Closing the Microphone dialog also terminates audio transmission.
Page 75

Operating and Setting Camera as Administrator
Setup Properties
Configuring Connection Settings
You can configure audio settings as well as automatic reconnection when the camera and NC
Viewer are disconnected due to a network trouble or other reasons.
To make settings ...
1. Choose “Setup Properties” from the
Administrator menu bar.
2. Set audio connection and automatic
reconnection under “Connection
Settings”.
1 Send and receive audio
Check this option to transmit and receive
audio. You need other settings to transmit
or receive audio (→ P.1-14).
2 Reconnect automatically
Check this option to automatically
reconnects to the camera.
By checking the Reconnect automatically
option, you can automatically reconnect to
the camera when you are disconnected
from it due to a network trouble or camera
reboot. If reconnection fails, it will be retried
again in 30 seconds.
Click “OK” when finished.
1
2
NC Viewer and Viewer Switcher
The audio connection is not reestablished even if the Reconnect automatically option
is checked. You need to reestablish the audio connection from the NC Viewer.
Note
3. When the message “Try new property setting. OK ?” appears, click “OK”.
3-31
Page 76

Operating and Setting Camera as Administrator
Setting Camera Control
If you have connected to the camera as Administrator, you can control the pan, tilt and zoom
operations by clicking and holding the mouse in the viewer to start and releasing the mouse to
stop.
To Make Settings...
1. Choose “Setup Properties” from the
Administrator menu bar.
2. Click the Cameral Control tab in the Setup
properties dialog.
Check the Use the arrow button to control the
camera option and click “OK”.
3. When the message “Try new property setting.” appears, click “OK”.
4. Placing the mouse cursor over the Viewer
window changes its shape into an 8-
direction arrow or a plus·minus icon.
Click on one of the icons and hold the mouse
button in the Viewer window to start panning, tilting
or zooming, and release the button to stop the
operation.
3-32
Page 77

Operating and Setting Camera as Administrator
Setting Video Display
A message box can be displayed in the event of a change in external device input.
To Make Settings...
1. Choose “Setup Properties” from the
Administrator menu bar.
2. Click the Display option tab in the
Setup properties dialog.
Ensure that the Display a massage for external
device input message option is checked, and
click “OK”.
NC Viewer and Viewer Switcher
3. When the message “Try new property
setting.” appears, click “OK”.
A message box can be displayed in the event
of a change in external device input.
If the NC Viewer window is minimized or in full-screen mode, the notification message
for external device input appears after get back to the normal display. Also, this
Tip
message is not displayed when the External Device Input dialog is displayed.
3-33
Page 78

Using Viewer Switcher
If you are using other cameras (e.g., VB-C50i) with the VB-C300, you can switch the Viewer to
use the cameras.
To use the Viewer Switcher, install it by using the Custom Installation option as directed
in “Install Necessary Software” of the Start Guide (→dStart Guide P.2-11).
Note
To make settings ...
1. Double-click the Viewer Switcher icon on the
desktop.
Alternatively, you can select “Viewer Switcher” from the Start
menu.
2. The Viewer Switcher dialog opens.
Select a camera from the camera list. The
camera list contains both the camera list of the
NC Viewer (→ P.3-22) and the camera site list
of the Viewer for PC. The viewer corresponding
to the selected camera automatically starts.
Viewer for PC NC Viewer
3-34
Viewer Switcher
VB-C300VB-C50i series
Page 79

Using Viewer Switcher
● The camera must be registered in the camera list (for the VB-C300) or camera site
Note
list (for other cameras) corresponding to the viewer to be used (→P.3-22).
● Switch to the Viewer for PC when you are using a camera other than the VB-C300.
Use the Viewer for PC Ver. 3.6 or later.
● When the NC Viewer launches, the Password dialog may open. Enter the correct
user name and password to connect to the camera.
NC Viewer and Viewer Switcher
3-35
Page 80

3-36
Page 81

Chapter
Appendix
Page 82

Troubleshooting
Before you contact your Canon dealer or service outlet, check the items listed below. If a log
message is displayed, refer to the log message list for the log details and the appropriate response.
The VB-C300 does not start up.
● When using a PoE HUB, Check that the LAN cable is connected properly.
● If you are using the AC Adapter (optional), check that the AC Adapter is connected properly.
● Power Off then On the camera (→dStart Guide P.2-5).
VBSetup.exe does not work.
● Check that the LAN cable is connected properly.
● Power Off then On the camera (→dStart Guide P.2-5). The camera stops responding
to VBSetup.exe in 20 minutes after power-on.
● Check that the PC where VBSetup.exe is running is connected to the same segment of
the LAN as the camera.
● VBSetup.exe may not run on Windows XP SP2. In this case, see “Note on Windows XP
SP2” (→ P.1-2). This Note holds true for users who have enabled the Windows Firewall
settings with Windows Server 2003 Standard Edition (SP1).
The VB-C300 top page does not appear.
● Check that the LAN cable is connected properly.
● Check that the network for the camera is set properly. In particular, check that the IP
address, subnet mask, and default gateway address are set to values available for the
current network.
● If the IP address has been changed, the new IP address will not take effect until the
camera is rebooted.
● Check if the URL (i.e., IP address of the camera) you entered in the Web browser is
correct (→ P.1-3, 1-7).
The video does not appear.
● If the video quality is poor, check the video quality setting of the camera (→ P.1-8). Also
check the display color quality setting of the PC where the Viewer is running.
● Up to 15 Viewers can access the camera simultaneously. If this limit has been exceeded,
a message appears instead of video.
I can’t control the camera.
● Anyone who connects to the NC Viewer as the Administrator occupies camera control.
Therefore, if you are connecting the NC Viewer as a Authorized user, you cannot get
camera control until the Administrator releases it. See your system administrator
(→ P.3-9).
4-2
Page 83

Troubleshooting
The viewer is disconnected.
● Check that the network or PC is working property.
● Reboot the PC and reconnect to the camera.
I forgot the password.
● You can initialize all the settings by using the Reset switch (→ P.4-9). The initialized
password is “VB-C300.” However, all the network settings including the IP address and
subnet mask are also initialized and need to be set again.
Appendix
4-3
Page 84

Log Messages
The VB-C300 Log Messages
The log messages are classified into the following five categories.
Classification Level Error level
crit Error A critical failure at software level (task stops).
err Error A failure affecting camera operation (task continues).
warning Warning A failure not affecting the camera operation.
notice Warning A failure external to the system.
info Information Information concerning normal operation.
■ Camera Messages
● A001 Camera start failure (crit)
Message no %1 installed
%1 sources | protocols
Explanation Camera failed to capture images or initialize the protocol and could not start.
Countermeasure Reboot the camera. If the problem persists, it is a camera failure. Call for service.
● A002 Protocol initialization failure (err)
Message %1 protocol not installed
%1 Protocol type (LS/H)
Explanation The camera failed to initialize the WebView. Configuration data may be destroyed.
Countermeasure Restore the factory default settings or press the Reset switch.
● A011 Camera control device error (warning)
Message %1 malfunction (%2)
%1 Camera type (Canon VB-C300NA | Canon VB-C300PA)
%2 Error (read | write | timeout | ...)
Explanation An I/O error for the camera control device has occurred.
Countermeasure If the problem persists, it is a camera failure. Call for service.
● A012 WebView Livescope client start and stop (info)
Message %1@%2 %3
%1 Client type (LS/H)
%2 Client host IP address
%3 connected | closed
Explanation The HTTP WebView client (LS/H) has started or stopped.
● A016 Video data transmission quantity (info)
Message %1@%2 %3 frames / %4 bytes in %5 seconds
%1 Client type (LS/H)
%2 Client host IP address
%3 Number of frames
%4 Number of bytes
%5 Video transmission period
Explanation This message indicates the results of video transmission to the client.
4-4
Page 85

● A023 Contact input change detection (err)
Message a %1 detected at In%2
%1 Contact input change (front-edge | rear-edge)
%2 Contact input terminal number (1-2)
Explanation Input change at the contact input terminal In1/In2 has been detected. “front-edge” means change
from Off to On, “rear-edge” means change from On to Off, “pulse” means change from Off to On to
Off, and “notch” means change from On to Off to On. “pulse” and “notch” indicate a short On/Off
(shorter than approximately 100 ms) detected during On/Off period.
● A201 Registered panorama image failure (warning)
Message corrupt panorama image %1
%1 File name of the panorama image (e.g., camera1.jpg)
Explanation A registered panorama image cannot be displayed.
Countermeasure Register a correct panorama image.
Log Messages
■ Audio Server Messages
● B001 Audio server start and stop (info)
Message %1 wvaudio
%1 starting | shutdown
Explanation The Audio Server has started or stopped.
● B011 Audio client start (info)
Message [%1] %2 connected n=%3
%1 Client type (send | recv)
%2 Client host IP address
%3 Total number of clients
Explanation An audio client has been connected to the Audio Server.
● B012 Audio client stop (info)
Message [%1] %2 closed [%3]
%1 Client type (send | recv)
%2 Client host IP address
%3 Disconnection type (active | passive | senderr)
Explanation An audio client has been disconnected from the Audio Server.
● B101 Abnormal request received (notice)
Message %1 unusual request [%2]
%1 Client host IP address
%2 Error type (400 | 404 | ...)
Explanation A request has been rejected due to a command error (400) or parameter error (404).
● B102 Client connection rejected (notice)
Message %1 request denied [%2]
%1 Client host IP address
%2 Rejection type (41 | 43 | ...)
Explanation A client connection request has been rejected due to an authentication error (41), resource shortage
Countermeasure 41: Check the user name, password, or user list. 43: Reconnect or reboot the camera. 45 - 46: Use
(43), specification of an unsupported codec (45), specification of an unsupported stream (46),
restriction on the number of clients (49), operation mode (4a).
supported client software. 49: Check the number of clients. 4a: Check that use of the Audio Server
is allowed.
Appendix
4-5
Page 86

Log Messages
● B103 Client forcibly disconnected (notice)
Message %1 request denied [%2]
%1 Client host IP address
%2 Rejection type (41 | 43 | ...)
Explanation Although connection was allowed at the start of session, the settings have been changed to ban
the client access and the client has been forcibly disconnected from the Audio Server (the rejection
types are the same as B102).
● B301 Transmission audio device error (err)
Message cannot use audio device for tx [%1 : %2]
%1 Error process (ld | buff)
%2 Error number
Explanation An audio device error has been detected.
Countermeasure Reboot the Camera. If the problem persists, it is an Audio Device failure. Call for service.
● B401 Audio device initialization failed (crit)
Message audio device initialization error [%1]
%1 Error number
Explanation The Audio device failed to initialize itself. The Audio Server stops.
Countermeasure Reboot the Camera. If the problem persists, it is an Audio Device failure. Call for service.
● B402 Audio Server initialization failed (crit)
Message wvaudio initialization error [%1]
%1 Error number
Explanation The Audio Server failed to initialize itself. The Audio Server stops.
Countermeasure Reboot the Camera. If the problem persists, it is an Audio Server failure. Call for service.
● B403 Setting change failed (crit)
Message cannot set config [%1]
%1 Error number
Explanation Update of settings failed. The Audio Server stops.
Countermeasure Reboot the Camera. If the problem persists, it is an Audio Server failure. Call for service.
■ System Log Messages
● S004 System start and stop (info)
Message %1 webview
%1 Start (starting) or stop (stopping)
Explanation This message indicates start or stop of the Video Server (webview).
● S005 System setting changed (info)
Message System settings updated
Explanation The settings have been changed without reboot.
● H043 User specification error (notice)
Message %1: user %2 not found: %3
%1 Client host IP address
%2 User Name
%3 URL
Explanation An unknown user has been specified in user authentication.
4-6
Page 87

● H044 Password specification error (notice)
Message %1: user %2: password mismatch: %3
%1 Client host IP address
%2 User Name
%3 URL
Explanation An incorrect password has been specified in user authentication.
Log Messages
Appendix
4-7
Page 88

Restoring the Factory Default Settings
Since the VB-C300 supports various functions, it is recommended to take a note of set values for
each function. If you want to redo the settings from the beginning because you have forgotten
them or for some other reason, first restore the factory default settings.
* Refer to P.4-12 for the factory default settings.
Restoring the Factory Default Settings via the Administration Tools Page using Web Browser
1. Start the Web browser and access the
Settings Title Page.
The VB-C300’s IP address, user name, and
administration password are required to
display the Settings Title Page (→ P.1-3).
2. Click “Administration Tools” on the
Settings Title Page.
The Administration Tools page appears.
3. Click “Restore” of the Restore Settings.
When the “Restore” button is clicked, the
confirmation message appears. Click “OK ” to
restore to the factory default settings.
● Never power off the camera while the restore operation is in progress. Powering
Note
off before completion may prevent it from starting up properly.
● Once you click “OK”, the process cannot be cancelled.
4. All settings in the VB-C300 will be returned to the factory default settings.
All the settings of the camera except for the Administrator password, network-related settings
(i.e., IP address, subnet mask and default gateway address) date, time, and time zone are
returned to the factory default settings.
4-8
Page 89

Restoring the Factory Default Settings
Initializing the Camera from the Reset Switch
If you have forgotten the IP address or Administrator password of the VB-C300, you cannot use it
via the network. In this case, press the Reset switch at the bottom of the unit.
1. Power off the camera.
Refer to “Turning the Power ON and OFF” (→dStart Guide P.2-5) for how to power on or off
the camera.
2. Press and hold the Reset switch and power on the camera, then hold the
Reset switch for at least five seconds.
The Reset switch is located toward the rear on the bottom. Use a thin tipped object to press
the Reset switch.
All settings except for the date, time, and time zone in the VB-C300 will be initialized.
Appendix
If you use the Reset switch to initialize the VB-C300, all the settings of the camera
including the network-related settings (i.e., IP address, subnet mask, and default
Note
gateway address) are initialized. Therefore, you cannot use the camera from the PC
connected to the camera via the network after reset. Set the IP address and other
network parameters for your environment using VBSetup.exe on the supplied Setup
CD-ROM (→dStart Guide P.2-7).
4-9
Page 90

Initializing the Camera Head Position
If the preset position is misaligned, you can correct it by initializing the camera head position.
When the camera head position is initialized, the camera head moves to face front, and then
moves back to the former position.
Initialization endsInitialization starts
To Make Settings...
1. Start the Web browser and enter the following URL:
http://192.168.100.1/support/
* The underlined IP address is an example. You should enter your IP address (→ P.1-7).
The VB-C300’s IP address, user name, and administrator password are required to display
the Initialize Camera Head Position Page (→ P.1-3).
2. Initialize from the Initialize Camera Head Position Page.
1 Initialize Camera Head Position
The camera head position is immediately initialized by clicking “Initialize”.
3 Click “Initialize”.
The Camera Head position is initialized and a confirmation message is displayed.
Click “OK” to end initialization.
During initializing,
● The camera faces to the front and returns to the former position. If you are using
Note
● The Viewer displays captured video.
● Even if you have camera control, initialization takes precedence.
● You cannot shoot a panorama image.
● Never touch the camera head during initialization. If you do this, the head position
4-10
1
network recording software (e.g., VK-64), video is recorded during initialization.
may not be initialized correctly, or other malfunctions may result.
Page 91

Initializing the Camera Head Position
The Connection Setting dialog may appear.
In this case, enter the user name “root” and the administrator password (factory default
Tip
Setting is “VB-C300,”) then click “OK”.
Then the Camera Head position is initialized.
Appendix
4-11
Page 92

Factory Default Settings
The following table lists the factory default settings. When you have changed these settings, be
sure to take a note of the new values.
Item Setting
● Administrator ID root
● Administrator password VB-C300
● Settings Page path admin
● Network
Address Setting Method Manual Setting
IP Address 192.168.100.1
Subnet Mask 255.255.255.0
Default Gateway Address
Maximum Transmission Unit 1500
● Connection Keeping
Send Packet Regularly NO
Target IP address
Interval (min.) 1
● Video Settings
Video Capture Size Medium
Video Quality 3
● Camera Settings
Shutter Speed Auto
Focus Mode Auto
Slow Shutter Not used
Day & Night Manual
Brightness Darker
Luminance Sensitivity Low
Enable Digital Zoom Not used
Mount Inverted
Return to Home Position when Not used
nobody has a control privilege
● Camera Name
Camera name Camera
● HTTP Server
HTTP Port 80
● Video Server
Maximum Frame Rate (fps) 30(NTSC)/25(PAL)
Restrict Maximum Transmission rate (Mbps)
● Audio Server
Enable Audio Transmission Not used
Input Volume 50
Enable Voice Activity Detection Not used
Enable Receive audio Not used
Output Volume 50
Disable echo canceller Used
● Authorized User Account
User list
● DNS
Name Server Address 1
Name Server Address 2
Register Host Name Not used
Host Name
● External device 1
Device name
● External device 2
Device name
● External output device
Device name
● LED Setting
Turn the LED OFF Not used
Not restricted
Item Setting 1 Item setting 2
(m) (d) (y) (m) (d) (y)
4-12
Page 93

Index
A
AC adapter ................................................................. 4-2
Access control .................................................. 1-2, 1-15
Administration Tools ........................................ 1-20, 4-8
Administrator account ................................................ 2-2
Administrator password .............................. 1-6, 2-2, 4-8
AE lock ............................................................... 2-5, 2-6
Audio .............................................. 3-5, 3-16, 3-23, 3-31
Input volume ........................................................ 1-13
Output volume ..................................................... 1-13
Receive ............................................. 1-13, 3-16, 3-30
Transmit ............................................ 1-13, 3-16, 3-29
Transmit and receive ................................... 3-5, 3-31
Audio Server ............................................................. 1-13
Authorized User Account ................................. 1-15, 3-3
Automatic reconnection ........................................... 3-31
B
Background .................................................... 3-15, 3-29
Backlight compensation ........................................... 3-12
Brightness ....................................................... 1-11, 3-28
C
Camera control ................................................. 3-9, 3-14
Camera head position ..............................................4-10
Camera name ........................................................... 1-11
Camera parameter ................................................... 2-11
Custom Install .......................................................... 3-34
D
Date .......................................................................... 1-16
Date and time ........................................................... 1-16
Day & Night .............................................................. 1-11
Default gateway address .......................... 1-7, 1-20, 4-8
Digital zoom .............................................................. 1-11
DNS .......................................................................... 1-18
E
Echo canceller .......................................................... 1-13
Event log ................................................................... 1-20
Exposure .................................................................. 3-28
External device input ........................................ 3-3, 3-13
Display message ................................................. 3-33
Display screen ..................................................... 3-27
External device name .............................................. 1-19
External device output ..................................... 3-3, 3-13
Display screen ..................................................... 3-27
Operate ................................................................ 3-27
F
Factory default settings .............................................. 4-8
List ....................................................................... 4-12
Restore .................................................................. 4-8
Filtering .....................................................................2-17
Focus .............................................................. 2-11, 3-14
Focusing mode ........................................................... 1-9
Frame rate ...................................................... 1-12, 3-18
G
Gain .......................................................................... 3-28
H
Home position ................................................ 1-11, 2-10
Host name ................................................. 2-2, 3-5, 3-23
HTTP port ............................... 1-12, 2-2, 3-5, 3-23, 4-12
HTTP server .......................................... 1-12, 2-17, 4-12
HUB ............................................................................ 4-2
I
Infrared cut filter ............................................. 1-11, 3-29
IP address ........................ 1-3, 1-7, 1-20, 2-2, 3-5, 3-23
L
LAN cable ......................................................... 3-29, 4-2
LED ................................................................. 1-19, 4-12
Log ............................................................................ 2-15
Copy .....................................................................2-16
Save ..................................................................... 2-16
Search .................................................................. 2-16
Log code ...................................................................2-16
Log message .............................................................. 4-4
Log Events ............................................................... 1-20
Log Viewer ...................................................... 2-15, 2-16
Browse ................................................................. 2-15
Download ............................................................. 2-15
Launch ................................................................... 2-3
M
Maximum frame rate ................................................ 1-12
Maximum transmission rate .....................................1-12
Microphone button ........................................... 3-7, 3-30
Mount type ................................................................1-11
N
Name server address ............................................... 1-18
NC Viewer ........................................................ 2-18, 3-2
Launch ................................................................... 3-4
Presets ....................................................... 2-12, 3-12
Receive audio .................. 1-13, 3-5, 3-16, 3-23, 3-30
Switch .................................................................. 3-34
Terminate ............................................................... 3-4
Transmit audio .......................... 1-13, 3-5, 3-16, 3-29
Network ...................................................................... 1-6
Night mode ..................................................... 1-10, 3-28
P
Pan ............................. 2-11, 3-8, 3-10, 3-14, 3-19, 3-25
Panorama Creation Tool ............................................2-4
Capture .................................................................. 2-6
Display screen ....................................................... 2-5
Appendix
4-13
Page 94

Index
Panorama preview ......................................... 2-10, 2-14
Password .......................... 1-3, 1-15, 2-2, 3-5, 3-23, 4-3
Preset Preview Frame ............................................. 2-12
Preset Setting Area ..................................................2-10
Preset Setting Tool .................................................... 2-9
Presets .................................................... 2-9, 2-12, 3-12
Display screen ..................................................... 2-10
Set up ................................................................... 2-12
Proxy ........................................................................... 2-2
Q
Quality ........................................................................ 1-8
R
Reboot .............................................................. 1-5, 1-20
Reconnect ........................................................ 2-8, 3-31
Recording ................................................................... 1-8
Reset switch ................................................ 1-6, 4-3, 4-9
Restore Settings ....................................................... 1-20
S
Scheduling ..................................................................2-3
Sensitivity .............................................. 1-11, 3-28, 3-30
Server ....................................................................... 1-12
Settings Title page ............................................. 1-3, 1-5
Setup CD-ROM .................................................. ii, v, 4-9
Shutter speed ................................................... 1-9, 3-28
Silent detection ......................................................... 3-30
Slow shutter .............................................................. 1-10
Specifications ................................................................ v
Start Guide ............................................ v, 1-8, 3-34, 4-9
Status list ..................................................................2-11
Subnet mask .................................................... 1-7, 1-20
W
White balance ................................................. 3-19, 3-25
T
Tilt ............................... 2-12, 3-8, 3-10, 3-14, 3-19, 3-25
Time ..........................................................................1-16
Time zone .................................................................1-17
Transmission rate ........................................... 1-12, 3-19
Troubleshooting ......................................................... 4-2
U
User account .................................................... 1-2, 1-15
User list ..................................................................... 1-15
User name ......................................... 1-3, 2-2, 3-5, 3-23
V
VBAdminTools ............................................................ 2-2
Launch ................................................................... 2-2
Presets ...................................................................2-9
VB Initial Setup Tool .......................................... 1-4, 1-7
VBSetup.exe ...................................................... 4-2, 4-9
Viewer for PC ........................................................... 3-34
Viewer Switcher ....................................................... 3-34
Viewing restriction settings ........................................ 2-3
4-14
Page 95

CANON INC.
30-2, Shimomaruko 3-chome, Ohta-ku, Tokyo 146-
8501, Japan
CANON U.S.A.,INC.
One Canon Plaza Lake Success, NY 11042-1198
USA
● If you have any questions, call the Canon
U.S.A. Information Center toll-free at
1-800-828-4040 (U.S.A. only)
CANON CANADA INC. NATIONAL HEADQUARTERS
6390 Dixie Road, Mississauga, Ontario L5T 1P7
CANON CANADA INC. CALGARY
2828, 16th Street, N.E, Calgary, Alberta T2E 7K7
CANON CANADA INC. MONTRÉAL
8801 Trans Canada Hwy, St. Laurent Québec H4S
1Z6
● If you have any questions, call the CANON
CANADA Customer Information Centre toll-
free at 1-800-OK-CANON (652-2666) (Canada
only)
CANON MEXICANA, S. DE R.L.DE C.V.
Boulevard Manuel Avila Camacho, No. 138 PB, Pisos
15, 16 y 17
Col Lomas de Chapultepec C.P. 11000 México, D.F.
México
CANON SINGAPORE PTE. LTD.
1 HarbourFront Avenue, #04-01, Keppel Bay Tower
Singapore 098632
CANON HONGKONG CO., LTD.
19/F., The Metropolis Tower, 10 Metropolis Drive,
Hunghom, Kowloon, Hong Kong
CANON AUSTRALIA PTY.LTD.
1 Thomas Holt Drive, North Ryde, Sydney, N.S.W.
2113, Australia
CANON EUROPA N.V.
Bovenkerkerweg 59-61, P.O. Box 2262, 1185 XB
Amstelveen, The Netherlands
CANON EUROPE LTD.
6 Roundwood Avenue, Stockley Park, Uxbridge
Middlesex, UB11 1JA, United Kingdom
CANON COMMUNICATION & IMAGE FRANCE
12 Rue De L'lndustrie, 92414 Corbevoie, Cedex,
Fance
CANON (UK) LTD.
Woodhatch, Reigate, Surrey RH2 8BF, United
Kingdom
CANON DEUTSCHLAND GmbH
Europark Fichtenhain A 10, 47807 Krefeld, Germany
CANON ITALIA S.p.A.
Via Milano, 8 San Donato M. se-20097 (MI), Italy
CANON (Schweiz) A.G.
Industriestrasse 12, 8305 Dietlikon, Switzerland
CANON BELGIUM N.V./S.A
Bessenveldstraat 7, 1831 Diegem, Belgium
CANON GmbH
Zetschegasse 11, A-1230 Wien, Austria
CANON ESPANA S.A.
C/Joaquin Costa 41, 28002 Madrid, Spain
CANON SVENSKA AB
Gustav III:s, Boulevard 26, 169 88 Solna, Sweden
CANON NORGE A/S
Hallagerbakken 110, P.O. Box 33, Holmlia, N-1201
Oslo, Norway
CANON OY
Huopalahdentie 24, P.O. Box 1, FIN-00351 Helsinki,
Finland
CANON DANMARK A/S
Knud Hoejgaards Vej 1, DK-2860, Soeborg, Denmark
PUB.YT1-1365-003 © CANON INC.2007
 Loading...