

OPERATING INSTRUCTIONS
CAMPBELL
IMPACT WRENCH
HAUSFELD
MODELS TL1002, TL1017 AND TL1049
READ CAREFULLY BEFORE ATTEMPTING TO ASSEMBLE, INSTALL, OPERATE OR MAINTAIN THE
PRODUCT DESCRIBED. PROTECT YOURSELF AND OTHERS BY OBSERVING ALL SAFETY INFORMATION. FAILURE TO COMPLY WITH INSTRUCTIONS COULD RESULT IN PERSONAL INJURY AND/OR
PROPERTY DAMAGE. RETAIN INSTRUCTIONS FOR FUTURE REFERENCE.
Description
Do-It-Yourself (DIY) impact wrenches are air tools
designed for removing and installing nuts and bolts
such as lug nuts, exhaust system clamps, etc.
Unpacking
When unpacking this product, carefully inspect for any
damage that may have occurred during transit. Make
sure any loose fittings, bolts, etc., are tightened before
putting this product into service.
General Safety Information
This product is a part of a high pressure system and the
following safety precautions must be followed at all
times along with any other existing safety rules.
1. Read all manuals included with this product carefully. Be thoroughly familiar with the controls and
the proper use of the equipment.
2. Only persons well acquainted with these rules of
safe operation should be allowed to use the
air tool.
General Safety (Continued)
9. Always use attachments designed for use with air
powered tools. Do not use damaged or worn attachments.
!
WARNING
DO NOT USE HAND-TOOL SOCKETS. USE IMPACT-QUALITY SOCKETS ONLY. HAND-TOOL
SOCKETS ARE "GLASS-HARD" AND WILL SHATTER AND CAN CAUSE SERIOUS PERSONAL INJURY IF USED WITH AIR TOOLS.
10. Never trigger the tool when not applied to a work
object. Attachments must be securely attached.
Loose attachments can cause serious injury.
11. Protect air lines from damage or puncture.
12. Never point an air tool at oneself or any other
person. Serious injury could occur.
13. Check air hoses for weak or worn condition before
each use. Make sure all connections are secure.
!
!
DANGER
DO NOT EXCEED MAXIMUM OPERATING PRESSURE OF THE AIR TOOL (90 PSI). THE AIR TOOL
COULD EXPLODE AND RESULT IN DEATH OR
SERIOUS PERSONAL INJURY.
3. Do not exceed any pressure rating of any component in the system.
4. Disconnect the air tool from air supply before
changing tools or attachments, servicing and during nonoperation.
5. Always wear safety glasses during operation.
6. Do not wear loose fitting clothing, scarves, or neck
ties. Loose clothing may become caught in moving
parts and result in serious personal injury.
7. Do not wear jewelry when operating any tool.
Jewelry may become caught in moving parts
and result in serious personal injury.
8. Do not depress trigger when connecting the air
supply hose.
!
!
WARNING
RELEASE ALL PRESSURE FROM THE SYSTEM
BEFORE ATTEMPTING TO INSTALL, SERVICE,
RELOCATE OR PERFORM ANY MAINTENANCE.
14. Keep all nuts, bolts and screws tight and ensure
equipment is in safe working condition.
15. Do not put hands near or under moving parts.
!
Operation
LUBRICATION
Proper lubrication is the owner's responsibility. Failure
to lubricate the air tool properly will dramatically shorten
the life of the tool and will void the warranty.
!
CAUTION
This impact wrench REQUIRES lubrication BEFORE the initial use and BEFORE and AFTER each
additional use.
Impact wrenches require lubrication throughout the life
of the tool and must be lubricated in two separate areas:
– 1 –
IN230000AV 9/93
IN230000AV MODELS TL1002, TL1017 AND TL1049
Operation (Continued)
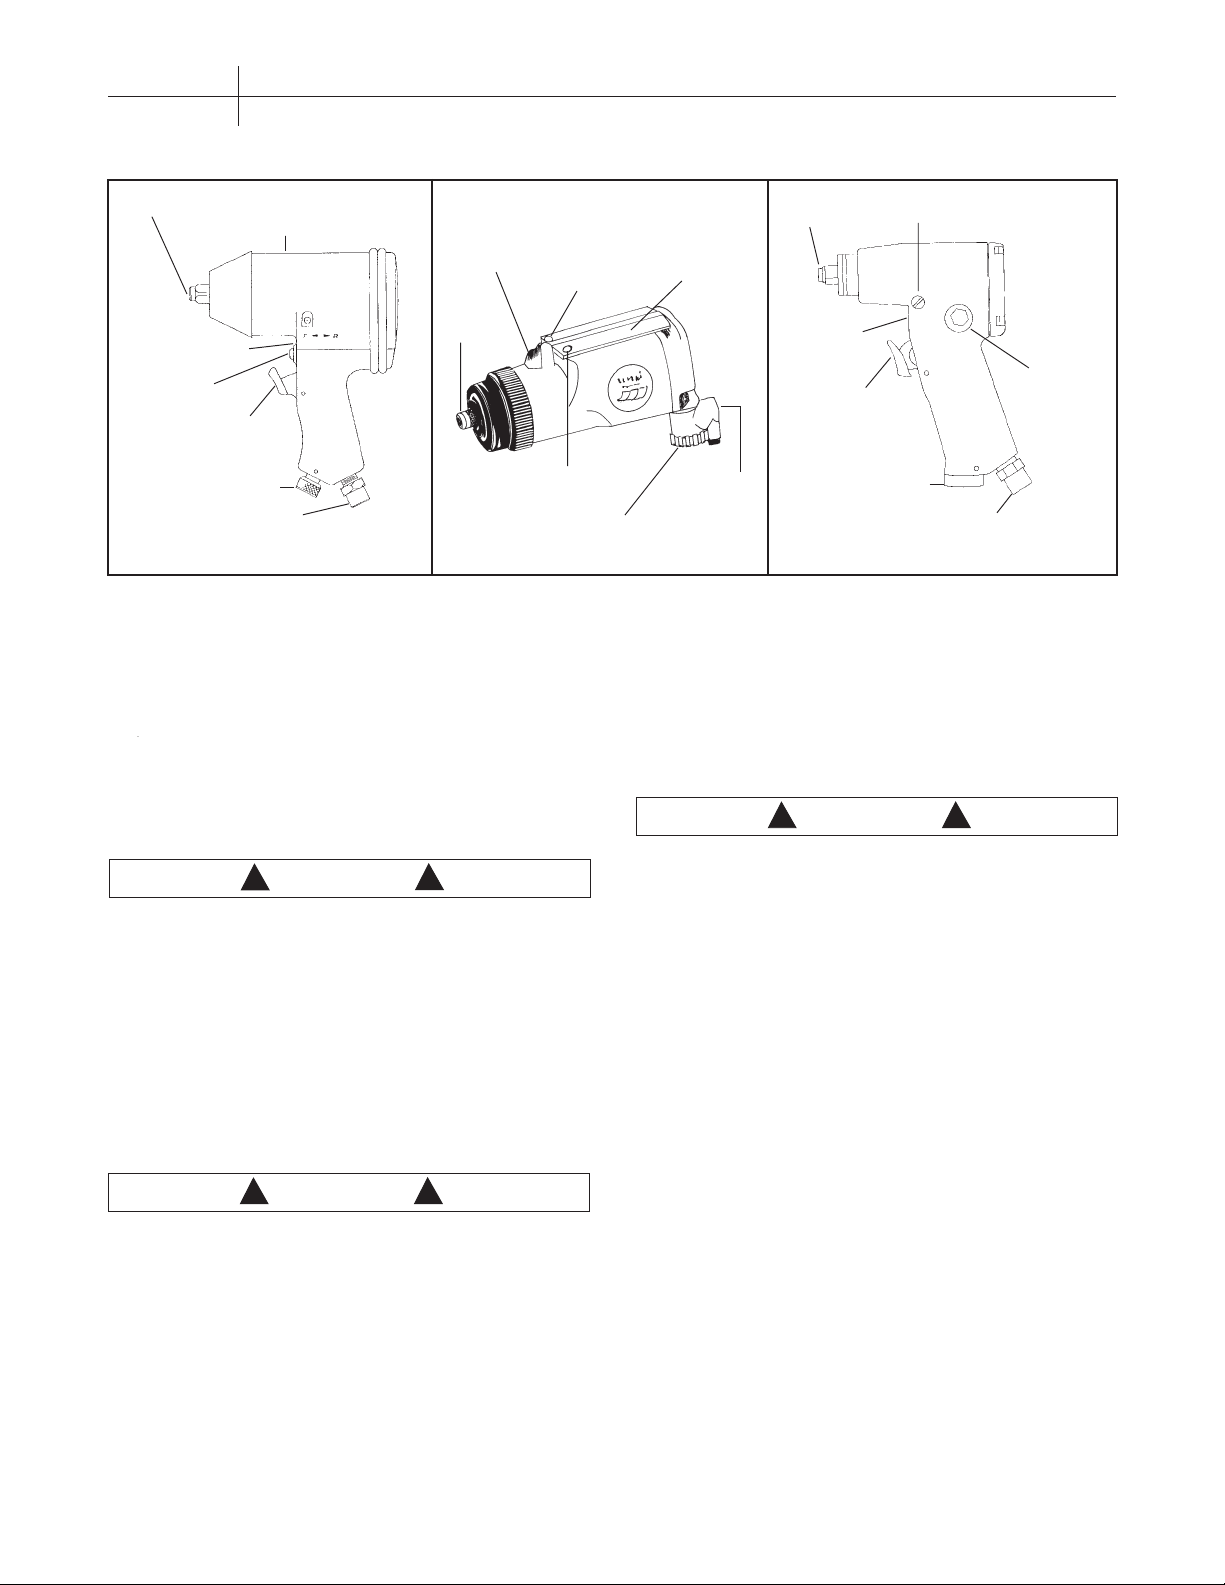
ANVIL
EXHAUST PORT
FORWARD/
REVERSE
BUTTON
REGULATOR
1/4" NPT FEMALE
OIL PORT
HOLE ON
BACK SIDE
TRIGGER
AIR INLET
MODEL
TL1002
REMOVE
SCREW FOR
OIL PORT
HOLE
ANVIL
FORWARD
LEVER
REVERSE
LEVER
REGULATOR
Figure 1 Impact Wrench Features
the air motor and the impact mechanism. Follow the
outlined procedures and refer to Figure 1 for details.
Campbell Hausfeld air tool oil (ST127000AV) is recommended because this oil cleans, lubricates and inhibits
rust all in one step.
Air Motor Lubrication.
OIL PORT
EXHAUST
PORT
UNDER-
NEATH
1/4" NPT
FEMALE
AIR INLET
MODEL
TL1017
ANVIL
EXHAUST
PORT
TRIGGER
REGULATOR
HOLE
FORWARD/
REVERSE
SWITCH
1/4" NPT FEMALE
AIR INLET
MODEL
TL1049
reverse directions for 20 to 30 seconds. Oil will
discharge from the exhaust port when air pressure
is applied.
Impact Mechanism Lubrication.
The impact mechanism should be lubricated monthly.
The motor must be lubricated daily. An air motor cannot
be oiled too often.
!
WARNING
!
DISCONNECT THE IMPACT WRENCH FROM THE
AIR SUPPLY BEFORE LUBRICATING.
1. Disconnect the impact wrench from the air supply.
2. Turn the impact wrench upside down.
3. Simultaneously (at the same time), pull the trigger
and pour a teaspoon of Campbell Hausfeld oil in the
air inlet. Then, push the forward and reverse button
in both directions.
!
WARNING
!
AFTER AN AIR TOOL HAS BEEN LUBRICATED,
OIL WILL DISCHARGE THROUGH THE EXHAUST
PORT DURING THE FIRST FEW SECONDS OF
OPERATION. THUS, THE EXHAUST PORT MUST
BE COVERED WITH A TOWEL BEFORE APPLYING AIR PRESSURE. FAILURE TO COVER THE
EXHAUST PORT CAN RESULT IN SERIOUS INJURY.
4. Connect the impact wrench to the air supply and
cover the exhaust port with a towel (See Figure 1).
Run the impact wrench in both the forward and
!
WARNING
!
DISCONNECT THE IMPACT WRENCH FROM THE
AIR SUPPLY BEFORE LUBRICATING.
1. Disconnect the impact wrench from the air supply.
2. Remove the allen head screw from the oil port hole
on the right side of the tool that has "OIL" stamped
below the hole for model TL1002. For model TL1049,
the screw is located on the left hand side of the tool
near the exhaust port. For model TL1017, the screw
is located in front of the forward/reverse lever.
3. Put three teaspoons of Campbell Hausfeld air tool
oil in the oil port hole. Replace the screw.
4. Reconnect the air supply to the impact wrench and
run for 20 to 30 seconds. Lubricate the entire impact
mechanism by rotating the tool upside down and
sideways while running the tool.
5. Remove the screw and hold the oil port hole over a
suitable container to allow excess oil to drain.
6. If the oil is dirty, repeat the procedure above until
the oil comes out clear. Install the screw and
tighten. The residual oil remaining in the impact
mechanism chamber is all that is needed for proper
lubrication.
– 2 –
IN230000AV
MODELS TL1002, TL1017 AND TL1049
Operation (Continued)
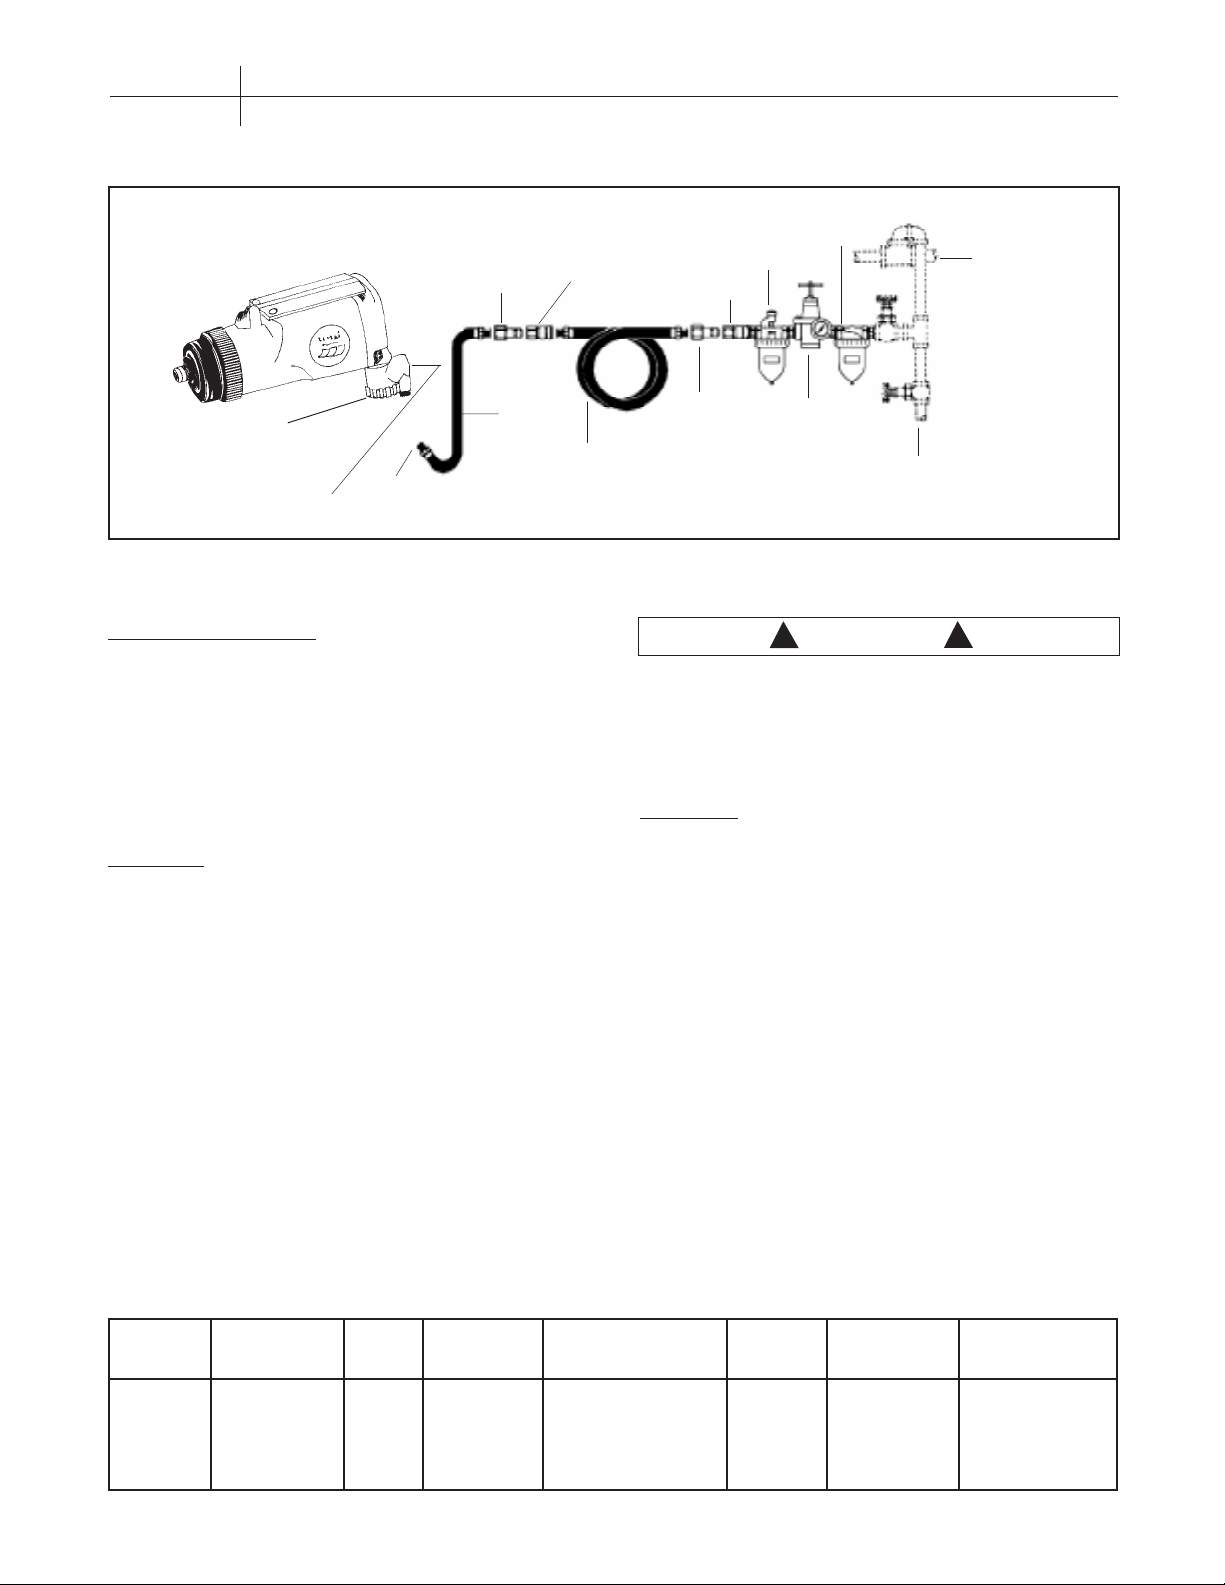
QUICK
COUPLER
(WHIP)
HOSE
HOSE
REGULATOR
AIR INLET (OIL HERE
DAILY IF NOT USING
AN AIR TOOL OILER)
QUICK
CONNECTOR
LEADER
DO NOT INSTALL A
QUICK COUPLER HERE
Figure 2 - Air Hose Hook-up
SPEED ADJUSTMENT
The impact wrench should never be used to set torque.
Use a torque wrench to set the torque. Models TL1002,
TL1017 and TL1049 are equipped with regulators for
speed adjustment (See Figure 2).
To remove nuts, set the regulator to the maximum
setting. To install nuts, set the regulator to the minimum
to medium setting. Do not overtighten the nuts.
AIR HOSE
Figure 2 illustrates a recommended air hose hook-up.
NOTE: It is not recommended to install a quick coupler
between the impact wrench and the leader (whip) hose
(See Figure 2).
Using fittings or air hoses which are too small can create
a pressure drop and reduce the power of the tool. For
models TL1002, TL1017 and TL1049, using 3/8" (I.D.)
fittings with 1/4" NPT threads are recommended. Most
compressors are shipped with a short, 1/4" I.D. hose.
For proper performance and more convenience, use a
3/8" I.D. hose. Hoses longer than 50 feet should have a
1/2" I.D.
QUICK
COUPLER
(OPTIONAL)
QUICK
CONNECTOR
AIR
(OPTIONAL)
AIR TOOL MANUFACTURERS RECOMMEND THAT AN AIR FILTER AND OILER BE USED TO INCREASE THE LIFE OF THE TOOL.
OILER
FILTER
REGULATOR
!
WARNING
AIR SUPPLY
DRAIN (WATER TRAP)
!
NEVER CARRY A TOOL BY THE HOSE OR PULL
THE HOSE TO MOVE THE TOOL OR A COMPRESSOR. KEEP HOSES AWAY FROM HEAT, OIL AND
SHARP EDGES. REPLACE ANY HOSE THAT IS
DAMAGED, WEAK OR WORN.
STORAGE
The impact wrench must be lubricated before storing.
Follow the air motor lubrication instructions with an
exception to step 4. Only run the impact wrench for 2
to 3 seconds instead of 20 to 30 seconds because more
oil needs to remain in the impact wrench when storing.
Technical Service
For information regarding the operation or repair of this
product, please call 1-800-543-6400. If you are calling
from Ohio or outside the continental United States,
please call collect, 1-513-367-1182.
Specifications & Performance
MODEL AVERAGE MAX MAX AIR EXTENDED
# SCFM & PSI RPM TORQUE INLET DRIVE WEIGHT ANVIL
TL1002 5.1 @ 90 7000 230 ft/lb 1/4" NPT (Female) 1/2" Sq 5 lb NA
TL1017 2.4 @ 90 10,000 75 ft/lb 1/4" NPT (Female) 3/8" Sq 2 lb N/A
TL1049 2.5 @ 90 10,000 75 ft/lb 1/4" NPT (Female) 3/8" Sq 3 lb NA
– 3 –

IN230000AV MODELS TL1002, TL1017 AND TL1049
General Troubleshooting Guide
SYMPTOM POSSIBLE CAUSE (S) CORRECTIVE ACTION
Tool runs slowly or will
not operate.
Moisture blowing out
of tool
1. Grit or gum in tool.
2. No oil in tool.
3. Low air pressure.
4. Air hose leaks.
5. Pressure drops.
6. Worn rotor blade in motor.
7. Worn ball bearing in motor.
1. Water in tank.
2. Water in the air lines/hoses.
1. Flush the tool with Campbell Hausfeld air tool oil, gum
solvent, or an equal mixture of SAE 10 motor oil and
kerosene. If Campbell Hausfeld oil is not used, lubricate the
tool after cleaning.
2. Lubricate the tool according to the lubrication instructions in
this manual.
3.a. Adjust the regulator on the tool to the maximum setting.
3.b. Adjust the compressor regulator to tool maximum while the
tool is running free.
4. Tighten and seal hose fittings if leaks are found.
5.a. Be sure the hose is the proper size. Long hoses or tools using
large volumes of air may require a hose with an I.D. of 1/2"
or larger depending on the total length of the hose.
5.b. Do not use a multiple number of hoses connected together
with quick connect fittings. This causes additional pressure
drops and reduces the tool power. Directly connect the
hoses together.
6. Replace rotor blade.
7. Remove and inspect bearing for rust, dirt and grit or worn
race. Replace or clean and regrease bearing with bearing
grease.
1. Drain tank. (See air compressor manual). Oil tool and run
until no water is evident. Oil tool again and run
1-2 seconds.
2.a. Install a water separator/filter. NOTE: Separators only work
properly when the air passing through the separator is cool.
Locate the separator/filter as far as possible from the
compressor.
2. b. Install an air dryer.
2. c. If the original separator will not separate all the water from the
air, install a Campbell Hausfeld belt air filter (MP2121).
Impact Mechanism Troubleshooting Guide
Impacts slowly or
will not impact.
1. DURATION: One year from the date of purchase by the original purchaser.
2. WHO GIVES THIS WARRANTY (WARRANTOR):
Campbell Hausfeld
The Scott Fetzer Company
100 Production Drive
Harrison, Ohio, 45030
Telephone: (513) 367-4811.
3. WHO RECEIVES THIS WARRANTY (PURCHASER): The original purchaser (other than for purposes of resale) of the Campbell Hausfeld product.
4. WHAT PRODUCTS ARE COVERED BY THIS WARRANTY: Any Campbell Hausfeld portable air compressor, air tool or supplementary air accessory supplied or manufactured
by Warrantor.
5. WHAT IS COVERED UNDER THIS WARRANTY: Defects on material and workmanship which occur within the duration of the warranty period.
6. WHAT IS NOT COVERED UNDER THIS WARRANTY:
A. Implied warranties, including those of merchantability and FITNESS FOR A PARTICULAR PURPOSE ARE LIMITED TO ONE YEAR FROM THE DATE OF ORIGINAL
PURCHASE. Some states do not allow limitations on how long an implied warranty lasts, so the above limitations may not apply to you.
B. ANY INCIDENTAL, INDIRECT, OR CONSEQUENTIAL LOSS, DAMAGE, OR EXPENSE THAT MAY RESULT FROM ANY DEFECT, FAILURE, OR MALFUNCTION OF THE
CAMPBELL HAUSFELD PRODUCT. Some states do not allow the exclusion or limitation of incidental or consequential damages, so the above limitation or exclusion may not apply
to you.
C. Any failure that results from an accident, purchaser’s abuse, neglect or failure to operate products in accordance with instructions provided in the owner’s manual(s) supplied
with product.
D. Pre-delivery service, i.e. assembly, oil or lubricants, and adjustment.
E. Normal adjustments which are explained in the owner’s manual(s) provided with the product, i.e. belts, pressure switch.
F. Items or service that are normally required to maintain the product, i.e. lubricants, filters and gaskets.
G. Electric motor and gasoline engine components are expressly excluded from coverage under this limited warranty. Such components should be returned by the purchaser to
the original manufacturer or to its authorized repair stations for service.
7. RESPONSIBILITIES OF WARRANTOR UNDER THIS WARRANTY: Repair or replace, at Warrantor’s option, products or components which have failed within duration of the
warranty period.
8. RESPONSIBILITIES OF PURCHASER UNDER THIS WARRANTY:
A. Deliver or ship the Campbell Hausfeld product or component to the nearest Campbell Hausfeld Authorized Service Center. Freight costs, if any, must be borne by the purchaser.
B. Use reasonable care in the operation and maintenance of the products as described in the owner’s manual(s).
9. WHEN WARRANTOR WILL PERFORM REPAIR OR REPLACEMENT UNDER THIS WARRANTY:
A. Repair or replacement will be scheduled and serviced according to the normal work flow at the servicing location, and depending on the availability of replacement parts.
B. If the purchaser does not receive satisfactory results from the Authorized Service Center, the purchaser should contact the Campbell Hausfeld Product Service Department (see
paragraph 2).
This Limited Warranty gives you specific legal rights and you may also have other rights which vary from state to state.
1. Lack of lubrication.
2. Tool regulator set in wrong position.
3. In-line regulator or compressor regulator
set too low.
Limited Warranty
1. Lubricate the air motor and the impact mechanism. (See
Lubrication section of this manual).
2. Adjust the regulator setting of the tool.
3. Adjust regulators in the air system (See Figure 2).
– 4 –
 Loading...