

Page 1
Air-operated Grease Gun
Operating Instructions
Models: TL053700AV and TL053700DI
© 2017 Campbell Hausfeld
A Marmon/Berkshire Hathaway Company
EN
IN744900AV 4/17
Page 2

Please read and save these instructions. Read carefully before
attempting to assemble, install, operate or maintain the product
described.
Protect yourself and others by observing all safety information. Failure
to comply with instructions could result in personal injury and/or
property damage! Retain instructions for future reference.
REMINDER: Keep your dated proof of purchase for warranty purposes!
Attach it to this manual or file it for safekeeping.
For parts, product & service information
Model #: ________________________________
Serial #: ________________________________
Purchase Date: __________________________
visit www.campbellhausfeld.com
Campbell Hausfeld
100 Production Drive
Harrison, Ohio 45030
REGISTER YOUR PRODUCT ONLINE NOW! www.campbellhausfeld.com
READ AND FOLLOW ALL INSTRUCTIONS
SAVE THESE INSTRUCTIONS • DO NOT DISCARD
Page 3

BEFORE YOU BEGIN
Description
Air-operated grease guns are designed for lubricating automobiles,
recreational vehicles, machinery and lawn/farm equipment in shots—this tool
does NOT apply grease in a continuous flow. The container tube is capable
of dispensing bulk-filled or 14 ounce grease cartridges. A 9 inch flexible hose
allows access to hard to reach fittings.
UNPACKING
After unpacking the unit, inspect carefully for any damage that may have
occurred during transit. Check for loose, missing or damaged parts. Check
to be sure all supplied accessories are enclosed with the unit. In case of
questions, damaged or missing parts, please visit www.campbellhausfeld.com
for customer assistance.
Do not operate unit if damaged during shipping,
cause injury or property damage.
handling or use. Damage may result in bursting and
Other Parts (Not Provided)
You will need the following items and/or accessories to properly set-up and
use this air-operated grease gun:
• 1/4 in. Plug NPT (M)
- For less stress on your air hose and you, try a flex plug.
• 1/4 in. (ID) Air Hose
• 1/4 in. Coupler NPT (F)
- Eliminate coupler confusion with a universal coupler style.
- Quick-connect couplers quickly, easily join hoses to tools.
- If you don’t use a flex plug, consider a swivel coupler to prevent hose
kinks and reduce stress on your air hose.
• 1 Gallon air compressor or larger
• 14 Ounce grease cartridge or bulk grease
• Adjustable wrench and PTFE tape to ensure tight connections
See www.campbellhausfeld.com for additional information on accessories to
support your air tools and pneumatic system.
1
Page 4
SPECIFICATIONS
TL0537
Average Air Consumption 0.1 CFM @ 90 PSI
Operating Pressure 90 PSI
Air Inlet Size 1/4 inch NPT
Fill Method Cartridge or Bulk-Filled
Cartridge Size 14 ounces
Tool Weight 3 lbs. 3 oz.
DIMENSIONS
Dimensions (assembled air tool, without grease hose attached)
Length 6-1/2 in.
Width 2-3/8 in.
Height 15-1/4 in.
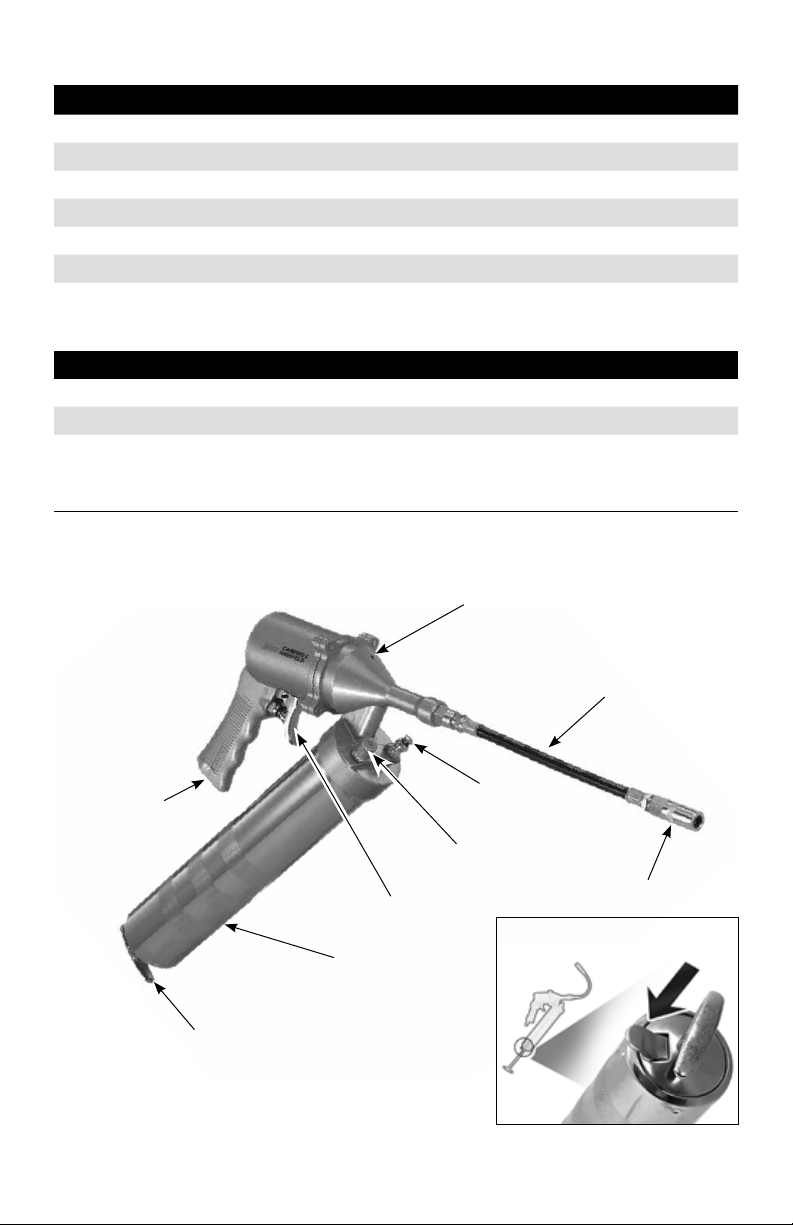
GETTING TO KNOW YOUR UNIT
Exhaust port hole
1/4 in. NPT (F)
air inlet
Figure 1
Plunger handle
Trigger
Container tube
2
Grease hose
Air vent
valve
Bulk-fill port
Grease fitting adapter
Handle
Release
Page 5
ASSEMBLY INSTRUCTIONS
Your grease gun comes from the manufacturer in 3 pieces. Unwrap each
piece from their protective poly bag. Thread the grease hose into the inlet
port of the grease gun and tighten. To prevent grease from seeping between
grease hose and grease gun, use PTFE tape and an adjustable wrench to
ensure a leak-proof connection.
Determine the method you will be using to fill the grease container tube
from the OPERATING INSTRUCTIONS below.
OPERATING INSTRUCTIONS
Fill container tube with grease using one of the 3 methods described below.
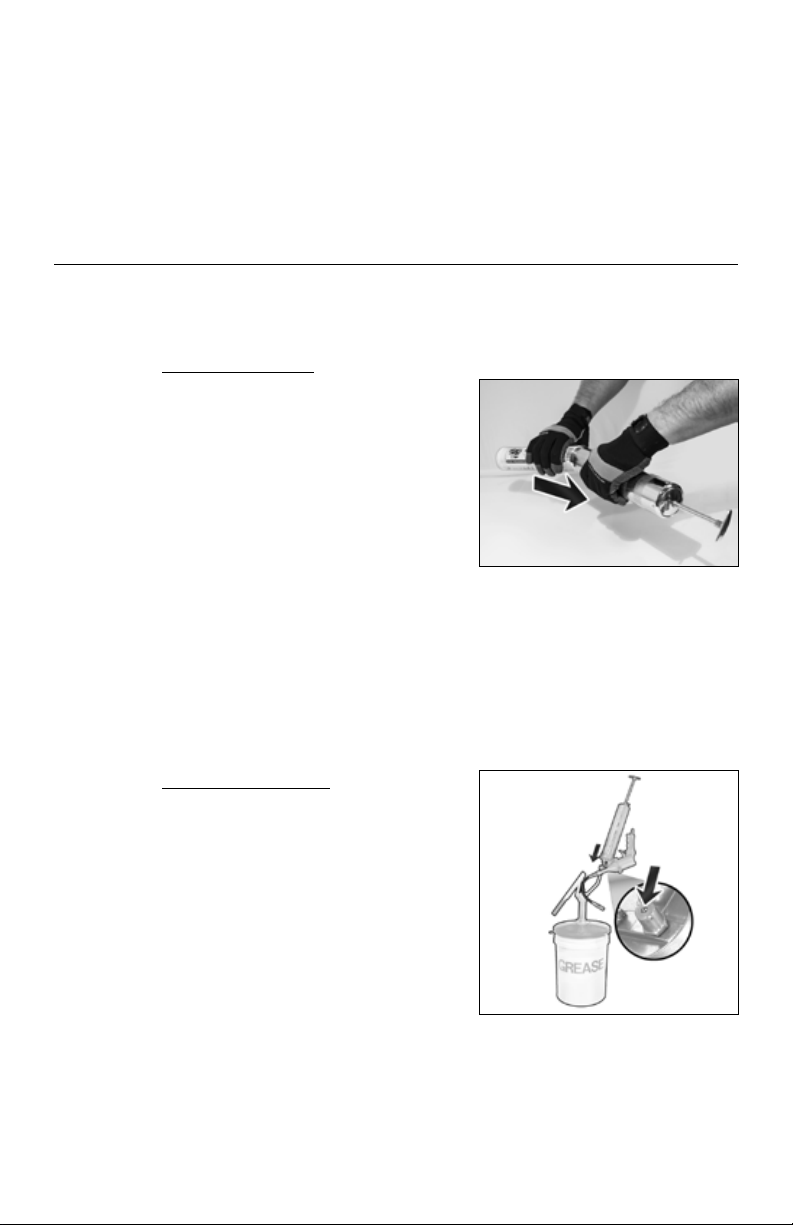
Grease Cartridges:
1. Unscrew the grease gun from the
container tube.
2. Pull the plunger handle back and out
of the container tube as far as it will
go.
3. Insert the open end of a 14 ounce
grease cartridge into the container
tube and push the cartridge
completely in to the container tube.
4. Remove the seal from the grease
cartridge.
5. Thread the grease gun and container tube back together and turn until
tight.
6. Press the handle release down to activate the plunger handle rod and
push the plunger handle back into the container tube.
7. Press the air vent valve several times to relieve any air pockets near the
top of the container tube.
Figure 2
Filler-Pump Method:
1. Thread the container tube on to the
grease gun and turn until tight.
2. Pull the plunger handle back and out
of the container tube as far as it will
go.
3. Connect the filler-pump hose to the
bulk-fill port.
4. Pump grease in to the container tube
until filled; disconnect the grease gun
from the filler-pump hose.
5. Press the handle release tab down to
activate the plunger handle rod and
push the plunger handle back into the container tube.
6. Press the air vent valve several times to relieve any air pockets near the
top of the container tube.
3
Figure 3
Page 6

OPERATING INSTRUCTIONS (CONTINUED)
Bulk-Filled Grease:
1. Unscrew the grease gun from the
container tube.
2. Insert open end of container tube in
to grease bucket (fully submerging
the opening).
3. Pull the plunger handle back to suck
grease in to the container tube. Pull
slowly and with consistent force to
ensure that the container tube is full
of grease by the time the plunger
handle is fully extended.
4. Thread the grease gun and container tube back together and turn until
tight.
5. Press the handle release tab down to activate the plunger handle rod
and push the plunger handle back into the container tube.
6. Press the air vent valve several times to relieve any air pockets near the
top of the container tube.
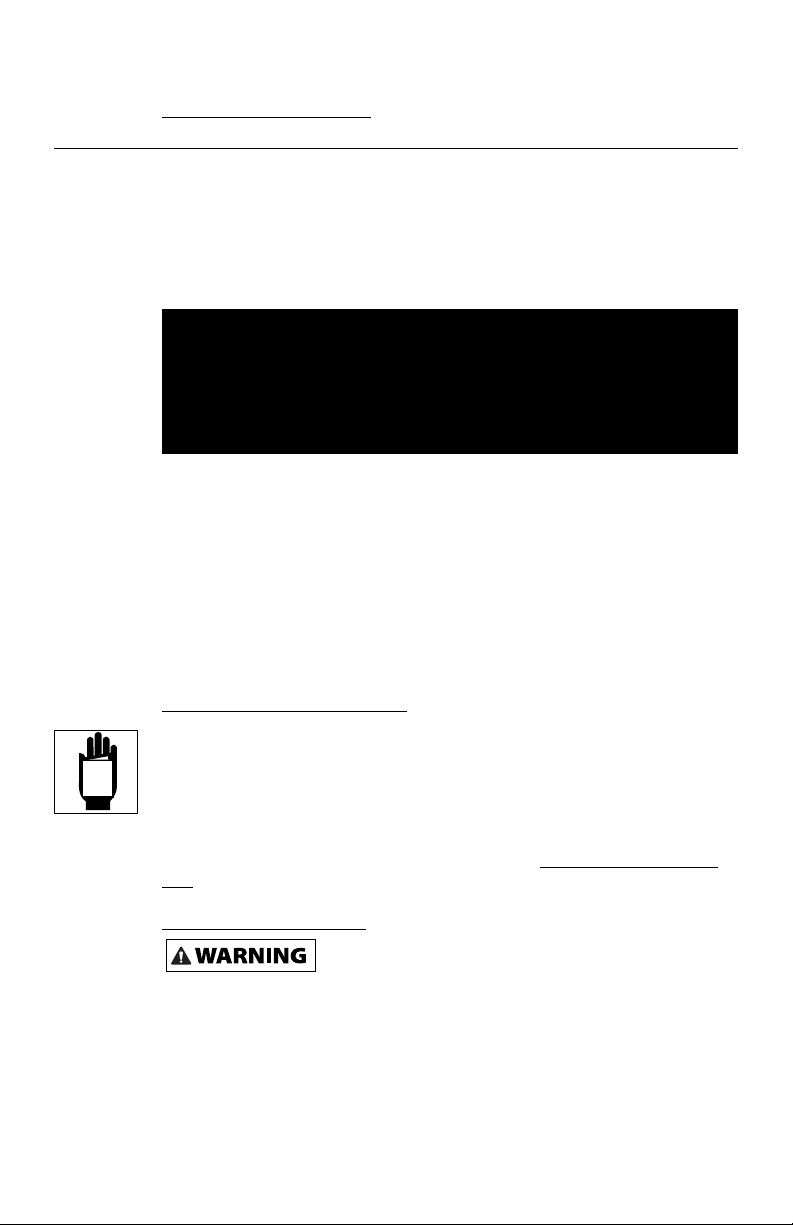
TIP: For best results, consider priming
grease gun before first use. To do this,
pack some grease in to the grease inlet
port of the gun, then operate as usual.
(See arrow in Figure 5.)
Connect grease gun to air compressor
system following Air Tool Set Up
Instructions (IN170102AV).
Figure 4
Figure 5 - Grease inlet port
CARE & MAINTENANCE
Failure to lubricate and maintain your air tools properly will dramatically
shorten their life. Use “air tool” oil every time you use your grease gun to
lubricate, clean and inhibit rust in one step. Campbell Hausfeld sells air tool
oil under part number ST1270.
In addition to regular lubrication of your air tool, the grease gun piston must
be lubricated periodically. Under heavy usage, the piston should be greased
with bearing grease every four months. For light usage only once a year.
To grease the piston:
1. Disconnect the tool from the air supply.
2. Remove the 4 screws on the gun head.
3. Separate the gun head from the pistol grip and remove the spring and
the piston.
4. Apply a film of bearing grease around the exterior of the rubber skirt on
the piston and a thin film of grease on the inside of the cylinder.
5. Install the spring and piston and reassemble the gun head and the pistol
grip. Insert and tighten 4 screws.
4
Page 7
TECHNICAL SERVICE
For information regarding the operation or repair of this product, please visit
www.campbellhausfeld.com.
GENERAL SAFETY INSTRUCTIONS
This manual contains information that is very important to know and
understand. This information is provided for SAFETY and to PREVENT
EQUIPMENT PROBLEMS. To help recognize this information, observe the
symbols found on page 7. The Safety Symbols throughout this manual are to
alert you to important safety hazards and precautions.
The DANGER, WARNING, CAUTION, and NOTICE notifications
and instructions in this manual cannot cover all possible condi-
tions and situations that may occur. It must be understood by
the operator that caution is a factor which cannot be built into
this product, but must be supplied by the operator.
With any piece of equipment, new or used, the most important part of its
operation is SAFETY!
Campbell Hausfeld encourages you to familiarize yourself with your new
equipment and stresses safe operation.
The next few pages of this manual are a summary of the main safety aspects
associated with this unit. Be sure to read and understand completely before
operating the machine.
The symbols used throughout the operation and maintenance sections of
this manual call attention to safety procedures.
MANUAL
Important Safety Information
Please read and save these instructions. Read carefully before attempting to
assemble, install, operate or maintain the product described. Protect yourself
and others by observing all safety information. Failure to comply with
instructions could result in personal injury and/or property damage! Retain
instructions for future reference.
This manual contains important safety, operational and maintenance
information. If you have any questions, please visit www.campbellhausfeld.
com for customer assistance.
California Proposition 65
• This product or its power cord may contain chemicals known to the State
of California to cause cancer and birth defects or other reproductive
harm. Wash hands after handling.
5
Page 8
GENERAL SAFETY INSTRUCTIONS (CONTINUED)
General Safety
This product is part of a high pressure system and the following safety
precautions must be followed at all times along with any other existing safety
rules.
1. Read all manuals included with this product carefully. Be thoroughly
MANUAL
familiar with the controls and the proper use of the equipment.
2. Only persons well acquainted with these rules of safe operation should
be allowed to use the air tool.
Do not exceed the maximum operating pressure of
the air tool (90 psi). This can reduce the life of the
tool.
3. Do not exceed any pressure rating of any component in the system.
4. Disconnect air tool from air supply before changing tools or attachments, servicing and during non-operation.
Safety glasses must be worn during operation.
5. Do not wear loose fitting clothing, scarves, neck ties or jewelry when
operating any tool. Loose clothing or jewelry may become caught in
moving parts and result in serious personal injury.
6. Do not depress trigger when connecting the air supply hose.
7. Always use attachments designed for use with air powered tools. Do not
use damaged or worn attachments.
8. Never trigger tool when not applied to a work object. Attachments must
be securely attached. Loose attachments can cause serious injury.
9. Protect air lines from damage or puncture.
10. Never point an air tool at oneself or any other person. Serious injury
could occur.
11. Check air hoses for weak or worn condition before each use. Make sure
all connections are secure.
Release all pressure from the system before
attempting to install, service, relocate or perform
any maintenance.
12. Keep all nuts, bolts and screws tight and ensure equipment is in safe
working condition.
13. Do not put hands near or under moving parts.
14. Always secure work.
Excessive exposure to vibration, working in
awkward positions and repetitive work motions can
cause injury to hands and arms. Stop using any tool if discomfort, numbness,
tingling or pain occur and consult a physician.
Never carry a tool by the hose or pull the hose to
move the tool or a compressor. Keep hoses away
from heat, oil and sharp edges. Replace any hose that is damaged, weak or
worn.
6
Page 9

Safety Glossary
This manual contains information that is very important to know and
understand. This information is provided for SAFETY and to PREVENT
EQUIPMENT PROBLEMS. To help recognize this information, observe the
following symbols.
Danger indicates an imminently hazardous situation
which, if not avoided, WILL result in death or serious
injury.
Warning indicates a potentially hazardous situation
which, if not avoided, COULD result in death or
serious injury.
Caution indicates a potentially hazardous situation
which, if not avoided, MAY result in minor or
moderate injury.
Notice indicates important information, that if not
followed, may cause damage to equipment.
IMPORTANT or NOTE: Information that requires special attention.
Safety Symbols
The following Safety Symbols appear throughout this manual to alert you to
important safety hazards and precautions.
MANUAL
Read Manual
First
Wear eye
and hearing
protection
Risk of
Pressure
SAVE THESE INSTRUCTIONS
DO NOT DISCARD
7
Page 10

TROUBLESHOOTING GUIDE
SYMPTOM POSSIBLE CAUSE(S) CORRECTIVE ACTION
Tool will not operate 1. No grease in tool 1. Lubricate the tool according to
2. Low air pressure 2. Adjust the compressor regulator as
3. Air hose leaks 3. Tighten and seal hose fittings if leaks
Tool operates, but
grease will not eject
from spout
Grease stops flowing
after initially working
1. Cold, thick grease 1. Bring tool inside and warm to room
2. Spring is still compressed 2. Pull the plunger handle back and
3. Out of grease 3. Refill container tube.
4. Air pockets in container tube 4. Remove air pockets (See below).
Air in the grease hose or
container tube
the lubrication instructions in this
manual.
needed.
are found.
temperature of 70°F - 85°F. Stand the
gun in an upright position to prevent
air pockets forming in the middle of
the cartridge.
release quickly. Make sure the catch
plate is released.
1. Remove air pockets from grease gun:
a. Partially unscrew the grease
gun from the container tube
(approximately 1 to 1-1/2 turns).
b. Pull the plunger handle back
and release it quickly by pressing
down on the handle release tab.
Repeat several times.
v. Release the handle release down
and tighten the grease gun and
container tube again.
d. Press the air vent valve several
times to relieve any air pockets
near the top of the container
tube.
e. When the grease gun container
tube has been properly bleed of
air, grease will start to seep out
of the air vent valve.
2. Prime grease gun by packing grease
in to the grease inlet port of the
gun (this is the section of the gun in
which the container tube threads).
8
Page 11

NOTES:
9
Page 12

Reminder: Keep your dated proof of purchase for warranty purposes! Attach it to this manual or file it
for safekeeping.
LIMITED WARRANTY
1. DURATION: From the date of purchase by the original purchaser as follows: One (1) Year.
2. WHO GIVES THIS WARRANTY (WARRANTOR): Campbell Hausfeld a Marmon/Berkshire Hathaway
Company, 100 Production Drive, Harrison, Ohio, 45030. Visit www.campbellhausfeld.com
3. WHO RECEIVES THIS WARRANTY (PURCHASER): The original purchaser (other than for purposes of
resale) of the Campbell Hausfeld product.
4. WHAT PRODUCTS ARE COVERED BY THIS WARRANTY: Any Campbell Hausfeld nailer, stapler, air tool,
spray gun, inflator or air accessory supplied or manufactured by Warrantor.
5. WHAT IS COVERED UNDER THIS WARRANTY: Substantial defects in material and workmanship which
occur within the duration of the warranty period.
6. WHAT IS NOT COVERED UNDER THIS WARRANTY:
A. Implied warranties, including those of merchantability and FITNESS FOR A PARTICULAR
PURPOSE ARE LIMITED FROM THE DATE OF ORIGINAL PURCHASE AS STATED IN THE DURATION.
If this product is used for commercial, industrial or rental purposes, the warranty will apply for
ninety (90) days from the date of purchase. Some States do not allow limitation on how long an
implied warranty lasts, so the above limitations may not apply to you.
B. ANY INCIDENTAL, INDIRECT, OR CONSEQUENTIAL LOSS, DAMAGE, OR EXPENSE THAT MAY
RESULT FROM ANY DEFECT, FAILURE, OR MALFUNCTION OF THE CAMPBELL HAUSFELD
PRODUCT. Some States do not allow the exclusion or limitation of incidental or consequential
damages, so the above limitation or exclusion may not apply to you.
C. Any failure that results from an accident, purchaser’s abuse, neglect or failure to operate
products in accordance with instructions provided in the owner’s manual(s) supplied with
product. Accident, purchaser’s abuse, neglect or failure to operate products in accordance with
instructions shall also include the removal or alteration of any safety devices. If such safety
devices are removed or altered, this warranty is void.
D. Normal adjustments which are explained in the owner’s manual(s) provided with the product.
E. Items or service that are normally required to maintain the product, i.e. o-rings, springs,
bumpers, debris shields, driver blades, fuses, batteries, gaskets, packings or seals, fluid nozzles,
needles, sandblast nozzles, lubricants, material hoses, filter elements, motor vanes, abrasives,
blades, cut-off wheels, chisels, chisel retainers, cutters, collets, chucks, rivet jaws, screw driver
bits, sanding pads, back-up pads, impact mechanism, or any other expendable part not
specifically listed. These items will only be covered for ninety (90) days from date of original
purchase. Underlined items are warranted for defects in material and workmanship only.
7. RESPONSIBILITIES OF WARRANTOR UNDER THIS WARRANTY: Repair or replace, at Warrantor’s
option, products or components which are defective, have malfunctioned and/or failed to conform
within duration of the warranty period.
8. RESPONSIBILITIES OF PURCHASER UNDER THIS WARRANTY:
A. Provide dated proof of purchase and maintenance records.
B. Deliver or ship the Campbell Hausfeld product or component to the nearest Campbell Hausfeld
Authorized Service Center. Freight costs, if any, must be borne by the purchaser.
C. Use reasonable care in the operation and maintenance of the products as described in the
owner’s manual(s).
9. WHEN WARRANTOR WILL PERFORM REPAIR OR REPLACEMENT UNDER THIS WARRANTY: Repair
or replacement will be scheduled and serviced according to the normal work flow at the servicing
location, and depending on the availability of replacement parts.
This Limited Warranty applies in the United States, Canada and Mexico only and gives you specific legal
rights. You may also have other rights which vary from state to state or country to country.
10
Page 13

Graisseur pneumatique
Instructions d’Utilisation
Modèles: TL053700AV et TL053700DI
© 2017 Campbell Hausfeld
A Marmon/Berkshire Hathaway Company
FR
IN744900AV 4/17
Page 14

Lire et conserver ces instructions. Il faut les lire attentivement avant
de commencer à assembler, installer, faire fonctionner ou entretenir
l’appareil décrit.
Pour se protéger et protéger autrui, observer toutes les informations sur
la sécurité. Négliger d’appliquer ces instructions peut causer
des blessures et/ou des dommages matériels! Conserver ces instructions
pour consultation ultérieure.
RAPPEL: Conservez votre preuve d’achat datée aux fins de garantie!
Attachez-le à ce manuel ou classez-le pour le garder en sécurité.
Pour de l’information sur les pièces,
produits et services veuillez visiter
N° de modèle : _____________________________
www.campbellhausfeld.com
N° de série : _______________________________
Date d’achat : _____________________________
ENREGISTREZ VOTRE PRODUIT EN LIGNE MAINTENANT !
www.campbellhausfeld.com
LIRE ET SUIVRE TOUTES LES INSTRUCTIONS
CONSERVER CES INSTRUCTIONS • NE PAS JETER
Campbell Hausfeld
100 Production Drive
Harrison, Ohio 45030
Page 15

AVANT DE COMMENCER
Description
Les graisseurs pneumatiques sont conçus pour lubrifier les automobiles,
véhicules récréatifs, machinerie et équipement paysager/agricole – cet
outil n’applique PAS la graisse en un flot continu. Le tube contenant peut
distribuer par un remplissage en vrac ou d’une cartouche de graisse de
414 mL (14 oz). Un tuyau flexible de 22,86 cm (9 po) permet d’accéder aux
raccords graisseurs difficiles à atteindre.
DÉBALLAGE
Dès que l’appareil est déballé, l’inspecter attentivement pour tout signe
de dommages en transit. Vérifier s’il y a des pièces desserrées, manquantes
ou endommagées. Vérifier pour s’assurer que tous les accessoires fournis
sont inclus avec l’appareil. Pour toutes questions, pièces endommagées ou
manquantes, veuillez visiter www.campbellhausfeld.com pour l’assistance à la
clientèle.
Ne pas utiliser un modèle qui a été endommagé
Le dommage peut résulter en explosion et peut causer des blessures ou
dégâts matériels.
pendant le transport, la manipulation ou l’utilisation.
Autres pièces (non fournies)
Il vous faudra les éléments et/ou accessoires suivants pour correctement
mettre en marche et utiliser votre graisseur pneumatique :
• Bouchon 6,4 mm (1/4 po) NTP (M)
- Pour une réduction du stress pour vous et votre tuyau, essayez un
connecteur flexible.
• Tuyau d’air de 6,4 mm (1/4 po) (DIA. INT.)
• Coupleur 6,4 mm (1/4 po) NPT (F)
- Élimine la confusion du coupleur avec un coupleur de style universel.
- Les coupleurs à attache rapide raccordent rapidement et facilement
les tuyaux aux outils.
- Si vous n’utilisez pas un connecteur flexible, un raccord pivotant
pourrait être utilisé afin d’éviter l’entortillement et réduire le
stress imposé à votre tuyau d’air.
• Compresseur d’air 3,79 L (1 gal) ou plus.
• Cartouche de graisse 414 mL (14 oz) ou graisse en vrac
• Clé ajustable et ruban PTFE pour assurer des connexions étanches
Voir au www.campbellhausfeld.com pour d’autres informations sur les
accessoires pour accompagner vos outils et votre système pneumatique.
Fr1
Page 16

CARACTÉRISTIQUES TECHNIQUES
TL0537
Consommation d’air moyenne 2,8 l/min @ 621 kPa
Pression d’opération 621 kPa
Taille de l’arrivée d’air
Méthode de remplissage Cartouche ou
Taille de la cartouche 0,41 L
Poids de l’outil 1,45 kg
6,4 mm (1/4 po) NPT
remplissage en vrac
DIMENSIONS
Dimensions (assembled air tool, without grease hose attached)
Leng. 16,51 cm
Larg. 8,57 cm
Haut. 38,74 cm
APPRENEZ À CONNAÎTRE VOTRE UNITÉ
Orifice de la sortie de
l’échappement
Arrivée d’air
1/4 po NPT (F)
Figure 1
Poignée du poussoir
Détente
Tube contenant
Fr2
Purgeur
d’air
Port de remplissage
en vrac
Adaptateur de raccord
Tuyau de
graissage
de graissage
Poignée de
dégagement
Page 17

INSTRUCTIONS D’ASSEMBLAGE
Votre graisseur vous est livré du fabricant en 3 morceaux. Déballez chaque
morceau de son sac de plastique protecteur. Vissez le tuyau de graissage dans
l’orifice d’arrivée du graisseur puis serrez. Pour éviter que la graisse s’échappe
du tuyau de graissage et du graisseur, utilisez du ruban PTFE et une clé
ajustable pour assurer un raccordement étanche.
Déterminez la méthode que vous utiliserez pour remplir le tube contenant de
graisse à partir des INSTRUCTIONS DE FONCTIONNEMENT ci-dessous.
MODE D’EMPLOI
Remplir le tube contenant en utilisant l’une des 3 méthodes suivantes.
Cartouches de graisse :
1. Dévissez le graisseur du tube contenant.
2. Tirez sur la poignée du poussoir et
sortez-la du tube contenant, aussi
loin que possible.
3. Insérez l’extrémité ouverte d’une
cartouche de graisse de 414 mL
(14 oz) dans le tube contenant tout
en poussant la cartouche
entièrement dans le tube contenant.
4. Retirez le sceau de la cartouche de
graisse.
5. Revissez le graisseur et le tube contenant ensemble et tournez jusqu’à ce
qu’il soit serré.
6. Appuyez sur la poignée de dégagement pour activer la tige de la poignée
du poussoir et poussez sur la poignée du poussoir, dans le tube contenant.
7. Appuyez sur le purgeur d’air à plusieurs reprises afin de retirer l’air
accumulé près du haut du tube contenant.
Figure 2
Méthode de remplissage :
1. Vissez le tube contenant sur le graisseur
et tournez jusqu’à ce qu’il soit serré.
2. Tirez sur la poignée du poussoir et
sortez-la du tube contenant, aussi
loin que possible.
3. Connectez le tuyau de la pompe de
remplissage à l’orifice de remplissage
en vrac.
4. Pompez la graisse dans le tube
contenant, jusqu’à ce qu’il soit plein;
débranchez le graisseur du tuyau de
la pompe de remplissage.
5. Appuyez sur la languette de la poignée de dégagement pour activer la
tige de la poignée du poussoir et poussez sur la poignée du poussoir,
dans le tube contenant.
Fr3
Figure 3
Page 18

MODE D’EMPLOI (SUITE)
Remplissage en vrac :
1. Dévissez le graisseur du tube contenant.
2. Insérez l’extrémité ouverte du tube
contenant dans le seau de graisse (en y
submergeant entièrement l’ouverture).
3. Tirez sur la poignée du poussoir
pour y aspirer la graisse dans le tube
contenant. Tirez lentement avec une
force constante afin d’assurer que le
tube contenant est plein de graisse au
moment où la poignée du poussoir
est complètement sortie.
4. Revissez le graisseur et le tube contenant ensemble et tournez jusqu’à ce
qu’il soit serré.
5. Appuyez sur la languette de la poignée de dégagement pour activer la
tige de la poignée du poussoir et poussez sur la poignée du poussoir,
dans le tube contenant.
6. Appuyez sur le purgeur d’air à plusieurs
reprises afin de retirer l’air accumulé
près du haut du tube contenant.
CONSEIL : Pour de meilleurs résultats, songez
à amorcer le graisseur avant la première
utilisation. À cette fin, remplissez l’orifice
d’arrivée du graisseur avec un peu de graisse,
puis utilisez comme d’habitude. (Voir la
flèche de la figure 5)
Connectez le graisseur au système de compresseur d’air selon les Instructions
de mise en marche de l’outil (IN170102AV).
Figure 4
Figure 5 - Orifice d’arrivée de la graisse
SOINS ET ENTRETIEN
À défaut de lubrifier et de correctement entretenir vos outils pneumatiques
diminuera drastiquement leur durée de vie. Utilisez une huile à « outils
pneumatiques » chaque fois que vous utilisez votre graisseur pour le lubrifier,
le nettoyer et éviter la rouille en une seule étape. Campbell Hausfeld offre
une huile à outils pneumatiques sous le numéro de pièce ST1270.
En plus d’une lubrification régulière de votre outil pneumatique, le graisseur
doit être périodiquement lubrifié. Sous un usage intensif, le piston devrait
être graissé tous les quatre mois avec une graisse à roulements. Sous un usage
léger, une fois par année suffit.
Pour graisser le piston :
1. Débranchez l’outil de l’alimentation d’air.
2. Retirez les 4 vis de la tête du graisseur.
3. Séparez la tête du graisseur de la poignée révolver en retirant le ressort
et le piston.
4. Appliquez une couche de graisse à roulements autour de l’extérieur de la jupe
en caoutchouc sur le piston et une couche de graisse sur l’intérieur du cylindre.
5. Installez le ressort et le piston, puis réassemblez la tête du graisseur et la
poignée révolver. Insérez et serrez les 4 vis.
Fr4
Page 19

SERVICE TECHNIQUE
Pour de l’information sur le fonctionnement ou la réparation de ce produit,
veuillez visiter le www.campbellhausfeld.com.
INSTRUCTIONS GÉNÉRALES DE SÉCURITÉ
Ce guide contient de l’information très importante que vous devez connaître
et comprendre. Cette information est fournie à des fins de SÉCURITÉ et
dans le but d’ÉVITER DES PROBLÈMES AVEC L’ÉQUIPEMENT. Pour faciliter la
reconnaissance de cette information, observez les symboles se trouvant à la
pageFr7. Les symboles sur la sécurité de ce manuel, visent à vous alerter des
importants dangers à la sécurité et les précautions.
Les symboles DANGER, AVERTISSEMENT, ATTENTION et AVIS
ainsi que les instructions de ce manuel ne peuvent pas couvrir
toutes les conditions et situations qui pourraient se produire.
L’opérateur doit comprendre que le bon sens et des précautions
sont des facteurs qui ne peuvent pas être inclus dans ces
produits, mais doivent être fournis par l’opérateur.
Avec toute pièce d’équipement, neuve ou usée, la plus importante partie de
l’opération est la SÉCURITÉ!
Campbell Hausfeld vous encourage à vous familiariser avec votre nouvel
équipement et insiste sur un fonctionnement sécuritaire.
Les prochaines pages de ce manuel résument les aspects principaux sur la
sécurité liée avec cette unité. Assurez-vous de les lire et les comprendre
entièrement avant d’utiliser cet appareil.
Les symboles utilisés dans les sections de fonctionnement et d’entretien du
présent manuel attirent l’attention sur les procédures de sécurité.
MANUAL
Importantes instructions de sécurité
S’il vous plaît lire et conserver ces instructions. Lire attentivement avant
de monter, installer, utiliser ou de procéder à l’entretien du produit décrit.
Se protéger ainsi que les autres en observant toutes les instructions de
sécurité, sinon, il y a risque de blessure et/ou dégâts matériels! Conserver ces
instructions comme référence.
Ce manuel contient des informations concernant la sécurité, le
fonctionnement et l’entretien. Si vous avez des questions, veuillez visiter
www.campbellhausfeld.com pour l’assistance à la clientèle.
Proposition 65 de Californie
• Ce produit ou son cordon peuvent contenir des produits chimiques
qui, de l’avis de l’État de Californie, causent le cancer et des anomalies
congénitales ou autres problèmes de reproduction. Lavez-vous les mains
après la manipulation.
Fr5
Page 20

INSTRUCTIONS GÉNÉRALES DE SÉCURITÉ (SUITE)
Généralités sur la sécurité
Ce produit fait partie d’un système de haute pression et les précautions de
sécurité suivantes doivent être prises en permanence, en même temps que
toute autre règle de sécurité en vigueur.
1. Lire attentivement tous les manuels, y compris celui de ce produit.
MANUAL
Bien se familiariser avec les commandes et l’utilisation correcte de
l’équipement.
2. Seules les personnes bien familiarisées avec ces règles d’utilisation en
toute sécurité doivent être autorisées à se servir de l’outil pneumatique.
Ne pas dépasser la pression maximum de service de
l’outil pneumatique (621 kPa). Ceci peut diminuer la
durée de l’outil.
3. Ne pas dépasser la pression nominale de n’importe quelle pièce du
système.
4. Débrancher l’outil pneumatique de l’alimentation en air avant de
remplacer des outils ou des accessoires, de procéder à l’entretien ou
mettre l’outil à repos.
Il est nécessaire de porter des lunettes de protection
pendant l’utilisation.
5. Ne pas porter de vêtements flottants, d’écharpe, de cravate, ni de bijoux
pendant l’opération d’un outil. Les vêtements flottants et les bijoux
risquent de se prendre dans les pièces mobiles, ce qui peut provoquer
des blessures graves.
6. Ne pas appuyer sur la gâchette lorsque l’on branche le tuyau
d’alimentation en air.
7. Toujours utiliser des accessoires conçus pour les outils pneumatiques. Ne
pas utiliser des accessoires endommagés ou usés.
8. Ne jamais appuyer sur la gâchette de l’outil tant qu’il n’y ait pas contact
avec l’objet de travail. Les accessoires desserrés peuvent causer des
blessures graves.
9. Protéger les canalisations d’air contre les dommages ou les perforations.
10. Ne jamais diriger un outil pneumatique vers soi-même ni vers une autre
personne afin d’éviter tout risque de blessures graves.
11. Vérifier les tuyaux d’air pour rechercher tout signe de faiblesse ou
d’usure avant chaque utilisation. S’assurer que tous les branchements
soient bien serrés.
Dissiper toute la pression du système avant
d’essayer d’installer, de déplacer le produit ou de
procéder au service ou à l’entretien.
12. Vérifier le serrage des écrous, boulons et vis et s’assurer que
l’équipement soit en bon état de marche.
13. Ne pas se mettre les mains près ou en-dessous des pièces mobiles.
14. Travaillez toujours de manière sécuritaire.
Fr6
Page 21

Toute exposition excessive aux vibrations, tout
travail dans des positions incommodes et tous
déplacements à répétition peuvent causer des blessures aux mains et
aux bras. Cessez d’utiliser tout outil s’il y a malaise, engourdissement,
fourmillement ou douleur et consultez un médecin.
Ne jamais transporter un outil par le tuyau et ne
jamais l’utiliser pour déplacer l’outil ou le
compresseur. Garder les tuyaux à l’écart de la chaleur, l’huile et les objets
pointus. Remplacer un tuyau usé, faible ou endommagé.
Glossaire sur la sécurité
Ce manuel contient de l’information très importante qui est fournie pour
la SÉCURITÉ et pour ÉVITER LES PROBLÈMES D’ÉQUIPEMENT. Rechercher les
symboles suivants pour cette information.
Danger indique une situation dangereuse imminente
qui MÈNERA à la mort ou à des blessures graves si
elle n’est pas évitée.
Avertissement indique une situation potentiellement
dangereuse qui, si elle n’est pas évitée, POURRAIT
mener à la mort ou à de graves blessures.
Attention indique une situation potentiellement
dangereuse qui, si elle n’est pas évitée, PEUT mener
à des blessures mineures ou modérées.
Avis indique de l’information importante qui
pourrait endommager l’équipement si elle n’est pas
respectée.
IMPORTANT ou REMARQUE: Information qui exige une attention spéciale.
Symboles de sécurité
Les symboles de sécurité suivants apparaissent dans l’ensemble de ce manuel
pour vous aviser des dangers et précautions importants de sécurité.
MANUAL
Lire d’abord
le manuel
Portez une
protection
oculaire et
auditive
Risque de
pression
CONSERVER CES INSTRUCTIONS
NE PAS JETER
Fr7
Page 22

GUIDE DE DÉPANNAGE
SYMPTÔME CAUSE(S) POSSIBLE(S) ACTION CORRECTIVE
L’outil ne fonctionne
pas
L’outil fonctionne,
mais la graisse ne
s’éjecte pas du bec
Le flot de graisse
s’arrête après le travail
initial
1. Pas de graisse dans l’outil 1. Graisser l’outil selon les instructions
2. Pression d’air basse 2. Régler le régulateur du compresseur
3. Fuites dans le tuyau d’air 3. Serrer les raccords de tuyaux en cas
1. Graisse froide et épaisse 1. Mettre l’outil à l’intérieure là où la
2. Le ressort est serré 2. Tirer le manche du plongeur vers
3. Vide de graisse 3. Remplir de nouveau le tube de la
4. Poches d’air dans le tube de
la boîte
Ajoutez l’air dans le tuyau de
graissage ou le tube contenant
de graissage dans ce manuel.
au besoin.
de fuites.
température est de 22-29°C. Mettre
le pistolet d’aplomb afin d’empêcher
la formation de poches d’air au
milieu de la cartouche.
l’arrière et lâcher rapidement.
S’assurer que la plaque du loquet soit
lâchée.
boîte.
4. Enlever les poches d’air
(Voir ci-dessous).
1. Retirez l’air accumulé dans le graisseur :
a. Dévissez partiellement le
graisseur du tube contenant
(environ 1 à 1,5 tour).
b. Tirez la poignée du poussoir vers
l’arrière et relâchez-la rapidement
en appuyant vers le bas sur la
poignée de dégagement. Répétez
à plusieurs reprises.
c. Débloquez à poignée de
dégagement vers le bas et serrez
à nouveau le graisseur et le tube
contenant.
d. Appuyez sur le purgeur d’air à
plusieurs reprises afin de retirer
l’air accumulé près du haut du
tube contenant.
e. Lorsque le tube contenant de
graisse a été correctement saigné
de son air, la graisse commencera
à s’écouler peu à peu, hors du
purgeur d’air.
2. Amorcez le graisseur en remplissant
de graisse l’orifice d’arrivée de la
graisse du graisseur (il s’agit de
la section du graisseur où le tube
contenant est vissé).
Fr8
Page 23

NOTES:
Fr9
Page 24

Mémento: Gardez votre preuve datée d’achat à fin de la garantie! Joignez-la à ce manuel ou classez-la
dans un dossier pour plus de sécurité.
GARANTIE LIMITÉE
1. DURÉE: À partir de la date d’achat par l’acheteur original comme suit - Un (1) An.
2. GARANTIE ACCORDÉE PAR (GARANT):Campbell Hausfeld a Marmon/Berkshire Hathaway Company,
100 Production Drive, Harrison, Ohio, 45030. Visitez www.campbellhausfeld.com
3. BÉNÉFICIAIRE DE CETTE GARANTIE (ACHETEUR): L’acheteur original (sauf en cas de revente) du
produit Campbell Hausfeld.
4. PRODUITS COUVERTS PAR CETTE GARANTIE: Tous les outils de fixation (cloueuses et agrafeuses),
outils pneumatiques, pistolets vaporisateurs, gonfleurs ou accessoires pneumatiques Campbell
Hausfeld qui sont fournis par ou fabriqués par le Garant.
5. COUVERTURE DE LA PRÉSENTE GARANTIE: Défauts de matière et de fabrication considérables qui se
révèlent pendant la période de validité de la garantie.
6. LA PRÉSENTE GARANTIE NE COUVRE PAS:
A. Les garanties implicites, y compris celles de commercialisabilité et D’ADAPTION À UNE
FONCTION PARTICULIÈRE SONT LIMITÉES À PARTIR DE LA DATE D’ACHAT INITIALE TELLE
QU’INDIQUÉE DANS LA SECTION DURÉE. Si ce produit est utilisé pour une fonction
commerciale, industrielle ou pour la location, la durée de la garantie sera quatre-vingt-dix (90)
jours à compté de la date d’achat. Quelques Provinces (États) n’autorisent pas de limitations de
durée pour les garanties implicites. Les limitations précédentes peuvent donc ne pas s’appliquer.
B. TOUT DOMMAGE, PERTE OU DÉPENSE FORTUIT OU INDIRECT POUVANT RÉSULTER DE TOUT
DÉFAUT, PANNE OU MAUVAIS FONCTIONNEMENT DU PRODUIT CAMPBELL HAUSFELD.
Quelques Provinces (États) n’autorisent pas l’exclusion ni la limitation des dommages fortuits ou
indirects. La limitation ou exclusion précédente peut donc ne pas s’appliquer.
C. Toute panne résultant d’un accident, d’une utilisation abusive, de la négligence ou d’une
utilisation ne respectant pas les instructions données dans le(s) manuel(s) accompagnant le
produit. Un accident, l’utilisation abusive par l’acheteur, la négligence ou le manque de faire
fonctionner les produits selon les instructions comprend aussi l’enlevage ou la modification
de n’importe quel appareil de sûreté. Si ces appareils de sûreté sont enlevés ou modifiés, la
garantie sera annulée.
D. Réglages normaux qui sont expliqués dans le(s) manuel(s) d’utilisation accompagnant le
produit.
E. Articles ou services qui sont exigés pour l’entretien du produit; Joints torique, ressorts,
amortisseurs, écrans de débris, lames d’entraînement, fusibles, batteries, joints d’étanchéité,
garnitures ou joints, buses de fluide, aiguilles, buses de sablage, graisses, tuyaux de matériaux,
cartouches filtrantes, pales de moteur, abrasifs, lames, meules de coupage, burins, fixe-burins,
coupeuses, douilles de serrage, mandrins. mâchoires de rivet, lames de tournevis, tampons
de sablage, tampons de sauvegarde, mécanisme de percussion ou toute pièce qui n’est pas
indispensable et qui n’est pas indiquée. Ces articles seront couverts pour quatre-vingt-dix (90)
jours à partir de la date d’achat original. Les articles soulignés sont garanties pour défauts de
matière et de fabrication seulement.
7. RESPONSABILITÉS DU GARANT AUX TERMES DE CETTE GARANTIE: Réparation ou remplacement, au
choix du Garant, des produits ou pièces qui se sont révélés défectueux pendant la durée de validité
de la garantie.
8. RESPONSABILITÉS DE L’ACHETEUR AUX TERMES DE CETTE GARANTIE:
A. Fournir une preuve d’achat datée et un état d’entretien.
B. Livraison ou expédition du produit ou de la pièce Campbell Hausfeld au Centre De Service
Autorisé Campbell Hausfeld. Taux de frais, si applicables, sont la responsabilité de l’acheteur.
C. Utilisation et entretien du produit avec un soin raisonable, ainsi que le décri(vent)t le(s)
manuel(s) d’utilisation.
9. RÉPARATION OU REMPLACEMENT EFFECTUÉ PAR LE GARANT AUX TERMES DE LA PRÉSENTE
GARANTIE: La réparation ou le remplacement sera prévu et exécuté en fonction de la charge de
travail dans le centre de service et dépendra de la disponabilité des pièces de rechange.
Cette Garantie Limitée s’applique aux É.-U., au Canada et au Mexique seulement et vous donne des
droits juridiques précis. L’acheteur peut également jouir d’autres droits qui varient d’une Province, d’un
État ou d’un Pays à l’autre.
Fr10
Page 25

Pistola lubricante neumática
Manual de Instrucciones
Modelos: TL053700AV y TL053700DI
© 2017 Campbell Hausfeld
A Marmon/Berkshire Hathaway Company
SP
IN744900AV 4/17
Page 26

Por favor, lea y guarde estas instrucciones. Lealas cuidadosamente antes
de tratar de montar, instalar, operar o dar mantenimiento al producto
aqui descrito.
Protejase usted mismo y a los demas observando toda la informacion de
seguridad. ¡El no cumplir con las instrucciones puede ocasionar daños,
tanto personales como a la propiedad! Guarde estas instrucciones para
referencia en el futuro.
RECORDATORIO: ¡guarde su comprobante de compra con fecha para
fines de la garantía! Adjúntela a este manual o archívela en lugar seguro.
Para ordenar repuestos, información de
productos y servicios visítenos en
Modelo #: ___________________________________
No. de Serie #: ______________________________
Fecha de Compra: ___________________________
www.campbellhausfeld.com
Campbell Hausfeld
100 Production Drive
Harrison, Ohio 45030
¡REGISTRE SU PRODUCTO EN LÍNEA AHORA MISMO!
GUARDE ESTAS INSTRUCCIONES • NO LAS DESECHE
www.campbellhausfeld.com
LEA Y SIGA TODAS LAS INSTRUCCIONES
Page 27

ANTES DE COMENZAR
Descripción
Las pistolas lubricantes neumáticas están diseñadas para lubricar automóviles,
vehículos recreativos, maquinaria y equipos de jardinería y agrícolas en
medidas; esta herramienta NO aplica grasa en un flujo continuo. El tubo
contenedor es capaz de aplicar cartuchos de grasa de 414 mL (14 onzas) o
llenados a granel. Una manguera flexible de 22,86 cm (9 pulgadas) facilita el
acceso a conectores difíciles de alcanzar.
DESEMPAQUE
Después de desempacar la unidad, inspecciónela cuidadosamente para
detectar cualquier daño que pueda haber ocurrido durante el envío.
Verifique que no haya piezas sueltas, faltantes ni dañadas. Asegúrese de que
todos los accesorios proporcionados vengan con la unidad. En caso de que
tenga preguntas, o de que haya piezas dañadas o faltantes, por favor visite
www.campbellhausfeld.com para asistencia al cliente.
No debe utilizar la unidad si se ha dañado durante
una explosión y ocasionarle heridas o daños a su propiedad.
el envío, manejo o uso. Los daños podrían ocasionar
Otras partes (no incluidas)
Necesitará los siguientes artículos o accesorios para preparar y utilizar
correctamente esta pistola lubricante neumática.
• Tapón NPT de 6,4 mm (1/4 pulg.) (M)
- Para reducir la tensión en su manguera de aire, pruebe con un tapón flexible.
• Manguera de aire de 6,4 mm (1/4 pulg.) (D.I.)
• Acoplador NPT de 6,4 mm (1/4 pulg.) (H)
- Elimine la confusión con los acopladores usando uno de estilo universal.
- Los acopladores de conexión rápida conectan las manguera y las
herramientas con facilidad y rapidez.
- Si no utiliza un tapón flexible, considere un acoplador con pivote para
evitar las torceduras y reducir la tensión en su manguera de aire.
• Compresor de aire de 3,79 L (1 galón) o más
• Cartucho de grasa de 414 mL (14 onzas) o grasa a granel
• Llave ajustable y cinta PTFE para garantizar una conexión hermética
Consulte www.campbellhausfeld.com para ver más información sobre
accesorios para complementar sus herramientas y sistema neumático.
Sp1
Page 28

ESPECIFICACIONES
TL0537
Consumo promedio de aire 2,8 l/min @ 6,2 bar
Presión de operación 6,2 bar
Tamaño de entrada de aire
Método de recarga Cartucho o a granel
Tamaño del cartucho 0,41 L
Peso de la herramienta 1,45 kg
6,4 mm (1/4 pulg.) NPT
DIMENSIONS
Dimensions (assembled air tool, without grease hose attached)
Long. 16,51 cm
Anch. 8,57 cm
Alt. 38,74 cm
CONOZCA SU UNIDAD
Puerto de escape
Entrada de aire de
1/4 pulg. NPT (H)
Figura 1
Manija del émbolo
Gatillo
Tubo contenedor
Sp2
Válvula de
venteo de aire
Puerto de llenado
a granel
Liberación de manija
Manguera
de grasa
Adaptador para
conector de grasa
Page 29

INSTRUCCIONES PARA EL ENSAMBLAJE
Su pistola lubricante viene empaquetada en 3 piezas. Saque cada pieza de su
bolsa protectora de polietileno. Atornille la manguera de grasa en el puerto
de entrada de la pistola lubricante y apriete. Para evitar que se filtre grasa
entre la manguera de grasa y la pistola lubricante, utilice cinta PTFE y una
llave ajustable para garantizar una conexión hermética.
Determine el método que utilizará para llenar el tubo contenedor de grasa,
consultando las siguientes INSTRUCCIONES DE OPERACIÓN.
INSTRUCCIONES DE OPERACIÓN
Llene el tubo contenedor de grasa usando uno de los 3 métodos que se
describen a continuación.
Cartuchos de grasa:
1. Desatornille la pistola lubricante del
tubo contenedor.
2. Jale la manija del émbolo hacia afuera
del contenedor hasta donde sea posible.
3. Inserte el extremo abierto de un
cartucho de grasa de 414 mL (14
onzas) en el tubo contenedor y
empuje el cartucho hasta meterlo
completamente en el tubo contenedor.
4. Quite el sello del cartucho de grasa.
5. Vuelva a enroscar la pistola lubricante con el tubo contenedor y
apriételos bien.
6. Empuje hacia abajo la lengüeta de liberación de la manija para activar
la varilla del émbolo y empuje la manija del émbolo al interior del tubo
contenedor.
7. Empuje la válvula de venteo de aire varias veces para eliminar las
burbujas que estén cerca de la parte superior del tubo contenedor.
Figura 2
Método de recarga con bombeo:
1. Enrosque el tubo contenedor en la
pistola lubricante y apriételo bien.
2. Jale la manija del émbolo hacia afuera
del contenedor hasta donde sea posible.
3. Conecte la manguera de la bomba de
llenado en el puerto de llenado a granel.
4. Bombee grasa hacia el tubo
contenedor hasta que se llene;
desconecte la pistola lubricante de la
manguera de la bomba de llenado.
5. Empuje hacia abajo la lengüeta de
liberación de la manija para activar la varilla del émbolo y empuje la
manija del émbolo al interior del tubo contenedor.
6. Empuje la válvula de venteo de aire varias veces para eliminar las
burbujas que estén cerca de la parte superior del tubo contenedor.
Sp3
Figura 3
Page 30

INSTRUCCIONES DE OPERACIÓN (CONTINUACIÓN)
Recarga de grasa a granel:
1. Desatornille la pistola lubricante del
tubo contenedor.
2. Inserte el extremo abierto del tubo
contenedor en la cubeta de grasa
(sumergiendo por completo la abertura).
3. Jale la manija del émbolo para
succionar grasa hacia el tubo
contenedor. Jale lentamente y con una
fuerza constante para asegurarse de
que el tubo contenedor esté lleno de
grasa cuando la manija del émbolo esté
completamente extendida.
4. Vuelva a enroscar la pistola lubricante con el tubo contenedor y
apriételos bien.
5. Empuje hacia abajo la lengüeta de liberación de la manija para activar la varilla
del émbolo y empuje la manija del émbolo al interior del tubo contenedor.
6. Empuje la válvula de venteo de aire varias veces para eliminar las
burbujas que estén cerca de la parte superior del tubo contenedor.
RECOMENDACIÓN: Para obtener mejores
resultados, es buena idea cebar la pistola
lubricante antes del primer uso. Para hacerlo,
inserte algo de grasa en el puerto de entrada
de grasa de la pistola, y luego utilícela con
normalidad. (Vea la flecha en la figura 5).
Conecte la pistola lubricante al sistema
del compresor de aire siguiendo
las instrucciones de instalación de
herramientas neumáticas (IN170102AV).
Figura 4
Figura 5 - Puerto de entrada de grasa
CUIDADO Y MANTENIMIENTO
De no lubricar y dar mantenimiento de manera apropiada a sus herramientas
neumáticas, reducirá dramáticamente su vida útil. Utilice aceite para
herramientas neumáticas cada vez que utilice su pistola lubricante para
lubricar, limpiar e inhibir la oxidación en un solo paso. Campbell Hausfeld
vende aceite para herramientas neumáticas con el número de parte ST1270.
Además de lubricar con regularidad su herramienta neumática, el pistón
de la pistola lubricante debe lubricarse periódicamente. En condiciones de
uso pesado, debe lubricar el pistón con grasa para rodamientos cada cuatro
meses. Para uso ligero, hágalo solo una vez al año.
Para engrasar el pistón:
1. Desconecte la herramienta del suministro de aire.
2. Quite los 4 tornillos en el cuerpo de la pistola.
3. Separe el cuerpo de la pistola del mango y quite el resorte y el pistón.
4. Aplique una capa de grasa para rodamiento alrededor de la parte
exterior de la falda de caucho del pistón y una capa delgada de grasa
en el interior del cilindro.
5. Instale el resorte y el pistón y vuelva a armar el cuerpo y el mango de la
pistola. Inserte y apriete los 4 tornillos.
Sp4
Page 31

SERVICIO TÉCNICO
Para obtener información sobre el funcionamiento o reparación de este
producto, visite www.campbellhausfeld.com.
INSTRUCCIONES GENERALES DE SEGURIDAD
Este manual contiene información que es muy importante que conozca y
comprenda. Esta información se proporciona para su SEGURIDAD y para
EVITAR PROBLEMAS CON EL EQUIPO. Para ayudarle a reconocer esta
información, observe los símbolos que se encuentran en la página Sp7. Los
símbolos de seguridad presentes en este manual sirven para alertarle sobre
riesgos de seguridad y precauciones importantes.
Los símbolos de PELIGRO, ADVERTENCIA, PRECAUCIÓN y AVISO
y las instrucciones en este manual no pueden posiblemente
cubrir todas las condiciones y situaciones posibles que puedan
presentarse. El usuario debe entender que las precauciones y el
sentido común son factores que no pueden incorporarse en este
producto: es el usuario mismo quíen debe contribuirlos.
Con cualquier pieza de equipo, nueva o usada, ¡la parte más importante de la
operación es la SEGURIDAD!
Campbell Hausfeld lo anima a que se familiarice con su nuevo equipo y
enfatiza además una operación segura.
Las siguientes páginas de este manual son un resumen de los principales
aspectos de seguridad relacionados con esta unidad. Asegúrese de leerlos y
comprenderlos por completo antes de usar el equipo.
Los símbolos utilizados en las secciones de operación y mantenimiento de
este manual dirigen su atención a los procedimientos de seguridad.
MANUAL
Importantes instrucciones de seguridad
Sírvase leer y guardar estas instrucciones.Lea con cuidado antes de tratar de
armar, instalar, manejar o darle servicio al producto descrito en este manual.
Protéjase usted. y a los demás observando todas las reglas de seguridad.
El no seguir las instrucciones podría resultar en heridas y/o daños a su
propiedad. Guarde este manual como referencia.
Este manual contiene información sobre seguridad, funcionamiento y
mantenimiento. Si tiene preguntas, por favor visite www.campbellhausfeld.
com para asistencia al cliente.
Proposición 65 de California
• Este producto, o su cordón eléctrico, puede contener productos químicos
conocidos por el estado de California como causantes de cáncer y
defectos de nacimiento u otros daños reproductivos. Lave sus manos
después de usar.
Sp5
Page 32

INSTRUCCIONES GENERALES DE SEGURIDAD (CONTINUACIÓN)
Generales seguridad
Este producto forma parte de un sistema de alta presión y siempre deben
acatarse las siguientes medidas de seguridad al igual que otras normas de
seguridad existentes.
1. Lea cuidadosamente todos los manuales incluidos con el producto.
MANUAL
Familiarícese completamente con los controles y el uso debido del
equipo.
2. Sólo aquellas personas completamente familiarizadas con estas normas
de funcionamiento seguro deben utilizar la herramienta neumática.
No exceda la presión máxima de funcionamiento
de la herramienta neumática (6,21 bar). Ésto
reduciría la duración de la herramienta.
3. No exceda las presiones especificadas para ninguno de los componentes
del sistema.
4. Desconecte la herramienta neumática del suministro de aire antes de
cambiar la herramienta o los accesorios, darle servicio y al no utilizarla.
Se deben utilizar lentes durante el funcionamiento.
5. No utilice ropas holgadas, bufandas, corbatas o joyas para operar
herramientas neumáticas. La ropas holgadas o joyas podrían atascarse en
las piezas en movimiento y ocasionarle lesiones graves.
6. No oprima el gatillo al conectar la manguera de suministro de aire.
7. Siempre utilice accesorios diseñados para herramientas neumáticas. No
utilice accesorios dañados o desgastados.
8. Nunca oprima el gatillo cuando la herramienta no esté aplicada a la
pieza de trabajo. Los accesorios deben estar firmente conectados. Los
accesorios flojos pueden ocasionarle lesiones graves.
9. Proteja las líneas de aire contra daños o perforaciones.
10. Nunca apunte la herramienta neumática hacia usted mismo u otras
personas. Ésto podría ocasionar lesiones graves.
11. Antes de cada uso, cerciórese de que la manguera de aire no esté
dañada o desgastada. Igualmente, cerciórese de que todas las
conexiones estén bien apretadas.
Libere toda la presión del sistema antes de tratar de
instalar, darle servicio, reubicar o realizar cualquier
mantenimiento.
12. Mantenga las tuercas, pernos y tornillos bien apretados y cerciórese de
que el equipo esté en buenas condiciones de funcionamiento.
13. No coloque las manos cerca o debajo de piezas en movimiento.
14. Siempre apriete bien el trabajo.
La exposición excesiva a la vibración, trabajar en
posiciones incómodas y los movimientos de trabajo
repetitivos pueden causar lesiones a las manos y brazos. Deje de usar
cualquier herramienta si aparece incomodidad, cosquilleo o dolor y consulte
a un médico.
Sp6
Page 33

Nunca cargue una herramienta neumática por la
manguera, ni hale la manguera para mover la
herramienta o el compresor. Mantenga las mangueras alejadas de fuentes de
calor, aceite u objetos afilados. Reemplace las mangueras dañadas, débiles o
desgastadas.
Glosario de seguridad
Este manual contiene información que es muy importante que se conozca
y comprenda. Esta información se proporciona con fines de SEGURIDAD y
para EVITAR PROBLEMAS CON EL EQUIPO. Para ayudar a reconocer esta
información, observe los siguientes símbolos.
Peligro indica una situación inminentemente
peligrosa, que si no se evita, dará como resultado la
muerte o lesiones graves.
Advertencia indica una situación potencialmente
peligrosa, que si no se evita, PODRÍA ocasionar la
muerte o lesiones graves.
Precaución indica una situación potencialmente
peligrosa, que si no se evita, PUEDE dar como
resultado lesiones leves o moderadas.
Aviso indica una información importante, que de no
seguirla, le podría ocasionar daños al equipo.
IMPORTANTE o NOTA: información que requiere atención especial.
Símbolos de seguridad
Los siguientes símbolos de seguridad aparecen a lo largo de este manual para
advertirle de importantes peligros y precauciones de seguridad.
MANUAL
Primero
lea el manual
Use protectores
para la vista y
los oídos
Riesgo de
presión
GUARDE ESTAS INSTRUCCIONES –
NO LAS DESECHE
Sp7
Page 34

GUIA DE IDENTIFICACION DE PROBLEMAS
SÍNTOMA CAUSA(S) POSIBLE(S) MEDIDA CORRECTIVA
La herramienta no
funciona
La herramienta
funciona pero no
emite lubricante
La grasa deja de fluir
después de funcionar
al principio
1. La herramienta no tiene
grasa
2. Baja presión de aire 2. Ajuste el regulador del compresor
3. Fugas en la manguera de
aire
1. La grasa está fria y espesa 1. Si está trabajando a la intemperie,
2. El resorte está comprimido 2. Hale el mango del cilindro hacia atrás
3. Se terminó el lubricante en
el tubo de lubricante
4. Hay vacíos de aire en el tubo
de lubricante
Aire en la manguera de grasa o
en el tubo contenedor
1. Lubrique la herramienta según las
instrucciones de lubricación en este
manual.
según sea necesario.
3. Apriete y selle las conexiones de la
manguera, si consigue fugas.
lleve la pistola adentro de su casa
o taller y permita que la pistola
se caliente hasta alcanzar una
temperatura de 22 °C a 29 °C.
Coloque la pistola boca arriba para
evitar que se formen vacíos de aire
en el medio del cartucho.
y suéltelo rápidamente. Cerciórese de
que el seguro no esté puesto.
3. Llene el tube de lubricante.
4. Elimine los vacíos de aire
(Ver más adelante).
1. Elimine las burbujas de aire de la
pistola lubricante:
a. Desatornille parcialmente la
pistola lubricante del tubo
contenedor (aproximadamente
1 a 1-1/2 vueltas).
b. Jale la manija del émbolo y
libérela rápidamente oprimiendo
la lengüeta de liberación de la
manija. Repita varias veces.
v. Suelte la lengüeta de liberación
de la manija y vuelva a apretar
la pistola lubricante y el tubo
contenedor.
d. Empuje la válvula de venteo de
aire varias veces para eliminar
las burbujas que estén cerca
de la parte superior del tubo
contenedor.
e. Cuando se haya eliminado
apropiadamente el aire del
tubo contenedor de la pistola
lubricante, empezará a fluir grasa
de la válvula de venteo de aire.
2. Cebe la pistola lubricante colocando
grasa en el puerto de entrada de
grasa de la pistola (esta es la sección
de la pistola en la que se enrosca el
tubo contenedor).
Sp8
Page 35

NOTAS:
Sp9Sp9
Page 36

Recordatorio: ¡Guarde su comprobante de compra con fecha para fines de la garantía! Adjúntela a este
manual o archívela en lugar seguro.
GARANTÍA LIMITADA
1 DURACION: A partir de la fecha de compra por el comprador original tal como se especifica a
continuación: Un (1) año.
2. QUIEN OTORGA ESTA GARANTIA (EL GARANTE: Campbell Hausfeld a Marmon/Berkshire Hathaway
Company, 100 Production Drive, Harrison, Ohio 45030. Visite www.campbellhausfeld.com
3. QUIEN RECIBE ESTA GARANTIA (EL COMPRADOR): El comprador original (que no sea un revendedor)
del producto Campbell Hausfeld.
4. PRODUCTOS CUBIERTOS POR ESTA GARANTIA: Cualquier clavadora, grapadora, herramienta
neumática, pistola pulverizadora, inflador o accesorio neumático suministrado o fabricado por el
Garante.
5. COBERTURA DE LA GARANTIA: Los defectos substanciales de material y fabricación que ocurran
dentro del período de validez de la garantía.
6. LO QUE NO ESTA CUBIERTO POR ESTA GARANTIA:
A. Las garantías implícitas, incluyendo aquellas de comercialidad E IDONEIDAD PARA FINES
PARTICULARES, ESTAN LIMITADOS A LO ESPECIFICADO EN EL PARRAFO DE DURACION. Si este
producto es empleado para uso comercial, industrial o para renta, la garantía será aplicable
por noventa (90) días a partir de la fecha de compra. En algunos estados no se permiten
limitaciones a la duración de las garantías implícitas, por lo tanto, en tales casos esta limitación
no es aplicable.
B. CUALQUIER PERDIDA DAÑO INCIDENTAL, INDIRECTO O CONSECUENTE QUE PUEDA RESULTAR
DE UN DEFECTO, FALLA O MALFUNCIONAMIENTO DEL PRODUCTO CAMPBELL HAUSFELD. En
algunos estados no se permite la exclusión o limitación de daños incidentales o consecuentes,
por lo tanto, en tales casos esta limitación o exclusión no es aplicable
C. Cualquier falla que resulte de un accidente, abuso, negligencia o incumplimiento de las
instrucciones de funcionamiento y uso indicadas en el (los) manual(es) que se adjunta(n) al
producto. Dichos accidentes, abusos por parte del comprador, o falta de operar el producto
siguiendo las instrucciones del manual de instrucciones suministrado también debe incluir
la desconexión o modificación de los instrumentos de seguridad. Si dichos instrumentos de
seguridad son desconectados, la garantía quedaría cancelada.
D. Los ajustes normales explicados en el(los) manual(es) suministrado(s) con el producto.
E. Artículos o servicios normalmente requeridos para el mantenimiento del producto, tales
como: anillos en O, resortes, amortiguadores, defensas, hojas de impulsor, fusibles, baterías,
empaques, almohadillas o sellos, boquillas de fluído, agujas, boquillas para rociar arena,
lubricantes, mangueras de material, elementos filtrantes, álabes de motores, abrasivos,
hojillas, discos para cortar, cinceles, retenes para cinceles, cortadores, collarines, mandriles,
mordazas para remachadoras, brocas para desarmadores, almohadillas para lijar, soportes de
almohadillas, mecanismo de impacto o cualquier otro artículo desgastable que no se haya
enumerado específicamente. Estos artículos sólo estarán cubiertos bajo esta garantía por
noventa (90) días a partir de la fecha de compra original. Los artículos subrayados sólo están
garantizados por defectos de material o fabricación.
7. RESPONSABILIDADES DEL GARANTE BAJO ESTA GARANTIA: Reparar o reemplazar, como lo decida el
Garante, los productos o componentes que estén defectuosos, se hayan dañado o hayan dejado de
funcionar adecuadamente, durante el período de validez de la garantía
8. RESPONSABILIDADES DEL COMPRADOR BAJO ESTA GARANTIA:
A. Suministrar prueba fechada de compra y la historia de mantenimiento del producto.
B. Entregar o enviar el producto o componente Campbell Hausfeld al Centro de Servicio
autorizado Campbell Hausfeld más cercano. Los gastos de flete, de haberlos, deben ser pagados
por el comprador.
C. Seguir las instrucciones sobre operación y mantenimiento del producto, tal como se indica(n) en
el (los) manual(es) del propietario
9. CUANDO EFECTUARA EL GARANTE LA REPARACION O REEMPLAZO CUBIERTO BAJO ESTA
GARANTIA: La reparación o reemplazo dependerá del flujo normal de trabajo del centro de servicio y
de la disponibilidad de repuestos.
Esta garantía limitada es válida sólo en los EE.UU., Canadá y México y otorga derechos legales
específicos. Usted también puede tener otros derechos que varían de un Estado a otro. o de un país a
otro.
Sp10
 Loading...