

Page 1
SERIE Z / Z SERIES / SÉRIE Z / BAUREIHE Z / SERIE Z
Documentazione
Tecnica
CANCELLI AUTOMATICI
QUADRO COMANDO
ELECTRIC
ARMOIRE
SCHALTTAFEL
CUADRO
CONTROL PANEL
DE COMMANDE
DE MANDO
ZL14
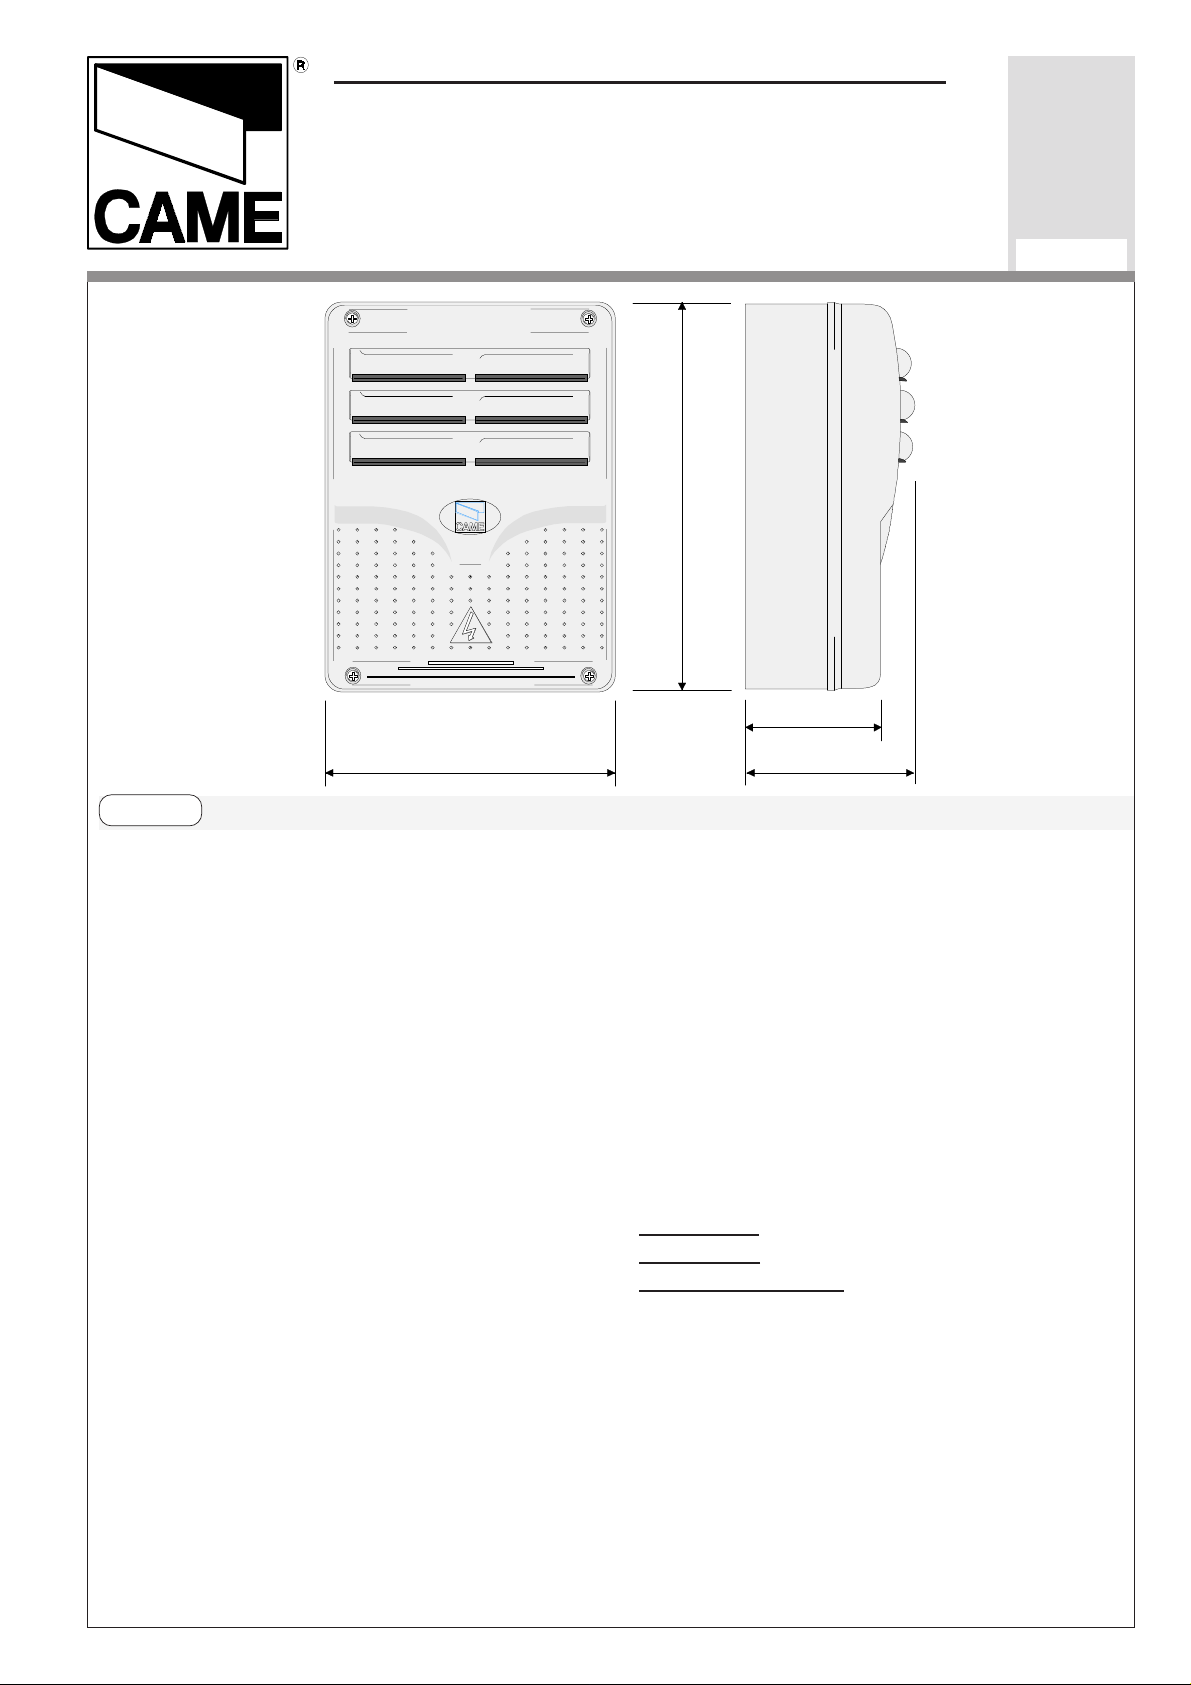
320 mm
M20
rev. 2.1
11/2000
©
CAME
CANCELLI
AUTOMATICI
319M20
240 mm
ITALIANOITALIANO
ITALIANO
ITALIANOITALIANO
CARA TTERISTICHE GENERALI
Descrizione quadro comando
Quadro elettrico per motoriduttori a 24V
(d.c.) con alimentazione 230V monofase;
frequenza 50÷60 Hz.
Adatto al comando di motoriduttori serie
ATI/FROG/FERNI oppure FLEX, impianti a
uno o due motoriduttori con Encoder o
senza.
Progettato e costruito interamente dalla
CAME CANCELLI AUTOMATICI S.p.A.,
risponde alle vigenti norme di sicurezza
UNI 8612, con grado di protezione IP 54.
Scatola in ABS, dotata di presa per il riciclo
d'aria. Garantito 12 mesi salvo
manomissioni.
Il quadro comando va alimentato sui
morsetti L1 ed L2, protetto in ingresso con
fusibili di linea da 1.6A e varistore.
I dispositivi di comando
sono a bassa tensione e
protetti con fusibile da
1.6A.
La potenza complessiva
degli accessori (24V) non
deve superare i 40W.
120 mm
145 mm
Sicurezza
Di base, il quadro include il lettore
amperometrico che garantisce l'arresto
durante l'apertura o la riapertura in fase di
chiusura. La sua sensibilità di intervento è
regolabile, mentre i valori amperometrici di
riferimento, definiti dall'esecuzione di un
autotest (vedi dip-switch 10), possono
essere, se necessario, aumentati del 20%
oppure diminuiti (ma solo per il rallentamento) del 15%.
Le fotocellule possono essere collegate e
predisposte per:
Riapertura in fase di chiusura;
-
Richiusura in fase di apertura;
Stop temporaneo (arresto del movimento
-
in caso di ostacolo e ripresa ad ostacolo
rimosso);
Page 2

- Stop parziale (arresto del cancello se in
movimento con conseguente
predisposizione alla chiusura automatica);
Stop totale (arresta il cancello escluden-
do l'eventuale ciclo di chiusura automatica;
per riprendere il movimento bisogna agire
sulla pulsantiera o sul radiocomando);
Accessori collegabili
- Lampada di segnalazione di "cancello
aperto";
- Lampada con funzione di servizio (120"
tempo fisso) oppure con funzione di ciclo
(durata completa ciclo apertura/chiusura);
- Lampeggiatore di movimento;
- Elettroserratura;
- Scheda LB18 per alimentazione mediante
batteria che, in caso di mancanza di
energia elettrica, interviene automaticamente; al ripristino della tensione di linea,
provvede alla ricarica delle batterie stesse;
- Ricevitore radio ad innesto.
-apre-stop-chiude-stop per pulsante e
trasmettitore;
-solo apertura per trasmettitore.
Regolazioni
- Trimmer VEL = Velocità di marcia : min/
max.;
- Trimmer RALL = Velocità di rallentamento
: min/max.;
- Trimmer SENS = Sensibilità
amperometrica : min/max.;
- Trimmer TCA = Tempo chiusura automatica : da 1 a 180";
- Trimmer TL = Tempo lavoro : da 10 a
110";
- Trimmer AP PARZ. = Apertura parziale :
da 1 a 26";
- Trimmer TR2M = Ritardo chiusura Motore
2 : da 1.5 a 17".
Altre funzioni selezionabili
Chiusura automatica. Il temporizzatore di
chiusura automatica si autoalimenta a
finecorsa in apertura. Il tempo prefissato
regolabile, é comunque subordinato
all'intervento di eventuali accessori di
sicurezza e si esclude dopo un intervento di
«stop» totale o in mancanza di energia
elettrica;
Colpo d’ariete. Ad ogni comando di aper-
tura, le ante premono in battuta di chiusura
per un secondo, facilitando l’operazione di
sgancio dell’elettroserratura collegata sui
morsetti 11-ES.
Rilevazione di presenza ostacolo. A
motore fermo (cancello chiuso, aperto o
dopo un comando di stop totale), impedisce qualsiasi movimento se i dispositivi di
sicurezza (es. fotocellule) rilevano un
ostacolo;
Apertura pedonale, apertura del solo
motore M2, totale o parziale;
Funzione a "uomo presente". Funziona-
mento del cancello mantenendo premuto il
pulsante;
Prelampeggio di 5 secondi sia in apertura
sia in chiusura dell'anta;
Tipo di comando:
-
-apre-chiude-inversione per pulsante e
trasmettitore;
Attenzione! Prima di intervenire
all’interno dell’apparecchiatura, togliere
la tensione di linea.
-2-
Page 3

ENGLISHENGLISH
ENGLISH
ENGLISHENGLISH
GENERAL CHARACTERISTICS
Description of control panel
Control panel for 24 VDC gear motors,
powered by 230 VAC at 50-60 Hz (singlephase).
Designed to control ATI/FROG/FERNI or
FLEX gear motors, with or without encoder,
in systems employing 1 or 2 gear motors.
Designed and built entirely by CAME to
meet UNI 8612 safety standards at an IP
54 level of protection. Housing in ABS is
equipped with vents to provide internal air
circulation. Guaranteed 12 months, unless
tampered with.
This control panel is powered by 230V AC
across terminals L1 and L2, and is
protected by a 1.6 A fuse on the main
power line as well as by a variator. The
total power consumption of 24 V
accessories (which are protected by a 1.6
A fuse) must not exceed 40 W.
Safety
The basic safety system consists of an
amperometric detector on the control
panel. This system immediately stops gate
movement if an obstacle is detected during
the opening cycle, and re-opens the gate if
an obstacle is detected during closing. The
sensitivity of this detector is adjustable:
the amperometric reference values, which
are determined during the self-test cycle
(see dip switch 10), can be increased by
20% or decreased (slowdown cycle, only)
by 15% if necessary.
Photocells can be connected to obtain:
-
Re-opening during the closing cycle;
-
Re-closing during the opening cycle;
-
Temporary stop (shutdown of movement if
obstacle is detected, with resumption of
movement when obstacle is removed);
-
Partial stop (shutdown of moving gate,
with activation of an automatic closing
cycle);
-
Total stop (shutdown of gate movement
without automatic closing; a pushbutton or
radio remote control must be actuated to
resume movement).
Accessories which can be connected
- “Gate open” signal light;
- Light with courtesy function (lights up for
a fixed period of 120") or cycle function
(lights up during the entire opening/closing
cycle);
- Flashing signal light when gate is in
motion;
- Electric lock;
- LB18 circuit card for emergency battery,
which is automatically connected in case of
power failure; battery is recharged when
line power is restored;
- Plug-in radio receiver.
Other functions
-
Automatic closing: The automatic closing
timer is automatically activated at the end
of the opening cycle. The preset,
adjustable automatic closing time is
automatically interrupted by the activation
of any safety system, and is deactivated
after a STOP command or in case of power
failure;
- A
“hammer movement” can be applied to
the gate to facilitate release of the electric
lock;
-
Detection of obstacle when motor is at
the end of its travel (gate completely open
or closed);
-
Opening to allow pedestrian travel
(opening performed by motor M2, only).
Can be total or partial;
- “
Operator present” function. Gate
operates only when the pushbutton is held
down;
-
Flashing light activated before opening
and closing cycle begins;
-
Type of command:
-open-close-reverse by button and transmitter;
-open-stop-close-stop by button and transmitter;
-open only by transmitter.
Adjustments
- Trimmer VEL = Operating speed: min/
max;
- Trimmer RALL = Slowdown speed: min/
max;
- Trimmer SENS = Sensitivity of
amperometric safety system: min/max;
- Trimmer TCA = Automatic closing time: 1"
to 180";
- Trimmer TL = Operating time: 10" to 110";
- Trimmer AP PARZ. = Par tial opening time:
1" to 26";
- Trimmer TR2M = Delay on closing cycle motor 2: 1.5" to 17";
Important! Disconnect the unit from
the main power lines before carrying out
any operation inside the unit.
-3-
Page 4

FRANÇAISFRANÇAIS
FRANÇAIS
FRANÇAISFRANÇAIS
CARACTÉRISTIQUES GÉNÉRALES
Description armoire de commande
Armoire électrique pour motoréducteurs en
24V c.c. avec alimentation 230V
monophasée; fréquence 50÷60 Hz.
Adaptée à commander les motoréducteurs
de la série ATI/FROG/FERNI ou FLEX,
avec ou sans Encodeur et dans des
installations prévoyant 1 ou 2
motoréducteurs.
L’armoire est entièrement conçue et
fabriquée par CAME S.p.A. conformément
aux normes de sécurité en vigueur NFP
25-362 avec un degré de protection IP 54.
Boîtier en ABS munie de prise de
circulation d’air. Garantie 12 mois sauf en
cas d’endommagement.
L’armoire de commande doit être alimentée
avec une tension de 230V sur les bornes
L1 et L2 et elle est protégée en entrée par
un fusible de ligne de 1,6A et par une
varistance. La puissance totale des
accessoires en 24V, protégés par un
fusible de 1,6A, ne doit pas dépasser 40W.
Sécurité
L’armoire prévoit un lecteur
ampèremétrique de sér ie qui garantit l’arrêt
pendant l’ouverture ou la réouver ture en
phase de fermeture. Sa sensibilité
d’intervention est réglable, par contre ses
valeurs ampèremétriques de référence
sont établies en exécutant un test
automatique (cf. dip-switch 10). Au besoin,
ces valeurs peuvent être augmentées de
20% ou diminuées (uniquement pour le
ralentissement) de 15%.
Il est possible de brancher des
photocellules et de les programmer pour :
Réouverture en phase de fermeture;
-
- Refermeture en phase d’ouverture;
- Stop temporaire (arrêt du mouvement en
cas d’obstacle et continuation après que
l’obstacle a été enlevé);
- Stop par tiel (arrêt du por tail, et fer meture
automatique);
- Stop total (arrêt du portail et désactivation
d’un éventuel cycle de fermeture
automatique; pour activer de nouveau le
mouvement, il faut agir sur les boutonspoussoirs ou sur la radiocommande).
Accessoires pouvant être branchés
- Lampe de signalisation de “portail
ouvert”;
- Lampe avec fonction de ser vice (temps
fixe 120") ou avec fonction de cycle (durée
complète du cycle d’ouverture/fermeture);
- Clignotant de mouvement;
- Serrure électrique;
- Carte pour l’alimentation par batter ie
intervenant automatiquement en cas
d’absence d’énergie électrique, au
rétablissement de la tension de ligne, la
carte procède au rechargement de la
batterie;
- Récepteur radio embrochable.
Autres fonctions
Fermeture automatique. Le temporisateur
de fermeture automatique est autoalimenté
à la fin du temps de la course en ouverture.
Le temps réglable est programmé,
cependant, il est subordonné à l’intervention d’éventuels accessoires de
sécurité et il est exclu après une
intervention de “stop” ou en cas de
coupure de courant;
- Coup de bélier. Facilite le déblocage de la
serrure électrique;
- Détection d’obstacle avec moteur en fin
de course (portail complètement ouver t ou
fermé);
- Ouverture pour piétons (ouver ture
effectuée seulement par le moteur M2).
Elle peut être totale ou partielle;
- Fonction “homme mort”. Fonctionnement
du portail en maintenant appuyé le boutonpoussoir;
- Préclignotement en ouverture et en
fermeture;
-Type de commande:
-ouvre-ferme-inversion pour bouton et
émetteur;
-ouvre-stop-ferme-stop pour bouton et
émetteur;
-seulement ouverture pour émetteur.
Réglages
- Trimmer VEL = Vitesse de mouvement:
min/max;
- Trimmer RALL = Vitesse de
ralentissement: min/max;
- Trimmer SENS = Sensibilité
ampèremétrique: min/max;
- Trimmer T.C.A. = T emps de fermeture
automatique: de 1 à 180";
- Trimmer T.L. = Temps de fonctionnement:
de 1 à 110";
- Trimmer AP. PARZ. = Ouverture partielle:
de 1 à 26";
- Trimmer T.R. 2M = Retard fermeture
moteur 2: de 1,5 à 17".
Attention! Avant d’intervenir à
l’intérieur de l’appareillage, couper la
tension de ligne.
-4-
Page 5

DEUTSCHDEUTSCH
DEUTSCH
DEUTSCHDEUTSCH
ALLGEMEINE MERKMALE
Beschreibung des Steuergeräts
Schalttafel für 24-V-GleichstromGetriebemotoren mit 230-VEinphasenstromversorgung; Frequenz:
5060 Hz.
Zur Steuerung von Getriebemotoren der
Baureihen ATI/FROG/FERNI bzw. FLEX,
mit oder ohne Encoder, mit Anlagen mit 1
oder 2 Getriebemotoren.
Vollkommen von der CAME S.p.A. den
geltenden Sicherheitsnormen (UNI 8612)
entsprechend entwickelt und hergestellt.
Schutzgrad: IP 54. ABS-Gehäuse mit
Luftklappe. 12 Monate Garantie,
vorbehaltlich unsachgemäßer Handhabung
und Montage.
Die Schalttafel wird mit einer Spannung
von 230V über die Klemmen L1 und L2
gespeist und ist am Eingang mit einer 1,6A-Hauptsicherung und einem Varistor
geschützt. Die Gesamtleistung des durch
eine 1,6-A-Sicherung geschützten 24-VZubehörs darf 40W nicht überschreiten.
Sicherheitsvorrichtungen
Zur Grundausstattung des Steuergeräts
gehört ein amperemetrischer Sensor, der
den Tor-Stillstand beim Öffnen bzw. die
Wiederöffnung beim Schließen
gewährleistet.
Die Ansprechempfindlichkeit dieser
Vorr ichtung ist einstellbar, während die
mittels Auto-Test festgelegten
amperemetrischen Bezugswerte (siehe
Dip-Switch 10), falls erforderlich, um 20%
erhöht bzw. um 15% gesenkt (aber nur
während der Laufverlangsamung) werden
können.
Die Lichtschranken können für folgende
Funktionen angeschlossen bzw. vorbereitet
werden:
Wiederöffnen beim Schließen;
-
- Wiederschließen beim Öffnen;
- vorübergehender Stop
(Laufunterbrechung und Stillstand des
Tores bei Auftreffen auf Hindernisse und
Wiederfortsetzung des Torlaufs nach
Beseitigung des Hindernisses);
- Teilstop (Stillstand des Tores während des
Torlaufs, mit darauffolgender automatischer
Torschließung);
- Totalstop (sofortiger Stillstand des Tores
mit Ausschluß eventueller
Schließautomatik: For tsetzung des Torlaufs
über Drucktaster- bzw. Funksteuerung);
Anschließbares Zubehör
- Anzeigeleuchte für “Tor off en”;
- Beleuchtung (120" feste Zeit) bzw. mit
Zyklus-Funktion (während der gesamten
Dauer des Öffnungs- und
Schließungszyklus eingeschaltet)
- Blinkleuchte “Tor in Bewegung”;
- Elektroschloß;
- Steckplatine für Stromversorgung über
Notbatterie, die sich bei Stromausfall
automatisch zuschaltet und die Batterie bei
erneuter Netz-Stromversorgung wieder
auflädt;
- Steck-Funkempfänger.
Andere funktionen
-Schließautomatik. Der SchließautomatikZeischalter speist sich beim Öffnen am
Ende der Torlaufzeit selbst. Die
voreingestellte Zeit ist auf jeden Fall immer
dem Eingriff eventueller Sicherheitsvorrichtungen untergeordnet und schließt sich
nach einem “Stop”-Eingriff bzw. bei
Stromausfall selbst aus;
- “Widderstoß”. Hilft bei Entr iegelung des
Elektroschlosses;
- Hinderniserfassung mit Motor am
Endanschlag (Tor ganz offen bzw.
geschlossen);
- Fußgänger-Durchgang (nur Motor 2).
Total- oder Teilöffnung;
- Funktion “Bedienung vom Steuerpult”.
Torbetrieb durch Druck-tasterbetätigung;
- V orb link en beim Öffnen und Schließen;
-Befehlsarten:
-Öffnen-Schließen-Inversion für Druckknopf und Sender;
-Öffnen-Stop-Schließen-Stop für Druckknopf und Sender;
-nur Öffnen für Sender.
Einstellungen
- Trimmer VEL = Einstellregler für die
Laufgeschwindigkeit: min/max;
- Trimmer RALL = Einstellregler für die
Soft-Stop Geschwindigkeit: min/ max;
- Trimmer SENS = Einstellregler für die
Erhöhung der gelernten Kraftabschaltung
bei Hindernisauflauf: min/max;
- Trimmer TCA = Einstellregler für die
Autozulaufzeit: von 1 bis 180";
- Trimmer TL = Einstellregler für die
Gesamt Laufzeit als übergeordnete
Sicherheit: von 10 bis 110";
- Trimmer AP PARZ. = Einstellregler für die
Zeit einer Teilöffnung: von 1 bis 26";
- Trimmer TR2M = Einstellregler für die
Schliessverzögerung des 2.Motor: von 1,5
bis 17".
Achtung! vor Eingriff im Innern
des Gerätes den Netzstecken ziehen.
-5-
Page 6

ESPANOLESPANOL
ESPANOL
ESPANOLESPANOL
CARACTERISTICAS GENERALES
Beschreibung des Steuergeräts
Cuadro eléctrico para motorreductores a
24V d.c. con alimentación 230V monofase:
frecuencia 50÷60 Hz.
Adecuado para el mando de
motorreductores serie ATI/FROG/FERNI o
FLEX, con Encoder o sin, con
instalaciones a 1 ó 2 motorreductores.
Diseñado y fabricado enteramente por
CAME S.p.A., cumple con las normas de
seguridad vigentes UNI 8612, con grado
de protección IP 54. Caja de ABS, dotada
de toma para la recirculación de aire.
Garantizado 12 meses salvo
manipulaciones.
El cuadro de mando se alimenta con una
tensión de 230V en los bornes L1 y L2 y
está protegido en entrada con fusible de
línea de 1,6A y varistor. La potencia total
de los accesorios a 24V, protegidos por
fusible a 1,6A, no debe superar los 40W.
Sicherheitsvorrichtungen
En su configuración base el cuadro incluye
el lector amperométrico que garantiza la
parada en la fase de apertura o la
reapertura en la fase de cierre. Su
sensibilidad de intervención es regulable,
mientras que los valores amperométricos
de referencia, definidos por la realización
de un autotest (ver dip-switch 10), pueden
ser, si fuera necesario, aumentados del
20% o bien disminuidos (pero sólo para el
ralentamiento) del 15%.
Las fotocélulas pueden estar conectadas y
predispuestas para:
- Reapertura en la fase de cierre;
- Recierre en la fase de apertura;
- Stop temporáneo (parada del movimiento
en caso de obstáculo y reactivación una
vez eliminado el obstáculo);
- Stop parcial (parada de la puerta si se
encuentra en movimiento con la
consiguiente predisposición al cierre
automático);
- Stop total (parada de la puerta
excluyendo el posible ciclo de cierre
automático; para reactivar el movimiento
es preciso actuar en el teclado o en el
mando a distancia).
Anschließbares Zubehör
- Lámpara de señal de “puerta abier ta”;
- Lámpara con función de servicio (120”
tiempo fijo) o bien con función de ciclo
(duración completa ciclo apertura/cierre);
- Lámpara intermitente de movimiento;
- Cerradura eléctrica;
- Tarjeta para la alimentación mediante
batería que, en caso de falta de energía
eléctrica, inter viene automáticamente; una
vez conectada de nuevo la tensión de
línea, se ocupa de cargar la batería misma;
- Radioreceptor a encastre.
Andere funktionen
-
Cierre automático. El temporizador de
cierre automático se autoalimenta en finde-tiempo carrera en fase de apertura. El
tiempo prefijado regulable, sin embargo,
está subordinado a la intervención de
posibles accesorios de seguridad y se
excluye después de una intervención de
parada o en caso de falta de energía
eléctrica;
- Golpe de ariete. Ayuda el desbloqueo de
la cerradura eléctrica;
- Detección del obstáculo con motor a fin
de carrera (puerta completamente abier ta
o cerrada);
- Aper tura peatonal (aper tura del solo
motor M2). Puede ser total o parcial);
- Función a “hombre presente”.
Funcionamiento de la puerta manteniendo
pulsada la tecla;
- Preintermitencia en fase de aper tura y
cierre;
-Befehlsarten:
-Öffnen-Schließen-Inversion für Druckknopf
und Sender;
-Öffnen-Stop-Schließen-Stop für Druckknopf und Sender;
-nur Öffnen für Sender.
Einstellungen
- Trimer VEL = V elocidad de marcha: mín/
máx;
- Trimer RALL = Velocidad de
ralentamiento: mín/máx;
- Trimer SENS = Sensibilidad
amperométrica: mín/máx;
- Trimer TCA = Tiempo cierre automático:
de 1 a 180”;
- Trimer TL = Tiempo trabajo: de 10 a 110”;
- Trimer AP PARZ. = Apertura parcial: de 1
a 26”;
- Trimer TR2M = Retraso cierre motor 2: de
1,5 a 17”.
¡Atención! Antes de actuar dentro
del aparato, quitar la tensión de línea.
-6-
Page 7
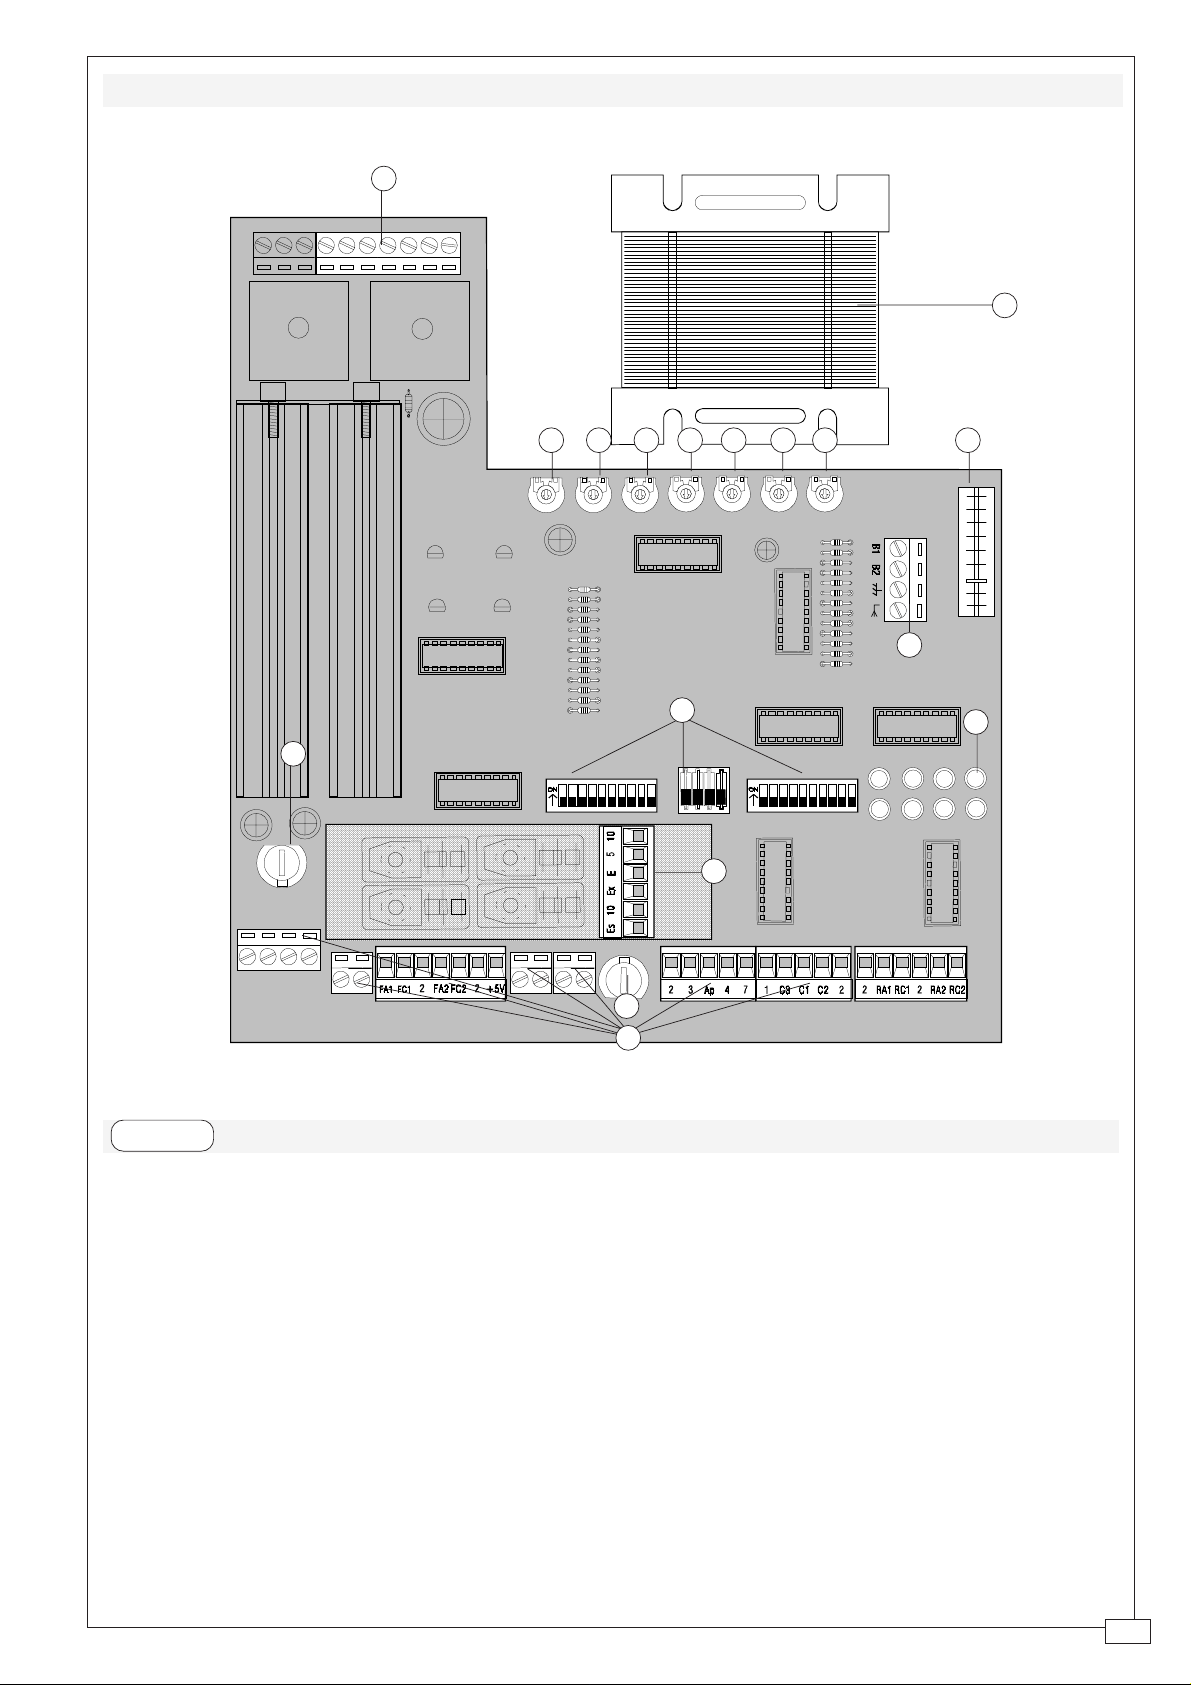
SCHEDA B ASE - MOTHERBOARD - CARTE BASE - GRUNDPLATINE - TARJETA BASE
16
F
E H G D C I
1
IN TRASF.
10
4
356
78
92
15
11
123
12345678910 11 12 13 14 15 16 17 18 19 20
4
12
13
L2L1
N1M1
1110N2M2
14
ITALIANOITALIANO
ITALIANO
ITALIANOITALIANO
1 Trasformatore
PRINCIPALI COMPONENTIPRINCIPALI COMPONENTI
PRINCIPALI COMPONENTI
PRINCIPALI COMPONENTIPRINCIPALI COMPONENTI
2 Regolazione velocità di marcia
3 Regolazione durante il rallentamento
4 Regolazione sensibilità amperometrica
5 Regolazione chiusura automatica
6 Regolazione tempo lavoro
7 Regolazione apertura parziale
8 Regolazione ritardo chiusura 2° motore
15
9 Innesto per ricevitore radio
10 Fusibile di linea 1.6A
11 Dip-switch "selezione funzioni"
12 LED di segnalazione "tensione presente"
13 Morsettiera per lampade
14 Fusibile accessori 1,6A
15 Morsettiere per collegamenti
16 Morsettiera per collegamento scheda LB18
-7-
Page 8

ENGLISHENGLISH
ENGLISH
ENGLISHENGLISH
MAIN COMPONENTSMAIN COMPONENTS
MAIN COMPONENTS
MAIN COMPONENTSMAIN COMPONENTS
FRANÇAISFRANÇAIS
FRANÇAIS
FRANÇAISFRANÇAIS
PRINCIPAUX COMPOSANTSPRINCIPAUX COMPOSANTS
PRINCIPAUX COMPOSANTS
PRINCIPAUX COMPOSANTSPRINCIPAUX COMPOSANTS
1 Transformer
2 Adjustment of operating speed
3 Adjustment of slowdown speed
4 Adjustment of amperometric sensitivity
5 Adjustment of automatic closing
6 Adjustment of operating time
7 Adjustment of partial opening
8 Adjustment of delayed closing-motor 2
9 Plug-in radio receiver
10 Line fuse, 1.6A
11 "Function selection" dip switch
12 LED pilot light
13 Terminal board for lamps
14 Fuse on accessory power line, 1.6A
15 Terminal boards for performing
connections
16 Terminal board for connection
motherboard LB18
1 Transformateur
2 Réglage vitesse de mouvement
3 Réglage pendant le ralentissement
4 Réglage sensibilité ampéremétrique
5 Réglage fermeture automatique
6 Réglage temps de fonctionnement
7 Réglage ouverture partielle
8 Réglage retard fermeture 2éme moteur
9 Branchement récepteur radio
10 Fusibile de ligne 1.6A
11 Dip-switch "sélection fonctions"
12 LED de signalisation "tension présente"
13 Plaque à bornes pour lampes
14 Fusible accessoires 1,6A
15 Plaque à bornes pour les branchements
16 Plaque à bornes pour branchement
carte LB18
DEUTSCHDEUTSCH
DEUTSCH
DEUTSCHDEUTSCH
1 Transformator
HAUPTKOMPONENTENHAUPTKOMPONENTEN
HAUPTKOMPONENTEN
HAUPTKOMPONENTENHAUPTKOMPONENTEN
2 Einstellung Laufgeschwindigkeit
3 Einstellung amperemetrische
Vorrichtung wahrend der
Laufverlangsamung
4 Einstellung amperemetrische
Ansprechempfindlichkeit
5 Einstellung Schließautomatik
6 Einstellung Laufzeit
7 Einstellung Teilöffnung
8 Einstellung Schließverzögerung Motor 2
9 Steck-Empfänger
10 Hauptsicherung, 1.6A
11 Dip-switch "Funktionswahl"
12 Anzeige-LED "Gerät unter Spannung"
13 Lampen-Anschlußklemmenbrett
14 Zubehörsicherung 1,6A
15 Anschlußklemmenbrett
16 Anschlußklemmenbrett für grundplatine
LB18
COMPONENTES PRINCIPALESCOMPONENTES PRINCIPALES
ESPANOLESPANOL
ESPANOL
ESPANOLESPANOL
1 Trasformador
COMPONENTES PRINCIPALES
COMPONENTES PRINCIPALESCOMPONENTES PRINCIPALES
2 Regulación velocidad de marcha
3 Regulación durante el ralentamiento
4 Regulación sensibilidad amperométrica
5 Regulación cierre automático
6 Regulación tiempo trabajo
7 Regulación apertura parcial
8 Regulación retraso cierre 2°motor
9 Conexión receptor radio
10 Fusible de linea 1.6A
11 Dip-switch "selección funciones"
12 LED de señal "tensión presente"
13 Caja de bornes para lámparas
14 Fusible accesorios 1,6A
15 Cajas de bornes para conexiones
16 Cajas de bornes para tarjeta base LB18
-8-
Page 9

FUNZIONI LED DI CONTROLLO - FUNCTIONS OF CONTROL LED - FONCTIONS LED DE CONTRÔLE -
KONTROLLEUCHTEN-FUNKTION - FUNCIONES LED DE CONTROL
LED STATO SIGNIFICATO
1/2/3 / Non utilizzati
4 acceso Presenza tensione di linea
12 3
20
7
8
4
5
6
5 acceso Contatto di sicurezza aperto
(fotocellule rilevano l'ostacolo oppure
il pulsante stop interviene)
6 acceso Intervento del sensore amperometrico
6 acceso Fase di taratura (vedi Autotest punti
A-B, dip-switch 10/ON)
6 lampeggia Conteggio del tempo in chiusura automatica (dip-switch 4/ON)
7 acceso Taratura dei microinterruttori (vedi Autotest punto C) in corso
6/7/8 accesi Taratura terminata
LED STATE MEANING
1/2/3 / Not used
4 lit Pilot light
5 lit Safety contact is open (photocells have detected an obstacle or stop
button has been pushed)
6 lit Amperometric sensor has tripped
6 lit Calibration procedure (see self-test, points A-B, dip-switch 10 is ON)
6 flashing Indicates operation of automatic closing timer (dip switch 4 is ON)
7 lit Microswitches are being calibrated (see self-test, point C)
6/7/8 lits Indicates end of calibration procedure
LED ÉTAT SIGNIFICATION
1/2/3 / Non utilisés
4 allumé Tension de ligne présente
5 allumé Contact de sécurité ouvert (détection obstacle par les
photocellules ou intervention bouton-poussoir stop)
6 allumé Intervention du capteur ampèremétrique
6 allumé Phase de réglage (voir Test automatique, points A-B, dip-10/ON)
6 clignotant Comptage du temps en fermeture automatique (dip-switch 4/ON)
7 allumé Réglage des microcont. en cours, voir Test automatique, point C
6/7/8 allumés Réglage terminé
LED BETRIEBSZUSTAND SIGNALBEDEUTUNG
1/2/3 / nicht in Funktion
4 leuchtet Netzspannung zugeschaltet
5 leuchtet Sicherheitskontakt offen (Hinderniserfassung durch Lichtschranken
oder Stoptasten-Eingriff)
6 leuchtet Eingriff des amperemetrischen Sensors
6 leuchtet Eichungsvorgangs (siehe Autotest, A-B, Dip-switch 10/ON)
6 blinkt Zeitzählung während automatischer Schließung (Dip-Switch 4/ON)
7 leuchtet Durchführung der Mikroschalter-Eichung (Siehe Autotest, Punkt C)
6/7/8 leuchten Eichungsvorgang beendet
LED ESTADO SIGNIFICADO
1/2/3 / No utilizados
4 encendido Presencia tensión de línea
5 encendido Contacto de seguridad abierto (las fotocélulas detectan el
obstáculo o la tecla de parada interviene)
6 encendido Intervención del sensor amperimétrico
6 encendido Fase de tarado (ver Autotest puntos A-B, dip-switch 10/ON)
6 parpadea Cálculo del tiempo durante el cierre automático, dip-switch 4/ON
7 encendido Tarado de los microinterruptores (ver Autotest punto C) en
curso
6/7/8 encendidos Tarado terminado
-9-
Page 10

SELEZIONI FUNZIONI - SELECTION OF FUNCTIONS - SÉLECTION FONCTIONS
FUNKTIONSWAHL- SELECCIÓN DE LAS FUNCIONES
12345678910
ENGLISHENGLISH
ENGLISH
ITALIANOITALIANO
ITALIANO
ITALIANOITALIANO
ENGLISHENGLISH
Dip-switch 1/ON(2OFF)
Funzione apertura-stop-chiusura stop
(collegamento ai morsetti 2-7)
Dip-switch 2/ON(1OFF)
Funzione apertura-chiusura-inversione
(collegamento ai morsetti 2-7)
Dip-switch 3/ON(4OFF)
Funzione apertura pedonale (del motore
M2 collegato ai morsetti 2-Ap)
Dip-switch 4/ON(3OFF)
Funzione apertura parziale (del motore
M2 collegato ai morsetti 2-Ap)
Dip-switch 5/ON(6OFF)
Funzione stop parziale (dei motori
collegati ai morsetti 2-C3)
Dip-switch 6/ON(5OFF)
Funzione attesa ostacolo (dei motori
collegati ai morsetti 2-C3):
Al rilevamento di ostacolo, il motore si
arresta e riprende, nella stessa direzione,
ad ostacolo rimosso.
Dip-switch 7/ON(8OFF)
Funzione lampeggiatore ciclo (collegato
ai morsetti 10-Ex)
Dip-switch 8/ON(7OFF)
Funzione lampada di cortesia (collegato
ai morsetti 10-Ex)
Dip-switch 9/ON
Funzione incremento (20%) parametri
assorbimento (vedere dip-switch 10)
Dip-switch 10/ON
Esecuzione autotest
Dip switch 1/ON(2OFF)
Open-stop-close-stop function
(actuated by switch connected across
terminals 2-7)
Dip switch 2/ON(1OFF)
Open-close-reverse function
(actuated by switch connected across
terminals 2-7)
Dip switch 3/ON(4OFF)
Opening of gate to allow pedestrian
travel (actuation of motor 2, connected
across terminals 2-Ap)
Dip switch 4/ON(3OFF)
Partial opening function (actuation of
motor 2, connected across terminals 2-Ap)
Dip switch 5/ON(6OFF)
Partial stop function (on motors
connected across terminals 2-C3)
Dip switch 6/ON(5OFF)
Wait-for-obstacle function (on motors
connected across terminals 2-C3)
The motor shuts down when an obstacle is
detected, and resumes operation in the
same direction when the obstacle is
removed.
Dip switch 7/ON(8OFF)
Flashing light during operating cycle
(light connected across terminals 10-Ex)
Dip switch 8/ON(7OFF)
Courtesy light function (light connected
across terminals 10-Ex)
Dip switch 9/ON
20% increase in current draw
parameters (see Dip switch 10)
Dip switch 10/ON
Execution of self-test
-10-
Page 11

FRANÇAISFRANÇAIS
FRANÇAIS
FRANÇAISFRANÇAIS
DEUTSCHDEUTSCH
DEUTSCH
DEUTSCHDEUTSCH
ESPANOLESPANOL
ESPANOL
ESPANOLESPANOL
Dip-switch 1/ON(2OFF)
Fonction ouverture-stop-
fermeture-stop
(interrupteur branché aux
bornes 2-7).
Dip-switch 2/ON(1OFF)
Fonction ouverture-
fermeture-inversion
(interrupteur branché aux
bornes 2-7).
Dip-switch 3/ON(4OFF)
Fonction ouverture pour
piétons (Moteur 2 branché
aux bornes 2-Ap).
Dip-switch 4/ON(3OFF)
Fonction ouverture
partielle (Moteur 2
branché aux bornes 2-Ap).
Dip-switch 5/ON(6OFF)
Fonction stop partiel
(Moteurs branchés aux
bornes 2-C3).
Dip-switch 6/ON(5OFF)
Fonction attente obstacle
(Moteurs branchés aux
bornes 2-C3) : lorsqu’un
obstacle est détecté, le
moteur s’arrête puis,
quand l’obstacle est
enlevé, il continue son
mouvement dans la même
direction.
Dip-switch 7/ON(8OFF)
Fonction Clignotant
cycle (branché aux bornes
10-Ex).
Dip-switch 8/ON(7OFF)
Fonction lampe de
service (branché aux
bornes 10-Ex).
Dip-switch 9/ON.
Fonction augmentation
(20%) Paramètres
absorption (cf. dip-switch
10).
Dip-switch 10/ON.
Exécution Test
automatique.
Dip-Switch 1/ON(2OFF)
Funktion Öffnen - Stop -
Schließen - Stop
(über Klemmen 2-7
zugeschalteter Schalter)
Dip-Switch 2/ON(1OFF)
Funktion Öffnen-
Schließen-
Torlaufumsteuerung
(über Klemmen 2-7
zugeschalteter Schalter)
Dip-Switch 3/ON(4OFF)
Funktion Öffnung
Fußgängerdurchgang
(über die Klemmen 2-Ap
zugeschalteter Motor 2)
Dip-Switch 4/ON(3OFF)
Funktion T eilöffnung
(über die Klemmen 2-Ap
zugeschalteter Motor 2)
Dip-Switch 5ON/6OFF
Funktion T eilstop (über
die Klemmen 2-C3
zugeschaltete Motoren)
Dip-Switch 6/ON(5OFF)
Funktion
Hinderniserfassung (über
die Klemmen 2-C3
zugeschaltete Motoren):
bei Erfassen des
Hindernisses kommt der
Motor automatisch zum
Stillstand und setzt seinen
Lauf nach Entfernung des
Hindernisses in der
gleichen Laufrichtung
wieder fort.
Dip-Switch 7/ON(8OFF)
Funktion Blinkleuchte
"Tor in bewegung" (über
die Klemmen 10-Ex
zugeschaltet)
Dip-Switch 8/ON(7OFF)
Funktion Beleuchtung
(über Klemmen 10-Ex
zugeschaltet)
Dip-Switch 9/ON
FunktionWerterhöhung(20%)
Aufnahme-Parameter
(siehe Dip-Switch 10)
Dip-Switch 10/ON
Durchführung Autotest
Dip-switch 1/ON(2OFF)
Función apertura-parada-
cierre-parada
(conectado a los bornes
2-7)
Dip-switch 2/ON(1OFF)
Función apertura-cierre-
inversión (conectado a los
bornes 2-7)
Dip-switch 3/ON(4OFF)
Función apertura
peatonal (del motor 2
conectado a los bornes 2-
Ap)
Dip-switch 4/ON(3OFF)
Función apertura parcial
(del motor 2 conectado a
los bornes 2-Ap)
Dip-switch 5/ON(6OFF)
Función parada parcial
(de los motores
conectados a los bornes 2-
C3)
Dip-switch 6/ON(5OFF)
Función espera
obstáculo (de los motores
conectados a los bornes 2-
C3)
Detectando el obstáculo el
motor se para,
una vez eliminado el
mismo se reactiva, en la
misma dirección.
Dip-switch 7/ON(8OFF)
Función lámpara
intermitente ciclo
(conectado a los bornes
10-Ex)
Dip-switch 8/ON(7OFF)
Función lámpara de
cortesía (conectado a los
bornes 10-Ex)
Dip-switch 9/ON
Función incremento
(20%) Parámetros
absorción (ver dip-switch
10)
Dip-switch 10/ON
Realización autotest
-11-
Page 12

ITALIANOITALIANO
ITALIANO
ITALIANOITALIANO
1234
ENGLISHENGLISH
ENGLISH
ENGLISHENGLISH
Dip-switch 1/ON (2OFF-3OFF)
radio comando funzione apertura-stop-
chiusura-stop (collegamento ai morsetti
2-7)
Dip-switch 2/ON (1OFF-3OFF)
radio comando apertura-chiusura-
inversione (collegamento ai morsetti 2-7)
Dip-switch 3/ON (1OFF-2OFF)
radio comando solo apertura
Dip-switch 4/ON
funzione chiusura automatica
FRANÇAISFRANÇAIS
FRANÇAIS
FRANÇAISFRANÇAIS
DEUTSCHDEUTSCH
DEUTSCH
DEUTSCHDEUTSCH
Dip switch 1/ON (2OFF-3OFF)
Radio remote control of open-stop-close-
stop operation
(actuated across terminals 2-7)
Dip switch 2/ON (1OFF-3OFF)
Radio remote command of open-close-
reverse operation
(actuated across terminals 2-7)
Dip switch 3/ON (1OFF-2OFF)
Radio remote control of open only
Dip switch 4/ON
Automatic closing function
ESPANOLESPANOL
ESPANOL
ESPANOLESPANOL
Dip-switch 1/ON (2OFF-
3OFF)
Commande radio fonction
ouverture-stop-
fermeture-stop
(interrupteur branché aux
bornes 2-7).
Dip-switch 2/ON (1OFF-
3OFF)
Commande radio fonction
ouverture-fermeture-
inversion (interrupteur
branché aux bornes 2-7)
Dip-switch 3/ON (1OFF-
2OFF)
Commande radio fonction
seulement ouverture.
Dip-switch 4/ON
Commande radio fonction
fermeture automatique.
Dip-Switch 1/ON (2OFF-
3OFF)
Funksteuerung Funktion
Öffnen-Stop-Schliessen-
Stop (über Klemmen 2-7
zugeschalteter Schalter)
Dip-Switch 2/ON (1OFF-
3OFF)
Funksteuerung Öffnen-
Schliessen-
Torlaufumsteuerung
(über KLemmen 2-7
zugeschalteter Schalter)
Dip-Switch 3/ON (1OFF-
2OFF)
Funksteuerung nur Öffnen
Dip-Switch 4/ON
Funktion
Schließautomatik
Dip-switch 1/ON (2OFF-
3OFF)
Mando a distancia función
apertura-parada-cierre-
parada
(conectado a los bornes
2-7)
Dip-switch 2/ON (1OFF-
3OFF)
mando a distancia apertu-
ra-cierre-inversion
(conectado a los bornes
2-7)
Dip-switch 3/ON (1OFF-
2OFF)
mando a distancia solo
apertura
Dip-switch 4/ON
Función cierre
automático
-12-
Page 13

ITALIANOITALIANO
ITALIANO
ITALIANOITALIANO
11 12 13 14 15 16 17 18 19 20
ENGLISHENGLISH
ENGLISH
ENGLISHENGLISH
Dip-switch 11/ON
Funzione prelampeggio
Dip-switch 12/ON
funzione colpo d'ariete (aiuta lo sblocco
dell'elettruserratura)
Dip-switch 13/ON
funzione riduzione tempo di intervento
sensore amperometrico
Dip-switch 14/ON
per uso motoriduttore FLEX
Dip-switch 15/ON
non in uso
Dip-switch 16/ON
funzione rilevazione ostacolo (con
cancello a finecorsa, nessun comando è
accettato in presenza di ostacolo)
Dip switch 11/ON
Flashing light activated
Dip switch 12/ON
“Hammer movement” function (which
facilitates release of the electric lock)
Dip switch 13/ON
Reduction of tripping time on
amperometric safety system
Dip switch 14/ON
Use of FLEX gear motor
Dip switch 15/ON
Not used
Dip switch 16/ON
Obstacle detection function (when gate
is at the end of its travel, no command is
accepted if an obstacle is present)
Dip-switch 17/ON
attivazione del secondo motoriduttore
Dip-switch 18/ON
funzione diminuzione(15%) parametri
assorbimento in rallentamento
(vedere dip-switch 10)
Dip-switch 19/ON
funzione uomo presente
Dip-switch 20/ON
attivazione encoder
Dip switch 17/ON
Activation of second gear motor
Dip switch 18/ON
15% decrease in current draw
parameters during slowdown (see Dip
switch 10)
Dip switch 19/ON
“Human presence” function
Dip switch 20/ON
Activation of encoder
-13-
Page 14

FRANÇAISFRANÇAIS
FRANÇAIS
FRANÇAISFRANÇAIS
DEUTSCHDEUTSCH
DEUTSCH
DEUTSCHDEUTSCH
ESPANOLESPANOL
ESPANOL
ESPANOLESPANOL
Dip-switch 11/ON.
Fonction
Préclignotement
Dip-switch 12/ON.
Fonction coup de bélier
(facilite le déblocage de la
serrure électrique).
Dip-switch 13/ON.
Fonction réduction
temps d’intervention
capteur ampèremétrique.
Dip-switch 14/ON.
Pour utilisation
motoréducteur FLEX.
Dip-switch 15/ON.
Non utilisé.
Dip-switch 16/ON.
Fonction détection
obstacle (avec portail en
fin de course, aucune
commande n’est acceptée
en présence d’obstacle).
Dip-switch 17/ON.
Activation du deuxième
motoréducteur.
Dip-switch 18/ON.
Fonction diminution
(15%) Paramètres
absorption en
ralentissement (cf. dip-
switch 10).
Dip-switch 19/ON.
Fonction “homme mort”.
Dip-switch 20/ON.
Activation encodeur.
Dip-Switch 11/ON
Funktion V orblinken
Dip-Switch 12/ON
Funkion “Widderstoß”
(hilft bei Entriegelung des
Elektroschlosses)
Dip-Switch 13/ON
Funktion Reduktion
Eingriffszeit
amperemetrischer
Sensor
Dip-Switch 14/ON
für den Einsatz des
Getriebemotors FLEX.
Dip-Switch 15/ON
nicht in Gebrauch
Dip-Switch 16/ON
Funktion
Hinderniserfassung (bei
Tor am Endanschlag wird
bei Auftreffen auf
Hindernisse keine
Steuerung ausgeführt)
Dip-Switch 17/ON
Zuschalten des zweiten
Getriebemotors
Dip-Switch 18/ON
Funktion
Wertverringerung (15%)
bei Laufverzögerung
Aufgenommene
Parameter (siehe Dip-
Switch 10)
Dip-Switch 19/ON
Funktion “Bedienung
vom Steuerpult”
Dip-switch 11/ON
Función preintermitencia
Dip-switch 12/ON
Función golpe de ariete
(ayuda el desbloqueo de la
cerradura eléctrica)
Dip-switch 13/ON
Función reducción
tiempo de intervención
sensor amperométrico
Dip-switch 14/ON
para uso motorreductor
FLEX.
Dip-switch 15/ON
fuera de uso
Dip-switch 16/ON
Función detección
obstáculo (con puer ta a
fin de carrera, no acepta
ningún mando en
presencia de obstáculos)
Dip-switch 17/ON
activación del segundo
motorreductor
Dip-switch 18/ON
Función disminución
(15%) Parámetros
absorción en
ralentamiento (ver dip-
switch 10)
Dip-switch 19/ON
función hombre presente
Dip-switch 20/ON
activación encoder
-14-
Dip-Switch 20/ON
Encoder zugeschaltet
Page 15

L1L1
L1
L1L1
L2L2
L2
L2L2
M1M1
M1
M1M1
N1N1
N1
N1N1
M2M2
M2
M2M2
N2N2
N2
N2N2
COLLEGAMENTI ELETTRICI - ELECTRICAL CONNECTIONS - BRANCHEMENTS ÉLECTRIQUES
ELEKRISCHE ANSCHLÜSSE - CONEXIONES ELÉCTRICAS
Alimentazione 230V (a.c.)
230V (a.c.) Power input
Alimentation 230V (c.a.)
Speisung 230v (Wechselstrom)
Alimentación 230V (a.c.)
Motore 1- 24V (d.c.)
24V (d.c.) Motor 1
M1
Moteur 1- 24V (c.c.)
Motor 1- 24V (Gleichstrom)
Motor 1- 24V (d.c.)
Motore 2 - 24V (d.c.)
24V (d.c.) Motor 2
M2
Moteur 2 - 24V (c.c.)
Moter 2 - 24V (Gleichstrom)
Motor 2 - 24V (d.c.)
22
2
22
22
2
22
22
2
22
22
2
22
FA1FA1
FA1
FA1FA1
FC1FC1
FC1
FC1FC1
FA2FA2
FA2
FA2FA2
FC2FC2
FC2
FC2FC2
Contatto (N.C.) per finecorsa Motore 1 in apertura
Contact (N.C.) for motor 1 limit switch in aperture
Contact (N.F.) pour fin de course moteur 1 en ouverture
Ruhekontakt für Endanschlag Motor 1 beim Öffnem
Contacto (N.C.) para final de carrera motor 1 en apertura
Contatto (N.C.) per finecorsa Motore 1 in chiusura
Contact (N.C.) for motor 1 limit switch in closure
Contact (N.F.) pour fin de course moteur 1 en fermeture
Ruhekontakt für Endanschlag Motor 1 beim Schließen
Contacto (N.C.) para final de carrera motor 1 en cierre
Contatto (N.C.) per finecorsa Motore 2 in apertura
Contact (N.C.) for motor 2 limit switch in aperture
Contact (N.F.) pour fin de course moteur 2 en ouverture
Ruhekontakt für Endanschlag Motor 2 beim Öffnen
Contacto (N.C.) para final de carrera motor 2 en apertura
Contatto (N.C) per finecorsa Motore 2 in chiusura
Contact (N.C.) for motor 2 limit switch in closure
Contact (N.F.) pour fin de course motor 2 en fermeture
Ruhekontakt für Endanschlag Motor 2 beim Schließen
Contacto (N.C.) para final de carrera motor 2 en cierre
N.B. I cavi che
collegano i
motori al quadro
elettrico vanno
separati da quelli
dei finecorsa e/o
rallentamenti.
N.B. The cables
connecting the
motors to the electric
switchboard must be
separated from those
of the limit switches
and/or decelerators.
N.B: Les câbles qui
relient les moteurs
au tableau
électrique doivent
être séparés des
câbles des
détecteurs de fin de
course et/ou des
décélérateurs.
HINWEIS: Die Kabel,
mit denen die Motoren
an der Schalttafel
angeschlossen sind,
müssen von den
Kabeln vom
Endanschlag u/o von
der
Geschwindigkeitsa
bnahme getrennt
werden.
NOTA: Los cables
que conectan los
motores al cuadro
eléctrico se tienen
que separar de los
finales de carrera y/
o dispositivos de
deceleración.
-15-
Page 16

+10+10
+10
+10+10
- 11- 11
- 11
- 11- 11
Alimentazione accessori (max 40W)
-24V (a.c.) con alimentazione a 230V (a.c.)
-24V (d.c.) con alimentazione a 24V (d.c.)
Powering accessories (max 40W)
-24V (a.c.) with power supply at 230V (a.c.)
-24V (d.c.) with power supply at 24V (d.c.)
Alimentation accessoires (max 40W)
-24V (c.a.) avec alimentation en 230V (c.a.)
-24V (c.c.) avec alimentation en 24V (c.c.)
Zubehörspeisung (max 40W)
-24V (Wechselstrom) bei Stromversorgung 230V (Wechselstrom)
-24V (Gleichstrom) bei Stromversorgung 24V (Gleichstrom)
Alimentación accesorios (max 40W)
-24V (a.c.) con alimentación 230V (a.c.)
-24V (d.c.) con alimentación 24V (d.c.)
44
4
44
33
3
33
22
2
22
22
2
22
33
3
33
22
2
22
ApAp
Ap
ApAp
22
2
22
44
4
44
Collegamento selettore a chive
Key selector connection
Connexion du sélecteur à clé
Schlüsselwahlschalteranschluß
Conexión selector con llave
Pulsante apre (N.O.)
Aperture button (N.O.)
Bouton-poussoir d'ouverture (N.O.)
Taste Öffnen (Arbeitskontakt)
Pulsador de apertura (N.O.)
Pulsante apre (N.O) per passaggio pedonale
Aperture button (N.O.) for pedestrian passage
Bouton-poussoir d'ouverture (N.O.) pour le passage des piétons
Taste Öffnen (Arbeitskontakt) für Durchgang
Pulsador de apertura (N.O.) para paso de peatones
Pulsante chiude (N.O.)
Closure button (N.O.)
Bouton-poussoir fermeture (N.O.)
Taste Schließen (Arbeitskontakt)
Pulsador de cierre (N.O.)
-16-
22
2
22
77
7
77
11
1
11
22
2
22
Contatto radio e/o pulsante apre-chiude-inversione
Contact radio and/or pushbutton controlled for open-close-reversal
Contact radio et/ou bouton-poussoir ouverture-fermetureinversion
Funkkontakt und/oder Taste Öffnen-Schließen-Umschalten
Contacto radio y/o pulsador de apertura-cierre-inversion
Pulsante stop (N.C.)
Stop button (N.C.)
Bouton-poussoir arrêt (N.F.)
Stop Taste (Ruhekontakt)
Pulsador de stop (N.C.)
Page 17

22
2
22
C1C1
C1
C1C1
22
2
22
C2C2
C2
C2C2
22
2
22
C3C3
C3
C3C3
Contatto (N.C.) di riapertura in fase di chiusura
Contact (N.C.) for re-aperture during closure
Contact (N.F.) de réouverture pendant la fermeture
Kontakt (Ruhekontakt) Wiederöffnen beim Schliessen
Contacto (N.C.) para la apertura en la fase de cierre
Contatto (N.C.) di richiusura in fase di apertura
Contact (N.C.) for re-closure during aperture
Contact (N.F.) de nouvelle fermeture pendant l'ouverture
Kontakt (Ruhekontakt) Wiederschliessen beim Öffnen
Contacto (N.C.) para el cierre en la fase de apertura
Contatto (N.C.) di stop parziale o attesa ostacolo
Partial stop contact or wait-for-obstacle (N.C.)
Contact (N.F.) d'arrêt partiel ou attente obstacle
Teil-Stop oder Hinderniserfassung (Ruhekontakt) Kontakt
Contacto (N.C.) de stop parcial o espera obstáculo
22
2
22
22
2
22
Contatto (N.O.) Rallentamento Motore 1 in apertura
(N.O.) Contact-deceleration of Motor 1 on aperture
Contact (N.O.) Ralentissement Moteur 1 en ouverture
(Arbeitskontakt) Geschwindigkkeitsverzögerung Motor 1 beim Öffnen
RA1RA1
RA1
RA1RA1
Contacto (N.O.) Deceleración Motor 1 en la fase de apertura
Contatto (N.O.) Rallentamento Motore 1 in chiusura
(N.O.) Contact-deceleration of Motor 1 on closure
RC1RC1
RC1
RC1RC1
Contact (N.O.) Ralentissement Moteur 1 en fermeture
(Arbeitskontakt) Geschwindigkeitsverzögerung Motor 1 beim Schließen
Contacto (N.O.) Deceleración Motor 1en fase de cierre
Contatto (N.O.) Rallentamento Motore 2 in apertura
(N.O.) Contact-deceleration of Moteur 2 on aperture
Contact (N.O.) Ralentissement Motor 2 en ouverture
(Arbeitskontakt) Geschwindigkeitsverzögerung Motor 2 beim Öffnen
RA2RA2
RA2
RA2RA2
Contacto (N.O.) Deceleración Motor 2 en la fase de apertura
Contatto (N.O.) Rallentamento Motore 2 in chiusura
RC2RC2
(N.O.) Contact-deceleration of Motor 2 on closure
RC2
RC2RC2
Contact (N.O.) Ralentissement Moteur 2 en fermeture
(Arbeitskontakt) Geschwindigkeitsverzögerung Motor 2 beim Schließen
Contacto (N.O.) Deceleración Motor 2 en la fase de cierre
N.B.Tutti i
contatti e
pulsanti (N.C.)
non collegati ad
accessori devono
essere
cortocircuitati
sulla morsettiera.
N.B. A bridge
connection must be
applied across all
normally closed
contacts and normallyclosed pushbutton
connections which are
not connected to
accessories. Apply the
bridge connections at
the terminal board.
N.B: Tous les
contacts et les
poussoirs (N.F.)
doivent être
courtcircuités sur
la plaque à bornes
s'ils ne sont pas
connectés aux
accessoires.
HINWEIS:Alle
Kontakte und Tasten
(N.C.), an die kein
Zubehör
angeschlossen ist,
müssen auf dem
Klemmenbrett
kurzgeschlossen
werden.
NOTA:Todos los
contactos y
pulsadores (N.C.)
no conexionados a
accessorios deben
ser
cortocircuitados
sobre la regleta de
-17-
Page 18

B1B1
B1
B1B1
B2B2
B2
B2B2
Uscita contatto N.O. (attiva con ricevitore bicanale ad
innesto).
Portata contatto: 1A a 24V (d.c.)
Contact output N.O. (enabled with plug-in two-channel
receiver).
Resistive load: 1A 24V (d.c.)
Sortie contact N.O. (sélectionné avec rècepteur bicanal à
branchement).
Portée contact: 1A à 24V (c.c.)
Ausgang Arbeitskontakt (zugeschaltet mit Doppelkanal-SteckFunkempfänger).
Stromfestigkeit: 1A bei 24V (Gleichstrom)
Salida contacto N.O. (habilitada con receptor bicanal con
inserción directa).
Carga resistiva: 1A a 24V (d.c.)
Collegamento antenna
Antenna connection
Connexion antenne
Antennenanschluß
Conexión antena
1010
10
1010
55
5
55
1010
10
1010
EE
E
EE
1010
10
1010
ExEx
Ex
ExEx
Lampada spia 24V-3W max. "cancello aperto"
24V-3W max. "gate-opened" signal lamp
Lampe-témoin 24V-3W max. "vantail ouvert"
Kontrollampe 24V-3W max. "Tor geöffnet"
Lámpara indicadora 24V-3W max. "puerta abierta"
Uscita 24V in movimento (es. lampeggiatore)
24V in movement output (e.g. flashing light)
Sortie 24V en mouvement (ex: clignotant)
Ausgang 24V "in Bewegung" (z.B: Blinkleuchte)
Salida 24V en movimiento (por ej. lámpara intermitente)
Lampada spia 24V ciclo o cortesia
24V signal lamp cycle
Lampe-témoin 24V cycle
Ausgang 24V Leuchte cyclus/raum
Lámpara indicadora 24V ciclo
-18-
1111
11
1111
EsEs
Es
EsEs
Collegamento elettroserratura (12V-15W max.)
Connection for electrically-actuated lock (12V-15W max.)
Connexion serrure électrique (12V-15W max.)
Anschluß Elektroverriegelung (max. 12V-15W)
Conexión electrocerradura (12V-15W max.)
Page 19

ITALIANOITALIANO
ITALIANO
ITALIANOITALIANO
Dip-switch 10/ON
AUTOTEST
Esegue il seguente ciclo di autotest:
A - rileva la posizione delle ante al momento della selezione ON del dip-switch e, se
necessario (ad esempio se rileva una posizione di ante chiuse o di apertura massima), si
mette in una posizione da cui poter effettuare le manovre di test;
B - esegue, per qualche secondo;
una manovra di chiusura del motore M1;
una manovra di rallentamento in chiusura del motore M1;
una manovra di chiusura del motore M2;
una manovra di rallentamento in chiusura del motore M2;
poi
una manovra di apertura del motore M2;
una manovra di rallentamento in apertura del motore M2;
una manovra di apertura del motore M1;
una manovra di rallentamento in apertura del motore M1;
rilevando e memorizzando, per ogni manovra, il relativo assorbimento amperometrico;
C - quindi effettua;
una chiusura del motor M1, a velocità di rallentamento;
una chiusura del motor M2, a velocità di rallentamento;
poi
una apertura del motor M2, a velocità di rallentamento;
una apertura del motor M1, a velocità di rallentamento;
rilevando e memorizzando così la presenza di finecorsa di rallentamento e/o di marcia.
Per eseguire l'autotest di un solo motore (M2), selezionare il dip-switch 17 in OFF ed
effettuare le stesse manovre precedenti.
La fine del ciclo di autotest (o di autoprogrammazione) è segnalata dall'accensione dei
led 6,7 e 8.
I dati così memorizzati sono la base di riferimento per le eventuali successive tarature a
mezzo dip-switch (es. dip n° 9 e n° 18) e/o trimmer (es. trimmer SENS).
NB, se si variano le velocità con i trimmer VEL e RALL (o se si aggiunge un
finecorsa), bisogna riprogrammare il microprocessore rifacendo il ciclo di autotest.
-19-
Page 20

ENGLISHENGLISH
ENGLISH
ENGLISHENGLISH
Dip switch 10/ON
SELF-TEST
The unit performs the following self-test cycle:
A - When dip switch 10 is set to ON, the position of the gate wings is detected. Then, if
necessary (for example, if gate wings are in the maximum closed or open position), the
gate wings are moved to the correct position for the self-test cycle;
B - The unit performs the following movements for a few second;
a closing movement with motor M1;
slowdown before closing with motor M1;
a closing movement with motor M2;
slowdown before closing with motor M2;
Then:
an opening movement with motor M2;
slowdown before opening with motor M2;
an opening movement with motor M1;
slowdown before opening with motor M1;
The levels of current draw amperometric during each movement are measured and
stored.
C - Next, the unit performs the following movements:
a closing cycle on motor M1, slowdown speed;
a closing cycle on motor M2, slowdown speed;
Then:
a opening cycle on motor M2, slowdown speed;
an opening cycle on motor M1, slowdown speed;
The presence of limit switches controlling slowdown and/or gate movement is detected
and stored.
At end of the self-test (or, self-programming) cycle, LEDs 6, 7 and 8 light up.
To perform the self-testing cycle on a single motor (M2), move dip switch 17 to OFF and
perform the operations previously described.
The data stored during the self-test cycle are used as the reference values for
subsequent adjustments performed with the dip switches (for example, dip switches 9
and 18) and/or the trimmers (for ex., the SENS trimmer).
N.B.: If speeds are varied with the VEL and RALL trimmers (or if a limit switch is
added), the self-test cycle must be repeated to re-program the microprocessor.
-20-
Page 21

FRANÇAISFRANÇAIS
FRANÇAIS
FRANÇAISFRANÇAIS
TEST AUTOMATIQUE
Le cycle de test automatique suivant est effectué:
A - détection de la position des vantaux au moment de la sélection ON sur le dip-switch
et, si nécessaire (quand, par exemple, une ouverture maximum est détectée ou que les
vantaux sont fermés), positionnement de façon à pouvoir effectuer les manoeuvres de
test;
B-exécution, pendant quelques secondes;
d’une manoeuvre de fermeture du moteur M1;
d’une manoeuvre de ralentissement en fermeture du moteur M1;
d’une manoeuvre de fermeture du moteur M2;
d’une manoeuvre de ralentissement en fermeture du moteur M2,
puis
d’une manoeuvre d’ouverture du moteur M2;
d’une manoeuvre de ralentissement en ouverture du moteur M2;
d’une manoeuvre d’ouverture du moteur M1;
d’une manoeuvre de ralentissement en ouverture du moteur M1;
pour chaque manoeuvre, l’absorption ampèremétrique correspondante est relevée et
mémorisée;
Dip-switch 10/ON
C - exécution:
d’une manoeuvre de fermeture du moteur M1, vitesse de ralentissement;
d’une manoeuvre en fermeture du moteur M2, vitesse de ralentissement,
puis
d’une manoeuvre en ouverture du moteur M2, vitesse de ralentissement;
d’une manoeuvre en ouverture du moteur M1, vitesse de ralentissement;
ainsi, la présence de fins de course de ralentissement et/ou fonctionnement est détectée
et mémorisée.
La fin du cycle de test automatique (ou de programmation automatique) est signalée par
l’allumage des leds 6, 7, 8.
Pour exécuter le test automatique d'un seul moteur (M2), positionner le dip-switch 17 sur
OFF et effectuer les manoeuvres précédentes.
Les données ainsi mémorisées constituent la base de référence pour d’éventuels
réglages successifs effectués à l’aide des dip-switchs (par ex. dip-switch n.9 et n.18) et/
ou à l’aide des trimmers (par ex. trimmer SENS).
N.B.: quand on varie la vitesse avec les trimmers VEL et RALL (ou quand on ajoute
un fin de course), il faut programmer de nouveau le microprocesseur en
réexécutant un cycle de test automatique.
-21-
Page 22

DEUTSCHDEUTSCH
DEUTSCH
DEUTSCHDEUTSCH
Dip-Switch 10/ON
AUTOTEST
Der Autotest-Zyklus wird folgendermaßen durchgeführt:
A - in “ON”-Stellung erfaßt er die Position der Torflügel und stellt sich, falls erforderlich
(z.B.: bei geschlossenen bzw. ganz geöffneten Torflügeln) auf eine Stellung, in der er die
Autotest-Funktion ausführen kann:
B - führt einige Sekunden lang
ein Schließmanöver des Motors M1;
ein Schließverzögerungsmanöver des Motors M1;
ein Schließmanöver des Motors M2;
ein Schließverzögerungsmanöver des Motors M2;
und dann
ein Öffnungsmanöver des Motors M2;
ein Öffnungsverzögerungsmanöver des Motors M2;
ein Öffnungsmanöver des Motors M1;
ein Öffnungsverzögerungsmanöver des Motors M1;
durch und erfaßt und speichert bei jedem Manöver die entsprechenden Aufnahmewerte
amperemetrische;
C - dann führ t er
eine vollkommene Torschließung des Motors M1, Laufverlangsamung;
eine vollkommene Torschließung des Motors M2, Laufverfangsamung;
und dann
eine vollkommene Toröffnung des Motors M2, Laufverfangsamung;
und eine vollkommene Toröffnung des Motors M1, Laufverfangsamung;
durch und erfaßt und speichert so die Präsenz der Laufverzögerungs-Endschalter und/
oder der Lauf-Endschalter.
manovre precedenti.
Das Ende des Autotest-Zyklus (bzw. der Selbstprogrammierung) wird durch Aufleuchten
der LEDs 6,7 und 8 angezeigt.
Zur Durchführung des Autotests von nur einem Motor (M2) den Dip-Switch 17 auf OFF
stellen und die zuvor durchgeführten Manöver ausführen.
Die so gespeicherten Daten sind die Bezugsgr undlage für eventuell nachfolgende
Eichungen mittels Dip-Switch (z.B. Dip-Switch 9 und 18) und/oder Tr immer (z.B.:Trimmer
SENS).
HINWEIS: wenn die Laufgeschwindigkeiten über die Trimmer VEL und RALL
geändert werden (oder wenn ein weiterer Endschalter zugeschaltet wird), ist der
Mikroprozessor durch Wiederholung des Autotest-Zyklus neu zu programmieren.
-22-
Page 23

ESPANOLESPANOL
ESPANOL
ESPANOLESPANOL
Dip-switch 10/ON
AUTOTEST
Efectúa el siguiente ciclo de autotest:
A - detecta la posición de las puertas en el momento de la selección ON del dip-switch
(por ejemplo si detecta una posición de puertas cerradas o de aper tura máxima), se
pone en la posición adecuada para poder efectuar las maniobras de prueba;
B - efectúa, durante unos segundos,
una maniobra de cierre del motor M1;
una maniobra de ralentamiento en fase de cierre del motor M1;
una maniobra de cierre del motor M2;
una maniobra de ralentamiento en fase de cierre del motor M2;
luego
una maniobra de apertura del motor M2;
una maniobra de ralentamiento en fase de apertura del motor M2;
una maniobra de apertura del motor M1,
una maniobra de ralentamiento en apertura del motor M1;
detectando y memorizando, para cada maniobra, la relativa absorción amperométrico;
C - posteriormente efectúa
un cierre del motor M1, a velocidad de ralentamiento;
un cierre del motor M2, a velocidad de ralentamiento;
sucesivamente
una apertura del motor M2, a velocidad de ralentamiento;
una apertura del motor M1, a velocidad de ralentamiento;
detectando y memorizando de esa manera la presencia de fin de carrera de
ralentamiento y/o de marcha.
Para efectuar el autotest de un solo motor (M2), colocar el dip-switch 17 en OFF y
efectuar las maniobras indicadas anteriormente.
El final del ciclo de autotest (o de autoprogramación) es señalado por el encendido de
los LED 6,7 y 8.
Los datos memorizados de esta manera son la base de referencia para las siguientes
eventuales regulaciones por medio de dip-switch (ej: dip nº 9 y nº 18) y/o trimer (ej:
trimer SENS).
N.B. si se varían las velocidades con los trimer VEL y RALL (o se añade un fin de
carrera), es preciso volver a programar el microprocesador repitiendo el ciclo de
autotest.
-23-
Page 24

ISTRUZIONI MONTAGGIO - ASSEMBLY INSTRUCTIONS - INSTRUCTIONS MONTAGE
MONTAGEANWEISUNGEN - INSTRUCCIONES MONTAJE
1
Assemblare le cerniere a pressione
Assemble the hinges by pressure
Assembler les charnières à pression
Setzen Sie die Druckscharniere zusammen.
Ensamblar las bisagras a presión
15 mm~
scorrono per ruotare
they must slide in order to turn
elles glissent pour tourner
laufen zum Drehen
deslizan para girar
!!
2
Inserire le cerniere nella scatola (sul lato
destro o sinistro a scelta) e fermarle con le
viti e le rondelle in dotazione
Insert the hinges (on the right or left side,
according to choice) and secure using the
screws and washers supplied
Placer les charnières (du côté droit ou
gauche au choix) et les fixer avec les vis et
les rondelles fournies de série
Setzen Sie die Scharniere ein (je nach
Wunsch auf der rechten oder linken Seite)
und befestigen Sie sie mit den mitgelieferten
Schrauben und Unterlegscheiben
Introducir las bisagras (en el lado izquierdo o
derecho, a placer) y fijarlas con los tornillos
y las arandelas suministradas a tal efecto
295 mm
215 mm
3
Posizionare e fissare la scatola del
quadro
Position and secure the control
panel housing
Placer et fixer la boîte de l'armoire
Plazieren Sie das Gehäuse der
Schalttafel und befestigen Sie es.
Colocar y sujetar la caja del cuadro
INTERNET:
www.came.it
E-MAIL:
info@came.it
ASSISTENZA TECNICA
800-295830
CANCELLI AUTOMATICI
4
N° 12 100 8953
Inserire a scatto il coperchio sulle cerniere,
chiuderlo e fissarlo con le viti in dotazione
Snap the cover onto the hinges and secure
using the screws supplied.
Assembler par encliquetage le couvercle sur
les charnières et fixer le couvercle avec les vis
fournies de série
Lassen Sie den Deckel in den Scharnieren
einrasten und befestigen Sie ihn mit den
mitgelieferten Schrauben.
Introducir la tapa en las bisagras hasta oír un
chasquido y fijar la tapa con los tornillos
suministrados a tal efecto.
CAME CANCELLI AUTOMATICI S.P.A.
VIA MARTIRI DELLA LIBERTA’, 15
31030 DOSSON DI CASIER
TREVISO
CAME SUD S.R.L.
VIA FERRANTE IMPARATO, 198
CM2 LOTTO A/7
80146 NAPOLI
CAME FRANCE S.A.
7 RUE DES HARAS
92737 NANTERRE CEDEX
PARIS
CAME AUTOMATISMOS S.A.
C/JUAN DE MARIANA, 17
28045 MADRID
CAME GMBH
BERGSTRASSE, 17/1
70825 KORNTAL
STUTTGART
CAME GMBH
AKAZIENSTRASSE, 9
16356 SEEFELD
BERLIN
 Loading...