

Buffalo LinkStation User Manual
LinkStation
User Manual
Buffalo Inc.
www.buffalotech.com
35011114-06

Contents |
|
Chapter 1 |
|
Setup......................................................................................... |
5 |
LinkNavigator Setup (LS-VL, LS-XHL, LS-CHL).......................................... |
5 |
LinkNavigator Setup (LS-WVL, LS-WXL)..................................................... |
7 |
LinkNavigator Setup (LS-WSXL).................................................................... |
9 |
LinkNavigator Setup (LS-QVL)....................................................................... |
12 |
LinkNavigator Setup (LS-XL)........................................................................... |
14 |
Diagrams and Layout (LS-VL, LS-XHL, LS-CHL)........................................ |
16 |
Diagrams and Layout (LS-WVL, LS-WXL).................................................... |
18 |
Diagrams and Layout (LS-WSXL)................................................................... |
20 |
Diagrams and Layout (LS-QVL)...................................................................... |
22 |
Diagrams and Layout (LS-XL)......................................................................... |
24 |
Chapter 2 |
|
Using your LinkStation........................................................... |
25 |
Opening the Shared Folder............................................................................ |
25 |
Opening the shared folder from another PC............................................ |
26 |
Adding another LinkStations......................................................................... |
27 |
Power Modes....................................................................................................... |
28 |
Turning Off the Power in the LS-XL Series................................................. |
30 |
Changing the IP Address................................................................................. |
31 |
Web Admin interface........................................................................................ |
32 |
LinkStation Function List................................................................................. |
35 |
Adding shared folders...................................................................................... |
36 |
Access Restrictions...................................................................................................... |
40 |
LinkStation User Manual |
1 |
Disk Quotas.................................................................................................................... |
50 |
FTP Server...................................................................................................................... |
55 |
Direct Copy.................................................................................................................... |
58 |
Users/Groups....................................................................................................... |
60 |
Adding Users................................................................................................................. |
60 |
Adding Groups............................................................................................................. |
62 |
Admin Password.......................................................................................................... |
63 |
Network................................................................................................................. |
64 |
Jumbo Frame................................................................................................................ |
64 |
Web server..................................................................................................................... |
66 |
MySQL server................................................................................................................ |
67 |
System-Settings.................................................................................................. |
68 |
Name, Date and Time................................................................................................. |
68 |
System-Storage................................................................................................... |
70 |
Check Disk...................................................................................................................... |
70 |
Format a Drive.............................................................................................................. |
72 |
Adding Storage............................................................................................................ |
74 |
Remove Disk.................................................................................................................. |
78 |
System Backup.................................................................................................... |
79 |
Time Machine............................................................................................................... |
79 |
System-Backup............................................................................................................. |
83 |
RAID Arrays........................................................................................................... |
91 |
RAID Scanning..................................................................................................... |
102 |
System - Maintenance...................................................................................... |
103 |
E-mail Notification...................................................................................................... |
103 |
System - Power Management........................................................................ |
105 |
UPS Settings.................................................................................................................. |
105 |
Sleep Timer.................................................................................................................... |
106 |
Restoring Factory Defaults....................................................................................... |
108 |
Format the LinkStation.............................................................................................. |
111 |
Online Update.............................................................................................................. |
112 |
Extensions............................................................................................................. |
113 |
WebAccess..................................................................................................................... |
113 |
LinkStation User Manual |
2 |
Network-USB Server................................................................................................... |
114 |
Print Server.................................................................................................................... |
116 |
BitTorrent Client........................................................................................................... |
123 |
DLNA Server.................................................................................................................. |
125 |
Using iTunes Server.................................................................................................... |
134 |
Squeezebox Server..................................................................................................... |
135 |
Flickr Support............................................................................................................... |
136 |
Eye-Fi connected......................................................................................................... |
139 |
Connecting to a Remote LinkStation................................................................... |
141 |
Chapter 3 |
|
NAS Navigator2....................................................................... |
143 |
Chapter 4 |
|
Web Admin interface.............................................................. |
149 |
Home...................................................................................................................... |
149 |
Shared Folders..................................................................................................... |
150 |
Users/Groups....................................................................................................... |
153 |
Network................................................................................................................. |
156 |
System.................................................................................................................... |
163 |
Extensions............................................................................................................. |
177 |
Appendix.................................................................................. |
183 |
Specifications....................................................................................................... |
183 |
Default Settings.................................................................................................. |
185 |
Mapping Additional Shares............................................................................ |
186 |
Windows......................................................................................................................... |
186 |
Mac OS X......................................................................................................................... |
187 |
Software................................................................................................................. |
188 |
LinkStation User Manual |
3 |
Info folder.............................................................................................................. |
191 |
Status LED (LS-VL, LS-XHL, LS-CHL).............................................................. |
192 |
Status LED (LS-WVL, LS-WXL)......................................................................... |
195 |
Status LED (LS-WSXL)........................................................................................ |
200 |
Status LED (LS-QVL)........................................................................................... |
204 |
Status LED (LS-XL).............................................................................................. |
209 |
Compliance Information.................................................................................. |
210 |
Troubleshooting................................................................................................. |
211 |
Data Backup......................................................................................................... |
213 |
GPL Information.................................................................................................. |
213 |
LinkStation User Manual |
4 |
Chapter 1
Setup
LinkNavigator Setup (LS-VL, LS-XHL, LS-CHL)
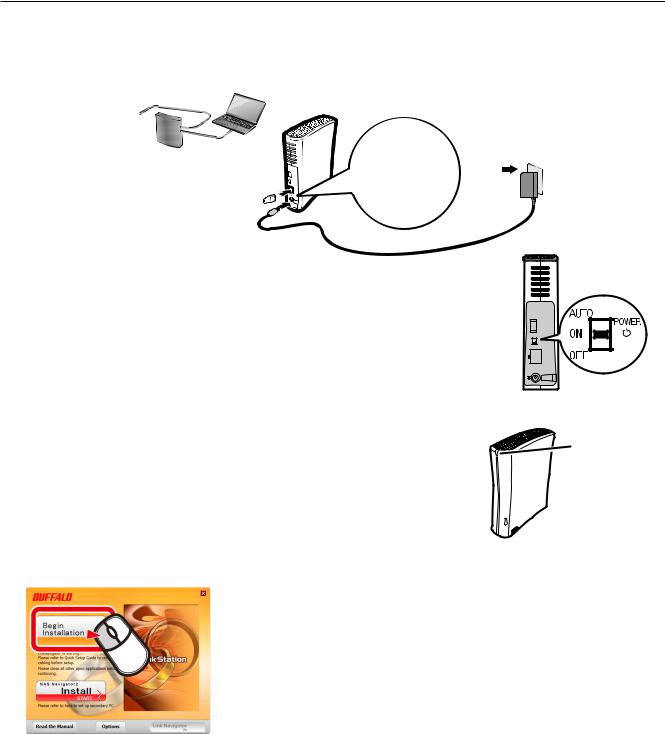
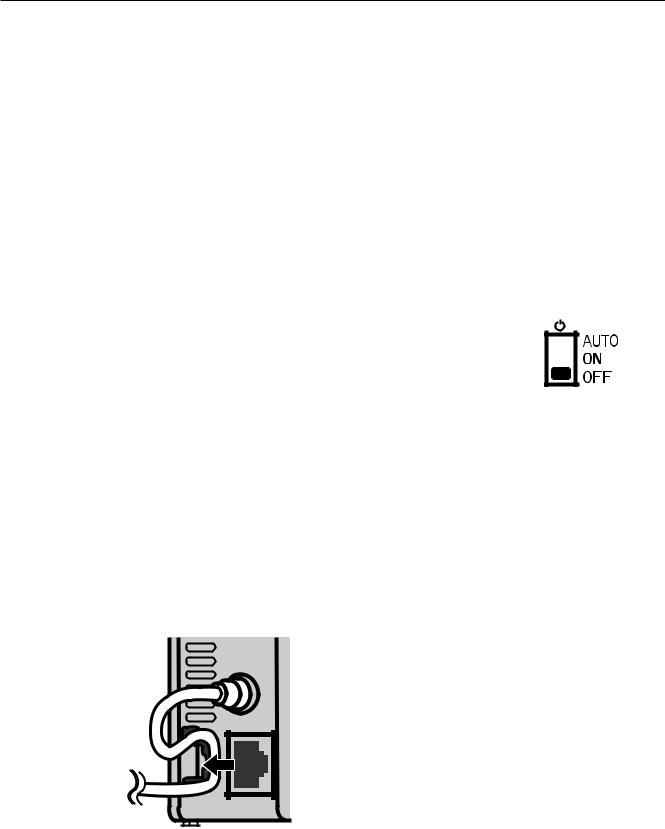
1 Connect the LinkStation with an Ethernet cable and the included AC adapter. Plug the power cord into a surge protector or power outlet. Connect the Ethernet cable to a router, hub,
or switch on your network. The Ethernet cable will “click” and lock in place when inserted
properly.
LinkStation
2 Move the Power Mode Switch on the back of the LinkStation to the ON position.
Note:
Do not set the Power Mode Switch to AUTO at this time. After the initial installation is complete, then the Auto Power Mode may be used.
3 Wait until the power LED stops blinking and glows a steady blue. |
Power LED |
4 Insert the Utility CD in your computer’s CD drive. LinkNavigator will launch. Click [Begin Installation]. The wizard will guide you through installation.
If LinkNavigator does not launch automatically, open the Utility CD and double-click  [LSNavi.exe].
This example shows a LinkStation Pro (LS-VL). Your screen may be slightly different.
LinkStation User Manual |
5 |

Chapter1 Setup
5
6
Notes:
•If you are using Windows 7 or Vista, the autoplay screen may appear. Click [Run LSNavi.exe].
•If “Do you want to allow the following program to make changes to this computer?” is displayed in Windows 7, please click [Yes].
•If “A program needs your permission to continue” is displayed in Windows Vista, please click [Continue].
•For OS X, double-click on the LinkNavigator icon in the utility CD.
•If you have problems installing, temporarily disable your anti-virus software and software firewall. After setup is complete, re-enable the software.
•If your computer does not have a CD drive, you may download the LinkNavigator software from www.buffalotech.com.
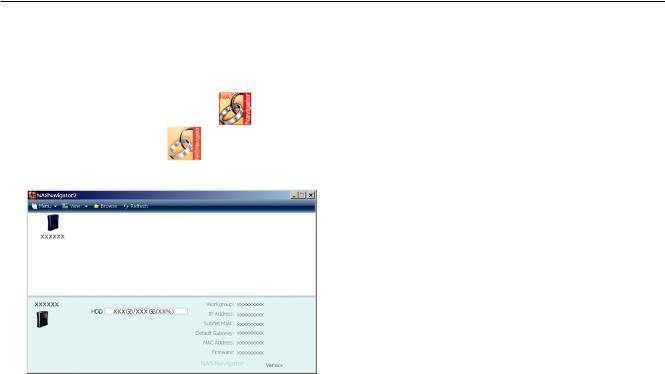
Click [Finish] or [Complete]. NAS Navigator2 starts automatically.
In NAS Navigator2, double-click your LinkStation’s icon.
7 The LinkStation’s shared folder opens. You can now use the LinkStation’s shared folder to save files just like any other folder.
Note:
With Mac OS, the LinkStation is mounted as a drive icon on the desktop, or it is displayed in the sidebar of the Finder.
Setup is now complete.
LinkStation User Manual |
6 |

Chapter1 Setup
LinkNavigator Setup (LS-WVL, LS-WXL)
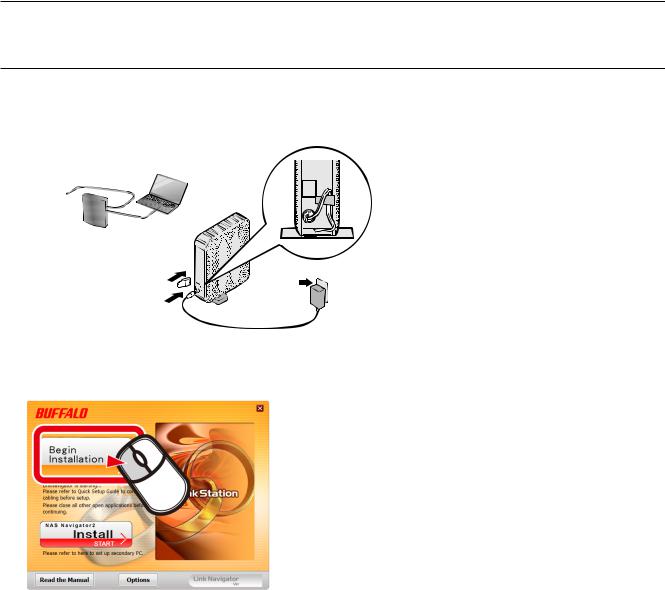
1 Connect the LinkStation with an Ethernet cable and the included AC adapter. Plug the power cord into a surge protector or power outlet. Connect the Ethernet cable to a router, hub,
or switch on your network. The Ethernet cable will “click” and lock in place when inserted properly.


 LinkStation
2 Move the Power Mode Switch on the back of the LinkStation to the ON position.
Note:
Do not set the Power Mode Switch to AUTO at this time. After the initial installation is complete, then the Auto Power Mode may be used.
3
4
Power LED
Wait until the power LED stops blinking and glows a steady blue.
Insert the Utility CD in your computer’s CD drive. LinkNavigator will launch. Click [Begin Installation]. The wizard will guide you through installation.
If LinkNavigator does not launch automatically, open the Utility CD and double-click  [LSNavi.exe].
This example shows a LinkStation Pro Duo (LS-WVL). Your screen may be slightly different.
LinkStation User Manual |
7 |

Chapter1 Setup
5
6
Notes:
•If you are using Windows 7 or Vista, the autoplay screen may appear. Click [Run LSNavi.exe].
•If “Do you want to allow the following program to make changes to this computer?” is displayed in Windows 7, please click [Yes].
•If “A program needs your permission to continue” is displayed in Windows Vista, please click [Continue].
•For OS X, double-click on the LinkNavigator icon in the utility CD.
•If you have problems installing, temporarily disable your anti-virus software and software firewall. After setup is complete, re-enable the software.
•If your computer does not have a CD drive, you may download the LinkNavigator software from www.buffalotech.com.
Click [Finish] or [Complete]. NAS Navigator2 starts automatically.
In NAS Navigator2, double-click your LinkStation’s icon.
7 The LinkStation’s shared folder opens. You can now use the LinkStation’s shared folder to save files just like any other folder.
Note:
With Mac OS, the LinkStation is mounted as a drive icon on the desktop, or it is displayed in the sidebar of the Finder.
Setup is now complete.
LinkStation User Manual |
8 |

Chapter1 Setup
LinkNavigator Setup (LS-WSXL)
1 Connect the LinkStation with the AC adaptor and an Ethernet cable. Plug the power cord into a surge protector or power outlet. Connect the Ethernet cable to a router, hub, or switch on your network. The Ethernet cable will “click” and lock in place when inserted properly.
LinkStation
2 Move the Power Mode Switch on the back of the LinkStation to ON.
Note:
Do not set the Power Mode Switch to AUTO at this time. After the initial installation is complete, then the Auto Power Mode may be used.
3 Wait until the power LED stops blinking and glows a steady blue.
Power LED
|
|
|
|
|
|
|
|
LinkStation User Manual |
9 |
||
Chapter1 Setup
4 Insert the Utility CD in your computer’s CD drive. LinkNavigator will launch. Click [Begin Installation]. The wizard will guide you through installation.
Notes:
•If LinkNavigator does not launch automatically, open the Utility CD and double-click [LSNavi. exe].
•If you are using Windows 7 or Vista, the autoplay screen may appear. Click [Run LSNavi.exe].
•If “Do you want to allow the following program to make changes to this computer ?” is displayed in Windows 7, please click [Yes].
•If “A program needs your permission to continue” is displayed in Windows Vista, please click [Continue].
•For Mac OS, double-click on the LinkNavigator icon in the utility CD.
•If you have problems installing, temporarily disable your anti-virus software and software firewall. After setup is complete, re-enable the software.
•If your computer does not have a CD drive, you may download the LinkNavigator software from www.buffalotech.com.
5 Click [Finish] or [Complete]. NAS Navigator2 starts automatically.
LinkStation User Manual |
10 |

Chapter1 Setup
6 |
Double-click your LinkStation's icon in the NAS Navigator2 |
|
window. |
7 The LinkStation’s shared folder opens. You can now use the LinkStation’s shared folder to save files just like any other folder.
Note:
With Mac OS X, the LinkStation is mounted as a drive on the desktop or displayed in the sidebar of the Finder.
Setup is now complete.
LinkStation User Manual |
11 |

Chapter1 Setup
LinkNavigator Setup (LS-QVL)
1 Connect the LinkStation with an Ethernet cable and the included AC adapter. Plug the power cord into a surge protector or power outlet. Connect the Ethernet cable to a router, hub,
or switch on your network. The Ethernet cable will “click” and lock in place when inserted properly.
LinkStation
2 Hold down the power button on the front of the LinkStation for one second. The blue Power LED will blink as the LinkStation boots. When the LinkStation is ready, the LED will stop blinking and glow steadily.
Note:
The power mode switch on the rear should be set to Manual, not Auto. The Auto position will be usable after initial setup is complete.
3 Insert the Utility CD in your computer’s CD drive. LinkNavigator will launch. Click [Begin Installation]. The wizard will guide you through installation.
If LinkNavigator does not launch automatically, open the
Utility CD and double-click  [LSNavi.exe].
LinkStation User Manual |
12 |

Chapter1 Setup
4
5
Notes:
•If you are using Windows 7 or Vista, the autoplay screen may appear. Click [Run LSNavi.exe].
•If “Do you want to allow the following program to make changes to this computer?” is displayed in Windows 7, please click [Yes].
•If “A program needs your permission to continue” is displayed in Windows Vista, please click [Continue].
•For OS X, double-click on the LinkNavigator icon in the utility CD.
•If you have problems installing, temporarily disable your anti-virus software and software firewall. After setup is complete, re-enable the software.
•If your computer does not have a CD drive, you may download the LinkNavigator software from www.buffalotech.com.
Click [Finish] or [Complete]. NAS Navigator2 starts automatically.
In NAS Navigator2, double-click your LinkStation’s icon.
6 The LinkStation’s shared folder opens. You can now use the LinkStation’s shared folder to save files just like any other folder.
Note:
With Mac OS, the LinkStation is mounted as a drive icon on the desktop, or it is displayed in the sidebar of the Finder.
Setup is now complete.
LinkStation User Manual |
13 |
Chapter1 Setup
LinkNavigator Setup (LS-XL)
1 Connect the LinkStation with the Ethernet cable and the AC adapter. It will power on automatically. Wait until the blue Power LED stops flashing and glows steadily.
LinkStation
Power LED
2 Insert the LinkNavigator CD into your computer. LinkNavigator will launch. Click [Begin Installation]. The wizard will guide you through installation.
If LinkNavigator does not launch automatically, open the
Utility CD and double-click  [LSNavi.exe].
Notes:
•If you are using Windows 7 or Vista, the autoplay screen may appear. Click [Run LSNavi.exe].
•If “Do you want to allow the following program to make changes to this computer?” is displayed in Windows 7, please click [Yes].
•If “A program needs your permission to continue” is displayed in Windows Vista, please click [Continue].
•For Mac OS X, double-click on the LinkNavigator icon in the utility CD.
•If you have problems installing, temporarily disable your anti-virus software and software firewall. After setup is complete, re-enable the software.
•If your computer does not have a CD drive, you may download the LinkNavigator software from www.buffalotech.com.
LinkStation User Manual |
14 |

Chapter1 Setup
4
5
Click [Finish] or [Complete]. NAS Navigator2 starts automatically.
In NAS Navigator2, double-click your LinkStation’s icon.
This opens the shared folder of the LinkStation.
You can now use the LinkStation’s shared folder to save files just like any other folder.
Note:
For Mac OS X, the LinkStation is mounted as a drive icon on the desktop, or it is displayed in the sidebar of the Finder.
Setup is now complete.
LinkStation User Manual |
15 |
Chapter1 Setup
Diagrams and Layout (LS-VL, LS-XHL, LS-CHL)
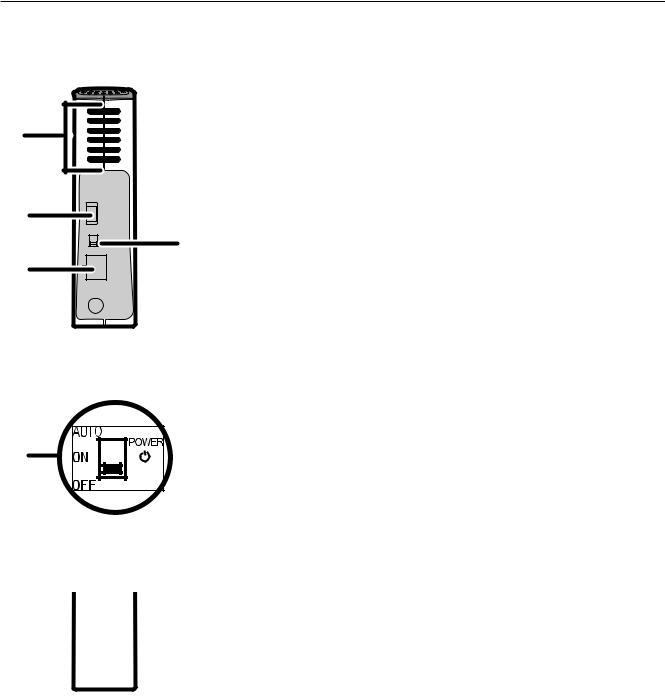
Front
1
2
1Power LED
Blue LED: Power on. LED is OFF: Power off.
Blinks blue:During startup or shutdown.
Amber light is flashing: The amber light flashes if there is a message. Flashing pattern varies depending on the message. For more information, refer to "Status LED" on page 194 .
Red light is flashing: Red light flashes when an error occurs. Flashing pattern varies depending on the message. For more information, refer to "Status LED" on page 192 .
2Function Button
The Function button initiates direct copy, dismounts USB devices, and is used to initialize the LinkStation
LinkStation User Manual |
16 |
Chapter1 Setup
Back
3
4
5
6
7 

 8
8
3Fan
Do not block the fan when installing the unit.
4USB 2.0 Connector
You may attach a USB device such as a digital camera, printer, memory card reader, or hard drive. USB hubs, mice, keyboards, and all-in-one printers are not supported. USB card readers that support multiple memory cards may not function properly.
5Power Mode Switch
AUTO: Automatically powers the LinkStation on and off with your computer.
ON: |
Turns the LinkStation on. |
OFF: |
Turns the LinkStation off. |
6LAN Port Connect an Ethernet cable here. The Link/Act LED by the LAN port turns green when the unit is connected to the network and flashes when there is network activity.
5 |
7
8
Power Connector Connect the AC adapter here. When it’s connected properly, the LED to the right will glow green.
Hook Use as a strain relief for the AC adapter cable.
7 

 8
8
LinkStation User Manual |
17 |

Chapter1 Setup
Diagrams and Layout (LS-WVL, LS-WXL)
Front |
Back |
1 |
4 |
5 |
|
2 |
6 |
|
7 |
3 |
8 |
|
|
|
9 |
|
Note: – Please do not lift the LinkStation by its front cover. It might come off. |
|
1 Power LED |
|
Blue LED: Power on. |
|
LED is off: Power off. |
|
Blinks blue: During startup or shutdown. |
10
11
12
2 Function LED
The Function LED glows blue when direct copy is finished, during initialization, and during USB dismounting (about 60 seconds). During direct copy it blinks blue.
3 Info/Error LED
The Info/Error LED blinks orange when there’s a message and red when there’s an error.
4 Function Button
The Function button initiates direct copy, dismounts USB devices, and is used to initialize the LinkStation.
LinkStation User Manual |
18 |

Chapter1 Setup
5 USB 2.0 connector
You may attach a USB device such as a digital camera, printer, memory card reader, or hard drive. USB hubs, mice, keyboards, and all-in-one printers are not supported. USB card readers that support multiple memory cards may not function properly.
6 Power Mode Switch
AUTO: The LinkStation turns on and off automatically with your PC (s). ON: The LinkStation boots and is operational.
OFF: The LinkStation shuts down.
7 LAN Port
Connect to your LAN with an Ethernet cable.
8 Link/Act LED
Glows green for connection. Blinks green for access.
9 Power connector
The AC adaptor connects here.
10 Fan
Do not block the fan when installing the unit.
11 Security lock for anti-theft
Many security cables are compatible with this lock.
12 Hook
Secure the Power cable so that it does not come off by mistake. Slide the cable down to secure.
LinkStation User Manual |
19 |
Chapter1 Setup
Diagrams and Layout (LS-WSXL)
Front |
|
Back |
|
1 |
|
|
|
2 |
6 |
7 |
|
3 |
|||
8 |
|||
|
|
4 |
9 |
|
5 |
||
10 |
||
|
||
|
11 |
1 Function Button
The Function Button initiates direct copy, dismounts USB devices, and is used to initialize the LinkStation.
2 Function LED
The Function LED glows blue when direct copy is finished, during initialization, and during USB dismounting (about 60 seconds). During direct copy the Function LED blinks blue.
3 Link/Act LED
Glows green for connection. Blinks green for access.
4 Info/Error LED
The Info/Error LED blinks orange when there’s a message and red when there’s an error.
LinkStation User Manual |
20 |
Chapter1 Setup
5 Power LED (LinkStation)
Blue LED: Power on. LED is off: Power off.
Blinks blue: During startup or shutdown.
6 Security lock for anti-theft
Many security cables are compatible with this lock.
7 USB 2.0 connector
You may attach a USB device such as a digital camera, printer, memory card reader, or hard drive. USB hubs, mice, keyboards, and all-in-one printers are not supported. USB card readers that support multiple memory cards may not function properly.
8 Power Mode Switch
AUTO: The LinkStation turns on and off automatically with your PC(s). ON: The LinkStation boots and is operational.
OFF: The LinkStation shuts down and turns off.
9 Power connector
The AC adaptor connects here.
10 LAN Port
Connect to your LAN with an Ethernet cable.
11 Hook
Secure the Power cable so that it does not come off by mistake. Slide the cable down to secure.
|
|
|
|
|
|
|
|
|
|
LinkStation User Manual |
21 |
|||
Chapter1 Setup
Diagrams and Layout (LS-QVL)
Front |
Back |
6
9
1 |
10 |
|
2 |
|
|
7 |
5 |
14 |
8 |
|
|
11 |
|
|
3 |
|
|
4 |
12 |
15 |
5 |
13 |
|
|
|
1 Power Button
Power on: Press the power button to turn on.
Power off: Press and hold the power button for 3 seconds.
2 Power LED
Blue LED: Power on. LED is off: Power off.
Blinks blue: During startup or shutdown.
Amber light is flashing: The amber light flashes if there is a message. Flashing pattern varies depending on the message. For more information, refer to “Status LED” on page 206.
Red light is flashing: Red light flashes when an error occurs. Flashing pattern varies depending on the message. For more information, refer to “Status LED” on page 204.
3 Function Button
Use this button to perform the following operations:
•DirectCopy
•Removal of USB devices
•Restoring factory defaults
4 Function LED
The Function LED glows blue when operating the function button.
LinkStation User Manual |
22 |

Chapter1 Setup
5 USB 2.0 Connector
You may attach a USB device such as a digital camera, printer, memory card reader, or hard drive. USB hubs, mice, keyboards, and all-in-one printers are not supported. USB card readers that support multiple memory cards may not function properly.
6 ~ 9 Status LEDs 1 to 4
These display the status of the hard drive corresponding to the drive number. Glowing green: Normal operation (flashes during access)
Glowing red: An error occurred in the hard drive. Replace the hard drive for the drive number that is lit red.
10 Power Mode Switch
Switches between AUTO and MANUAL power modes (page 29).
11 LINK/ACT LED
Glowing green: Linked Flashing green: Accessing
12 LAN Port
Connect to a router, hub, or switch on your Ethernet network.
13 Power Connector
Use the included AC cable to connect.
14 Fan
Do not block the fan.
15 Anti-Theft Security Slot
You can also secure it using an off-the-shelf wire lock.
LinkStation User Manual |
23 |

Chapter1 Setup
Diagrams and Layout (LS-XL)
Front |
Back |
4 |
|
|
2
5
1 |
3 |
|
1 Power LED
The blue Power LED glows when you connect the AC adapter. The blue LED blinks while booting, shutting down, or updating firmware.
Note:
Do not disconnect the AC adapter while the blue LED is on or blinking. You may shut down the LinkStation from the Web Admin interface or from NAS Navigator2. If the AC adapter is unplugged without first shutting down the LinkStation properly, the unit may be damaged. Refer to page 30 to shut down your LinkStation properly.
2 LAN Port
Connect to a router, hub, or switch on your Ethernet network. When LAN port 2 is connected to a network, it is illuminated in green.
3 Power Connector
Use the included AC cable to connect.
4 Anti-Theft Security Slot
Use this slot to secure your LinkStation with a Kensington-type cable lock (not included).
5 Hook
Use as a strain relief for the AC adapter cable.
LinkStation User Manual |
24 |
Chapter 2
Using your LinkStation
Opening the Shared Folder
1 |
Launch NAS Navigator2. |
|
|
|
• Windows: Double-click the |
icon on the desktop. |
|
|
• Mac OS X: Click the |
icon in the Dock. |
|
2 |
|
|
Double-click on the LinkStation's icon. |
3 The LinkStation’s shared folder opens.
Note:
In Mac OS X, the share is mounted as a drive icon on the desktop, or displayed in the sidebar of the Finder.
You can now use the LinkStation’s shared folder to save files just like any other folders.
LinkStation User Manual |
25 |

Using your LinkStation
Opening the shared folder from another PC
After the LinkStation is installed on one computer, you don’t have to go through the full installation to add a second computer. Just install NAS Navigator2 on each additional computer to access the LinkStation.
1 Insert the Utility CD in your computer’s CD drive. LinkNavigator will launch.
Notes:
•If LinkNavigator does not open, open the Utility CD and double-click  [LSNavi.exe].
•If you are using Windows 7 or Vista, the autoplay screen may appear. Click [Run LSNavi.exe].
•If “Do you want to allow the following program to make changes to this computer ?”is displayed in Windows 7, please click [Yes].
•If “A program needs your permission to continue” is displayed in Windows Vista, please click [Continue].
•For Mac OS, double-click on the LinkNavigator icon in the utility CD.
2
3
4
Click [Options] - [Additional Software Installation].
For Mac OS, click [Install NAS Navigator].
Follow the instruction on the screen to install NAS Navigator2.
After NAS Navigator2 is installed, click  at the top right top of the installer window to close it.
LinkStation User Manual |
26 |

Using your LinkStation
5 Launch NAS Navigator2:
6
7
•Windows: Double-click the  icon on the desktop.
•Mac OS X: Click the  icon in the Dock.
Double-click on the LinkStation icon.
The LinkStation’s shared folder opens.
Note:
On Mac OS, LinkStation is mounted as a drive icon on the desktop, or displayed in the sidebar on the Finder.
Setup is complete. You can now use the LinkStation’s shared folder to save files just like any other folders.
Adding another LinkStations
To add one or more additional LinkStations to your network, rerun the installation program for each one.
LinkStation User Manual |
27 |

Using your LinkStation
Power Modes
The LinkStation can automatically turn on and off with your computers. To use this feature, install NAS Navigator2 on each computer and then set the Power Mode Switch to the AUTO position.
LS-VL, XHL, CHL |
LS-WVL, WXL |
LS-WSXL |
|
|
|||||||||||||||
|
|
|
|
|
|
|
|
|
|
|
|
|
|
|
|
|
|
|
|
|
|
|
|
|
|
|
|
|
|
|
|
|
|
|
|
|
|
|
|
|
|
|
|
|
|
|
|
|
|
|
|
|
|
|
|
|
|
|
|
|
|
|
|
|
|
|
|
|
|
|
|
|
|
|
|
|
|
|
|
|
|
|
|
|
|
|
|
|
|
|
|
|
|
|
|
|
|
|
|
|
|
|
|
|
|
|
|
|
|
|
|
|
|
|
|
|
|
|
|
|
|
|
|
|
|
|
|
|
|
|
|
|
|
|
|
|
|
|
|
AUTO: When the switch is in the AUTO position, the LinkStation automatically turns off when all computers on the network with NAS Navigator2 turn off. If any computer on the network is powered on, the LinkStation automatically powers on as well.
ON: The LinkStation stays on, even when all computers are off. OFF: Turns the LinkStation off.
Notes: Never disconnect power from the LinkStation while the switch is in the ON position.
The Auto Power Mode may not work in some network environments. If this occurs, move the switch to the ON position to use the LinkStation.
After all computers are powered down, it may take several minutes for the LinkStation to shut down.
During initial setup, leave the Power Mode Switch in the ON position. Do not move it to the AUTO position until the unit is set up and NAS Navigator2 is installed on all computers that will access the LinkStation.
If a power outage disconnects power from the LinkStation while it’s in Auto Power Mode, will not power on automatically when power is restored. Move the Power Mode Switch to the ON position to power on the LinkStation. Once the unit has booted, you can move the Power Mode Switch back to the AUTO position.
Immediately after the Power Mode Switch is switched to the AUTO position, it will not shut down for at least 5 minutes even if all PCs on the network are turned off.
The LinkStation models with multiple hard drives do not shut down during RAID initialization or rebuild.
LinkStation User Manual |
28 |

Using your LinkStation
LS-QVL
Manual (default):
In this position, the power button on the front of the LinkStation turns it on and off. It is not affected by the power state of connected computers.
Auto:
In this position, if all connected computers are turned off, the LinkStation will turn off too. If a connected computer is powered on, the LinkStation will power on too.
Notes:
•After you turn off your computer, it may take several minutes for the LinkStation to shut down.
•When the Power Mode Switch is changed from Auto to Manual or vice-versa, it takes about five minutes for the change to take effect.
•Power on the LinkStation before moving the switch to the Auto position.
•Install NAS Navigator2 on all computers that will be accessing the LinkStation before switching to Auto Power Mode.
•Some networks may not support the Auto Power Mode. If you have problems with it, just use Manual Power Mode.
LinkStation User Manual |
29 |
 Loading...